

Page 1
Basic Manual
DIGITAL CAMERA
D-590 ZOOM
C-470 ZOOM
X-500
ENGLISH....................... 2
FRANÇAIS .................. 28
ESPAÑOL ................... 54
DEUTSCH ................... 80
Page 2

En
Contents
Unpacking the box contents....................................................................3
What can this camera do? ......................................................................4
Safety precautions ..................................................................................7
General precautions......................................................................7
FCC Notice ...................................................................................8
Attaching the strap ................................................................................10
Charging the battery..............................................................................11
Loading and removing the battery.........................................................12
Loading the battery .....................................................................12
Removing the battery..................................................................13
Inserting and removing the card............................................................15
xD-Picture Card ..........................................................................15
Inserting the card ........................................................................16
Removing the card......................................................................18
Power on/off..........................................................................................19
When taking pictures (Shooting mode).......................................19
When viewing pictures (Playback mode) ....................................20
Holding the camera correctly ................................................................21
Taking still pictures................................................................................22
Playing back still pictures......................................................................26
Information on OLYMPUS Master.........................................................27
2
Page 3
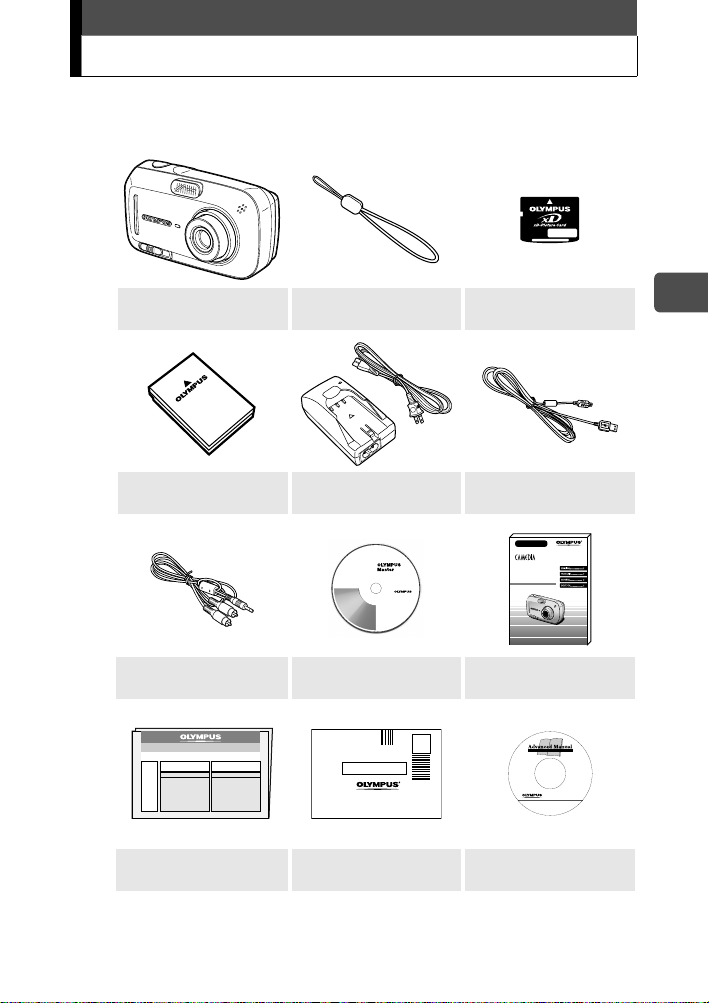
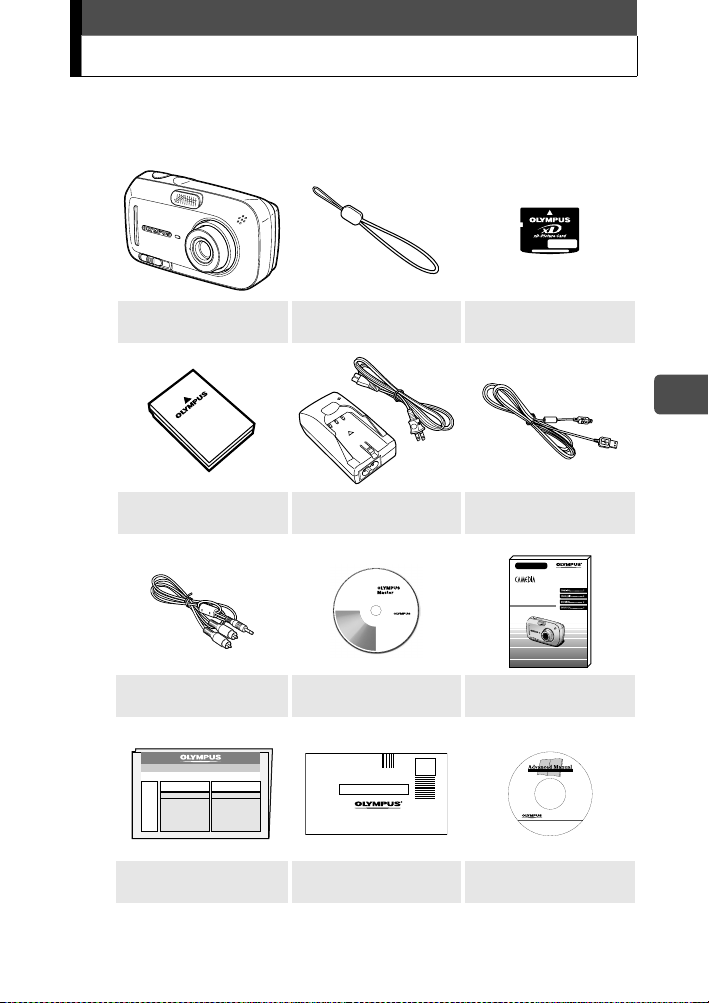
Unpacking the box contents
If any item is missing or damaged, contact your dealer from whom you
purchased the camera.
Digital camera Strap xD-Picture Card
Lithium ion battery
(LI-12B)
AV c able
Warranty card Registration card
Depending on the region where you purchased the camera, the box contents
differ.
Lithium ion battery
charger (LI-10C)
OLYMPUS Master
CD-ROM
USB cable
Basic Manual
DIGITAL CAMERA
D-590 ZOOM
C-470 ZOOM
X-500
Basic manual
(This manual)
Advanced manual
CD-ROM
En
3
Page 4

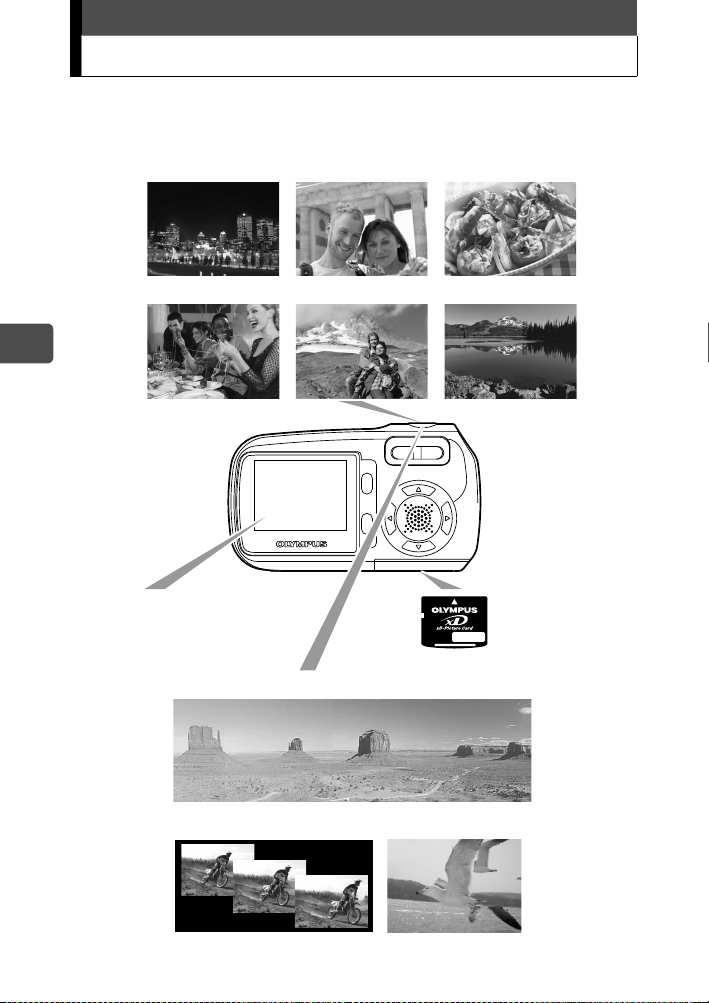
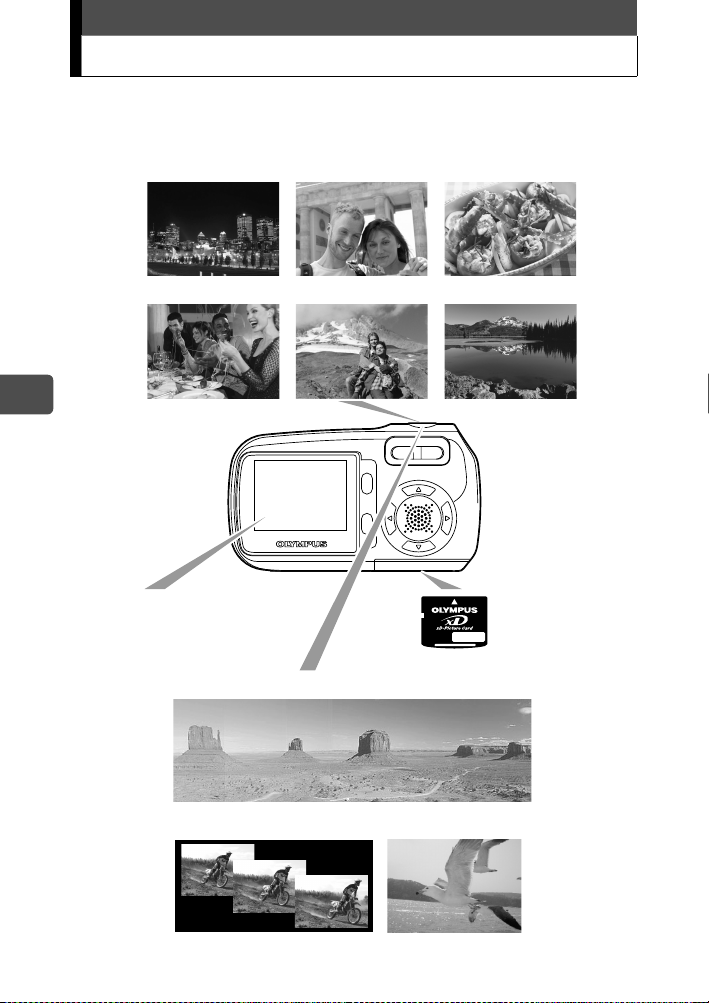
What can this camera do?
The camera has 10 shooting scene modes.
Just choose a desired shooting scene mode and press the shutter button to
take pictures. The camera does all the rest.
NIGHT SCENE SELF PORTRAIT CUISINE
En
You can frame, take, and
view your shots all on the
very clear 1.8" monitor.
INDOOR LANDSCAPE + PORTRAIT LANDSCAPE
Pictures that you
take will be
recorded on the
xD-Picture Card.
You can take a series of pictures for a panorama.
You can take successive
pictures.
You can also
record movies.
4
Page 5
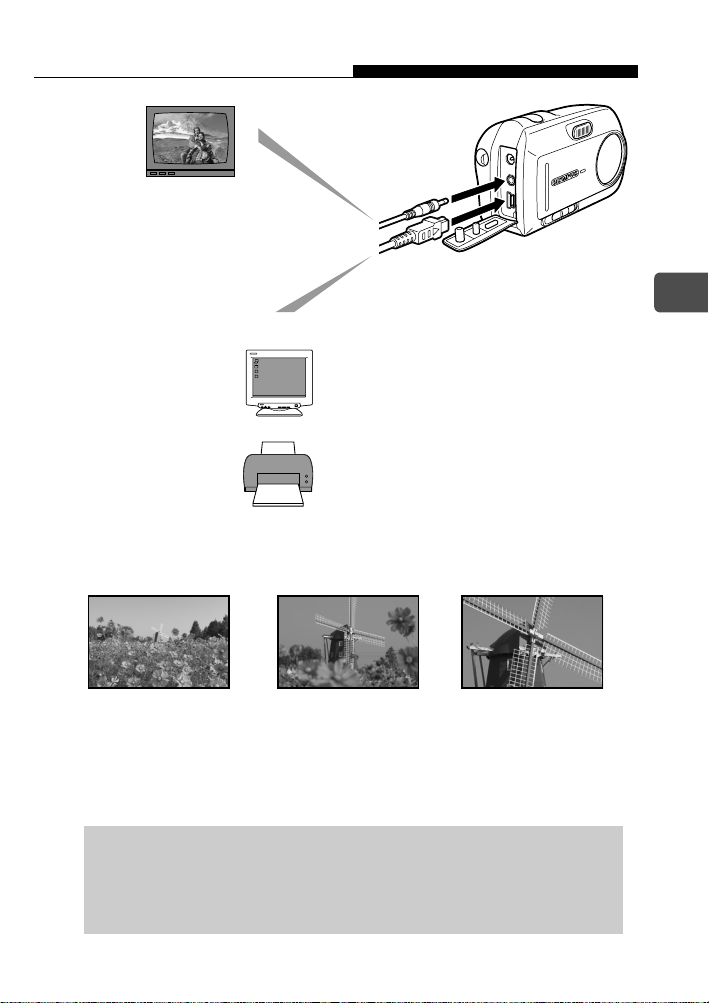
What can this camera do?
The camera can play back
the pictures on TV.
When the camera is connected to a computer or printer...
Image data stored on the card can be
transmitted or played back by installing
supplied CD-ROM.
Connect the camera to a PictBridge
compatible printer, and you can print your
pictures without the use of a computer.
Use the 3x optical zoom and digital zoom (total 12x seamless zoom) to
get up close to the subject.
En
1x Optical
3x Optical 12x (Total seamless zoom)
For the details of the operation and advanced use of the camera,
see the separate Advanced manual (PDF on included CD-ROM)
which also describes about the installation of the software
provided, error messages and troubleshooting.
5
Page 6
For customers in North and South America
For customers in USA
Declaration of Conformity
Model Number : D-590 ZOOM, C-470 ZOOM, X-500
Trade Name : OLYMPUS
Responsible Party :
Address : Two Corporate Center Drive, PO Box 9058,
Melville, NY 11747-9058 U.S.A.
Telephone Number : 1-631-844-5000
En
Tested To Comply With FCC Standards
FOR HOME OR OFFICE USE
This device complies with Part 15 of the FCC rules. Operation is
subject to the following two conditions:
(1) This device may not cause harmful interference.
(2) This device must accept any interference received, including
interference that may cause undesired operation.
For customers in Canada
This Class B digital apparatus meets all requirements of the
Canadian Interference-Causing Equipment Regulations.
For customers in Europe
“CE” mark indicates that this product complies with the European
requirements for safety, health, environment and customer protection.
“CE” mark cameras are intended for sales in Europe.
Trademarks
• IBM is a registered trademark of International Business Machines Corporation.
• Microsoft and Windows are registered trademarks of Microsoft Corporation.
• Macintosh is a trademark of Apple Computer Inc.
• All other company and product names are registered trademarks and/or trademarks of
their respective owners.
• The standards for camera file systems referred to in this manual are the “Design Rule for
Camera File System/DCF” standards stipulated by the Japan Electronics and Information
Technology Industries Association (JEITA).
This manual describes about the basic operations of taking pictures and playing back
the pictures taken. For detailed functions and operations, please read the Advanced
manual (CD-ROM).
Please thoroughly read the manuals before using the camera. When you plan to take
important pictures while travelling abroad for instance, make sure if the camera
functions properly by taking a few trial pictures.
The monitor screen shots and the camera illustrations used in the manuals may differ
from the actual ones.
6
Page 7
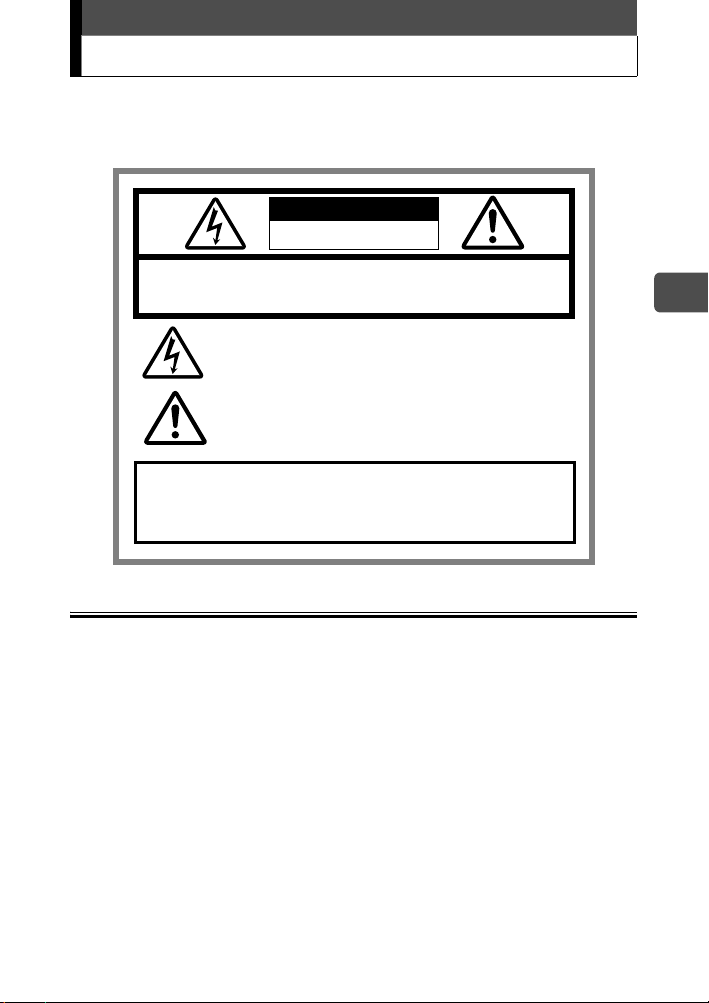
Safety precautions
Before using this camera, please thoroughly read the precautions
hereinunder as well as “Precautions” for use shown in the Advanced
manual.
CAUTION
RISK OF ELECTRIC SHOCK
DO NOT OPEN
CAUTION:
TO REDUCE THE RISK OF ELECTRICAL SHOCK, DO NOT
REMOVE COVER (OR BACK). NO USER-SERVICEABLE PARTS INSIDE.
REFER SERVICING TO QUALIFIED OLYMPUS SERVICE PERSONNEL.
Lightning flash with an arrowhead, enclosed in a triangle, alerts
you to the presence of uninsulated voltage points
inside the product which could cause a serious electrical shock.
An exclamation mark enclosed in a triangle alerts you to important
operating and maintenance instructions in the
documentation provided with the product.
WARNING!
TO AVOID THE RISK OF FIRE OR ELECTRICAL SHOCK, NEVER EXPOSE
THIS PRODUCT TO WATER OR OPERATE IN A HIGH HUMIDITY
ENVIRONMENT.
General precautions
Read All Instructions — Before you use the product, read all operating instructions.
Save These Instructions — Save all safety and operating instructions for future
reference.
Heed Warnings — Read carefully and follow all warning labels on the product and those
described in the instructions.
Follow Instructions — Follow all instructions provided with this product.
Cleaning — Always unplug this product from the wall outlet before cleaning. Use only a
damp cloth for cleaning. Never use any type of liquid or aerosol cleaner, or any type of
organic solvent to clean this product.
Attachments — For your safety, and to avoid damaging the product, use only
accessories recommended by Olympus.
Water and Moisture — Never use this product around water (near a bathtub, kitchen
sink, laundry tub, wet basement, swimming pool or in the rain).
Location — To avoid damage to the product and prevent personal injury, never place
this product on an unstable stand, tripod, bracket, table or cart. Mount only on a stable
tripod, stand, or bracket. Follow the instructions that describe how to safely mount the
product, and use only the mounting devices recommended by the manufacturer.
Power Sources — Connect this product only to the power source described on the
product label. If you are not sure about the type of power supply in your home, consult
your local power company.
Refer to your operating instructions for information on using the product with a battery.
En
7
Page 8

Safety precautions
Grounding, Polarization — If this product can be used with a specified AC adapter, the
adapter may be equipped with a polarized alternating current line plug (a plug with one
blade wider than the other). This safety feature allows the plug to fit into the power outlet
only one way. If you cannot insert the plug into the wall outlet, pull it out, reverse it, and
then reinsert it. If the plug still fails to fit, contact an electrician and have the receptacle
replaced.
Protecting the Power Cord — The power supply cord should be placed so it will not be
walked on. Never put a heavy object on the power cord or wrap it around the leg of a
table or chair. Keep the area around the power cord connection points, at the power
outlet, and at the product connection, free of all AC adapter or accessory power cords.
Lightning — If a lightning storm occurs while using a specified AC adapter, remove it
from the wall outlet immediately. To avoid damage from unexpected power surges,
always unplug the AC adapter from the power outlet and disconnect it from the camera
En
when the camera is not in use.
Overloading — Never overload wall outlets, extension cords, power strips, or other
power connection points with too many plugs.
Foreign Objects, Liquid Spillage — To avoid personal injury caused by fire or electrical
shock from contact with internal high voltage points, never insert a metal object into the
product.
Avoid using the product where there is a danger of spillage.
Heat — Never use or store this product near any heat source such as a radiator, heat
register, stove, or any type of equipment or appliance that generates heat, including
stereo amplifiers.
Servicing — Refer all servicing to qualified personnel. Attempting to remove the covers
or disassemble the product, could expose you to dangerous high voltage points.
Damage Requiring Service — If you notice any of the conditions described below while
using a specified AC adapter, unplug it from the wall outlet and refer servicing to qualified
service personnel:
a) Liquid has been spilled onto the product or some other object has fallen into the
product.
b) The product has been exposed to water.
c) The product does not operate normally despite following operating instructions.
Adjust only the controls described in the operating instructions as improper
adjustment of other controls could damage the product and require extensive repair
work by a qualified technician.
d) The product has been dropped or damaged in any way.
e) The product exhibits a distinct change in performance.
Replacement Parts — When replacement parts are required, make sure that the service
center uses only parts with the same characteristics as the originals, as recommended by
the manufacturer. Unauthorized substitution of parts could result in fire, electrical shock,
or create other hazards.
Safety Check — Upon completion of servicing or repairs, ask the service technician to
perform safety checks to determine that the product is in good working order.
FCC Notice
Radio and Television Interference
Change or modifications not expressly approved by the manufacturer may void the user’s
authority to operate this equipment. This equipment has been tested and found to comply
with the limits for a Class B digital device, pursuant to Part 15 of the FCC Rules. These limits
are designed to provide reasonable protection against harmful interference in a residential
installation.
This equipment generates, uses, and can radiate radio frequency energy and, if not installed
and used in accordance with the instructions, may cause harmful interference to radio
communications.
However, there is no guarantee that interference will not occur in a particular installation. If
this equipment does cause harmful interference to radio or television reception, which can
be determined by turning the equipment off and on, the user is encouraged to try to correct
the interference by one or more of the following measures:
8
Page 9

Safety precautions
• Adjust or relocate the receiving antenna.
• Increase the distance between the camera and receiver.
• Connect the equipment to an outlet on a circuit different from that to which the
receiver is connected.
• Consult your dealer or an experienced radio/TV technician for help.
Only the OLYMPUS-supplied USB cable should be used to connect the camera to
USB-enabled personal computers (PC).
Any unauthorized changes or modifications to this equipment would void the user's authority
to operate.
Legal and other notices
Olympus makes no representations or warranties regarding any damages, or benefit
expected by using this unit lawfully, or any request from a third person, which are caused
by the inappropriate use of this product.
Olympus makes no representations or warranties regarding any damages or any benefit
expected by using this unit lawfully which are caused by erasing picture data.
Disclaimer of Warranty
Olympus makes no representations or warranties, either expressed or implied, by or
concerning any content of these written materials or software, and in no event shall be
liable for any implied warranty of merchantability or fitness for any particular purpose or
for any consequential, incidental or indirect damages (including but not limited to
damages for loss of business profits, business interruption and loss of business
information) arising from the use or inability to use these written materials or software or
equipment. Some countries do not allow the exclusion or limitation of liability for
consequential or incidental damages, so the above limitations may not apply to you.
Olympus reserves all rights to this manual.
WARNING
Unauthorized photographing or use of copyrighted material may violate applicable
copyright laws. Olympus assumes no responsibility for unauthorized photographing, use
or other acts that infringe upon the rights of copyright owners.
En
Copyright Notice
All rights reserved. No part of these written materials or this software may be reproduced
or used in any form or by any means, electronic or mechanical, including photocopying
and recording or the use of any type of information storage and retrieval system, without
the prior written permission of Olympus. No liability is assumed with respect to the use of
the information contained in these written materials or software, or for damages resulting
from the use of the information contained therein. Olympus reserves the right to alter the
features and contents of this publication or software without obligation or advance notice.
9
Page 10
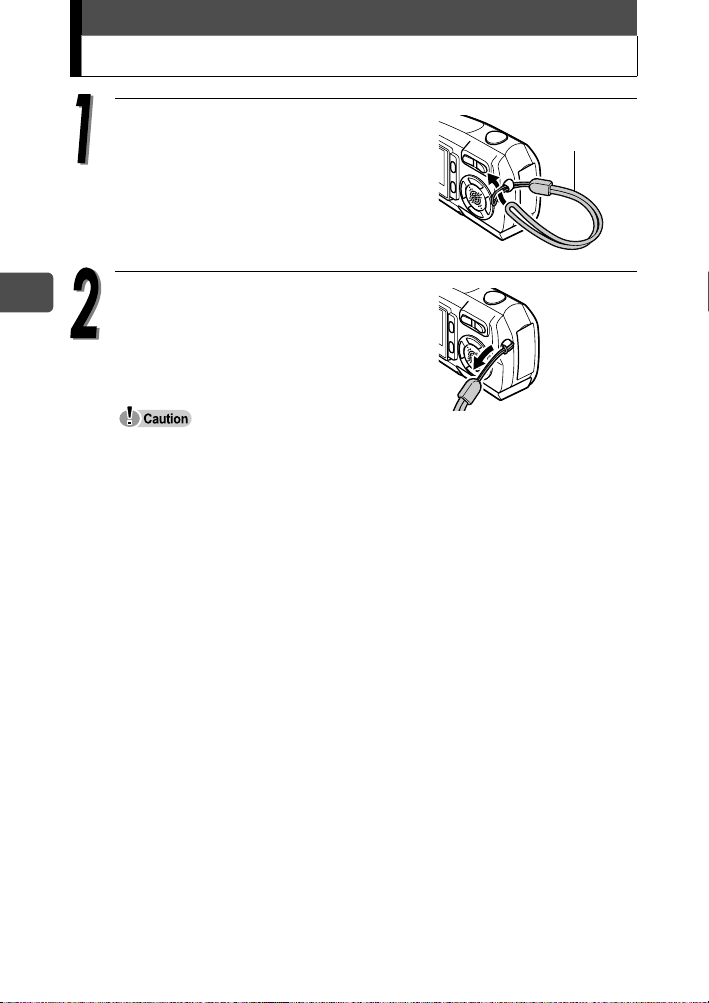
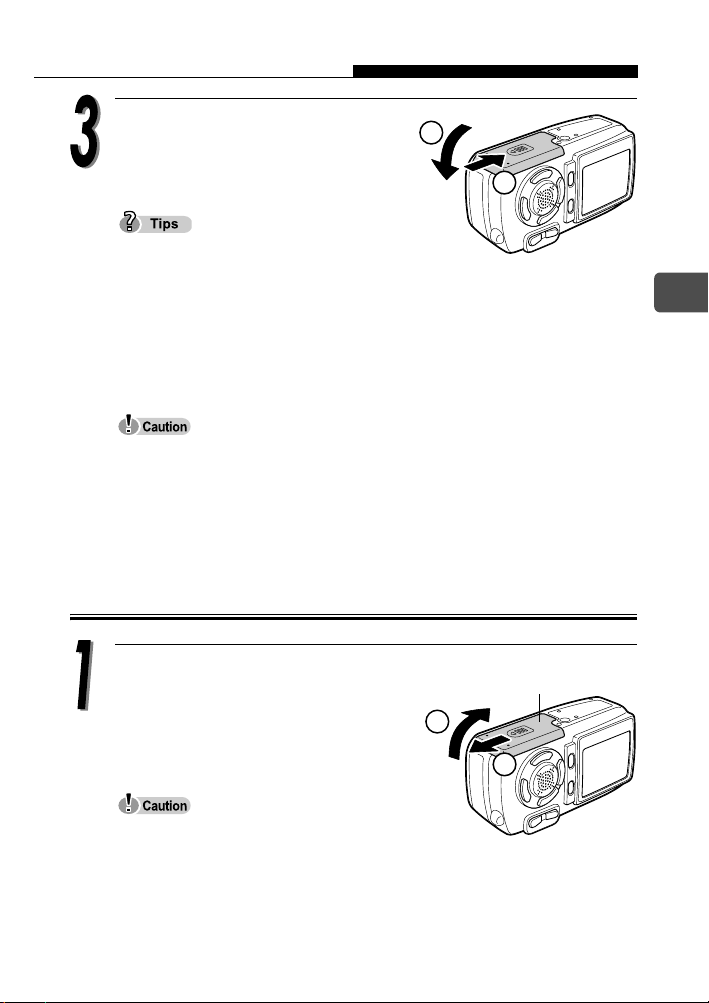
Attaching the strap
En
Thread the strap through the strap
eyelet as shown.
Strap
Pull the strap tight, making sure that
it is securely fastened and does not
come loose.
Do not swing the camera around by the strap or pull the strap with excessive
force as this may cause the strap to break.
Attach the strap correctly so that it does not come off. Olympus is not
responsible for any damages if the strap is attached incorrectly and the
camera is dropped.
10
Page 11
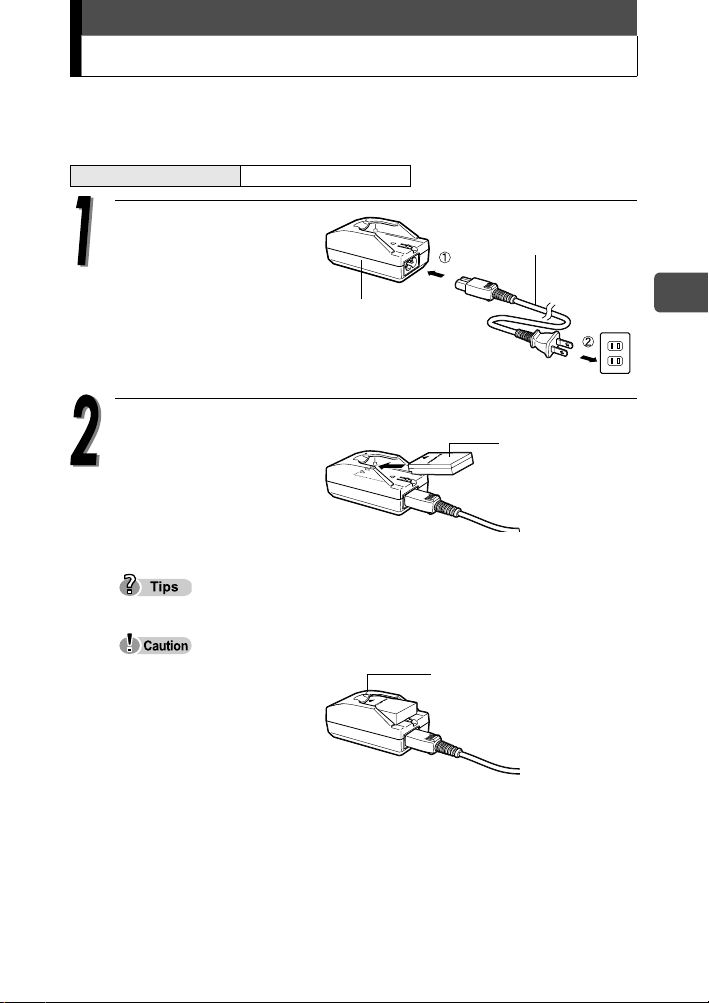
Charging the battery
This camera uses an Olympus lithium ion battery (LI-12B).
The battery is not fully charged when the camera is purchased. Fully
charge the battery before first use.
Charging time Approx. 2 hours
Plug in the power cord
in the sequence
Power cord for the
battery charger
indicated by c and d.
Lithium ion battery
charger (LI-10C)
AC wall outlet
Place the battery in the
battery charger.
Insert as indicated by the arrow.
Lithium ion battery
(LI-12B)
The indicator on the
charger lights red and
charging begins.
Charging is finished when the indicator turns green.
The LI-10B Olympus lithium ion battery (sold separately) can also be used.
Use only the specified
charger.
We recommend that you
keep a spare battery (sold
separately) with you if you
are planning to use the
camera for long periods or in a cold region.
The charger can be used within the range of AC100V to AC240V (50/60Hz).
Do not use voltage converters sold in stores traveling overseas as this could
damage your charger.
When using the charger abroad, you may need a plug adapter to convert
the plug to the shape of the electrical outlet. For details, ask at your local
electrical shop or travel agent.
Charge indicator
Red: Charging
Green: Charging is finished.
En
11
Page 12
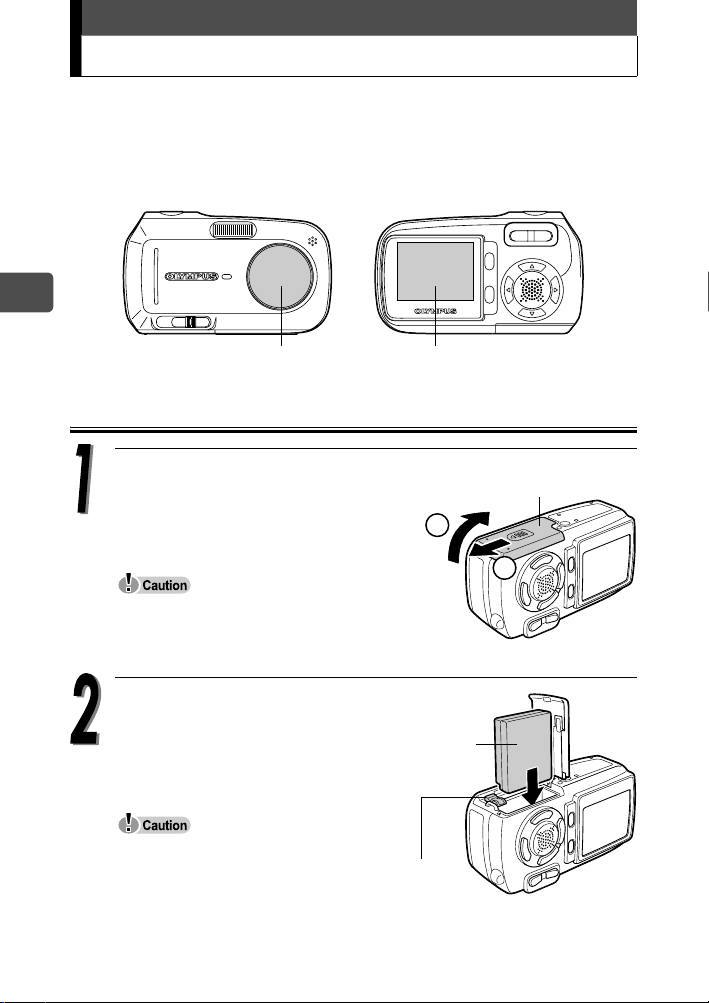
Loading and removing the battery
This camera uses an Olympus lithium ion battery.
Check the following items before loading or removing the battery:
cThe lens barrier is closed.
dThe monitor is off.
En
cLens barrier dMonitor
Loading the battery
12
Slide the battery compartment/card
cover in the direction of A.
The cover is unlocked and opens in the
direction of B.
Be sure to slide the cover using the ball of
your finger. Do not use your fingernails as
this may cause injury.
Orient the battery as shown.
Insert the battery into the slot
until the battery is locked in
position with the battery lock
knob.
If the battery is not correctly
oriented and inserted, the battery
compartment/card cover will not
close.
Battery lock
knob
B
Battery
Battery compartment/
card cover
A
Page 13
Loading and removing the battery
Close the battery compartment/
card cover in the direction of C,
C
and slide in the direction of D.
D
Do not try to forcibly close the cover. The
cover closes easily when the battery is
properly oriented and inserted. If the cover does not close easily, check the
orientation of the battery.
For the number of storable pictures when a fully charged new battery is
used, see the “6. Appendix, Camera specifications” of the separate
Advanced manual (CD-ROM).
Power is consumed continuously during the conditions described below.
This may drain the battery power more quickly.
• Repeated zoom adjustments.
• Repeated auto-focus by depressing the shutter button half-way.
• The camera is connected to a computer or printer.
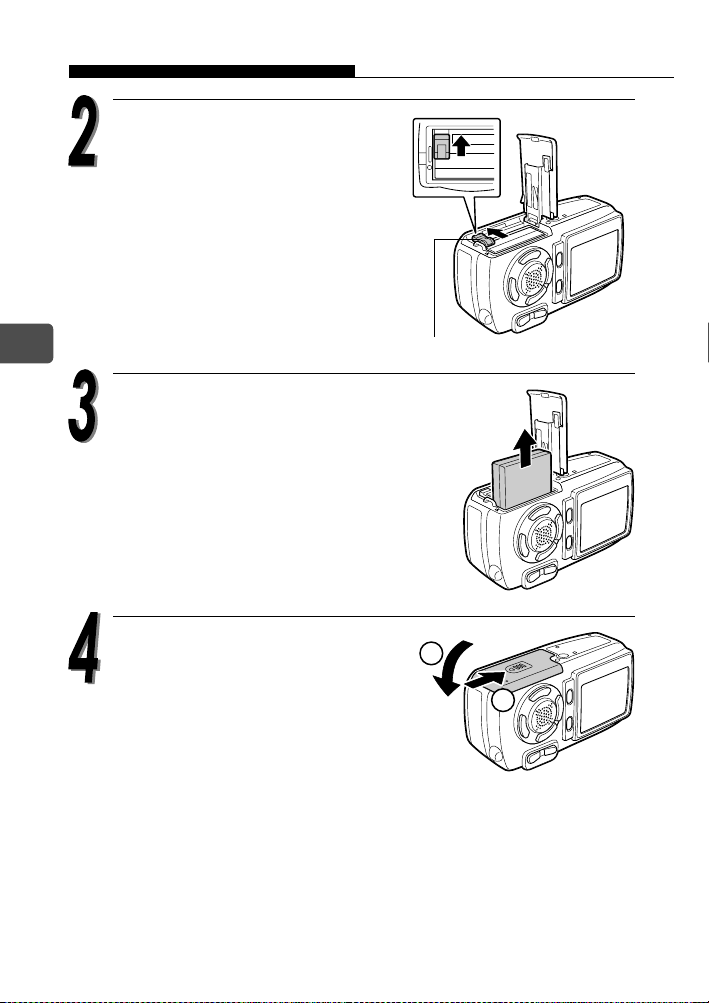
Removing the battery
Slide the battery compartment/card
cover in the direction of A.
The cover is unlocked and opens in the
direction of B.
Battery compartment/
card cover
B
A
En
Be sure to slide the cover using the ball of
your finger. Do not use your fingernails as this may cause injury.
13
Page 14
Loading and removing the battery
Slide the battery lock knob in
the direction of the arrow.
The battery will eject partially.
En
Pull the battery out.
Battery lock knob
14
Close the battery compartment/
card cover in the direction of C,
and slide in the direction of D.
C
D
Page 15
Inserting and removing the card
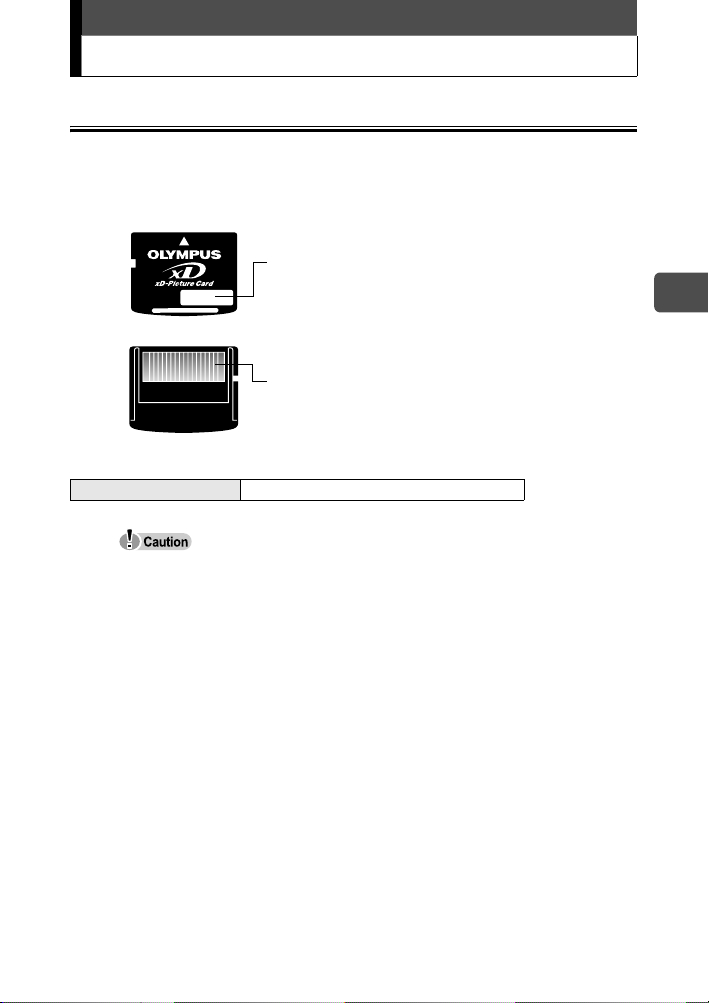
xD-Picture Card
This camera uses an xD-Picture Card to record pictures. “Card” in the
manuals refer to the xD-Picture Card. Pictures recorded and stored on
the picture card can be erased or transferred and edited on a computer.
You can use this space to briefly describe the
contents of the picture card.
These are the contacts for reading the
camera signals. Do not touch the gold area.
Compatible cards xD-Picture Card (16MB to 512MB)
This camera may not recognize a non-Olympus card or a card that was
formatted on another device (such as a computer). Before use, be sure to
format the card on this camera. For details, see the Advanced manual
(CD-ROM) supplied separately.
If a non-Olympus card is used, some functions of this camera cannot be
performed. We recommend that you use Olympus cards for this camera.
En
15
Page 16
Inserting and removing the card
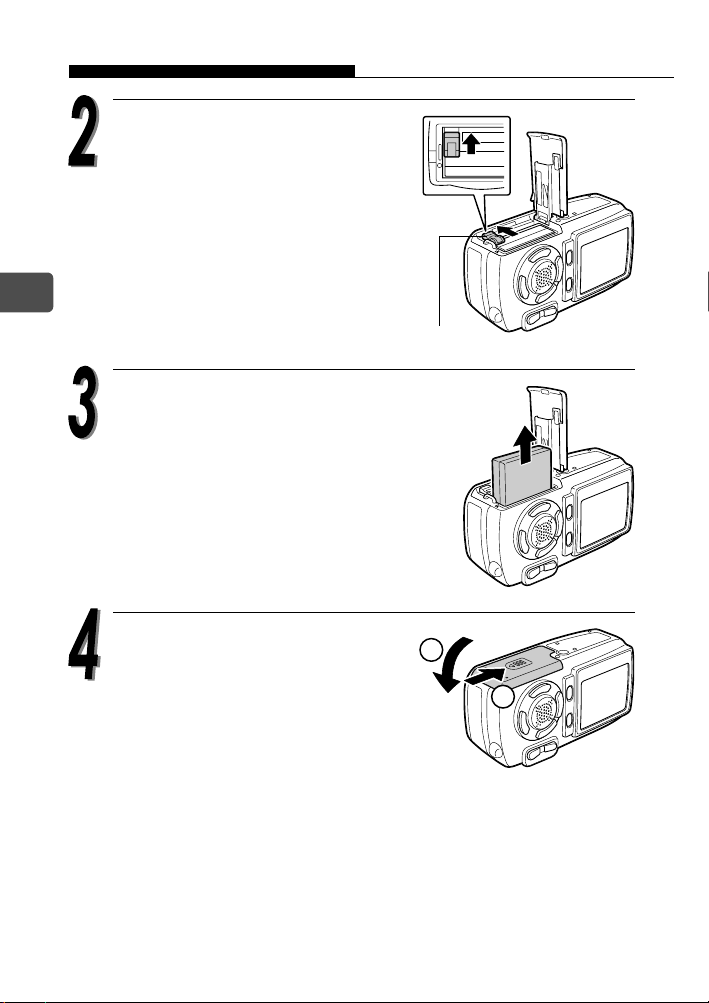
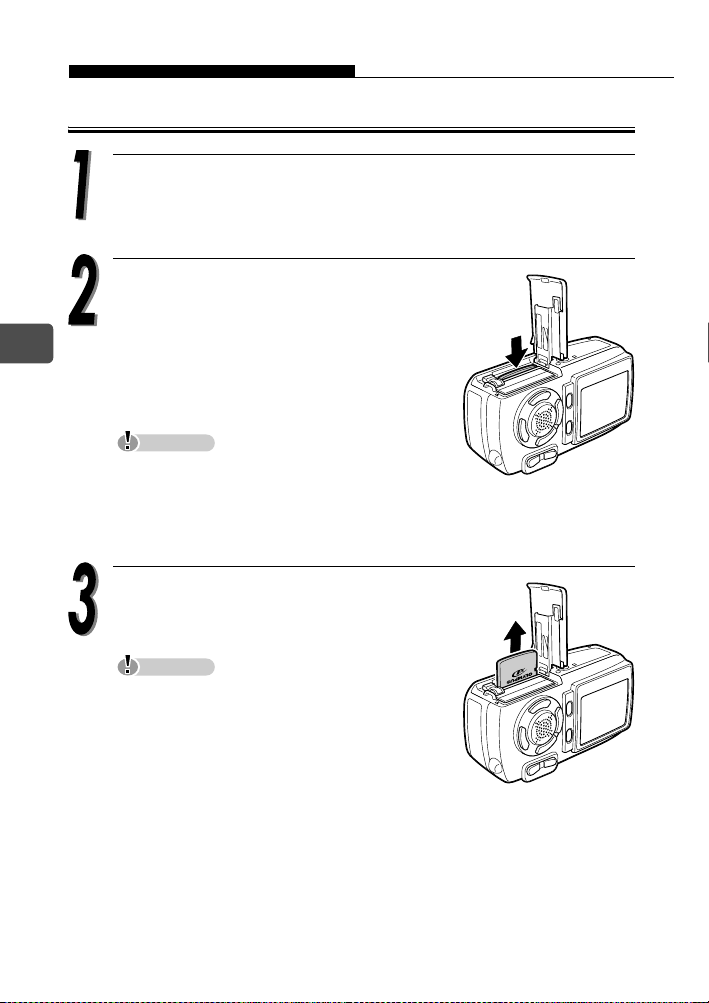
Inserting the card
This camera stores image data on an xD-Picture Card. No pictures can
be stored unless a card has been inserted in the camera.
Check the following items before inserting or removing the card:
cThe lens barrier is closed.
dThe monitor is off.
En
cLens barrier dMonitor
16
Slide the battery compartment/card
cover in the direction of A.
The cover is unlocked and opens in the
direction of B.
Be sure to slide the cover using the ball of
your finger. Do not use your fingernails as this may cause injury.
Battery compartment/
card cover
B
A
Page 17
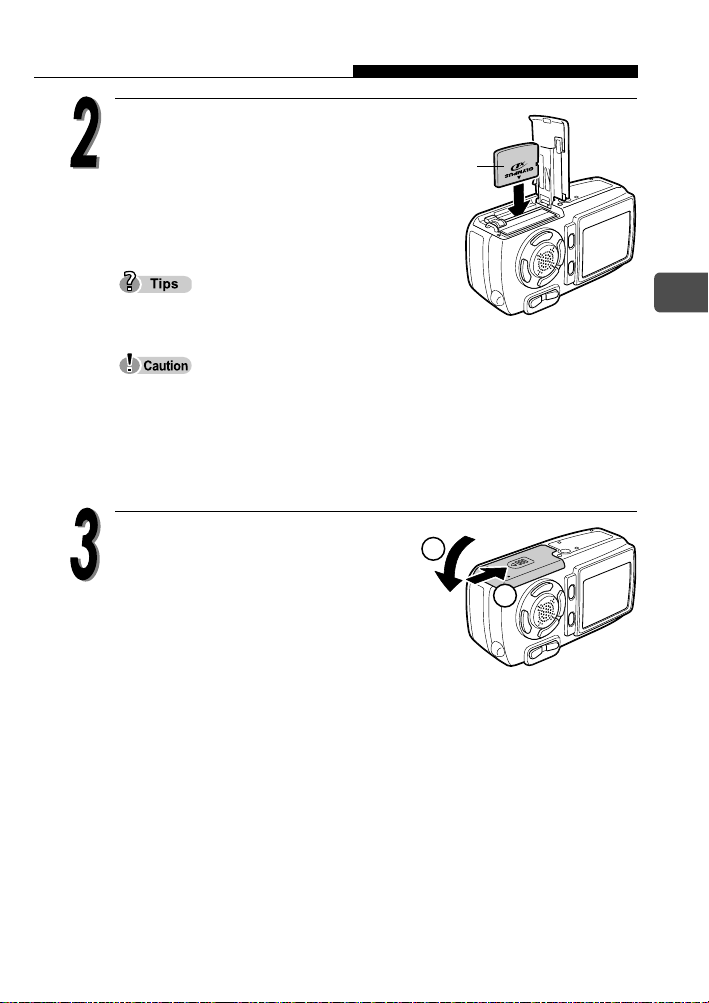
Inserting and removing the card
Orient the card and insert it into
the spring-loaded card slot as
shown.
The card will lock into place when
fully inserted.
Card
Push the card in as far as it will go.
The card can only be inserted one way; inserting it with incorrect
orientation or obliquely may cause damage to the connectors and the
card may get stuck in the camera.
If the card is not fully inserted in place, the pictures may not be stored
on the card.
Close the battery compartment/
card cover in the direction of C,
C
and slide in the direction of D.
D
En
17
Page 18
Inserting and removing the card
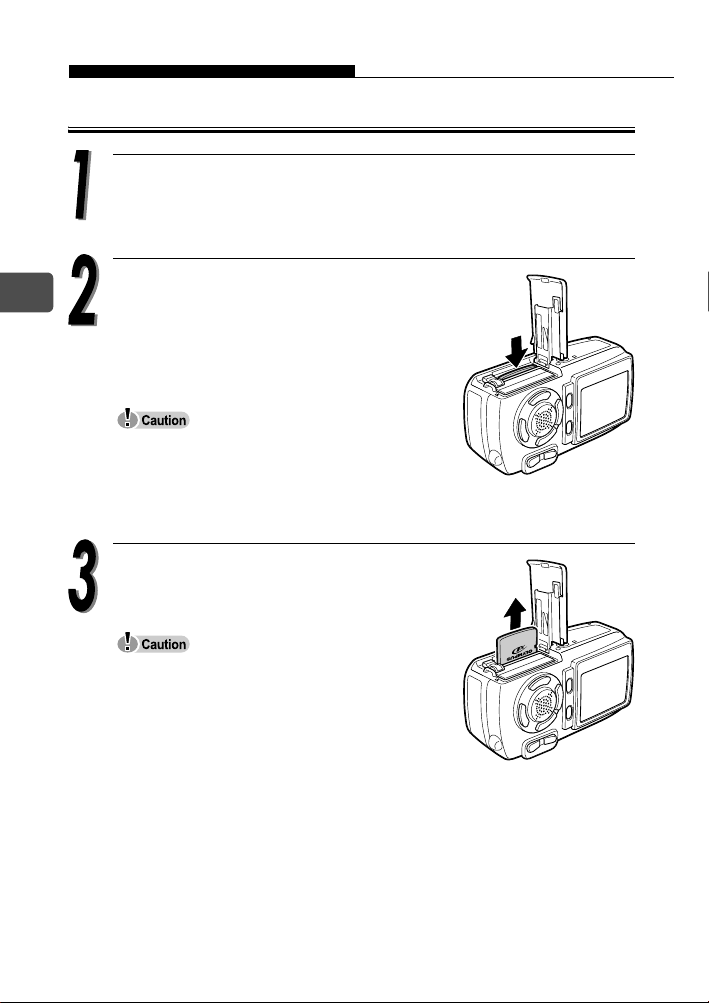
Removing the card
Open the battery compartment/card cover.
En
Push the card all the way in to unlock
it, then release your finger slowly to
let the card eject slowly.
The card will eject partially.
Do not push the card in with a hard or
pointed item such as a ballpoint pen.
Releasing your finger quickly after pushing
the card in may cause it to shoot out of the slot.
Remove the card.
Never open the battery compartment/card
cover while the camera is turned on. Such
action could destroy all the data on the card.
Once destroyed, data cannot be restored.
Do not place any sticker on the picture
cards. Doing so may cause the picture card
get stuck in the camera and will not eject.
18
Page 19
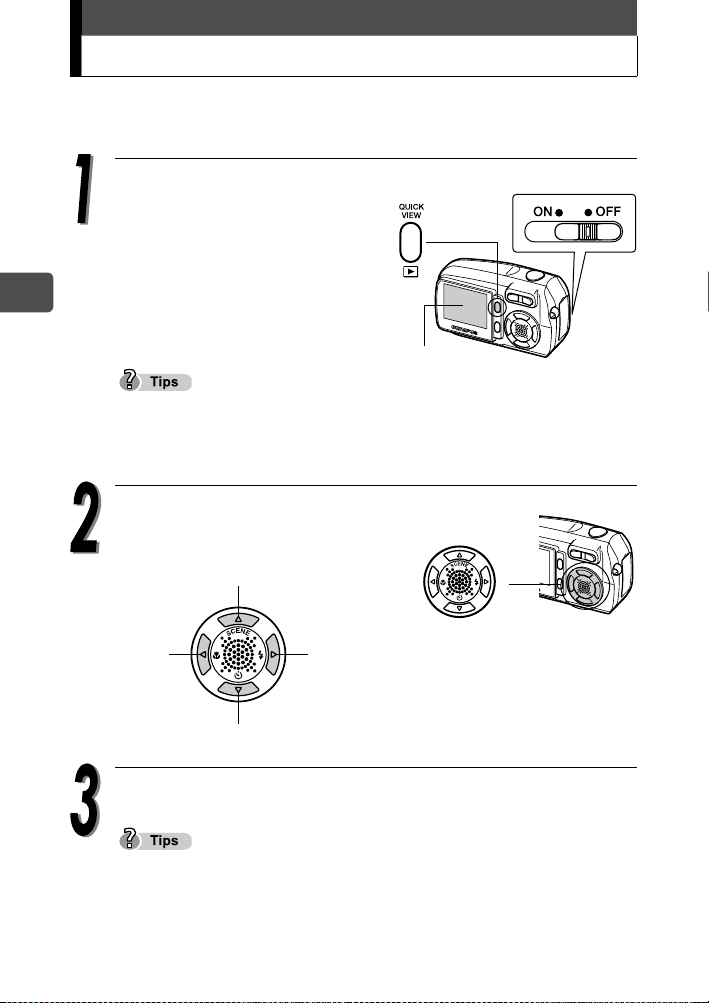
Power on/off
The camera can be turned on by different operation in “shooting mode”
or “playback mode.”
When you use the camera for the first time, the message saying [Y/M/D]
appears on the monitor. For the details of the setting procedure, see the
separate Advanced manual (CD-ROM).
Never open the battery compartment/card cover, or connect or disconnect the
battery or AC adapter while the camera is turned on. Such actions could
destroy all the data on the card. Once destroyed, data cannot be restored.
When taking pictures (Shooting mode)
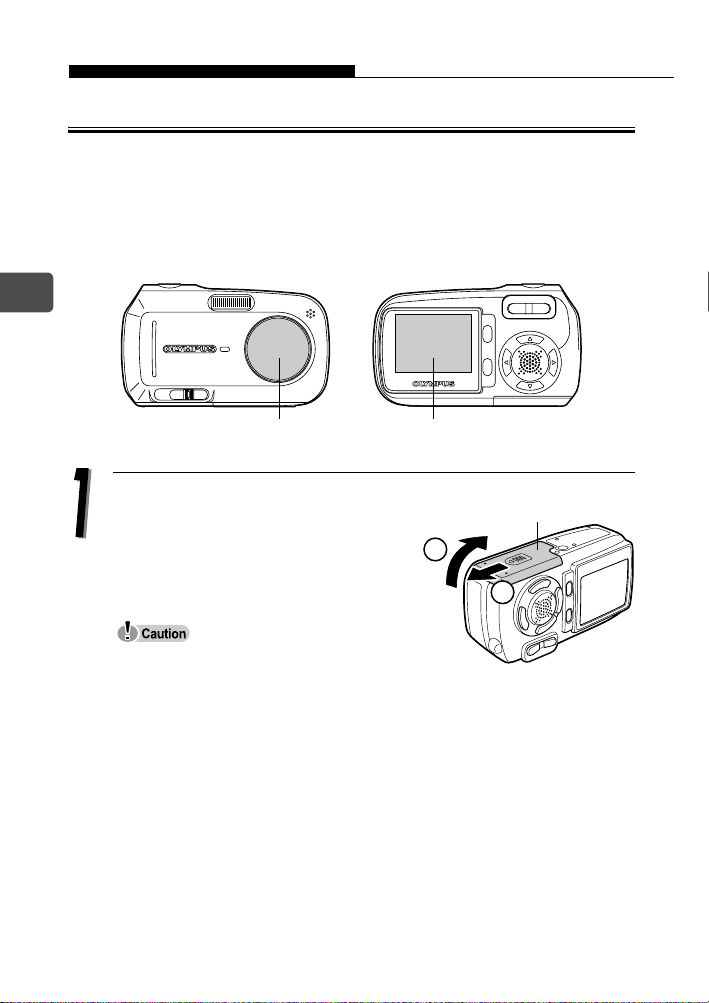
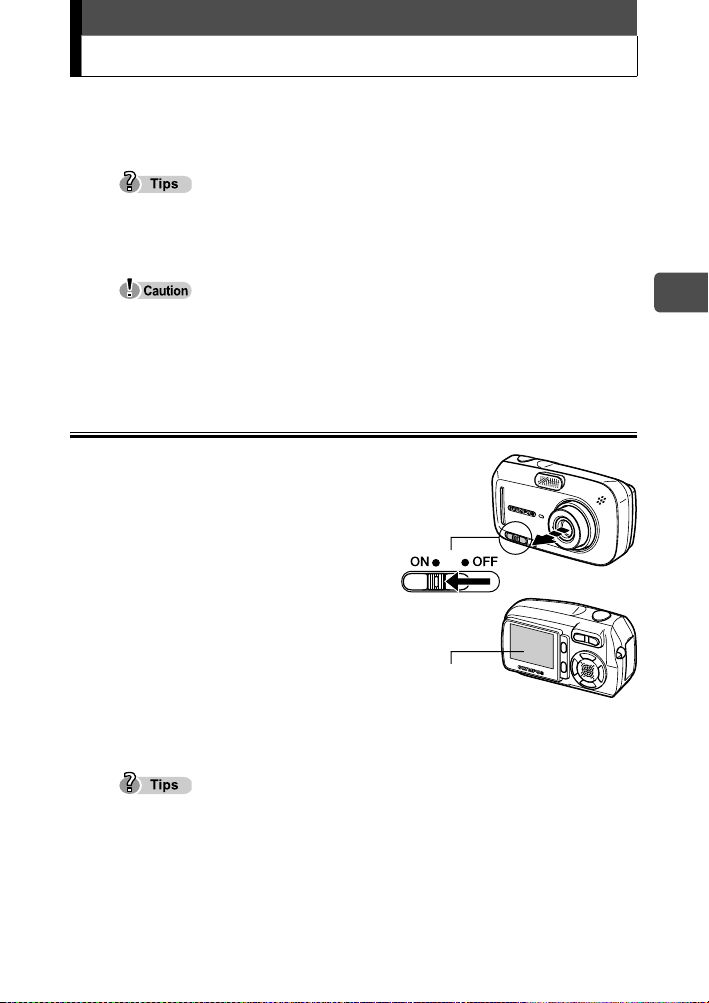
How to turn the camera on
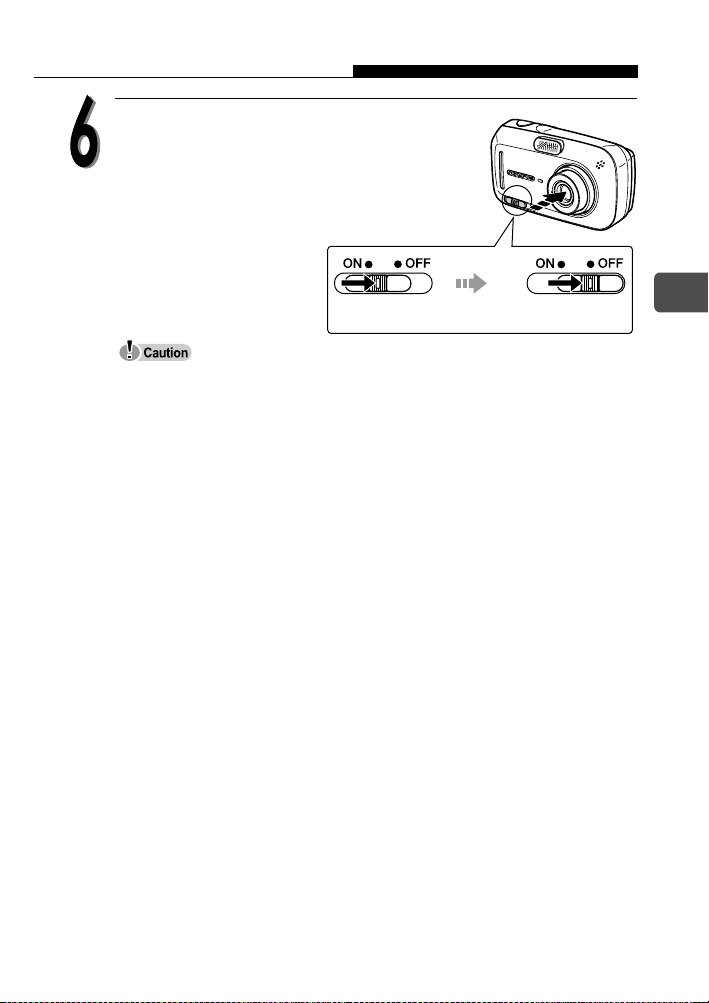
Î Slide the power switch to ON.
The lens barrier opens, the lens
extends, and the subject is
displayed on the monitor.
If the lens does not extend even
when the lens barrier is opened,
there is a possibility that the power
switch is not fully set to the ON
position. Slide the power switch to
the ON position correctly.
Power switch
Monitor
En
To save battery power, the camera automatically enters the sleep mode and
stops operation after about 3 minutes of non-operation. Press any button
such as the zoom button to activate the camera again.
To save battery power, the camera automatically turns off after about 15
minutes of non-operation. To recover the function, slide the power switch to
the OFF position by following “How to turn the camera off,” then turn the
camera on again.
19
Page 20
Power on/off
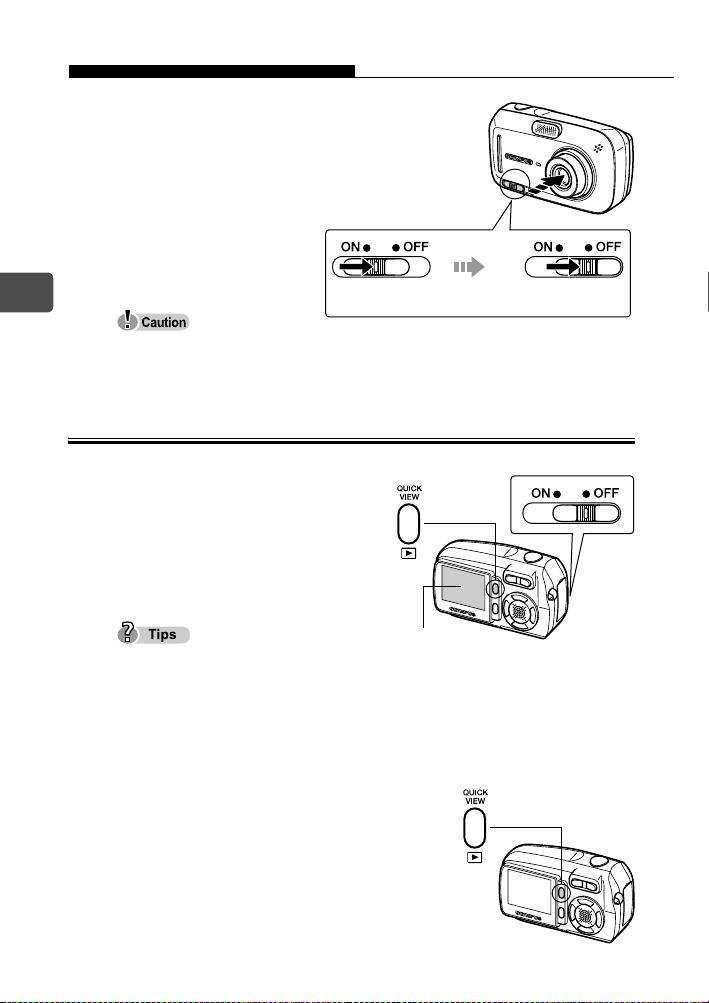
How to turn the camera off
Î Slide the power switch
until it slightly clicks.
After retracting the
lens, slide the power
switch to the OFF
position.
En
The monitor turns off.
Do not slide the power switch directly to the OFF position. Doing so may
cause damage to the camera.
When viewing pictures (Playback mode)
Stop sliding
the switch.
After retracting
the lens
Slide to
OFF.
How to turn the camera on
Î When the power switch is set to
the OFF position, press the
playback (q) button.
The picture you have just taken is
displayed.
To save battery power, the camera
automatically turns off after about 3 minutes of non-operation.
If the playback button is pressed in shooting mode, the camera can display
the pictures (QUICK VIEW).
To return to shooting mode, press the playback button or press the shutter
button half-way down.
How to turn the camera off
Î Press the playback (q) button
again.
The monitor turns off.
20
Playback (q) button
Monitor
Page 21
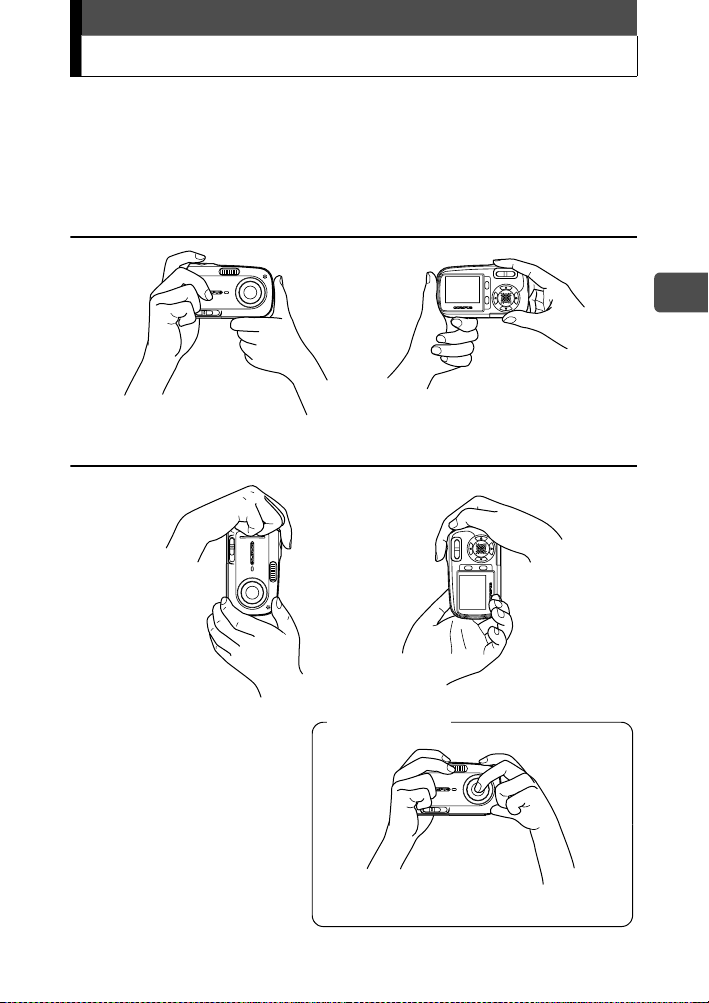
Holding the camera correctly
When taking pictures, hold the camera firmly with both hands while
keeping your elbows at your sides to prevent the camera from moving.
It may cause camera movement, extending your arms or not keeping
your elbows at your sides.
Horizontal grip
Vertical grip
En
Incorrect grip
Keep your fingers and the strap away
from the lens, flash, and microphone.
21
Page 22
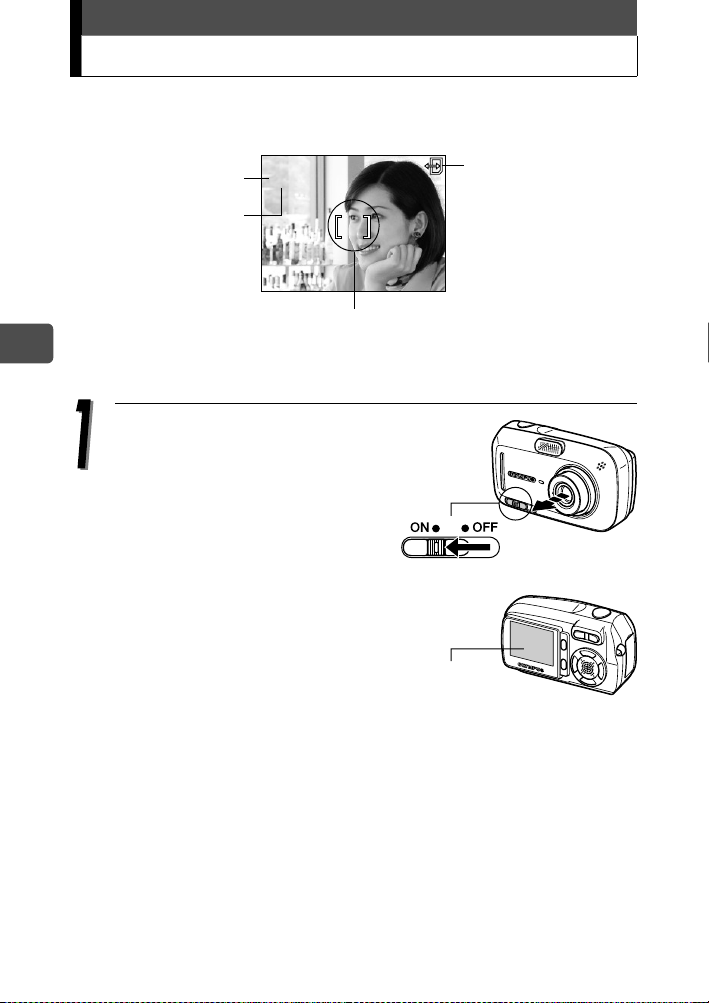
Taking still pictures
2272*1704
20
HQ
The following section describes how to take pictures using the monitor.
e
P
#
(
o
HQ
AF target mark
2272*1704
2020
En
Green lamp
Flash standby/
flash charging
For details regarding the display on the monitor, please refer to the
Advanced manual (CD-ROM).
Slide the power switch to ON.
When power is turned on, the lens
barrier opens, the lens extends, and
the monitor turns on automatically.
Card access mark
a
22
If the lens does not extend even
when the lens barrier is opened,
there is a possibility that the power
switch is not fully set to the ON
position. Slide the power switch to
the ON position correctly.
Power switch
Monitor
Page 23
Taking still pictures
2272*1704
20
HQ
2272*1704
20
HQ
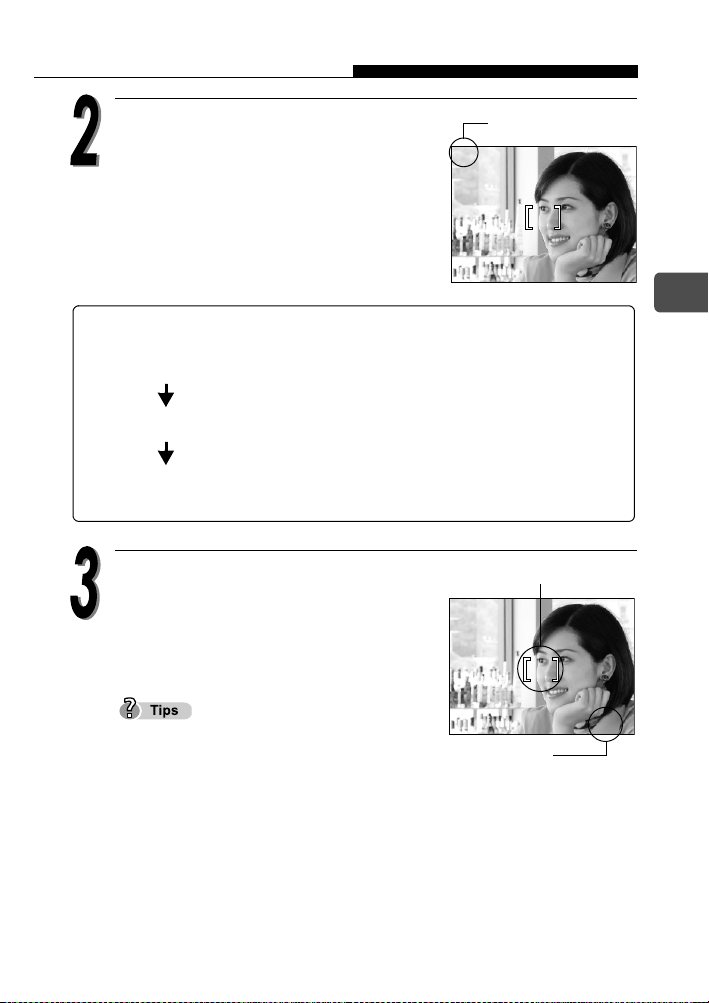
Confirm on the monitor that the
battery check indicator is e
(green).
Battery check
e
P
o
HQ
2272*1704
Battery check
The battery check indicator changes as follows.
e Lights (Green) Pictures can be taken.
f Lights (Red)
[BATTERY EMPTY]
is displayed.
Place the AF target mark on the
subject.
The battery is running low. Replace with a
charged battery or charge the battery.
The battery is exhausted. Replace with a
charged battery or charge the battery.
AF target mark
e
P
The number of remaining pictures is
displayed on the monitor.
o
2272*1704
If the monitor is hard to see:
Bright light, such as direct sunlight, may
cause vertical lines to appear on the monitor
screen.
When you point the camera lens toward a bright subject, lines like beams of
light (smears) may appear on the image in the monitor. This does not affect
recorded pictures.
HQ
Number of
shootable still pictures
2020
2020
a
En
a
23
Page 24
Taking still pictures
$
P
2272*1704
HQ
11
1111
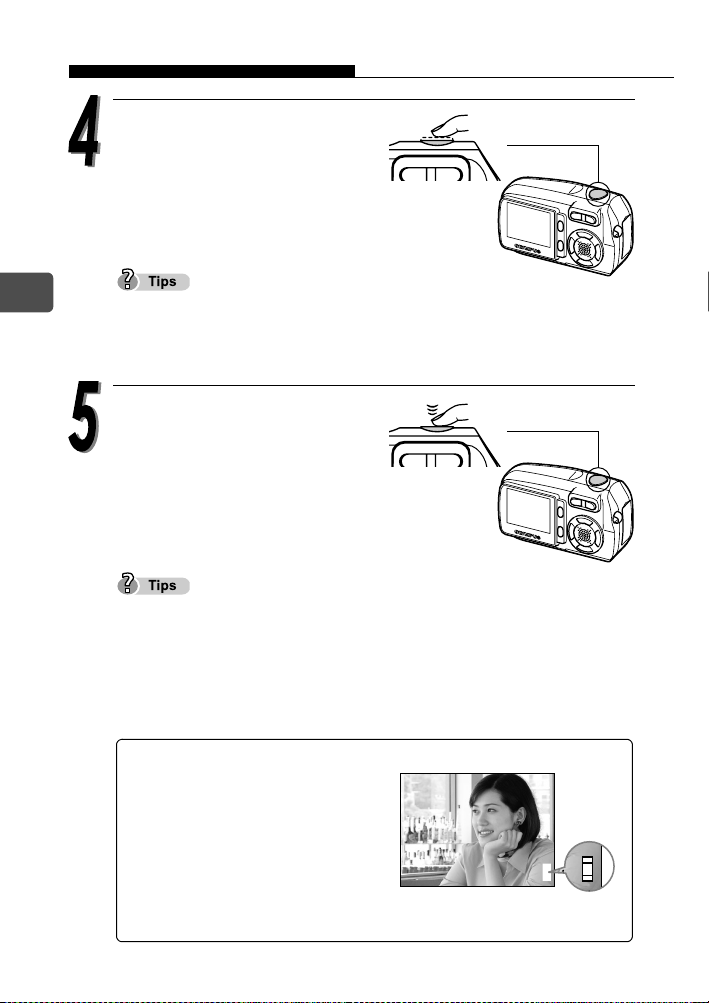
Press the shutter button halfway.
When the focus and exposure are
locked, the green lamp lights
steadily.
En
24
When the flash is going to fire, the flash standby indicator lights.
If the green lamp blinks, this means that the focus is not yet locked. Press
the shutter button half-way again.
Press the shutter button all
the way (fully) down to take
the picture.
The picture is stored on the card.
The card access mark (X) on the monitor blinks red while the picture is
being stored on the card.
Never open the battery compartment/card cover, or connect or disconnect
the battery or AC adapter while the card access mark (X) on the monitor is
blinking. The picture just taken may not be stored and also the data of the
pictures stored on the card may be lost.
Memory gauge
The memory gauge lights up when
you take a picture. While the gauge
is lit, the camera is storing the
picture on the card. When the
memory gauge is fully lit (as shown
on right), no more pictures can be
taken. Wait until the gauge turns off
before taking the next picture.
$
o
e
P
HQ
2272*1704
Memory gauge
d
11
Page 25
To turn the camera off,
slide the power switch
until it slightly clicks.
After retracting the
lens, slide the power
switch to the OFF
position.
Taking still pictures
The monitor turns off.
Do not slide the power switch directly to the OFF position. Doing so may
cause damage to the camera.
Stop sliding
the switch.
After retracting
the lens
Slide to
OFF.
En
25
Page 26
Playing back still pictures
When the playback mode is activated, the last picture taken is displayed
on the monitor.
En
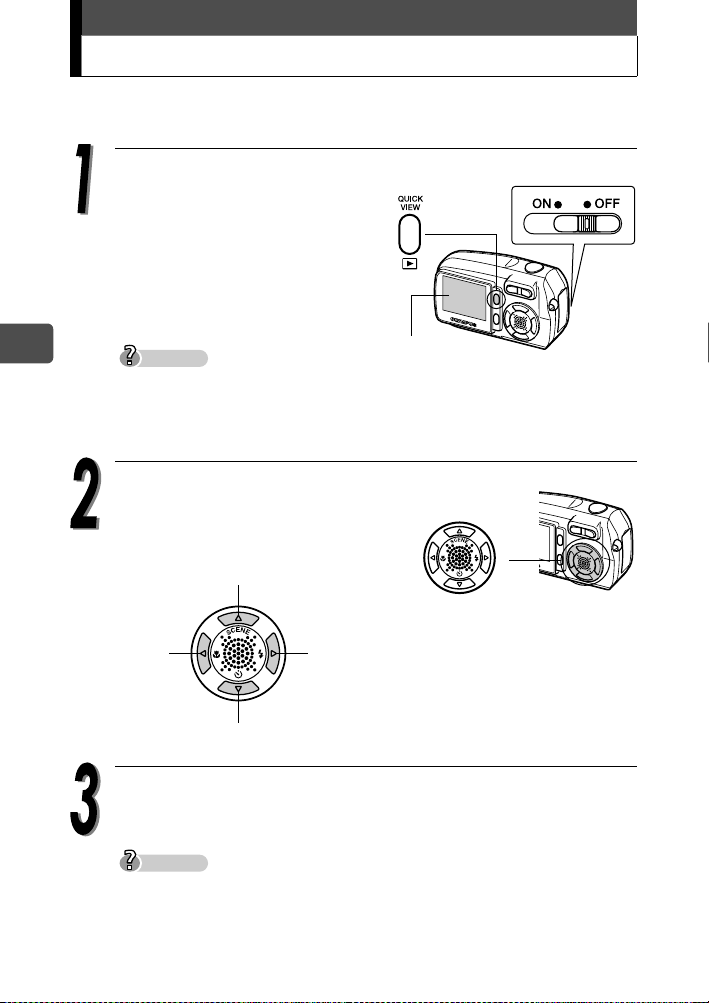
When the power switch is set to
Playback (q) button
the OFF position, press the
playback (q) button.
Playback mode is selected and the
last picture taken is displayed on
the monitor.
Monitor
In shooting mode, pressing the playback button displays the pictures.
(QUICK VIEW)
The shooting information on the monitor disappears after 3 seconds.
Press a, c, b or d (arrow
pads) to switch the pictures.
Jumps to the picture 10 frames back.
Displays the
previous picture.
Jumps to the picture 10 frames ahead.
Displays the
next picture.
26
Press the playback (q) button to turn the camera off.
If the picture is displayed by pressing the playback button while taking
pictures, the mode can be changed back to shooting mode by the following
operation.
Press the playback button or press the shutter button half-way down.
Page 27
Information on OLYMPUS Master
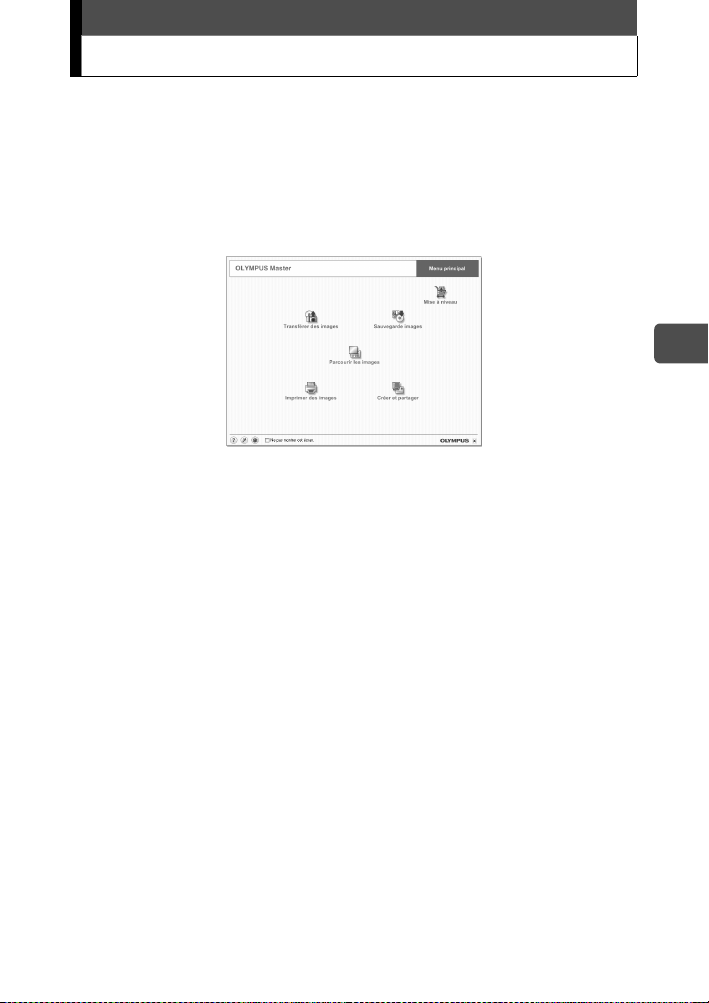
The OLYMPUS Master is an application software for editing and
controlling the pictures taken with the camera on your computer.
Using this software, you can sort and control various pictures taken just
like you could with photo albums. Also, you can easily transfer the
pictures from the camera then edit or print them as you like.
In the separate Advanced manual, the following detailed information is
available.
Note: The Advanced manual is located on the CD-ROM.
• Installing OLYMPUS Master.
• Connecting the camera to your computer.
• Transferring the pictures from the camera to your computer.
• Playing back the pictures and movies on your computer.
On OLYMPUS Master, you can register the users of the camera and
OLYMPUS Master on-line. When you have registered the users, you
can get information of the software and firmware.
For the detailed operations of the OLYMPUS Master, refer to the “Help”
section and the operation manual of the OLYMPUS Master provided.
En
27
Page 28

Fr
Table des matières
Déballage du contenu du carton ...........................................................29
Quelles sont les fonctions de cet appareil photo ?................................30
Consignes de sécurité...........................................................................33
Consignes générales ..................................................................33
Avis de la FCC............................................................................34
Fixation de la courroie...........................................................................36
Recharge de la batterie.........................................................................37
Mise en place et retrait de la batterie ....................................................38
Mise en place de la batterie ........................................................38
Retrait de la batterie....................................................................39
Insertion et retrait de la carte ................................................................41
xD-Picture Card ..........................................................................41
Insertion de la carte ....................................................................42
Retrait de la carte........................................................................44
Mise en marche/arrêt ............................................................................45
Lorsque vous prenez des photos (mode prise de vue)...............45
Pendant l’affichage des photos (mode affichage).......................46
Comment tenir l’appareil photo .............................................................47
Prise de vues fixes ................................................................................48
Affichage d’images fixes .......................................................................52
Informations sur OLYMPUS Master......................................................53
28
Page 29

Déballage du contenu du carton
Si un élément est manquant ou endommagé, contactez le revendeur de
l’appareil photo.
Appareil photo
numérique
Batterie lithium ion
(LI-12B)
Câble AV
Carte de garantie Carte d’enregistrement
Le contenu du carton peut varier selon la région où vous avez acheté l’appareil
photo.
Courroie xD-Picture Card
Chargeur de la batterie
lithium ion (LI-10C)
CD-ROM
OLYMPUS Master
Câble USB
Basic Manual
DIGITAL CAMERA
D-590 ZOOM
C-470 ZOOM
X-500
Manuel de base
(Ce manuel)
CD-ROM du
Manuel avancé
Fr
29
Page 30
Quelles sont les fonctions de cet appareil photo ?
L’appareil photo propose 10 modes de scènes de prise de vue.
Sélectionnez simplement le mode de scène de prise de vue de votre choix et appuyez
sur le déclencheur pour prendre des photos. L’appareil photo se charge du reste.
SCENE NUIT AUTO-PORTRAIT CUISINE
INTERIEUR PAYSG + PORTRT PAYSAGE
Fr
Vous pouvez cadrer, prendre
et afficher vos photos sur
l’écran ACL 1,8"
particulièrement lumineux.
Vous pouvez prendre une série de photos pour un panorama.
Vous pouvez prendre des
vues successives.
30
Les photos sont
enregistrées sur
la carte xDPicture Card.
Vous pouvez aussi
enregistrer des vidéos.
Page 31

Quelles sont les fonctions de cet appareil photo ?
L’appareil photo permet
d’afficher les images sur
un téléviseur.
Lorsque l’appareil est raccordé à un ordinateur ou à une imprimante...
Les données d’image enregistrées sur la
carte peuvent être transmises ou lues en
installant le CD-ROM fourni.
Connectez l’appareil photo à une
imprimante compatible PictBridge et vous
pouvez imprimer sans passer par un
ordinateur.
Utilisez le zoom optique 3× et le zoom numérique (soit un zoom total
continu 12×) pour réaliser un gros plan du sujet.
Optique 1×
Optique 3× 12× (zoom total continu)
Pour plus d’informations sur l’utilisation et les opérations avancées
de l’appareil photo, consultez le Manuel avancé (livré au format
PDF sur le CD-ROM fourni) qui décrit également l’installation du
logiciel fourni, les messages d’erreur et les solutions de dépannage.
Fr
31
Page 32
Pour les utilisateurs en Amérique du Nord et du Sud
Pour les utilisateurs aux États-Unis
Déclaration de conformité
Numéro de modèle : D-590 ZOOM, C-470 ZOOM, X-500
Marque : OLYMPUS
Responsable :
Adresse : Two Corporate Center Drive, PO Box 9058,
Melville, NY 11747-9058 Etats-Unis
Numéro de téléphone
: 1-631-844-5000
Testé pour être en conformité avec la réglementation FCC
POUR L’UTILISATION À LA MAISON OU AU BUREAU
Cet appareil est conforme aux normes de la Section 15 des directives
Fr
FCC. Son utilisation est soumise aux deux conditions suivantes :
(1) Cet appareil ne doit pas provoquer d’interférences gênantes.
(2) Cet appareil doit pouvoir résister à toutes les interférences, y compris
celles susceptibles d’entraver son bon fonctionnement.
Pour les utilisateurs au Canada
Cet appareil numérique de la catégorie B est conforme à la
législation canadienne sur les appareils générateurs de parasites.
Pour les utilisateurs en Europe
Le label “CE” indique que ce produit est conforme aux normes européennes en matière
de sécurité, de santé, d’environnement et de protection du consommateur. Les
appareils photo comportant le label “CE” sont destinés à être vendus en Europe.
Marques commerciales
• IBM est une marque déposée d’International Business Machines Corporation.
• Microsoft et Windows sont des marques déposées de Microsoft Corporation.
• Macintosh est une marque d’Apple Computer Inc.
• Tous les autres noms de sociétés et appellations de produits sont des marques déposées
et/ou des marques de fabrique de leurs propriétaires respectifs.
• Les normes pour les systèmes de fichiers d’appareil photo indiquées dans ce manuel sont
les normes “Design Rule for Camera File System/DCF” stipulées par l’association JEITA
(Japan Electronics and Information Technology Industries Association).
Ce manuel décrit les opérations de base nécessaires pour prendre et lire des photos.
Pour des informations détaillées sur les fonctions et l’utilisation de l’appareil, lisez le
Manuel avancé (CD-ROM).
Lisez attentivement les manuels avant d’utiliser l’appareil photo. Si vous envisagez de
prendre des photos importantes, notamment à l’occasion d’un voyage à l’étranger,
prenez quelques photos au préalable afin de vous assurer du bon fonctionnement de
l’appareil.
Les recopies de l’écran ACL et les illustrations de l’appareil photo qui figurent dans les
manuels peuvent être différentes de la réalité.
32
Page 33
Consignes de sécurité
Avant d’utiliser cet appareil photo, lisez attentivement les consignes ci-dessous
ainsi que les “Précautions” qui figurent dans le Manuel avancé.
ATT ENTION
RISQUE D’ELECTROCUTION
NE PAS OUVRIR
ATTENTION :
POUR REDUIRE LE RISQUE D’ELECTROCUTION, NE RETIREZ PAS LE COUVERCLE (OU
L’ARRIERE). CE PRODUIT NE RENFERME AUCUNE PIECE SUSCEPTIBLE D’ETRE REPAREE PAR VOS
SOINS. TOUTE REPARATION DOIT ETRE EXCLUSIVEMENT CONFIEE A UN TECHNICIEN OLYMPUS AGREE.
Un triangle renfermant un éclair terminé par une flèche vous
signale la présence, à l’intérieur de l’appareil, de points de tension
non isolés susceptibles de provoquer l’électrocution.
Un triangle renfermant un point d’exclamation vous signale la
présence d’importantes instructions d’utilisation et d’entretien
dans le documentation qui accompagne le produit.
AVERTISSEMENT !
POUR EVITER TOUT RISQUE D’INCENDIE OU D’ELECTROCUTION,
N’EXPOSEZ JAMAIS CE PRODUIT A L’EAU ET NE L’UTILISEZ PAS DANS
UN ENVIRONNEMENT TRES HUMIDE.
Consignes générales
Fr
Lisez toutes les instructions —
d’utilisation.
Conservez ces instructions — Conservez toutes les instructions d’utilisation et les
consignes de sécurité afin de pouvoir les consulter ultérieurement.
Respectez les avertissements — Lisez attentivement et respectez toutes les étiquettes
d’avertissement apposées sur le produit ainsi que celles décrites dans les instructions.
Suivez les instructions — Suivez toutes les instructions fournies avec ce produit.
Nettoyage — Débranchez toujours ce produit de la prise murale avant de le nettoyer.
Utilisez exclusivement un linge humide pour le nettoyage. N’utilisez jamais de nettoyant
liquide ou en aérosol, pas plus qu’un solvant organique pour nettoyer ce produit.
Accessoires — Pour votre sécurité et pour éviter d’endommager le produit, utilisez
exclusivement les accessoires recommandés par Olympus.
Eau et humidité — N’utilisez jamais ce produit à proximité d’un point d’eau (baignoire,
évier, lavabo, sous-sol humide, piscine ou pluie).
Emplacement — Pour éviter d’endommager le produit et pour écarter tout risque de
blessure, ne le posez jamais sur un pied, un trépied, un support, une table ou un chariot
instable. Posez-le exclusivement sur un pied, un trépied ou un support stable. Suivez les
instructions qui décrivent la manière d’installer le produit en toute sécurité et utilisez
exclusivement les dispositifs de fixation recommandés par le fabricant.
Sources d’alimentation — Raccordez exclusivement ce produit à la source
d’alimentation décrite sur son étiquette. Si vous n’êtes pas certain du type d’alimentation
électrique de votre maison, consultez votre fournisseur d’électricité.
Reportez-vous aux instructions d’utilisation pour toute information relative à l’utilisation du
produit avec une batterie.
Avant d’utiliser ce produit, lisez toutes ses instructions
33
Page 34

Consignes de sécurité
Mise à la terre, polarisation — Si ce produit peut être utilisé avec un adaptateur secteur
déterminé, ce dernier est peut-être équipé d’une fiche secteur polarisée (une fiche dont
une lame est plus large que l’autre). Ce dispositif de sécurité évite de brancher la fiche à
l’envers dans la prise secteur. Si vous ne parvenez pas à insérer la fiche dans la prise
murale, retirez-la, retournez-la et réinsérez-la. Si le branchement s’avère malgré tout
impossible, contactez un électricien ou faites remplacer la prise.
Protection du cordon d’alimentation — Le cordon d’alimentation doit être disposé à
l’écart des lieux de passage. Ne déposez jamais un objet lourd sur le cordon
d’alimentation et ne l’enroulez pas non plus autour du pied d’une table ou d’une chaise.
Veillez à ce que la zone qui entoure les points de raccordement du cordon d’alimentation,
tant au niveau de la prise secteur que du produit, soient dégagés de tout cordon
d’alimentation supplémentaire et de tout adaptateur secteur.
Orage — Si un orage survient alors que vous utilisez un adaptateur secteur spécifié,
débranchez-le immédiatement de la prise murale. Pour éviter les dégâts provenant d’une
surtension inattendue, débranchez toujours l’adaptateur secteur de la prise secteur et de
l’appareil photo lorsque vous n’utilisez pas celui-ci.
Surcharge — Ne surchargez jamais les prises murales, les cordons prolongateurs, les
prises multiples ou tout autre point de raccordement électrique en y branchant un
Fr
nombre trop élevé de fiches.
Renversement de liquide ou d’objets étrangers — N’insérez jamais d’objets
métalliques dans le produit afin d’éviter que leur contact avec des points haute tension
internes vous blesse en provoquant l’électrocution ou un début d’incendie.
Evitez d’utiliser le produit si du liquide risque de s’épancher sur celui-ci.
Chaleur — Vous ne devez jamais utiliser ou ranger ce produit à proximité d’une source
de chaleur, notamment un radiateur, un poêle ou tout autre type d’équipement ou
d’appareil dégageant de la chaleur, y compris les amplificateurs stéréo.
Entretien
— Confiez tous les entretiens à un personnel qualifié. Toute tentative de retrait des
couvercles ou de démontage du produit peut vous exposer à des points haute tension dangereux.
Pannes nécessitant une intervention — Si vous remarquez la présence d’une des
conditions décrites ci-dessous alors que vous utilisez un adaptateur secteur spécifié,
débranchez-le de la prise murale et confiez la réparation de votre appareil à un
technicien qualifié :
a) Du liquide a été renversé sur le produit ou un objet a pénétré à l’intérieur de celui-ci.
b) Le produit a été exposé à l’eau.
c) Le produit ne fonctionne pas normalement malgré le respect des instructions
d’utilisation. Réglez uniquement les commandes décrites dans les instructions
d’utilisation, car tout mauvais réglage d’autres commandes pourrait endommager le
produit et exiger d’importantes réparations par un technicien qualifié.
d) Le produit est tombé ou a été endommagé.
e) Le produit connaît une diminution sensible de ses performances.
Pièces de rechange
centre de réparation utilise exclusivement des pièces qui présentent les mêmes caractéristiques
que les pièces d’origine, comme recommandé par le fabricant. Le remplacement non autorisé de
pièces peut provoquer l’incendie, l’électrocution ou d’autres risques.
Contrôle de sécurité — Une fois l’entretien ou les réparations terminés, demandez au
technicien d’effectuer les contrôles de sécurité afin de déterminer que le produit est en
ordre de marche.
— Si des pièces de rechange sont nécessaires, assurez-vous que le
Avis de la FCC
Interférences radio et télévision
Tout changement ou modification qui n’est pas expressément approuvé par le fabricant peut
annuler le droit de l’utilisateur à faire fonctionner cet appareil. Cet appareil a été testé et
déclaré conforme aux limites des dispositifs numériques de Classe B conformément à la
Section 15 des directives FCC. Ces limites sont conçues pour assurer une protection
raisonnable contre les interférences gênantes au sein d’une installation résidentielle.
Cet appareil génère, utilise et peut diffuser de l’énergie haute fréquence et, s’il n’est pas
installé et utilisé selon les instructions, peut provoquer des interférences gênantes aux
communications radio.
34
Page 35

Consignes de sécurité
Toutefois, il n’est pas garanti que de telles interférences surviendront dans une installation déterminée.
Si cet appareil provoque des interférences gênantes à la réception des émissions de radio ou de
télévision, ce qui peut être déterminé en mettant l’appareil hors et sous tension, l’utilisateur est
encouragé à essayer d’éliminer les interférences d’une ou de plusieurs des manières suivantes :
• Réglez ou déplacez l’antenne réceptrice.
• Augmentez la distance entre l’appareil photo et le récepteur.
• Raccordez l’appareil à une prise d’un circuit électrique différent de celui auquel le
récepteur est raccordé.
• Sollicitez l’aide d’un revendeur ou d’un technicien radio/TV expérimenté.
Seul le câble USB fourni par OLYMPUS doit être utilisé pour le raccordement de
l’appareil photo à un ordinateur personnel (PC) compatible USB.
Tout changement ou modification non autorisé apporté à cet appareil annulerait le droit de
l’utilisateur à le faire fonctionner.
Avis légaux et autres
Olympus ne formule aucun engagement ou garantie concernant les dégâts ou les
avantages découlant de l’utilisation correcte de cet appareil, ou toute demande tierce
résultant de l’utilisation inadaptée de ce produit.
Olympus ne formule aucun engagement ou garantie concernant les dégâts ou les
avantages découlant de l’utilisation correcte de cet appareil consécutifs à l’effacement
des données d’image.
Renonciation de garantie
Olympus ne formule aucun engagement ou garantie, exprès ou implicite, au sujet ou
concernant le contenu de ces documents imprimés ou du logiciel, et ne peut en aucun
cas être responsable pour toute garantie implicite relative à la qualité marchande ou à
l’adéquation à un usage déterminé, ou pour tout dommage consécutif, incident ou
indirect, y compris, mais sans limitation, les dégâts liés à la perte de revenus
professionnels, à l’interruption d’activité ou à la perte d’informations commerciales,
consécutifs à l’utilisation ou à l’impossibilité d’utiliser ces documents imprimés, le logiciel
ou l’appareil. Certains pays n’autorisent pas l’exclusion ou la limitation de garantie pour
les dommages consécutifs ou incidents et les limitations ci-dessus peuvent ne pas
s’appliquer à votre cas.
Olympus se réserve tous les droits sur ce manuel.
Fr
AVERTISSEMENT
Photographier sans autorisation ou utiliser des éléments protégés par copyright peut
enfreindre la législation applicable aux droits d’auteur. Olympus n’assume aucune
responsabilité quant à la prise de vue non autorisée, à l’utilisation ou à la pose d’actes
qui enfreignent les droits des propriétaires des droits d’auteur.
Avis de copyright
Tous droits réservés. Aucune partie de ces documents imprimés ou de ce logiciel ne peut
être reproduite ou utilisée sous quelque forme ou par quelque moyen que ce soit,
électronique ou mécanique, y compris la photographie et l’enregistrement ou l’utilisation
de n’importe quel type de système de stockage et d’archivage des informations, sans
l’accord écrit préalable d’Olympus. Aucune responsabilité n’est assumée quant au
respect de l’utilisation des informations contenues dans ces documents écrits ou ce
logiciel, ou pour tout dommage résultant de l’utilisation des informations qu’ils
renferment. Olympus se réserve le droit de modifier les fonctionnalités et le contenu de
cette publication ou logiciel sans obligation ou avis préalable.
35
Page 36

Fixation de la courroie
Fr
Faites passer la courroie dans
l’œillet comme illustré ci-contre.
Courroie
Tirez fermement sur la courroie, puis
vérifiez qu’elle est solidement
attachée et qu’elle ne peut pas se
détacher.
Remarque
Ne faites pas balancer l’appareil photo à l’aide de la courroie et ne tirez pas
dessus trop fort. Cela pourrait la casser.
Fixez correctement la courroie afin qu’elle ne se détache pas. Olympus
décline toute responsabilité pour les dommages occasionnés par une
courroie mal fixée et la chute de l’appareil photo.
36
Page 37

Recharge de la batterie
Cet appareil photo emploie une batterie Olympus au lithium ion
(LI-12B).
La batterie n’est pas complètement chargée au moment de l’achat de
l’appareil. Chargez-la complètement avant la première utilisation.
Durée de charge Environ 2 heures
Branchez le cordon
d’alimentation dans
Cordon d’alimentation
du chargeur de batterie
l’ordre indiqué par c et
d.
Insérez la batterie dans
le chargeur.
Le voyant du chargeur
Chargeur de la
batterie lithium ion
(LI-10C)
Prise secteur murale
Insérez-la dans le sens indiqué par la flèche.
Batterie lithium ion
(LI-12B)
s’illumine en rouge et la
charge commence. Dès
que le voyant vire au
vert, la charge est terminée.
Conseils
La batterie lithium ion LI-10B Olympus (vendue séparément) peut
également être utilisée.
Remarque
Utilisez uniquement le
chargeur indiqué.
Nous vous conseillons de
garder avec vous une
batterie de rechange
(vendue séparément) si
vous prévoyez d’utiliser
l’appareil photo pendant une
période prolongée ou dans une région froide.
Le chargeur peut être utilisé dans une fourchette de tensions de 100 V CA à 240 V CA
(50/60 Hz). N’utilisez pas les transformateurs de tension vendus dans le commerce
lorsque vous voyagez à l’étranger, car cela pourrait endommager votre chargeur.
Lorsque vous utilisez le chargeur à l’étranger, vous pouvez avoir besoin d’un
adaptateur de prise pour convertir le connecteur à la forme de la prise
électrique. Pour des informations détaillées, renseignez-vous auprès de
votre revendeur local d’articles électriques ou de l’agence de voyage.
Indicateur de charge
Rouge : En charge
Vert : Charge terminée.
Fr
37
Page 38

Mise en place et retrait de la batterie
Cet appareil photo emploie une batterie Olympus au lithium ion.
Vérifiez les points suivants avant de charger ou de retirer la batterie :
cLe capot de protection de l’objectif est fermé.
dL’écran ACL est éteint.
Fr
cCapot de protection de l’objectif dÉcran ACL
Mise en place de la batterie
Faites glisser le couvercle du
compartiment de la batterie/carte
dans le sens de A.
Le couvercle se déverrouille et s’ouvre
dans le sens de B.
Remarque
Veillez à faire glisser le couvercle avec le
dessous du doigt. N’utilisez pas les
ongles, car vous risquez de vous blesser.
Orientez la batterie de la
manière illustrée. Insérez la
batterie dans son
compartiment jusqu’à ce
qu’elle soit verrouillée en
position à l’aide du bouton de
verrouillage de la batterie.
Remarque
Si la batterie n’est pas
correctement orientée et insérée,
le couvercle du compartiment de
la batterie/carte ne se ferme pas.
Couvercle du compartiment
de la batterie/carte
B
A
Batterie
Bouton de
verrouillage
de la batterie
38
Page 39

Mise en place et retrait de la batterie
Refermez le couvercle du
compartiment de la batterie/carte
C
dans le sens de C et faites-le
glisser dans le sens de D.
Conseils
Ne forcez pas le couvercle en le fermant. Lorsque la batterie est
correctement orientée et insérée, le couvercle se ferme facilement. Si le
couvercle se ferme mal, vérifiez l’orientation de la batterie.
Pour connaître le nombre de photos qui peuvent être stockées lorsque vous
utilisez une batterie neuve complètement chargée, reportez-vous à la
section “6. Annexe, Caractéristiques techniques de l’appareil photo” du
Manuel avancé (CD-ROM) fourni séparément.
Remarque
De l’énergie est consommée en permanence dans les situations ci-
dessous. Cela peut vider la batterie plus rapidement.
• En cas d’utilisations répétées du zoom.
• Lorsque la mise au point automatique est utilisée de manière répétée
par pression sur le déclencheur jusqu’à mi-course.
• L’appareil est raccordé à un ordinateur ou à une imprimante.
D
Retrait de la batterie
Fr
Faites glisser le couvercle du
compartiment de la batterie/carte
dans le sens de A.
Le couvercle se déverrouille et s’ouvre
dans le sens de B.
Remarque
Veillez à faire glisser le couvercle avec le dessous du doigt. N’utilisez pas
les ongles, car vous risquez de vous blesser.
Couvercle du compartiment
de la batterie/carte
B
A
39
Page 40
Mise en place et retrait de la batterie
Faites glisser le bouton de
verrouillage de la batterie
dans le sens de la flèche.
La batterie s’éjecte partiellement.
Fr
Extrayez la batterie.
Refermez le couvercle du
compartiment de la batterie/carte
dans le sens de C et faites-le
glisser dans le sens de D.
Bouton de verrouillage de la batterie
C
D
40
Page 41

Insertion et retrait de la carte
xD-Picture Card
Cet appareil photo utilise une carte xD-Picture Card pour enregistrer les
images. Dans les manuels, “carte” désigne la carte xD-Picture Card.
Les photos enregistrées et mémorisées sur la carte photos peuvent
être effacées ou transférées et retouchées sur un ordinateur.
Vous pouvez utiliser cet espace pour décrire
brièvement le contenu de la carte.
Ces contacts permettent de lire les
signaux de l’appareil photo. Ne touchez pas
la partie dorée.
Cartes compatibles xD-Picture Card (16 Mo à 512 Mo)
Remarque
Cet appareil photo risque de ne pas reconnaître une carte de marque autre
que “Olympus” ou une carte qui a été formatée sur un autre système
(ordinateur, etc.). Avant de l’utiliser, pensez à formater la carte sur cet
appareil. Pour plus d’informations, consultez le Manuel avancé
(CD-ROM) fourni séparément.
Si vous utilisez une carte qui ne porte pas la marque Olympus, certaines
fonctions de cet appareil ne peuvent pas être exécutées. Nous vous
recommandons d’utiliser des cartes Olympus avec cet appareil photo.
Fr
41
Page 42

Insertion et retrait de la carte
Insertion de la carte
Cet appareil enregistre les données d’image sur une carte xD-Picture
Card. Aucune vue ne peut être enregistrée si aucune carte n’a été
insérée dans l’appareil.
Vérifiez les points suivants avant d’insérer ou de retirer la carte :
cLe capot de protection de l’objectif est fermé.
dL’écran ACL est éteint.
Fr
cCapot de protection de l’objectif dÉcran ACL
42
Faites glisser le couvercle du
compartiment de la batterie/carte
dans le sens de A.
Le couvercle se déverrouille et s’ouvre
dans le sens de B.
Remarque
Veillez à faire glisser le couvercle avec le dessous du doigt. N’utilisez pas
les ongles, car vous risquez de vous blesser.
Couvercle du compartiment
de la batterie/carte
B
A
Page 43

Insertion et retrait de la carte
Orientez la carte et insérez-la
dans le connecteur de carte à
ressort comme illustré ci-contre.
La carte se verrouille dans son
emplacement lorsqu’elle est insérée
à fond.
Conseils
Appuyez sur la carte le plus loin
possible.
Remarque
La carte ne peut être insérée que dans un sens ; si vous l’insérez dans
le mauvais sens, ou en oblique, vous risquez d’endommager les
connecteurs et de coincer la carte dans l’appareil photo.
Si la carte n’est pas insérée complètement, les images ne peuvent pas
être mémorisées sur celle-ci.
Carte
Fr
Refermez le couvercle du
compartiment de la batterie/carte
dans le sens de C et faites-le
glisser dans le sens de D.
C
D
43
Page 44
Insertion et retrait de la carte
Retrait de la carte
Ouvrez le couvercle du compartiment de la batterie/carte.
Appuyez à fond sur la carte pour la
déverrouiller, puis relâchez
Fr
lentement le doigt pour qu’elle
s’éjecte lentement.
La carte s’éjecte partiellement.
Remarque
N’appuyez pas sur la carte à l’aide d’un
objet dur ou pointu tel qu’un stylo à bille.
Si vous retirez votre doigt rapidement après avoir enfoncé la carte à fond,
elle risque d’être propulsée hors de son logement.
Retirez la carte.
44
Remarque
N’ouvrez jamais le couvercle du
compartiment de la batterie/carte alors que
l’appareil photo est allumé. Cela risquerait
de détruire toutes les données enregistrées
sur la carte. Une fois détruites, les données
ne peuvent plus être récupérées.
N’apposez aucun autocollant sur les cartes. Sinon, la carte risquerait de se
bloquer dans l’appareil photo et de ne plus s’éjecter.
Page 45

Mise en marche/arrêt
Il est possible de mettre l’appareil photo sous tension de différentes
manières en “mode prise de vue” ou en “mode affichage”.
Conseils
La première fois que vous utilisez l’appareil photo, le message [A/M/J]
s’affiche sur l’écran ACL. Pour plus d’informations sur la procédure de
réglage, reportez-vous au Manuel avancé séparé (CD-ROM).
Remarque
N’ouvrez jamais le couvercle du compartiment de la batterie/carte et ne
branchez/débranchez jamais l’adaptateur secteur lorsque l’appareil photo
est allumé. Cela risquerait de détruire toutes les données enregistrées sur
la carte. Une fois détruites, les données ne peuvent plus être récupérées.
Lorsque vous prenez des photos (mode prise de vue)
Comment allumer l’appareil photo
Î Faites glisser l’interrupteur
Marche/Arrêt sur la position ON
(Marche).
Le capot de protection de l’objectif
s’ouvre, l’objectif sort et le sujet
apparaît sur l’écran ACL.
Si l’objectif ne se déploie pas alors
que son capot est ouvert, il est
possible que l’interrupteur Marche/
Arrêt ne soit pas complètement sur
la position ON (Marche). Faites
glisser correctement l’interrupteur
Marche/Arrêt sur la position ON (Marche).
Interrupteur marche/arrêt
Écran ACL
Fr
Conseils
Pour économiser l’énergie de la batterie, l’appareil passe automatiquement
en mode veille et cesse de fonctionner après 3 minutes d’inactivité.
Appuyez sur n’importe quelle touche, par exemple la touche du zoom pour
réactiver l’appareil photo.
Pour économiser l’énergie de la batterie, l’appareil s’éteint automatiquement
lorsqu’il ne fonctionne pas pendant environ 15 minutes. Pour le réactiver,
faites glisser l’interrupteur Marche/Arrêt sur la position OFF (Arrêt) de la
manière indiquée à la section “Comment éteindre l’appareil photo”, puis
remettez-le sous tension.
45
Page 46

Mise en marche/arrêt
Comment éteindre l’appareil
photo
Î
Faites glisser l’interrupteur
Marche/Arrêt jusqu’à ce
qu’il émette un léger déclic.
Une fois l’objectif rentré,
faites glisser l’interrupteur
Marche/Arrêt sur la position
Fr
Arrêt (OFF).
L’écran ACL s’éteint.
Remarque
Ne faites pas glisser l’interrupteur Marche/Arrêt directement sur la position
OFF (Arrêt). Cela risquerait d’endommager l’appareil photo.
Cessez de faire
glisser l’interrupteur.
Une fois
l’objectif rentré
Pendant l’affichage des photos (mode affichage)
Faites-le glisser
sur Arrêt (OFF).
Comment allumer l’appareil photo
Î Lorsque l’interrupteur Marche/
Arrêt est en position Arrêt
(OFF), appuyez sur la touche
de lecture (q).
La photo que vous venez de
prendre est affichée.
Conseils
Pour économiser l’énergie de la batterie, l’appareil s’éteint automatiquement
lorsqu’il ne fonctionne pas pendant environ 3 minutes.
Si vous appuyez sur la touche de lecture en mode de prise de vue, l’appareil
photo peut afficher les images (QUICK VIEW ).
Pour revenir au mode de prise de vue, appuyez sur la touche de lecture ou
sur le déclencheur à mi-course.
Comment éteindre l’appareil photo
Î Appuyez de nouveau sur la
touche de lecture (q).
L’écran ACL s’éteint.
46
Touche de lecture (q)
Écran ACL
Page 47

Comment tenir l’appareil photo
Lorsque vous prenez des photos, tenez fermement l’appareil photo
avec les deux mains tout en appuyant les coudes le long du corps pour
éviter de bouger. Si vous étendez vos bras ou ne gardez pas vos
coudes le long du corps, le risque de bougé de l’appareil est plus grand.
Position horizontale
Position verticale
Fr
Prise incorrecte
Prenez garde que vos doigts ou la courroie ne se
trouvent pas devant l’objectif, le flash et le micro.
47
Page 48
Prise de vues fixes
2272*1704
20
HQ
La section suivante explique comment prendre des photos à l’aide de
l’écran ACL.
e
Voyant vert
Flash en
attente/flash
en cours de
recharge
Repères de mise au point automatique
Fr
Pour plus d’informations sur l’affichage sur l’écran ACL, reportez-vous
(
o
P
#
HQ
2272*1704
2020
au Manuel avancé (CD-ROM).
Faites glisser l’interrupteur
Marche/Arrêt sur la position ON
(Marche).
Á la mise sous tension, le capot de
protection de l’objectif s’ouvre,
l’objectif se déploie et l’écran ACL
s’allume automatiquement.
Si l’objectif ne se déploie pas alors
que son capot est ouvert, il est
possible que l’interrupteur Marche/
Arrêt ne soit pas complètement sur
la position ON (Marche). Faites
glisser correctement l’interrupteur Marche/Arrêt sur la position ON
(Marche).
Interrupteur marche/arrêt
Écran ACL
Indicateur d’accès
à la carte
a
48
Page 49

Prise de vues fixes
2272*1704
20
HQ
2272*1704
20
HQ
Vérifiez sur l’écran ACL que
l’indicateur de contrôle de la batterie
est e (vert).
Contrôle de la batterie
e
P
o
2272*1704
HQ
Contrôle de la batterie
L’indicateur de contrôle de la batterie change comme suit.
e Allumé (Vert) Vous pouvez prendre des photos.
Allumé (Rouge)
f
[BATTERIE VIDE]
est affiché.
Positionnez les repères de mise au
point automatique sur le sujet.
La batterie est bientôt vide. Chargez-la ou
remplacez-la par une batterie chargée.
La batterie est déchargée. Chargez-la ou
remplacez-la par une batterie chargée.
Repères de mise au point automatique
e
P
Le nombre de vues restantes apparaît sur
l’écran ACL.
Conseils
Si les données affichées sur l’écran ACL
sont illisibles :
Une lumière vive telle que le rayonnement
solaire direct peut provoquer l’apparition de lignes verticales sur le moniteur.
Lorsque vous dirigez l’objectif de l’appareil en direction d’un sujet lumineux,
des lignes ressemblant à un faisceau lumineux (taches) peuvent apparaître
sur l’image de l’écran ACL. Celles-ci n’affectent pas l’image enregistrée.
o
2272*1704
HQ
Nombre de vues
fixes restantes
2020
2020
a
Fr
a
49
Page 50
Prise de vues fixes
$
P
2272*1704
HQ
11
1111
Enfoncez le déclencheur à micourse.
Si la mise au point et l’exposition
sont mémorisées, le voyant vert
reste allumé.
Lorsque le flash est prêt pour la
prise de vue, l’indicateur de veille du flash reste allumé.
Si le voyant vert clignote, la mise au point n’est pas encore mémorisée.
Fr
Enfoncez de nouveau le déclencheur à mi-course.
Enfoncez complètement le
déclencheur pour prendre la
photo.
La photo est enregistrée sur la carte.
L’indicateur d’accès à la carte (X) de l’écran ACL clignote en rouge pendant
l’enregistrement de la photo sur la carte.
N’ouvrez jamais le couvercle du compartiment de la batterie/carte et ne
branchez/débranchez jamais l’adaptateur secteur lorsque l’indicateur
d’accès à la carte (X) clignote sur l’écran ACL. La photo que vous venez de
prendre risquerait de ne pas être enregistrée et les données des photos
stockées sur la carte risqueraient d’être perdues.
Conseils
Conseils
50
Bloc mémoire
Le bloc mémoire s’allume lorsque
e
P
vous prenez une photo. Aussi
longtemps que le bloc mémoire
reste allumé, l’appareil photo
enregistre des photos sur la carte.
Quand le bloc mémoire est
totalement allumé (comme illustré
$
o
HQ
2272*1704
Bloc mémoire
11
ci-contre à droite), il n’est plus
possible de prendre des vues. Attendez que le bloc mémoire
s’éteigne avant de prendre la photo suivante.
d
Page 51

Prise de vues fixes
Pour mettre l’appareil
photo hors tension,
faites glisser
l’interrupteur Marche/
Arrêt jusqu’à ce qu’il
émette un léger déclic.
Une fois l’objectif
rentré, faites glisser
l’interrupteur Marche/
Arrêt sur la position
Cessez de faire
glisser l’interrupteur.
Une fois
l’objectif rentré
Faites-le glisser
sur Arrêt (OFF).
Arrêt (OFF).
L’écran ACL s’éteint.
Remarque
Ne faites pas glisser l’interrupteur Marche/Arrêt directement sur la position
OFF (Arrêt). Cela risquerait d’endommager l’appareil photo.
Fr
51
Page 52
Affichage d’images fixes
Lorsque le mode affichage est activé, la dernière photo prise apparaît
sur l’écran ACL.
Fr
Lorsque l’interrupteur Marche/
Touche de lecture (q)
Arrêt est en position Arrêt
(OFF), appuyez sur la touche
de lecture (q).
Le mode affichage est sélectionné
et la dernière photo prise apparaît
sur l’écran ACL.
Conseils
En mode de prise de vue, l’appui de la touche de lecture entraîne l’affichage
des photos. (QUICK VIEW)
Les informations de prise de vue affichées sur l’écran ACL disparaissent
après 3 secondes.
Écran ACL
Appuyez sur a, c, b ou d
(molette de défilement) pour faire
défiler les images.
Affiche la 10e photo en arrière.
Affiche la
photo
précédente.
Affiche la 10e photo en avant.
Affiche la
photo
suivante.
52
Appuyez sur la touche de lecture (q) pour éteindre l’appareil
photo.
Conseils
Si l’image est affichée à l’aide de la touche de lecture pendant la prise de vue, le
mode de prise de vue peut être rétabli en procédant de la manière suivante.
Appuyez sur la touche de lecture ou appuyez sur le déclencheur à mi-course.
Page 53
Informations sur OLYMPUS Master
OLYMPUS Master est un logiciel permettant d’éditer et de contrôler les
images prises avec l’appareil photo sur votre ordinateur.
À l’aide de ce logiciel, vous pouvez trier et contrôler différentes images
comme vous le feriez avec des albums photo. Vous pouvez aussi
transférer aisément les images depuis l’appareil photo, puis les éditer
ou les imprimer à votre guise.
Les informations détaillées suivantes sont disponibles dans le Manuel
avancé fourni séparément.
Remarque : Le Manuel avancé se trouve sur le CD-ROM.
• Installation d’OLYMPUS Master.
• Raccordement de l’appareil photo à votre ordinateur.
• Transfert des images depuis l’appareil photo vers votre ordinateur.
• Lecture des images et des films sur votre ordinateur.
Dans OLYMPUS Master, vous pouvez enregistrer les utilisateurs de
l’appareil photo et OLYMPUS Master en ligne. Une fois l’enregistrement
des utilisateurs terminé, vous pouvez obtenir des informations sur le
logiciel et le micrologiciel.
Pour des informations détaillées sur l’utilisation d’OLYMPUS Master,
reportez-vous à la section “Aide” du manuel d’utilisation d’OLYMPUS
Master fourni.
Fr
53
Page 54

Es
Contenidos
Desembalaje del contenido de la caja ..................................................55
¿Qué puede hacer esta cámara? .........................................................56
Precauciones de seguridad...................................................................59
Precauciones generales .............................................................59
Aviso FCC...................................................................................60
Fijación de la correa..............................................................................62
Carga de la batería ...............................................................................63
Cómo instalar y retirar la batería...........................................................64
Instalación de la batería..............................................................64
Extracción de la batería ..............................................................65
Cómo insertar y extraer la tarjeta..........................................................67
xD-Picture Card ..........................................................................67
Inserción de la tarjeta..................................................................68
Extracción de la tarjeta ...............................................................70
Encender / apagar de la cámara...........................................................71
Para tomar fotografías (Modo de fotografía)...............................71
Para visualizar fotografías (Modo de reproducción) ...................72
Sujeción correcta de la cámara.............................................................73
Toma de fotografías..............................................................................74
Reproducción de fotografías .................................................................78
Información sobre OLYMPUS Master...................................................79
54
Page 55
Desembalaje del contenido de la caja
Si falta algún elemento o está dañado, póngase en contacto con el
distribuidor a quien compró la cámara.
Cámara digital Correa xD-Picture Card
Es
Batería de iones de litio
(LI-12B)
Cable AV
Tarjeta de garantía Tarjeta de registro
El contenido de la caja puede variar según la región geográfica donde se
adquiera la cámara.
Cargador de batería de
iones de litio (LI-10C)
OLYMPUS Master
CD-ROM
Cable USB
Basic Manual
DIGITAL CAMERA
D-590 ZOOM
C-470 ZOOM
X-500
Manual básico
(este manual)
Manual avanzado
CD-ROM
55
Page 56
¿Qué puede hacer esta cámara?
La cámara tiene 10 modos de escena de fotografía.
Seleccione el modo de escena de fotografía deseado y pulse el botón
obturador para tomar fotografías. La cámara hará el resto.
ESC.NOCT AUTO - RETRATO COCINA
INTERIORES PAIS. + RETR. PAISAJE
Es
Puede enmarcar, tomar y ver
sus fotografías en el monitor
de 1,8 pulgadas.
Puede tomar varias fotografías y crear un panorama.
Puede tomar fotografías
sucesivas.
56
También puede
grabar vídeos.
La fotografías que
tome se grabarán
en la tarjeta xDPicture Card.
Page 57

¿Qué puede hacer esta cámara?
Las fotografías se pueden
reproducir en un televisor.
Si la cámara está conectada a un ordenador o impresora...
Los datos de imágenes almacenados en
la tarjeta se pueden transmitir o
reproducir si se instala el CD-ROM
suministrado.
Conecte la cámara a una impresora
compatible PictBridge y podrá imprimir
sus fotografías sin utilizar un ordenador.
Utilice el zoom óptico de 3× y el zoom digital (zoom total de 12×) para
acercarse al sujeto.
Es
Óptico 1×
Óptico 3× 12× (Zoom total)
Si desea más información sobre el funcionamiento y uso de la
cámara, consulte el Manual avanzado (archivo PDF en el CDROM incluido), que explica también cómo instalar el software
incluido, los mensajes de error y la solución de problemas.
57
Page 58

Para clientes de Norteamérica y Sudamérica
Para los clientes de Estados Unidos
Declaración de conformidad
Número de modelo : D-590 ZOOM, C-470 ZOOM, X-500
Nombre comercial : OLYMPUS
Parte responsable :
Dirección : Two Corporate Center Drive, PO Box 9058,
Melville, NY 11747-9058 U.S.A.
Número de teléfono: 1-631-844-5000
Se ha probado su cumplimiento con las normas FCC
PARA USO DOMÉSTICO O COMERCIAL
Este dispositivo cumple con el Apartado 15 de las normas FCC.
La operación se encuentra sujeta a las dos condiciones
siguientes:
Es
(1) Este dispositivo podría no causar interferencia perjudicial.
(2) Este dispositivo debe aceptar cualquier interferencia que se
reciba, incluyendo aquellas interferencias que pueden
provocar un funcionamiento no deseado.
Para los clientes de Canadá
Este aparato digital de Clase B cumple con todos los
requerimientos de las reglamentaciones canadienses sobre
equipos generadores de interferencia.
Para los clientes de Europa
La marca “CE” indica que este producto cumple con los requisitos europeos sobre
protección al consumidor, seguridad, salud y protección del medio ambiente. Las
cámaras con la marca “CE” están destinadas a la venta en Europa.
Marcas comerciales
• IBM es una marca comercial registrada de International Business Machines Corporation.
• Microsoft y Windows son marcas comerciales registradas de Microsoft Corporation.
• Macintosh es una marca comercial de Apple Computer, Inc.
• Todos los demás nombres de compañías y productos son marcas registradas y/o marcas
comerciales de sus respectivos propietarios.
• Las normas para sistemas de archivos de cámara referidas en este manual son las
“Normas de Diseño para Sistema de Archivos de Cámara/DCF” estipuladas por la
Asociación de Industrias Electrónicas y de Tecnología de Información de Japón (JEITA).
Este manual describe las operaciones básicas para tomar fotografías y reproducir las
fotografías tomadas. Si desea información más detallada sobre funciones y
operaciones, consulte el Manual avanzado (CD-ROM).
Antes de empezar a utilizar la cámara, lea con atención los manuales. Si piensa tomar
fotografías importantes, por ejemplo, cuando esté viajando por el extranjero, le recomendamos
que realice varias tomas de prueba para verificar que la cámara funciona correctamente.
Los ejemplos de pantallas del monitor y las ilustraciones de la cámara que se
muestran en este manual pueden diferir de los reales.
58
Page 59

Precauciones de seguridad
Antes de utilizar esta cámara, lea detenidamente las precauciones
siguientes así como “Precauciones” de uso que se incluyen en el Manual
avanzado.
PRECAUCIÓN
RIESGO DE DESCARGA
ELÉCTRICA
PRECAUCIÓN:
LA TAPA (NI LA PARTE POSTERIOR). NINGUNA PIEZA EN EL INTERIOR PUEDE SER MANIPULADA
POR EL USUARIO. CONSULTE AL PERSONAL DE SERVICIO TÉCNICO OLYMPUS ESPECIALIZADO.
¡ADVERTENCIA!
PARA EVITAR EL RIESGO DE INCENDIO O DE DESCARGA ELÉCTRICA,
NUNCA EXPONGA ESTE PRODUCTO AL AGUA NI LO UTILICE EN UN
ENTORNO DE HUMEDAD EXCESIVA.
Precauciones generales
Lea todas la instrucciones — Antes de utilizar el producto, lea todas las instrucciones
de funcionamiento.
Guarde estas instrucciones
funcionamiento para su posterior consulta.
Preste atención a las advertencias —
advertencia que se encuentren en el producto y las que se describen en las instrucciones.
Siga las instrucciones —
Limpieza
Accesorios
Agua y humedad
Fuentes de alimentación —
— Desenchufe este producto de la toma de corriente antes de proceder a su
limpieza. Utilice únicamente un paño húmedo para limpiarlo. Nunca limpie este producto
con un limpiador líquido o en aerosol, o algún tipo de disolvente orgánico.
producto, utilice exclusivamente accesorios recomendados por Olympus.
fregadero, lavadero, sótano húmedo, piscina o bajo la lluvia).
Colocación
coloque este producto sobre un soporte, trípode, mesa o carro inestables. Móntelo sólo sobre un
trípode o soporte estables. Siga las instrucciones que describen cómo montar con seguridad el
producto y utilice sólo los dispositivos de montaje recomendados por el fabricante.
descrita en la etiqueta del producto. Si no sabe con seguridad cuál es el tipo de
alimentación de su hogar, consulte con la compañía eléctrica.
Si desea más información sobre cómo utilizar el producto con una batería, consulte las
instrucciones de funcionamiento.
PARA REDUCIR EL RIESGO DE SUFRIR UNA DESCARGA ELÉCTRICA, NO RETIRE
El dibujo de un relámpago con la punta en forma de flecha, dentro de
un triángulo, le advierte de la presencia de puntos de voltaje sin aislar
dentro del producto, que podrían causar una grave descarga
eléctrica.
Un signo de exclamación dentro de un triángulo le advierte de
instrucciones importantes de funcionamiento y mantenimiento en
la documentación suministrada con el producto.
— Conserve todas las instrucciones de seguridad y
Lea con atención y respete todas las etiquetas de
Respete todas las instrucciones incluidas en este producto.
— Por su seguridad, y para evitar que se pueda producir un daño en el
— Nunca utilice este producto cerca del agua (en una bañera,
— Para evitar que se dañe este producto y prevenir lesiones personales, nunca
Conecte este producto sólo con la fuente de alimentación
Es
59
Page 60

Precauciones de seguridad
Toma de tierra, polarización — Si este producto se utiliza con un adaptador de CA
especificado, el adaptador debe estar equipado con un enchufe de corriente alterna
polarizado (un enchufe con una paleta más ancha que la otra). Esta característica de
seguridad permite que el enchufe se ajuste a la toma únicamente de una forma. Si no
puede introducir en el enchufe en la toma, sáquelo, dele la vuelta y vuelva a introducirlo.
En caso de que el enchufe siga sin encajar, póngase en contacto con un electricista para
que sustituya la toma de corriente.
Protección del cable de alimentación — El cable de la alimentación debe estar situado
de tal forma que no se pise accidentalmente. Nunca ponga un objeto pesado sobre el
cable y procure que no se enrolle en la pata de una mesa o de una silla. Mantenga el
área próxima a los puntos de conexión del cable, en la toma de corriente y en la conexión
del producto, libre de cualquier adaptador de CA o de cualquier otro cable adicional.
Rayos — Si ocurre una tormenta eléctrica mientras está utilizando un adaptador de CA
especificado, desenchúfelo inmediatamente. Para evitar daños producidos por
sobrecargas eléctricas inesperadas, desenchufe el adaptador de CA de la toma de
corriente y desconéctelo de la cámara mientras no la esté utilizando.
Sobrecarga — Nunca sobrecargue las tomas de corriente, alargadores, regletas o
cualquier otro punto de conexión eléctrica con demasiados enchufes.
Objetos extraños, derramamiento de líquidos — Para evitar lesiones personales
causadas por incendios o descargas eléctricas por el contacto con los puntos internos
de alto voltaje, nunca inserte un objeto de metal en el producto.
Es
Evite utilizar el producto cuando haya peligro de derramamiento.
Calor — No utilice ni guarde este producto cerca de una fuente de calor como un
radiador, resistencias, estufas o de cualquier tipo de equipo o dispositivo que genere
calor, incluyendo los amplificadores estéreos.
Servicio técnico — Consulte cualquier asunto relacionado con el servicio técnico con el
personal cualificado. Si intenta retirar las tapas o desmontar el producto, se puede
exponer a puntos de alto voltaje muy peligrosos.
Daños que requieren asistencia técnica — Si observa cualquiera de las condiciones
descritas a continuación mientras utiliza un adaptador de CA especificado, desenchúfelo
de la toma de corriente y consulte con el personal técnico cualificado:
a) Se ha derramado líquido sobre el producto o cualquier otro objeto se ha introducido
en el producto.
b) El producto se ha expuesto al agua.
c) El producto no funciona normalmente, a pesar de haber seguido las instrucciones de
funcionamiento. Ajuste sólo los controles descritos en las instrucciones de
funcionamiento, ya que el ajuste inadecuado de los otros controles podría dañar el
producto y requerir un trabajo de reparación costoso por parte de un técnico cualificado.
d) El producto se ha caído o se ha dañado de alguna forma.
e) El producto muestra un claro cambio en el rendimiento.
Piezas de repuesto
centro de servicio técnico utiliza únicamente piezas con las mismas características que
las originales, tal como recomienda el fabricante. La sustitución por piezas no autorizadas
podría provocar un incendio, descarga eléctrica o cualquier otro riesgo grave.
Comprobación de seguridad — Una vez finalizada la asistencia técnica o la sustitución
de la pieza, pida al servicio técnico que realice las comprobaciones de seguridad para
determinar que el producto está en perfecto estado de funcionamiento.
—
Cuando se requieren piezas de repuesto, asegúrese de que el
Aviso FCC
Interferencia de radio y televisión
Los cambios y las modificaciones no aprobados expresamente por el fabricante pueden
invalidar la autorización del usuario a manejar este equipo. Este equipo se ha probado y
cumple con las limitaciones impuestas a los dispositivos digitales de Clase B, en conformidad
con el Apartado 15 de las normas FCC. Estas limitaciones están pensadas para proporcionar
una protección razonable contra la interferencia perjudicial en una instalación residencial.
Este equipo genera, utiliza y puede radiar energía de radiofrecuencia y, si no se instala y se
utiliza de acuerdo con las instrucciones, puede causar una interferencia perjudicial a las
radiocomunicaciones.
60
Page 61

Precauciones de seguridad
Sin embargo, no hay garantía de que la interferencia no ocurrirá en una instalación
concreta. Si este equipo causa interferencias con la recepción de la radio y la televisión lo
que puede determinarse apagando y encendiendo el equipo, se recomienda al usuario que
intente corregir la interferencia poniendo en práctica alguna de las siguientes medidas:
• Ajuste o vuelva a colocar la antena receptora.
• Aumente la distancia entre la cámara y el receptor.
• Conecte el equipo a una toma en un circuito diferente al que está conectado el
receptor.
• Consulte al distribuidor o a un técnico especializado en radio/TV en caso de
necesitar ayuda.
Sólo debe utilizarse el cable USB suministrado por OLYMPUS para conectar la
cámara a los ordenadores personales (PC) adaptados a USB.
Cualquier cambio o modificación no autorizada en este equipo puede invalidar la
autorización del usuario a manejar este equipo.
Avisos legales y otros avisos
Olympus no garantiza ni se responsabiliza de ningún daño, ni beneficio supuesto al
utilizar esta unidad legalmente, ni de cualquier petición de una tercera persona, que
estén causados por el uso inapropiado de este producto.
Olympus no garantiza ni se responsabiliza de ningún daño ni beneficio supuesto al
utilizar esta unidad legalmente causados por el borrado de datos de fotografías.
Exención de responsabilidad en la garantía
Olympus no garantiza ni se responsabiliza, expresa o implícitamente, con relación a
cualquier contenido de estos materiales escritos o software, y en ningún caso será
responsable de cualquier garantía implícita, incluida la mercantil y con capacidad para
un propósito particular, de cualquier daño directo, incidental o indirecto (incluyendo, pero
no limitado a daños por la pérdida de ganancias comerciales, interrupción de negocio y
pérdida de información comercial) resultante del uso o de la incapacidad de usar estos
materiales escritos o el software o equipamiento. Algunos estados no permiten la
exclusión o limitación de responsabilidad por daños resultantes o incidentales, en este
caso las limitaciones anteriores no serán de aplicación en su caso concreto.
Olympus se reserva todos los derechos de este manual.
Es
ADVERTENCIA
La toma de fotografías no autorizadas o el uso de material sujeto a derechos de autor
puede infringir las leyes de propiedad intelectual aplicables. Olympus no asume ninguna
responsabilidad por la toma de fotografías no autorizadas, el uso o cualquier otro acto
que infrinja la propiedad intelectual de sus respectivos propietarios.
Aviso de propiedad intelectual
Todos los derechos reservados. Ninguna parte de estos materiales escritos o de este
software pueden ser reproducidos o utilizados en forma alguna o por ningún medio, ya
sea electrónico o mecánico, incluyendo fotocopias y grabación o el uso de cualquier tipo
de sistema de almacenamiento y recuperación, sin el consentimiento escrito previo de
Olympus. No se asume ninguna responsabilidad respecto al uso de la información
contenida en estos materiales escritos o software, ni por daños resultantes del uso de la
información contenida allí. Olympus se reserva el derecho de modificar las
características y el contenido de esta publicación o software sin obligación de dar noticia
de ello por anticipado.
61
Page 62

Fijación de la correa
Es
Haga pasar la correa a través del
enganche para correa como se
Correa
muestra.
Tire de la correa para comprobar que
ha quedado firmemente sujeta, sin
riesgos de que se afloje.
Nota
No balancee la cámara sujetándola por la correa o tire de la correa con una
fuerza excesiva, ya que la correa podría romperse.
Fije la correa correctamente para que no se suelte. Olympus no se hace
responsable de los daños si la cámara llegara a caerse por haber fijado la
correa incorrectamente.
62
Page 63

Carga de la batería
Esta cámara utiliza una batería de iones de litio Olympus (LI-12B).
Cuando usted adquiere la cámara, la batería no está cargada
completamente. Debe cargar completamente la batería antes de usarla
por primera vez.
Tiempo de carga Aprox. 2 horas
Enchufe el cable de
alimentación en el
orden indicado por c y
Cable de
alimentación para el
cargador de batería
d.
Cargador de la
batería de ión litio
(LI-10C)
Toma de corriente CA
Coloque la batería en el
cargador de la batería.
Insértela como indica la flecha.
Batería de iones
de litio (LI-12B)
El indicador del
cargador está
encendido en rojo y
comienza la carga. La
carga finaliza cuando aparece una luz verde en el indicador.
Sugerencias
La batería de ión litio LI-10B Olympus (se vende por separado) también se
puede utilizar.
Nota
Utilice sólo el cargador
especificado.
Le recomendamos que
lleve consigo una batería de
reserva (se vende por
separado) si piensa utilizar
la cámara durante mucho
tiempo o en una región fría.
El cargador se puede utilizar con voltajes entre CA 100 V y CA 240 V (50/
60Hz). No utilice transformadores de tensión de los que se venden en
tiendas si viaja al extranjero, ya que podría dañarse el cargador.
Si utiliza el cargador en el extranjero, puede que necesite un adaptador de
enchufe adecuado a la forma de la toma de corriente eléctrica. Para más
detalles, pregunte en una tienda de material eléctrico o agencia de viajes.
Indicador de carga
Rojo:
Cargando
Verde:
La carga ha finalizado.
Es
63
Page 64
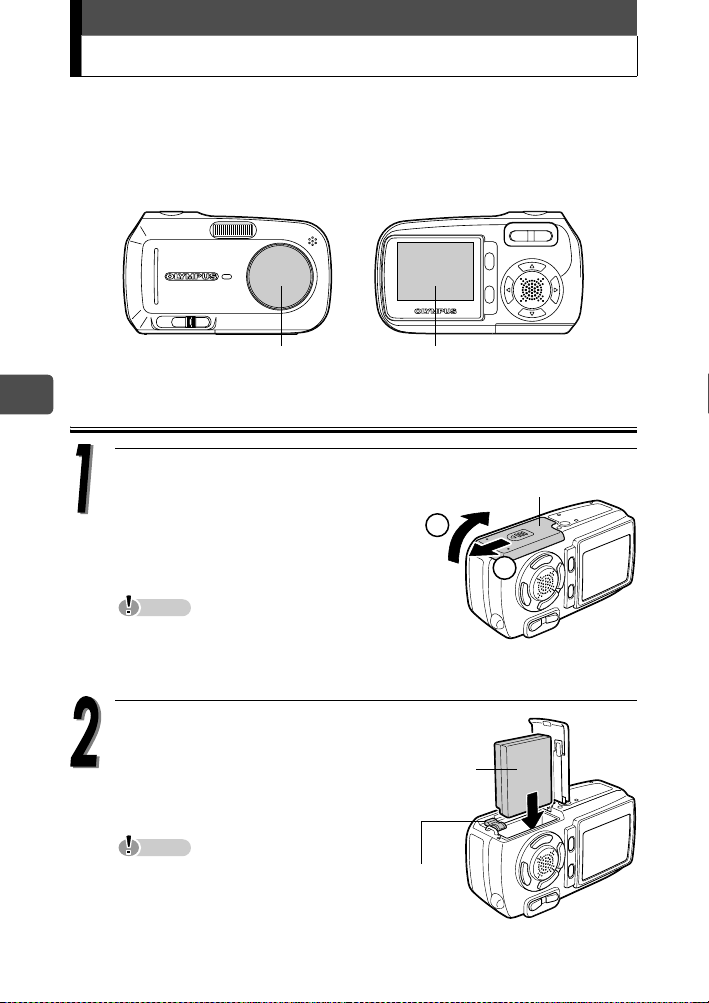
Cómo instalar y retirar la batería
Esta cámara utiliza una batería de iones de litio Olympus.
Compruebe los siguientes elementos antes de instalar o retirar la batería:
cEl cubreobjetivo está cerrado.
dEl monitor está apagado.
cCubreobjetivo dMonitor
Es
Instalación de la batería
64
Deslice la tapa del compartimento
de la batería / tarjeta en la
dirección que indica A.
La tapa se desbloquea y abre en la
dirección que indica B.
Nota
Deslice la tapa con la punta del dedo. No
utilice la uña del dedo ya que puede
hacerse daño.
Oriente la batería tal como se
muestra. Inserte la batería en
la ranura hasta que ésta se
ajuste en su sitio con el
pestillo de bloqueo.
Nota
Si la batería no está correctamente
orientada e insertada, no se podrá
cerrar la tapa del compartimento
de la batería / tarjeta.
Pestillo de
bloqueo de
la batería
Tapa del compartimento
de la batería / tarjeta
B
A
Batería
Page 65
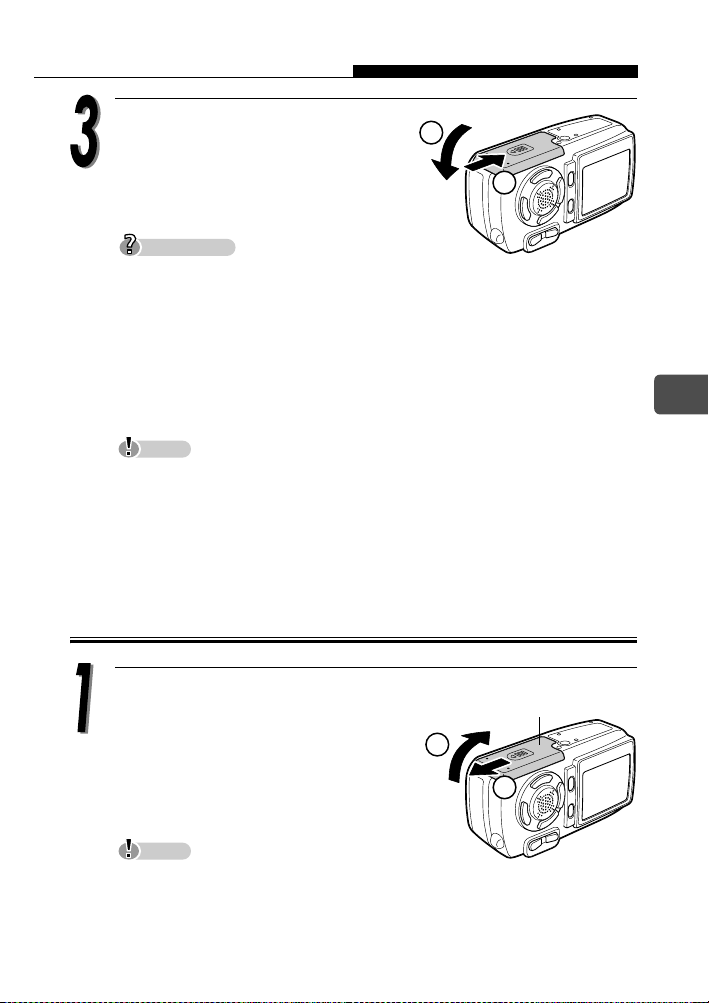
Cómo instalar y retirar la batería
Cierre la tapa del compartimento
de la batería / tarjeta en la
C
dirección que indica
en la dirección que indica
Sugerencias
No fuerce la tapa para cerrarla. La tapa del compartimento debe cerrarse
fácilmente cuando la batería está correctamente orientada e insertada. Si la
tapa no se cierra fácilmente, compruebe la orientación de la batería.
Para obtener información acerca de las fotografías que se pueden
almacenar cuando utilice una batería nueva completamente cargada,
consulte “6. Apéndice, Especificaciones de la cámara” del Manual
avanzado, que se incluye por separado (CD-ROM).
Nota
El consumo de energía es continuo durante las condiciones descritas más
abajo. Esto puede agotar la carga de la batería más rápidamente.
• Ajustes repetidos de zoom.
• Enfoque automático repetido presionando a medias el botón obturador.
• Si la cámara está conectada a un ordenador o impresora.
, y deslícela
D
.
C
D
Extracción de la batería
Deslice la tapa del compartimento
de la batería / tarjeta en la
dirección que indica A.
La tapa se desbloquea y abre en la
dirección que indica B.
Tapa del compartimento
de la batería / tarjeta
B
A
Es
Nota
Deslice la tapa con la punta del dedo. No utilice la uña del dedo ya que
puede hacerse daño.
65
Page 66
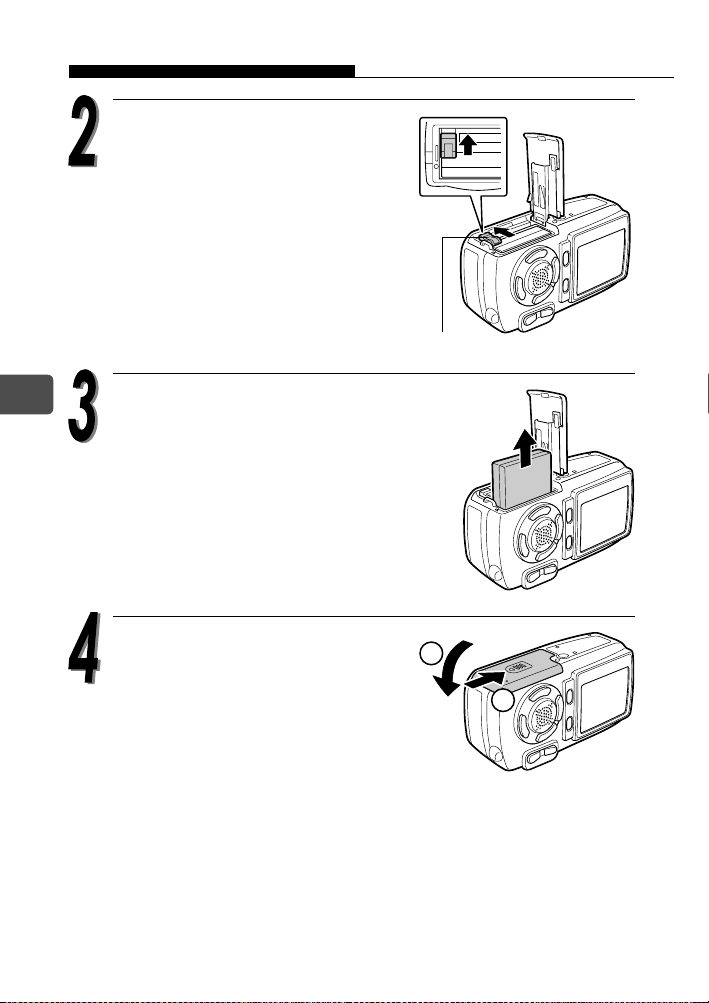
Cómo instalar y retirar la batería
Deslice el pestillo de bloqueo
de la batería en la dirección
de la flecha.
La batería será expulsada.
Pestillo de bloqueo de la batería
Es
66
Extraiga la batería.
Cierre la tapa del compartimento
de la batería / tarjeta en la
dirección que indica C, y
deslícela en la dirección que
indica D.
C
D
Page 67

Cómo insertar y extraer la tarjeta
xD-Picture Card
Esta cámara utiliza una tarjeta fotográfica xD-Picture Card para grabar
fotografías. En este manual se emplea el término “tarjeta” para referirse
a la tarjeta xD-Picture Card. Las fotografías grabadas y almacenadas
en la tarjeta pueden transferirse y editarse en un ordenador.
Puede utilizar este espacio para describir
brevemente los contenidos de la tarjeta.
Estos son los contactos para la lectura de las
señales de la cámara. No toque la área
dorada.
Tarjetas compatibles xD-Picture Card (16MB a 512MB)
Nota
Esta cámara puede no reconocer una tarjeta que no sea de Olympus o que
haya sido formateada en otro dispositivo (por ejemplo un ordenador). Antes
de usar la tarjeta, asegúrese de formatearla en esta cámara. Si desea más
información detallada, consulte el Manual avanzado (CD-ROM) que se
suministra por separado.
Si utiliza una tarjeta que no sea Olympus, no se podrán realizar algunas
funciones de esta cámara. Le recomendamos que utilice tarjetas Olympus
para esta cámara.
Es
67
Page 68
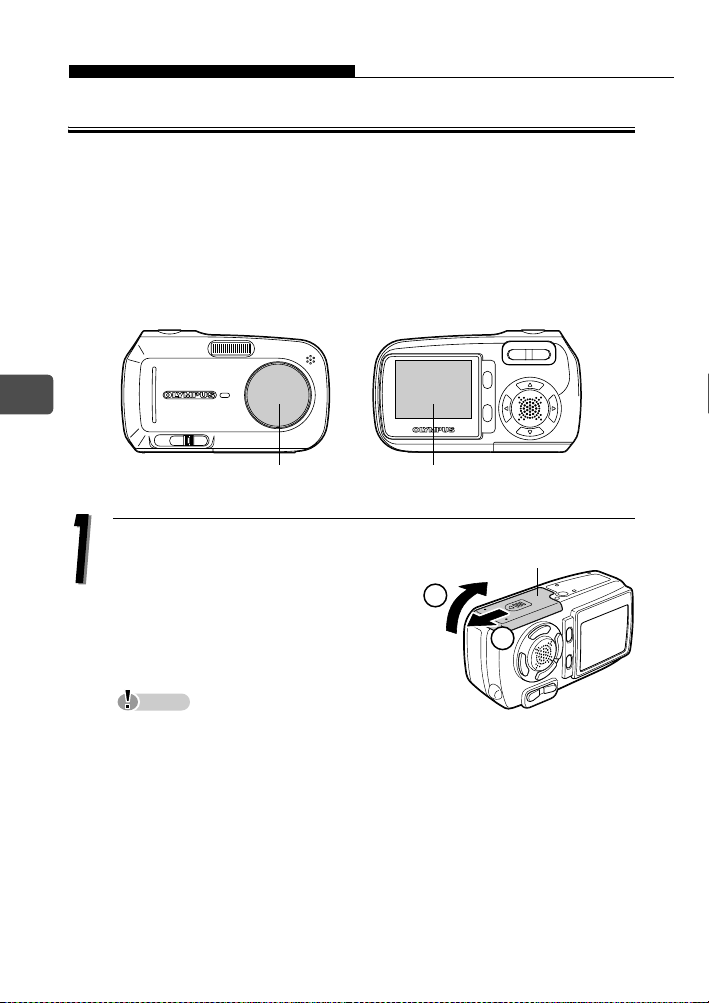
Cómo insertar y extraer la tarjeta
Inserción de la tarjeta
Esta cámara almacena los datos de imágenes en una tarjeta xD-Picture
Card. No se pueden tomar fotografías si no se ha insertado una tarjeta
en la cámara.
Compruebe los siguientes elementos antes de insertar o extraer la
tarjeta:
cEl cubreobjetivo esté cerrado.
dEl monitor esté apagado.
Es
cCubreobjetivo dMonitor
68
Deslice la tapa del compartimento
de la batería / tarjeta en la
dirección que indica A.
La tapa se desbloquea y abre en la
dirección que indica B.
Nota
Deslice la tapa con la punta del dedo. No utilice la uña del dedo ya que
puede hacerse daño.
Tapa del compartimento
de la batería / tarjeta
B
A
Page 69
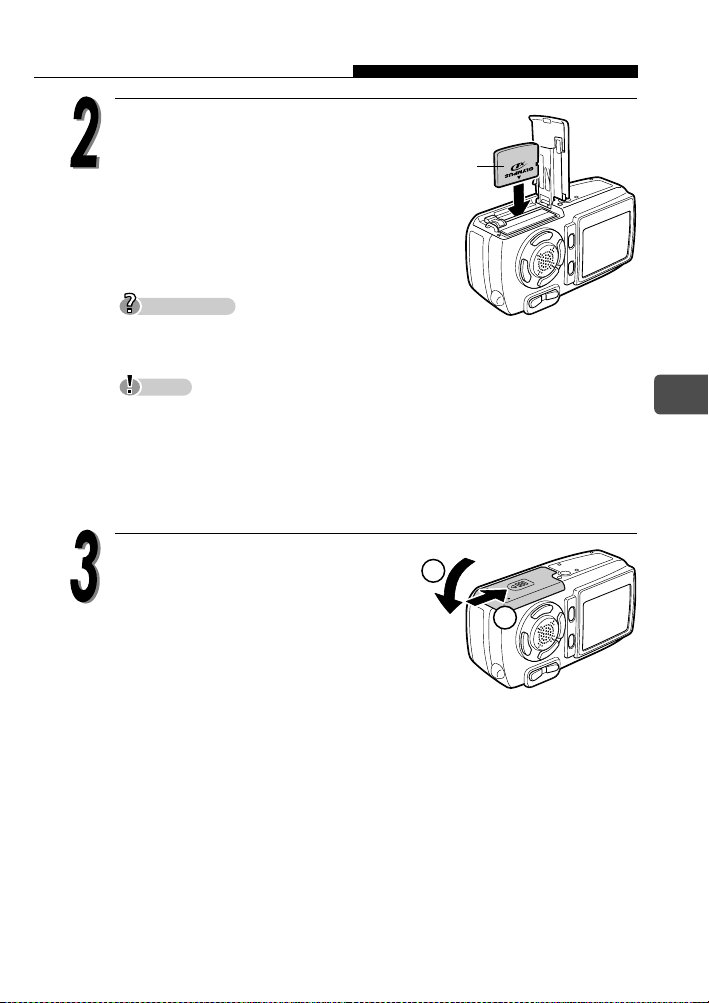
Cómo insertar y extraer la tarjeta
Oriente e inserte la tarjeta en la
ranura con resorte tal como se
muestra.
La tarjeta se bloqueará en su
posición cuando esté completamente
insertada.
Sugerencias
Empuje la tarjeta hasta el fondo.
Ta rj e ta
Nota
La tarjeta sólo puede insertarse en una dirección, insertarla con una
orientación incorrecta u oblicuamente puede dañar los conectores y la
tarjeta podría quedar atascada dentro de la cámara.
Si la tarjeta no se inserta completamente en su posición, puede que las
fotografías no se almacenen en la tarjeta.
Cierre la tapa del compartimento
de la batería / tarjeta en la
C
dirección que indica C, y
deslícela en la dirección que
D
indica D.
Es
69
Page 70

Cómo insertar y extraer la tarjeta
Extracción de la tarjeta
Abra la tapa del compartimento de la batería / tarjeta.
Empuje la tarjeta hasta el fondo para
desengancharla, y luego suelte
lentamente los dedos para dejar que
salga despacio.
Es
La tarjeta será expulsada.
Nota
No empuje la tarjeta con un objeto duro o
punzante, como un bolígrafo.
Si retira el dedo rápidamente después de empujar la tarjeta, ésta podría
salirse con fuerza de la ranura.
Extraiga la tarjeta.
Nota
Nunca abra la tapa del compartimento de la
batería / tarjeta cuando la cámara esté
encendida. Si lo hace, podrían destruirse
todos los datos de la tarjeta. Una vez
destruidos, los datos no se pueden
recuperar.
No pegue nada en las tarjetas. Si lo hace, es posible que la tarjeta se quede
pegada en la cámara y no pueda salir.
70
Page 71
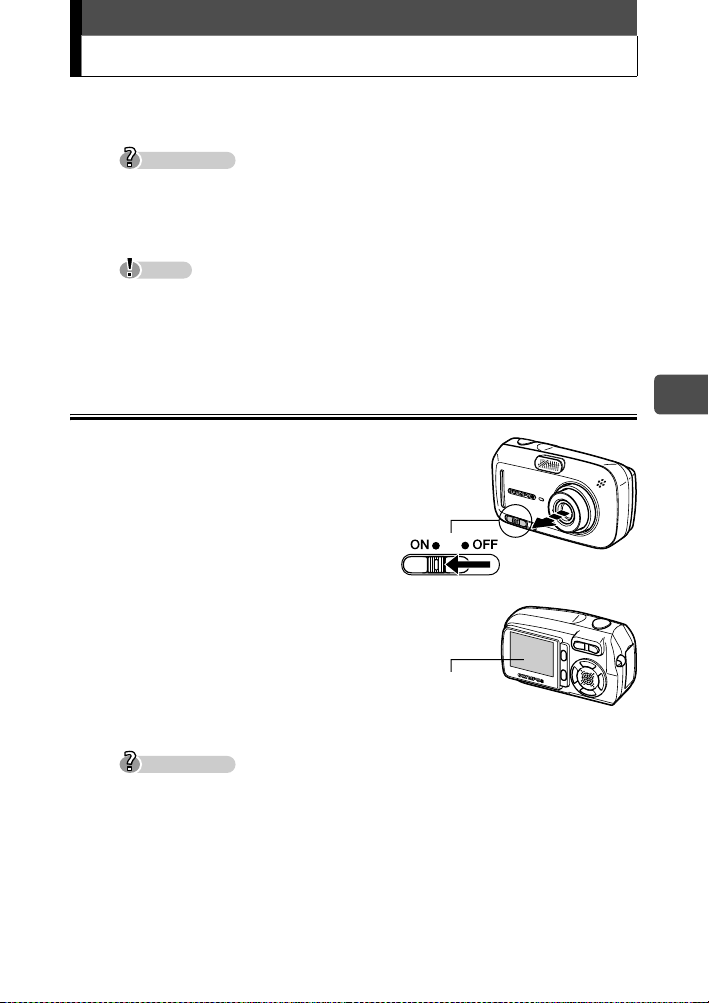
Encender / apagar de la cámara
La cámara puede encenderse en “modo de fotografía” o “modo de
reproducción”.
Sugerencias
La primera vez que utiliza la cámara, aparece el mensaje [A/M/D] en el
monitor. Para obtener información acerca del procedimiento de
configuración, consulte el Manual avanzado, que se incluye por separado
(CD-ROM).
Nota
Nunca abra la tapa del compartimento de la batería / tarjeta, o conecte o
desconecte el adaptador CA mientras la cámara esté encendida. Si lo hace,
podrían destruirse todos los datos de la tarjeta. Una vez destruidos, los
datos no pueden recuperarse.
Para tomar fotografías (Modo de fotografía)
Cómo encender la cámara.
Î Deslice el interruptor de
alimentación a la posición ON
(encendido).
El cubreobjetivo se abre y el sujeto
aparece en el monitor.
Si no se extiende el objetivo cuando
se abre el cubreobjetivo, es posible
que el interruptor de alimentación
no se haya deslizado totalmente a
la posición ON. Deslice el
interruptor de alimentación a la
posición ON correctamente.
Sugerencias
Para ahorrar energía de la batería, la cámara entra automáticamente en
modo de reposo y deja de funcionar después de unos 3 minutos de
inactividad. Pulse cualquier botón, por ejemplo el botón del zoom, para
volver a activar la cámara.
Para ahorrar energía de la batería, la cámara se apaga automáticamente
tras unos 15 minutos de inactividad. Para encenderla, deslice el interruptor
de alimentación a la posición OFF (apagado) siguiendo las instrucciones
que aparecen en “Cómo apagar la cámara”, a continuación vuelva a
encender la cámara.
Interruptor de alimentación
Monitor
Es
71
Page 72
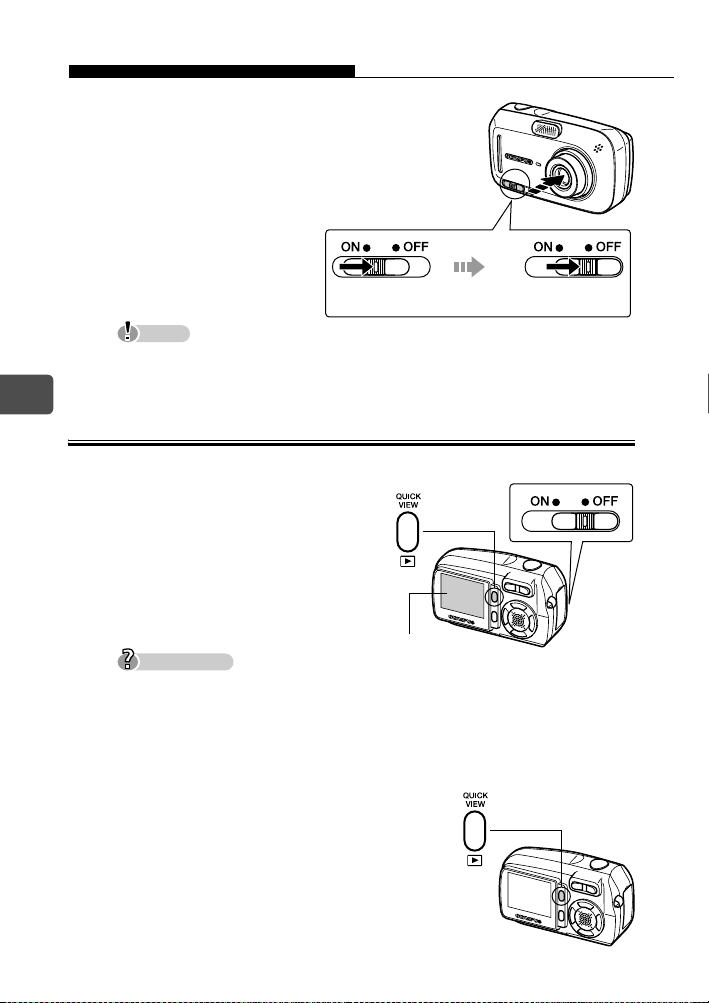
Encender / apagar de la cámara
Cómo apagar la cámara.
Î Deslice el interruptor
de alimentación hasta
que suene un leve clic.
Después de que se
retraiga el objetivo,
deslice el interruptor
de alimentación a la
posición OFF.
El monitor se apaga.
Nota
No deslice directamente el interruptor de alimentación a la posición OFF.
Hacerlo podría provocar daños en la cámara.
Es
Para visualizar fotografías (Modo de reproducción)
Deje de deslizar
el interruptor.
Despúes de que se
retraiga el objetivo
Deslice
a OFF.
Cómo encender la cámara.
Î Cuando el interruptor de
alimentación esté en la
posición OFF, presione el
botón de reproducción (q).
Aparecerá la fotografía que
acaba de tomar.
Sugerencias
Para ahorrar energía de la batería, la cámara se apaga automáticamente
tras unos 3 minutos de inactividad.
Si se presiona el botón de reproducción en modo de fotografía, se podrán
visualizar fotografías en la cámara (QUICK VIEW).
Para volver al modo de fotografía, pulse el botón de reproducción o el botón
obturador hasta la mitad de su recorrido.
Cómo apagar la cámara.
Î Pulse el botón de reproducción
(q) de nuevo.
El monitor se apaga.
72
Botón de reproducción (q)
Monitor
Page 73
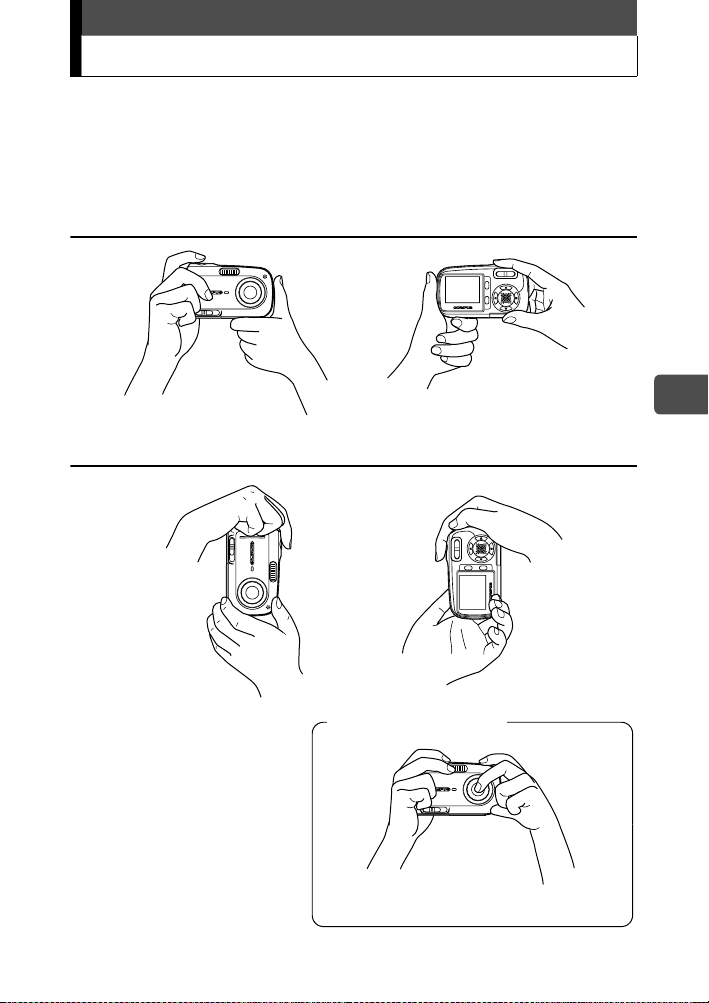
Sujeción correcta de la cámara
Al tomar fotografías, para evitar que se mueva la cámara, sujétela
firmemente con ambas manos, apoyando los codos contra su cuerpo.
Si extiende los brazos o no mantiene los codos pegados a los costados
puede dar lugar a movimiento de la cámara.
Sujeción horizontal
Sujeción vertical
Es
Sujeción incorrecta
Mantenga los dedos y la correa alejados
del objetivo, el flash y el micrófono.
73
Page 74

Toma de fotografías
2272*1704
20
HQ
La siguiente sección describe cómo tomar fotografías usando el monitor.
e
Lámpara verde
Flash en
reposo / flash
cargándose
Marca de objetivo de enfoque automático (AF)
(
o
P
#
HQ
2272*1704
2020
Para más información sobre la visualización en el monitor, consulte el
manual avanzado (CD-ROM).
Marca de acceso a
tarjeta
a
Es
74
Deslice el interruptor de
alimentación a la posición ON.
Cuando se enciende la cámara, se
abre el cubreobjetivo, el objetivo se
extiende y el monitor se enciende
automáticamente.
Si no se extiende el objetivo
cuando se abre el cubreobjetivo, es
posible que el interruptor de
alimentación no se haya deslizado
totalmente a la posición ON.
Deslice el interruptor de
alimentación a la posición ON correctamente.
Interruptor de alimentación
Monitor
Page 75

Toma de fotografías
2272*1704
20
HQ
2272*1704
20
HQ
Compruebe en el monitor que la
indicación de verificación de la
batería es e (verde).
Verificación de la batería
e
P
o
2272*1704
HQ
Verificación de la batería
La indicación de verificación de la batería cambia del siguiente modo.
Se ilumina (verde)
e
f Se ilumina (rojo)
Se muestra el mensaje
[BATER. AGOTADA]
Sitúe la marca de objetivo de enfoque
automático (AF) sobre el sujeto.
El número de fotografías restantes se
Se pueden tomar fotografías.
La carga de la batería es baja. Sustitúyala por
una batería cargada o cargue la batería.
La batería está agotada. Sustitúyala por una
batería cargada o cargue la batería.
Marca de objetivo de
enfoque automático (AF)
e
P
indica en el monitor.
2020
a
Es
Sugerencias
Si resulta difícil ver el monitor:
La luz brillante, como la luz directa del sol,
pueden provocar la aparición de líneas
verticales en la pantalla del monitor.
Si apunta con el objetivo de la cámara hacia
un sujeto brillante, podrían aparecer líneas similares a haces de luz
(manchas) en la imagen del monitor. Esto no afecta a las fotografías
grabadas.
o
2272*1704
HQ
Número de
fotografías que se
pueden tomar
2020
a
75
Page 76

Toma de fotografías
$
P
2272*1704
HQ
11
1111
Presione el botón obturador
hasta la mitad.
El enfoque y la exposición quedan
bloqueados y se ilumina la
lámpara verde permanentemente.
Sugerencias
Cuando el flash va a dispararse, se
enciende la lámpara de flash en
reposo.
Si parpadea la lámpara verde, significa que el enfoque aún no está
bloqueado. Vuelva a presionar el botón obturador hasta la mitad.
Es
76
Presiónelo a fondo
(completamente) para tomar
la fotografía.
La fotografía se almacena en la
tarjeta.
Sugerencias
La marca de acceso a tarjeta (X) en el monitor parpadea en rojo mientras
se almacena la fotografía en la tarjeta.
Nunca abra la tapa del compartimento de la batería / tarjeta, o conecte o
desconecte la batería o el adaptador CA cuando la marcade acceso a
tarjeta (X) en el monitor esté parpadeando. Si lo hace, no se guardará la
fotografía que se acaba de tomar y se pueden perder también los datos de
las fotografías almacenadas en la tarjeta.
Indicador de memoria
El indicador de memoria se
enciende cuando usted toma una
fotografía. El indicador permanece
encendido mientras la cámara
almacena la fotografía en la tarjeta.
Cuando el indicador de memoria
está totalmente iluminado (como se
muestra a la derecha), no se
pueden tomar más fotografías. Espere hasta que el indicador se
apague antes de tomar la siguiente fotografía.
e
P
$
o
2272*1704
HQ
Indicador de memoria
d
11
Page 77

Toma de fotografías
Para apagar la
cámara, deslice el
interruptor de
alimentación hasta que
suene un leve clic.
Después de que se
retraiga el objetivo,
deslice el interruptor
de alimentación a la
posición OFF.
El monitor se apaga.
Nota
No deslice directamente el interruptor de alimentación a la posición OFF.
Hacerlo podría provocar daños en la cámara.
Deje de deslizar
el interruptor.
Despúes de que se
retraiga el objetivo
Deslice
a OFF.
Es
77
Page 78

Reproducción de fotografías
Cuando está activado el modo de reproducción, se muestra en el
monitor la última fotografía tomada.
Es
Cuando el interruptor de
Botón de reproducción (q)
alimentación esté en la
posición OFF, presione el
botón de reproducción (q).
Se activa el modo de
reproducción y se muestra en el
monitor la última fotografía
tomada.
Monitor
Sugerencias
En el modo de fotografía, pulsando el botón de reproducción se muestran
las fotografías. (QUICK VIEW)
La información sobre la fotografía en el monitor desaparece al cabo de 3
segundos.
Pulse a, c, b o d (teclas de
control) para pasar las fotografías.
Se retroceden 10 cuadros.
Muestra la
imagen
anterior.
Se avanzan 10 cuadros.
Muestra la
imagen
siguiente.
78
Pulse el botón de reproducción (q) para apagar la cámara.
Sugerencias
Si la fotografía se muestra presionando el botón de reproducción mientras se
toman fotografías, el modo se puede volver a cambiar a modo de fotografía
con la operación siguiente.
Pulse el botón de reproducción o el botón obturador hasta la mitad de su
recorrido.
Page 79

Información sobre OLYMPUS Master
OLYMPUS Master es un software de aplicación para editar y controlar
en el ordenador las fotografías tomadas con la cámara.
Mediante este software, podrá clasificar y controlar varías fotografías
de la misma forma que lo haría en un álbum de fotos. Además, podrá
transferir fácilmente las fotografías de la cámara y editarlas o
imprimirlas como desee.
En el Manual avanzado, que se incluye por separado, podrá disponer
de la siguiente información detallada.
Nota: El Manual avanzado se encuentra en el CD-ROM.
• Instalación de OLYMPUS Master.
• Conexión de la cámara al ordenador.
• Transferencia de imágenes desde la cámara al ordenador.
• Reproducción de las fotografías o vídeos en el ordenador.
Con OLYMPUS Master, podrá registrar a los usuarios de la cámara y
registrar OLYMPUS Master en línea. Cuando haya registrado a los
usuarios, podrá obtener información del software y firmware.
Para más información sobre las operaciones detalladas de OLYMPUS
Master, consulte la sección “Ayuda” y el manual de funcionamiento de
OLYMPUS Master suministrado.
Es
79
Page 80

De
Inhalt
Inhalt der Verpackung...........................................................................81
Funktionen der Kamera.........................................................................82
Vorsichtsmaßnahmen ...........................................................................85
Allgemeine Vorsichtsmaßnahmen ..............................................85
FCC-Vermerk..............................................................................86
Anbringen des Trageriemens................................................................88
Aufladen des Akkus ..............................................................................89
Einlegen und Herausnehmen des Akkus ..............................................90
Einlegen des Akkus ....................................................................90
Herausnehmen des Akkus..........................................................91
Einlegen und Herausnehmen der Karte................................................93
xD-Picture Card ..........................................................................93
Einlegen der Karte ......................................................................94
Entfernen der Karte.....................................................................96
Ein- und Ausschalten der Kamera ........................................................97
Beim Aufnehmen von Bildern (Aufnahmemodus).......................97
Beim Betrachten von Bildern (Wiedergabemodus).....................98
Richtige Kamerahaltung........................................................................99
Einzelbildaufnahme.............................................................................100
Wiedergabe von Einzelbildern ............................................................104
Informationen zu OLYMPUS Master...................................................105
80
Page 81

Inhalt der Verpackung
Sollte etwas fehlen oder beschädigt sein, wenden Sie sich an den
Händler, bei dem die Kamera erworben wurde.
Digitalkamera Trageriemen xD-Picture Card
De
Lithium-Ionen-Akku
(LI-12B)
AV-Kabel
Garantiekarte Registrierungskarte
Der Lieferumfang kann je nach Region, in der Sie die Kamera erworben haben,
abweichen.
Ladegerät für Lithium-
Ionen-Akku (LI-10C)
CD-ROM mit
OLYMPUS Master
USB-Kabel
Basic Manual
DIGITAL CAMERA
D-590 ZOOM
C-470 ZOOM
X-500
Basis-Anleitung
(Dieses Handbuch)
CD-ROM mit
Erweiterte Anleitung
81
Page 82

Funktionen der Kamera
Die Kamera verfügt über 10 Motiv Programme.
Zum Fotografieren wählen Sie einfach das gewünschte Motivprogramm und
drücken den Auslöser. Die Kamera erledigt den Rest.
NACHTAUFNAHME SELBSTPORTRÄIT SPEISEN
INNENAUFNAHME
De
Der gestochen scharfe 1,8" LCDMonitor erlaubt das Wählen des
Bildausschnitts bei der Aufnahme
sowie die Wiedergabe der
aufgenommenen Bilder.
Sie können eine Reihe von Bildern für eine Panoramamontage aufnehmen.
Sie können Bildserien
aufnehmen.
LAND./PORTRÄIT LANDSCHAFT
Die Bilder werden
auf der xD-Picture
Card gespeichert.
Sie können auch
Filmsequenzen aufnehmen.
82
Page 83
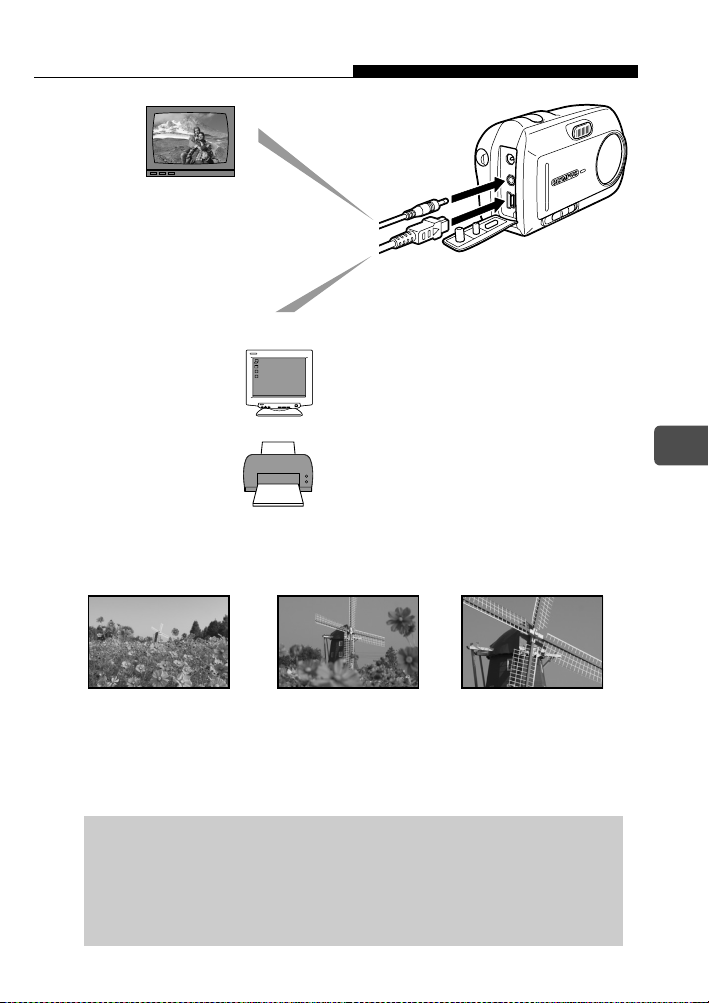
Die Kamera kann die Bilder
auf einem Fernsehgerät
wiedergeben.
Bei Anschluss der Kamera an einen Computer oder Drucker...
Funktionen der Kamera
Sie können auf der Karte gespeicherte
Bilddaten mit der Software auf der
mitgelieferten CD-ROM übertragen oder
wiedergeben.
Wenn Sie die Kamera an einen PictBridgekompatiblen Drucker (Direktdruckfunktion)
anschließen, können Sie Ihre Bilder auch
ohne Computer sofort ausdrucken.
Mit dem 3× optischen Zoom und Digitalzoom (übergangsloser 12×
Gesamtzoom) können Sie sehr nahe an das Motiv heranzoomen.
1× optischer Zoom
3× optischer Zoom 12× (übergangsloser
Gesamtzoom)
Einzelheiten zur Bedienung und zum professionellen Einsatz der
Kamera finden Sie in der Erweiterte Anleitung (im PDF-Format
auf der beigelegten CD-ROM), wo auch die Installation der
mitgelieferten Software, Fehlermeldungen und die Fehlersuche
beschrieben werden.
De
83
Page 84

Für Kunden in Nord- und Südamerika
Für Kunden in den USA
Konformitätserklärung
Modellnummer : D-590 ZOOM, C-470 ZOOM, X-500
Markenname : OLYMPUS
Verantwortlicher Hersteller
:
Anschrift : Two Corporate Center Drive, PO Box 9058,
Melville, NY 11747-9058 U.S.A.
Telefonnummer : 1-631-844-5000
Auf Übereinstimmung mit den FCC-Bestimmungen geprüft.
FÜR DEN HEIM- UND BÜROGEBRAUCH
Dieses Gerät erfüllt die Auflagen unter Abschnitt 15 der FCC-Bestimmungen. Das Betreiben
dieses Geräts ist zulässig, wenn die beiden nachfolgend genannten Auflagen erfüllt werden:
(1) Von diesem Gerät dürfen keine schädlichen Störeinstreuungen ausgehen.
(2) Dieses Gerät muss die Einwirkung von Störeinstreuungen zulassen.
Dies schließt Störeinstreuungen ein, welche Beeinträchtigungen der
De
Funktionsweise oder Betriebsstörungen verursachen können.
Für Kunden in Kanada
Dieses digitale Gerät der Klasse B erfüllt alle Anforderungen der
kanadischen Vorschriften für Geräte, die Störeinstreuungen verursachen.
Für Kunden in Europa
Das „CE“-Zeichen bestätigt, das dieses Produkt mit den europäischen Bestimmungen
für Sicherheit, Gesundheit, Umweltschutz und Personenschutz übereinstimmt. Mit
dem „CE“-Zeichen versehene Kameras sind für den europäischen Markt bestimmt.
Warenzeichen
• IBM ist ein eingetragenes Warenzeichen der International Business Machines Corporation.
• Microsoft und Windows sind eingetragene Warenzeichen der Microsoft Corporation.
• Macintosh ist ein eingetragenes Warenzeichen von Apple Computer Inc.
• Alle weiteren Firmen- und Produkteigennamen sind eingetragene Warenzeichen/
Warenzeichen der jeweiligen Rechteinhaber.
• Die Bilddatenverwaltung dieser Kamera unterstützt die DCF-Norm „Design Rule for Camera
File System“ der JEITA (Japan Electronics and Information Technology Industries Association).
Dieses Handbuch beschreibt die grundlegenden Bedienvorgänge zum Aufnehmen von
Bildern und Wiedergeben der aufgenommenen Bilder. Detaillierte Funktions- und
Vorgangsbeschreibungen finden Sie in der Erweiterte Anleitung (CD-ROM).
Lesen Sie die Handbücher vor Gebrauch der Kamera bitte aufmerksam durch. Wenn
Sie wichtige Aufnahmen machen möchten, beispielsweise auf einer Auslandsreise,
vergewissern Sie sich vorher anhand einiger Probeaufnahmen, dass die Kamera
einwandfrei arbeitet.
Die in diesem Handbuch abgedruckten Abbildungen (LCD-Monitorbild und Kamera)
können vom tatsächlichen Aussehen abweichen.
84
Page 85

Vorsichtsmaßnahmen
Bevor Sie die Kamera in Gebrauch nehmen, lesen Sie bitte die folgenden
Vorsichtsmaßnahmen sowie auch die „Vorsichtsmaßnahmen“ zum
Gebrauch im Erweiterte Anleitung.
VORSICHT
STROMSCHLAGGEFAHR
NICHT ÖFFNEN
VORSICHT:
UM DIE GEFAHR EINES ELEKTRISCHEN SCHLAGES ZU VERRINGERN, DIE ABDECKUNG (ODER
RÜCKWAND) NICHT ENTFERNEN. ES BEFINDEN SICH KEINE VOM BENUTZER ZU WARTENDEN TEILE IM
INNEREN. ÜBERLASSEN SIE WARTUNGSARBEITEN DEM QUALIFIZIERTEN OLYMPUS-WARTUNGSPERSONAL.
Ein Blitzsymbol in einem Dreieck warnt vor dem Vorhandensein
nicht isolierter Spannungspunkte im Produkt, die einen schweren
elektrischen Schlag verursachen können.
Ein Ausrufezeichen in einem Dreieck macht auf wichtige Betriebsund Wartungsanweisungen in der das Produkt begleitenden
Dokumentation aufmerksam.
WARNUNG!
ZUR VERMEIDUNG VON BRAND- ODER STROMSCHLAGGEFAHR DIESES
PRODUKT NIEMALS WASSER AUSSETZEN ODER IN EINER UMGEBUNG
MIT HOHEN FEUCHTIGKEITSWERTEN BETREIBEN.
Allgemeine Vorsichtsmaßnahmen
Lesen Sie alle Anweisungen — Lesen Sie alle Bedienungsanweisungen, bevor Sie das
Produkt in Gebrauch nehmen.
Bewahren Sie diese Anweisungen gut auf — Bewahren Sie alle die Sicherheit und
den Betrieb betreffenden Anweisungen für spätere Bezugnahme gut auf.
Beachten Sie Warnhinweise — Lesen und beachten Sie alle Warnschilder am Produkt
sowie alle Warnhinweise in der Dokumentation.
Den Anweisungen folgen
Reinigung
Sie für Reinigungszwecke ausschließlich ein feuchtes Tuch. Keinesfalls flüssige Reinigungsmittel,
Sprays oder organische Lösungsmittel zum Reinigen dieses Produkts verwenden.
Zubehörteile — Verwenden Sie zu Ihrer Sicherheit und zur Vermeidung von
Geräteschäden ausschließlich von Olympus empfohlene Zubehörteile.
Wasser und Feuchtigkeit
(Badewanne, Waschbecken in der Küche, Wäschetrog, feuchter Keller, Schwimmbecken oder im Regen).
Einsatzort
legen oder montieren Sie dieses Produkt niemals auf eine instabile Unterlage (Ständer, Stativ,
Halterung, Tisch oder Karren). Verwenden Sie ein Stativ, ein Gestell oder eine Halterung, das/die
ausreichend stabil ist. Folgen Sie den Anweisungen, die eine sichere Montage des Produkts
beschreiben, und verwenden Sie ausschließlich Vorrichtungen, die vom Hersteller empfohlen werden.
Stromversorgung
Stromversorgung an. Wenn Sie sich bezüglich der Netzanschlusswerte in Ihrer Wohnung nicht im
Klaren sind, erkundigen Sie sich bitte beim örtlichen Energieversorgungsunternehmen.
Wie Sie das Produkt mit einem Akku betreiben, ist in den Bedienungsanweisungen beschrieben.
— Ziehen Sie vor Reinigungsarbeiten am Produkt stets den Netzstecker. Verwenden
— Zur Vermeidung von Schäden am Produkt und Verhütung von Körperverletzungen
— Folgen Sie allen mit dem Produkt gelieferten Anweisungen.
— Verwenden Sie dieses Produkt niemals in der Nähe von Wasser
— Schließen Sie dieses Produkt nur an die auf dem Produktschild angegebene
De
85
Page 86

Vorsichtsmaßnahmen
Erdung, Polung
einem gepolten Netzstecker vorgeschrieben (ein Stecker, bei dem eine Kontaktklinge breiter
ist als die andere). Dieses Sicherheitsmerkmal sorgt dafür, dass der Stecker nur in einer
Ausrichtung in die Steckdose passt. Sollte sich der Stecker nicht einstecken lassen, drehen
Sie ihn um und stecken ihn dann erneut ein. Sollte der Stecker noch immer nicht passen,
lassen Sie die Steckdose von einem Elektrofachmann durch eine geeignete ersetzen.
Schutz des Netzkabels
Stellen Sie niemals einen schweren Gegenstand auf das Netzkabel und achten Sie darauf, dass
es nicht um ein Tisch- oder Stuhlbein gewickelt wird. Halten Sie die Netzkabelanschlüsse
(Steckdose und Anschluss am Produkt) frei von anderen Netzteilen und Netzkabeln.
Blitzschlag
aufziehen, ziehen Sie sofort den Netzstecker. Um Schäden durch Stromstöße zu vermeiden,
ziehen Sie bei Nichtgebrauch den Netzstecker und trennen das Netzteil von der Kamera ab.
Überlastung — Vermeiden Sie unbedingt eine Überlastung von Steckdosen,
Verlängerungskabeln, Mehrfachsteckdosen und anderen Netzanschlusspunkten durch
Anschließen zu vieler Netzstecker.
Fremdkörper, Flüssigkeiten — Zur Vermeidung von Verletzungen durch einen Brand
oder elektrischen Schlag bei Berührung eines internen Hochspannungspunkts dürfen
keine Gegenstände aus Metall in das Gerät eingeführt werden.
Wenn die Gefahr besteht, dass Flüssigkeit verschüttet wird, sehen Sie von einer
Verwendung des Produkts ab.
Wärme
Heizkörpern, Öfen oder anderen Wärme entwickelnden Geräten (Stereoverstärker u. dgl.) auf.
Wartung — Überlassen Sie alle Wartungsarbeiten qualifiziertem Fachpersonal. Beim
De
Versuch, die Abdeckungen zu entfernen oder das Produkt zu zerlegen, können Sie sich
gefährlichen Hochspannungspunkten aussetzen.
Schäden, die eine Wartung erfordern
Netzteils einer der folgenden Umstände auftreten, ziehen Sie den Netzstecker und lassen das
Produkt von qualifiziertem Kundendienstpersonal überprüfen:
a)
Flüssigkeit wurde auf dem Produkt verschüttet oder ein Fremdkörper ist in das Gerät gefallen.
b) Das Produkt wurde Wasser ausgesetzt.
c) Das Produkt arbeitet nicht einwandfrei, obwohl alle Bedienungsanweisungen befolgt
wurden. Nehmen Sie Einstellungen nur mit den in den Anweisungen erwähnten
Reglern vor, da ein Verstellen anderer Teile einen Schaden mit aufwendiger
Instandsetzung durch einen Fachmann zur Folge haben kann.
d) Das Produkt wurde fallen gelassen oder anderweitig beschädigt.
e) Das Produkt legt eine merkliche Leistungsänderung an den Tag.
Ersatzteile — Wenn Ersatzteile erforderlich sind, achten Sie darauf, dass der
Kundendienst ausschließlich Teile verwendet, die den Originalteilen entsprechen, wie
vom Hersteller empfohlen. Unzulässige Ersatzteile können einen Brand, elektrischen
Schlag und andere Gefahren zur Folge haben.
Sicherheitsprüfung — Bitten Sie den Kundendienst nach Instandsetzungsarbeiten,
eine Sicherheitsprüfung auf einwandfreie Funktion des Produkts durchzuführen.
— In gewissen Ländern ist für den Netzbetrieb des Produkts ein Netzteil mit
— Das Netzkabel sollte so verlegt werden, dass niemand darauf tritt.
— Sollte beim Gebrauch eines vorgeschriebenen Netzteils ein Gewitter
— Bewahren Sie dieses Produkt niemals in der Nähe von Wärmequellen wie
— Sollte beim Gebrauch eines vorgeschriebenen
FCC-Vermerk
Funkstörungen
Änderungen und Modifikationen, die vom Hersteller nicht ausdrücklich genehmigt sind, haben ein
Erlöschen der Betriebsbefugnis dieses Geräts zur Folge. Dieses Gerät wurde geprüft und als
übereinstimmend mit den Einschränkungen für ein Digitalgerät der Klasse B gemäß Abschnitt 15
der FCC-Richtlinien befunden. Diese Einschränkungen sind vorgesehen, einen ausreichenden
Schutz gegen schädliche Störungen in Wohnanlagen zu gewährleisten.
Dieses Gerät generiert und nutzt Hochfrequenzenergie und kann solche Energie abstrahlen.
Wenn es nicht in Übereinstimmung mit den Anweisungen eingerichtet und betrieben wird,
kann es die Funkkommunikation störende Interferenzen erzeugen.
Es wird jedoch nicht dafür garantiert, dass Störungen in bestimmten Einrichtungen nicht
auftreten. Sollte das Gerät den Rundfunkempfang (Radio oder Fernsehen) stören, was durch
Aus- und Wiedereinschalten des Geräts ermittelt werden kann, wird dem Benutzer empfohlen,
durch eine der folgenden Maßnahmen Abhilfe zu schaffen:
86
Page 87

Vorsichtsmaßnahmen
• Ausrichten oder Umstellen der Antenne.
• Vergrößern des Abstands zwischen Kamera und Empfänger.
• Anschluss des Geräts an eine Steckdose in einem Versorgungskreis, der von dem
des Empfängers getrennt ist.
• Wenn Sie diesbezüglich Hilfe benötigen, wenden Sie sich an Ihren
Rundfunkfachmann.
Die Kamera darf nur über von OLYMPUS gelieferte USB-Kabel mit einem USBkompatiblen Computer verbunden werden.
Unbefugte Änderungen oder Modifikationen an diesem Gerät haben einen Verfall der
Betriebsbefugnis zur Folge.
Rechtliche und andere Vermerke
Olympus übernimmt keinerlei Haftung für Schäden, durch rechtmäßige Nutzung dieses
Geräts erwartete, aber entgangene Gewinne oder jegliche Forderungen einer dritten
Person als Folge einer unvorschriftsmäßigen Nutzung dieses Produkts.
Olympus übernimmt keinerlei Haftung für Schäden oder durch rechtmäßige Nutzung
dieses Geräts erwartete, aber entgangene Gewinne als Folge einer Löschung von
Bilddaten.
Haftungsausschluss
Olympus gibt keinerlei Gewährleistungen, ob vertraglich oder gesetzlich, bezüglich
jeglichen Inhalts dieser Dokumentation oder Software und haftet unter keinen
Umständen für jegliche gesetzliche Gewährleistungen für Durchschnittsqualität oder
Tauglichkeit für einen bestimmten Zweck oder für jegliche Folge-, Neben- und
unmittelbare Schäden (einschließlich, aber nicht beschränkt auf, Schäden durch
entgangene Gewinne, Unterbrechung des Geschäftsbetriebs und Verlust von
Geschäftinformationen), die aus der Nutzung oder der Unfähigkeit zur Nutzung der
Dokumentation, der Software oder des Geräts entstehen. In gewissen Ländern ist der
Ausschluss oder die Einschränkung der Haftung für Folge- oder Nebenschäden nicht
zulässig, in welchem Fall die obigen Einschränkungen nicht auf Sie zutreffen.
Olympus behält sich alle Rechte für dieses Handbuch vor.
WARNUNG
Unbefugtes Fotografieren oder Verwenden von urheberrechtlich geschütztem Material
kann gegen bestehende Urheberrechtsgesetze verstoßen. Olympus haftet nicht für
unbefugtes Fotografieren oder andere Handlungen, die gegen die Rechte von Urhebern
verstoßen.
De
Copyright-Vermerk
Alle Rechte vorbehalten. Diese Dokumentation darf ohne die vorherige schriftliche
Genehmigung von Olympus weder als Ganzes noch auszugsweise in jeglicher Form
oder auf jegliche Weise, ob elektronisch oder mechanisch, einschließlich durch
Fotokopieren und Aufzeichnen in beliebigen Datenspeicherungs- und wiedergewinnungssystemen, vervielfältigt oder verwendet werden. Bezüglich der
Nutzung der in dieser Dokumentation enthaltenen Informationen und der Software wird
keinerlei Haftung für Schäden gewährleistet, die aus der Nutzung derselben entstehen.
Olympus behält sich das Recht vor, die Funktionen und den Inhalt dieser
Veröffentlichung oder der Software unverbindlich und ohne Vorankündigung zu ändern.
87
Page 88

Anbringen des Trageriemens
De
Führen Sie den Trageriemen durch
die Trageriemenöse (siehe
Trageriemen
Abbildung).
Ziehen Sie den Trageriemen straff
und achten Sie darauf, dass er
sicher befestigt ist und sich nicht
lösen kann.
Hinweis
Schwenken Sie die Kamera nicht am Trageriemen hin und her, und ziehen
Sie auch nicht übermäßig stark daran, da er dadurch reißen kann.
Bringen Sie den Trageriemen ordnungsgemäß an, damit er sich nicht lösen
kann. Wenn der Trageriemen nicht ordnungsgemäß angebracht wurde und
die Kamera herunterfällt, haftet Olympus nicht für die daraus resultierenden
Schäden.
88
Page 89
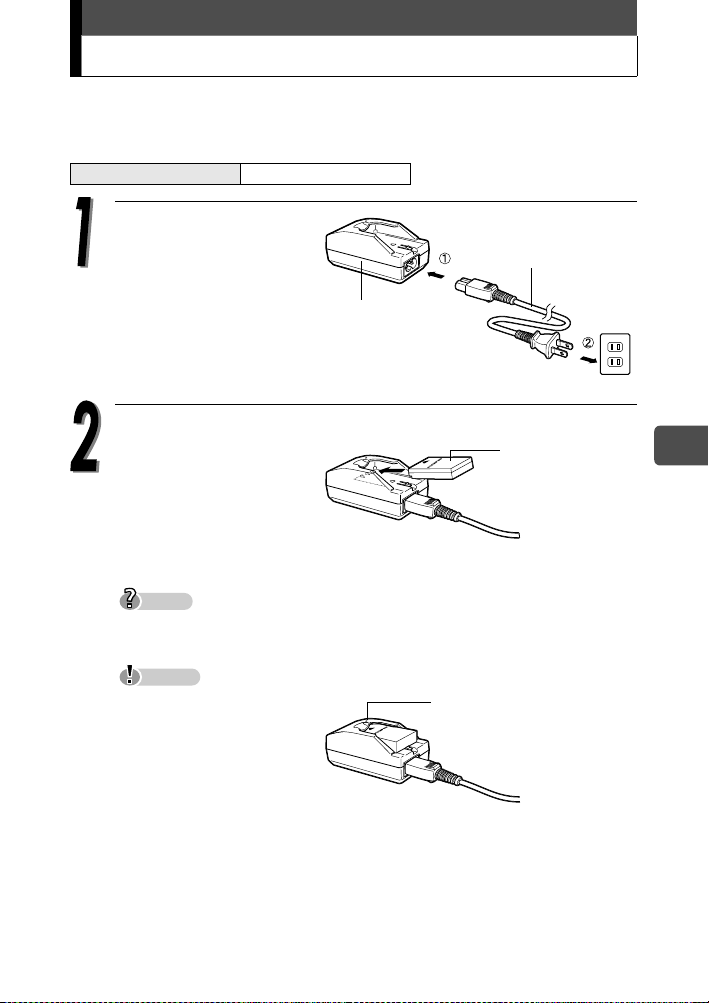
Aufladen des Akkus
A
Diese Kamera arbeitet mit einem Olympus Lithium-Ionen-Akku (LI-12B).
Wenn Sie die Kamera kaufen, ist der Akku noch nicht vollständig geladen.
Laden Sie den Akku daher erst vollständig auf.
Ladezeit ca. 2 Stunden
Stecken Sie das
Netzkabel in der durch
c und d angegebenen
Reihenfolge ein.
Legen Sie den Akku in
das Ladegerät ein.
Ladegerät für
Lithium-Ionen-
kku (LI-10C)
Führen Sie den Akku in Pfeilrichtung ein.
Netzkabel für das
Akku-Ladegerät.
Netzsteckdose
Lithium-IonenAkku (LI-12B)
De
Die Anzeige am
Ladegerät leuchtet rot und
der Ladevorgang beginnt.
Der Akku ist aufgeladen,
sobald die Ladeanzeige grün leuchtet.
Tipps
Der Olympus Lithium-Ionen-Akku LI-10B (als separates Sonderzubehör
erhältlich) kann ebenfalls verwendet werden.
Hinweis
Verwenden Sie
ausschließlich das für den
Akku bestimmte Ladegerät.
Wir empfehlen Ihnen das
Mitführen eines Ersatzakkus
(als separates
Sonderzubehör erhältlich),
falls Sie vorhaben, die
Kamera über einen längeren Zeitraum oder in kalten Gebieten zu benutzen.
Das Ladegerät kann im Bereich von 100 V bis 240 V Wechselstrom (50/60 Hz) verwendet
werden. Verwenden Sie keine im Handel für Auslandsreisen angebotenen
Spannungswandler, da das Ladegerät durch diese Geräte beschädigt werden könnte.
Wenn Sie das Ladegerät im Ausland benutzen, benötigen Sie eventuell einen Adapterstecker,
um den Stecker an die Form der dortigen Steckdosen anzupassen. Einzelheiten dazu erfahren
Sie bei Ihrem Elektrogeschäft oder Reisebüro.
Ladeanzeige
Rot:
Ladevorgang
Grün:
Ladevorgang ist beendet.
89
Page 90

Einlegen und Herausnehmen des Akkus
Diese Kamera arbeitet mit einem Olympus Lithium-Ionen-Akku.
Überprüfen Sie folgende Punkte, bevor Sie die Kamera einschalten:
cDer Objektivschutzschieber ist geschlossen.
dDer LCD-Monitor ist abgeschaltet.
cObjektivschutzschieber dLCD-Monitor
Einlegen des Akkus
De
Schieben Sie den Akku-/
Kartenfachdeckel in Richtung A
Der Deckel wird dadurch entriegelt und
B
kann in Richtung
Hinweis
Schieben Sie den Deckel mit der
Fingerkuppe. Verwenden Sie nicht die
Fingernägel. Sie könnten sich sonst
verletzen.
aufgeklappt werden.
.
Akku-/
Kartenfachdeckel
B
A
90
Richten Sie den Akku wie
dargestellt aus. Schieben Sie den
Akku in das Fach, bis er am AkkuEntriegelungsknopf einrastet.
Hinweis
Wenn der Akku nicht mit korrekter
Ausrichtung eingesetzt wurde,
kann der Akku-/Kartenfachdeckel
nicht geschlossen werden.
Akku
Akkuverriegelung
Page 91
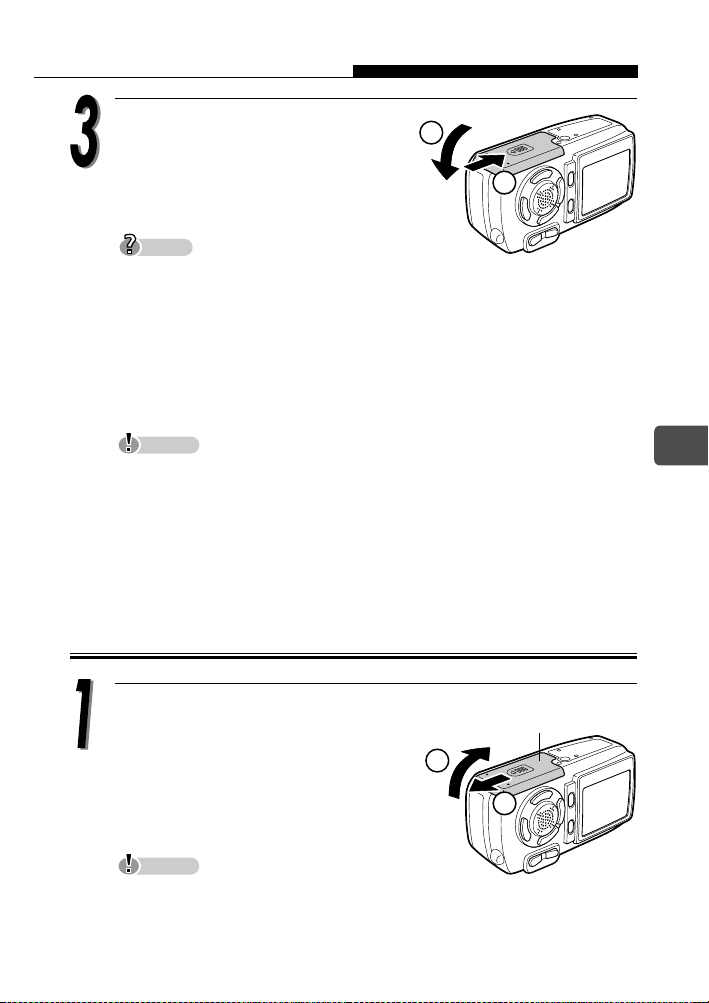
Einlegen und Herausnehmen des Akkus
Klappen Sie den Akku-/
Kartenfachdeckel in Richtung C
C
zu und schieben Sie ihn dann in
Richtung D.
Tipps
Versuchen Sie nicht, den Deckel mit Gewalt zu schließen. Der Deckel lässt
sich problemlos schließen, wenn der Akku in korrekter Ausrichtung
eingelegt wurde. Wenn sich der Deckel nicht problemlos schließen lässt,
prüfen Sie, ob der Akku falsch herum eingesteckt wurde.
Angaben zur Anzahl der speicherbaren Bilder bei Verwendung eines neuen
Akkus finden Sie im separaten Erweiterte Anleitung (CD-ROM) unter „6.
Anhang, Technische Daten der Kamera“.
Hinweis
In den unten genannten Fällen wird durchgehend Strom verbraucht.
Dadurch wird der Akku schneller entladen.
• Bei wiederholten Zoomeinstellungen.
• Wenn wiederholt der Autofokus aktiviert wird, indem der Auslöser halb
heruntergedrückt wird.
• Wenn die Kamera an einem Computer oder Drucker angeschlossen ist.
D
Herausnehmen des Akkus
De
Schieben Sie den Akku-/
Kartenfachdeckel in Richtung A.
Der Deckel wird dadurch entriegelt und
kann in Richtung B aufgeklappt
werden.
Hinweis
Schieben Sie den Deckel mit der Fingerkuppe. Verwenden Sie nicht die
Fingernägel. Sie könnten sich sonst verletzen.
Akku-/
Kartenfachdeckel
B
A
91
Page 92
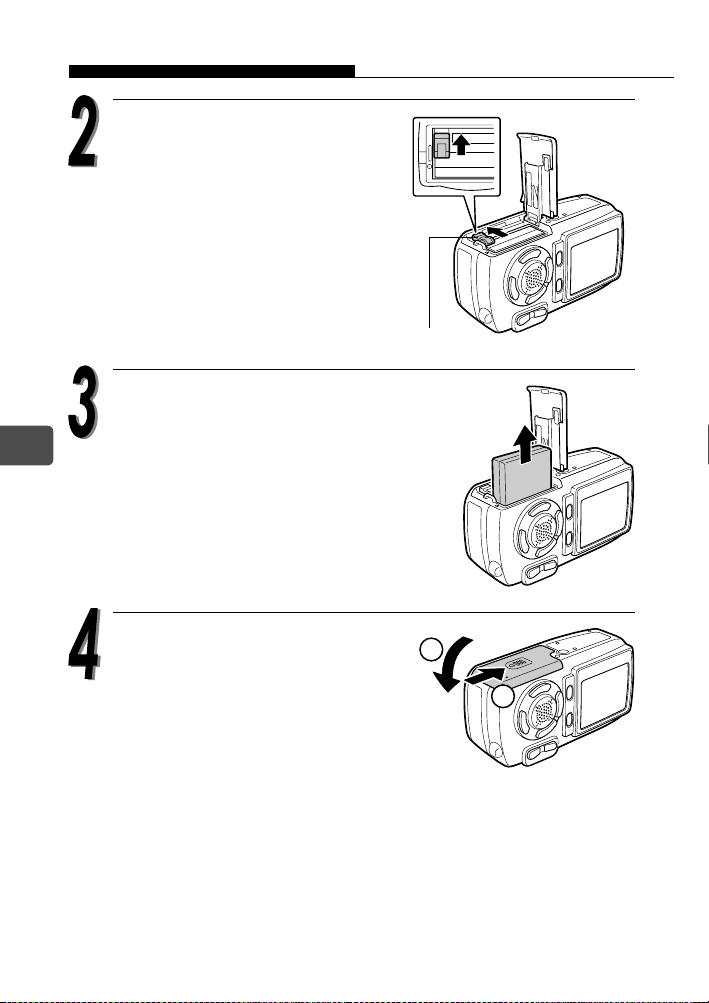
Einlegen und Herausnehmen des Akkus
A
Schieben Sie den AkkuEntriegelungsknopf in
Pfeilrichtung.
Der Akku springt ein wenig
heraus.
Ziehen Sie den Akku heraus.
De
kku-Entriegelungsknopf
Klappen Sie den Akku-/
Kartenfachdeckel in Richtung C
zu und schieben Sie ihn dann in
Richtung D.
C
D
92
Page 93

Einlegen und Herausnehmen der Karte
xD-Picture Card
Diese Kamera speichert die Bilder auf einer xD-Picture Card. Die
Bezeichnung „Karte“ oder „Speicherkarte“ bezieht sich in diesem
Handbuch auf das Fabrikat xD-Picture Card.
In diesem Bereich können Sie den Inhalt der
Speicherkarte kurz beschreiben.
Dies sind die Kontakte zum Lesen der
Kamerasignale. Berühren Sie keinesfalls den
goldenen Bereich.
Kompatible Karten xD-Picture Card (16 MB bis 512 MB)
Hinweis
Diese Kamera kann ggf. eine Karte eines Fremdherstellers oder eine Karte,
die mittels eines anderen Geräts (z. B. auf einem Computer) formatiert
wurde, nicht identifizieren. Eine Karte muss vor dem Gebrauch zunächst in
dieser Kamera formatiert werden. Einzelheiten finden Sie in der Erweiterte
Anleitung auf lhrer CD-ROM.
Wenn die Karte eines Fremdherstellers verwendet wird, können einige
Kamerafunktionen nicht ausgeführt werden. Wir empfehlen den Einsatz von
Olympus-Karten für diese Kamera.
De
93
Page 94

Einlegen und Herausnehmen der Karte
Einlegen der Karte
Diese Kamera speichert Bilddaten auf einer xD-Picture Card. Bilder können
nur gespeichert werden, wenn eine Karte in der Kamera eingelegt ist.
Überprüfen Sie folgende Punkte, bevor Sie die Karte einlegen oder
herausnehmen:
cDer Objektivschutzschieber ist geschlossen.
dDer LCD-Monitor ist abgeschaltet.
De
94
cObjektivschutzschieber dLCD-Monitor
Schieben Sie den Akku-/
Kartenfachdeckel in Richtung A.
Der Deckel wird dadurch entriegelt und
kann in Richtung B aufgeklappt
werden.
Hinweis
Schieben Sie den Deckel mit der Fingerkuppe. Verwenden Sie nicht die
Fingernägel. Sie könnten sich sonst verletzen.
Akku-/
Kartenfachdeckel
B
A
Page 95

Einlegen und Herausnehmen der Karte
Richten Sie die Karte wie in der
Abbildung aus und schieben Sie
sie in das unter Federdruck
Karte
stehende Kartenfach.
Sie wird von selbst verriegelt, wenn
Sie sie vollständig hineinschieben.
Tipps
Schieben Sie die Karte so weit wie
möglich ein.
Hinweis
Beachten Sie die Einsteckrichtung der Karte. Wenn Sie die Karte falsch
herum oder schräg einführen, kann der Kontaktbereich der Karte
beschädigt werden oder die Karte verklemmt sich.
Wenn die Karte nicht vollständig eingeschoben wird, können u. U.
keine Daten auf die Karte gespeichert werden.
De
Klappen Sie den Akku-/
Kartenfachdeckel in Richtung C
zu und schieben Sie ihn dann in
Richtung D.
C
D
95
Page 96

Einlegen und Herausnehmen der Karte
Entfernen der Karte
Öffnen Sie den Akku-/Kartenfachdeckel.
Drücken Sie die Karte zum
Entriegeln vorsichtig hinein und
nehmen Sie den Finger dann
langsam von der Karte, um sie
langsam herausgleiten zu lassen.
Die Karte springt ein wenig heraus.
De
96
Hinweis
Drücken Sie nicht mit harten oder spitzen
Gegenständen (Kugelschreiber u. dgl.) auf die Karte.
Wenn Sie Ihren Finger zu schnell von der Karte nehmen, nachdem Sie
diese hineingedrückt haben, kann es passieren, dass die Karte unvermittelt
herausspringt.
Entnehmen Sie die Karte.
Hinweis
Öffnen Sie niemals den Akku-/
Kartenfachdeckel, solange die Kamera
eingeschaltet ist. Dadurch können alle auf
der Karte gespeicherten Daten verloren
gehen. Diese Daten können nicht mehr
wiederhergestellt werden.
Bringen Sie keine Aufkleber an den Speicherkarten an. Dies kann ein
Verklemmen der Karte in der Kamera verursachen, so dass die Karte nicht
ausgeworfen wird.
Page 97

Ein- und Ausschalten der Kamera
Die Kamera wird im „Aufnahmemodus“ und „Wiedergabemodus“ auf
unterschiedliche Weise eingeschaltet.
Tipps
Wenn Sie die Kamera zum ersten Mal verwenden, erscheint die Meldung
[T/M/J] auf dem Monitor. Eine detaillierte Beschreibung des
Einstellvorgangs finden Sie im separaten Erweiterte Anleitung (CD-ROM).
Hinweis
Bei eingeschalteter Kamera dürfen Sie niemals den Akku-/Kartenfachdeckel
öffnen, die Batterie einlegen bzw. herausnehmen oder das Netzteil
anschließen bzw. trennen. Dadurch können die auf der Karte gespeicherten
Daten verloren gehen. Diese Daten können nicht mehr wiederhergestellt
werden.
Beim Aufnehmen von Bildern (Aufnahmemodus)
So wird die Kamera eingeschaltet
Î Schieben Sie den Ein/Aus-
Schalter bis zur Position ON.
Der Objektivschutzschieber öffnet
sich, das Objektiv wird
ausgefahren, und das Motiv
erscheint auf dem LCD-Monitor.
Falls das Objektiv auch bei
geöffnetem Objektivschutzschieber
nicht ausgefahren wird, steht der
Ein/Aus-Schalter vielleicht nicht
richtig auf Position ON. Schieben
Sie den Ein-/Aus-Schalter korrekt
auf Position ON.
Tipps
Um Akkukapazität zu sparen, wechselt die Kamera automatisch in den
Ruhemodus und stellt ihren Betrieb ein, wenn innerhalb von 3 Minuten kein
Bedienungsschritt erfolgt. Drücken Sie eine beliebige Taste oder den
Zoomregler, um die Kamera wieder zu aktivieren.
Um Akkukapazität zu sparen, schaltet sich die Kamera automatisch nach
etwa 15 Minuten aus, wenn kein Bedienungsschritt erfolgt. Zum
Wiedereinschalten der Kamera schieben Sie den Ein/Aus-Schalter einmal
bis zur Position OFF, wie unter „So wird die Kamera ausgeschaltet“
beschrieben, und schalten die Kamera dann wieder ein.
Ein/Aus-Schalter
LCD-Monitor
De
97
Page 98

Ein- und Ausschalten der Kamera
So wird die Kamera
ausgeschaltet
Î
Schieben Sie den Ein/AusSchalter, bis ein leises
Klickgeräusch zu hören ist.
Nachdem das Objektiv
eingefahren wurde, schieben
Sie den Ein/Aus-Schalter bis
zur Position OFF.
Der LCD-Monitor schaltet ab.
Hinweis
Schieben Sie den Ein/Aus-Schalter nicht sofort bis zur Position OFF. Die
Kamera kann dadurch beschädigt werden.
Schalter nicht
weiter schieben.
Nach Einfahren
des Objektivs
Beim Betrachten von Bildern (Wiedergabemodus)
De
So wird die Kamera eingeschaltet
Î
Wenn sich der Ein/Aus-Schalter
auf der Position OFF befindet,
die Taste Wiedergabe (q)
drücken.
Das zuletzt von Ihnen
aufgenommene Bild wird
angezeigt.
Tipps
Um Akkukapazität zu sparen, schaltet sich die Kamera automatisch nach
etwa 3 Minuten aus, wenn kein Bedienungsschritt erfolgt.
Wenn die Wiedergabetaste im Aufnahmemodus gedrückt wird, kann die
Kamera die Bilder anzeigen (QUICK VIEW).
Zum erneuten Aktivieren des Aufnahmemodus drücken Sie die
Wiedergabetaste oder drücken den Auslöser halb nach unten.
So wird die Kamera ausgeschaltet
Wiedergabetaste (q)
LCD-Monitor
Auf OFF
schieben.
Î Drücken Sie die Wiedergabetaste
(q) ein weiteres Mal.
Der LCD-Monitor schaltet ab.
98
Page 99
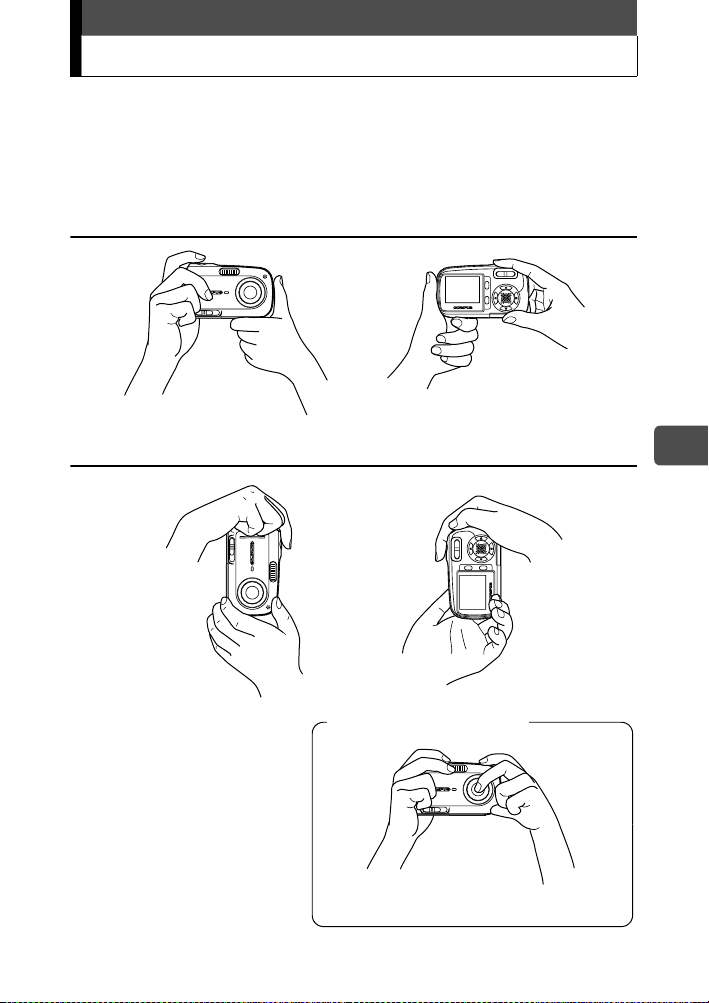
Richtige Kamerahaltung
Halten Sie die Kamera mit beiden Händen und legen Sie die Ellbogen
am Körper an, um eine möglichst stabile Kamerahaltung zu
gewährleisten. Es kann zu Kameraverwacklung kommen, wenn Sie
Ihre Arme ausstrecken oder die Ellbogen nicht am Körper halten.
Querformat
Hochformat
Falsche Kamerahaltung
Achten Sie darauf, dass Finger, Trageriemen usw. den
Blitz, das Objektiv und das Mikrofon nicht verdecken.
De
99
Page 100
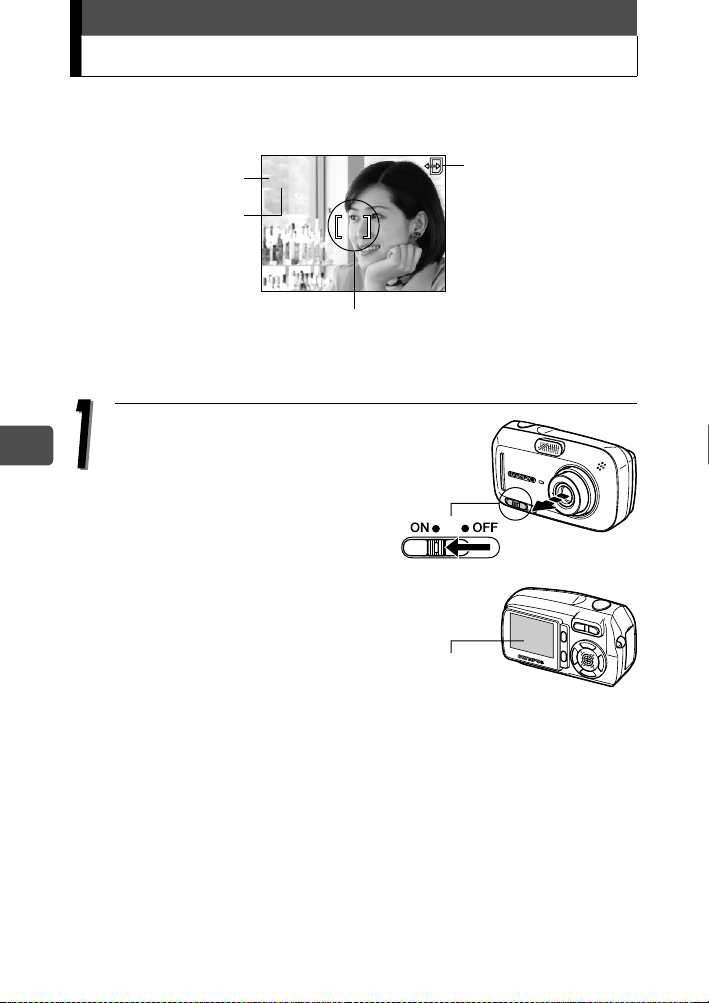
Einzelbildaufnahme
2272*1704
20
HQ
Im folgenden Abschnitt wird beschrieben, wie Sie Bilder mithilfe des
LCD-Monitors aufnehmen.
e
Grüne LED
Blitzbereitschaft/
BlitzLadevorgang
P
#
(
o
HQ
AF-Markierung
2272*1704
2020
Weitere Einzelheiten zu den Anzeigen auf dem LCD-Monitor finden Sie
in der Erweiterte Anleitung auf Ihrer CD-ROM.
Schieben Sie den Ein/Aus-
De
Schalter bis zur Position ON.
Wenn Sie die Kamera einschalten,
öffnet sich der
Objektivschutzschieber, das
Objektiv fährt aus und der LCDMonitor schaltet sich automatisch
ein.
Ein/Aus-Schalter
KartenZugriffsymbol
a
100
Falls das Objektiv auch bei
geöffnetem Objektivschutzschieber
nicht ausgefahren wird, steht der
Ein/Aus-Schalter vielleicht nicht
richtig auf Position ON. Schieben Sie den Ein-/Aus-Schalter korrekt
auf Position ON.
LCD-Monitor
 Loading...