

Olympus C-2040 User Manual [en, de, es, fr]

DIGITAL CAMERA/APPAREIL PHOTO NUMÉRIQUE
DIGITAL-KAMERA/CAMERA DIGITAL
C-2040ZOOM
BASIC MANUAL/MANUEL DE BASE
KURZANLEITUNG/MANUAL BÁSICO
ENGLISH
FRANÇAIS
DEUTSCH
ESPAÑOL
■ Before using your camera, read this manual carefully to ensure correct use.
■ We recommend that you take test shots to get accustomed to your camera before taking
important photographs.
■ These instructions are only a basic manual. For more details on the functions described here,
refer to the software CD’s reference manual on CD-ROM.
■ Avant d’utiliser votre appareil photo, veuillez lire attentivement ce mode d’emploi, de
manière à obtenir les meilleurs résultats possibles.
■ Avant d’effectuer des prises de vues importantes, nous vous conseillons par ailleurs de
faire quelques essais afin de vous familiariser avec le maniement de l’appareil photo.
■ Ces instructions ne sont qu'un manuel de base. Pour plus de détails sur les fonctions décrites
ici, se référer aux manuel de référence du CD logiciel sur le CD-ROM.
■ Bitte lesen Sie vor Gebrauch dieser Kamera sorgfältig diese Bedienungsanleitung, um
optimale Ergebnisse beim Fotografieren zu erzielen.
■ Wir empfehlen, vor wichtigen Aufnahmen Probeaufnahmen durchzuführen, um sich mit
der Bedienung und den Funktionen der Kamera vertraut zu machen.
■ Die vorliegende Broschüre stellt nur eine einfache Anleitung dar. Falls Sie ausführlichere
Angaben zu den hier beschriebenen Funktionen benötigen, steht Ihnen die Kurzanleitung auf
der CD-ROM zur Verfügung.
■ Antes de usar su cámara lea este manual detalladamente para asegurar el uso correcto.
■ Nosotros le recomendamos que tome fotografías de prueba para familiarizarse con su
cámara antes de tomar fotografías importantes.
■ Estas instrucciones constituyen sólo un manual básico. Para más detalles de las funciones
descritas aquí, refiérase a las manual de consultas del software CD en el CD-ROM.

2
Thank you for purchasing an Olympus digital camera. Before you start to use your new
camera, please read these instructions carefully to enjoy optimum performance and a
longer service life. Keep this manual in a safe place for future reference.
•IBM is a registered trademark of International Business Machines Corporation.
•Microsoft and Windows are registered trademarks of Microsoft Corporation.
•Macintosh is a trademark of Apple Computer Inc.
•All other company and product names are registered trademarks and/or trademarks of their
respective owners.
•The standards for camera file systems referred to in this manual are the “Design Rule for
Camera File System/DCF” standards stipulated by the Japan Electronics Industry
Development Association (JEIDA).
IMPORTANT NOTICES
Disclaimer of Warranty
Olympus makes no representations or warranties, either expressed or implied,
by or concerning any content of these written materials or software, and in no
event shall be liable for any implied warranty of merchantability or fitness for any particular purpose or for any consequential, incidental or indirect damages
(including but not limited to damages for loss of business profits, business interruption and loss
of business information) arising from the use or inability to use these written materials or software. Some countries do not allow the exclusion or limitation of liability for consequential or
incidental damages, so the above limitations may not apply to you.
Copyright Notice
All rights reserved. No part of these written materials or software may be reproduced or used
in any form or by any means, electronic or mechanical, including photocopying and recording
and the use of any kind of information storage and retrieval system, without prior permission
in writing from Olympus. No liability is assumed with respect to the use of the information contained in these written materials or software, or for damages resulting from the use of the information contained in these written materials or of the software. Olympus reserves the right to
alter the features and contents of this publication or software without obligation or advance
notice.
WARNING
Unauthorised photographing or use of copyrighted material may violate applicable copyright
laws. Olympus assumes no responsibility for unauthorised photographing, use or other acts
that infringe upon the rights of copyright owners.
CONTENTS/TABLE DES MATIÉ/INHALT/CONTENIDO
PRECAUTIONS (in English only)...........................................3
ENGLISH ......................................................................5
FRANÇAIS ...................................................................41
DEUTSCH ....................................................................77
ESPAÑOL...................................................................113

3
PRECAUTIONS
CAUTION
Caution concerning the flash
● Be careful when taking pictures at close range.
● Do not take pictures of people’s faces (babies in particular) at close range. If the flash goes off too close to
someone’s eyes it may cause a loss of vision. In particular, when taking pictures of babies, be sure that the
distance is at least 1 m.
Be careful when handling the unit
● Do not use in an unstable position. If you lose your balance, you might get hurt.
● Be careful that no foreign substance (dirt, rain, sand) can enter the unit, particularly when the battery cover
or lens barrier is open, as it may cause damage.
● To prevent damage, do not drop the camera or subject it to severe shock or vibration.
● This camera is not water-resistant. Do not put it in water, and be careful to protect it from rain, sea water,
etc.
● Do not use the camera outside during a storm or when there is lightning.
●
When replacing the batteries, make sure the power is OFF. If it is left ON, it may damage the internal circuits.
Storage environment
● To avoid damage or mis-operation of the camera, only store it where the temperature is –20 ~ 60°C and
the humidity 10 ~ 90%.
● Do not store in humid places, as condensation may form and cause damage.
● To prevent injuries or accidents, keep the camera out of the reach of children.
Usage environment
● Do not use where there may be a large concentration of flammable or explosive gases, as it may cause a
fire or explosion.
● To avoid damage or mis-operation of the camera, use it only if the temperature is 0 ~ 40°C and the humid-
ity 30 ~ 90%.
● Do not move the camera suddenly from a hot to cold place, or vice versa. It may cause the formation of
condensation inside the unit that may damage it. To prevent the formation of condensation, put the camera in a plastic bag, etc. to protect it and wait until the camera has reached the ambient temperature before
taking it out.
● If used in low temperatures, the batteries will have a shorter life span than normal.
Precautions when handling the batteries
To prevent leakage, fire, or damage, please read the instructions carefully and observe the following points:
● Do not heat or throw the batteries into a fire.
● Do not disassemble, modify or solder.
● Do not install with inverted polarity (+, –).
● Do not let metal objects touch the contacts. Do not store or carry loosely with necklaces or hairpins.
●
Do not use old batteries together with new ones, and do not use different types of batteries at the same time.
● Do not store them in humid places as they may corrode.
● Do not use if something seems to be wrong.
● Do not use if there is leaking, swelling, a rise in temperature, or any other abnormal condition.
● When using them for the first time, if there are signs of corrosion or if they are warm, please take them
back to where they were bought.
● Never use any battery whose body is not fully covered by the insulating sheet or the sheet is torn as it may
cause leak, fire or injury. Some commercially available batteries are also partially covered, or not covered
at all by the insulating sheet. Never use these batteries.

4
CAUTION
If there is a leak
● If the liquid gets into your eyes, do not rub them. Rinse with clean water, then seek medical attention imme-
diately.
● If the liquid gets in contact with your skin or clothing, rinse with clean water.
● If the liquid has leaked inside the battery compartment, clean it carefully with a wet rag before inserting
new batteries.
When the batteries are dead, take them out of the camera
● If old batteries are left inside the camera, they may leak. If the camera is going into storage or if you intend
not to use the camera for a long period of time, remove the batteries.
Do not use in an airtight device
● It may cause the batteries to leak and/or the camera to be damaged.
Do not recharge alkaline or lithium batteries
● Do not attempt to recharge Lithium batteries as this could result in serious injury.
Keep out of the reach of children
● Make sure children do not take the batteries out when using the camera. If a child is going to use the cam-
era, be sure to teach the child proper usage according to this manual.
● When disposing of old batteries, be sure to do so in accordance with all applicable regulations in your area.
Precautions on using accessories
● Be sure to use only the supplied accessories, or accessories recommended by the manufacturer, otherwise
fire, electric shock or damage may result. For more information, please consult the dealer where the unit
was purchased.
● Do not keep the AC adaptor connected when not using the camera, otherwise fire, electric shock or dam-
age may result.
● To prevent electric shock and damage, do not plug, connect or handle the AC adaptor with wet hands.
● Do not modify, bend forcibly, pull strongly, scratch, etc., or otherwise alter the AC adaptor power cord. Also,
do not put heavy objects on the power cord, or place it close to a heat source as it may result in a fire or
electric shock.
Points to verify before using the camera
● If taking particularly important pictures or if you have not used the camera for a long period, first confirm
that it functions properly, or consult an Authorized Service Centre.
● We decline all responsibility concerning the loss of data, down time, loss of revenue or any other direct or
indirect damage or claims caused by this camera.
Do not use or store in a hot place (e.g. inside a closed car on a hot and sunny day)
● It may shorten their service life. Store in a dry cool place protected from direct sunlight.
Notes on display and backlight
● The Control panel and the fluorescent lamps used in the LCD monitor have a limited service life. If they
begin to darken or flicker, contact your nearest service center.
● In cold conditions, the display backlight may be slow to come on or may change color suddenly. To avoid
this, keep the camera warm when using in cold temperatures. Backlight performance will return to normal
under normal temperature conditions.
● When the color LCD monitor shows different pictures, some pixels may not change color and remain on
or off. This phenomenon may be due to a lag in some circuits, but is considered to be within the normal
operating tolerances of the LCD monitor. In addition, the brightness of the color LCD monitor may vary
between pictures.
PRECAUTIONS (Cont.)

5
CONTENTS
GETTING STARTED 6
BASIC FUNCTIONS 16
RECORDING FUNCTIONS 22
PLAYBACK FUNCTIONS 24
PRINTING PICTURES 32
DOWNLOADING IMAGES TO YOUR COMPUTER 33
ERROR CODES 35
SPECIFICATIONS 37
6
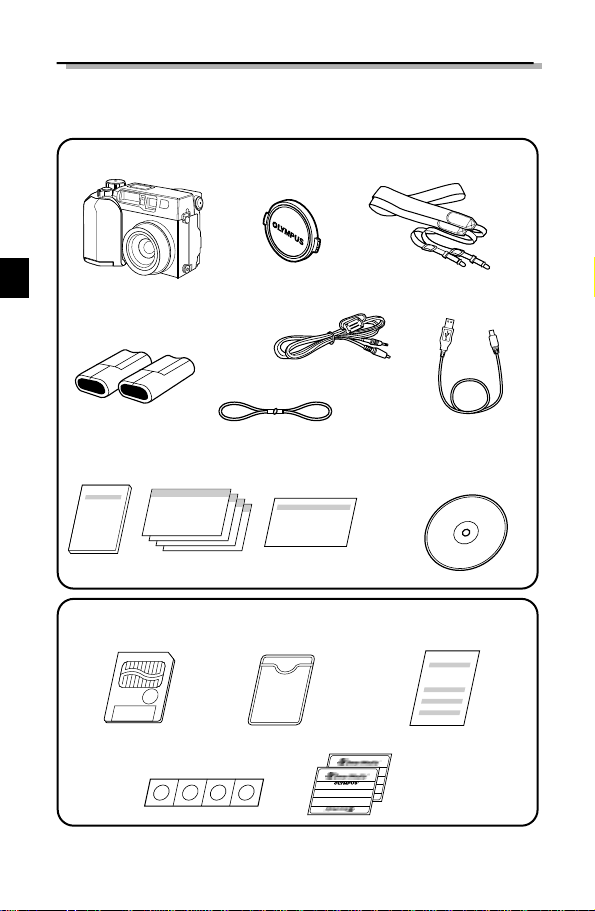
Camera
Strap
Video cable
USB cable
Warranty
Lens cap
Lens cap cord
CR-V3 Lithium
Battery Pack (2)
Software CDs (including
Windows 98 USB driver
Installer Software/Reference
Manual)
GETTING STARTED
PACKAGE CONTENTS
SmartMedia
card (1)
Static-free
SmartMedia case
SmartMedia
labels (2)
SmartMedia writeprotect stickers (4)
SmartMedia
Instruction
Instructions
(Basic Manual/Quick start
Guide)
7
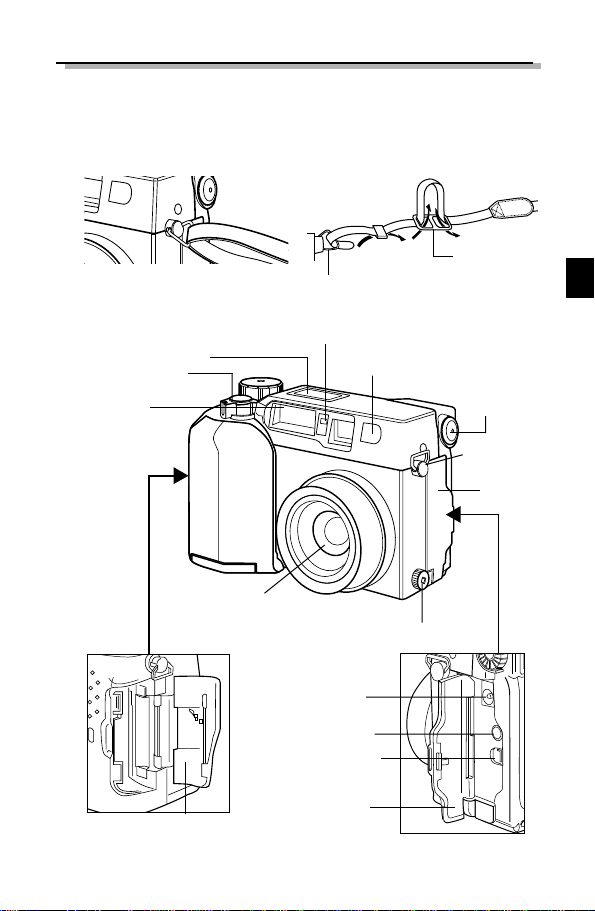
Zoom lever
Control panel
Flash (built-in)
Lens
Card cover
Video output jack
Connector
cover
DC IN jack
Diopter adjustment dial
Self-timer/Remote control lamp
Remote control receiver
5-pin external flash socket
USB connector
Connector cover
Strap eyelet
Thread the strap through loop and fastener as indicated by the arrows in the figure. Then check that the strap does not loosen or come undone when pulled.
ATTACHING THE STRAP
Strap eyelet
Fastener
NAME OF PARTS
■ Camera
8
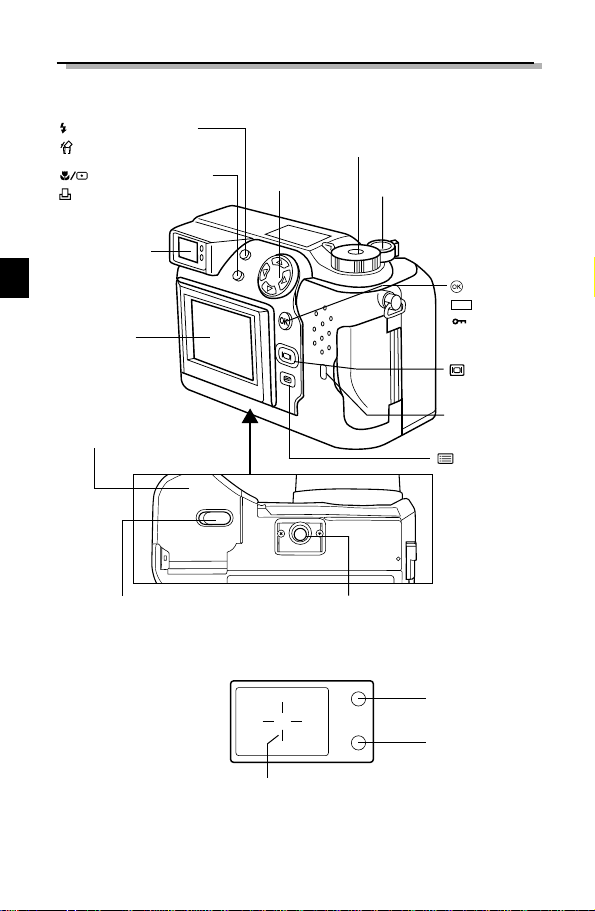
Monitor
Viewfinder
(Flash mode button)
(Erase button)
(Spot/Macro button)
(Print button)
(OK button)
(AE lock button)
(Protect button)
AEL
Tripod socketBattery compartment lock
Arrow pad
■ Viewfinder
Orange lamp
Green lamp
AF target mark
Mode dial
Shutter button
(Monitor button)
(Menu button)
Card access lamp
Battery compartment cover
Bottom view
■ Camera

9
■ Control panel display
Spot Metering
mode
Flash intensity control
Sequence
mode
Flash mode
Exposure
compensation
Card error
Recording mode
Number of storable pictures
ISO indicator
Self-timer/
Remote control
Macro mode
Slow synchro
Card writing
Battery check
Auto bracket
Manual focus
White balance
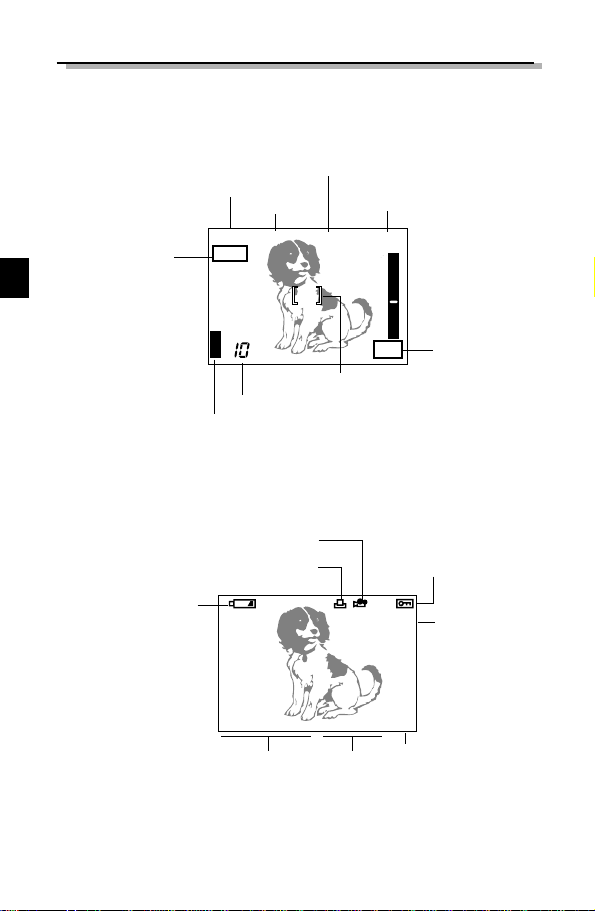
10
1023.12.,00 21:56
HQ
Frame number
Date
Protect
Battery check
Movie picture
Time
Print reserve
Record mode
(During Playback)
Number of storable pictures
Memory gauge
Aperture
Shutter speed
Exposure compensation/Exposure differential
(During Shooting)
P F2.8 1/800 +2.0
AEL
AF MF
5m
3m
2m
0.8m
Shooting mode
AF target mark
■ Monitor display
Manual focus
AE lock
11
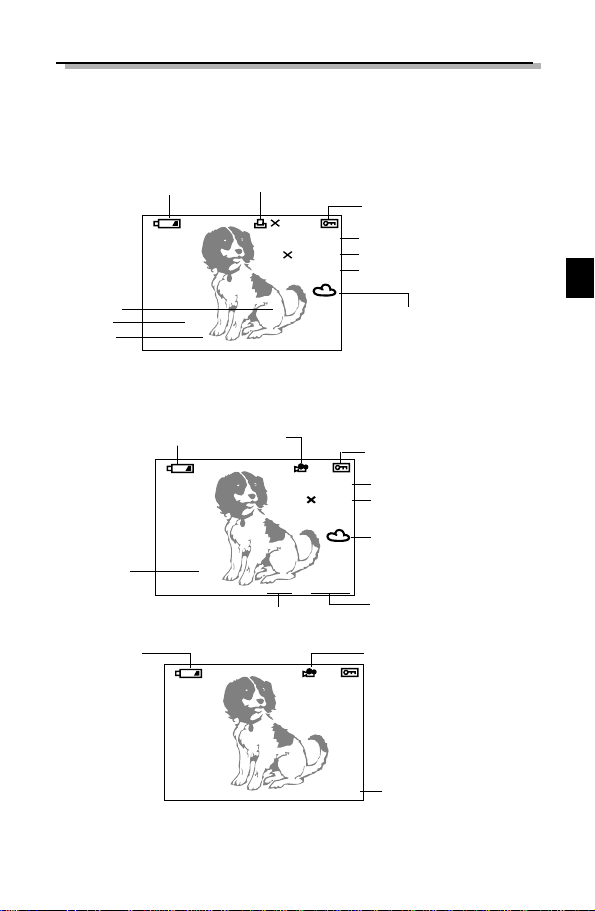
DISPLAYING IMAGE INFORMATION
■ Displaying image information for pictures
HQ
SIZE:1600 1200
F2.0 1/800 +2.0
ISO400
23.12.,00 21:56
FILE:123-3456
10
Battery check
Print reserve
Protect
Record mode
Resolution
Aperture/Shutter speed/
Exposure compensation
White balance
File name
Date/time
ISO setting
■ Displaying image information for movies
HQ
SIZE: 320 240
0" / 18"
23 .12.,00 21:56
Battery check
Movie picture
Protect
Record mode
Resolution
White balance
During movie playback
Date/time
Total recording time (sec.)
Number of seconds played back
FILE: 123-3456
Battery check
Movie picture
When a picture is selected
File name
When you set image information display to "ON", the following information
appears on the LCD monitor.
12
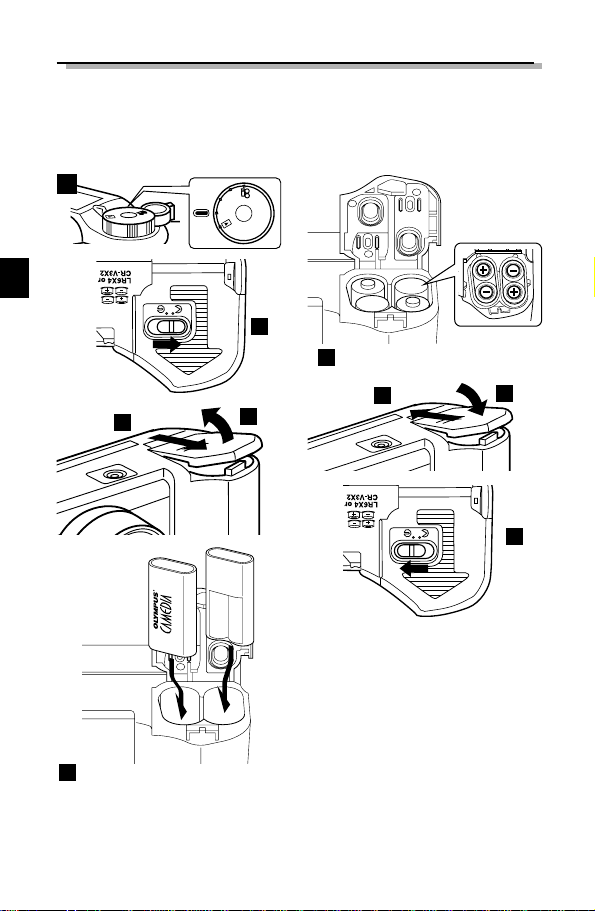
LOADING THE BATTERIES
Check that the camera is off and load the batteries as shown in the illustrations
below. Note that CR-V3 lithium battery packs cannot be charged.
8
7
When using AA-size batteries
5
2
4
3
If you are using lithium battery packs
5
O
FF
P
A
/S
/
M
P
A
/S/M
OFF
P
O
W
E
R
/
M
O
D
E
D
I
A
L
1
6
13
Photography/Display
Number of shots
Playback time
Conditions
1
2
Battery Life
Approx. 400
Approx. 360 minutes
* The figures in the table are for reference purposes only. Actual results may differ.
1 Two continuous shots repeated at 10-minute intervals at normal temperature (25˚C). Flash
used for 50% of the shots, the lens zoomed in and out once for each shot, and full-time AF
and digital zoom both switched off. (No images displayed and no communication with a PC.)
2 Continuous display in Automatic Playback mode, repeatedly switching the camera back on
immediately after it automatically powers off and then restarting automatic playback.
■ Life of the lithium battery pack
■ Using a domestic AC wall outlet
To connect your camera to an ordinary domestic AC wall outlet, you need the
optional AC adapter.
Consult your nearest Olympus dealer or Service center for details.
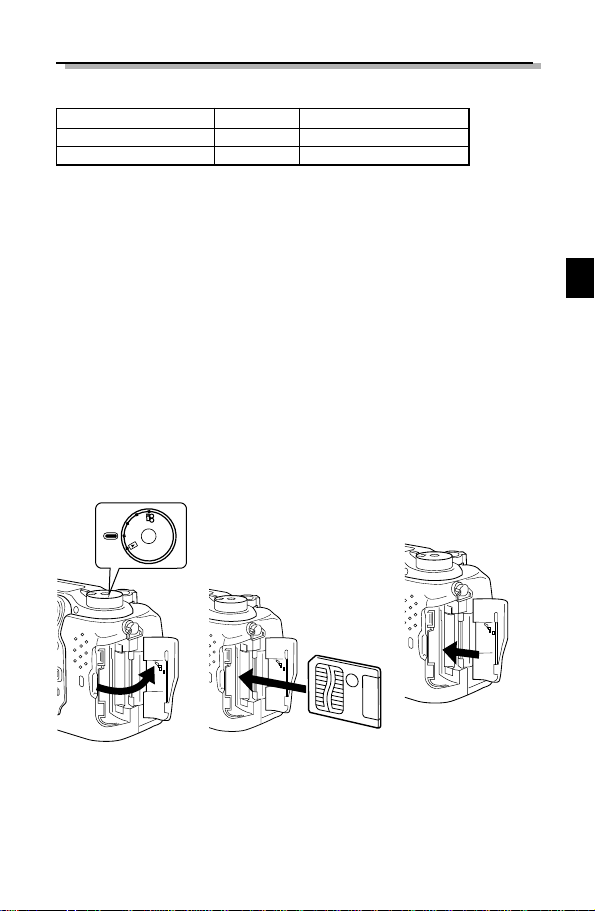
INSERTING AND REMOVING SMARTMEDIA CARDS
Use an Olympus SmartMedia card or a 3-volt (3.3V) card commercially available.
Non-Olympus brand SmartMedia Cards or cards that have been formatted on a
PC or other device, should first be formatted on the camera.
P
O
W
E
R
/
M
O
D
E
D
I
A
L
O
P
A
/S
/M
OFF
Insert the card
Push the card in
to remove it.
14
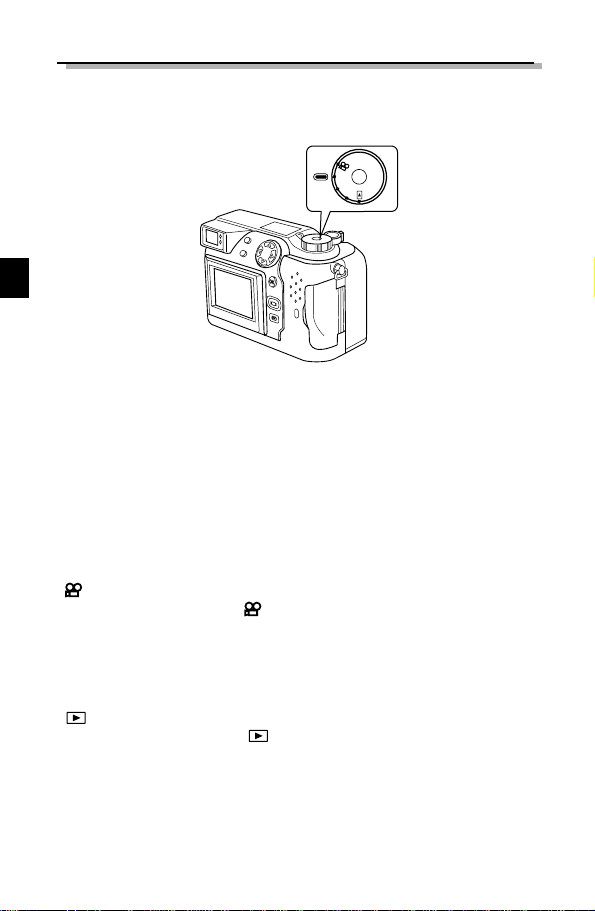
USING THE MODE DIAL
You can change modes by turning the mode dial on the top righthand side of the
camera. Always remove the lens cap before you switch the camera on.
Camera Modes
"P" and "A/S/M" (Still Picture Shooting Mode)
Setting the Mode dial to "P" or "A/S/M" switches the camera on in Still
Picture Shooting mode.
In "P" (Program mode) , the camera automatically selects the optimal aperture and shutter speed, allowing you to take properly exposed photographs
simply by pressing the shutter button.
"A/S/M" (Still Shooting mode) allows you select "Aperture Priority mode",
"Shutter Priority mode" or "Manual mode" from the Still Picture Shooting
menu. You can then select your own photography settings to achieve the
desired effect.
" " (Movie record mode)
Setting the Mode dial to " " switches the camera on in Movie record
mode. This mode allows you to shoot movies.
"OFF" (Camera off)
Setting the Mode dial to "OFF" switches the camera off.
" " (Playback mode)
Setting the Mode dial to " " switches the camera on in Playback mode
and allows you to view pictures recorded on a SmartMedia card.
P
A/S/M
O
F
F
P
O
W
E
R
/
M
O
D
E
D
I
A
L
15
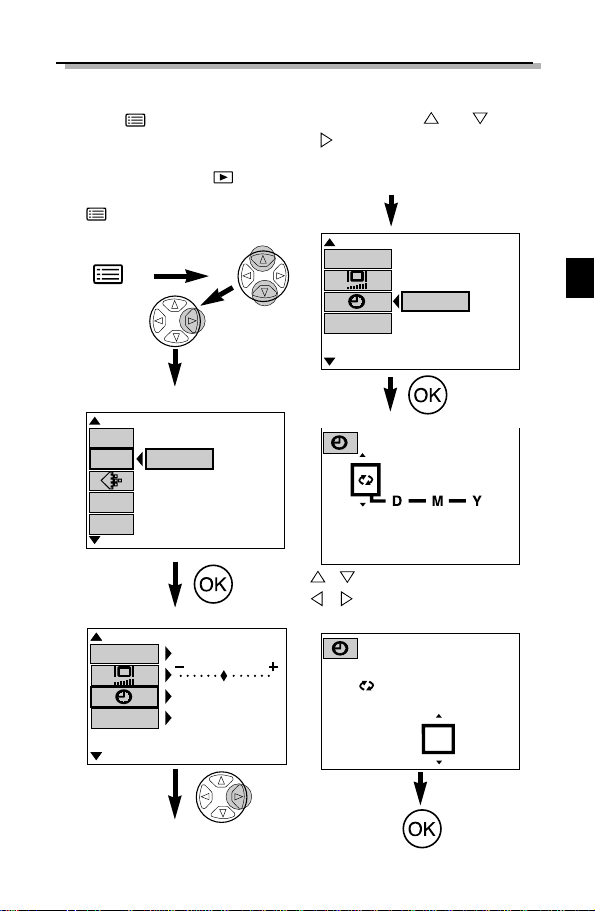
SETTING THE DATE AND TIME
Press the (Menu) button to display the menu. Press or on the
Arrow pad to select MODE SETUP, press and then press the [OK] button.
See the illustrations shown below. If the card contains no recorded images when
the Mode dial is set to , the menu
screen does not appear when you press
the (Menu) button. Always remove
the lens cap before you switch the camera on.
[
4/4
]
m/ft
FILE NAME
SETUP
0 : 00
1 . 1 . ,00
23 . 12 . ,00
21 : 56
[
3/3
]
A/S/M
MODE
CARD
SETUP
MODE
SETUP
SETUP
AE LOCK
[
4/4
]
m
AUTO
01.01.,00
00:00
[
4/4
]
m/ft
FILE NAME
Still picture record menu
Mode setting screen
Date and time screen
:Changes the setting.
:Moves to other settings
●The year 2000 is displayed as ’00.
A
A
16
BASIC FUNCTIONS
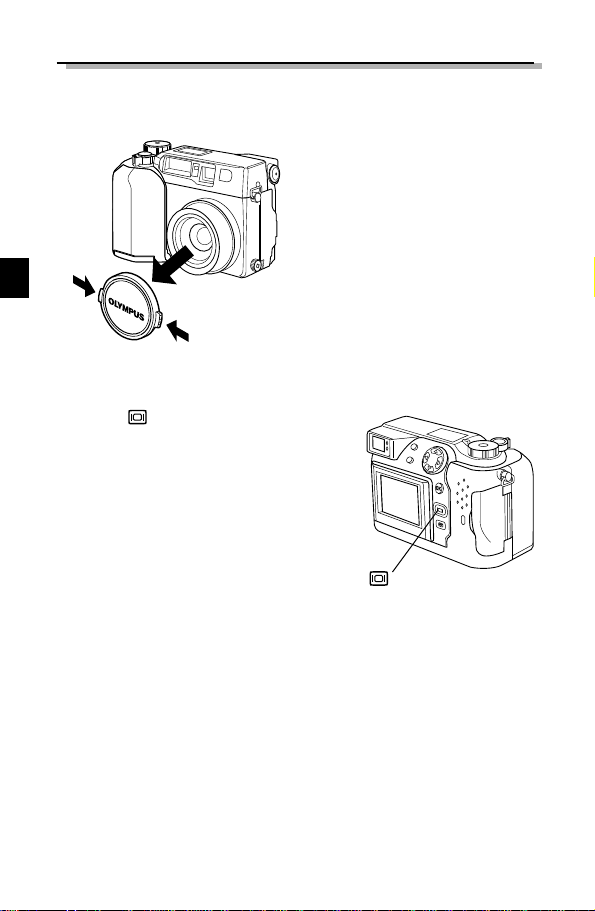
SWITCHING THE CAMERA ON AND OFF
To switch the camera on, remove the
lens cap and set the Mode dial to any
setting other than OFF.
To switch the camera off, set the Mode
dial to OFF.
Always replace the lens cap when the
camera is not in use.
TAKING PICTURES USING THE MONITOR
(Monitor button)
Press the (Monitor) button to switch the
monitor on. Compose the picture by looking at
the image on the monitor and then take the picture using the same procedure as the viewfinder.
17
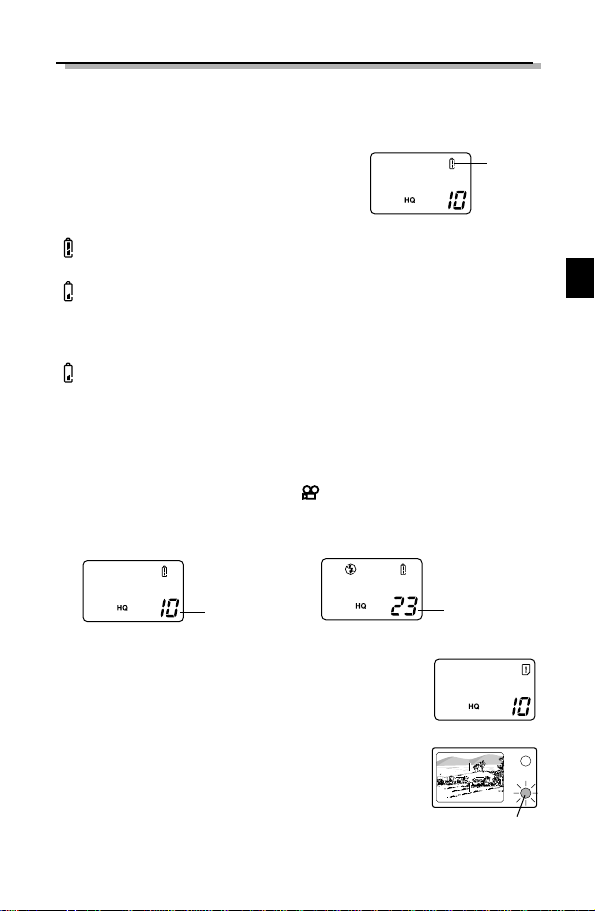
CHECKING THE DISPLAY
■ Checking the remaining battery charge
When you switch the camera on, the level of
remaining battery charge is displayed on the
control panel. When the remaining battery
charge is low, load new batteries. If you are
using NiMH or Ni-Cd batteries, recharge the
batteries.
lights (and turns off automatically).
The batteries have ample charge and you can take pictures.
blinks and the other icons on the control panel are displayed nor-
mally.
The battery charge is low and the batteries should be replaced. You can still take
pictures, but the battery power may run out in mid shot.
blinks (and disappears after 12 seconds) and the other icons on the
control panel disappear.
The batteries are fully depleted and should be replaced immediately.
Battery
check
indicator
Control panel
■ Checking the available shots/time
When you switch the camera on with the Mode dial set to "P" or "A/S/M", the
number of storable pictures is displayed on the control panel. (When you switch
the camera on with the Mode dial set to , the available shooting time (in seconds) is displayed.)
Still Shooting mode
number of storable
pictures
Movie mode
Available shooting
time (sec.)
When the number of storable pictures reaches 0, the camera emits a warning beep, the green lamp beside the
viewfinder blinks and the "CARD FULL" message appears
on the monitor. The same thing occurs the next time you
switch the camera on.
When this happens, load a new card or one that is not full.
Alternatively, erase some unwanted images on the card to
create some free space.
Control panel
Viewfinder
Green lamp

18
■ Number of Available Still Shots
Recording mode
HIGH (quality)
NORMAL
HIGH (quality)
NORMAL
Number
of pixels
File
Memory capacity
8MB 16MB 32MB 64MB
1600x1200
1024x768
640x480
1600x1200
1024x768
640x480
1
3
8
7
16
13
38
32
82
2
6
16
14
31
26
76
66
165
5
13
33
29
64
53
153
132
331
11
27
67
58
128
107
306
265
664
TIFF
SHQ
HQ
SQ1
SQ2
TIFF
JPEG
■ Available shooting time (seconds)
• This table shows the maximum times for movies shot by pressing the
shutter button down fully once and shooting continuously. The available
shooting time shown on the control panel and monitor is the remaining
time for which you can record data on the current card.
Recording
Number of pixels
Memory capacity
mode
4MB
Over 8MB
HQ 320 x 240 14 18
SQ 160 x 120 62 80

19
ADJUSTING THE VIEWFINDER
Turn the diopter adjustment dial until you can see the AF target mark clearly.
Diopter
adjustment dial
Viewfinder
The shutter button has a 2-step operation. Practice using the shutter button
before you take pictures.
1
Press the shutter button lightly
(press halfway down).
● The focus and image bright-
ness (exposure) are locked.
● The green lamp beside the
viewfinder lights.
● To focus on a subject that is
not inside the AF target mark,
use Focus Lock.
2
Press the shutter button the rest
of the way down (press fully).
● The camera takes the picture
and emits a short doublebeep.
● The card access lamp blinks
while the picture is being
recorded onto the card.
TAKING PICTURES
Shutter button
Viewfinder
Green lamp (blinks)
AF target
mark
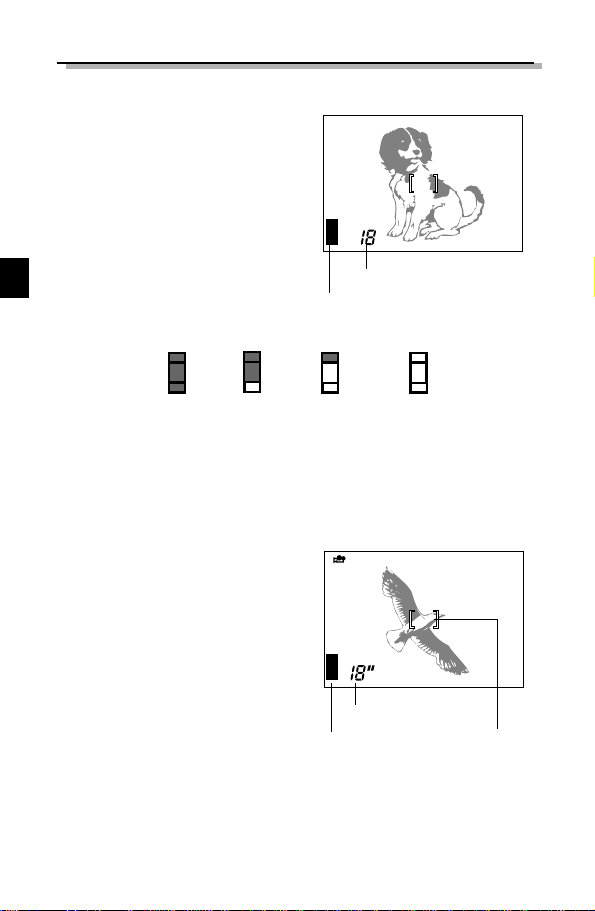
20
■ When taking a still picture
● The camera emits a short double-
beep when it has finished taking the
picture.
● To check the picture you’re just
taken, you can view it on the display.
● Continuous shooting is possible if
the memory gauge shows there is
space on the card.
● When the buffer memory is full, the
top of the memory gauge will light
up and no more pictures can be
taken.
P F2.0 1/800 0.0
Memory gauge
number of storable pictures
1 shot
taken
2 or more
shots taken
No photography
possible
No shots
taken
● Never open the card cover, eject the card, remove the batteries, or unplug
the AC adapter while the card access lamp is blinking. This could not only
prevent the recording of your current picture, but could also destroy the
images recorded on the card.
■ Recording movies
To begin shooting, press the
shutter button down fully. To stop
shooting, press the shutter button again.
● If the green lamp blinks, the
focus and exposure are not
locked. To focus on a subject
that is not in the center of the
shot, use Focus Lock.
F2.0 1/800 0.0
Memory gauge
Available shooting time
AF target mark
21
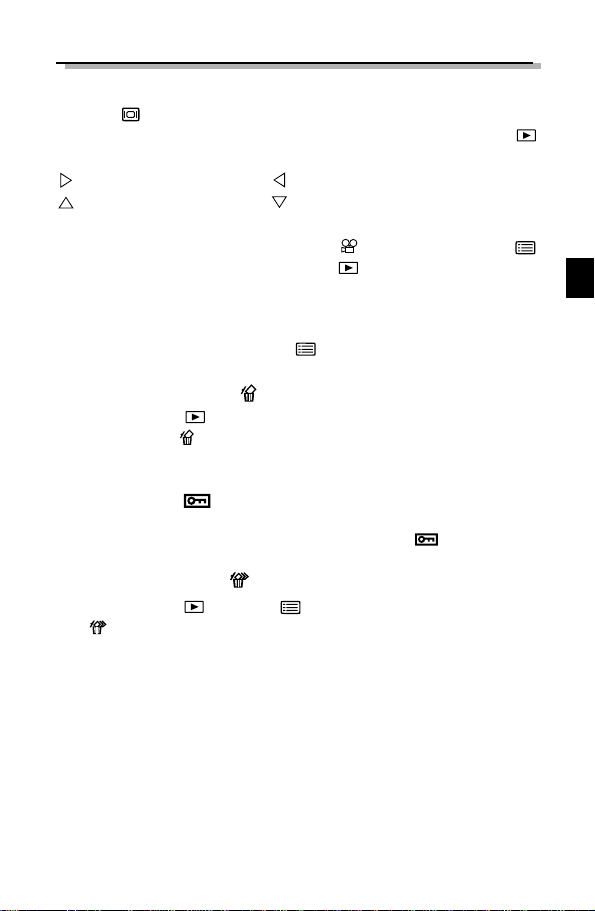
■ Displaying pictures
Press the (Monitor) button twice in quick succession to switch the monitor
on and display the most recent picture. You can also view shots by selecting
on the Mode dial. (Single-frame display)
: Displays the next picture. : Displays the previous picture.
: Jumps back 10 pictures. : Jumps forward 10 pictures.
■ Playback movies
Use the Arrow pad to select an image with the icon and then press the
(Menu) button. Select "MOVIE PLAY", press to select "START" and then
press the [OK] button. The card access lamp blinks and movie playback begins.
To pause playback, press the [OK] button. Press it again to resume the playback.
Use the Arrow pad to display the previous/next frame once playback has finished
or while the movie is paused. Press the (Menu) button to exit Movie Playback
mode and return to the menu screen.
■ One-frame erase
Set the Mode dial to and use the Arrow pad to display the picture you want
to erase. Press the (Erase) button. A message asking whether you want to
erase the picture appears. Make sure that "YES" is selected, then press [OK] button.
■ Protection
Use the Arrow pad to select the picture you want to protect and press the [OK]
button to protect the picture. The picture is protected and appears on the
monitor.
■ All-frame erase
Set the Mode dial to . Press the (Menu) button. Select "CARD SETUP",
then . Press the [OK] button. Make sure that "OK" is selected and press the
[OK] button.
22
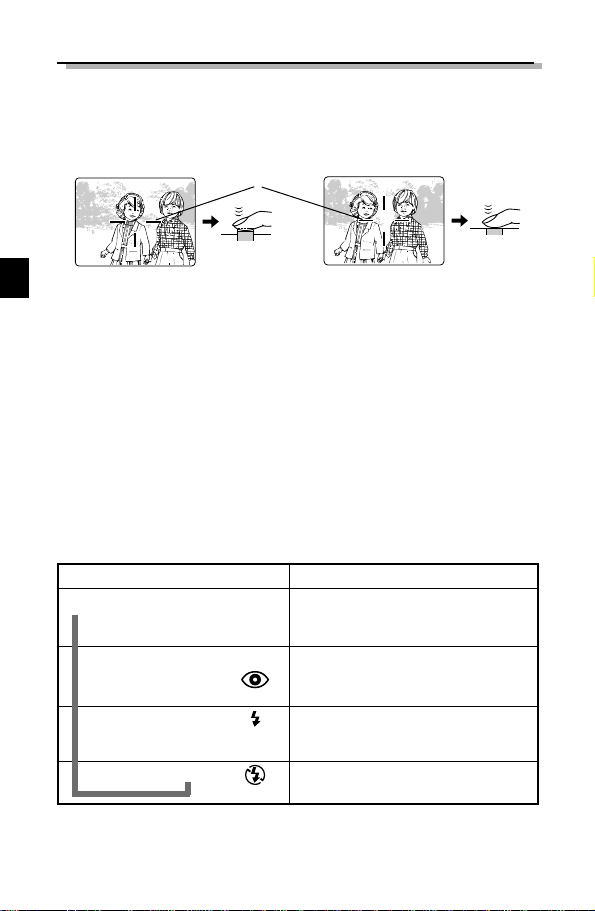
Flash mode Function and Purpose
Auto-Flash Automatically fires in low-light and
nothing displayed backlit conditions.
Red-Eye Reduction Flash Reduces the "red-eye" effect
(subject's eyes appearing red).
Forced Flash Fires for every shot.
Flash Off Never fires.
➠➠
➠
➡
RECORDING FUNCTIONS
■ Focus lock
When your main subject is not within the AF target marks, follow the procedure
below.
Position your main subject inside the
AF target marks, and press the shutter
button down halfway.
Recompose the picture while holding the
shutter button down halfway. Press the
shutter button down fully to take the picture.
AF target mark
■ Zoom
You can use the camera's 3x zoom for telephoto or wide-angle shots. If "DIGITAL ZOOM" is set to "ON" in the shooting menu , you can zoom in to even higher magnifications.
■ Auto flash
When flash is needed, the orange lamp beside the viewfinder lights when you
press the shutter button down halfway.
● When the orange lamp beside the viewfinder lights, this indicates that the flash
is ready to fire.
● A flashing orange lamp indicates that the flash is charging. Wait until the lamp
stops flashing before you press the shutter button.
23
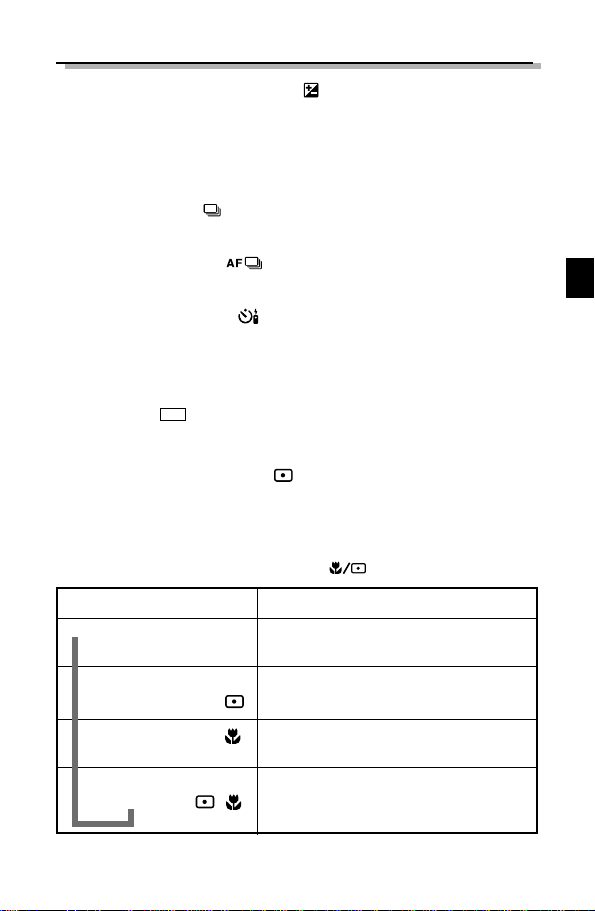
Setting Function and Purpose
Normal Digital ESP metering.
Used for normal autofocus photography.
Spot metering mode Measures light only at the center of the
shot.
Macro mode Used for close-up shots.
Macro + Spot metering Used for spot metering in close-up
mode shots.
➠
➠
➠
➡
■ Exposure compensation
The camera automatically sets the correct exposure for your shots, but you can
also adjust the exposure by plus or minus 2 steps in increments of 1/3 of a step.
Select a positive compensation value to show white objects more brightly or a
negative value to show black objects more intensely black.
■ Sequence mode
Sequential Shooting ( ): Allows you to take up to five frames in a sequence
of sequential shots. Focus, brightness (exposure), and white balance are locked
at the first frame.
AF Sequential Shooting ( ): Allows you to take a sequence of sequential shots. Focus, brightness (exposure), and white balance are measured and
updated for each frame.
Self-timer/remote-control ( ): Allows you to take pictures with the selftimer/remote-control.
Auto bracket (BKT): Allows you to record multiple images with different brightness settings from a single shot. Focus and white balance are set for the first shot
and remain fixed during continuous shooting.
■ AE Lock
You can use this feature when you want to set the exposure for one scene and
then recompose the shot and use the same exposure settings for the new scene.
■ Spot Metering mode
In Spot Metering mode,the camera measures the brightness of the subject. Spot
metering, because it only measures the light levels at the center of the image,
allows you obtain the correct exposure for backlit subjects since the exposure is
not affected by the background light. The light metering mode changes in the
cycle shown below each time you press the
(Spot/Macro) button.
AEL
24
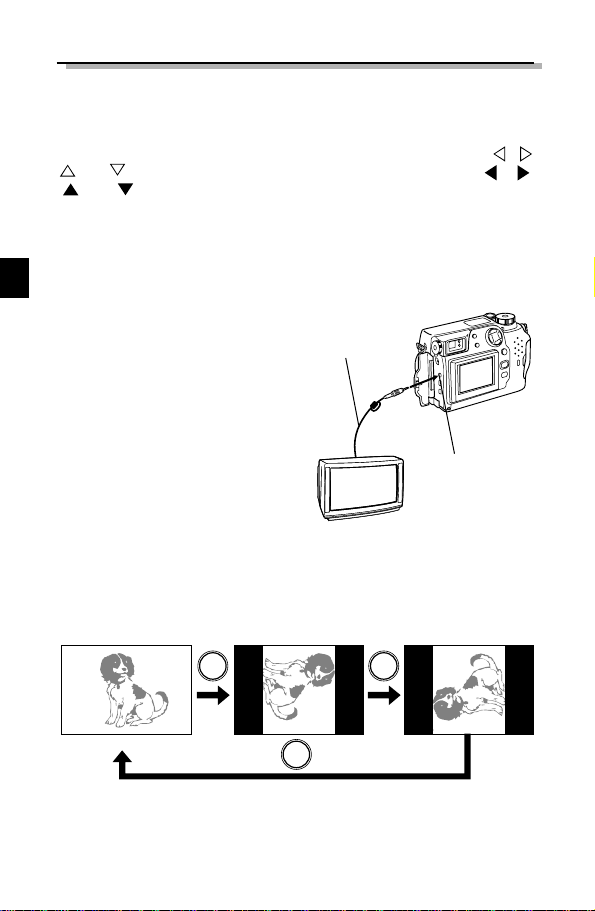
■ Rotating and Checking Vertically Oriented Pictures
If the camera is connected to a TV, a function is provided that rotates pictures so
that images shot when the camera was on its side are easier to see. Each time
you press the [OK] button, the image changes one step in the following
sequence: "Rotated 90° right", "Rotated 90° left", "Not rotated".
1023.12.,00 21:56
SQ
1012.23.,00 21:56
SQ
OK OK
OK
1012.23.,00 21:56
SQ
■ Viewing images on a TV
You can play back the pictures you
have recorded on a TV using the video
cable supplied with the camera.
Plug one end of the Video cable into
the video output jack (yellow) on the
camera. Then plug the other end into
the VIDEO IN (yellow) terminal on the
TV.
Video cable
Connect to the
Video output jack
(yellow).
PLAYBACK FUNCTIONS
■ Close-up display
Each time you turn the zoom lever towards "T", the image magnification
increases one step to 1.5x, 2x, 2.5x and then 3x. Press the Arrow pad ( , ,
and ) scrolls around the enlarged image and direction arrows ( , ,
and ) appear on each edge of the screen.
■ Index display
By turning the zoom lever towards "W", you can view multiple pictures on one
screen. Use the Arrow pad to select a picture to view separately and then turn
the zoom lever towards "T". You can use the menu to select the number of pictures to be displayed simultaneously
Normal display of a picture shot
with the camera on its side
• Video images cannot be rotated.
25
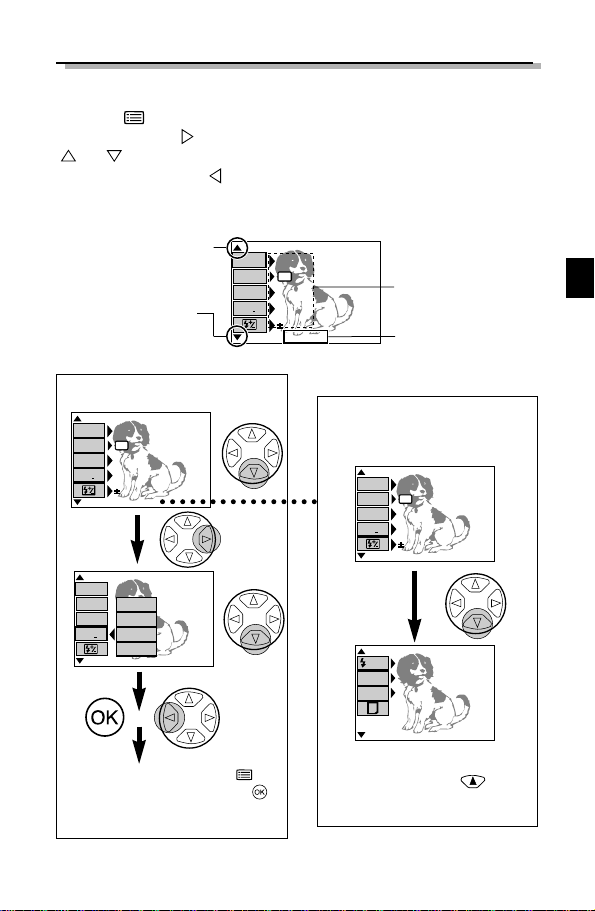
Press the (Menu) button and then use the Arrow pad to select a desired
menu option. Press to view the settings for the selected option and then use
or to select the setting. When you have finished selecting the setting,
press the [OK] button or to return to the previous option. Press the [OK] button again.
USING MENUS FOR DETAILED ADJSTMENTS
[
1/3
]
F2.0 1/800 0.0 P
DRIVE
O
ISO
WB
AUTO
AUTO
AF
AF/MF
Menu screen display
Indicates that there is a
preceding screen.
Current settings
Indicates that this is
the first of 3 pages.
Indicates that there is
a subsequent screen.
(Example) :
Selecting "400" as the ISO setting
● Note that if you press the
(Menu) button instead of the
button to exit Menu mode, the
setting is not saved.
(Example) :
Moving to the second and subsequent
menu pages
● You can move from page 1/3 to
page 3/3 by pressing on the
Arrow pad.
[
1/3
]
F2.0 1/800 0.0 P
DRIVE
O
ISO
WB
AUTO
AUTO
AF
AF/MF
[
1/3
]
F2.0 1/800 0.0 P
DRIVE
ISO
WB
AF/MF
AUTO
100
200
400
[
1/3
]
F2.0 1/800 0.0 P
DRIVE
O
ISO
WB
AUTO
AUTO
AF
AF/MF
[
2/3
]
F2.0 1/800 0.0 P
OFF
OFF
OFF
DIGITAL
ZOOM
FUNCTION
SLOW
Selection
Confirm
or
26
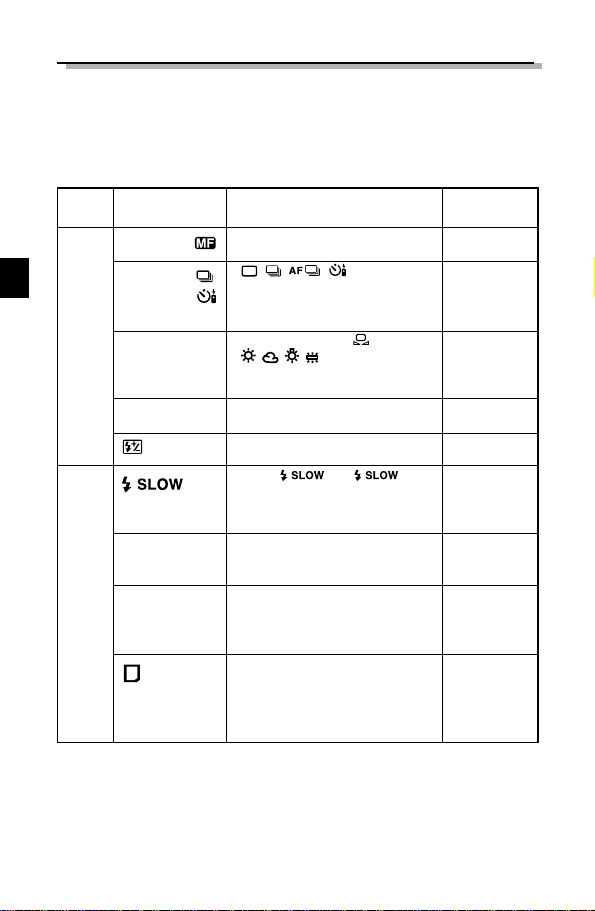
Menu
page
1/3
2/3
Display
AF/MF
DRIVE
WB
ISO
DIGITALZOOM
FUNCTION
Function
•AF MF
•
Selects Autofocus or Manual Focus.
• BKT
•
Select this option to use continu-
ous shooting, the self-timer or
Auto Bracket.
•AUTO PRE-SET
•
•Sets the white balance for a light
source.
•AUTO 100 200 400
•Sets the ISO setting.
•Setting the intensity of the flash.
•OFF 1 2
•Sets the flash timing to get the
best results in shots of night
scenes.
•OFF ON
•Allows you to zoom digitally up
to 5x.
•OFF BLACK & WHITE WHITE
BOARD BLACK BOARD
•Allows dedicated photography
modes.
•PLAY
•
Select this setting when you want
to use Function SmartMedia
cards for tasks
such as panora-
ma image creation.
Default
settng
AF
Single picture
shooting
AUTO
AUTO
± 0
OFF
OFF
OFF
–
SHOOTING MENU OPTIONS
Change the camera to your desired setting. For more details, refer to the software CD’s instructions on CD-ROM.
Still picture shooting menu
These options are displayed in the still picture shooting modes (P or A/S/M).
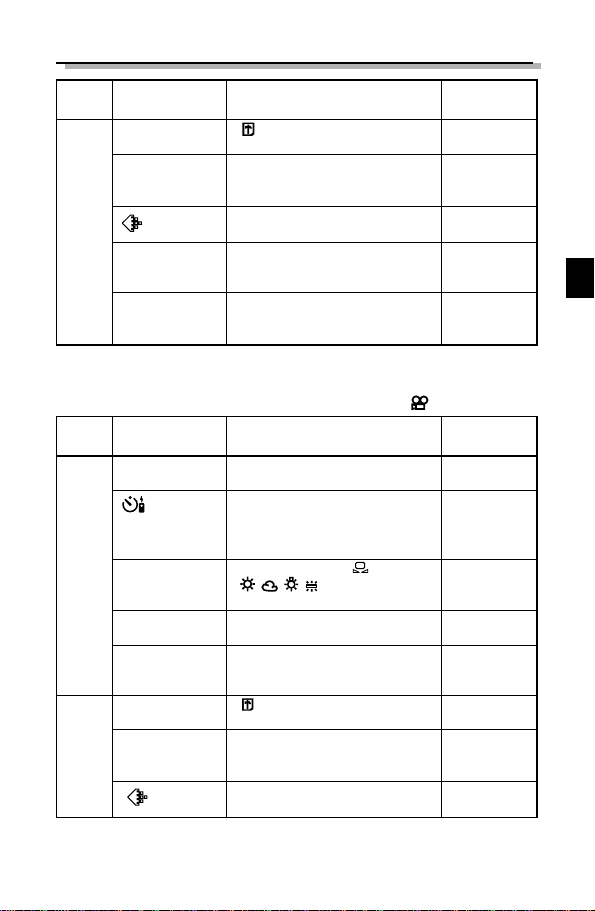
27
Menu
page
3/3
Display
CARD SETUP
MODE SETUP
A/S/M MODE
AE LOCK
Function
•
•Initializes (formats) the card.
•SETUP
•Sets the camera mode to suit
the type of photography.
•TIFF SHQ HQ SQ1 SQ2
•Sets the record mode.
•A S M
•
Sets the functions available when
the Mode dial is set to A/S/M.
•OFF SINGLE MULTI
•Allows AE lock or multi-metering
to be used.
Default
setting
–
–
HQ
A
OFF
Movie record menu
These menu options are displayed in Movie record mode ( ).
Menu
page
1/2
2/2
Display
AF/MF
WB
ISO
FUNCTION
CARD SETUP
MODE SETUP
HQ
SQ
Function
•AF MF
•
Selects Autofocus or Manual Focus.
•OFF ON
•Select this option to take pic-
tures using the self-timer or
remote control.
•AUTO PRE-SET
•
•
Sets the white balance for a light source.
•AUTO 100 200 400
•Sets the ISO setting.
•OFF BLACK & WHITE
•Allows black and white photog-
raphy.
•
•Initializes (formats) the card.
•SETUP
•Sets the camera mode to suit
the type of photography.
•HQ SQ
•Sets the image quality mode.
Default
setting
AF
OFF
AUTO
AUTO
OFF
–
–
HQ
28
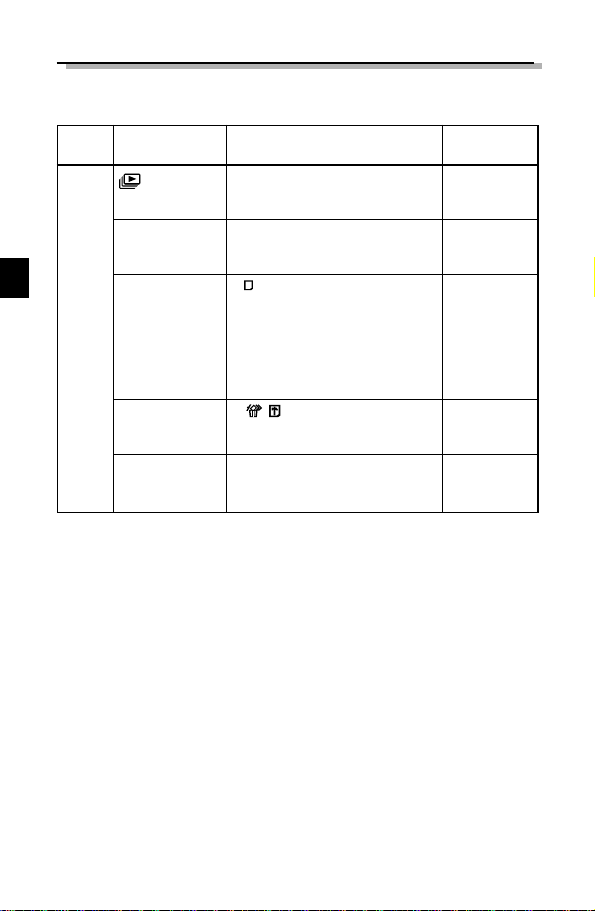
Still picture playback menu
These menu options are displayed when still image frames are being displayed.
Menu
page
1/1
Display
INFO
FUNCTION
CARD SETUP
MODE SETUP
Function
•PLAY
•Automatically displays successive frames.
•ON OFF
•Allows you to view photography
details for each image.
•
•Allows you to use dedicated
function SmartMedia cards to
create composite images. This
option can only be selected
when you are using a dedicated
function SmartMedia card.
•
•Erases all the frames on a card
or initializes (formats) the card.
•SETUP
•Sets the camera mode to suit
the type of photography.
Default
setting
–
OFF
–
–
–

29
Movie playback menu
These menu options are displayed when you are playing back a movie.
Menu
page
1/1
Display
MOVIE PLAY
INFO
FUNCTION
CARD SETUP
MODE SETUP
Function
•START
•Play back movie pictures.
•OFF ON
•Allows you to view photography
details for the movie (date and
time, file name, etc.).
•MOVIE INDEX MOVE EDIT
•Allows you to edit a movie or cre-
ate an index listing the movie
details.
•
•Erases all the frames on a card
or initializes (formats) the card.
•SETUP
•Sets the camera mode to suit
the type of photography.
Default setting
–
OFF
–
–
–
30
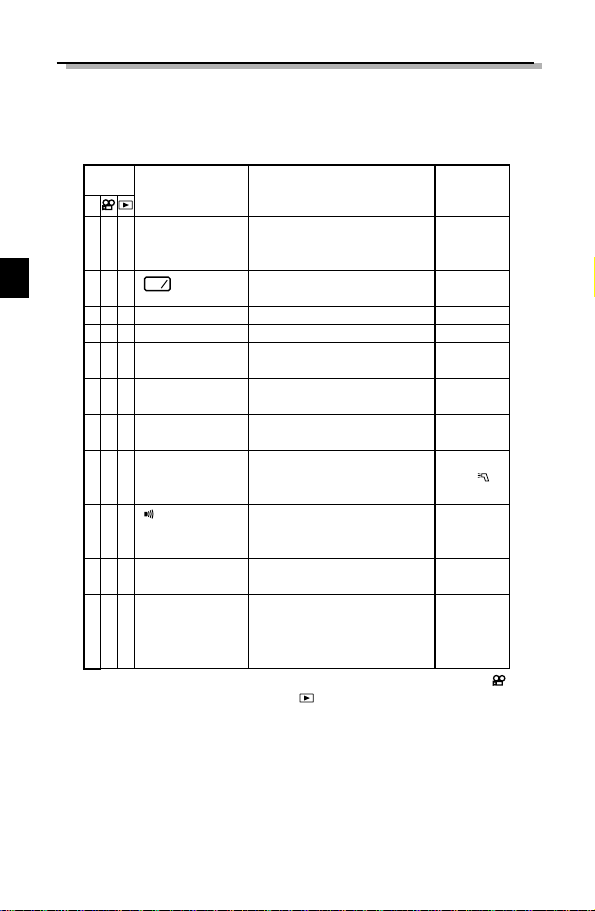
* P (A/S/M is as same as "P") denotes Still Picture Shooting mode,
denotes Movie record mode, and denotes Picture playback mode
or Movie playback mode. "O" indicates that the setting is displayed in
that mode.
O
O
O
O
O
O
O
Setting
ALL RESET
SHARPNESS
CONTRAST
TIFF
SQ1
SQ2
FLASH
AF MODE
FULL-TIME AF
Function
Determines the camera status when you switch the
camera on.
Makes fine adjustments to
the white balance.
Sets the image clarity.
Sets the image contrast.
Sets the quality for the TIFF
quality mode.
Sets the quality for the SQ1
quality mode.
Sets the quality for the SQ2
quality mode.
Sets the flash firing settings
when an external flash is
mounted on the camera.
Sets the volume of the tones
emitted during camera operation.
Sets the system used for
focusing in Autofocus mode.
Allows you to specify that the
camera repeatedly focuses
without the shutter button
being pressed down halfway.
Default
setting
ON
RED
...◆...
BLUE
NORMAL
NORMAL
1600 × 1200
1024 × 768
NORMAL
640 × 480
NORMAL
IN+
LOW
NORMAL
OFF
LIST OF MODE SETTING
Change the camera to your desired setting. For more details, refer to the instructions on the software CDs supplied with the camera.
P
O
O
O
O
O
O
O
O
O
O
O
Displayed
mode*
WB
+
-
 Loading...