

DIGITAL CAMERA
D-560ZOOM
C-350ZOOM
MANUAL FOR DIRECT PRINTING
Manual outlining new features added to the camera with firmware update.
z This manual contains guidelines for using Olympus D-560ZOOM/
C-350ZOOM.
z In the interest of continually improving products, Olympus reserves the
right to update or modify information contained in this manual.
About this manual
Update the camera’s firmware to enable PictBridge on your camera. This will
allow you to print pictures directly from the camera by connecting it to a printer
that supports PictBridge with the USB cable.
This manual explains additional functions, and different operations that are
available when the camera’s firmware has been updated. These functions
and operations are different than what is stated in the Reference Manual that
originally provided with your camera.
What is PictBridge? … It is the standard for connecting digital cameras and
printers of different makers and printing out pictures directly.
Indications used in this manual
Important information on factors which may lead to a
malfunction or operational problems. Also warns of operations that
Note
should be absolutely avoided.
Useful information and hints that will help you get the most out of
your camera.
Reference pages describing details or associated information.
g
Reference pages describing details or associated information in
the CD reference manual. See the English reference manual for
details.
2

Contents
Contents . . . . . . . . . . . . . . . . . . . . . . . . . . . . . . . . . . . . . . . . . . 3
1 Functions changed by updating the
firmware 4
Connection to a computer . . . . . . . . . . . . . . . . . . . . . . . . . . . . . 4
Direct printing function. . . . . . . . . . . . . . . . . . . . . . . . . . . . . . . . 5
2 Direct printing 6
Using the direct printing function . . . . . . . . . . . . . . . . . . . . . . . . 6
Connecting the camera to a printer . . . . . . . . . . . . . . . . . . . . . . 7
Printing pictures. . . . . . . . . . . . . . . . . . . . . . . . . . . . . . . . . . . . . 8
PRINT mode/MULTI PRINT mode . . . . . . . . . . . . . . . . . . . 8
ALL PRINT mode . . . . . . . . . . . . . . . . . . . . . . . . . . . . . . . 12
ALL INDEX mode/PRINT ORDER mode . . . . . . . . . . . . . 14
Exiting direct printing . . . . . . . . . . . . . . . . . . . . . . . . . . . . . . . . 16
If an error code is displayed . . . . . . . . . . . . . . . . . . . . . . . . . . 17
Troubleshooting. . . . . . . . . . . . . . . . . . . . . . . . . . . . . . . . . . . . 18
3
1
Functions changed by updating the firmware
Connection to a computer
When the USB cable is used to connect the camera to a computer, follow
the procedure below to select PC in the camera settings.
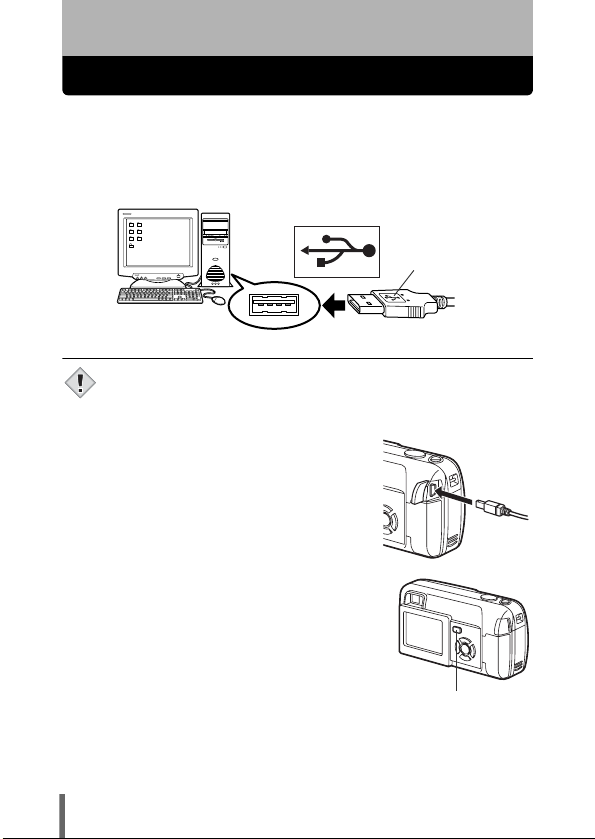
1 Insert the marked end of the provided USB cable into the
USB port on your computer as shown below.
Look for this mark.
Terminal
USB port
• The location of the USB port varies depending on the computer.
For details, refer to your computer’s manual.
Note
2 Plug the other end of the USB cable
into the camera’s USB connector.
3 Press q to turn the camera on.
• The monitor turns on and the selection
screen for the USB connection is
displayed.
Playback button (q)
4
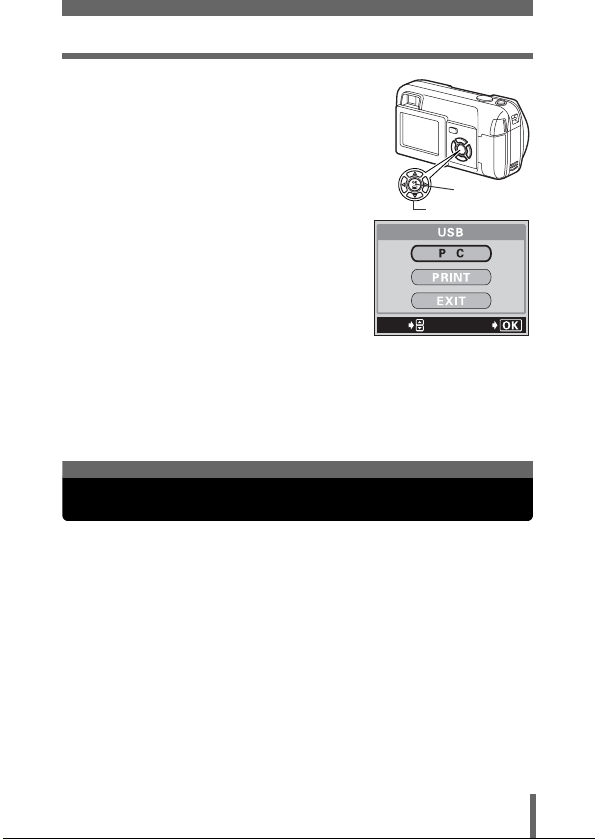
4 Press ac to select PC and
press e.
Direct printing function
OK button
Arrow pad
SELECt
GO
5 The computer recognizes the camera as a new device.
• When you connect the camera to the computer for the first time, the
computer automatically recognizes the camera. Click “OK” when the
message saying that the installation is completed appears.
• The computer recognizes the camera as a “Removable Disk”.
Direct printing function
After updating the camera’s firmware to enable PictBridge, pictures can be
printed directly from the camera. By connecting the camera directly to a
printer that supports PictBridge with the USB cable, you can print pictures
stored on the card inside the camera without a need to use a computer.
For details of printing instructions, see “Direct printing” (gP.6).
5
2 Direct printing
Using the direct printing function
By connecting the camera to a PictBridge-compatible printer with the USB
cable, you can print out recorded pictures directly without the use of a
computer. With the camera connected to the printer, use the camera’s
monitor to select the pictures you want to print, and the number of prints you
want to make. It is also possible to print out pictures using the print
reservation data.
To find out if your printer is compatible with PictBridge, refer to the printer’s
instruction manual.
What is PictBridge? … It is the standard for connecting digital cameras and
printers of different makers and printing out pictures directly.
< STANDARD … All printers that support PictBridge have standard print
settings. Selecting < STANDARD on the settings screens (g P.9 to 14),
images are printed according to the default settings. See the instruction
manual for your printer for its standard settings or inquire with the printer
manufacturers.
TIPS
• For details of printing paper types, ink cassettes, etc., refer to the
printer’s instruction manual.
• You are recommended to use the optional AC adapter for the
camera when printing pictures directly. If you use the battery, make
Note
sure that it is fully charged. If you are using alkaline batteries, make
sure that you use new batteries. If the camera stops operating
while communicating with the printer, the printer may malfunction
or image data may be lost.
• Images recorded in movie mode cannot be printed.
• The camera will not enter sleep mode when connected to the USB
cable.
“Print setting” (P.108)
6

Connecting the camera to a printer
Use the USB cable provided with the camera to connect it to a PictBridgecompatible printer.
1 Turn the printer on and plug the
printer end of the USB cable into
the printer’s USB port.
• For details of how to turn the printer on
and the position of the USB port, refer to
the printer’s instruction manual.
2 Plug the other end of the USB cable
into the camera’s USB connector.
3 Press q to turn the camera on.
• The monitor turns on and the selection
screen for the USB connection is
displayed.
Playback button (q)
4 Press ac to select PRINT, then
press e.
• ONE MOMENT is displayed and the
camera and printer are connected. The
PRINT MODE SELECT screen is
displayed on the monitor. Make the print
settings on the camera’s monitor.
g Go to “Printing pictures” (P.8).
SELECt
GO
• When the USB mode is set to PC, the PRINT MODE SELECT
screen is not displayed. Remove the USB cable, and repeat the
Note
procedure from Step 1.
7

Printing pictures
When the camera is connected to a PictBridgecompatible printer, the PRINT MODE SELECT
screen is displayed on the monitor. Use this
screen to select the print mode. You can choose
from the following print modes.
GO
SELECt
EXIt
PRINT Prints the selected picture.
ALL PRINT Prints all the pictures stored on the card.
MULTI PRINT * Prints one picture in multiple layout format.
ALL INDEX * Prints an index of all the pictures stored on the card.
PRINT ORDER * Prints the pictures according to the print reservation data
* This option may not be available depending on the type of printer.
PRINT mode/MULTI PRINT mode
g “PRINT mode/MULTI PRINT mode” (P.8)
g “ALL PRINT mode” (P.12)
g “PRINT mode/MULTI PRINT mode” (P.8)
g “ALL INDEX mode/PRINT ORDER mode” (P.14)
on the card. If no print reservations (
(P.108)) have been made, this option is not available.
g “ALL INDEX mode/PRINT ORDER mode” (P.14)
“Print setting”
1 In the PRINT MODE SELECT
screen, press ac to select
PRINT or MULTI PRINT, then press
e.
• The print size settings screen is
displayed.
8
Zoom lever
OK button
Arrow pad

Printing pictures
2 Press ac to select the paper
size, then press d.
• PRINT mode: Go to step 3.
• MULTI PRINT mode: Go to step 4.
• The available paper size settings vary
depending on the type of printer.
• When the PRINT PAPER screen is not
displayed, SIZE, BORDERLESS and
PICS/SHEET are set to < STANDARD. Go to step 5.
3 Use ac to select framed or
unframed, then press e.
Go to step 5.
OFF ( ) The image is printed
inside a blank frame.
ON ( ) The image is printed filling
the entire page.
4 Press ac to select PICS/SHEET,
then press e.
• PICS/SHEET depends on the paper size
set in step 2 and the capabilities of your
printer.
PRINt PAPER
SIZE
StANDARD
SELECt
CANCEL
PRINT MODE screen
PRINt PAPER
SIZE
StANDARD
SELECt
PRINt PAPER
SIZE
StANDARD
SELECt
5 Press bd to select the picture you
want to print.
• Turn the zoom lever toward to
display the pictures in index format. You
can then select the pictures you want to
print from the index.
SELECt
SINGLE
6 Select the print reservation method.
SINGLE PRINT Makes a single-frame print reservation for the
MORE Sets the number of prints of the selected picture in
selected picture according to standard settings.
the print reservation data. You can also add the date
or file name.
BORDERLESS
StANDARD
GO
BORDERLESS
StANDARD
GO
PICS/SHEEt
16
GO
PRINt
MORE
9

Printing pictures
WItHOUt
WItHOUt
zSet a SINGLE PRINT reservation
Press a.
•Press a when < is displayed to cancel
the reservation.
Print reservation
mark is displayed.
SELECt
CANCEL
zSet MORE print reservations
c Press c.
• Print information setting screen is displayed.
d Press ac to select the item
you want to set, then press d.
• Press ac to select the item, then
press
e.
• The available options vary depending
on the type of printer. Items outside
the capability of the printer are not
available.
< × Sets the number of prints.You can
DATE ( ) If you select WITH, pictures are printed
FILE NAME ( ) If you select WITH, pictures are printed
• DATE and FILE NAME are not available in MULTI PRINT mode.
select up to 10 prints.
with the date and time.
with the file name.
X
FILE NAME
SELECt
10
SEt
PRINt
MORE
1
WItHOUt
WItHOUt
GO

Printing pictures
e When you have finished all the settings for MORE,
press e.
• The screen displayed in step 5 appears.
• To print more than one picture in Print
and/or Multi-print mode, repeat steps 5
and 6 and make single and/or multiple
print reservations for all the pictures you
want to print.
• is displayed in MULTI PRINT mode.
The settings you have
made are displayed.
SELECt
CANCEL
7 Press e.
• The PRINT screen is displayed.
8 Print the pictures.
•Press ac to select OK or CANCEL,
then press e.
OK Printing starts.
CANCEL The settings are
• When printing is finished, the monitor returns to the PRINT MODE
SELECT screen.
g “Exiting direct printing” (P.16)
zTo cancel printing
Pressing e during print data transfer displays
the screen for selecting whether to continue or
cancel printing. To cancel printing, press
to select CANCEL, then press e.
canceled and the monitor
returns to the PRINT
MODE SELECT screen.
ac
PRINt
CANCEL
CANCELGOSELECt
PRINt
CONtINUE
CANCEL
SELECt
OK
PRINt
MORE
GO
11

Printing pictures
WItHOUt
WItHOUt
ALL PRINT mode
1 In the PRINT MODE SELECT
screen, press ac to select ALL
PRINT, then press e.
• The print size settings screen is
displayed.
SELECt
2 Press ac to select the paper
size, then press d.
• The available paper size settings vary
depending on the type of printer.
• When the PRINT PAPER screen is not
displayed, SIZE and BORDERLESS are
set to < STANDARD. Go to step 4.
3 Use ac to select framed or
unframed, then press e.
OFF ( ) The image is printed inside
a blank frame.
ON ( ) The image is printed filling
the entire page.
• Print information setting screen is
displayed.
EXIt
PRINt PAPER
SIZE
StANDARD
CANCEL
PRINt PAPER
SIZE
StANDARD
SELECt
SELECt
4 Press ac to select the item you
want to set, then press d.
•Press ac to select the item, then press
e.
• If PRINT INFO cannot be set with your
printer, go to step 6.
• The available options vary depending on
the type of printer. Items outside the
capability of the printer are not available.
• Only one print of each image can be made at a time.
DATE ( ) If you select WITH, pictures are printed
FILE NAME ( ) If you select WITH, pictures are printed
12
with the date and time.
with the file name.
X
FILE NAME
SELECt
1
WItHOUt
WItHOUt
SEt
GO
BORDERLESS
StANDARD
GO
BORDERLESS
StANDARD
GO
GO

5 Press e.
• The PRINT screen is displayed.
6 Print the pictures.
•Press ac to select OK or CANCEL,
then press e.
Printing pictures
PRINt
OK
OK Printing starts.
CANCEL The settings are
canceled and the monitor
returns to the PRINT
MODE SELECT screen.
• When printing is finished, the monitor returns to the PRINT MODE
SELECT screen.
g “Exiting direct printing” (P.16)
CANCEL
CANCELGOSELECt
zTo cancel printing
Pressing e during print data transfer displays
the screen for selecting whether to continue or
cancel printing. To cancel printing, press
to select CANCEL, then press e.
ac
PRINt
CONtINUE
CANCEL
SELECt
GO
13

Printing pictures
ALL INDEX mode/PRINT ORDER mode
1 In the PRINT MODE SELECT
screen, press ac to select ALL
INDEX or PRINT ORDER, then
press e.
• The print size settings screen is
displayed.
2 Press ac to select the paper
size, then press d.
• The available paper size settings vary
depending on the type of printer.
• Depending on the selected print mode,
SIZE cannot be selected.
• When the PRINT PAPER screen is not
displayed, SIZE is set to < STANDARD.
Go to step 3.
3 Print the pictures.
•Press ac to select OK or CANCEL,
then press e.
OK Printing starts.
CANCEL The settings are
• When printing is finished, the monitor returns to the PRINT MODE
SELECT screen.
g “Exiting direct printing” (P.16)
canceled and the monitor
returns to the PRINT
MODE SELECT screen.
SELECt
EXIt
PRINt PAPER
SIZE
StANDARD
CANCEL
SELECt
PRINt
CANCEL
CANCELGOSELECt
GO
BORDERLESS
StANDARD
GO
OK
14

zTo cancel printing
Pressing e during print data transfer displays
the screen for selecting whether to continue or
cancel printing. To cancel printing, press
to select CANCEL, then press
e.
• In ALL INDEX mode, the printer automatically selects the number
of pictures per sheet, etc.
Note
• ALL INDEX printing is only available on printers with an index
function.
• The PRINT ORDER function is only available on DPOF-compatible
printers.
ac
CONtINUE
SELECt
Printing pictures
PRINt
CANCEL
GO
15

Exiting direct printing
When you have finished printing, disconnect the camera from the printer.
1 In the PRINT MODE SELECT screen,
select b.
GO
SELECt
EXIt
• The message shown right is displayed.
TURN OFF THE POWER
2 Turn the camera off.
3 Remove the USB cable from the
camera.
4 Remove the USB cable from the
printer.
16
Playback button (q)

If an error code is displayed
If an error code appears on the camera’s monitor during direct print setting
or printing, see the following table.
For more details, refer to the printer’s instruction manual.
Monitor indication Possible cause Corrective action
NO CONNECTION
NO PAPER
NO INK
JAMMED
SETTINGS CHANGED
PRINT ERROR
The camera is not
connected to the printer
correctly.
There is no paper in the
printer.
The printer has run out of
ink.
The paper is jammed. Remove the jammed
The printer’s paper
cassette has been
removed or the printer
has been manipulated
while making settings on
the camera.
There is a problem with
the printer and/or
camera.
Disconnect the camera
and connect it again
correctly.
Load some paper in the
printer.
Replace the ink cartridge
in the printer.
paper.
Do not manipulate the
printer while making
settings on the camera.
Turn off the camera and
printer. Check the printer
and remedy any
problems before turning
the power on again.
TIPS
• If an error code other than those shown above is displayed, refer to
“Error codes”.
“Error codes” (P.117)
17

Troubleshooting
If you have trouble connecting the camera to a printer after updating the
firmware, take the action described below.
The printer fails to connect
Possible cause Corrective action Ref. Page
PC was selected on the
monitor after connecting
to the printer with a USB
cable.
Disconnect the USB cable from the camera
and start again from the beginning.
g P.7
18

http://www.olympus.com/
OLYMPUS CORPORATION
Shinjuku Monolith, 3-1 Nishi-Shinjuku 2-chome, Shinjuku-ku, Tokyo, Japan
Two Corporate Center Drive, Melville, NY 11747-3157, U.S.A. Tel. 631-844-5000
Technical Support (USA)
24/7 online automated help: http://www.olympusamerica.com/support
Phone customer support: Tel. 1-888-553-4448 (Toll-free)
Our phone customer support is available from 8 am to 10 pm
(Monday to Friday) ET
E-Mail: distec@olympus.com
Olympus software updates can be obtained at: http://www.olympus.com/digital
Olympus Europa GmbH
OLYMPUS AMERICA INC.
Premises/Goods delivery: Wendenstrasse 14-18, 20097 Hamburg, Germany
Letters: Postfach 1 0 49 08, 20034 Hamburg, Germany
European Technical Customer Support:
Please visit our homepage http://www.olympus-europa.com
or call our TOLL FREE NUMBER* : 00800 - 67 10 83 00
for Austria, Belgium, Denmark, Finland, France, Germany, Italy, Luxemburg,
Netherlands, Norway, Portugal, Spain, Sweden, Switzerland, United Kingdom
* Please note some (mobile) phone services/provider do not permit access or
request an additional prefix to +800 numbers.
For all not listed European Countries and in case that you can’t get connected
to the above mentioned number please make use of the following
CHARGED NUMBERS: +49 180 5 - 67 10 83 or +49 40 - 237 73 899
Our Technical Customer Support is available from 9 am to 6 pm MET (Monday to Friday)
2003-2004 OLYMPUS CORPORATION
Tel: +49 40-23 77 3-0 / Fax: +49 40-23 07 61
VT783902
 Loading...