


User Guide
English ( 2 – 5 )
Guía del usuario
Español ( 6 – 9 )
Guide d'utilisation
Français ( 10 – 13 )
Guida per l'uso
Italiano ( 14 – 17 )
Benutzerhandbuch
Deutsch ( 18 – 21 )
Appendix
English ( 22 – 23 )
User Guide (English)
Introduction
Box Contents
WS100 Microphone Transmitter
WS100 Receiver
Carrying Case
1/4” (6.35 mm) cable
Power Adapter
User Guide
Safety & Warranty Manual
Support
For the latest information about this product (system requirements, compatibility information, etc.) and product registration, visit numark.com.
For additional product support, visit numark.com/support.
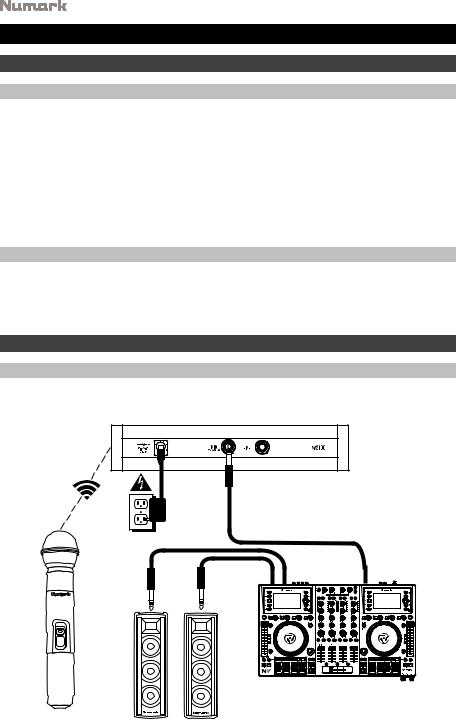
Setup
Connection
Here is just an example of how to use your WS100 in your setup. Items not listed in
Introduction > Box Contents are sold separately.
Power
Mixer |
WS100
Speakers
2

Setting Up the Microphone Transmitter
1.Remove the microphone transmitter’s battery compartment cover and insert 2 AA batteries into compartment. Make sure the polarities of the batteries (+ and –) are correct.
2.Reattach the battery compartment cover.
3.Slide the power switch into the on position. The power indicator will flash briefly to indicate the microphone transmitter is on.
Setting Up the Receiver
1.For best results, place the receiver at least 3 feet (1 meter) above the ground and place the antennae in a vertical position.
2.Use the included power adapter to connect the receiver’s power input to a power outlet.
3.Use a standard 1/4” (6.35 mm) cable to connect one of the receiver’s audio outputs to your mixer or PA system. Do not use both audio outputs at the same time; this can result in signal loss or increased noise.
4.Press the power button to turn the receiver on.
5.If the microphone transmitter is on, the receiver’s RF indicator will light to show that the two devices are connected and within range. The receiver and microphone transmitter are pre-programmed to operate on a regional fixed frequency.
6.Adjust the volume knob to set the audio signal level sent from the audio output to your mixer or PA system.
Features
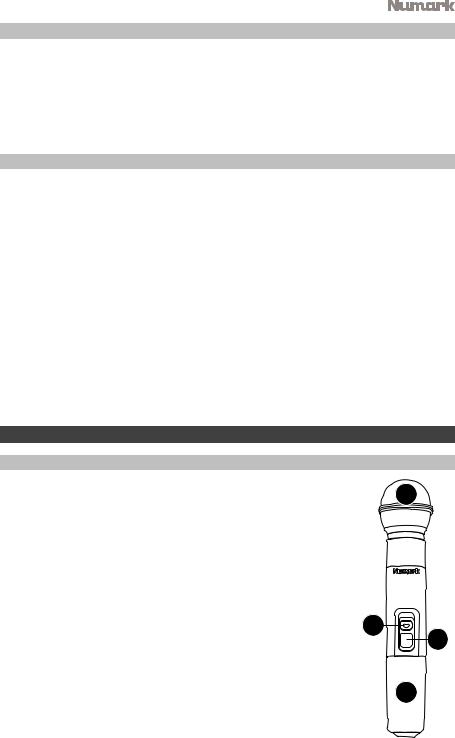
Microphone Transmitter
1. Grille: This cover protects the microphone capsule and reduces |
1 |
noise from air and breath. |
2.Power Switch: This three-position switch turns the transmitter on
or off.
|
i. |
The transmitter is off. |
|
|
|
ii. |
The transmitter is on, but the audio signal is muted. |
|
|
|
iii. |
The transmitter is on and sending audio to the receiver. |
|
|
3. |
Power Indicator: This LED will flash briefly when the power |
|
|
|
|
|
switch is moved into the on position. |
3 |
|
4. |
|
Battery Compartment: Insert 2 AA batteries into the |
2 |
|
|
|
compartment. Make sure the polarities of the batteries (+ and –) |
|
|
are correct.
4
WS100
3
Receiver
Front Panel |
|
|
|
|
|
5 |
3 |
2 |
|
6 |
4 |
1 |
6 |
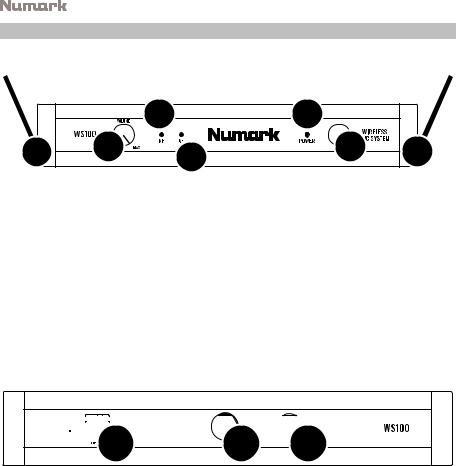
1.Power Button: Press this button to turn the receiver on or off.
2.Power Indicator: When lit, this LED indicates the receiver is powered on.
3.RF Indicator: When lit, this LED indicates that the receiver is receiving a signal from the transmitter.
4.AF Indicator: When lit, this LED indicates the current audio signal level received from the transmitter.
5.Volume Knob: Turn this knob to adjust the volume level of the Mic Output and Line Output.
6.Antennae: These antennae receive the signal from the transmitter. Place the antennae in a vertical position for the best signal quality.
Rear Panel


 1
1


 2
2


 3
3
1.Power Input: Use the included power adapter to connect this input to a power outlet.
2.Mic Output (1/4” / 6.35 mm): Use a standard 1/4” (6.35 mm) cable to connect this balanced output to your mixer, PA system, etc. Make sure the input of the connected device is set to receive a mic-level audio signal.
3.Line Output (1/4” / 6.35 mm): Use a standard 1/4” (6.35 mm) cable to connect this unbalanced output to your guitar amplifier, mixer, PA system, etc. Make sure the input of the connected device is set to receive a line-level audio signal.
4

Troubleshooting
Problem
The receiver does not produce any sound.
There is audible interference in the transmission.
The signal is distorted.
Solution
Make sure the receiver’s power adapter is properly connected to the power input and a power source.
Make sure the microphone transmitter’s batteries are properly inserted and that their polarities (+ and –) are correct.
Make sure the receiver’s audio output is properly connected to your mixer, amplifier system, etc. Also, make sure the input of the connected device is set to receive the correct mic-level or line-level audio signal, depending on which audio output is being used.
Make sure the receiver and microphone transmitter are within 200 feet (60 meters) and have a clear line of sight. Also, make sure the receiver is not immediately near any metal objects or devices that could cause RF interference (other wireless systems, TVs, radio, etc.).
Make sure the receiver and microphone transmitter are within 200 feet (60 meters) and have a clear line of sight. Also, make sure the receiver is not immediately near any metal objects or devices that could cause RF interference (other wireless systems, TVs, radio, etc.).
If you are using multiple transmitter-receiver pairs, use only one pair at a time.
Make sure the receiver is not immediately near any metal objects or devices that could cause RF interference (other wireless systems, TVs, radio, etc.).
Lower the setting of the receiver’s Volume knob.
Make sure the input of the connected device is set to receive the correct mic-level or line-level audio signal, depending on which audio output is being used.
5

Guía del usuario (Español)
Introducción
Contenido de la caja
WS100 Transmisor de micrófono
WS100 Receptor
Estuche de transporte
6,35 mm (1/4 pulg.) cable
Adaptador de alimentación
Guía del usuario
Manual sobre la seguridad y garantía
Soporte
Para obtener la información más completa acerca de este product (los requisitos del sistema, compatibilidad, etc) y registro del producto, visite numark.com.
Para soporte adicional del producto, visite numark.com/support.
Configuración
Diagrama de conexión
He aquí un ejemplo de cómo utilizar su WS100 en su configuración. Los productos que no figuran en el Introducción > Contenido de la caja se venden por separado.
Alimentación
Mezclador |
WS100
Altavoces
6
Preparación del transmisor del micrófono
1.Extraiga la puerta del compartimiento para pilas del transmisor del micrófono e inserte 2 pilas AA en el mismo. Asegúrese de que las polaridades de las pilas (+ y –) sea la correcta.
2.Vuelva a colocar la puerta del compartimiento para pilas.
3.Coloque el interruptor de encendido en la posición on. El indicador de encendido parpadeará brevemente para indicar que el transmisor del micrófono está encendido.
Preparación del receptor
1.Para obtener mejores resultados, coloque el receptor al menos a 1 metro (3 pies) por encima del piso y coloque la antena en posición vertical.
2.Utilice el adaptador de corriente incluido para conectar la entrada de corriente del receptor a su toma de corriente.
3.Utilice un cable de 6,35 mm (1/4 pulg.) estándar para conectar una de las salidas de audio de su receptor a su mezclador o sistema de altavoces alimentados. No utilice ambas salidas de audio al mismo tiempo; esto puede dar como resultado una pérdida en la señal o mayor ruido.
4.Pulse el botón de encendido para encender el altavoz
5.Si el transmisor del micrófono está encendido, el indicador RF del receptor se iluminará para mostrar que los dispositivos están conectados y dentro del rango. El receptor y el transmisor del micrófono están pre-programados para funcionar en una frecuencia regional fija.
6.Utilice la perilla de volumen para ajustar el nivel de la señal de audio enviada desde la salida de audio de su mezclador o sistema de altavoces alimentados.
Características
Transmisor de micrófono
1. Rejilla: Esta cobertura protege la cápsula del micrófono y reduce |
1 |
el ruido del aire y la respiración. |
2.Interruptor de encendido: Este interruptor de tres posiciones
enciende y apaga el transmisor.
i. El transmisor está apagado.
ii. El transmisor está encendido, pero la señal de audio está silenciada.
iii. El transmisor está encendido y enviando audio al receptor.
3. Indicador de encendido: Este LED parpadeará brevemente |
3 |
|
cuando el interruptor de encendido se pasa a la posición de |
2 |
|
encendido. |
|
4. Compartimiento de las pilas: Inserte 2 pilas AA en el compartimiento. Asegúrese de que las polaridades de las pilas
(+ y –) sea la correcta. |
4 |
|
|
|
WS100 |
7

Receptor
Panel frontal |
|
|
|
|
|
5 |
3 |
2 |
|
6 |
4 |
1 |
6 |
1.Botón de encendido: Pulse este botón para encender o apagar el receptor.
2.Indicador de encendido: Al encenderse, este LED indica que el receptor está encendido.
3.Indicador RF: Al encenderse, este LED indica que el receptor está recibiendo una señal proveniente del transmisor.
4.Indicador AF: Al encenderse, este LED indica el nivel actual de la señal de audio recibida desde el transmisor.
5.Perilla de volumen: Gire esta perilla para ajustar el volumen de la salida de micrófono y la salida de línea.
6.Antenas: Estas antenas reciben la señal proveniente del transmisor. Coloque las antenas en posición vertical para obtener la mejor calidad de señal.
Panel trasero


 1
1


 2
2


 3
3
1.Entrada de corriente: Utilice el adaptador de corriente incluido para conectar esta entrada a una toma de corriente.
2.Salida de micrófono (6,35 mm / 1/4 pulg.): Utilice un cable estándar de 6,35 mm (1/4 pulg.) para conectar esta salida balanceada a su mezclador, sistema de altavoces alimentados, etc. Asegúrese de que la entrada del dispositivo conectado esté configurada para recibir una señal de audio de nivel de micrófono.
3.Salida de línea (6,35 mm / 1/4 pulg.): Utilice un cable estándar de 6,35 mm (1/4 pulg.) para conectar esta salida no balanceada a su amplificador de guitarra, mezclador, sistema de altavoces alimentados, etc. Asegúrese de que la entrada del dispositivo conectado esté configurada para recibir una señal de audio de nivel de línea.
8
 Loading...