


TT1600MKII – TT1610
PROFESSIONAL DJ TURNTABLE
Quick Start Owner’s Manual
(ENGLISH)
BOX CONTENTS
-Turntable
-Aluminum Platter w/Belt
-Pre-Mounted Cartridge
-45 RPM Adapter
-Counterweight
Manual de inicio rápido para el usuario
(ESPAÑOL)
CONTENIDOS DE LA CAJA:
-Giradiscos
-Plato de aluminio con correa
-Cartucho pre-montado
-Adaptador de 45 RPM
-Contrapeso
Gebrauchsanweisung zur schnellen Inbetriebnahme
(DEUTSCH)
SCHACHTELINHALT
- |
Plattenspieler |
- |
Aluminium-Drehteller mit Riemen |
- |
Vorgefertigtes Einbaumodul |
- |
45 RPM-Adapter |
- |
Gegengewicht |
Guide d’utilisation rapide
(FRANÇAIS)
Contenu de la boîte
-Platine tourne-disque
-Plateau en aluminium avec courroie
-Cartouche prémontée
-Adaptateur 45 tr/min
-Contrepoids
Manuale Rapido di Utilizzazione
(ITALIANO)
CONTENUTO DELLA CONFEZIONE
-Giradischi
-Piatto in Alluminio con Cinghia
-Cartuccia Pre-Installata
-Adattatore 45 giri
-Contrappeso
(ENGLISH) QUICK START GUIDE
1.Make sure all items listed on the front of this guide are included in the box.
2.READ SAFETY INSTRUCTION BOOKLET BEFORE USING THE PRODUCT
3.Go to http://www.numark.com for product registration.
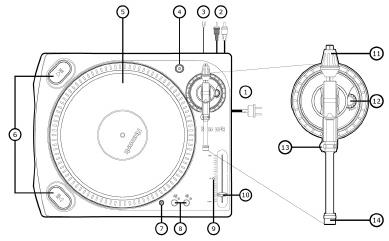
GENERAL CONTROLS
1.Power Cable: This power cable should be plugged into a wall receptacle AFTER all audio connections are made.
2.RCA Audio Output Cables: These cables are used to connect the turntable to a DJ mixer or amplifier that has a built in PHONO PREAMP. This RCA type input is a feature that is commonly found on most DJ mixers and will be labeled PHONO or TURNTABLE. If the RCA Audio Output Cables are not connected to a mixer or amplifier with a PHONO PREAMP, then the audio output will be very quiet.
3.Ground Wire: This ground wire must be connected to a metal bolt or ground lug that is on the mixer or amplifier that the turntable is connected to. If the ground wire is not securely fastened to a metal bolt or ground lug, then the audio output will exhibit a “buzzing” sound.
4.Power Button: This ring around the power button illuminates red when the turntable is switched on.
5.Platter: This aluminum platter must be securely fastened to the turntable prior to operation. The Motor Drive Belt can be found on the drive ring underneath the platter. See SETUP INSTRUCTIONS for detailed information on installing the Motor Drive Belt.
6.Start/Stop Buttons: These buttons start and stop the turntable motor. Both buttons have the same function. If they seem to not be functioning, check to make sure that the Motor Drive Belt is properly installed in the SETUP INSTRUCTIONS.
7.Target Lamp Power Jack: This RCA Jack supplies power to the an accessory Target Lamp (NOT INCLUDED.)
Note: IT HAS NO AUDIO FUNCTION-DO NOT CONNECT AUDIO CORDS TO THIS POWER JACK
The Target Lamp shines light across the vinyl record grooves to help identify track marks in low light situations.
8.33 and 45 RPM Buttons: These buttons control the RPM of the turntable platter. A red LED indicates which RPM mode has been selected.
NOTE: If the turntable is powered down while in the 45 RPM setting, it will return to 33 RPM when it is powered up.
9.Pitch LED: This LED illuminates green when the pitch slider is set at 0%. When the pitch slider is moved away from zero, the LED illuminates red.
10.Pitch Slider: This slide control allows the pitch to be increased or decreased by 10%. In the center position the pitch is at 0%. When moved away from the center and towards the tone arm decreases the pitch (slows down the platter) and moving the pitch slider away from the tone arm increase the pitch (speeds up the platter.)
TONE ARM: Items 11 – 15 are all parts of the Tonearm. Refer to the TONEARM SETUP section for additional details on these controls. Your model will be equipped with straight arm or S-arm style depending upon model purchased.
11.Counter Weight and Scale Ring: The Counterweight is used to balance the head shell and cartridge assembly so that the proper amount of stylus pressure is applied to the record.
12.Anti-Skate Adjustment: This knob is used to compensate for inward tracking forces. See TONEARM SETUP for more details.
13.Arm Clip: This specially designed arm clip secures the tone arm while at rest or when not in use. The arm clip has been designed to remain in the up position while unlocked.
NOTE: When transporting the turntable, it is always recommended that the headshell be removed and the arm clip secured to prevent tonearm or turntable damage.
14.Tone Arm Lock Nut: This Aluminum nut is used to secure the head shell and cartridge assembly to the tone arm tube. See Cartridge Setup for more details.

PLATTER SETUP
WARNING: Incorrect Platter setup can lead to poor turntable performance, platter instability or permanent motor damage.
1.Start by placing the rubber drive belt around the inner bottom ring of the turntable platter. This should come preinstalled, but check to make sure that it is not twisted or damaged.
2.Install the Platter on the center spindle and press it down firmly. Check to make sure that it rotates uniformly and does not wobble excessively.
3.Rotate the platter so that the one of the holes is aligned with the Start Stop button on the front corner of the turntable. The brass motor spindle should be visible through this hole.
4.Reach into the hole and pull the rubber drive belt off of the inner ring, and install it over the motor spindle. Be careful not to twist the rubber drive belt during this step. Check to make sure the platter rotates uniformly. If the drive belt is properly installed, there should be a slight amount of tension that brings the platter to a stop after spinning it freely.
TONEARM SETUP
1.Begin by rotating the counterweight clockwise until it is in the complete forward position (NOTE: this is also the maximum amount of pressure that can be applied to the cartridge.)
2.Now there should be a feeling of weight and resistance when the head shell is raised and lowered. Begin rotating the counterweight counter-clockwise (away from the pivot point) until the weight and resistance feeling is gone. If done properly, the tone arm will pivot with very little resistance back and forth indicating that there is exactly 0 grams of stylus pressure.
3.With the counterweight in its new position further away from tone arm pivot point, grasp the scale ring of the counter weight and rotate it until "0" is in the vertical position.
4.Finally, rotate the counterweight (and scale ring) clockwise (towards the pivot point) until the desired amount of weight is reached. If the scale rotates 360 degrees beyond the zero point, the new scale ring reading should be added to 3.5.
*The included head shell and cartridge assembly requires a minimum of 3 grams and no more than 5 grams for optimum performance.
Setting the Anti-Skate Adjustment
In most cases, the Anti-Skate should be set to its minimum setting. Anti-Skate compensates for inward tracking forces that occur with certain cartridges when the stylus nears the center of the record. If the turntable is experiencing excessive skipping during back-cueing and scratching while nearing the center spindle, try increasing the Anti-Skate in the increments indicated on the dial. Start by adding an increment of 1, test its performance, than increase it more, and so on.

(ESPAÑOL) MANUAL DE COMIENZO RÁPIDO DEL LECTOR
1.Asegúrese de que todos los artículos incluidos al inicio de este manual están incluidos en la caja.
2.LEA LAS INSTRUCCIONES DEL FOLLETO DE SEGURIDAD ANTES DE UTILIZAR EL PRODUCTO.
3.Visite http://www.numark.com para registrar el producto.
CONTROLES GENERALES
1.Cable de alimentación: Este cable de alimentación debe ser enchufado a una toma de corriente en la pared DESPUÉS de que se realicen todas las conexiones de audio.
2.Cables RCA de salida de audio: Estos cables se utilizan para conectar el giradiscos a un mezclador de DJ o a un amplificador que tiene un PHONO PREAMP instalado. Esta entrada tipo RCA es una característica que se encuentra en la mayoría de los mezcladores de DJ y estará identificada con PHONO o TURNTABLE. Si los cables de salida de audio RCA no son conectados a un mezclador o amplificador con PHONO PREAMP, la salida de audio será muy baja.
3.Cable de conexión a tierra: Este cable de conexión a tierra debe ser conectado a una clavija metálica o a una lengüeta de tierra del mezclador o amplificador al cual está conectado el giradiscos. Si el cable de conexión a tierra no está bien ajustado a una clavija metálica o a una lengüeta de tierra, la salida de audio tendrá un sonido de zumbido.
4.Botón de alimentación: Este anillo alrededor del botón de alimentación se ilumina de color rojo cuando se enciende el giradiscos.
5.Plato: Este plato de aluminio debe estar bien ajustado al giradiscos antes de hacerlo funcionar. La correa de transmisión del motor puede ubicarse en el anillo del drive, debajo del plato. Vea las INSTRUCCIONES DE INSTALACIÓN para más información sobre la instalación de la Correa de transmisión del motor.
6.Botones Start/Stop: Estos botones ponen en marcha y detienen el motor del giradiscos. Ambos botones tienen la misma función. Si parecen no funcionar, revise las INSTRUCCIONES DE INSTALACIÓN para asegurarse de que la correa de transmisión del motor está instalada correctamente.
7.Enchufe de alimentación de la lámpara con flexo: Este jack de RCA suministra la alimentación a la lámpara de accesorio (NO INCLUIDA.)
NOTA: NO TIENE FUNCIONES DE AUDIO. NO CONECTE CABLES DE AUDIO A ESTE ENCHUFE DE ALIMENTACIÓN
La lámpara con flexo ilumina las ranuras del disco de vinilo para ayudar a la identificación de las marcas en situaciones de baja iluminación.
8.Botones de 33 y 45 RPM (revoluciones por minuto): Estos botones controlan las RPM del plato del giradiscos. Un LED rojo indica el modo de RPM que ha sido seleccionado.
NOTA: Si apaga el giradiscos mientras que está funcionando a 45 RPM, volverá a las 33 RPM cuando encienda de nuevo el giradiscos.
9.LED del Pitch: Este LED se ilumina de color verde cuando el deslizador del pitch está fijado al 0%. Cuando el deslizador del pitch es alejado del cero, el LED se ilumina de color rojo.
10.Deslizador del Pitch: Este deslizador permite aumentar o disminuir el pitch en un 10%. En la posición central, el pitch está al 0%. Cuando es alejado del centro y se mueve hacia el brazo, esto disminuye el pitch (baja la velocidad del plato) y cuando el deslizador del pitch es alejado del brazo, esto hace que aumente el pitch (aumenta la velocidad del plato.)
EL BRAZO: Los artículos 11 – 15 forman todos parte del brazo. Consulte la sección INSTALACIÓN DEL BRAZO para más detalles sobre estos controles. Su modelo estará equipado con un brazo recto o un brazo en forma de S, dependiendo del modelo adquirido.
11.Contrapeso y anillo numerado: El contrapeso se usa para balancear el ensamblaje del portacápsulas y del cartucho con el fin de aplicarle al disco la cantidad adecuada de presión de la aguja.
12.Ajuste Anti-Skate (anti-deslizamiento): Este botón se usa para compensar por las fuerzas de tracción de entrada. Consulte la INSTALACIÓN DEL BRAZO para más detalles.
13.Clip del brazo: Este clip está diseñado especialmente para fijar el brazo mientras está en el soporte o mientras no se usa. El clip ha sido diseñado para permanecer hacia arriba mientras no esté fijado.
NOTA: Al transportar el giradiscos, es siempre recomendable retirar el portacápsulas y sujetar con firmeza el clip del brazo para evitar daños al brazo o al giradiscos.
14.Tuerca de fijación del brazo: Esta tuerca de aluminio se usa para fijar el ensamblaje del portacápsulas y del cartucho al tubo del brazo. Consulte la Instalación del cartucho para más detalles.
 Loading...