


PROFESSIONAL MP3/CD/USB PLAYER AND CONTROLLER
QUICKSTART GUIDE
ENGLISH ( 1 – 9 )
GUÍA DE INICIO RÁPIDO
ESPAÑOL ( 10 – 18 )
GUIDE D'UTILISATION RAPIDE
FRANÇAIS ( 19– 27 )
GUIDA RAPIDA
ITALIANO ( 28 – 36 )
KURZANLEITUNG
DEUTSCH ( 37 – 45 )
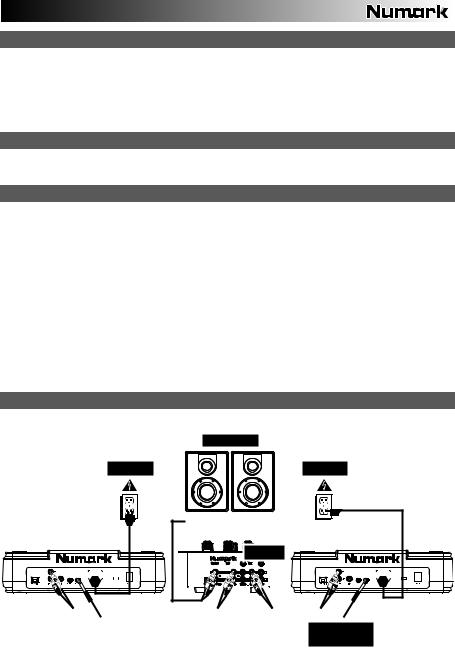
BOX CONTENTS
NDX800
Power cable
RCA cable (stereo)
USB cable
Quickstart Guide
Safety & Warranty Information Booklet
REGISTRATION
Please go to http://www.numark.com to register your NDX800. Registering your product ensures that we can keep you up-to- date with any new product developments and provide you with world-class technical support, should you run into any problems.
GROUND RULES
1.Make sure all items listed in the BOX CONTENTS section are included in the box.
2.READ SAFETY & WARRANTY INFORMATION BOOKLET BEFORE USING THE PRODUCT.
3.Study the connection diagram in this guide.
4.Place mixer in an appropriate position for operation.
5.Make sure all devices are turned off and all faders and gain knobs are set to "zero."
6.Connect all stereo input sources as indicated in the diagram.
7.Connect the stereo outputs to power amplifier(s), tape decks, and/or other audio sources.
8.Plug all devices into AC power.
9.Switch everything on in the following order:
•Audio input sources (i.e. turntables, CD players, etc.)
•Mixer
•Last, any amplifiers or output devices
10.When turning off, always reverse this operation by turning off:
•Amplifiers
•Mixer
•Last, any input devices
CONNECTION DIAGRAM
HOUSE AMP
POWER |
POWER |
MIXER |
|
|
|
|
|
|
|
|
|
|
|
|
|
|
|
GROUND |
GROUND |
|
|
|
|
|
|
|
|
|
|
|
|
|
|
|
|
|
|
|
|
|
|
|
|
|
|
|
|
|
|
|
|
|
|
|
|
|
|
|
|
|
|
|
|
|
|
|
|
|
|
|
|
|
|
|
|
|
|
|
|
|
|
|
|
|
|
|
|
|
|
|
|
|
|
|
|
|
|
|
|
|
|
|
|
|
|
|
|
|
|
|
|
|
|
|
|
|
|
|
|
|
|
|
|
|
|
|
|
|
|
|
|
|
|
|
|
|
|
|
|
|
|
|
|
|
|
|
|
|
|
|
|
|
|
|
|
|
|
|
|
|
|
|
|
|
RELAY CABLE (not included)
1

REAR PANEL FEATURES
5 |
6 |
7 |
8 |
1 |
3 |
4 |
|
|
|
|
2 |
1.POWER IN – Use the included power adapter to connect the mixer to a power outlet. While the power is switched off, plug the power supply into the mixer first, then plug the power supply into a power outlet.
2.VOLTAGE SELECTOR – This 2-position switch sets the AC input voltage for the NDX800. U.S. users should set this switch to "115V" whereas U.K. and most European users will need to set this to "230V."
3.POWER BUTTON – Press this to turn the unit on and off.
4.USB SLAVE – Connect the NDX800 to a computer via this USB jack and your NDX800 can be used as a software controller device using USB MIDI protocol.
5.LINE OUTPUT (RCA) – Use standard RCA cables to connect this output to the line input of your mixer.
6.DIGITAL OUTPUT – This RCA connector will allow you to send a digital audio signal to any device designed to accept a S/PDIF (Sony/Phillips Digital Interface Format) signal. You can also connect the digital output to a karaoke decoder to reproduce the graphics from CD+G discs.
7.FADER START – Use this connector to plug into your fader start compatible mixer or remote switch. To use this connector for fader start, use a fader start cable to connect to a fader start compatible mixer. Every time you move the crossfader on the mixer to the side that the unit is on, it will start playing. When you move the fader away from that side, the unit will stop. Moving the fader back will start playback again.
8.RELAY – Relay play allows two compatible CD players to alternate play from one unit to the other and back as the tracks end. To use the relay feature, connect one end of your relay cable here and the other end to the relay jack of your other CD player. To turn relay mode on and off, hold the MODE button and turn the parameter knob.
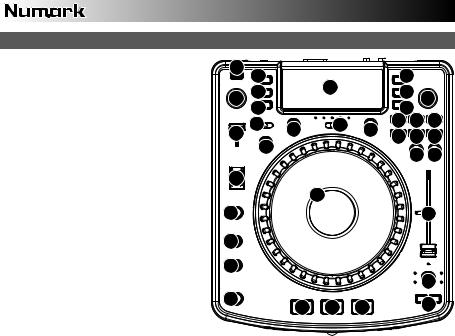
LCD FEATURES
1.PLAY / PAUSE – This shows when the unit is playing or paused.
2.CUE – Flashing when the unit is setting a cue point. Lit continuously when the unit is paused at a cue point.
3.TRACK NUMBER – Shows the current track number.
4.TOTAL TRACKS – Shows the total number of tracks on the CD.
5.MP3 – Indicates when there are MP3s present on the disc or connected USB device.
3 1 2 6 7 8 |
10 |
4


 12
12
2
13 9 14 5 9 11
6.MINUTES – Shows the minutes elapsed or remaining depending on mode setting.
7.SECONDS – Shows the seconds elapsed or remaining depending on mode setting.
8.FRAMES – The CD player breaks down a second into 75 frames for accurate cueing. This shows the frames elapsed or remaining depending on mode.
9.TIME MODE – Indicates whether the time shown on the LCD is the elapsed time for the track, remaining time for the track, or total remaining time for the entire CD.
10.BPM – The tempo, which is indicated in BPM (beats per minute).
11.PITCH – Shows the percentage change in pitch.
12.KEY LOCK – Indicates when Key Lock Mode is engaged. The number next to the lock icon indicates how far away the track's current key is from its original key (in semitones).
13.LOOP – Indicates when a loop is programmed. When the indicator is flashing, a loop is currently playing.
14.TEXT DISPLAY – Displays folder names, CD information, and MP3 tag information.
2
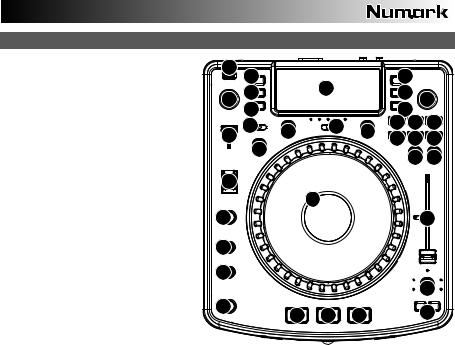
TOP PANEL FEATURES
1.EJECT – Press this button to eject the CD. If a CD is currently playing, this button will have no effect.
2.USB MASTER – Connect your USB storage device to this connector to allow the NDX800 to read and play back your music files. The NDX800 only supports the MP3 format so please make sure that your audio files are encoded as MP3s if you would like to use them with the NDX800,
Note: The NDX800 supports the HFS+, FAT and NTFS files systems. HFS+ GUID Partition Table is not supported at this time.
3.SOURCE – Press the SOURCE button and turn the PARAMETER knob to choose which audio source you want to play; CD, USB, or you can use the NDX800 as a USB MIDI controller. This button will not function if the NDX800 is currently playing.
4.TRACK KNOB – Used to skip from track to track, for folder navigation and as an "enter" button.
5.BACK – When navigating a CD or device with folders, this button will take you back to folder navigation or file navigation.
6.PLAY – Starts the music. The music will begin playing from either the cue point or the last point of pause. Pressing this button while the unit is playing will restart the song from the last set cue point, which can be used to create a "stutter" effect.
2 |
3 |
|
|
|
5 |
|
|
27 |
|
31 |
|
30 |
|
26 |
|
|
|
4 |
||
|
28 |
|
|
|
29 |
|
|
24 |
13 |
20 |
11 |
18 18 18 |
|
|
|
|
||||
25 |
|
19 19 19 |
||||
|
|
|
|
|||
|
|
|
|
|
||
|
23 |
|
|
|
21 22 |
|
|
|
|
|
|
||
17 |
|
|
|
|
|
|
|
|
|
9 |
|
|
|
10 |
|
|
|
|
|
15 |
12 |
|
|
|
|
|
|
12 |
|
|
|
|
|
|
|
|
|
|
|
|
14 |
1 |
|
8 |
7 |
6 |
|
16 |
|
|
|
||||
|
|
|
|
|||
7.PAUSE – Stops the music while in play. Pressing play following this sets a new cue point. Holding down the button while scratching or stuttering the music will stop the music at the current position, allowing you to capture a loop in or cue point.
8.CUE – Returns and pauses the music at the last set cue point. The cue point is the last place in which the unit was paused and then play was pressed. Pressing a second time allows for temporary play of this point. You can easily edit the cue point by turning the wheel. As you rotate the wheel the music will sound. By stopping the wheel and pressing play a new point is set.
9.JOG WHEEL – The jog wheel serves many functions depending on its current mode.
a)If a track is not playing, the JOG WHEEL will search slowly through a track's frames. To set a new cue point, rotate the JOG WHEEL then begin playback when you have determined the proper position. Press CUE to return to that cue point.
b)If a track is playing, the JOG WHEEL will temporarily bend the pitch of the track. Rotating the JOG WHEEL clockwise temporarily speeds it up while rotating it counterclockwise slows it down. This is a useful tool for beatmatching.
c)When the SEARCH button has been activated, rotating the JOG WHEEL will scan rapidly through the track.
d)When the SCRATCH button has been activated, rotating the JOG WHEEL will "scratch" over the audio of the track, like a needle on a record.
10.SCRATCH – Turns scratch mode on or off. If scratch mode is on, the button will light up and the center part of the jog wheel will scratch like a turntable when you spin it. If scratch mode is off, the center part of the jog wheel will pitch bend when you spin it.
To change the scratch mode or style, hold down SCRATCH and turn the PARAMETER knob.
11.SEARCH – When engaged, search mode will allow you to use the jog wheel to quickly scan through the current track. If you do not touch the wheel for 10 seconds you will automatically exit search mode. Search speed can be adjusted by holding the SEARCH button and turning the PARAMETER knob.
To adjust how quickly SEARCH scans through your tracks, hold down SEARCH and turn the PARAMETER knob.
12.STOP / START TIME – Use these knobs to adjust the speed that the music starts when you press play (START TIME) or the speed that the music stops when you press pause (STOP TIME).
13.TAP – Pressing this button in time with the beat will help the built-in BPM counter detect the proper tempo. Holding the button for 2 seconds will cause the BPM counter to reset and recalculate.
14.PITCH / KEYLOCK – The pitch button controls the range of the pitch fader as well as enabling and disabling key lock mode.
Press and release the pitch button to cycle through pitch fader settings of +/- 6%, 12%, 25% and 100%. You can also disable the pitch fader by pressing the pitch button again after selecting 100%.
The other function of this button is key lock. To engage key lock mode, hold the pitch button for two seconds. This feature allows you to change the speed of the song without changing the key. The key of the song will lock to whatever position the pitch fader is at when key lock is engaged.
To change the key of a song manually, hold PITCH / KEYLOCK and turn the PARAMETER knob.
3

15.PITCH FADER – This controls the speed of the music. Moving towards the "+" will speed the music up, while moving towards the "-" will slow it down. The percentage of pitch adjustment is shown on the display.
16.PITCH BEND – Allows you to briefly adjust the speed of the music faster or slower for as long as the button is held. Useful for quick speed adjustments to help match the beats of two songs that might be at the same tempo but have beats that hit at slightly different times.
17.BLEEP / REVERSE SWITCH – Use this if you want to play a CD backwards. "Bleep" mode will play the music in reverse while the CD timer continues to advance. When you release the switch, the CD will continue to play where it would have been if you had not engaged the switch. "Reverse" mode will play music in reverse and the CD time will also count backwards.
18.LOOP IN / OUT / RELOOP – These buttons are used to define your beginning and ending loop points (LOOP IN and LOOP OUT) or to replay or restart your loop (RELOOP). For more information about this feature please see the looping section of this manual.
19.TRIGGER BUTTONS – These buttons can be used for 3 possible functions, chosen by holding the REC button and turning the PARAMETER knob. For more information see the "Multi Mode Trigger Buttons" section later in this manual.
20.SHIFT – Used with the looping feature, the shift switch allows you to cut your loop in half or double it.
21.REC – This button is used in conjunction with the 3 assignable TRIGGER BUTTONS to record samples and set hot start points. When used in conjunction with the parameter knob, this allows you to set the mode for the three multi-mode trigger buttons.
To choose a mode, hold the REC button, then while continuing to hold REC, hold the desired TRIGGER BUTTON and turn the PARAMETER knob to select the option you want to change. For more information see the "Multi Mode Trigger Buttons" section later in this manual.
22.(BUTTON) MODE – This button is used to change the function of the 3 assignable buttons. Pressing this button will cycle between LOOP-2, HOT CUE and SAMPLES. For more information see the "Multi Mode Trigger Buttons" section later in this manual.
23.FX – Pressing this button will turn effect mode on or off. If the button is illuminated, effects mode is on.
24.FX SELECT – Use this toggle switch to choose which effect you want to use. There are six different effects available. See the effects section in this manual for more information.
25.WET / DRY FADER – Use this to adjust how much of the effect will be mixed into the main mix. The 0% or "dry" side of the fader will give you less of the effected music and more of the original music while the 100% or "wet" side adds more of the effected music and less of the original music.
26.PARAMETER – This knob has multiple uses depending on what you are doing when you turn it.
By default, spinning this knob will adjust a parameter of the effect you have currently chosen with the FX SELECT switch. For more information see the effect section later in this manual.
Other settings can be adjusted by holding down an appropriate button while turning the PARAMETER knob.
27.PROG (Program) – This button helps you create a program – a sequence of tracks to play continuously. To create a program, press PROGRAM when the CD player is paused. To enter a track into the program, use the TRACK KNOB to select the desired track then press PROGRAM to enter it. Repeat this process for each track you want to enter (in the order you want them to play). When you have finished, press PLAY to start playing the program. The tracks will play in the order you entered them. To cancel your program as it is playing, press and hold PROGRAM for three seconds.
Holding down the PROG button and turning the PARAMETER knob will bring you to a list of menu options. Please see "Parameter Knob Features" section of this manual for more information.
28.TIME – Toggles the display to show elapsed time, time remaining on the current song, or time remaining of an entire audio CD.
29.RECALL / STORE – Pressing and holding the RECALL button for 2 seconds will allow cue points to be stored. More than one cue set can be stored per CD. Cue sets will be numbered sequentially per CD.
When a CD with stored cue points is inserted, the display will indicate that there are "Cue Points Available". To recall your stored cue points press and release the RECALL button. If more than one set of cue points has been saved on a CD, the PARAMETER knob will allow you to cycle through your stored cue sets.
30.(PLAY) MODE – There are four playback modes:
Single: Plays the selected song, then pauses and cues the next track.
SingleReplay: Repeats the current song until manually stopped.
Random: Plays all songs on the CD in a random order.
Continuous: Plays all songs on the CD in order then repeats at the beginning.
To view file names or ID3 tag information when playing MP3s, hold RECALL/ STORE and press (PLAY) MODE. To turn Relay Mode on or off, hold (PLAY) MODE and turn the PARAMETER knob.
31.LCD DISPLAY – All information and functions are displayed here. CD text (if available), ID3 tag information and effects settings are all shown here.
4

PARAMETER KNOB FEATURES
SCRATCH
Holding the SCRATCH button and turning the PARAMETER knob will allow you to choose the desired scratch mode:
Vinyl: This mode allows you to use the JOG WHEEL to scratch just like you would with a vinyl record. When you press on the JOG WHEEL, the music will stop where it is until the wheel is released.
Forward: When you use the JOG WHEEL to scratch, only the forward motions are heard. This simulates using a crossfader to cut out the backspins.
Cue: Scratches from the current cue point. Each time you touch the JOG WHEEL, the song will begin from the current cue point. This allows you to set a cue point for a certain segment of a song and scratch repeatedly over the same segment.
Cue Forward: Cue Forward is a combination of Cue Mode and Forward Mode. It scratches from the current cue point but does not play sound during counterclockwise motion of the wheel.
Bleep: Allows you to "insert" a scratch while the music continues to advance. One you are done scratching, the music will continue to play where it would have been if you hadn't scratched.
Bleep Forward: Essentially a combination of Bleep and Forward Scratch Modes. Allows you to "insert" a scratch but only plays the forward motion of the platter.
PITCH
Holding the PITCH button and turning the PARAMETER knob allows you to change the key of the current song from "L" (lower key) to "H" (higher key) in 40 semitone increments (with 0 being no key change).
MODE
To turn Relay Mode on and off, hold the rectangular MODE button and turn the PARAMETER knob to select the appropriate relay setting. Relay Mode will allow you to alternate play between 2 compatible units connected via a 1/8" mono relay/remote cable.
SEARCH
Search speed can be adjusted by holding SEARCH and rotating the PARAMETER knob. Options based upon 1 wheel rotation are 15 seconds, 30 seconds, and 1 minute.
PROGRAM / PARAMETER OPTIONS
Holding the PROGRAM button and turning the PARAMETER knob will bring you to the following menu options. Pressing down on the PARAMETER knob will allow you to modify the parameters for the menu option that you have selected:
Scratch Delay (On, Off): Activates a slight delay when releasing the platter in Scratch Mode.
Remote (On-On, On-Off, Fader Start): Changes the remote start option to allow the unit to be started by another device using a remote start cable.
Power On Play (On, Off): When on, this option will cause the CD player to begin playing as soon as the power is turned on.
Memo All Clear (No, Yes): Clears all stored cue points and loop point information.
Sleep Mode (On, Off): When sleep mode is engaged the unit will go into a "sleep" state after a few minutes of inactivity.
Preset Clear (Yes, No): Reset all global parameters to their default settings.
Version Number: When the PARAMETER knob is pressed, the operating system version numbers will be displayed for as long as the PROG button is held.
Power On Demo (On, Off): When this option is on, the unit will go into a "demo mode" where the platter LEDs will illuminate in a pattern as soon as the unit is powered on.
5

MULTI-MODE TRIGGER BUTTONS
By pressing the circular MODE button, you can choose the desired mode for the three trigger buttons shown above. There are three modes available:
LOOP-2: In this mode the three TRIGGER BUTTONS act as another set of loop buttons that behave in the same way as the buttons above them. This gives you the ability to set two completely separate sets of loop points. For more information on looping, see the following chapter.
HOT CUE: This mode will allow you to set up to three "hot cue points". These are similar to regular cue points, except that when the TRIGGER BUTTONS are pressed, the unit will instantly jump to the defined point and begin playing.
To define a hot cue point, make sure you are in hot cue mode by pressing the circular MODE button until "Mode:Hot CUE" is displayed on the lower portion of the screen. Press REC to arm recording, then press the desired TRIGGER BUTTON. Whatever point you are at on the CD at the moment you press the TRIGGER BUTTON is the point that will be recorded to the TRIGGER BUTTON. To instantly start playing from your hot cue point just press the same TRIGGER BUTTON again.
SAMPLE: The third mode is sample mode. Sample mode allows you to record an audio sample up to 5 seconds long, on each of the 3 TRIGGER BUTTON.
To record a sample, first make sure you are in sample mode by pressing the round MODE button until the display shows "Mode:SAMPLES". Next, press and release REC to arm recording. Then, when you press one of the three TRIGGER BUTTONS, the unit will begin recording until you either press that TRIGGER BUTTON again to stop recording or you run out of sample space.
To play back your sample, just press the appropriate TRIGGER BUTTON. Buttons with samples assigned to them will be lit while unused buttons will be dark.
There are also three playback options you can choose for each of the three sample TRIGGER BUTTONS. To choose a mode, hold the REC button, then while continuing to hold REC, hold the desired TRIGGER BUTTON and turn the PARAMETER knob to select the option you want to change. To modify the selected option, press down and release the PARAMETER knob then turn the knob to the desired setting. Press down on the PARAMETER knob to lock in that option choice.
The three playback options are:
Sample Insert (On, Off): Determines whether the sample will override the currently playing audio source or if it will be mixed together with the currently playing audio source. With 'On' selected, the sample will override the playing audio, while with 'Off' selected, the sample will be mixed in with the playing audio.
Sample Reverse (On, Off): When on, this option will play the sample in reverse.
Sample Volume (0-100): This setting controls the volume of the sample when played back.
6

LOOPING
The NDX800 has a seamless looping feature, which means that if you define a loop, there is no delay when the music loops back to the beginning. This looping feature allows you to be very creative with your mixes, allowing you to extend desired sections of a song for as long as you want, or create remixes on the fly!
There are three buttons used for looping:
LOOP IN: This is the point where you would like a loop to start. By default, a "loop in" point is automatically set at the beginning of the song. To define a new "loop in" point, press the LOOP IN button when the song reaches the desired point where you would like a loop to begin. The LOOP IN button will light, indicating a new "loop in" point has been set. The RELOOP/STUTTER button will also illuminate indicating that you can now press it to immediately go back to the "loop in" point and begin playing. If you wish to change the "loop in" point, just press the LOOP IN button again.
LOOP OUT: Sets the end point of the loop. The first time you press LOOP OUT while a song is playing, the LOOP OUT button will blink, and the song will begin playing in a seamless loop, starting from the "loop in" point and ending at the "loop out" point. To release, or end the loop, press LOOP OUT a second time and play will continue forward when the song passes the previously set loop out point. The LOOP OUT button will then be continuously lit, indicating that the loop is now in memory for re-looping purposes.
RELOOP / STUTTER: Repeats play or "stutters" (if repeatedly tapped) from the loop in point. If a loop has previously been set, it plays and repeats that loop, until the loop is released by pressing the LOOP OUT button.
SHIFT: Adjusts the loop length by half length or double length increments. Move the shift switch to the right to increase loop length or to the left to shorten the loop.
Hint: The assignable 1-2-3 TRIGGER BUTTONS can be used as a second set of loop buttons. Read the preceding chapter for more information on these multi-mode trigger buttons.
Press LOOP IN to set the beginning of the loop, then press LOOP OUT to set the end point of the loop. Once you press LOOP out, the NDX800 will loop between these two points. If you press LOOP OUT again, the NDX800 will exit the loop and continue playing normally.
If you press LOOP IN but then decide you want to set a different "loop in" point, just press LOOP IN again. Then press LOOP OUT to start looping between the IN and OUT points.
The "loop in" point can also be used as a way to "stutter" play beginning from a certain point in a song. Just press LOOP IN to set the "stutter point", then press RELOOP to begin play from the stutter point. Each time you press RELOOP the NDX800 will jump back to the stutter point and play from that point.
7

EFFECTS
Use the FX SELECT switch to choose the desired effect. Press the EFFECTS button to toggle the effect on and off. You can use the WET/DRY fader to adjust the effect presence in the mix. Most effects can by synched to a ratio of the BPM counter by holding down the PARAMETER knob while turning it, or controlled manually by turning the PARAMETER knob without holding it down.
There are six effects available:
FILTER: An isolation (band pass) filter that lets you play only a specific frequency of the music. Rotation of the PARAMETER knob moves the filter frequency. If you press down on the PARAMETER knob while turning it performs a coarse adjustment to the frequency. If you just turn the PARAMETER knob without holding it down it will perform a fine adjustment of the filter frequency.
ECHO: Creates a reverb effect. The rate can be adjusted with the PARAMETER knob. Holding down the PARAMETER knob while turning will allow you to synch the effect to a ratio of the BPM counter.
CHOP: Simulates turning a mute button on and off in time with the music. The speed of the effect is controlled by turning the PARAMETER knob and can also be synched to a ratio of the BPM counter by pressing down on the PARAMETER knob while turning it.
PAN: Alternates playing the right then left speaker channel based on either the tempo of the BPM counter or the speed selected manually. To set the rate, turn the PARAMETER knob. You can synch the speed to a ratio of the BPM counter by pressing down on the PARAMETER knob while turning it.
PHASER: Sweeping phase shifter effect. It is similar to the flange effect, except that the flange effect has a more pronounced harmonic sound. A phase shifter is enharmonic, and has a more "swooshing" sound. The speed of the effect is controlled by turning the PARAMETER knob and can also be synched to a ratio of the BPM counter by pressing down on the knob while turning it.
FLANGER: Sweeping effect with a more pronounced harmonic sound than the phaser, reminiscent of a jet engine passing overhead. The speed of the effect is controlled turning by the PARAMETER knob and can also be synched to a ratio of the BPM counter by pressing down on the knob while turning it.
Wet/Dry Fader
In addition to the PARAMETER knob there is also a WET/DRY fader that allows you to adjust the balance between effected and unaffected audio. As you move the fader from DRY to WET you will more and more of the effected sound.
8
USB MASTER MODE
By connecting a USB mass storage class device such as a USB hard drive, thumb drive or portable media player to the USB MASTER connector on the top of the NDX800, you can access, play, and scratch your music files in the same way you might play a normal audio CD.
To access your USB device:
Note: The NDX800 supports the HFS+, FAT and NTFS files systems. HFS+ GUID Partition Table is not supported at this time.
1.First make sure it is connected to the USB MASTER connector on the top panel of the NDX800.
2.Press and release the SOURCE button.
3.Turn the PARAMETER knob until the display indicates "USB-MASTER", then press down on the PARAMETER knob.
4.After the NDX800 has first analyzed the partition structure (max 9 partitions), then analyzed the folder structure (max 999 folders) of the USB device, you can then navigate through your USB device by following the instructions below.
USB Mass Storage Device
To access files on a USB mass storage class device, use the TRACK knob to choose which folder you want to open, then press down on the knob to enter that folder. You can then use the TRACK knob to either navigate to another folder level or choose an audio file in the current folder that you want to play.
Hint: To organize a large music collection you might consider creating a separate folder for each artist.
Please note:
•Because not all MP3 devices are USB mass storage class, not every player will be compatible with the NDX800.
•If there are no MP3 files inside a folder you are browsing on your external device, the NDX800 will display "No MP3 files in this folder, PLS try another one."
•To change MP3 display mode, hold the RECALL / STORE button and press the (PLAY) MODE button to toggle between file name, ID3 song title, ID3 album title and ID3 artist name.
Tips For Using USB Devices With Your NDX800
•When disconnecting a USB device from the NDX800, always make sure to use the SOURCE button to switch to CD/MP3 Mode before disconnecting. Make sure that the letters "HD" are not blinking on the display when disconnecting a USB device.
•Disconnecting a USB device while the NDX800 is in USB MASTER Mode could possibly cause data on the USB device to become corrupted and unreadable.
•Note: There is a limit of 999 songs per folder or playlist. Use multiple folders or playlists to separate large numbers of songs.
•We do not recommend using MP3 files over 300MB as this may affect the performace of the NDX800.
•For large capacity HD, the NDX800 can read a maximum of 9 disc partitions. Each partition is limited to 999 folders, and each folder is limited to 999 songs.
USB MIDI MODE
You can also connect the NDX800 to a computer via USB to use the NDX800 as a controller for software programs that are compliant with USB MIDI protocol. Check with your software manufacturer to find out if your software supports a USB MIDI controller.
To activate USB MIDI mode, connect a USB cable from the NDX800 USB SLAVE connector to a USB port on your computer. Then press SOURCE and turn the parameter knob to select "USB-MIDI."
NDX800 SOFTWARE
NDX800 works best with the latest software installed. We strongly recommend that you check for software updates right away, and continue to check regularly so you don't miss out on any of the good stuff! Visit www.numark.com for the latest software updates.
9

CONTENIDO DE LA CAJA
NDX800
Cable de alimentación
Cable RCA (stereo)
Cable USB
Guía de inicio rápido
Folleto de información sobre la seguridad y la garantía
REGISTRO
Visite http://www.numark.com y registre su NDX800. El registro de su producto asegura que podamos mantenerle actualizado con los nuevos desarrollos de productos y brindarle apoyo técnico de categoría mundial en caso de que tenga algún problema.
REGLAS BÁSICAS
1.Asegúrese de que todos los artículos indicados en "Contenido de la caja" estén incluidos en la caja.
2.LEA EL FOLLETO DE INFORMACIÓN SOBRE LA SEGURIDAD Y LA GARANTÍA ANTES DE UTILIZAR EL PRODUCTO.
3.Estudie el diagrama de conexión incluido en esta guía.
4.Coloque el mezclador en una posición adecuada para su funcionamiento.
5.Asegúrese que todos los dispositivos estén apagados y que todos los faders y perillas de ganancia estén en posición «cero».
6.Conecte todas las fuentes de entrada estéreo como se indica en el diagrama.
7.Conecte las salidas estéreo a los amplificadores de potencia, bandejas de cinta magnética y/o otras fuentes de audio.
8.Enchufe todos los dispositivos al suministro de corriente alterna.
9.Encienda todo en el siguiente orden:
y fuentes de entrada de audio (por ejemplo, giradiscos, reproductores de CD, etc.) y el mezclador
y por último, cualquier amplificador o dispositivo de salida
10.Al apagar, realice siempre esta operación en sentido inverso: y apague los amplificadores
y el mezclador
y por último, cualquier dispositivo de entrada
DIAGRAMA DE CONEXIÓN
AMPLIFICADOR
DE AUDITORIO
ALIMENTACIÓN |
ALIMENTACIÓN |

 MEZCLADOR
|
|
|
|
|
|
|
|
|
|
|
|
|
|
|
GROUND |
GROUND |
|
|
|
|
|
|
|
|
|
|
|
|
|
|
|
|
|
|
|
|
|
|
|
|
|
|
|
|
|
|
|
|
|
|
|
|
|
|
|
|
|
|
|
|
|
|
|
|
|
|
|
|
|
|
|
|
|
|
|
|
|
|
|
|
|
|
|
|
|
|
|
|
|
|
|
|
|
|
|
|
|
|
|
|
|
|
|
|
|
|
|
|
|
|
|
|
|
|
|
|
|
|
|
|
|
|
|
|
|
|
|
|
|
|
|
|
|
|
|
|
|
|
|
|
|
|
|
|
|
|
|
|
|
|
|
|
|
|
|
|
|
|
|
|
|
|
|
|
|
|
|
|
|
|
|
|
|
|
|
|
|
|
|
|
|
|
|
|
|
|
|
|
|
|
|
|
|
|
|
CABLE RELÉ (no incluido)
10

CARACTERÍSTICAS DEL PANEL TRASERO
5 |
6 |
7 |
8 |
1 |
3 |
4 |
|
|
|
|
2 |
1.ENTRADA D'ALIMENTACIÓN – Use el adaptador de alimentación incluido para conectar el mezclador a un tomacorriente alimentado. Mientras está desconectada la alimentación eléctrica, enchufe la fuente de alimentación al mezclador primero, y luego al tomacorriente.
2.SELECTOR DE VOLTAJE – Este conmutador de 2 posiciones establece el voltaje de entrada de CA del NDX800. Los usuarios de EE.UU. deben colocar este conmutador en "115V", mientras que los del Reino Unido y la mayoría de los países europeos deben colocarlo en "230V".
3.BOTÓN DE ENCENDIDO – Se usa para encender y apagar la unidad.
4.ESCLAVO USB – Conecte el NDX800 a una computadora mediante este jack USB y de esta forma se puede usar como dispositivo controlador de software con el protocolo USB MIDI.
5.SALIDA DE LINÉA (RCA) – Use cables RCA estándar para conectar esta salida maestra a la entrada de linéa de su mezclador.
6.SALIDA DIGITAL – Este conector RCA permite enviar una señal de audio digital a cualquier dispositivo diseñado para aceptar señales S/PDIF (Formato de interfaz digital Sony/Phillips). También es posible conectar la salida digital a un decodificador de karaoke para reproducir los gráficos de discos CD+G.
7.FADER START – Use este conector para enchufarlo a su interruptor remoto o mezclador compatible con Fader Start. Para usar este conector para el Fader Start, conecte el cable de Fader Start a un mezclador compatible con Fader Start. Cada vez que desplace el crossfader del mezclador hacia el lado donde está la unidad activa, empezará a reproducir automáticamente. Cuando aleje el fader de ese lado, la unidad se detendrá. Moviendo el fader hacia atrás activará la reproducción otra vez.
8.RELÉ – La reproducción relé permite que dos reproductores de CD compatibles reproduzcan alternadamente de una unidad a otra y viceversa cuando se terminan las pistas. Para usar esta función de relé, conecte un extremo de su cable de relé aquí y el otro al jack de relé del otro reproductor de CD. Para activar y desactivar el modo relé, mantenga pulsado el botón MODE y haga girar la perilla de parámetros.
CARACTERÍSTICAS DE LA PANTALLA LCD
1.PLAY / PAUSE – Está activo si la unidad está reproduciendo un CD o en pausa.
2.CUE – Parpadea si la unidad está determinando un punto cue. Se ilumina de forma continua si la unidad está detenida en un punto cue.
3.NUMERO DE PISTA – Muestra el numero de pista.
4.TOTAL DE PISTAS – Muestra el numero total de pistas del CD.
5.MP3 – Indica cuando hay MP3 presentes en el disco o dispositivo USB conectado.
3 1 2 6 7 8 |
10 |
4


 12
12
2
13 9 14 5 9 11
6.MINUTOS – Muestra los minutos restantes o transcurridos dependiendo de la configuración del modo.
7.SEGUNDOS – Muestra los segundos restantes o transcurridos dependiendo de la configuración del modo.
8.FRAMES – El reproductor de CD divide un segundo en 75 frames para un cueing más preciso. Muestra los frames restantes o transcurridos dependiendo de la configuración del modo.
9.MODO DE TIEMPO – Indica cuando se visualiza el tiempo restante de la pista ("Remaining" / Restante) o el tiempo restante de todo el CD ("Total" / Total). Esta función se controla mediante el botón de tiempo (TIME).
10.BPM – El tempo, que se indica en el BPM (beats por minuto).
11.PITCH – Muestra el cambio porcentual en pitch.
12.BLOQUEO DE TONALIDAD – Indica cuando se activa el modo Key Lock (Bloqueo de tonalidad). El número que está junto al icono del candado indica a qué distancia está la tonalidad actual de la pista de su tonalidad original (en semitonos).
13.LOOP – Esto ilumina cuando un bucle está jugando.
14.VISUALIZACIÓN DE TEXTO – Muestra el nombre de carpeta, la información del CD or MP3, etc.
11
CARACTERÍSTICAS DEL PANEL SUPERIOR
1. |
EXPULSIÓN – Pulse este botón para expulsar |
2 |
|
|
|
|
|
|
el CD. Si se está reproduciendo un CD, este |
3 |
|
|
|
5 |
|
|
|
|
|
|
|||
|
botón no tiene ningún efecto. |
|
|
|
|
||
|
|
|
|
31 |
|
|
|
2. |
MAESTRO USB – Conecte su dispositivo de |
26 27 |
|
|
30 4 |
||
|
|
|
|||||
|
almacenamiento USB a este conector para |
|
28 |
|
|
|
29 |
|
permitir que el NDX800 lea y reproduzca sus |
|
|
|
|
||
|
|
|
|
|
|
|
|
|
archivos de música. El NDX800 sólo soporta el |
|
24 |
|
20 |
|
18 18 18 |
|
formato MP3, de modo que debe asegurarse de |
25 |
13 |
11 |
19 19 19 |
||
|
que sus archivos de audio estén codificados |
|
|
|
|
||
|
|
23 |
|
|
|
||
|
como pp3 si desea usarlos con el NDX800 |
|
|
|
|
21 22 |
|
|
Nota: El NDX800 soporta los sistemas de |
|
|
|
|
|
|
|
|
|
|
|
|
|
|
|
archivos HFS+, FAT y NTFS. Por el momento, |
|
|
|
|
|
|
|
no soporta la tabla de partición de HFS+ GUID. |
17 |
|
|
|
|
|
3. |
FUENTE – Mantenga oprimido el botón |
|
|
|
9 |
|
|
|
SOURCE y haga girar la PERILLA DE |
|
|
|
|
|
|
|
PARÁMETROS para elegir la fuente de audio |
10 |
|
|
|
|
15 |
|
que desea reproducir: CD, USB o puede elegir |
|
|
|
|
||
|
el NDX800 como controlador MIDI USB. Este |
|
|
|
|
|
|
|
botón no funciona mientras está reproduciendo |
12 |
|
|
|
|
|
|
el NDX800. |
|
|
|
|
|
|
4. |
PERILLA DE PISTAS – Se usa para saltar de |
|
|
|
|
|
|
|
pista en pista, para navegar por carpetas y |
12 |
|
|
|
|
|
|
como botón "enter". |
|
|
|
|
|
14 |
5. |
VOLVER – Cuando se navega por un CD o |
|
|
|
|
|
|
|
dispositivo con carpetas, este botón le permite |
1 |
|
|
|
|
|
|
navigar las carpetas y los archivos de audio. |
|
8 |
7 |
6 |
16 |
|
|
|
|
|||||
6. |
REPRODUCIR – Inicia la música. La música |
|
|
|
|||
|
|
|
|
|
|
||
|
comienza a reproducirse desde el punto de |
|
|
|
|
|
|
|
partida (cue) o el punto de la última pausa. |
|
|
|
|
|
|
|
Pulsando este botón cuando la unidad está reproduciendo, el tema se reinicia desde el último punto cue establecido, |
||||||
|
que puede usarse para crear un efecto de "tartamudeo". |
|
|
|
|
|
|
7.PAUSA – Detiene la música durante la reproducción. Al pulsar el botón de reproducir a continuación, se establece un nuevo punto cue. Manteniendo pulsado el botón durante el efecto de rayado (scratch) y tartamudeo de la música, la misma se detiene en la posición actual, permitiéndole capturar un punto de inicio de loop (ciclo) o cue.
8.CUE – Durante la reproducción, al pulsar CUE se vuelve al punto más reciente donde se inició la reproducción y la pista se pone en pausa. Manteniendo pulsado CUE, la reproducción comienza desde este punto y, al soltarlo, vuelve a ese punto y la pista se pone en pausa. Asimismo, si la pista está en pausa, es posible usar la RUEDA DE AVANCE POR PASOS para localizar un nuevo punto de cue.
9.RUEDA DE AVANCE POR PASOS – Esta rueda cumple numerosas funciones que dependen del modo en que se encuentra.
a)Si no se está reproduciendo una pista, la RUEDA DE AVANCE POR PASOS busca lentamente a lo largo de los frames de la pista. Para determinar un nuevo punto de cue, gire la RUEDA y comience a reproducir una vez que haya determinado la posición adecuada. Pulse CUE para volver a ese punto de cue.
b)Si se está reproduciendo una pista, la RUEDA inflexiona temporalmente el pitch de la misma. Al girar la RUEDA en sentido horario, se la acelera temporalmente, mientras que si se gira en sentido antihorario se la desacelera. Ésta es una herramienta útil para igualar el beat.
c)Cuando está activado el botón SEARCH (Buscar), al girar la RUEDA DE AVANCE POR PASOS se explora rápidamente la pista.
d)Cuando está activado el botón SCRATCH (Rayar), al girar la RUEDA DE AVANCE POR PASOS se "raya" el audio de una pista, como una púa en un disco.
10.EFECTO RAYADO (SCRATCH) – Activa o desactiva el modo de rayado. Cuando se activa, al girar la RUEDA DE AVANCE POR PASOS se crea un efecto 'scratch' (Rayado). Cuando el modo de rayado está activo, el LED indicador se ilumina.
Para cambiar el modo o estilo de rayado, mantenga pulsado SCRATCH y gire la PERILLA DE PARÁMETROS.
11.BUSCAR – Si pulsa este botón, es posible usar la RUEDA DE AVANCE POR PASOS para explorar rápidamente la música. Cuando el modo de búsqueda está activo, el LED indicador se ilumina con luz roja. Si no toca la rueda en 10 segundos, saldrá automáticamente del modo de búsqueda. La velocidad de búsqueda se puede ajustar manteniendo pulsado el botón SEARCH y haciendo girar la perilla de PARÁMETROS.
Para ajustar la rapidez con que SEARCH (Búsqueda) explora sus pistas, mantenga pulsado SEARCH y gire la PERILLA DE PARÁMETROS.
12.TIEMPO DE PAUSA / INICIO – Use estas perillas para ajustar la velocidad con que se inicia la música cuando se pulsa el botón de reproducir (START TIME) o la velocidad con que se detiene cuando se pulsa el botón de pausa (STOP TIME). Es posible ajustar el tiempo de inicio o frenado pulsando la perilla de modo que salga hacia afuera y girándola al valor deseado.
13.GOLPE – Pulsando este botón al ritmo del beat, se ayuda al contador de BPM incorporado a detectar el tempo correcto. Manteniendo pulsado el botón por 2 segundos, el contador de BPM se reinicia y recalcula.
14.PITCH / BLOUEO DE TONALIDAD – El botón de pitch controla la gama del fader de pitch, como también activa y desactiva el modo de bloqueo de tonalidad.
Pulse y suelte el botón de pitch para recorrer los valores del fader de pitch de +/- 6%, 12%, 25% y 100%. También es posible desactivar el fader de pitch pulsando nuevamente el botón de pitch después de seleccionar 100%.
12

La otra función de este botón es el bloqueo de tonalidad. Para activar este modo, mantenga pulsado el botón de pitch dos segundos. Esta función permite cambiar la velocidad del tema sin cambiar la tonalidad. La tonalidad del tema se enganchará a la posición en que esté el fader de pitch cuando se activa el bloqueo de tonalidad. También es posible cambiar manualmente la tonalidad de un tema manteniendo pulsado el botón PITCH mientras se hace girar la perilla de parámetros.
Para cambiar manualmente la tonalidad de un tema, mantenga pulsado PITCH / KEYLOCK y gire la PERILLA DE PARÁMETROS.
15.FADER DE PITCH – Controla la velocidad de la música. Moviéndolo hacia el + se acelera la música y moviéndolo hacia el "-" se reduce la velocidad. El porcentaje de ajuste del pitch se muestra en la pantalla.
16.INFLEXIÓN DE PITCH – Permite ajustar brevemente la velocidad de la música para aumentarla o disminuirla mientras se mantiene pulsado el botón. Es útil para ajustar rápidamente la velocidad a fin de contribuir a hacer coincidir los beats de dos canciones que pueden estar al mismo tempo pero tener beats que golpean en momentos ligeramente diferentes.
17.CONMUTADOR DE MODO BLEEP / REVERSA – Use este conmutador si desea reproducir un CD al revés. En modo "Bleep" la música se reproduce al revés, mientras que el temporizador del CD continúa avanzando. Cuando suelta el conmutador, el CD continúa reproduciéndose donde hubiera estado si usted no hubiera accionado el conmutador. En modo "Reversa" la música se reproduce al revés y el tiempo del CD también se cuenta regresivamente.
18.INICIO / FIN / REPETICIÓN DE CICLO (LOOP IN / LOOP OUT / RELOOP) – Estos botones se usan para definir los puntos de comienzo y fin del ciclo (LOOP IN y LOOP OUT) o para repetir o reiniciar el ciclo (RELOOP). Para más información acerca de esta función, consulte la sección sobre ciclos de este manual.
19.BOTONES DE DISPARO – Estos botones se pueden usar para 3 funciones posibles, elegidas manteniendo pulsado el botón REC y haciendo girar la perilla de parámetros. Para más información, consulte la sección "Botones de disparo multimodos" más adelante en este manual.
20.DESPLAZAMIENTO – Usado con la función looping (creación de ciclos), el conmutador de desplazamiento permite cortar el ciclo por la mitad o llevarlo al doble.
21.GRABAR – Este botón se usa en connunto con los 3 BOTONES DE DISPARO asignables para grabar muestras y establecer puntos de arranque rápido. Cuando se usa en conjunto con la PERILLA DE PARÁMETROS, le permite configurar el modo de los tres BOTONES DE DISPARO multimodos.
Para elegir un modo, pulse el botón REC y luego, mientras lo mantiene pulsado, mantenga también pulsado el BOTÓN DE DISPARO deseado y haga girar la PERILLA DE PARÁMETROS para seleccionar la opción que desea cambiar. Para más información, consulte la sección "Botones de disparo multimodos" más adelante en este manual.
22.MODO (BOTONES) – Este botón se usa para cambiar la función de los 3 botones asignables. Al pulsar este botón se recorren los modos LOOP-2 (Ciclo-2), HOT CUE (Cue rápido) y SAMPLES (Muestras). Para más información, consulte la sección "Botones de disparo multimodos" más adelante en este manual.
23.FX – Pulsando este botón se activa y desactiva el modo de efectos. Si el botón está iluminado, el modo de efectos está activado.
24.SELECCIÓN FX – Use este conmutador de palanca para elegir el efecto que desea usar. Se dispone de seis efectos diferentes. Para más información, consulte la sección de efectos de este manual.
25.FADER DE SONIDO DE EFECTOS / ORIGINAL – Use este control para ajustar la cantidad del efecto a mezclar con el sonido original. El 0% o lado "dry" del fader proporciona menos música de efectos y más de la música original, mientras que el 100% o lado "wet" agrega más de la música con efectos y menos de la música original.
26.PERILLA DE PARÁMETROS – Esta perilla tiene múltiples usos que dependen de lo que usted está haciendo cuando la hace girar.
Por defecto, haciendo girar esta perilla se ajusta un parámetro del efecto que tiene elegido en ese momento con el conmutador FX SELECT. Para más información, consulte la sección de efectos más adelante en este manual.Es posible ajustar otros valores manteniendo pulsado el botón apropiado mientras se hace girar la perilla de parámetros.
27.PROG – Este botón le ayuda a crear un programa —una secuencia de pistas a reproducir continuamente. Para crear un programa, pulse PROG mientras el reproductor de CD está en pausa. Para incluir una pista en el programa, use la PERILLA DE PISTA para seleccionar la pista deseada y luego pulse PROG para ingresarla. Repita este proceso para cada pista que desee incluir (en el orden en que desee que se reproduzcan). Cuando termine, pulse REPRODUCIR para comenzar a reproducir el programa. Las pistas se reproducen en el orden en que las ingresó. Para cancelar el programa mientras se está reproduciendo, pulse y mantenga pulsado PROG durante tres segundos.
Manteniendo pulsado el botón PROG y haciendo girar la perilla de PARÁMETROS, se accede a una lista de opciones de menú. Para más información, consulte la sección "Funciones de la perilla de parámetros" de este manual.
28.TIEMPO – Cambia la visualización del tiempo entre el tiempo de reproducción transcurrido y el tiempo restante en la pista y el tiempo restante en todo el CD (audio).
29.RECUPERAR / GUARDAR – Pulsando y reteniendo el botón RECALL por 2 segundos, se permite guardar los puntos de cue. Es posible guardar más de un conjunto de puntos de cue por CD. Los conjuntos de puntos de cue se numeran secuencialmente por CD.
Cuando se inserta un CD con puntos de cue guardados, la pantalla indicará "Cue Points Available" (Puntos de cue disponibles). Para recuperar sus puntos de cue guardados, pulse y suelte el botón RECALL. Si hay más de un conjunto de puntos de cue guardados en un CD, la perilla de parámetros le permite recorrer estos conjuntos.
30.MODO (REPRODUCCIÓN) – Hay cuatro modos de reproducción:
Single: Reproduce el tema seleccionado y luego hace una pausa y busca el inicio de la pista siguiente. SingleReplay: Repite el tema actual hasta que se detiene manualmente.
Random: Reproduce todas las canciones del CD en orden aleatorio.
Continuous: Reproduce todos los temas del CD en orden y luego los repite desde el comienzo.
Para ver los nombres de archivo o la información de etiquetas ID3 cuando se reproducen MP3, mantenga pulsado RECUPERAR / GUARDAR y pulse (PLAY) MODE.
Para activar y desactivar el modo relé, mantenga pulsado (PLAY) MODE y gire la perilla PARAMETER.
31.PANTALLA LCD – Aquí aparece toda la información y las funciones. También se muestran el texto del CD (si está disponible), la información de etiquetas ID3 y los valores de parámetros de efectos.
13
 Loading...