


NS7
Quickstart Guide
English ( 2 – 9 )
Guía de inicio rápido
Español ( 10 – 17 )
Guide d’utilisation rapide
Français ( 18 – 25 )
Guida rapida
Italiano ( 26 – 33 )
Schnellstart-Anleitung
Deutsch ( 34 – 41 )
Appendix
English ( 42 – 43 )
2
Quickstart Guide (English)
Introduction
Box Contents
NS7 III
2 Platter Assemblies
• Aluminum Platter
• Slipmat
• Vinyl
• 45 RPM Adapter (attached)
Spindle Screw
Allen Wrench
Display Unit
Display USB Cable
Display Power Cable
Serato DJ™ Software (download)
USB Cable
Power Cable
Quickstart Guide
User Guide (download)
Safety & Warranty Manual
Important: Download the full NS7 III User Guide from numark.com.
Support
For the latest information about this product (system requirements, compatibility information, etc.)
and product registration, visit numark.com.
For additional product support, visit numark.com/support.
Setup
Before getting started:
• Read the Safety & Warranty Manual before using NS7 III.
• Make sure all items listed in Introduction > Box Contents are included.
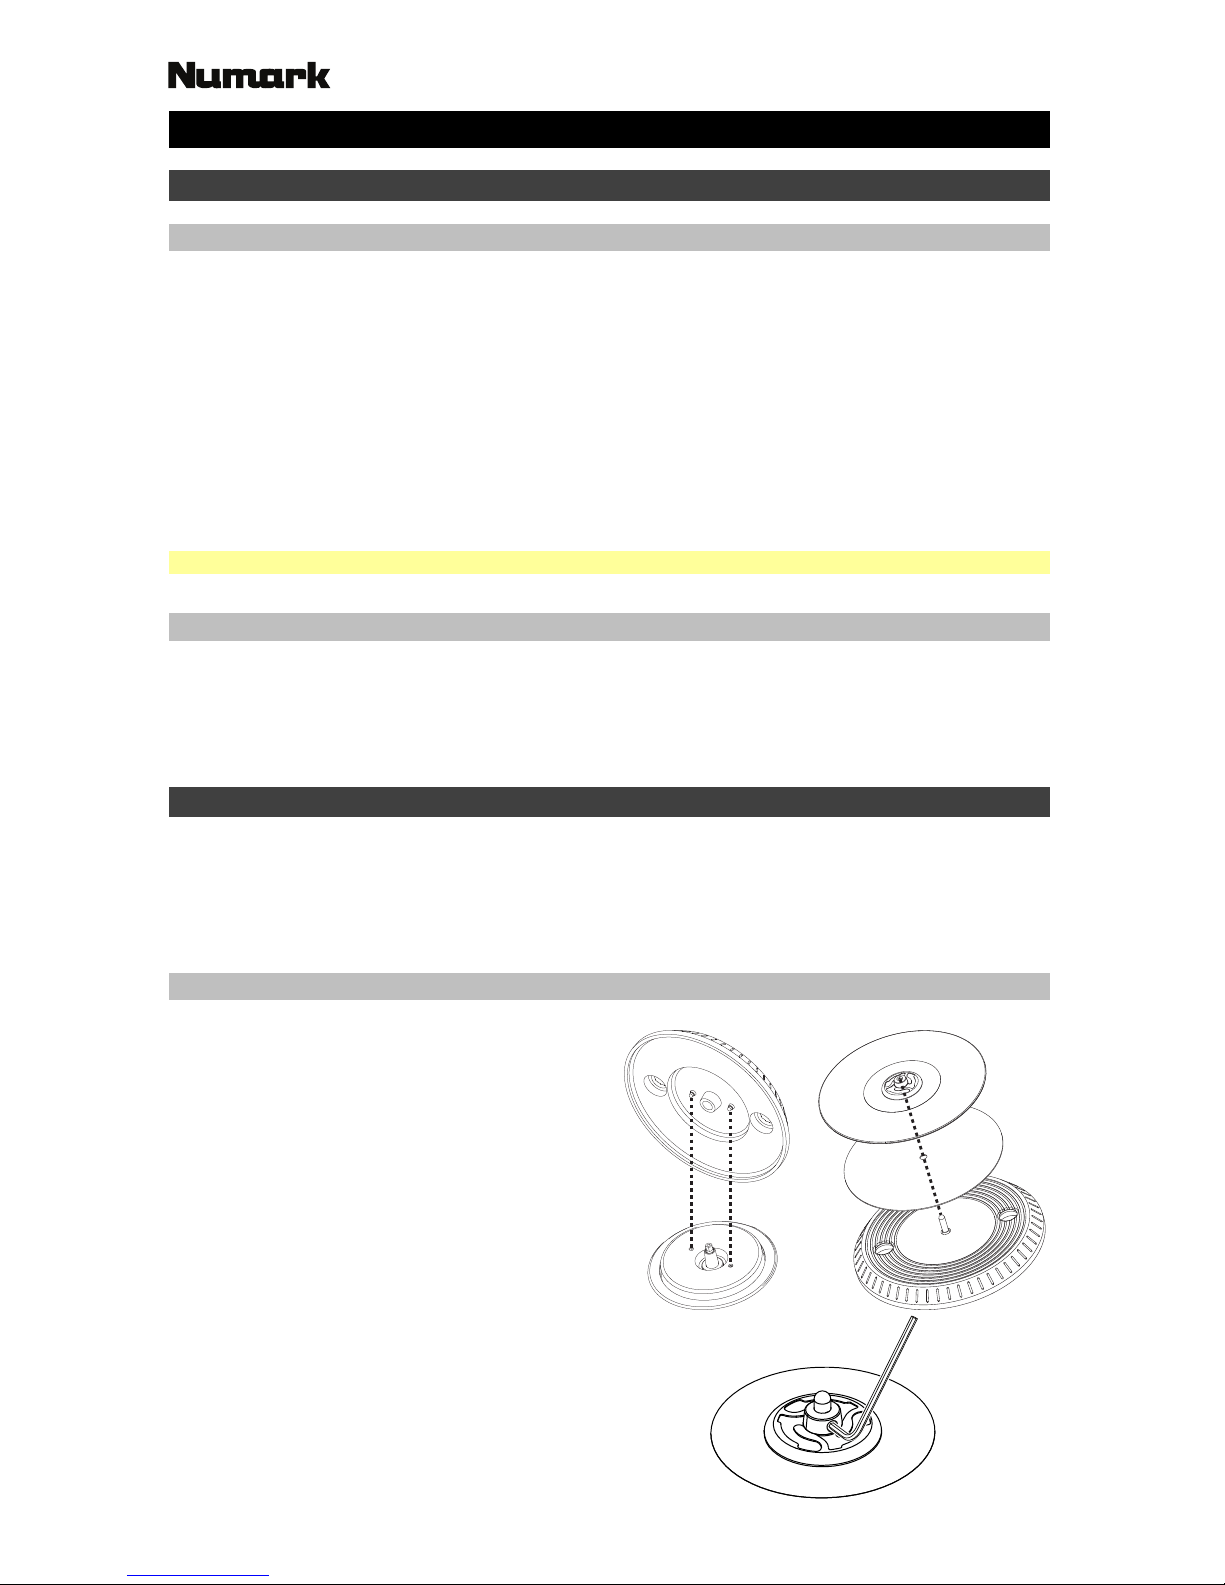
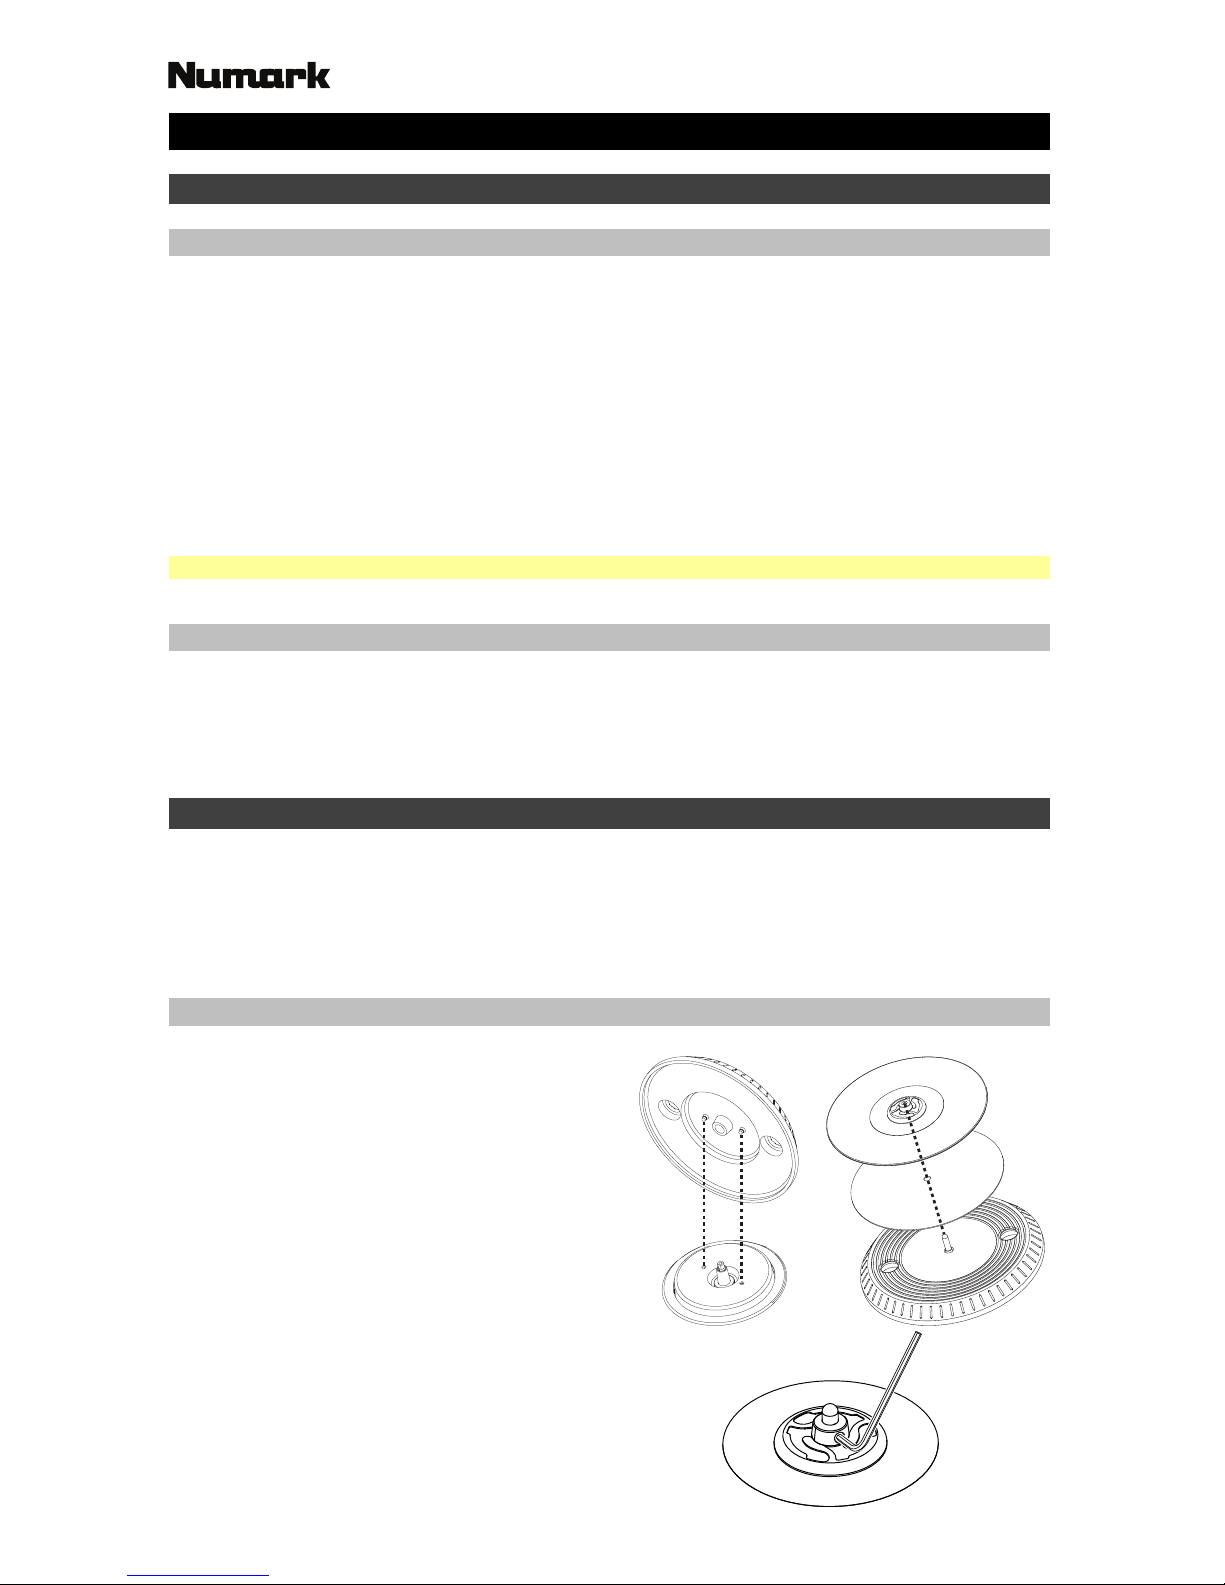
1. Assemble the Platters
1. Remove NS7 III from the packaging. Remove
the two platter assemblies from package
(underneath NS7 III). Place NS7 III on a flat,
stable surface for operation. Ensure unit has
adequate air flow to all ventilation ports
(especially if installed in a case).
2. Place the platter onto NS7 III by aligning the
pins in the bottom of the platter with the
holes in NS7 III’s motor.
3. Place the slipmat onto the platter, then place
the vinyl over the slipmat.
4. Line up the notch in the spindle with the
screw in the vinyl’s 45 RPM adapter. Use the
allen wrench (included) to tighten the screw,
locking the adapter to the spindle.
Step 2 Step 3
Step 4
3
2. Attach the Display Unit
1. With the screens facing up and slightly toward you, place the display unit over the two brackets
on the rear panel (which would typically hold a laptop computer stand). Make sure the two
brackets are securely inserted into the holes under the display unit.
2. Using the small display USB cable (included), connect the “NS7” USB port on the display unit to
the USB port on NS7 III’s rear panel.
3. Using the small display power cable (included), connect the display power input (DC In) to the
display power output (DC Out) on NS7 III’s rear panel.
3. Install the Drivers and Software
Drivers (Windows users only): Download and install the latest drivers from numark.com.
Software: Download and install the latest version of Serato DJ from serato.com.
4. Connect and Start DJing!
Follow this sequence of steps whenever you use NS7 III:
1. Make sure all devices are off and all faders and gain knobs are set to “zero.”
2. Connect input sources (microphones, turntables, CD players, etc.) to NS7 III.
3. Connect output devices (headphones, power amplifiers, sub-mixer, recorders, etc.) to NS7 III.
4. Plug all devices into power sources, and turn on devices in proper order:
• When starting a session, turn on (1) input sources, (2) NS7 III and display unit, (3) output devices.
• When ending a session, turn off (1) output devices, (2) NS7 III and display unit, (3) input sources.
5. Using a standard USB cable (included), connect the “To PC” USB port on NS7 III’s display unit
to your computer.
6. Open Serato DJ and go! For more information on how to use Serato DJ with NS7 III, visit
serato.com/dj/support and select Numark NS7 III.
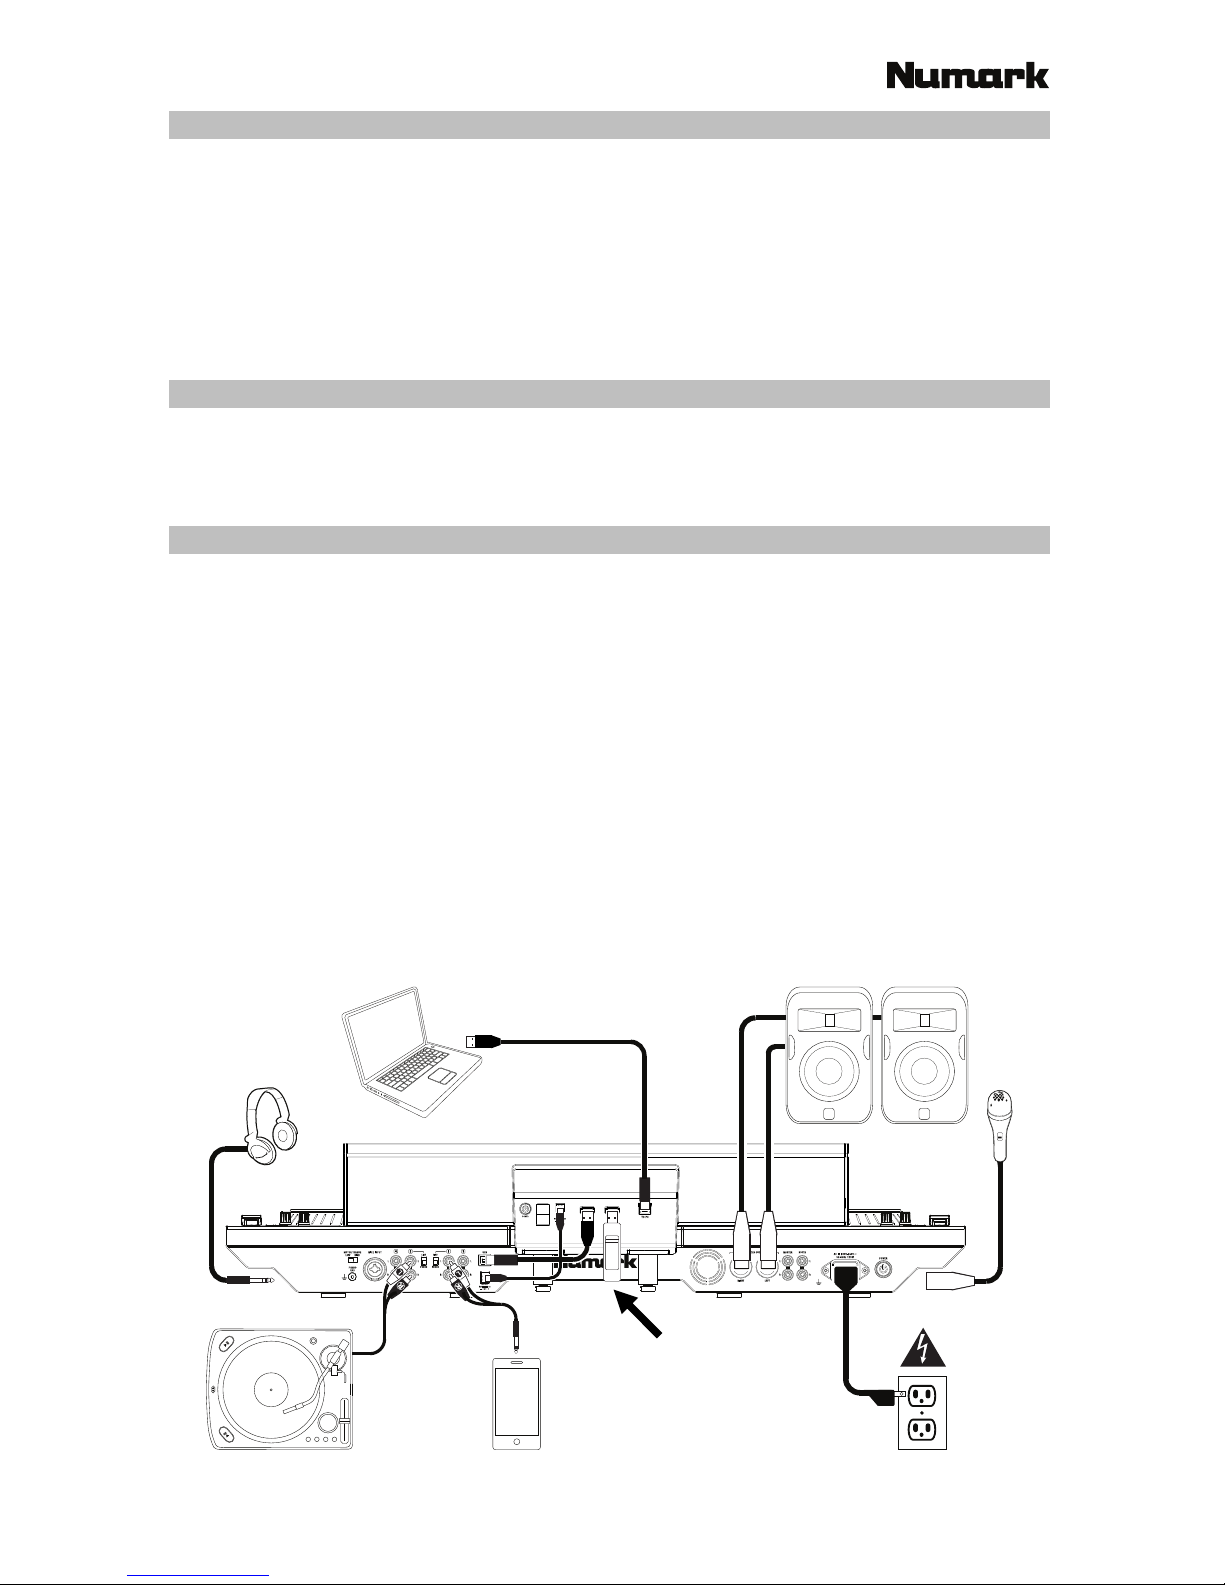
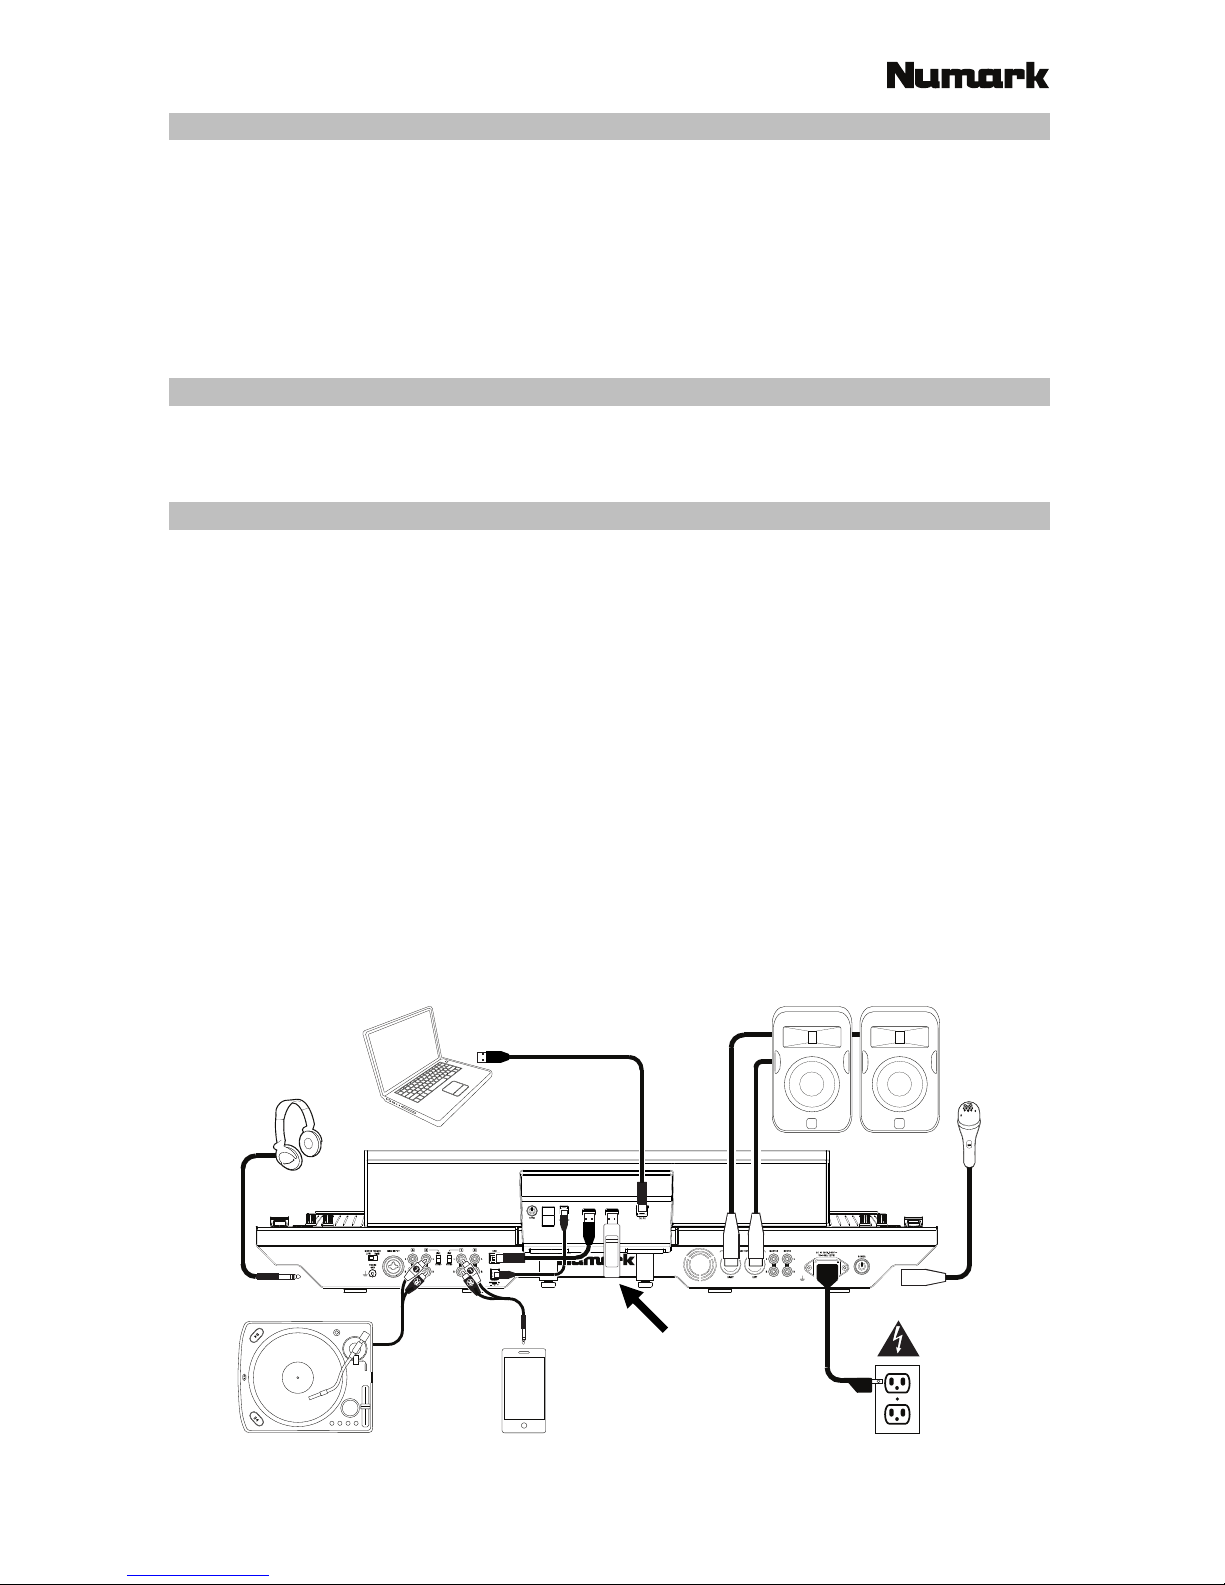
Connection Diagram (example):
00.0%
Any items shown here but not mentioned in Introduction > Box Contents are sold separately.
Computer
Headphones
(on front panel)
Turntable
Smartphone,
tablet, etc.
Power
Loudspeakers
Microphone
(on front panel)
USB thumb drive
4
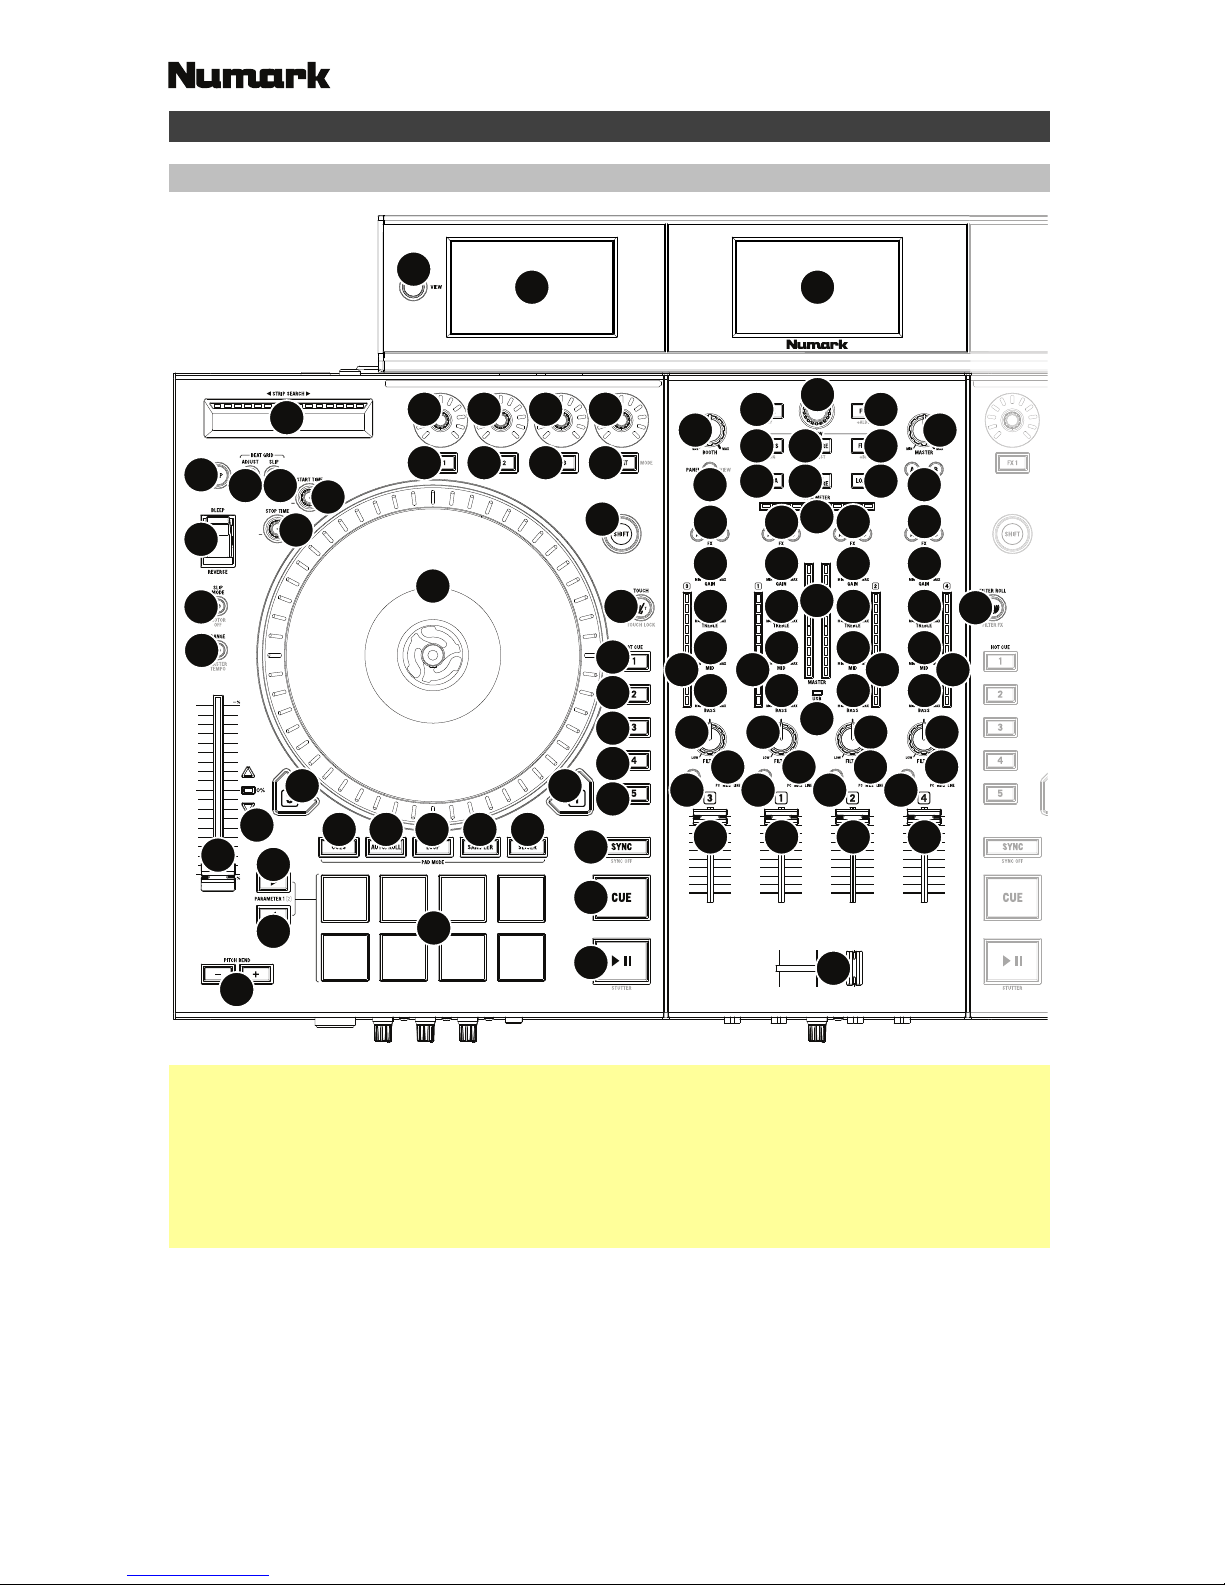
Features
Top Panel
1
3
4
8
9
10
18
19
20
33
3435
36
37
38
39
40
41
24
17 16
11
11
13
21
22
23
25
25
25
25
25
26
27
28 29 30 31 32
27
14
8
9
9
99
10
42
43
44
45
48 4849
50
55 55 55 55
56 56 56 56
57
55
51 51 51
53
54
52 52 52
46 47
44
11
11
8
10
11
11
8
10
11
11
13
14
13
15
14
13
14
5
6
7777
5
1
2
Useful Terms:
Audio Playhead: The current position in a track from where audio will play. When you select a track
and begin playing, the Audio Playhead will usually start from the beginning and stop at the end.
Hot Cue Point: A marked position in a track, which will be permanently stored by the software. You
can set, return to, or delete Hot Cue Points with the Hot Cue Buttons.
Temporary Cue Point: A marked position in a track, which will only remain while that track is still
loaded in the Deck. You can set and return to the Temporary Cue Point with the Cue button.
General Controls
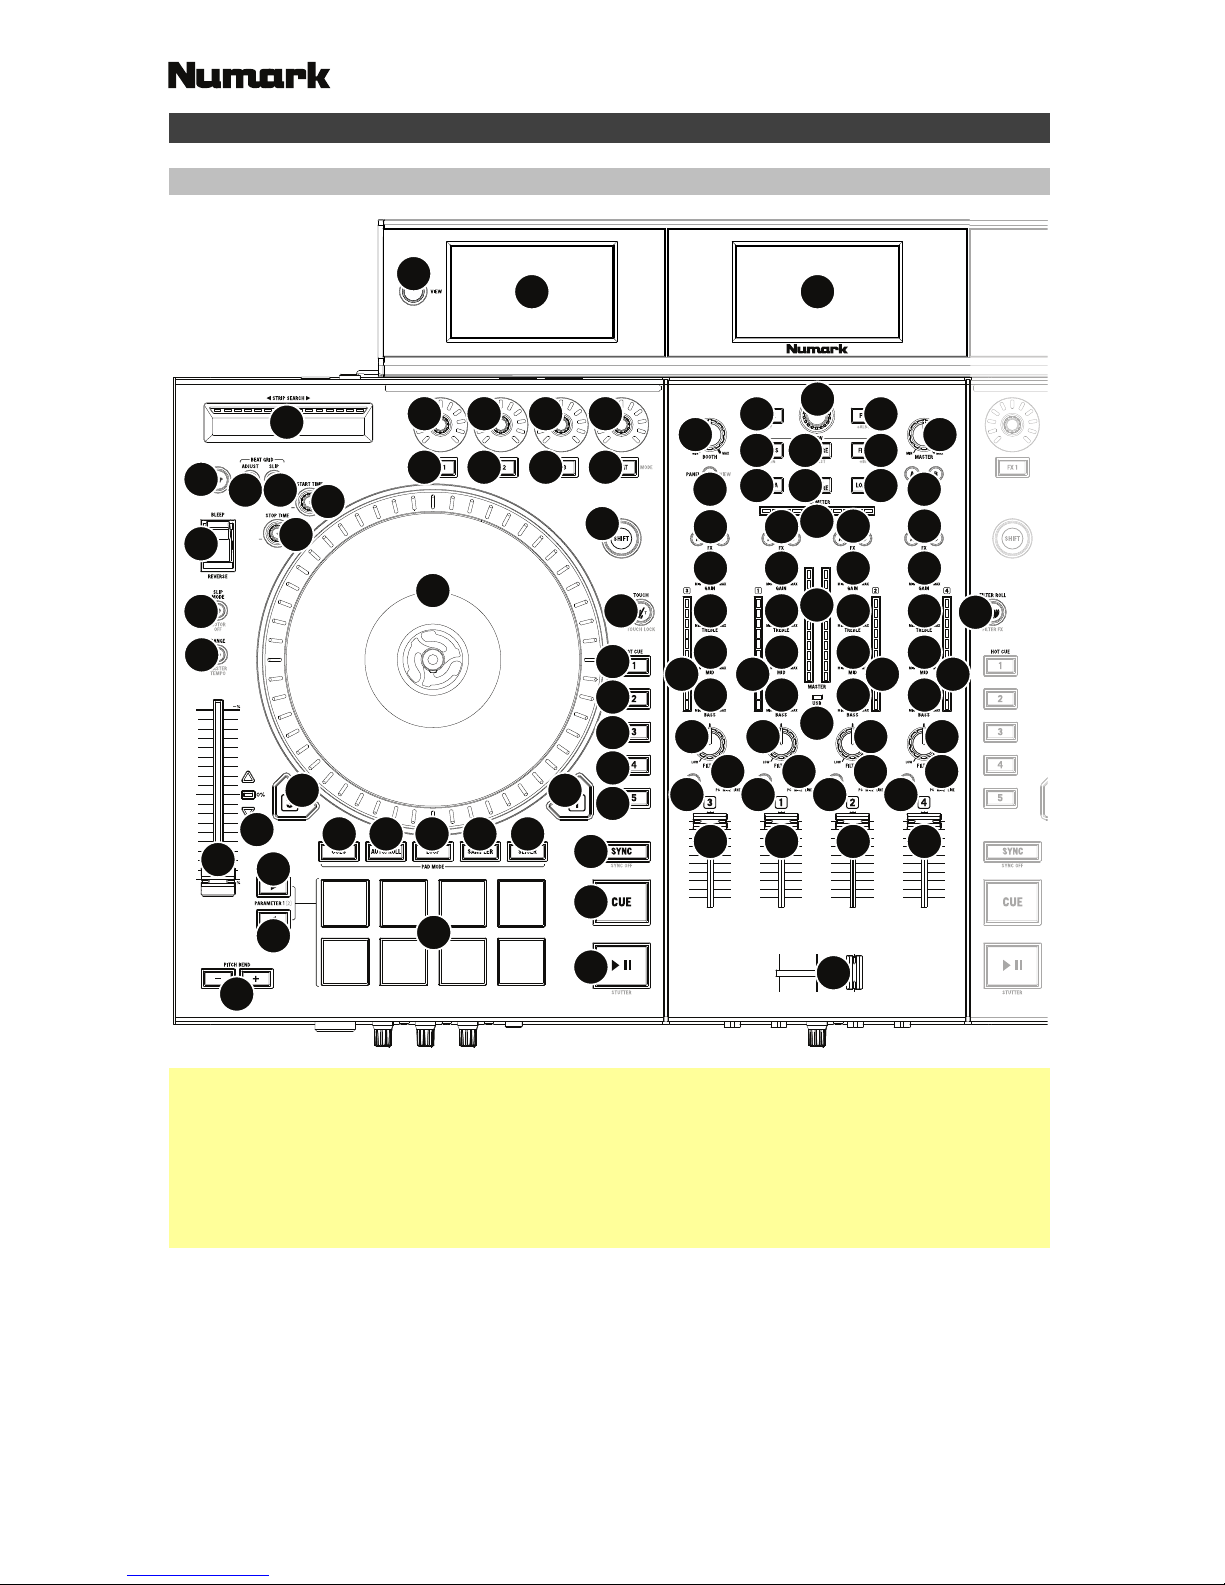
1. Displays: Use the screens to view performance information, waveforms, and your library. See
the User Guide for more information.
2. View: Press this button to cycle through the available NS7 III display modes. See the User Guide
for more information.
3. Shift: Press and hold this button to access secondary functions (in red lettering) of other controls
on NS7 III.
5
4. Touch Mode: Press and hold this button to activate Touch Mode, which lets you access the
touch-capacitive functions of NS7 III’s FX 1 Knob, FX 2 Knob, and FX 3 Knob.
Press and hold Shift and then press this button to access the touch-capacitive functions of the
same knobs as above plus the EQ Knobs (Channel Treble, Channel Mid, and Channel Bass).
These functions are momentary, not “latching.”
5. Layer: Selects which Layer in the software is controlled by that hardware Deck. Deck A can
control Layer 1 or 3; Deck B can control Layer 2 or 4.
6. USB Indicator: This LED lights up when NS7 III is successfully connected to and communicating
with your computer.
Mixer Controls
7. Input Selector: Set this switch to the desired audio source from this channel: PC (a track
playing on that layer in the software), Mic 2 or Line (a device connected to the Mic 2 Input or
Line Input on NS7 III’s rear panel). Please note that the Line/Phono selector switches on NS7
III’s rear panel must also be set properly. Also, a channel’s controls will only send MIDI
information when its Input Selector is set to PC.
Important: Do not set more than one channel’s Input Selectors to Mic2; doing so can cause
unwanted feedback or distortion.
8. Gain Trim: Adjusts the pre-fader, pre-EQ audio level of the corresponding channel in the software.
9. LED Meters: Monitors the audio levels of the corresponding channel.
10. Channel Treble: Adjusts the high (treble) frequencies. When Touch Mode is activated, touching
this knob will mute the corresponding channel’s high frequencies (an “EQ kill”).
11. Channel Mid: Adjusts the mid-range frequencies. When Touch Mode is activated, touching this
knob will mute the corresponding channel’s mid-range frequencies (an “EQ kill”).
12. Channel Bass: Adjusts the low (bass) frequencies. When Touch Mode is activated, touching this
knob will mute the corresponding channel’s low frequencies (an “EQ kill”).
13. Channel Fader: Adjusts the audio level on the corresponding channel in the software.
14. PFL: Press this button to send this channel’s pre-fader signal to the Cue Channel for monitoring.
When engaged, the button will be lit. By pressing one PFL button at a time, you will cue that
channel alone (and deactivate PFL monitoring for the other channels). To cue to multiple
channels simultaneously, press the PFL buttons for those channels at the same time.
15. Crossfader: Blends audio between the channels assigned to the left and right side of the crossfader.
16. Master Volume: Adjusts the output volume of the Program Mix.
17. Booth Volume: Adjusts the output volume of the Booth Output mix.
Playback Controls
18. Platter: Controls the Audio Playhead in the software.
19. Start Time: Controls the rate at which the platter regains its normal playback speed.
20. Stop Time: Controls the rate at which the platter slows to a complete stop (“brake time”).
21. Play / Pause: This button pauses or resumes playback.
Press and hold Shift and then press this button to “stutter-play” the track from the last set Cue Point.
22. Cue: When the Deck is paused, you can set a Temporary Cue Point by moving the platter to
place the Audio Playhead at the desired location and then pressing the Cue Button.
During playback, you can press the Cue Button to return the track to this Temporary Cue Point.
(If you did not set a Temporary Cue Point, then it will return to the beginning of the track.)
If the Deck is paused, you can press and hold the Cue Button to play the track from the
Temporary Cue Point. Releasing the Cue Button will return the track to the Temporary Cue Point
and pause it. To continue playback without returning to the Temporary Cue Point, press and
hold the Cue Button, then press and hold the Play Button, and then release both buttons.
Press and hold Shift and then press this button to return to the beginning of the track.
23. Sync: Press this button to automatically match the corresponding Deck’s tempo with the opposite
Deck’s tempo and phase. Press and hold Shift and press this button to deactivate Sync.
6
24. Bleep / Reverse: Reverses audio playback of the track on the corresponding deck. When the
switch is in the Reverse position, the playback of the track will be reversed. Returning the switch
to its center (deactivated) position will resume normal playback from wherever the Audio
Playhead stops. When the switch is in the Bleep position, the playback of the track will be
reversed. Returning the switch to its center (deactivated) position will resume normal playback
from where it would have been if you had never engaged the Bleep function (i.e., as if the track
had been playing forward the whole time).
Cue Controls
25. Hot Cue Buttons (1–5): Assigns a Hot Cue Point or returns the track to that Hot Cue Point.
When a Hot Cue Button is unlit, you can assign a Hot Cue Point by pressing it at the desired
point in your track. Once it is assigned, the Hot Cue Button will light. To return to that Hot Cue
Point, simply press it.
Press and hold Shift and then press a Hot Cue Button to delete its assigned Hot Cue Point.
Tip: If the Deck is paused, holding a lit Hot Cue Button will start playback from that Hot Cue
Point. Releasing it will return the track to that Hot Cue Point and pause playback.
Pad Mode Controls
26. Pads: These pads have different functions on each Deck depending on the current Pad Mode.
These pads are the same pads used with Akai Professional MPCs®, so they are velocity-sensitive
(in certain modes only), durable, and easy to play.
27. Parameter < / > : Use these buttons for various functions in each Pad Mode. Press and hold
Shift and use these buttons to access secondary parameters.
28. Cues: This Pad Mode button switches the pads between two modes: Hot Cue Mode (red) and
Hot Cue Auto-Loop Mode (orange). When the button is unlit, the first press will always select Hot
Cue Mode. See the User Guide for more information.
29. Auto / Roll: This Pad Mode button puts the pads in two modes: Auto-Loop Mode (dark blue)
and Loop Roll Mode (light blue). When the button is unlit, the first press will always select AutoLoop Mode. See the User Guide for more information.
30. Loop: This Pad Mode button switches the pads between two banks in Manual Loop Mode.
When the button is unlit, the first press will always select the first bank. See the User Guide for
more information.
31. Sampler: This Pad Mode button switches the pads between two modes: Sample Player Mode
and Sample Velocity Trigger Mode). When the button is unlit, the first press will always select
Sample Player Mode. See the User Guide for more information.
32. Slicer: This Pad Mode button switches the pads between two modes: Slicer Mode and Slicer
Loop Mode. When the button is unlit, the first press will always select Slicer Mode. See the User
Guide for more information.
Important: Your track must have a set Beat Grid for Slicer Mode or Slicer Loop Mode to work.
Track Controls
33. Strip Search™: The length of this strip represents the length of the entire track. Place your
finger on a point along this sensor to jump to that point in the track. (If you want to scroll through
a track, we recommend using your computer rather than running your finger along the strip.)
34. Slip / Clear: When using the software’s Beat Grid, press and hold this button and move the
platter to “slip” (i.e., shift or slide) the entire Beat Grid to the left or right.
Press and hold Shift and then press this button to delete the entire Beat Grid.
Important: Your track must have a set Beat Grid for the Slip / Clear button to work.
35. Adjust / Set: Press and hold this button and move the platter to “warp” the entire Beat Grid.
Press and hold Shift and then press this button to set a Beat Marker at the Audio Playhead’s
current location.
Important: Your track must have a set Beat Grid for the Adjust feature to work. Also, using the
Adjust feature will change the track’s BPM.
7
36. Slip Mode / Motor Off: Press this button to enable or disable Slip Mode. In Slip Mode, you can
jump to Hot Cue Points, trigger Loop Rolls, or use the platters, while the track’s timeline
continues. In other words, when you stop the action, the track will resume normal playback from
where it would have been if you had never done anything (i.e., as if the track had been playing
forward the whole time).
Press and hold Shift and press this button to activate or deactivate the corresponding platter’s
motor. This will not affect the track’s playback.
Pitch Controls
37. Tap: Tap this button at the same tempo as the track to help the software detect a more accurate
BPM reading.
38. Range / Master Tempo: Press this to adjust the range of the Pitch Fader to ±8%, ±16%, and ±50%.
Press and hold Shift and then press this button to “lock” the track’s pitch to its original key. The
track’s tempo will remain at the speed designated by the Pitch Fader.
39. Takeover LEDs: When you select the other Deck with the Deck Select switch, the position of the
NS7 III’s Pitch Fader may not match the Pitch setting for that Deck in the software. Slowly move
the Pitch Fader in the direction indicated by the Takeover LED arrow until it turns off. At this
point, the Pitch Fader matches the Pitch setting in the software and can control it again.
40. Pitch Fader: Controls the track’s playback speed. An LED next to the fader will light up when set
at 0%.
41. Pitch Bend ( + / – ): Press or hold down either of these buttons to temporarily adjust the track’s
playback speed. When released, the track playback will return to the speed designated by the
Pitch Fader.
42. BPM Meter: This meter is an aid for matching the tempo of both decks. When the white center
LED is lit, the BPMs are matched. Otherwise, the meter will tend towards the faster deck. The
further from center, the greater the difference between the two BPMs.
The meter is also an aid while adjusting Loop In or Loop Out points. If you are making fine
adjustments to your Loop In or Loop Out points using the platters, the lit LED will “wrap around”
the meter. It will rest on the white center LED whenever the loop’s length has been doubled or
halved exactly.
Note: The BPM Meter will aid in loop adjustments only if (1) a BPM reading has been entered for
that track and (2) the two Decks’ tempos have been synchronized.
Navigation Controls
43. Scroll Knob: Use this knob to scroll through lists of tracks, Crates, etc. in the software. You can
also press it to move between the panels shown in the software.
44. Fwd / Back: These buttons move the selector between various panels in the software. Press and
hold Shift and then press Fwd to sort the current Library/Crate/Panel View by album. Press and
hold Shift and then press Back to sort the current Library/Crate/Panel View by track number.
45. Crates: Press this to move the selector to the Crates Panel in the software. Press and hold Shift
and then press this button to sort the current Library/Crate/Panel View by song.
46. Prepare: Press this to move the selector to the Prepare Panel in the software. Press and hold
Shift and then press this button to sort the current Library/Crate/Panel View by artist.
47. Files: Press this to move the selector to the Files Panel in the software. Press and hold Shift and
then press this button to sort the current Library/Crate/Panel View by BPM.
48. Load A / Load B: Press one of these buttons while a track is selected to assign it to Deck A or
Deck B, respectively.
49. Load Prepare: Press this to add a selected track to the list of tracks in the Prepare Panel in the
software.
50. Panel / View: Press this to toggle through the Recording (Rec), Effects (FX), and Sampler (SP-6)
panels. Press and hold Shift and then press this button to toggle through the available software
display modes (e.g., Vertical, Horizontal, Extended, Library).
8
Effects Controls
51. FX 1, FX 2, FX 3: These buttons have different functions on each Deck depending on the current
FX Mode. See the User Guide for more information.
52. FX 1 Knob, FX 2 Knob, FX 3 Knob: These knobs have different functions on each Deck
depending on the current FX Mode. See the User Guide for more information.
53. Beat / Mode: Tap this button repeatedly at the desired tempo to set the rate of the effects’ lowfrequency oscillators (LFOs). Press and hold this button to reset Beat Multiplier to the Deck’s
BPM. Press and hold Shift and then press this button to switch between Single-FX Mode and
Multi-FX Mode.
54. Beat Knob: Turn this knob to set the Time Division for the selected effects.
55. FX Assign: Use these buttons to apply Effect A and/or B to the corresponding channel. You can
apply Effect A and/or B to the entire Program Mix by using the FX Send buttons below the
Master Volume knob. (Each effect can be applied to any or all of the four channels and/or the
Program Mix.)
56. Channel Filter: Turn this knob to adjust the filter on the corresponding channel. The type of filter
it adjusts will depend on the Filter Mode button.
57. Filter Mode: Press this button to change the Filter Mode (off, Filter Roll Mode, or Filter FX
Mode), which affects the Channel Filter knobs. See the User Guide for more information.
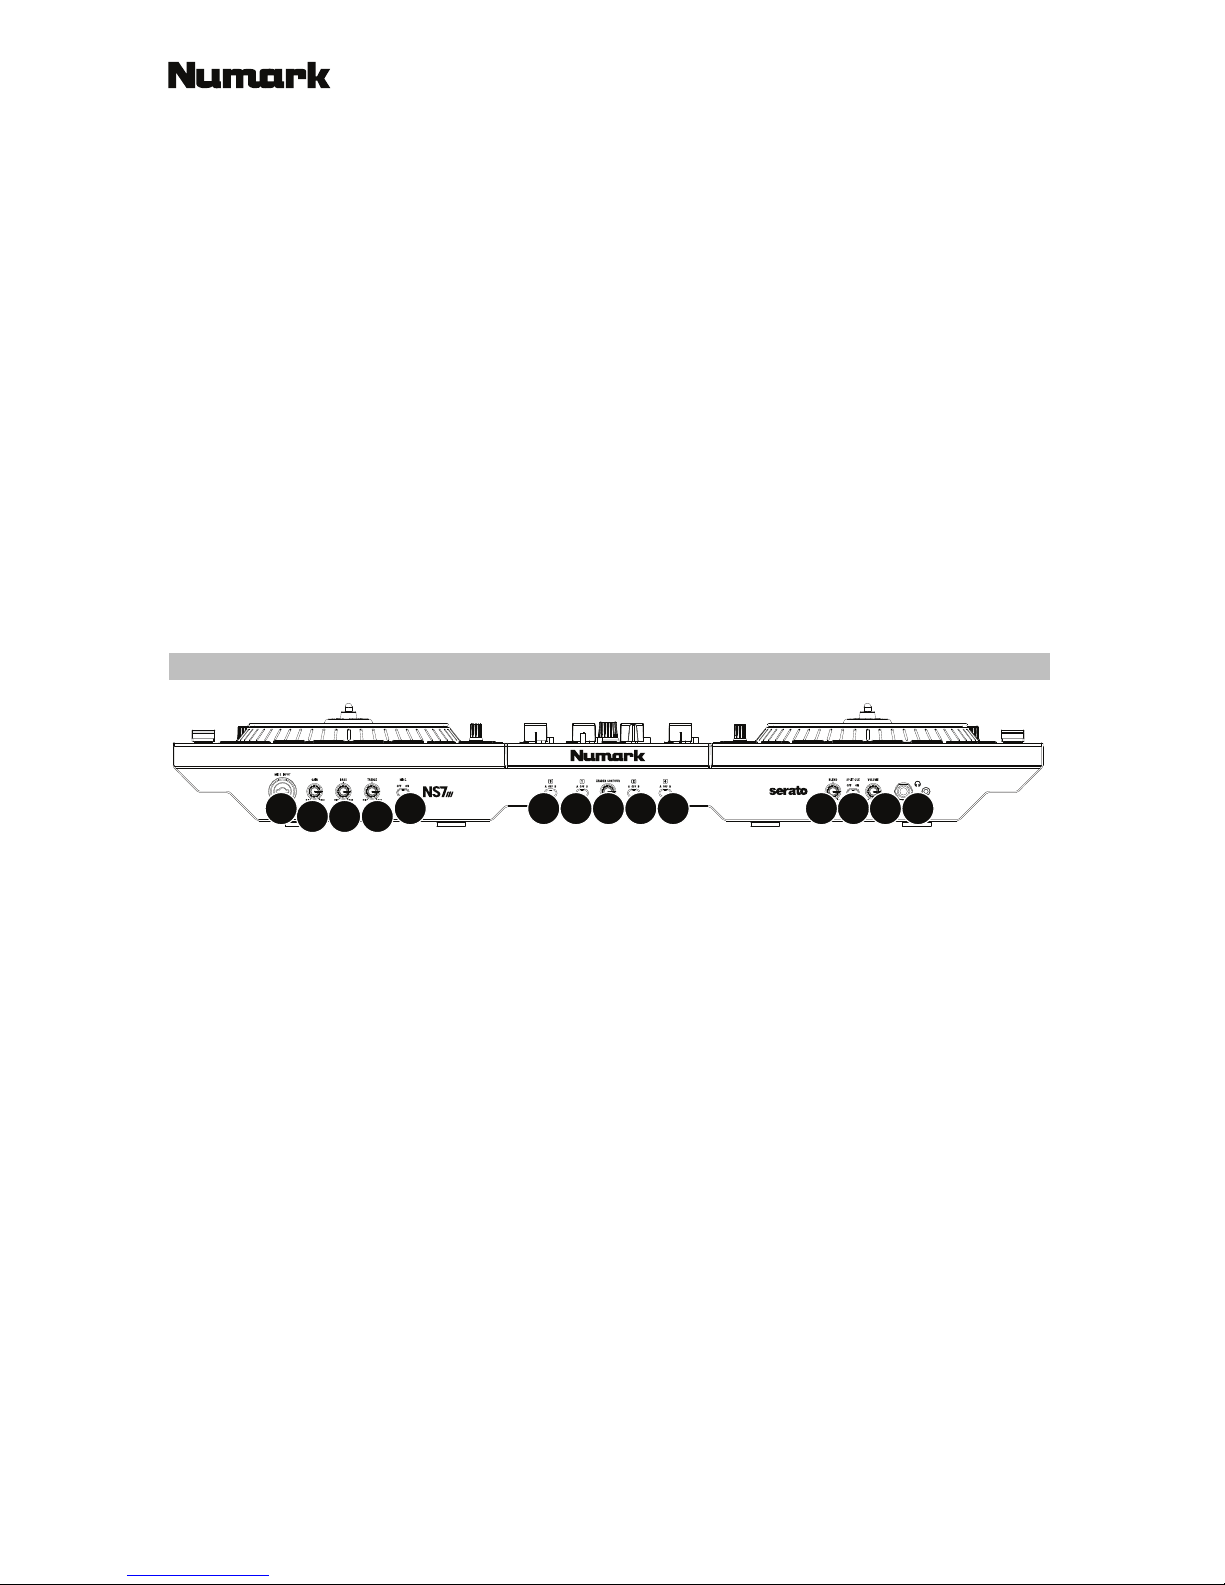
Front Panel
12345555
7
8
9
6
10 11
1. Headphones (1/4”, 1/8”) (6.35 mm, 3.5 mm): Connect your 1/4” or 1/8” (6.35 mm or 3.5 mm)
headphones to this output for cueing and mix monitoring.
2. Headphone Volume: Adjusts the volume level of the headphone output.
3. Split Cue: When this switch is in the on position, the headphone audio will be “split” such that
all channels sent to Cue are mixed to mono and applied to the left headphone channel and the
Program mix is mixed to mono and applied to the right channel. When the switch is in the off
position, Cue and Program audio will be “blended” together.
4. Cue Blend: Turn to mix between Cue and Program in the Headphone channel. When all the way
to the left, only channels routed to Cue will be heard. When all the way to the right, only the
Program mix will be heard.
5. Crossfader Assign: Routes the audio playing on the corresponding channel to either side of the
crossfader (A or B), or bypasses the crossfader and sends the audio directly to the Program Mix
(center, Off).
6. Crossfader Slope: Adjusts the slope of the crossfader curve. Turn the knob to the left for a
smooth fade (mixing) or to the right for a sharp cut (scratching). The center position is a typical
setting for club performances.
7. Mic 1 Input (1/4” / 6.35 mm): Connect a 1/4” (6.35 mm) microphone to this input. This input’s
audio signal is routed directly to the Program Mix and Cue Mix.
8. Mic 1 On/Off: When set to on, the Mic 1 Input is active, and its audio signal is routed directly to
the Program Mix and Cue Mix. When set to off, the Mic 1 Input is disabled.
9. Mic Gain: Adjusts the gain of the microphone channel.
10. Mic Bass: Adjusts the low (bass) frequencies of the audio signal coming from the microphone input.
11. Mic Treble: Adjusts the high (treble) frequencies of the audio signal coming from the microphone
input.
9
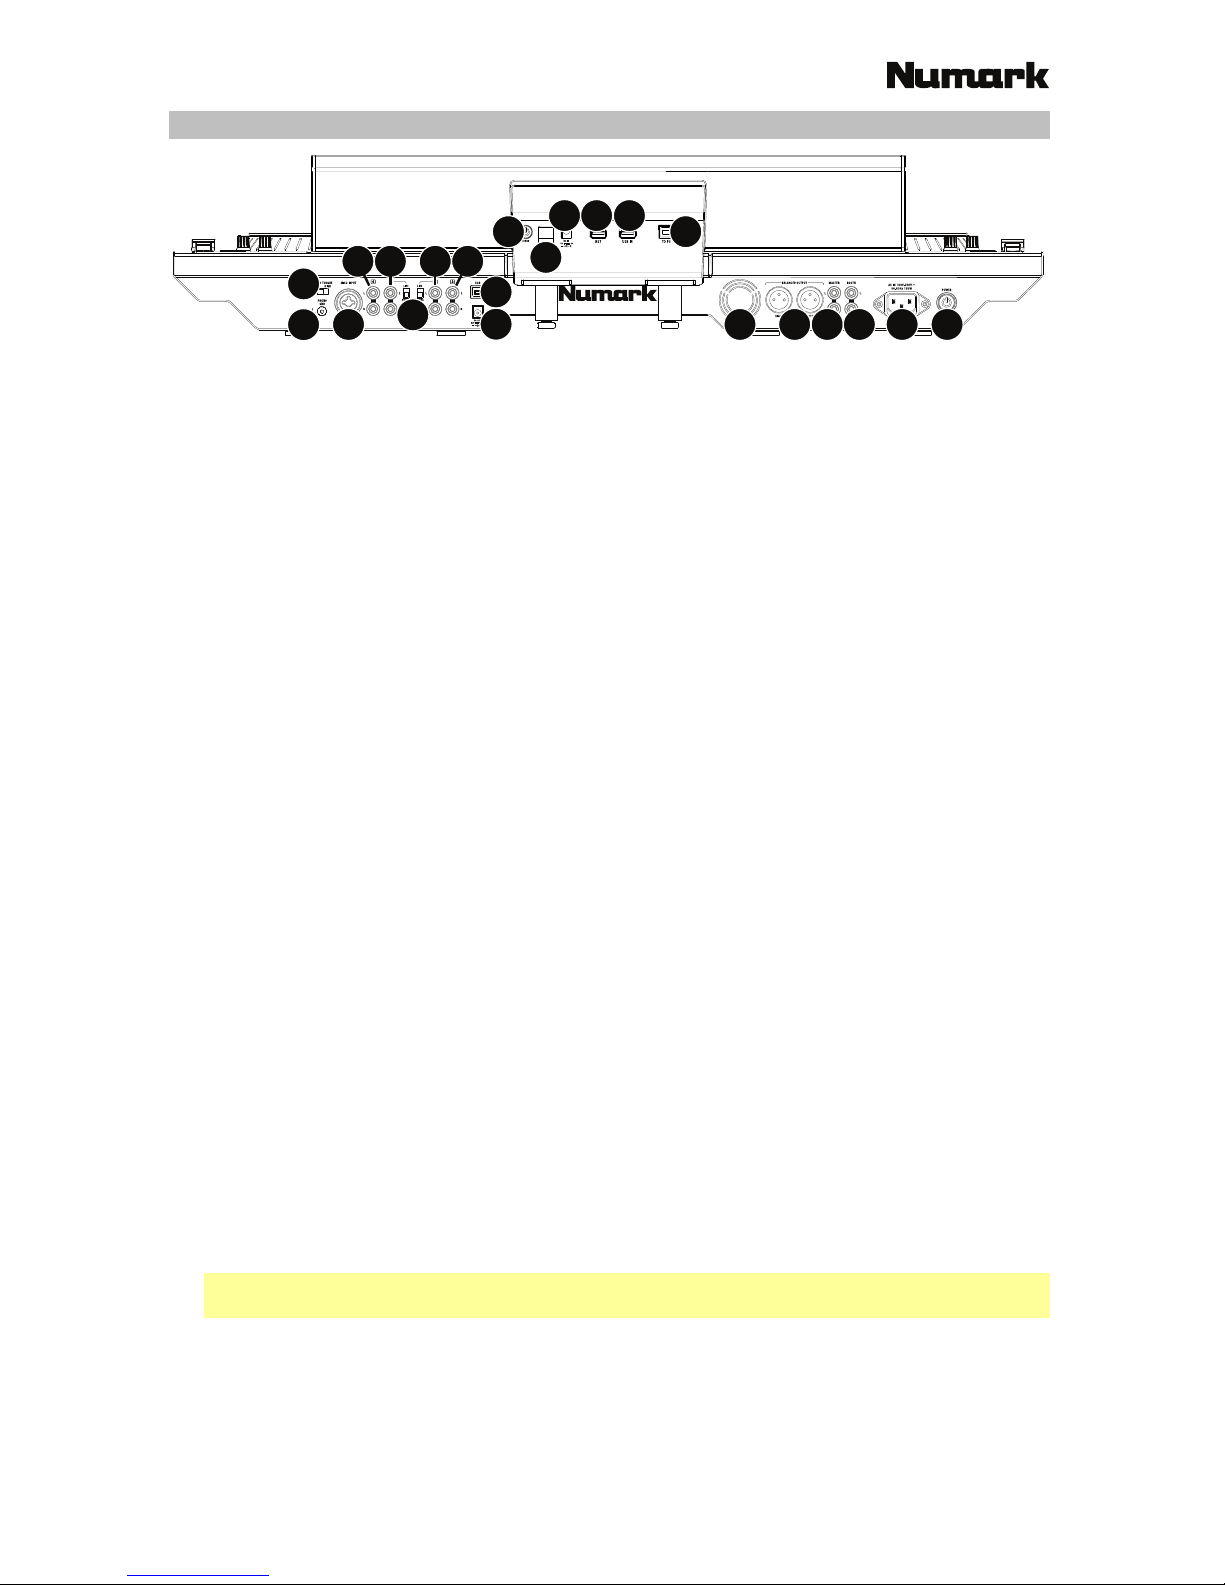
Rear Panel
1
2
3
4
5
6
7
8
9
112012 13
141416
17
18
19
16
15
10
1. NS7 III Power Input: Use the included power cable to connect NS7 III to a power outlet. While the
power is switched off, plug the cable into NS7 III first, then plug the cable into a power outlet.
2. NS7 III Power Switch: Powers NS7 III on and off. Power on NS7 III after all input devices have
been connected and before you turn on amplifiers. Turn off amplifiers before you turn off NS7 III.
3. USB Port: Use the included small display USB cable to connect this USB port to the “NS7” USB
port on the display.
4. Power Output (DC Out): Use the included small display power cable to connect this output to
the display power input (DC In).
5. Display Power Input (DC In): Use the included small display power cable to connect this input
to the power output (DC Out) on NS7 III.
6. Cable Restraint: You can secure the display power cable to this restraint to help prevent
disconnecting it accidentally.
7. Display Power Switch: Powers the display unit on and off.
8. USB Port (NS7): Use the included small display USB cable to connect this USB port to the USB
port on NS7 III.
9. USB Port (USB In): You can connect an optional USB hard drive (not included) to this powered
USB port.
10. Display USB Port (To PC): Use the included USB cable to connect this USB port to your
computer.
11. Master Output (XLR): Connect this low-impedance XLR output to a PA system or powered
monitors. The level of this output is controlled with the Master knob on the top panel.
12. Master Output (RCA): Use standard RCA cables to connect this output to a speaker or amplifier
system. The level of this output is controlled by the Master knob on the top panel.
13. Booth Output (RCA): Use standard RCA cables to connect this output to a booth monitoring
system. The level of this output is controlled by the Booth knob on the top panel.
14. Line/Phono Inputs (RCA): Connect your audio sources to these inputs. These inputs can
accept both line and phono-level signals.
15. Line/Phono Switch: Flip this switch to the appropriate position, depending on the device
connected to the Line/Phono Inputs. If you are using phono-level turntables, set this switch to
Phono to provide the additional amplification needed for phono-level signals. If using a line-level
device, such as a CD player or sampler, set this switch to Line.
16. Line Inputs (RCA): Connect line-level devices, such as CD players, samplers or audio
interfaces, to these inputs.
17. Grounding Terminal: If using phono-level turntables with a grounding wire, connect the
grounding wire to these terminals. If you experience a low “hum” or “buzz”, this could mean that
your turntables are not grounded.
Note: Some turntables have a grounding wire built into the RCA connection and, therefore,
nothing needs to be connected to the grounding terminal.
18. Mic 2 Input (1/4” / 6.35 mm): Connect a 1/4” (6.35 mm) microphone to this input. Microphone
controls are located on the top panel on any channel whose Input Selector is set to Mic2.
19. Motor Torque: Flip this switch to adjust the torque of the platters. At the high setting, the
platters will have the heavier, stronger feel of “modern” turntables. At the lower setting, they are
lighter and more graceful—the feel of a “classic” turntable.
20. Cooling Fan: Keep the area in front of this vent clear from obstructions. The fan behind the vent
cools the NS7 III, preventing overheating.
10
Guía de inicio rápido (Español)
Introducción
Contenido del paquete
NS7 III
2 conjuntos de plato
• Plato de aluminio
• Alfombrilla antideslizante
• Vinilo
• Adaptador de 45 rpm (fijado)
Tornillo del eje central
Llave Allen
Unidad de pantalla
Cable USB de la pantalla
Cable de corriente de la pantalla
Serato DJ
™ Software (descarga)
Cable USB
Cable de corriente
Guía de inicio rápido
Guía del usuario (descargar)
Manual sobre la seguridad y garantía
Importante: Descargue la Guía del usuario de NS7 III de numark.com.
Soporte
Para obtener la información más completa acerca de este product (los requisitos del sistema,
compatibilidad, etc) y registro del producto, visite numark.com.
Para soporte adicional del producto, visite numark.com/support.
Instalación
Antes de empezar:
• Lea el Manual sobre la seguridad y garantía antes de usar el NS7 III.
• Asegúrese de que estén presentes todos los elementos enumerados en Introducción >
Contenido del paquete.
1. Arme los platos
1. Retire el NS7 III del embalaje. Retire los dos
conjuntos de plato del embalaje (están debajo
del controlador NS7 III). Coloque el NS7 III
sobre una superficie plana y estable para
hacerlo funcionar. Asegúrese de que la unidad
tenga un flujo de aire adecuado en todas las
aberturas de ventilación (especialmente si se
instala dentro de una caja).
2. Coloque el plato en el NS7 III alineando los
pernos de la parte inferior del plato con los
orificios del motor.
3. Coloque la alfombrilla sobre el plato y luego el
vinilo sobre la alfombrilla.
4. Alinee la muesca del eje con el tornillo del
adaptador de 45 RPM del vinilo. Use la llave
Allen (incluida) para apretar el tornillo,
sujetando así el adaptador en el eje.
Paso 2 Paso 3
Paso 4
11
2. Instalación de la unidad de pantalla
1. Con las pantallas hacia arriba y ligeramente hacia usted, coloque la unidad de pantalla sobre los
dos soportes en el panel trasero (los cuales normalmente sostendrían un ordenador portátil).
Asegúrese de que los dos soportes estén insertados de forma segura dentro de los orificios
debajo de la unidad de pantalla.
2. Con el cable USB pequeño de la pantalla (incluido), conecte el puerto USB “NS7” de la unidad
de pantalla al puerto USB del panel trasero del NS7 III.
3. Con el pequeño cable de corriente de la pantalla (incluido), conecte la entrada de corriente de la
pantalla (DC In) a la salida de corriente de la pantalla (DC Out) del panel trasero del NS7 III.
3. Instale los drivers y el software
Drivers (usuarios de Windows): Descargue y instale los drivers más recientes de numark.com.
Software: Descargue y instale la versión más reciente de Serato DJ de serato.com.
4. ¡Conecte y sea el DJ!
Siga esta secuencia de pasos toda vez que utilice el NS7 III:
1. Asegúrese que todos los dispositivos estén apagados y que todos los faders y perillas de
ganancia estén en posición “cero”.
2. Conecte al NS7 III las fuentes de entrada (micrófonos, giradiscos, reproductores de CD, etc.).
3. Conecte al NS7 III los dispositivos de salida (auriculares, amplificadores de potencia, submezclador,
grabadores, etc.).
4. Enchufe todos los dispositivos a la fuente de alimentación y enciéndalos en el orden correcto:
• Para iniciar la sesión, encienda (1) las fuentes de entrada, (2) el NS7 III y la unidad de pantalla y
(3) los dispositivos de salida.
• Para finalizar la sesión, apague (1) los dispositivos de salida, (2) el NS7 III y la unidad de pantalla
y (3) las fuentes de entrada.
5. Con el cable USB estándar (incluido), conecte el puerto USB “To PC” de la unidad de pantalla
del NS7 III a su ordenador.
6. ¡Abra Serato DJ y a tocar! Para más información acerca de cómo usar Serato DJ con NS7 III,
visite serato.com/dj/support y seleccione Numark NS7 III.
Diagrama de conexión (ejemplo):
00.0%
Todos los elementos que se muestran en la ilustración pero no se mencionan en Introducción > Contenido del paquete se
venden por separado.
Computadora
Auriculares
(en el panel frontal)
Giradiscos
Teléfono inteligente
(smartphone), tableta, etc.
Alimentacion
Altavoces
Micrófono
(en el panel
frontal)
Memoria USB
12
Características
Panel superior
1
3
4
8
9
10
18
19
20
33
3435
36
37
38
39
40
41
24
17 16
11
11
13
21
22
23
25
25
25
25
25
26
27
28 29 30 31 32
27
14
8
9
9
99
10
42
43
44
45
48 4849
50
55 55 55 55
56 56 56 56
57
55
51 51 51
53
54
52 52 52
46 47
44
11
11
8
10
11
11
8
10
11
11
13
14
13
15
14
13
14
5
6
7777
5
1
2
Términos útiles:
Puntero de audio: Posición actual de la pista desde donde se reproduce el audio. Cuando usted selecciona
una pista y comienza a reproducir, el puntero de audio arranca habitualmente al comienzo y se detiene al final.
Punto de cue rápido: Posición marcada en una pista, que el software almacena permanentemente. Es
posible establecer, volver o eliminar puntos de cue rápido con los controles de cue rápido.
Punto de cue temporal: Posición marcada en la pista que permanece sólo mientras la pista está cargada
en la bandeja. Es posible establecer y volver al punto de cue temporal con el botón Cue.
Controles generales
1. Pantallas: Utilice las pantallas para visualizar información de rendimiento, formas de onda y su
biblioteca. Para más información, consulte la Guía del usuario.
2. Vista: Pulse este botón para alternar entre los modos de visualización disponibles del NS7 III. Para más
información, consulte la Guía del usuario.
3. Función secundaria: Mantenga pulsado este botón para acceder a las funciones secundarias (en letra
roja) de los demás controles del NS7 III.
13
4. Modo táctil: Mantenga pulsado este botón para acceder a las funciones capacitivas táctiles de las
perillas FX 1, FX 2 y FX 3 del NS7 III.
Mantenga pulsado Shift (botón de función secundaria) y pulse este botón para acceder a las funciones
capacitivas táctiles de las mismas perillas de arriba más las perillas del ecualizador (agudos de canal,
medios de canal y bajos de canal). Estas funciones son momentáneas, no de “enganche”.
5. Bandeja virtual: Se usa para seleccionar qué bandeja virtual del software es controlada por esa
bandeja del hardware. La bandeja A puede controlar las bandejas virtuales 1 ó 3. La bandeja B puede
controlar las bandejas virtuales 2 ó 4.
6. Indicador USB: Este LED se enciende cuando el NS7 III se conecta exitosamente y se comunica con
su computadora.
Controles del mezclador
7. Selector de entrada: Coloque este interruptor según la fuente de audio deseada desde este canal: PC (un
pista que se reproduce en esa capa en el software), Mic 2 o Line (Línea) (un dispositivo conectado a la
entrada Mic 2 (Micrófono 2) o Line (Línea) del panel trasero del NS7 III). Tenga en cuenta que los
interruptores selectores Line/Phono del panel trasero también se deben colocar correctamente. Asimismo,
los controles de un canal solo envían información MIDI cuando su selector de entrada se coloca en PC.
Importante: No coloque más de un selector de entrada de canal en Mic2, puesto que puede causar
una realimentación o distorsión indeseable.
8. Ajuste de ganancia: Ajusta el nivel de audio previo al fader y al ecualizador del canal correspondiente
en el software.
9. Medidores con LED: Monitorean el nivel de audio de la salida de programa en el canal
correspondiente.
10. Treble (de canal): Ajusta las altas frecuencias (agudos) del audio que se reproduce en el canal
correspondiente.
11. Medios (de canal): Ajusta las frecuencias medias del audio que se reproduce en el canal
correspondiente.
12. Graves (de canal): Ajusta las bajas frecuencias (graves) del audio que se reproduce en el canal
correspondiente.
13. Fader canal: Ajusta el nivel de audio del canal correspondiente en el software.
14. PFL: Pulse este botón para enviar esta señal de nivel pre-fader al canal de cue para monitoreo. Cuando
está pulsado, el botón se enciende. Al pulsar un botón PFL a la vez, hace cue en ese canal solamente
(y desactiva el monitoreo de PFL de los demás canales). Para hacer cue en varios canales
simultáneamente, pulse los botones PFL de esos canales al mismo tiempo.
15. Crossfader: Combina el audio entre los canales asignados a los lados izquierdo y derecho del crossfader.
16. Volumen maestro: Ajusta el volumen de salida de la mezcla de programa.
17. Volumen cabina (booth): Ajusta el volumen de salida de la mezcla de salida para cabina (Booth Output).
Controles de la reproducción
18. Plato: Controla el puntero de audio en el software.
19. Tiempo de arranque: Controla el tiempo en el cual el plato retoma su velocidad de reproducción normal.
20. Tiempo de parada: Controla el tiempo en que el plato aminora su velocidad hasta detenerse por
completo (“tiempo de frenado”).
21. Reproducir/Pausa: Con este botón se pone en pausa o reanuda la reproducción.
Mantenga pulsado Shift y pulse este botón para que la pista “tartamudee” desde el último punto de cue.
22. Cue: Cuando la bandeja se pone en pausa, puede establecer un punto de cue temporal moviendo el
plato para colocar el puntero de audio en el lugar deseado y pulsando luego el botón Cue.
Durante la reproducción, puede pulsar el botón Cue para que la pista vuelva a este punto de cue
temporal. (Si no estableció un punto de cue temporal, volverá al principio de la pista.)
Si la bandeja está en pausa, puede mantener pulsado el botón Cue para reproducir la pista desde el
punto de cue temporal. Al soltar el botón Cue, la pista vuelve al punto de cue temporal y se pone en
pausa. Para continuar la reproducción sin volver al punto de cue temporal, mantenga pulsado el botón
Cue, luego mantenga pulsado el botón de reproducir y luego suelte ambos botones.
Mantenga pulsado Shift y pulse este botón para volver al comienzo de la pista.
23. Sincronismo: Pulse este botón para hacer coincidir automáticamente el tempo de la bandeja
correspondiente con el tempo y la fase de la bandeja opuesta. Mantenga pulsado Shift y pulse este
botón para desactivar el sincronismo.
14
24. Bleep / Reversa: Invierte la reproducción de audio de la pista en la bandeja correspondiente.
Cuando el interruptor está en la posición Reverse, se invierte la reproducción de la pista. Al regresar el
conmutador a la posición central (desactivado) se reanuda la reproducción normal desde el punto en
que se detuvo el puntero de audio.
Cuando el interruptor se mantiene en la posición Bleep, se invierte la reproducción de la pista. Al volver
el conmutador a la posición central (desactivado), se reanuda la reproducción normal desde donde lo
haría si nunca se hubiera activado la función Bleep (es decir, si la pista se hubiera estado
reproduciendo hacia adelante todo el tiempo).
Controles de cue
25. Botones de cue rápido (1–5): Asignan un punto de cue rápido o regresan la pista a ese punto de cue
rápido. Cuando un botón cue rápido está apagado, puede asignar un punto de cue rápido pulsándolo
en el punto deseado de su pista. Una vez asignado, el botón cue rápido se enciende. Para volver a ese
punto de cue rápido, simplemente púlselo.
Pulse y mantenga pulsado el botón Shift y pulse el botón hot cue apropiado para eliminar el punto de
cue rápido asignado.
Consejo: Si la bandeja está en pausa, al mantener pulsado un botón cue rápido encendido, la
reproducción comienza desde ese punto de cue rápido. Al soltarlo, la pista regresa a ese punto de cue
rápido y se pone la reproducción en pausa.
Controles de modo de pad
26. Pads: Estos pads tienen distintas funciones en cada bandeja en función del modo de pad activado.
Son los mismos usados en los MPC
®
Akai Professional, de modo que son sensibles a la velocidad (solo
en algunos modelos), durables y fáciles de tocar.
27. Parámetro < / >: Use estos botones para diversas funciones en cada modo de pad. Mantenga pulsado
Shift y pulse este botón para acceder a las funciones secundarias.
28. Cues: Este botón de modo de pad cambia los pads entre dos modos: Modo de Hot Cue (Cue rápido)
(rojo) y loop automático con cue rápido (naranja). Cuando el botón está apagado, la primera pulsación
selecciona siempre el modo de cue rápido. Consulte la Guía del usuario para obtener más información.
29. Auto / Regreso: Este botón de modo de pad cambia los pads entre dos modos: Loop automático (azul
oscuro) y loop con regreso (celeste). Cuando el botón está apagado, la primera pulsación selecciona
siempre el modo de loop automático. Consulte la Guía del usuario para obtener más información.
30. Fijación: Este botón de modo de pad cambia los pads entre dos bancos en modo de loop manual.
Cuando el botón está apagado, la primera pulsación selecciona siempre el primer banco. Consulte la
Guía del usuario para obtener más información.
31. Muestreador: Este botón de modo de pad cambia los pads entre dos modos: Reproductor de muestras y
disparo por velocidad de muestras. Cuando el botón está apagado, la primera pulsación selecciona
siempre el modo de reproductor de muestras. Consulte la Guía del usuario para obtener más información.
32. Cortador: Este botón de modo de pad cambia los pads entre dos modos: Cortador y loop del
cortador. Cuando el botón está apagado, la primera pulsación selecciona siempre el modo cortador.
Consulte la Guía del usuario para obtener más información.
Importante: Su pista debe tener configurada una grilla de bits para que los modos cortador o loop del
cortador funcionen.
Controles de pista
33. Strip Search™: La longitud de esta tira representa la longitud de la pista completa. Coloque su dedo
en un punto de este sensor para saltar a ese punto en la pista. (Si desea desplazarse a lo largo de una
pista, recomendamos que use la computadora en vez de pasar el dedo a lo largo de la tira.)
34. Resbalar / Borrar: Cuando se usa la grilla de beats del software, mantenga pulsado este botón y
mueva el plato para “hacer resbalar” (es decir, desplazar o deslizar) la grilla de beats completa a la
izquierda o la derecha.
Mantenga pulsado Shift y pulse este botón para eliminar la grilla de beats completa.
Importante: Su pista debe tener configurada una grilla de bits para que el botón Slip / Clear (Resbalar /
Borrar) funcione.
35. Ajustar / Posicionar: Mantenga pulsado este botón y mueva al plato para “alabear” la grilla de beats
completa.
Mantenga pulsado Shift y pulse este botón para establecer un marcador de beats en la posición actual
del punto de audio.
Importante: Su pista debe tener configurada una grilla de bits para que la función de ajuste funcione.
Asimismo, al usar la función de ajuste, cambian los BPM de la pista.
 Loading...