


CDN77USB
QUICKSTART GUIDE
ENGLISH ( 3 – 6 )
GUÍA DE INICIO RÁPIDO
ESPAÑOL ( 7 – 10 )
GUIDE D’UTILISATION RAPIDE
FRANÇAIS ( 11 – 14 )
GUIDA RAPIDA
ITALIANO ( 15 – 18 )
KURZANLEITUNG
DEUTSCH ( 19 – 22 )


BOX CONTENTS
CDN77USB CD player
Power cable
2 stereo RCA cables
2 controller cables
Quickstart Guide
Safety & Warranty Information Booklet
REGISTRATION
Please go to http://www.numark.com
up-to-date with any new product developments and provide you with world-class technical support, should you run into any
problems.
QUICK SETUP
1. Make sure all items listed in the BOX CONTENTS section are included in the box.
2. READ SAFETY & WARRANTY INFORMATION BOOKLET BEFORE USING THE PRODUCT.
3. Study the connection diagram in this guide.
4. Place mixer in an appropriate position for operation.
5. Make sure all devices are turned off and all faders and gain knobs are set to “zero.”
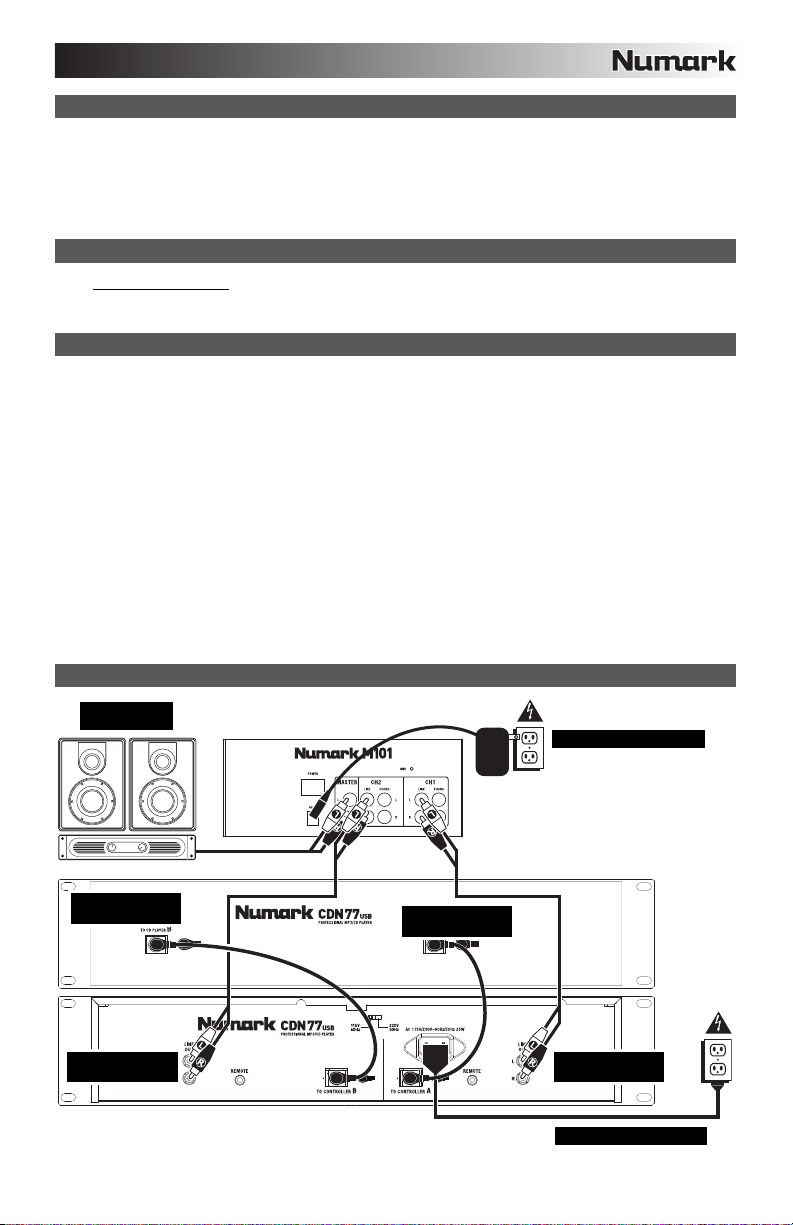
6. Connect all stereo input sources as indicated in the diagram.
7. Connect the stereo outputs to power amplifier(s), tape decks, and/or other audio sources.
8. Plug all devices into AC power.
9. Switch everything on in the following order:
• Audio input sources (i.e. turntables, CD players, etc.)
• Mixer
• Last, any amplifiers or output devices
10. When turning off, always reverse this operation by turning off:
• Amplifiers
• Mixer
• Last, any input devices
CONNECTION DIAGRAM
HOUSE AMP
to register your CDN77USB. Registering your product ensures that we can keep you
MIXER
POWER
CONTROLLER
CABLE
STEREO RCA
CABLE
CONTROLLER
CABLE
3
STEREO RCA
CABLE
POWER

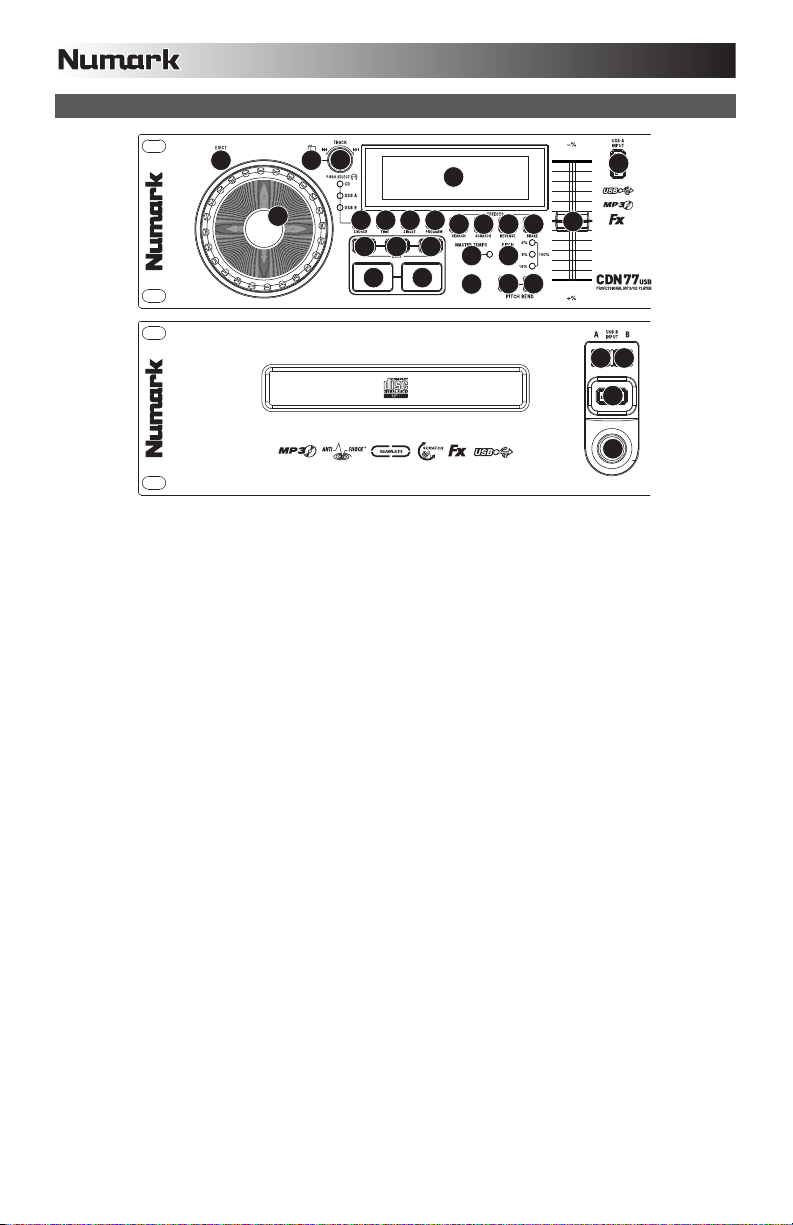
TOP PANEL FEATURES
13
56
4
14 15 16
78
25
171819
910 11 12
20
23
22 22
24
3
21
222
3
1
1. POWER SWITCH – Turn the machine on and off with this button. The unit should always be shut down with this button
first before any external power is removed. Typically it is recommended that the CD player is powered on before
amplifiers and powered off after amplifiers.
2. EJECT – Press this button to eject the CD. If a CD is currently playing, this button will have no effect. This unit is
designed to play commercially available CDs, properly burned and finalized CD-Rs, and MP3 CDs. Due to variances on
the specification of certain CD burners and CDs, some homemade CDs may not play properly. We recommend burning
CDs at the minimum speed possible for the best performance.
3. USB – You can connect USB thumb drives (with a FAT16 or FAT32 file system) with MP3s here. To view their
contents, use the SOURCE button and TRACK KNOB to select "USB A" or "USB B" as your source. (Both decks can
play tracks from the same USB device simultaneously.)
4. SOURCE – Press this button to select the source of your tracks – an inserted CD or an attached USB device ("USB A"
or "USB B"). (Both decks can play tracks from the same USB device simultaneously.) An LED will indicate the currently
selected source. Confirm your choice by pressing the TRACK KNOB.
5. FOLDER – Press this button to toggle between Folder View and File View. In Folder View, you can use the TRACK
KNOB to scroll through all the available folders. When you have selected a folder, press the TRACK KNOB button to
enter File View – the first file shown will be the first MP3 available in that folder. To return to Folder View, press the
FOLDER button again. (While in Folder View, you can press and hold the FOLDER button at any time to exit Folder
View without making any changes.)
Note: In both views, you are not restricted to viewing only folders or files on a single "directory level." Each view is
simply a list of all available folder or files. This function provides a faster way of navigating your files, allowing you to
jump to different groups of files within a folder but without requiring you to enter/exit multiple directory levels.
6. TRACK KNOB – Turn this knob to select a track to play. Press and turn this knob to skip through your track/folder
listing 10 tracks at a time.
7. PLAY / PAUSE – Plays or pauses the track. Pausing the track will create a cue point at that location (which can be
adjusted with the JOG WHEEL in Search Mode).
8. CUE – During playback, pressing CUE will return to the most recent point where playback was started and will pause
the track. Holding down CUE will start playback from this point, and releasing CUE will cause it to return to that point
and will pause the track. Also, if the track is paused, you can use the JOG WHEEL to locate a new cue point.
9. SCRATCH – Activates or deactivates Scratch Mode. While activated, rotating the JOG WHEEL creates a 'scratch'
effect. The button will be red when Scratch Mode is active. (Note: This feature is not optimal for searching through
long audio passages. For longer searches, activate the SEARCH function.)
10. SEARCH – Pressing this button allows you to use the JOG WHEEL to rapidly scan through the music. The button will be
red when Search Mode is active.
11. REVERSE – Press this button to reverse playback of the track (the button will be lit). Press it again to return to normal
playback.
12. BRAKE – Press this button to activate braking (the button will be lit). When braking is activated, pausing the track will
cause playback to slow down before stopping, simulating the effect of stopping the motor of a turntable. Braking will
also affect the startup time when pressing PLAY. Adjust the braking time by holding BRAKE and turning the JOG
WHEEL.
4

13. JOG WHEEL – The jog wheel serves many functions depending on its current mode.
a) If a track is not playing, the JOG WHEEL will search slowly through a track's frames. To set a new cue point,
rotate the JOG WHEEL then begin playback when you have determined the proper position. Press CUE to return
to that cue point.
b) If a track is playing, the JOG WHEEL will temporarily bend the pitch of the track. Rotating the JOG WHEEL
clockwise temporarily speeds it up while rotating it counterclockwise slows it down. This is a useful tool for beat-
matching.
c) When the SEARCH button has been activated, rotating the JOG WHEEL will scan rapidly through the track.
d) When the SCRATCH button has been activated, rotating the JOG WHEEL will "scratch" over the audio of the
track, like a needle on a record.
Note: When a track is paused, turn the JOG WHEEL to activate "stutter cue," allowing you to hear the current frame
repeatedly. This is a good aid when trying to cue up a precise point in a track like a downbeat.
14. LOOP IN – Sets a new cue point or the start point of a loop (a "Loop In" point) during playback.
15. LOOP OUT – Sets the end point of a loop (a "Loop Out" point) and starts playing the loop. While playing a loop, press
LOOP OUT to release it from the loop and continue normal playback.
16. RELOOP – Plays the track immediately from the beginning of a loop (and reactivates the loop).
17. PROGRAM – This button helps you create a program – a sequence of tracks to play continuously:
• IMPORTANT: Before performing any program functions below, pause playback by pressing PLAY / PAUSE.
• To create a program:
1. Press PROGRAM. "P–##" will flash on the LCD ("##" indicates what number that track occupies in the
program – "P–01," "P–02," etc.)
2. Turn the TRACK KNOB to select a track then press the TRACK KNOB to enter it into the program. Repeat
this process to add more songs to the program.
3. When finished, press PLAY to play the program or press PROGRAM to exit and return to normal play
mode. (When a program is stored, "PG" will be shown on the LCD.)
• To play the program:
1. With a program stored, press PROGRAM. "P–##" will flash on the LCD. The total number of tracks in the
program will be displayed to the left of the LCD (as "P##").
2. Press PLAY to play the first track of the program. When playing a program, "PG" will flash on the LCD.
• To exit a program (without deleting it), if you are playing track within the program, pause it, then press and
hold PROGRAM.
• To add tracks to your stored program:
1. If you were playing your program (if "PG" is flashing), press and hold PROGRAM. You will return to the
first track of that program. If you were not playing your program (if "PG" is solid), skip to the next step.
2. Press PROGRAM. The next available slot of the program will flash in the LCD (as "P–##"). The total
number of tracks in the program will be displayed to the left of the LCD (as "P##").
3. Turn the TRACK KNOB to select a track then press the TRACK KNOB to enter it into the program. Repeat
this process to add more songs to the program.
4. When finished, press PLAY to play the program or press PROGRAM to exit and return to normal play
mode. (When a program is stored, "PG" will be shown on the LCD.)
• To delete a program:
1. Press PROGRAM. "P–##" will flash in the LCD.
2. Press and hold PROGRAM. "PG" will disappear from the LCD and you will return to the first playable track
18. SINGLE – Press this button to toggle between Single Play (playback will stop at the end of each track) or Continuous
Play (tracks will be played one after another without interruption).
Hold down this button and turn the TRACK KNOB to adjust the remote start settings (as long as the CDN77USB's
REMOTE START CONNECTOR is connected to the appropriate input of a remote start-compatible mixer):
19. TIME – Switches the time display between elapsed playing time, remaining time on the track, and total remaining time
on an entire CD. Hold down this button and turn the TRACK KNOB to scroll through the ID3 tags of a selected file with
available ID3 information. You can choose to view the Title, Album, Artist, or no ID3 tags.
20. PITCH – Adjusts the range of the PITCH FADER (±4%, 8%, 16%, and 100%) or deactivates it. (When all three LEDs
are lit, the PITCH FADER's range is ±100%.) The current range will be indicated by the LCD and LEDs.
21. PITCH FADER – Moving the PITCH FADER will adjust the overall pitch of the music when one or all of the PITCH LEDs
are lit. The pitch will not be changed if the PITCH LEDs are off.
22. PITCH BEND -/+ – You can use these two pitch bend buttons to temporarily adjust the pitch and tempo of the music up
to -/+ 16% from the current pitch setting.
23. MASTER TEMPO – Engages the Master Tempo feature, which locks the musical key of the track to the original key (as
if it were playing with 0% pitch adjustment). You can then adjust the tempo of the track without affecting its key or pitch.
24. TAP – Tap this button to the beat of the music to enter a BPM manually. To prompt CDN77USB to detect a BPM
automatically, hold this button down for 2 seconds.
25. LCD – Indicates all the functions, as they are occurring.
on your CD/device.
• CUE/PLAY: When the mixer's crossfader is moved towards the player, the loaded track will play from the last cue
point. When the mixer's crossfader is moved away from the player, the track will return to the cue point and
remain paused.
• TACT: When you connect a momentary switch/pedal to the CDN77USB's REMOTE START CONNECTOR, you
can start or pause playback by pressing it once.
• LOCK: When you connect a momentary switch/pedal to the CDN77USB's REMOTE START CONNECTOR, you
can pause playback by holding the switch down and resume playback by releasing it.
5
6
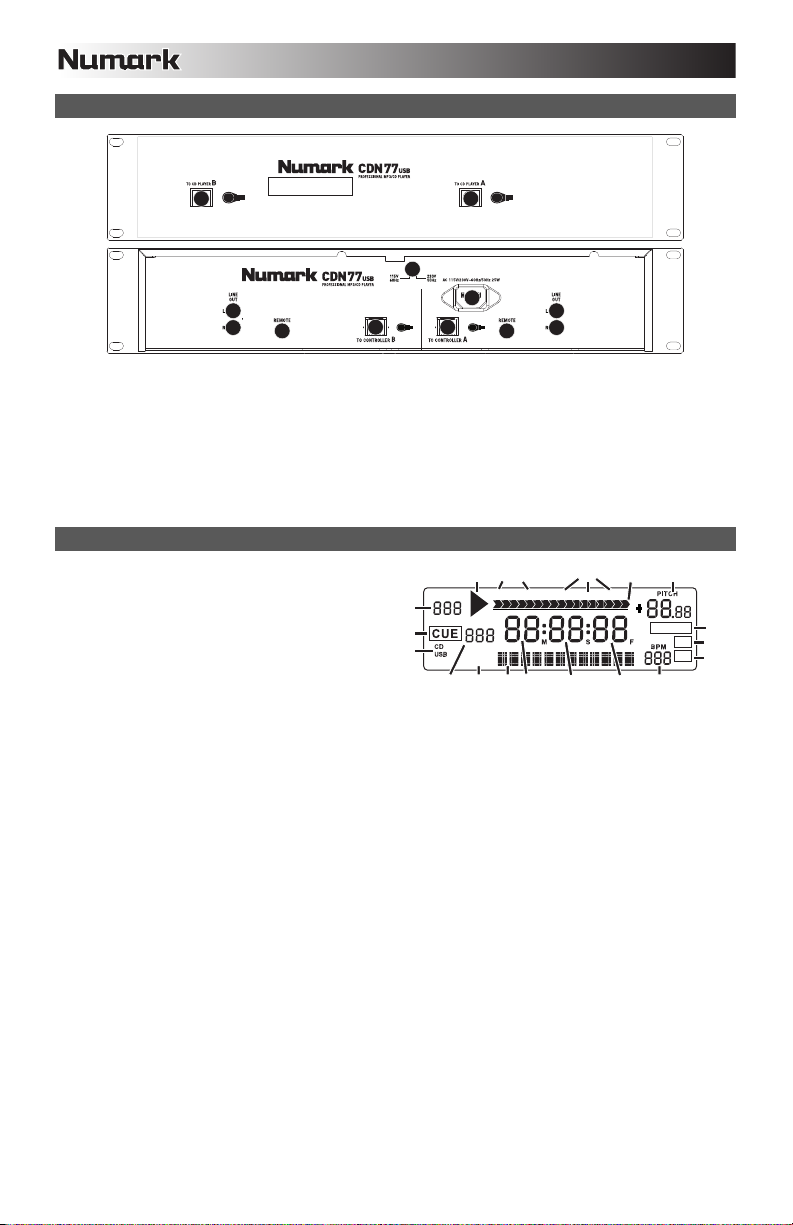
REAR PANEL FEATURES
3
4
4
55
1. VOLTAGE SELECTOR --- Set this switch to the voltage for your location.
2. POWER PLUG CONNECTOR – Plug your supplied power cord in here.
3. CONTOLLER CABLE CONNECTOR – Use the included controller cables to connect the CD player (bottom) to the
controller unit (top).
4. RCA AUDIO CONNECTORS – Connect your CD player to your mixer from these line level outputs.
5. REMOTE START CONNECTOR – To use CDN77USB's fader start features, connect these jacks to a fader start-
compatible mixer using a standard fader start cable (not included). Every time you move the crossfader on the mixer
towards one deck, that deck will automatically start playing. When you move the fader away from that deck, the deck
will stop playing.
3
3
1
2
3
4
4
LCD FEATURES
1. PLAY – This shows when the unit is playing.
2. CUE – Lit continuously when the unit is paused at a
cue point.
3. CD / USB – Indicates whether you are playing tracks
from a loaded CD or a connected USB device.
4. TRACK / FOLDER NUMBER – Shows the current
track or folder number. When viewing or playing a
program, the number will have a "P" in front of it
("P01," "P02," etc.), indicating the number of that
track in the program.
5. TOTAL TRACK – Displays the total number of tracks available on the CD or USB device. (When in Folder View, it will
display the total number of folders available on the USB device.)
6. MINUTES – Shows the minutes elapsed or remaining depending on mode setting.
7. SECONDS – Shows the seconds elapsed or remaining depending on mode setting.
8. FRAMES – The CD player breaks down a second into 75 frames for accurate cueing. This shows the frames elapsed or
remaining depending on mode setting.
9. TIME MODE – Indicates whether the time shown on the LCD is the elapsed time for the track, remaining time for the
track, or total remaining time for the entire CD.
10. TIME BAR – Shows either time remaining or elapsed depending on the setting of the TIME button.
11. PLAY MODE – Shows when the unit is set to Single Mode (the deck will stop at the end of each track) or Continuous
Play Mode (the entire disc will be played without interruption). This function is controlled by the SINGLE button.
12. RELOOP – Indicates when a loop is programmed.
13. BPM – Displays the tempo in BPM (beats per minute) of the current track. When "AUTO BPM" is displayed, it is a
tempo that has been automatically detected.
14. PITCH – Shows the percentage change in pitch.
15. MT (MASTER TEMPO) – Indicates that the MASTER TEMPO button is engaged.
16. PG (PROGRAM) – Indicates that a program is playing.
17. TEXT DISPLAY – Displays the folder name or file name when navigating MP3s.
18. iD3 TAG – Displays what kind of iD3 tag is shown in the TEXT DISPLAY.
4
2
3
1
11
Single Cont. Elapsed Total Remain
TRACK
FOLDER
Tot al
TITLE
ALBUM
ARTIST
5
1718
9
6
7
10
8
RELOOP
13
14
12
MT
15
PG
1
6
CONTENIDO DE LA CAJA
CDN77USB
Cable de alimentación
2 cables RCA estéreo
2 cables del controlador
Guía de inicio rápido
Folleto de información sobre la seguridad y la garantía
REGISTRO
Visite http://www.numark.com
actualizado con los nuevos desarrollos de productos y brindarle apoyo técnico de categoría mundial en caso de que tenga
algún problema.
INSTALACIÓN RÁPIDA
1. Asegúrese de que todos los artículos indicados en “Contenido de la caja" estén incluidos en la caja.
2. LEA EL FOLLETO DE INFORMACIÓN SOBRE LA SEGURIDAD Y LA GARANTÍA ANTES DE UTILIZAR EL
PRODUCTO.
3. Estudie el diagrama de conexión incluido en esta guía.
4. Coloque el mezclador en una posición adecuada para su funcionamiento.
5. Asegúrese que todos los dispositivos estén apagados y que todos los faders y perillas de ganancia estén en posición
«cero».
6. Conecte todas las fuentes de entrada estéreo como se indica en el diagrama.
7. Conecte las salidas estéreo a los amplificadores de potencia, bandejas de cinta magnética y/o otras fuentes de audio.
8. Enchufe todos los dispositivos al suministro de corriente alterna.
9. Encienda todo en el siguiente orden:
y fuentes de entrada de audio (por ejemplo, giradiscos, reproductores de CD, etc.)
y el mezclador
y por último, cualquier amplificador o dispositivo de salida
10. Al apagar, realice siempre esta operación en sentido inverso:
y apague los amplificadores
y el mezclador
y por último, cualquier dispositivo de entrada
DIAGRAMA DE CONEXIÓN
AMPLIFICADOR
DE AUDITORIO
y registre su CDN77USB. El registro de su producto asegura que podamos mantenerle
MEZCLADOR
FUENTE DE ALIMENTACIÓN
CABLE DEL
CONTROLADOR
CABLE RCA
ESTÉREO
CABLE DEL
CONTROLADOR
7
CABLE RCA
ESTÉREO
FUENTE DE ALIMENTACIÓN
CARACTERÍSTICAS DEL PANEL SUPERIOR
13
56
4
14 15 16
78
25
171819
910 11 12
20
23
22 22
24
3
21
222
3
1
1. POWER SWITCH – enciende y apaga la máquina con este botón. La unidad se debe cerrar siempre con este botón
primero antes de que se quite cualquier potencia externa. Se recomienda típicamente que accione el lector de CD,
encendido antes de los amplificadores y apagado después de los amplificadores para evitar un punto audio que se
enviará a través de su equipo.
2. EJECT – Pulse este botón para expulsar el CD. Si se está reproduciendo un CD, este botón no tiene ningún efecto.
Esta unidad está diseñada para poner los CDs comercial disponible, los CDs MP3 y los CD-Rs correctamente escritos y
cerrados. Debido a las variaciones en la especificación de ciertos escritores de CD y CDs que están hechos en casa
pueden funcionar incorrectamente. Para obtener los mejores resultados, recomendamos quemar los CD a la mínima
velocidad posible.
3. USB – Puede conectar aquí unidades de almacenamiento miniatura USB (con sistema de archivos FAT16 o FAT32)
con MP3. Para ver el contenido, use el botón SOURCE (Fuente) y la PERILLA TRACK (Pista) para seleccionar "USB
A" o "USB B" como fuente. (Ambas bandejas pueden reproducir pistas del mismo dispositivo USB simultáneamente.)
4. FUENTE – Pulse este botón para seleccionar la fuente de sus pistas –un CD insertado o un dispositivo USB conectado
("USB A" o "USB B"). (Ambas bandejas pueden reproducir pistas del mismo dispositivo USB simultáneamente.) Un
LED indica la fuente seleccionada actualmente. Confirme su selección presionando la PERILLA TRACK (Pista).
5. CARPETA – Pulse este botón para conmutar entre la vista Folder (Carpetas) y File (Archivos). En la vista de carpetas,
puede usar la PERILLA TRACK (Pista) para desplazarse por todas las carpetas disponibles. Cuando haya
seleccionado una carpeta, pulse la PERILLA TRACK para entrar a la vista de archivos —el primer archivo que se
muestra es el primer MP3 disponible en esa carpeta. Para volver a la vista de carpetas, pulse otra vez el botón
FOLDER. (En la vista de carpetas, puede pulsar y retener el botón FOLDER en cualquier momento para salir de dicha
vista sin hacer ningún cambio.)
Nota: En ambas vistas, no está restringido a ver sólo carpetas o archivos de un solo “nivel de directorio”. Cada vista es
simplemente una lista de todas las carpetas o archivos disponibles. Esta función proporciona una manera más rápida
de navegar por los archivos, permitiéndole saltar a distintos grupos de archivos dentro de una carpeta pero sin
requerirle entrar y salir de varios niveles de directorio.
6. PERILLA DE PISTA – Gire esta perilla para seleccionar una pista a reproducir. Pulse y gire esta perilla para saltar por
la lista de pistas/carpetas de a 10 pistas por vez.
7. REPRODUCIR / PAUSA – Reproduce o pone en pausa la pista. Al poner la pista en pausa se crea un punto de cue en
ese lugar (que se puede ajustar con la RUEDA DE AVANCE POR PASOS en modo de búsqueda).
8. CUE – Durante la reproducción, al pulsar CUE se vuelve al punto más reciente donde se inició la reproducción y la pista
se pone en pausa. Manteniendo pulsado CUE, la reproducción comienza desde este punto y, al soltarlo, vuelve a ese
punto y la pista se pone en pausa. Asimismo, si la pista está en pausa, es posible usar la RUEDA DE AVANCE POR
PASOS para localizar un nuevo punto de cue.
9. RAYAR – Activa o desactiva el modo de rayado. Cuando se activa, al girar la RUEDA DE AVANCE POR PASOS se
crea un efecto 'scratch' (Rayado). Cuando el modo de rayado está activo, el botón se ilumina.
10. BUSCAR – Si pulsa este botón, es posible usar la RUEDA DE AVANCE POR PASOS para explorar rápidamente la
música. Cuando el modo de búsqueda está activo, el botón se ilumina.
11. REVERSA – Pulse este botón para reproducir la pista en sentido inverso (se enciende el botón). Púlselo nuevamente
para volver a la reproducción normal.
12. FRENADO – Pulse este botón para activar el frenado (se enciende el botón). Cuando se activa el frenado, al poner la
pista en pausa se produce el enlentecimiento de la reproducción antes de detenerse, simulando el efecto de parar el
motor de un giradiscos. El frenado también afecta al tiempo de arranque cuando se pulsa REPRODUCIR. Ajuste el
tiempo de frenado manteniendo pulsado BRAKE y girando la RUEDA DE AVANCE POR PASOS.
8
 Loading...