


User Guide
English ( 3 – 8 )
Guía del usuario
Español ( 9 – 14 )
Guide d'utilisation
Français ( 15 – 20 )
Guida per l'uso
Italiano ( 21 – 26 )
Benutzerhandbuch
Deutsch ( 27 – 32 )
Appendix
English ( 33 )

User Guide (English)
Introduction
Box Contents
NDX500 |
Power Cable |
USB Cable |
User Guide |
RCA Audio Cable |
Safety & Warranty Manual |
|
|
Support |
|
For the latest information about this product (system requirements, compatibility information, etc.) and product registration, visit numark.com/ndx500.
For additional product support, visit numark.com/support.
Quick Start / Connection Diagrams
NDX500 as a Media Player
Loudspeakers
NDX500
Mixer
Power
NDX500 as a USB MIDI Controller
Powered Monitors
Important: When setting up, power on NDX500 before your amplifiers. When tearing down, power off your amplifiers before NDX500.
NDX500
Power
Important: Remember to select NDX500 as your playback or audio output device in your computer's Sound Control Panel or Preferences.
Computer
Power
3

Features
Top Panel
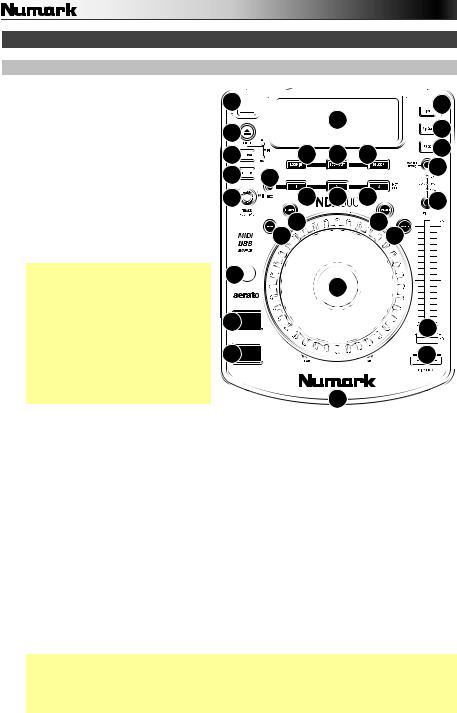
1.Display: This screen shows information relevant to NDX500's current operation. See the Display section to learn more.
2.USB Host Port: Connect a standard USB thumb drive (with a FAT16 or FAT32 file system) to this port to allow NDX500 to browse and play MP3 files stored on it. Use the Folder button and Track Knob to navigate the contents.
3.CD Slot: Insert an audio CD or MP3 CD into this slot.
Important: This unit is designed to play commercially available CDs, properly burned and finalized CDRs, and MP3 CDs. Due to variances on the specification of certain CD burners and CDs, some homemade CDs may not play properly. We recommend burning CDs at the minimum speed possible for the best performance.
4.Eject: Press this button to eject a CD from the CD Slot.
2


 20
20
4 |
|
|
|
|
|
|
1 |
|
|
|
|
|
21 |
|
|
|
|
|
|
|
|
|
|
|
|
|
|
||
|
|
|
|
|
|
|
|
|
|
|
|
|
||
5 |
|
|
25 |
26 |
|
27 |
|
22 |
||||||
|
|
|
|
|||||||||||
|
|
|
|
19 |
||||||||||
6 |
23 |
|
|
|
|
|
|
|
|
|
|
|||
|
|
|
|
|
|
|
|
|
|
|||||
|
|
|
|
|
|
|
|
|
|
|||||
|
|
|
|
|
|
|
|
|
|
|
||||
|
|
|
|
|
|
|
|
|||||||
7 |
24 |
24 |
24 |
16 |


 9 10
9 10


 1112
1112


18 |
8 |
|
|
|
|
|
|
||
|
|
|
||
14 |
|
|
|
|
|
|
|
||
|
|
|
||
|
|
|
|
|
|
|
|
|
|
|
|
|
|
|
|
|
|
|
|
|
|
15 |
|
|
|
|
|
|
13 |
|
|
|
17 |
||
|
|
|||||
|
|
|||||
|
3 |
|
|
|||
5.Source: Press this button to cycle between NDX500's different modes:
•CD: NDX500 will play music from an audio CD or MP3 CD inserted into its CD Slot. The CD LED next to the button will light up.
•USB: NDX500 will play music from a USB thumb drive connected to its USB Host Port. The USB LED next to the button will light up.
•MIDI: NDX500 will act as a USB MIDI controller, letting you control software on a computer connected to NDX500's USB Port (on the rear panel). Both the CD and USB LEDs next to the button will light up.
6.Folder: When browsing the contents of a connected USB thumb drive, press this button to switch between Folder View and File View.
•In Folder View, turn the Track Knob to scroll through the available folders. When you have selected a folder, press the Folder button to enter File View.
•In File View, turn the Track Knob to scroll through the available files. The first file shown will be the first MP3 available in that folder.
Note: In both views, you are not restricted to viewing only folders or files on a single "directory level." Each view is simply a list of all available folder or files. This function provides a faster way of navigating your files, allowing you to jump to different groups of files within a folder but without requiring you to enter/exit multiple directory levels.
7.Track Knob: Turn this knob to move to the next or previous track.
Press and hold the knob down while turning it to skip 10 tracks at a time.
4

8.Platter: The platter serves many functions depending on its current mode:
•If a track is not playing, turn the platter to search slowly through a track's frames. To set a new cue point, rotate the platter and begin playback when you have determined the proper position. Press Cue to return to that cue point.
•If a track is playing, turn the platter to temporarily bend the pitch of the track. Turning it clockwise speeds it up while turning it counterclockwise slows it down. This is a useful tool for beat-matching.
•When the Search button is active (Search Mode), turn the platter to scan rapidly through the track.
•When the Scratch button is active (Scratch Mode), turn the platter to "scratch" over the audio of the track, like a needle on a record.
Tip: When a track is paused, turn the platter clockwise while touching only its sides to activate "stutter cue," allowing you to hear the current frame repeatedly. This is useful when trying to cue up a precise point in a track like a downbeat. To deactivate stutter cue, touch the top of the platter.
9.Brake: Press this button to activate or deactivate Brake Mode. In this mode, pausing the track will cause playback to slow down before stopping, simulating the effect of stopping a turntable's motor.
To adjust the braking time, press and hold this button and then turn the platter.
10.Reverse: Press this button to activate or deactivate Reverse Mode. In this mode, music will play in reverse, and its time will count backwards in the display. The platter will also work in reverse.
11.Scratch: Press this button to activate or deactivate Scratch Mode. In this mode, you can touch the center part of the jog wheel will scratch like a turntable when you spin it. If scratch mode is off, the center part of the jog wheel will pitch bend when you spin it.
To change the Scratch Mode or style, press and hold down Scratch, and then turn the
Track Knob.
12.Search: Press this button to activate or deactivate Search Mode. In this mode, you can scan quickly through the track. If you do not touch the platter for 10 seconds, you will automatically deactivate Search Mode.
To adjust how quickly Search Mode scans through your tracks, press and hold down Search, and then turn the Track Knob.
13.Play/Pause: Press this button to start/resume or pause playback. Pausing a track will automatically create a cue point at that location. See the Cue button description below to learn how to edit a cue point.
14.Cue: Press this button to return to the last set cue point and pause playback. The cue point is the location in that track where you last started playback.
Press and hold this button a second time to start playback from this point. Release it to return to the last set cue point and pause playback.
To edit the cue point, pause the track, then turn the platter to locate where you want the new cue point to be (you will hear the track's audio as your do this), and then stop moving the platter.
15.Pitch Fader: Move this fader to adjust the overall pitch of the music when one or all of the Pitch Range LEDs are lit. If all of the Pitch Range LEDs are off, the Pitch Fader has no effect.
16.Pitch Range: Press this button to cycle through the available ranges of the Pitch Fader: 4%, 8%, 16%, or 100%. The corresponding LED will light up. When all three LEDs are lit, the range is ±100%. When no LEDs are lit, the Pitch Fader has no effect. The current range will also be shown in the display.
5

17.Pitch Bend –/+: Press either of these buttons to temporarily raise (+) or lower (–) the pitch and tempo of the music up to 4% from the current pitch setting.
18.Tap: Tap this button to the beat of the music to enter a BPM manually. Press and hold this button for 2 seconds to prompt NDX500 to detect a BPM automatically.
19.Master Tempo: Press this to activate or deactivate Master Tempo, which locks the musical key of the track to its original key (as if it were playing with 0% pitch adjustment). You can then adjust the tempo of the track without affecting its key or pitch.
20.Time: Press this button to cycle through the available Time Modes, which determine how time is shown in the display: elapsed time (Elapsed), remaining time on the track (Remain), and total remaining time on an entire CD (Remaining).
Press and hold this button and turn the Track Knob to scroll through the ID3 tags of a selected file with available ID3 information. You can choose to view the Title, Album, Artist, or no ID3 tags.
21.Single: Press this button to switch between the available Play Modes: Auto-Cue (playback will stop at the end of each track) or Continuous (Continue) (tracks will play one after another without interruption).
Press and hold this button and turn the Track Knob to adjust the remote start settings (as long as the NDX500's Remote Start Connector is connected to the appropriate input of a remote-start-compatible mixer). See the Remote Start Connector description to learn about the available settings.
22.Prog: This button helps you create a program, a sequence of tracks to play continuously:
•To add a track to the program, turn the Track Knob to select it, and then press and hold Prog and then press Rec. P–## will flash on the LCD (## indicates what number that track occupies in the program: P–01, P–02, etc.). Repeat this process to add more songs to the program. If a program is stored, Prog will be shown in the display.
•To play the program, press Prog once. The currently selected track in the program will be shown in the display, and the program's total number of tracks will be shown in the upper-left corner as P##. Turn the Track Knob to select the current track, press the Track Knob to load the track, and then press Play to start playing the Program from that track.
•To exit the program, press and hold Prog, and then press Folder. (If a track is currently playing, it will continue playing.)
•To delete the program, press and hold Prog, and then press Eject. When asked if you want to delete the program, turn the Track Knob to select Yes or No, and then press the Track Knob to confirm your choice. (If a track is currently playing, it will continue playing.)
23.Rec: Press this button, and then press one of the Hot Cue buttons to record a hot cue point at the desired location in the track.
24.Hot Cue: Press one of these buttons to return its corresponding hot cue point and continue playback. Only lit Hot Cue buttons have a recorded hot cue point.
To record a hot cue point, press Rec, and then press one of the Hot Cue buttons at the desired location in the track. You can also overwrite these hot cue points in the same way. Hot cue points will not be deleted when you load a new track.
25.Loop In: Press this button during playback to set a Loop In point, the start point of a loop. The cue point becomes this Loop In point.
26.Loop Out: Press this button to set a Loop Out point, the end point of a loop. The loop will begin playing immediately. To deactivate a loop, press Loop Out again.
27.Reloop: Press this button to jump immediately to the Loop In point and start playing the loop at that point.
6

Display
5 |
|
|
11 |
|
|
|
|
|
|
|
9 |
|
|
10 |
|
|
|
|
14 |
|||||||||||||||||||
|
|
|
|
|
|
|
|
|
|
|
|
|
|
|
|
|
|
|
|
|
|
|
|
|
|
|
|
|
|
|
|
|
|
|
15 |
|||
|
|
|
|
|
|
|
|
|
|
|
|
|
|
|
|
|
|
|
|
|
|
|
|
|
|
|
|
|
|
|
|
|
||||||
|
|
|
|
|
|
|
|
|
|
|
|
|
|
|
|
|
|
|
|
|
|
|
|
|
|
|
|
|
|
|
|
|
||||||
|
|
|
|
|
|
|
|
|
|
|
|
|
|
|
|
|
|
|
|
|
|
|
|
|
|
|
|
|
|
|
|
|
|
|
||||
1 |
|
|
|
|
|
|
|
|
|
|
|
|
|
|
|
|
|
|
|
|
|
|
|
|
|
|
|
|
|
|
|
|
|
|
|
|||
|
|
|
|
|
|
|
|
|
|
|
|
|
|
|
|
|
|
|
|
|
|
|
|
|
|
|
|
|
|
|
|
|
|
|
||||
|
|
|
|
|
|
|
|
|
|
|
|
|
|
|
|
|
|
|
|
|
|
|
|
|
|
|
|
|
|
|
|
|
|
|
|
|
12 |
|
2 |
|
|
|
|
|
<TITLE> |
|
|
|
|
|
|
|
|
|
|
|
|
|
|
|
|
|
|
|
|
|
|
|
|
|
|
|
|||||
|
|
|
|
|
< A L B U M > |
|
|
|
|
|
|
|
|
|
|
|
|
|
|
|
|
|
|
|
|
|
|
|
|
|
|
|
|
|||||
3 |
|
|
|
< A R T I S T > |
|
|
|
|
|
|
|
|
|
|
|
|
|
|
|
|
|
|
|
|
|
|
|
|
|
|
|
|
||||||
4 17 |
|
6 |
7 |
|
8 16 13 |
|
|
|
|
|||||||||||||||||||||||||||||
1.Play/Pause: This indicates whether the track is playing or paused.
2.Cue: This appears when the unit is paused at a cue point.
3.CD/USB: This indicates whether you are playing tracks from a connected USB thumb drive or an inserted CD.
4.Track/Folder Number: This indicates the current track or folder number. When viewing or playing a program, the number will have a P in front of it (P01, P02, etc.), indicating the number of that track in the program.
5.Total Track: This is the total number of tracks available on a connected USB thumb drive or inserted CD. (When in Folder View, it will display the total number of folders available on the USB thumb drive.)
6.Minutes: This is the number of minutes elapsed or remaining, depending on the Time Mode (see the Time button description).
7.Seconds: This is the number of seconds elapsed or remaining, depending on the Time Mode (see the Time button description).
8.Frames: NDX500's CD player divides one second into 75 frames for accurate cueing. This is the number of frames elapsed or remaining, depending on the Time Mode (see the Time button description).
9.Time Mode: This indicates the current Time Mode, which determines how time is shown in the display: elapsed time (Elapsed), remaining time on the track (Remain), and total remaining time on an entire CD (Remaining).
10.Time Bar: This is a visual indicator of time elapsed or remaining, depending on the Time Mode (see the Time button description).
11.Play Mode: This indicates the current Play Modes: Auto-Cue (playback will stop at the end of each track) or Continuous (Continue) (tracks will play one after another without interruption).
12.Reloop: This indicates when a loop is programmed.
13.BPM: This is the tempo in BPM (beats per minute) of the current track. When Auto BPM appears next to it, it means the tempo has been automatically detected.
14.Pitch: This is the current change in pitch as a percentage.
15.MT (Master Tempo): This indicates that Master Tempo is active.
16.Prog: This indicates that a program is stored.
17.Text Display: When navigating a connected USB thumb drive, the folder name or file name appears here.
7

Rear Panel
5 |
4 |
2 |
3 |
|
|||
6 |
|
|
|
|
|
1 |
|
|
|
|
1.Voltage Selector: Set this switch to the voltage for your location.
2.Power Connector: Use the included power cable to connect this jack to a power outlet.
3.Power Switch: Use this switch to power NDX500 on or off. Remember to power off NDX500 before disconnecting its power.
Important: When setting up, power on NDX500 before your amplifiers. When tearing down, power off your amplifiers before NDX500.
4.USB Port: Use a standard USB cable to connect this USB port to your computer. This lets you use NDX500 as a USB MIDI software controller or as a USB audio device. Use the Source button to select MIDI as NDX500's operating mode.
Important: Remember to select NDX500 as your playback or audio output device in your computer's Sound Control Panel or Preferences.
5.RCA Audio Connectors: Use standard RCA audio cables to connect these line-level outputs to your mixer.
6.Remote Start Connector: Use a standard remote start cable (sold separately) to connect this jack to a remote-start-compatible mixer.
To adjust the remote start setting, press and hold the Single button and turn the Track Knob:
•Cue/Play: When you move your mixer's crossfader towards this NDX500, the loaded track will play from its cue point. When you move your mixer's crossfader away from this NDX500, the track will return to the cue point and remain paused.
•Tact: When you connect a momentary switch/pedal to the NDX500's Remote Start Connector, you can start or pause playback by pressing it once.
•Lock: When you connect a momentary switch/pedal to the NDX500's Remote Start Connector, you can pause playback by holding the switch down and resume playback by releasing it.
8

Guía del usuario (Español)
Introducción
Contenido de la caja
NDX500 |
Cable de alimentación |
Cable USB |
Guía del usuario |
Cable de audio RCA |
Manual sobre la seguridad y garantía |
|
|
Soporte |
|
Para obtener la información más reciente acerca de este producto (requisitos de sistema, información de compatibilidad, etc.) y registrar el producto, visite numark.com/ndx500.
Para soporte adicional del producto, visite numark.com/support.
Diagrama de inicio / conexión rápida
El NDX500 como reproductor de medios
Altavoces
NDX500
Mezclador
Suministro eléctrico
Importante: Al comenzar, encienda su NDX500 antes que sus amplificadores. Al finalizar, apague sus amplificadores antes que el NDX500.
NDX500
Suministro eléctrico
El NDX500 como controlador USB MIDI
Monitores alimentados
Importante: Recuerde seleccionar el NDX500 como su dispositivo de reproducción o salida de audio en Control Panel (Panel de control) o Preferences (Preferencias) de sonido de su ordenador.
Ordenador
Suministro eléctrico
9
Características
Panel superior
1.Pantalla: Esta pantalla muestra 2 


 información relacionada con la


 20
20
operación actual del NDX500. Consulte |
4 |
|
1 |
|
21 |
||||
|
|
|
|||||||
la sección Pantalla para aprender más. |
|
|
|
||||||
|
|
|
|
22 |
|||||
2. Puerto USB host: Conecte una unidad |
5 |
25 |
26 |
27 |
|||||
|
|||||||||
de memoria |
USB |
(con sistema de |
19 |
||||||
archivos FAT16 o FAT32) a este puerto |
6 |
23 |
|
|
|||||
para permitir |
al NDX500 explorar y |
|
|
|
|||||
reproducir |
los |
archivos |
MP3 |
7 |
24 |
24 |
24 |
16 |
|
almacenados |
en ella. Utilice el botón |
||||||||
Folder (Carpeta) y la perilla Track |
|
9 10 |
|
1112 |
|
||||
(Pista) para explorar el contenido. |
|
|
|
|
|||||
3. Ranura para CD: Inserte un CD de |
|
|
|
|
|
||||
audio o MP3 en esta ranura. |
|
|
|
|
|
|
|||
Importante: Esta unidad está diseñada para reproducir CD que están disponibles comercialmente y CD-R y CD de MP3 que hayan sido grabados y finalizados correctamente. Debido a las variaciones en las especificaciones de ciertas grabadoras de CD y CD, algunos discos hechos en casa podrían no escucharse bien. Para obtener los mejores resultados, recomendamos quemar los CD a la mínima velocidad posible.
18
 14
14


 13
13


8
3
 15
15

 17
17 

4.Expulsar: Pulse este botón para eyectar un CD de la ranura de CD.
5.Fuente: Pulse este botón para alternar entre los distintos modos del NDX500:
•CD: El NDX500 reproducirá música de un CD de audio o MP3 insertado en su ranura de CD. El LED CD junto al botón se iluminará.
•USB: El NDX500 reproducirá música de la unidad de memoria USB conectada a su puerto USB host. El LED USB junto al botón se iluminará.
•MIDI: El NDX500 se comportará como un controlador USB MIDI, permitiendo controlar el software en un ordenador conectado al puerto USB del NDX500 (en el panel trasero). Tanto el LED CD como el LED USB junto al botón se iluminarán.
6.Carpeta: Al explorar el contenido de una unidad de memoria USB conectada, pulse este botón para alternar entre la vista de carpetas y la vista de archivos.
•En la vista de carpetas, puede usar la perilla Track para desplazarse por todas las carpetas disponibles. Una vez seleccionada una carpeta, pulse el botón Folder para entrar en la vista de archivos.
•En la vista de archivos, puede usar la perilla Track para desplazarse por los archivos disponibles. El primer archivo que se muestre será el primer MP3 disponible en esa carpeta.
Nota: En ambas vistas, no está restringido a ver sólo carpetas o archivos de un solo “nivel de directorio”. Cada vista es simplemente una lista de todas las carpetas o archivos disponibles. Esta función proporciona una manera más rápida de navegar por los archivos, permitiéndole saltar a distintos grupos de archivos dentro de una carpeta pero sin requerirle entrar y salir de varios niveles de directorio.
7.Perilla de pistas: Gire esta perilla para moverse a la pista siguiente o anterior. Mantenga pulsada la perilla mientras la gira para saltar de a 10 pistas por vez.
10
8.Plato: El plato cumple muchas funciones dependiendo de su modo actual:
•Si no se está reproduciendo una pista, gire el plato para buscar lentamente a lo largo de los cuadros de la pista. Para determinar un nuevo punto de cue, gire el plato y comience a reproducir una vez que haya determinado la posición adecuada. Pulse Cue para volver a ese punto de cue.
•Si se está reproduciendo una pista, gire el plato para flexionar temporalmente el pitch de la misma. Si la gira en el sentido horario se acelera y si la gira en sentido antihorario se desacelera. Esta es una herramienta útil para sincronizar beats.
•Cuando el botón Search (Búsqueda) está activado (modo Búsqueda), gire el plato para recorrer la pista rápidamente.
•Cuando el botón Scratch (Rayado) está activado (modo Rayado), gire el plato para "rayar" sobre el audio de la pista, como una púa en un disco.
Consejo: Cuando se pone una pista en pausa, gire el plato en sentido horario tocando solamente los costados del mismo para activar el "cue tartamudeado", que le permite oír el cuadro actual repetidamente. Esto resulta útil cuando se trata de señalar un punto preciso de la pista como un downbeat. Para detener el cue tartamudeado, toque la parte superior del plato.
9.Freno: Pulse este botón para activar o desactivar el modo Freno. En este modo, poner la pista en pausa produce un enlentecimiento de la reproducción antes de detenerse, simulando el efecto de parar el motor de un giradiscos.
Para ajustar el tiempo de frenado, mantenga pulsado el botón y después gire el plato.
10.Reversa: Pulse este botón para activar o desactivar el modo Reversa. En este modo, la música se reproducirá en reversa y su tiempo se contará hacia atrás en la pantalla. El plato también funcionará en reversa.
11.Rayado: Pulse este botón para activar o desactivar el modo Rayado. En este modo, puede tocar la parte central del plato para rayar el audio como cuando mueve un giradiscos. Si el modo está desactivado, la parte central del plato produce inflexión de pitch (pitch bend) cuando se hace girar.
Para cambiar el modo o estilo de rayado, mantenga pulsado Scratch y gire la perilla Track.
12.Búsqueda: Pulse este botón para activar o desactivar el modo Búsqueda. En este modo, puede recorrer la pista rápidamente. Si no toca el plato durante 10 segundos, el modo Búsqueda se desactiva automáticamente.
Para ajustar la velocidad de recorrido del modo Búsqueda por sus pistas, mantenga pulsado
Search y después gire la perilla Track.
13.Reproducir/Pausa: Pulse este botón para iniciar/poner en pausa la reproducción. Al poner una pista en pausa, se creará automáticamente un punto de cue en esa posición. Consulte la descripción del botón Cue más adelante para aprender a editar un punto de cue.
14.Cue: Pulse este botón para volver al último punto de cue establecido y poner la reproducción en pausa. El punto de cue es la posición de la pista en donde comenzó la última reproducción.
Mantenga pulsado este botón una segunda vez para comenzar la reproducción desde este punto. Suéltelo para volver al último punto de cue establecido y hacer una pausa en la reproducción.
Para editar el punto de cue, haga pausa en la pista, después gire el plato para localizar el lugar en donde desea colocar el nuevo punto de cue (escuchará el audio de la pista mientras hace esto) y después deje de mover el plato.
15.Fader de pitch: Mueva este fader para ajustar el pitch general de la música cuando uno o todos los LED del rango de pitch estén encendidos. Si todos los LED del rango de pitch están apagados, el fader de pitch no hace efecto.
16.Rango de pitch: Pulse este botón para alternar los rangos disponibles del fader de pitch: 4, 8, 16 o 100%. Se encenderá el LED correspondiente. Cuando los tres LED están encendidos, el rango es ±100%. Cuándo ningún LED está encendido, el fader de pitch no hace efecto. El rango actual también aparecerá en la pantalla.
17.Inflexión de pitch (tono) –/+: Pulse cualquiera de estos botones para elevar (+) o reducir (–) temporalmente el pitch y tempo de la música hasta 4% a partir del ajuste de pitch actual.
11
 Loading...