


User Guide
English ( 2 – 5 )
Guía del usuario
Español ( 6 – 9 )
Guide d’utilisation
Français ( 10 – 13 )
Guida per l’uso
Italiano ( 14 – 17 )
Benutzerhandbuch
Deutsch ( 18 – 21 )
Appendix
English ( 23 )

User Guide (English)
Introduction
Box Contents
DJ2GO2 Touch
Mini-USB Cable
Software Download Card
1/8”-to-stereo-RCA Cable
Quickstart Guide
Support
For the latest information about this product (documentation, technical specifications, system requirements, compatibility information, etc.) and product registration, visit numark.com.
For additional product support, visit numark.com/support.
For complete warranty information: numark.com/warranty.
Setup
Items not listed under Introduction > Box Contents are sold separately.
Speakers
Computer
Headphones
Before you can begin using DJ2GO2 Touch with your computer, you must install a DJ software application on your computer.
1.With a DJ software application installed on your computer, connect DJ2GO2 Touch to an available USB port on your computer. (If possible, use a USB port on the rear panel of your computer.)
2.On your computer, open your DJ software application.
3.Once the software opens, search for your music, video, and/or karaoke files.
4.Once a supported file is found, load the file to one of the software decks.
5.Repeat the process to assign a file to the other software deck.
2

Features |
1.Mini-USB Port: Plug the included mini-USB cable into this port and into the USB port of your computer to power DJ2GO2 Touch. DJ2GO2 Touch is class-compliant, so it is "plug-and-play" – no separate driver installation is necessary.
2.PFL / Cue: Sends pre-fader audio to the Cue channel for monitoring.
3.Cue Gain: Adjusts the audio level of the Cue channel.
4.Master Gain: Adjusts the output volume of the Program mix.
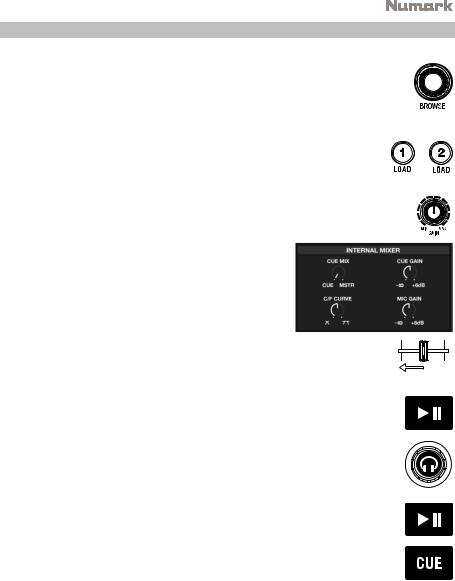
5.Browse Knob: Turn this knob to scroll through a list of tracks and directories/folders in the software. Press this knob to enter a directory/folder.
6.Load 1 / Load 2: Press one of these buttons while a track is selected to assign it to Deck 1 or Deck 2, respectively.
7.Channel Gain: Adjusts the audio level for the corresponding channel.
8.Crossfader: Blends audio playing between Decks 1 and 2. Sliding this to the left plays Deck 1 and sliding to the right plays Deck 2.
9.Pad Mode: This determines the function of the 4 pad bank buttons. The 4 options are: Hot Cue, Auto Loops, Manual Loops, and Sampler.
10.Jog Wheel: Move the touch capacitive wheel to control the playback position and scroll throughout the current song.
11.Play / Pause: Starts or resumes playback if the Deck is paused. Pauses playback if the Deck is playing. The LED will be OFF when there is no track loaded. The LED will flash when a track is paused. The LED will be ON when a track is playing.
12.Buttons 1-4: These buttons send momentary MIDI messages based on the set Pad Mode. See Operation > Pad Mode Controls for more information.
13.Cue: The Cue button will return and pause the track at the last set cue point. For temporary play of the cue point, hold down the Cue button. The track will play for as long as the button is held down and will return to the cue point once it has been released. Hold down Cue and Play / Pause simultaneously to start playback from the cue point. Release both buttons to allow playback to continue.
14.Sync: Press to automatically match the corresponding deck's tempo with the other deck's tempo.
15.Pitch Fader: Controls the track's playback speed.
16.1/8” (3.5 mm) Main Output: Connect this audio output to a mixer, powered speakers, or an audio recorder.
17.1/8” (3.5 mm) Headphone Output: Connect your headphones to this audio output.
3

Operation
Pad Mode Controls
1.Cues: This Pad Mode button switches Buttons 1-4 to Hot Cue Mode.
2.Auto Loop: This Pad Mode button switches Buttons 1-4 to trigger loops (loop bar value is set in your software).
Pad 1 - 1 beat
Pad 2 - 2 beats
Pad 3 - 4 beats
Pad 4 - 8 beats
3.Manual Loop: This Pad Mode button switches Buttons 1-4 to manually control looping. In Manual Loop mode:
Pad 1 - Loop In Set Point Pad 2 - Loop Out Set Point Pad 3 - Loop On/Off
Pad 4 - Retrigger Loop
4.Sampler: This Pad Mode button switches Buttons 1-4 to Sampler Mode to trigger samples.
4
Beat-Matching and Mixing with DJ2GO2 Touch
Below is an example of how to mix tracks using DJ2GO2 Touch:
1. Turn the Browse knob to scroll through your music library.
2. Load tracks with similar BPM onto Decks 1 and 2 by pressing the Load 1 and Load 2 buttons on DJ2GO2 Touch.
3. Start with the Gain knobs at the 12 o’clock position. You can adjust these for more or less signal gain after the tracks are loaded.
4.In your software, ensure the Cue Mix knob is adjusted to the desired position for CUE (headphone output) and MSTR (master mix output).
5. Move the crossfader all the way to the left to send the audio from Deck 1 to the main outputs. If you are listening through the headphone output, adjust the Cue Gain knob.
6.Play the track that is loaded on Deck 1.
7.Press the PFL button on Deck 2, and adjust the Cue Gain knob to preview the
audio through the headphone output.
8.Play the track that is loaded on Deck 2 to preview it in your headphones.
9.While the track is playing, press the Cue button to return to the beginning of the track.
10.(Auto) Press Sync on Deck 2 to auto-match its BPM with Deck 1. Press play and the songs should be in sync.
11.(Manual) Move the pitch slider so the BPM in the software matches with Deck 1. Press play on the downbeat, then use the wheel to align the beats together.
12.Move the crossfader on DJ2GO2 Touch toward the right to crossfade from Deck 1 to Deck 2.
5

Guía del usuario (Español)
Introducción
Contenido de la caja
DJ2GO2 Touch
Cable mini USB
Tarjeta de descarga de software
Cable RCA a estéreo de 1/8 pulg.
Guía de inicio rapido
Soporte
Para obtener la información más reciente acerca de este producto (documentación, especificaciones técnicas, requisitos de sistema, información de compatibilidad, etc.) y registrarlo, visite numark.com.
Para obtener soporte adicional del producto, visite numark.com/support.
Para información completa sobre la garantía: numark.com/warranty.
Instalación
Los elementos que no se enumeran en Introducción > Contenido de la caja se venden por separado.
Altavoz
Ordenador
Auriculares
Antes de comenzar a utilizar el DJ2GO2 Touch con su ordenador, debe instalar una aplicación de software para DJ en su ordenador.
1.Con la aplicación de software para DJ instalada en su ordenador, conecte el DJ2GO2 Touch a un puerto USB disponible en su ordenador. (Si es posible, use un puerto USB del panel trasero de la computadora).
2.En su ordenador, abra su aplicación de software para DJ.
3.Una vez abierto el software, busque sus archivos de música, vídeo y/o karaoke.
4.Una vez encontrado un archivo compatible, cargue el archivo a una de las bandejas del software.
5.Repita el proceso para asignar un archivo a la otra bandeja del software.
6

Características |
1.Puerto mini-USB: Enchufe el cable mini-USB incluido en este puerto y en el puerto USB de su ordenado para suministrar corriente al DJ2GO2 Touch. DJ2GO2 Touch cumple con la clase, de modo que es "plug-and-play" – no es necesario instalar ningún controlador por separado.
2.PFL / Cue: Envía el audio pre-fader (previo al atenuador) al canal de Cue para monitoreo.
3.Cue Gain: Ajusta el nivel de audio del canal de Cue.
4.Master Gain: Ajusta el volumen de salida de la mezcla del programa.
5.Perilla Browse: Gire esta perilla para recorrer la lista de pistas y directorios/carpetas en el software. Pulse esta perilla para entrar a un directorio/carpeta.
6.Load 1 / Load 2: Pulse uno de estos botones mientras está seleccionada una pista para asignarla a la bandeja 1 o 2 respectivamente.
7.Channel Gain (Ganancia de canal): Permite ajustar el nivel de audio del canal correspondiente.
8.Crossfader: Mezcla el audio que se reproduce en las bandejas 1 y 2. Al deslizarlo hacia la izquierda se reproduce la bandeja 1 y al deslizarlo hacia la derecha reproduce la bandeja 2.
9.Pad Mode: Este botón determina el funcionamiento de los 4 botones del banco de pads. Las 4 opciones son: Cue rápido, bucles automáticos, bucles manuales y muestreador.
10.Rueda de avance por pasos: Mueva la rueda de táctile capacitivo para controlar la posición de reproducción y recorrer la totalidad de la canción actual.
11.Reproducir / Pausa: Permite iniciar o reanudar la reproducción si la bandeja está en pausa. Permite poner la reproducción en pausa si la bandeja está reproduciendo. El LED estará apagado cuando no haya ninguna pista cargada. El LED parpadeará cuando haya una pista en pausa. El LED estará encendido cuando se esté reproduciendo una pista.
12.Botones 1-4: Estos botones envían mensajes MIDI momentáneos en base al modo de pad definido. Consulte Funcionamiento > Controles de modo de pad para más información.
13.Cue: El botón Cue regresa y detiene la pista en el último punto de cue establecido. Para reproducir temporalmente el punto de cue, mantenga presionado el botón Cue. La pista se reproduce mientras el botón se mantiene presionado y retorna al punto de cue cuando se suelta. Mantenga pulsado Cue y Reproducir / Pausa simultáneamente para comenzar la reproducción desde el punto de cue temporal. Suelte ambos botones para permitir que continúe la reproducción.
14.Sync: Púlselo para igualar automáticamente el tempo de la bandeja correspondiente con el de la otra bandeja.
15.Fader de tono: Permite controlar la velocidad de reproducción de la pista.
16.Salida principal de 3,5 mm (1/8 pulg.) Conecte esta salida de audio a un mezclador, altavoces alimentados o a un grabador de audio.
17.Salida para auriculares de 3,5 mm (1/8 pulg.): Conecte sus auriculares a esta salida de audio de 1/4 pulg.
7

Funcionamiento
Controles de modo de pad
1.Cues: Este botón de modo de pad conmuta los botones 1-4 a el modo de cue rápido.
2.Auto Loop: Este botón de modo de pad conmuta los botones 1-4 para disparar bucles (la cantidad de barras del bucle se define en su software).
Pad 1 - Bucle de 1 beat
Pad 2 - Bucle de 2 beats
Pad 3 - Bucle de 4 beats
Pad 4 - Bucle de 8 beats
3.Manual Loop: Este botón de modo de pad conmuta entre los botones 1-4 para controlar los bucles de forma manual.
En el modo de bucle manual:
Pad 1 - Punto inicial del bucle
Pad 2 - Punto final Out del bucle
Pad 3 - Activar/Desactivar bucle
Pad 4 - Volver a disparar bucle
4.Sampler: Este botón de modo de pad conmuta los botones 1-4 al modo muestreador para disparar muestras.
8
 Loading...