


CDN25, CDN25+G, CDN30
Professional CD Players
Quick Start Owner’s Manual
BOX CONTENTS
∙CD PLAYER TRANSPORT UNIT
∙CD PLAYER CONTROL UNIT
∙IEC POWER CORD
∙RCA CONNECTING CABLES (2 pair)
∙CONTROL CABLE
Manual de inicio rápido del usuario (ESPAÑOL)
CONTENIDO DE LA CAJA
∙UNIDAD TRANSPORTADORA DE REPRODUCTOR DE CD
∙UNIDAD DE CONTROL DE REPRODUCTOR DE CD
∙CABLE DE ALIMENTACIÓN IEC
∙CABLES CONECTORES
Schnellbedienungsanleitung (DEUTSCH)
INHALT DER SCHACHTEL
∙TRANSPORT EINHEIT F. CD-SPIELER
∙STEUERUNGSEINHEIT F. CD-SPIELER
∙IEC-genormtes STROMKABEL
∙RCA-VERBINDUNGSKABEL (DOPPELPAAR)
∙STEUERUNGSKABEL
Manuale Rapido di Utilizzazione (ITALIANO)
CONTENUTO DELLA CONFEZIONE:
∙UNITÀ DI TRASPORTO LETTORE CD
∙UNITÀ DI CONTROLLO LETTORE CD
∙CAVO DI ALIMENTAZIONE IEC
∙CAVI DI CONNESSIONE RCA (2 paia)
∙CAVO DI CONTROLLO
Guide d’utilisation simplifié (FRANÇAIS)
CONTENU DE LA BOÎTE
∙UNITÉ DE TRANSPORT DU LECTEUR CD
∙UNITÉ DE COMMANDE POUR LECTEUR CD
∙CÂBLES DE CONNEXION RCA (2 paires)
∙CÂBLE D’ALIMENTATION IEC
∙CÂBLE DE COMMANDE
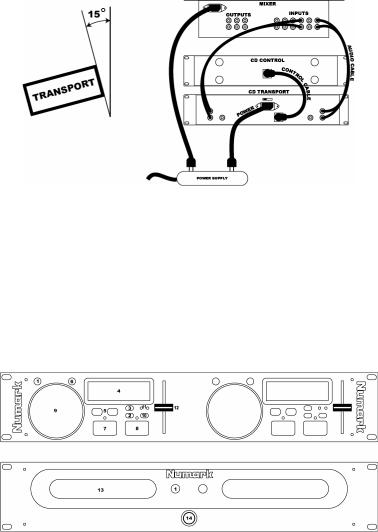
CD PLAYER QUICK SETUP
1.Make sure all items listed on the front of this guide are included in the box.
2.READ SAFETY INSTRUCTION BOOKLET BEFORE USING THE PRODUCT.
3.Study this setup diagram.
4.Mount the units in your console or rack with 19” EIA rails.
5.The transport should be mounted not to exceed an angle of 15 degrees.
6.Make sure all devices are turned off and all faders and gain knobs are set to “zero”
7.Connect all devices as indicated in the diagram.
8.Connect the stereo outputs to power amplifier(s), tape decks, and/or other audio sources.
9.Plug all devices into AC power.
10.Switch everything on in the following order.
∙audio input sources (i.e. turntables or CD players)
∙Mixers
∙last, any amplifiers or output devices
11.When turning off, always reverse this operation by,
∙turning off amplifiers
∙Mixers
∙last, any input devices
12.Go to http://www.numark.com for product registration.
More information about this product may be found at http://www.numark.com
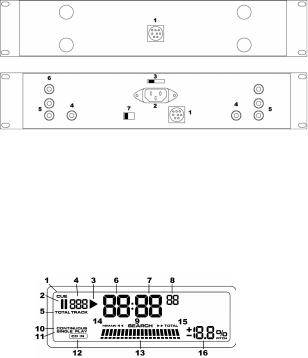
FRONT PANEL FEATURES
1.Open/Close: Press to load or eject the disc. The tray will not open if a disc is in play. The tray door will automatic close in 30 seconds if left open. This is to protect the tray from accidental damage while open
2.Single: toggles the unit to play back just one track at a time (single) or play continuously through all tracks and then start over repeating the CD infinitely (continuous).
3.Time: switches the time modes on the display between elapsed playing time, remaining time on the track, and remaining time on the total CD. When toggled to remaining time total the total number of remaining tracks will also show.
4.LCD DISPLAY - Indicates all the functions, as they are occurring, with the CD.
5.Track Buttons: These buttons are used to select the track to be played.
6.Search Button: Pressing this button allows you to use the wheel and rapidly scan the music to find a cue point. The search function automatically shuts off after 8 seconds of non-use or you may toggle it off.
7.Cue: Returns and pauses the music at the last set cue point. The cue point is where the music will begin when play is pressed. The cue point is set as the initial start point on a track or can be moved when play is started at a different point. For instance if the music is paused then play is pressed a new cue point is set. You can easily edit the cue point by turning the wheel during pause. As you rotate the wheel the music will sound. By stopping the wheel and pressing play a new point is set. Alternately pressing the PLAY button and the CUE button allows
the CD to be played from the same position any number of times.
Note: Pressing cue 2 times plays music temporarily from this point until the button is released.
8.Play/Pause: Starts the music from the cue point or pauses it while in play. By pressing play after pause a new cue point will be set
9.Jog Wheel:
Cue Function: As explained under “CUE”, when the music is paused and you rotate the wheel, music will sound. By pressing play a new cue point is set.
Search Function: As explained under “SEARCH BUTTON”, when search is pressed and you rotate the wheel, the music will rapidly scan the music to find a cue point.
Pitch Bend Function: allows the user to temporarily change the speed of the music to align beats. When the beats of the music of the CD you wish to match is fast compared to the tempo of the other music rotate the jog wheel counter clockwise (to the left). When the CD is behind rotate the jog wheel clockwise (to the right). The pitch changes temporarily while the jog wheel is rotated. The faster you rotate the wheel the more pitch is changed. Releasing the wheel results in a return to the original pitch.
10.Pitch Range: actives the pitch slider and adjusts the amount of control the pitch slider has on the overall speed of music. Tapping the pitch will toggle slider between 8% and 16% pitch ranges. Holding the pitch for 3 seconds will deactivate the pitch control.
11.Pitch Range LEDs: indicate current pitch range. When both LEDs are off the pitch slider is not active
12.Pitch Slider: By moving the slider in the (+) direction the speed of the music permanently speeds up. By moving the slider in the (-) direction the speed of the music permanently slows down. To match the speeds of two CDs you can adjust the pitch. When the tempo of the music of the CD you wish to match is slow compared to the tempo of the other music, move the slider to the (+) side and match the speed. When faster, move the pitch slider to the (-) side. By making this adjustment the speeds will be matched though the beats may not yet be aligned.
13.CD Drawer – Place your CDs you wish to play in here. This unit is designed to play commercially available CD and properly burned and finalized CDR formats. Due to variances on the specification of certain CD burners and CDs some discs home made CDs may not play properly.
14.Power Switch- Turn on and turn off the machine with this button. The unit should always be shut down with this button first before any external power is removed.
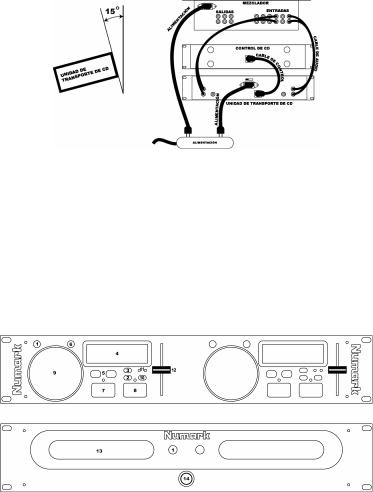
REAR CONNECTIONS
1.Control Cable Connector- Plug in the 8-pin cable included in here to connect the remote control and main CD unit together
2.IEC Power Plug Connector - Plug your supplied power cord in here.
3.Voltage Selector - Set this switch to the voltage for your location.
4.RCA Audio Connectors - Connect your CD player to your mixer from this line level output.
5.Digital Output - The format is type 2, form 1, also known as S/PDIF (Sony/Phillips Digital Interface Format). In order to use the digital output you should not use variable pitch
slider and the pitch bend buttons. If you adjust the pitch, other devices may not read the digital output properly because the sampling rate changes
6.Video Output (CDN25+G only) – Plug the composite video input on your video monitor or mixer directly into this output. The output will be the text graphics from CD+G Karaoke disks.
7.PAL/NTSC Switch (CDN25+G only) – The changes the scan rate of your composite video output. You should set this to your local standard. The incorrect setting will cause your display to flicker. Typically set this to NTSC for the US and PAL for Europe.
LCD DISPLAY FEATURES
1.CUE - Flashing when the unit is setting a cue point. Lit continuously when the unit is paused at a cue point.
2.PAUSE (II)- Active when the unit is paused.
3.PLAY (>)- Active while the unit is actually playing a CD.
4.TRACK - Shows the track that the unit is playing.
5.TOTAL – indicates when total CD remaining tracks are displayed.
6.MINUTES - Shows the minutes elapsed or remaining depending on mode setting.
7.SECONDS - Shows the seconds elapsed or remaining depending on mode setting.
8.FRAMES - The CD Player breaks down a second into 75 frames for accurate cueing. This shows the frames elapsed or remaining depending on mode setting.
9.SEARCH – indicates when the unit is searching through the music
10.CONTINUOUS PLAY – Shows when the unit is set to play back the entire CD without stopping between tracks.
11.SINGLE PLAY- Shows when the unit is set to play just one track at a time.
12.CD IN – indicates a standard CD is in the unit.
13.TIME BAR - Shows either track elapsed time, remaining track time, or remaining total time depending on the setting of the “time” button.
TIME MODE -
14.(Remain) indicates when track remain time is displayed.
15.(Total) indicates when total CD remain time is displayed note: if both indications will not be lit when the unit is showing “elapsed” time
16.PITCH DISPLAY – indicating current pitch

PLAY / PAUSE & CUE OPERATIONS
PLAY & CUE
Press "PLAY/PAUSE" |
Press "CUE" return to |
to start music |
last starting point |
Play Interval |
Position on Disc |
Back Cue Operation
Pressing the “PLAY/PAUSE” button starts the disc. Pressing the “CUE” button will reset the disc to the last place where the disc was started. This is called the cue point. By alternately pressing the “PLAY/PAUSE” button and the “CUE” button, the disc may be returned and played from the cue point any number of times. This function is called back cue.
PLAY, PAUSE & CUE
Press "PLAY/PAUSE" |
Press "PLAY/PAUSE" |
Press "PLAY/PAUSE" |
Press "CUE" return to |
to start music |
to pause music |
to start music |
last starting point |
Play Interval |
|
Play Interval |
Position on Disc |
Back Cue Operation
When play has been paused and then started again, the return position for the back cue will be updated to this new position.
EDITING CUE POINT
When the inner dial is turned while a cue point is set, a new cue point can be located. The CD player will repeatedly play small parts of the CD as you move it to the desired position. By pressing “PLAY/PAUSE” then “CUE” you can confirm that the new cue point is desirable.
Matching the Beats Per Minute
Match the tempo by monitoring the music of both PLAYER 1 and PLAYER 2 by ear and adjusting the pitch. When the tempo of the music of the selected CD player is slow compared to the tempo of the other player, move the slider to the ( + ) side and match the tempo. When faster, move the pitch slider to the ( - ) side. The following illustration shows the case of matching the pitch of PLAYER 2 to the pitch of the music being played on PLAYER 1.
1. Press PLAY/PAUSE to start PLAYER 1. PLAYER 1 is playing
2. Press PLAY/PAUSE to start PLAYER 2 Both CD players are playing discs.
3.Listen to PLAYER 2 in your headphones. If the beat of channel 2 (in the headphones) is faster than channel 1, slow down the beat of channel 2 using the pitch control.
4.If the beat of channel 2 (in the headphones) slower than the beat of channel 1, speed up the beat using the
pitch control.

BEAT MATCHING USING PITCH BEND
If you find the BPM’s (Beats Per Minute or Tempos) are the same, however, the drum beats are not matched you will need to temporarily change the pitch. The illustration below shows how to match the beat of PLAYER 2 to the beat of the music being played on PLAYER 1. (This procedure can be done on either PLAYER).
After matching the BPM’s adjust the pitch temporarily as follows: |
|
When PLAYER 2 is rotate the jog wheel counter clockwise |
When PLAYER 2 is behind rotate the jog wheel clockwise |
The pitch changes automatically while the jog wheel is rotated. The faster you rotate the wheel the more you change. Releasing the wheel results in a return to the original pitch. (So the BPM’s are once again the same.)
EXAMPLE OF MIXING USING BOTH PLAYERS OF YOUR CD PLAYER
While playing a disc on PLAYER 1, load a disc into PLAYER 2 and select your next track, match its pitch to the track playing on PLAYER1 and when you are ready use the crossfader on your mixer to fade from PLAYER 1 to PLAYER 2.
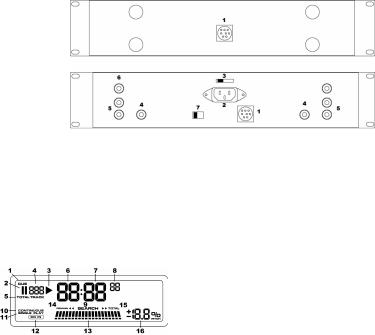
INSTALACIÓN RÁPIDA DEL REPRODUCTOR DE CD (ESPAÑOL)
1.Asegúrese de que todos los artículos incluidos al inicio de este manual están incluidos en la caja.
2.LEA EL FOLLETO DE INSTRUCCIONES DE SEGURIDAD ANTES DE UTILIZAR EL PRODUCTO.
3.Estudie este diagrama de instalación.
4.Monte las unidades en su consola o bastidor con raíles EIA de 19”.
5.El transporte debería ser montado para que no exceda un ángulo de 15 grados.
6.Asegúrese de que todos los dispositivos están apagados y de que todos los faders y potenciómetros de ganancia están en posición “cero”.
7.Conecte todos los dispositivos como se indica en el diagrama.
8.Conecte las salidas del estéreo a los amplificadores de alimentación, unidades de cinta magnética y/o otras fuentes de audio.
9.Enchufe todos los dispositivos a la potencia de corriente alterna.
10.Prenda todo en el siguiente orden:
∙fuentes de entrada de audio (por ej. giradiscos o reproductores de CD)
∙Mezcladores
∙por último, cualquier amplificador o dispositivo de salida
11.Al apagar, realice siempre esta operación al contrario:
∙apague los amplificadores
∙Mezcladores
∙por último, cualquier dispositivo de entrada
12.Visite http://www.numark.com para registrar el producto.
Puede encontrar más información sobre este producto al visitar http://www.numark.com
LAS CARACTERÍSTICAS DEL PANEL FRONTAL
1.Open/Close (Abrir/Cerrar): pulse para cargar o expulsar el disco. La bandeja no se abrirá si hay un disco tocando. La puerta de la bandeja se cerrará automáticamente en 30 segundos si se deja abierta. Esto es para proteger la bandeja de daño accidental mientras esté abierta: NO desconecte la alimentación mientras la bandeja de discos esté abierta.
2.Single: hace que la unidad se active para reproducir las pistas de una en una (single) o reproducir continuamente todas las pistas y comenzar repitiendo el CD infinitamente (continuo).
3.Time (Tiempo): cambia los modos de tiempo en el visualizador entre el tiempo de reproducción transcurrido, tiempo restante de la pista y tiempo restante en todo el CD. Cuando se activa el total tiempo restante también mostrará el número total de pistas restantes.
4.PANTALLA LCD – Indica todas las funciones del CD a medida que van teniendo lugar.
5.Botones del Track (Pista): estos botones se utilizan para seleccionar la pista que se va a reproducir.
6.Botón de búsqueda: pulsar este botón le permite usar la rueda y escanear rápidamente la música para encontrar un punto cue.
La función de búsqueda se apaga automáticamente si no se utiliza durante 8 segundos; puede desactivarla si desea.
7.Cue: vuelve a reproducir y para la música en el último punto de cue determinado. El punto cue es donde la música comenzará cuando se pulse play. El punto cue se establece como el punto de partida inicial en una pista o puede trasladarse cuando se comienza a reproducir desde un punto diferente. Por ejemplo, si la música está en pausa y se pulsa play, se establece un nuevo punto cue. Puede modificar el punto cue fácilmente al girar la rueda durante la pausa. Al girar la rueda se escuchará la música. Al parar la rueda y pulsar play, se establece un nuevo punto de partida. Si se pulsan alternativamente los botones PLAY y CUE, el CD será reproducido desde la misma posición cuantas veces se desee.
Nota: Si se pulsa el botón cue dos veces, se reproducirá música temporalmente desde este punto hasta que suelte el botón.
8.Play/Pause: hace que comience la música desde el punto cue o la pausa mientras suena. Si pulsa play después de pausa, establecerá un nuevo punto cue.
9.Jog wheel (rueda de avance lento):
Función Cue: tal y como hemos explicado en “Cue”, cuando la música esté pausada y usted gire la rueda, se escuchará música. Si pulsa play, establecerá un nuevo punto cue.
Función de búsqueda: como se ha explicado bajo el botón de búsqueda “SEARCH”, cuando se pulse SEARCH y se gire la rueda, se escaneará la música rápidamente para encontrar un punto de cue.
Función Pitch Bend: permite que el usuario cambie la velocidad de la música temporalmente para alinear los beats. Cuando los beats de la música del CD que usted desea alinear son rápidos comparados con el tempo de la otra música, debe girar la rueda de avance lento (jog wheel) en el sentido contrario al de las agujas del reloj (hacia la izquierda). Cuando el CD se retrase, gire la jog wheel en el sentido de las agujas del reloj (hacia la derecha). El pitch cambia temporalmente mientras gira el jog wheel (rueda de avance lento). Cuanto más rápido gira la rueda, más cambia el pitch. Soltar la rueda hace que se vuelva al pitch original.
10.Rango del pitch: activa al deslizador del pitch y ajusta la cantidad de control que tiene el deslizador del pitch sobre la velocidad total de la música. Si le da un golpecito al pitch alternará el deslizador entre rangos de pitch de 8% y de 16%. Mantenga el botón PITCH pulsado durante 3 segundos para desactivar el control del pitch.
11.LED para el rango del pitch: indica el rango del pitch en ese momento. Cuando ambos LED están apagados, el deslizador del pitch no está activo.
12.Deslizador del Pitch: al mover el deslizador en la dirección de
(+)la velocidad de la música aumenta permanentemente. Al
mover el deslizador en la dirección de (-) la velocidad de la música disminuye permanentemente. Puede ajustar el pitch para igualar las velocidades de dos CD. Cuando el tempo de la música del CD que desea igualar sea lento comparado con el de la otra música, desplace el deslizador hacia el (+) e iguale la velocidad. Cuando sea más rápido, desplace el pitch hacia (-). Al realizar este ajuste las velocidades se igualarán aunque los beats podrían no estar aún alineados.
13.Cajón de CD – Coloque aquí los CD que desea reproducir. Esta unidad está diseñada para reproducir CD que están disponibles de modo comercial y CDR que han sido grabados y finalizados correctamente. Debido a las variaciones en la especificación de ciertas grabadoras de CD y CD, algunos discos o discos hechos en casa no se escucharán bien.
14.Interruptor de alimentación – Encienda y apague la máquina con este interruptor. La unidad debería ser siempre apagada con este interruptor primero antes de retirar cualquier fuente de alimentación externa.
CONEXIONES TRASERAS
1.Conector del cable de control- Enchufe el cable de 8- pines que se incluye aquí para conectar el control remoto a la unidad principal de CD.
2.Conector del cable de alimentación IEC – Enchufe su cable de alimentación aquí.
3.Selector de voltaje – Ajuste este interruptor al voltaje de su ubicación.
4.Conectores de audio RCA – Conecte su reproductor de CD a su mezclador desde esta salida de nivel de línea.
5.Salida digital - El formato es de tipo 2, form 1, también conocido como S/PDIF (Sony/Phillips Digital Interface Format). Para poder usar la salida digital no debería usar un deslizador de pitch variable y los botones del pitch bend. Si
ajusta el pitch, otros dispositivos podrán tener problemas para leer la salida digital correctamente ya que el ritmo de muestreo cambia.
6.Salida de video (CDN25+G solamente) – Conecte la entrada de conjunto de video de su monitor de video o mezclador directamente a esta salida. La salida serán los gráficos de texto de los discos de karaoke CD+G.
7.Interruptor PAL/NTSC (CDN25+G solamente) – Cambia el ritmo de escaneo de su conjunto de salida de video. Debería ajustar esto a la norma de su área. El ajuste incorrecto causará el parpadeo de su visualizador. Típicamente, puede ajustar este interruptor a NTSC para los Estados Unidos y PAL para Europa.
CARACTERÍSTICAS DE LA PANTALLA LCD
1.CUE - Parpadea si la unidad está determinando un punto cue. Se ilumina de forma continua si la unidad está detenida en un punto cue.
2.PAUSE (II) - Está activo si la unidad está en pausa.
3.PLAY (>) - Está activo si la unidad está reproduciendo un CD en ese momento.
4.TRACK (PISTA) - Muestra la pista que la unidad está reproduciendo en ese momento.
5.TOTAL – Indica cuando se visualizan las pistas restantes en el CD.
6.MINUTES - Muestra los minutos restantes o transcurridos dependiendo de la configuración del modo.
7.SEGUNDOS - Muestra los segundos restantes o transcurridos dependiendo de la configuración del modo.
8.FRAMES - El reproductor de CD divide un segundo en 75 frames para un cueing más preciso. Muestra los frames
restantes o transcurridos dependiendo de la configuración del modo.
9.SEARCH (búsqueda)– Indica cuando la unidad está buscando a través de la música
10.CONTINUOUS PLAY (Reproducción continua) – Muestra cuando la unidad está ajustada para reproducir todo el CD sin parar entre cada pista.
11.SINGLE PLAY (Reproducción única) - Muestra cuando la unidad está configurada para reproducir las pistas de una en una.
12.CD IN – Indica que hay un CD estándar en la unidad.
13.TIME BAR (barra de tiempo)- Muestra ya sea el tiempo transcurrido de la pista, el tiempo restante de la pista o tiempo restante total dependiendo del ajuste del botón “time” (tiempo).
MODO DE TIEMPO -
14.REMAIN (Restante) indica cuando se visualiza el tiempo restante de la pista.
15.TOTAL - Indica cuando se visualiza el tiempo restante de todo el CD.
Nota: si ambas indicaciones no están iluminadas cuando la unidad muestra el tiempo transcurrido “elapsed”
16.PITCH DISPLAY – Indica el pitch actual
 Loading...