

Page 1

Nokia Mediamaster
Owner’s Manual
Digital terrestrial Free-to-View is a non-subscription service through an
existing TV and aerial.
Total Channel availability is subject to coverage.
You may be required to upgrade your television aerial to enable full
service reception.
Contact information:
Nokia Support: 01793 556 046, E-mail: NHC.sales@nokia.com
Page 2

General information about the Mediamaster
Throughout this manual you will notice that the everyday operation
of your Mediamaster is based on a series of user friendly on-screen
displays and menus. These menus will help you get the most from
your Mediamaster, guiding you through installation, channel selection, viewing and many other functions.
All functions can be performed by using the buttons on the remote
control, and some of the functions can also be performed by using
the buttons on the front panel.
Please be aware that new software may change the functionality of
the Mediamaster.
Should you experience any difficulties with the operation of your
Mediamaster, please consult the relevant section of this manual, including the Problem Solving, or alternatively call your dealer or a customer service adviser.
Read this before using the Mediamaster
• Allow 10 cm space around the Mediamaster for sufficient ventilation.
• Do not cover the Mediamaster’s ventilation openings with items such as
newspapers, tablecloths, curtains etc.
• Do not place the Mediamaster on top of a unit that emits heat.
• Do not place naked flame sources, such as lighted candles, on the Mediamaster.
• Use a soft cloth and a mild solution of washing-up liquid to clean the casing.
• Do not expose the Mediamaster to dripping or splashing liquids.
• Do not place any objects filled with liquids, such as vases, on the Mediamaster.
•To give your Mediamaster an extra protection, e.g. at a thunderstorm, we
recommend that you connect it via an external surge protection device.
• Do not connect or modify cables when the Mediamaster is plugged in.
• Do not remove the cover.
• Do not allow the unit to be exposed to hot, cold or humid conditions.
• Service should be carried out only at a Nokia Authorised Service Centre.
• Please note that the only way to isolate the Mediamaster completely from
the mains supply is to unplug the mains cable!
Page 3

Contents
Remote control 4
Front and rear panel 5
About the Common Interface slot 6
Connecting the Mediamaster 7
About the SCART sockets 7
Preparing the remote control 7
About the digital transmission 7
Connecting the Mediamaster 8
Connecting to the TV aerial 8
General about connections 8
Connecting to the TV with SCART 8
Connecting to the TV without SCART 9
Connecting a HiFi system 9
Connecting a video recorder without
SCART 10
Connecting a video recorder with SCART 10
First time installation 11
General information 11
Switching on for the first time and start
the “First time installation” 11
Time adjustment 12
Channel search in progress 12
Navi Bars 13
General information 13
The “Control” and “Settings” folders 14
Control folder ☛ User preferences 14
Control folder ☛ Edit channels 15
Control folder ☛ Timer 18
Control folder ☛ System info 18
Settings folder ☛ Channel 19
Settings folder ☛ TV 20
Settings folder ☛ Modem 21
Settings folder ☛ Access Ctrl 22
Settings folder ☛ Time 22
Settings folder ☛ SW update 23
Settings folder ☛ Reinstall 23
Games folder 23
Viewing Mode 24
General Information 24
Programme information 24
Extended programme information 25
Temporary settings 25
TV Release (0) 26
Enhanced TV / Digital Text 26
Glossary of terms 27
Troubleshooting 28
Technical specifications 29
Nokia Mediamaster software enduser license 30
Nokia, Nokia Connecting People and Navi Bars are registered trademarks of Nokia Corporation. Other
product and company names mentioned herein may be trademarks or trade names of their owners.
Nokia operates a policy of continuous development. Therefore we reserve the right to make changes
and improvements to any of the products described in this manual without any prior notice.
Copyright © 2003 Nokia. All rights reserved.
GB 3
Page 4
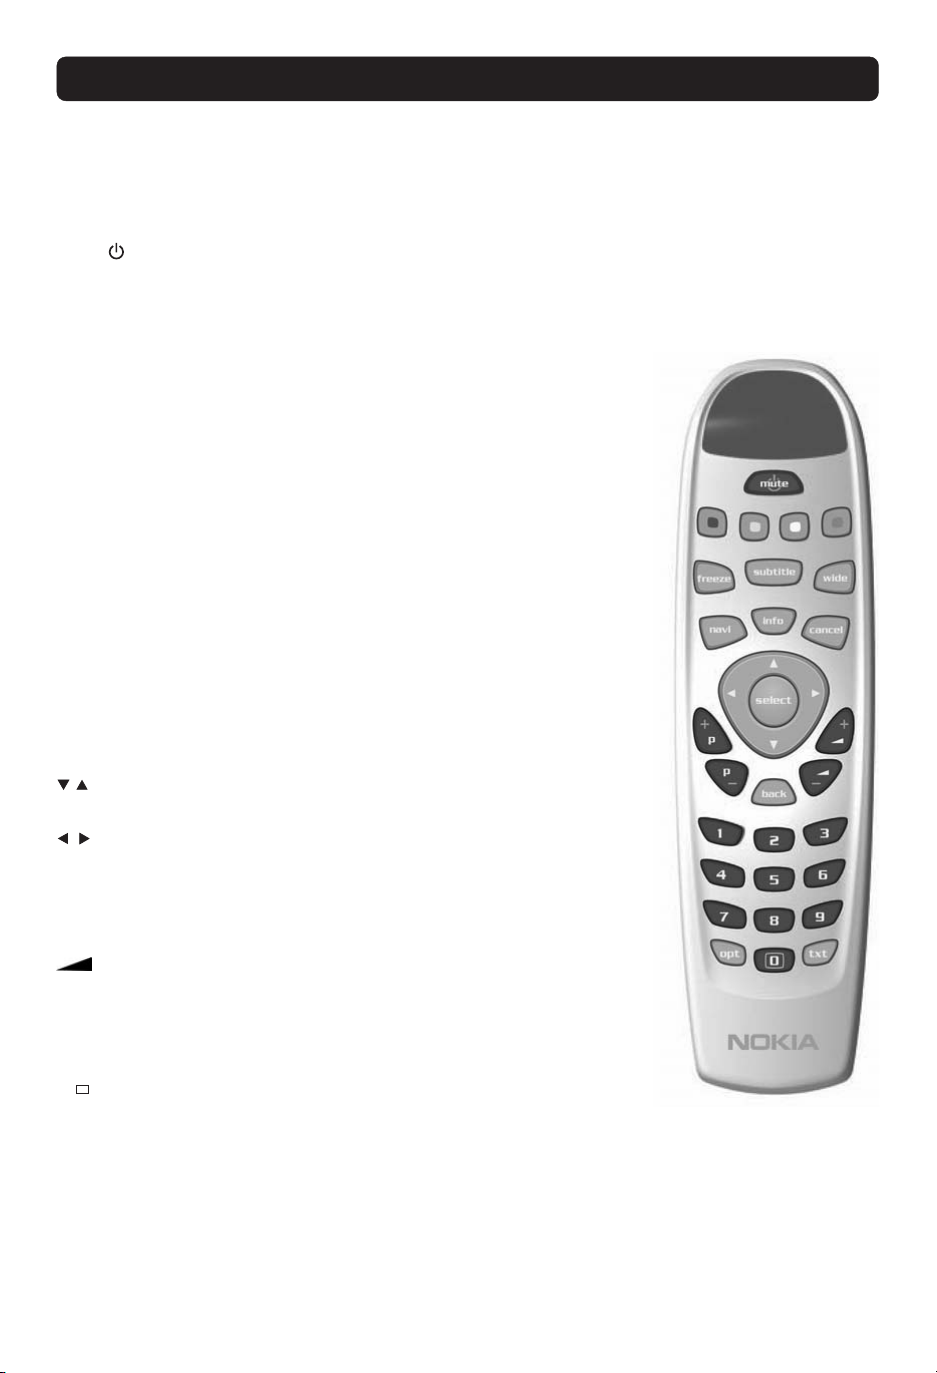
Remote control
This section describes how to operate the Mediamaster using the buttons on the remote control.
Some of the functions can also be carried out using the buttons on the front panel.
mute/ Press once to turn the sound off/on (mute). Press and hold for a
red Function keys for interactive applications
green
yellow
blue
freeze To freeze the picture. Press the button one more time to return
subtitle To show and hide subtitles.
wide Toggle between Fullscreen, Combined and Letterbox formats.
navi To open or close the Navi Bars.
info To display brief and detailed information (if transmitted) about
cancel Function key for interactive applications.
select Confirm choices and selection of a highlighted item.
Move up/down in the Navi Bars and menus and to
few seconds to switch the Mediamaster into standby mode.
Press any number button to switch it on again.
to normal viewing mode
Your Mediamaster must be set to 4:3 picture format. When set
to 16:9 the Mediamaster will automatically manage the picture display.
current and next programmes. Can be used with All TV folder in
Navi Bars.
change channels.
Move left/right in the Navi Bars, in menus and to adjust sound.
P+ P- Change channels up and down, one at a time. Return to TV mode
back Go back one level at a time within menus
0 - 9 Change channel and to select individual menu options.
0 TV Release. To switch between digital TV/Radio and analogue TV,
opt Show service options in viewing mode. Only applies to the chan-
txt Press to enter teletext (if available).
GB 4
from an interactive application.
+ - Adjust the volume. The Mediamaster’s maximum volume level
is controlled by the TV’s volume setting.
Note: If 0 is entered as the first digit, the TV Release functionality is activated (see below).
satellite TV and VCR. Function may not be available on all TV and
Video models.
nel you are watching.
Page 5
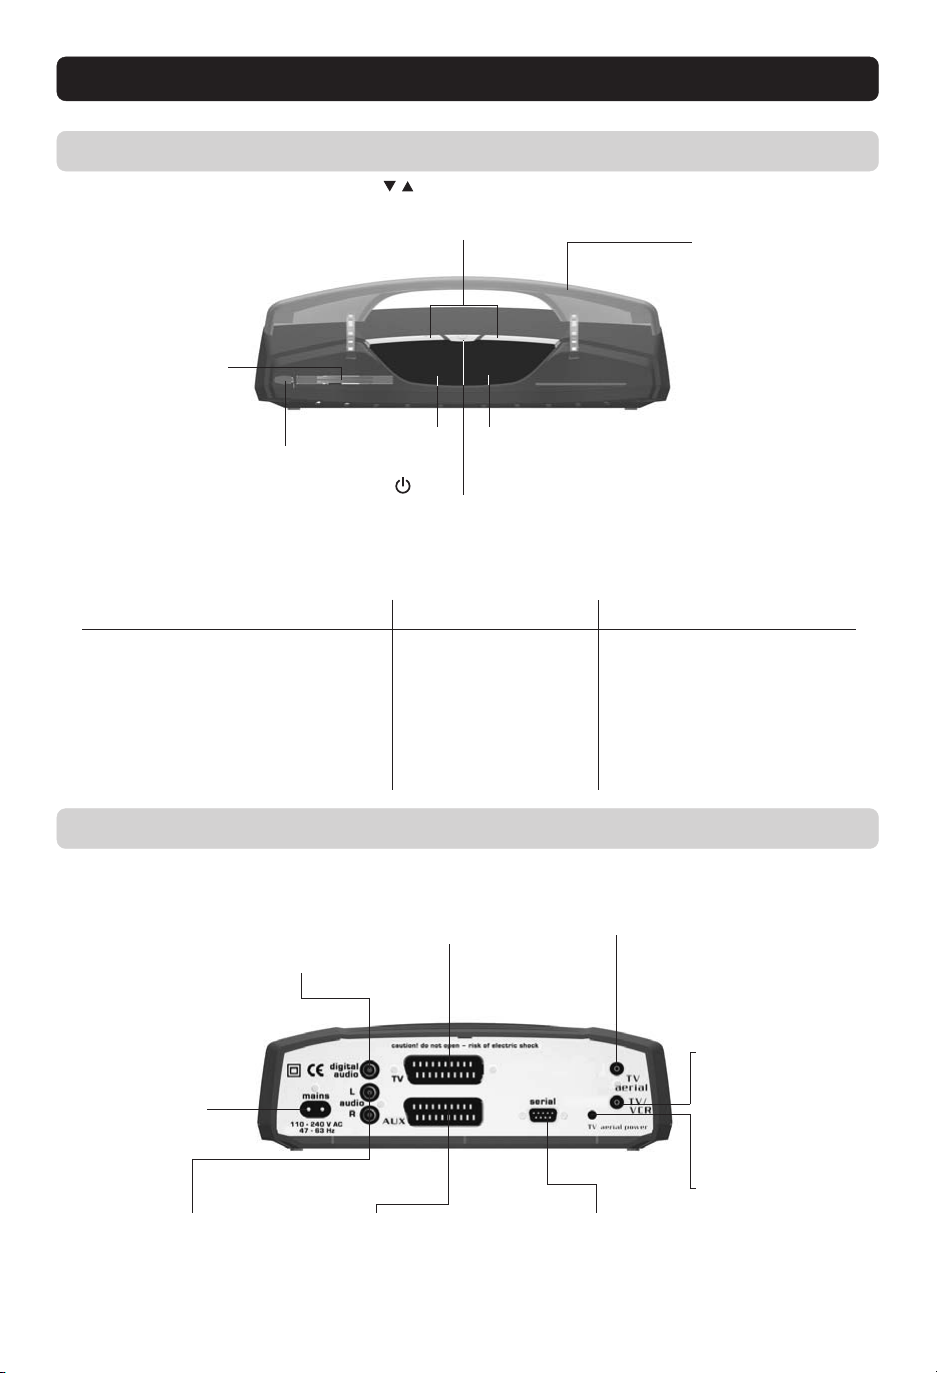
Front and rear panel
Front panel
Slot
CI slot for extra
modules (additional
functionality) such
as an ADM
Button
push the button to
release an inserted
CI module
to change channels
and to move in menus
Indicator 1
to put the Mediamaster
in and out of standby
mode
Indicator 2
Lid
open the lid in order
to access CI slot
Function
ON
Standby
Locked to channel / Signal Drop out
Remote control feedback
SW download
Error. Please contact Nokia Support
Rear panel
Digital audio
RCA connector
S/PDIF digital output for connection
to a HiFi system
Mains cable
110-240 V AC
Audio L R
RCA connectors
stereo outputs for connection to an analogue
HiFi system
Indicator 1
Green
Red
Green
Green
Continous green flashing
Continous red flashing
TV SCART
for connection
to the TV
AUX SCART
for connection to a VCR
or a satellite receiver
Indicator 2
Green
Red if not locked to channel
Single flash
Continous green flashing
Continous red flashing
TV aerial
for an external
TV aerial
Serial port
for connection to
external modem
TV/VCR
for an RF-cable to the
aerial input of the TV or
VCR
Power supply
for connection of a
NOKIA indoor TV aerial
with signal amplifier
only.
(Not available for UK
use.)
GB 5
Page 6
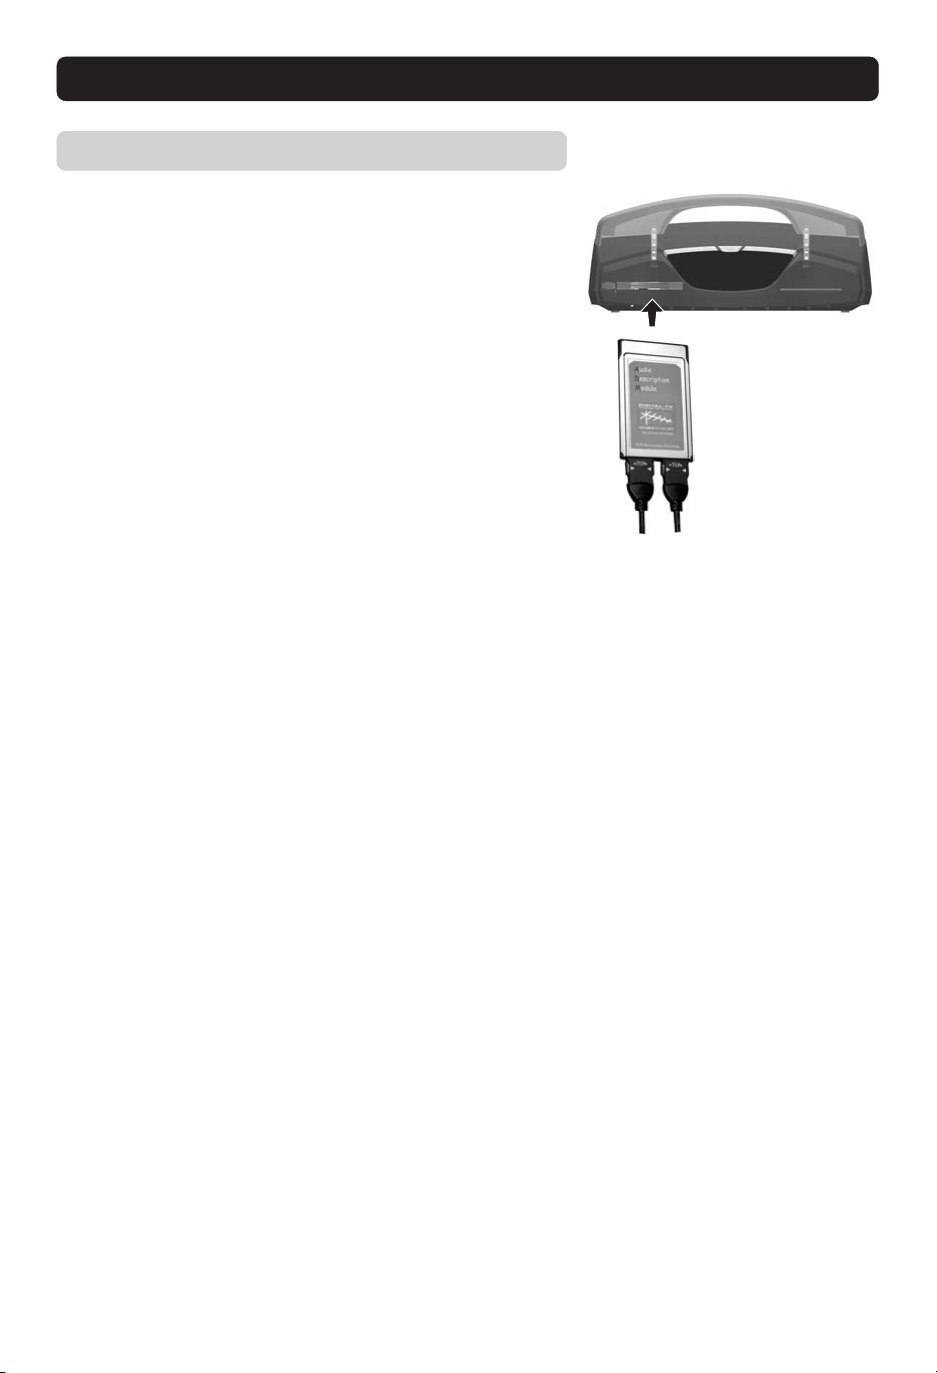
About the Common Interface slot
Common Interface slot
The Nokia Mediamaster 221 T has an integrated Common Interface (CI) slot, which can give you access to future services such
as Audio Description.
Audio description is a service which provides an extra sound
commentary to accompany a programme. The purpose of this
commentary is to describe actions, scenery or facial expressions
to enable people with sight problems to enjoy the programme to
the full.
ADM module
GB 6
Page 7
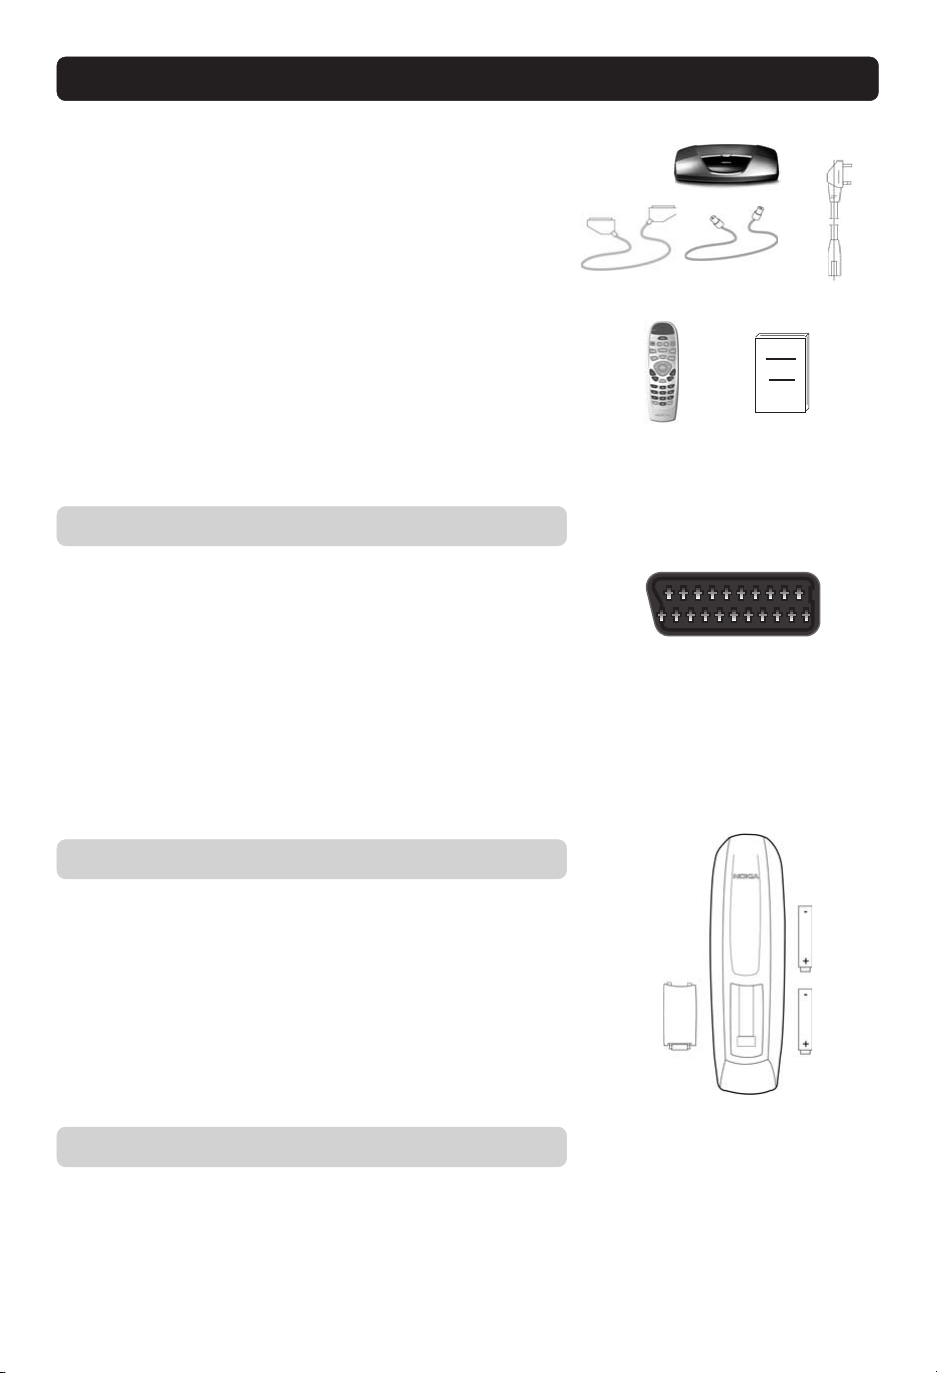
Connecting the Mediamaster
The box for your Mediamaster should contain the following items:
• the Mediamaster
• remote control with 2 AAA batteries
• SCART cable (fully connected; 1,0 metre)
• mains cable
• RF cable
• Owner’s manual including a software license agreement
About the SCART sockets
The rear panel of the Mediamaster is equipped with 2 SCART
sockets (see diagram). When you connect other devices to any
of these sockets, always use fully connected SCART cables (as
the one supplied.) There are SCART cables available which do not
have all the pins connected. The picture quality could be reduced
if you use them.
SCART cable Mains cable
RF cable
Owner’s ManualRemote control
SCART socket
Preparing the remote control
• Remove the cover on the battery compartment at the bottom
of the remote control.
• Insert the 2 AAA; 1,5 V batteries, as shown in the diagram, taking care to observe the + and - markings indicated inside.
• Replace the cover.
About the digital transmission
Digital Radio and TV signals can be blocked by buildings, mountains and the terrain. Depending on if the receiver is located in a
valley, behind a mountain or in a concrete building, the quality of
reception may vary considerably.
As with most other transmissions, bad weather does affect the
reception quality.
GB 7
Page 8

Connecting the Mediamaster
Connecting to the TV aerial
You can connect the Mediamaster to the following type of aerials:
1. Standard outdoor aerial
Where possible, use an outdoor roof aerial intended for receiving UHF channels between 21 and 69.
Please note the following:
• In some block of flats, the roof-mounted aerial system includes
a filter and channel selector. If so, the aerial may not work with
the Mediamaster. Please consult the landlord.
• Many older roof-mounted aerials may only receive a limited
number of channels. As a result, digital channels transmitted
on higher frequencies are difficult or even impossible to receive. The problem can be solved by replacing the roof aerial.
• Some outdoor aerials are directed towards an analogue transmitter. The aerial must be directed towards a digital TV transmitter.
• It is not always advisable to position the aerial as high as possible. If problems arise, experiment with different aerial
heights.
2. Indoor and window mounted aerials
It is not advisable to use indoor or window mounted aerials, as
digital channels will be difficult or even impossible to receive.
General about connections
There are many different types of TV/VCR and other equipment
that you can connect to the Mediamaster.
In this manual you will see some of the most common ways to
connect your equipment.
If you have problems with your connections and need help, contact your retailer or Nokia Support.
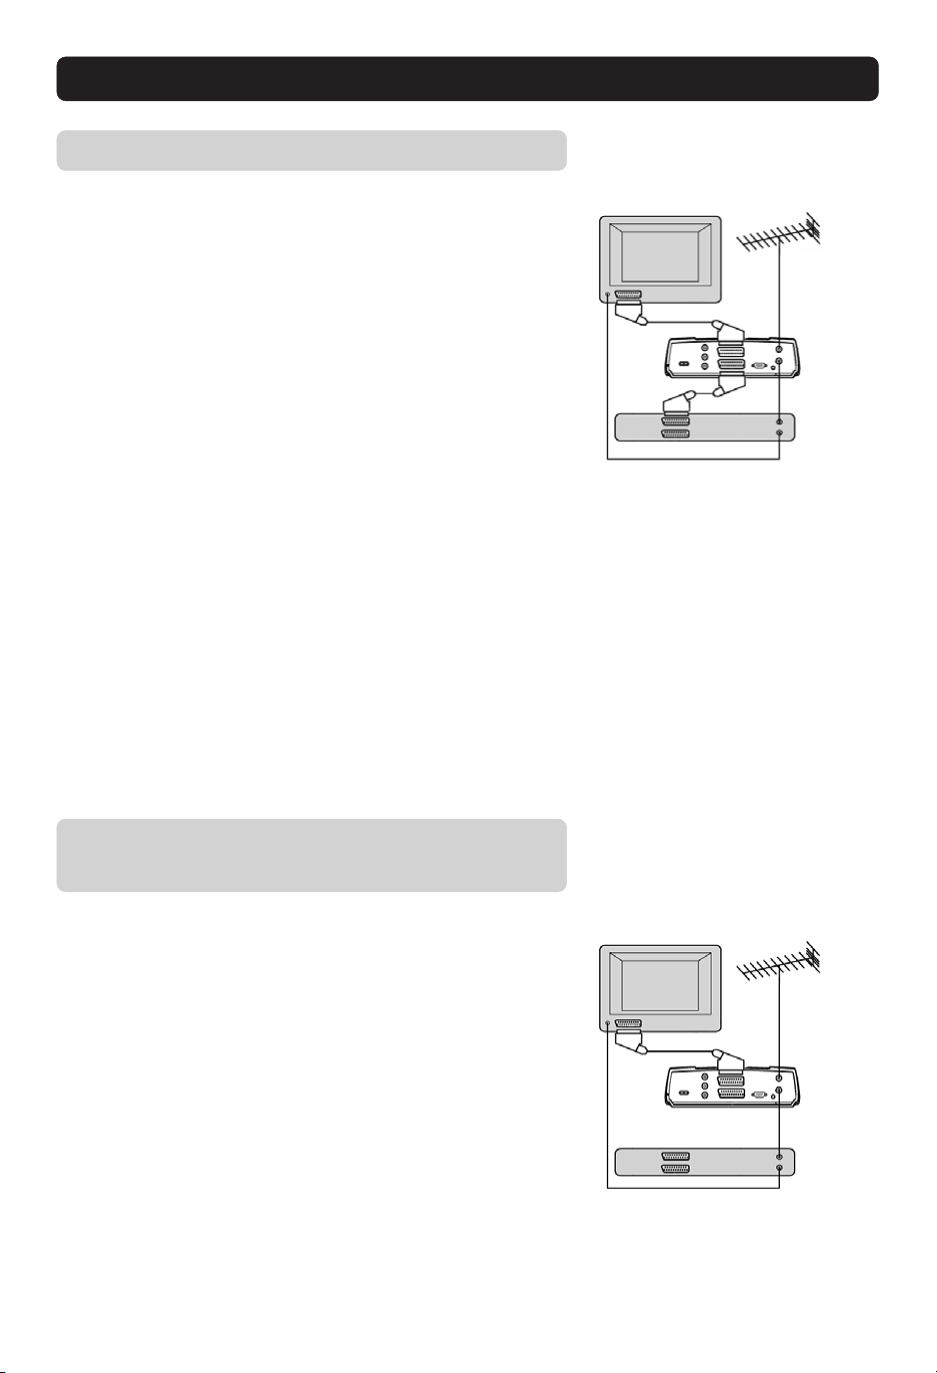
Connecting to the TV with SCART
• Remove the aerial lead from your TV and connect this to the
TV AERIAL input socket on the Mediamaster.
• Connect a SCART cable between the main SCART socket on
the TV and the TV SCART socket on the Mediamaster.
• Connect an RF cable from the TV/VCR output on the Mediamaster to the RF input socket on the TV.
• Switch on your TV, plug in and switch on your Mediamaster.
You may need to select the AV ( SCART ) channel on your TV
to watch Digital TV. In some cases your TV will automatically
select this channel when the Mediamaster is switched on.
Note: The RF lead will need to be connected in order to watch
analogue channels ( your old 1,2,3,4,5 )
It is always advisable to consult your TV instruction book.
RF
SCART
GB 8
Page 9

Connecting the Mediamaster
Connecting to the TV without SCART
• Remove the aerial lead from your TV and connect this to the
TV AERIAL input socket on the Mediamaster.
• Connect an RF cable from the TV/VCR output on the Mediamaster to the RF input socket on the TV.
• Switch on your TV, plug in and switch on your Mediamaster.
• Select a programme number on the TV that is not currently
used for other TV channels.
• Follow the instructions in your TV manual to tune the TV to pick
up the First time installation menu.
• Follow the instructions in your TV manual to store this channel.
• When the First time installation menu is visible, press the se-
lect button on the Mediamasters remote control to start the
installation procedure.
If the picture quality is bad you can later change the predefined
UHF channel 43 to any other figure between 21 and 69. You will
also have to tune your TV to the same (= the new) channel
number. Please see RF modulator output channel setting on
page 20.
RF
Connecting a HiFi system
• Connect an RCA/Cinch stereo cable ( phono ) from the AUDIO
L R sockets on the Mediamaster to the LINE, -IN, AUX, SPARE
or EXTRA input sockets on your HiFi system.
• If available you can connect an RCA/Cinch single cable from
the DIGITAL AUDIO socket on the Mediamaster to a HiFi system equipped with digital audio input. This output is also used
for connection to an external Dolby™ digital decoder.
Note: To avoid interference you must use screened audio
cables. Never connect digital output to any analogue input.
It is always advisable to consult your HiFi instruction book.
GB 9
Page 10
Connecting the Mediamaster
Connecting a video recorder with SCART
• Remove the aerial lead from your TV and connect this to the
TV AERIAL input socket on the Mediamaster.
• Connect a SCART cable between the main SCART socket on
the TV and the TV SCART socket on the Mediamaster.
• Connect an RF cable from the TV/VCR output on the Mediamaster to the RF input socket on the video.
• Connect an RF cable from the TV/VCR output on the video to
the RF input socket on the TV.
• Connect a SCART cable between the TV SCART socket on the
video and the AUX SCART socket on the Mediamaster.
• Switch on your TV, plug in and switch on your Mediamaster.
•On your VCR there should be an A/V select button. This should
be selected to record Digital TV.
You may need to select the AV ( SCART ) channel on your TV.
In some cases your TV will automatically select this channel
when the Mediamaster is switched on.
Note: To record a digital channel you will need to select the
AV ( SCART ) channel on your video.
It is always advisable to consult your video and TV instruction books.
video
Connecting a video recorder without
SCART
• Remove the aerial lead from your TV and connect this to the
TV AERIAL input socket on the Mediamaster.
• Connect an RF cable from the TV/VCR output on the Mediamaster to the RF input socket on the video.
• Connect the TV aerial to the TV AERIAL input socket on the
Mediamaster.
• Connect an RF cable from the TV/VCR output on the video to
the RF input socket on the TV.
• Switch on your TV, plug in and switch on your Mediamaster.
You may need to select the AV ( SCART ) channel on your TV.
In some cases your TV will automatically select this channel
when the Mediamaster is switched on.
• Pick a spare channel on your VCR and tune this into the 221T
– store this channel.
• Select this channel on your video when you want to record a
digital channel.
GB 10
video
Page 11

First time installation
General information
Once you have correctly connected the Mediamaster, you also
have to perform a “First time installation.”
During this procedure, helpful information is displayed at the bottom of the menus.
Please note!
The select button always confirms a selection within these
menus, and pressing it will take you to the next step in the installation process. However, and this is important, often more than
one value has to be changed in a menu. First, perform all necessary changes then, confirm them all by pressing select.
You can always go back to the previous menu by pressing back.
Use
the buttons to move upwards and downwards from one
line to another.
Use buttons to change settings.
You can also use the numeric buttons on the remote control to
enter numeric values.
Switching on for the first time and start
the “First time installation”
• Ensure you have selected the AV (SCART) channel on your TV
• The ”First time installation” menu is shown.
• Press select to continue.
GB 11
Page 12

First time installation
Channel search in progress
This menu will be shown as long as the Mediamaster is searching for TV and radio channels.
All channels found will be listed on the screen.
Please note that the search procedure may take a few minutes.
You can cancel the search at any time by pressing select.
When the search procedure has ended, a message will tell you
how many TV and radio channels have been found.
• Press select to continue.
Time adjustment
The time is adjusted by using the buttons, ±1/2 an hour at a
time.
You can also adjust the minutes by using the buttons.
•Press select to finish the first time installation and to open the
Navi Bars.
GB 12
Page 13

Navi Bars
General information
• Press the navi button on your remote control to open the Navi
Bars.
In order to select TV or radio channels and to change system settings you will use the Navi Bars.
The horizontal row contains folders, e. g. All TV, Settings and
so on. Their names are shown with black text at the bottom of
each folder.
Each folder contains bookmarks. The All TV folder contains bookmarks for the different TV channels; the Control/Settings folder
contains bookmarks for some system settings and so on.
You move a folder horizontally by pressing the
When a folder is moved to focus, the bookmarks will be shown
in a vertical row. The name of the different bookmarks are shown
with white text at the top of each bookmark.
You select a bookmark by pressing the
the selection, press select.
Below the folder bar some information about the bookmark in
focus is presented. When a TV or radio channel bookmark is in
focus, this box can contain two different symbols after the channel name:
“
”= new channel you have not previously visited.
“ ” = channel is locked by the user.
With a TV or radio programme bookmark in focus you can get
programme information by pressing info.
When you press info with bookmark from the control or settings
folders in focus, you get more detailed information about what
you can do in that menu.
When you press opt you get a detailed channel information about
the TV or radio programme bookmark in focus.
buttons.
buttons. To confirm
Bookmark
in focus
Information box
Bookmark
name
name
Bookmark
FolderFolder
You can leave the Navi Bars at any time by pressing back.
If you open the Navi Bars and do not press any buttons on the
remote control, the Navi Bars will automatically close after
2 minutes.
GB 13
Page 14

Navi Bars
The “Control” and “Settings” folders
Both of these system folders contain bookmarks. Each of these
bookmarks contains menus from where you can make different
settings.
The system folders can not be deleted.
The manual will now explain the different settings you can per-
form from the Control and Settings folders, starting with the
bookmarks from the Control folder.
Control folder ☛ User preferences
Banner Time-out
When you switch channels, an information banner will be shown
for a few seconds. You can select how long the banner will be
shown.
Volume bar
Select whether or not you want the volume bar to appear on the
screen when you change the volume.
Volume bar time-out
Select how long the volume bar will be visible on the screen.
Subtitles
Select whether or not subtitles will be visible on the screen.
Main Subtitle Language
If you select the “Visible” alternative for subtitling and more than
one language is available, you may select a main language.
Main Audio Language
If more than one audio language is transmitted, you may select
the main language.
Menu Language
Menu language is in English.
Channel list icons
In order to make the bookmark lists for TV and Radio channels
shorter you can hide the icons and only show the channel names.
GB 14
Page 15

Navi Bars
Control folder ☛ Edit channels
From these menus you can create and edit favourite channel lists.
You can add, delete, rename and arrange the order of the channels within the favourite lists.
The “All TV” list might contain lots of channels. By creating your
own favourite lists you can make channel handling more convenient.
Important about editing channels
Before you start you must select which list, TV or radio, you want
to edit. When you are watching TV and press select and choose
Edit channels, you can only edit TV channels. When you are listening to radio channels you can edit radio channels.
After the selection, radio or TV, use the buttons to select the
name of the list to edit.
Create list
From here you create your own favourite lists, containing the
channels you watch most frequently. You must give each list a
specific name, e.g. “Sport” or “Films”. The new lists you create
will appear as a new folder in the horizontal part of the Navi Bars.
When a favourite list is selected, you see only those channels defined in the list.
When you have given the list a name; press select and choose
“Add/Delete Channels” from the menu.
You can create separate favourite lists for TV and radio channels.
How to give a specific name
This procedure is the same whether you enter a name for the first
time or change an existing.
• Move to a new character position by using the
• If you make a mistake, you can remove characters by press-
ing txt as many times as needed.
buttons.
GB 15
Page 16

Navi Bars
• Enter the name as follows:
Press the numerical button corresponding to the character you
want: once for the first character, twice for the second and so
on.
The available characters are listed below.
* # & % $ , ! ; - + ) / \ @ ^ 1
1
a b c 2 Å Ä Á Á Â C Ã
2
d e f 3 É É Ë Ê
3
g h i 4 Î Ï Í Ì
4
j k l 5
5
• If the next letter is located on the same key as the present one,
wait for the time-out or press the
tion and then select the letter.
•Toggle between capital and lowercase letters with opt.
•To insert a space, press numerical button number 0.
Delete list
If you want to delete a favourite list completely, select the list with
the buttons and press select.
m n o 6 Ö Ô Ñ Ó Ò
6
p q r s 7 $
7
t u v 8 Ü Ù Ú
8
w x y z 9
9
space 0
0
button to move one posi-
Rename list
You can give an existing list a new name by following the instructions under the headline How to give a specific name, page 20.
Rearrange lists
If you have created several favourite lists you can determine the
sequence in which the lists will appear.
• With the
position.
•Move the list to the desired position with the buttons and
press the button.
• Press select to confirm the new position.
GB 16
button, mark the list you want to move to a new
Page 17

Navi Bars
Add/Delete channels
From this menu you add and remove the channels in your favourite lists. You use the “All TV” or “All radio” list as a basis to select the channels from.
A channel is added or removed from the list by pressing info. The
square to the right on a line will be empty for removed channels,
and will contain an “x” for added channels. Beside the channel
name three different symbols can be shown. ( “
nel you have not previously visited. “
by the user.)
• Move to the desired channel(s) with the buttons.
• Press opt if you want to preview the channel.
• Add/remove by pressing info.
• When you are ready, confirm the selections and leave the
menu by pressing select.
Rearrange channels
From here you can arrange the sequence for the channels within
your favourite lists.
• Move to the desired channel(s) with the
• Press opt if you want to preview the channel.
• With the
new position within the list.
• Move the channel to the desired position with the buttons
and press the buttons.
• Press select to confirm the new position.
button, mark the channel you want to move to a
” = the channel is locked
” = a new chan-
buttons.
Lock channels
To get to this menu you first have to enter your access code.
From here you can lock (and later unlock) channels in order to pre-
vent e.g. your children from watching.
• Select the channel you want to lock and press info. Repeat the
procedure for each channel you want to lock.
• Press opt if you want to preview the channel.
• Press select to confirm.
A locked channel will be marked with a “
You must enter your access code before you can watch a locked
channel.
” (padlock) symbol.
GB 17
Page 18

Navi Bars
Control folder ☛ Timer
General
You can programme the Mediamaster to turn on and off at a selected time on a selected channel, in conjunction with the timer
setting on your VCR.
A useful example of this function is:
If you go out and want to record different programmes on different channels at different times you set the timer on the Mediamaster to change to those selected channels.
Remember you must set the timer on your VCR in order to make
the recordings.
This function can be used for up to 8 different settings, on different dates, times and channels in conjunction with the capabilities of your VCR’S timer.
Note! The timer function only works when the receiver is in
standby.
Timer setup
• Press select to enter the Timer setup menu.
• First, select Channel List with the
• Then, step to Channel to select the desired TV/Radio channel.
• Set the date using the numerical buttons on your remote con-
trol (dd/mm/yy).
• If you enter a wrong digit you can erase it with the
•Set the start and stop time using the numerical buttons on your
remote control.
The different start times may never overlap each other. If you try
to enter a start or stop time within an already occupied period of
time you will get a warning message.
• Press select to save or back to cancel.
• Press back twice to leave the Navi Bars and return to view-
ing mode.
• Press and hold
Up to 8 different events can be predefined. The events will be
sorted in start time order.
At each stop time the box will return to standby.
You can erase a predefined event by pressing the
• Press back to cancel the deletion and select to delete the
event.
to put the Mediamaster in standby.
buttons.
button.
button.
Control folder ☛ System info
In the menu you find general information about which hardware
and software version your Mediamaster is running on.
GB 18
Page 19

Navi Bars
Settings folder ☛ Channel
When you want to search for channels at a later time. To open
this menu you will be asked to enter your access code.
From the factory the access code is set to 1234.
A channel search procedure can be performed in different ways:
Automatic, Manual or Advanced manual search.
Automatic search
•Highlight the line and press select to start searching for chan-
nels.
Manual search
When you perform a Manual search you first need to enter some
parameters for the channel search to work.
The information you need to enter in this menu should be supplied by your broadcaster or local aerial installer.
Channel: Select the channel you want to search for.
Network search: Select “Yes” if you want to search on all trans-
mitters connected to a specific network.
• Press select to start searching for channels.
• Within this menu you can also check the strength of your dig-
ital signal if you know the UHF channel numbers for your area
(This information can be supplied by your local aerial installer.)
Alternatively if you exit this menu and go to a selected channel then re-enter this menu you will see the signal strength for
that chosen channel.
Advanced manual search
The information you need to enter in this menu should be supplied by your broadcaster or local aerial installer.
You can use this menu if you are looking for some “specific”
channels (i.e. non-DVB standard channels) which can be more
easy to find when you have entered the necessary PID settings
here.
Channel: Select the channel you want to search for.
PID Video: Enter the PID (Packet Identifier) for the video signal.
PID Audio: Enter the PID for the audio signal.
PID PCR: Enter the PID for the PCR (Programme Clock Refer-
ence).
• Press select to tune with the specified values.
All channels created with advanced manual search will get an
automatically generated name, e.g. P0001 for the first channel,
P0002 for the second etc.
• Press select to save the new channel or back if you do not
want to save it.
GB 19
Page 20

Navi Bars
Settings folder ☛ TV
To open this menu you will be asked to enter your access code.
From the factory the access code is set to 1234.
From here you can adjust the audio/video settings for your Mediamaster.
TV screen format
Select your TV screen format.
The 4:3 format is the standard format for most TV screens.
Select 16:9 for a widescreen TV.
Position of the RGB output
Adjust the horizontal position of the TV picture with the
tons.
Set transparency level
Adjust the transparency level of the graphics in the menus by
using the buttons.
Select digital audio format
Select audio format for the digital output. (The upper audio
output on the rear of the Mediamaster). AC-3 when the sound is
transmitted in Dolby™ Digital format. PCM for ordinary digital
sound. Please note; When you select AC-3 there will be no
sound output from the analogue audio connections.
but-
Picture format
If you have a TV set with the 4:3 picture format and the transmission is in 16:9, you can select “Fullscreen” or “Letterbox”. If you
have the stretched and boxed format 14:9, you select “Combined”.
Fullscreen will fill up the screen but will cut off some information
on the left and right sides.
Letterbox will give a complete picture, but leave black areas at
the top and bottom.
Combined will give black areas both at the top and bottom and
also on both sides
RF modulator output channel
Select this alternative if you have to change the RF channel.
(Channel 43 is preset from factory.)
When you change the RF channel number, you must also change
to the same value on the TV. If you do not, there will be no picture and sound.
letterboxfullscreen
GB 20
Page 21

Navi Bars
Settings folder ☛ Modem
General
In the future some Service Providers may make it possible for you
to order e. g. movies via an external phone modem.
Normally you do not need to change any of the following settings.
They are there to make it possible to use any external modem that
accepts AT commands. For more information about AT com-
mands, please consult the documentation of your particular
modem.
Prefix
If the connection has to pass a switch board, enter the digit(s) that
will open the line.
International dialling code
This sequence of numbers will replace the ‘+’ sign in an international phone number where the ‘+’ sign is followed with country code, area code and actual local number. Maximum length of
the number is four digits.
Modem initialising
In most cases you can leave this field empty. To start with, always
check your system without entering anything in this field.
Baudrate
This field specifies the data transfer rate (speed) between your
Mediamaster and your modem. In most cases modems can detect the right speed automatically.
Default value is 57600 bits/s. If your modem does not seem to
respond, enter a lower value.
GB 21
Page 22

Navi Bars
Settings folder ☛ Access Ctrl
To open this menu you will be asked to enter your access code.
From the factory the access code is set to 1234.
The following settings can be altered from this menu.
Access Control
Select “Yes” or “No” to turn the access control in all menus on
or off. Note: Even when “No” is selected, the access code still
has to be entered before you can watch locked channels.
Receiver lock
If you select “Yes” you will have to enter the access code every
time you start the Mediamaster from standby.
Age rating control
If you want everybody to have access to all available types of programmes, select “No”
If you select “Yes” you may block programmes unsuitable for children.
Age Limit
Select an age limit between 3 and 18 years on the line that appears.
However, you should be aware that not all Service Providers have
the necessary codes for these functions implemented in their
transmissions.
Change access code
From here you can change the access code from the standard 1234. DO NOT FORGET IT! Without it you do not have access to any of the functions where the code is required!
If you forget it, please contact Nokia Support for help.
Settings folder ☛ Time
To open this menu you will be asked to enter your access code.
From the factory the access code is set to 1234.
The time is adjusted by using the buttons, ±1/2 an hour at a
time.
You can also adjust the minutes by using the
GB 22
buttons.
Page 23

Navi Bars
Settings folder ☛ SW update
Your Mediamaster will advise you from time to time of any new
software upgrades using information sent by TV Broadcasters
through your aerial.
Note : These messages will only appear if your Mediamaster
has been switched on from Standby.
After downloading of a new software version, all your previous
settings, access code and favourite channels etc. will be erased!
IMPORTANT! The updating may take a while.
NEVER turn off the Mediamaster, never use the remote control or disconnect the antenna cable during the download
procedure! This will damage the software and the receiver
will have to be sent in for service!
Settings folder ☛ Reinstall
Use this option only if you have to start the complete installation
procedure from scratch. If you continue from here, all your previous settings, access code and favourite channels etc. will be
erased!
If you do not want to perform a reinstallation you can leave
this menu when the warning is displayed by pressing
“back”.
Games folder
• When the Games folder is in focus, select a game and press
info to get instructions how to play it.
• Press select to start a game.
• Press back to finish a game.
GB 23
Page 24

Viewing Mode
General Information
The following describes the basic functions of your Mediamaster
while watching terrestrial digital TV.
Some of the functions described here are dependent on the
Broadcaster and can only be used if they are included in the
transmitted programme information.
In addition to the normal functions like switching the Mediamaster in/out of standby, changing the volume etc. there are
some other useful functions which will be explained in this part
of the manual.
You can always leave a menu at any time you want, without
affecting any settings, by pressing the back button.
Programme information
Every time you change channels you will receive programme information for a few seconds. (In the Control folder/User preferences’ menu you can select how long this information will be
shown.)
The information may include:
Current time.
Channel list.
Channel number and name.
Name of the current and next programme.
The start and stop time of the current programme.
A bar, indicating the elapsed time of the current programme.
The start and stop time of the next programme.
Programme information will only be available if it is included
in the transmission. Otherwise a “No information available”
message will be shown.
Channel name
and number
Current
time
Name of channel
list
Information
about the
current programme
Information about
the next programme
GB 24
Page 25

Viewing Mode
Extended programme information
The Mediamaster can display information about programmes currently being broadcast as well as those that will be broadcast
next.
This procedure is the same for both TV and radio mode.
By pressing info while watching TV you will get the “Programme
information” banner. Press info again to display extended infor-
mation about the current and next programme. Use the
buttons to switch between the current and next programme information.
When there is a lot of information text, use the
continue reading on the next info page.
You cannot switch to another channel while the banner is visible.
• Press info or back to return to TV/radio mode.
buttons to
Temporary settings
By pressing opt you open a menu in which it is possible to enter
temporary settings. Settings made in this “options menu” are
only valid for the programme you are currently watching. If you
leave the programme and return to it again, the temporary settings will be gone.
Audio language
When available, you can select among the different languages being broadcast.
Subtitle language
When available, you can select among different subtitle languages.
TV screen format
If you have a TV set with a 4:3 picture format, and the transmission is in 16:9, you can select Fullscreen or Letterbox to change
display format. Fullscreen will fill up the screen vertically, but cut
some information from the left and right sides of the picture.
Letterbox will give a complete picture, but leave black areas at
the top and bottom.
• Press opt or back to return to TV/radio mode.
GB 25
Page 26

Viewing Mode
TV Release (0)
With the 0 button you can toggle between external connected
equipment, e. g. a digital terrestrial TV or a Video recorder.
This function may not be available on all TV and Video models.
(This is only valid when the units are connected via SCART cables,
and not by RF connection.)
Enhanced TV / Digital Text
On a Digital Text service pressing txt will open an application.
Broadcasters may also use on screen promptings to enter into
interactive applications.
Once in the interactive application follow the on screen instruc-
tions and menus to navigate and exit.
Use P + / - on the remote control to exit this service.
GB 26
Page 27

Glossary of terms
Access code
A four-digit code stored in the Mediamaster. Used to
lock/unlock the Mediamaster.
Access control
A feature that allows parents to ”lock” programmes that
they consider unsuitable for children. A ”locked” channel or programme can only be ”unlocked” with the special access code.
ADM
Audio Description Module
AGC
Automatic Gain Control.
BER
Bit Error Rate. Signal quality measure.
CI
Common Interface
C/N
Carrier to Noise. Signal quality measure
DVB
The Digital Video Broadcast group was created to establish a technical framework for the introduction of digital
video broadcasting systems.
GHz
The prefix giga means billion, and Hertz means cycles per
second. Signals in the GHz range are often called microwaves.
MHz
The prefix mega means million, and Hertz means cycles
per second.
MPEG
Moving Picture Experts Group. Established by the International Standards Organisation to provide the basis for
a picture coding and compression system.
PCM
Pulse Code Modulation. Non-compressed digital audio
format.
PCR
Program Clock Reference.
PID
Packet Identifier.
RCA
Coaxial connector used to connect the Mediamaster to
an external amplifier.
RF
Radio frequency (known as HF in some countries).
RGB
Red, Green, Blue. Colour signals are routed in separate
cables in order to provide a high quality TV picture.
SERIAL RS 232
A serial communication standard data port.
SCART
A 21-pin connector used for connection of the
Mediamaster,VCR and TV. Also named Euroconnector or
Peritel connector.
S/PDIF
Sony/Philips digital interface format. Digital audio output.
SW
Software. Programme code.
TS
Transport stream.
VCR
Video Cassette Recorder.
GB 27
Page 28

Troubleshooting
Problem
The LED on the front panel does
not light up/is not lit.
The left LED is shining red
The remote control is not working.
You have forgotten your Access
code.
During the first time installation
when the Mediamaster tries to find
and store channels you get the
message “No channels found”.
When only very few of the expected number of channels are
found.
Possible causes
Mains cable is not connected.
The Mediamaster is in standby
mode.
Battery exhausted.
Remote control is incorrectly
aimed.
The aerial is not properly connected
to the Mediamaster.
The aerial is not correctly directed
towards the transmitter.
The aerial is not suitable for digital
channels.
The signal is too weak for the connected aerial.
There are no terrestrial digital transmissions in the area.
What to do
Check that the mains cable is
plugged into the power socket.
Press the standby button to bring the
Mediamaster out of standby mode.
Change both batteries.
Aim the remote control at box.
Check that nothing blocks the front
panel.
Contact your Nokia Support.
Check the aerial installation including
its connections.
Check if you can receive and watch
analogue channels from the transmitter.
Check that the aerial is directed towards the transmitter.
Check that digital transmissions are
available in the area.
If things do not work as they should,
let the local TV dealer check whether
the aerial is intended for receiving
digital transmissions or not. If not,
you have to upgrade the aerial.
There is no First time installation
menu on the screen when you
switch on the Mediamaster for the
first time.
The system is connected by SCART
cables and the TV is not in AV/EXT
mode.
The system is connected by RF cables and the TV is not set to the
channel tuned for digital terrestrial
TV.
When the system is connected by
SCART cables the TV must be set in
AV/EXT mode.
When the system is connected by RF
cables, select the appropriate TV
channel on the TV. If you have not yet
tuned the TV to the same output
channel as the Mediamaster, you
must do this before you get picture
and sound from it.
What to do if you can’t solve the problem?
If you have tried all of the actions suggested above, without solving the problem, please contact your
Retailer or Nokia Support.
GB 28
Page 29

Technical specifications
Transmission Standards DVB, MPEG 2, OFDM
RF input Modulator output
In-/output connector IEC female / IEC male
RF input frequency 174-300; 474-862 MHz
RF input power level -78 to -30 dBm
RF impedance 75 Ω
Frequency range Loop through 47-862MHz
Frequency range RF modulator 470-862 MHz
Output channel CH 21-69
Preset channel 43
Output signal PAL I
Demodulation Supports 2k and 8k
TV SCART
Video output 1 V
Audio output 0.5 V
RGB output Internal RGB
(± 1 dB) / 75 Ω
pp
/ RL >10 kΩ
rms
RGB bandwidth 5.8 MHz ± 3 dB
Fast blanking output Internal
Status output 0/6/12 V / RL 10 kΩ
AUX SCART
Video output 1 Vpp (± 1 dB) / 75 Ω
Video input 1 V
Audio output 0.5 V
Audio input 0.5 Vrms / RL >10 kΩ
/ 75 Ω
pp
/ RL >10 kΩ
rms
Status input 0/6/12 V / RL >10 kΩ
DIGITAL AUDIO (S/PDIF)
Connector 1 x RCA
AUDIO R L
Connector 2 x RCA (R+L)
Output 0.5 V
± 0.5 dB/ RL 10 kΩ
rms
SERIAL (RS 232) Serial data
Connector 9-pin D-sub male
Signals RS232, max. 115,2 kbit/s
Pin 1 DCD (Data carrier detect) not
connected
2 RXD (Receive data)
3 TXD (Transmit data)
4 DTR (Data terminal ready) Set to high
5 GND (Signal ground)
6 DSR (Data set ready) not connected
7 RTS (Ready to send)
8 CTS (Clear to send)
9 RI (Ring indicator) not connected
Conditional Access system
One PCMCIA interface for a Common Interface CA module
(DVB Standard)
Front panel
Two LED; Buttons: ,▼ ▲
General data
The model code, variant and serial number, are located on a
label on the underside of the housing.
Supply voltage 110-240 V AC, 47-63 Hz
Power consumption max 10 W
Power consumption in
standby 5 W
Operating temperature +5° C to +45° C
Storage temperature - 40° C to +65° C
Humidity 25 to 75 % rel humidity
Operating distance for
remote control About 10 meters
Dimensions (w x d x h) 251 x 275 x 80 mm
Weight 1100 g. approx.
SCART sockets
TV AUX
1 Audio out right ch. Audio out right ch.
2 - Audio in right ch.
3 Audio out left ch. Audio out left ch.
4 Audio ground Audio ground
5 RGB blue ground 6- Audio in left ch.
7 RGB blue signal out 8 Switch voltage out Switch voltage in
9 RGB green ground 10 Connect to pin 10 in AUX scart
11 RGB green signal out 12 - 13 RGB red ground 14 Fast blank. ground Fast blank. ground
15 RGB red signal out 16 Fast blanking out 17 Video out ground Video out ground
18 - Video in ground
19 Video out Video out
20 - Video in
21 Ground (casing) Ground (casing)
220
121
GB 29
Page 30

Nokia Mediamaster software end-user license
IMPORTANT: READ CAREFULLY BEFORE OR USING THE SOFTWARE
NOKIA CORPORATION, NOKIA HOME COMMUNICATIONS END-USER SOFTWARE AGREEMENT
This Software Agreement (“Agreement”) is between You (either an individual or an entity), the End User,
and Nokia Corporation, Nokia Home Communications (“Nokia”). The Agreement authorises You to use
the Software specified in Clause 1 below and which is included in this Nokia digital TV receiver. This is
an agreement on end-user rights and not an agreement concerning sale.
Read this Agreement carefully before using the Software. By using this Nokia digital TV receiver, You
agree to the terms and conditions of this Agreement. If You do not agree to all of the terms and conditions of this Agreement, return this Nokia digital TV receiver and accompanying documentation to the
place of purchase. YOU AGREE THAT YOUR USE OF THE SOFTWARE ACKNOWLEDGES THAT YOU
HAVE READ THIS AGREEMENT, UNDERSTAND IT, AND AGREE TO BE BOUND BY ITS TERMS AND
CONDITIONS.
1. SOFTWARE. As used in this Agreement, the
term “Software” means, collectively: (i) the software product identified above (ii) digital images,
stock photographs, clip art, or other artistic works
(“Stock Files”) (iii) related explanatory written materials and any other possible documentation related thereto (“Documentation”); (iv) fonts, and (v)
upgrades, modified versions, updates, additions,
and copies of the Software, if any, licensed to You
by Nokia under this Agreement.
2. END-USER RIGHTS AND USE. Nokia grants to
You non-exclusive, non-transferable end-user rights
to use the Software on this Nokia digital TV receiver
only.
3. LIMITATIONS ON END-USER RIGHTS. You may
not copy, distribute, or make derivative works of
the Software except as follows:
(a) You may transfer all your rights to the Software
at the same time as You transfer this Nokia digital
TV receiver on a permanent basis, provided that
You transfer this Nokia digital TV receiver and all
copies of the related Documentation, do not retain
any copies by yourself, and the recipient agrees to
the terms and conditions of this Agreement.
(b) You may not use, modify, translate, reproduce,
or transfer the right to use the Software or copy the
Software except as expressly provided in this
Agreement.
(c) You may not resell, except as set forth in clause
3 (a), sublicense, rent, lease, or lend the Software.
(d) You may not reverse engineer, decompile, disassemble, or otherwise attempt to discover the
source code of the Software (except to the extent
that this restriction is expressly prohibited by law)
or create derivative works based on the Software.
(e) Unless stated otherwise in the Documentation,
You shall not display, modify, reproduce, or distribute any of the Software.
In the event that the Documentation allows You to
display the Stock Files, You shall not distribute the
Stock Files on a stand-alone basis, i.e., in circumstances in which the Stock Files constitute the primary value of the product being distributed. You
should review the “Readme” files (if any) associated with such Stock Files that You use to ascertain
what rights You have with respect to such materials. Stock Files may not be used in the production
of libelous, defamatory, fraudulent, infringing, lewd,
obscene, or pornographic material or in any otherwise illegal manner. You may not register or claim
any rights in the Stock Files or derivative works
thereof.
(f) You agree that You shall only use the Software
in a manner that complies with all applicable laws
in the jurisdiction in which You use the Software,
including, but not limited to, applicable restrictions
concerning copyright and other intellectual property
rights.
4. COPYRIGHT. The Software and all rights, without limitation including proprietary rights therein,
are owned by Nokia and/or its licensors and affiliates and are protected by international treaty provisions and all other applicable national laws of the
country in which it is being used. The structure,
organisation, and code of the Software are the valuable trade secrets and confidential information of
Nokia and/or its licensors and affiliates. You must
not copy the Software
5. COMMENCEMENT & TERMINATION. This
Agreement is effective from the first date You use
this Nokia digital TV receiver. You may terminate
this Agreement at any time by returning, at Your
own costs, this Nokia digital TV receiver, and all
related materials provided by Nokia. Your end-user
rights automatically and immediately terminate
GB 30
Page 31

Nokia Mediamaster software end-user license
without notice from Nokia if You fail to comply with
any provision of this Agreement. In such an event,
You must immediately return at Your own cost, this
Nokia digital TV receiver, and all related material to
the place of purchase.
6. NO OTHER OBLIGATIONS. This Agreement
creates no obligations on the part of Nokia other
than as specifically set forth herein.
7. LIMITATION OF LIABILITY. TO THE MAXIMUM
EXTENT PERMITTED BY APPLICABLE LAW, IN
NO EVENT SHALL NOKIA, ITS EMPLOYEES OR
LICENSORS OR AFFILIATES BE LIABLE FOR ANY
LOST PROFITS, REVENUE, SALES, DATA, OR
COSTS OF PROCUREMENT OF SUBSTITUTE
GOODS OR SERVICES, PROPERTY DAMAGE,
PERSONAL INJURY, INTERRUPTION OF BUSINESS, LOSS OF BUSINESS INFORMATION, OR
FOR ANY SPECIAL, DIRECT, INDIRECT, INCIDENTAL, ECONOMIC, COVER, PUNITIVE, SPECIAL,
OR CONSEQUENTIAL DAMAGES, HOWEVER
CAUSED AND WHETHER ARISING UNDER CONTRACT, TORT, NEGLIGENCE, OR OTHER THEORY
OF LIABILITY ARISING OUT OF THE USE OF OR
INABILITY TO USE THE SOFTWARE, EVEN IF
NOKIA OR ITS LICENSORS OR AFFILIATES ARE
ADVISED OF THE POSSIBILITY OF SUCH DAMAGES. BECAUSE SOME COUNTRIES/STATES/
JURISDICTIONS DO NOT ALLOW THE EXCLUSION OF LIABILITY, BUT MAY ALLOW LIABILITY
TO BE LIMITED, IN SUCH CASES, NOKIA, ITS
EMPLOYEES OR LICENSORS OR AFFILIATES’
LIABILITY SHALL BE LIMITED TO U.S. $50.
Nothing contained in this Agreement shall prejudice the statutory rights of any party dealing as a
consumer. Nokia is acting on behalf of its employees and licensors or affiliates for the purpose of
disclaiming, excluding, and/or restricting obligations, and liability as provided in this clause 7, but
in no other respects and for no other purpose.
8. EXPORT CONTROL. The Software, including
technical data, includes cryptographic software
subject to export controls under the U.S. Export
Administration Regulations (“EAR”) and may be
subject to import or export controls in other countries. The EAR prohibits the use of the Software
and technical data by a Government End User, as
defined hereafter, without a license from the U.S.
government. A Government End User is defined in
Part 772 of the EAR as “any foreign central, regional, or local government department, agency, or
other entity performing governmental functions;
including governmental research institutions, governmental corporations, or their separate business
units (as defined in part 772 of the EAR) which are
engaged in the manufacture or distribution of items
or services controlled on the Wassenaar Munitions
List, and international governmental organisations.
This term does not include: utilities (telecommunications companies and Internet service providers;
banks and financial institutions; transportation;
broadcast or entertainment; educational organisations; civil health and medical organisations; retail
or wholesale firms; and manufacturing or industrial
entities not engaged in the manufacture or distribution of items or services controlled on the
Wassenaar Munitions List.)” You agree to strictly
comply with all applicable import and export regulations and acknowledge that You have the responsibility to obtain licenses to export, re-export, transfer, or import the Software. You further represent
that You are not a Government End User as defined
above, and You will not transfer the Software to any
Government End User without a license.
9. CONTACT DETAILS. If You want to contact Nokia
in respect of this Agreement, contact Nokia at the
following address:
Nokia Home Communications
ITÄMERENKATU 11-13,
00 180 HELSINKI
FINLAND
10. APPLICABLE LAW & GENERAL PROVISIONS.
This Agreement is governed by the laws of Finland.
All disputes arising from or relating to this Agreement shall be settled by a single arbitrator appointed by the Central Chamber of Commerce of
Finland. The arbitration procedure shall take place
in Helsinki, Finland in the English language. If any
part of this Agreement is found void and unenforceable, it will not affect the validity of the balance of
the Agreement, which shall remain valid and enforceable according to its terms. This Agreement
may only be modified in writing by an authorised
officer of Nokia.
This is the entire agreement between Nokia and
You relating to the Software, and it supersedes any
prior representations, discussions, undertakings,
end-user agreements, communications, or advertising relating to the Software.
GB 31
Page 32

DECLARATION OF CONFORMITY
Hereby, Nokia declares that this digital receiver 221 T is in conformity with the
essential requirements and other relevant provisions of Directive 1999/5/EC.
Via an external modem this Terminal Equipment can be connected to the analogue
Public Switched Telephone Networks (PSTNs), in which network addressing,
if provided, is by means of Dual Tone Multiple-Frequency (DTMF) signalling.
Page 33

Page 34

Nokia is a registered trademark of Nokia Corporation
www.nokia.co.uk
667699311.01
© 0312
 Loading...