

Nokia 2160i Owner's Manual

OWNER’S
MANUAL
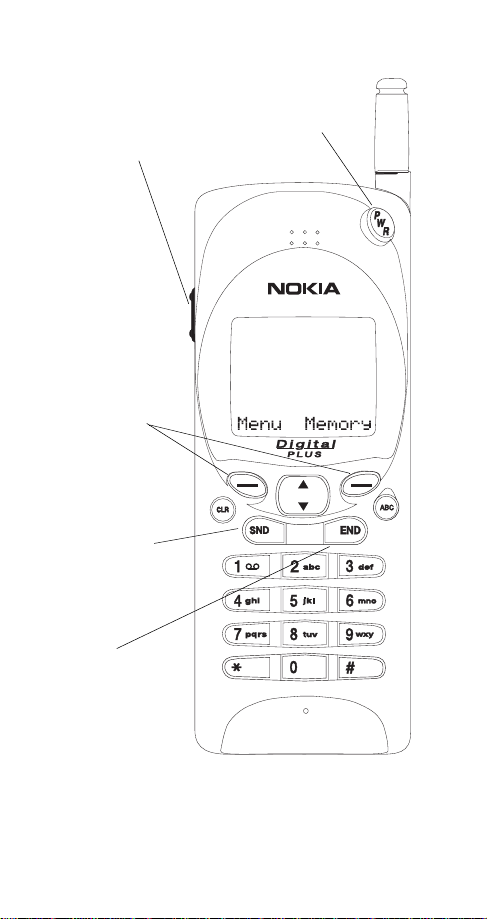
Keys and the Display
Switches phone
on/off when you
Adjusts volume of the earphone
or handsfree speaker.
These keys perform
the function shown
on the display
directly above them
(e.g., here the keys
are the “Menu” and
“Memory” keys).
“Dials” the number
on display. With
display clear, redials
last number dialed.
press and hold.
Ends a call.
PRINTED IN CANADA
i
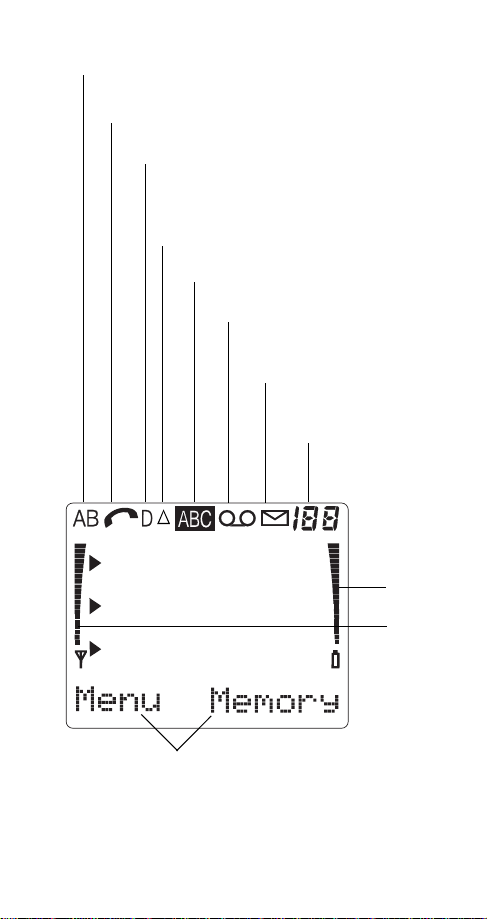
Public System the phone uses (A, B, or both).
None shown: Home area only.
A call is in progress.
Digital signaling is in use.
The phone is roaming in a home typ e
system. Flashing: roaming in a non-home
type system.
The phone is in alpha mode.
You have a voice message.
You have a text message. If
flashing, text memory is ful l.
Memory location, menu,
or option number.
Battery
Charge
Signal
Strength
These words change; they determine the function of the
ñ keys directly below them (e.g., with these words on
display, the left
ñ key is the “Menu” key and the right
ñ key is the “Memory” key).
ii

Connectors
➌➍
➋
➊
1) For Rapid Cigarette Lighter Charger, Rapid Travel
Charger, and S t an d a r d T rav el Charger
2) Power connector for Desktop Charger CHH-2/CHH-2L
3) System and data connector fo r accessories, deskt op
chargers, and HF car kit
4) For external antenna
iii

Table of Contents
1. Safety At A Glance............................ 1
2. The Battery.......................................3
3. Basics...............................................7
Switching On or Off..............................................7
Signal Strength....................................................7
Access Codes .....................................................7
4. Making and Receiving Calls.............9
Answering a Call..................................................9
Making a Call............................... ............... .........9
Speed Dialing..................... ............... .................10
Last Number Redial...........................................10
One-Touch Dialing................. ............... .............10
Emergency Key 9............. ............... ...................11
Voice Mail Key 1................................................11
Earpiece Volume................................. .............. .11
Calling Line Identification.............. ......................12
Special Ringing Tone.........................................12
Key Lock........................ .............. ......................13
Call Waiting........................................................13
Calling Card Calls................... ............... .............14
5. Voice and Text Messages..............15
Voice Messages.................................................15
Message Mode.............. .............. ......................16
Text Messages...... ............... ............... ...............16
To Dial a Number in a Message .........................17
6. The Personal Directory .................. 19
Alpha Mode.......................................................19
Entering Names.................................................20
Storing Numbers and Names.............................21
Recalling Stored Numbers .................................22
Recalling Stored Names.....................................22
7. Temporary Lists & Call Timers.......24
To view Dialed Numbers....................................24
To view Last Received Calls...............................24
To view Missed Calls..........................................24
Call Timers.........................................................25
iv

8. Touch Tones .................................. 26
Sending Individual Touch Tones.............. ..........26
Sending Strings of Touch Tones........................26
Touch Tone Settings in the Phone.....................28
9. The Menu ....................................... 29
Summary of Menu Functions and Shortcuts...... 30
Menu 01, Memory Functions.............................32
Menu 2, Messages............................................32
Menu 3, Call Settings........................................32
Menu 4, Phone Settings.................................... 34
Menu 5, Security Options..................................37
Menu 6, Network Services............... .................38
Menu 7, System Search.................................... 43
Menu 8, NAM Selection..................................... 43
Menu 9, Number Editor....................... ..............44
Menu 10, Alert Options ..................................... 44
Menu 11, Loc k t he K eys........ ............ . ............... 45
10. Data and Fax Calls....................... 46
11. Accessories.................................. 48
Batteries............................................................48
Chargers...........................................................50
12. Care and Maintenance................. 53
13. For Your Safety ............................ 54
Traffic Safety.....................................................54
Operating Environment........... ...........................54
Emergency Calls............ ...................................55
14. Technical Data ............................. 57
v

1. Safety At A Glance
Read these simple guidelines before using your
phone. Failure to comply with these guidelines
may be dangerous or illegal.
For more detailed safety information, see
“For Your Safety” on page 54.
Road Safety Comes First
Don't use a hand-held phone while driving; park the
vehicle first.
Switch Off In Hospitals
Switch off your phone when near medical equipment. Follow any regulations or rules in force.
Switch Off On Aircraft
Mobile phones can cause interference. Using them
on aircraft is illega l.
Switch Off Wh en Refueling
Do not use your phone at a refueling point. Do n ot
use near fuels or chemicals.
Switch Off Near Blasting
Do not use your phone where a blasting oper ation
is in progress. Observe restrictions, and follo w any
regulations or rules in force.
Use Sensibly
Use only in the normal position (to ear). Avoid unnecessary cont act wit h the ante nna when phone is
on.
Interference
All mobile phones may be subject to radio interference, which may a ffect the performance of your
phone. Therefore, you should never rely solely upo n
any cellular phone for essential communications
(e.g., medical emergencies).
Qualified Service
Only qualified servic e personnel may i nstall or repair
cellular phon e equipment. Use only approved accessories and batteries.
1

Using this Owner’s Manual
The cellular phone descr ibed in this manual is approved for
use in AMPS/TDMA networks.
A number of features included in this guide are called
Network Services. They ar e s pecial services provi de d by
cellular service providers. Before you can take advantage
of any of these Network Services, you must subscribe to
them through your home service provider. You can then
activate these functions as described in this manual.
The manual act ivat io n co mmand s f or v ar io us s er vic es are
not presented in this guide (e.g.
activating or deactivating services). The phone nevertheless
is capable o f handling com mands given in th at form. For
these commands please cons ult with your service
provider.
FCC/Industry Cana da No t ic e
Your phone may cause TV or radio interference (e.g. when
using a telephone in cl o s e pro x im it y to r ec ei v in g equ ipment). The FCC/Industry Canada can require you to stop
using your telephone if such interference cannot be eliminated. If you require as sistance, contact you r local serv ice
facility.
THIS DEVICE COMPLIES WITH PARTS 15 AND 68 OF
THE FCC RULES. OPERATION IS SUBJECT TO THE
CONDITION THAT THIS DEVICE DOES NOT CAUSE
HARMFUL INTERFERENCE.
∗ and # characters for
2

2. The Battery
Your phone is powered by a rech argeable battery. Use
only batteries approved by the phone manufacturer and
recharge your battery on ly w ith th e c harge rs ap prov ed by
the manufacturer.
New batteries must be charged with
the phone off for at least 24 hours
before initial use. A new battery’s
full performance is achieved only
after two or three complete charge
and discharge cycles!
Note: This chapter gives only the basi cs for battery usage.
See “Accesso r i es ” o n page 48 for more in fo r mation on
chargers and other acce sso r ies.
NICKEL CADMIUM AND NICKEL METAL
HYDRIDE BATTE RIES MUST BE RECYCLED OR
DISPOSED OF PROPERLY. MUST NOT BE DIS-
NiCd
POSED OF IN MUNICIPAL WASTE.
NiMH
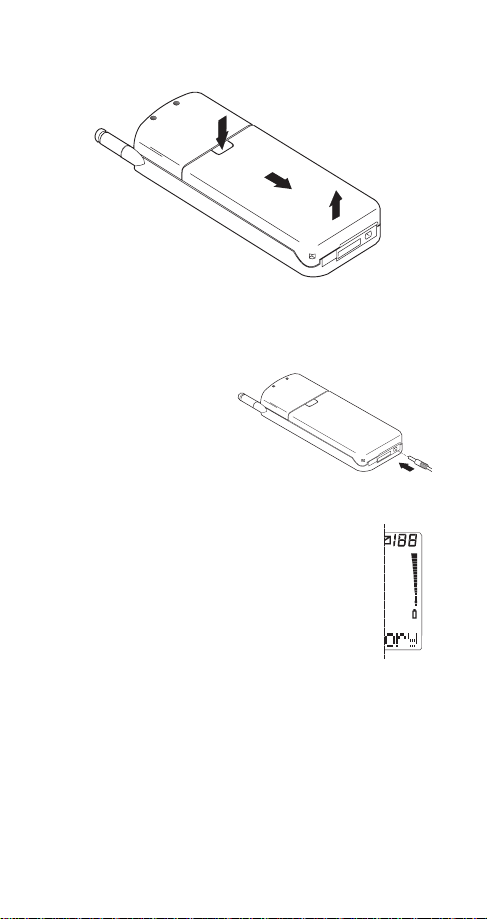
Installing a battery
2.
1.
3
Removing a batte ry
Switch off the phone before removing the battery.
1.
2.
3.
Charging a battery with Rapid Travel
Charger (ACH-4U)
1) Connect the lead from
the charger to the bottom of the phone.
2) Connect the charger to
a standard 120V AC
outlet.
When the battery is charging, the battery
indicator on the right side of the displ ay sc rolls.
Allow the battery to completely charge.
Charging is finished when the segments stop
scrolling.
The charging times depend on the type of the
battery and the charger used.
See “Accesso r i es ” o n page 48 for detai ls .
When charging is finished, disconnect the charger from
the AC outle t a nd from the phon e. W h en you discon nect
the power cord of any accessory, grasp and pull the plug,
not the cord.
Discharging the battery
Either leave your phone switched on until it turns itse lf off
or use the battery discharge facility of any approved
4

accessory available for your phone. The battery can be
charged and discharged hundreds of times but it will
eventually wear out. When the operating time is noticeably
shorter than normal, it is time to buy a new battery.
Battery Charge
The phone gives you a warning tone
and the messag e BATTERY LOW when
only a couple of minutes of talk time remain. When no more battery power
remains, you get a Recharge Battery
Tone and the message RECHARGE
BATTERY. The phone switch es itself off.
Connect your phone directly to a charg er or place it on a
charging stand with the power on or off to begin charging.
Note: In some vehicles, the ignition must be on in order to
charge the phone with the cigarette lighter adapter.
If the message NOT CHARGING is displayed, charging is
suspended. Check that the battery is not ove rheated (over
104°F/40°C), too cold, or connected to a non-approved
charging device. Wait for a while, connect the charger to
the phone aga in an d retry. If chargin g st il l f ai ls , co nt act
qualified service personnel.
Important Battery Information
For good operation times, discharge the battery from time
to time by leaving y ou r ph one switched on un t il it tu r n s
itself off or by using the battery discharge facility of any
approved accessory available for your phone. Do not
attempt to discharge the battery by any other means.
• When a charger is not in use, disconnect it from the
power source. Do not leave the battery connected to
a charger for longer than a week; overcha r g in g may
shorten its life.
• If left unused, a fully charged battery will discharge
itself in about a week at room temperature.
• When the battery is not in use, st o re it uncharged in a
cool, dark and dry place.
5

• Temperatur e e xtr e mes affect the abil it y of yo ur batt ery
to charge: it may require cooling or warming first.
• Do not short circuit the battery. Accidental short circuiting can occ ur wh e n a m et al lic o b je ct (e. g . co i n,
clip, or pen) causes direct connection of the + and terminals of the battery (metal strips on the back of
the battery), for example when you carry a spare battery in your pocket or purse. Short circui ting the terminal may damage the battery or the connecting object.
• Use the battery only for its intended purpose.
• Never use any charger or batte r y that is damaged or
worn out.
• Leaving the battery in hot or cold places, such as in a
closed car in summer or winter conditions, reduces
the capacity and lifetime of the battery. Always try to
keep the battery between 59°F and 77°F (15°C and
25°C). A phone with a hot or cold battery may temporarily not work, even if the battery is fully charged.
NiMH battery performance is particular ly lim it ed in
tempera tures be low 14°F (-10°C).
• The batte r y is a sealed unit with no serviceab le p ar t s .
Do not attempt to open the case.
• Do not dispose of a battery in a fire! Dispose of used
batteries in accordance with local regulations.
Recycle!
6

3. Basics
Switching On or Off
• Press and hold ð for a second.
When switching on, if your phone has an extendible antenna,
extend the antenna fully. As with any other radio transmitting device, avoid unnecessary contact with the antenna
when the phon e is s wit ched on.
Push in the antenna when you are not using the phone.
The phone carries out a short self-test and briefly displays
the phone num b e r in u s e.
A Personal Reminder Note appears if you have pro-
grammed one with Menu 4 5. Press left
save it or right
The phone can make and receive calls only when it
is switched on and is located in the cellular network’s service area.
The phone automatic ally switches itse lf off if the operat ing
temperature exceeds 158°F (70°C).
ñ
(Erase)
to delete it.
Signal Strength
The stronger the radio signal, the better the call
quality. The higher the col umn on the left side of
the phone display, the better the signal at your
location.
If the signal strength is not good, try moving the
phone slightly. In a building, reception may be
better near a window.
ñ
(Keep)
to
Access Codes
Your phone uses a Security Code or Lock Code to help
protect against unauthorized use of the phone.
Note: Avoid using access codes similar to emergency
numbers such as 911 to prevent accidental dialing of the
emergency number.
7

Security Code (5 digits)
• When the phone asks for the
enter it then press left
The Security Code comes with your
phone and is required with some
phone features. Keep i t secr et an d in a
safe place, separate from the phone.
You cannot change the Security Code.
If you need a n ew one, contac t yo u r
dealer. The default is 12345.
If you enter an incorrect s ecurity code
five times in a row, the phone won’t ac cept any entries f or
the next five minutes.
Lock Code
• When the phone asks for the lock code, enter it then
press left
You need the 4-digit lock code to turn
on the Automatic Phone Lock in
Menu 5 1. The default Lock Code is
1234.
ñ
(OK)
.
Security code:
ñ
(OK)
.
(CODE ERROR)
,
8

4. Making and Receiving Calls
Answering a Call
• Press any key (except ð, ô, ÷ or volume keys)
then speak.
With
KEYS LOCKED
to stop the ringing sound, without answering the call.
Making a Call
1) Extend antenna fully.
2) Key in phone number.
3) Press
Your phone can make and recei v e calls only when it is
switched on and in the cellular network’s service area,
and not set to Message Mode (see “Message Mode” on
page 16).
í.
NO SERVICE
cellular service area. No calls can be placed or received.
If you try to m ake a call whi l e
the phone dis plays
make the call for the next 2 minutes.
Note: Check with your cellular system operator for information about wh en you need to dial a ‘1’ and/or an are a
code in addition to the number.
, only í answers calls. Press ô
means that you are probably outside t he
NO SERVICE
WAIT FOR SERVICE
is displayed,
, and tries to
If you make a mistake entering a number
1) Press
2) Press and hold
Hanging up
• Press
ù once to delete the last digit, or
ù to clear the who l e d is play.
ô.
9

Speed Dialing
1) Enter the memory location number (2 to 99).
2) Press
The phone recalls the phone number from the memory,
displays it briefly, then dials it.
Note: If you press 1
stored with Menu 2 3, Set Voice Mailbox Number (see
page 15). If you press 9
gency call only if Menu 3 4, Emergency Key 9, is set to On.
Last Number Re dial
1) Clear dis play with ù.
2) Press
Redialing any of the last 5 numbers
1) Press
2) Once you see the n umber yo u wa nt, pr ess
Note: After
to scroll through the last 5 dialed numbers. Otherwise, the
phone automatically dials the most recently dialed number.
One-Touch Dialing
• Press and hold the key (2 to 8) for a few seconds until
The phone recalls the phone number from memory, displays it brie fly, then dials it. To use this feature, Menu 3 3 ,
One-Touch Dialing, must be On and you must have stored
numbers in the location corresponding to the n umber you
pressed. See “The Personal Directory” on page 19 for
details on storing numbers.
Note: If you press and hold 1, the ph one dials th e number
stored with Menu 2 3, Set Voice Mailbox Number (see
page 15). If you press and hold 9, the phone initiat es an
emergency call only if Menu 3 4, Emergency Key 9, is set
to On.
í.
í, the phone dials the number
í, the phone in itiates an emer-
í.
í then W or V within a second.
í to dial it.
í, you must press W or V within a second
the call is started.
10

Important!
Official emergency numbers vary by location (e.g. 911 or
other official emergency number). Only one emergency
number is programmed into your phone to be dialed
automatically by Emergency Key 9, whi ch may not be the
proper number in all circumst ances. Emerge ncy Key 9
dialing does not operate with
phone is connected to a modem.
KEYS LOCKED
or when the
Emergency Key 9
Note: Emergency Key 9 works only if it has been set
to On in Menu 3 4 !
1) Press 9 then í.
OR
2) Press and hold 9 for more than 3 seconds.
The phone dials the prep r o grammed emergency number
(e.g. 911) with either of these dialing methods. You can
also dial an emergency number by keying in the whole
emergency number then
Note: Pressing and holding Emergency Key 9 to dial an
emergency call does not function with KEYS LOCKED or
when the phone is connected to a modem. (See “Key Lock”
on page 13 later in this chapter for more information on
Key Lock.)
í.
Voice Mail Key 1
• Press and hold õ for a few seconds.
The phone dials the number stored with Menu 2 3, Set
Voice Mailbox Number. See “Voice Messages” on page 15
for more information.
Earpiece Volume
The volume button on the side of the phone adjusts the
earpiece volume. The upper part of the button increases
and the lower part decreases the volume.
11

If an accessory with its own loudspeaker is connected to the
phone, the volume keys select the volume for that accessory.
Muting/Unmuting the phone’s microphone
1) Press and hold left
2) Press W to
3) Press left
Muting and u nmuti ng may be done onl y durin g an act ive cal l.
ñ
Mute
(OK)
ñ
or
.
(Menu)
Unmute
for few seconds.
.
Calling Line Identification
If you have subscribed to and activated this network service, the phone displays the caller’s phone number if the
system is able to identi fy it. The phon e displays the cal ler’s
name if you have stored that caller’s name and number,
and the person calls you from the number you have stored.
The phone also displays a caller’s name if the network
supplies it, even if you don’t have the person’s name
stored in your phone.
or
CALL
available.
has prevented the number from being shown.
Note: For informat ion about availab ility of and su bscription
to Calling Line Identification, conta ct your system
operator.
NO ID CALL
PRIVATE ID CALL
displays when the number is not
displays when the caller
Special Ringing Tone
You may set your phone to a special ring when particular
people call. To do this, store the person’s name and
number in your phone and include the characte r “!” somewhere in the person’s name (e.g. Joe!Smith). When that
person calls you from that number, you’ll know it by the
special ring you hear. For details on storing names and
numbers, see “The Personal Directory” on page 19.
Note: Special Ringing Tone works only when Calling Line
Identificati on is active and th e ca lling number is av ailable.
12

Key Lock
• Press and hold ô, or press left ñ then ∗.
Key Lock prevents accidental key presses (e.g. when th e
phone is in your pocket). Press left
the keypad.
Key Lock cannot be activated when the phone is connected
to a car kit or a hand s free desktop c ha r g e r .
Note: With Keys Locked, calls may be possible to the
emergency number 911 (911
also work, if Menu 3 4, Emergency Key 9, is set to ON.
However, pressing and holding Emergency Key 9 does
not function.
When placing an eme rgency call, the emerg ency number
will be displayed only after you have keyed in all its digits.
After the emergen cy c all , Key Lock be come s ac tive agai n.
Answering a call with Keys Locked
• Press
During the call the keypad remains unlocked which lets
you operate the phone as usual. After you end the call, Key
Lock becomes active again.
í.
ñ then ∗ to unlock
í). Pressing 9 í should
Call Waiting
With Call Waiting, the active call is put on hold as y o u
answer the waiting (incoming) call. This service is available
only if you have subscribed to it through your network
operator. For details on Call Waiting availability and
operation, check with your network operator.
Note: If you do not answer a waiting call, the calling phone
number (if available) is added to the Missed Calls List.
13

Calling Card Calls
If you use the phone’s Calling Card storage feature
(see “Menu 3 7, Calling Card” on page 33), you can use
the method described below. You won’t need to enter
Calling Card information every time you want to make a
card call.
Note: No physical credit cards ar e needed in order to
direct the call charges to the credit card.
To make a Calling Card Call
1) Enter the phone number of the party to be called, beginning with a 0 or a 1 if your calling c ard requires you
to enter a 0 or a 1 before the area code and phone
number. See your calling card for instructions.
2) Press and hold
displays
3) When you hear a tone or voice prompt, press left
4) If you get another tone or voice prompt, press left
The call is then made, as if you had manually entered the
card information.
(OK)
ñ
.
(OK)
í for 3 seconds, until the phone
CARD CALL
again.
.
ñ
14

5. Voice and Text Messages
Please check with your operator for the availability of
message features.
Voice Messages
When you receive a voice message, the phone beeps,
lights the voi ce message indi cator ( ), and displa ys
VOICE MESSAGE
sages if there are more than one.
To use the methods described below to call your voice
mailbox, you must store your voice mailbox number in
your phone, which is described in this section.
To call your voice mailbo x after receivin g
a message
With
NEW VOICE MESSAGE
1) Press left
2) Press
Note that your voice mailbox number must be stored in the
phone to use this method (see below).
To call y our voic e mailbo x a n y time
• Press and hold 1
You can also call your voice mailbox by pressing left
(Menu)
2 1.
. The phone shows the number of mes-
on display,
ñ
(Listen)
OR
í.
NEW
ñ
To store your voice mailbox number in
the phone
1) Press left
2) Key in voice ma ilbox number.
3) Press left
Once you enter the number, it is used until you change it again.
Note: The voice mailbox may be provided by the network
(and the network operator gives you the number to call).
ñ
ñ
(Menu)
(OK)
2 3.
.
15
 Loading...