

Page 1

SERVICE SOFTWARE
INSTRUCTIONS
9618ARo
Technical Documentation
Copyright Nokia Mobile Phones
Contents of Service Software Instructions
Service Software Instructions 5–3
General 5–3
Required Servicing Equipment 5–3
Mechanical Connections 5–4
Starting 5–6
The Service Software Menu Structure 5–7
Using Menus 5–8
Windows 5–8
Dialog Boxes 5–10
File Selection Dialog Box 5–12
Help Functions 5–12
File menu 5–13
Open 5–13
Save 5–13
Save As 5–13
Edit 5–13
Change Dir 5–14
DOS Shell 5–14
Exit 5–15
Window menu 5–16
Size/Move 5–16
Zoom 5–16
Next 5–16
Previous 5–16
Close 5–16
Tile 5–17
Cascade 5–17
Service Menu 5–18
Tunings 5–18
Booster Tunings 5–19
RF Testing 5–19
DSP Audio Loops 5–20
Trouble Shooting 5–21
Self Tests 5–21
Execute Tests 5–22
View Test Results 5–22
Print Results to Printer 5–22
Print Results to File 5–23
Product Identity 5–23
NHC–4
5–1
Page 2

SERVICE SOFTWARE
INSTRUCTIONS
9618ARo
Technical Documentation
Copyright Nokia Mobile Phones
NHC–4
5–2
Phone Mode 5–24
EEPROM Initialize 5–24
Dealer Menu 5–25
Subscriber (NAM) Number 5–25
Short Code Memory 5–28
SID Screening 5–30
Calling Card Numbers 5–31
System Feature Codes 5–32
A–Key Programming 5–33
User Data Transfer 5–33
Warranty Information 5–35
Set Factory Values 5–36
Microcell Programming 5–37
Product Profile Programming 5–38
PRSID Programming 5–39
Options Menu 5–41
General 5–41
Help Menu 5–42
General Help 5–42
Using Help 5–42
Product Information 5–42
Appendix I 5–43
Installing Service Software on PC Hard Disk 5–43
Page 3

SERVICE SOFTWARE
INSTRUCTIONS
9618ARo
Technical Documentation
Service Software Instructions
General
The Service software is specially designed to facilitate the servicing of NHC–4
cellular telephones.
The software can be used to control the phone according to the user’s wish
merely by entering commands via the keyboard or by using a mouse of a PC/
AT connected to the phone.
This section refers to NHC–4 Service software Version 0.89. To receive a free
upgrade, please follow the de–install instructions in Appendix I and send the
disk to Nokia Mobile Phones.
Required Servicing Equipment
NHC–4
5–3
Copyright Nokia Mobile Phones
– Computer: IBM PC/AT or compatible with one unused serial port (COM1 or
COM2)*), one parallel port (LPT1), hard disk recommended
– Operating System: DOS Version 3.2 or later
– 550 kB free memory under DOS (when using SW without Faultlog)
– Display: Any 80–character text display
– The Service software program for 3.5” disk (product code: 0774003),
for 5,25” disk (product code: 0774004)
– Software protection key PKD–1 (product code: 0750018)
– M2BUS adapter DAU–2 (product code: 0750006)
– Modular cable XCM–1 (product code: 4626131)
– RS–232 adapter, 9–to–25 pins (product code: 4626170)
– Phone adapter MCH–4 (product code: 0620004)
– Service box JBS–7 (product code: 0750023)
*)
Note: A number of PC’s of an older generation use the Intel, National Semiconductor, or
United Microelectronics IC 8250 as the serial port UART. This is a comparatively
inefficient circuit for current purposes and does not necessarily support the
M2BUS adapter at 9600 baud. The newer UART’s NS16450 and NS16550AF of
National Semiconductor offer solutions for these problems.
Page 4
SERVICE SOFTWARE
INSTRUCTIONS
9618ARo
Technical Documentation
Mechanical Connections
Caution: Make sure that you have switched off the PC and the printer before
making connections !
Caution: Do not connect the PKD–1 key to the serial port. You may damage
your PKD–1 !
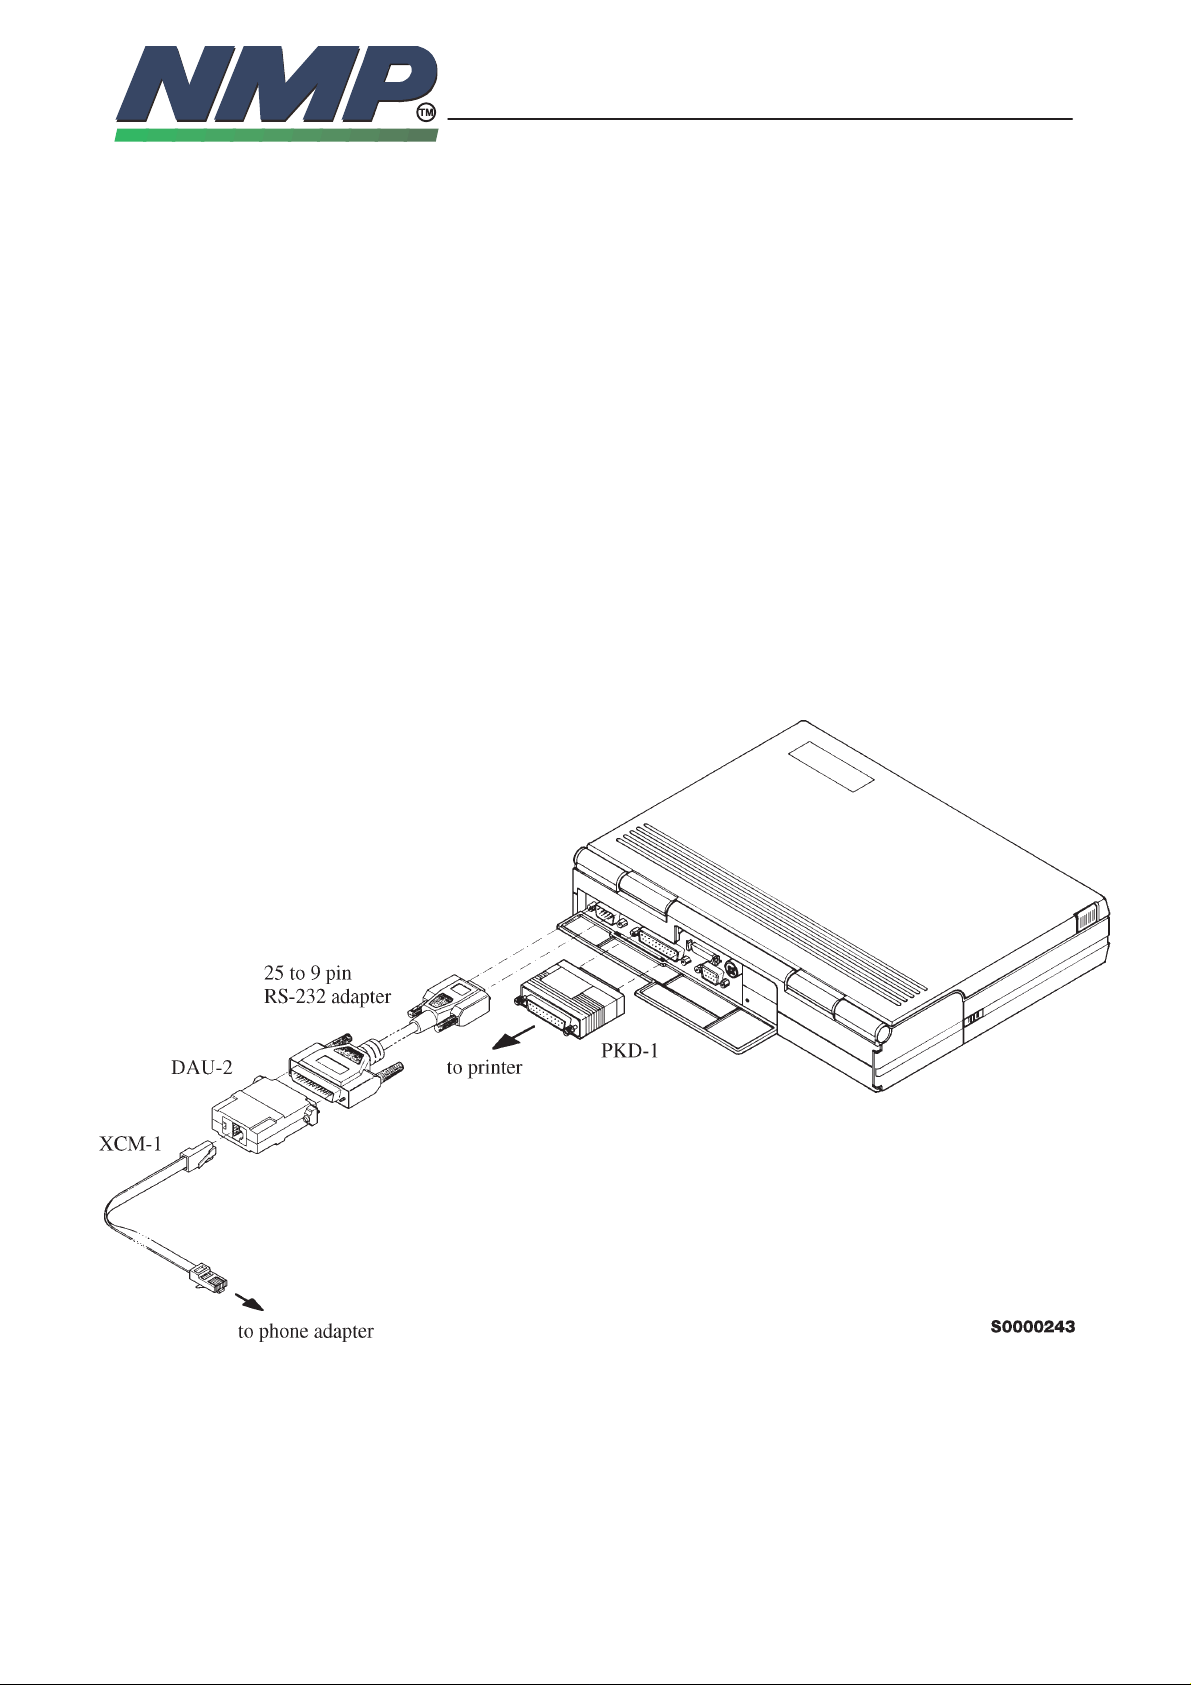
The software controls the phone via a separate adapter connected to the serial
port of the PC and to the telephone’s M2BUS (DAU–2 and XCM–1).
Attach the protection key PKD–1 to parallel port one (25–pin female D–connector) of the PC. When connecting the PKD–1 to the parallel port be sure that you
insert the PC end of the PKD–1 to the PC (male side). If you use a printer on
parallel port one, place the PKD–1 between the PC and your printer cable.
The PKD–1 should not effect devices working with it. If some errors occur (errors in printing are possible) please try printing without the PKD–1. If printing is
OK without the PKD–1 please contact your dealer. We will offer you a new
PKD–1 in exchange for your old one.
NHC–4
5–4
Copyright Nokia Mobile Phones
Page 5
SERVICE SOFTWARE
INSTRUCTIONS
9618ARo
Technical Documentation
Copyright Nokia Mobile Phones
NHC–4
5–5
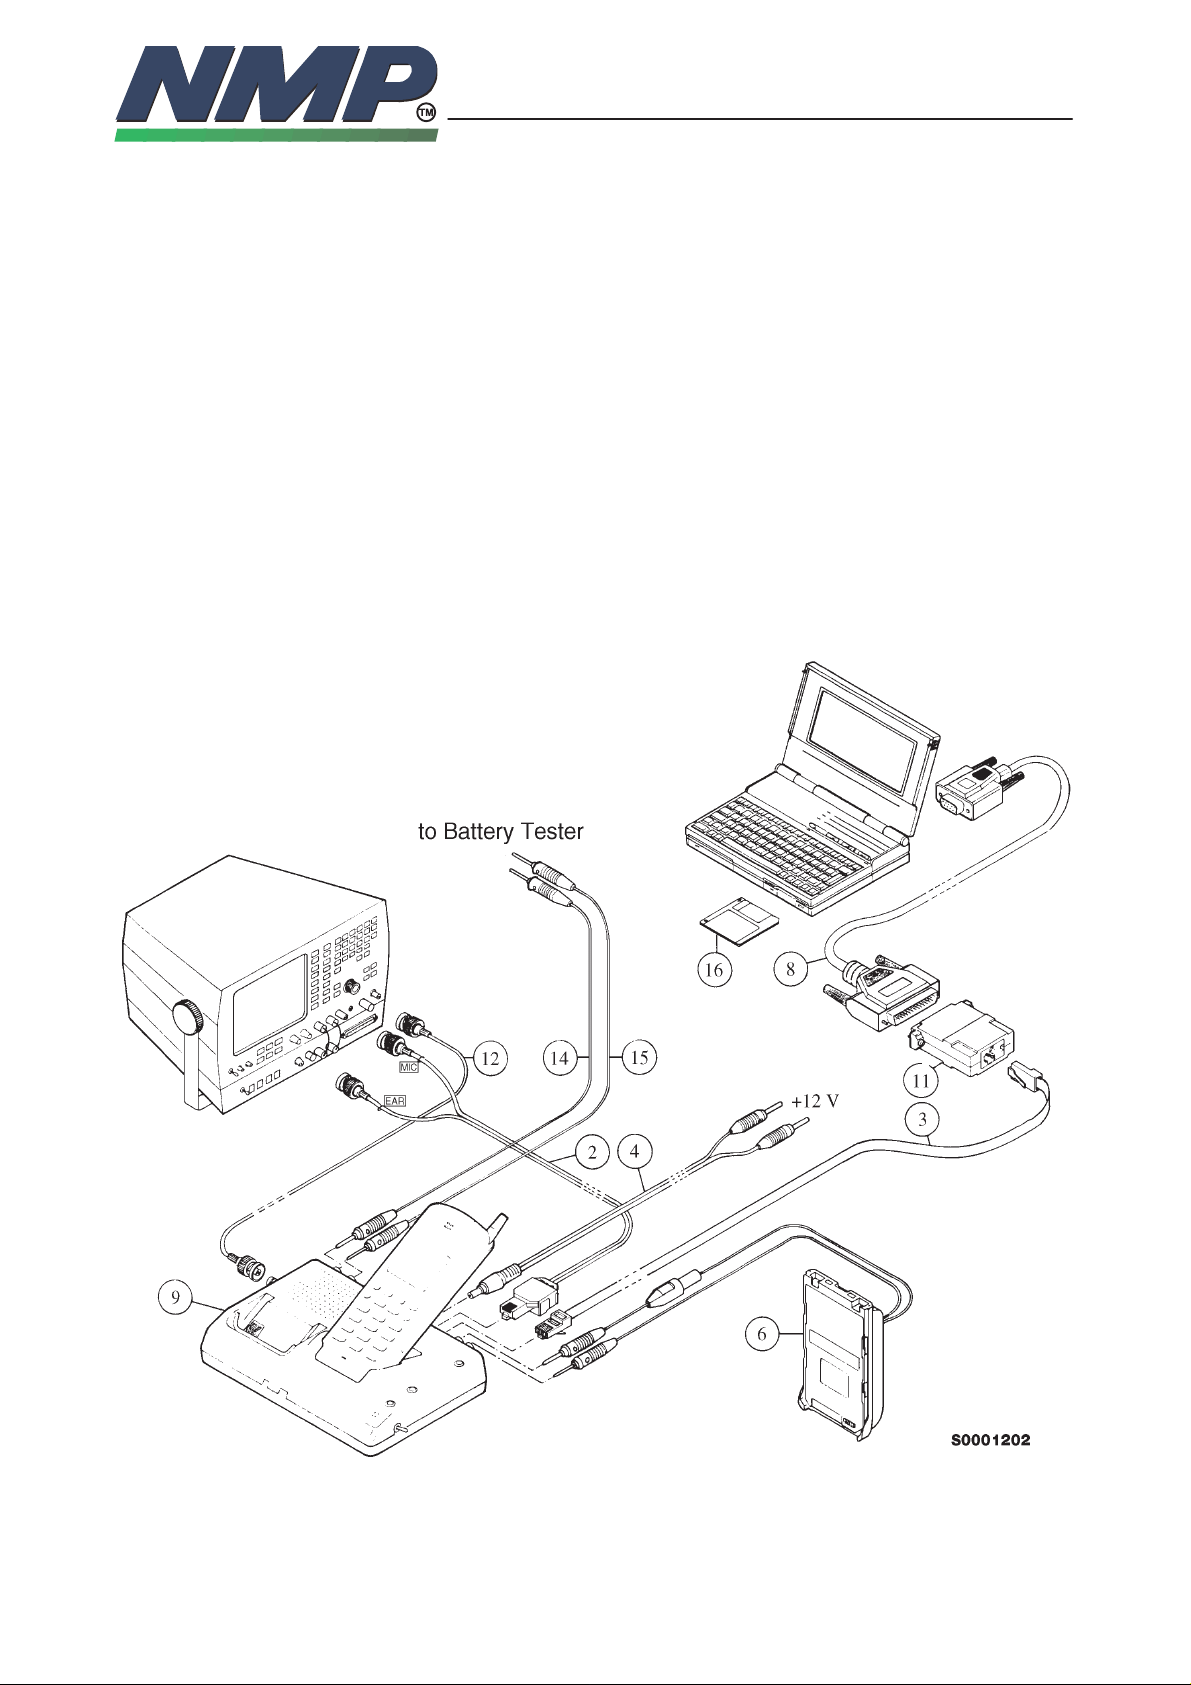
Connect the M2BUS adapter (DAU–2, item 11) to the serial port (25–pin male
D–connector). In case your PC (as AT types in general) has a 9–pin serial port
use the special connector adapter cable provided (item 8).
Then connect the modular cable XCM–1 (item 3) from the M2BUS adapter to
the modular connector of the service box JBS–7 (item 9).
Now connect the transceiver NHC–4 to the service box. Then attach the service
box’s RF connector to the measurement station by using the BNC–BNC cable
(item 12) if needed.
Then connect external audio lines of the JBS–7 to the measurement station by
using the audio cable ADS–1 (item 2).
Connect service box to the power supply by using power cable PCS–1 (item 4).
The voltage must be set to 12 V.
Connect battery tester to the service box by using two banana plug cables (red
and black).
Page 6

Starting
SERVICE SOFTWARE
INSTRUCTIONS
9618ARo
Technical Documentation
Copyright Nokia Mobile Phones
NHC–4
Start the phone by pressing the power on button of the handset. Switch PC
power on.
To start the program on diskette, proceed as follows:
1. insert Service software diskette
into drive A: of your PC
5–6
2. log into drive A:
3. start NHC4SERV.BAT and
run the Service software
type A: and press <Enter>
type NHC4SERV
and press <Enter>
To start the program on hard disk (if installed), proceed as follows:
1. log into drive C:
2. start NHC4SERV.BAT and
run the Service software
type C: and press <Enter>
type NHC4SERV
and press <Enter>
Note: See installation instructions in Appendix I.
The Service software starts by loading the configuration file. After it has been
loaded, a menu bar is shown at the top line of the screen. Refer to section ’Using menus’ how to navigate through menus.
Page 7
SERVICE SOFTWARE
INSTRUCTIONS
9618ARo
Technical Documentation
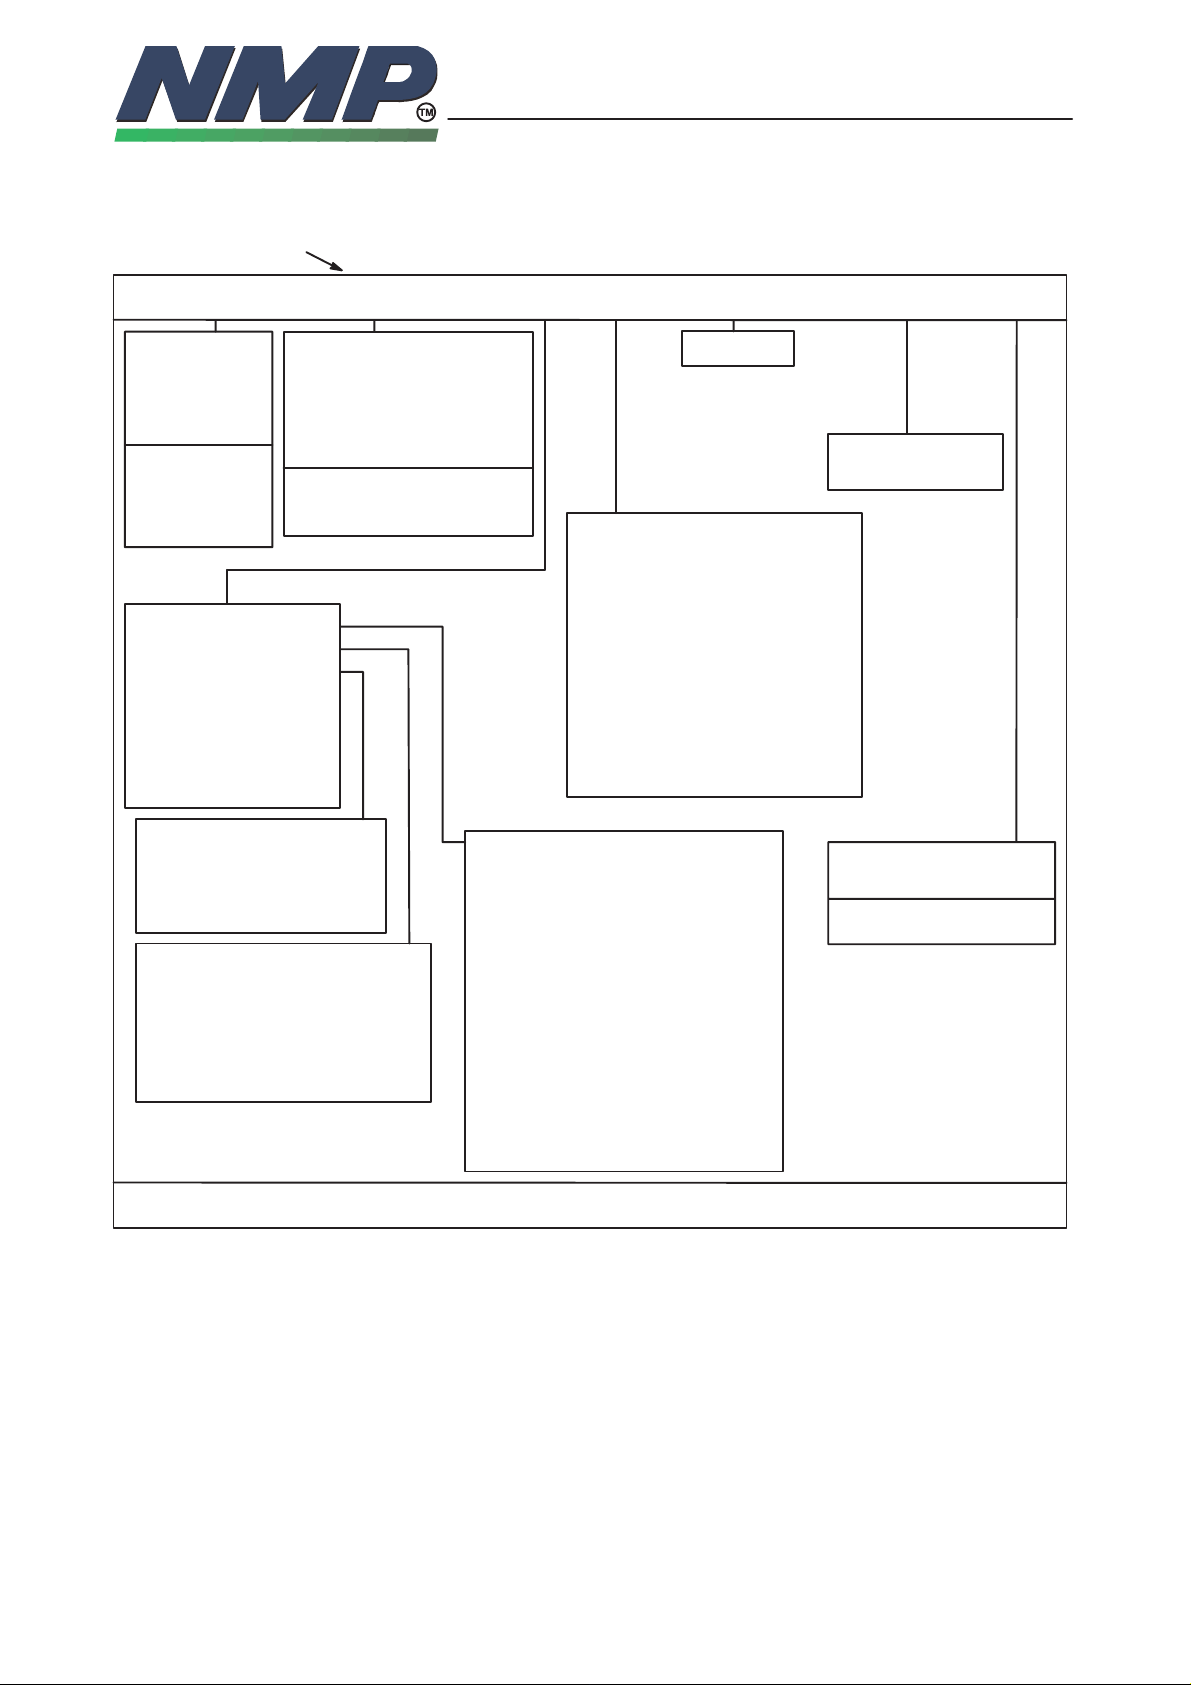
The Service Software Menu Structure
Menu bar
NHC–4
5–7
Copyright Nokia Mobile Phones
File
Open
Save
Save As
Edit
Window Service Dealer Options Help
Resize/move
Zoom
Next
Previous
Close
Change dir
Dos shell
Exit Alt–X
Tile
Cascade
Tunings
Booster tunings
Self tests
RF–testing
DSP audio loops
Trouble shooting
Product identity
Phone mode
Execute tests
View test results
Print results to printer
Print results to file
Output power tuning
Transmitter freq tuning
Output power check
Receiver calibration
Voltage calibration
Temperature calibration
Alt–F7
Alt–F8
F6
Alt–F6
Alt–F4
F7
F8
Subscriber (NAM) number
Short code memory
SID programming
Calling card numbers
System feature codes
A–key programming
User data transfer
Warranty information
Set factory values
Internat Access Code
NAM password change
Microcell Programming
Bias current tuning
TX output power band 1
TX output power band 2
TX output power band 3
TX output power band 4
Calculate TX tables 2–4
FM modulation
AFC tuning
TX IQ–tuning
AMPS demodulation
Analog mode RSSI
Digital mode AGC
Battery voltage tuning
Charger voltage tuning
Faultlog
General
Faultlog Dialog
Configure File
General help F1
Using help
Product information
F1 Help Alt–F8 Move F6 Next Alt–F6 Previous F10 Menu Alt–F4 Close
Page 8

Using Menus
There are three visible components to the Service software: the menu bar at
the top, the window area in the middle, and the status line at the bottom of the
screen. Many menu items also offer dialog boxes. Although there are several
different ways to make a selection in the Service software, they access the
same commands and dialog boxes.
SERVICE SOFTWARE
INSTRUCTIONS
9618ARo
Technical Documentation
NHC–4
5–8
Copyright Nokia Mobile Phones
The
menu bar
is your primary access to all the menu commands. If the command is followed by an arrow, the command leads to another menu. Otherwize
the action occurs as soon as you choose the command.
Here is how you choose menu commands using the keyboard:
– Press F10. This makes the menu bar active; the next thing you type will re-
late to the items on the menu bar.
– Use the arrow keys to select the menu you want to display. Then press En-
ter. As a shortcut to this step, you can just press the highlighted letter of the
menu title. For example, when the menu bar is active, press F to move to
and display the File menu. At any time, press Alt and the highlighted letter
(such as Alt+F) to display the menu you want.
– Use the arrow keys again to select command from the menu you’ve opened.
Then press Enter.
At this point, the Service software either carries out the command, displays
a dialog box, or displays another menu.
There are two ways to choose commands with a mouse:
– Click the decired menu title to display the menu and click the decired com-
mand.
– Or, drag straight from the menu title down to the menu command. Release
the mouse button on the command you want. (If you change your mind, just
drag off the menu; no command will be chosen.)
Windows
Some menu commands are unavailable when it would make no sense to
choose them. However, you can always get online Help also about currenly unavailable commands by pressing F1.
The service software offers a number of quick ways to choose menu commands. The click–drag method for mouse users is an example. From the keyboard, you can use a number of keyboard shortcuts (or hot keys) to access the
menu bar, choose commands, or work with dialog boxes. You need to hold
down Alt while pressing the highlighted letter when moving from input box to a
group of buttons or boxes.
Some of the actions you see and do in the Service software happens in a window. A window is a screen area that you can open, close, move, resize, zoom,
tile, and overlap.
Page 9
SERVICE SOFTWARE
INSTRUCTIONS
9618ARo
Technical Documentation
Copyright Nokia Mobile Phones
NHC–4
5–9
You can have many windows open, but only one window can be active at any
time. Any command you choose generally applies only to the active window.
You can spot the active window easily: It’s the one with the double–lined border
around it. The active window always has a close box, a zoom box, and scroll
bars. If your windows are overlapping, the active window is always on top of all
the others (the foremost one).
Most of the windows have these things in common:
– a title bar
– a close box
– scroll bars
– a zoom box
– a window number
The following figure shows a typical window:
The close box of a window is the box in the upper left corner. Click this box to
quickly close the window. (Or choose Window|Close.)
The title bar, the topmost horizontal bar of a window, contains the name of the
window and the window number. Double–clicking the title bar zooms the window. You can also drag the title bar to move the window around.
The zoom box of a window appears in the upper right corner. If the icon in that
corner is an up arrow, you can click the arrow to enlarge the window to the largest size possible. If the icon is a double–headed arrow, the window is already at
its maximum size. To zoom a window from keyboard, choose Window|Zoom.
A window has a window number in the upper right border. You can make a window active (and thereby bring it to the top of the heap) by pressing Alt in combination with the window number.
You can use scroll bars with a mouse to scroll the contents of the window. Click
the arrow at either end to scroll one line at a time. (Keep the mouse button
pressed to scroll continuously.) You can click the shaded area to either side if
the scroll box to scroll a page at a time. Finally, you can drag the scroll box to
any spot on the bar to quickly move to a spot in the window relative to the position of the scroll box. From keyboard you can scroll the window contents with
arrow keys.
Page 10
You can drag lower right corner to make window larger or smaller. To resize using the keyboard, choose Size/Move from the Window menu. Move the window
around with arrow keys and resize it with Shift+arrow keys. When you are done
with sizing/moving drop the window back to the desktop by pressing Enter.
The status line appears at the bottom of the screen to
– remind you of basic keystrokes and shortcuts (or hot keys) applicable at that
moment in the active window.
– let you click the shortcuts to carry out the action instead of choosing the
command from the menu or pressing the shortcut keystroke.
Dialog Boxes
Most of the menu commands leads to a dialog box. Dialog boxes offer a convenient way to view and set multiple options. There are basically two types of dialog boxes: modal and non–modal. When you open a modal dialog box, you are
unable to use menus and thus open other dialog boxes. These boxes are typically used in for making settings or doing some action, where the phone must
be put to a certain state and all other actions must be denied. Non–modal dialog boxes you can have open several at one time on the desktop. You can
switch between them by making them active with mouse or keyboard. When
you’re making settings in dialog boxes, you work with five basic types of onscreen controls: action buttons, radio buttons, check boxes, input boxes, and list
boxes. Dialog boxes have similar features like windows: title bar and close box.
Here’s sample dialog box that illustrates some of these items:
SERVICE SOFTWARE
INSTRUCTIONS
9618ARo
Technical Documentation
NHC–4
5–10
Copyright Nokia Mobile Phones
This dialog box has two standard buttons: OK and Cancel. If you choose OK,
the choices in the dialog box are accepted; if you choose Cancel, nothing
changes and the dialog box is closed. Esc is always a keyboard shortcut for
Cancel (even if no Cancel button appears).
If you’re using mouse, click the dialog–box button you want. When you’re using
the keyboard, press Alt and the highlighted letter of an item to activate it. For
example, Alt+O selects the OK button because the O in OK is highlighted.
Press Tab or Shift+Tab to move forward or back from one item to another in a
dialog box. Each element is highlighted when it becomes active.
Page 11

SERVICE SOFTWARE
INSTRUCTIONS
9618ARo
Technical Documentation
Copyright Nokia Mobile Phones
NHC–4
5–11
Radio buttons are like car–radio buttons. They come in groups, and only one
radio button in the group can be on at any one time. To choose a radio button,
click it or its text. From the keyboard, select Alt and the highlighted letter, or
press Tab until the group is highlighted, and then use the arrow keys to choose
a particular radio button. Press Tab or Shift+Tab again to leave the group with
the new radio button chosen.
Check boxes differ from radio buttons in that you can have any number of
check boxes checked at any time. When you select a check box, an X appears
in it to show you it’s on. An empty box indicates it’s off. To change the status of
a check box, click it or its text, press Tab until the check box is highlighted and
then press Spacebar, or select Alt plus the highlighted letter.
If several check boxes apply to a topic, they appear as a group. In that case,
tabbing moves to the group. Once the group is selected, use the arrow keys to
select the item you want, and then press Spacebar to check or uncheck it. On
monochrome monitors, the active check box or group of check boxes will have
a chevron symbol to the left and right. When you press Tab, the chevrons move
to the next group of check boxes or radio buttons.
Input boxes let you type in text. Most basic text–editing keys work in the text
box (for example, arrow keys, Home, End, Backspace, Del and Ins). If the contents of the input box is highlighted (typically when you first select it) and you
start typing in new data, the old data is erased. If you want to save it, use arrow
keys, Home, End, Backspace or toggle Insert mode and move the cursor to decired position and type in new data.
If an input box has a down–arrow icon to its right, there is an associated history
list. Click the icon or press down–arrow to display the list. You’ll find text you
typed the last few times you used the input box. Press Enter to choose an item
from this list. You can also edit an entry in the history list. Press Esc to exit from
the history list without making a selection.
A final component of many dialog boxes is a list box, which lets you scroll
through and select from varaible–length lists (often file names) without leaving
a dialog box. You make a list box active by clicking it or by choosing the highlighted letter of the list title (or press Tab until it’s highlighted). Once a list box is
displayed, you can use the scroll box to move through the list or press the up or
down arrow from the keyboard.
Page 12
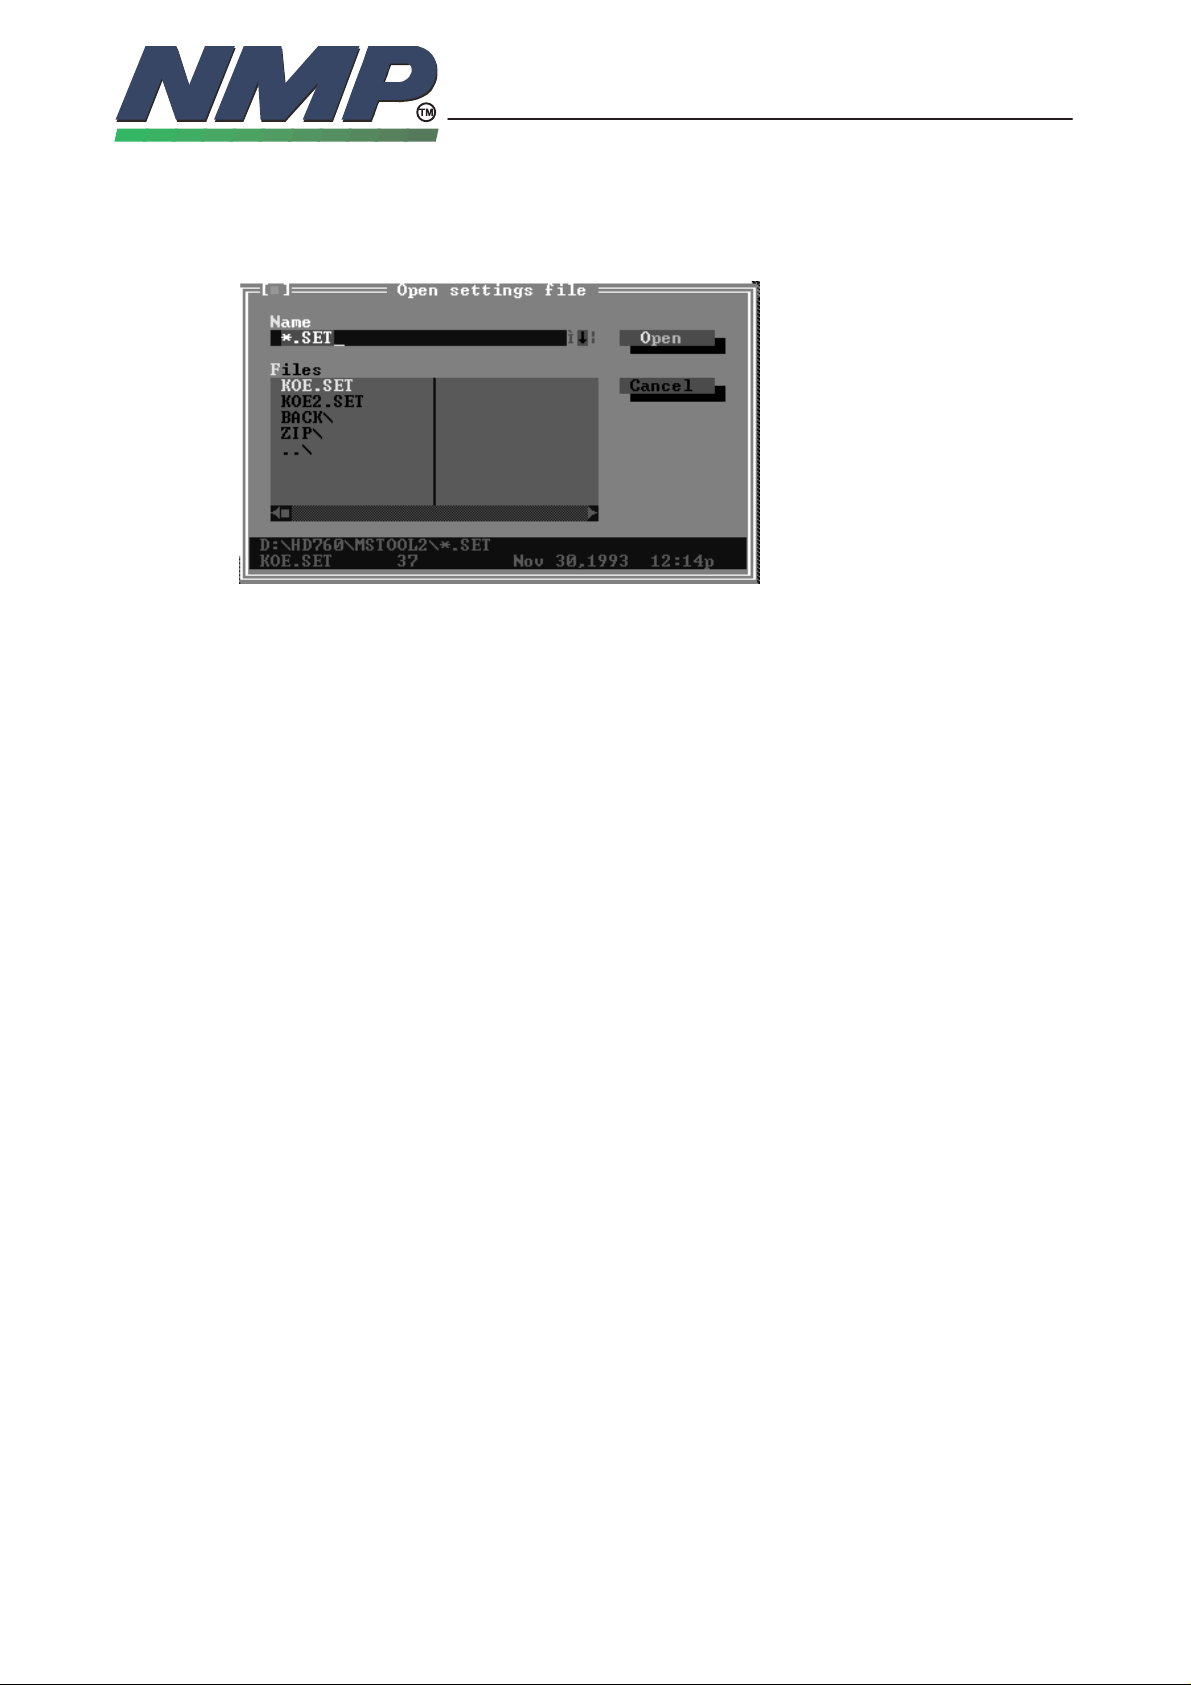
File Selection Dialog Box
The file–selection dialog box offers you a way to select the file you want to
open for reading or writing. Here is what the box looks like:
The dialog box contains an input box, a file list, buttons labeled Open and Cancel, and an information panel that describes the selected file. Now you can do
any of these actions:
SERVICE SOFTWARE
INSTRUCTIONS
9618ARo
Technical Documentation
NHC–4
5–12
Copyright Nokia Mobile Phones
– Type in a full file name and choose Open. The file is now opened for loading
or saving.
– Type in a file name with wildcards, which filters the file list to match your
specification.
– Press down arrow to choose a file specification from a history list of file
specifications you’ve entered earlier. Choose a name from the list by
double–clicking it or selecting it with the arrow keys and press Enter.
– View the contents of different directories by selecting a directory name in the
file list.
The input box lets you enter a file name explicitly or enter a file name with stan-
dard DOS wildcards (* and ?) to filter the names appearing in the history list
box. If you enter the entire name and press Enter, PCLocals opens it.
Once you’ve typed in or selected the file you want, choose the Open button
(choose Cancel if you change your mind). You can also just press Enter once
the file is selected, or you can double–click the file name in the file list.
Help Functions
The help menu gives you access to online help in a special window. There is
help information on virtually all aspects of the PCLocals. To open the Help window, do one of these actions:
– Press F1 at any time (including from any dialog box or when any menu com-
mand is selected).
– Click Help whenever it appears on the status line or in a dialog box.
Page 13
File menu
The file menu contains commands related to file operations. It lets you save
and edit configuration file, go to DOS shell and quit PCLocals.
Open
The File|Open command displays a file–selection dialog box for you to select a
configuration file to open. The file contains default channel numbers for all tunings and default values for testing window. You can edit these values with
File|Edit command. Once the file is opened the new values take effect.
Save
The File|Save command saves the previously opened configuration file. If no
file has been opened, Save As – command is performed instead.
SERVICE SOFTWARE
INSTRUCTIONS
9618ARo
Technical Documentation
NHC–4
5–13
Copyright Nokia Mobile Phones
Save As
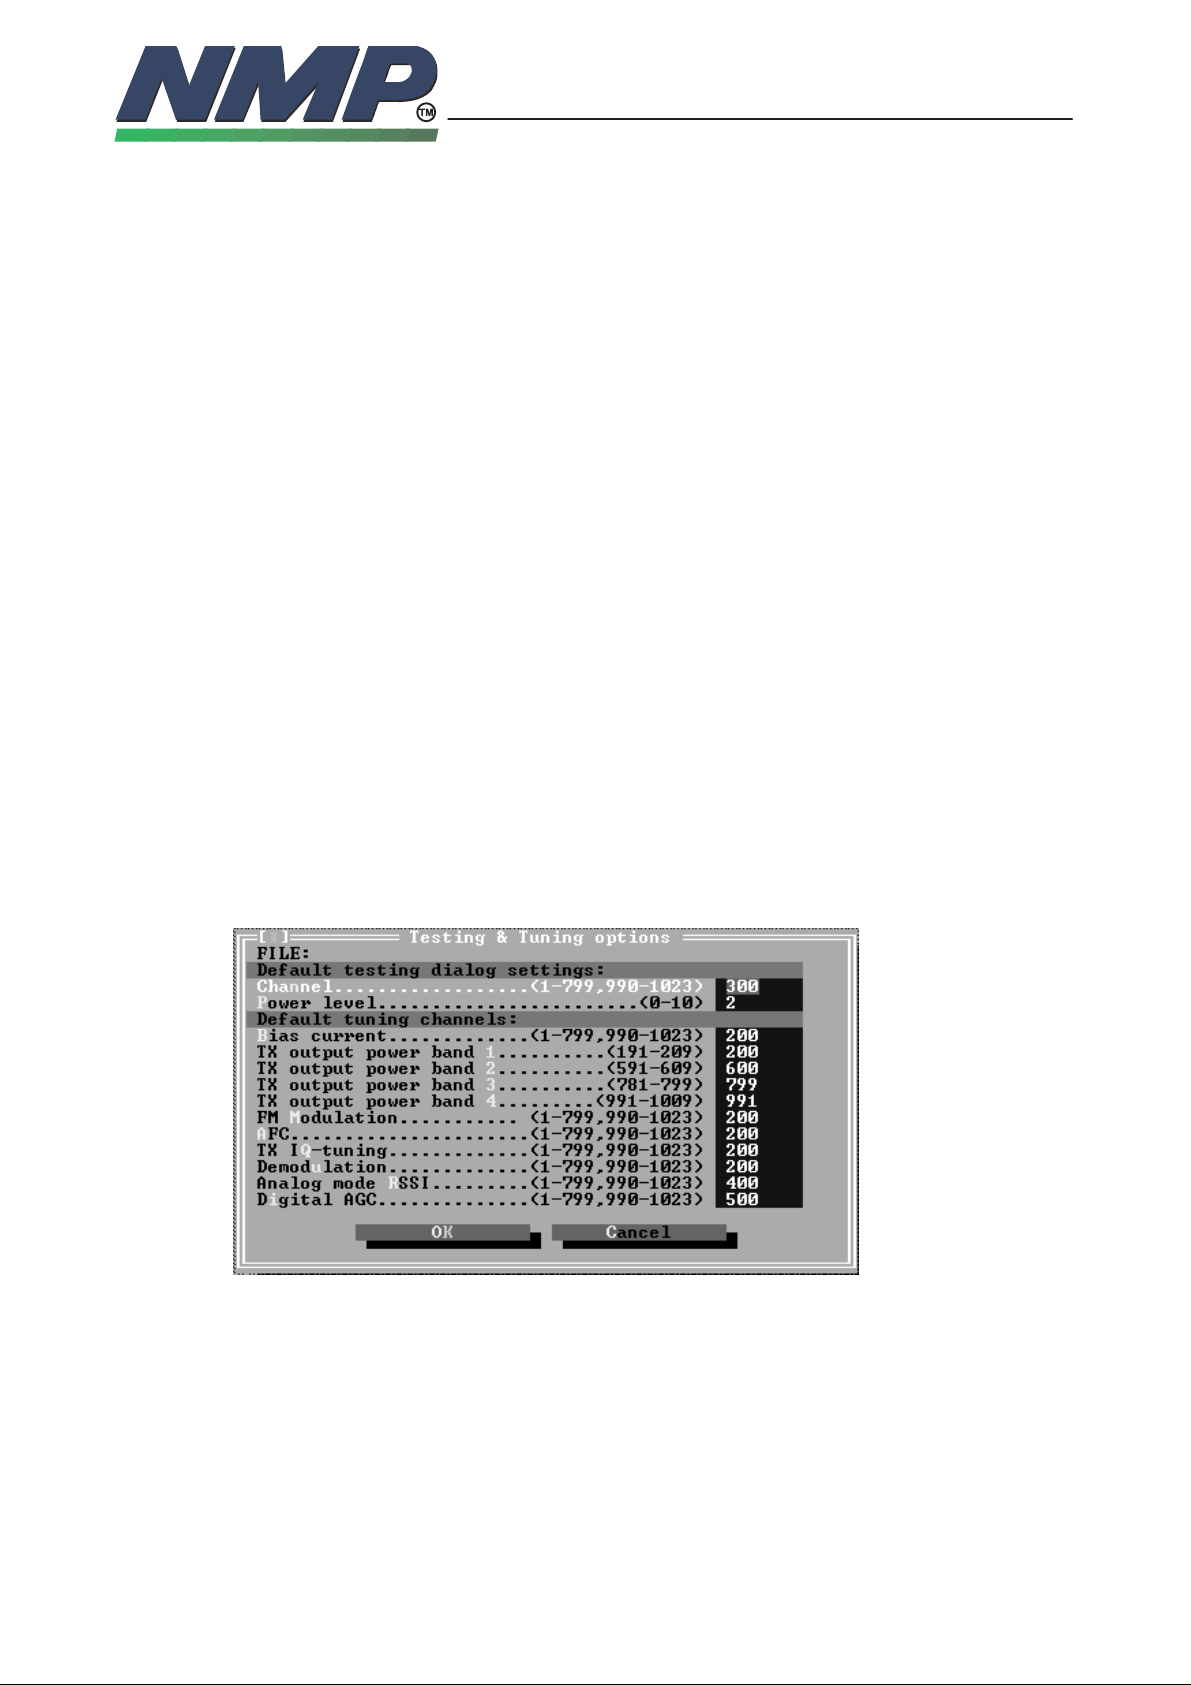
Edit
The File|Save As command lets you save the configuration file under a different
name, in a different directory, or on a different drive. When you choose this
command, you see the file–selection dialog box for Save File As.
The File|Edit commands opens a dialog box for editing configuration file contents. The dialog box looks like the following:
In the top of the dialog you see the name of the current configuration file. Below
that there are default testing dialog settings and below that there are default
tuning channels. Select the value you want to change with hotkeys (
Tab
or
clicking by mouse or using tabulator keys (
Shift+Tab
) and type in new
Alt
+letter),
value. Accept the changes by pressing Enter or abandon changes by pressing
Esc (or click the corresponding button). Note, that you can define in Options|General the name of the configuretion file that is loaded when the program is started.
Page 14
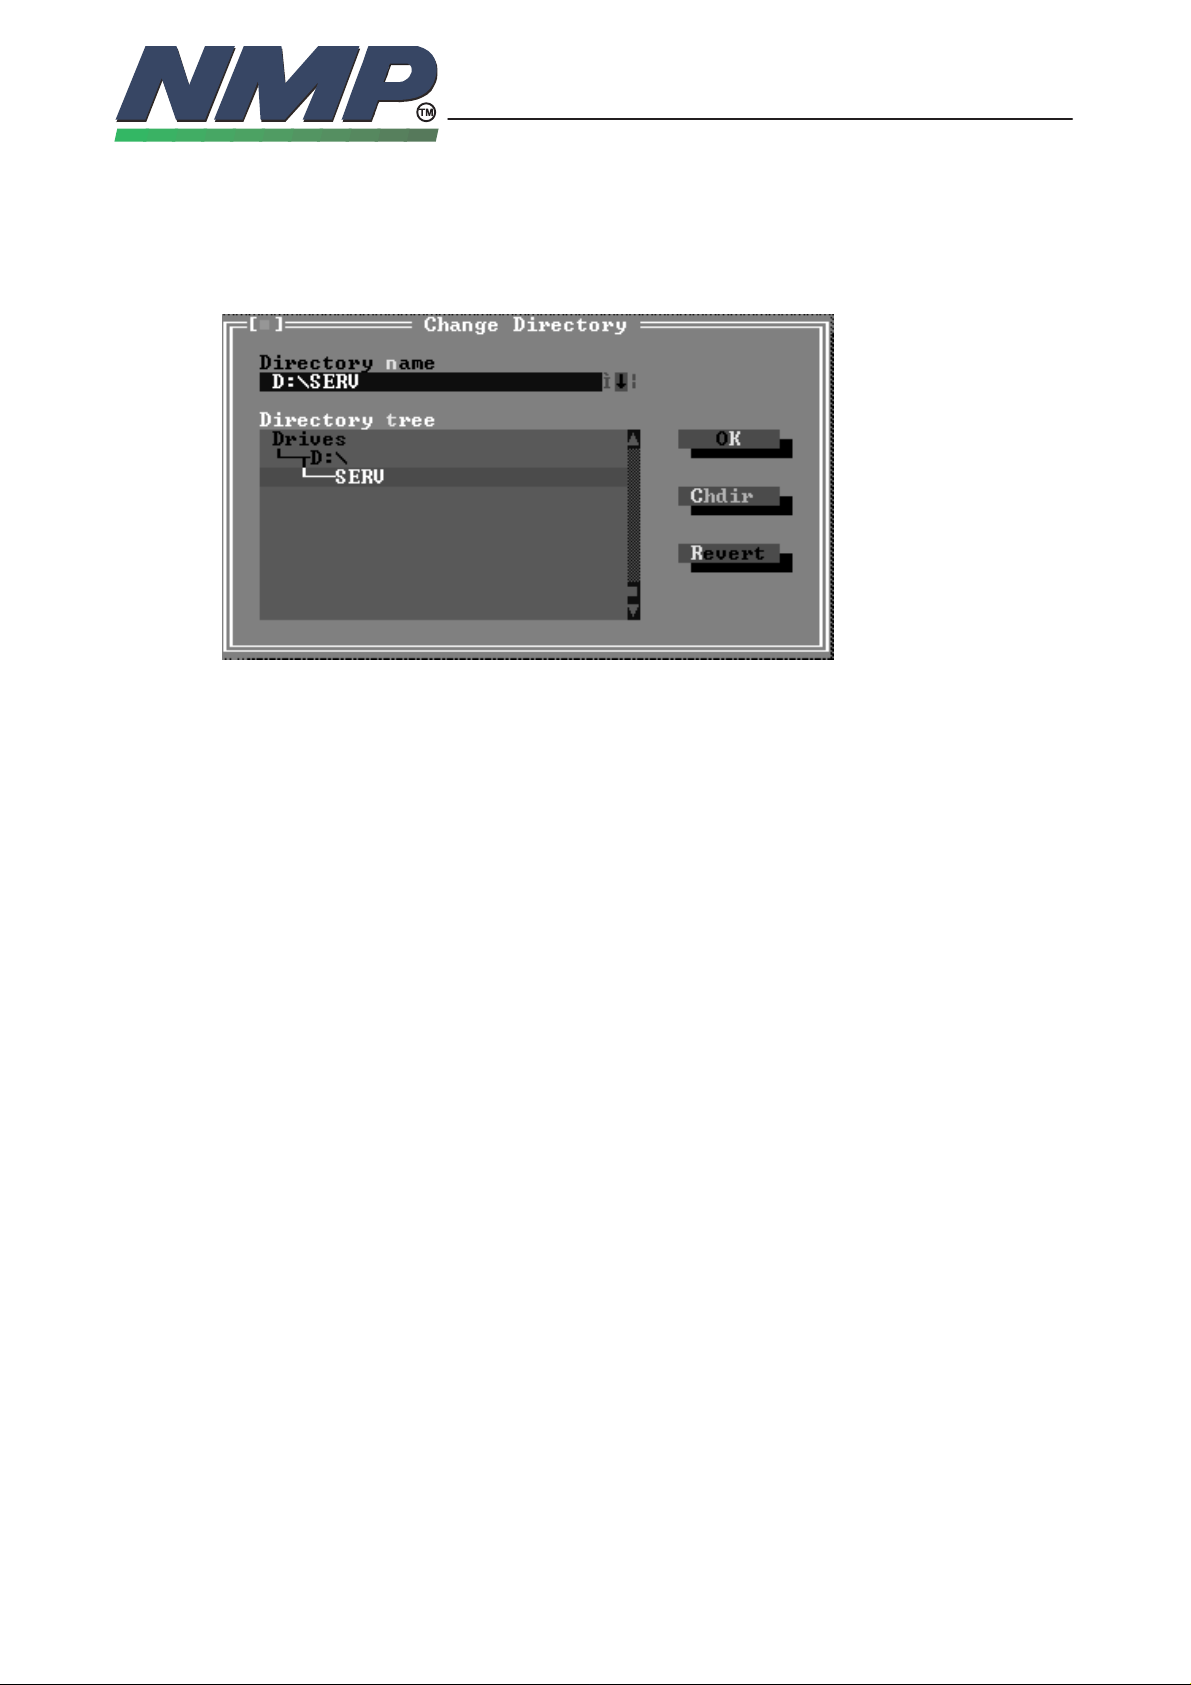
Change Dir
The File|Change Dir command lets you specify a drive and a directory to make
current. The current directory is the one PCLocals uses to open files and
search for files. Here is what the Change Directory dialog box looks like:
SERVICE SOFTWARE
INSTRUCTIONS
9618ARo
Technical Documentation
NHC–4
5–14
Copyright Nokia Mobile Phones
There are two ways to change directories:
– Type in the path of the new directory in the input box and press Enter.
– Choose the directory you want in the Directory tree (if you’re using the key-
If you choose the OK button, your changes are made and the dialog box is
closed. If you choose the Chdir button, the Directory tree list box is changes to
the selected directory and displays the subdirectories of the currently highlighted directory (pressing Enter or double–clicking on that entry gives you the
same result). If you change your mind about the directory you’ve picked and
you want to go back to the previous one (and you’ve yet to exit the dialog box),
choose the Revert button.
DOS Shell
The File|Dos Shell command lets you temporarily exit PCLocals to enter a DOS
command or program. To return to PCLocals type EXIT and press Enter on
DOS prompt.
You may find that there is not enough memory to execute this command. In that
case DOS Shell is not executed and the program continues running. You
should free up some memory before starting the PCLocals by leaving some
TSR programs unloaded. You can check the free memory amount from PCLocals with command Help|Product information.
board, press Enter to make it the current directory), then choose OK or
press Esc.
Don’t install any TSR programs (like SideKick) or print a file with the DOS print
command while you’ve shelled to DOS, because memory may be misallocated.
Page 15

Exit
SERVICE SOFTWARE
INSTRUCTIONS
9618ARo
Technical Documentation
Copyright Nokia Mobile Phones
NHC–4
5–15
The File|Exit command exits the PCLocals and removes it from memory. Before
exiting a confirmation dialog box is displayed. Pressing Enter quits the program
and Esc cancels exiting.
Page 16

Window menu
The window menu contains window–management commands. All of the windows and dialog boxes you open from the menus have all or some of the standard window elements like scroll bars, a close box, and zoom boxes. Refer to
sections ’Windows’ and ’Dialog boxes’ for information on these elements and
how to use them.
Size/Move
Choose Window|Size/Move to change the size or position of the active window.
When you choose this command, the active window moves in response to the
arrow keys. When the window is where you want, press Enter. You can also
move a window by dragging its title bar.
If you press Shift while you use the arrow keys, you can change the size of the
window. When it’s the size you want, press Enter. If a window has a resize corner, you can drag that corner to resize it.
SERVICE SOFTWARE
INSTRUCTIONS
9618ARo
Technical Documentation
NHC–4
5–16
Copyright Nokia Mobile Phones
Zoom
Next
Previous
Hotkey for this command is Alt–F7.
Choose Window|Zoom to resize the active window to the maximum size. If the
window is already zoomed, you can choose this command again to restore it to
its previous size. You can also double–click anywhere on the top line (except
where an icon appears) of a window to zoom or unzoom it.
Hotkey for this command is Alt–F8.
Choose Window|Next to make the next window active, which makes it the topmost open window.
Hotkey for this command is F6.
Choose Window|Previous to make the previous window active, which makes it
the topmost open window.
Close
Hotkey for this command is Alt–F6.
Choose Window|Close to close the active window. You can also click the close
box in the upper left corner to close a window.
Hotkey for this command is Alt–F4.
Page 17

Tile
Cascade
SERVICE SOFTWARE
INSTRUCTIONS
9618ARo
Technical Documentation
Copyright Nokia Mobile Phones
Choose Window|TIle to tile all your open windows.
Hotkey for this command is F7.
Choose Window|Cascade to stack all open windows.
Hotkey for this command is F8.
NHC–4
5–17
Page 18

Service Menu
This menu contains commands needed for tuning and testing the phone. You
can also get information about HW and SW version of the phone and view
trouble shooting diagram from this menu.
Tunings
Choosing Service|Tunings opens a sub–menu, where the desired tuning can be
selected. After you select a tuning from the sub–menu, a tuning dialog box will
be opened. All necessary settings for tuning the phone are done automatically.
The tuning dialog box looks like the following:
SERVICE SOFTWARE
INSTRUCTIONS
9618ARo
Technical Documentation
NHC–4
5–18
Copyright Nokia Mobile Phones
On the left side there are input lines for all tuning values. In the text box on the
right side of the dialog box you can see instructions how to tune the corresponding tuning value. You can change the tuning value with arrow keys (fine
tuning) or Page Up and Page Down–keys (coarse tuning). You can also click
the corresponding button to change the value. After the value has been
changed it will be updated automatically to the phone after 500 ms timeout.
When you are satisfied with the currently highlighted tuning value, you can select the next value (if there are several tuning values in the dialog box) with
hotkeys (
Shift+Tab
+letter), clicking by mouse or using tabulator keys (
). All settings are done automatically and the tuning instructions text in
Tab
or
Alt
text box will be updated according to the new tuning.
When you are done with all the tunings, you can accept the new values by
pressing Enter or abandon changes by pressing Esc (or click the corresponding
button). If you accepted the new values they are now stored to the phone’s eeprom.
All target values and equipment settings can be seen on the text box on the
right side of tuning values. However, it is recommendable to check the values
from the latest version of tuning instructions.
Page 19

Booster Tunings
Choosing Service|Booster tunings opens a sub–menu, where the desired
booster tuning can be selected. After you select a tuning from the sub–menu, a
booster tuning dialog box will be opened. All necessary settings for tuning the
booster are done automatically. Refer to separate booster tuning instructions
for more information.
RF Testing
Choosing Service|RF–testing opens a testing dialog box. In this dialog you are
able to command the phone in local mode. The testing dialog looks like the following:
SERVICE SOFTWARE
INSTRUCTIONS
9618ARo
Technical Documentation
NHC–4
5–19
Copyright Nokia Mobile Phones
You can change the settings 1–4 by pressing the corresponding number or by
clicking the button. Depending on the value type, either an input dialog box or
a radio button box is displayed. In input dialog you must type in new value and
in radio button box you select the new value from a list.
Note! High temperature or low battery voltage can cause that TX output
power level 2 changes automatically to level 2.5
Mode shows the current operating mode of the phone (analog/digital). If you
select digital, all necessary parameters (time slot and DVCC) must also be entered.
Channel shows the current channel where the synthesizers are loaded into. If
you enter an invalid channel number, an error message is displayed and the
channel number is not accepted. After the channel number receiving and transmitting frequencies are displayed.
Power level shows the currently used transmitter power level (0–10). Power
level is also displayed as a dBm and mW value. In analog mode only levels 0
–7 are selectable.
Volume shows the currently used earpiece volume level (1–10).
Received signal strength is shown in an analog channel and in a digital channel
also BER (bit error rate) is shown.
Page 20

SERVICE SOFTWARE
INSTRUCTIONS
9618ARo
Technical Documentation
Copyright Nokia Mobile Phones
NHC–4
5–20
You can change the states of radio buttons by moving around with hotkeys
Alt
+letter), clicking by mouse or using tabulator keys (
(
Tab
or
Shift+Tab
) or with
arrow keys. If you change a setting, the new state will immediately be updated
to the phone. The following states can be set with radio buttons:
TX
– Toggles transmitter on/off.
ST
– Toggles transmitted ST (Signalling Tone) on/off.
SAT
– Toggles transmitted SAT (Supervisory Audio Tone) on/off.
Audio path
– Toggles transmitted audio path on/off. If the path is on, audio signal is trans-
mitted and audio signal receiving is enabled. If the path is off, both trans-
mitted and received audios are muted.
Audio mode
– Select audio mode between HF (Handsfree) and HS (Handset). If mode is
selected to HF, all audios are routed to the bottom connector. In HS mode
audios are routed normally to phone’s microphone and earpiece.
Tone path
– Toggles transmitted audio tone path on/off. If the path is on, all DTMF tones
generated by the phone are transmitted.
Compander
– Toggles transmitted audio compander on/off.
Expander
– Toggles received audio expander on/off.
You can go directly to trouble shooting diagram by pressing T or clicking the
button. Exit the testing dialog by selecting Close or pressing Esc. The phone
will be restarted automatically after exiting.
DSP Audio Loops
Choosing Service|DSP audio loops opens a dialog box, where you can select
audio loop mode on or off and audio routing.
Page 21

From the radio buttons on the left side you can select the audio mode and from
the right side you can select the loop mode. If the audio mode is HS, the audios
are routed from the microphone to the earpiece. In HF mode the audios are
routed to the bottom connector respectively.
Trouble Shooting
Choosing Service|Trouble shooting opens the trouble shooting diagram dialog
box. The dialog box looks like the following:
SERVICE SOFTWARE
INSTRUCTIONS
9618ARo
Technical Documentation
NHC–4
5–21
Copyright Nokia Mobile Phones
In the upper left corner you can see the trouble shooting path you’ve selected.
The path is updated as you go down or up the trouble shooting tree. Below it
there is a scroll box of trouble shooting items, where you can select an item depending on what is the subject you are debugging at the moment. On the right
side of the scroll box there is a text window, which context changes according
to which trouble shooting item is currently highlighted in the scroll box.
You can go down the tree by pressing Enter (or the ’Next level’–button) when
the desired item is highlighted. After that the trouble shooting path is updated
and new item list and information text are displayed. Select new item and go
deeper down the tree, or go to the previous level by pressing Esc (or the ’Previous level’ –button).
You can jump directly to the testing dialog by pressing ’T’ or clicking the ’Testing’– button.
Self Tests
Choosing Service|Self tests opens a sub–menu, from where you can execute
self tests and view test results. For more information about how to interpret the
self test results, see baseband trouble shooting section.
Page 22

Note: Because of the nature of the self tests, you should power the phone
down by cutting off the battery voltage or by removing the battery after
you have executed the tests. You cannot execute self test two times in
a row without powering the phone down in between. You should not also
do any other servicing action after self test without powering the phone
down.
Execute Tests
Choosing Self tests|Execute tests starts self testing sequence. It takes about 1
minute to complete and the test results are displayed on the self test result window as they come. If an MBUS timeout occurs during testing, and confirmation
dialog box is displayed on the screen. You can continue test execution by selecting ’Yes’ or abort testing by selecting ’No’ from the dialog.
View Test Results
SERVICE SOFTWARE
INSTRUCTIONS
9618ARo
Technical Documentation
NHC–4
5–22
Copyright Nokia Mobile Phones
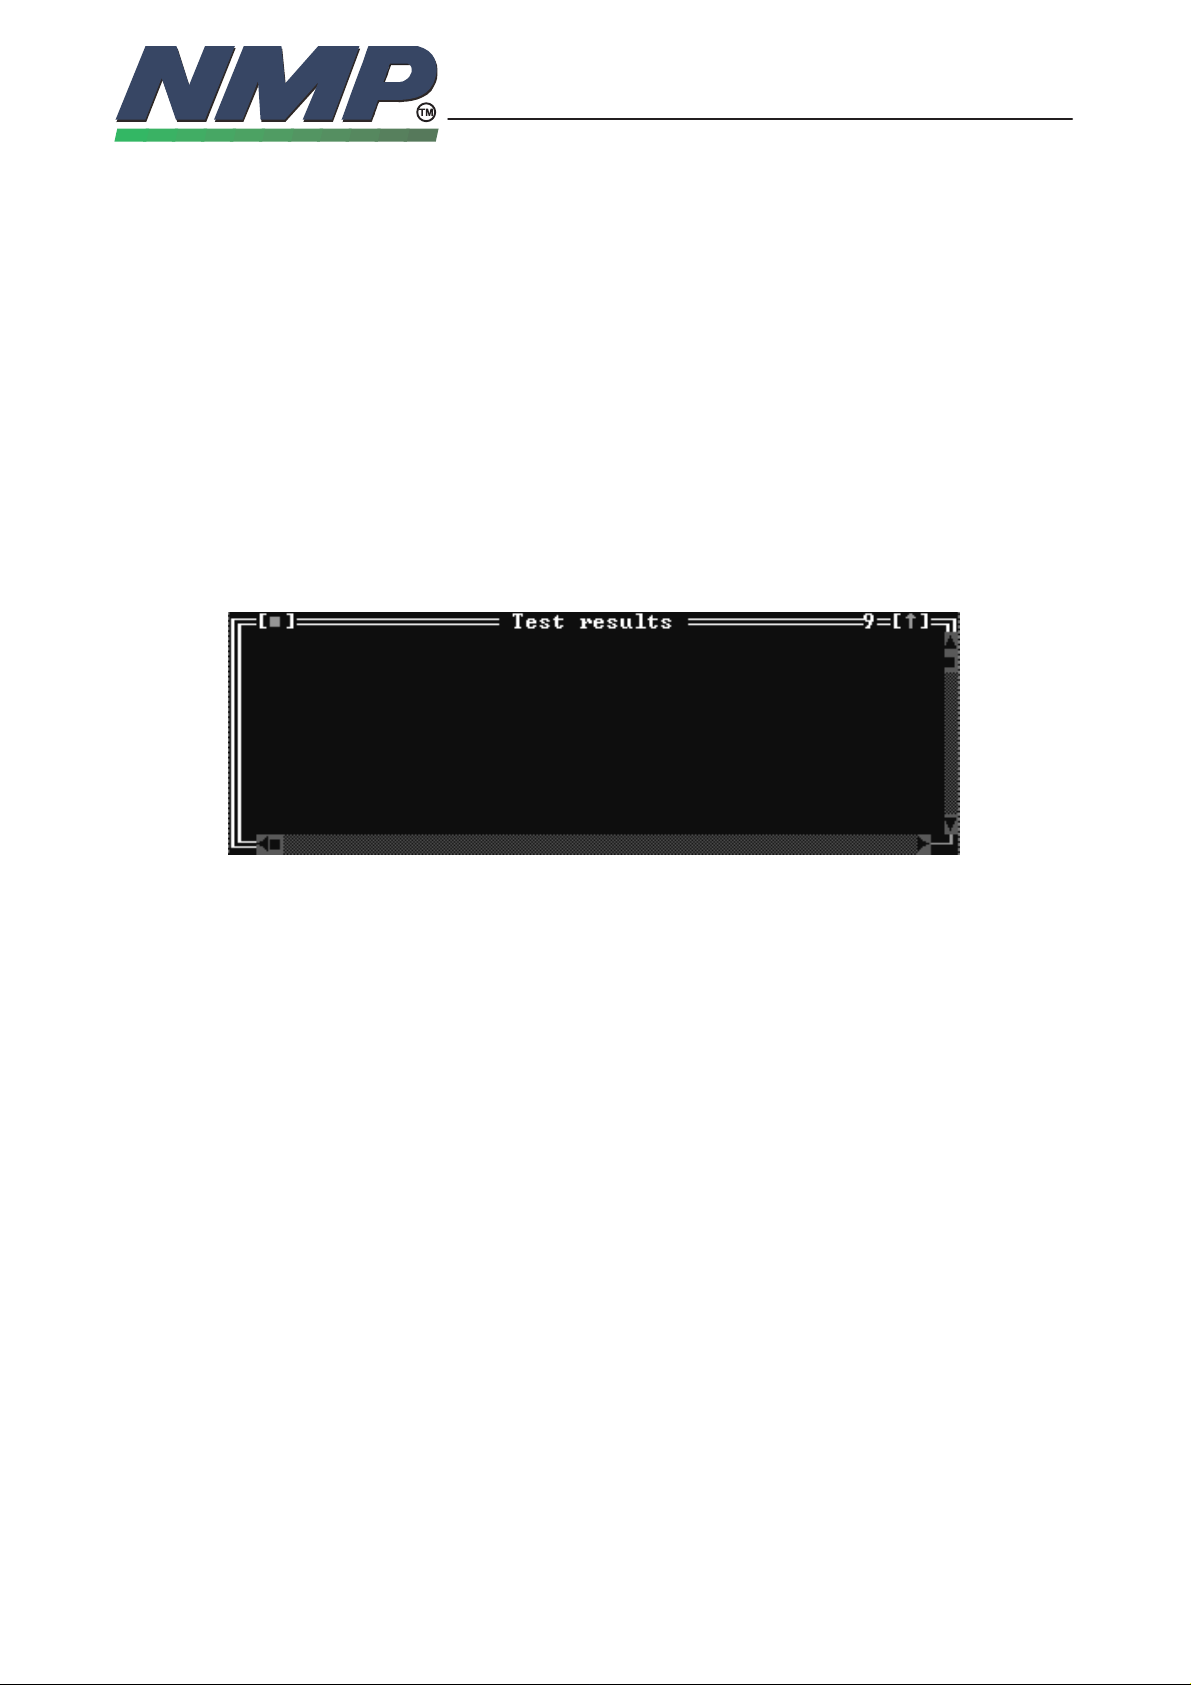
Choosing Self tests|View test results selects the self test result window as an
active window and brings it to the front. If no self tests are executed, the window will be empty. In that case use ’Execute tests’ – command to execute the
tests. The self test results window looks like the following:
The contents of the window is scrollable, so this picture shows only a subset of
self tests. For more information about self tests see baseband trouble shooting
section.
Print Results to Printer
Choosing Self tests|Print results to printer prints self test result window contents
to a printer. Before printing an additional header information can be typed in.
This will be printed to the self test results report.
Page 23

Print Results to File
Choosing Self tests|Print results to file prints self test result window contents to
a text file in ASCII format. Before printing an additional header information can
be typed in. This will be printed to the self test results report file.
Product Identity
Choosing Service|Product identity displays information about HW and SW versions of the phone to the Phone identification window. The following items are
displayed:
SERVICE SOFTWARE
INSTRUCTIONS
9618ARo
Technical Documentation
NHC–4
5–23
Copyright Nokia Mobile Phones
Serial number
– Serial number (ESN) of the phone.
Product code
– identifies the product uniquely, the same as the NMP Code.
Order number
– allows the phone to be dedicated to a certain customer
Production serial number
– Used in production to identify the phone
H8 SW version
– Software version of the H8 processor.
Flash SW version
– Software version of flash (or eprom) code
HW version
– identifies the hardware build version
UDSA version
– Version of the UDSA ASIC circut.
DSP mask rom version
– Software version of the DSP–processor.
Page 24

Phone Mode
Choosing Service|Phone mode opens a dialog box, where you can set the
phone mode. The dialog looks like the following:
The following commands can be selected from the dialog:
Normal mode
– Restarts the phone into normal cellular mode. Phone starts scanning for a
control channel and registers into a network if available.
Local mode
SERVICE SOFTWARE
INSTRUCTIONS
9618ARo
Technical Documentation
NHC–4
5–24
Copyright Nokia Mobile Phones
– Restarts the phone into local mode.
Close
– Closes phone mode dialog.
EEPROM Initialize
Choosing Service|EEPROM Initialize opens a submenu from where desired initialization method can be chosen based on the phone‘s RFI. The menu looks
like the following:
Whole EEPROM (RFI, Texas Instruments)
– EEPROM initialization for phones with TI RFI
– RFI type is checked and if the check fails, confirmation box is shown. If this
happens you should cancel and test the next submenu.
Whole EEPROM (RFI, Ams)
– EEPROM initialization for phones with Ams RFI
Page 25

Dealer Menu
This menu contains functions for programming and editing certain information
stored in the phone’s eeprom.
Subscriber (NAM) Number
Choosing Dealer|Subscriber number opens a NAM editing dialog box. Note that
if you want to store modified NAM data back to the phone the NAM password is
checked. The default password is *3001#12345. If the password doesn’t match
the user is asked to type in the password. However, you can read data from the
phone and use the file functions without the correct NAM password.
Here is what the NAM programming dialog box looks like:
SERVICE SOFTWARE
INSTRUCTIONS
9618ARo
Technical Documentation
NHC–4
5–25
Copyright Nokia Mobile Phones
On the upper left corner there is a scroll box, where you can select the NAM
which you want to edit. The per NAM data below it is updated according to the
highlighted NAM. Wakeup message, emergency numbers, lock code and security code are common to all NAM’s.
Here is how you operate with the NAM programming dialog:
– Select from the scroll box which NAM you want to edit
– Select the field you want to change (use hot keys, click the value or tab
throught it).
– Change the value by typing in new value or editing the old value.
– Select the next field you want to change. If you have entered an invalid val-
ue to the previous field you edited, an error message is displayed and you
are not allowed to select a new field until you’ve entered a valid value.
– After you have made all the changes you wanted select the next NAM to be
programmed from the scroll box. You can make the scroll box active directly
by pressing Enter when you are editing the values.
Page 26

SERVICE SOFTWARE
INSTRUCTIONS
9618ARo
Technical Documentation
Copyright Nokia Mobile Phones
NHC–4
5–26
The following NAM data can be edited:
Number
– Mobile Identification Number. Contains a 10–digit directory telephone num-
ber which is used by the network. When you have entered a new number it
will automatically be updated to the scroll box and also to the ’Ascii Num’–
field. If the ’Ascii Num = Net Num’ is checked you cannot change the ’Ascii
Num’–field. If it is not checked you can type in different number into this
field. Normally these fields have the same value. The ’ACCOLC’–field is au-
tomatically set as the last digit of the number.
Ascii Num
– Contains 10 digit telephone number which is showed to the user. Normally
this is the same than ’Number’–field but if it should be different uncheck
’Ascii Num = Net Num’ and type in different value.
Operator
– At this point you can define the system operator’s name (20 characters). If
defined, this name will be shown when the phone is powered up and also
from the ’NAM SELECT’ menu.
Home system ID (SID)
– This number is used to define the primary traffic area of the phone. The
number contains the country code (bits 13–14), system bit information (bit 0)
and the area code (bits 1–12). Default value is 38.
Primary paging channel
– This number is used to define the primary traffic area. Typically 333 for sys-
tem A and 334 for system B.
Secondary paging channel
– This number defines the secondary paging channel set to be searched in
the home traffic area. These channels are used in dual mode, if no digital
channels are found in the primary paging channel set. Typically 708 for sys-
tem A and 737 for system B.
Group Identification Mark (GIM)
– Here you can identify the group of the phone. Default value is 10.
Access Method (EX)
– This is used to define the way of sending the phone identification data
(1=country code in use, 0=no country code in use). Default value is 1.
Local Use Mark (LUM)
– This option is used to determine whether the phone must respond to local
control messages sent from the exchange. Typically 1.
Page 27

SERVICE SOFTWARE
INSTRUCTIONS
9618ARo
Technical Documentation
Copyright Nokia Mobile Phones
NHC–4
5–27
Access Overload Class (ACCOLC)
– This number is used to identify to which Overload Class the phone belongs
to. When the number is typed in this field is automatically set as the last digit
of the number.
Nam enable
– Using this field you can enable/disable NAM (1=enabled, 0=disabled). De-
fault value is 0.
Dedicated Control Channel
– In the following dialog box you can edit Dedicated Control Channel informa-
tion:
Common NAM fields:
Wakeup message
– The wakeup message is displayed when the phone is switched on after dis-
playing own number.
Emergency Numbers
– Altogether 3 different emergency numbers can be defined. Default numbers
are 911 and *911.
Lock code
– Here you can define the 4–digit lock code. Default value is 1234.
Security code
– Here you can define the 5–digit security code. Default value is 12345.
Checkboxes:
Ascii Num = Net Num
– If this option is checked the ’Ascii num’ field cannot be edited. When un-
checked you can change the field.
Autom numbering
– If this is set automatic numbering is in use. It means that every time you wri-
ten NAM data to the phone ’number’ is incremented by one and ACCOLC is
updated as last digit of the number. This is usefull if you have several
phones to program with concecutive numbers. This option has effect on only
NAM 1.
Page 28

SERVICE SOFTWARE
INSTRUCTIONS
9618ARo
Technical Documentation
Copyright Nokia Mobile Phones
NHC–4
5–28
The following actions can be done in the NAM dialog by selecting the corresponding button:
File Load (Alt–L)
– Reads NAM data from a file. You can select the file to be loaded from the
file–selection dialog box. If you try to load a file, that is of incorrect format,
an error message is displayed.
File Save (Alt–S)
– Writes NAM data to a file. You can select the file to be written from the file–
selection dialog box.
Read Phone (Alt–R)
– Reads NAM data from the phone and updates it to the display.
Write Phone (Alt–I)
– Writes NAM data to the phone. Before writing the user must confirm the writ-
ing. If the NAM password is incorrect, an error message is displayed and the
user is asked for the correct password.
ESC–Close
– Closes NAM programming dialog box. Click the button or press the Esc key.
Short Code Memory
Choosing Dealer|Short code memory opens short code memory editing dialog
box. In this box you can view and edit all 100 memory locations of the phone.
You can also store the information to a file and read information from a file. It is
also possible to read short code memory files generated by other product’s
pclocals software. The following pclocals versions support this general file format:
– pclocals tha–6/tha–17/tha–7 v4.9
– subdata thn–6/thn–7/cd60hn v4.9
– pclocals thn–6/thn–7/cd60hn v4.9
– pclocals thx–6/thx–7 v4.9
– pclocals nmc–1
– pclocals tha–4/thn–4/thx–4
– pclocals nhc–1
Page 29

SERVICE SOFTWARE
INSTRUCTIONS
9618ARo
Technical Documentation
Copyright Nokia Mobile Phones
NHC–4
5–29
Here is what the SCM editing dialog box looks like:
To edit a memory location select it from the scroll box with arrow keys or by
clicking with a mouse. When the item is highlighted, press Enter or Spacebar
and an editing dialog box will be opened. Doubleclicking an item will directly
open this editing dialog box. The editing dialog box looks like the following:
In the dialog edit or type in new name and number. You can change the field
with Tab–key or with a mouse. When you are done accept the new values by
pressing Enter or by clicking the corresponding button. Esc cancels the operation.
The following actions can be done in the short code memory dialog by selecting
the corresponding button:
File Load (Alt–L)
– Reads SCM data from a file. You can select the file to be loaded from the
file–selection dialog box.
File Save (Alt–S)
– Writes SCM data to a file. You can select the file to be written from the file–
selection dialog box.
Read Phone (Alt–R)
– Reads SCM data from the phone and updates it to the display.
Write Phone (Alt–W)
– Writes SCM data to the phone. Before writing the user must confirm the writ-
ing.
ESC–Close
– Closes SCM programming dialog box. Click the button or press the Esc key.
Page 30

SID Screening
To edit SID screening list, select Dealer|SID screening. The SID editing dialog
looks like the following:
SERVICE SOFTWARE
INSTRUCTIONS
9618ARo
Technical Documentation
NHC–4
5–30
Copyright Nokia Mobile Phones
For NAM one and two there can be maximum of 30 SID’s in the search table
i.e. a total of 60 SIDs in all. These 30 SIDs are a mixture of friendly and unfriendly–there is not a fixed proportion. If the SID is marked as ’ignore’ it means
as if the field would be empty and the value is not taken into account.
When the phone does a scan, or rescan, it will find a strong channel and if the
SID’s option is enabled it will try and match the SID for this channel with a
friendly SID in its SID table. If it cannot match a friendly SID, it will try and
match a unfriendly SID. The phone does this for the two strongest channels it
can find.
If at the end of this procedure the phone has found a channel with a friendly
SID it will lock on to this channel. If it has not found a friendly SID and has only
found unfriendly SIDs, it will not go into service. If it has not found a friendly SID
and has not found an unfriendly SID for a particular channel, it will ROAM onto
this channel.
To alter the SID tables select the field you want to change by moving around
with Tab–keys or by clicking with mouse. You can jump directly from NAM 1 SID
list to NAM 2 by pressing Enter. When the item you want to edit is highlighted,
type in new SID value or edit the previous one. You can toggle the SID status
with the Spacebar between ’friendly’, ’unfriendly’ and ’ignore’. In the dialog the
following commands are available:
File Load (Alt–L)
– Reads SID screening data from a file. You can select the file to be loaded
from the file–selection dialog box.
File Save (Alt–S)
– Writes SID screening data to a file. You can select the file to be written from
the file–selection dialog box.
Page 31

Read Phone (Alt–R)
– Reads SID screening data from the phone and updates it to the display.
Write Phone (Alt–W)
– Writes SID screening data to the phone. Before writing the user must con-
firm the writing.
ESC–Close
– Closes SID programming dialog box. Click the button or press the Esc key.
Calling Card Numbers
Calling card numbers dialog lets you program card numbers and names for four
calling cards.
SERVICE SOFTWARE
INSTRUCTIONS
9618ARo
Technical Documentation
NHC–4
5–31
Copyright Nokia Mobile Phones
Read Phone (Alt–R)
– Reads system feature codes from the phone and updates it to the display.
Write Phone (Alt–W)
– Writes system feature codes to the phone. Before writing the user must con-
firm the writing.
ESC–Close
– Closes system feature codes programming dialog. Click the button or press
the Esc key.
Page 32

System Feature Codes
If you want to customize system service feature codes, choose Dealer|System
feature codes. The editing dialog looks like the following:
The following actions can be done in the system service feature dialog by selecting the corresponding button:
SERVICE SOFTWARE
INSTRUCTIONS
9618ARo
Technical Documentation
NHC–4
5–32
Copyright Nokia Mobile Phones
File Load (Alt–L)
– Reads feature codes from a file. You can select the file to be loaded from
the file–selection dialog box.
File Save (Alt–S)
– Writes feature codes o a file. You can select the file to be written from the
file–selection dialog box.
Read Phone (Alt–R)
– Reads system feature codes from the phone and updates it to the display.
Write Phone (Alt–W)
– Writes system feature codes to the phone. Before writing the user must con-
firm the writing.
ESC–Close
– Closes system feature codes programming dialog. Click the button or press
the Esc key.
Page 33

A–Key Programming
If you want to program the A–keys used in the authentication, choose Dealer|A–key programming. In the editing dialog you can enter the A–key for all
three nams. Here is what the dialog box looks like:
The following actions can be done in the A–key programming dialog by selecting the corresponding button:
Write Selected (Alt–W)
SERVICE SOFTWARE
INSTRUCTIONS
9618ARo
Technical Documentation
NHC–4
5–33
Copyright Nokia Mobile Phones
– Writes the currently selected A–key to the phone. Before writing the user is
asked for a confirmation.
Write All (Alt–L)
– Writes all 6 A–keys to the phone. Before writing the user must confirm the
writing.
ESC–Exit
– Exits A–key programming. Click the button or press the Esc key.
User Data Transfer
To transfer eeprom data from one phone to another, choose Dealer|User data
transfer. With that function you can select which information you read from a
phone and which is written to another phone. Here is what the user data transfer dialog box looks like:
Page 34

SERVICE SOFTWARE
INSTRUCTIONS
9618ARo
Technical Documentation
Copyright Nokia Mobile Phones
NHC–4
5–34
Select with check boxes which information you want to transfer. The following
items can be transferred:
– Subscriber NAM numbers & Microcell
Transfers all three NAMs and Microcell information.
– Short code memory
All 100 locations are transferred
– Calling card numbers
– System service feature codes
– Private/Residential SID
– SID screening table
– UI settings
– Warranty information
– SMS Data
You can do the following actions with this dialog:
Load File (Alt–L)
– Reads user data from a file. You can select the file to be loaded from the
file–selection dialog box. Note that you can only read the items you have
stored i.e. if you have uncheck e.g. UI settings when you have saved the file
you cannot restore them. You also cannot store warranty information to a
file.
Save File (Alt–S)
– Writes user data to a file. You can select the file to be written from the file–
selection dialog box. Only the items that are checked are stored to the file.
Read Phone (Alt–R)
– Reads user data items that are checked from the phone. If you read the
warranty information you have to transfer it to another phone; you cannot
write it back or re–read it. This is because the warranty information is pur-
posed to be transferred from one phone to another.
Write Phone (Alt–T)
– Writes user data to the phone. Before writing the user must confirm the writ-
ing.
ESC–Close
– Closes user data transfer dialog box. Click the button or press the Esc key.
Page 35

Warranty Information
To view and edit warranty information stored into the phone’s eeprom, choose
Dealer|Warranty information. When selected the following dialog box will be
opened:
The following items can be seen in the dialog:
– Original ESN
This the phone’s actual ESN used in the network.
SERVICE SOFTWARE
INSTRUCTIONS
9618ARo
Technical Documentation
NHC–4
5–35
Copyright Nokia Mobile Phones
– Warranty ESN
This is a copy of the ESN which the customer purchased in the first place. If
this field is 0, it means that no warranty information transfer has been done
to this module.
– Manufacturing month
Here is the date when the module has been manufactured. This field is pro-
grammed in the factory and cannot be changed. The format of the date is
MMYY.
– Repair month
Here is the date when the module has been repaired last time. This field is
updated whenever the module is being repaired. The format of the date is
MMYY.
– Purchase month
This field indicates when the date when the customer has bought the first
phone. This should be programmed when the phone is given to the custom-
er. The format of the date is MMYY. Programming this field will set the ’Only
transfer allowed’–flag.
– Transfer flags
If ’Only transfer allowed’ is checked it is not possible to program purchase
month (it has already been done).
When ’Transfer done’ –flag is set it means that this phone’s warranty in-
formation has already been transferred to another phone (transfer is no
longer possible).
You can do the following actions with warranty information dialog:
Read Phone (Alt–R)
– Reads warranty information from the phone and updates it to the display.
Page 36

Write Phone (Alt–W)
– Writes warranty information to the phone. Before writing the user must con-
firm the writing.
Reset data
– Resets warranty information data. Warranty ESN and purchase month are
set to 0, repair month according to PC’s date and ”Transfer done” –flag is
cleared and ”Only transfer allowed” –flag is set.
ESC–Close
– Closes the warranty information dialog box. Click the button or press the
Esc key.
Set Factory Values
To set eeprom factory values select Dealer|Set factory values. When selected
the following dialog box will be opened:
SERVICE SOFTWARE
INSTRUCTIONS
9618ARo
Technical Documentation
NHC–4
5–36
Copyright Nokia Mobile Phones
You can select with check boxes which items you want to factory reset. The following items can be selected:
– Subscriber NAM numbers & Microcell
Resets all six NAMs and microcell information.
– Short code memory
All 100 locations are cleared
– Calling card numbers
– System service feature codes
– Private/Residential SID
– SID screening table
– UI settings
– Call counters
– SMS data
Page 37

You can do the following actions when the dialog box is open:
Reset data
– This command will reset the selected items from the phone. The user is
asked for a confirmation before resetting.
ESC–Close
– Closes factory settings dialog box. Click the button or press the Esc key.
Microcell Programming
Microcell is a small cell operating on user specified control channels, parallel to
normal AMPS–network control channels. The transmit power of the microcell
base station is quite weak, so it can operate only in small area for example inside a building.
If the microcell feature is activated the phone first scans the channels dedicated
for the microcell and tries to lock onto those. If it fails the phone returns to normal AMPS control channels. The basic idea is to keep phone on microcell
channels when it is inside the building, outside the building it shall use normal
AMPS channels.
SERVICE SOFTWARE
INSTRUCTIONS
9618ARo
Technical Documentation
NHC–4
5–37
Copyright Nokia Mobile Phones
For more information about this feature please contact Nokia product marketing. They will provide the password needed to activate this feature.
When the feature is activated the following dialog box will be opened:
In the dialog you can define microcell channels for all three NAMs. For each
NAM you can define the channel range (starting channel and ending channel)
to be scanned for microcell control channels. Note, that the channel range depends on the system type A/B (shown on the right hand side of the channels).
NAM (system) types are updated when microcell information is read from the
phone. In this dialog you can do the following actions:
File Load (Alt–L)
– Reads microcell data from a file. You can select the file to be loaded from
the file–selection dialog box.
Figure 1.
Page 38

SERVICE SOFTWARE
INSTRUCTIONS
9618ARo
Technical Documentation
Copyright Nokia Mobile Phones
NHC–4
5–38
File Save (Alt–S)
– Writes microcell data to a file. You can select the file to be written from the
file–selection dialog box.
Read Phone (Alt–R)
– Reads microcell data from the phone and updates it to the display. NAM
type information is also read from NAM parameters and updated on the
screen.
Write Phone (Alt–W)
– Writes microcell data to the phone. Before writing the user must confirm the
writing.
Reset
– Resets microcell data i.e. clears the channel information. This action has no
effect on NAM type. This feature can be usefull if you have a bunch of
phones which have been using microcell and are wanted to be taken into
normal use.
ESC–Close
– Closes the microcell dialog box. Click the button or press the Esc key.
Product Profile Programming
To Edit Product Profile, select Dealer|Product Profile. The Product Profile programming dialog looks like the following:
This dialog allows you to edit certain dynamically configurable features in the
phone.
To alter Product Profile features select the field you want to change by moving
around with cursor keys or clicking with mouse. Press Enter or double–click an
item and you will be prompted with small dialog box holding possible selections.
Choose your selection with mouse, or choose selection with cursor keys and
press Enter.
If the feature has a number in the link filed, it means that this ‘master‘ feature
has to be enabled in order to change the current field.
Page 39

SERVICE SOFTWARE
INSTRUCTIONS
9618ARo
Technical Documentation
Copyright Nokia Mobile Phones
NHC–4
5–39
The following actions can be done in the Product Profile programming dialog be
selecting the corresponding button:
Open Profile (Alt–O)
– Reads Product Profile data from a file. You can select the file to be loaded
from the file–selection dialog box.
Save Profile (Alt–S)
– Writes Product Profile data to a file. You can select the file to be written from
the file–selection dialog box.
Write Profile (Alt–W)
– Writes Product Profile data to the phone.
Read Phone (Alt–R)
– Reads Product Profile data from the phone.
(ESC)
– Closes Product Profile programming dialog.
PRSID Programming
Choosing Dealer|PRSID Programming opens Private/Residential SID programming dialog. In this dialog you can edit information abut non–public systems (either private or residential) that phone can be connected to.
The PRSID Programming dialog looks like the following:
On the upper left corner there is a scroll box, where you can select the PRSID
you want to edit. The PRSID data below is updated according to the selected
PRSID.
The following PRSID data can be edited:
Private/Residential
– Whether the PRSID in question is Private or Residential.
Name
– Alpha Tag associated with the current PSID/RSID.
Page 40

SERVICE SOFTWARE
INSTRUCTIONS
9618ARo
Technical Documentation
Copyright Nokia Mobile Phones
NHC–4
5–40
P/R System ID
– Below PRSID inputline you can find textual explanation about current PSID/
RSID
System ID
– Numeric value of Home System ID.
Sytem Operator Code
– This number identifies which operator is providing service
Mobile Country Code
– Mobile Country Code of current DCCH.
The following actions can be done in the Product Profile programming dialog by
selecting the corresponding button:
Read Phone (Alt–R)
– Reads PRSID data from the phone.
Write Phone (Alt–W)
– Writes PRSID data to the phone.
File Load (Alt–L)
– Reads PRSID data from a file. You can select the file to be loaded from the
file–selection dialog box.
File Save (Alt–S)
– Writes PRSID data to a file. You can select the file to be written from the
file–selection dialog box.
ESC–Close (ESC)
– Closes PRSID programming dialog.
Page 41

Options Menu
This menu enables you to set certain parameters used by the service software.
General
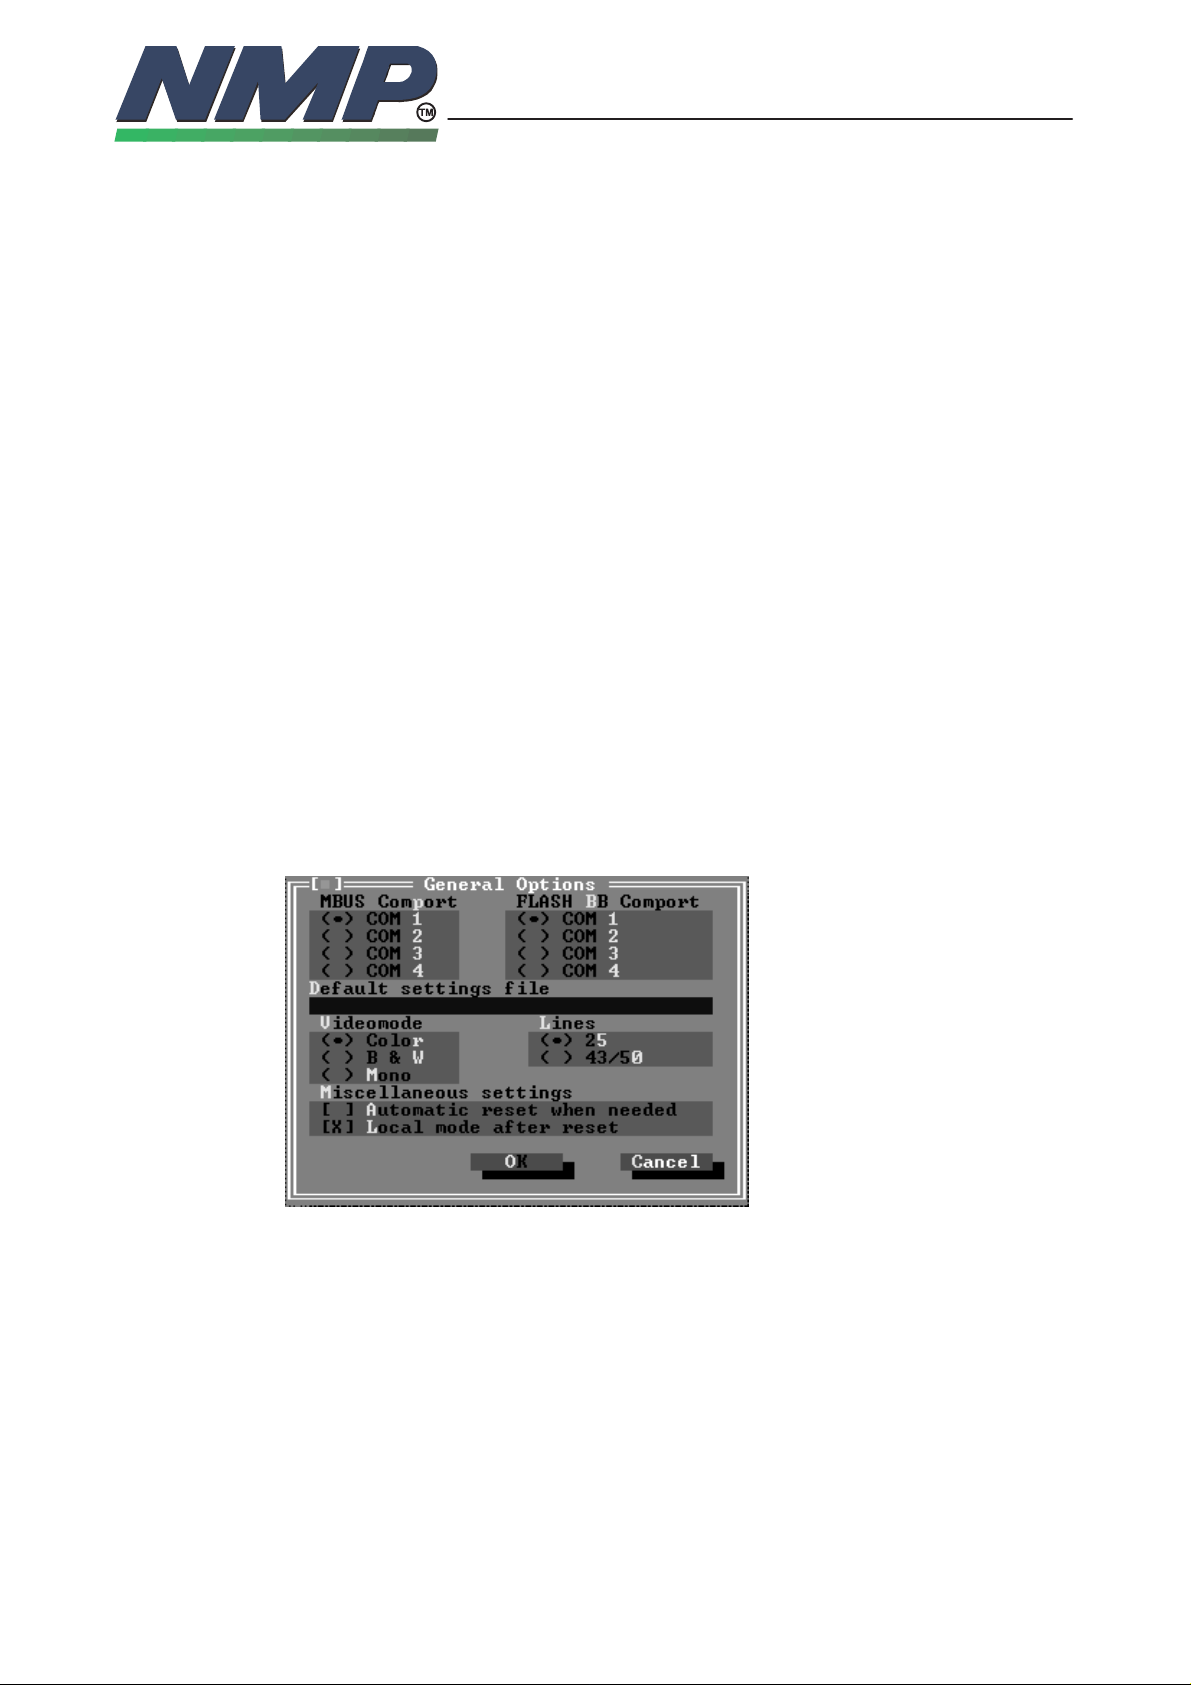
To change system options choose Options|General. When selected, the following dialog box will be opened:
SERVICE SOFTWARE
INSTRUCTIONS
9618ARo
Technical Documentation
NHC–4
5–41
Copyright Nokia Mobile Phones
From the Options dialog box you can set the following parameters:
– MBUS comport
Select to which comport the MBUS adapter is connected.
– Default settings file
Here you can define, which settings file is loaded when the program is first
started. Default values are used, if this field is empty. For more information
see File|Open and File|Edit.
– Videomode
You can change the used videomode with this option. The selections are
Color, Black and white (B&W) or Monochrome (mono) display.
– Lines
Select how many lines there are on the display. Note that monochrome di-
plays cannot show 43/50 lines.
– Miscellaneous settings
Here you can select whether the phone is automatically restarted and set to
local mode after certain actions.
Press OK to accept the new options or ESC to cancel changes.
Page 42

Help Menu
The Help menu gives you access to online help in special window.
General Help
Choose Help|General help to get general help information about the service
PClocals
Using Help
Choose Help|Using help to get information how to use help facilites.
Product Information
Choosing Help|Product information gives you information about the software
version, copyright, and available free memory. Here is what the product information dialog looks like:
SERVICE SOFTWARE
INSTRUCTIONS
9618ARo
Technical Documentation
NHC–4
5–42
Copyright Nokia Mobile Phones
Press Enter or click OK to put the dialog away.
Page 43

SERVICE SOFTWARE
INSTRUCTIONS
9618ARo
Technical Documentation
Appendix I
Installing Service Software on PC Hard Disk
The program is delivered on a diskette and is protected with a protection key
PKD–1, which must be attached to the parallel port when the Service software
is being used.
The program can also be installed on the hard disk, which is recommendable to
obtain maximum data access rate.
Do not lose your original diskette. It will be needed when upgrading the program !
If you are planning to use PCL–Start service software, you must install it before
installing the Service software. See PCL–Start installation instructions.
To install the Service software, proceed as follows:
NHC–4
5–43
Copyright Nokia Mobile Phones
1. insert the new Service software diskette
into drive A: of your PC
2. log into drive A:
3. start INSTALL.EXE and
install Service sotware into
type A: and press <Enter>
type INSTALL C:
and press <Enter>
drive C:
This service manual describes the Technophone NHC–4NX handportable Telephone for the North American Dual Mode TDMA system. The manual comprises technical descriptions together with service instructions.
This service manual describes the AT&T NHC–4NX handportable Telephone
for the North American Dual Mode TDMA system. The manual comprises technical descriptions together with service instructions.
Page 44

SERVICE SOFTWARE
INSTRUCTIONS
9618ARo
Technical Documentation
NHC–4
5–44
Copyright Nokia Mobile Phones
This page intentionally left blank.
 Loading...