


NEC P525WL, P525UL User Manual
Projector
P525UL/P525WL
User’s Manual
Please visit our web site for User’s Manual in the latest version. https://www.nec-display.com/dl/en/pj_manual/lineup.html
Model No.
NP-P525UL/NP-P525WL

Table of Contents
Introduction .............................................................................................................................................. |
iii |
Important Information ........................................................................................................................ |
iv |
1. Check the product overview, supplied items and part names ..................................... |
1 |
1-1. Introduction to the Projector ............................................................................................................ |
1 |
1-2. What’s in the Box? .................................................................................................................................. |
4 |
1-3. Part Names of the Projector ............................................................................................................... |
5 |
1-4. Part Names of the Remote Control .............................................................................................. |
10 |
2. Projecting an Image (Basic Operation) .................................................................................. |
15 |
2-1. Flow of Projecting an Image ........................................................................................................... |
15 |
2-2. Connecting Your Computer/Connecting the Power Cord ................................................... |
16 |
2-3. Turning on the Projector .................................................................................................................. |
18 |
2-4. Selecting a Source .............................................................................................................................. |
20 |
2-5. Adjusting the Picture Size and Position ...................................................................................... |
22 |
2-6. Correcting Keystone Distortion [KEYSTONE] ............................................................................ |
28 |
2-7. Optimizing Computer Signal Automatically ............................................................................. |
30 |
2-8. Turning Up or Down Volume .......................................................................................................... |
30 |
2-9. Turning off the Projector .................................................................................................................. |
31 |
2-10. When Moving the Projector ......................................................................................................... |
32 |
3. Convenient Features ....................................................................................................................... |
33 |
3-1. Turning off the Image and Sound ................................................................................................. |
33 |
3-2. Freezing a Picture ............................................................................................................................... |
33 |
3-3. Magnifying a Picture .......................................................................................................................... |
34 |
3-4. Changing Eco Mode/Checking Energy-Saving Effect .......................................................... |
35 |
3-5. Using 4-Point Corner to Correct Keystone Distortion [CORNERSTONE] ......................... |
37 |
3-6. Preventing the Unauthorized Use of the Projector [SECURITY] ........................................ |
41 |
3-7. Displaying Two Pictures at the Same Time ................................................................................ |
44 |
4. Using On-Screen Menu .................................................................................................................... |
47 |
4-1. Using the Menus ................................................................................................................................. |
47 |
4-2. List of Menu Items .............................................................................................................................. |
49 |
4-3. Menu Descriptions & Functions [INPUT] .................................................................................... |
53 |
4-4. Menu Descriptions & Functions [ADJUST] ................................................................................ |
54 |
4-5. Menu Descriptions & Functions [SETUP] .................................................................................... |
62 |
4-6. Menu Descriptions & Functions [INFO.] ...................................................................................... |
78 |
4-7. Menu Descriptions & Functions [RESET] .................................................................................... |
80 |
i
|
Table of Contents |
|
|
5. Making Connections ........................................................................................................................ |
81 |
5-1. Connecting Your Computer ............................................................................................................ |
81 |
5-2. Connecting to a DVD player and other AV devices ................................................................ |
84 |
5-3. Connecting to a Wired LAN ............................................................................................................. |
86 |
5-4. Connecting to a Wireless LAN (Optional: NP05LM series) ................................................... |
87 |
5-5. Connecting to a HDBaseT transmission device (sold commercially) ............................... |
90 |
5-6. Portrait projection (vertical orientation) .................................................................................... |
92 |
6. Using the VIEWER .............................................................................................................................. |
95 |
6-1. Things you can do with the VIEWER ............................................................................................. |
95 |
6-2. Projecting the pictures on a USB memory (basic operation) ............................................. |
96 |
6-3. Slide screen operations .................................................................................................................. |
100 |
6-4. File list screen operations .............................................................................................................. |
101 |
6-5. Option menu ...................................................................................................................................... |
103 |
6-6. Changing the logo data (background image) ........................................................................ |
104 |
7. Connecting to a Network ........................................................................................................... |
106 |
7-1. Things you can do by connecting the projector to a network ......................................... |
106 |
7-2. Connecting to MultiPresenter ...................................................................................................... |
107 |
7-3. NETWORK SETTINGS ....................................................................................................................... |
109 |
7-4. HTTP server function ....................................................................................................................... |
115 |
8. Maintenance ..................................................................................................................................... |
119 |
8-1. Cleaning the Lens ............................................................................................................................. |
119 |
8-2. Cleaning the Cabinet ....................................................................................................................... |
120 |
9. Appendix ............................................................................................................................................ |
121 |
9-1. Setting Up the Screen and the Projector ................................................................................. |
121 |
9-2. Compatible Input Signal List ........................................................................................................ |
125 |
9-3. Specifications ..................................................................................................................................... |
127 |
9-4. Cabinet Dimensions ........................................................................................................................ |
130 |
9-5. Pin assignments and signal names of main terminals ........................................................ |
131 |
9-6. PC Control Codes and Cable Connection ................................................................................ |
133 |
9-7. About the ASCII Control Command ........................................................................................... |
135 |
9-8. Troubleshooting ................................................................................................................................ |
137 |
9-9. Indicator Message ............................................................................................................................ |
140 |
9-10. Setting the date and time in the projector ........................................................................... |
144 |
9-11. Troubleshooting Check List ........................................................................................................ |
146 |
9-12. REGISTER YOUR PROJECTOR! (for residents in the United States, Canada, and |
|
Mexico) .................................................................................................................................................... |
148 |
ii

Introduction
Thank you for purchasing the NEC projector.
This projector can be connected to computers, video devices, etc. to project images sharply onto a screen.
Please read this manual carefully before using your projector and keep the manual handy for future reference.
Read this user’s manual if you have any doubts about operation or if you believe the projector may be faulty.
NOTES
(1)The contents of this user’s manual may not be reprinted in part or whole without permission.
(2)The contents of this user’s manual are subject to change without notice.
(3)Great care has been taken in the preparation of this user’s manual; however, should you notice any questionable points, errors or omissions, please contact us.
(4)Notwithstanding article (3), NEC will not be responsible for any claims on loss of profit or other matters deemed to result from using the Projector.
Ver. 2 12/18
iii

Important Information
About the symbols
To ensure safe and proper use of the product, this manual uses a number of symbols to prevent injury to you and others as well as damage to property.
The symbols and their meanings are described below. Be sure to understand them thoroughly before reading this manual.
WARNING |
Failing to heed this symbol and handling the product erroneously |
could result in accidents leading to death or major injury. |
|
CAUTION |
Failing to heed this symbol and handling the product erroneously |
could result in personal injury or damage to surrounding property. |
Examples of symbols
This symbol indicates you should be careful of electric shocks.
This symbol indicates you should be careful of high temperatures.
This symbol indicates something that must be prohibited.
This symbol indicates something that must not be got wet.
This symbol indicates you should not touch with wet hands.
This symbol indicates something that must not be disassembled.
This symbol indicates things you must do.
This symbol indicates that the power cord should be unplugged from the power outlet.
iv
Important Information
Safety Cautions
 WARNING
BE SURE TO DO
PROHIBITION
HAZARDOUS
VOLTAGE
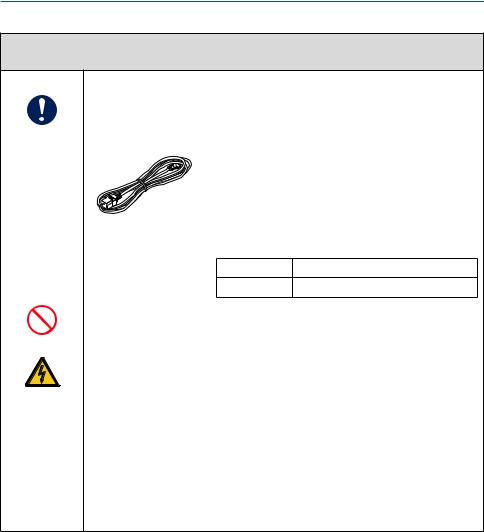
Handling the power cord
•Please use the power cord supplied with this projector. If the supplied power cord does not satisfy requirements of your country’s safety standard, and
voltage and current for your region, make sure to use the power cord that conforms to and satisfies them.
• The power cord you use must be approved by and
comply with the safety standards of your country.
Please refer to the page 128 about the power cord
specification.
Rated voltage by country is listed below for your reference. For selecting an appropriate power cord, please check rated voltage for your region by yourself.
AC 230 V European countries
AC 120 V North America
•The power cord included with this projector is exclusively for use with this projector. For safety, do not use it with other devices.
•Handle the power cord with care. Damaging the cord could lead to fire or electric shock.
-Do not place heavy objects on the cord.
-Do not place the cord under the projector.
-Do not cover the cord with a rug, etc.
-Do not scratch or modify the cord.
-Do not bend, twist or pull the cord with excessive force.
-Do not apply heat to the cord.
Should the cord be damaged (exposed core wires, broken wires, etc.), ask your dealer to replace it.
•Do not touch the power plug should you hear thunder. Doing so could result in electric shock.
v
Important Information
Installing the Projector
•This projector is designed to be used with a 100–240 V AC, 50/60 Hz power supply. Before using the projector, check that the power supply to which the
BE SURE TO DO |
projector is to be connected meets these requirements. |
|
• Use a power outlet as the projector’s power supply. Do not connect the |
||
|
||
|
projector directly to electrical light wiring. Doing so is dangerous. |
|
|
• Do not use in places such as those described below. Doing so could lead to |
|
|
fire or electric shock. |
|
PROHIBITION |
- Shaky tables, inclined surfaces or other unstable places |
|
- Near heating appliances or places with heavy vibrations |
||
|
||
|
- Outdoors or humid or dusty places |
|
|
- Places exposed to soot or steam |
|
|
- Near cooking appliances, humidifiers, etc. |
|
|
• Do not use in places such as those described below where the projector could |
|
|
get wet. Doing so could lead to fire or electric shock. |
|
DO NOT WET |
- Do not use in the rain or snow, on a seashore or waterfront, etc. |
|
- Do not use in a bathroom or shower room. |
||
|
||
|
- Do not place vases or potted plants on the projector. |
|
|
- Do not place cups, cosmetics or medicines on the projector. |
|
|
Should water, etc. get inside the projector, first turn off the projector’s power, |
|
|
then unplug the power cord from the power outlet and contact your dealer. |
|
|
• Do not insert or drop metal or combustible objects or other foreign materials |
|
|
into the projector from the vents. Doing so could lead to fire or electric shock. |
|
UNPLUG THE |
Be particularly careful if there are children in the home. Should a foreign object |
|
get inside the projector, first turn off the projector’s power, then unplug the |
||
POWER CORD |
||
power cord from the power outlet and contact your dealer. |
||
|
Unplug the power cord if the projector malfunctions.
|
• Should the projector emit smoke or strange odors or sounds, or if the projector |
|
|
has been dropped or the cabinet broken, turn off the projector’s power, then |
|
UNPLUG THE |
unplug the power cord from the power outlet. Failure to do so could not only |
|
lead to fire or electric shock, it could also result in vision impairment. Contact |
||
POWER CORD |
||
your dealer for repairs. |
||
|
||
|
Never try to repair the projector on your own. Doing so is dangerous. |
|
|
|
Do not disassemble the projector. |
|
|
|
|
• Do not remove or open the projector’s cabinet. |
|
|
|
|
Also, do not modify the projector.There are high voltage areas in the projector. |
|
DO NOT |
Modifying the projector could lead to fire, electric shock or leakage of laser |
|||
beams. |
||||
DISASSEMBLE |
||||
Have qualified service personnel perform inspection, adjustments and repairs |
||||
|
|
|
||
|
|
|
of the interior. |
|
vi
Important Information
|
Installing suspended from the ceiling |
|
|
• Should special works be required, for example to suspend the projector from |
|
|
the ceiling, consult your dealer. |
|
CAUTION |
Never try to install the projector yourself in such cases. The projector could |
|
drop and cause injury. |
||
|
||
|
Suspending the projector from the ceiling requires sufficient ceiling strength |
|
|
to support the projector, and the building standards laws in your particular |
|
|
country must be followed. |
|
|
It is also necessary to take measures to prevent the projector from dropping |
|
|
in anticipation of a malfunction occurring in the projector, ceiling mounting |
|
|
device and installation location. |
•When installed suspended from the ceiling, etc. do not hang from the projector. The projector could drop and cause injury.
•When installing suspended from the ceiling, use a power outlet that is within reach so the power cord can be easily plugged and unplugged.
|
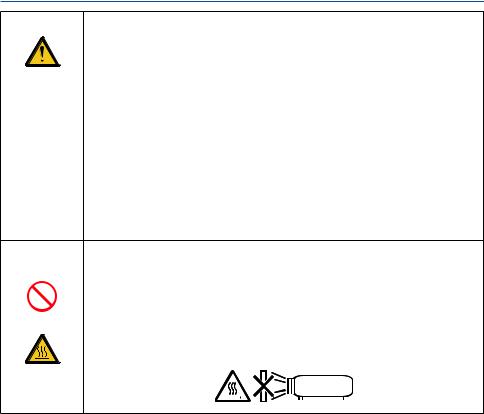
Do not place objects in front of the lens while the projector is |
|||
|
operating. |
|||
|
• Do not leave the lens cap on the lens while the projector is operating. The |
|||
|
|
lens cap could get hot and be warped. |
||
PROHIBITION |
• |
Do not place objects in front of the lens that obstruct the light while the |
||
|
projector is operating. The object could get hot and be broken or catch fire. |
|||
|
|
|||
|
• |
The below pictogram indicated on the cabinet means the precaution for |
||
|
|
avoiding to place objects in front of the projector lens. |
||
CAUTION |
|
|
|
|
FOR HIGH |
|
|
|
|
TEMPERATURE |
|
|
|
|
|
|
|
|
|
vii
Important Information
About the projector’s light source
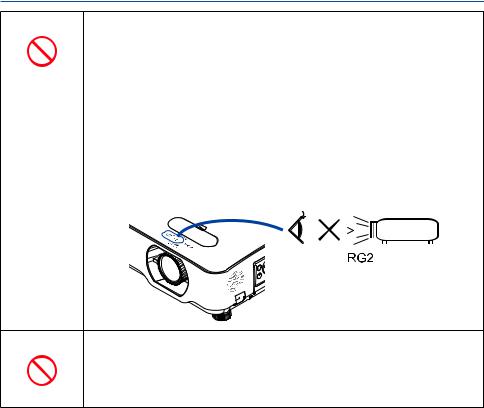
•Do not look into the projector’s lens.
Strong light that could damage your eyes is projected when the projector is
PROHIBITION |
operating. Be especially careful when children are around. |
|||||||||
• Do not look at the projected light using optical devices (magnifying glasses, |
||||||||||
|
||||||||||
|
reflectors, etc.). Doing so could result in vision impairment. |
|||||||||
|
• Check that there is no one looking at the lens within the projection range |
|||||||||
|
before turning on the projector. |
|||||||||
|
• Do not allow children to operate the projector alone.When a child is operating |
|||||||||
|
the projector an adult should always be present and watch the child carefully. |
|||||||||
|
• The below pictogram, that is indicated near the lens on the cabinet, describes |
|||||||||
|
this projector is categorized in the risk group 2 of IEC 62471-5:2015. As with |
|||||||||
|
any bright light source, do not stare into the beam, RG2 IEC 62471-5:2015. |
|||||||||
|
|
|
|
|
|
|
|
|
|
|
|
|
|
|
|
|
|
|
|
|
|
|
|
|
|
|
|
|
|
|
|
|
When cleaning the projector
•Do not use flammable gas sprays to remove dust from the lens, cabinet, etc. Doing so could lead to fire.
PROHIBITION
viii
Important Information
 CAUTION
Connecting the power cord to earth
•This equipment is designed to be used in the condition of the power cord connected to earth. If the power cord is not connected to the earth, it may
BE SURE TO DO |
cause electric shock. Please make sure the power cord is earthed properly. |
|
Do not use a 2-core plug converter adapter. |
||
|
Handling the power cord
•When connecting the power cord to the projector’s AC IN terminal, make sure the connector is fully and firmly inserted. Loose connection of the power cord
BE SURE TO DO |
could lead to fire or electric shock. |
|
|
||
|
• Do not connect or disconnect the power cord with wet hands. Doing so could |
|
|
result in electric shock. |
|
DO NOT TOUCH |
|
|
WITH WET |
|
|
HANDS |
|
|
|
• When cleaning the projector, for safety purposes unplug the power cord from |
|
|
the power outlet beforehand. |
|
UNPLUG THE |
• When moving the projector, first be sure to turn off the power, unplug the |
|
power cord from the power outlet and check that all connection cables con- |
||
POWER CORD |
||
necting the projector to other devices have been disconnected. |
||
|
•When planning not to use the projector for long periods of time, always unplug the power cord from the power outlet.
|
Do not use on networks subject to overvoltage. |
|
|
• Connect the projector’s Ethernet/HDBaseT port and LAN port to a network |
|
|
for which there is no risk of overvoltage being applied. |
|
PROHIBITION |
Overvoltage applied to the Ethernet/HDBaseT or LAN port could result in |
|
electric shock. |
||
|
||
|
|
|
|
Lens shift, focus and zoom operations |
|
|
• When shifting the lens or adjusting the focus or zoom, do so from either |
|
|
behind or to the side of the projector. If these operations are performed from |
|
BE SURE TO DO |
the front, your eyes could be exposed to strong light and get injured. |
|
• Keep your hands away from the lens area when performing the lens shift op- |
||
|
||
|
eration. If not, your fingers could get caught in the gap between the cabinet |
|
|
and the lens. |
ix
Important Information
|
Handling batteries |
|
|
• Handle batteries with caution. Failure to do so could lead to fire, injury or |
|
|
contamination of the surroundings. |
|
PROHIBITION |
- Do not short-circuit or take apart batteries or dispose of them in flames. |
|
- Do not use batteries other than those specified. |
||
|
||
|
- Do not use new batteries together with old ones. |
|
|
- When inserting batteries, pay attention to the polarities (+ and − directions), |
|
|
and be sure to insert them as indicated. |
|
|
• Contact your dealer or local authorities when disposing of batteries. |
About the vents
•Do not obstruct the projector’s vents. Also, do not place such soft objects as paper or cloths underneath the projector. Doing so could lead to fire.
PROHIBITION |
Leave sufficient space between the place where the projector is installed and |
|
its surroundings (as a general rule, at least 10 cm/4 inches for the intake vent, |
||
|
||
|
20 cm/8 inches for the exhaust vent). |
|
• |
Do not touch the exhaust vent area while projecting or immediately after |
|
CAUTION |
projecting images. The exhaust vent area may be hot at this time and touch- |
|
FOR HIGH |
ing it could cause burns. |
|
TEMPERATURE |
|
Moving the projector
•When moving the projector, do not hold the lens section. The focus ring could turn, causing the projector to drop and resulting in injury. Also, if you
PROHIBITION |
put your hand on the gap between the cabinet and the lens, the projector |
|
may be damaged, falling and causing injury. |
||
|
Inspecting the projector and cleaning the inside
•Consult with your dealer about once per year for cleaning of the inside of the projector. Dust could accumulate inside of the projector if it is not cleaned
BE SURE TO DO |
for extended periods of time, leading to fires or malfunction. |
|
x
Important Information
Laser Safety Caution
 WARNING
CLASS 2 OF IEC 60825-1 SECOND EDITION LASER PRODUCT
•LASER RADIATION - DO NOT STARE INTO BEAM.
•Use of controls or adjustments or performance of procedures other than those specified herein may result in hazardous radiation exposure.
•For USA
This product is classified as Class 2 of IEC 60825-1 Second edition 2007-03.
Complies with FDA performance standards for laser products except for deviations pursuant to Laser Notice No. 50, dated June 24, 2007.
For other regions
This product is classified as Class 1 of IEC 60825-1 Third edition 2014-05 and RG2 of IEC 62471-5 First edition 2015-06.
Obey the laws and regulations of your country in relation to the installation and management of the device.
•Outline of laser emitted from the built-in light module:
•Wave length: 449–461 nm
•Maximum power: 95 W
•Radiation pattern from the protective housing:
•Wave length: 449–461 nm
•Maximum laser radiation output: 66.6 mW
•The laser module is equipped in this product. Use of controls or adjustments of procedures other than those specified herein may result in hazardous radiation exposure.
Light Module
•A light module containing multiple laser diodes is equipped in the product as the light source.
•These laser diodes are sealed in the light module. No maintenance or service is required for the performance of the light module.
•End user is not allowed to replace the light module.
•Contact qualified distributor for light module replacement and further information.
xi

Important Information
•The caution and the explanatory labels of the LASER PRODUCT in CLASS 2 conforming to IEC 60825-1 Second edition, and in Class 1 conforming to IEC 60825-1 Third edition are stuck on the below indicated positions.
For USA
Label
For other regions
xii
Important Information
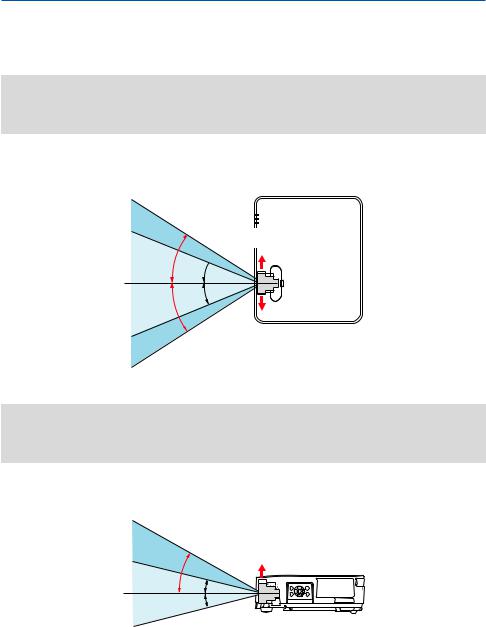
Laser light radiation range
The figure below shows the maximum radiation range of the laser light.
Horizontal angle (unit: degree)
|
|
Lens position |
|
|
|
|
|
Zoom |
Right most |
Center (Reference value) |
Left most |
|
|
|
|
|
HR |
HC |
HL |
|
|
|
|
Wide |
33.0 |
22.3 |
33.0 |
|
|
|
|
Tele |
21.8 |
14.2 |
21.8 |
|
|
|
|
Right
HR
HC 
HC
HL
|
|
|
Left |
|
Vertical angle (unit: degree) |
|
|
|
|
|
|
|
|
|
|
|
|
Lens position |
|
|
|
|
|
|
Zoom |
|
Upper most |
|
Center (Reference value) |
|
|
|
|
|
|
|
VU |
|
VC |
|
|
|
|
|
Wide |
|
29.5 |
|
14.4 |
|
|
|
|
|
Tele |
|
19.2 |
|
9.0 |
|
|
|
|
|
Upper
VU
VC |
VC |
xiii

Important Information
Cable information
Use shielded cables or cables attached ferrite cores so as not to interfere with radio and television reception.
For details, please refer to “5. Making Connections” in this user’s manual.
FCC Information (for USA only)
 WARNING
•The Federal Communications Commission does not allow any modifications or changes to the unit EXCEPT those specified by NEC Display Solutions of America, Inc. in this manual. Failure to comply with this government regulation could void your right to operate this equipment.
•This equipment has been tested and found to comply with the limits for a Class B digital device, pursuant to Part 15 of the FCC Rules. These limits are designed to provide reasonable protection against harmful interference in a residential installation. This equipment generates, uses, and can radiate radio frequency energy and, if not installed and used in accordance with the instructions, may cause harmful interference to radio communications. However, there is no guarantee that interference will not occur in a particular installation.
If this equipment does cause harmful interference to radio or television reception, which can be determined by turning the equipment off and on, the user is encouraged to try to correct the interference by one or more of the following measures:
•Reorient or relocate the receiving antenna.
•Increase the separation between the equipment and receiver.
•Connect the equipment into an outlet on a circuit different from that to which the receiver is connected.
•Consult the dealer or an experienced radio / TV technician for help.
Supplier’s declaration of conformity (for USA only)
This device complies with Part 15 of FCC Rules. Operation is subject to the following two conditions.
(1) This device may not cause harmful interference, and (2) this device must accept any interference received, including interference that may cause undesired operation.
U.S.Responsible Party: |
NEC Display Solutions of America, Inc. |
Address: |
3250 Lacey Rd, Ste 500 |
|
Downers Grove, IL 60515 |
Telephone Number: |
630-467-3000 |
Type of Product: |
Projector |
Equipment Classification: |
Class B Peripheral |
Model Number: |
NP-P525UL/NP-P525WL |
xiv
Important Information
Disposing of your used product
In the European Union
EU-wide legislation as implemented in each Member State requires that used electrical and electronic products carrying the mark (left) must be disposed of separately from normal household waste. This includes projectors and their electrical accessories. When you dispose of such products, please follow the guidance of your local authority and/or
ask the shop where you purchased the product.
After collecting the used products, they are reused and recycled in a proper way. This effort will help us reduce the wastes as well as the negative impact to the human health and the environment at the minimum level.
The mark on the electrical and electronic products only applies to the current European Union Member States.
Outside the European Union
If you wish to dispose of used electrical and electronic products outside the European union, please contact your local authority and ask for the correct method of disposal.
For EU: The crossed-out wheeled bin implies that used batteries should not be put to the general household waste! There is a separate collection system for used batteries,
to allow proper treatment and recycling in accordance with legislation.
According the EU directive 2006/66/EC, the battery can’t be disposed improperly.The battery shall be separated to collect by local service.
(for Germany only)
Machine Noise Information Regulation - 3. GPSGV,
The highest sound pressure level is less than 70 dB (A) in accordance with EN ISO 7779.
Information of the AUDIO OUT mini jack
The AUDIO OUT mini jack does not support earphone/headphone terminal.
xv

Important Information
Cautions for ensuring the projector’s performance
•Do not install in places subject to vibrations or shocks.
If installed in places where the vibrations from power sources and the like are conveyed, or in vehicles or on vessels, etc. the projector could be affected by vibrations or shocks that may damage internal parts and lead to malfunction.
Install in a place not subject to vibrations or shocks.
•Do not install near high voltage power lines or power sources.
The projector may be affected by interference if it is installed near a high voltage power line or a power source.
•Do not install or store in such places as those described below. Doing so could lead to malfunction.
-Places where strong magnetic fields are generated
-Places where corrosive gases are generated
•If intense light like laser beams enters from the lens, it could lead to malfunction.
•Consult your dealer before using in places where much cigarette smoke or dust is present.
•When the same still image is projected for a long period of time with a computer, etc. the pattern of the image may remain on the screen after the projection is stopped, but it will disappear after a while. This happens due to the properties of liquid crystal panels, and is not a malfunction. We recommend using a screensaver on the computer side.
•When using the projector at altitudes of about 1,700 m/5,500 feet or higher, be sure to set the [FAN MODE] to [HIGH ALTITUDE]. If not, the inside of the projector may get hot, leading to malfunction.
•When the projector is used at high altitudes (places where the atmospheric pressure is low), it may be necessary to replace the optical parts (light source, etc.) sooner than usual.
•About moving the projector
-Be sure to mount the included lens cap to protect the lens from scratches.
-Do not subject the projector to vibrations or strong shocks.
The projector could be damaged otherwise.
•Do not use the tilt feet for purposes other than adjusting the projector’s tilt.
Improper handling, such as carrying the projector by the tilt feet or using it leaned against a wall, could lead to malfunction.
•Do not touch the surface of the projection lens with bare hands.
Fingerprints or dirt on the surface of the projection lens will be enlarged and projected on the screen. Do not touch the surface of the projection lens.
•Do not unplug the power cord from the projector or the power outlet while projecting. Doing so could cause deterioration of the projector’s AC IN terminal or power plug contact. To interrupt the AC power supply while images are being projected, use a power strip switch, a breaker, etc.
•About handling of the remote control
-The remote control will not work if the projector’s remote signal sensor or the remote control’s signal transmitter is exposed to strong light or if there are obstacles between them that obstruct the signals.
-Operate the remote control from within 7 meters from the projector, pointing it at the projector’s remote signal sensor.
-Do not drop the remote control or handle it improperly.
-Do not let water or other liquids get on the remote control. Should the remote control get wet, wipe it off immediately.
-Avoid using in hot and humid places as far as possible.
-When planning not to use the remote control for long periods of time, remove both batteries.
xvi
Important Information
•Take measures to prevent external light from shining on the screen.
Make sure only the light from the projector shines on the screen. The less external light on the screen, the higher the contrast and the more beautiful the images.
•About screens
Images will not be clear if there is dirt, scratches, discoloration, etc. on your screen. Handle the screen with care, protecting it from volatile substances, scratches and dirt.
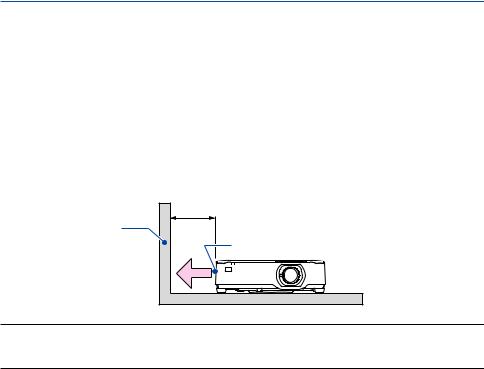
Clearance for Installing the Projector
When installing the projector, keep sufficient space around it, as described below. If not, the hot exhaust emitted from the projector may be taken back in.
Also, make sure no wind from an air-conditioner hits the projector.
The projector’s heat control system may detect an abnormality (temperature error) and automatically shut off the power.
20 cm/8" or greater
Wall
Exhaust vent
NOTE:
•In the above figure, it is assumed that there is sufficient space above the projector. There is also an intake vent on the back. Leave enough space behind to install the cables.
xvii

Important Information
About Copyright of original projected pictures:
Please note that using this projector for the purpose of commercial gain or the attraction of public attention in a venue such as a coffee shop or hotel and employing compression or expansion of the screen image with the following functions may raise concern about the infringement of copyrights which are protected by copyright law.
[ASPECT RATIO], [KEYSTONE], Magnifying feature and other similar features.
Power management function
The projector has power management functions. To reduce power consumption, the power management functions (1 and 2) are factory preset as shown below. To control the projector from an external device via a LAN or serial cable connection, use the on-screen menu to change the settings for 1 and 2.
1.STANDBY MODE (Factory preset: NORMAL)
To control the projector from an external device, select [NETWORK STANDBY] or [SLEEP] for [STANDBY MODE]. (→ page 74)
2.AUTO POWER OFF (Factory preset: 1 hour)
To control the projector from an external device, select [OFF] for [AUTO POWER OFF]. (→ page 76)
Model Number of Wireless LAN unit
Wireless LAN unit is an optional item.
To find the appropriate model to your area, please visit the company website: URL: https://www.nec-display.com/global/support/index.html
xviii

Important Information
Trademarks
•MultiPresenter is a trademark or registered trademark of NEC Display Solutions, Ltd. in Japan and other countries.
•Apple, Mac, MacBook, and iMac are trademarks of Apple Inc. registered in the U.S. and other countries.
•Microsoft, Windows, and PowerPoint are either a registered trademark or trademark of Microsoft Corporation in the United States and/or other countries.
•The terms HDMI and HDMI High-Definition Multimedia Interface, and the HDMI Logo are trademarks or registered trademarks of HDMI Licensing Administrator, Inc. in the United States and other countries.
•HDBaseT™ and the HDBaseT Alliance logo are trademarks of the HDBaseT Alliance.
•PJLink trademark and logo are trademarks applied for registration or are already registered in Japan, the United States of America and other countries and areas.
•Wi-Fi® is a registered trademark of the Wi-Fi Alliance®. WPA™, WPA2™ are trademarks of the Wi-Fi Alliance®.
•Blu-ray is a trademark of Blu-ray Disc Association
•CRESTRON and CRESTRON ROOMVIEW are trademarks or registered trademarks of Crestron Electronics, Inc. in the United States and other countries.
•Extron and XTP are registered trademarks of RGB Systems, Inc. in the United States.
•Ethernet is either a registered trademark or trademark of Fuji Xerox Co., Ltd.
•Other product names and company logos mentioned in this user’s manual may be the trademarks or registered trademarks of their respective holders.
•GPL/LGPL Software Licenses
The product includes software licensed under GNU General Public License (GPL), GNU Lesser General Public License (LGPL), and others.
For more information on each software, see “readme.pdf” inside the “about GPL&LGPL” folder on the supplied CD-ROM.
xix
1. Check the product overview, supplied items and part names
1-1. Introduction to the Projector
This section introduces you to your new projector and describes the features and controls.
General
•Liquid crystal type high brightness/high resolution projector
Model name |
Brightness |
Resolution |
Aspect ratio |
|
|
|
|
|
|
P525UL |
5,000 lm |
WUXGA |
16:10 |
|
(1920 × 1200 pixels) |
||||
|
|
|
||
|
|
|
|
|
P525WL |
5,000 lm |
WXGA |
16:10 |
|
(1280 × 800 pixels) |
||||
|
|
|
||
|
|
|
|
•A proprietary sealed structure that achieves highly dust-proof performance
Due to its excellent dust-proof performance, the projector is not equipped with a filter. Filter replacement is therefore unnecessary.
•Silent design utilizing a sealed structure
A silent design with no irritating fan noise even in a quiet conference room or classroom.
Light source · Brightness
•A long-life laser diode is equipped in the light module
The product can be operated at low cost because the laser light source can be used for a long time without requiring replacement or maintenance.
•Brightness can be adjusted within a wide range
Unlike with ordinary light sources, the brightness can be adjusted from 30 to 100% in 1% increments.
•[CONSTANT BRIGHTNESS] mode
Brightness normally decreases with use, but by selecting [CONSTANT BRIGHTNESS] mode, the projector automatically controls the output from the light module according to the light module used time for maintaining constant brightness.
Installation
•360° installation and portrait projection
The projector can be installed at any angle from 0° to 360° in both the vertical and horizontal direction. When installing the projector in a tilted position, use brackets of sufficient strength. Portraits can also be projected with the projection screen tilted 90°. Be sure to assemble and install a dedicated stand.
•Lens shift mechanism for adjusting the position of the projected image easily
The position of the projected image is moved by turning the two dials on the projector cabinet top, one for the vertical direction and another for the horizontal direction.
1

1. Check the product overview, supplied items and part names
Videos
•Wide range of input terminals (HDMI × 2, HDBaseT, etc.)
The projector is equipped with a variety of input terminals: HDMI (× 2), Computer (analog), Video, HDBaseT, etc. HDMI input terminal on this product supports HDCP. HDBaseT is a connection standard for home appliances that is established by the HDBaseT Alliance.
•Simultaneous display of 2 images (PIP)
With this projector, it is possible to project 2 images with a single projector, by displaying a small sub-display within the main display. Furthermore, the sub-display display position can be changed and the main display and sub-display images can be swapped.
•[VIEWER] function to project still images saved in a USB memory
When you insert a commercially available USB memory containing the picture into the USB port of the projector (Type A), the images on the USB can be projected by the unit. By doing this, you can make a presentation without using a personal computer.
•Seamless switch function for smoother screen changes when switching the signal
When the input connector is switched, the image displayed before switching is held so that that the new image can be switched to without a break due to absence of a signal.
Network
•Compatible with wired LAN / wireless LAN
Equipped with a LAN port (RJ-45), the projector can be connected to a wired LAN to transmit images from a computer to this unit or to control this unit from the computer. In addition, when a wireless LAN unit sold separately is attached to the unit, the unit can be connected to a wireless LAN.
•CRESTRON ROOMVIEW and Extron XTP compatibility
The projector supports CRESTRON ROOMVIEW and Extron XTP, allowing multiple devices connected in the network to be managed and controlled from a computer. Moreover, it enables to output and control image via an Extron XTP transmitter connected with the projector.
•Compatible with the MultiPresenter application
This projector is compatible with the NEC MultiPresenter application, so multi-screen projection is possible via the network (wired LAN/wireless LAN).
Energy-saving
•0.13 W (100-130 V AC)/0.19 W (200-240 V AC) in standby condition with energy saving technology
Selecting [NORMAL] for [STANDBY MODE] from the menu can put the projector in power-saving mode.
NORMAL: 0.13 W (100-130 V AC)/0.19 W (200-240 V AC) NETWORK STANDBY: 1.4 W (100-130 V AC)/1.6 W (200-240 V AC)
2

1.Check the product overview, supplied items and part names
•[ECO MODE] for low power consumption and [CARBON METER] display
The projector is equipped with a [ECO MODE] for reducing power consumption during use. Furthermore, the power-saving effect when the [ECO MODE] is set is converted into the amount of reductions of CO2 emissions and this is indicated on the confirmation message displayed when the power is turned off and at [INFO.] on the on-screen menu ([CARBON METER]).
3
1. Check the product overview, supplied items and part names
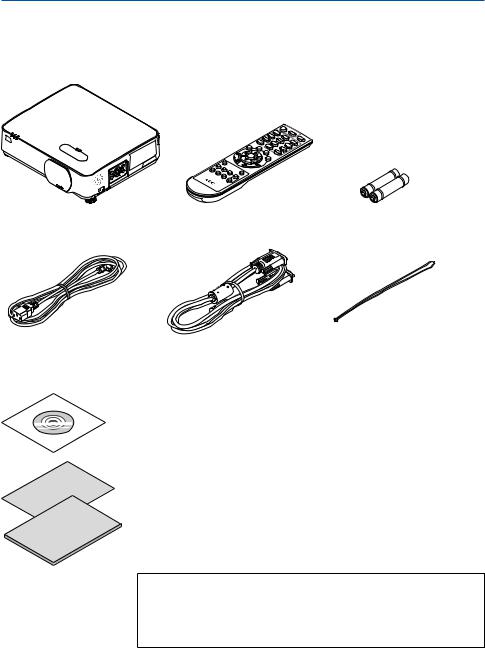
1-2. What’s in the Box?
Make sure your box contains everything listed. If any pieces are missing, contact your dealer. Please save the original box and packing materials if you ever need to ship your projector.
Projector
Remote control |
Batteries (AAA × 2) |
(7N901171) |
|
Power cord |
Computer cable (VGA) |
Lens cap strap |
(US: 7N080236/7N080242) |
(7N520089) |
|
(EU: 7N080022/7N080028) |
|
|
NEC Projector CD-ROM |
|
|
(7N952802) |
|
|
• |
Important Information |
|
|
(7N8N9291) |
|
• |
Quick Setup Guide |
|
|
(For North America: 7N8N9301) |
|
|
(For Other countries than North America: 7N8N9301 and 7N8N9311) |
|
• |
Security Sticker |
|
|
(Use this sticker when security password is set on.) |
|
For North America only
• Limited warranty
For customers in Europe:
You will find our current valid Guarantee Policy on our Web Site: https://www.nec-display-solutions.com
4
1. Check the product overview, supplied items and part names
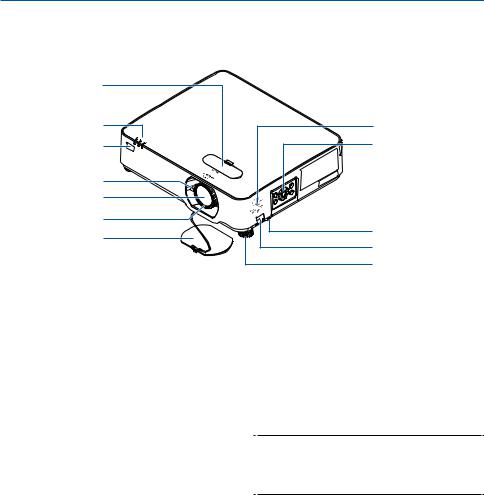
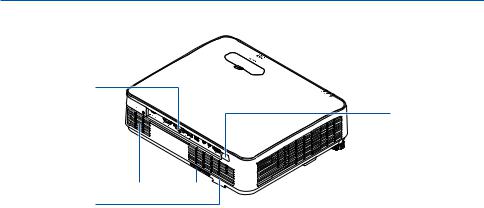
1-3. Part Names of the Projector
Front
1 |
|
|
6 |
8 |
|
7 |
9 |
|
2 |
|
|
3 |
|
|
4 |
10 |
|
5 |
||
11 |
||
|
||
|
12 |
1.Lens shift cover
(→ page 23)
2.Zoom Lever
(→ page 26)
3.Lens
4.Focus Ring
(→ page 25)
5.Lens Cap
6.Indicators
(→ page 8, 140)
7.Remote Sensor
(→ page 14)
8.Monaural Speaker
9.Controls
(→ page 8)
10.Security Slot (  )
)
11.Security chain opening
Attach an anti-theft device.
The security chain opening accepts security wires or chains up to 0.18 inch/4.6 mm in diameter.
12.Tilt Foot
(→ page 27)
TIP:
•Security and theft protection lock compatible with Kensington security cables/equipment. For products, visit Kensington's website.
5
1. Check the product overview, supplied items and part names
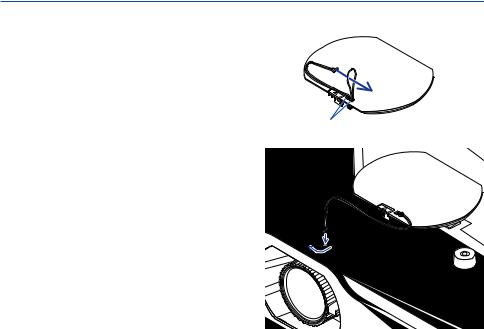
Mounting the lens cap strap
1.Insert the tip of the strap into the lens cap mount hole and pass the knot through.
Lens cap mount hole
2.Insert the knot into the strap mount hole (large) on the bottom of the projector, then press it into the narrow (small) hole.
6
1. Check the product overview, supplied items and part names
Rear
1
3

 2
2
1.Terminal Panel
(→ page 9)
2.AC Input
Connect the supplied power cord’s threepin plug here, and plug the other end into an active wall outlet.
(→ page 16)
3.Intake Vent
4.Remote Sensor
(→ page 14)
5.Exhaust Vent
4


 5
5
7
1. Check the product overview, supplied items and part names
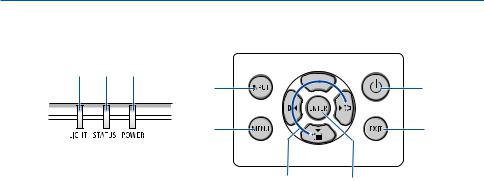
Controls/Indicators
4 3 2
5 |
1 |
6 |
7 |
8 |
9 |
1. (POWER) Button
(→ page 18, 31)
2.POWER Indicator
(→ page 16, 18, 31, 140)
3.STATUS Indicator
(→ page 140)
4.LIGHT Indicator
(→ page 140)
5.INPUT Button
(→ page 20)
6.MENU Button
(→ page 47)
7.EXIT Button
(→ page 47)
8.▲▼ / Volume Buttons / Keystone Button ▼
(→ page 28, 30, 47)
9.ENTER Button
(→ page 47)
8
1. Check the product overview, supplied items and part names
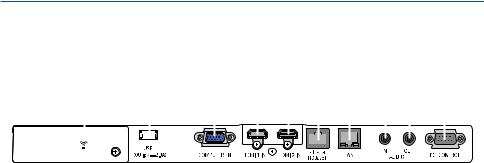
Terminal Panel Features
10 |
8 |
3 |
|
|
1 |
2 |
6 |
|
|
7 |
|
4 |
5 |
9 |
||||||||||||||||||||
|
|
|
|
|
|
|
|
|
|
|
|
|
|
|
|
|
|
|
|
|
|
|
|
|
|
|
|
|
|
|
|
|
|
|
|
|
|
|
|
|
|
|
|
|
|
|
|
|
|
|
|
|
|
|
|
|
|
|
|
|
|
|
|
|
|
|
|
|
|
|
|
|
|
|
|
|
|
|
|
|
|
|
|
|
|
|
|
|
|
|
|
|
|
|
|
|
|
|
|
|
|
|
|
|
|
|
|
|
|
|
|
|
|
|
|
|
|
|
|
|
|
|
|
|
|
|
|
|
|
|
|
|
|
|
|
|
|
|
|
|
|
|
|
|
|
|
|
|
|
|
|
|
|
|
|
|
|
|
|
|
|
|
|
|
|
|
|
|
|
|
|
|
|
|
1.HDMI 1 IN Terminal (Type A)
(→ page 81, 83, 85)
2.HDMI 2 IN Terminal (Type A)
(→ page 81, 83, 85)
3.COMPUTER IN/ Component Input Terminal (Mini D-Sub 15 Pin)
(→ page 81, 84)
4.AUDIO IN Mini Jack (Stereo Mini)
(→ page 81, 84)
5.AUDIO OUT Mini Jack (Stereo Mini)
Audio signal of the image projected from the projector is output.
When audio equipment is connected, the projector speaker is disabled.
6.Ethernet/HDBaseT Port (RJ-45)
(→ page 90)
7.LAN Port (RJ-45)
(→ page 86)
8.USB Port (Type A)
Connect the USB memory. When picture data is saved in a USB memory, the picture can be projected with the [VIEWER] of the projector.
(→ page 95)
In addition, a 5 V/2.0 A power supply can be supplied for expansion use.
9.PC CONTROL Port (D-Sub 9 Pin)
Use this port to connect a PC or control system. This enables you to control the projector using serial communication protocol. If you are writing your own program, typical PC control codes are on page 133.
10.Wireless LAN cover ( )
)
There are two terminals behind the cover.
•USB (Wireless LAN) Port (→ page 88)
•SERVICE Port (USB Type B) (for service purpose only)
9
1. Check the product overview, supplied items and part names
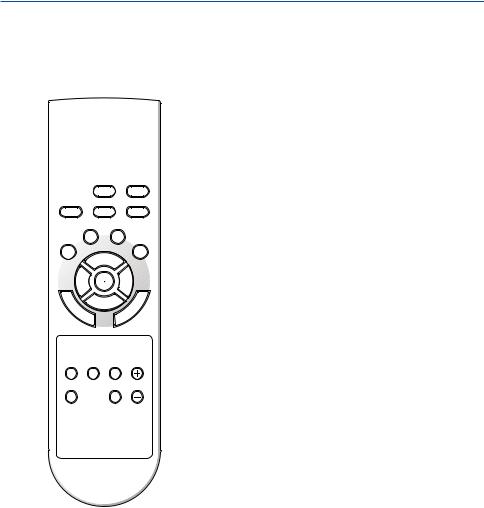
1-4. Part Names of the Remote Control
1 |
3 |
1. |
Infrared Transmitter |
|
(→ page 14) |
||
|
|
||
2 |
4 |
2. |
POWER ON Button |
|
(→ page 18) |
||
5 |
6 |
|
|
3. |
POWER STANDBY Button |
||
8 |
7 |
|
(→ page 31) |
|
10 |
4. |
SOURCE Button |
11 |
9 |
|
(→ page 20) |
|
|
5. |
HDMI1 Button |
|
|
|
(→ page 20) |
|
|
6. |
HDMI2 Button |
|
|
|
(→ page 20) |
|
|
7. |
HDBaseT Button |
|
|
|
(→ page 20) |
|
|
8. |
DisplayPort Button |
|
|
|
(This button does not work in this series of projec- |
|
|
|
tors) |
|
|
9. |
COMPUTER Button |
|
|
|
(→ page 20) |
10. AUTO ADJ. Button
(→ page 30)
11. VIDEO Button
(This button does not work in this series of projectors)
10
 Loading...