

Empowered by Innovation
FeaturesIntroduction Telephone
Features
DSX Telephone Feature
Handbook
P/N 1093099
Rev 2, June 2006
Printed in U.S.A
01.00.00
.

This manual has been developed by NEC Unified Solutions, Inc. It is intended for the use of its customers and service
personnel, and should be read in its entirety before attempting to install or program the system. Any comments or suggestions
for improving this manual would be appreciated. Forward your remarks to:
NEC Unified Solutions, Inc.
4 Forest Parkway
Shelton, CT 06484
www.necunifiedsolutions.com
Nothing contained in this manual shall be deemed to be, and this manual does not constitute, a warranty of, or representation
with respect to, any of the equipment covered. This manual is subject to change without notice and NEC Unified Solutions,
Inc. has no obligation to provide any updates or corrections to this manual. Further, NEC Unified Solutions, Inc. also reserves
the right, without prior notice, to make changes in equipment design or components as it deems appropriate. No
representation is made that this manual is complete or accurate in all respects and NEC Unified Solutions, Inc. shall not be
liable for any errors or omissions. In no event shall NEC Unified Solutions, Inc. be liable for any incidental or consequential
damages in connection with the use of this manual. This document contains proprietary information that is protected by
copyright. All rights are reserved. No part of this document may be photocopied or reproduced without prior written consent
of NEC Unified Solutions, Inc.
©2006 by NEC Unified Solutions, Inc. All Rights Reserved.
Printed in U.S.A.

Table of Contents
Table of Contents
Introduction . . . . . . . . . . . . . . . . . . . . . . . . . . . . . . . . . . . . . . . . . . . . . . . . . . . . . . . . . . 1
Using the DSX Feature Handbook. . . . . . . . . . . . . . . . . . . . . . . . . . . . . . . . . . . . . . . . . . . 1
Charts . . . . . . . . . . . . . . . . . . . . . . . . . . . . . . . . . . . . . . . . . . . . . . . . . . . . . . . . . . . . . . . . . 2
Telephone Illustrations. . . . . . . . . . . . . . . . . . . . . . . . . . . . . . . . . . . . . . . . . . . . . . . . . . . . 4
Features . . . . . . . . . . . . . . . . . . . . . . . . . . . . . . . . . . . . . . . . . . . . . . . . . . . . . . . . . . . . . 9
Introduction . . . . . . . . . . . . . . . . . . . . . . . . . . . . . . . . . . . . . . . . . . . . . . . . . . . . . . . . . . . . 9
Account Codes . . . . . . . . . . . . . . . . . . . . . . . . . . . . . . . . . . . . . . . . . . . . . . . . . . . . . . . . . 10
Optional (Unforced) Account Codes . . . . . . . . . . . . . . . . . . . . . . . . . . . . . . . . . . . . . . 10
Forced Account Codes . . . . . . . . . . . . . . . . . . . . . . . . . . . . . . . . . . . . . . . . . . . . . . . . . 10
Verified Account Codes . . . . . . . . . . . . . . . . . . . . . . . . . . . . . . . . . . . . . . . . . . . . . . . . 10
Using Account Codes and Speed Dial . . . . . . . . . . . . . . . . . . . . . . . . . . . . . . . . . . . . . 10
Using Account Codes with Last Number Redial and Save . . . . . . . . . . . . . . . . . . . . . 10
Account Codes and Emergency Calls . . . . . . . . . . . . . . . . . . . . . . . . . . . . . . . . . . . . . 11
Alphanumeric Display . . . . . . . . . . . . . . . . . . . . . . . . . . . . . . . . . . . . . . . . . . . . . . . . . . . 12
Attendant Call Queuing . . . . . . . . . . . . . . . . . . . . . . . . . . . . . . . . . . . . . . . . . . . . . . . . . . 13
Operator Call Key . . . . . . . . . . . . . . . . . . . . . . . . . . . . . . . . . . . . . . . . . . . . . . . . . . . . 13
Attendant Position . . . . . . . . . . . . . . . . . . . . . . . . . . . . . . . . . . . . . . . . . . . . . . . . . . . . . . 14
Auto Redial . . . . . . . . . . . . . . . . . . . . . . . . . . . . . . . . . . . . . . . . . . . . . . . . . . . . . . . . . . . 15
Automatic Handsfree . . . . . . . . . . . . . . . . . . . . . . . . . . . . . . . . . . . . . . . . . . . . . . . . . . . . 16
Background Music . . . . . . . . . . . . . . . . . . . . . . . . . . . . . . . . . . . . . . . . . . . . . . . . . . . . . . 17
Barge In (Intrusion) . . . . . . . . . . . . . . . . . . . . . . . . . . . . . . . . . . . . . . . . . . . . . . . . . . . . . 18
Call Coverage Keys . . . . . . . . . . . . . . . . . . . . . . . . . . . . . . . . . . . . . . . . . . . . . . . . . . . . . 19
User Programmable Feature. . . . . . . . . . . . . . . . . . . . . . . . . . . . . . . . . . . . . . . . . . . . . 20
Call Forwarding . . . . . . . . . . . . . . . . . . . . . . . . . . . . . . . . . . . . . . . . . . . . . . . . . . . . . . . . 21
Call Forwarding Chaining . . . . . . . . . . . . . . . . . . . . . . . . . . . . . . . . . . . . . . . . . . . . . . 21
Call Forwarding Cancel . . . . . . . . . . . . . . . . . . . . . . . . . . . . . . . . . . . . . . . . . . . . . . . . 21
Call Forwarding Key . . . . . . . . . . . . . . . . . . . . . . . . . . . . . . . . . . . . . . . . . . . . . . . . . . 21
Call Forwarding Toggle in a Personal Speed Dial Bin . . . . . . . . . . . . . . . . . . . . . . . . 22
Call Forwarding Confirmation Tone . . . . . . . . . . . . . . . . . . . . . . . . . . . . . . . . . . . . . . 22
User Programmable Feature. . . . . . . . . . . . . . . . . . . . . . . . . . . . . . . . . . . . . . . . . . . . . 23
Call Forwarding Off Premises . . . . . . . . . . . . . . . . . . . . . . . . . . . . . . . . . . . . . . . . . . . . . 24
Call Timer . . . . . . . . . . . . . . . . . . . . . . . . . . . . . . . . . . . . . . . . . . . . . . . . . . . . . . . . . . . . 26
Call Waiting / Camp-On . . . . . . . . . . . . . . . . . . . . . . . . . . . . . . . . . . . . . . . . . . . . . . . . . 28
Callback . . . . . . . . . . . . . . . . . . . . . . . . . . . . . . . . . . . . . . . . . . . . . . . . . . . . . . . . . . . . . . 29
Caller ID. . . . . . . . . . . . . . . . . . . . . . . . . . . . . . . . . . . . . . . . . . . . . . . . . . . . . . . . . . . . . . 30
Single and Multiple Message Format Compatibility . . . . . . . . . . . . . . . . . . . . . . . . . . 30
Caller ID Logging . . . . . . . . . . . . . . . . . . . . . . . . . . . . . . . . . . . . . . . . . . . . . . . . . . . . . . 31
Central Office Calls, Answering . . . . . . . . . . . . . . . . . . . . . . . . . . . . . . . . . . . . . . . . . . . 32
Answering Priority . . . . . . . . . . . . . . . . . . . . . . . . . . . . . . . . . . . . . . . . . . . . . . . . . . . . 32
User Programmable Feature. . . . . . . . . . . . . . . . . . . . . . . . . . . . . . . . . . . . . . . . . . . . . 32
Central Office Calls, Placing . . . . . . . . . . . . . . . . . . . . . . . . . . . . . . . . . . . . . . . . . . . . . . 33
Store and Forward . . . . . . . . . . . . . . . . . . . . . . . . . . . . . . . . . . . . . . . . . . . . . . . . . . . . 33
Check Key . . . . . . . . . . . . . . . . . . . . . . . . . . . . . . . . . . . . . . . . . . . . . . . . . . . . . . . . . . . . 36
Conference . . . . . . . . . . . . . . . . . . . . . . . . . . . . . . . . . . . . . . . . . . . . . . . . . . . . . . . . . . . . 37
Cordless Telephone . . . . . . . . . . . . . . . . . . . . . . . . . . . . . . . . . . . . . . . . . . . . . . . . . . . . . 39
Dial Number Preview. . . . . . . . . . . . . . . . . . . . . . . . . . . . . . . . . . . . . . . . . . . . . . . . . . . . 40
Direct Inward Line . . . . . . . . . . . . . . . . . . . . . . . . . . . . . . . . . . . . . . . . . . . . . . . . . . . . . . 42
Night Mode Control . . . . . . . . . . . . . . . . . . . . . . . . . . . . . . . . . . . . . . . . . . . . . . . . . . . 42
DSX Feature Handbook
Table of Contents ◆ i

ii ◆
Table of Contents
Direct Line Access. . . . . . . . . . . . . . . . . . . . . . . . . . . . . . . . . . . . . . . . . . . . . . . . . . . . . . 43
Direct Station Selection (DSS) . . . . . . . . . . . . . . . . . . . . . . . . . . . . . . . . . . . . . . . . . . . . 44
Direct Station Selection (DSS) Console . . . . . . . . . . . . . . . . . . . . . . . . . . . . . . . . . . . . . 46
Directed Call Pickup . . . . . . . . . . . . . . . . . . . . . . . . . . . . . . . . . . . . . . . . . . . . . . . . . . . . 53
Directory Dialing . . . . . . . . . . . . . . . . . . . . . . . . . . . . . . . . . . . . . . . . . . . . . . . . . . . . . . . 54
Distinctive Ringing . . . . . . . . . . . . . . . . . . . . . . . . . . . . . . . . . . . . . . . . . . . . . . . . . . . . . 55
Do Not Disturb. . . . . . . . . . . . . . . . . . . . . . . . . . . . . . . . . . . . . . . . . . . . . . . . . . . . . . . . . 60
Do Not Disturb Override . . . . . . . . . . . . . . . . . . . . . . . . . . . . . . . . . . . . . . . . . . . . . . . . . 62
Door Box . . . . . . . . . . . . . . . . . . . . . . . . . . . . . . . . . . . . . . . . . . . . . . . . . . . . . . . . . . . . . 63
Extended Ringing. . . . . . . . . . . . . . . . . . . . . . . . . . . . . . . . . . . . . . . . . . . . . . . . . . . . . . . 65
Extension Hunting . . . . . . . . . . . . . . . . . . . . . . . . . . . . . . . . . . . . . . . . . . . . . . . . . . . . . . 66
Extension Locking . . . . . . . . . . . . . . . . . . . . . . . . . . . . . . . . . . . . . . . . . . . . . . . . . . . . . . 68
Feature Keys . . . . . . . . . . . . . . . . . . . . . . . . . . . . . . . . . . . . . . . . . . . . . . . . . . . . . . . . . . 70
Flash. . . . . . . . . . . . . . . . . . . . . . . . . . . . . . . . . . . . . . . . . . . . . . . . . . . . . . . . . . . . . . . . . 76
Flexible Numbering Plan . . . . . . . . . . . . . . . . . . . . . . . . . . . . . . . . . . . . . . . . . . . . . . . . . 77
Forced Line Disconnect . . . . . . . . . . . . . . . . . . . . . . . . . . . . . . . . . . . . . . . . . . . . . . . . . . 78
Group Call Pickup . . . . . . . . . . . . . . . . . . . . . . . . . . . . . . . . . . . . . . . . . . . . . . . . . . . . . . 79
Group Listen . . . . . . . . . . . . . . . . . . . . . . . . . . . . . . . . . . . . . . . . . . . . . . . . . . . . . . . . . . 80
Group Ring. . . . . . . . . . . . . . . . . . . . . . . . . . . . . . . . . . . . . . . . . . . . . . . . . . . . . . . . . . . . 81
Handsfree and Handsfree Answerback . . . . . . . . . . . . . . . . . . . . . . . . . . . . . . . . . . . . . . 83
Headset Compatibility . . . . . . . . . . . . . . . . . . . . . . . . . . . . . . . . . . . . . . . . . . . . . . . . . . . 85
Hold . . . . . . . . . . . . . . . . . . . . . . . . . . . . . . . . . . . . . . . . . . . . . . . . . . . . . . . . . . . . . . . . . 87
User Programmable Feature . . . . . . . . . . . . . . . . . . . . . . . . . . . . . . . . . . . . . . . . . . . . . 45
Default DSS Console Key Assignments. . . . . . . . . . . . . . . . . . . . . . . . . . . . . . . . . . . . 47
DSS Console Feature Key Assignments. . . . . . . . . . . . . . . . . . . . . . . . . . . . . . . . . . . . 48
User Programmable Feature . . . . . . . . . . . . . . . . . . . . . . . . . . . . . . . . . . . . . . . . . . . . . 52
The Distinctive Ringing Hierarchy. . . . . . . . . . . . . . . . . . . . . . . . . . . . . . . . . . . . . . . . 55
Understanding Ring Types . . . . . . . . . . . . . . . . . . . . . . . . . . . . . . . . . . . . . . . . . . . . . . 56
When Multiple Calls Ring an Extension . . . . . . . . . . . . . . . . . . . . . . . . . . . . . . . . . . . 56
Do Not Disturb BLF for Hotline and Call Coverage Keys. . . . . . . . . . . . . . . . . . . . . . 60
Door Box Relays. . . . . . . . . . . . . . . . . . . . . . . . . . . . . . . . . . . . . . . . . . . . . . . . . . . . . . 63
Door Box Alerts . . . . . . . . . . . . . . . . . . . . . . . . . . . . . . . . . . . . . . . . . . . . . . . . . . . . . . 63
Circular Hunting . . . . . . . . . . . . . . . . . . . . . . . . . . . . . . . . . . . . . . . . . . . . . . . . . . . . . . 66
Terminal Hunting . . . . . . . . . . . . . . . . . . . . . . . . . . . . . . . . . . . . . . . . . . . . . . . . . . . . . 66
Uniform Call Distribution (UCD) Hunting . . . . . . . . . . . . . . . . . . . . . . . . . . . . . . . . . 66
Walking Class of Service and Extension Locking . . . . . . . . . . . . . . . . . . . . . . . . . . . . 68
Extension Feature Key Assignments . . . . . . . . . . . . . . . . . . . . . . . . . . . . . . . . . . . . . . 71
User Programmable Feature . . . . . . . . . . . . . . . . . . . . . . . . . . . . . . . . . . . . . . . . . . . . . 75
User Programmable Feature . . . . . . . . . . . . . . . . . . . . . . . . . . . . . . . . . . . . . . . . . . . . . 79
Handsfree . . . . . . . . . . . . . . . . . . . . . . . . . . . . . . . . . . . . . . . . . . . . . . . . . . . . . . . . . . . 83
Handsfree Answerback and Forced Intercom Ringing. . . . . . . . . . . . . . . . . . . . . . . . . 83
User Programmable Feature . . . . . . . . . . . . . . . . . . . . . . . . . . . . . . . . . . . . . . . . . . . . . 84
Headset Key . . . . . . . . . . . . . . . . . . . . . . . . . . . . . . . . . . . . . . . . . . . . . . . . . . . . . . . . . 85
Off-Hook Signaling and Headsets . . . . . . . . . . . . . . . . . . . . . . . . . . . . . . . . . . . . . . . . 86
User Programmable Feature . . . . . . . . . . . . . . . . . . . . . . . . . . . . . . . . . . . . . . . . . . . . . 86
System (Regular) Hold . . . . . . . . . . . . . . . . . . . . . . . . . . . . . . . . . . . . . . . . . . . . . . . . . 87
Exclusive Hold . . . . . . . . . . . . . . . . . . . . . . . . . . . . . . . . . . . . . . . . . . . . . . . . . . . . . . . 87
Automatic Hold. . . . . . . . . . . . . . . . . . . . . . . . . . . . . . . . . . . . . . . . . . . . . . . . . . . . . . . 87
Intercom Hold . . . . . . . . . . . . . . . . . . . . . . . . . . . . . . . . . . . . . . . . . . . . . . . . . . . . . . . . 87
Distinctive Flash Rate on Recall. . . . . . . . . . . . . . . . . . . . . . . . . . . . . . . . . . . . . . . . . . 87
Table of Contents
DSX Feature Handbook

Table of Contents
Hold Recall Display . . . . . . . . . . . . . . . . . . . . . . . . . . . . . . . . . . . . . . . . . . . . . . . . . . . 88
Hotline . . . . . . . . . . . . . . . . . . . . . . . . . . . . . . . . . . . . . . . . . . . . . . . . . . . . . . . . . . . . . . . 90
Hotline Automatic Transfer . . . . . . . . . . . . . . . . . . . . . . . . . . . . . . . . . . . . . . . . . . . . . 90
User Programmable Feature . . . . . . . . . . . . . . . . . . . . . . . . . . . . . . . . . . . . . . . . . . . . . 91
Interactive Soft Keys . . . . . . . . . . . . . . . . . . . . . . . . . . . . . . . . . . . . . . . . . . . . . . . . . . . . 92
Intercom . . . . . . . . . . . . . . . . . . . . . . . . . . . . . . . . . . . . . . . . . . . . . . . . . . . . . . . . . . . . . . 93
Handsfree Answerback and Forced Intercom Ringing. . . . . . . . . . . . . . . . . . . . . . . . . 93
User Programmable Feature . . . . . . . . . . . . . . . . . . . . . . . . . . . . . . . . . . . . . . . . . . . . . 93
Key Ring . . . . . . . . . . . . . . . . . . . . . . . . . . . . . . . . . . . . . . . . . . . . . . . . . . . . . . . . . . . . . 94
Language Selection . . . . . . . . . . . . . . . . . . . . . . . . . . . . . . . . . . . . . . . . . . . . . . . . . . . . . 95
Last Number Redial . . . . . . . . . . . . . . . . . . . . . . . . . . . . . . . . . . . . . . . . . . . . . . . . . . . . . 96
Enhanced Last Number Redial . . . . . . . . . . . . . . . . . . . . . . . . . . . . . . . . . . . . . . . . . . . 96
Line Group Routing . . . . . . . . . . . . . . . . . . . . . . . . . . . . . . . . . . . . . . . . . . . . . . . . . . . . . 98
Line Groups . . . . . . . . . . . . . . . . . . . . . . . . . . . . . . . . . . . . . . . . . . . . . . . . . . . . . . . . . . . 99
Line Keys . . . . . . . . . . . . . . . . . . . . . . . . . . . . . . . . . . . . . . . . . . . . . . . . . . . . . . . . . . . . 100
Answering Priority . . . . . . . . . . . . . . . . . . . . . . . . . . . . . . . . . . . . . . . . . . . . . . . . . . . 100
User Programmable Feature . . . . . . . . . . . . . . . . . . . . . . . . . . . . . . . . . . . . . . . . . . . . 101
Line Queuing / Line Callback . . . . . . . . . . . . . . . . . . . . . . . . . . . . . . . . . . . . . . . . . . . . 102
Line Queuing . . . . . . . . . . . . . . . . . . . . . . . . . . . . . . . . . . . . . . . . . . . . . . . . . . . . . . . 102
Line Callback . . . . . . . . . . . . . . . . . . . . . . . . . . . . . . . . . . . . . . . . . . . . . . . . . . . . . . . 102
Line Queuing Priority . . . . . . . . . . . . . . . . . . . . . . . . . . . . . . . . . . . . . . . . . . . . . . . . . 102
Loop Keys . . . . . . . . . . . . . . . . . . . . . . . . . . . . . . . . . . . . . . . . . . . . . . . . . . . . . . . . . . . 103
Switched Loop Keys. . . . . . . . . . . . . . . . . . . . . . . . . . . . . . . . . . . . . . . . . . . . . . . . . . 103
Fixed Loop Keys. . . . . . . . . . . . . . . . . . . . . . . . . . . . . . . . . . . . . . . . . . . . . . . . . . . . . 103
Answering Priority . . . . . . . . . . . . . . . . . . . . . . . . . . . . . . . . . . . . . . . . . . . . . . . . . . . 103
Meet-Me Conference . . . . . . . . . . . . . . . . . . . . . . . . . . . . . . . . . . . . . . . . . . . . . . . . . . . 105
Message Waiting . . . . . . . . . . . . . . . . . . . . . . . . . . . . . . . . . . . . . . . . . . . . . . . . . . . . . . 106
Microphone Mute. . . . . . . . . . . . . . . . . . . . . . . . . . . . . . . . . . . . . . . . . . . . . . . . . . . . . . 107
Handsfree Reply Soft Key . . . . . . . . . . . . . . . . . . . . . . . . . . . . . . . . . . . . . . . . . . . . . 107
Monitor / Silent Monitor . . . . . . . . . . . . . . . . . . . . . . . . . . . . . . . . . . . . . . . . . . . . . . . . 108
Music on Hold . . . . . . . . . . . . . . . . . . . . . . . . . . . . . . . . . . . . . . . . . . . . . . . . . . . . . . . . 109
Names for Extensions and Lines . . . . . . . . . . . . . . . . . . . . . . . . . . . . . . . . . . . . . . . . . . 110
Name Programming Chart . . . . . . . . . . . . . . . . . . . . . . . . . . . . . . . . . . . . . . . . . . . . . 111
Night Service / Night Ring . . . . . . . . . . . . . . . . . . . . . . . . . . . . . . . . . . . . . . . . . . . . . . 112
Night Service Keys . . . . . . . . . . . . . . . . . . . . . . . . . . . . . . . . . . . . . . . . . . . . . . . . . . . 112
Off-Hook Signaling . . . . . . . . . . . . . . . . . . . . . . . . . . . . . . . . . . . . . . . . . . . . . . . . . . . . 114
Off-Hook Signaling for Outside Calls . . . . . . . . . . . . . . . . . . . . . . . . . . . . . . . . . . . . 114
Off-Hook Signaling for Intercom Calls . . . . . . . . . . . . . . . . . . . . . . . . . . . . . . . . . . . 114
Off-Hook Signaling for Hotline Calls . . . . . . . . . . . . . . . . . . . . . . . . . . . . . . . . . . . . 114
User Programmable Feature . . . . . . . . . . . . . . . . . . . . . . . . . . . . . . . . . . . . . . . . . . . . 115
Paging . . . . . . . . . . . . . . . . . . . . . . . . . . . . . . . . . . . . . . . . . . . . . . . . . . . . . . . . . . . . . . 116
Internal Paging . . . . . . . . . . . . . . . . . . . . . . . . . . . . . . . . . . . . . . . . . . . . . . . . . . . . . . 116
External Paging. . . . . . . . . . . . . . . . . . . . . . . . . . . . . . . . . . . . . . . . . . . . . . . . . . . . . . 116
Page Relay Control . . . . . . . . . . . . . . . . . . . . . . . . . . . . . . . . . . . . . . . . . . . . . . . . . . . 116
Outside Call Ringing Over External Page . . . . . . . . . . . . . . . . . . . . . . . . . . . . . . . . . 116
Intercom Ring Over External Page. . . . . . . . . . . . . . . . . . . . . . . . . . . . . . . . . . . . . . . 117
Door Chime Over External Page . . . . . . . . . . . . . . . . . . . . . . . . . . . . . . . . . . . . . . . . 117
Background Music Over External Page . . . . . . . . . . . . . . . . . . . . . . . . . . . . . . . . . . . 117
Ring Over Page Volume Adjustment . . . . . . . . . . . . . . . . . . . . . . . . . . . . . . . . . . . . . 117
User Programmable Feature . . . . . . . . . . . . . . . . . . . . . . . . . . . . . . . . . . . . . . . . . . . . 118
DSX Feature Handbook
Table of Contents ◆ iii

Table of Contents
Park . . . . . . . . . . . . . . . . . . . . . . . . . . . . . . . . . . . . . . . . . . . . . . . . . . . . . . . . . . . . . . . . 119
PBX / Centrex Compatibility. . . . . . . . . . . . . . . . . . . . . . . . . . . . . . . . . . . . . . . . . . . . . 122
Prime Line Preference . . . . . . . . . . . . . . . . . . . . . . . . . . . . . . . . . . . . . . . . . . . . . . . . . . 123
Privacy . . . . . . . . . . . . . . . . . . . . . . . . . . . . . . . . . . . . . . . . . . . . . . . . . . . . . . . . . . . . . . 124
Privacy Release Groups . . . . . . . . . . . . . . . . . . . . . . . . . . . . . . . . . . . . . . . . . . . . . . . . . 125
Private Line . . . . . . . . . . . . . . . . . . . . . . . . . . . . . . . . . . . . . . . . . . . . . . . . . . . . . . . . . . 126
Programmable Idle Menu Soft Keys (Super Display) . . . . . . . . . . . . . . . . . . . . . . . . . . 127
Pulse to Tone Conversion . . . . . . . . . . . . . . . . . . . . . . . . . . . . . . . . . . . . . . . . . . . . . . . 130
Removing Lines and Extensions from Service. . . . . . . . . . . . . . . . . . . . . . . . . . . . . . . 131
Reverse Voice Over . . . . . . . . . . . . . . . . . . . . . . . . . . . . . . . . . . . . . . . . . . . . . . . . . . . . 132
Ringdown Extension . . . . . . . . . . . . . . . . . . . . . . . . . . . . . . . . . . . . . . . . . . . . . . . . . . . 134
Ringing Line Preference . . . . . . . . . . . . . . . . . . . . . . . . . . . . . . . . . . . . . . . . . . . . . . . . 135
Save Number Dialed . . . . . . . . . . . . . . . . . . . . . . . . . . . . . . . . . . . . . . . . . . . . . . . . . . . 138
Selectable Display Messaging . . . . . . . . . . . . . . . . . . . . . . . . . . . . . . . . . . . . . . . . . . . . 139
Single Line Telephones . . . . . . . . . . . . . . . . . . . . . . . . . . . . . . . . . . . . . . . . . . . . . . . . . 142
Speed Dial . . . . . . . . . . . . . . . . . . . . . . . . . . . . . . . . . . . . . . . . . . . . . . . . . . . . . . . . . . . 149
Split (Alternate) . . . . . . . . . . . . . . . . . . . . . . . . . . . . . . . . . . . . . . . . . . . . . . . . . . . . . . . 154
Station Key Telephones . . . . . . . . . . . . . . . . . . . . . . . . . . . . . . . . . . . . . . . . . . . . . . . . . 155
Tandem Calls / Unsupervised Conference. . . . . . . . . . . . . . . . . . . . . . . . . . . . . . . . . . . 157
Time and Date . . . . . . . . . . . . . . . . . . . . . . . . . . . . . . . . . . . . . . . . . . . . . . . . . . . . . . . . 160
Transfer . . . . . . . . . . . . . . . . . . . . . . . . . . . . . . . . . . . . . . . . . . . . . . . . . . . . . . . . . . . . . 161
User Programmable Features. . . . . . . . . . . . . . . . . . . . . . . . . . . . . . . . . . . . . . . . . . . . . 164
Voice Mail . . . . . . . . . . . . . . . . . . . . . . . . . . . . . . . . . . . . . . . . . . . . . . . . . . . . . . . . . . . 167
iv ◆
Distinctive Flash Rate on Recall. . . . . . . . . . . . . . . . . . . . . . . . . . . . . . . . . . . . . . . . . 119
Personal Park Orbit Recall Display . . . . . . . . . . . . . . . . . . . . . . . . . . . . . . . . . . . . . . 120
System Park Orbit Recall Display . . . . . . . . . . . . . . . . . . . . . . . . . . . . . . . . . . . . . . . 120
PBX/Centrex Access Codes . . . . . . . . . . . . . . . . . . . . . . . . . . . . . . . . . . . . . . . . . . . . 122
Idle Prime Line . . . . . . . . . . . . . . . . . . . . . . . . . . . . . . . . . . . . . . . . . . . . . . . . . . . . . . 123
Intercom Prime Line . . . . . . . . . . . . . . . . . . . . . . . . . . . . . . . . . . . . . . . . . . . . . . . . . . 123
Prime Line vs. Ringing Line Preference. . . . . . . . . . . . . . . . . . . . . . . . . . . . . . . . . . . 123
User Programmable Feature . . . . . . . . . . . . . . . . . . . . . . . . . . . . . . . . . . . . . . . . . . . . 123
User Programmable Feature . . . . . . . . . . . . . . . . . . . . . . . . . . . . . . . . . . . . . . . . . . . . 129
Prime Line vs. Ringing Line Preference. . . . . . . . . . . . . . . . . . . . . . . . . . . . . . . . . . . 136
User Programmable Feature . . . . . . . . . . . . . . . . . . . . . . . . . . . . . . . . . . . . . . . . . . . . 137
Name Programming Chart . . . . . . . . . . . . . . . . . . . . . . . . . . . . . . . . . . . . . . . . . . . . . 141
Message Waiting. . . . . . . . . . . . . . . . . . . . . . . . . . . . . . . . . . . . . . . . . . . . . . . . . . . . . 142
System Speed Dial . . . . . . . . . . . . . . . . . . . . . . . . . . . . . . . . . . . . . . . . . . . . . . . . . . . 149
Personal Speed Dial . . . . . . . . . . . . . . . . . . . . . . . . . . . . . . . . . . . . . . . . . . . . . . . . . . 149
Unique Speed Dial Entries . . . . . . . . . . . . . . . . . . . . . . . . . . . . . . . . . . . . . . . . . . . . . 149
Storing Line Routing in a Speed Dial Bin . . . . . . . . . . . . . . . . . . . . . . . . . . . . . . . . . 149
Centrex Compatibility. . . . . . . . . . . . . . . . . . . . . . . . . . . . . . . . . . . . . . . . . . . . . . . . . 149
Chaining Bins for Dialing Long Numbers . . . . . . . . . . . . . . . . . . . . . . . . . . . . . . . . . 150
User Programmable Features . . . . . . . . . . . . . . . . . . . . . . . . . . . . . . . . . . . . . . . . . . . 152
Name Programming Chart . . . . . . . . . . . . . . . . . . . . . . . . . . . . . . . . . . . . . . . . . . . . . 153
Ring/Message Lamp . . . . . . . . . . . . . . . . . . . . . . . . . . . . . . . . . . . . . . . . . . . . . . . . . . 156
User Programmable Feature . . . . . . . . . . . . . . . . . . . . . . . . . . . . . . . . . . . . . . . . . . . . 160
Distinctive Flash Rate on Recall. . . . . . . . . . . . . . . . . . . . . . . . . . . . . . . . . . . . . . . . . 161
Transfer Recall Display . . . . . . . . . . . . . . . . . . . . . . . . . . . . . . . . . . . . . . . . . . . . . . . 161
Handsfree Transfer . . . . . . . . . . . . . . . . . . . . . . . . . . . . . . . . . . . . . . . . . . . . . . . . . . . 161
Hotline Automatic Transfer . . . . . . . . . . . . . . . . . . . . . . . . . . . . . . . . . . . . . . . . . . . . 161
Table of Contents
DSX Feature Handbook

Table of Contents
Call Forwarding to Voice Mail. . . . . . . . . . . . . . . . . . . . . . . . . . . . . . . . . . . . . . . . . . 167
Leaving a Message . . . . . . . . . . . . . . . . . . . . . . . . . . . . . . . . . . . . . . . . . . . . . . . . . . . 167
Transferring to Voice Mail . . . . . . . . . . . . . . . . . . . . . . . . . . . . . . . . . . . . . . . . . . . . . 167
Conversation Record. . . . . . . . . . . . . . . . . . . . . . . . . . . . . . . . . . . . . . . . . . . . . . . . . . 167
Conversation Record Key for a Co-worker’s Mailbox. . . . . . . . . . . . . . . . . . . . . . . . 167
Personal Answering Machine Emulation . . . . . . . . . . . . . . . . . . . . . . . . . . . . . . . . . . 168
Voice Mail Overflow . . . . . . . . . . . . . . . . . . . . . . . . . . . . . . . . . . . . . . . . . . . . . . . . . 168
Message Center Mailbox . . . . . . . . . . . . . . . . . . . . . . . . . . . . . . . . . . . . . . . . . . . . . . 168
Interactive Soft Key Shows New Messages . . . . . . . . . . . . . . . . . . . . . . . . . . . . . . . . 168
User Programmable Features . . . . . . . . . . . . . . . . . . . . . . . . . . . . . . . . . . . . . . . . . . . 173
Voice Over . . . . . . . . . . . . . . . . . . . . . . . . . . . . . . . . . . . . . . . . . . . . . . . . . . . . . . . . . . . 174
Volume, Brightness, and Contrast Controls . . . . . . . . . . . . . . . . . . . . . . . . . . . . . . . . . 175
Volume Control Presets . . . . . . . . . . . . . . . . . . . . . . . . . . . . . . . . . . . . . . . . . . . . . . . 175
Display Brightness and Contrast Control . . . . . . . . . . . . . . . . . . . . . . . . . . . . . . . . . . 175
Walking Class of Service. . . . . . . . . . . . . . . . . . . . . . . . . . . . . . . . . . . . . . . . . . . . . . . . 178
Walking Class of Service and Extension Locking . . . . . . . . . . . . . . . . . . . . . . . . . . . 178
DSX Feature Handbook
Table of Contents ◆ v

Table of Contents
vi ◆
Table of Contents
DSX Feature Handbook
Using the DSX Feature Handbook
Using the DSX Feature Handbook
Introduction
Introduction
How the Feature Handbook is Organized
This feature handbook describes the features and operation of the DSX Multibutton Telephone. It is divided
into two chapters, as follows:
Introduction
❥
This is the chapter you are reading now. It provides a handy quick reference chart for the system feature
codes, as well as key layout illustrations for each telephone.
Features
❥
The Features chapter contains the description and operation for each DSX telephone system feature. For
feature operation, use the convenient operation charts at the end of each feature.
Additionally, at the end of this manual are the DSX Program List (page 929) and Index (page 947).
The System Document CD
The System Document CD provided with your system contains documentation, software, and other DSX
resources. Insert this CD into your PC and browse through its contents.
Checking your System’s Software Level
How to Check your System’s Software Level
To check your system’s software level:
1.
Press
INTERCOM
Dial
#*#*
2.
3.
Press
DSX Feature Handbook
.
• The system software level shows on the first line of your display.
• You see:
SPEAKER
DSX-nn vxx.xx.xx
to exit.
.
Introduction ◆ 1

Charts
Charts
2 ◆
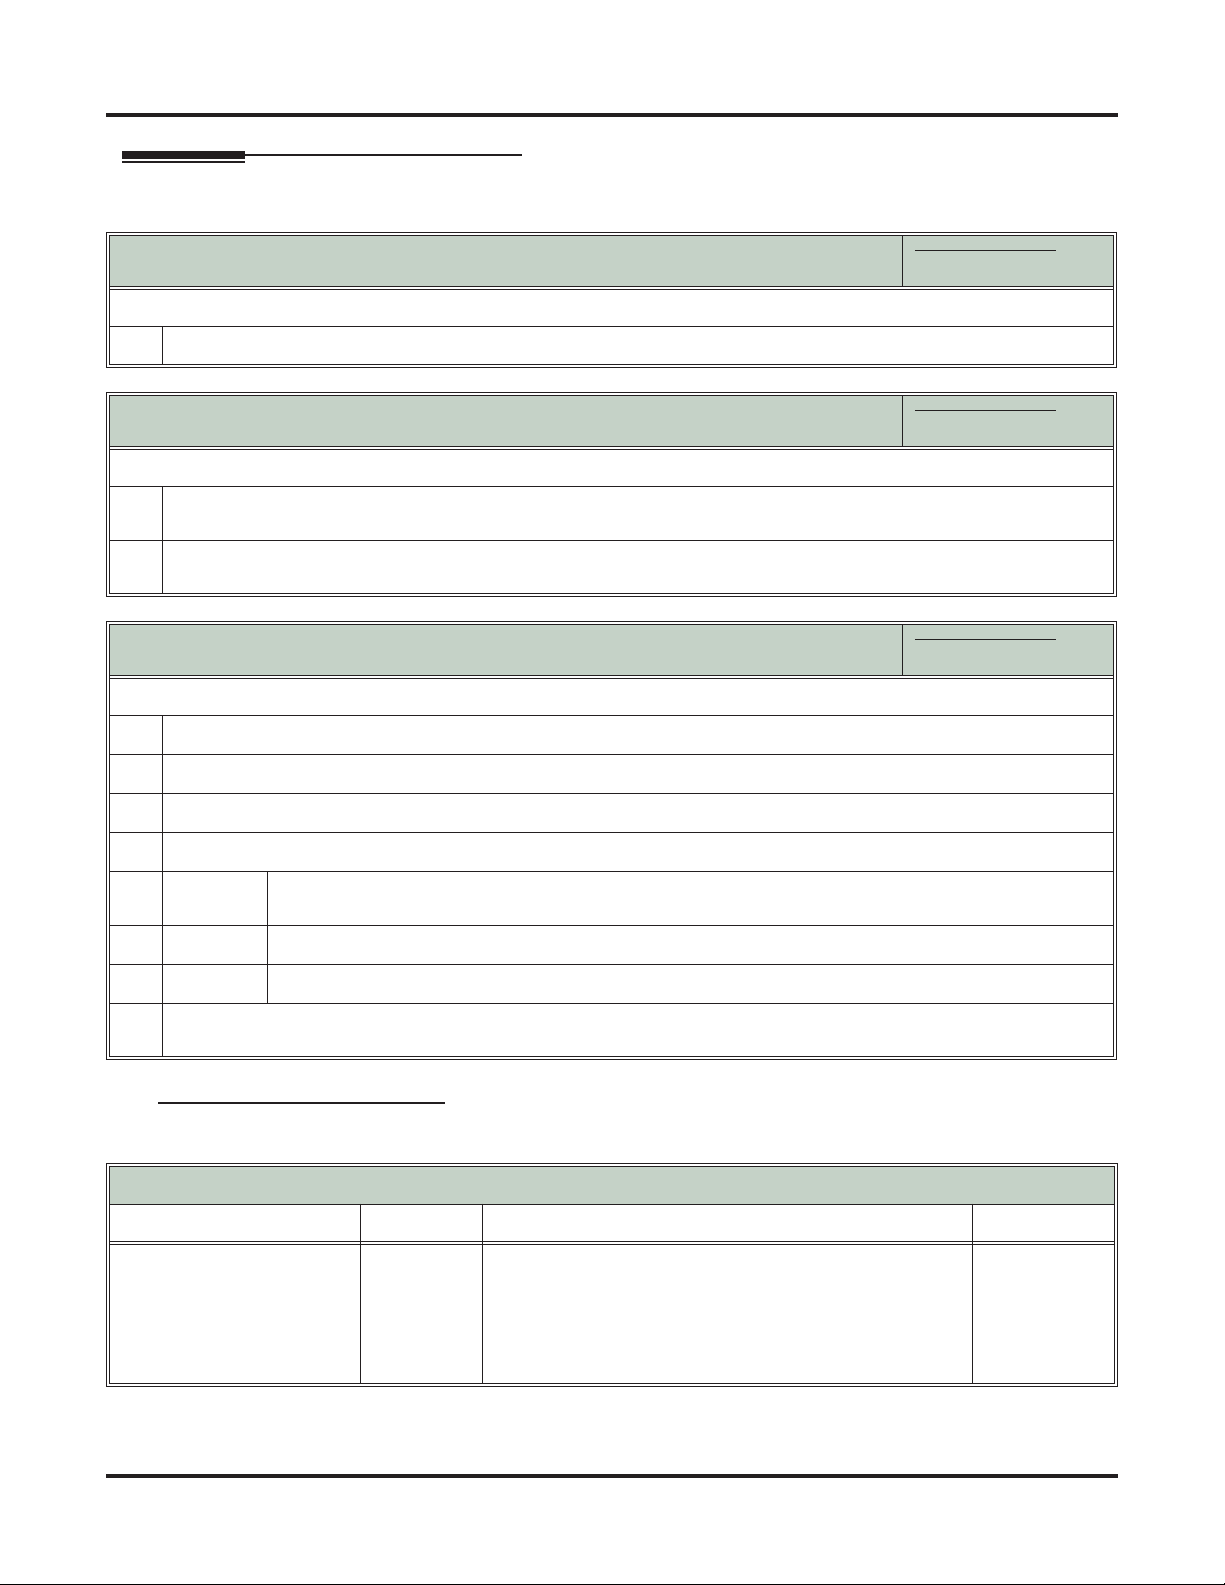
DSX Dial Codes by Feature
For this feature Dial this code When you are
Barge In (Intrusion)
Call Forwarding
INTERCOM
4
(Page 1 of 2)
+
*30
Barging-In on a co-worker’s call
Canceling Call Forwarding at an
extension
INTERCOM
+
*32
+ Extension or 0
(for the operator)
INTERCOM
+
*33
Enabling Call Forwarding Busy/No
Answer
Setting up Call Forwarding Off
Premise
INTERCOM
+
*34
+ Extension or 0
Enabling Call Forwarding All Calls
(for the operator)
INTERCOM
+
*36
+ Extension or 0
Enabling Call Forwarding No Answer
(for the operator)
Call Waiting / Camp-On
Central Office Calls, Placing
INTERCOM
INTERCOM
+
*37
+ 2 (all calls) or 8
(outside calls)
+ Do not hang up
2
2
+ Hang up
+ #9 + Line number
(e.g., 01)
Setting up Personal Answering
Machine Emulation
Camping-On to a co-worker
Leaving a Callback for a co-worker
Using Line Dial-Up to place an outside call
Dial Number Preview
Directed Call Pickup
Flash
Forced Line Disconnect
Group Call Pickup
Hold
Intercom
Meet-Me Conference
INTERCOM + Line extension number
(e.g., 101)
INTERCOM + 9 or 90-98 Accessing a Line Group to place an
Using Direct Line Access to place an
outside call
outside call
INTERCOM
*
+ ** + Extension Intercepting a call ringing a
Previewing a number before dialing
co-worker’s extension
#3
Flashing a line at a single line
extension
#
Using Forced Line Disconnect to disconnect a busy outside line
INTERCOM
+ *# Answering a call ringing a phone in
your Pickup Group
INTERCOM
INTERCOM
+ *4 + Line number (e.g.,
01)
+ Extension (e.g., 301) Placing an Intercom call to a co-
Picking up an outside call on System
Hold at a co-worker’s extension
worker
INTERCOM
+ #11 or # 12 Setting up or joining a Meet-Me Con-
ference
Introduction
DSX Feature Handbook
DSX Dial Codes by Feature (Page 2 of 2)
Charts
For this feature Dial this code When you are
Monitor / Silent Monitor
Night Service / Night Ring
Paging
Park
Removing Lines and Extensions
From Service
Selectable Display Messaging
Speed Dial
6
+ UNA code (01-04) Answering a call ringing UNA at
**
INTERCOM
+ *1 + Page zone (1-7 or
0 for All Call)
INTERCOM
+ * + System Park Orbit
(60-69)
INTERCOM + ** + Extension (e.g.,
301)
INTERCOM
+ #40 + Extension (e.g.,
301) or line (e.g., 101) + 4 (to return)
or 6 (to remove)
INTERCOM
+ *38 + Message (00-16)
+ Hold + Add additional digits + Hold
INTERCOM
+ # + System bin (201-
299) or Personal bin (701-720)
Introduction
Setting up Monitor after calling a busy
co-worker
night
Making an internal Paging announcement
Parking or retrieving a call from System Park Orbit
Using Personal Park to Park or
retrieve a call at a co-workers extension
Removing or returning an extension
or line to service
Enabling a Selectable Display Message
Dialing a System or Personal Speed
Dial number
Transfer
Line Queuing / Line Callback
Voice Mail
Voice Over
INTERCOM
INTERCOM + Extension (e.g., 301) +
+ Extension (e.g., 301) Transferring a call to a co-worker’s
V-MAIL
2 Queuing or leaving a Callback for a
INTERCOM
+ V-MAIL Calling your mailbox from your key-
Lift handset + *8 Calling your mailbox from your single
INTERCOM + Extension (e.g., 301) +
V-MAIL
Hookflash + Extension (e.g., 301) +
INTERCOM + *37 + 2 (all calls) or 8
(outside calls)
INTERCOM + *30 Canceling Personal Answering
9
extension
Transferring a call to a co-worker’s
mailbox
busy line
set
line telephone
Transferring a call to a co-worker’s
mailbox from your keyset
8
Transferring a call to a co-worker’s
mailbox from your single line telephone
Setting up Personal Answering
Machine Emulation
Machine Emulation
Initiating a Voice Over to a busy
extension (after hearing busy/ring
tone)
DSX Feature Handbook Introduction ◆ 3
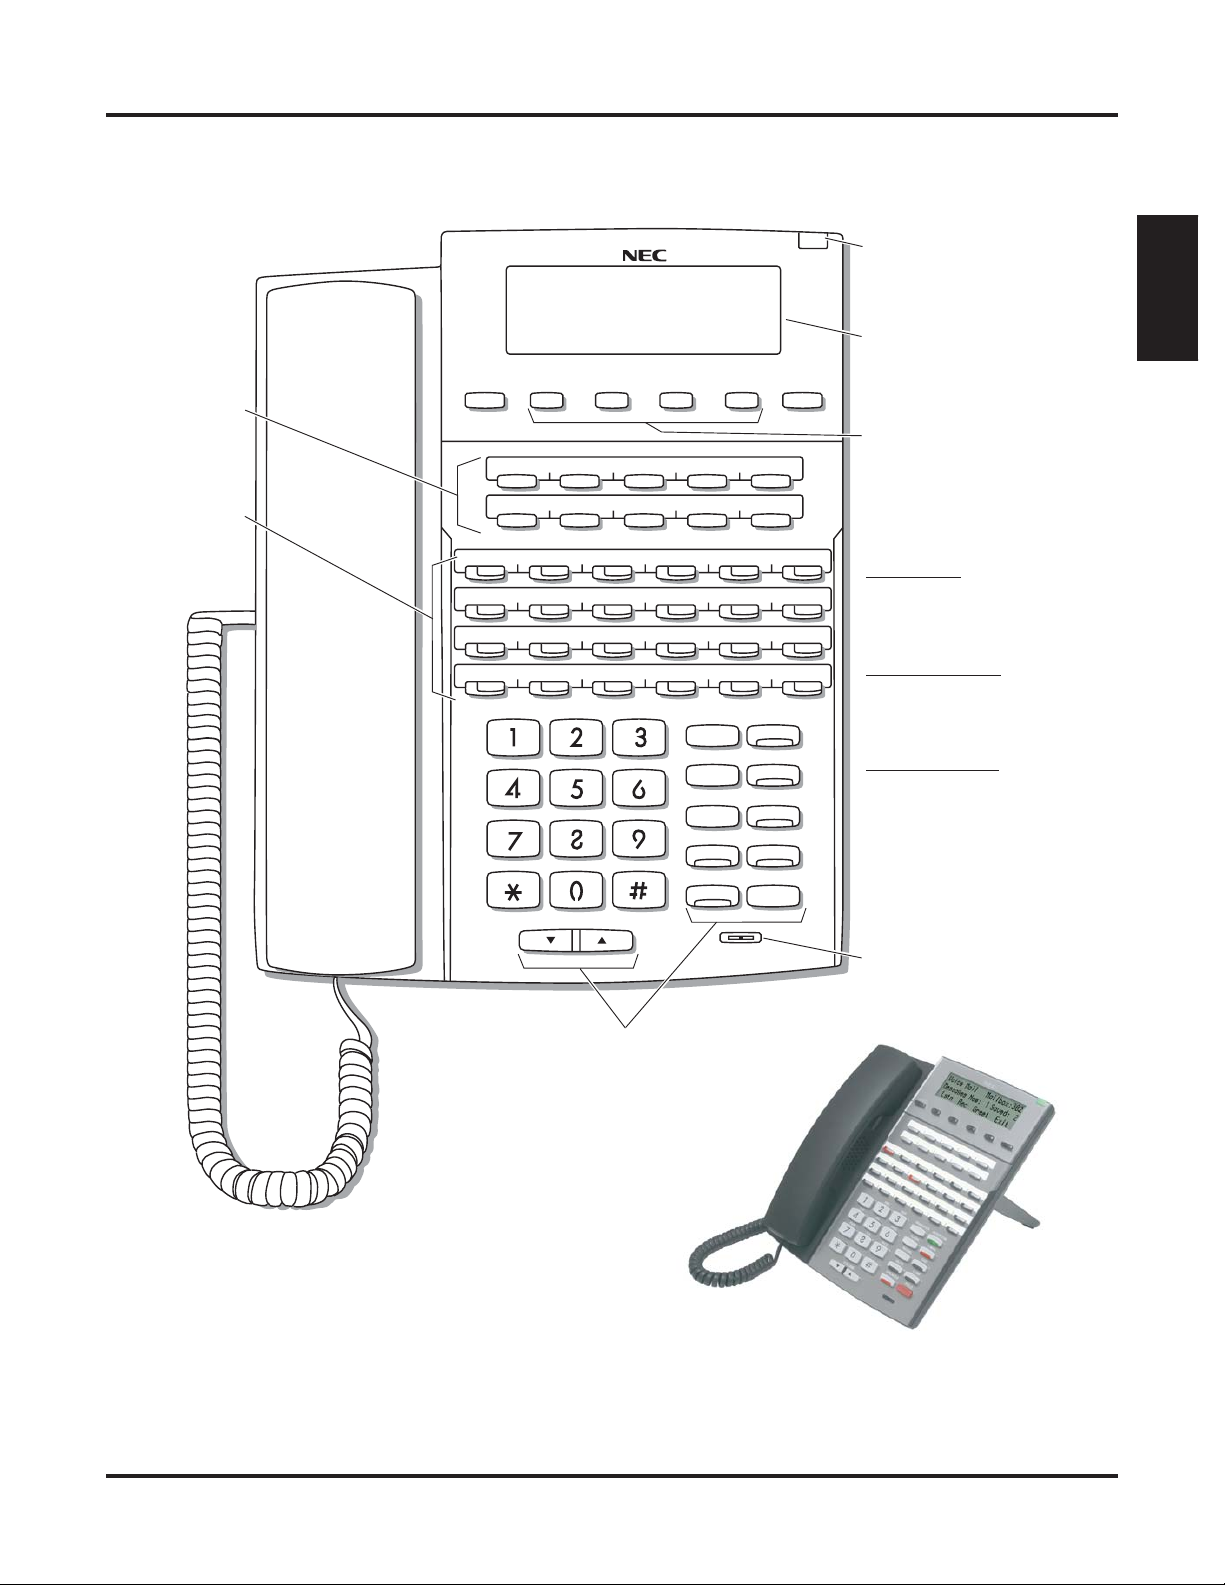
Telephone Illustrations
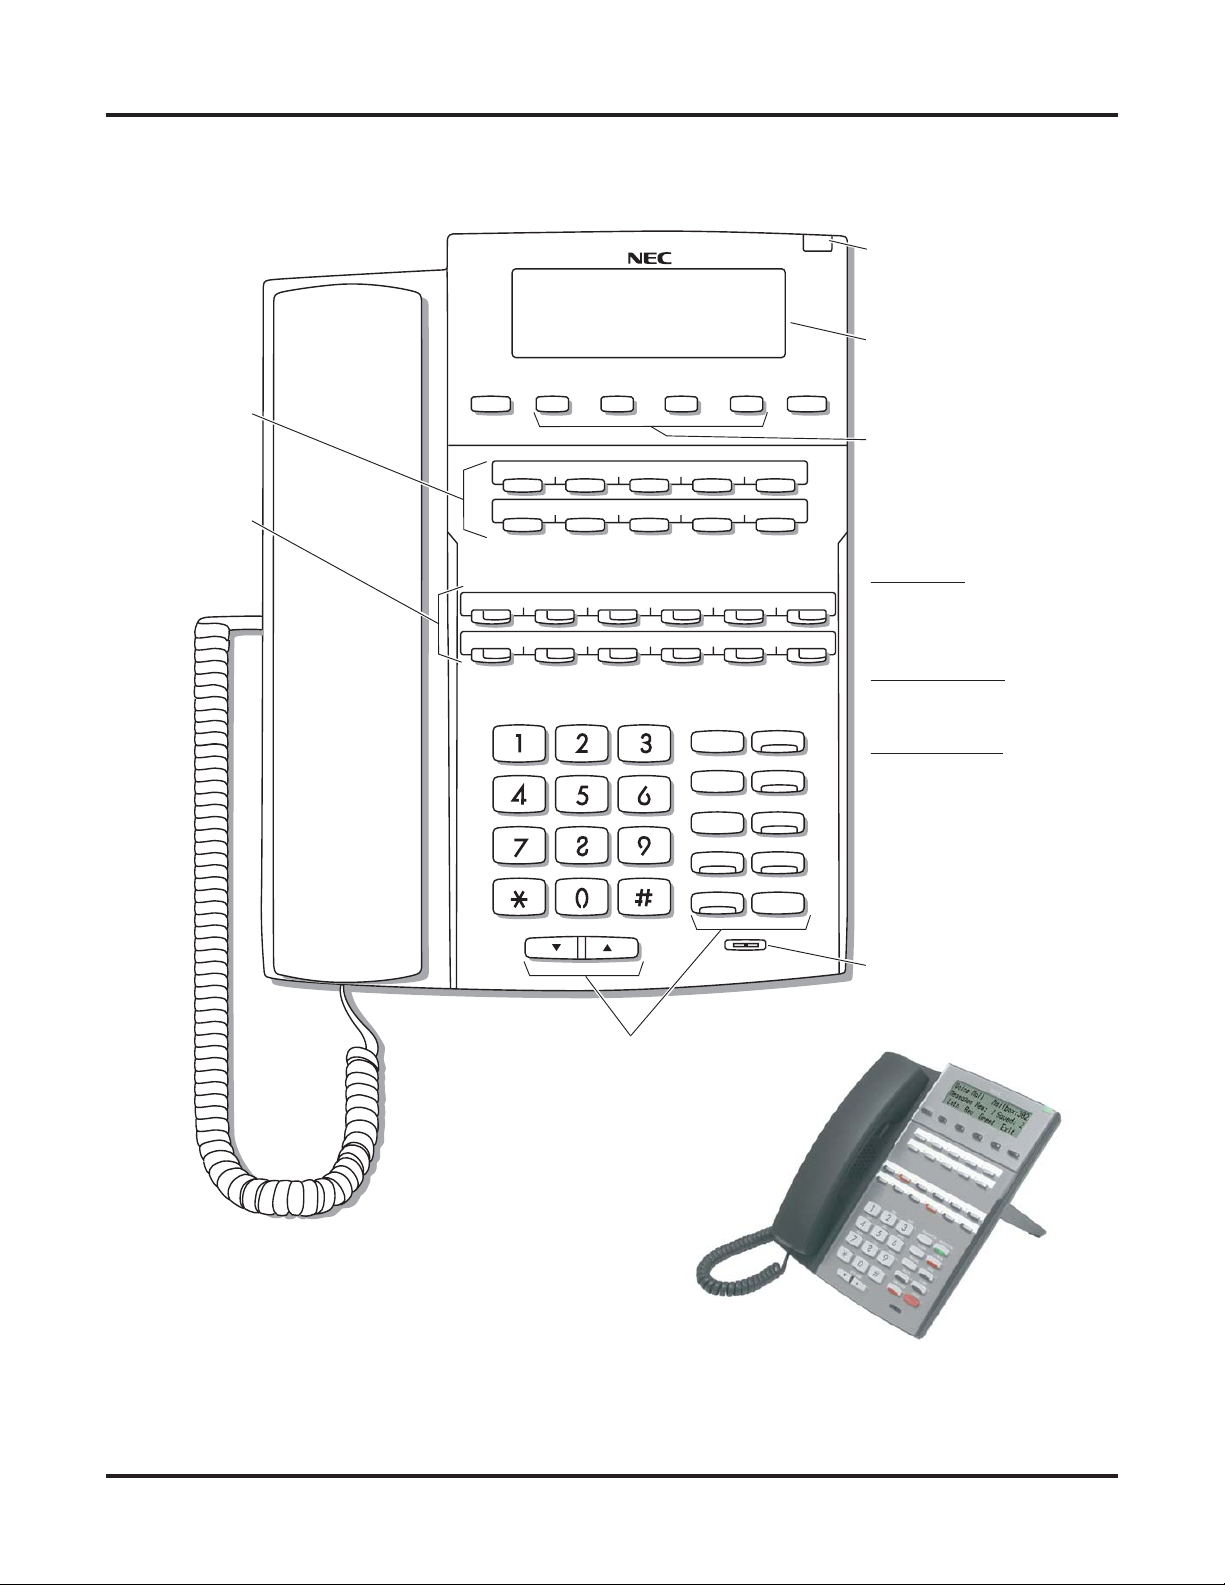
Telephone Illustrations
Ring/Message Lamp
Speed Dial
Bin keys
Feature keys
1093100 - 2
Thu June 8 11:52 AM
Pat Smith x301
Menu Dir VM:00 CL:00
CLEARCHECK
Line 1 Line 2 Line 3 Line 4 Line 5 Line 6
Line 7 Line 8 Line 9 Line 10 Line 11 Line 12
GHI
PQRS
ABC
JKL
TUV
DEF
MNO
WXYZ
TRANSFER
FLASH
REDIAL
MUTE
INTERCOM
V-MAIL
DND
CONF
Alpanumeric Display
Soft keys
In DSX-40:
Keys 1-8 are line keys.
Keys 9-12 are undefined.
In DSX-80/160:
Keys 1-12 are line keys.
For Attendants:
Key 12 is the
Operator Call key.
SPEAKER
VOLUME
Fixed Function keys
22-Button Display Telephone
HOLD
Microphone
4 ◆ Introduction DSX Feature Handbook
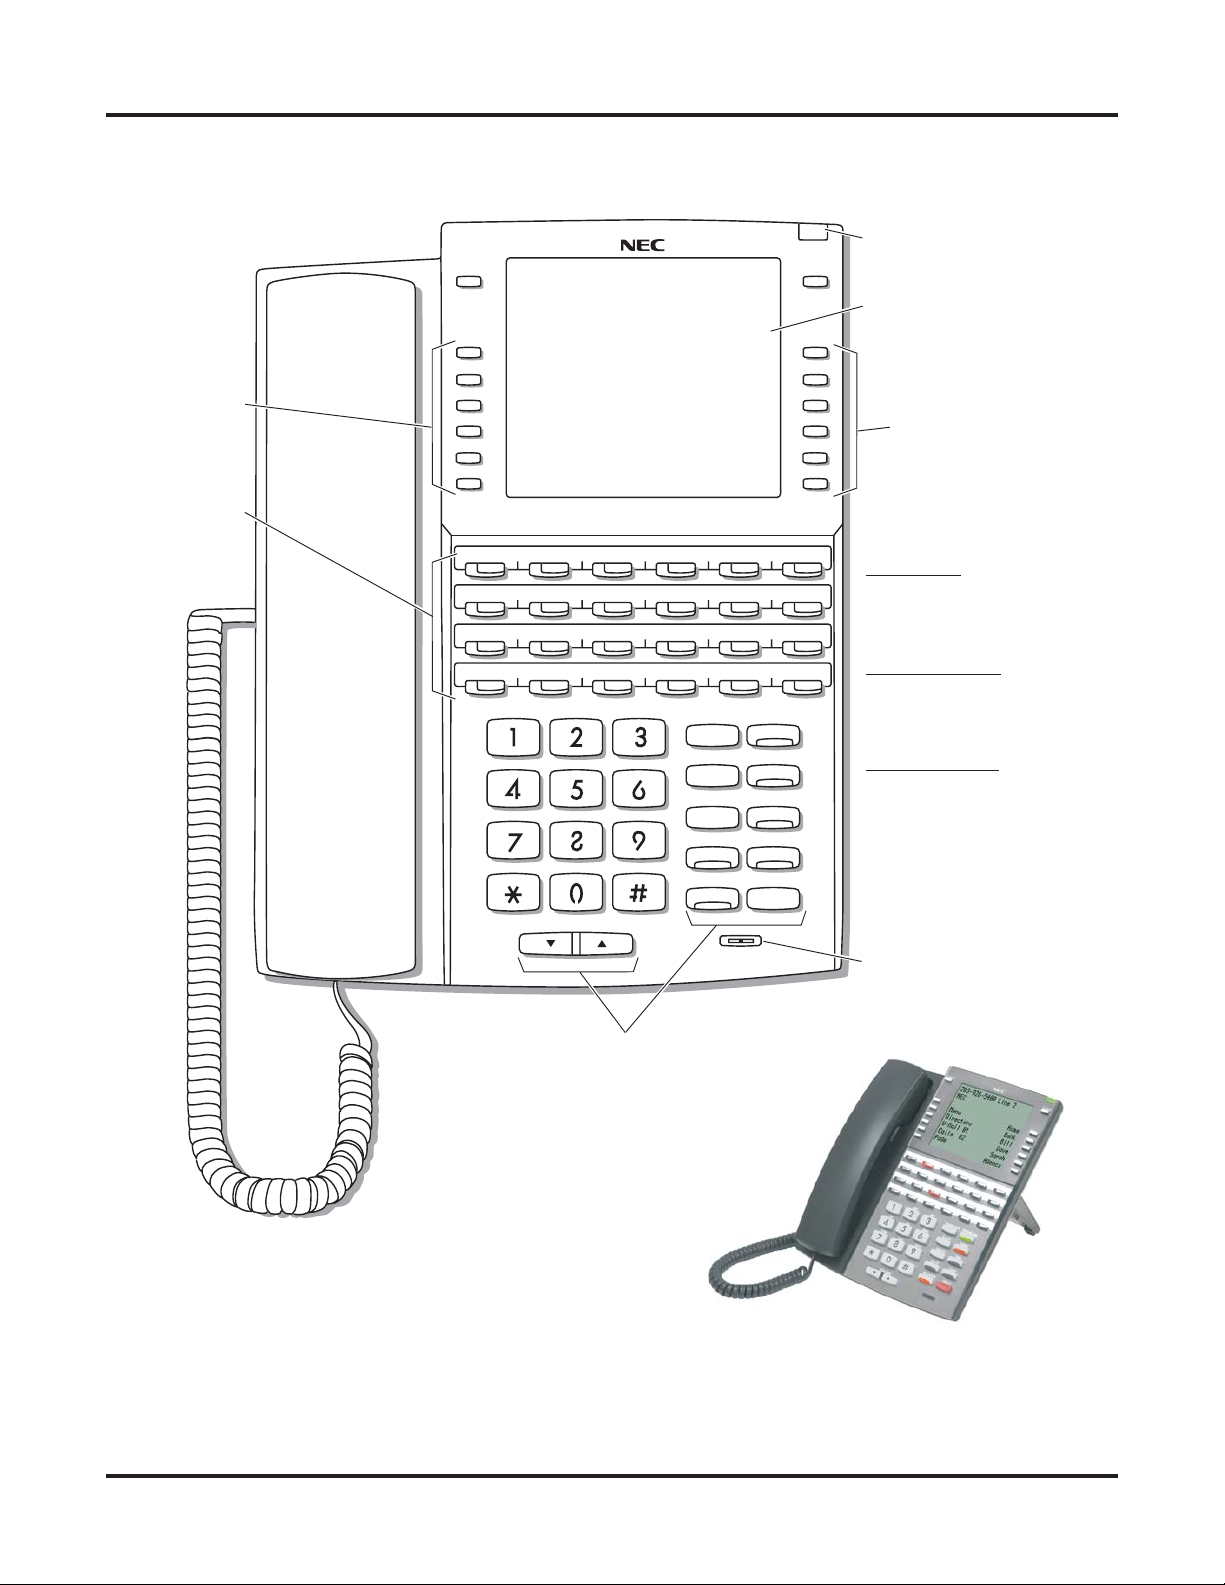
Telephone Illustrations
Ring/Message Lamp
Introduction
Speed Dial
Bin keys
Feature keys
1093100 - 1
Thu June 8 11:52 AM
Pat Smith x301
Menu Dir VM:00 CL:00
CLEARCHECK
Line 1 Line 2 Line 3 Line 4 Line 5 Line 6
Line 7 Line 8 Line 9 Line 10 Line 11 Line 12
GHI
PQRS
ABC
JKL
TUV
DEF
MNO
WXYZ
TRANSFER
FLASH
REDIAL
MUTE
INTERCOM
V-MAIL
DND
CONF
Alpanumeric Display
Soft keys
In DSX-40:
Keys 1-8 are line keys.
Keys 9-24 are undefined.
In DSX-80/160:
Keys 1-12 are line keys.
Keys 13-24 are undefined.
For Attendants:
Key 24 is the
Operator Call key.
SPEAKER
VOLUME
Fixed Function keys
34-Button Display Telephone
HOLD
Microphone
DSX Feature Handbook Introduction ◆ 5
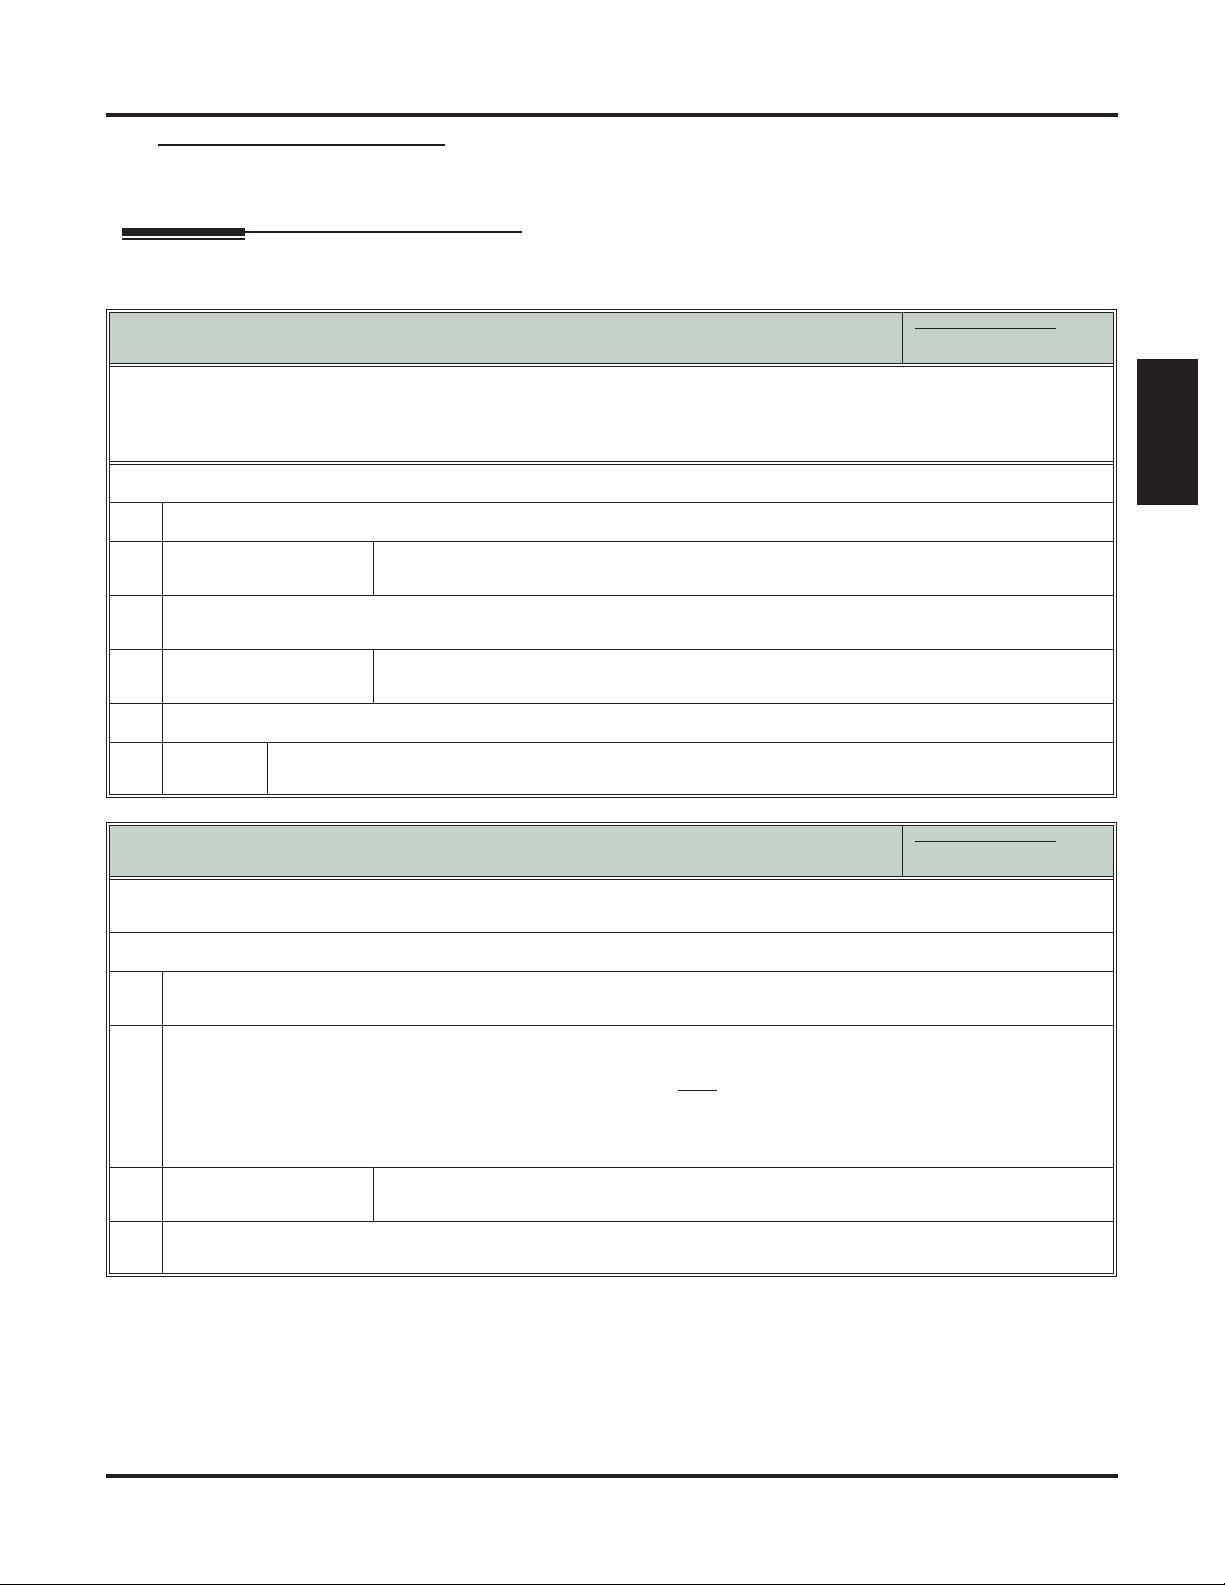
Telephone Illustrations
1093100 - 4
Soft keys
Feature keys
Thu June 8 11:52 AM
Pat Smith x301
Menu
Director
y
V-Mail 00
Calls 00
g
Pa e SP Dial 2
SP Dial 1
Ring/Message Lamp
CLEARCHECK
Alpanumeric Display
Soft keys
Line 1 Line 2 Line 3 Line 4 Line 5 Line 6
Line 7 Line 8 Line 9 Line 10 Line 11 Line 12
GHI
PQRS
ABC
JKL
TUV
VOLUME
DEF
MNO
WXYZ
TRANSFER
FLASH
REDIAL
MUTE
SPEAKER
INTERCOM
V-MAIL
DND
CONF
HOLD
Fixed Function keys
In DSX-40:
Keys 1-8 are line keys.
Keys 9-24 are undefined.
In DSX-80/160:
Keys 1-12 are line keys.
Keys 13-24 are undefined.
For Attendants:
Key 24 is the
Operator Call key.
Microphone
34-Button Super Display Telephone
6 ◆ Introduction DSX Feature Handbook
1093100 -3
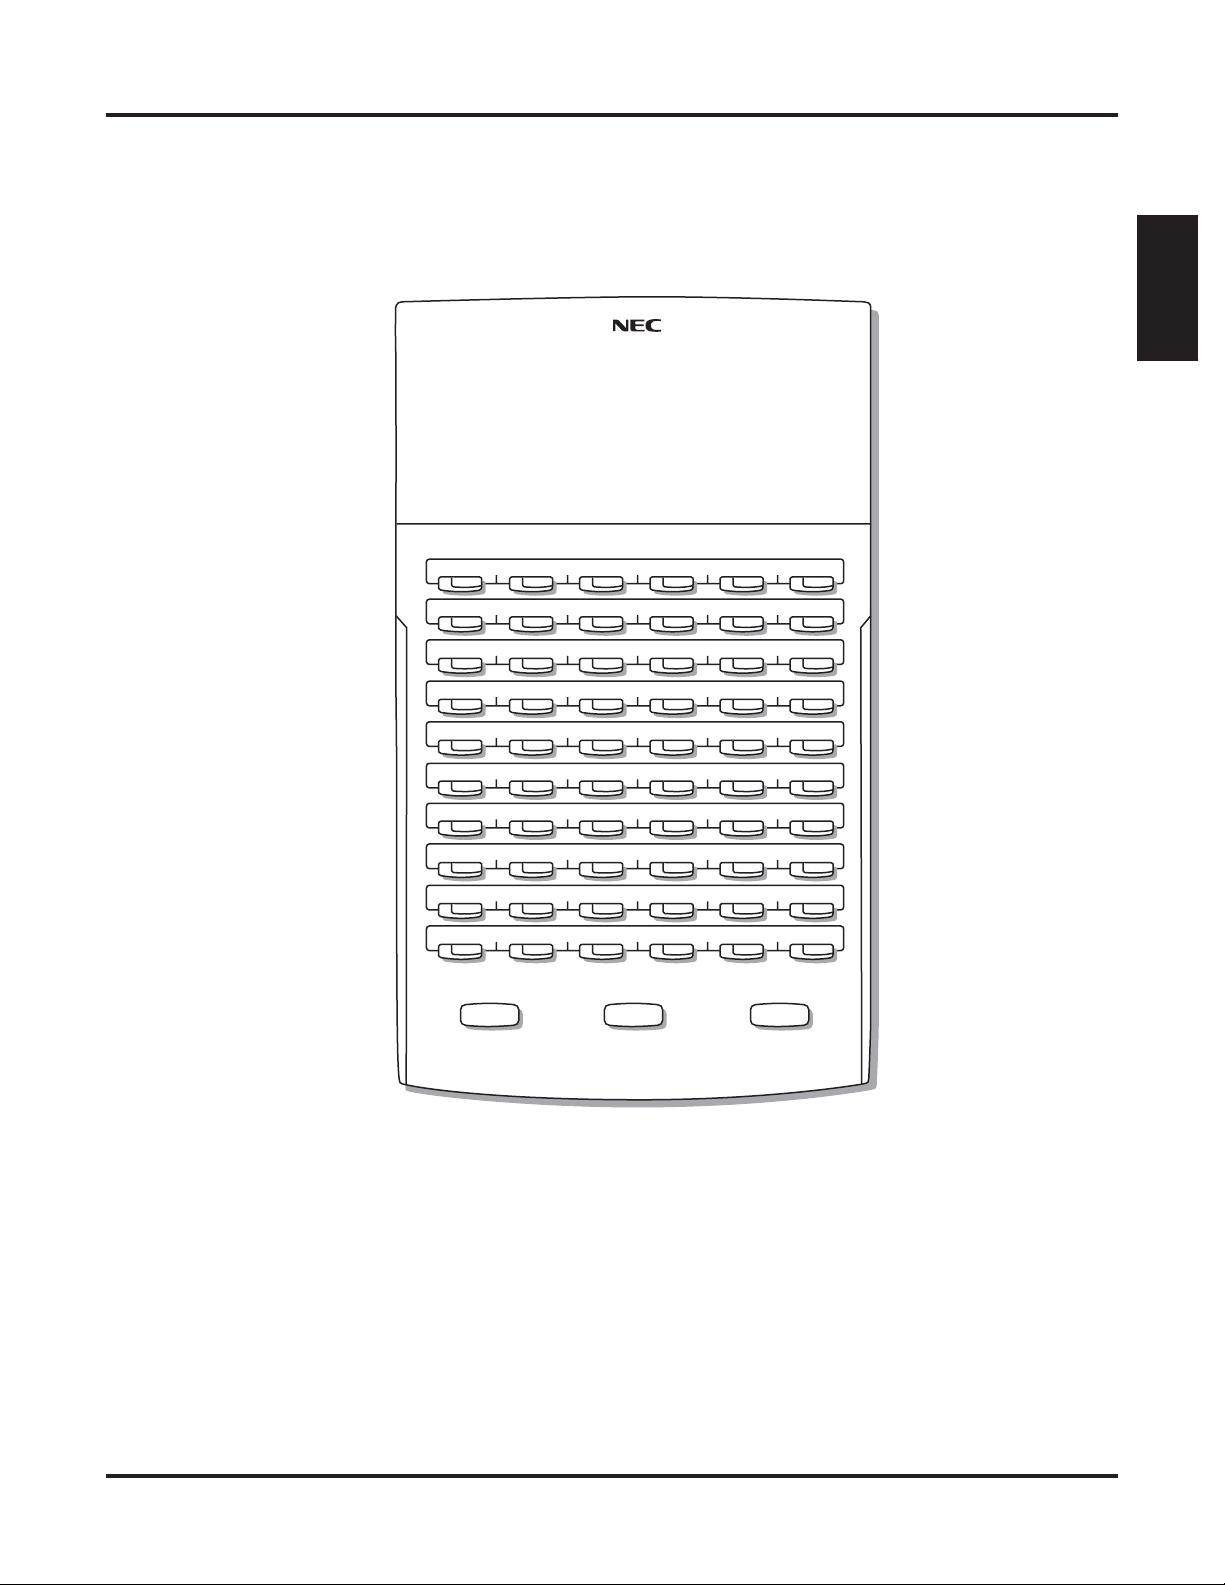
Telephone Illustrations
Introduction
300 301 302 303 304 305
306 307 308 309 310 311
312 313 314 315 316 317
318 319 320 321 322 323
324 325 326 327 328 329
330 331 332 333 334 335
336 337 338 339 340 341
342 343 344 345 346 347
RELEASE
ALL
CALL
Park 60 Park 61
TRANSFERANSWER
Page 1 Page 2 Page 3
NightPark 62 Park 63 Park 64 Park 65 Park 66
60-Button DSS Console
DSX Feature Handbook Introduction ◆ 7

Telephone Illustrations
8 ◆ Introduction DSX Feature Handbook

Introduction
Introduction
How To Use This Chapter
This chapter provides detailed information on the system’s features. The features in this chapterare in alphabetical order, like a dictionary, and are subdivided into headings as follows:
❥ Description
Read Description to get an overview of the feature.
❥ Operation
Refer to this heading for convenient, compact, yet detailed operation charts for using each feature.
Features
Features
DSX Feature Handbook Features ◆ 9

Account Codes
Account Codes
Description
Use Account codes to categorize and/or restrict outside calls.
Account Codes are user-dialed codes that help categorize and/or restrict outside calls. Account Codes are
from 2-10 digits long, using any combination of the digits 0-9. There are three types of Account Codes:
❥ Optional (Unforced Account Codes)
❥ Forced Account Codes
❥ Verified Account Codes
Optional (Unforced) Account Codes
Optional Account Codes allow a keyset extension user to enter an Account Code while placing an outside
call or any time while on a call. This type of Account Code is optional: the system does not require the user
to enter it. If the keyset user is already talking on an outside call, their conversation continues uninterrupted
while they enter an Account Code.
Single line telephone users can only enter an Account Code while placing their outside call.
Forced Account Codes
Forced Account Codes require an extension user to enter an Account Code every time they place an outside
call. If the user doesn’t enter the code, the system prevents the call. The system can require Forced Account
Codes for all outside calls, or just for toll calls (as determined by Toll Restriction programming). Note that
Forced Account Codes do not pertain to incoming calls.
Verified Account Codes
With Verified Account Codes, the system compares the Account Code the user dials with a list of codes pro-
grammed into the Verified Account Code Table. If the Account Code is in the table, the call goes through
(provided it is not prevented by an extension’s Toll Restriction programming). If the code is not in the table,
the system prevents the call. Verified Account Codes, if enabled, apply only to Forced Account Codes.
Using Account Codes and Speed Dial
To simplify Account Code operation, Personal and System Speed Dial bins can contain Account Codes.
Keep the following in mind when using Speed Dial and Account Codes:
❥ The Account Code can be either the first or last entry in the bin, and must be preceded and followed by
the # character. For example, the Account Code 1234 must be entered as #1234#.
❥ The Speed Dial bin can contain an Account Code followed by an outside number, or just the Account
Code. The Account Code must be preceded and followed by a # entry. If the bin contains just the
Account Code, the user must be sure to press the bin key before dialing the outside number.
❥ If the system has Verified Account Codes enabled, the Account Code entered in the Speed Dial bin must
match an entry in the Verified Account Code Table.
❥ If the Speed Dial bin does not contain an Account Code, the user must enter the Account Code manually.
If Forced Account Codes are enabled, the system requires the user to enter the Account Code before it
outdials the stored Speed Dial number.
❥ An extension user can preselect a line for a Speed Dial call.
Using Account Codes with Last Number Redial and Save
Last Number Redial and Save do not store Account Codes. This means that the user must manually enter an
Account Code to have it included with a call dialed using Last Number Redial and Save. If Forced Account
Codes are enabled, the system requires the user to enter the Account Code before it outdials the stored number saved by Last Number Redial or Save.
An extension user can preselect a line for a Last Number Redial or Save call.
10 ◆ Features DSX Feature Handbook
Account Codes and Emergency Calls
Account Codes are never enforced for emergency (911 and 1+911) calls.
Operation
Account Codes
Optional (Unforced) Account Codes
[Super Display Soft Key] - [Keyset Soft Key]
In these instructions:
[Super Display Soft Key]
[Keyset Soft Key]
• For keysets, Optional Account Codes apply to both incoming and outgoing calls. For outgoing calls, you can enter the
Account Code before or after dialing the outside number.
• For Single Line sets, Optional Account Codes apply only to outgoing calls. You must enter the Account Code after getting dial tone on the line but before dialing the outside number.
To enter an Optional (Unforced) Account Code:
1.
Place or Answer outside call.
[Acct Code]
2.
[Acct]
When you see Enter Account Code, enter Account Code.
3.
4.
5.
• An Account Code can be up to 10 digits long, using the digits 0-9.
[Acct Code]
[Acct]
For outside calls only:
a.
Dial your outside number.
• Toll Restriction may still prevent you from dialing certain outside numbers.
Press Account Code soft key.
• You can optionally press an Account Code Feature Key or dial # (if enabled).
Press Account Code soft key.
• You can optionally press an Account Code Feature Key or dial # (if enabled).
Forced Account Codes
[Super Display Soft Key] - [Keyset Soft Key]
In these instructions:
[Super Display Soft Key]
[Keyset Soft Key]
• Forced Account Codes may prevent Speed Dial from dialing 911 emergency services.
• Forced Account Codes do not apply to incoming calls.
Features
To enter a Forced Account Code:
Access a line for an outgoing call.
1.
2.
• You hear three beeps.
When you see Enter Account Code, enter Account Code.
• An Account Code can be up to 10 digits long, using the digits 0-9.
• If your system has Verified Account Codes enabled, you must
enter one from the Verified Account Codes
Table. If you enter an invalid Verified Account Code, your call will be cut off in the next step.
• Skip this step to bypass Account Code entry (for example, when dialing a local call and your system requires
Account Codes only for toll calls).
[Acct Code]
3.
[Acct]
Dial your outside number.
4.
Press Account Code soft key.
• You can optionally press an Account Code Feature Key or dial # (if enabled).
• Toll Restriction may still prevent you from dialing certain outside numbers.
DSX Feature Handbook Features ◆ 11

Alphanumeric Display
Alphanumeric Display
Description
The Alphanumeric Display messages help the display telephone user process calls, identify
callers and customize features.
The 22- and 34-Button Display Telephones have a three-line, 24-character per line alphanumeric display.
The first line displays the date and time (while idle) and feature status messages. The second line is used
extensively by IntraMail. The third line displays the Soft Key definitions.
The 34-Button Super Display Telephone has a nine-line, 24-character per line alphanumeric display. The
first line displays the date and time (while idle) and feature status messages, just like the 22- and 34-Button
Display Telephones. The second line is used extensively by IntraMail. Lines 4-9 are the comprehensive
Super Display Telephone soft key definitions.
❥ To learn more about the display telephones:
- see 22-Button Display Telephone on page 4
- see 34-Button Display Telephone on page 5
- see 34-Button Super Display Telephone on page 6
❥ To learn more about the Soft Keys, see Interactive Soft Keys on page 92.
Operation
Refer to the individual features for feature operation.
12 ◆ Features DSX Feature Handbook
Attendant Call Queuing
Description
Attendant Call Queuing
Attendant Call Queuing helps minimize call congestion in systems that use the attendant as
the overflow destination for unanswered calls.
An unlimited number of callers can queue for the attendant. The callers hear ringback while they wait for the
attendant to answer — not busy tone. If you have the attendant as the overflow destination for Direct Inward
Lines, for example, unanswered DILs will “stack up” at the attendant until they are answered.
Operator Call Key
The last Feature Key on an attendant telephone is permanently assigned as an Operator Call key. When the
operator has Intercom calls waiting to be answered, the calls queue under this key. The key winks (on) when
calls are queued.
The Operator Call key is a permanent assignment for all extensions assigned as operators. You cannot
change this assignment. Attendant Call Queuing is a permanent, non-programmable feature.
Operation
Attendant Call Queuing
[Super Display Soft Key] - [Keyset Soft Key]
To answer a call flashing the Operator Call Key:
1.
Press the flashing Operator Call key.
In these instructions:
[Super Display Soft Key]
[Keyset Soft Key]
Features
DSX Feature Handbook Features ◆ 13
Attendant Position
Attendant Position
Description
The attendant is the system’s call processing focal point.
The attendant is the focal point for call processing within the system. The system can have up to four attendants. In addition to the features of a standard keyset, the attendant also has the following unique capabilities
(refer to the respective feature for details):
❥ Attendant Call Queuing (page 13)
Incoming Intercom calls from co-workers queue for the attendant. The callers never hear busy tone.
❥ Barge In (Intrusion) (page 18)
The attendant can break into another extension user’s established call. This option is enabled in the attendant’s Class of Service (COS 1).
❥ Direct Line Access (page 43)
Direct Line Access lets the attendant user dial a code to access an individual line. This option is enabled
in the attendant’s Class of Service (COS 1).
❥ Forced Line Disconnect (page 78)
In an emergency, the attendant can release (disconnect) another user’s active outside call. This option is
enabled in the attendant’s Class of Service (COS 1).
❥ Line Queuing / Line Callback (page 102)
The attendant can Camp-On (queue) for a busy line. This option is enabled in the attendant’s Class of
Service (COS 1).
❥ Night Service / Night Ring (page 112)
An attendant with a System Night key can put the system in the night mode. This option is enabled in the
attendant’s Class of Service (COS 1).
❥ Removing Lines and Extensions from Service (page 131)
The attendant can remove problem lines from service —then return them to service once the problem is
corrected. This option is enabled because the attendant has Direct Line Access enabled in their Class of
Service (COS 1).
The attendant should use a 34-Button Display or 34-Button Super Display Telephone. In addition, most
attendants should find a DSS Console helpful when processing calls.
Operation
To call the attendant:
Press INTERCOM.
1.
2.
• You hear dial tone.
Dial 0.
• You hear two beeps.
• This calls the attendant assigned to your extension. If your system has multiple attendants, you can reach them
by dialing 01-04.
• In a multiple attendant system, you can dial 0 and wait on the line to automatically call operator 1.
[Super Display Soft Key] - [Keyset Soft Key]
Attendant Position
In these instructions:
[Super Display Soft Key]
[Keyset Soft Key]
14 ◆ Features DSX Feature Handbook
Auto Redial
Description
Auto Redial
Instead of redialing, have Auto Redial periodically retry a busy outside number.
Auto Redial periodically redials a busy outside number. If a keyset user places an outside call and the call
recipient is busy, the user can press a soft key to enable Auto Redial. The keyset user doesn’t have to retry
the number, hoping it will go through.
Auto Redial will periodically retry the number up to 15 times. Auto Redial cancels when the called party
rings or answers, or when the extension:
❥ Places or answers another outside call.
❥ Receives an Intercom voice announcement or answers an Intercom call by lifting the handset or pressing
SPEAKER.
❥ Presses SPEAKER to cancel Auto Redial.
❥ Presses any other fixed feature key except MIC.
❥ Lifts and replaces the handset.
❥ Presses the CANCEL soft key (Super Display only).
Operation
[Super Display Soft Key] - [Keyset Soft Key]
To enable Auto Redial:
1.
Place an outside call and receive busy tone.
2.
[Auto Redial]
[Alnd]
You see:
WAITING (30 SEC)
AUTO REDIAL 1 OF 15
Press to enable Auto Redial.
Auto Redial
In these instructions:
[Super Display Soft Key]
[Keyset Soft Key]
• The system enables Auto Redial for the last outside call you dialed.
The display shows the interval between callout attempts (e.g., 30 seconds), as
well as how many times redial has occurred (e.g., 1 of 15).
• SPEAKER winks when your telephone has Auto Redial enabled.
Features
3.
The system periodically redials the call, up to 15 times.
Auto Redial cancels when you:
• Place or answer another outside call.
• Receive an Intercom voice announcement or answer an Intercom call by lifting the handset or
pressing
• Press
SPEAKER.
SPEAKER to cancel Auto Redial.
• Lift and replace the handset.
• Press the
CANCEL soft key (Super Display only).
If a Caller ID call rings while Auto Redial is enabled, your display will show the number and optional
name of the incoming caller. However, the ringing does not cancel Auto Redial. In addition, the Auto
Redial display will be restored after the Caller ID call stops ringing.
DSX Feature Handbook Features ◆ 15

Automatic Handsfree
Automatic Handsfree
Description
Automatic Handsfree is a convenience for workers who don’t have a free hand to answer a call
or use a feature.
Automatic Handsfree allows a keyset user to place or answer a call Handsfree by just pressing a key — without lifting the handset or pressing SPEAKER first. If enabled, the system provides Automatic Handsfree for:
❥ Call Coverage keys
❥ Central Office Calls (line and loop calls)
❥ Group Call Pickup keys
❥ Hotline Keys
❥ Intercom (INTERCOM key)
❥ Last Number Redial (REDIAL key)
❥ Paging keys
❥ Park keys
❥ Personal Speed Dial bin keys
❥ Personal and System Speed Dial Feature Keys
The system always provides Automatic Handsfree for:
❥ Dial Number Preview
❥ Directory Dialing
Operation
If enabled, Automatic Handsfree operation is automatic when you press the key.
16 ◆ Features DSX Feature Handbook

Background Music
Description
Operation
Background Music
Broadcast music through the telephone speaker for a more pleasing work environment.
Background Music (BGM) sends music from a customer-provided music source to speakers in keysets. If an
extension user activates it, BGM plays whenever the extension is idle. Incoming calls and Paging announcements temporarily override (turn off) Background Music. Background Music requires a customer-provided
external music.
Features
[Super Display Soft Key] - [Keyset Soft Key]
To turn Background Music on and off:
1.
Do not lift the handset or press SPEAKER.
2.
Press HOLD.
Background Music
In these instructions:
[Super Display Soft Key]
[Keyset Soft Key]
DSX Feature Handbook Features ◆ 17
Barge In (Intrusion)
Barge In (Intrusion)
Description
In an emergency, use Barge In to get through to a co-worker right away.
Barge In permits an extension user to break into another extension user’s established call. This sets up a
three-way conversation between the intruding extension and the two parties on the initial call. The user can
Barge In on an Intercom call or outside call.
Operation
CAUTION
Unauthorized intrusion on calls using this feature may be interpreted as an
invasion of privacy.
Barge In (Intrusion)
[Super Display Soft Key] - [Keyset Soft Key]
To Barge In on a call:
Place one of the following types of call:
1.
• Call busy extension.
• Press line key for busy line.
• Press INTERCOM and dial 101 for busy line (i.e., using Direct Line Access).
• Press INTERCOM and dial #901 for busy line (i.e., using Line Dial-up).
• Press INTERCOM and dial Line Group access code (e.g., 9).
2.
[Barge In]
[MORE + Barg}
Press to Barge In.
• Alternately dial 4.
• You hear two beeps.
3.
Join the conversation in progress.
In these instructions:
[Super Display Soft Key]
[Keyset Soft Key]
18 ◆ Features DSX Feature Handbook

Call Coverage Keys
Description
Call Coverage Keys
Call Coverage keys allow an extension user to cover a co-worker’s calls from their own telephone.
A keyset can have Call Coverage Keys for a co-worker’s extensions, Ring Group master numbers and UCD
Group master numbers. The Call Coverage Key lights when the co-worker’s extension is busy, flashes slowly
when the co-worker has an incoming call, and flashes fast when the co-worker is in Do Not Disturb. The Call
Coverage Key can ring immediately when a call comes into the covered extension, ring after a delay or not
ring at all. In addition, the keyset user can press the Call Coverage Key to intercept their co-worker’s incoming call. They can also go off hook and press the Call Coverage key to call the covered extension. An extension can have as many Call Coverage Keys as they have available Feature Keys on their telephone.
Call Coverage Key Busy Lamp Indications
When the key is: The covered extension is:
Off Idle or not installed
On Busy
Slow Flash Ringing
Features
Medium Flash Covered extension is in DND for outside
calls (option 1).
Fast Flash
Covered extension is in DND for Intercom
calls (option 2) or All Calls (option 3).
Call Coverage Keys will intercept the following types of calls:
❥ Key Ring Calls
❥ Ringing Intercom calls
❥ Calls to a UCD Group master number
❥ Calls ringing a Group Ring master number
❥ Transferred calls
Call Coverage Keys will not intercept a call ringing the attendant’s Operator Call Key.
DSX Feature Handbook Features ◆ 19
Call Coverage Keys
Operation
Answering Call Coverage Keys
[Super Display Soft Key] - [Keyset Soft Key]
To answer a call ringing or flashing a Call Coverage key:
1.
Press the flashing Call Coverage key.
Using Call Coverage Keys to Place Calls
[Super Display Soft Key] - [Keyset Soft Key]
To place a call from an idle Call Coverage key to the covered extension:
Press the Call Coverage key.
1.
• You hear two beeps or Intercom ringing.
Speak with the co-worker at the covered extension.
2.
• The Call Coverage key lights green while you are connected.
Using Call Coverage Keys to Transfer Calls
[Super Display Soft Key] - [Keyset Soft Key]
To Transfer your call using a Call Coverage key:
1.
Do not hang up.
2.
Press TRANSFER.
3.
Press your Call Coverage key.
In these instructions:
[Super Display Soft Key]
[Keyset Soft Key]
In these instructions:
[Super Display Soft Key]
[Keyset Soft Key]
In these instructions:
[Super Display Soft Key]
[Keyset Soft Key]
4.
Do one of the following.
a.
b.
c.
When you Transfer a call, it will recall to you if it is unanswered at the destination. If you don’t answer the recall, it
5.
Announce the call to make a Screened Transfer.
• Hang up if your co-worker accepts the call.
Hang up to send the call through as an Unscreened Transfer.
Press the flashing line key to return to the call if your co-worker doesn’t want it.
diverts to Key Ring.
User Programmable Feature
Setting Call Coverage Key Ringing
Feature Mnemonic Operation Access Level
Feature Key Ringing
#RA (#72)
#RAC
+ Call Coverage key repeatedly to select ringing
mode +
SPEAKER to exit.
• Call Coverage keys flash as follows:
- Lamp only = On red
- Immediate ring = On green
- Delay ring = Fast flash green.
2-5
20 ◆ Features DSX Feature Handbook
Call Forwarding
Description
Call Forwarding Chaining
Call Forwarding
Call Forwarding ensures that the user’s calls are covered when they are away from their work area.
Call Forwarding permits an extension user to redirect their call to another extension. The types of Call Forwarding are:
❥ Call Forwarding when Not Answered
Calls ringing the extension forward when not answered.
❥ Call Forwarding when Busy or Not Answered
Calls ringing the extension forward when not answered, and all calls forward while the extension is busy.
❥ Call Forwarding Immediate
All calls to the extension forward immediately.
You can set up Call Forwarding to reroute all calls or just outside calls. If an extension with forwarding set
for outside calls only receives a screened Transfer, the initial voice-announcement broadcasts at the extension. When the caller hangs up to complete the transfer, the outside call forwards as programmed.
Extension user’s can chain Call Forwards. For example, extension 301 can forward all calls immediately to
304, which in turn can forward all calls immediately to extension 302. Any co-worker calling 301 or 304
goes to 302 instead. If extension 302 is Call Forwarded to voice mail, callers to 301 or 304 go directly to
302’s mailbox.
Features
Call Forwarding Cancel
Call Forwarding cancel allows a keyset user to dial a code to simultaneously cancel all Call Forwarding system-wide. The extension must have access level 4 or 5.
Call Forwarding Key
A keyset user can have a key on their telephone or DSS Console assigned as a Call Forwarding key.
❥ While the extension is idle, pressing the key puts the extension in the Call Forwarding programming
mode - the same as pressing INTERCOM and dialing *3.
- If the extension has Call Forwarding enabled, and the user presses the key and waits (for at least 6
seconds), Call Forwarding is automatically cancelled.
- If the extension has Call Forwarding disabled, and the user presses the key and waits (for at least 6
seconds), the prior Call Forwarding mode is automatically enabled (if any).
❥ While the extension is busy, pressing the key switches Call Forwarding on and off.
Call Forwarding Key BLF
This flash rate: Means:
Off Call Forwarding is disabled.
Fast flash The extension is in the Call For-
warding programming mode.
Slow flash Call Forwarding is enabled at the
extension.
DSX Feature Handbook Features ◆ 21

Call Forwarding
Call Forwarding Toggle in a Personal Speed Dial Bin
If an extension doesn’t have an available Feature Key for a Call Forwarding key, the user can program a Personal Speed Dial bin for similar operation (without the BLF). To do this:
❥ While on hook, dial #77.
❥ Press the key for the Personal Speed Dial bin you want to program + HOLD.
❥ For LINE/GRP/ICM, press INTERCOM + HOLD.
❥ For NUM, dial *3 + HOLD.
❥ For NA, enter a name of your choosing + HOLD.
❥ Press SPEAKER to exit.
While the extension is idle, pressing the bin key puts the extension in the Call Forwarding programming
mode - the same as pressing INTERCOM and dialing *3.
❥ If the extension has Call Forwarding enabled, and the user presses the bin key and waits (for at least 6
seconds), Call Forwarding is automatically cancelled.
❥ If the extension has Call Forwarding disabled, and the user presses the bin key and waits (for at least 6
seconds), the prior Call Forwarding mode is automatically enabled (if any).
Call Forwarding Confirmation Tone
Keyset users will hear a single confirmation beep after enabling or cancelling Call Forwarding. Single line
telephone users will hear Intercom dial tone after enabling or cancelling Call Forwarding.
22 ◆ Features DSX Feature Handbook

Operation
Activating or Canceling Call Forwarding
To activate Call Forwarding:
1.
Select the Call Forwarding options.
[Menu + Call Forward]
[Menu + Cfwd]
2.
Select or cancel a Call Forwarding type.
[Immediate]
[Immed]
[Ring/No Ans]
[RNA]
[Busy/No Ans]
[BNA]
[Off-Premise]
[MORE + OFFP]
[Ans Machine]
[MORE + AME]
[Message]
[MORE + MSG]
[None]
[MORE + MORE + NONE]
Select the Call Forwarding destination:
3.
• An extension number or UCD Group master number.
• 0 for the operator.
• V-MAIL for voice mail.
Call Forwarding
In these instructions:
[Super Display Soft Key]
[Keyset Soft Key]
Alternately do one of the following:
• Press INTERCOM and dial *3.
• Press your Call Forwarding Feature Key.
Select Call Forwarding Immediate.
• Alternately dial 4.
Select Call Forwarding when Not Answered.
• Alternately dial 6.
Select Call Forwarding when Busy or Not Answered.
• Alternately dial 2.
Select Call Forwarding Off Premises.
• Alternately dial 3.
• Turn to Call Forwarding Off Premises (page 24) for more.
Select Personal Answering Machine Emulation.
• Alternately dial 7.
• Skip to Personal Answering Machine Emulation (page 168) for more.
Select Selectable Display Messaging.
• Alternately dial 8.
• Skip to Selectable Display Messaging (page 139) for more.
Select to cancel Call Forwarding.
• Alternately dial 0.
1
1
Features
4.
Select the Call Forwarding mode.
[All]
[All]
[Line Only]
[Line]
1
Option will not forward voice-announced Intercom calls.
Select forwarding all calls.
• Alternately dial
2.
Select forwarding outside calls only.
• Alternately dial
8.
User Programmable Feature
Canceling All Call Forwards System-Wide
Feature Mnemonic Operation Access Level
Call Forwarding Clear All
#CC (#22)
DSX Feature Handbook Features ◆ 23
#CC
+ Y to clear (cancel) forwarding or N to exit without
clearing + SPEAKER to hang up.
4 and 5

Call Forwarding Off Premises
Call Forwarding Off Premises
Description
When a user is out of the office, they can send their calls to their home office or cell phone.
Off Premises Call Forwarding allows a keyset user to forward their calls to an off-site location (such as a cell
phone or remote office) if allowed by their Class of Service. Keyset users can stay in touch by having Off
Premises Call Forwarding automatically forward their calls while they are away from the office. To set up
Off Premises Call Forwarding, the user selects the line or Line Group over which the call should route, as
well as the number the system should dial. The number dialed can be from an extension’s Personal Speed
Dial bin containing an outside number, or the user can enter an outside number directly into their Personal
Speed Dial bin 720. When a call rings the forwarded extension, the system selects the specified line or group
and then outdials the stored number.
Off Premises Call Forwarding reroutes:
❥ Intercom calls
❥ Transferred calls
❥ Direct Inward Lines
❥ UTRF (unscreened transfer) calls routed from the voice mail Automated Attendant
❥ Circular and Terminal Extension Hunting calls
Off Premises Call Forwarding does not reroute:
❥ Key Ring calls
❥ Calls to a UCD Group master number.
❥ Group Ring calls (i.e., calls to a Ring Group master number)
❥ UCD Group Calls (i.e., calls to a UCD Group master number)
❥ Ringing Call Coverage key calls
You can set up Off Premises Call Forwarding to reroute all calls or just outside calls. If an extension with
forwarding set for outside calls only receives a screened Transfer, the initial voice-announcement broadcasts
at the extension. When the caller hangs up to complete the transfer, the outside call forwards as programmed.
Operation
Activating or Canceling Call Forwarding Off Premises
To activate Call Forwarding:
Select the Call Forwarding options.
1.
[Menu + Call Forward]
[Menu + Cfwd]
Select or cancel a Call Forwarding Off Premises.
2.
[Off-Premise]
[MORE + OFFP]
[None]
[MORE + MORE + None]
Do one of the following.
3.
a.
To select a Personal Speed Dial bin as your Off Premises Call Forwarding number:
Alternately do one of the following:
• Press
• Press your Call Forwarding Feature Key.
Select Call Forwarding Off Premises, then proceed to step 3 below.
• Alternately dial 3.
Select to cancel Call Forwarding.
• Alternately dial 0 or press CLEAR.
INTERCOM and dial *3.
In these instructions:
[Super Display Soft Key]
[Keyset Soft Key]
24 ◆ Features DSX Feature Handbook

Activating or Canceling Call Forwarding Off Premises
[SPEED DIAL BIN]
[Bin]
Select the bin option.
When you see BIN#:
• Enter the Personal Speed Dial bin you want to use (701-720) + HOLD.
b.
To store a new Off Premises Call Forwarding number:
• The system automatically stores this number in bin 720.
[NUMBER]
[Num]
When you see
Select the number option.
LINE/GRP/ICM:
• Enter the line number (e.g., 1 for line 1) or Line Group number (e.g.,
90 for group 0) + HOLD.
• Following Speed Dial programming methods, enter the number you
want to store (up to 16 digits long) + HOLD.
- Press MUTE to store a Pause.
- Press FLASH to store a Flash.
- You cannot enter a name using this option.
If you see 720: IN USE OVERRIDE?
Call Forwarding Off Premises
In these instructions:
[Super Display Soft Key]
[Keyset Soft Key]
Features
c.
Select the Call Forwarding mode.
4.
[All]
[All]
[Line Only]
[Line]
To view the currently enabled Off Premises Call Forwarding number (if any):
[YES]
[YES]
[NO]
[NO]
[VIEW]
[View]
Select to view the currently stored number.
• Press SPEAKER to exit the view mode.
Select forwarding all calls.
• Alternately dial 2.
Select forwarding outside calls only.
• Alternately dial 8.
Select to override the existing entry and enter a
new number.
Select to cancel and back up to step 3.
DSX Feature Handbook Features ◆ 25

Call Timer
Call Timer
Description
Call Timer helps users that must keep track of their time on the phone.
Call Timer lets a keyset user with a Call Timer key time their outside calls on the telephone display. There
are two types of Call Timer keys:
❥ Manual Call Timer
Any time while placing a call or while on a call, a display keyset user can press their Manual Call Timer
key to start the Call Timer. The Call Timer will continue until the user hangs up or presses their Manual
Call Timer key again.
❥
Automatic Call Timer
In addition to the features of the Manual Call Timer key, the Automatic Call Timer key provides automatic
timing for outside calls. When a display keyset with an Automatic Call Timer key places or answers an outside call, the Call Timer automatically starts when that outside call connects. The Automatic Call Timer
does not automatically start for Intercom calls. The Automatic Call Timer can also work like a Manual Call
Timer key. There is no need to have a Manual and Automatic Call Timer key on the same phone.
The Call Timer feature also provides:
❥ Review of Previously Timed Call
Any time after hanging up from a timed call, a display keyset user can press their Manual or Automatic
Call Timer key to review the duration of that call.
❥ Timer Reset for Current Call
While the display keyset user is timing their call, they can press CLEAR at any time to reset the Call
Timer to 00:00:00.
❥ Automatic Timer Stop
The system assigns the Call Timer to the active call. When the user terminates the active call, the Call
Timer automatically shuts down.
❥
Wrap-up Timer Display
After hanging up a timed call, a display keyset will show the Call Timer data for 6 seconds before returning
the display to idle. This gives the extension user adequate time to make a record of the timed call, if desired.
Operation
In these instructions:
Automatically Timing Your Outside Call
To time your outside call if you have an Automatic Call Timer key:
Place or answer outside call.
1.
• The Call Timer starts automatically. The Automatic Call Timer key lights red while the system times the call.
Manually Timing Your Outside Call
To manually time your Intercom or outside call:
1.
While placing or while on the call, do one of the following.
a.
b.
[Timer]
[Time]
Press the Call Timer soft key.
Press the Manual or Automatic Call Timer key.
• The Automatic Call Timer key lights red while the system times the call.
26 ◆ Features DSX Feature Handbook
[Super Display Soft Key]
[Keyset Soft Key]
In these instructions:
[Super Display Soft Key]
[Keyset Soft Key]

Stopping and Restarting the Call Timer for Your Call
To stop the Call Timer:
1.
Do one of the following.
a.
b.
2.
The Call Timer disappears from the display.
[Timer]
[Time]
Press the Call Timer soft key.
Press the Manual or Automatic Call Timer key.
To restart the Call Timer:
• The timer will restart from 00:00.
1.
Do one of the following.
a.
b.
[Timer]
[Time]
Press the Call Timer soft key.
Press the Manual or Automatic Call Timer key.
Resetting the Call Timer
To reset the Call Timer while it is running (i.e., timing your call):
Call Timer
In these instructions:
[Super Display Soft Key]
[Keyset Soft Key]
In these instructions:
[Super Display Soft Key]
[Keyset Soft Key]
Features
Press CLEAR.
1.
• The Call Timer restarts from 00:00. It does not disappear from the display.
Reviewing a Call’s Duration
To review the duration of your last timed call:
1.
Wait for the Manual or Automatic Call Timer key to go out.
2.
Press the Manual or Automatic Call Timer key.
In these instructions:
[Super Display Soft Key]
[Keyset Soft Key]
DSX Feature Handbook Features ◆ 27

Call Waiting / Camp-On
Call Waiting / Camp-On
Description
Call Waiting helps busy extension users know when they have additional waiting calls. It also
lets callers wait in line for a busy extension without being forgotten.
With Call Waiting, an extension user may call a busy extension and wait in line (Camp-On) without hanging
up. When the user Camps-On (by dialing 2), the system signals the busy extension with two beeps indicating
the first waiting call. (The busy extension can be on a handset or Handsfree call.) The call goes through when
the extension becomes free.
If an extension has more than one caller waiting, they queue on a first-in/first-out basis (FIFO). The extension will not hear Camp-On beeps for additional waiting calls.
Off-Hook Signaling also alerts the user when unanswered calls are waiting to get through. Turn to Off-Hook
Signaling (page 114) for more.
The following chart shows when the two types of Off-Hook Signaling occur. Note that Camp-On tones occur
for an extension when they are the exclusive recipient of the call (such as a DIL).
Key Ring Yes No
Off-Hook Ringing Camp-On Tones
Transferred Outside Call Yes Yes
Direct Inward Line Yes Yes
Transfer from voice mail (UTRF) Yes Yes
Call Coverage Key Yes No
Group Call Pickup Key Yes No
Operation
Camp-On to a Busy Extension
To Camp-On to a busy extension:
Call the busy extension.
1.
2.
3.
• Listen for busy or busy/ring tone.
• With IntraMail installed, you will hear a voice prompt first.
Dial 2 but do not hang up.
• If you hang up, the system converts your Camp-On to a Callback.
When your co-worker hangs up their initial call, you hear:
• Ringback as their telephone rings.
• Your co-worker’s voice when they answer.
In these instructions:
[Super Display Soft Key]
[Keyset Soft Key]
28 ◆ Features DSX Feature Handbook
Callback
Description
Callback
With Callback, a user does not have to repeatedly call a busy extension back, hoping to find it idle.
When an extension user calls a busy co-worker, they can leave a Callback request for a return call. The system services Callback requests as follows:
❥ Caller at extension A leaves a Callback at extension B.
- Caller can place or answer additional calls in the mean time.
❥ When extension B becomes idle, the system rings extension A. This is the Callback ring.
❥ Once caller A answers the Callback ring, the system rings (formerly busy) extension B.
- If caller A doesn’t answer the Callback ring, the system cancels the Callback.
❥ As soon as caller B answers, the system sets up an Intercom call between A and B.
An extension user can leave a Callback at many extensions simultaneously. The system processes the Callbacks as the extensions become free. In addition, many extensions can leave a Callback at the same extension. The system processes these Callbacks on a first-in/first-out (FIFO) basis.
If an extension user leaves a Callback request and then fails to answer within four rings, the system cancels
the Callback.
Features
Operation
Leaving a Callback
To leave a Callback at a busy extension:
Call the busy extension.
1.
2.
3.
4.
To cancel a Callback:
1.
2.
• Listen for busy or busy/ring tone.
Dial 2 and hang up.
• Stay on the line without hanging up if you want to Camp-On instead.
When the busy co-worker becomes free:
• You hear Intercom ring.
Answer the Intercom ring.
• The system automatically places a call to your co-worker.
• Speak to your co-worker when the call goes through.
Cancelling a Callback
Do not lift the handset, do not press INTERCOM, and do not press SPEAKER.
Dial # + DC (32).
• This cancels the Callback you have left. If you have left callbacks for several extensions, this simultaneously
cancels all your Callbacks.
In these instructions:
[Super Display Soft Key]
[Keyset Soft Key]
In these instructions:
[Super Display Soft Key]
[Keyset Soft Key]
DSX Feature Handbook Features ◆ 29

Caller ID
Caller ID
Description
Single and Multiple Message Format Compatibility
Operation
Caller ID automatically displays the phone number and optional name for incoming outside calls.
Caller ID allows a display keyset to show an incoming caller’s telephone number (called Directory Number
or DN) and optional name as the call is ringing. Caller ID supports the telco’s Called Number Identification
(CNI) and Called Number Delivery (CND) service, when available. These services provide the Caller ID
information (i.e., messages) between the first and second ring burst of an incoming call.
Caller ID provides the following features:
There are two types of Caller ID message formats currently available: Single Data Message Format (SDMF)
and Multiple Data Message Format (MDMF). With Single Message Data Format, the telco sends only the
caller’s phone number (DN). The DN can be up to 10 digits long. In Multiple Data Message Format, the
telco sends the DN and the caller’s name. The DN for this format can be up to 15 digits long, and the name
provided can consist of up to 15 ASCII characters.
If no DN is received, no number or error message displays.
Clearing the Display
To cancel (clear) the Caller ID display and return your phone to its normal display:
• You can only do this while you are on a call, not while your phone is ringing.
Press CLEAR.
1.
To turn the Caller ID display back on (after you press CLEAR to cancel it):
Press CHECK.
1.
Third Party Caller ID
To display the Caller ID data for the third party’s call:
Press INTERCOM + CHECK.
1.
Press one of the following keys for the call you want to check.
2.
• You see Caller ID data for the line you select.
Press a line key while the call is ringing or connected to the third party.
Press a loop key while the call is ringing the third party.
Press a Hotline key while the call is connected to the third party.
Press a Call Co
verage key while the call is ringing the third party.
In these instructions:
[Super Display Soft Key]
[Keyset Soft Key]
In these instructions:
[Super Display Soft Key]
[Keyset Soft Key]
Hang up when you are done.
3.
30 ◆ Features DSX Feature Handbook

Caller ID Logging
Description
An extension can store the caller’s name and phone number for easy review and redialing.
When caller ID is enabled, Caller ID Logging stores a record of the caller’s number and name (if provided
by the telco) for each outside call that rings an extension. This allows an extension user to easily review and
redial their calls. The system can log records directly to an extension or to one of 8 Caller ID Logging
Groups. All the extensions in the same Logging Group share the same Caller ID records. Each extension or
Logging Group can store up to 99 Caller ID records. The system stores up to 1000 Caller ID records, allocated among all extensions and Caller ID Logging Groups. All Caller ID records are retained when the system is powered down or reset. If a line rings more than one extension simultaneously, the system logs the
call at all ringing extensions.
Operation
To review your Caller ID log:
[Calls XX]
1.
[CLXX]
[View All]
[All]
[View Unans]
[Unan]
[Delete All]
[Del*]
[View Ans]
[N/A]
[Exit]
[Exit]
Caller ID Logging
In these instructions:
Reviewing the Caller ID Log
Select the Caller ID log.
• Your Ring/Message Lamp will wink on (green) when you have Caller ID records
that you have not yet reviewed.
Select to review all your Caller ID records.
• You see the following review options.
• Press Volume Up and Volume Down to scroll through your records.
Review Options
• On a 3-line display telephone, press CHECK to switch between the name (page 1)
and number (page 2) display.
[Callback]
[Call]
[Delete]
[Del]
[Store Bin]
[Stor]
[Delete All]
[N/A]
[Exit]
[Exit]
Select to call the person back.
Select to delete the displayed record.
Select to store the number in one of your Personal Speed Dial
bins (following normal Speed Dial programming steps).
Select to delete all your Caller ID records.
Back up to the beginning without making any changes.
Select to review Caller ID records for calls that rang your extension and
were unanswered.
• Go to the review options (see above).
• Press
Volume Up and Volume Down to scroll through your records.
Select to delete all Caller ID records logged at your phone or in your group.
Select to review Caller ID records for calls that rang your phone and were
answered (somewhere in the system).
• Press Volume Up and Volume Down to scroll through your records.
• Go to the review options (see above).
Select to exit.
• Alternately dial 9.
[Super Display Soft Key]
[Keyset Soft Key]
Features
DSX Feature Handbook Features ◆ 31

Central Office Calls, Answering
Central Office Calls, Answering
Description
The system allows outside calls to ring and be answered at any combination of system extensions.
The system provides flexible routing of incoming CO calls to meet the exact site requirements.
Answering Priority
When multiple calls ring an extension simultaneously, the system services the ringing calls in the following order:
1. Ringing Intercom call
2. Line or loop key (from lowest to highest)
Operation
Answering Outside Calls
To answer an outside call:
• An incoming call on a line or loop key will flash red.
• An incoming call on your Direct Inward Line will flash green.
In these instructions:
[Super Display Soft Key]
[Keyset Soft Key]
Lift handset.
1.
• If you have Ringing Line Preference, this will answer the incoming call.
• If you have Automatic Handsfree, you can press the line or loop key without first lifting the handset.
Press flashing line or loop key.
2.
• The key will be on (green) after you answer the call.
User Programmable Feature
Feature Mnemonic Operation Access Level
Feature Keys
#RAL
(#725)
Setting Up Line Key Ringing
Outside Line Keys: #RAL + Line Key repeatedly to select
ringing mode + SPEAKER to exit.
• Line keys flash as follows:
- Lamp only = On red
- Immediate ring = On green
- Delay ring = Fast flash green
- Night ring = Slow flash green
2-5
32 ◆ Features DSX Feature Handbook

Central Office Calls, Placing
Description
Central Office Calls, Placing
Customize the call placing options to meet the site requirements and each individual’s needs.
The system provides flexibility in the way each extension user can place outgoing calls. A user can place a
call by:
❥ Pressing a Line Key
Any keyset can have line keys for one-touch access to specific lines.
- See Line Keys on page 100 for more.
❥ Pressing a Loop Key
Loop Keys provide a user with one-touch access to the assigned Loop Group. Loop Groups can consist
of one or more Line Groups.
- See Loop Keys on page 103 for more.
❥ Using Line Dial-Up
With Line Dial-Up, a user can select a specific line by pressing INTERCOM and dialing the Line
Dial-Up code (#9) followed by the line number (1-64).
❥ Using Direct Line Access
Direct Line Access allows a user to access a line by pressing INTERCOM and dialing the line’s extension number (e.g., 101 for line 1, 102 for line 2. etc.).
- See Direct Line Access on page 43 for more.
❥
Dialing a Line Group Access Code
User’s can also place outside calls by pressing
- See Line Groups on page 99 for more.
❥ Line Group Routing
If the system has Line Group Routing enabled, user’s get the first available line when they press INTER-
and dial 9.
COM
- See Line Group Routing on page 98 for more.
INTERCOM
and dialing a Line Group Access Code (90-98).
Features
Store and Forward
Store and Forward is an alternate method of placing outside calls in which the system stores (“collects”) the
digits a user dials, waits for the user to finish dialing, and then redials the digits on the selected line. Store
and forward provides Intercom dial tone to the caller as soon as they dial a line access code or press a loop
key, similar to conventional ARS operation. When the user has completed dialing, the system will dial out
the call over the connected line after 6 seconds or when the user dials #. Store and Forward can also be an
advantage when connected to a T1 service that does not provide line dial tone.
Post dialing for Store and Forward calls is also available. After a user dials using Store and Forward, they
can manually dial additional digits. The normal post dialing soft keys (such as
Auto Redial) are also enabled.
❥ Store and Forward does not apply to line keys, Direct Line Access, or line dial up (i.e., #9 plus the line
number).
❥ You can use Account Codes with Store and Forward enabled (see Operation below).
AUTO REDIAL [ALND] for
DSX Feature Handbook Features ◆ 33

Central Office Calls, Placing
Operation
Placing Outside Calls Using Line Keys
To place an outside call over a specific line using a line key:
1.
Lift handset.
Press line key.
2.
3.
To place an outside call over a specific line using a Line Dial-up or Direct Line Access:
1.
2.
• You hear dial tone on the line you select and the line key lights green.
• To use loop keys for placing calls, see Loop Keys (page 103).
Dial outside number.
Placing Outside Calls Using Line Dial-up or Direct Line Access
Lift handset.
Press INTERCOM.
In these instructions:
[Super Display Soft Key]
[Keyset Soft Key]
In these instructions:
[Super Display Soft Key]
[Keyset Soft Key]
3.
Do one of the following:
a.
For Line Dial-up:
Dial #9 followed by the line number (e.g., 01 for line 1).
• If you hear busy tone, you may be able to dial 2 to queue for the busy line.
b.
For Direct Line Access:
Dial 1 plus the line number (e.g., 01 for line 1).
• If you hear busy tone, you may be able to dial 2 to queue for the busy line.
3.
Dial outside number.
In these instructions:
Placing Outside Calls Using Line Groups
[Super Display Soft Key]
[Keyset Soft Key]
• By default, pressing Intercom and dialing 911 or lifting the handset and dialing 911 will not call emergency services.
To place an outside call over a Line Group:
1.
Lift handset.
2.
Press INTERCOM.
Dial the Line Group code (90-98).
2.
• If you hear dial tone as soon as you dial 9, your system has Line Group Routing enabled. See Line Group
Routing (page 98).
3.
Dial outside number.
34 ◆ Features DSX Feature Handbook

Using Store and Forward
Feature Name
To place an outside call using Store and Forward:
1.
Do one of the following.
Central Office Calls, Placing
In these instructions:
[Super Display Soft Key]
[Keyset Soft Key]
a.
Press INTERCOM and dial 9.
• You may optionally be able to dial 90-98.
b.
c.
2.
Dial the outside telephone number.
When you have finished dialing, wait 6 seconds or dial # for the call to go though,
3.
Press a Switched Loop key + Dial Line Group number (90-98).
Press Fixed Loop key.
• The stored number dials out.
In these instructions:
Using Store and Forward and Account Codes
[Super Display Soft Key]
[Keyset Soft Key]
To place an outside call when both Store and Forward and Account Codes are enabled:
• With Forced Account Codes for Toll Calls Only, you do not have to enter an Account Code for local calls. Just dial
the call normally.
1.
Do one of the following.
a.
b.
c.
2.
Dial the outside telephone number.
Press INTERCOM and dial 9 (or optionally 90-98).
Press Switched Loop key + Dial the Line Group number (90-98).
Press Fixed Loop key.
Features
3.
Do one of the following.
a.
b.
c.
4.
Enter the Account Code.
5.
Do one of the following.
a.
b.
c.
d.
Wait for three beeps (Forced Account Codes only).
[Account Code]
[ACCT]
Select Account Code soft key.
Press your Account Code Feature Key.
Wait 6 seconds.
[Account Code]
[ACCT]
Select Account Code soft key.
Press your Account Code Feature Key.
Dial #.
DSX Feature Handbook Features ◆ 35

Check Key
Check Key
Description
Quickly check keyset and DSS Console Feature Key assignments.
A keyset user can use the CHECK key to check keyset and DSS Console Feature Key assignments and Personal Speed Dial bin names.
Operation
Checking Feature Key Assignments
To check a Feature Key assignment:
Press CHECK.
1.
Press the Feature Key on keyset or DSS Console.
2.
Do one of the following.
3.
In these instructions:
[Super Display Soft Key]
[Keyset Soft Key]
a.
b.
To check a Personal Speed Dial name and number:
Press CHECK.
1.
Do one of the following.
2.
a.
Press another Feature Key to check.
Press SPEAKER to exit the check mode.
Checking Personal Speed Dial Bin Name and Number
(22-Button and 34-Button 3-Line Keysets Only)
Press the Personal Speed Dial bin key once to display the name for the lower numbered bin.
• For example, pressing bin 1 in this step displays the name for 701.
b.
Press the Personal Speed Dial bin key a second time to display the number stored in the lower numbered bin.
• For example, pressing bin 1 in this step displays the number stored for 701.
c.
Press the Personal Speed Dial bin key a third time to display the name for the higher numbered bin.
• For example, pressing bin 1 in this step displays the name stored for 711.
d.
Press the Personal Speed Dial bin key a fourth time to display the number stored in the higher numbered bin.
• For example, pressing bin 1 in this step displays the number stored for 711.
Press another key or SPEAKER to exit the check mode.
3.
In these instructions:
[Super Display Soft Key]
[Keyset Soft Key]
36 ◆ Features DSX Feature Handbook

Conference
Description
Conference
A user can set up a multiple-party telephone meeting without leaving the office.
Conference lets an extension user add additional inside and outside callers to their conversation. The following table shows the system’s Conference capacities:
Description Capacity
Features
Conference circuits 32
The system’s 32 Conference circuits are dynamically allocated as users request them.
Operation
To set up a Conference:
Establish an Intercom or outside call.
1.
Press CONF.
2.
3.
• Your hear Intercom dial tone.
• Your caller hears Music on Hold (if installed) while they wait for you to set up the Conference.
Do one of the following:
a.
Dial extension you want to add.
Maximum simultaneous users in Conference
(total of all Conferences system-wide)
Maximum simultaneous conferences 8
Maximum parties in any one Conference
(lines and/or extensions)
Setting up a Conference
32
8
In these instructions:
[Super Display Soft Key]
[Keyset Soft Key]
b.
c.
Press CONF to set up the Conference.
4.
Place or answer an outside call.
Retrieve a call from Park Orbit.
• If you cannot add additional parties to your Conference, you have exceeded the system’s Conference limit.
Repeat steps 2-4 to add additional parties to your Conference. You can also do one of the following.
5.
a.
To optionally place a Conference on Hold:
Press HOLD.
b.
To reinstate the Conference on Hold.
Press CONF.
DSX Feature Handbook Features ◆ 37

Conference
Exiting a Conference
To exit a Conference without affecting the other parties:
Hang up.
1.
To use Conference at a single line telephone:
1.
2.
3.
4.
• The remaining parties can continue their conversation uninterrupted.
• If you were in Conference with two outside lines, this may set up a tandem call. Refer to Tandem Calls /
Unsupervised Conference (page 157) for more.
Using Conference at a Single Line Telephone
Establish an Intercom or outside call.
Hookflash and dial the extension or outside line you want to add.
Hookflash and dial #10 to set up the Conference.
• If you cannot add additional parties to your Conference, you have exceeded the system’s Conference limit.
Repeat steps 2 and 3 to add additional parties to your Conference.
In these instructions:
[Super Display Soft Key]
[Keyset Soft Key]
In these instructions:
[Super Display Soft Key]
[Keyset Soft Key]
38 ◆ Features DSX Feature Handbook

Cordless Telephone
Description
Cordless Telephone
Provides cordless mobility and a rich feature set for employees away from their desks.
The DSX Cordless Lite II Telephone (P/N 730087) is a 900 Mhz digital narrow band FM cordless telephone that provides mobility, flexibility and convenience for those who spend much of
the workday away from their desk. Fully integrated with the DSX system, the DSX Cordless
Lite II Telephone offers many standard features such as Call Forwarding, Call Coverage, Hotline, and Voice Mail. Complemented by 4 fully programmable function keys (with LEDs), the
DSX Cordless Lite II Telephone achieves a whole new level of convenience and mobility. An
easy-to-read 16-character by 2-line LCD display (with four status icons), volume controls, a
rechargeable Nickel Metal Hydride Battery Pack, and a handy belt clip round out the elegant
and affordable DSX Cordless Lite II Telephone.
Features
DSX Feature Handbook Features ◆ 39

Dial Number Preview
Dial Number Preview
Description
Dial Number Preview helps the user avoid dialing errors.
Dial Number Preview lets a display keyset user dial and review a number before the system dials it out.
Operation
Using Dial Number Preview
To dial using Dial Number Preview:
Do not lift the handset and do not press SPEAKER or INTERCOM.
1.
Dial *.
2.
3.
4.
• Your display shows: DIAL PREVIEW.
Dial the number you want to call.
• Your display shows the digits for your call.
Press a line key.
• Your call will dial out on the line selected.
In these instructions:
[Super Display Soft Key]
[Keyset Soft Key]
Editing the Displayed Number
To correct the displayed digits before dialing them out:
Press Volume Up or Volume Down until the cursor replaces the digit you want to change.
1.
• Volume Up moves the cursor left; Volume Down moves the cursor right.
Dial the digit that you want to replace the cursor.
2.
Do one of the following.
3.
a.
b.
Press Volume Up or Volume Down to place the cursor over any other digits you want to edit.
Press Volume Down until the entire number displays to the left of the cursor.
• The system will only dial the digits to the left of the cursor.
Press a line key to have the system automatically dial the displayed number.
4.
In these instructions:
[Super Display Soft Key]
[Keyset Soft Key]
40 ◆ Features DSX Feature Handbook

Dial Number Preview
Dial Number Preview Editing Example
To replace 2049265410 with 2039265400:
Dial * followed by 2049265410. You see: 2049265410-
1.
Press Volume Up until you see: 20-9265410
2.
Dial 3. You see: 203-265410
3.
Press Volume Down until you see: 20392654-0
4.
Dial 0. You see: 203926540-
5.
Press Volume Down until the entire number displays to the left of the cursor. You see: 2039265400-
6.
Press line key to dial number.
7.
In these instructions:
[Super Display Soft Key]
[Keyset Soft Key]
Features
DSX Feature Handbook Features ◆ 41

Direct Inward Line
Direct Inward Line
Description
A DIL lets an employee know which calls are just for them.
A Direct Inward Line (DIL) is a line that rings an extension directly. Since DILs only ring one extension,
employees always know which calls are for them. For example, a company operator can have a Direct
Inward Line for International Sales Information. When outside callers dial the DIL’s phone number, the call
rings the operator on the International Sales line key. The DIL does not ring other extensions.
Assigning a DIL to an extension automatically provides immediate ringing and incoming access for the line,
with no additional programming required.
A DIL can ring:
❥ Extension numbers (including the attendant’s extension)
❥ Ring Group master numbers
❥ UCD Group master numbers (including the voice mail master number)
Night Mode Control
The extension to which the line is terminated controls the night mode of the line. For example, if extension
301 has line 1 assigned as a DIL, the user can press DND to switch line 1 to its night routing destination.
Switching line 1 to night mode at extension 301 has no affect on the night mode of the system. This flexibil-
ity could allow a service dispatcher with several DILs to independently send lines to their night destinations
without affecting the night mode of the entire system.
Operation
Handling Your Direct Inward Lines
To answer a call on your Direct Inward Line:
The line or loop key for your DIL flashes green.
1.
Lift handset.
2.
To place your Direct Inward Line into the Night Mode:
1.
• The key lights on green when you connect to your caller.
Press DND.
• Your DND flashes.
• This also enables Do Not Disturb for your extension.
In these instructions:
[Super Display Soft Key]
[Keyset Soft Key]
42 ◆ Features DSX Feature Handbook
Direct Line Access
Description
Priority users can access lines directly. Direct Line Access also lets maintenance personnel
access and test individual lines.
Direct Line Access lets an extension user access (seize) an individual line. After seizing the line, the user can
dial any outside telephone number without restriction. An extension’s Class of Service allows or denies
Direct Line Access. Direct Line Access is normally only provided for attendants, priority users and maintenance personnel.
Operation
Using Direct Line Access
To place a call over a specific line using Direct Line Access:
Lift the handset.
1.
Press INTERCOM.
2.
Dial 1 plus the line number (e.g., 01 for line 1).
3.
4.
• If you hear busy tone, you may be able to dial 2 to queue for the line. See Line Queuing / Line Callback
(page 102) for more.
Dial the outside number.
Direct Line Access
In these instructions:
[Super Display Soft Key]
[Keyset Soft Key]
Features
DSX Feature Handbook Features ◆ 43

Direct Station Selection (DSS)
Direct Station Selection (DSS)
Description
Quickly place and Transfer calls to co-workers, without having to look up or dial your coworker’s extension numbers.
• If you enable an extension’s DSS Keys and leave the extension’s default Prime Line programming
intact, the line keys automatically change to DSS keys when the user lifts the handset.
If an extension’s Direct Station Selection (DSS) Keys are enabled, Feature Keys automatically become
Direct Station Selection (DSS) keys when the user presses INTERCOM. Direct Station Selection provides an
extension user with one-button Intercom access and Transfer to co-workers. Each DSS key also provides a
Busy Lamp Field (BLF) for the assigned co-worker.
When the DSS/BLF key is: The covered extension is:
Off Idle
On Busy or ringing
Important
Flashing fast In Do Not Disturb
44 ◆ Features DSX Feature Handbook

Operation
Placing a Call using a DSS Key
To place a call to a co-worker using a DSS key:
Lift the handset.
1.
Direct Station Selection (DSS)
In these instructions:
[Super Display Soft Key]
[Keyset Soft Key]
Press INTERCOM.
2.
• Your DSS keys show the status of the assigned extension:
Off = Idle
On = Busy or ringing
Fast flash = in Do Not Disturb
Press DSS key for the co-worker you want to call.
3.
Transferring a Call using a DSS Key
To Transfer a call to a co-worker using a DSS key:
Place or answer an outside call.
1.
Press INTERCOM.
2.
• Your DSS keys show the status of the assigned extension:
Off = Idle
On = Busy or ringing
Fast flash = in Do Not Disturb
Press DSS key for the co-worker you want to call.
3.
Do one of the following:
4.
a.
b.
Press TRANSFER to have the Transfer go through unscreened.
Wait for your co-worker to answer if you want them to screen the transfer, then press TRANSFER.
In these instructions:
[Super Display Soft Key]
[Keyset Soft Key]
Features
User Programmable Feature
Setting Up DSS Keys
Feature Mnemonic Operation Access Level
DSS
#BLF
(#253)
DSX Feature Handbook Features ◆ 45
#BLF
+ Press Feature Key + HOLD + Enter extension
number + Volume Up + Program another key or
SPEAKER to exit.
1-5

Direct Station Selection (DSS) Console
Direct Station Selection (DSS) Console
Description
DSS Consoles provide one-touch access to extensions, lines, and system features.
The DSS Console (P/N 1090024 for black and P/N 090029
for white) gives a keyset user one-button access to extensions, lines, and selected features. This saves time for users
that do a lot of call processing such as operators or dispatchers).
The system allows you to install 4 DSS Consoles maximum per system. DSS Consoles use their own digital station port and do not require a separate power supply. In
programming, you assign each installed console to an
“owner” keyset. Each console can only have one owner.
You can assign the following types of Feature Keys to a DSS Console.:
• Account Code • Intercom Directory Dialing • Save Number Dialed
• Call Coverage (immediate,
delayed or no ring)
• Call Forwarding • Message Center • Speed Dial, System
• Group Call Pickup (immediate, delayed or no ring)
• Headset key • Page Zones • Voice Mail Conversation
• Hotline • Park Orbit
• Line keys • Speed Dial, Personal
• Night key • Split
Record
46 ◆ Features DSX Feature Handbook

Direct Station Selection (DSS) Console
Default DSS Console Key Assignments
The following illustration shows the default DSS Console key assignments.
1093100 -3
300 301 302 303 304 305
306 307 308 309 310 311
312 313 314 315 316 317
318 319 320 321 322 323
324 325 326 327 328 329
Features
330 331 332 333 334 335
336 337 338 339 340 341
342 343 344 345 346 347
RELEASE
ALL
CALL
Park 60 Park 61
TRANSFERANSWER
Page 1 Page 2 Page 3
NightPark 62 Park 63 Park 64 Park 65 Park 66
DSX Feature Handbook Features ◆ 47

Direct Station Selection (DSS) Console
DSS Console Feature Key Assignments
DSS Console Feature Key Assignments (Page 1 of 4)
Key Type Description Key Code and Data Operation
Undefined
Line
(page 100)
Park Orbit
(page 119)
Hotline
(page 90)
Use this option to designate a Feature Key as
0
N/A
undefined (no function).
Use this option to assign a Feature Key as a
line key.
3 + nn (line
number 1-64)
• Press the key to
place or answer call.
Busy Lamp Field (BLF)
Off . . . . . . . . . . . . . . Line is idle or not installed.
On (red) . . . . . . . . . . . A co-worker is busy on the line or has the line on Exclusive Hold.
On (green) . . . . . . . . . You are busy on the line.
Wink On (red) . . . . . . . On System Hold at a co-worker’s extension.
Wink On (green) . . . . . . On System Hold at your extension.
Double Wink On (green). On Exclusive Hold or recalling your extension.
Slow Flash (red) . . . . . . Line is ringing.
Slow Flash (green):. . . . Line is ringing or your extension directly.
Use this option to assign a Feature Key as a
Park Orbit key.
4 + nn (Park Orbit
60-69)
• Press key to Park or
retrieve parked call.
Busy Lamp Field (BLF)
Off . . . . . . . . . . . Orbit is idle.
On . . . . . . . . . . . Orbit is holding a parked call.
Wink On (green) . . . Orbit is holding a call you parked.
Use this option to assign a Feature Key as a
Hotline key. You cannot set up a hotline for an
5 + nnn (extension
number)
• Press key to call
Hotline partner.
outside line.
Busy Lamp Field (BLF)
Off . . . . . . . . . . . Partner extension is idle.
On . . . . . . . . . . . Partner extension is busy or ringing.
Medium Flash . . . . Partner extension is in DND for outside calls (option 1).
Fast Flash. . . . . . . Partner extension is in DND for Intercom calls (option 2) or All Calls (option 3).
Call Coverage
Immediate Ring
(page 19)
Use this option to assign a Feature Key as an
immediately ringing Call Coverage Key.
6 + nnn (extension
number)
• Press key to call covered extension or
pick up ringing call.
Busy Lamp Field (BLF)
Off . . . . . . . . . . . Covered extension is idle.
On . . . . . . . . . . . Covered extension is busy.
Slow Flash . . . . . . Covered extension is ringing.
Medium Flash . . . . Covered extension is in DND for outside calls (option 1).
Fast Flash. . . . . . . Covered extension is in DND for Intercom calls (option 2) or All Calls (option 3).
48 ◆ Features DSX Feature Handbook

Direct Station Selection (DSS) Console
DSS Console Feature Key Assignments (Page 2 of 4)
Key Type Description Key Code and Data Operation
Call Coverage No
Ring
(page 19)
Call Coverage
Delay Ring
(page 19)
Group Pickup
Immediate Ring
(page 79)
Use this option to assign a Feature Key as a
lamp only (no ring) Call Coverage Key.
7 + nnn (extension
number)
• Press key to call covered extension or
pick up ringing call.
Busy Lamp Field (BLF)
Off . . . . . . . . . . . Covered extension is idle.
On . . . . . . . . . . . Covered extension is busy.
Slow Flash . . . . . . Covered extension is ringing.
Medium Flash . . . . Covered extension is in DND for outside calls (option 1).
Fast Flash. . . . . . . Covered extension is in DND for Intercom calls (option 2) or All Calls (option 3).
Use this option to assign a Feature Key as a
delayed ringing Call Coverage Key.
8 + nnn (extension
number)
• Press key to call covered extension or
pick up ringing call.
Busy Lamp Field (BLF)
Off . . . . . . . . . . . Covered extension is idle.
On . . . . . . . . . . . Covered extension is busy.
Slow Flash . . . . . . Covered extension is ringing.
Medium Flash . . . . Covered extension is in DND for outside calls (option 1).
Fast Flash. . . . . . . Covered extension is in DND for Intercom calls (option 2) or All Calls (option 3).
Use this option to assign a
Feature Key
as an
immediately ringing Group Call Pickup key.
9 + nn (Pickup Group
1-16)
• Press key to answer
call ringing Pickup
Group.
Busy Lamp Field (BLF)
Off . . . . . . . . . . . No call is ringing the pickup group.
Slow Flash (green) . A call is ringing the pickup group.
Features
Group Pickup No
Ring
(page 79)
Group Pickup
Delay Ring
(page 79)
Page Zone
(page 116)
Use this option to assign a
Feature Key
as a
lamp only (no ring) Group Call Pickup key.
10 + nn (Pickup
Group 1-16)
• Press key to answer
call ringing Pickup
Group.
Busy Lamp Field (BLF)
Off . . . . . . . . . . . No call is ringing the pickup group.
Slow Flash (green) . A call is ringing the pickup group.
Use this option to assign a Feature Key as a
delay ring Group Call Pickup key.
11 + nn (Pickup
Group 1-16)
• Press key to answer
call ringing Pickup
Group.
Busy Lamp Field (BLF)
Off . . . . . . . . . . . No call is ringing the pickup group.
Slow Flash (green) . A call is ringing the pickup group.
Use this option to assign a Feature Key as a
Page Zone key.
13 + n (Page Zone 1-
7, 0 for All Call)
• Press key to Page
into assigned zone.
Busy Lamp Field (BLF)
On . . . . . . . . . . . The assigned Page zone is busy.
On (green) . . . . . . The assigned Page zone is busy broadcasting an announcement you are making.
Off . . . . . . . . . . . The assigned Page zone is idle.
DSX Feature Handbook Features ◆ 49

Direct Station Selection (DSS) Console
DSS Console Feature Key Assignments (Page 3 of 4)
Key Type Description Key Code and Data Operation
System Speed
Dial
(page 149)
Personal Speed
Dial
(page 149)
Voice Mail
Record
(page 167)
Night
(page 112)
Use this option to assign a Feature Key as a
System Speed Dial key. You assign the key to
specific System Speed Dial bin.
• There is no BLF for this key type.
Use this option to assign a Feature Key as a
Personal Speed Dial key. You assign the key to
a specific Personal Speed Dial bin.
• There is no BLF for this key type.
Use this option to assign a Feature Key as a
Voice Mail Record key.
• You must have voice mail installed to
use this key.
• A voice prompt and periodic beep will
remind you that your calls are being
recorded.
Busy Lamp Field (BLF)
Off . . . . . . . . . . . Conversation Record is off.
Fast Flash (green) . Conversation Record is on.
Use this option to assign a
Feature Key
as a
Night key. There are two options: System
Night key and UCD Night key. The System
Night key puts all Key Ring lines and lines
terminated to Ring Group master numbers
into the night mode. The UCD Night key puts
all lines terminated to the UCD Group master
number into the night mode.
14 + nnn (bin 001-
999)
15 + nnn (01-20)
17 + nnn (extension
number of valid Sub-
scriber Mailbox)
18 + CLEAR
(System Night key)
18 + UCD Group
master number
(UCD Night key)
• Press key to dial
stored number.
• Press key to dial
stored number.
• Press key to record
conversation into
mailbox.
• Press key to put Key
Ring lines and lines
terminated to Ring
Group master into
night mode.
OR
• Press key to put
lines terminated to
UCD master into
night mode.
Busy Lamp Field (BLF)
On . . . . . . . . . . . Night mode is on.
Off . . . . . . . . . . . Night mode is off.
Split
(page 154)
Use this option to assign a programmable key
as a Split key.
20
See Split (Alternate)
(page 154) for more.
• There is no BLF for this key type.
Intercom
Directory Dialing
(page 54)
Use this option to assign a programmable key
as an Intercom Directory Dialing key.
21
• Press key to access
Intercom Directory
Dialing.
Busy Lamp Field (BLF)
On . . . . . . . . . . . Intercom Directory Dialing is active (being used).
Off . . . . . . . . . . . Intercom Directory Dialing is inactive (off).
Message Center
(page 167)
Use this option to assign a Feature Key as a
Message Center key.
24 + nnn (extension
number)
• Press key to call
Message Center
Mailbox.
Busy Lamp Field (BLF)
Off . . . . . . . . . . . No messages waiting in the Message Center Mailbox.
Fast Flash (green) . Messages waiting in the Message Center Mailbox.
50 ◆ Features DSX Feature Handbook

Direct Station Selection (DSS) Console
DSS Console Feature Key Assignments (Page 4 of 4)
Key Type Description Key Code and Data Operation
Save Number
Dialed
(page 138)
Account Code
(page 10)
Call Forwarding
(page 21)
Use this option to assign a Feature Key as a
Save Number Dialed key.
• There is no BLF for this key type.
25
While on a call:
• Press key to save
the number you just
dialed.
While idle:
• Press key to redial a
previously saved
number.
Use this option to assign a Feature Key as an
Account Code key.
26
1. Place or answer out-
side call.
2. Press key.
3. Enter Account Code.
4. Press key to return to
the call.
Busy Lamp Field (BLF)
Off . . . . . . . . . . . Not in Account Code mode or not entering Account Codes.
Fast Flash (green) . In the Account Code entry mode.
On (green) . . . . . . On a call for which the user has entered an Account Code.
Use this option to assign a Feature Key as a
Call Forwarding key.
27
• Press key instead of
pressing
COM
Busy Lamp Field (BLF)
Off . . . . . . . . . . . Extension not call forwarded or in the Call Forwarding setup mode.
Fast Flash. . . . . . . In the Call Forwarding setup mode.
Wink Off . . . . . . . . Extension has Call Forwarding enabled.
Features
INTER-
and dialing *3.
Headset
(page 85)
Use this option to assign a Feature Key as a
Headset key.
Busy Lamp Field (BLF)
Off . . . . . . . . . . . Extension is not in the headset mode.
On . . . . . . . . . . . Extension is in the headset mode.
28
• Press key to enable
or disable headset
mode.
DSX Feature Handbook Features ◆ 51

Direct Station Selection (DSS) Console
Operation
See DSS Console Feature Key Assignments (page 48).
Using the Speed Processing Keys on the DSS Console
To use the ANSWER key:
1.
Press ANSWER to answer any call ringing your extension.
To use the RELEASE key:
1.
Press RELEASE to hang up (disconnect) your active call.
To use the TRANSFER key:
1.
Press TRANSFER on your DSS Console instead of the TRANSFER key on your extension.
User Programmable Feature
In these instructions:
[Super Display Soft Key]
[Keyset Soft Key]
DSS Console Hotline Key Assignments
Feature Mnemonic Operation Access Level
Hotline
#HL (#45)
#HL
+ Press flashing Hotline key + Enter extension for
3-5
new Hotline partner + HOLD + Program another Hotline
key or SPEAKER to exit.
52 ◆ Features DSX Feature Handbook

Directed Call Pickup
Description
Operation
Directed Call Pickup
Directed Call Pickup allows co-workers to answer each other’s calls.
Directed Call Pickup permits an extension user to intercept any type of call ringing another extension. With
Directed Call Pickup, an extension user can pick up:
❥ Outside (Key Ring) calls ringing an extension
❥ Direct Inward Lines
❥ Transferred outside calls
❥ Ringing Intercom calls
❥ Recalls (e.g., Hold recall)
❥ Ring Group Calls (by dialing either the ringing extension’s number or the Ring Group master number)
❥ Ringing Call Coverage key calls
❥ Ringing Group Call Pickup calls
❥ Calls ringing the operator’s Operator Call key
Features
Using Directed Call Pickup
To intercept a call ringing a co-worker’s extension:
Lift the handset.
1.
Dial * *.
2.
Dial the number of the extension whose call you want to intercept.
3.
• To intercept a call ringing an attendant, dial the attendant’s extension number (e.g., 300). Do not dial 0 or 01-04.
In these instructions:
[Super Display Soft Key]
[Keyset Soft Key]
DSX Feature Handbook Features ◆ 53

Directory Dialing
Directory Dialing
Description
Allows users to place Intercom or Speed Dial calls from a displayed list of names.
Directory Dialing allows a display keyset user to select a co-worker or outside call from a list of names,
rather than dialing the phone number. There are three types of directory Dialing:
❥ System (Company-Wide) Speed Dial names.
❥ Intercom names (including extension, Ring Group and UCD Group names).
❥ Personal Speed Dial names.
Operation
Using Directory Dialing
To place a call using Directory Dialing:
1.
Select the Directory Dialing type.
[DIRECTORY + EXTENSION]
[DIR + EXT]
[DIRECTORY + PERSONAL]
[DIR + PERS]
[DIRECTORY + COMPANY]
[DIR + CMPY]
Select Intercom Directory Dialing.
• You can optionally dial 34 (while on hook).
Select Personal Speed Dial Directory Dialing.
• You can optionally dial 37 (while on hook).
Select System Speed Dial Directory Dialing.
• You can optionally dial 32 (while on hook).
In these instructions:
[Super Display Soft Key]
[Keyset Soft Key]
2.
Do one of the following:
a.
b.
To place the call by scrolling:
i.
ii.
Press Volume Up or Volume Down until the name you want to call displays.
[Dial]
[Dial]
Select to call the displayed name.
To place the call by alphabetical dialing:
i.
Dial the first letter of the desired name.
• For example, dial 4 if the name begins with G, H, or I.
Look at your telephone’s display and dial the digit for the letter you want to call.
• In the example in step i:
1 if the name begins with G.
- Dial
ii.
- Dial
2 if the name begins with H.
- Dial 3 if the name begins with I.
• The first name that begins with your selection displays. If you see
there is no name stored for your selection.
Press Volume Up or Volume Down to scroll through all the names that begin with the
iii.
letter you selected.
OR
Skip to the next step if the display name is the one you want to call.
iv.
[Dial]
[Dial]
Select to call the displayed name.
UNLISTED NAME,
To exit Directory Dialing at any time:
1.
Press SPEAKER.
54 ◆ Features DSX Feature Handbook

Distinctive Ringing
Description
Distinctive Ringing
Allows users to customize their telephone’s ringing so they’ll know when calls are just for them.
Distinctive Ringing allows the installer or keyset extension user to customize keyset ringing. This permits
the user to determine the type of call just by listening to their keyset ring. Distinctive Ringing provides:
❥ Distinctive Ring Configuration at Each Keyset
A keyset user can follow intuitive soft key menus to set up distinctive ringing for their phone. Their
phone will even play back the new ring tones as the distinctive rings are being set up.
❥ Line Override (Distinctive Ringing by Line and Ringing Mode)
Each line can have its own distinctive ringing for each ring mode (day, night, or delay). This allows a
keyset user, for example, to easily differentiate between new ringing calls and calls that are ringing their
phone after a delay.
❥ Extension Ring Override
Each keyset extension can additionally override a line’s distinctive ringing with the extension’s own
unique settings. Extension Ring Override helps identify ringing phones in large, open work areas.
❥ Key Ring Override
A keyset extension can set up unique ringing for each of its Call Coverage, Group Call Pickup, and line
keys. If a user needs to know what type of call is ringing their phone, Key Ring Override will help.
❥ Unique Ringing for UCD Groups and Ring Groups
UCD Groups and Ring Groups can have their own distinctive rings. This allows a user to tell the difference between Intercom calls ringing their phone and UCD or Ring Group Calls.
Features
The Distinctive Ringing Hierarchy
An extension’s Distinctive Ringing uses the following hierarchy:
1. Key Ring Override
2. Extension Ring Override
3. Line Override
4. Default ringing assigned by the system
This means that Line Override will replace the default ringing assigned by the system. Extension Ring Override will in turn replace ringing set by Line Override. Finally, Key Ring Override will replace ringing set by
Extension Override or ringing set by Line Override.
DSX Feature Handbook Features ◆ 55

Distinctive Ringing
Understanding Ring Types
The Ring Types determine how different types of calls rings extensions. Each Ring Type sounds unique
because it uses one of the 10 available ring tones. The first four Ring Types are assigned by default (see the
table below). The last two (B and C) are unassigned by default but you can assign on your phone using
Extension Override and Key Ring Override.
Ring Type Call Type
Intercom Intercom ringing
Ring Group Ring Group ringing
Recall Recall ringing
Ring “A” Type A ringing
Ring “B” Type B ringing
Ring “C” Type C ringing
The Ring Types
This includes ringing Intercom calls, as well as calls ringing Extension Hunting
groups, Call Coverage keys and the operator’s Call key.
This includes Hold, Park or Transfer recall ringing.
This includes line key, loop key, Transfer, and DIL ringing. (You can reassign
types A, B, and C ringing in Extension Override and Key Ring Override below.)
Not used (unassigned) by default. (You can reassign types A, B, and C ringing in
Extension Override and Key Ring Override below.)
Not used (unassigned) by default. (You can reassign types A, B, and C ringing in
Extension Override and Key Ring Override below.)
When Multiple Calls Ring an Extension
When multiple calls with different priorities are ringing an extension, the system prioritizes ringing according to the list below. All LEDs will flash as appropriate for the type of call, but the telephone will ring only
for the highest priority call.
1. INTERCOM Key
2. Line Key (from lowest to highest)
3. Loop Key (from lowest to highest)
56 ◆ Features DSX Feature Handbook

Operation
Distinctive Ring Configuration
Using Distinctive Ring Configuration
To customize a Ring Set for your extension:
[Menu + Ring
1.
[Menu + MORE + Ring]
[Config]
2.
[Cnfg]
3.
Do one of the following.
Select the Distinctive Ringing options.
Select Distinctive Ring Configuration.
Distinctive Ringing
In these instructions:
[Super Display Soft Key]
[Keyset Soft Key]
Features
a.
b.
c.
Select a Ring Type to customize.
[Intercom]
[Icm]
[Ring Group]
[Rgrp]
[Recall]
[Rcl]
[Ring “A”]
[MORE + “A”]
[Ring “B”]
[MORE + “B”]
[Ring “C”]
[MORE + “C”]
Select to change the Intercom Ring Type.
Select to change the Ring Group Ring Type.
Select to change the Recall Ring Type.
Select to change Type A Ring Type.
Select to change Type B Ring Type.
Select to change Type C Ring Type.
Select a new ring tone.
Dial a new ring tone (0-9).
• You hear the selection you entered.
• You can optionally press SPEAKER to exit the Distinctive Ringing options.
[Cancel]
[Cncl]
[Save]
[Save]
Select to cancel and back up to the previous step.
Select to save your selection and back up to the
previous step.
Set your customized ringing back to the system default.
[Default]
[MORE + MORE + Dflt]
[Yes]
[Yes]
[No]
[No]
Select to cancel any custom settings and choose a default Ring
Set. You see:
Are You Sure?(Y/N)
Select to default your extension’s ringing.
Select to back up without defaulting your ringing.
Exit Distinctive Ring Configuration.
[Exit]
[MORE + MORE + EXIT]
Select to exit Distinctive Ring Configuration.
DSX Feature Handbook Features ◆ 57

Distinctive Ringing
Extension Override
Using Extension Override
To customize ringing for your extension’s outside calls:
[Menu + Ring]
1.
[Menu + MORE + Ring]
[Assign]
2.
[Asgn]
3.
Select the ringing mode you want to change.
[Day Ring]
[Day]
[Night Ring]
[Nght]
[Delay Ring]
[Dely]
[Exit]
[Exit]
a.
For the ringing mode selected, select the Ring Type.
Select the Distinctive Ringing options.
Select Extension Override.
Select day ring.
Select night ring.
Select delay ring.
Select to back up to the previous step without making any changes.
[RING “A” + EXIT]
[“A” + MORE + EXIT]
[RING “B” + EXIT]
[“B” + MORE + EXIT]
[RING “C” + EXIT]
[“C” + MORE + EXIT]
[CO LINE]
[MORE + Line + EXIT]
[Exit]
[Exit]
In these instructions:
[Super Display Soft Key]
[Keyset Soft Key]
Select Ring Type A.
Select Ring Type B.
Select Ring Type C.
Select to have ringing follow Line Override.
Press repeatedly to back up step-by-step.
58 ◆ Features DSX Feature Handbook

Key Ring Override
Using Key Ring Override
To assign a Ring Type to a Call Coverage, Group Call Pickup, or line key:
[Menu + Ring]
1.
[Menu + MORE + Ring]
[Key]
2.
[Key]
a.
Select a key type to customize.
Select the Distinctive Ringing options.
Select Key Ring Override.
Distinctive Ringing
In these instructions:
[Super Display Soft Key]
[Keyset Soft Key]
Features
b.
c.
[Call Coverage]
[Cck]
[Pickup]
[Pkup]
[Line]
[Line]
[Exit]
[Exit]
Select your Call Coverage keys.
• Your Call Coverage keys light.
Select your Group Call Pickup keys.
• Your Group Call Pickup keys light.
Select your line keys.
• Your line keys light.
Press repeatedly to back up step-by-step.
Press the key for which you want to set the Ring Type.
Do one of the following.
For the key selected, choose the Ring Type.
• Dial 1 for Ring Type A.
i.
• Dial 2 for Ring Type B.
• Dial 3 for Ring Type C.
• Dial 0 to Select to have ringing follow Line Override.
For the key selected, press the key repeatedly to choose the ringing mode.
• For line key night ring only (lamp only in the day):
- Press key until it flashes slowly green.
- Not for Group Call Pickup or Call Coverage keys.
ii
• For delay ring day and night:
- Press key until it flashes fast green.
• For lamp only (no ring) day and night:
- Press key until it is on red.
• For immediate ring day and night:
Press key until it is on green.
d.
Press another key to program, or SPEAKER to exit.
DSX Feature Handbook Features ◆ 59

Do Not Disturb
Do Not Disturb
Description
DND permits an extension user to work by the phone undisturbed by incoming calls and
announcements.
Do Not Disturb (DND) blocks incoming calls, Off-Hook Signaling and Paging announcements. An extension user can activate DND anytime while on a call or while their phone is idle. Once activated, incoming
outside calls still flash the line keys. The user may use the phone in the normal manner for placing and processing calls.
Do Not Disturb provides the following 4 DND options:
(1) Incoming outside calls blocked
(2) Incoming Intercom calls blocked
(3) All incoming calls blocked
(0) Cancel Do Not Disturb
(1) Incoming Outside Calls Blocked Ringing for outside calls, including:
(2) Incoming Intercom Calls Blocked • Incoming Intercom calls
(3) All Incoming Calls Blocked • All calls blocked by Option 1 and Option 2.
(0) Cancel Do Not Disturb • Option 0 cancels Do Not Disturb
Do Not Disturb Options
This DND option: Blocks these calls:
• Key Ring calls
• Off Hook Ringing
• Call Coverage Keys
• Group Call Pickup keys
• Transferred outside calls
• Hold, Park, and Transfer recalls
• Circular or Terminal Extension Hunting calls
• DILs to the extension (if the extension is not the
night mode termination)
• DILs to a Ring Group or UCD Group master number (if the extension is in the group)
• Transferred Intercom calls
• Paging announcements
• Ringing from Intercom calls to the Ring Group
master number (if the extension is in the group)
• Extension hunting calls that normally ring the
extension
Do Not Disturb BLF for Hotline and Call Coverage Keys
The following charts show the Do Not Disturb Busy Lamp Field flash rates for Hotline and Call Coverage keys.
Hotline Busy Lamp Indications
When the key is: The covered extension is:
Off Idle or not installed
On Busy or ringing Intercom call
Medium Flash In DND for outside calls (option 1)
Fast Flash In DND for Intercom calls (option 2)
or All Calls (option 3)
60 ◆ Features DSX Feature Handbook

When the key is: The covered extension is:
Note: When transferring an outside call to an extension in DND, the Transfer will be blocked if the extension
has enabled DND for all calls (type 3) or DND for outside calls (type 1). The Transfer will be allowed if the
extension has enabled DND for Intercom calls (type 2).
Operation
Enabling or Disabling Do Not Disturb
To enable or disable DND an extension:
Do Not Disturb
Call Coverage Key Busy Lamp Indications
Off Idle or not installed
On Busy
Slow flash Ringing
Medium flash In DND for outside calls (option 1)
Fast Flash In DND for Intercom calls (option 2)
or All Calls (option 3)
In these instructions:
[Super Display Soft Key]
[Keyset Soft Key]
Features
1.
While on-hook, press DND.
Select the DND type.
2.
• If you don’t select a type within 10 seconds:
- If DND is enabled, the system automatically disables DND for your extension, or
- If DND is disabled, the system automatically enables DND type 3 for your extension.
[Off]
[Off]
[External]
[Ext]
[Intercom]
[Icm]
Select to turn off (cancel) Do Not Disturb.
• Alternately dial 0.
Select to block incoming outside calls only.
• Alternately dial 1.
Select to block incoming Intercom calls only.
• Alternately dial 2.
• Your Intercom callers will hear DND tone and see the display DO NOT DISTURB.
[All]
[All]
Select to block all incoming calls.
• Alternately dial 3.
• Your Intercom callers will hear DND tone and see the display
[Exit]
[N/A]
Your telephone’s display shows the type of DND you enabled.
3.
Select to return to idle.
• Your DND key is on.
If you are on a call (or anytime your telephone is not idle):
1.
Pressing DND does one of the following.
DO NOT DISTURB.
a.
b.
If DND is enabled, the system automatically disables DND for your extension.
If DND is disabled, the system automatically enables DND type 3 for your extension.
DSX Feature Handbook Features ◆ 61

Do Not Disturb Override
Do Not Disturb Override
Description
Easily override a co-worker’s Do Not Disturb.
Do Not Disturb Override lets an extension user override another extension’s Do Not Disturb. This allows a
priority employee (such as a supervisor or executive) to get through to a co-worker right away while the coworker’s phone is in Do Not Disturb. DND Override is available to all extensions that have DND Override
set in their Class of Service. It is also available to any extension that has a Hotline key for a co-worker, even
without the Class of Service option enabled.
Operation
Do Not Disturb Override
To use Do Not Disturb Override:
Dial your co-worker’s extension or press their Hotline key.
1.
2.
• You hear DND tone and see DO NOT DISTURB in your display.
• If you hear busy or ring/busy tone instead, your co-worker is busy on a call.
[DND Override]
[Ovrd]
Select to override the extension’s Do Not Disturb.
• Alternately dial 1.
In these instructions:
[Super Display Soft Key]
[Keyset Soft Key]
3.
The system automatically places a ringing Intercom call to your co-worker.
62 ◆ Features DSX Feature Handbook

Door Box
Description
Door Box Relays
Door Box Alerts
Door Box
Use a Door Box to remotely monitor an entrance door.
The Door Box (P/N 922450) is a self-contained analog Intercom unit typically used to monitor an entrance
door. A visitor at the door can press the Door Box call button (like a door bell). The Door Box then sends
chime tones or ringing to all extensions programmed to receive chimes. To answer the chime or ringing, the
called extension user just lifts the handset. This lets the extension user talk to the visitor at the Door Box.
The Door Box is convenient to have at a delivery entrance, for example. It is not necessary to have company
personnel monitor the delivery entrance; they just answer the Door Box instead.
Any keyset extension that receives Door Box chimes or ringing can control a control relay, which in turn
typically enables an electric strike on an entrance door next to the Door Box.
The system uses Ring Groups to control Door Box alerts. When a visitor at the door presses the Door Box
call button, the Door Box will alert (chime or ring) all the extensions in the Ring Group to which the Door
Box belongs. For example, if Door Box 309 and extensions 301 and 302 are in Ring Group 1, pressing the
call button alerts 301 and 302.
Features
Operation
Calling from the Door Box
To place a call from the Door Box:
1.
Press the Door Box call button.
When someone inside the building answers your call, speak toward the Door Box.
2.
To place a call to the Door Box from a keyset:
1.
2.
To answer Door Box chimes or ringing:
• Once you press the call button, you can not control the call. You must wait for someone to answer.
Calling to the Door Box
Lift handset and press INTERCOM.
• At a single line set, just lift the handset.
Dial the Door Box extension number.
• You hear two beeps, then conversation with the visitor at the door.
Answering Door Box Chimes
In these instructions:
[Super Display Soft Key]
[Keyset Soft Key]
In these instructions:
[Super Display Soft Key]
[Keyset Soft Key]
In these instructions:
[Super Display Soft Key]
[Keyset Soft Key]
Lift the handset.
1.
• Door Box chimes are not available at single line telephones.
DSX Feature Handbook Features ◆ 63

Door Box
In these instructions:
Controlling the Door Strike
To activate the Door Box relay (which in turn controls the door strike):
• Once set up in programming, this option is available to any member of the Door Box Ring Group as well as any
extension with a Call Coverage key for the Door Box Ring Group.
1.
Place or answer a Door Box call.
2.
Do one of the following.
[Super Display Soft Key]
[Keyset Soft Key]
a.
b.
c.
[Open]
[Open]
[Close]
[Close]
Select to open the Door Box relay (if closed/activated).
• Alternately press FLASH.
Select to close the Door Box relay (if open/deactivated).
• Alternately press FLASH.
At a single line telephone, hookflash to open or close the Door Box relay,
64 ◆ Features DSX Feature Handbook

Extended Ringing
Description
Operation
Extended Ringing
Lets calls ring longer that usual to assist co-workers that can’t readily get to their phones.
Extended Ringing forces an unanswered call to ring a telephone an extended number of times before rerouting. This helps a users that cannot get to their phone quickly to pick up calls (such as a warehouse worker).
Extended Ringing is available with the following features:
❥ Direct Inward Line
DILs ring for an extended period before routing to the overflow destination.
❥ Transfer
Transferred outside calls ring for an extended period before recalling the transferring extension.
None
Features
DSX Feature Handbook Features ◆ 65

Extension Hunting
Extension Hunting
Description
Automatically route calls to co-workers that work closely together.
Extension Hunting routes calls to a predefined group of hunt group member extensions. A call rings in
sequence through the hunt group until answered at a member extension. Extension Hunting is helpful, for
example, for a group of co-workers that share responsibility for answering calls. Each call cycles through the
group until an available member picks it up.
There are three types of Extension Hunting:
❥ Circular Hunting
❥ Terminal Hunting
❥ Uniform Call Distribution (UCD) Hunting
Circular Hunting
A Circular Hunting group consists of a group of extensions programmed into a Circular Hunting list. A call
unanswered at a member extension rings the next extension in the programmed list. If unanswered, the call
will continue to cycle through the hunt group. Depending on the hunt type (see below), Circular Hunting
will occur for transferred outside calls, DILs to a hunt group member, and ringing Intercom calls. Hunting
does not occur for Key Ring and Ring Group calls.
Terminal Hunting
A Terminal Hunting group consists of a group of extensions programmed into a Terminal Hunting list. A call
unanswered at a member extension rings the next extension in the programmed list. The call will cycle
through the group once, until it reaches the last extension in the list. Unlike Circular Hunting, the call will
not cycle back to the top of the hunt list. Depending on the hunt type (see below), Terminal Hunting will
occur for transferred outside calls, DILs to a hunt group member, and ringing Intercom calls. Hunting does
not occur for Key Ring and Ring Group calls.
Uniform Call Distribution (UCD) Hunting
Like Circular and Terminal Hunting, a UCD Hunting also consists of a group of extensions programmed into
a hunt list. The system routes calls into a UCD Group according to the frequency of use of the member
extensions. The first extension rung is the member that has been idle the longest. The last extension rung is
the member that has been idle the shortest.
Each member of the group is additionally associated with a UCD Master Extension Number. To activate
UCD Hunting, an incoming call must route to the UCD Group master number. This is done by placing an
Intercom call to the master number, transferring a call to the master number or setting up a DIL to the master
number. When all members of the UCD Group are busy, the call can route to the programmed UCD Overflow destination.
66 ◆ Features DSX Feature Handbook

Operation
Sending a Call to a Terminal or Circular Hunting Group
To send a call to a Terminal or Circular Hunting Group:
1.
Do one of the following.
Extension Hunting
In these instructions:
[Super Display Soft Key]
[Keyset Soft Key]
a.
b.
c.
d.
Transfer an outside call to a hunt group member.
Set up a DIL to a hunt group member.
Place a ringing Intercom call to a hunt group member.
Set up a hunt group member as a line’s overflow destination.
Sending a Call to a UCD Group
To send a call to a UCD Group:
1.
Do one of the following.
a.
b.
c.
d.
Transfer a call to the UCD Group master number.
Set up a DIL to the UCD Group master number.
Place an Intercom call to the UCD Group master number.
Set up the UCD Group master number as a line’s overflow destination.
Removing/Reinstalling your Extension from your UCD Group
To temporarily remove/reinstall your extension from your UCD Group:
In these instructions:
[Super Display Soft Key]
[Keyset Soft Key]
In these instructions:
[Super Display Soft Key]
[Keyset Soft Key]
Features
1.
Press INTERCOM and dial *5.
2.
Do one of the following:
a.
b.
3.
Press SPEAKER to hang up.
Dial 4 to return your extension to your UCD Group.
Dial 6 to remove your extension from your UCD Group.
DSX Feature Handbook Features ◆ 67

Extension Locking
Extension Locking
Description
When they leave the office, a keyset user can secure their phone to prevent unauthorized use.
Extension Locking allows a keyset extension user to secure their phone when they leave the office. The user
may want to do this if their phone has Toll Restriction and Class of Service options enabled that could be
easily abused. While locked, the restrictions set up in Class of Service 15 and Toll Level 7 are in force at
the extension. When the user returns, they just unlock their extension to return it to normal operation.
You’ll need to program the restrictions in Class of Service 15 and Toll Level 7 separately.
Walking Class of Service and Extension Locking
Walking Class of Service overrides Extension Locking. For example:
❥ Extension 301 is permitted by their Class of Service and Toll Restriction to use Paging and place long
distance calls.
❥ Extension 306 locks their extension. While locked, Class of Service 15 prevents Paging and Toll Level 7
prevents long distance calls. These features are no longer available at extension 306.
❥ The extension 301 user goes to extension 306 and implements Walking Class of Service.
❥ The extension 301 user can then use 306 to make long distance calls and Page (even though 306 was
locked to prevent those features).
Operation
Locking and Unlocking Your Extension
To lock your extension:
Press INTERCOM and dial ##5.
1.
To unlock your extension:
1.
2.
To enter your PIN number (if you don’t have one assigned):
1.
2.
3.
• While your extension is locked, DND winks on and you hear pulsating dial tone when you press INTERCOM.
Press INTERCOM and dial ##5.
Your hear pulsating dial tone when you press INTERCOM.
When you see ENTER PIN CODE:
• Enter your PIN number +
HOLD.
Entering or Changing Your PIN Number
Press INTERCOM and dial ##6.
When you see ENTER NEW PIN:
• Enter your new PIN number + HOLD.
• When entering your PIN number:
CLEAR erases your entire entry.
-
- REDIAL backspaces over (erases) the last digit entered.
When you see REENTER NEW PIN:
• Confirm your entry by reentering your new PIN number.
In these instructions:
[Super Display Soft Key]
[Keyset Soft Key]
In these instructions:
[Super Display Soft Key]
[Keyset Soft Key]
68 ◆ Features DSX Feature Handbook

Entering or Changing Your PIN Number
4.
When you see NEW PIN ACCEPTED:
[Exit]
[Exit]
To change your PIN number (if you already have one assigned):
1.
Press INTERCOM and dial ##6.
When you see ENTER PIN CODE:
2.
• Enter your current PIN number + HOLD.
When you see ENTER NEW PIN:
3.
• Enter your new PIN number + HOLD.
• When entering your PIN number:
- CLEAR erases your entire entry.
- REDIAL backspaces over (erases) the last digit entered.
When you see REENTER NEW PIN:
4.
• Confirm your entry by reentering your new PIN number.
5.
When you see NEW PIN ACCEPTED:
[Exit]
[Exit]
Select to exit PIN number programming.
Extension Locking
In these instructions:
[Super Display Soft Key]
[Keyset Soft Key]
Features
In these instructions:
Unlocking an Extension from the Attendant’s Phone
[Super Display Soft Key]
[Keyset Soft Key]
To unlock an extension (and clear the extension’s PIN number) from the attendant’s phone:
Press INTERCOM and dial ##3.
1.
• You must have a PIN number entered for your phone to use this feature.
When you see ENTER PIN CODE:
2.
• Enter your PIN number + HOLD.
When you see ENTER EXTENSION:
3.
• Enter the number of the extension you want to unlock + HOLD.
4.
When you see CLEAR PIN: xxx, do one of the following:
[YES]
[YES]
[NO]
[NO]
Select to unlock the extension entered in step 3 above.
Select to back up to step 2 without unlocking.
DSX Feature Handbook Features ◆ 69

Feature Keys
Feature Keys
Description
Feature Keys simplify feature operation.
Each keyset has Feature Keys. These Feature Keys simplify placing calls, answering calls and using certain
features. You can customize the function of any keyset’s Feature Keys from the system program and the User
Programmable Features.
The 22-Button Standard and Display Tele-
phones
feature 12 Feature Keys.
The 34-Button Display Telephone features 24
Feature Keys.
34-Button Super Display Telephone also
The
features 24 Feature Keys.
You can assign the following types of Feature Keys to an extension.
• Account Code • Intercom Directory Dialing • Park Orbit
• Call Coverage (immediate,
delayed or no ring)
• Line keys • Reverse Voice Over
• Call Forwarding • Message Center • Save Number Dialed
• Call Timer • Loop Key, Fixed • Speed Dial, Personal
• Group Call Pickup (immediate, delayed or no ring)
70 ◆ Features DSX Feature Handbook
• Loop Key, Switched • Speed Dial, System

• Headset key • Night key • Split
• Hotline • Page Zones • Voice Mail Conversation
Extension Feature Key Assignments
Feature Keys
Record
Extension Feature Key Assignments (Page 1 of 5)
Key Type Description Key Code and Data Operation
Undefined
Use this option to designate a Feature Key as
00
undefined (no function).
Loop Key
(Switched)
Use this option to assign a Feature Key as a
Switched Loop key.
01
• Press the key to
place or answer call.
(page 103)
Busy Lamp Field (BLF)
Off . . . . . . . . .Loop key idle.
On (green) . . . .You are busy on a loop key call.
Slow Flash . . . .Line is ringing.
Loop Key (Fixed)
(page 103)
Use this option to assign a Feature Key as a
Fixed Loop key.
02 + nn (Line Group
90-98)
Busy Lamp Field (BLF)
Off . . . . . . . . . . . . . . Loop key idle.
On (green) . . . . . . . . . You are busy on a loop key call.
Slow Flash . . . . . . . . . Line is ringing.
Line
(page 100)
Use this option to assign a Feature Key as a
line key.
03 + nn (line
number 1-64)
• Press the key to
place or answer call.
Busy Lamp Field (BLF)
Off . . . . . . . . . . . . . . Line is idle or not installed.
On (red) . . . . . . . . . . . A co-worker is busy on the line or has the line on Exclusive Hold.
On (green) . . . . . . . . . You are busy on the line.
Wink On (red) . . . . . . . On System Hold at a co-worker’s extension.
Wink On (green) . . . . . . On System Hold at your extension.
Double Wink On (green). On Exclusive Hold or recalling your extension.
Slow Flash (red) . . . . . . Line is ringing.
Slow Flash (green):. . . . Line is ringing or your extension directly.
Features
N/A
Park Orbit
(page 119)
Use this option to assign a Feature Key as a
Park Orbit key.
04 + nn (Park Orbit
60-69)
• Press key to Park or
retrieve parked call.
Busy Lamp Field (BLF)
Off . . . . . . . . . . . . . . Orbit is idle.
On. . . . . . . . . . . . . . . Orbit is holding a parked call.
Wink On (green) . . . . . . Orbit is holding a call you parked.
DSX Feature Handbook Features ◆ 71

Feature Keys
Extension Feature Key Assignments (Page 2 of 5)
Key Type Description Key Code and Data Operation
Hotline
(page 90)
Call Coverage
Immediate Ring
(page 19)
Call Coverage No
Ring
(page 19)
Use this option to assign a Feature Key as a
Hotline key.
05 + nnn (extension
number)
• Press key to call
A keyset user can use the #HL user-programmable procedure to change the Hotline assignments on their console.
Busy Lamp Field (BLF)
Off . . . . . . . . . . . . . . Partner extension is idle.
On . . . . . . . . . . . . . . Partner extension is busy or ringing.
Medium Flash . . . . . . . Partner extension is in DND for outside calls (option 1).
Fast Flash
Use this option to assign a Feature Key as an
immediately ringing Call Coverage Key.
. . . . . . . . . . Partner extension is in DND for Intercom calls (option 2) or All Calls (option 3).
06 + nnn (extension
• Press key to call cov-
number)
Busy Lamp Field (BLF)
Off . . . . . . . . . . . . . . Covered extension is idle.
On . . . . . . . . . . . . . . Covered extension is busy.
Slow Flash . . . . . . . . . Covered extension is ringing.
Medium Flash . . . . . . . Covered extension is in DND for outside calls (option 1).
Fast Flash
Use this option to assign a Feature Key as a
lamp only (no ring) Call Coverage Key.
. . . . . . . . . . Covered extension is in DND for Intercom calls (option 2) or All Calls (option 3).
07 + nnn (extension
• Press key to call cov-
number)
Hotline partner.
ered extension or
pick up ringing call.
ered extension or
pick up ringing call.
Call Coverage
Delay Ring
(page 19)
Group Pickup
Immediate Ring
(page 79)
Busy Lamp Field (BLF)
Off . . . . . . . . . . . . . . Covered extension is idle.
On . . . . . . . . . . . . . . Covered extension is busy.
Slow Flash . . . . . . . . . Covered extension is ringing.
Medium Flash . . . . . . . Covered extension is in DND for outside calls (option 1).
Fast Flash
Use this option to assign a Feature Key as a
delayed ringing Call Coverage Key.
. . . . . . . . . . Covered extension is in DND for Intercom calls (option 2) or All Calls (option 3).
08 + nnn (extension
• Press key to call cov-
number)
Busy Lamp Field (BLF)
Off . . . . . . . . . . . . . . Covered extension is idle.
On . . . . . . . . . . . . . . Covered extension is busy.
Slow Flash . . . . . . . . . Covered extension is ringing.
Medium Flash . . . . . . . Covered extension is in DND for outside calls (option 1).
Fast Flash
Use this option to assign a
immediately ringing Group Call Pickup key.
. . . . . . . . . . Covered extension is in DND for Intercom calls (option 2) or All Calls (option 3).
Feature Key
as an
09 + nn (Pickup
• Press key to answer
Group 1-16)
Busy Lamp Field (BLF)
Off . . . . . . . . . . . . . . No call is ringing the pickup group.
Slow Flash (green) . . . . A call is ringing the pickup group.
ered extension or
pick up ringing call.
call ringing Pickup
Group.
72 ◆ Features DSX Feature Handbook

Feature Keys
Extension Feature Key Assignments (Page 3 of 5)
Key Type Description Key Code and Data Operation
Group Pickup No
Ring
(page 79)
Group Pickup
Delay Ring
(page 79)
Page Zone
(page 116)
System Speed
Dial
(page 149)
Use this option to assign a
Feature Key
as a
lamp only (no ring) Group Call Pickup key.
10 + nn (Pickup
Group 1-16)
Busy Lamp Field (BLF)
Off . . . . . . . . . . . . . . No call is ringing the pickup group.
Slow Flash (green) . . . . A call is ringing the pickup group.
Use this option to assign a Feature Key as a
delay ring Group Call Pickup key.
11 + nn (Pickup
Group 1-16)
Busy Lamp Field (BLF)
Off . . . . . . . . . . . . . . No call is ringing the pickup group.
Slow Flash (green) . . . . A call is ringing the pickup group.
Use this option to assign a Feature Key as a
Page Zone key.
13 + n (Page Zone 1-
7, 0 for All Call)
Busy Lamp Field (BLF)
On . . . . . . . . . . . . . . The assigned Page zone is busy.
On (green)
Off . . . . . . . . . . . . . . The assigned Page zone is idle.
Use this option to assign a Feature Key as a
. . . . . . . . . . The assigned Page zone is busy broadcasting an announcement you are making.
14 + nnn (bin 001-
System Speed Dial key. You assign the key to
specific System Speed Dial bin.
• There is no BLF for this key type.
999)
• Press key to answer
call ringing Pickup
Group.
Features
• Press key to answer
call ringing Pickup
Group.
• Press key to Page
into assigned zone.
• Press key to dial
stored number.
Personal Speed
Dial
(page 149)
Call Timer
(page 26)
Voice Mail
Record
(page 167)
Use this option to assign a Feature Key as a
Personal Speed Dial key. You assign the key to
a specific Personal Speed Dial bin.
• There is no BLF for this key type.
Use this option to assign a Feature Key as a
Call Timer key. There are two types of timer
key: manual and automatic.
Busy Lamp Field (BLF)
On . . . . . . . . . . . . . . Call Timer on.
Off . . . . . . . . . . . . . . Call Timer off.
Use this option to assign a Feature Key as a
voice mail Record key.
• You must have voice mail installed to
use this key.
• A voice prompt and periodic beep will
remind you that your calls are being
recorded.
Busy Lamp Field (BLF)
Off . . . . . . . . . . . . . . Conversation Record is off.
Fast Flash (green) . . . . Conversation Record is on.
15 + nnn (bin 01-20)
16 + n (1=manual,
2=automatic)
17 + nnn (extension
number of valid Sub-
scriber Mailbox)
• Press key to dial
stored number.
• Press key to start or
stop Call Timer.
• Press key to record
conversation into
mailbox.
DSX Feature Handbook Features ◆ 73

Feature Keys
Extension Feature Key Assignments (Page 4 of 5)
Key Type Description Key Code and Data Operation
Night
(page 112)
Split
(page 154)
Intercom
Directory Dialing
(page 54)
Reverse Voice
Over Key
(page 132)
Use this option to assign a
Feature Key
as a
Night key. There are two options: System
Night key and UCD Night key. The System
Night key puts all Key Ring lines and lines
terminated to Ring Group master numbers
18 + CLEAR
(System Night key)
18 + UCD Group
master number
(UCD Night key)
into the night mode. The UCD Night key puts
all lines terminated to the UCD Group master
number into the night mode.
Busy Lamp Field (BLF)
On . . . . . . . . . . . . . . Night mode is on.
Off . . . . . . . . . . . . . . Night mode is off.
Use this option to assign a programmable key
20
as a Split key.
• There is no BLF for this key type.
Use this option to assign a programmable key
21
as an Intercom Directory Dialing key.
Busy Lamp Field (BLF)
On . . . . . . . . . . . . . . Intercom Directory Dialing is active (being used).
Off . . . . . . . . . . . . . . Intercom Directory Dialing is inactive (off).
Use this option to assign a Feature Key as a
Reverse Voice Over key.
23 + nnn (extension
number)
• Press key to put Key
Ring lines and lines
terminated to Ring
Group master into
night mode.
OR
• Press key to put
lines terminated to
UCD master into
night mode.
See Split (Alternate)
(page 154) for more.
• Press key to access
Intercom Directory
Dialing.
• While on a handset
call, press key to
place a private
Intercom call to
covered extension.
Busy Lamp Field (BLF)
Off . . . . . . . . . . . . . . Assigned extension is idle.
On . . . . . . . . . . . . . . Assigned extension is busy or ringing.
Medium Flash . . . . . . . Assigned extension is in DND for outside calls (option 1).
Message Center
(page 167)
Fast Flash
Use this option to assign a Feature Key as a
Message Center key.
. . . . . . . . . . Assigned extension is in DND for Intercom calls (option 2) or All Calls (option 3)
24 + nnn (extension
number)
• Press key to call
Message Center
Mailbox.
Busy Lamp Field (BLF)
Off . . . . . . . . . . . . . . No messages waiting in the Message Center Mailbox.
Fast Flash. . . . . . . . . . Messages waiting in the Message Center Mailbox.
Save Number
Dialed
(page 138)
Use this option to assign a Feature Key as a
Save Number Dialed key.
• There is no BLF for this key type.
25
While on a call:
• Press key to save
the number you just
dialed.
While idle:
• Press key to redial a
previously saved
number.
74 ◆ Features DSX Feature Handbook

Feature Keys
Extension Feature Key Assignments (Page 5 of 5)
Key Type Description Key Code and Data Operation
Account Code
(page 10)
Call Forwarding
(page 21)
Headset
(page 85)
Use this option to assign a Feature Key as an
Account Code key.
26
1. Place or answer out-
side call.
2. Press key.
3. Enter Account Code.
4. Press key to return to
the call.
Busy Lamp Field (BLF)
Off . . . . . . . . . . . . . . Not in Account Code mode or not entering Account Codes.
Fast Flash (green) . . . . In the Account Code entry mode.
On (green) . . . . . . . . . On a call for which the user has entered an Account Code.
Use this option to assign a Feature Key as a
Call Forwarding key.
27
• Press key instead of
pressing
and dialing *3.
COM
Busy Lamp Field (BLF)
Off . . . . . . . . . . . . . . Extension not call forwarded or in the Call Forwarding setup mode.
Fast Flash. . . . . . . . . . In the Call Forwarding setup mode.
Wink Off . . . . . . . . . . . Extension has Call Forwarding enabled.
Use this option to assign a Feature Key as a
Headset key.
28
• Press key to enable
or disable headset
mode.
Busy Lamp Field (BLF)
Off . . . . . . . . . . . . . . Extension is not in the headset mode.
On . . . . . . . . . . . . . . Extension is in the headset mode.
Features
INTER-
Operation
See Extension Feature Key Assignments (page 71).
User Programmable Feature
Programming Feature Keys
Feature Mnemonic Operation Access Level
Programmable Feature Key
#KP (#57)
Assignments
DSX Feature Handbook Features ◆ 75
#KP
+ Press key you want to program + HOLD + INTER-
+ Press Volume Up or Volume Down to select key
COM
option + HOLD + (Enter any additional data, if required +
HOLD) + Press Volume Up or Volume Down to select
another key to program, or
CONF + SPEAKER to exit.
3-5

Flash
Flash
Description
Extension users can access certain CO and PBX features by interrupting line loop current.
Flash allows an extension user to access certain CO and PBX features by interrupting line loop current.
Flash lets an extension user take full advantage of whatever features the connected telco or PBX offers. You
must set the Flash parameters for compatibility with the connected telco.
Operation
Flashing and Outside Line
To Flash the outside line you are on:
Do one of the following.
1.
In these instructions:
[Super Display Soft Key]
[Keyset Soft Key]
a.
b.
At a keyset, press FLASH.
At a single line telephone, hookflash and dial #3.
76 ◆ Features DSX Feature Handbook

Flexible Numbering Plan
Description
Flexible Numbering Plan
Change the digits users dial for co-workers and other features.
The system’s Flexible Numbering Plan allows you to change the digits users dial to reach the attendant,
other co-worker’s, outside lines, UCD Groups, and Ring Groups. The following chart shows the areas of the
system number plan you can change.
Operation
None
For this feature:
Attendant Position (page 14) Reach the system operator(s) 0 or 01-04
Central Office Calls, Placing
(page 33)
Direct Line Access (page 43) Directly access a line 101-164
Extension Hunting (page 66) Reach a UCD Group master number 700-707
Group Ring (page 81) Reach a a Ring Group master number 600-607
Intercom (page 93) Call a co-worker over the Intercom 300-427
You can change the digits a user
dials to:
Access a Line Group 90-98
These digits are
normally:
Features
DSX Feature Handbook Features ◆ 77

Forced Line Disconnect
Forced Line Disconnect
Description
Disconnect a co-worker’s outside call in an emergency.
Forced Line Disconnect allows an extension user to disconnect (release) another extension’s active outside
call. Forced Line Disconnect lets a user access a busy line in an emergency, when no other lines are available. Maintenance technicians can also use Forced Line Disconnect to release a line on which there is no
conversation. This can happen if a line does not properly disconnect when the outside party hangs up.
Forced Line Disconnect abruptly terminates the active call on the line. Only
use this feature in an emergency and when no other lines are available.
Operation
Using Forced Line Disconnect
To disconnect a busy line:
CAUTION
In these instructions:
[Super Display Soft Key]
[Keyset Soft Key]
1.
Do one of the following.
a.
b.
When you hear busy tone, dial # to disconnect the line.
2.
Press the line key for the busy line.
Press INTERCOM and dial the line’s extension number (e.g., 101 for line 1).
• You hear Intercom dial tone and the line key goes out.
• You can now place a new call on the line.
78 ◆ Features DSX Feature Handbook

Group Call Pickup
Description
Operation
Group Call Pickup
Easily answer a call ringing your Pickup Group, even if you don’t know which extension is ringing.
Group Call Pickup allows an extension user to answer a call ringing an extension in their assigned Pickup
Group. This permits co-workers in the same Pickup Group to easily answer each other’s ringing calls. The
user can intercept the ringing call by dialing a code or pressing a programmed Group Call Pickup key. The
system has a maximum of eight Pickup Groups, with an unlimited number of extensions in each group.
However, an extension can be a member of only one pickup group.
Group Call Pickup can answer the following types of calls:
❥ Ringing Intercom calls
❥ Transferred calls
❥ Direct Inward Lines
❥ Calls on lines assigned to the Pickup Group
To simplify picking up calls, an extension can have Feature Keys assigned as Group Call Pickup keys. There
are three types of Group Call Pickup keys: immediate ring, no ring (lamp only), or delayed ring.
Features
Answering a Pickup Group Call
To answer a call ringing a phone in your Pickup Group:
1.
Lift the handset.
2.
Do one of the following.
a.
b.
Press the flashing Group Call Pickup key.
Press INTERCOM and dial *#.
User Programmable Feature
Changing the Group Call Pickup Key Ringing
Feature Mnemonic Operation Access Level
Group Call Pickup
#RA (#72)
#RAP
+ Group Call Pickup key repeatedly to select ring-
ing mode + SPEAKER to exit.
• Call Coverage Keys flash as follows:
- Lamp only = On red
- Immediate ring = On green
- Delay ring = Fast flash green.
In these instructions:
[Super Display Soft Key]
[Keyset Soft Key]
1-5
DSX Feature Handbook Features ◆ 79

Group Listen
Group Listen
Description
Use Group Listen to talk to an important client or customer and have your co-workers listen in
on the meeting.
Group Listen permits a keyset user to talk on the handset and have their caller’s voice broadcast over the
telephone speaker. This lets the keyset user’s co-workers listen to the conversation. Group Listen turns off
the keyset’s Handsfree microphone so the caller does not hear the co-worker’s voices during a Group Listen.
When a keyset user sets up Group Listen, they hear their caller’s voice over the telephone speaker as well as
their handset.
Operation
To set up Group Listen:
1.
Place or answer a call using the handset.
Press SPEAKER twice (but do not hang up).
2.
3.
• SPEAKER flashes slowly red.
Talk to the caller through your handset.
• You and your co-workers hear your caller’s voice over your telephone speaker.
• Your handsfree microphone and handset receiver are off.
Using Group Listen
In these instructions:
[Super Display Soft Key]
[Keyset Soft Key]
To talk Handsfree after initiating Group Listen:
1.
Press SPEAKER twice.
Hang up.
2.
• SPEAKER is on.
• Talk to your caller using the Handsfree speaker and microphone.
To cancel Group Listen and return to your handset:
1.
Do not hang up.
Press flashing SPEAKER.
2.
•
SPEAKER is off.
• Talk to your caller over your handset. Your co-workers can no longer hear your caller’s voice.
80 ◆ Features DSX Feature Handbook

Group Ring
Description
Operation
Placing and Transferring Ring Group Calls
Group Ring
Use Group Ring to call a group of co-worker’s simultaneously.
Group Ring allows you to arrange extensions into Ring Groups for answering calls. When a call comes into
the Ring Group master number, all extensions in the group ring simultaneously. Any user in the Ring Group
can answer the call just by lifting the handset. The ringing call can be:
❥ A Direct Inward Line to the Ring Group (i.e., terminated to the Ring Group master number).
❥ An outside call transferred to the Ring Group master number.
❥ An intercom call to the Ring Group master number.
The system provides up to 8 Ring Groups (1-8). The Ring Group master numbers are predefined as 600-607,
but can be any valid extension number not already in use.
An unanswered DIL to the Ring Group master number can be picked up by the Ring Group Mailbox.
Features
Placing an Intercom Call to a Ring Group
To make an Intercom call to a Ring Group:
1.
Lift handset and press INTERCOM.
2.
Dial the Ring Group number (e.g., 600).
Wait for co-worker to answer.
3.
• If all Ring Group members are busy, your call will continue to ring until a group member becomes free.
Transferring a Call to a Ring Group
To Transfer your call to a Ring Group:
1.
Press INTERCOM.
2.
Dial the Ring Group number (e.g., 600).
Do one of the following:
3.
a.
To screen (announce) the Transfer:
Wait for a Ring Group member to answer then press TRANSFER.
b.
To have the call go through unscreened (unannounced):
In these instructions:
[Super Display Soft Key]
[Keyset Soft Key]
In these instructions:
[Super Display Soft Key]
[Keyset Soft Key]
TRANSFER.
Press
• If your Transfer is unanswered, the call will return to you.
c.
To return to the call before a Ring Group member picks it up:
Press the flashing (green) line key.
DSX Feature Handbook Features ◆ 81

Group Ring
Answering Ring Group Calls
Answer a Call to a Ring Group
To answer a call ringing your Ring Group:
1.
Do one of the following:
In these instructions:
[Super Display Soft Key]
[Keyset Soft Key]
a.
If the call doesn’t appear on a line or loop key:
Lift handset.
b.
If the call appears on a line or loop key:
Press the flashing line or loop key.
Answer a Call to Another Ring Group
To answer a call ringing another Ring Group (of which you are not a member):
1.
Lift handset and press INTERCOM.
2.
Dial ** and the Ring Group number (e.g., 600).
In these instructions:
[Super Display Soft Key]
[Keyset Soft Key]
82 ◆ Features DSX Feature Handbook

Handsfree and Handsfree Answerback
Description
Handsfree
Handsfree Answerback and Forced Intercom Ringing
Handsfree and Handsfree Answerback
- Talk over the phone Handsfree, using the built-in speaker and microphone.
- With Handsfree Answerback, answer an Intercom call by just speaking toward your phone.
Handsfree allows a keyset user to process calls using the speaker and microphone in the telephone (instead
of the handset). Handsfree is a convenience for workers who don’t have a free hand to pick up the handset.
For example, a terminal operator could continue to enter data with both hands while talking on the phone.
Handsfree Answerback permits an extension user to respond to a voice-announced Intercom call by speaking toward the phone, without lifting the handset. Like Handsfree, this is a convenience for workers who
don’t have a free hand to pick up the handset. Incoming Intercom calls alert with two beeps if the extension
has Handsfree Answerback — a single beep if it does not.
Forced Intercom Ringing causes an Intercom call to ring the destination extension. You can enable Forced
Intercom Ringing system-wide (for all extensions), or a user can dial a code to have their Intercom call ring
the destination.
Features
Operation
Using Handsfree
To use Handsfree instead of lifting the handset:
1.
Press SPEAKER.
To talk on a Handsfree call:
Speak toward your telephone.
1.
To change a handset call into a Handsfree call:
1.
2.
To change a Handsfree call into a handset call:
1.
• To temporarily turn off the Handsfree microphone, see Microphone Mute (page 107).
Press SPEAKER.
Hang up the handset.
Lift the handset.
In these instructions:
[Super Display Soft Key]
[Keyset Soft Key]
In these instructions:
Setting Up Incoming Voice Announcements
To turn voice-announcements for your incoming Intercom calls on and off:
Select the voice announce option.
1.
[Menu + Voice Announce]
[Menu + Vann]
[Super Display Soft Key]
[Keyset Soft Key]
DSX Feature Handbook Features ◆ 83

Handsfree and Handsfree Answerback
Setting Up Incoming Voice Announcements
Do one of the following.
2.
In these instructions:
[Super Display Soft Key]
[Keyset Soft Key]
a.
b.
To turn incoming voice announcements on:
[On + EXIT]
[On + EXIT]
To turn incoming voice announcements off:
[Off + EXIT]
[Off + EXIT]
User Programmable Feature
Setting Up Incoming Voice Announcements
Feature Mnemonic Operation Access Level
Handsfree Answerback
#VA (#82)
#VA
+ V for voice announce or R for ring + SPEAKER to
exit.
3-5
84 ◆ Features DSX Feature Handbook

Headset Compatibility
Description
Headset Compatibility
Have the privacy of a handset call without having to hold the handset.
A keyset user can utilize a customer-provided headset in place of the handset. Like using Handsfree, using
the headset frees up the user’s hands for other work. However, the headset provides privacy not available
from Handsfree.
Headset Compatibility also provides the following features. (Note that while an extension is in the Headset
mode, the system ignores all hookswitch depressions.)
❥ Background Music
If programmed and connected, Background Music will broadcast over the telephone speaker while the
extension is in the Headset mode.
❥ Central Office Calls, Answering
An extension user in the Headset mode can press Volume Up and Volume Down to control the volume
of any call ringing their phone.
❥
Handsfree and Handsfree Answerback
An extension in the Headset mode can receive normal voice-announced Intercom calls, depending on system programming. The extension user can respond to the voice-announced call by speaking toward the
phone (just like non-headset extensions). To answer the voice-announced call in the headset, the user just
presses
SPEAKER
❥ Microphone Mute
after hearing the voice-announcement.
While on a headset call, the extension user can press MUTE to mute (i.e., turn off) the headset microphone. While responding to an Intercom call using Handsfree Answerback, pressing MUTE mutes the
Handsfree microphone.
❥ Off-Hook Signaling
Outside Calls
Depending on system programming, an extension in the headset mode can receive either Camp-On
beeps or Off-Hook Ringing for incoming outside calls (just like non-headset extensions).
Intercom Calls
Depending on system programming, an extension in the headset mode can receive either Camp-On
beeps or Voice Over announcements from a co-worker (just like non-headset extensions).
Features
Hotline Calls
Depending on system programming, an extension in the headset mode can receive either Camp-On
beeps or Voice Over announcements from their Hotline partner.
Paging
Internal Paging announcements broadcast over the telephone speaker while the extension is in the Headset mode.
Transfer
Screened and unscreened transfers work just like non-headset extensions. For example, if a headset
extension user presses
SPEAKER to answer a screened transfer, the call will connect to their headset
when the transferring party hangs up. Note that Handsfree Transfers always connect to the headset extension’s headset, not speakerphone.
Volume Control
While on a headset call, the extension user can press Volume Up and Volume Down to adjust the
receive volume in the headset.
Headset Key
A keyset user can have a Feature Key on their telephone or DSS Console assigned as a Headset key. The
user presses the key to enable or disable the headset mode, as an alternative to using the
DSX Feature Handbook Features ◆ 85
#HL
User Pro-

Headset Compatibility
grammable Feature. The key lights while the extension is in the Headset mode, and is off while the Headset
mode is disabled. If an extension user is on a call, pressing the Headset key automatically switches the
active call to the headset. Pressing the Headset key again switches the call back to Handsfree.
Off-Hook Signaling and Headsets
Outside Calls (transfers and DILs)
If the extension is set up to receive Camp-On tones for waiting (transferred) outside calls, the user will hear
the Camp-On tones in their headset. They will also hear Camp-On tones in their headset for a waiting Direct
Inward Line (DIL). The extension will not, however, receive Camp-On tones for Key Ring calls ringing the
phone while it is in the headset mode.
An extension in the headset mode will not hear Off-Hook Ringing.
Intercom Calls
If the extension is set up to receive Camp-On tones for waiting Intercom calls, the user will hear tones in
their headset when a co-worker dials 2 to wait in line.
Operation
To connect the headset:
Using the Headset
In these instructions:
[Super Display Soft Key]
[Keyset Soft Key]
1.
Plug a compatible headset into the telephone headset jack.
To turn the headset mode on and off:
1.
Do one of the following.
a.
b.
While in the headset mode:
1.
You can do the following.
a.
b.
c.
Press the headset Feature Key on your telephone or DSS Console.
Use the User Programmable Features (see below).
Press a line key to place or answer an outside call.
Press INTERCOM to get Intercom dial tone.
If on a call, press SPEAKER to hang up.
User Programmable Feature
Turning the Headset Mode On and Off
Feature Mnemonic Operation Access Level
Headset Compatibility
#HS (#47)
#HS
+ Y to enable or N to disable + SPEAKER to exit. 3-5
86 ◆ Features DSX Feature Handbook

Hold
Description
System (Regular) Hold
Exclusive Hold
Automatic Hold
Hold
Have a call wait on Hold, then pick it up to continue the conversation.
Hold lets an extension user put a call in a temporary waiting state. The caller on Hold hears silence or Music
on Hold, not conversation in the extension user’s work area. While the call waits on Hold, the extension user
may process calls or use a system feature. Outside calls left on Hold too long recall the extension that placed
them on Hold. If the recall is unanswered, the call diverts to Key Ring.
There are four types of Hold:
With System Hold, an outside call a user places on Hold flashes the line key (if programmed) at all other
keysets. Any keyset user with the flashing line key can pick up the call.
When a user places a call on Exclusive Hold, only that user can pick up the call from Hold. The line appears
busy to all other keysets that have a key for the line. Exclusive Hold is important if the user doesn’t want a
co-worker picking up their call on Hold.
Automatic Hold allows a user to be on an outside call, activate a feature, and automatically place the call on
Hold without first pressing the HOLD key. The system places a call on Hold automatically when the user
presses CONF, INTERCOM, or a Hotline key. Automatic Hold optionally allows a user, busy on an outside
call, to press another line key or a Call Coverage Key to automatically put their initial call on Hold.
Features
Intercom Hold
A user can place an Intercom call on Hold. The Intercom call on Hold does not indicate at any other extension. There is no Hold Recall for Intercom calls.
Distinctive Flash Rate on Recall
System Hold and Exclusive Hold recall feature a distinctive flash rate for line keys (see the chart below).
This allows the keyset extension user to easily differentiate new calls that are ringing from held calls that
are recalling.
For this type of call:
Call that you placed on Hold
Call that you initially placed on Hold
Call a co-worker placed on Hold at
Call a co-worker initially placed on
recalling
Hold recalling
your phone
their extension
your phone
Distinctive Flash Rate on Recall
You see this flash rate:
System Hold Exclusive Hold
Single Wink On (green) Double Wink On (green)
Double Wink On (green) Double Wink On (green)
Single Wink On (red) None (On red)
Double Wink On (red) Double Wink On (red)
DSX Feature Handbook Features ◆ 87

Hold
Hold Recall Display
The Hold recall display identifies:
❥ The type of call recalling the extension.
❥ The extension which initially placed the call on Hold.
The Hold recall displays occurs as the call is ringing the extension that initially placed it on Hold, and after
the call diverts to Key Ring.
Operation
To place a call on System Hold:
Press HOLD.
1.
• The line key winks (on) while on Hold, double-wink (on) while recalling.
• Line keys on Hold are green for your calls - red for your co-workers.
If a call on Hold recalls, you see one of the following.
Using System Hold
In these instructions:
[Super Display Soft Key]
[Keyset Soft Key]
a.
b.
If the extension that placed to call on Hold doesn’t have a name:
Hold Recall
STA 301
If the extension that placed the call on Hold has a programmed name:
Hold Recall
300: Attendant
To pick up an outside call on System Hold:
Press the flashing line key.
1.
• The line key lights solid (green).
To pick up an outside call on system Hold at a co-worker’s extension:
• You must know the number of the line that is on Hold.
1.
Lift the handset and press INTERCOM.
2.
Dial *4.
Dial the number of the line that is on Hold.
3.
• For example, dial 01 for line 1.
Using Exclusive Hold
To place an outside call on Exclusive Hold:
In these instructions:
[Super Display Soft Key]
[Keyset Soft Key]
Press HOLD twice.
1.
• For you, the line key winks (on green) while on Hold, flashes slowly while recalling.
• For your co-workers, the line key is on red while on Hold, flashes slowly (red) while recalling.
If a call on Hold recalls, you see one of the following.
a.
If the extension that placed to call on Hold doesn’t have a name:
Hold Recall
STA 301
88 ◆ Features DSX Feature Handbook

Using Exclusive Hold
b.
If the extension that placed the call on Hold has a programmed name:
Hold Recall
300: Attendant
To pick up an outside call on Exclusive Hold:
Press the flashing line key.
1.
• The line key lights solid (green).
Using Intercom Hold
To place an Intercom call on Hold:
Press HOLD.
1.
• INTERCOM flashes with a double-wink (on green) while on Hold - slow flash (green) while recalling.
To pick up an Intercom call from Hold:
1.
Lift the handset
Hold
In these instructions:
[Super Display Soft Key]
[Keyset Soft Key]
In these instructions:
[Super Display Soft Key]
[Keyset Soft Key]
Features
2.
If you are not connected to the Intercom call, press INTERCOM.
Using Hold at a Single Line Telephone
To place an outside or Intercom call on Exclusive Hold:
• Single line telephones cannot place calls on System Hold.
1.
Hookflash.
Dial *7 and hang up.
2.
• If you leave the call on Hold too long, it will recall to you.
• If you hookflash and hang up without dialing *7, the call will recall immediately.
• If you have a call on Exclusive Hold and have a Camped-On call waiting, dialing *7 will answer the waiting
call. See Split (Alternate) (page 154) for more.
To retrieve your call from Exclusive Hold:
1.
Lift the handset and dial *7.
To pick up an outside call on system Hold at a co-worker’s extension:
• You must know the number of the line that is on Hold.
1.
Lift the handset and dial *4.
2.
Dial *4.
In these instructions:
[Super Display Soft Key]
[Keyset Soft Key]
Dial the number of the line that is on Hold.
3.
• For example, dial 01 for line 1.
DSX Feature Handbook Features ◆ 89

Hotline
Hotline
Description
Hotline provides partner extensions with one-button calling and Transfer.
Hotline gives a keyset user with a programmed Hotline key one-button calling and Transfer to another extension (the Hotline partner). Hotline helps co-workers that work closely together. The Hotline partners can call
or Transfer calls to each other just by pressing a single key.
In addition, the Hotline key shows the status of the partner’s extension:
Hotline Busy Lamp Indications
When the key is: The partner extension is:
Off Idle or not installed
1
Ringing Intercom and Group Ring calls light the Hotline key. DILs, Key Ring calls
and transferred calls do not.
Hotline Automatic Transfer
With Hotline Automatic Transfer, the extension can Transfer their call to a co-worker just by pressing their
Hotline key and hanging up. Without Hotline Automatic Transfer, the user must press TRANSFER before
pressing the Hotline key. If the user frequently uses their Hotline key for one-button Transfer to co-workers,
Hotline Automatic Transfer is recommended. If the user prefers to consult with their Hotline partner rather
than Transfer, disabling Hotline Automatic Transfer would be helpful.
Pressing a Hotline key can Transfer a call to an uninstalled extension’s mailbox (if the mailbox is
enabled).
On
Busy or ringing
1
Medium Flash Partner extension is in DND for outside
calls (option 1).
Fast Flash Partner extension is in DND for Intercom
calls (option 2) or All Calls (option 3).
90 ◆ Features DSX Feature Handbook

Operation
Using Hotline
To place a call to your Hotline partner:
1.
Press your Hotline key.
To transfer a call to your Hotline partner:
1.
While on a call, press your Hotline key.
2.
Do one of the following.
Hotline
In these instructions:
[Super Display Soft Key]
[Keyset Soft Key]
Features
a.
b.
3.
The call recalls to you if it is not picked up.
To answer a call from your Hotline partner:
1.
When you hear two beeps, speak towards the phone.
If your partner answers, announce the call, press TRANSFER.
• If your extension has Hotline Automatic Transfer, just announce the call and hang up.
Press TRANSFER to have the call wait at your Hotline partner unannounced.
• If your extension has Hotline Automatic Transfer, just hang up instead.
User Programmable Feature
Feature Mnemonic Operation Access Level
Hotline
#HL (#45)
Reassigning Hotline Keys
#HL
+ Press flashing Hotline key + Enter extension for
new Hotline partner + HOLD + Program another Hotline
key or SPEAKER to exit.
3-5
DSX Feature Handbook Features ◆ 91

Interactive Soft Keys
Interactive Soft Keys
Description
Use advanced features just by pressing a soft key, without remembering feature codes.
Interactive Soft Keys provide intuitive feature access. It is no longer necessary to remember feature codes to
access the telephone’s advanced features because the function of the soft keys change as the user process calls.
For example, while on an outside call a display keyset user can press the
Operation
See each feature.
PARK
soft key to Park their call in orbit.
92 ◆ Features DSX Feature Handbook
 Loading...