

D
term
®
Analog Cordless
User’s Guide
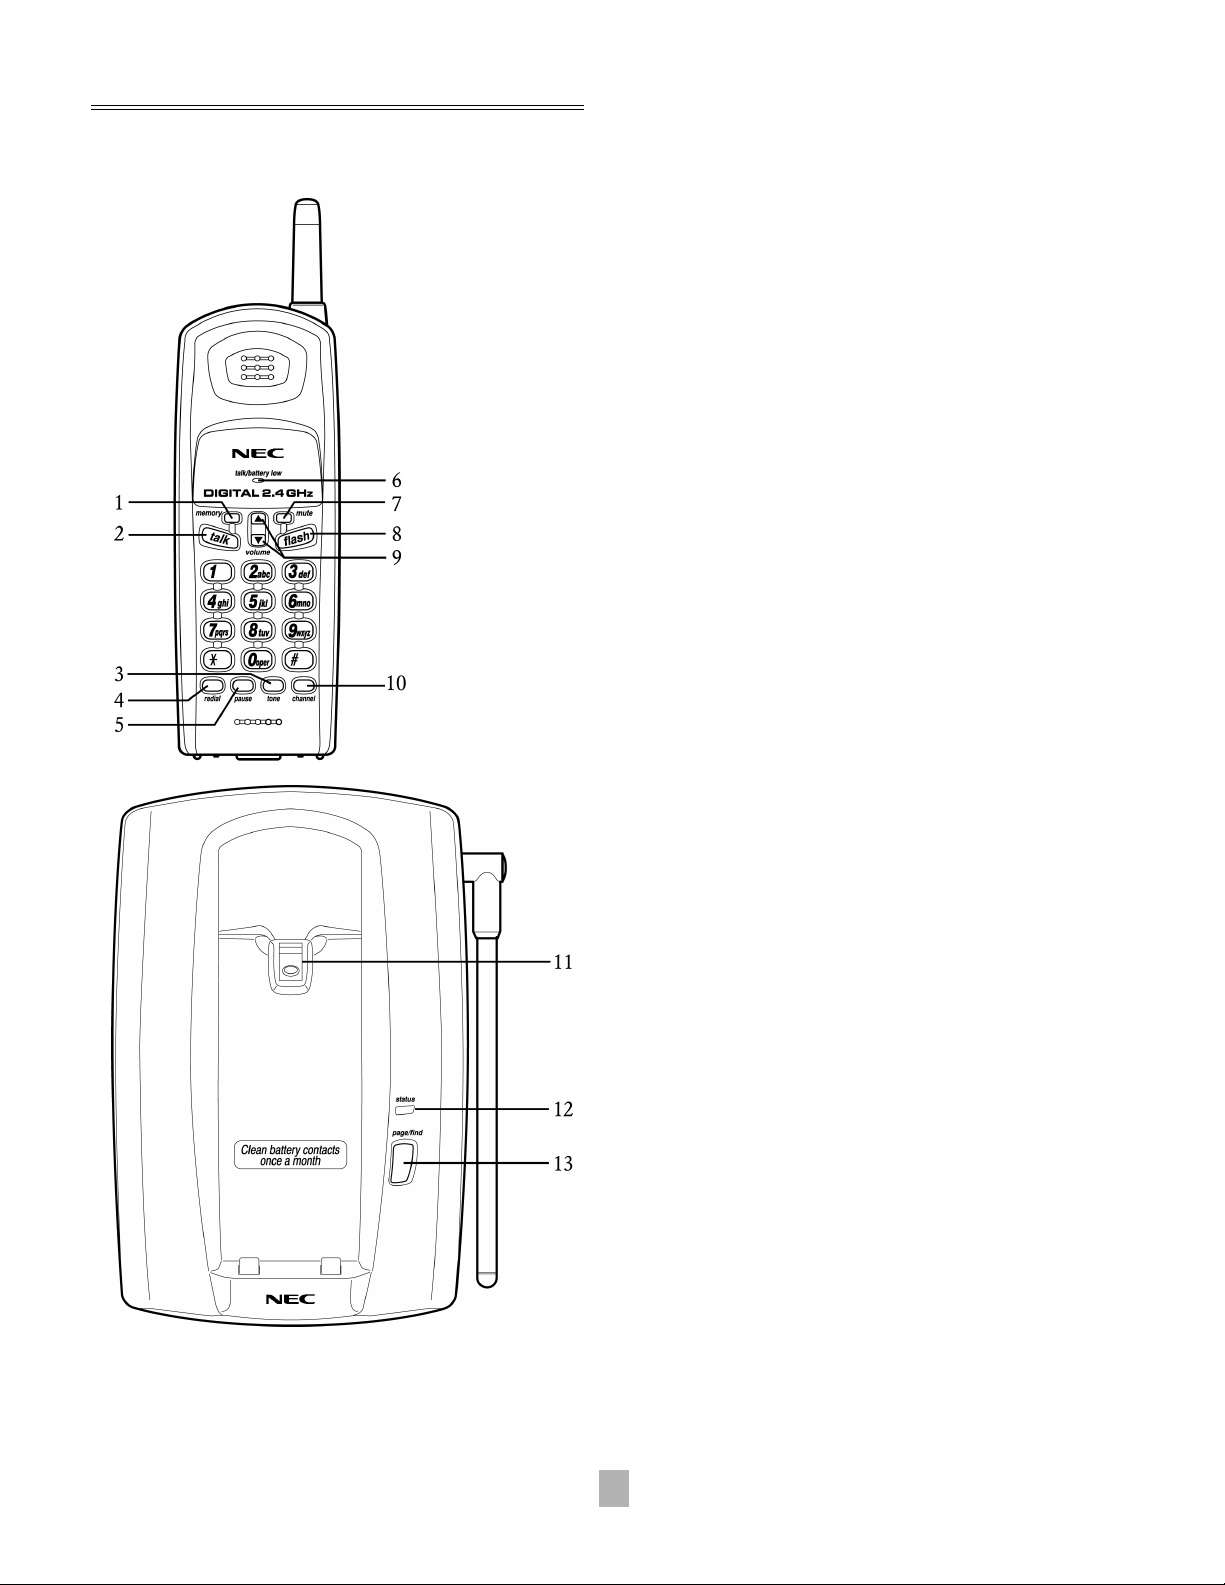
Controls and Functions
1
memory –
recalls numbers in memory.
2
talk –
3
tone
dialing in pulse dial mode.
4
redial –
number.
5
pause –
in a memory dialing sequence.
6
talk/battery low –
that indicates when the phone
is in use or the battery is low.
7
mute –
microphone while you are
using the telephone.
8
flash –
(if available), transfer and
conference calling.
Enters or
Answers or places calls.
– Switches to tone
Redials the last
Adds a timed pause
An LED
Turns off the handset
Accesses call waiting
9
volume –
and earpiece volumes.
10
channel –
channel for clearer reception.
11
handset retainer –
handset in the base unit for
wall mounting.
12
status –
indicates the telephone is in
use or the handset is
charging.
13
page/find –
handset.
Sets both the ringer
Selects another
Holds the
An LED that
Locates the
1
Connecting the Base Unit
1. Connect the telephone line cord to the “TEL LINE” jack on the base unit and to a telephone
outlet.
2. Connect the AC adapter to the DC IN 9V jack and to a standard 120 V AC wall outlet.
3. Set the base unit on a desk or tabletop and place the handset on the base unit.
4. Raise the antenna to a vertical position.
Before plugging the telephone line into your new telephone, the rechargeable
nickel-cadmium battery pack must be fully charged. Charge the battery for
approximately 15 to 20 hours without interruption.
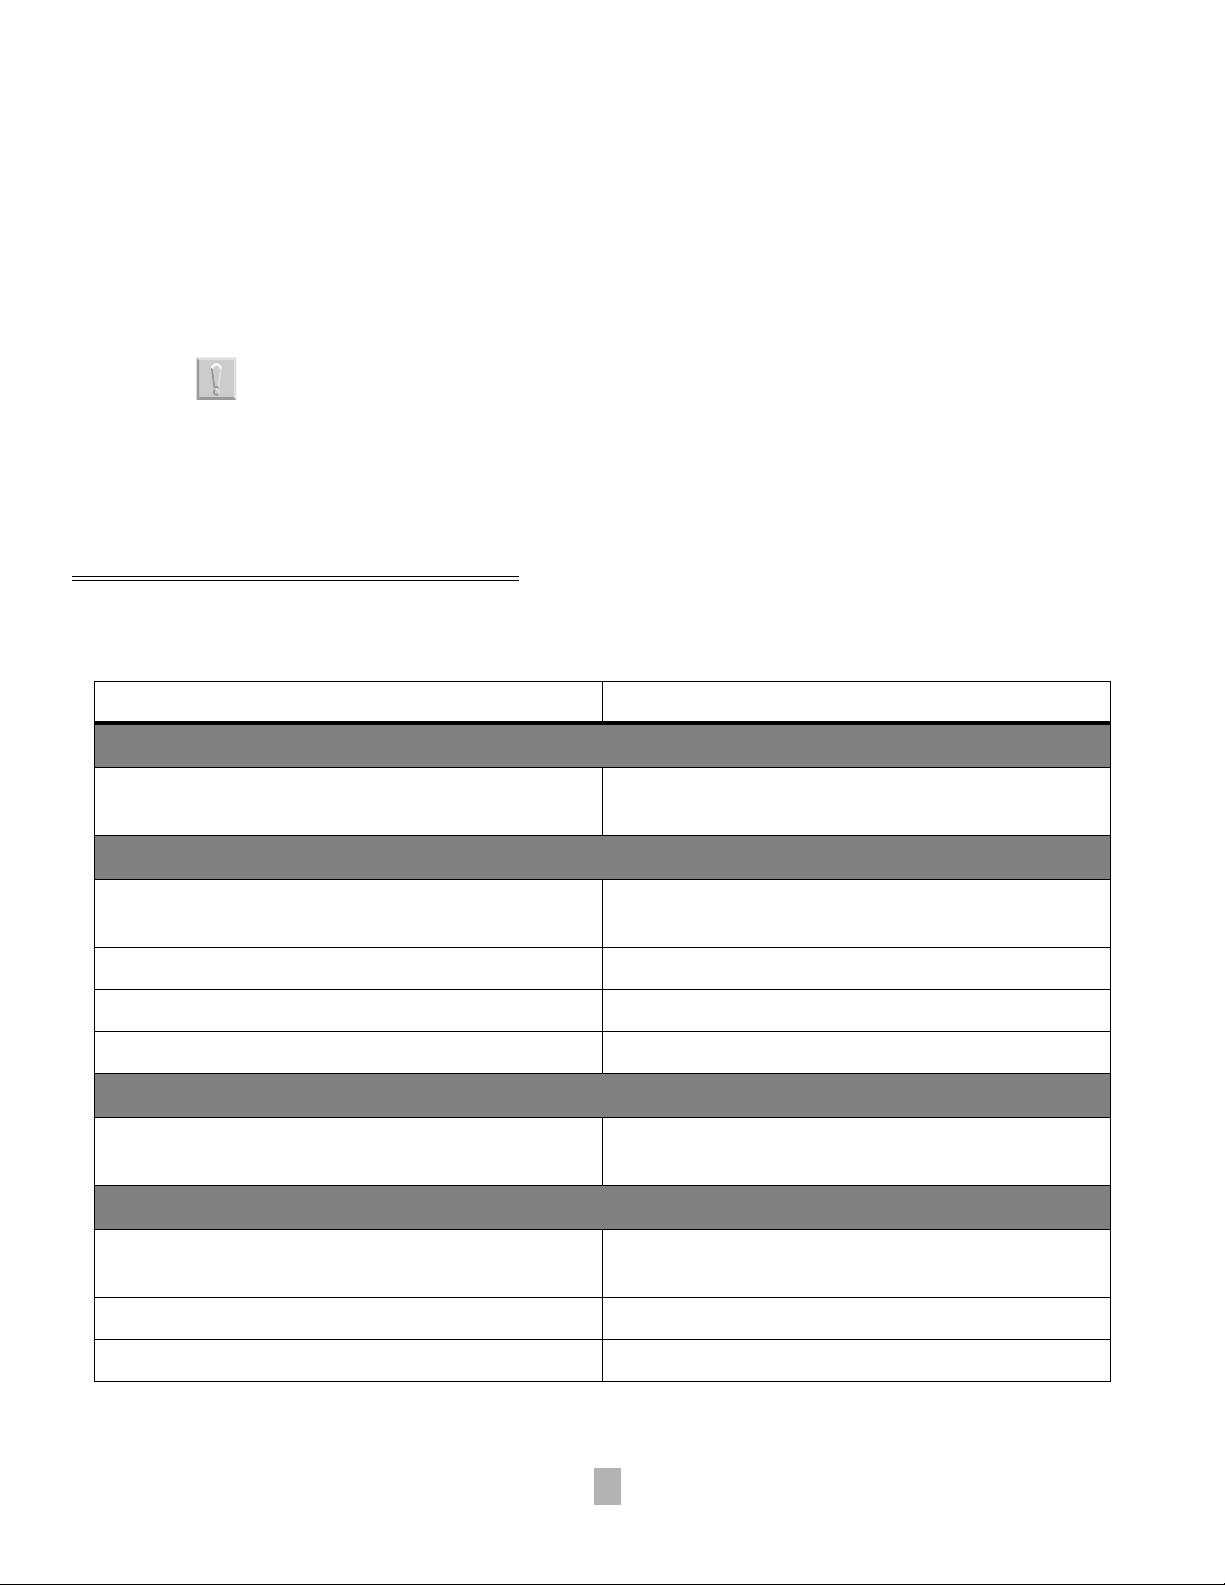
USING YOUR PHONE
Handset On Base Handset Off Base
Answer Call
Remove the handset from the base,
(AutoTalk) or press talk.
Pick up the handset and press talk.
Make Call
1 Remove the handset from the base,
(AutoTalk) or press talk.
2The talk/battery low LED lights. 2 The talk/battery low LED lights.
3 Listen for the dial tone. 3 Listen for the dial tone.
4 Dial the number. 4 Dial the number.
1Press talk.
Hang Up
Return the handset to the base,
(AutoStandby) or press talk.
Press talk.
Redial
1 Remove the handset from the base,
(AutoTalk) or press talk.
1 Pick up the handset and press talk.
2 Listen for the dial tone. 2 Listen for the dial tone.
3 Press redial to dial the last number dialed. 3 Press redial to dial the last number dialed.
2

Receiver, Ringer Tone and Volume Control
The telephone has two ringer tones and each tone has two volume levels.
While the telephone is idle, continue to press volume until you hear the ringer tone and
volume level you want.
The telephone has four receiver volume levels: Low, Medium, High, Maximum.
While on a call, continue to press volume until you hear the volume level you want. (When
you hang up, the telephone retains the last volume setting selected.)
Muting the Handset
The handset microphone can be temporarily turned off (muted) during a telephone conversation so
the person you are talking with cannot hear you. You can turn the microphone back on to resume
the conversation.
1. While on a call, press mute on the handset to turn the microphone off.
2. Press mute or talk to cancel mute. (The microphone is turned on.)
Flash Button
The flash button allows you to access services such as Centrex call waiting, call transfer,
conference calling and call hold.
1. During the conversation, press flash. (If accessing call waiting; this allows you to answer
the second caller.)
2. Press flash again. (This returns you to the previous call.)
Storing a Number
Your NEC D
frequently called telephone numbers.
1. Remove the handset from the base unit.
2. Press memory. (The talk/battery low LED flashes and a beep is heard).
3. Enter the telephone number you want to store (up to 20 digits).
term
Analog Cordless telephone has 10 memory locations for storing important or
4. Press memory and enter the memory location (0~9) you want to use.
You will hear a long beep and the talk/battery low LED stops flashing indicating the number
has been successfully stored. If you select any keys other than 0~9 or you exceed the
20-second limit, the handset beeps rapidly and no number will be stored.
3

Storing Mixed Tone/Pulse Numbers
If the telephone is set up for pulse dialing, mixed mode numbers can be stored to easily access
long distance services.
1. Remove the handset from the base unit.
2. Press memory. (The talk/battery low LED flashes and a beep is heard.)
3. Enter the number(s) to be dialed in pulse mode.
4. Press tone on the handset to enter a pause. (This also counts as one digit.)
5. Enter the number(s) to be dialed in tone mode.
6. Press memory and enter the memory location (0~9) you want to use.
The ability to pulse dial is dependent upon the telephone system and/or the outside lines to
which the D
term
Analog Cordless is connected.
Dialing a Stored Number
1. Remove the handset from the base unit.
2. Press talk.
3. Press memory and enter the memory location number (0~9) you want to dial. (If you select
a memory location that does not have a number stored in it, the handset beeps rapidly.)
4. The number is dialed.
Chain Dialing
After dialing a number you may be requested to enter a special access code, for example, when
performing a banking transaction.
To dial the number using chain dialing:
1. Remove the handset from the base unit.
2. Manually dial the telephone number.
3. Press memory and enter the memory location number (0~9) you want to dial.
4

Replacing a Stored Number
When you enter the memory location number, any number previously stored for the memory
location is replaced.
Erasing a Stored Number
1. Remove the handset from the base unit.
2. Press memory twice.
3. Enter the memory location number (0~9) you want to erase. (You will hear a long beep
confirming the number has been erased.)
Selecting a Different Channel
You can manually change the telephone channel for clearer operation. There are 30 factory-set
channels from which you can select. (Changing channels only works when the telephone is in
use.)
1. Remove the handset from the base unit.
2. Press channel. (The talk/battery low LED flashes, indicating the telephone is changing
channels.)
3. Continue step 2 until you find a clear channel.
Traveling Out of Range
When you begin to move too far away from the base unit, you will hear a clicking sound. As you
travel further out of range, the voice transmission begins to break up. Once you have passed the
range limits of the base unit, the call terminates.
Page/Find Button
Page/find only works when the telephone is not in use.
1. Press page/find on the base unit for a five-second beep.
2. Press and hold the page/find button for a longer beep.
3. Once the handset has been located; press talk on the handset to end the page/find feature.
4. If you do not wish to make a call at this time, press talk again to hang up.
5

Headset Installation
Your telephone may be used with an optional headset. To use this feature, simply plug the headset
into the headset jack on the handset. Your telephone is ready for handsfree conversation.
Setting the Dial Mode Switch
Place the switch in the “Tone” position for tone dialing, or the “Pulse” position for pulse dialing.
The ability to pulse dial is dependent upon the telephone system and/or the outside lines to which
term
the D
Analog Cordless is connected.
Charging the Battery
The plastic connectors will fit together only one way. Make sure the battery connector is properly
aligned.
Before plugging the telephone line into your new telephone, the rechargeable
nickel-cadmium battery pack must be fully charged. Charge the battery for
approximately 15 to 20 hours without interruption.
1. Remove the handset battery cover.
2. Plug the battery cable into the handset and place the battery pack inside the battery
compartment.
3. Replace the battery cover.
4. Place the handset on the base to charge. (The handset can charge in either the face-up or
face-down position.)
Low Battery Indicator
When the battery pack in the handset needs to be charged, the talk/battery low indicator flashes.
If this occurs while you are on the telephone, you will hear an alert tone. Complete your call as
quickly as possible and return the handset to the base unit for charging.
Cleaning Battery Contacts
To maintain a good charge, it is important to clean all battery contacts on the handset and base unit
about once a month. Use a dry cloth or pencil eraser, if necessary. Do no use any liquids or
solvents.
6

Beltclip Installation
1. Insert the beltclip into the holes on each side of the handset.
2. Press down firmly until it clicks into the holes.
If you have wall mounted the base, you cannot place the handset with the keypad facing
inside. Pull both sides of the beltclip out of the holes to remove.
term
D
Analog Cordless is hearing aid compatible.
7

Optional Available Parts
Part Description Stock Number
Headset with Foam Covered Ear and Microphone 730616
Replacement AC Adapter for Base Unit 760625
Replacement String-Type Beltclip 730624
Replacement Wall Mount Unit 730623
8

© 2001 NEC America, Inc.
The material contained herein is subject to change
without prior notice at the sole discretion of NEC America,
Inc.
term
®
is a registered trademark of NEC Corporation.
D
AutoTalk, AutoStandby, Random Code, UltraClear Plus,
and AutoSecure are trademarks of Uniden America
Corporation.
Document Revision 1
For more information contact:
NEC America, Inc.
6555 N State Highway 161
Irving, TX 75039-2402
www.cng.nec.com
750229-0
 Loading...