

Page 1
Page 2

The information in this document is subject to change without notice and does not represent a
commitment on the part of Native Instruments GmbH. The software described by this document is subject to a License Agreement and may not be copied to other media. No part of this
publication may be copied, reproduced or otherwise transmitted or recorded, for any purpose,
without prior written permission by Native Instruments GmbH, hereinafter referred to as Native
Instruments.
“Native Instruments”, “NI” and associated logos are (registered) trademarks of Native Instruments GmbH.
All other trade marks are the property of their respective owners and use of them does not imply any affiliation with or endorsement by them.
Document authored by: Native Instruments GmbH
Software version: 1.0 (12/2015)
Disclaimer
Page 3

NATIVE INSTRUMENTS GmbH
Schlesische Str. 29-30
D-10997 Berlin
Germany
www.native-instruments.de
NATIVE INSTRUMENTS North America, Inc.
6725 Sunset Boulevard
5th Floor
Los Angeles, CA 90028
USA
www.native-instruments.com
NATIVE INSTRUMENTS K.K.
YO Building 3F
Jingumae 6-7-15, Shibuya-ku,
Tokyo 150-0001
Japan
www.native-instruments.co.jp
Contact
NATIVE INSTRUMENTS UK Limited
18 Phipp Street
London EC2A 4NU
UK
www.native-instruments.com
© NATIVE INSTRUMENTS GmbH, 2015. All rights reserved.
Page 4

Table of Contents
Table of Contents
1 Welcome to BLOCKS WIRED .......................................................................................
1.1 About the BLOCKS WIRED Documentation .................................................................................. 6
1.1.1 Document Conventions .............................................................................................. 7
1.1.2 Info Hints ................................................................................................................... 8
2 Installation and Activation .........................................................................................
2.1 Installing BLOCKS WIRED ........................................................................................................... 10
2.2 Activating BLOCKS WIRED .......................................................................................................... 10
3 How to Use BLOCKS WIRED ........................................................................................
3.1 How to Open BLOCKS WIRED ....................................................................................................... 12
3.2 Exploring Factory-set Snapshots ................................................................................................ 16
3.3 Saving a Snapshot ..................................................................................................................... 18
3.2.1 Loading a Snapshot from the Toolbar ........................................................................ 17
3.2.2 Loading a Snapshot from the Side Pane .................................................................... 18
4 Lumikko Ensemble ....................................................................................................
5 XY Ensemble .............................................................................................................
6 Submotion Ensemble .................................................................................................
7 Block Reference ........................................................................................................
6
10
12
19
22
27
30
7.1 Bento Box 4 Mods ....................................................................................................................... 30
7.2 Bento Box Envelope .................................................................................................................... 31
7.3 Bento Box LFO .............................................................................................................................32
7.4 Bento Box Mix ............................................................................................................................. 33
7.5 Bento Box OSC ............................................................................................................................ 34
7.6 Bento Box VCA ............................................................................................................................ 35
7.7 Bento Box Xfade ......................................................................................................................... 36
7.8 CLK DIV .......................................................................................................................................37
BLOCKS WIRED - MANUAL - 4
Page 5

7.9 COMB ......................................................................................................................................... 38
7.10 LEVEL S ...................................................................................................................................... 39
7.11 Monark Filter .............................................................................................................................. 40
7.12 Paul ............................................................................................................................................ 41
7.13 ROUNDS Delay ............................................................................................................................ 42
7.14 ROUNDS LFO ............................................................................................................................... 43
7.15 ROUNDS REVERB ........................................................................................................................ 44
7.16 SCOPE ........................................................................................................................................ 45
7.17 UTIL ClOCK ................................................................................................................................. 46
7.18 UTIL NOTE IN ...............................................................................................................................47
7.19 West Coast DWG ......................................................................................................................... 48
7.20 West Coast LPG .......................................................................................................................... 49
7.21 West Coast XYS .......................................................................................................................... 50
8 Credits ......................................................................................................................
Table of Contents
51
BLOCKS WIRED - MANUAL - 5
Page 6
Welcome to BLOCKS WIRED
About the BLOCKS WIRED Documentation
1 Welcome to BLOCKS WIRED
BLOCKS WIRED takes you on a tour to new modular grounds: tweak and play three pre-patched REAKTOR Blocks Ensembles showcasing the power of the REAKTOR Blocks framework. Experience unique ways of creating sounds only available in modular synthesis, and explore new
and unheard sequences, percussion, and textures.
1.1 About the BLOCKS WIRED Documentation
This manual gives an overview over the basic workflows in BLOCKS WIRED.
While most of the instructions in this manual do not require prior knowledge about REAKTOR,
it is recommended to read the REAKTOR 6 Getting Started document to get a better understanding of the underlying concepts and features.
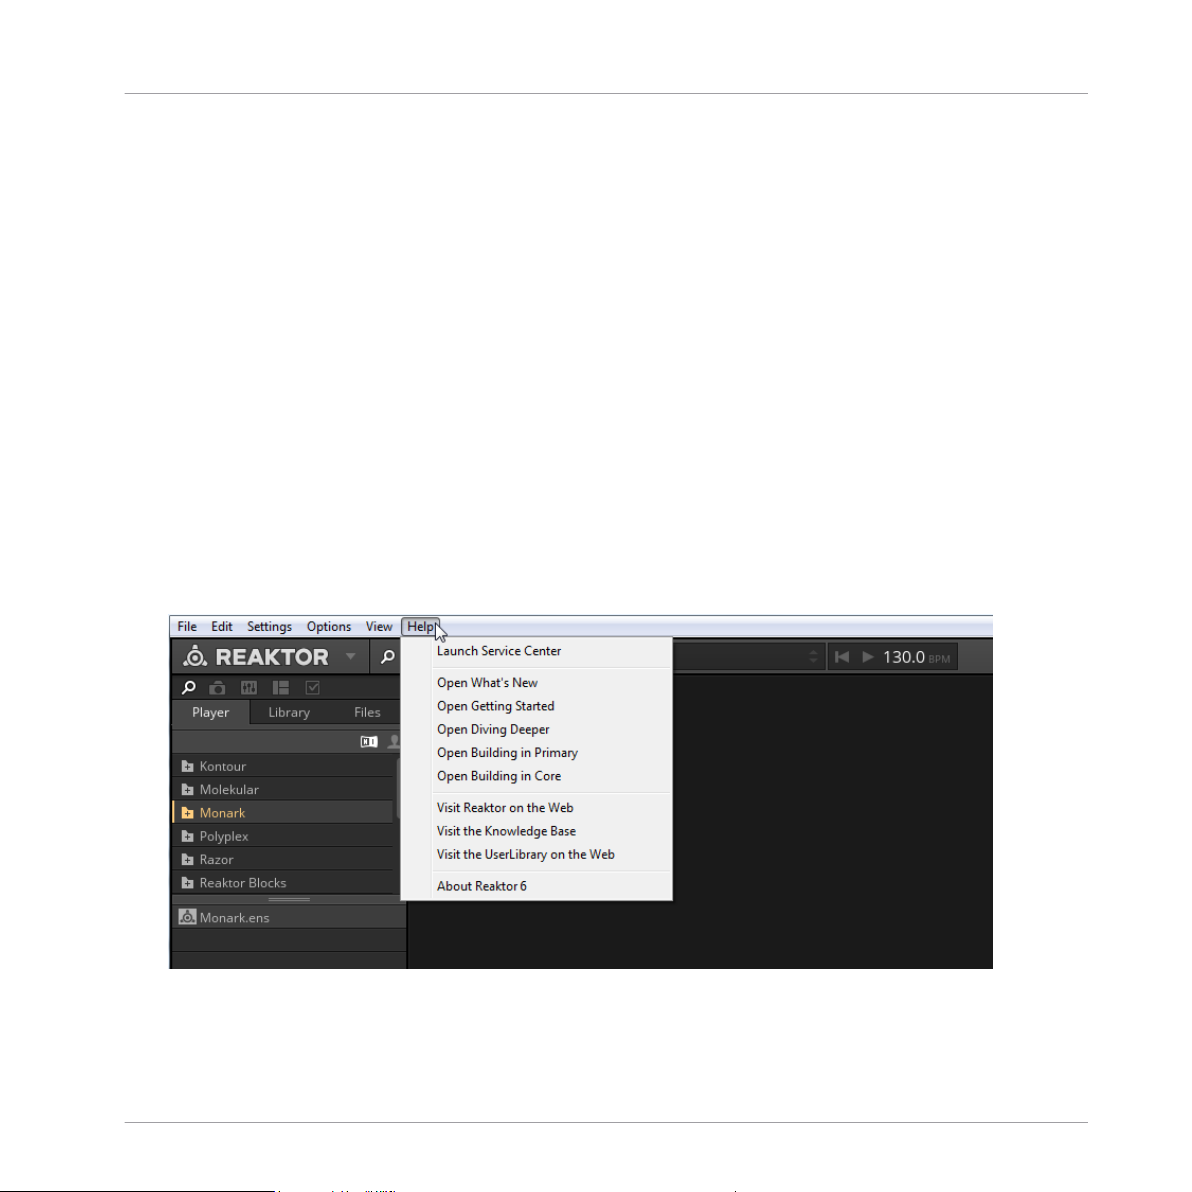
To access the REAKTOR 6 Getting Started document, open the Help menu in the REAK-
►
TOR menu bar:
BLOCKS WIRED - MANUAL - 6
Page 7
Welcome to BLOCKS WIRED
About the BLOCKS WIRED Documentation
1.1.1 Document Conventions
This section introduces you to the signage and text highlighting used in this manual.
• Text appearing in (drop-down) menus (such as Open…, Save as… etc.) and paths to locations on your hard disk or other storage devices is printed in italics.
• Text appearing elsewhere (labels of buttons, controls, text next to checkboxes etc.) is
printed in blue. Whenever you see this formatting applied, you will find the same text appearing somewhere on the screen.
• Important names and concepts are printed in bold.
• References to keys on your computer’s keyboard you’ll find put in square brackets (e.g.,
“Press [Shift] + [Enter]”).
Single instructions are introduced by this play button type arrow.
►
Results of actions are introduced by this smaller arrow.
→
Furthermore, this manual uses particular formatting to point out special facts and to warn you
of potential issues. The icons introducing these notes let you see what kind of information is to
be expected:
The speech bubble icon indicates a useful tip that may often help you to solve a task
more efficiently.
The exclamation mark icon highlights important information that is essential for the given context.
The red cross icon warns you of serious issues and potential risks that require your full
attention.
BLOCKS WIRED - MANUAL - 7
Page 8
Welcome to BLOCKS WIRED
About the BLOCKS WIRED Documentation
1.1.2 Info Hints
Blocks features comprehensive information about the Blocks, their parameters and inputs and
outputs in the application. You can view this information in the form of tooltips (called Info
Hints in REAKTOR).
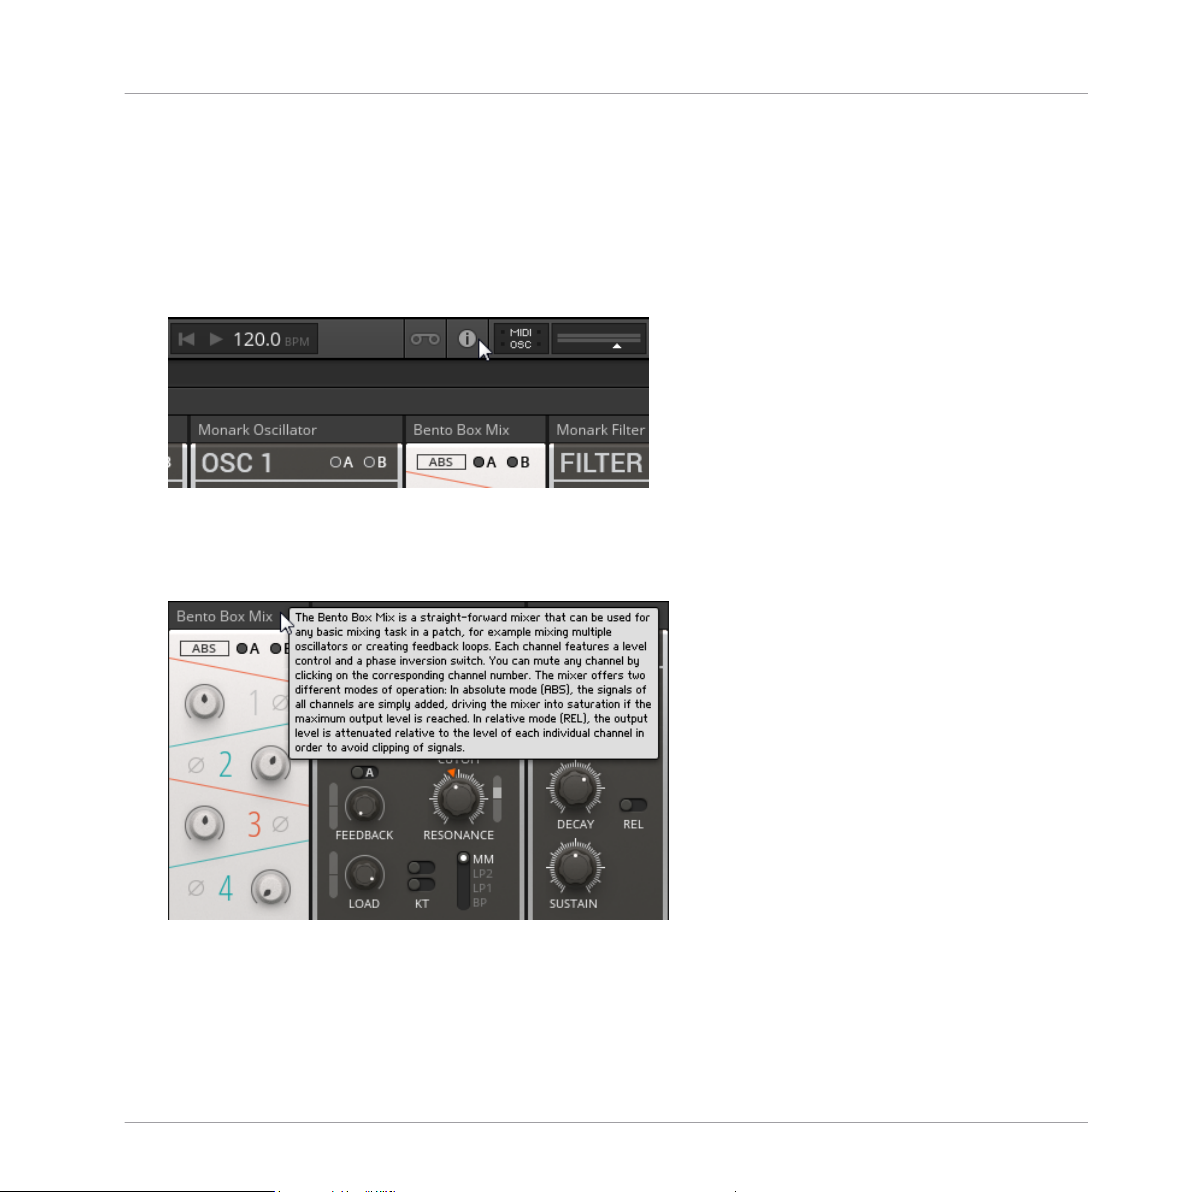
To show the Info Hints in REAKTOR, enable the Show Info Hints option in the Toolbar.
►
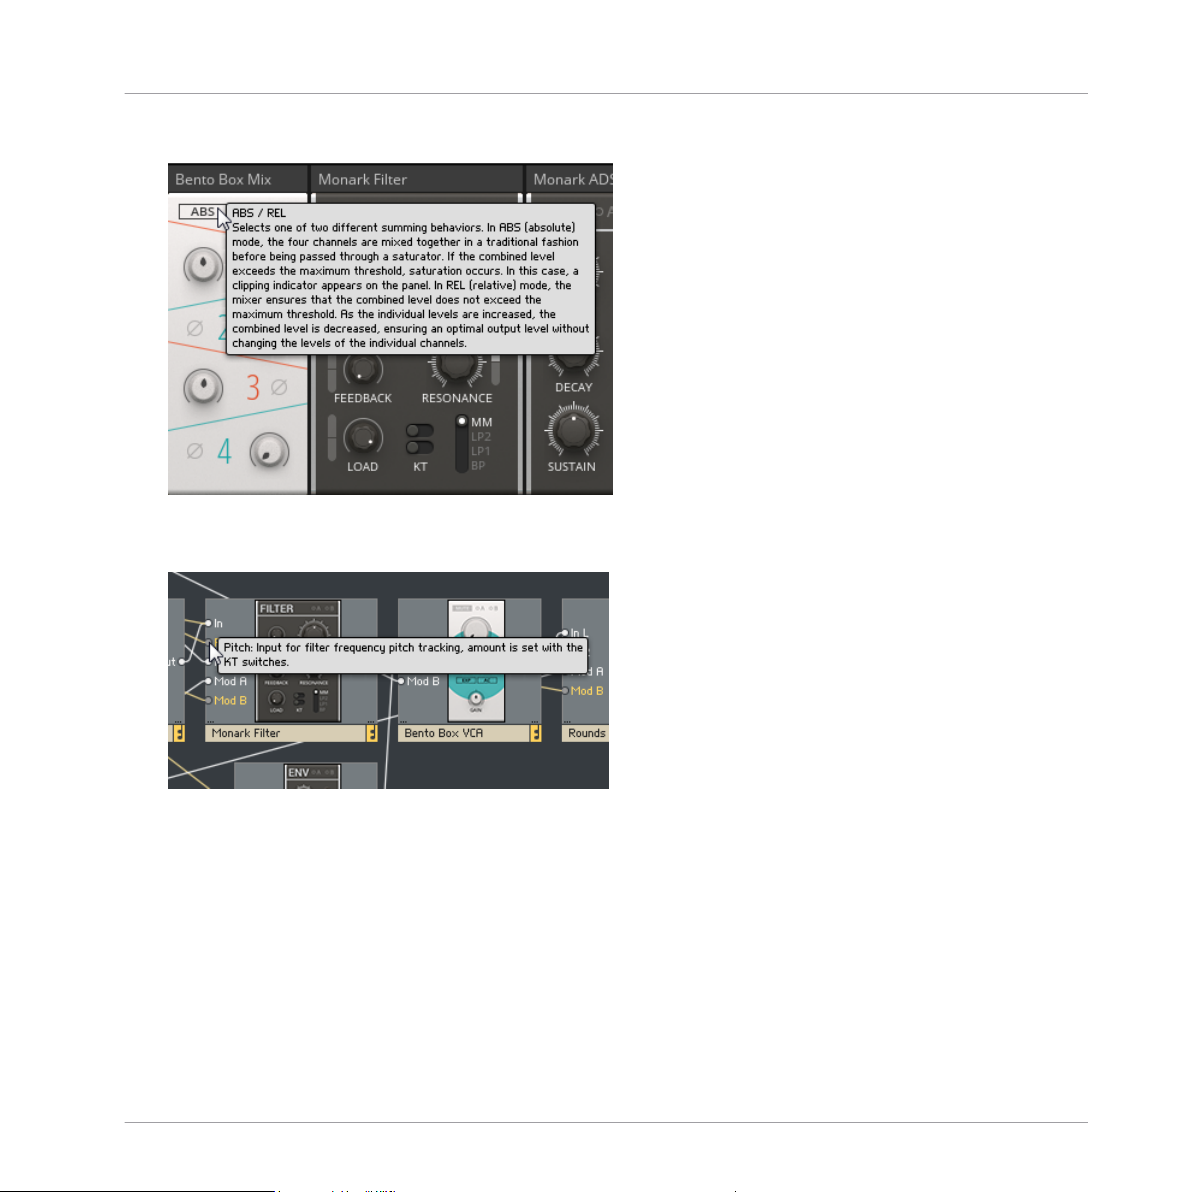
Info Hints are available for each entire Block, the individual parameters, as well as the inputs
and outputs.
To view the Info Hint for a Block, place the mouse over its header:
►
BLOCKS WIRED - MANUAL - 8
Page 9
About the BLOCKS WIRED Documentation
To view the Info Hint for a parameter, place the mouse over its Panel control:
►
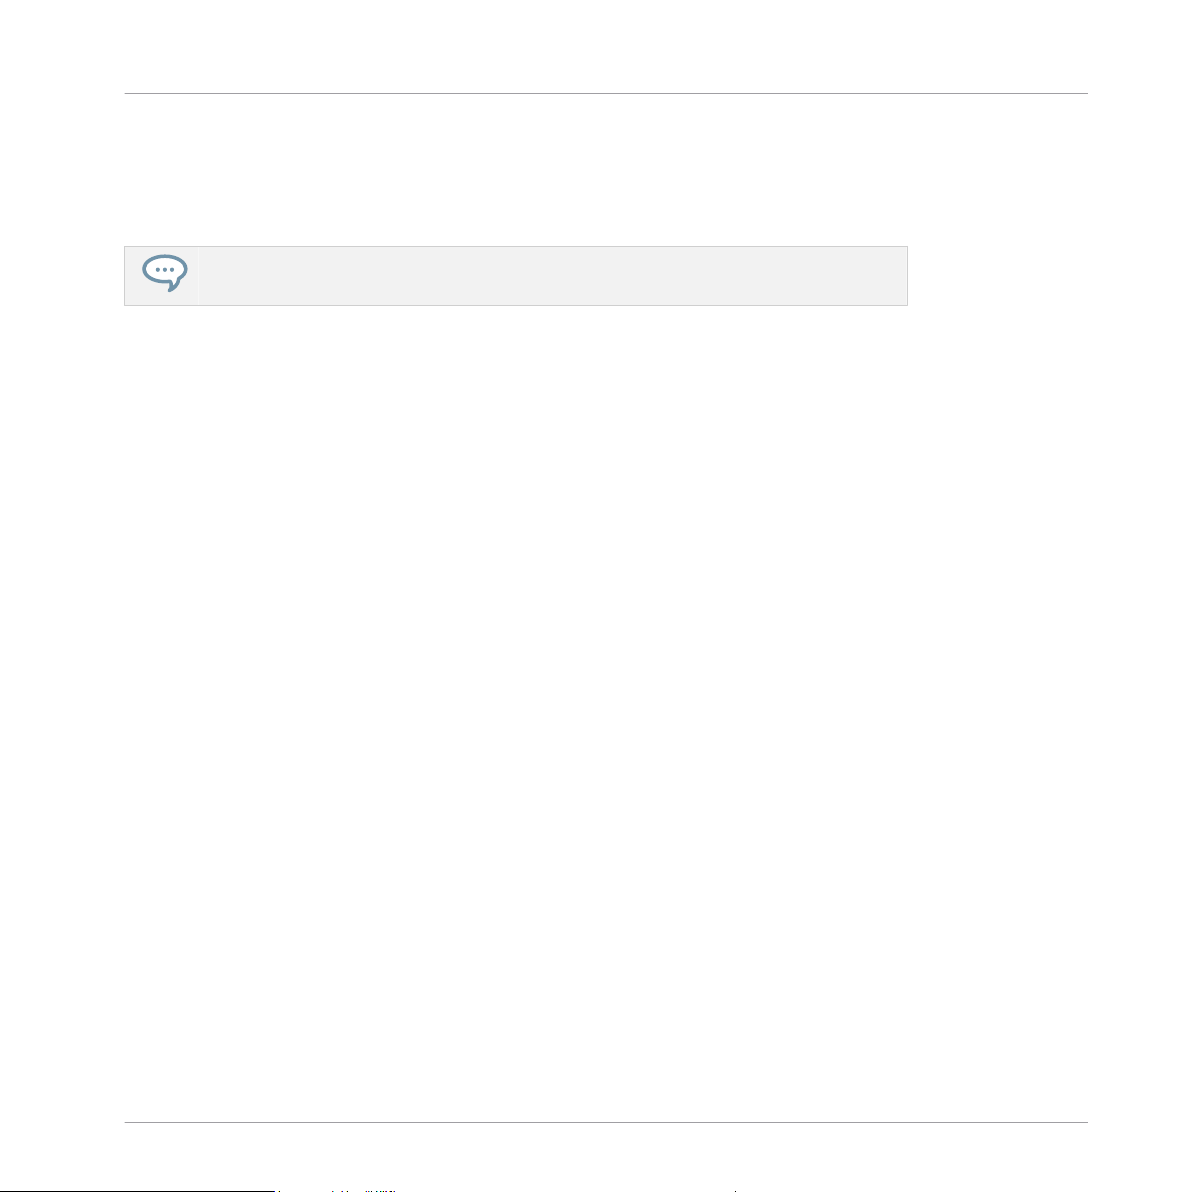
To view the Info Hint for an input or output, place the mouse over the port in the Struc-
►
ture.
Welcome to BLOCKS WIRED
BLOCKS WIRED - MANUAL - 9
Page 10

Installation and Activation
Installing BLOCKS WIRED
2 Installation and Activation
2.1 Installing BLOCKS WIRED
The following section explains how to install and activate BLOCKS WIRED. Although this process is straightforward, please take a minute to read these instructions, as doing so might prevent some common problems.
To install BLOCKS WIRED, double-click the installer application and follow the instruc-
►
tions on the screen. The installer application automatically places the new ensemble file
into a REAKTOR PLAYER directory. Alternatively, during the installation process, choose
the directory where you would like to have BLOCKS WIRED installed.
A full version of REAKTOR 6.0.1 or the free REAKTOR PLAYER 6.0.1 (or subsequent versions)
is required to use BLOCKS WIRED. You can download the free REAKTOR PLAYER from the
Native Instruments website.
2.2 Activating BLOCKS WIRED
When installation is finished, start the Service Center application, which was installed with
BLOCKS WIRED. It will connect your computer to the Internet and activate your BLOCKS
WIRED installation. In order to activate your copy of BLOCKS WIRED, you have to perform the
following steps within the Service Center:
Log in: Enter your Native Instruments user account name and password on the initial page.
This is the same account information you used in the Native Instruments Online Shop, where
you bought your REAKTOR Instrument, and for other Native Instruments product activations.
Select products: The Service Center detects all products that have not yet been activated and
lists them. You can activate multiple products at once—for example, several REAKTOR Instruments.
Activate: After proceeding to the next page, the Service Center connects to the Native Instruments server and activates your products.
BLOCKS WIRED - MANUAL - 10
Page 11
Installation and Activation
Activating BLOCKS WIRED
Download updates: When the server has confirmed the activation, the Service Center automatically displays the Update Manager with a list of all available updates for your installed products. Please make sure that you always use the latest version of your Native Instruments products to ensure they function correctly.
Downloading updates is optional. After activation is complete, you can always quit the
Service Center.
BLOCKS WIRED - MANUAL - 11
Page 12
How to Use BLOCKS WIRED
How to Open BLOCKS WIRED
3 How to Use BLOCKS WIRED
The following sections will give you a brief overview over some basic operations: you will learn
how to open BLOCKS WIRED, how to explore the factory-set Snapshots and how to load and
play BLOCKS WIRED Snapshots from the Header and the Side Pane.
For the latest information on REAKTOR PLAYER files and using Snapshots please refer
to the REAKTOR Getting Started Guide, available from the REAKTOR Help menu.
3.1 How to Open BLOCKS WIRED
This is how to open BLOCKS WIRED in REAKTOR or REAKTOR PLAYER:
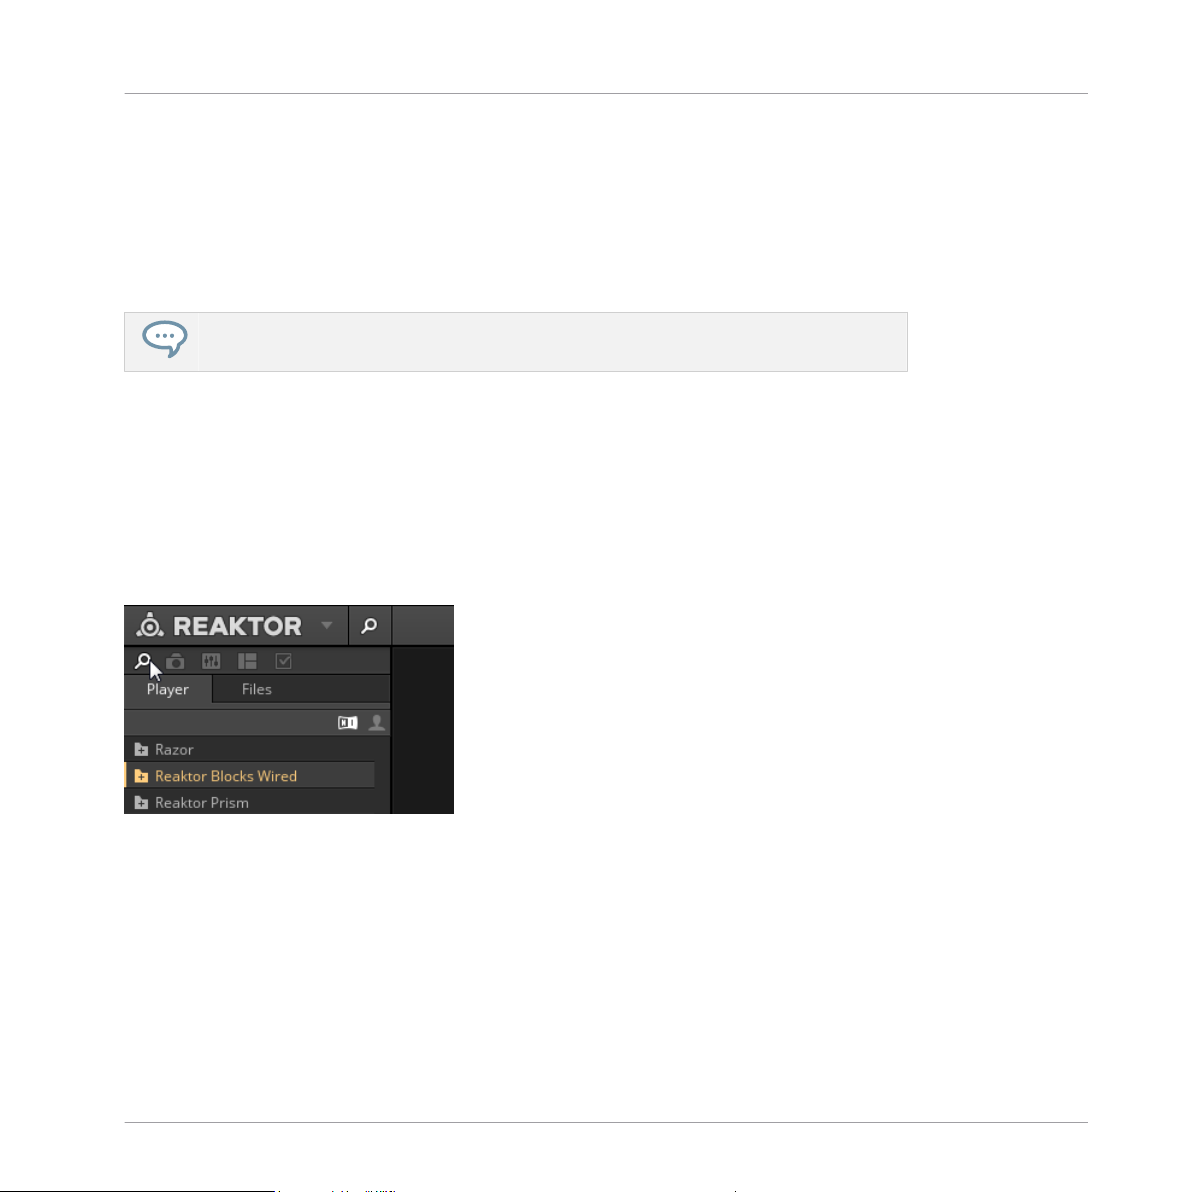
1. Start REAKTOR or REAKTOR PLAYER.
2. Click the Browser icon to open the Browser
3. Click the Player tab to show the REAKTOR PLAYER files (or you can open the Browser
with the [F1] key from your keyboard).
BLOCKS WIRED - MANUAL - 12
Page 13
How to Use BLOCKS WIRED
How to Open BLOCKS WIRED
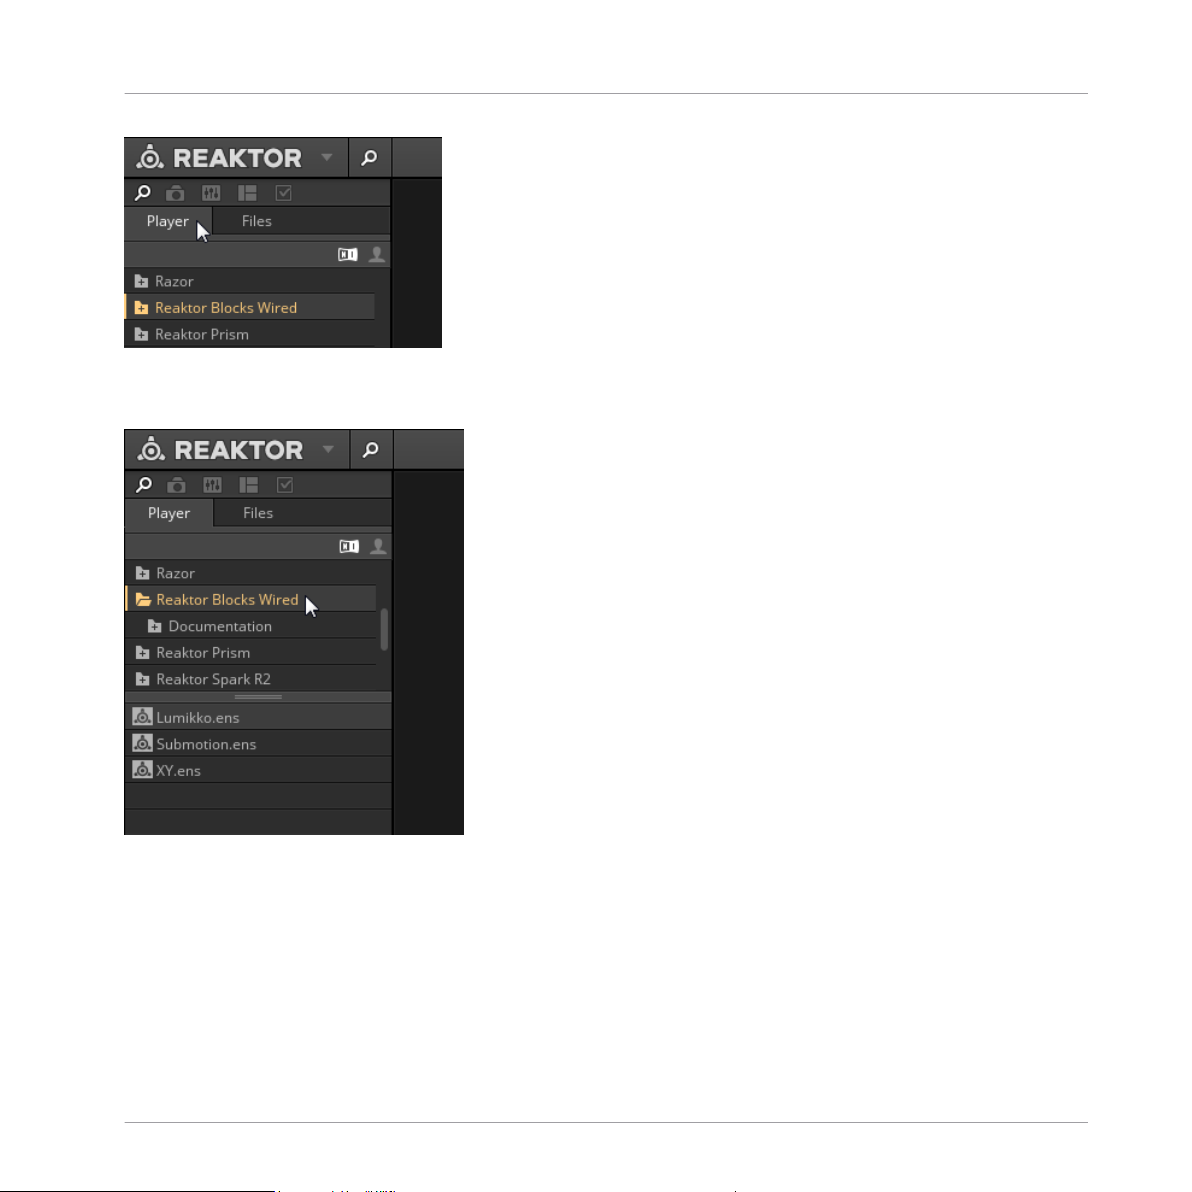
4. Click the Blocks Wired folder. The content of the folder will be displayed in the lower section of the Browser.
5. Double-click either the XY.ens, the Lumikko.ens, or the Submotion.ens file, or drag it into
the main screen.
BLOCKS WIRED - MANUAL - 13
Page 14

⇨ The Ensemble will be loaded in REAKTOR/REAKTOR PLAYER:
How to Use BLOCKS WIRED
How to Open BLOCKS WIRED
BLOCKS WIRED - MANUAL - 14
Page 15
How to Use BLOCKS WIRED
How to Open BLOCKS WIRED
BLOCKS WIRED - MANUAL - 15
Page 16
How to Use BLOCKS WIRED
Exploring Factory-set Snapshots
3.2 Exploring Factory-set Snapshots
All three BLOCKS WIRED Ensembles come with a wide selection of preset sounds, ready to be
used in your music. Exploring and tweaking the presets is useful for learning the Ensembles
before creating your own sounds from scratch.
A Snapshot is REAKTOR’s notion for a sound, preset, or patch. BLOCKS WIRED can
hold banks of Snapshots, and loading any of these Snapshots will set each control of the
Instrument to a specific value, and re-create a particular sound.
Play some notes on your MIDI keyboard to verify if REAKTOR PLAYER is set up correctly
►
and to get a first impression of how BLOCKS WIRED sounds.
Please refer to the REAKTOR Getting Started for details on configuring your Audio and
MIDI settings, available from the Help Menu.
The Snapshots of BLOCKS WIRED are accessible from the drop-down menu in REAKTOR PLAYER’s header (called the Toolbar) or from the Side Pane.
BLOCKS WIRED - MANUAL - 16
Page 17

1
2
3
4
5
How to Use BLOCKS WIRED
Exploring Factory-set Snapshots
BLOCKS WIRED interface with Snapshot list in the Side Pane.
(1) Side Pane button
(2) Snapshot drop-down menu
(3) Snapshot button
(4) Snapshot Banks
(5) Snapshots
3.2.1 Loading a Snapshot from the Toolbar
Loading a Snapshot from the Snapshot drop-down menu in the Toolbar is the simplest way to
interact with Snapshots.
BLOCKS WIRED - MANUAL - 17
Page 18

How to Use BLOCKS WIRED
Exploring Factory-set Snapshots
1. Click on the Snapshot drop-down menu (2). The menu holds all Snapshots and Banks of
the Instrument.
2. Click an entry to select it.
⇨ The Snapshot is loaded and ready to play.
3.2.2 Loading a Snapshot from the Side Pane
If it is not already visible after startup, you need to open the Side Pane. The Side Pane holds a
full overview of the Snapshot Banks and Snapshots from BLOCKS WIRED.
1. Click the Side Pane button (1) in the Header to open the Side Pane.
2. Click the Snapshot button to display Snapshots (3).
3. Select a Snapshot Bank (4).
4. Select the name of a Snapshot entry (5) and double-click it with your mouse to load it.
⇨ The Snapshot is loaded and ready to play.
3.3 Saving a Snapshot
Snapshots can only be saved when using the full version of REAKTOR. However, all parameter
settings made in BLOCKS WIRED are conveniently saved as part of your host software. If you
are using the full version of REAKTOR, please read the REAKTOR Getting Started for more information on plug-in mode and saving Snapshots.
BLOCKS WIRED - MANUAL - 18
Page 19

1
2
3
4
5
6
7
8
9
10
Lumikko Ensemble
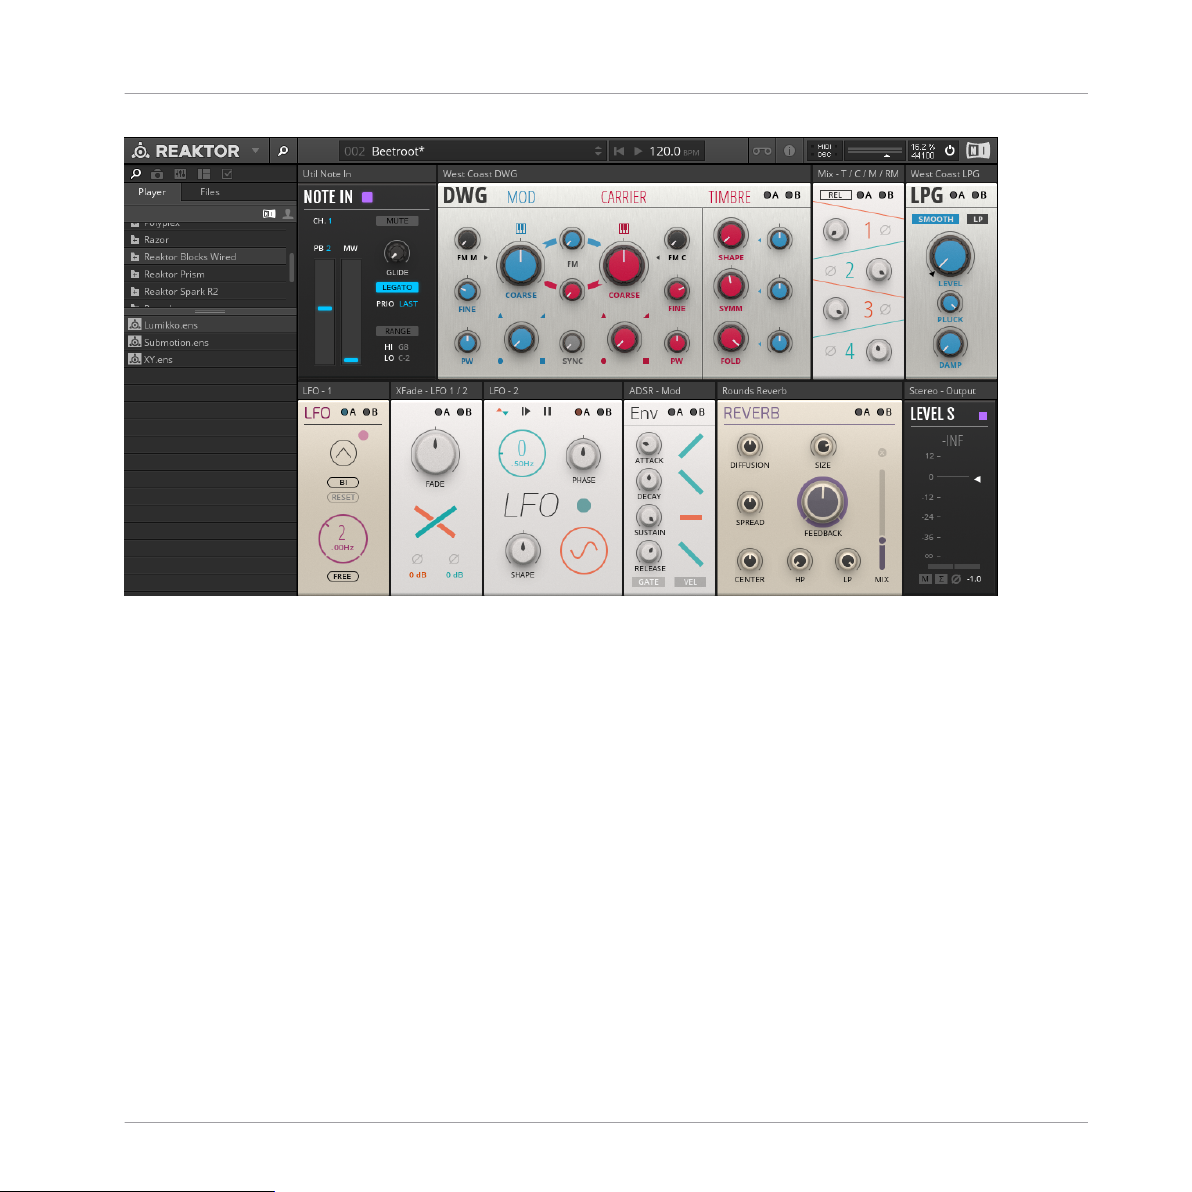
4 Lumikko Ensemble
Featuring two of the new West Coast Blocks (see section ↑7.19, West Coast DWG and ↑7.20,
West Coast LPG), Lumikko brings the classic West Coast mono-synth voice to REAKTOR. While
using only a small selection of Blocks, Lumikko is capable of producing a wide array of unusual and exciting sounds thanks to the powerful modulation possibilities within the Dual Waveform Generator (DWG), the unique character of the Low Pass Gates (LPGs), and extensive modulation and feedback patching.
Lumikko overview
(1) Util Note In: For more information on this Block, refer to section ↑7.18, UTIL NOTE IN in
the Block Reference chapter.
(2) West Coast DWG: For more information on this Block, refer to section ↑7.19, West Coast
DWG in the Block Reference chapter.
BLOCKS WIRED - MANUAL - 19
Page 20

Lumikko Ensemble
(3) Bento Box Mix: For more information on this Block, refer to section ↑7.4, Bento Box Mix in
the Block Reference chapter.
(4) LPG West Coast: For more information on this Block, refer to section ↑7.20, West Coast LPG
in the Block Reference chapter.
(5) LFO – Rounds LFO: For more information on this Block, refer to section ↑7.14, ROUNDS LFO
in the Block Reference chapter.
(6) Bento Box XFade: For more information on this Block, refer to section ↑7.7, Bento Box Xfade
in the Block Reference chapter.
(7) Bento Box LFO: For more information on this Block, refer to section ↑7.3, Bento Box LFO in
the Block Reference chapter.
(8) Bento Box Envelope: For more information on this Block, refer to section ↑7.2, Bento Box
Envelope in the Block Reference chapter.
(9) ROUNDS REVERB: For more information on this Block, refer to section ↑7.15, ROUNDS RE-
VERB in the Block Reference chapter.
(10) LEVEL S: For more information on this Block, refer to section ↑7.10, LEVEL S in the Block
Reference chapter.
Lumikko Audio and Modulation Signal Flow
Signal flow diagram of the Lumikko Ensemble
The Dual Waveform Generator (DWG) receives pitch information from the Note In Block. The
DWG’s MOD (Modulator), CARRIER and TIMBRE outputs as well as a product of the MOD and
CARRIER signals are mixed by a Bento Box Mix, and then filtered by a Low Pass Gate (LPG).
This LPG gets triggered by the Note In (by way of a velocity-to-gate length conversion taking
place ‘behind the scenes’). The LPG’s output feeds both of the DWG’s FM inputs, and is then
forwarded to a Reverb. Modulation is generated by a Rounds LFO and a Bento Box LFO (one of
BLOCKS WIRED - MANUAL - 20
Page 21

Lumikko Ensemble
which can be synchronized and used as a clock), and a Bento Box ADSR (triggered by the
note-in Gate). The LFOs’ output signals are crossfaded and sent to Mod A inputs (so can also
cross-modulate), while the ADSR output signal is sent to all Mod B inputs.
Mixer Channel Assignment
Bento Box Mix
1: TIMBRE
2: CARRIER
3: MOD
4: [MOD × CARRIER]
BLOCKS WIRED - MANUAL - 21
Page 22

5 XY Ensemble
Utilizing the West Coast XYS Sequencer in conjunction with the DWG, XY is capable of creating generative melodies and sonic textures. Numerous routings are possible via the modulation
buses that, combined with the sequenced triggering of three LPGs, allow for the creation of
complex layered sequences and interesting polyrhythms. The Comb Filter, fed by the timbre
output of the DWG via the crossfader for adjustable external feedback via the LPG, is particularly useful for stringy drones and noise textures.
From melodic rhythmic sequences to noisy soundscapes, XY can meet a variety of needs.
The XY Ensemble needs both Clock and MIDI note input in order to produce sound.
Make sure that XY is receiving a clock signal either from REAKTOR’s built-in clock, or
from an external sequencer or host software. Otherwise, you will not hear any audio from
the XY Ensemble.
XY Ensemble
BLOCKS WIRED - MANUAL - 22
Page 23

1
2
3
4
5
6
7
8
9
10
11
12
13
14
15
16
17
XY Ensemble
XY ensemble overview
(1) Util Clock: For more information on this Block, refer to section ↑7.17, UTIL ClOCK in the
Block Reference chapter.
(2) West Coast XYS: For more information on this Block, refer to section ↑7.21, West Coast XYS
in the Block Reference chapter.
(3) West Coast DWG: For more information on this Block, refer to section ↑7.19, West Coast
DWG in the Block Reference chapter.
(4) Clock Divider: For more information on this Block, refer to section ↑7.8, CLK DIV in the
Block Reference chapter.
BLOCKS WIRED - MANUAL - 23
Page 24

(5), (7), (9) LPG– Mod / Carr/ Timbre: For more information on this Block, refer to section ↑7.20,
West Coast LPG in the Block Reference chapter.
(6), (8), (11), (17) LEVEL S– Mod / Carr / TimbreMod / Carr / Timbre: For more information on this
Block, refer to section ↑7.10, LEVEL S in the Block Reference chapter.
(10) COMB: For more information on this Block, refer to section ↑7.9, COMB in the Block Reference chapter.
(12) Util Note In: For more information on this Block, refer to section ↑7.18, UTIL NOTE IN in
the Block Reference chapter.
(13) ROUNDS LFO: For more information on this Block, refer to section ↑7.14, ROUNDS LFO in
the Block Reference chapter.
(14) Bento Box Envelope: For more information on this Block, refer to section ↑7.2, Bento Box
Envelope in the Block Reference chapter.
(15) SCOPE: For more information on this Block, refer to section ↑7.16, SCOPE in the Block
Reference chapter.
(16) ROUNDS DELAY: For more information on this Block, refer to section ↑7.13, ROUNDS De-
lay in the Block Reference chapter.
XY Ensemble
XY Audio and Modulation Signal Flow
Signal Flow Diagram of the XY Ensemble
At the core of its synthesis engine XY features the Dual Waveform Generator (DWG), with each
of its three outputs assigned to an LPG: the MOD (Modulator), the CARRIER, and the TIMBRE
output. The Modulator LPG is plucked by XYS Gate X and is fed back into the DWG external
BLOCKS WIRED - MANUAL - 24
Page 25

FM input to modulate the Carrier signal. The Carrier LPG is plucked by XYS Gate Y, and is fed
back into the Modulator FM. The Timbre LPG is plucked by Clock Divider (CLK DIV) Gate 3,
and then processed by a Comb Filter that uses DWG Carrier Output as an FM source. All three
voices are dynamically controlled by the ADSR before the Stereo level controls. The signal
passes through the master Stereo Level (Level S) before going through the Rounds Delay.
The main sequencing routings of the West Coast XYS feature the X gates of the XYS triggering
the Pluck of the Modulator LPG, the Y gates triggering the Pluck of the Carrier LPG, whilst the
3rd output of the Clock Divider plucks the Timbre LPG. The XYS (Modulation) Out is summed
with the Note In Pitch to control Pitch transposition of the DWG's Modulator Oscillator. The
Logic Out is summed with Note In to transpose the Carrier Pitch, and is also used as a Modulation Source to the Clock Divider. This is particularly useful for creating generative rhythms.
The Clock Divider is controlled by the main Clock module and drives the XYS X Gate with
Gate 1. The Y-Gate is driven by Clock Gate 2, whilst Gate 3 is used as a pluck source for the
LPG 3 Pluck. Gate 4 is connected to the LFO Reset input. Gate 5 triggers the master ADSR,
which helps create interesting rhythmical structures. When set to a low clock division, you can
use this combination to sustain the instrument permanently. Note that, Muting CLK div 5 will
turn off the permanent sustain, useful for switching off the Free Running sequences.
All Modulation A ports are receiving the LFO (except the LFO itself) which can act as an expressive sound shaper as well as add rhythmical textures.
XY Ensemble
Module
DWG LFO XYS Out Logic Ext FM M <- LPG Mod
LPG (Mod) LFO ADSR Pluck <- XYS Gate X (<-- Clock Div Gate 1)
LPG (Car) LFO ADSR Pluck <- XYS Gate Y (<-- Clock Div Gate 2)
LPG (Tim) LFO ADSR Pluck <-- Clock Div Gate 3)
Comb LFO XYS Out Logic Pitch <- Note In Pitch, FM <-- DWG Out C
ADSR LFO ModWheel GATE <-- (Note In Gate || Clock Div Gate 5)
Mod A Source Mod B Source Other
Ext FM C <-LPG Carr
Mod Pitch <- XYS Out + Note In
Carr Pitch <- XYS Logic Out + Note In.
(merged)
BLOCKS WIRED - MANUAL - 25
Page 26

Module Mod A Source Mod B Source Other
LFO XYS Out ModWheel Gate <-- Clock out | RESET <-- Clock Div Gate
4
ClockDiv LFO XYS Out Logic RESET <- Clock Reset, GATE <-- Clock Gate
XYS LFO ModWheel RESET <- Clock Reset, Gate X <-- Clock Div
Gate 1, Gate Y <-- Clock Div Gate
XY Ensemble
BLOCKS WIRED - MANUAL - 26
Page 27

1
2
3
4
5
6
7
8
9
10
11
Submotion Ensemble
6 Submotion Ensemble
Submotion produces a wide range of step-modulated sounds, bass sequences, and dark sequenced sounds with rhythmically animated overtone structures.
Submotion Overview
(1) NOTE IN: For more information on this Block, refer to section ↑7.18, UTIL NOTE IN in the
Block Reference chapter.
(2), (7) ROUNDS LFO: For more information on this Block, refer to section ↑7.14, ROUNDS LFO
in the Block Reference chapter.
(3), (5) Bento Box OSC: For more information on this Block, refer to section ↑7.5, Bento Box
OSC in the Block Reference chapter.
(4) Bento Box Xfade: For more information on this Block, refer to section ↑7.7, Bento Box Xfade
in the Block Reference chapter.
BLOCKS WIRED - MANUAL - 27
Page 28

Submotion Ensemble
(6) Monark Filter: For more information on this Block, refer to section ↑7.11, Monark Filter in
the Block Reference chapter.
(8) Bento Box 4 Mods Sequencer: For more information on this Block, refer to section ↑7.1,
Bento Box 4 Mods in the Block Reference chapter.
(9) Bento Box Envelope: For more information on this Block, refer to section ↑7.2, Bento Box
Envelope in the Block Reference chapter.
(10) Bento Box VCA: For more information on this Block, refer to section ↑7.6, Bento Box VCA
in the Block Reference chapter.
(11) ROUNDS REVERB: For more information on this Block, refer to section ↑7.15, ROUNDS RE-
VERB in the Block Reference chapter.
Submotion Audio and Modulation Signal Flow Diagram
Signal Flow Diagram of the Submotion Ensemble
Submotion’s classic synth structure uses two Bento Box Oscillators, which can sync and frequency-modulate each other. A Bento Box XFade (crossfade) Block balances the levels of the
oscillators. This mix signal is sent to a Monark Filter that receives an FM input from the second oscillator, and is finally passed to a Rounds Reverb.
The Bento Box 4 MODS modulation sequencer is hard-wired to certain modulation destinations, as detailed in the table below. Rounds LFO 1 is providing the clock for triggering the
4 MODS. LFO 1 can be modulated by LFO 2 that generates cyclic modulation. Both LFOs are
connected to sequencer track 3 of the 4 MODS Sequencers. This allows for unusual rhythmic
variations.
BLOCKS WIRED - MANUAL - 28
Page 29

Submotion Ensemble
Module Mod A Source Mod B Source Other
LFO (1) 4Mods 3 LFO (2) Reset < NOTE IN GATE
LFO (2) ModWheel 4Mods 3 Reset < NOTE IN GATE
4Mods ModWheel LFO (2) Reset < NOTE IN GATE, !! GATE < -LFO (1) !!
OSC 1 4Mods 1 LFO (2) Pitch < Note In Pitch
OSC2 4Mods 2 LFO (2) Pitch < Note In Pitch
XFade 4Mods 3 LFO (2)
Filter 4Mods 4 ADSR Pitch < Note In Pitch
ADSR 4Mods 3 LFO (2)
VCA ADSR LFO (2)
Reverb 4Mods 3 LFO (2)
BLOCKS WIRED - MANUAL - 29
Page 30

7 Block Reference
This chapter covers the reference of the included blocks in Blocks Wired.
7.1 Bento Box 4 Mods
Block Reference
Bento Box 4 Mods
Bento Box 4 Mods
Complementing the 8 Steps sequencer, Bento Box 4 Mods provides four sequences for modulation purposes. Each sequence consists of a set of 8 freely adjustable values, with selectable
glide for smooth transitions between steps. In addition to using 4 Mods as a modulation
source, its outputs can also be sent to the Digilog QUANT quantizer for creating note sequences. All global parameters (DIRECTION, STEPS, OFFSET) can be modulated, which makes 4
Mods an incredibly powerful tool for creating complex and evolving sequences.
BLOCKS WIRED - MANUAL - 30
Page 31

Block Reference
Bento Box Envelope
7.2 Bento Box Envelope
Bento Box Envelope
The Bento Box Env is an envelope generator with four stages: ATTACK, DECAY, SUSTAIN, and
RELEASE. The ATTACK, DECAY and RELEASE stages can be individually switched to linear,
logarithmic or exponential shapes by clicking on the icons on the right side of the module. This
allows you to customize the envelope for specific needs. Each stage has an additional gate output that goes high when the corresponding stage is active. You can use these gate signals to
trigger other events in a patch.
BLOCKS WIRED - MANUAL - 31
Page 32

Block Reference
7.3 Bento Box LFO
Bento Box LFO
The Bento Box LFO is a fully featured low frequency oscillator for modulation purposes. Its
straight-forward interface allows you to quickly find the right settings for any basic modulation
task, but it also offers advanced features that can be creatively exploited to create very complex modulation signals, especially when modulated by another LFO. Six basic waveforms can
be bent into unusual shapes with the SHAPE control. The additional options at the top allow
you to switch between bipolar and unipolar operation, manually reset the waveform, and hold
the current output value. The Hold parameter can be modulated, which makes it possible to
stop and hold the LFO with a gate signal, or slice the waveform up in interesting ways by using
another LFO.
Bento Box LFO
BLOCKS WIRED - MANUAL - 32
Page 33

Block Reference
7.4 Bento Box Mix
Bento Box Mix
The Bento Box Mix is a straight-forward mixer that can be used for any basic mixing task in a
patch, for example mixing multiple oscillators or creating feedback loops. Each channel features a level control and a phase inversion switch. You can mute any channel by clicking on
the corresponding channel number. The mixer offers two different modes of operation: In absolute mode (ABS), the signals of all channels are simply added, driving the mixer into saturation
if the maximum output level is reached. In relative mode (REL), the output level is attenuated
relative to the level of each individual channel in order to avoid clipping of signals.
Bento Box Mix
BLOCKS WIRED - MANUAL - 33
Page 34

Block Reference
Bento Box OSC
7.5 Bento Box OSC
Bento Box OSC
The Bento Box OSC is a versatile oscillator that is suitable for a wide range of different synthesis methods. Its features make it particularly useful for FM (frequency modulation) synthesis.
The linear thru-zero FM mode (LIN TZ) allows for very deep and stable FM sounds. The Bento
Box OSC's Sync input can be freely adjusted from soft sync to hard sync, with the option to
accept dedicated OSC Sync signals from other Blocks oscillators (e.g. Bento Box OSC, Boutique Multiwave OSC) for best audio quality. Syncing oscillators is useful for a number of different applications: adding stability to complex FM patches with multiple operators, patching
classic oscillator sync sounds, and creating interesting new waveforms by mixing signals from
multiple synced oscillators.
BLOCKS WIRED - MANUAL - 34
Page 35

Block Reference
7.6 Bento Box VCA
Bento Box VCA
The Bento Box VCA is essentially a simple volume control. As one of the basic building blocks
in modular synthesis, it is used whenever the level of a signal needs to be controlled dynamically. For example, it is commonly patched as the final stage in a synthesizer patch, modulated
by an envelope to shape the amplitude of the sound over time. If used for audio signals, the
AC / DC switch should be set to AC, enabling the DC offset filter. If used for modulation sig-
nals, it needs to be set to DC, disabling the DC offset filter. Further controls include a switch
to select either an exponential (EXP) or a linear (LIN) response to modulation signals, as well
as an additional GAIN control that can be used to attenuate or amplify the signal independent
from the main level control.
Bento Box VCA
BLOCKS WIRED - MANUAL - 35
Page 36

Block Reference
Bento Box Xfade
7.7 Bento Box Xfade
Bento Box Xfade
Bento Box Xfade allows you to create a blend between two input signals with a single FADE
control. For example, it can be used to smoothly morph from one sound to the other, to combine waveform outputs from oscillators for additional wave shaping, or as a simple dry / wet
control when routing effect signals. The Curve control changes the FADE response from linear
to constant-power, allowing you to compensate for volume drops at the center position.
BLOCKS WIRED - MANUAL - 36
Page 37

Block Reference
7.8 CLK DIV
CLK DIV
The CLK DIV is an essential building block for sequencing. It takes any Gate signal, for example a clock, and provides six user-definable timing divisions of this signal for further distribution in a patch. This allows you to create a set of related timing signals that are all based on
the same tempo, but with a different amount of beats in the same time interval, similar to note
divisions. It can be used to run sequencers at different but related speeds, or to set up interesting rhythmical structures within a patch. The ability to modulate the Divisions for each output makes it possible to create very complex polyrhythms.
CLK DIV
BLOCKS WIRED - MANUAL - 37
Page 38

Block Reference
7.9 COMB
COMB
The Comb delays the input signal and feeds it back onto itself, similar to an echo effect. However, the Comb is optimized for very short delay times, causing interferences in the audible
range. It creates regularly spaced peaks and troughs in the frequency response, resembling the
appearance of a comb. The effect gets more pronounced as the feedback is increased. Apart
from filtering oscillator signals, the Comb can also be used to create effects like flanging and
chorus, or serve as the basis for physical modelling sounds. If Key Tracking is turned up, it can
be controlled with a Pitch signal arriving at the Pitch input, making it possible to play the
Comb's frequency according to a musical scale.
COMB
BLOCKS WIRED - MANUAL - 38
Page 39

Block Reference
7.10 LEVEL S
LEVEL S
LEVEL S is a stereo volume control including level metering, with additional switches for mute,
mono summing and phase inversion. It is intended to be used as the first Block after an In
module or the last Block before an Out module, however it may also be used to monitor and
control signals at any point in a patch. The color selector in the upper right corner of the panel
lets you assign distinct colors to different parts or signal chains in a patch.
LEVEL S
BLOCKS WIRED - MANUAL - 39
Page 40

Block Reference
7.11 Monark Filter
Monark Filter
Modelled after the classic 4-pole ladder low pass filter of an iconic monophonic synthesizer
from the seventies, the MONARK Filter captures every nuance of the original circuit, including
its rich saturation behaviour. This can be explored even more with the additional LOAD and
FEEDBACK parameters, allowing you to overdrive the input and add nonlinear behaviour to the
filter. The MONARK Filter offers four different filter modes, including three low pass modes
and one band pass mode, all derived from the classic ladder structure. This filter is an excellent choice for huge sounding synth bass and lead sounds.
Monark Filter
BLOCKS WIRED - MANUAL - 40
Page 41

Block Reference
7.12 Paul
Paul
The Paul is a smooth sounding low pass filter, adapting the filter design of early polyphonic
analog synthesizers. Its resonance behaviour has been optimized to provide a warm and full
sound: as you turn up the RESONANCE, the bass is boosted. You can click on the F-clef icon
in the bottom-right corner to deactivate the bass boost. This gives you an even bass response
independent from the RESONANCE setting. Four filter modes allow you to change the overall
sound of the filter, from bright (LP1) to boomy (LP4). This filter is particularly useful for all
kinds of bass sounds, from rumbling sub-bass sounds to liquid sounding acid basslines.
Paul
BLOCKS WIRED - MANUAL - 41
Page 42

Block Reference
ROUNDS Delay
7.13 ROUNDS Delay
ROUNDS Delay
The ROUNDS Delay can produce a wide range of different echo, flanging and chorus effects. It
offers two basic modes of operation, normal and GRAIN. In normal mode, changing the delay
time momentarily alters the pitch of the signal, similar to tape echo effects. In GRAIN mode,
the pitch is not altered. The PONG option lets the delay repetitions alternate between the left
and right channel for a wide stereo effect. By clicking on the ms unit label next to the Delay
Time, you can synchronize the ROUNDS Delay externally to REAKTOR's master tempo or internally to a sequence of gates from within the Blocks patch.
BLOCKS WIRED - MANUAL - 42
Page 43

Block Reference
7.14 ROUNDS LFO
ROUNDS LFO
The ROUNDS LFO brings the LFO (Low Frequency Oscillator) from the Modulation section of
the ROUNDS synthesizer to Blocks. Just like the ROUNDS Delay, it features a tempo-sync option. This lets you synchronize the LFO externally to REAKTOR's master tempo or internally to
a sequence of gates from within the Blocks patch, making it possible to create modulation signals that are always locked to the beat of your music.
ROUNDS LFO
BLOCKS WIRED - MANUAL - 43
Page 44

Block Reference
ROUNDS REVERB
7.15 ROUNDS REVERB
ROUNDS REVERB
The ROUNDS Reverb is based on a feedback delay network with eight delay taps. It can produce a wide range of effects: from big, deep and cloudy halls to small, resonant rooms or grainy delays. All parameters have been optimized for modulation via the A and B modulation busses, so you can morph from one space into the other, create very animated textures, or add
interesting rhythmical effects to the reverb sound. This makes the ROUNDS Reverb suitable
not only for adding space to a sound, but also for inserting it at any point in your patch as part
of the sound generation.
BLOCKS WIRED - MANUAL - 44
Page 45

Block Reference
7.16 SCOPE
SCOPE
Scope allows you to monitor any signal in a Blocks patch. It shows how signals change over
time: The vertical axis represents the amplitude of a signal and the horizontal axis represents
time. You can use the Scope to visualize modulation signals or waveforms from oscillators, or
to troubleshoot issues in complex patches by checking for the range and shape of a signal.
Watching the signals change as you add modulation and processing to your patch is a great
learning experience, too. The behaviour of the Scope can be adjusted with the controls at the
top of the panel.
SCOPE
BLOCKS WIRED - MANUAL - 45
Page 46

Block Reference
7.17 UTIL ClOCK
UTIL CLOCK
Clock provides a clock signal as a sequence of gates via its Gate output. It allows you to run
Blocks that rely on external timing information, for example sequencers. For this, the Clock's
Gate output is connected to the Gate input of a sequencer. The tempo is set in beats per minute (BPM), with a definable note division for the sequence of gates (4th, 8th, and so on). Additionally, you can add some groove by turning up SHUFFLE. The Reset output sends a gate
every time Clock is activated. When the RESET function is enabled, reset gates are also sent
while the clock is running, at an interval set by the Reset Interval control on the panel. Reset
gates are useful for synchronizing multiple sequencers in a patch.
UTIL ClOCK
BLOCKS WIRED - MANUAL - 46
Page 47

Block Reference
7.18 UTIL NOTE IN
UTIL NOTE IN
The Note In receives MIDI note data and converts it into control signals for use in your Blocks
patch. It allows you to control the pitch of oscillators according to MIDI notes, trigger envelopes with note on messages, and modulate parameters with the modulation wheel or after
touch. The Pitch output carries all pitch information including MIDI note, pitch bend and
glide, while the Note output only carries the MIDI note information. In a similar fashion, the
Gate output provides gates that combine note on and note off messages with velocity, while
the Vel output only provides velocity information. Pitch bend is also available separately via the
Pbend output, as are the modulation wheel (Mwheel) and after touch (Atouch).
UTIL NOTE IN
BLOCKS WIRED - MANUAL - 47
Page 48

Block Reference
West Coast DWG
7.19 West Coast DWG
West Coast DWG
The West Coast DWG combines two oscillators (MOD, CARRIER) and additional waveshaping
(TIMBRE) with extensive internal modulation possibilities, allowing you to intuitively explore
complex timbres by means of frequency modulation synthesis (FM), blending of waveforms
(SHAPE) as well as wavefolding (FOLD, SYMM).
BLOCKS WIRED - MANUAL - 48
Page 49

Block Reference
West Coast LPG
7.20 West Coast LPG
West Coast LPG
The West Coast LPG represents the Blocks take on the low pass gate, a peculiar filter circuit
originally designed by synthesizer legend Don Buchla for controlling the dynamic properties of
a sound. It uses an optocoupler that smoothes the LPG's response to external control. When
excited by a sharp-edged signal via its Pluck input, the LPG opens and closes in a natural
sounding manner, giving sounds a plausible quality that is reminiscent of a drum hit or a
plucked string.
BLOCKS WIRED - MANUAL - 49
Page 50

Block Reference
West Coast XYS
7.21 West Coast XYS
West Coast XYS
The West Coast XYS is a storage system for values and triggers, which can be accessed in a lot
of interesting ways. It can be used for generating complex modulation and gate signals as well
as note sequences. It is based on a two-dimensional grid of 16 steps that can be accessed by a
combination of two clock and two modulation signals, controlling both the direction and the
tempo of the sequence. Even though it can be used as a basic 16 step sequencer, the XYS
excels at creating evolving patterns and constantly shifting sequences.
BLOCKS WIRED - MANUAL - 50
Page 51

8 Credits
BLOCKS WIRED Instrument
Product Design
Dave Forrester, André Estermann
Instrument Development
Dave Forrester, Julian Parker, Francisco Garcia, Alexander Potekhin
GUI Design
Efflam Le Bivic
Sound Design
Jamil Samad, Tommaso De Donatis, André Estermann
Quality Assurance
Frank Ellendt
Project Management
Eike Jonas, Marin Vrbica
Credits
©2015 Native Instruments
BLOCKS WIRED - MANUAL - 51
 Loading...