

Page 1

Manual
Page 2

The information in this document is subject to change without notice and does not represent a
commitment on the part of Native Instruments GmbH. The software described by this document is subject to a License Agreement and may not be copied to other media. No part of this
publication may be copied, reproduced or otherwise transmitted or recorded, for any purpose,
without prior written permission by Native Instruments GmbH, hereinafter referred to as Native
Instruments.
“Native Instruments”, “NI” and associated logos are (registered) trademarks of Native Instruments GmbH.
Mac, Mac OS, GarageBand, Logic, iTunes and iPod are registered trademarks of Apple Inc.,
registered in the U.S. and other countries.
Windows, Windows Vista and DirectSound are registered trademarks of Microsoft Corporation
in the United States and/or other countries.
AKAI S-x000/z8, AKAI S-1000/3000/5000/6000 and MPC are trademarks of Akai Professional, L.P. and used with permission.
Emax and SP-1200 are trademarks of E-mu Systems, Inc. The trademark holders are not affiliated with the maker of this product and do not endorse this product.
All other trade marks are the property of their respective owners and use of them does not imply any affiliation with or endorsement by them.
Disclaimer
Document authored by: David Gover
Product version: 1.7 (08/2011)
Special thanks to the Beta Test Team, who were invaluable not just in tracking down bugs, but
in making this a better product.
Page 3

Germany
Native Instruments GmbH
Schlesische Str. 29-30
D-10997 Berlin
Germany
www.native-instruments.de
USA
Native Instruments North America, Inc.
6725 Sunset Boulevard
5th Floor
Los Angeles, CA 90028
USA
www.native-instruments.com
Contact
© Native Instruments GmbH, 2011. All rights reserved.
Page 4

Table of Contents
Table of Contents
1 Introduction ..............................................................................................................
1.1 Welcome to MASCHINE! .............................................................................................................. 12
1.2 MASCHINE Documentation .......................................................................................................... 14
1.1.1 Manual Conventions .................................................................................................. 13
1.1.2 Naming Conventions ................................................................................................. 13
2 Basic Concepts .........................................................................................................
2.1 Names and concepts you should know ....................................................................................... 16
2.2 Common Operations ................................................................................................................... 18
2.3 Stand-alone and Plug-in Mode ................................................................................................... 24
2.4 Preferences .................................................................................................................................25
2.2.1 Switching Views ........................................................................................................ 18
2.2.2 Showing and hiding the Browser ............................................................................... 19
2.2.3 Minimizing the Arranger ............................................................................................ 20
2.2.4 Hiding Parameter Pages in the Control Area .............................................................. 20
2.2.5 Hiding the Modulation Lane ....................................................................................... 21
2.2.6 Navigating Parameter Pages in the Control Area ....................................................... 22
2.2.7 Undo and Redo .......................................................................................................... 23
2.2.8 Pinning a Mode .......................................................................................................... 23
2.3.1 Differences between Stand-alone and Plug-in Mode ................................................. 24
2.3.2 Switching Instances with the Hardware in Plug-in Mode ........................................... 24
2.3.3 Switching Instances with the Software in Plug-in Mode ............................................ 24
2.4.1 Preferences – General Tab ......................................................................................... 26
2.4.2 Preferences – Defaults Tab ....................................................................................... 28
2.4.3 Preferences – User Paths Tab .................................................................................... 29
2.4.4 Preferences – Libraries Tab ....................................................................................... 31
2.4.5 Preferences – Plug-ins Tab ....................................................................................... 31
12
16
MASCHINE - Manual - 4
Page 5

Table of Contents
2.5 Audio and MIDI Settings ............................................................................................................. 36
2.6 Connecting External MIDI Equipment ......................................................................................... 40
2.4.6 Preferences – Hardware Tab ...................................................................................... 35
2.5.1 Audio Tab .................................................................................................................. 37
2.5.2 Routing Tab ............................................................................................................... 38
2.5.3 MIDI Tab .................................................................................................................... 39
2.6.1 Sync to External MIDI Clock ....................................................................................... 41
2.6.2 Send MIDI Clock ......................................................................................................... 41
3 Browser ....................................................................................................................
3.1 Elements of the Browser ............................................................................................................. 44
3.2 Adding your Own Samples .......................................................................................................... 50
3.3 Quick Browse .............................................................................................................................. 54
3.4 The Browser on the Hardware ..................................................................................................... 56
3.1.1 Disk Selector .............................................................................................................. 45
3.1.2 File Type Selector ....................................................................................................... 46
3.1.3 Tag Filter ................................................................................................................... 46
3.1.4 Text Search field ........................................................................................................ 47
3.1.5 Search Result List ..................................................................................................... 48
3.1.6 Locating missing Samples ........................................................................................ 49
3.2.1 Importing a Sample Into the Library .......................................................................... 52
3.2.2 Tagging your Groups, Sounds, Patterns, Instruments, FX Presets, and Samples ....... 53
3.3.1 Using Quick Browse ................................................................................................... 55
3.3.2 In-Place Auditioning .................................................................................................. 55
4 Sound Slots ..............................................................................................................
4.1 Defining a Sound Slot's Role ...................................................................................................... 59
4.2 The Sampler Parameters in Module 1 ......................................................................................... 61
4.1.1 Selecting a Source using the Hardware ..................................................................... 60
4.1.2 Selecting a Source using the Software ...................................................................... 61
43
58
MASCHINE - Manual - 5
Page 6

Table of Contents
4.3 Loading an Instrument Plug-in ...................................................................................................72
4.4 The Sampler Parameters in the Sound’s Output Tab (OUT) ......................................................... 77
4.5 Saving a Sound .......................................................................................................................... 79
4.6 Copying and Pasting Sounds ...................................................................................................... 80
4.7 Resetting a Sound ...................................................................................................................... 81
4.8 Mute and Solo .............................................................................................................................82
4.9 Loading REX Files ....................................................................................................................... 85
4.10 Sound MIDI Options .................................................................................................................... 86
4.2.1 Page 1: Voice Settings and Engine ............................................................................ 63
4.2.2 Page 2: Pitch/Gate and Amplitude Envelope .............................................................. 64
4.2.3 Page 3: FX and Filter Settings ................................................................................... 67
4.2.4 Page 4: Modulation Envelope and Destination ........................................................... 68
4.2.5 Page 5: LFO and Destination ..................................................................................... 69
4.2.6 Page 6: Velocity Destination and Modwheel Destination ............................................ 71
4.3.1 Opening and Closing Plug-in Windows ...................................................................... 76
4.4.1 Page 1: Main, Aux 1 and Aux 2 .................................................................................. 77
4.4.2 Page 2: Pre Mix Options ............................................................................................. 79
4.8.1 Hardware ................................................................................................................... 82
4.8.2 Software .................................................................................................................... 83
4.10.1 Sound MIDI Batch Setup ............................................................................................ 86
4.10.2 Sound MIDI Settings .................................................................................................. 88
4.10.3 MIDI Output from Sounds .......................................................................................... 90
5 Creating Groups ........................................................................................................
5.1 The Group Property Pages ........................................................................................................... 92
5.1.1 Page 1: Voice Settings and Pitch ............................................................................... 92
5.1.2 Page 2: Groove ........................................................................................................... 93
5.1.3 Page 3: Macro Controls .............................................................................................. 94
5.1.4 Accessing Macro Controls from the Hardware ........................................................... 98
92
MASCHINE - Manual - 6
Page 7

5.2 The Group's Output Parameters .................................................................................................. 99
5.3 Saving a Group ........................................................................................................................... 101
5.4 Copy and Paste Groups ...............................................................................................................102
5.5 Resetting a Group .......................................................................................................................103
5.6 Naming Groups & Sounds ........................................................................................................... 104
5.7 Loading Groups without Patterns ............................................................................................... 105
5.8 MPC Program Import to Groups .................................................................................................. 106
5.2.1 Page 1: Routing, Volume and Pan ............................................................................. 99
5.2.2 Page 2: Aux Pre and Post Mode (Pre Mix 1 and 2) ...................................................... 100
5.8.1 Supported Parameters from MPC Programs ............................................................... 106
5.8.2 Importing MPC Program Files .................................................................................... 107
6 Working with Patterns (Hardware) ..............................................................................
6.1 Creating Patterns ....................................................................................................................... 110
6.2 Editing Patterns ......................................................................................................................... 121
6.1.1 Pattern Mode ............................................................................................................. 110
6.1.2 Pad Mode ................................................................................................................... 111
6.1.3 Pad Link .................................................................................................................... 112
6.1.4 Releasing a Pad from a Pad Link Group .................................................................... 113
6.1.5 Recording the Pads ................................................................................................... 113
6.1.6 The Metronome .......................................................................................................... 114
6.1.7 Using the Step Sequencer .......................................................................................... 114
6.1.8 Using Note Repeat ..................................................................................................... 116
6.1.9 Using the Piano Roll/Keyboard ................................................................................... 117
6.1.10 Recording Automation ............................................................................................... 118
6.1.11 Recording Automation in the Step Sequencer ............................................................ 119
6.1.12 Step Grid, Pattern Length Grid and Quantization ....................................................... 119
6.2.1 Selecting Notes and Events ....................................................................................... 121
6.2.2 Erase/Clear ................................................................................................................ 122
Table of Contents
110
MASCHINE - Manual - 7
Page 8

Table of Contents
6.2.3 Copy/Paste ................................................................................................................ 122
6.2.4 Nudge ........................................................................................................................ 122
6.2.5 Compare/Split ........................................................................................................... 122
6.2.6 Transpose .................................................................................................................. 123
7 Working with Patterns (Software) ...............................................................................
7.1 The Pattern Editor .......................................................................................................................124
7.2 Editing Patterns ......................................................................................................................... 128
7.1.1 Selecting Patterns and Pattern Banks ....................................................................... 125
7.1.2 Copy and Paste Patterns ........................................................................................... 126
7.1.3 Resetting Patterns ..................................................................................................... 127
7.1.4 Saving Patterns ......................................................................................................... 127
7.2.1 Mouse Actions in the Pattern Editor ........................................................................... 128
7.2.2 The Zoom Tool ............................................................................................................ 129
7.2.3 Compare/Split ........................................................................................................... 130
7.2.4 The Piano Roll / Keyboard .......................................................................................... 130
7.2.5 Recording and Editing Automation ............................................................................ 131
7.2.6 Adding a Modulator ................................................................................................... 132
7.2.7 Step Grid, Pattern Length Grid and Quantization ....................................................... 134
7.2.8 Pad Link .................................................................................................................... 138
7.2.9 Releasing a Pad from a Pad Link Group .................................................................... 139
7.2.10 Setting up a Pad as Master or Slave in a Pad Link Group .......................................... 140
7.2.11 Rendering Audio from Patterns using Drag and Drop ................................................ 141
7.2.12 Rendering MIDI from Patterns using Drag and Drop .................................................. 143
8 The Effects Overview .................................................................................................
8.1 Dynamics ....................................................................................................................................145
8.1.1 Compressor ............................................................................................................... 145
8.1.2 Gate ........................................................................................................................... 146
8.1.3 Limiter ....................................................................................................................... 148
124
145
MASCHINE - Manual - 8
Page 9

Table of Contents
8.2 Filtering ...................................................................................................................................... 149
8.3 Modulation ................................................................................................................................. 153
8.4 Spatial and Reverb ..................................................................................................................... 159
8.5 Delay .......................................................................................................................................... 164
8.6 Distortion ....................................................................................................................................169
8.1.4 Maximizer .................................................................................................................. 148
8.2.1 EQ .............................................................................................................................. 149
8.2.2 Filter .......................................................................................................................... 151
8.3.1 Chorus ....................................................................................................................... 153
8.3.2 Flanger ...................................................................................................................... 154
8.3.3 FM ............................................................................................................................. 155
8.3.4 Freq Shifter ................................................................................................................ 156
8.3.5 Phaser ....................................................................................................................... 157
8.4.1 Ice ............................................................................................................................. 159
8.4.2 Metaverb ................................................................................................................... 160
8.4.3 Reflex ........................................................................................................................ 161
8.4.4 Reverb ....................................................................................................................... 162
8.5.1 Beat Delay ................................................................................................................. 164
8.5.2 Grain Delay ................................................................................................................ 165
8.5.3 Grain Stretch ............................................................................................................. 166
8.5.4 Resochord .................................................................................................................. 167
8.6.1 Distortion ................................................................................................................... 169
8.6.2 Lofi ............................................................................................................................ 170
8.6.3 Saturator ................................................................................................................... 171
9 Using FX ...................................................................................................................
9.1 Applying Effects to a Sound ........................................................................................................173
9.2 Applying Effects to a Group ........................................................................................................ 176
9.3 Applying Effects to the Master .................................................................................................... 178
173
MASCHINE - Manual - 9
Page 10

9.4 Bypassing Effects .......................................................................................................................181
9.5 Automating Effects and Sampler Parameters ............................................................................. 183
9.6 Applying FX to an External Instrument ........................................................................................ 184
9.7 Recording FX Automation ........................................................................................................... 187
9.8 Saving FX Presets ....................................................................................................................... 187
9.9 Creating a Send Effect ............................................................................................................... 189
9.10 Creating a Multi Effect ............................................................................................................... 191
10 Creating a Song using Scenes ....................................................................................
10.1 Selecting a Scene ....................................................................................................................... 194
10.2 Creating and deleting a Clip in the Arranger .............................................................................. 195
10.3 Scene Sync ................................................................................................................................. 197
10.4 Inserting and Deleting Scenes .................................................................................................... 199
10.5 Copy and Paste Scenes ...............................................................................................................200
10.6 Using the Loop Mode to combine Scenes .................................................................................... 200
10.7 Triggering Scenes via MIDI ......................................................................................................... 202
11 Sampling and Sample Mapping ..................................................................................
11.1 Controlling Sampling from the Hardware ................................................................................... 204
11.1.1 Recording a Sample (Hardware) ................................................................................ 204
11.1.2 Editing a Sample (Hardware) .................................................................................... 206
11.1.3 Slicing a Sample (Hardware) ..................................................................................... 209
11.1.4 Mapping a Sample (Hardware) .................................................................................. 211
11.1.5 Editing a Sample ....................................................................................................... 213
11.1.6 Slicing a Sample ....................................................................................................... 216
11.1.7 Mapping a Sample .................................................................................................... 221
12 The Master Section ...................................................................................................
12.1 The Master Parameter Pages ...................................................................................................... 225
12.1.1 Mix Page 1: Master Mixer ........................................................................................... 225
12.1.2 Mix Page 2: Group Panning ........................................................................................ 226
Table of Contents
194
204
225
MASCHINE - Manual - 10
Page 11

Table of Contents
12.1.3 Groove Swing ............................................................................................................. 227
12.1.4 The Master Output Tab (OUT) .................................................................................... 228
13 Exporting Audio .........................................................................................................
13.1 Export Audio ............................................................................................................................... 230
13.2 Save Project with Samples ......................................................................................................... 232
14 Appendix: Tips for playing Live ..................................................................................
14.1 Preparations ............................................................................................................................... 234
14.2 Basic Techniques ....................................................................................................................... 236
14.3 Special Tricks ............................................................................................................................. 237
14.1.1 Focus on the Hardware .............................................................................................. 234
14.1.2 Customize the Pads of the Hardware ......................................................................... 234
14.1.3 Check your CPU Power before Playing ........................................................................ 234
14.1.4 Name your Groups, Sounds and Scenes ..................................................................... 235
14.1.5 Consider using a Limiter on your Master ................................................................... 235
14.1.6 Hook up your other Gear and sync it with MIDI Clock ................................................. 235
14.1.7 Improvise ................................................................................................................... 235
14.2.1 Use Mute & Solo ........................................................................................................ 236
14.2.2 Use Scene Mode and Scene Sync ............................................................................... 236
14.2.3 Create Variations of your Drums in the Step Sequencer ............................................. 236
14.2.4 Use Note Repeat ........................................................................................................ 236
14.2.5 Set up your own Multi FX Groups and automate them ............................................... 237
14.3.1 Changing Pattern Length for variation ...................................................................... 237
14.3.2 Using the Loop Mode to cycle through Samples ......................................................... 237
14.3.3 Load long Audio Files and play with the Start Point ................................................... 237
Index ........................................................................................................................
230
234
238
MASCHINE - Manual - 11
Page 12

Welcome to MASCHINE!
1 Introduction
1.1 Welcome to MASCHINE!
Thank you for buying MASCHINE!
MASCHINE is a groove production studio that implements the familiar working style of classical groove boxes along with the advantages of a computer based system. MASCHINE is ideal
for making music live, as well as in the studio. It’s the hands-on aspect of a dedicated instrument, the MASCHINE hardware controller, united with the advanced editing features of the
MASCHINE software.
Creating beats is often not very intuitive with a computer, but using the MASCHINE hardware
controller to do it makes it easy and fun. You can tap in freely with the pads or use Note Repeat to jam along. Alternatively, build your beats using the Step Sequencer just as in classic
drum machines.
Patterns can be intuitively combined and rearranged on the fly to form larger ideas. You can try
out several different versions of a song without ever having to stop the music.
Introduction
Since you can integrate it into any sequencer that supports VST, Audio Units, or RTAS plugins, you can reap the benefits in almost any software setup, or use it as a standalone application. You can sample your own material, slice loops and rearrange them easily.
However, MASCHINE is a lot more than an ordinary groovebox or sampler: it comes with an
inspiring 6-gigabyte library, containing over 250 kits and 14,000 samples, and a sophisticated, yet easy to use tag-based Browser to give you instant access to the sounds you are looking
for.
What’s more, MASCHINE provides lots of options for manipulating your sounds via internal effects and other sound-shaping possibilities. You can also control external MIDI hardware and
3rd-party software with the MASCHINE hardware controller, while customizing the functions of
the pads, knobs and buttons according to your needs utilizing the included Controller Editor
application. We hope you enjoy this fantastic instrument as much as we do. Now let's get going!
—The MASCHINE team at Native Instruments.
MASCHINE - Manual - 12
Page 13

Welcome to MASCHINE!
1.1.1 Manual Conventions
This section introduces you to the signage and text highlighting used in this manual. This manual uses particular formatting to point out special facts and to warn you of potential issues.
The icons introducing these notes let you see what kind of information is to be expected:
Whenever this exclamation mark icon appears, you should read the corresponding note carefully and follow the instructions and hints given there if applicable.
This light bulb icon indicates that a note contains useful extra information. This information
may often help you to solve a task more efficiently, but does not necessarily apply to the setup or operating system you are using; however, it's always worth a look.
Furthermore, the following formatting is used:
▪ Text appearing in (drop-down) menus (such as Open…, Save as… etc.) and paths to loca-
tions on your hard drive or other storage devices is printed in italics.
▪ Text appearing elsewhere (labels of buttons, controls, text next to checkboxes etc.) is
printed in blue. Whenever you see this formatting applied, you will find the same text appearing somewhere on the screen.
Introduction
▪ Text appearing on labels of the MASCHINE hardware controller is printed in orange.
Whenever you see this formatting applied, you will find the same text on the controller.
▪ Important names and concepts are printed in bold.
▪ References to keys on your computer's keyboard you'll find put in square brackets (e.g.,
"Press [Shift] + [Return]").
► Single instructions are introduced by this play button type arrow.
→ Results of actions are introduced by this smaller arrow.
1.1.2 Naming Conventions
Throughout the documentation we will refer to MASCHINE as the hardware controller and MASCHINE software as the software installed on your computer.
The term 'effects' will often be abbreviated as 'FX' when referring to elements in the MASCHINE software and hardware. These terms have the same meaning.
MASCHINE - Manual - 13
Page 14

MASCHINE Documentation
Unlabeled Buttons and Knobs
The buttons and knobs above and below the displays on your MASCHINE controller do not
have labels (all other elements on the controller do). For better reference, we applied a special
formatting here: throughout the document, the elements are capitalized and numbered, so the
buttons are written Button (1-8), while the knobs are written Knob (1-8). E.g., whenever you
see an instruction such as “Press Button 2 to open the EDIT page,” you’ll know it’s the second
button from the left above the displays.
1.2 MASCHINE Documentation
MASCHINE provides you with many information sources. The main sources are meant to be
read in the following sequence:
▪ MASCHINE Setup Guide
▪ MASCHINE Getting Started Guide and online video tutorials
▪ MASCHINE Reference Manual (this document)
▪ MASCHINE Hardware Control Reference
Introduction
Hereafter is a quick description of each of these documentation sources.
The Setup Guide is available in printed form and on the DVD in the product box. The whole
documentation set is also available in PDF format and located within the MASCHINE installation folder on your hard drive. You can also access these documents from the application’s
Help menu.
MASCHINE Setup Guide
A printed Setup Guide is included in the product box. It will guide you through the software
and hardware installation of MASCHINE, from the very beginning to the first sound coming
through your speakers. This should be your first stop in learning MASCHINE.
First read the Setup Guide. Then proceed with this MASCHINE Getting Started Guide to get
more familiar with MASCHINE.
MASCHINE - Manual - 14
Page 15

MASCHINE Documentation
MASCHINE Getting Started Guide
After reading the Setup Guide and following its instructions, your MASCHINE should be up
and running. The next step is to read this MASCHINE Getting Started Guide. The MASCHINE
Getting Started Guide first gives you an overview of MASCHINE and a practical approach to
creating a project.
MASCHINE Reference Manual
The MASCHINE Reference Manual provides you with a detailed reference of your MASCHINE
software along with extra information (solving common issues, specifications, etc.).
MASCHINE Hardware Control Reference
The MASCHINE Hardware Control Reference provides an overview of a MASCHINE project, the
quick access options performed using the MASCHINE hardware controller, and lots of keyboard shortcuts.
Video Tutorials
The Native Instruments website provides you with a lot of video tutorials that give you a handson approach to many sides of the MASCHINE workflow. To see them, point your favorite browser to following URL:
Introduction
http://native-instruments.com/maschinemedia
Controller Editor Reference Manual
Besides using your MASCHINE hardware controller together with its dedicated MASCHINE
software, you can also use it as a powerful and highly versatile MIDI controller to pilot any other MIDI-capable application or device. This is made possible by the Controller Editor software,
a little application that allows you to precisely define all MIDI assignments for your MASCHINE
controller. The Controller Editor should have been installed during the MASCHINE installation
procedure. For more info on this, please refer to the Controller Editor Reference Manual available as a PDF file in the Documentation subfolder of the Controller Editor installation folder on
your hard disk.
MASCHINE - Manual - 15
Page 16

Basic Concepts
Names and concepts you should know
2 Basic Concepts
This chapter will reintroduce you to MASCHINE's main elements and terminology and explain
how they relate to one another. You will also learn how to set up your audio interface and how
to connect MIDI devices.
Before reading this chapter it is strongly recommended that you read the MASCHINE Getting
Started Guide first.
2.1 Names and concepts you should know
We will start with a list defining the most important concepts and names.
Browser
The Browser is the front end for accessing all the elements of your MASCHINE Projects:
Projects, Groups, Sounds, Samples, Patterns, Instruments and FX Presets. Each of these can
be stored and tagged in a way that allows you easy access to all of them. MASCHINE's Factory
Library is already completely tagged, and you can also import your own Samples to the Library
and tag them as well. To learn more about the Browser, please read chapter ↑3, Browser.
Projects
A Project contains all data needed for a Song: up to eight Groups with their Patterns, 64
Scenes and all settings, automation, FX, Routings, Sounds and Samples. It’s like a snapshot of
the entire state of MASCHINE. Please read the Getting Started Guide for a complete overview
of the MASCHINE Project structure.
Sounds
A Sound can hold up to 4 modules which can be a Sampler, VST/AU Plug-in Instruments or
FX, internal MASCHINE FX, as well as an external Input, or a MIDI Out module. Each Sound of
the selected Group is mapped to one of the 16 pads on the MASCHINE hardware controller, so
you can play the Sounds by pressing the pads. Refer to chapter ↑4, Sound Slots for more information on Sounds.
MASCHINE - Manual - 16
Page 17

Basic Concepts
Names and concepts you should know
Groups
A Group contains 16 Sound slots, each of which can hold one Sound. In addition to the effects
applied to an individual Sound, a Group can have up to 4 Insert FX. These affect all the
Sounds in the Group. A Group can also contain up to 64 Patterns assigned from one of the
four Pattern Banks. Refer to chapter ↑5, Creating Groups, for more information on Groups.
Master
This is where all audio signals from each of the Groups and Sounds come together and get
mixed. The Master bus can also host up to four Insert FX of its own, these effects are applied
to all Groups and the Sounds within them. More information on the Master can be found in
chapter ↑11.1.7, Mapping a Sample.
Scenes
A Scene represents a combination of different Groups with their associated Patterns. Scenes
are used to chain patterns (known as Clips in the arrangement area) in order to build up a finished arrangement, or to trigger different parts of a Song while you are playing live. More information on Scenes can be found in chapter ↑10, Creating a Song using Scenes.
Patterns
A Pattern is a sequence that plays Sounds from the current Group. A Pattern is therefore usually linked to a Group since it is a part of the Group; however you can also save it independently from the Group. This is useful if you want to try out different drum kits with the same Pattern or different Sounds with a given melody. More information on Patterns can be found in
chapter ↑6, Working with Patterns (Hardware) and chapter ↑7, Working with Patterns (Soft-
ware).
Events
Events are the individual element that make up a pattern. In Step Editor mode these are visually represented in the MASCHINE software by rectangles. In Piano Roll mode they are represented by note information. Each event represents a musical note or a drum hit.
MASCHINE - Manual - 17
Page 18
Basic Concepts
Common Operations
Modules
MASCHINE contains four Module slots on each of the three MASCHINE Project levels Sound,
Group, and Master. MASCHINE modules are the MASCHINE Sampler, VST/AU Plug-in Instruments or FX, internal MASCHINE FX, as well as the external Input module and the MIDI Out
module.
Effects (FX)
MASCHINE comes with many different effects that are called FX in MASCHINE terminology.
You may also use VST/AU plug-in effects too. Up to four effects can be directly applied as insert effects to each Sound, Group or Master level. With the routing system you can also create
send effects and multi-effects. Refer to chapter ↑8, The Effects Overview.
2.2 Common Operations
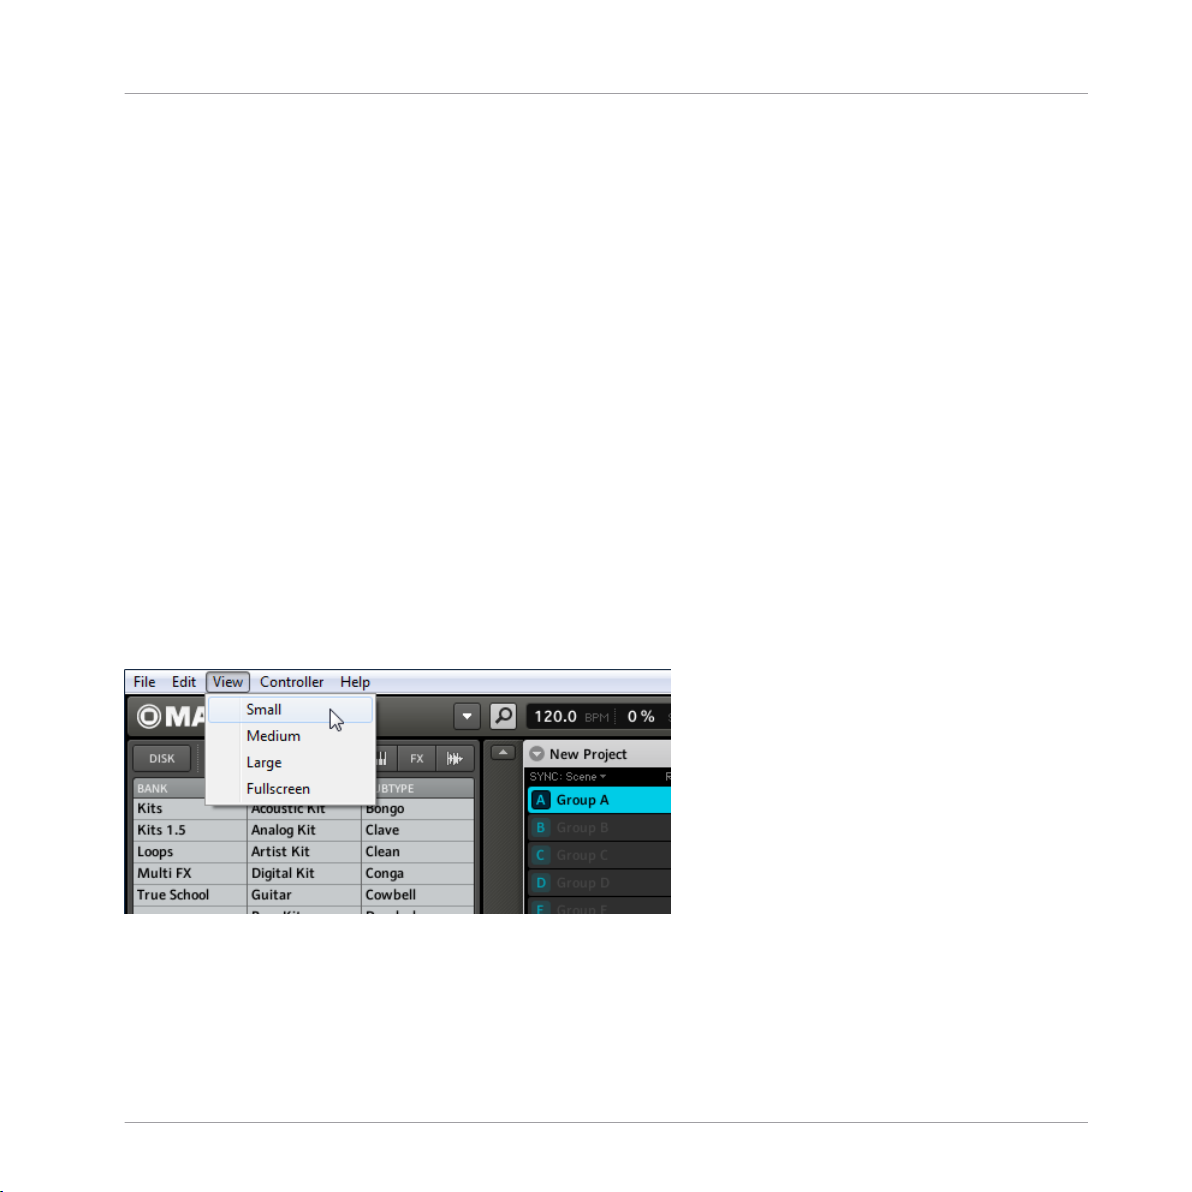
2.2.1 Switching Views
From the Main menu & the Plug-in menu you can select one of four different sizes to display
MASCHINE's software GUI:
The View entry in the Main menu (Windows depicted).
MASCHINE - Manual - 18
Page 19

The View entry in the Plug-in menu.
Full screen view is also available from your computer keyboard via the [F5] function key.
2.2.2 Showing and hiding the Browser
Hardware
► Press and hold NAVIGATE; now press Button 5 to hide the Browser.
To bring it back, press Button 5 again.
Basic Concepts
Common Operations
The Navigate screen on the left and right display of the MASCHINE hardware controller.
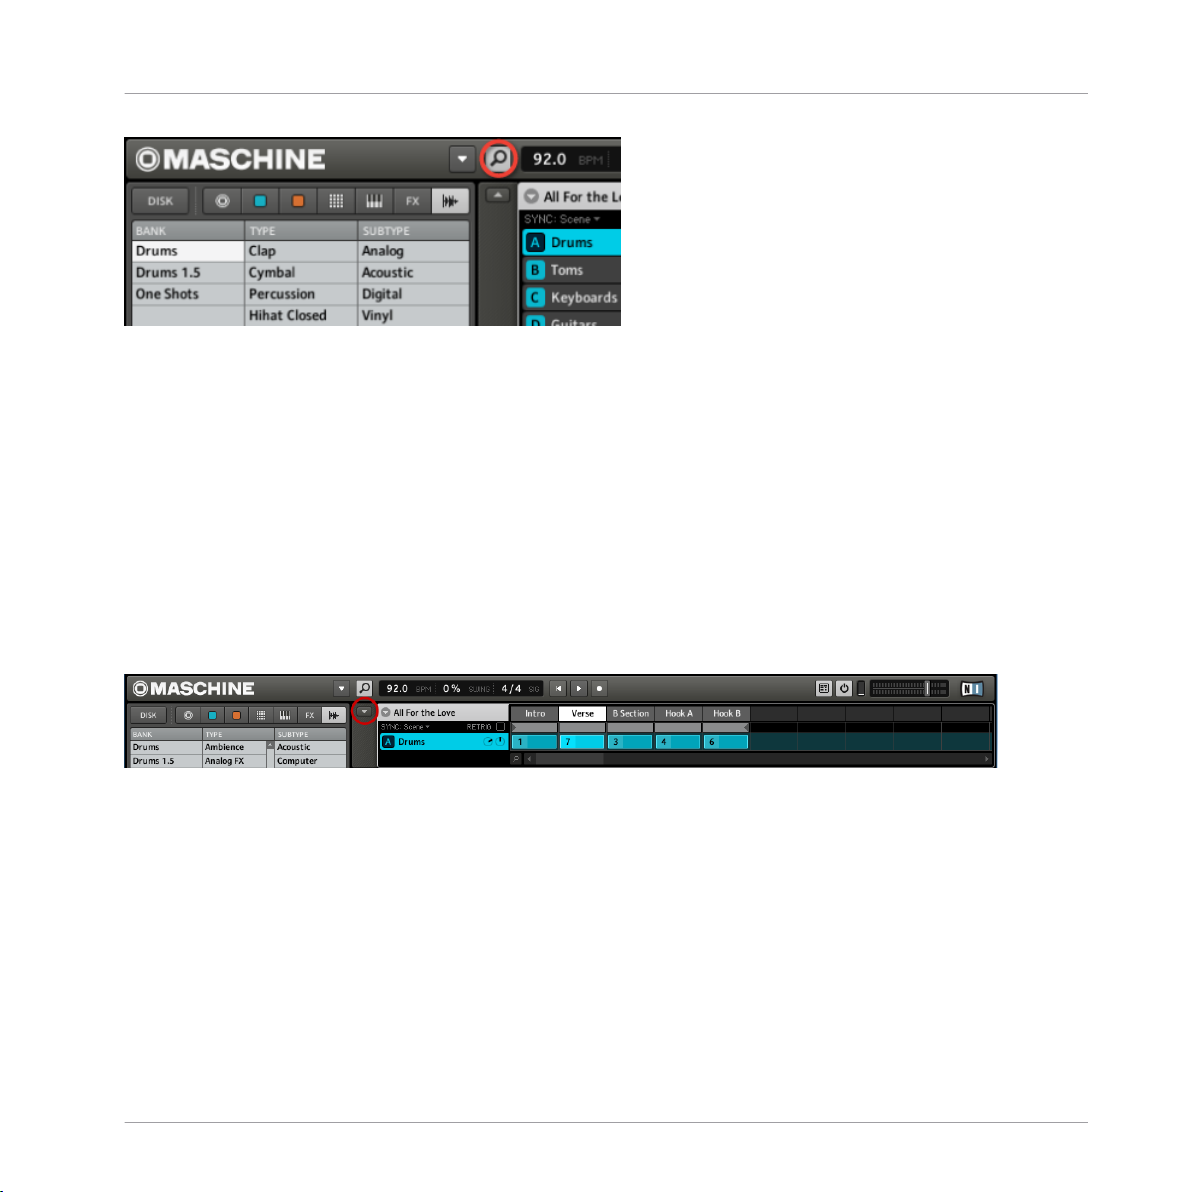
Software
► Click on the Browser button (with the magnifier symbol) in the Header to show and hide the
Browser.
MASCHINE - Manual - 19
Page 20
Basic Concepts
Common Operations
The Browser button in the Header.
2.2.3 Minimizing the Arranger
Hardware
Press NAVIGATE + Button 6 to minimize the Arranger to the currently selected Group slot and
again to show all Group slots.
Software
► Click on the Minimize button (showing an arrow) on the left of the Arranger to minimize the
Arranger to the currently selected Group slot and again to show all Group slots.
The Arranger in minimized view showing the Group slot in focus.
2.2.4 Hiding Parameter Pages in the Control Area
Hardware
► Press NAVIGATE + Button 7 to show and hide the Parameter pages in the Control area.
MASCHINE - Manual - 20
Page 21
Common Operations
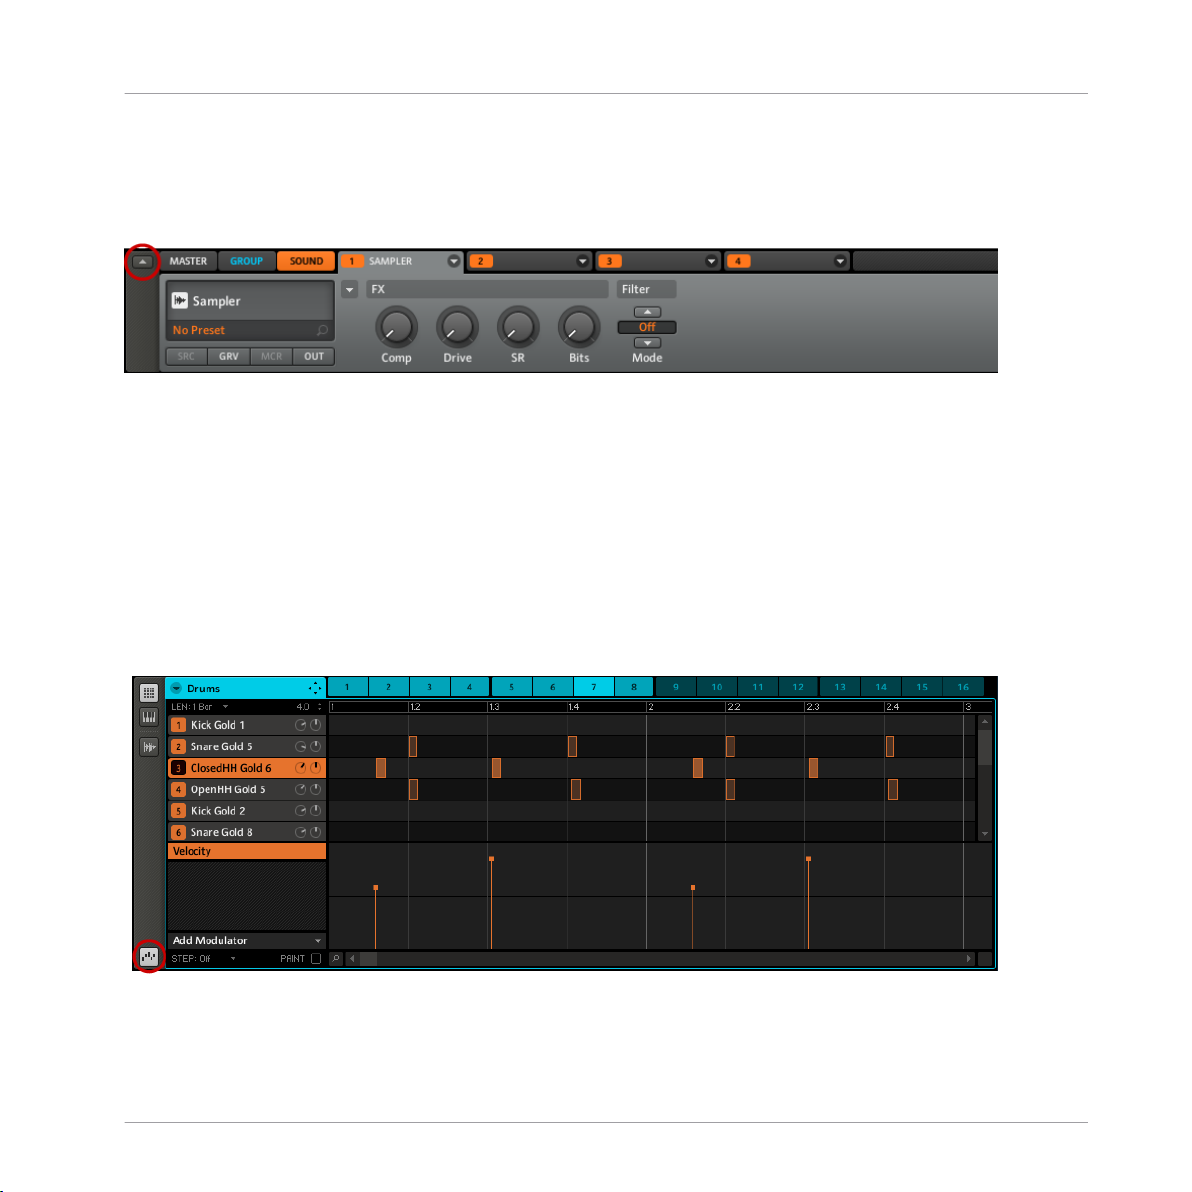
Software
► Click on the Minimize button (showing an arrow) to the left of the Control area to show and
hide the Parameter pages in the Control area.
The Control area in full size.
2.2.5 Hiding the Modulation Lane
Hardware
► Press NAVIGATE + Button 8 to show and hide the Modulation Lane.
Software
Basic Concepts
► Click on the Automation View switch on the left of the Modulation Lane to show and hide it.
The Automation View switch.
MASCHINE - Manual - 21
Page 22
Basic Concepts
Common Operations
2.2.6 Navigating Parameter Pages in the Control Area
In some situations, the Control area consists of more parameters than the displays can show at
once. Examples of this are the Groups’ Output tab (OUT on the controller) and the Sounds’
Source tab (SRC on the controller) if set to Sampler. In these cases, the number of Parameters
is divided into several Parameter pages that you can easily navigate with the hardware and
software.
Hardware
On the MASCHINE hardware controller you can use the Page buttons to navigate through the
Parameter pages. Whenever there is more than one page, it will be shown on the right side of
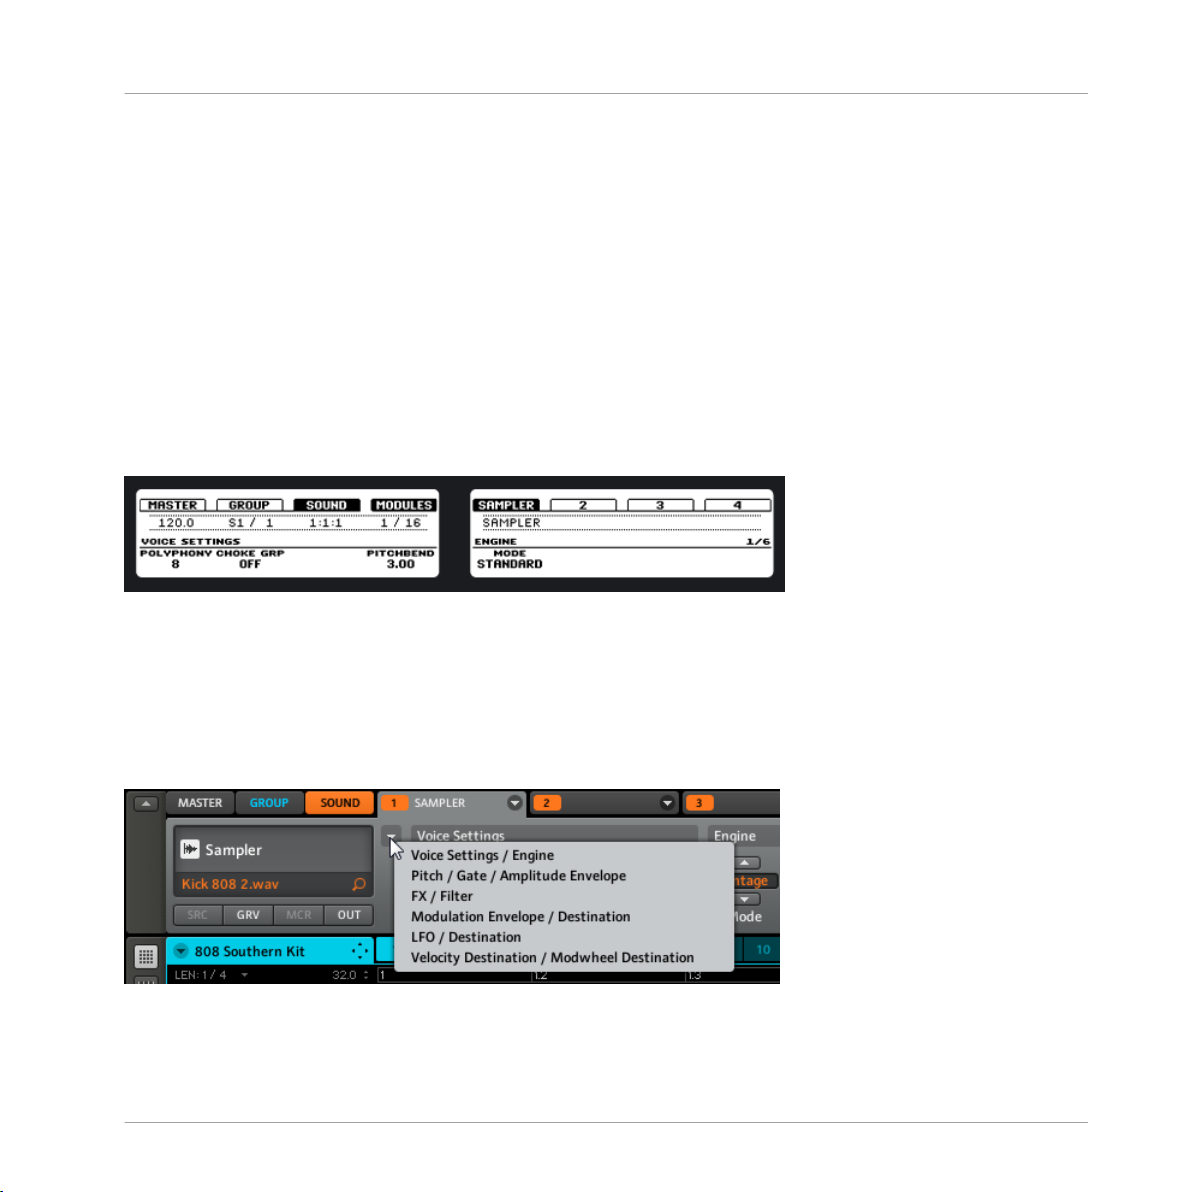
the right display like this:
The display of available 1/6 pages in a Group Output tab.
Moreover, if there is another page available to the left or to the right of the current page, the
corresponding Page button will be lit on your MASCHINE hardware controller.
Software
On the software you click the Parameter Page selector to navigate through the pages:
The Parameter Page selector in the Control area: first page of parameter settings for Module 1.
MASCHINE - Manual - 22
Page 23

Basic Concepts
Common Operations
2.2.7 Undo and Redo
Undo and Redo are useful to cancel operations you have performed or to compare two versions
before and after a change (find the Compare/Split functions explained in chapter ↑6.2.5, Com-
pare/Split for the hardware and ↑7.2.3, Compare/Split for the software). In the MASCHINE
software you can undo nearly everything you did after loading or creating your Project.
Note: If you save your Project, you will no longer be able to Undo or Redo any actions performed before saving!
Hardware
► On the MASCHINE hardware controller, perform the Undo operation by pressing SHIFT +
pad 1. To perform the Redo operation, press SHIFT + pad 2.
Software
On the software, use the common keyboard shortcuts for the Undo and Redo functions. For
Undo, press [Ctrl]+[Z] ([Cmd]+[Z] on Mac OS X). For Redo, press [Ctrl]+[Y] ([Cmd]+[Y] on Mac
OS X). You can also select Undo and Redo from the Edit menu.
2.2.8 Pinning a Mode
You can pin a screen by pressing the relevant Mode button (SCENE, PATTERN, etc.) + Button
1 above the left display.
Now the screen is always pinned when you select this mode. To make it a temporary screen,
press the mode button + Button 1 again. Now the screen will only show up, as long as you
press the mode button.
SELECT mode can not be pinned.
MASCHINE - Manual - 23
Page 24

Basic Concepts
Stand-alone and Plug-in Mode
2.3 Stand-alone and Plug-in Mode
You can run MASCHINE software as a stand-alone application or integrate it into your favorite
Digital Audio Workstation (or DAW, in short) by loading it as a plug-in. MASCHINE software is
available in the VST, Audio Unit and RTAS plug-in formats. For further information on plug-in
compatibility and for a detailed description of how to use plug-ins in your host, please refer to
the documentation included with your host software. If you did not install the plug-ins when
installing the MASCHINE software, please refer to the printed Setup Guide or the PDF version
of this document available from the MASCHINE software Help menu.
2.3.1 Differences between Stand-alone and Plug-in Mode
When you are using MASCHINE as a plug-in within a host application (i.e., sequencer software
like Cubase or Pro Tools), you can open multiple MASCHINE instances. Actually, you can load
as many instances of MASCHINE as your computer and your host application can handle CPUwise. In contrast to the stand-alone application, they are always synced to the host. In plug-in
mode you can also send a MIDI Program Change message from your host to switch between
MASCHINE’s Scenes or record automation using the Macro controls. To learn more about
these, have a look at chapter ↑10, Creating a Song using Scenes and ↑5.1, The Group Property
Pages.
2.3.2 Switching Instances with the Hardware in Plug-in Mode
To switch from one instance to another in plug-in mode, press SHIFT + STEP; using Knob 5
you can now select the desired instance and load it by pressing Button 8.
2.3.3 Switching Instances with the Software in Plug-in Mode
You can select the controller from an instance by clicking the Connect button in the MASCHINE header.
MASCHINE - Manual - 24
Page 25
Basic Concepts
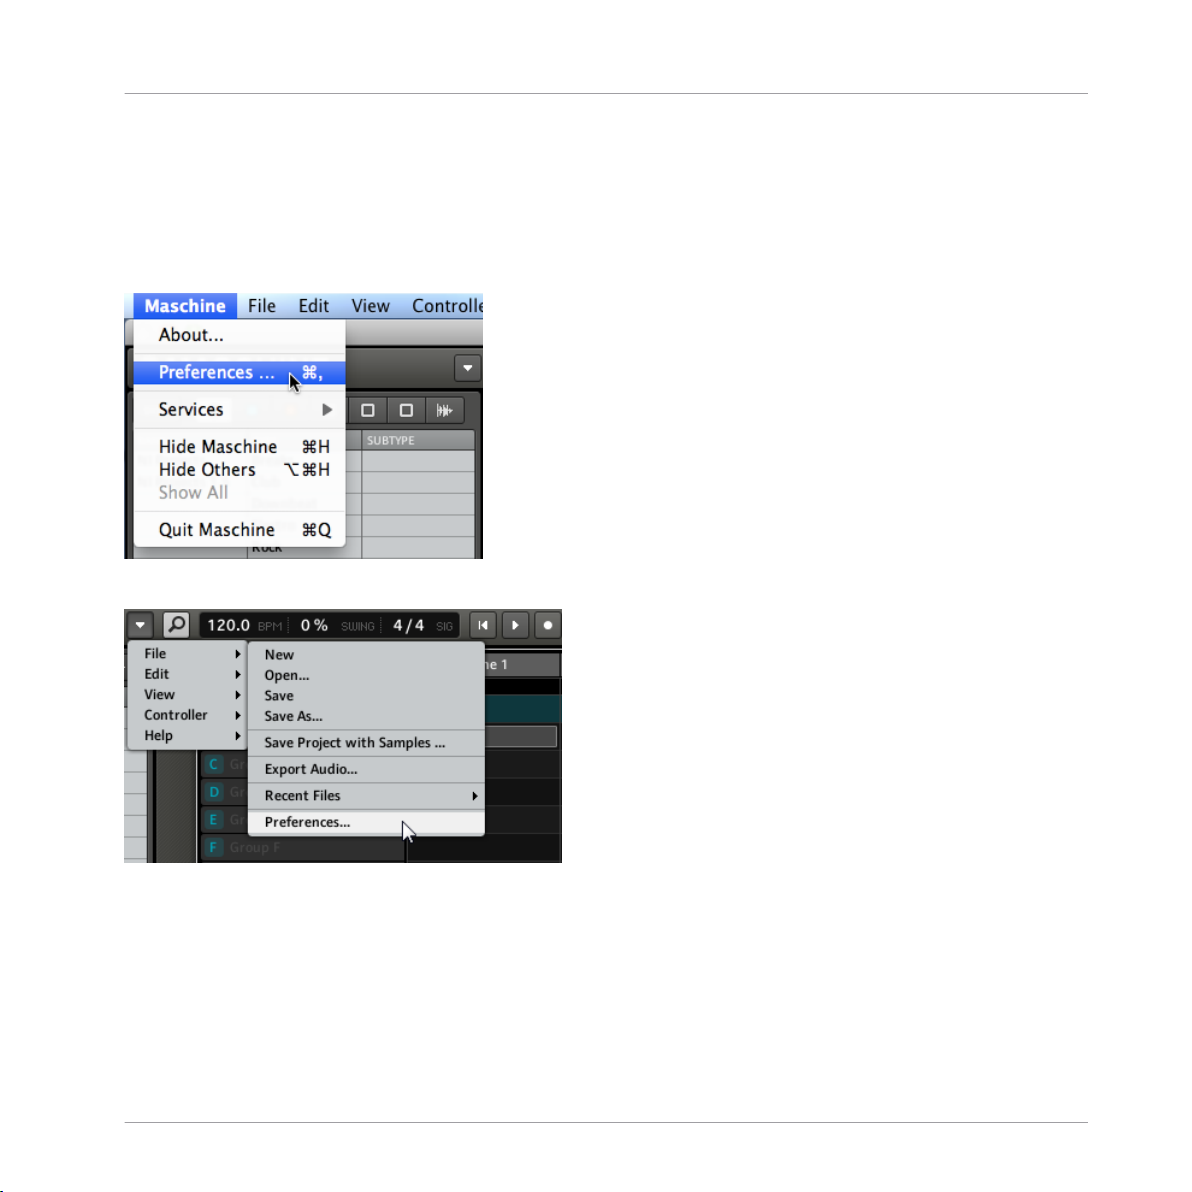
2.4 Preferences
You can find the Preferences dialog under MASCHINE in the Main menu (Mac OS X) or in the
File menu (Windows), as well as in the File submenu of the Plug-in menu:
Preferences… on the Main menu (Mac OS X depicted).
Preferences
Preferences… in the Plug-in menu.
MASCHINE - Manual - 25
Page 26

2.4.1 Preferences – General Tab
Basic Concepts
Preferences
The Preferences – General tab.
Screen Element Description
Startup
Reload last Project If this option is checked, the last Project you worked on when quitting MA-
SCHINE will be loaded as soon as you start MASCHINE again.
Recording Audio
Prefer Project Folder If this checkbox is marked, the Samples you record will be put in a subdir-
ectory of the folder where your project is saved. If not, your recordings will
be saved in the generic recordings folder in your standard user library path.
MIDI
MASCHINE - Manual - 26
Page 27
Screen Element Description
Sync Offset Slave Depending on variables such as the speed of your CPU, your audio inter-
face, your MIDI interface and the Latency you selected in the Audio and
MIDI Settings window, you may experience a lack of synchronization between MASCHINE and the external MIDI Master. To compensate, you can
adjust this Sync Offset Slave value in milliseconds. An easy way to do that
is to play a 4/4 kick drum pattern or a metronome sound on both MASCHINE (see chapter ↑6.1.6, The Metronome on how to activate the Metronome) and the external MIDI Master and mix them together moving the
slider until they are played at exactly the same time. As soon as you can
hear a flanger-like effect, you know you are close to the correct Sync Offset
Slave value. Keep on adjusting the Sync Offset Slave control until you can
neither hear the flanging effect nor two separate signals.
Input Channel Use this to select the MIDI channel you want MASCHINE to receive MIDI
messages on. This can be used to limit MIDI input sent by the external
sync master device. The Omni setting will allow the MASCHINE software to
receive messages on all 16 channels at one.
Basic Concepts
Preferences
MASCHINE - Manual - 27
Page 28
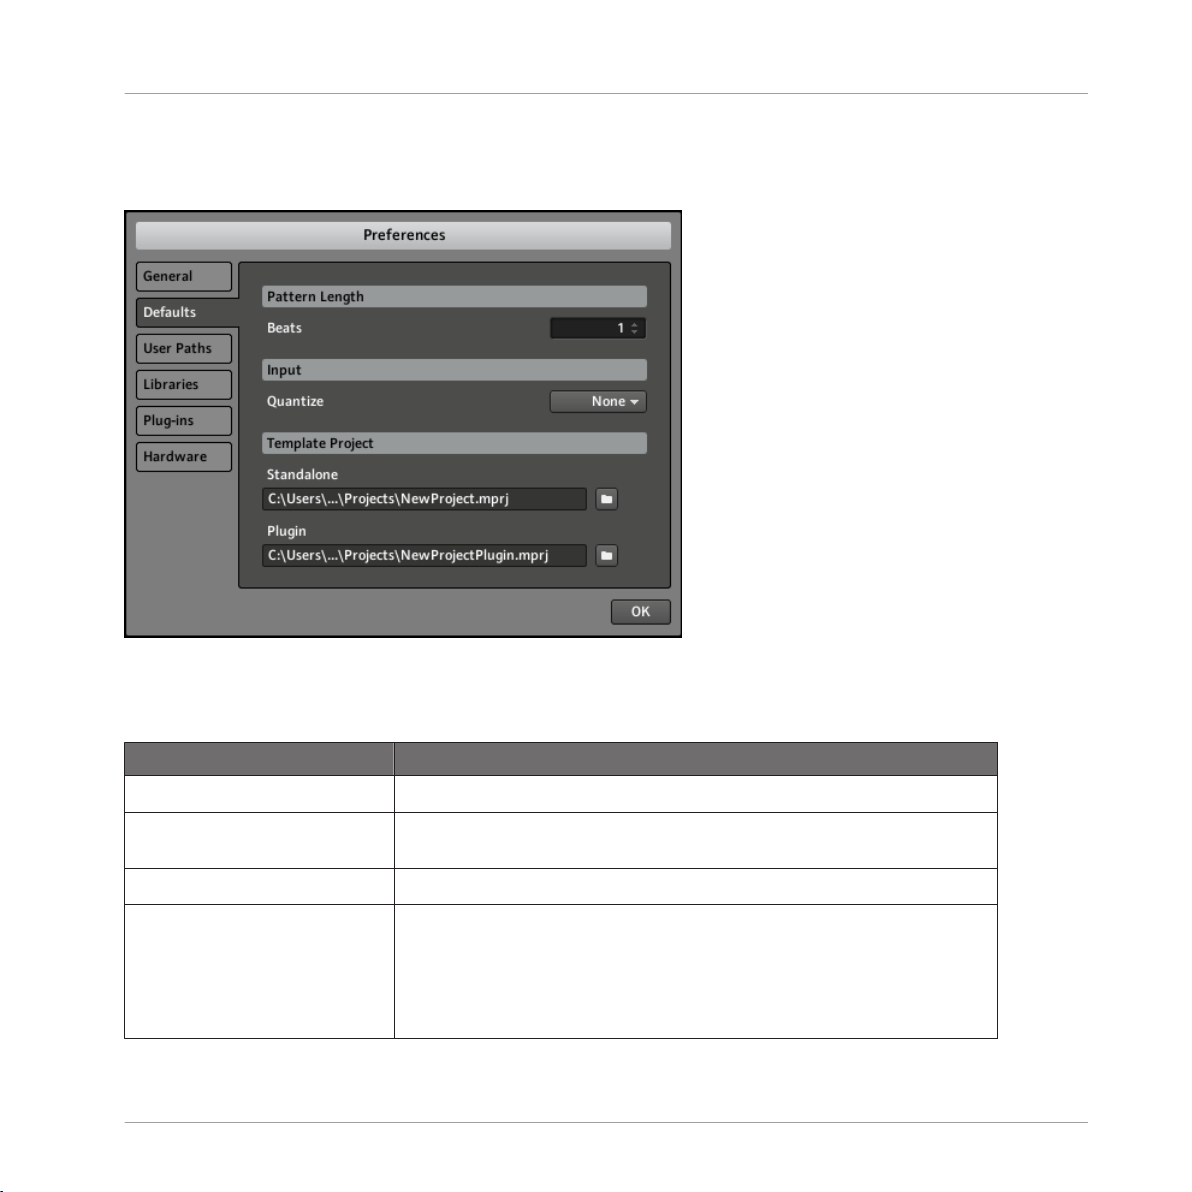
2.4.2 Preferences – Defaults Tab
Basic Concepts
Preferences
The Preferences – Defaults tab.
The Defaults tab allows you to define a few default settings that will be used for every new
Project.
Screen Element
Pattern Length
Beats Here you can define the default length of new Patterns. Select a value by
Input
Quantize This allows you to select one of the three quantize options:
Description
pressing your mouse button and dragging up or down.
None (no quantization),
Record (quantization only in Record mode) or
Play/Rec (quantization in Play and Record mode).
MASCHINE - Manual - 28
Page 29
Screen Element Description
Template Project
Standalone Here you can select a Project to load automatically when you start a new
project. The window displays the location of the Template Project currently
selected for use. Click the file icon to select the Template Project you
would like MASCHINE to load when used as a standalone. Any Project file
can be used as a template, this can be from the MASCHINE library or you
could create a file, for example with your preferred plug-ins and FX loaded
into the Module slots.
Plug-in Here you can select a Project to load automatically when you start a new
project within a Digital Audio Workstation. The window displays the location of the Template Project currently selected for use. Click the file icon
to select the Template Project you would like MASCHINE to load when it is
used as a plug-in. Any Project file can be used as a template, this can be
from the MASCHINE library or you could create a file, for example with
your preferred plug-ins and FX loaded into the Module slots.
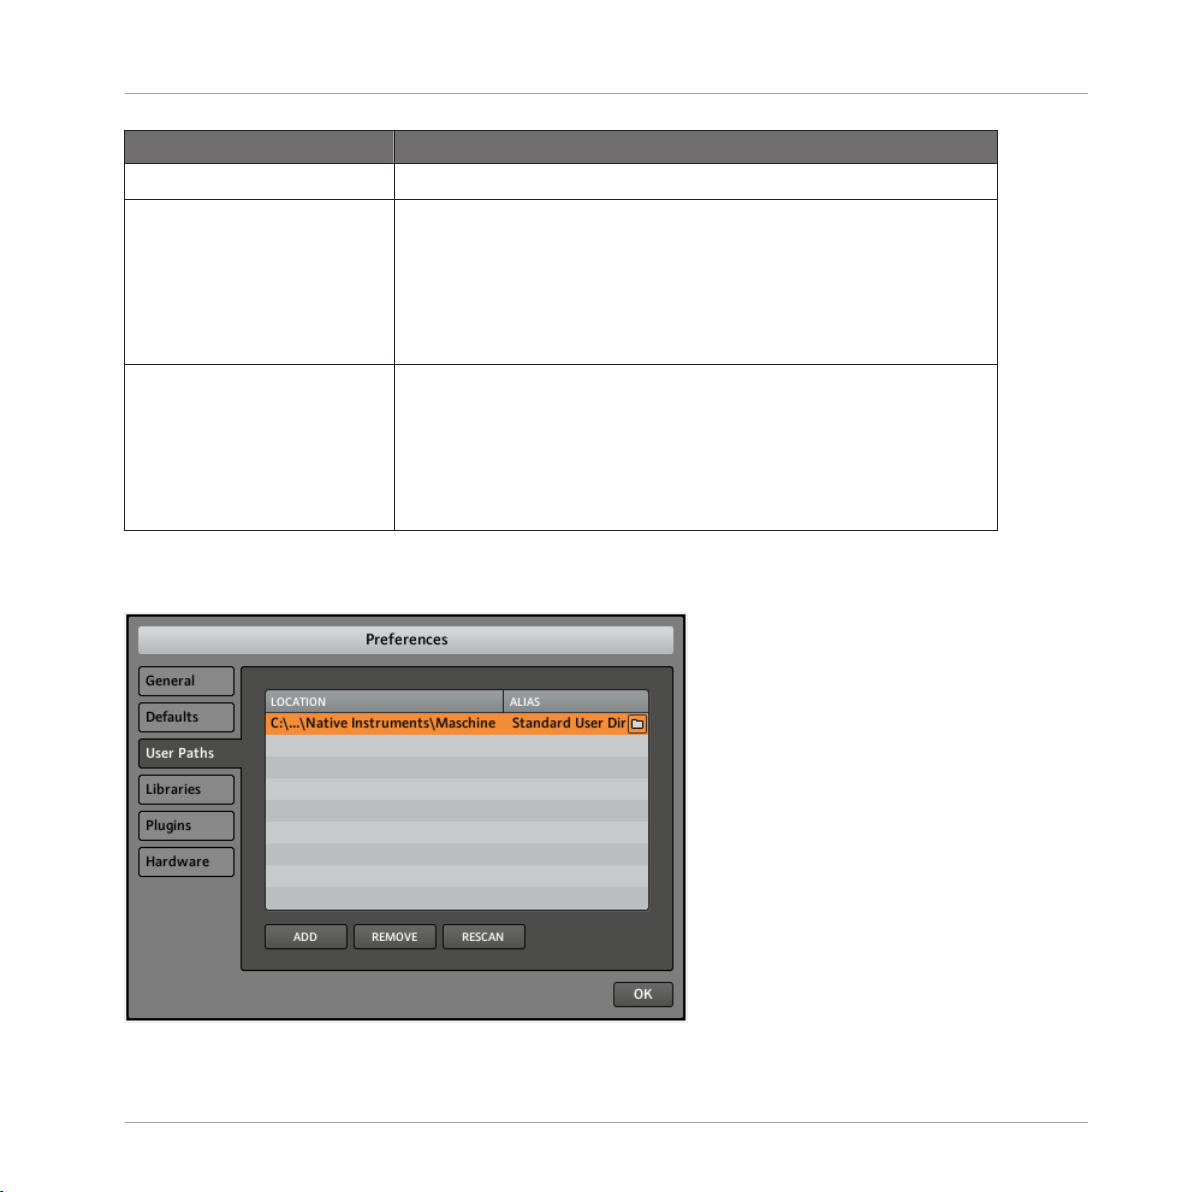
2.4.3 Preferences – User Paths Tab
Basic Concepts
Preferences
The Preferences – User Paths tab.
MASCHINE - Manual - 29
Page 30

Basic Concepts
The User Paths tab shows the locations of all MASCHINE files and Samples you have added to
the Library. By clicking on the folder icon to the right, you can change the path for example if
you moved your sample folder to another location.
Please consult chapter ↑3, Browser for more information on adding your own samples.
Screen Element Description
LOCATION Shows the path of your user content. Click the icon to change the path.
ALIAS ALIAS acts as a reference to the path in the LOCATION column. This is a
stand-in for any folder on your computer or removable drive and provides a
dynamic link to it. The path in the LOCATION column may be changed,
but the ALIAS column will still provide the link therefore avoiding the possibility of missing samples. The Alias also allows you to use a Project on
different computers even if the samples are stored in different locations.
After adding a Location, double-click the ALIAS column to set the Alias
name. The Alias of the first entry in the list, named 'standard user Directory' cannot be edited.
ADD Click ADD to manually add directories to the Library; keep in mind that
any MASCHINE-compatible files in those directories will not be tagged if
you add them like this (see the Browser chapter for more information on
importing and tagging your files). Paths to samples that you added via the
import function from the Browser will also show up here.
Preferences
REMOVE Click REMOVE to remove directories from the Library. Files will only be re-
moved from the MASCHINE Browser, not from your hard disk.
RESCAN If you have changed the content of the selected directory (such as added
or removed files), you should rescan it in order to let MASCHINE know
which files have been removed and/or added so that they show up in the
MASCHINE Library.
MASCHINE - Manual - 30
Page 31

2.4.4 Preferences – Libraries Tab
Basic Concepts
Preferences
The Preferences – Libraries tab.
Screen Element Description
RESCAN Click this button to rescan the MASCHINE Factory Library or other Libra-
ries from Native Instruments. This is useful if you have moved the Factory
Library to another hard drive or to another location on the same hard drive.
2.4.5 Preferences – Plug-ins Tab
LOCATIONS Section
In the LOCATIONS section of the Plug-ins tab, you can manage the storage folders of all the
plug-ins available. By clicking on the folder icon to the right of an entry, it is possible to
change the path of each plug-in directory.
MASCHINE - Manual - 31
Page 32

The Plug-ins tab's LOCATIONS section.
The LOCATIONS section also contains the following features:
Basic Concepts
Preferences
Screen Element Description
ADD Click ADD to manually add plug-in directories.
REMOVE Click REMOVE to remove directories.
RESCAN If you have changed the content of the selected directory (such as installed or re-
moved plug-ins), you should rescan your plug-in directories in order to keep the
list of available plug-ins up to date. RESCAN will check the integrity of your plugins and allow you to automatically detect plug-ins, that are added or removed, or
deselect any plug-ins that are not working correctly for any reason.
MANAGER Section
In the MANAGER section of the Plug-ins tab, you can enable or disable plug-ins, rescan plugin directories, and set default Module presets for plug-ins.
When a plug-in is disabled, it will not appear in the Module menus. If, for example, you do
not use VST plug-ins on a Mac, it could be useful to disable them so that these VSTs do not
appear in the list of loadable Modules.
MASCHINE - Manual - 32
Page 33

The Plug-ins tab's MANAGER section.
Screen Element Description
PLUG-IN Lists all available plug-ins. This includes all enabled or disabled 32-bit plug-ins,
when MASCHINE is running in 32-bit mode or otherwise all enabled or disabled
64-bit plug-ins, when MASCHINE is running in 64-bit mode.
Basic Concepts
Preferences
DEFAULT CONFIG You can set a default Module preset here, which will be loaded with this plug-in
when you load it from the Module browser on the hardware or the Module menu
of a Module slot. Use the SELECT button to set the default Module preset. The
default Module preset can also be set via the Module slot menu (Save As De-
fault…). If no default is set here, the parameters of this plug-in will be auto-mapped when loading it to a Module slot.
RESCAN If you have changed the content of the selected directory (such as installed or re-
moved plug-ins), you should rescan your plug-in directories in order to keep the
list of available plug-ins up to date. RESCAN will check the integrity of your plugins and allow you to automatically detect plug-ins, that were added or removed,
or deselect any plug-ins that are not working correctly for any reason.
CLEAR This removes the default configuration for the selected plug-in.
MASCHINE - Manual - 33
Page 34

Basic Concepts
Screen Element Description
SELECT This allows the selection of a default configuration for the selected plug-in.
Scan at startup Check this box to allow MASCHINE to automatically scan for new plug-ins on
start-up. Please be aware these scans increase start-up times. If you leave this
box unchecked, be sure to perform a manual scan using the RESCAN button
when new plug-ins are installed or plug-ins are removed.
64 BIT / 32 BIT Section
Displays 32-bit/64-bit plug-ins, that are identified by MASCHINE, but cannot be used in the
current bit-mode.
To check which bit mode you are currently running, open the About screen from MASCHINE's Help menu and see the Mode section in the upper right.
Preferences
The Plugins tab's 64 BIT / 32 BIT section (depending on the MASCHINE bit mode).
MASCHINE - Manual - 34
Page 35

Screen Element Description
PLUG-INS The plug-ins listed here are known to MASCHINE, but cannot be used in the cur-
rent bit-mode. This section is provided for information only. If MASCHINE is
used in 64-bit mode, only 32-bit plug-ins will be listed here and vice versa. If
you only have 32-bit or 64-bit plug-ins installed then no 64 BIT or 32 BIT tab
will be shown respectively.
If you plug a MASCHINE instance into your DAW, keep in mind that a 64-bit MASCHINE
plug-in will host 64-bit plug-ins only, as well as a 32-bit instance will allow only hosting of
32-bit plug-ins.
2.4.6 Preferences – Hardware Tab
Basic Concepts
Preferences
The Preferences – Hardware tab.
The Hardware tab enables you to customize how the pads react to your playing, and the brightness/contrast of the MASCHINE hardware controller displays.
MASCHINE - Manual - 35
Page 36

Audio and MIDI Settings
Screen Element Description
Pads
Sensitivity Slider Use the Sensitivity Slider to adjust how sensitive the pads respond to your
Velocity Scaling Velocity Scaling determines how your playing is translated into velocity val-
touch. This sets the minimum threshold at which MASCHINE hardware
controller will register a “hit.”
ues: starting from Soft 3 (a soft touch is enough to get a big velocity value)
through Linear to Hard 3 (you really have to hit the pad hard to get a big
velocity value).
Basic Concepts
Display
Brightness The Brightness Slider allows you to adjust the brightness of both Left and
Contrast Left & Right With these sliders you can adjust the contrast of the Left and right displays
right displays of the MASCHINE hardware controller.
separately.
Adjusting the Settings from the Hardware
You also have access to these settings from the MASCHINE hardware controller. To do this,
you first have to enter the MIDI mode by pressing SHIFT + CONTROL. In MIDI mode, press
SHIFT + Button 4 to show the Settings Display mode. In this mode, the left display gives you
access to all of the settings described above, with the exception of the Velocity Scaling. The
Knobs 1-4 allow you to adjust the Brightness, Pad Sensitivity, Contrast Left and Contrast
Right, respectively.
When you’re done, press SHIFT + CONTROL again to quit the MIDI mode and get back to Control mode.
2.5 Audio and MIDI Settings
► To open the Audio and MIDI Settings dialog, select the Audio and MIDI Settings… entry
from the File menu.
MASCHINE - Manual - 36
Page 37

2.5.1 Audio Tab
Basic Concepts
Audio and MIDI Settings
The Audio tab of the Audio and MIDI Settings dialog.
Screen Element
Description
Driver Select your audio driver here.
Device This allows you to choose available devices if you have connected more
than one audio interface.
Status This shows you whether your audio interface is currently running.
MASCHINE - Manual - 37
Page 38

Audio and MIDI Settings
Screen Element Description
Sample Rate The currently selected sample rate of your audio interface. Please restart
MASCHINE after changing the sample rate.
Latency Mac OS X: This slider allows you to adjust the latency of your audio inter-
face in samples. Lower values result in a more immediate playing response
but are heavier on both the CPU and the audio driver, and may result in
audible clicks and pops. Larger values are easier on the CPU, but introduce a larger latency (i.e., there may be a very small delay between when
you hit a pad and when you actually hear it). You should therefore experiment with this setting so that it is as low as possible without overloading
your CPU or introducing any audio artifacts.
Windows: When using an ASIO driver, the Audio and MIDI Settings dialog
shows an ASIO Config button instead of the Latency slider. Click this button to open the settings dialog of the selected ASIO driver.
2.5.2 Routing Tab
Basic Concepts
The Routing tab of the Audio and MIDI Settings dialog.
MASCHINE - Manual - 38
Page 39

Audio and MIDI Settings
Screen Element Description
Inputs By clicking on this button, you can define which two inputs on your audio
interface will be seen by MASCHINE. Select the Inputs of your audio interface on the right column by clicking on the fields: you will be presented
with a drop-down menu with all the available Inputs. The choices made
here will determine which Inputs can be used when sampling external
sources, for example.
Outputs By clicking on Outputs, you will be presented with a list of the eight stereo
outputs from MASCHINE: in the right column, you can assign them to the
outputs of your audio interface via a drop-down menu.
2.5.3 MIDI Tab
Basic Concepts
The MIDI tab of the Audio and MIDI Settings dialog (entries may vary on your computer).
MASCHINE - Manual - 39
Page 40

Connecting External MIDI Equipment
Screen Element Description
Inputs Clicking on Inputs displays a list of all the available MIDI Inputs of your
system. You can activate each Input by clicking in the Status column.
Outputs Clicking on Outputs displays a list of all the available MIDI Outputs of your
system. You can activate each output by clicking in the right column that
displays the current status of the corresponding port.
Offset Use the Offset control to compensate delay that may occur during MIDI
data transmission. Delayed MIDI clock data will cause external devices to
respond too late, thus making your track sound out of sync.
By adjusting the Offset value you can set an amount of latency to be compensated (in milliseconds). MASCHINE will then send MIDI clock events
ahead of time as defined.
2.6 Connecting External MIDI Equipment
Basic Concepts
MASCHINE's rear view.
To connect your external MIDI equipment, hook it up to the MASCHINE hardware controller’s
MIDI In or MIDI Out socket on the rear panel. If you connect a MIDI keyboard to the MIDI In,
you can directly play the currently selected Sound with it without having to set anything up.
You can also switch Scenes remotely by sending MIDI program change messages to MASCHINE. More on this in chapter ↑10, Creating a Song using Scenes.
MASCHINE - Manual - 40
Page 41

Basic Concepts
Connecting External MIDI Equipment
2.6.1 Sync to External MIDI Clock
MASCHINE can be controlled externally via MIDI Clock by any device that is capable of sending MIDI Clock. This could be hardware such as a drum machine, another groovebox or sequencer, or even another software sequencer. To enable this, select the Sync to External MIDI
Clock entry from the File menu:
Sync to External MIDI Clock activated.
If you use MASCHINE as a plug-in, it is automatically synced to the host application so you
don't have to activate External Sync!
You have to define at least one Input in the Audio and MIDI Settings’ MIDI tab to enable
External Sync.
If Sync to External MIDI Clock is checked, the play button on the MASCHINE header and on
the MASCHINE hardware controller are deactivated.
2.6.2 Send MIDI Clock
MASCHINE can also send a MIDI Clock signal to any device that is capable of receiving MIDI
Clock. This could be hardware such as a drum machine, another groovebox, or even another
software sequencer. To enable Send MIDI Clock, select it from the File menu:
MASCHINE - Manual - 41
Page 42

Send MIDI Clock activated.
Basic Concepts
Connecting External MIDI Equipment
MASCHINE - Manual - 42
Page 43

3 Browser
The Browser is the place where you can organize and categorize all of your Samples, Sounds,
Groups, Projects, Patterns, Instruments, and FX Presets. This is done by tagging them, which
means categorizing them by using keywords. Given that the MASCHINE software has some advantages over the hardware in this case, such as a very big screen and a QWERTY-keyboard, we
will start with the software first.
Browser
MASCHINE - Manual - 43
Page 44

3.1 Elements of the Browser
Browser
Elements of the Browser
The elements of the Browser.
(1) Disk button: Use the DISK button to switch between the Browser and access to your computer hard drives.
MASCHINE - Manual - 44
Page 45

Elements of the Browser
(2) File Type selector: This contains seven icons, each representing the different files types of
MASCHINE. From the left to right the file types are Project, Group, Sound, Pattern, Instrument, FX, and Sample. By clicking one of them it causes only the files of the selected type to
be displayed in the Search Result list.
(3) Tag Filter: The Tag Filter allows you to search for file types based on tags that have been
applied to them. You can quickly find files based on the Bank, Type and Subtype categories.
(4) Text search field: Use the text search field to quickly find files based on their name or tagged attribute. Select the type of file you are looking for from the File Type Selector and enter
the name or category of a file into the text search field to perform a search. Results are displayed in the search result list below.
(5) Search result list: The search result list (RESULTS) displays all files that match your query.
(6) Tag Editor: The Tag Editor allows you to edit Tags applied to files and add Tags to new files
from the three available categories.
(7) Audition Controls: This allows you to listen to Samples, Sounds, which can be listened to in
context with the rest of your Project while it is playing.
3.1.1 Disk Selector
Browser
The Disk Selector button when the Browser Library is selected.
The Disk Selector button when DISK is selected.
On the Browser , you can choose whether you want to browse the Library or access your disk
drives. Press the DISK button to toggle between Browser Library and hard disk content.
MASCHINE - Manual - 45
Page 46

3.1.2 File Type Selector
The File Type selector.
(1) Project: (.mprj)
(2) Groups: (.mgrp)
(3) Sounds: (.msnd)
(4) Patterns: (.mpat)
(5) Instruments: (.mfxp)
(6) FX Presets: (.mfxp)
Browser
Elements of the Browser
(7) Samples: (.wav, .aiff)
The File Type selector only appears by when you have selected the Library using the DISK button in the Browser Mode selector. On the File Type selector you will find 7 icons representing
the different file types of MASCHINE: Projects (1), Groups (2), Sounds (3), Patterns (4), Instruments (5) FX Presets (6) and Samples (7). By clicking on one of them will cause only the
files of the selected type to be displayed in the search result list (RESULTS). You may also
deactivate all of them to perform your search on all file types at once.
3.1.3
Tag Filter
As with the File Type selector, the Tag Filter only shows up when you have selected the Library
in the Browser Mode selector. Then it turns into the three category columns BANK, TYPE and
SUBTYPE.
MASCHINE - Manual - 46
Page 47

Elements of the Browser
The Tag Filter with the file type Sample selected.
Screen Element Description
BANK The BANK category is meant to define a basic structure. If you add a large
library with many types of Samples, this might be the place to put its
name.
TYPE The TYPE category is the first in the tag hierarchy of MASCHINE, and
should be used to categorize your file in a general way.
Browser
SUBTYPE With the SUBTYPE, you can narrow down the description of your file even
further.
3.1.4 Text Search field
The text search field.
In the text search field you can enter your search query. The search will be performed on the
file paths, the file name and the tags. If you want to search for a combination of two words
(e.g. “bass” and “analog”) just enter both words in the text search field with a gap in between.
As you start typing, the list of matches will start narrowing in the search result list (RESULTS).
To the right of it you will find the Reset switch that resets both text search and tag search.
MASCHINE - Manual - 47
Page 48

Elements of the Browser
3.1.5 Search Result List
The search result list (RESULTS) shows all the files that match your query. Double-clicking
one of the matches will load the respective file. Depending on what File type you have selected, the file will be loaded to different locations within MASCHINE:
Browser
The search result list showing Kicks from the MASCHINE Factory Library.
▪ If it is a Project it will load all associated files replacing all files currently in memory. A
dialog will appear asking you if you want to save changes to the currently loaded Project.
This is to prevent you from losing changes you performed on it by accidentally loading a
new Project without saving the old one.
▪ If it is a Group, it will be loaded into the Group slot currently in focus.
▪ If it is a Sound, it will be loaded into the Sound slot currently in focus.
▪ If it is a Pattern, it will be loaded into the Pattern slot currently in focus.
▪ If it is an Instrument, it can be loaded into Module 1 only of the selected Sound slot and
will replace the Sample, FX or Instrument currently loaded.
▪ If it is an FX Preset, it will be loaded into the selected Module replacing the current one.
MASCHINE - Manual - 48
Page 49

Elements of the Browser
▪ If it is a Sample, it will be loaded into the selected Zone of the Sound in focus replacing
the current one.
You can also load presets into specific Modules by dragging them from the Browser and
dropping them on the desired location.
3.1.6 Locating missing Samples
If you are loading a MASCHINE Project and the referenced samples cannot be found for any
reason, a dialog in which you can locate the missing samples will open.
The Missing Library dialog allows you to locate missing samples.
Browser
Sounds and Groups referencing missing samples are marked with an exclamation mark.
You can open the Missing Library dialog manually from the MASCHINE Plug-in menu. The
Purge Missing Samples and the Find Missing Samples… menu entries only show up in the
File menu when sample references cannot be resolved.
MASCHINE - Manual - 49
Page 50

Adding your Own Samples
The Purge Missing Samples and the Find Missing Samples… entries in the MASCHINE plug-in's File menu.
► Select Purge Missing Samples to remove all Sounds with missing samples from your MA-
SCHINE Project.
3.2 Adding your Own Samples
Apart from the huge Library, you might still want to use your own Samples. The supported file
types are Wav and Aiff. To be able to find them in the Browser from the hardware, you will
have to import them into the Library. Importing Samples does not mean they will be moved
from the directory they currently reside in, they will only be referenced by the Browser. That’s
why whenever you move Samples, make sure to update the paths to their respective directories
as described in chapter ↑2.4, Preferences. Click on DISK in the Browser Mode Selector and
you will be presented with a list of your hard drives:
Browser
MASCHINE - Manual - 50
Page 51

Adding your Own Samples
The Browser with DISK selected showing the available volumes.
In the tree view, choose the directory that contains your Samples. You can pre-listen the Samples automatically before loading them by activating the Audition function in the lower row of
the Browser:
1. Click on the Audition button (speaker symbol) to activate the Audition function.
2. Adjust the pre-listening volume by moving the volume slider to the right of the Audition
button.
Browser
From left to right: Swap button, Audition button, Volume slider, Import button.
MASCHINE - Manual - 51
Page 52

3.2.1 Importing a Sample Into the Library
Browser
Adding your Own Samples
Selecting a Sample on your hard drive.
After you have found your Sample, you can add it to the Library by clicking the IMPORT button. If you want to add multiple files at once, such as a folder of your favorite Samples, you
can select the whole folder and tag all files at once using the same dialog as when importing
single files. You can also make non-contiguous selections within a directory by clicking while
holding down the [Ctrl] key (Windows) or the [Cmd] key (Mac OS X). After pressing IMPORT,
MASCHINE - Manual - 52
Page 53

Adding your Own Samples
you will be presented with the Tag Editor to tag the Sample(s) you are about to import to the
Library. You can also apply/remove tags at any time, after they are imported. However, it may
be best to tag files on import, since it will make it easier to find them later.
Please be aware there is no UNDO/REDO commands available for Tagging.
3.2.2 Tagging your Groups, Sounds, Patterns, Instruments, FX Presets, and Samples
In the three category columns of the Tag Editor (Bank, Type and Subtype), select the tags you
want to apply to the Sample you are importing:
Browser
The Tag Editor with selected Tags (highlighted and check marked).
Make you are as precise as possible when tagging your files in order to be able to find what
you are looking for later.
You can add as many Tags to a file as you want to by clicking on them. A checkmark will appear next to the selected Tags. To remove the Tag from the Sample, click on it again. After you
have finished tagging, click the OK button to import the Sample to the Library and apply the
selected Tags. You can cancel the Import by clicking the Cancel button.
Adding New Tags
You can also add your own Tags. On the bottom of each of the three category columns in the
Tag Editor, there is an add new… entry:
MASCHINE - Manual - 53
Page 54

Adding a new Tag in the TYPE column.
To add a new Tag, click on this entry and enter the Tag name with your computer keyboard.
The new Tag will then be available in that Tag category.
Editing Tags
It's possible to edit existing Tags on the files in your Library. Click the file you want to edit and
the existing Tags for that file will appear in the search result list (RESULTS). Click the EDIT
button and select/deselect Tags by checking/unchecking the respective checkmarks next to
them.
You may also select multiple files and add or remove tags collectively.
Browser
Quick Browse
Deleting Tags
To delete a Tag from the Tag Editor, right-click (on Mac OS X: [Ctrl]-click) on the Tag to open
the delete menu. It is possible to delete multiple Tags by selecting them in the Tag Filter and
then right-click (on Mac OS X: [Ctrl]-click) on the selection to open the delete menu.
A deleted tag will be removed from all files. Once a tag is deleted it is not possible to undo
it!
3.3 Quick Browse
Quick Browse is a feature that allows you to quickly recall a search query you performed to get
to a given file. Let’s say you have loaded a Kick Sound after browsing the Library, then loaded
a Snare Sound to another Sound slot and now you realize you are not satisfied with that Kick
Sound, but you heard a nice Kick Sound just before you chose the current one. Normally you
would now have to try to remember the name or the Tags you used to find it, or browse all Kick
Sounds (given that the MASCHINE Library already has around 700 Kick Sounds, this may take
MASCHINE - Manual - 54
Page 55

a considerable amount of time). With Quick Browse you can restore the query with just one
click. Quick Browse is available in Module 1 (for Instruments, Sounds and Samples), in Module 2-4 (for FX), in the GROUP tab (for Groups), in the MASTER tab (for Projects).
3.3.1 Using Quick Browse
The Quick Browse function in the SOUND tab.
The Quick Browse function is activated by clicking on the Magnifier Tool next to the file name.
If you click on the Magnifier Tool, the search query for the currently selected file will be restored allowing you to choose other results for that query from the search result list. By using
the cursor keys on your computer keyboard, you can browse through files in the search result
list and they will be instantly loaded if In-Place Auditioning is activated (see below). The
Browser on the MASCHINE hardware controller always restores the search query you performed
to get a given file.
Browser
Quick Browse
3.3.2 In-Place Auditioning
To activate in-place auditioning, click the Swap button in the bottom row of the Browser which
will be highlighted:
Activating In-place Auditioning by clicking the Swap button.
In-place Auditioning is not only useful to look for an appropriate Sound, Group, FX or Sample, but can also be very inspiring: with a Pattern playing, browse through your Library with
In-Place Auditioning activated and listen to Sounds and Samples you normally would not use
in that context.
MASCHINE - Manual - 55
Page 56

The Browser on the Hardware
This allows you to listen to Samples, Sounds, Groups, and FX Presets which will be instantly
loaded and can be listened to in context with the rest of your Project while it is playing. To
deactivate this function, just click the Swap button in the bottom row of the Browser again.
You will still be presented with the Search Result list if you click on the Magnifier Tool next to
the file name in the respective Tab, but they will not be loaded automatically while browsing
them.
3.4 The Browser on the Hardware
In contrast to the software, the Browser on the hardware can only load files that have already
been added to the Library. You cannot directly access specific directories on your hard drives
with the Browser using the hardware. This is why you should always tag all your Samples and
import them to the Library using the software beforehand.
► To enter the Browser on the MASCHINE controller press BROWSE.
Browser
The Browser on the MASCHINE hardware controller displays with the SOUND tab in focus.
Filter
Dial Knob 1 to select a file type you are looking for. Depending on which of the Buttons 2-4
are selected (the picture above shows the Browser with Button 4, i.e. the Sound tab selected),
Filter will allow you to select compatible file types only:
Master Group Sound
Project
FX
Group
Patterns
FX
Sound
Instrument
FX
Sample
MASCHINE - Manual - 56
Page 57

The Browser on the Hardware
Tag Level Description
BANK The BANK category is meant to define a basic structure. Examples for the
BANK category from the Factory Library are DRUMS or ONE SHOTS or
FACTORY FX.
TYPE The TYPE category is the first in the tag hierarchy of MASCHINE and cate-
gorizes the file in a general way. Examples for the TYPE category from the
Factory Library are BRASS, ANALOG FX or KICK.
SUBTYPE With the SUBTYPE, you can narrow down the description of your file even
further. Examples for the SUBTYPE category are DJEMBE, GLITCH or AN-
ALOG.
The Browser on the hardware showing a search result list.
If you want to use your hardware a lot make sure to tag all the files you want to use extensively! This makes it a lot easier to access them using the hardware.
Browser
You can browse through the search result list by turning Knob 5; once you want to load a file,
press Button 8. Buttons 5 and 6 allow you to directly load the next or the previous file from
the search result list in order to be able to compare them easily (just like In-Place Auditioning
on the software).
MASCHINE - Manual - 57
Page 58

4 Sound Slots
A Sound can hold up to four modules which can be configured as a Sampler, VST/AU Plug-in
Instrument or FX, internal MASCHINE FX, as well as an external Input, or a MIDI Out module.
Each Sound of the selected Group is mapped to one of the 16 pads on the MASCHINE hardware controller, so you can play the Sounds by pressing the pads.
Sound Slots
Sound slots in MASCHINE.
A Sound slot in MASCHINE can be configured to:
▪ act as a Sampler (Sampler)
▪ be a bussing point for an internal or external signal (Input)
▪ act as a MIDI Out module (MIDI Out)
MASCHINE - Manual - 58
Page 59

Defining a Sound Slot's Role
▪ host VST/AU instruments (Plug-ins)
▪ host internal MASCHINE effects and VST/AU effects (FX)
In MASCHINE terminology, the above are called sources.
Using a Sound slot as a Sampler, you can fill it with either one audio file (a Sample in MASCHINE terminology), or with multiple audio files mapped across the keyboard. Using it as
an effect source, you could for example make it a send effect for other Sounds, or even route
external audio signals through a given Sound slot.
This configuration takes place in the first Module slot (there are four available per Sound slot).
Sound Slots
Modules 1-4 for Sound slot 2.
4.1 Defining a Sound Slot's Role
The Control area contains four Modules per Sound slot. The Modules handle the sources in the
following way:
▪ Module 1 can host all sources (sampler, input, MIDI out, VST/AU instrument plug-ins,
MASCHINE FX and VST/AU plug-in effects).
▪ Module 2, 3, and 4 can only host effects (MASCHINE FX and VST/AU plug-in effects).
The following list explains the available sources in more detail:
MASCHINE - Manual - 59
Page 60

Defining a Sound Slot's Role
▪ Sampler: allows the selected Sound slot to play back Samples. This is the most common
source type, as adding a Sample to the Sound slot will automatically set the source to
Sampler. The Sampler can only be used in Module 1 of a Sound.
▪ Input: this allows the selected Sound slot to be available as a bussing point for external
and internal signals. Input can only be used in Module 1 of a Sound.
▪ MIDI Out: allows you to use a Sound to send MIDI notes to your host application or your
external MIDI equipment. MIDI Out can only be used in Module 1 of a Sound.
▪ Plug-ins: allows the use of external plug-ins from Native Instruments and third-party man-
ufacturers. Plug-in Instruments can only be used in Module 1 of a Sound.
▪ FX: allows the use of internal MASCHINE effects or external plug-in effects from Native
Instruments and third-party manufacturers. The Sound slot will be available as a bussing
point for internal signals. Internal MASCHINE effects and Plug-in effects can be used in
all four modules of a Sound.
If you use the MIDI Out Module in slot 1, slots 2-4 will not be effective.
You can sample directly to a Sound slot (read chapter ↑10.7, Triggering Scenes via MIDI for
more details on this), or use it to send MIDI notes (see section ↑4.10.3, MIDI Output from
Sounds).
Sound Slots
4.1.1 Selecting a Source using the Hardware
To select a source on the MASCHINE hardware controller:
1. Press the CONTROL button to enter the Control mode.
2. Press the pad you want to load the instrument to.
3. Press Button 3 to put the focus on the Sound tab.
4. Make sure MODULES is activated to show Module slots 1 to 4 (Button 4).
5. Press Button 5 to select Module slot 1.
6. Press SHIFT + BROWSE to select an internal Sound source. On the left display, change
the TYPE to INTERNAL using Knob 1.
7. Using Knob 2, set the SUBTYPE entry to INSTRUMENT or FX. The right display now
shows the list of the available internal sources.
8. Turn Knob 5 to browse the available internal sources.
MASCHINE - Manual - 60
Page 61

Defining a Sound Slot's Role
9. If you want to load a plug-in INSTRUMENT or FX change the TYPE to PLUG-IN.
10. Once again, using Knob 2, set the SUBTYPE entry to INSTRUMENT or FX. The right display now shows the list of available the available plug-in sources.
11. Turn Knob 5 to browse the available sources.
12. When you have found the instrument plug-in you want to use, press Button 8 to load it.
4.1.2 Selecting a Source using the Software
The Control area contains four Module slots on each Sound. In the software, click the Arrow in
the header of Module 1:
Click on the little arrow in the header of Module 1 to choose the source to use for that Sound.
Now you will be presented with the Module menu where you can select a source as listed
above.
Sound Slots
In the following section, we will concentrate on the Sampler mode which is probably the one
you will use the most.
For information on working with internal MASCHINE effects and Plug-in effects please refer
to ↑9, Using FX.
4.2 The Sampler Parameters in Module 1
The Sampler Parameters offer various ways to further shape each of your Sounds individually.
You can tune, change basic dynamics and apply effects as well as different modulation options. Not only are these parameters automatable but they were designed to be tinkered with!
See chapter ↑6.1.10, Recording Automation for the hardware and chapter ↑7.2.5, Recording
and Editing Automation for the software.
MASCHINE - Manual - 61
Page 62

The Sampler Parameters in Module 1
Sampler Parameters are not available for VST/AU Plug-ins.
The Sampler Parameters are organized in 6 pages:
▪ Page 1: Voice Settings, Pitchbend and Engine Settings
▪ Page 2: Pitch/Gate and Amplitude Envelope
▪ Page 3: FX and Filter Settings
▪ Page 4: Modulation Envelope and Destination
▪ Page 5: LFO and Destination
▪ Page 6: Velocity Destination and Modwheel Destination
Hardware
► On your MASCHINE hardware controller, use the Page buttons to step through the various
parameter pages.
Sound Slots
On the MASCHINE controller, step through the pages by pressing the Page buttons.
Software
► In the software, use the Parameter Page selector to step through Parameter pages.
MASCHINE - Manual - 62
Page 63

In the software, step through Parameter pages by clicking the Parameter Page selector's arrow button.
4.2.1 Page 1: Voice Settings and Engine
Sampler VOICE SETTINGS on the hardware.
Sound Slots
The Sampler Parameters in Module 1
Sampler Voice Settings on the software.
Screen Element Description
Voice Setting Controls
Polyphony Here you can define a voice limit for the Sound. The default value is 8, the
minimum 1 and the maximum 32 voices. You can also set this to Legato.
MASCHINE - Manual - 63
Page 64

The Sampler Parameters in Module 1
Screen Element Description
Choke Group You can choose one of the 8 Choke Groups here or leave this option set to
Off. If you assign more than one Sound to the same Choke Group, they will
cancel each other out. This is a behavior you can find in vintage drum machines (typically used to “choke” the open hi-hat with the closed one), but
also in monophonic synthesizers that are only capable of playing one note
at a time.
Glide If Legato is selected, this allows for a portamento effect between consecu-
tive steps.
Pitchbend Here you can adjust how the Sound reacts on incoming MIDI Pitchbend
messages from an external MIDI controller or your host application. For
more information on how to setup your Sounds to receive MIDI, refer to
section ↑4.10.1, Sound MIDI Batch Setup.
Sound Slots
Engine Controls
Mode This allows you to determine the mode of the sampling engine. Available
options are Standard and Vintage.
Model If you choose Vintage in Mode, you can select between two Models, which
emulate the sound of the MPC60 and SP1200. The sonic characteristics
of these legendary Samplers are often used in Hip-Hop and similar genres
of music.
Filter If you choose S1200 (see above), you can further shape the emulation by
activating a filter here. The available filters are: None (no filter), Low, Lo-
Mid, Hi-Mid, and High.
4.2.2 Page 2: Pitch/Gate and Amplitude Envelope
Sampler PITCH / GATE on the hardware.
MASCHINE - Manual - 64
Page 65

Sampler Pitch / Gate on the software.
Sound Slots
The Sampler Parameters in Module 1
Pitch/Gate Controls
Tune Defines the basic pitch of your Sample: turn the knob to the right for a
Start Determines the start point of the Sample (can also be modulated with Ve-
Reverse If Reverse is activated, the Sample will be played backwards.
higher pitch and to the left for a lower pitch.
locity control see ↑4.2.6, Page 6: Velocity Destination and Modwheel Des-
tination).
Amplitude Envelope
The Amplitude Envelope allows you to tailor your Sample in terms of its loudness over time.
There are three different types of Amplitude Envelope:
Oneshot mode activated.
Oneshot: This is typical vintage drum machine behavior: the sample is played in its entirety
from beginning to end with no envelope.
If Oneshot is activated, the following parameters will not be available!
MASCHINE - Manual - 65
Page 66

The Sampler Parameters in Module 1
AHD mode activated.
AHD: AHD mode disables the Sustain and Release controls, and replaces them with the Hold
parameter. AHD mode is ideal for “fire and forget” behavior, whereby you would like to have
the sound trigger for a certain amount of time regardless of how long you hold the pad down.
ADSR mode activated.
ADSR: Typically, the ADSR envelope is used for longer, sustained Samples that require complex dynamic control.
Sound Slots
Unlike many other hardware devices, the pads on MASCHINE are sensitive not only to being
hit, but also to being held — so using the ADSR envelope, you can make the pads behave
like a MIDI keyboard and sustain a note only for as long as it is held down.
Amplitude Envelope Controls
Attack Attack determines how quickly the Sound reaches full volume after being
Hold Hold determines how long the envelope will stay at its maximum level.
Decay Decay determines how fast the envelope drops to the Sustain level in
triggered.
ADSR mode; in AHD-mode, it is used to adjust how fast the Sound dies
down. This parameter can be modulated by Velocity.
MASCHINE - Manual - 66
Page 67

Sound Slots
The Sampler Parameters in Module 1
Amplitude Envelope Controls
Sustain Sustain determines the constant level being kept after Decay until the note
Release Release determines how long the sound takes to fade out after the note
ends. This can also be controlled by an external MIDI controller or keyboard using MIDI CC 64.
has ended.
4.2.3 Page 3: FX and Filter Settings
Sampler FX settings on the hardware.
Sampler FX settings on the software.
FX
This is a small selection of basic FX, not to be mixed up with the FX section covered in depth
in chapter ↑8, The Effects Overview.
FX Controls
Comp Basic compressor allowing you to give a Sound more density.
Drive Defines the amount of saturation applied to a Sound.
SR SR stands for sample rate: you can use it to lower the original sample rate
Bits Allows you to lower the original bit rate of the Sound, resulting in a more
in order to make the Sound more lo-fi.
rough, digital sounding lo-fi effect.
MASCHINE - Manual - 67
Page 68

The Sampler Parameters in Module 1
Filter Modes
The Mode menu in the Filter section gives you access to a set of different filters. Using the
arrows you can choose from different filter type settings: Off, HP2, BP2, LP2, and EQ. Each
type results in different parameters to the right of it:
Sound Slots
Filter Controls
LP2 LP2 is a low-pass filter with Cutoff and Resonance. Cutoff can be modulat-
BP2 BP2 is a band-pass filter with Cutoff. Cutoff can be modulated by Velocity,
HP2 HP2 is a high-pass filter with Cutoff and Resonance. Cutoff can be modu-
EQ The EQ is an equalizer with Frequency, Bandwidth and Gain.
ed by Velocity, the Modulation Envelope, the LFO or the MIDI Modulation
Wheel.
the Modulation Envelope, the LFO or the MIDI Modulation Wheel.
lated by Velocity, the Modulation Envelope, the LFO or the MIDI Modulation Wheel.
4.2.4 Page 4: Modulation Envelope and Destination
Sampler MODULATION ENVELOPE on the hardware.
Sampler Modulation Envelope on the software.
MASCHINE - Manual - 68
Page 69

The Sampler Parameters in Module 1
Modulation Envelope
The Modulation Envelope offers an envelope that shapes the modulation you apply to your
Sound. Its parameters are matched to those of the Amplitude Envelope on page 2, so that you
have either an ADSR (Attack, Decay, Sustain, Release) envelope or an AHD (Attack, Hold, Decay) envelope to control your modulations. If you choose Oneshot mode, only the AHD envelope (pictured) will be available for modulation.
Sound Slots
Modulation Envelope Controls
Attack The time it takes for the envelope to reach its maximum level.
Hold How long the envelope will stay at its maximum level.
Decay With Decay you adjust how fast the envelope drops to the sustain level in
Sustain The envelope level that will be maintained as long as the note is played.
Release The time for the sustain level to return to zero after the note has ended.
ADSR mode; in AHD-mode it is used to adjust how fast the envelope fades
out.
Destination
This is where you define modulation targets for the Modulation Envelope. Available targets are:
▪ Pitch, located on Sampler Parameter page 2
▪ Cutoff, located on Sampler Parameter page 3
▪ Drive, located on Sampler Parameter page 3
▪ Pan, located on Output Parameter page 1
4.2.5 Page 5: LFO and Destination
Sampler LFO on the hardware.
MASCHINE - Manual - 69
Page 70

The Sampler Parameters in Module 1
Sampler LFO on the software.
LFO
The LFO (Low Frequency Oscillator) is another modulation source based on waveforms with
different shapes.
Sound Slots
LFO Controls
Type Here you can choose the shape of the LFO waveform. Available shapes are
Speed Controls the speed of the LFO measured in Hz (Hertz). If you choose to
Phase Defines the initial phase of the LFO waveform, expressed as a percentage.
Sync This button is used to activate synchronization of the LFO to the tempo of
Sine, Tri (Triangle), Rect (Rectangle), Saw, and Random.
synchronize the Speed by activating Sync, it will show musical values instead.
your Project. If enabled, the values on the Speed parameter will change into rhythmical values ranging from 16/1 (= one modulation cycle in 16
bars) to 1/32 (one modulation in 1/32nd note).
Destination
This is where you define up to four modulation targets for the LFO:
▪ Pitch, located on Sampler Parameter page 2
▪ Cutoff, located on Sampler Parameter page 3
▪ Drive, located on Sampler Parameter page 3
▪ Pan, located on Output Parameter page 1
MASCHINE - Manual - 70
Page 71

4.2.6 Page 6: Velocity Destination and Modwheel Destination
Sampler VELOCITY DESTINATION on the hardware.
Sampler Velocity Destination on the software.
Velocity Destination
Sound Slots
The Sampler Parameters in Module 1
Velocity Destination Controls
Start This is a built-in modulation source that allows you to modulate the sam-
ple Start parameter on page 2 based on the input velocity. Positive values
shift the sample start position later in time as you play harder, negative
values shift it closer to the beginning of the sample as you play harder.
Tip: a typical example for this parameter is setting it so that the initial attack transient of a snare drum is heard only at high velocity values. This
makes it sound “snappier” when you play hard, and “mushier” or muted
when you play softly.
Decay This allows you to modulate the Decay parameter of the Amplitude Enve-
lope on page 2 by using Velocity.
Cutoff This allows you to modulate the Cutoff parameter of the Filters with filter
types LP, HP, BP (on page 3).
Volume This allows you to modulate volume, which is what Velocity normally is
used for.
MASCHINE - Manual - 71
Page 72

Modwheel Destination
Sound Slots
Loading an Instrument Plug-in
Modwheel Destination Controls
Start Here you can determine how incoming MIDI Modulation Wheel data affects
Cutoff This allows you to modulate the Cutoff parameter of the Filters with filter
LFO Depth Here you can adjust the effect of the MIDI Modulation Wheel data on the
Pan Another modulation target for the MIDI Modulation Wheel: the panorama
the Start parameter on page 2.
types LP2, BP2, HP2 (on page 3) using the MIDI Modulation Wheel.
LFO Depth of the LFO on page 5.
position on Output Parameter page 1.
4.3 Loading an Instrument Plug-in
To load a Plug-in Instrument we must be at the Sound level, where there are four Module slots
available. Module slot 1 can host either source Modules or effect Modules. Module slots 2, 3
and 4 can host effect Modules only (of course you can put an effect Module behind a source
Module and add them in series) but more on using effects in the next chapter. For now, lets
load an instrument plug-in to a Sound slot:
Hardware
1. Press the CONTROL button to enter the Control mode.
2. Press the pad you want to load the instrument to.
3. Press Button 3 to put the focus on the SOUND tab.
4. Make sure MODULES is activated to show Module slots 1 to 4 (Button 4).
5. Press Button 5 to select slot 1.
6. Press SHIFT + BROWSE to select the sound source. On the left display, change the TYPE
to PLUG-IN using Knob 1.
MASCHINE - Manual - 72
Page 73

Loading an Instrument Plug-in
7. Using Knob 2, set the SUBTYPE entry to INSTRUMENT. The right display now shows the
list of available instrument plug-ins.
8. Turn Knob 5 to browse the available instruments.
9. When you have found the instrument plug-in you want to use, press Button 8 to load it.
10. Press the CONTROL button to switch back to Control mode.
11. Now you can try out the instrument plug-in by playing the pad.
12. Edit the plug-in parameters using the Knobs 1-8.
13. Press the Page buttons to step through the Parameter pages of the plug-in.
Sound Slots
To play the instrument plug-in chromatically using the pads on the MASCHINE hardware;
press SHIFT then press the PAD MODE (KEYBOARD) button to quickly toggle to Keyboard
mode.
Software
1. Click on the SOUND tab to switch to the Sound level.
MASCHINE - Manual - 73
Page 74

Loading an Instrument Plug-in
2. Click on the Sound slot you want to load an instrument to.
3. Click on the first Module slot (only Module slot 1 can host instrument plug-ins) and click
the drop-down arrow at the right end of it.
Sound Slots
MASCHINE - Manual - 74
Page 75

Loading an Instrument Plug-in
4. Select Plug-ins from the menu to get a list of all available instrument plug-ins.
As an example: let’s choose the Native Instruments KONTAKT plug-in. After selecting it
5.
with the mouse, KONTAKT will be loaded, and its parameters will be displayed on the parameter area of the Module tab: Now you can try out the instrument plug-in by pressing
the pad.
Sound Slots
6. Choose different Parameter pages via the Parameter Page selector by clicking the triangle
on the top left side of the Parameter area.
7. If you find a good sound setting, save it as a preset as described in section ↑4.4.2, Page
2: Pre Mix Options.
To play the instrument plug-in chromatically using the pads on the MASCHINE MIKRO hardware controller; press SHIFT then press the PAD MODE button to quickly toggle to Keyboard
mode.
MASCHINE - Manual - 75
Page 76

Loading an Instrument Plug-in
4.3.1 Opening and Closing Plug-in Windows
You can open floating windows for all plug-ins of a MASCHINE project. MASCHINE will always
show the open floating windows of the selected Sound, Group or the Master at a time.
Sound Slots
MASCHINE with GUITAR RIG and MASSIVE plug-in user interfaces opened.
You can open or close floating windows for plug-ins as described in the following.
Software
When a plug-in has been assigned to a Module slot, the plug-in icon will appear in the Quick
Browse area.
MASCHINE - Manual - 76
Page 77
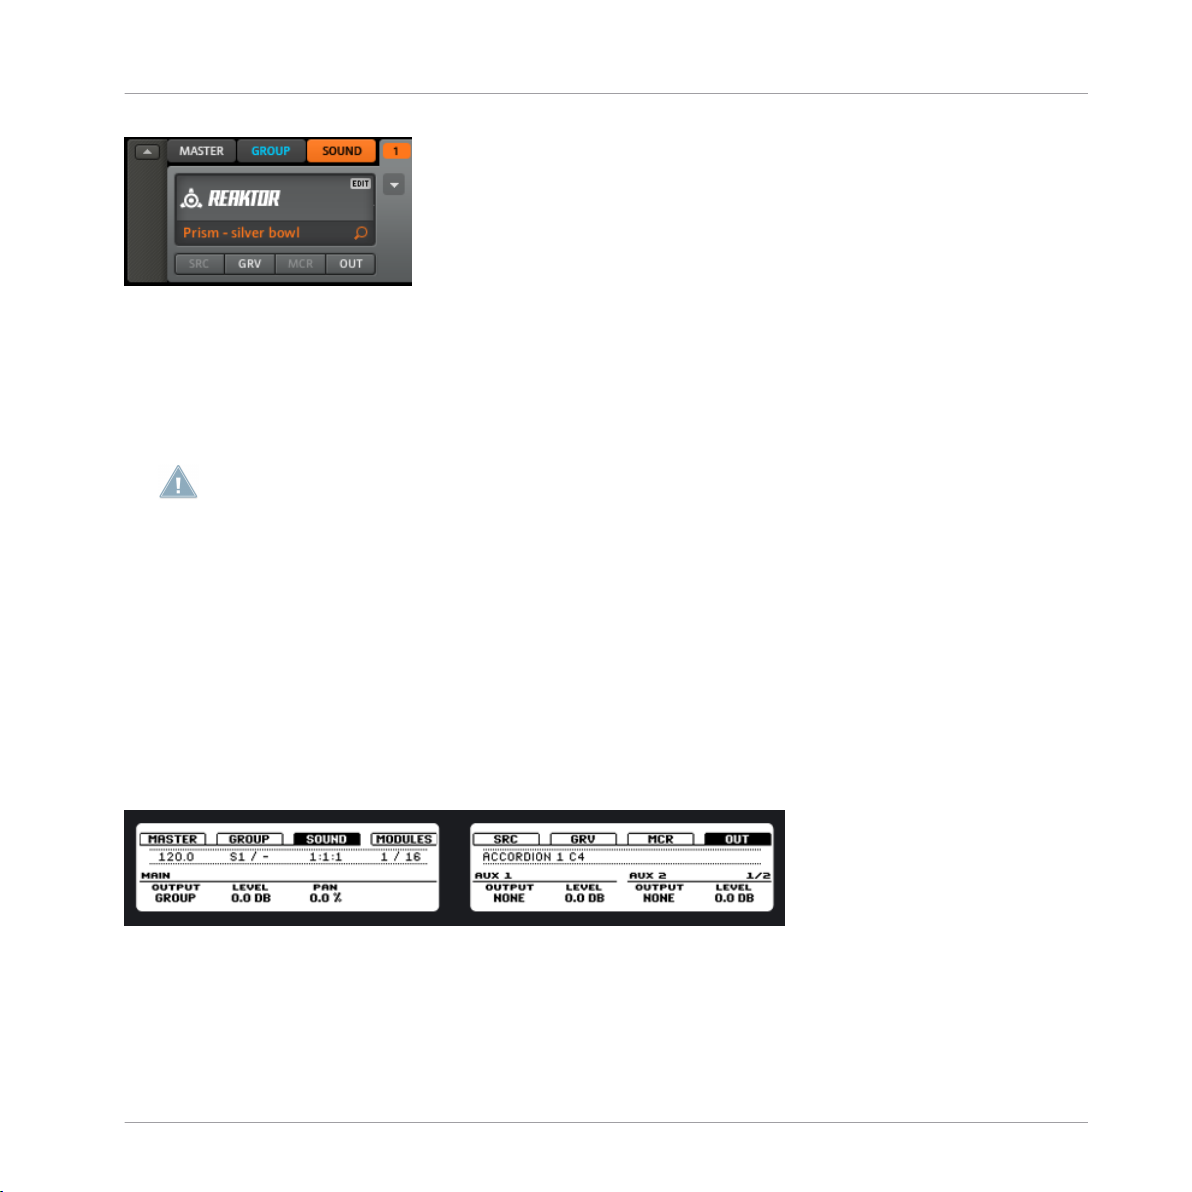
The Sampler Parameters in the Sound’s Output Tab (OUT)
An edit icon appears when the mouse curser is placed over the REAKTOR logo.
To open a floating window for the plug-in:
1. Place your mouse cursor over the plug-in icon; an EDIT button appears.
2. Click the EDIT button to open the plug-in in a separate floating window. A second click on
the EDIT button will close the plug-in window.
This feature is currently not available from the MASCHINE hardware controller, please use
the MASCHINE software instead.
4.4 The Sampler Parameters in the Sound’s Output Tab (OUT)
The Sound’s Output tab allows you to route your Sound and define Aux sends. Aux sends allow
you to send a definable amount of your Sound to other Groups or Sounds for further processing. Read the chapter ↑9.9, Creating a Send Effect to get to know more about how to set up a
classic send effect.
Sound Slots
4.4.1 Page 1: Main, Aux 1 and Aux 2
Page 1 of 2 from the Sampler Output tab on the hardware.
MASCHINE - Manual - 77
Page 78

Page 1 of 2 from the Sampler Output tab on the software.
Main
Sound Slots
The Sampler Parameters in the Sound’s Output Tab (OUT)
Main Output Controls
Output This is used to define where you want to send your Sound. Available op-
Level Here you adjust the overall volume level of your Sound.
Pan Defines the pan position of your Sound in the stereo field.
If MASCHINE is running as a plug-in, the External Outputs will correspond to virtual outputs
in your host. This allows you to send individual Sounds from MASCHINE to their own mixer
channel within your DAW, for example.
tions are Master, Group, any other Sound within the Project whose Source
type is set to Input, the External Outputs 1-8, and None.
Aux 1
Aux 1 Controls
Destination The destination for Aux 1: available destinations are Master, Group, all
Level Here you adjust the level of the signal that gets sent to the Aux 1 destina-
Sounds with Input enabled, the External Outputs 1-16 and None.
tion.
Aux 2
Aux 2 Controls
Destination The destination for Aux 2: available destinations are Master, Group, all
Sounds with Input enabled, the External Outputs 1-8 and None.
Level Here you adjust the level of the signal that gets sent to the Aux 2 destina-
tion.
MASCHINE - Manual - 78
Page 79

The Sampler Parameters in the Sound’s Output Tab (OUT)
4.4.2 Page 2: Pre Mix Options
Page 2 of 2 from the Sampler Output tab on the hardware.
Page 2 of 2 from the Sampler Output page on the software.
Aux Mode Parameter Description
Pre Mix 1 If this is enabled, the Sound will be fed into Aux 1 before Main Level and
Pan of the Sound.
Sound Slots
Pre Mix 2 If this is enabled, the Sound will be fed into Aux 2 before Main Level and
Pan of the Sound.
4.5 Saving a Sound
To save a Sound, right-click (on Mac OS X: [Ctrl]-click) on the Sound slot in the Arranger and
select Save As… from the drop-down menu:
MASCHINE - Manual - 79
Page 80

Saving a Sound.
The Sound will be added to the Library and is ready to be tagged.
Saving a Sound is only available in MASCHINE software. Once a Sound is saved and tagged,
it is available from the Browser for use in other Groups and Projects.
4.6 Copying and Pasting Sounds
Sound Slots
Copying and Pasting Sounds
Hardware
To copy a Sound from one pad to another, press DUPLICATE, press the pad of the Sound you
want to copy, then select your target Sound slot (this can also be in another Group, in this case
first hold press one of the Group buttons) by pressing its pad. All parameters of the Sound will
be copied including the source’s Pattern content.
To duplicate Sounds excluding the Pattern content, disable the EVENTS option (Button 2)
on the Duplicate Screen.
Software
You can copy and paste Sounds by right-clicking (on Mac OS X: [Ctrl]-click) on the Sound slot.
In the drop-down menu, choose Copy to copy a Sound. To paste the Sound, select an empty
Sound slot by right-clicking (Mac OS X: [Ctrl]-click) on it and then select Paste from the dropdown menu. All parameters of the Sound will be copied except for the source’s Pattern content.
MASCHINE - Manual - 80
Page 81

Resetting a Sound
Copying a Sound.
4.7 Resetting a Sound
Resetting a Sound results in removing its associated Sample(s) and FX as well as putting all
Sampler Parameters back to their default value.
Sound Slots
Hardware
► Hold SHIFT + ERASE and then touch the pad corresponding to the Sound to be reset.
Software
► To reset a Sound, right-click (on Mac OS X: [Ctrl]-click) the Sound slot and choose Reset
from the drop-down menu.
MASCHINE - Manual - 81
Page 82

Resetting a Sound.
4.8 Mute and Solo
Muting is used to bypass the audio signal of either a Sound or a Group, whereas Solo is pretty
much the opposite: it mutes all other Sounds and Groups, so that you can listen to the selected Sound or Group alone. The combination of both is a useful means to play live and to test
different sequences together.
Sound Slots
Mute and Solo
4.8.1 Hardware
Soloing Sounds and Groups
► Press SOLO and hold it: now you can solo Sounds by pressing their pads, and Groups by
pressing the corresponding Group buttons.
Solo is a temporary mode, therefore you will have to hold SOLO to access it. If you press SOLO
and Button 1 at the same time, the Solo function gets locked, e.g. you stay in Solo mode until
you press SOLO again. There are two more functions in the Solo mode: ALL ON (press Button 3) to turn all Sounds on and NONE (press Button 4) to turn all Sounds of the Group currently in focus off.
MASCHINE - Manual - 82
Page 83

The Solo Screen on the hardware.
Muting Sounds and Groups
Mute works in the same way as the Solo mode: hold MUTE to mute Sounds by pressing their
respective pads, and Groups by pressing the Group buttons. You can also lock the Mute function by pressing MUTE and Button 1 at the same time and unlock it by pressing MUTE again.
Like in the Solo mode, there are two more functions in the Mute mode: ALL ON (press Button 3) to turn all Sounds on and NONE (press Button 4) to turn all Sounds of the Group in
focus off.
Since pressing SOLO mutes all sounds except one, the MUTE button can be used to “release” Sounds that have been muted. You can use this technique to create a breakdown: Solo a given sound such as a kick drum, then build the track up again by bringing the muted
sounds back in one at a time with the MUTE button.
Sound Slots
Mute and Solo
The Mute Screen on the hardware.
4.8.2 Software
Soloing a Sound
► To solo a Sound, right-click (on Mac OS X: [Ctrl]-click) on the pad icon in the Pattern Editor.
MASCHINE - Manual - 83
Page 84

Soloing the Kick Sound.
► To unsolo a Sound, right-click (on Mac: [Ctrl]-click) on the pad icon again.
Soloing a Group
► To solo a Group, right-click (on Mac OS X: [Ctrl]-click) on the Group icon in the Arranger:
Sound Slots
Mute and Solo
Soloing a Group.
► To unsolo a Group, right-click (on Mac OS X: [Ctrl]-click) on the Group icon again.
Muting a Sound
► To mute a Sound, click on the pad icon in the Pattern Editor.
Muting a Sound.
MASCHINE - Manual - 84
Page 85

Loading REX Files
► To unmute the Sound, click on the pad icon again.
Muting a Group
► To mute a Group, click on the Group icon in the Arranger:
Muting a Group.
► To unmute the Group, click on the Group icon again.
4.9 Loading REX Files
MASCHINE supports REX (ReCycle) files to be loaded. REX files are loops that are already
sliced and mapped to MIDI notes.
Sound Slots
Only REX2 files are currently supported.
A REX file loaded on Sound 1 in the Piano Roll/Keyboard view.
MASCHINE - Manual - 85
Page 86

Sound MIDI Options
4.10 Sound MIDI Options
MASCHINE’s Groups and Sounds can be triggered via MIDI, both globally and individually. To
configure the appropriate MIDI settings, you have two functions at your disposal: Sound MIDI
Batch Setup (for whole Groups) and Sound MIDI Settings (for individual Sounds). Furthermore,
you can configure your Sounds’ outputs for sending MIDI data.
You can also trigger your Scenes using MIDI messages. Please refer to section ↑10.7, Trig-
gering Scenes via MIDI for more info on this.
4.10.1 Sound MIDI Batch Setup
To create a MIDI setting for an entire Group, you can use the Sound MIDI Batch Setup function. Here you can set up how all Sounds of the selected Group respond to MIDI. Right-click
(on Mac OS X: [Ctrl]-click) on the Group slot in the Arranger and choose Sound MIDI Batch
Setup from the pop-up menu.
Sound Slots
Selecting Sound MIDI Batch Setup for a Group.
Now you will be presented with the Sound MIDI Batch Setup dialog:
MASCHINE - Manual - 86
Page 87

The Sound MIDI Batch Setup dialog.
Sound MIDI Batch Setup Options
Mapping Mode Mode Description
Restore Defaults Select this radio button to restore the Sound MIDI Batch Setup to its de-
fault values. In the default state, each Sound in this Group will receive
notes from all MIDI channels, as long as it is in focus.
Sound Slots
Sound MIDI Options
Sounds to MIDI Channels Select this radio button to have Sounds mapped to individual MIDI chan-
nels. This is useful if you want to play a Sound in a tonal way.
Sounds to MIDI Notes Select this radio button to have Sounds mapped to MIDI notes, starting
with the root note. This is useful for drum kits.
MIDI Channel Select a MIDI channel here if you have selected the Sounds to MIDI Notes
option.
Root Note Choose a root note here if you have selected the Sounds to MIDI Notes op-
tion.
This window is only meant to set settings to a group of sounds. It does not show the current
settings of sounds of a group! If you want to see the current setting of a sound, see next
chapter.
MASCHINE - Manual - 87
Page 88

Sound MIDI Options
4.10.2 Sound MIDI Settings
You can also assign individual Sounds to MIDI. This is done in the Sound MIDI Settings.
Right-click (on Mac OS X: [Ctrl]-click) on the Sound slot of a Sound and choose Sound MIDI
Settings from the pop-up menu.
Choosing Sound MIDI Settings for a Sound.
Now you will be presented with the Sound MIDI Settings dialog:
Sound Slots
MASCHINE - Manual - 88
Page 89

The Sound MIDI Settings dialog.
Note: if the Sound MIDI Settings are disabled (i.e., the checkbox is unchecked), any incoming MIDI note will trigger the Sound as long as the Sound is in focus.
Sound Slots
Sound MIDI Options
Sound MIDI Settings
Status Options
Enable To enable Sound MIDI Settings, click this checkbox.
Input Options
Channel Choose on which MIDI Channel the Sound will receive MIDI by selecting it
Low Note Define the lowest note on which the Sound will respond to MIDI here.
High Note Define the highest note on which the Sound will respond to MIDI here.
Destination Options
Root Note Define the root note of the selected Sound here.
in the drop-down menu.
MASCHINE - Manual - 89
Page 90

Sound MIDI Options
Combining the MIDI Settings for Scenes, Groups and Sounds, you can easily create your
custom MIDI setup and create a keyboard split for your live-set, for example: first octave
controlling the Scenes, second octave controlling your drum kit, third one for the piano
sound and so forth.
The settings for Sounds have a higher priority than the Group settings, as well as the settings
for Groups have a higher priority than the Scene settings.
4.10.3 MIDI Output from Sounds
You can output MIDI notes from individual Sounds allowing you to control your host application and/or external MIDI gear from MASCHINE’s sequencer.
Hardware
1. Select an empty Sound slot by pressing its pad.
2. Press Button 5 to select the Source tab (SRC).
3. Press SHIFT + BROWSE. By using Buttons 5 & 6 or Knob 5 you can select either Sampler, Input or MIDI Out.
4. Select MIDI OUT and press Button 8 to confirm your selection.
Sound Slots
5. Press BROWSE to leave this dialog and use Knob 1 to select the MIDI Channel you want
the Sound to send note data to.
You will notice that the Sound was automatically renamed to “MIDI OUT."
MASCHINE - Manual - 90
Page 91

Software
1. Select an empty Sound slot by clicking on it.
2. Select Module 1 and click on the arrow to open the drop-down menu.
3. Choose MIDI Out, then select the MIDI Channel you want the Sound to send MIDI to.
Sound Slots
Sound MIDI Options
MASCHINE - Manual - 91
Page 92

Creating Groups
The Group Property Pages
5 Creating Groups
A Group contains 16 Sound slots with all their parameters. It can have up to four Insert FX and
up to 64 Patterns assigned to it, which are organized in 4 Banks. More on Patterns in chapter
↑6, Working with Patterns (Hardware) and chapter ↑7, Working with Patterns (Software).
5.1 The Group Property Pages
Use the Group Property pages to control the Source, Groove, Macro and Output properties.
5.1.1 Page 1: Voice Settings and Pitch
Hardware
To access the Voice settings and Pitch:
1. Press CONTROL to enter Control mode.
2. Press the Group button (A-H) you want to edit.
3. Press Button 2 to select GROUP.
4. Press Button 5 to select SRC (Source).
5. Turn Knob 1 to edit POLYPHONY.
6. Turn Knob 5 to change the PITCH.
Software
To access the Group Source Property page:
1. Select the GROUP level tab.
2. Click the SRC button.
MASCHINE - Manual - 92
Page 93

The Group Property Pages
The Group Source tab parameters on the software.
Page Parameters Parameter Description
Voice Settings
Polyphony Here you can define a voice limit for the Group. The default value is 16,
the minimum 1 and the maximum 32 voices.
Creating Groups
Pitch
Tune This parameter provides tuning for the Group as a whole: all Sounds of the
Group will be tuned together. Dial it to the right to get a higher pitch and
to the left to get a lower pitch.
5.1.2 Page 2: Groove
Hardware
To edit Group Swing settings:
1. Press CONTROL to enter Control mode.
2. Select the Group you want to edit by pressing a Group button A-H.
3. Press Button 2 to select GROUP.
4. Press Button 5 to select GRV (Groove).
5. Turn Knob 1 to add SWING.
6. Turn Knob 2 to change CYCLE.
7. Turn Knob 3 to turn INVERT on or off.
MASCHINE - Manual - 93
Page 94

The Group Property Pages
For a quick and easy way to edit Group Swing; press a Group button, then turn the SWING
knob.
Software
To access the Group Groove Property page:
1. Select the GROUP tab.
2. Click the GRV button.
The Group Groove page on the software.
Page Parameters Parameter Description
Swing
Swing Groups can have an individual Swing value independent of the Global
Swing and Swing settings applied to individual Sounds. Swing allows for
rhythmic shifting of a Pattern to create a “shuffled” feel. This effect is also
found in vintage drum machines and is often used in various genres of
dance music and Hip-Hop. Increasing this parameter increases the
strength of the effect.
Creating Groups
Cycle This determines on what musical resolutions the Swing is applied. The de-
fault value is 1/8.
Invert This button allows you to invert the Swing function so the note position of
the Swing is switched in the opposite direction.
5.1.3 Page 3: Macro Controls
Macro controls enable you to control selected parameters using eight knobs per Group. This is
useful for playing live since you can choose a set of parameters to manipulate on one screen
without having to switch screens, but also allows you to automate MASCHINE parameters and
third party VST/AU plug-ins using the host automation of your DAW (Digital Audio Workstation). All MASCHINE Macro Controls are visible for hosts and automation can be recorded in
MASCHINE - Manual - 94
Page 95

Creating Groups
The Group Property Pages
your host for each MASCHINE Macro controller. Please refer to the manual of your DAW software for more information. In addition, Macro controls also allow you to control parameters
through external MIDI controllers using MIDI CCs. Finally, you can record them as automation
in a Pattern (for more information on that, see section ↑7.2.5, Recording and Editing Automa-
tion). To assign Macro controls you must use the MASCHINE software.
The Macro controls on the software.
Assigning a Parameter to a Macro Control
The Macro controls are assigned using the MASCHINE software. Each Macro control can be assigned to one destination with the full range of the selected parameter. Macro controls are bipolar knobs with a range of -100% to +100% (0% is centre). It is possible to assign any modulatable parameters in the Group Modules (1-4) as well as any modulatable parameter on any
Sound inside the Group. Choose any controllable parameter of your Group or the Sounds contained in it and right-click (on Mac OS X: [Ctrl]-click) on it:
Assigning the Tune parameter of a Sound to a Macro control.
Now choose one of the available Macro controls 1-8. After assignment is made, a blue dot
shows that the parameter is assigned to a Macro control:
MASCHINE - Manual - 95
Page 96

Creating Groups
The Group Property Pages
Tune assigned to a Macro control.
On the Macro page you will see the name of the assigned parameter now under the Macro Control.
Removing a Parameter from a Macro Control
To remove a parameter from the assigned Macro control, right-click (on Mac OS X: [Ctrl]-click)
on it and select the Remove Macro Control entry from the pop-up menu:
Removing a parameter from a Macro control.
Assigning Macro Controls to external MIDI CCs
Just like the parameter assignment, the MIDI CC assignment is performed in the MASCHINE
software. To assign a MIDI CC to a MASCHINE Macro Control, get back to the Macro page by
selecting the GROUP tab and then clicking on the MCR button. Now you can right-click (on
Mac OS X: [Ctrl]-click) on the Macro control and choose your MIDI CC:
MASCHINE - Manual - 96
Page 97

Creating Groups
The Group Property Pages
Assigning MIDI CC 1 to Macro control 1.
Alternatively, you can also let MASCHINE learn the MIDI CC it is supposed to react to. Choose
MIDI Learn from the pop-up menu and move the desired knob or fader on your connected MIDI
controller:
Selecting Enter MIDI Learn in the pop-up menu.
As soon as you select MIDI Learn, a white dot starts to flash until the software receives an incoming MIDI CC:
MASCHINE - Manual - 97
Page 98

Creating Groups
The Group Property Pages
The white dot next to the Macro control.
When the MIDI CC has been received, the white dot will stop flashing.
Macro Controls can also be controlled by Host Automation. Each MASCHINE Macro Control
has a unique Automation ID, which is provided to your host/DAW by the MASCHINE plug-in.
5.1.4 Accessing Macro Controls from the Hardware
To access the Macro Controls:
1. Press CONTROL to enter Control mode.
2. Select the Group with the Macro Controls you want to access by pressing a Group button
A-H.
3. Press Button 2 to select GROUP.
4. Press Button 7 to select MCR (Macro).
5. You can now change the parameters you assigned in the MASCHINE software using Knobs
1-8.
MASCHINE - Manual - 98
Page 99

5.2 The Group's Output Parameters
5.2.1 Page 1: Routing, Volume and Pan
Software
To access the Group Output pages:
1. Select the GROUP level tab.
2. Click the OUT button to open the Group Output pages.
Page 1 of 2 from the Group's Output pages on the software.
Creating Groups
The Group's Output Parameters
Page Parameters Parameter Description
Main
Output This is used to define where you want to send your Group. Available op-
Level Here you adjust the volume level of your Group.
Pan Defines the pan position of your Group in the stereo field.
Aux 1
Destination The destination for Aux 1: available destinations are Master, all Sounds
Level Here you adjust the amount of the signal that gets sent to the Aux 1 desti-
Aux 2
tions are Master, all Sounds with Input enabled, the External Outputs 1-8
and None.
with Input enabled, the External Outputs 1-8 and None.
nation.
MASCHINE - Manual - 99
Page 100

Creating Groups
The Group's Output Parameters
Page Parameters Parameter Description
Destination The destination for Aux 2: available destinations are Master, all Sounds
with Input enabled, the External Outputs 1-8 and None.
Level Here you adjust the amount of the signal that gets sent to the Aux 2 desti-
nation.
Hardware
To access page 1 of the Group Output pages:
1. Press CONTROL to enter Control mode.
2. Select the Group with the Macro Controls you want to access by pressing a Group button
A-H.
3. Press Button 2 to select GROUP.
4. Press Button 8 to select OUT.
5.2.2 Page 2: Aux Pre and Post Mode (Pre Mix 1 and 2)
Software
Page 2 of 2 from the Group Output pages on the software.
MASCHINE - Manual - 100
 Loading...