

Page 1

GETTING STARTED
Page 2

The information in this document is subject to change without notice and does not represent a
commitment on the part of Native Instruments GmbH. The software described by this document is
subject to a License Agreement and may not be copied to other media. No part of this publication
may be copied, reproduced or otherwise transmitted or recorded, for any purpose, without prior
written permission by Native Instruments GmbH, hereinafter referred to as Native Instruments. All
product and company names are ™ or ® trademarks of their respective owners.
Getting Started written by Benjamin Weiss; edited by Jens Hoffmann, Joshua Fielstra
Manual version: 1.0 (11/2008)
Software version: 1.0
Special thanks to the Beta Test Team, who were invaluable not just in tracking down bugs, but in
making this a better product.
Page 3

Germany
NATIVE INSTRUMENTS GmbH
Schlesische Str. 28
D-10997 Berlin
Germany
info@native-instruments.de
www.native-instruments.de
USA
NATIVE INSTRUMENTS North America, Inc.
5631 Hollywood Boulevard
Los Angeles, CA 90028
USA
sales@native-instruments.com
www.native-instruments.com
© Native Instruments GmbH, 2008. All rights reserved.
Page 4

1. Welcome to MASCHINE!
Thank you for buying MASCHINE!
MASCHINE is essentially the synergy of the MASCHINE Controller hardware and the
MASCHINE software combining the advantages of both worlds for making music, live
as well as in the studio. The intuitive, hands-on qualities of a dedicated Instrument,
the MASCHINE Controller, with the advanced editing features and the versatility of the
MASCHINE software turn it into the creative center of your musical productions.
Creating beats is often not very intuitive with a computer, but using the MASCHINE
Controller to do it makes it easy and fun. You can tap in freely with the Pads or use Note
Repeat to jam along. Alternatively, build your beats utilizing the Step Sequencer just as
in classic drum machines.
Since you can integrate it in any DAW that supports VST, Audio Units or the RTAS – for-
mat with multiple instances, you can prot from its abilities in almost any software setup
or use it as a stand-alone application. You can sample your own material, slice Loops and
rearrange them easily.
However, MASCHINE is a lot more than an ordinary Groovebox or Sampler: It comes with
a large 5 gigabytes library, programmed and gathered by well known artists, and a sophisticated, yet easy to use tag-based Browser to give you instant access to the sounds
you are looking for.
You can also control your external MIDI Hardware and your Software with the MASCHINE
Controller and customize the functions of the Pads, Encoders and Buttons to your needs,
utilizing the Controller Editor Application. This is possible at the same time you are using
the stand-alone version or the plug-in.
We hope you enjoy the MASCHINE playground as much as we do. Now let´s get going!
The MASCHINE team at Native Instruments
MASCHINE Getting Started – 4
Page 5

2. Installation and Setup
2.1 What´s in the box
After opening the MASCHINE package you will nd the following items:
The MASCHINE Controller
1.
The Installer DVDs
2.
This Getting Started Manual
3.
The Service Center Quick Start Guide
4.
USB cable
5.
The Serial Number Card
6.
2.2 The MASCHINE Documentation
2.2.1 About this Getting Started Manual
This section will introduce you to the signage and text highlighting used in this manual.
Marginal Notes
This manual uses marginal notes to point out special facts and to warn you of potential
dangers. The icons included in the marginal notes let you see what kind of information is
to be expected:
!Whenever this exclamation mark icon appears, you should read the corresponding mar-
ginal note carefully and follow the instructions and hints given there if applicable.
MASCHINE Getting Started – 5
Page 6

%
This lightbulb icon indicates that a marginal note contains useful extra information. This
information may often help you to solve a task more efciently, but does not necessarily
apply to the setup or operating system you are using. However, it should be worth reading
for most users.
Special Formatting
This manual contains some elements that appear in a different font type. This distinctive
formatting has been applied in order to let you recognize certain elements in the text at
a glance:
►
Menu Item: Items from MASCHINE’s menus are printed in italics.
►
GUI E
in Small CapS. Consequently you will notice that this formatting has been applied to all
names of knobs, buttons and other elements that let you interact with the MASCHINE
software, but not to the names that relate to the MASCHINE Controller’s rotary encoders,
pads, etc.
lEmEnt
: Elements from MASCHINE’s graphical user interface (GUI) are printed
2.2.2 Other Documentation
What you are holding in your hands right now is the Getting Started Manual that will give
you a fast overview of MASCHINE’s main features and functions. For more in-depth information on all the topics not covered here, please refer to the MASCHINE Reference Manual
that is available via the Native Instruments Service Center application. Alternatively, you
can download the Reference Manual from the Update Manager on the Native Instruments
Website:
www.native-instruments.com
You can use the MASCHINE Controller for controlling other MIDI-enabled software or external MIDI hardware. For all information on these functions, please refer to the Controller
Editor Manual, located in the Documentation folder inside the Controller Editor installation
folder.
MASCHINE Getting Started – 6
Page 7

2.3 Installing MASCHINE
This chapter will guide you through the MASCHINE installation procedure step by step.
The installation includes all components of MASCHINE: the MASCHINE application, the
sound library and the Controller Editor application.
2.3.1 Installing MASCHINE on Windows XP and Windows Vista
Place the installation Windows-specic DVD in your computer’s DVD-ROM drive.
1.
Use Windows Explorer to browse the content of the DVD-ROM.
2.
Double-click the installer le named “MASCHINE Setup.exe.”
3.
Click “Next.”
4.
To continue, you need to rst accept the license agreement. After you have read the
5.
license agreement, check the corresponding checkbox and click “Next.”
To perform a complete installation, leave the Complete option checked and click “Next”
6.
to install all components to their default location. To deselect components or to install
the MASCHINE application or sound library to an alternative location, choose Custom.
Then click “Next.”
The Setup Program will lead you through the installation procedure. Please follow the
7.
onscreen instructions.
After the installation has been performed successfully, click “Finish.”
8.
To install the MASCHINE Controller hardware driver, you need to connect the
9.
MASCHINE Controller to your computer now. On Windows Vista, the driver setup will
nish automatically. On Windows XP, the following screen should appear:
Select “No, not this time” and click “Next.”
10.
On the following screen select “Install software automatically” and click “Next.”
11.
Now the MASCHINE Controller hardware driver installation will nish. After that you
12.
need to go through the same procedure in order to install the MASCHINE Controller
USB driver.
If a warning message concer-
If a warning message concer-
!
!
appears during installation, there is no
appears during installation, there is no
need to worry – just click “Continue” to
need to worry – just click “Continue” to
proceed.
proceed.
ning the Windows Logo test
ning the Windows Logo test
MASCHINE Getting Started – 7
Page 8

2.3.2 Installing the MASCHINE Software on Mac OS X
Place the installation DVD-ROM in your computer’s DVD-ROM drive. Its icon will ap-
1.
pear in the Mac OS X Finder.
Double-click the MASCHINE DVD icon to display the content of the DVD.
2.
Double-click the installer le named “MASCHINE Installer.mpkg.”
3.
Click “Continue” to proceed.
4.
To continue, you need to rst accept the license agreement. After you have read the
5.
license agreement, check the corresponding checkbox and click “Agree.” Then click
“Continue” to proceed.
Select the hard disk onto which you would like to install MASCHINE. Please note that
6.
you can only install MASCHINE onto hard disks which contain a Mac OS X version
that matches the system requirements. Hard disks without a suitable Mac OS X version on them will be agged with a red Stop sign, and you cannot select them in the
Installation Destination dialog. From Mac OS X 10.5 on, this screen will be skipped
automatically.
Click “Continue.”
7.
Select the elements you want to install (we recommend installing all elements, however
8.
if you know that you don´t need a certain element like a plug-in format, uncheck the
checkbox next to it). If you want to install the Maschine Library contents to a custom
location, e.g. to an external hard disk, click the folder icon in the “Location” column
to open a dialog in which you can specify a destination for the installation.
Click “Install” to continue. The Setup Program will lead you through the installation
9.
procedure. Please follow the onscreen instructions.
To nish the MASCHINE Controller hardware driver installation you need to restart
10.
your computer now.
You cannot deselect the Service
You cannot deselect the Service
!
!
required for activating the MASCHINE
required for activating the MASCHINE
software.
software.
Center application because it is
Center application because it is
MASCHINE Getting Started – 8
Page 9

2.4 Activating MASCHINE
When you start the MASCHINE software for the rst time, you will be asked to activate
MASCHINE using the Service Center. Please refer to the Service Center Quick Start Guide
for all information on that matter.
2.5 Connecting the MASCHINE Controller
Connecting the MASCHINE Controller to your computer is easy: plug the USB cable (included in delivery) into the USB port on the back of the MASCHINE Controller, then connect
the cable’s other end to one of the USB-ports of your computer.
If you have any MIDI equipment such as synthesizers, keyboards, drum machines or sam-
plers, you may connect them to MASCHINEs MIDI In and MIDI Out ports.
If you want to connect the
If you want to connect the
!
!
USB-hub instead, make sure that the
USB-hub instead, make sure that the
hub has its own power supply – the
hub has its own power supply – the
MASCHINE Controller will not work on a
MASCHINE Controller will not work on a
passive (bus-powered) USB hub.
passive (bus-powered) USB hub.
MASCHINE Controller to a
MASCHINE Controller to a
On its rear panel, the MASCHINE Controller features a MIDI In and a MIDI Out port as well as a USB port that
connects it to your computer. Use the Kensington Lock slot to lock your MASCHINE controller to something
immobile and thus save it from being stolen.
MASCHINE Getting Started – 9
Page 10
3. Overview
This chapter will introduce you to the MASCHINE Controller’s hardware elements and the
MASCHINE Software’s user interface. Nearly all functions are available on both interfaces.
If you need to look up a certain user interface element’s name, you can return to this
chapter at any time for a refresher!
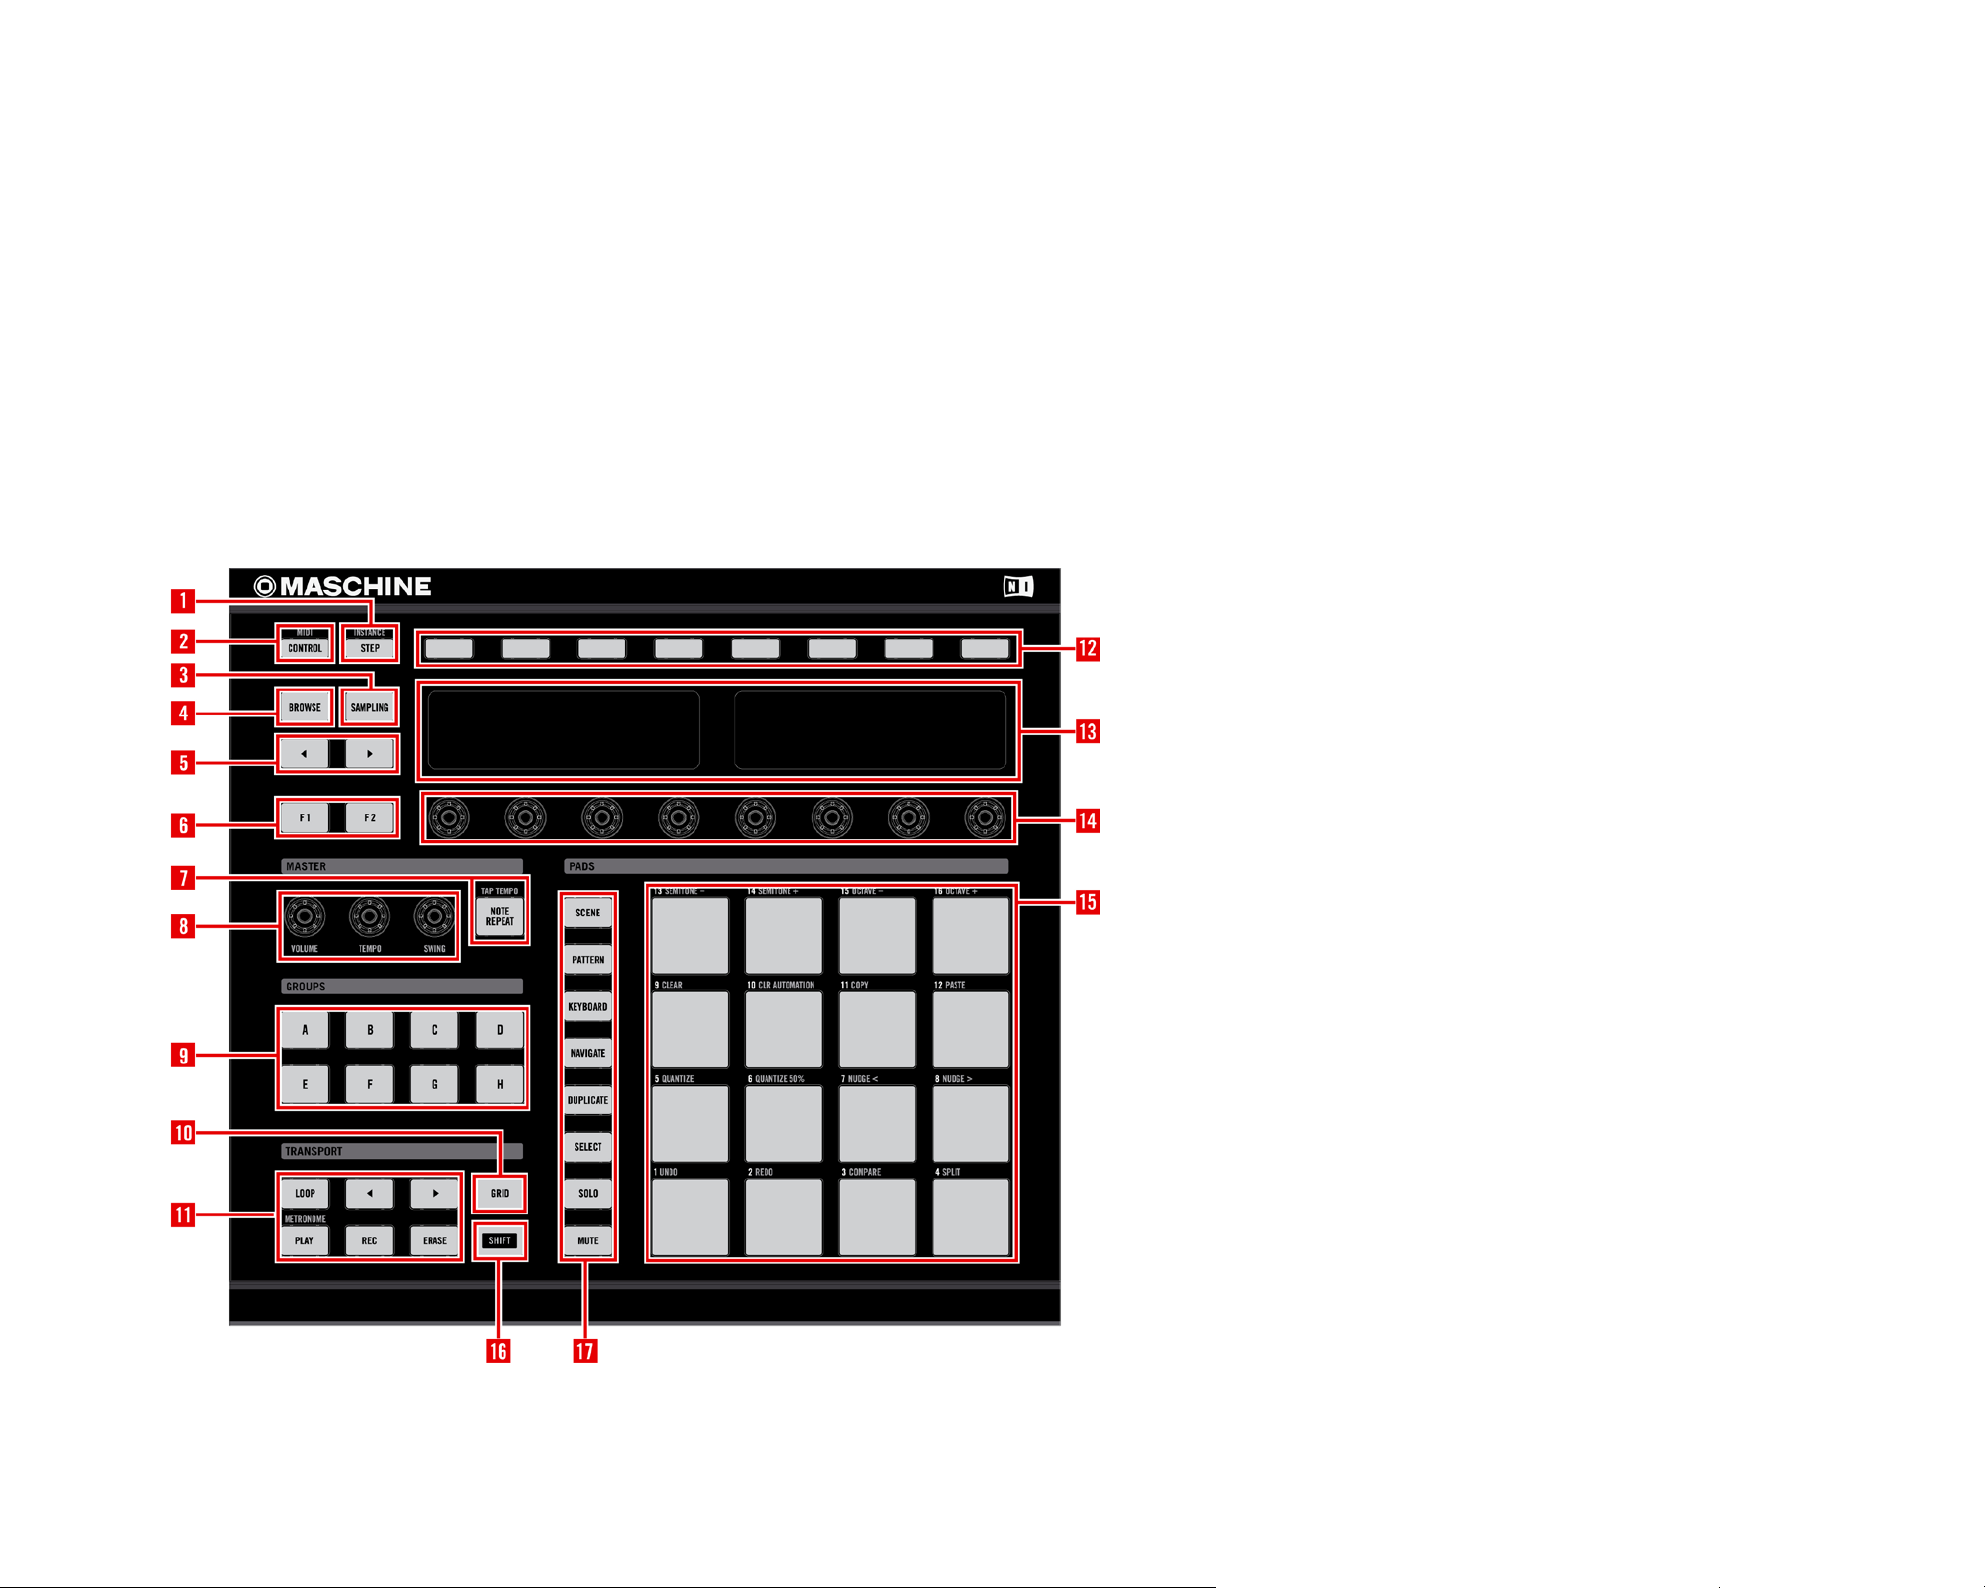
3.1 Hardware
1 Step Mode Button
Step Mode Button
1
Control Mode Button
2 Control Mode Button
2
Sampling Button
3 Sampling Button
3
Browse Button
4 Browse Button
4
Page Buttons
5 Page Buttons
5
Function Buttons
6 Function Buttons
6
Note Repeat Button
7 Note Repeat Button
7
Master Encoders
8 Master Encoders
8
Group Buttons
9 Group Buttons
9
10 Grid Button
10 Grid Button
11 Transport Buttons
11 Transport Buttons
12 Buttons 1-8
12 Buttons 1-8
The MASCHINE Controller
13 Left and Right Display
13 Left and Right Display
14 Rotary Encoders 1-8
14 Rotary Encoders 1-8
15 Pads
15 Pads
(secondary function is
(secondary function is
reached by pressing Shift)
reached by pressing Shift)
16 Shift Button
16 Shift Button
17 Modier Buttons
17 Modier Buttons
MASCHINE Getting Started – 10
Page 11

3.2 Software
1 Header
Header
1
Browser
2 Browser
2
Arranger
3 Arranger
3
Control Area
4 Control Area
4
Pattern Editor
5 Pattern Editor
5
The Header
1
1 Menu Button
Menu Button
Browser Button
2 Browser Button
2
Display Area
3 Display Area
3
Transport Controls
4 Transport Controls
4
Connect Button
5 Connect Button
5
Audio Engine Button
6 Audio Engine Button
6
CPU Meter
7 CPU Meter
7
Volume Control
8 Volume Control
8
NI Logo
9 NI Logo
9
MASCHINE Getting Started – 11
Page 12
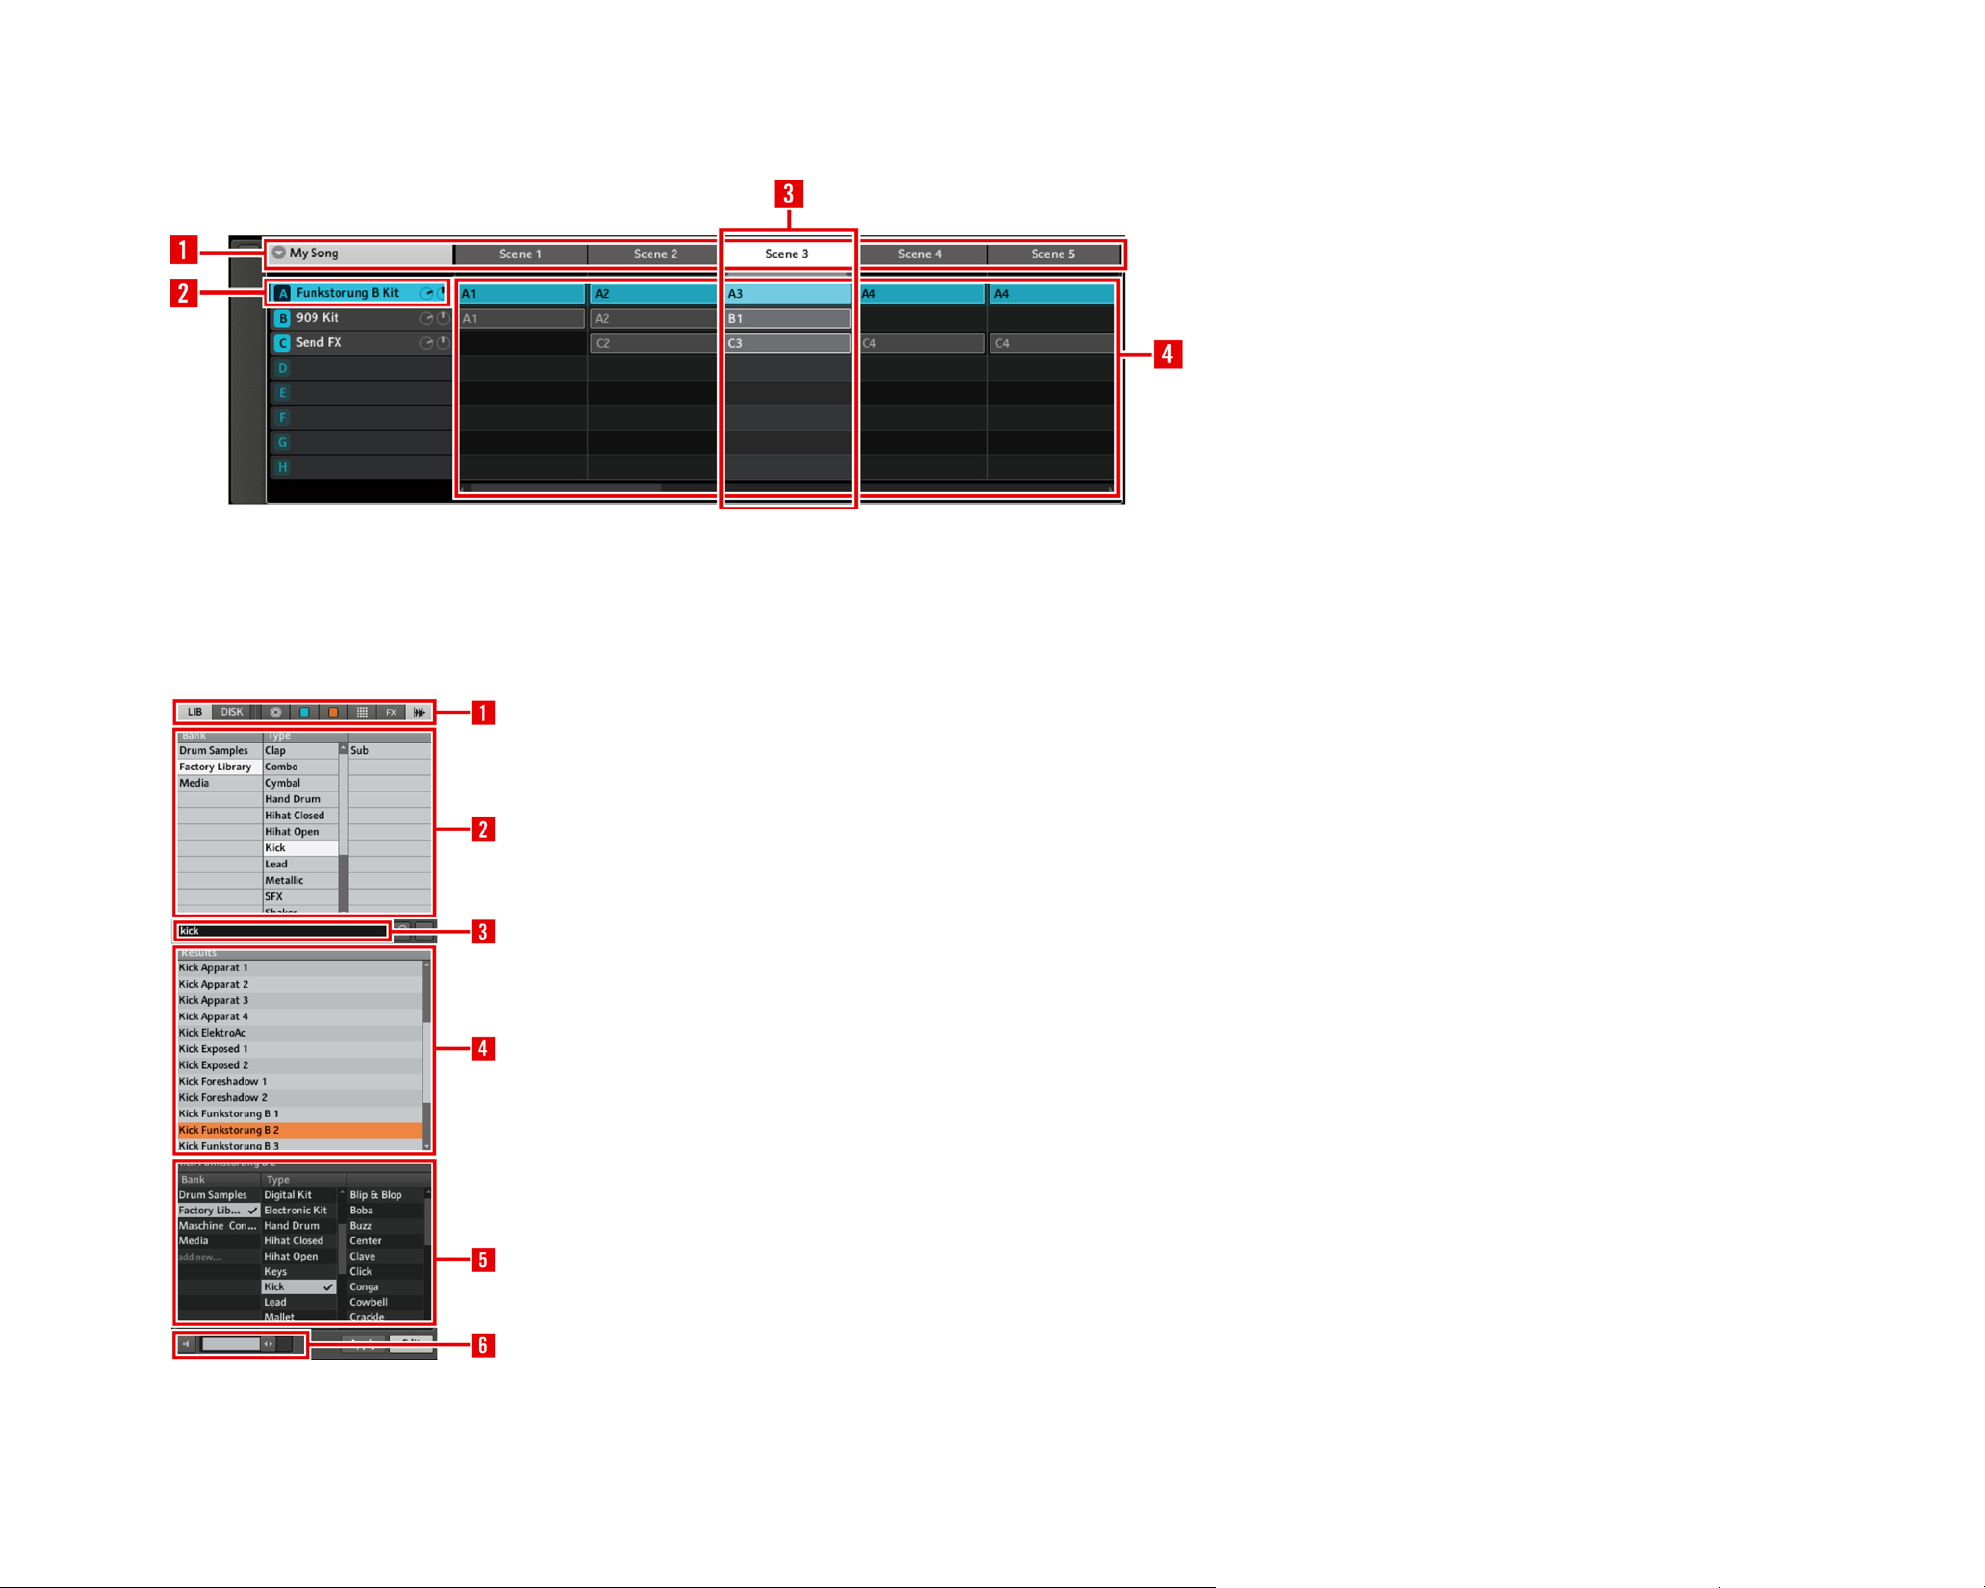
The Arranger
The Browser
1
1 Arranger Timeline
Arranger Timeline
Group Slots
2 Group Slots
2
Scene Column
3 Scene Column
3
Clip Area
4 Clip Area
4
1 File Type Selector
File Type Selector
1
Tag Filter
2 Tag Filter
2
Text Search Field
3 Text Search Field
3
Search Result List
4 Search Result List
4
Tag Editor
5 Tag Editor
5
Audition Control
6 Audition Control
6
MASCHINE Getting Started – 12
Page 13
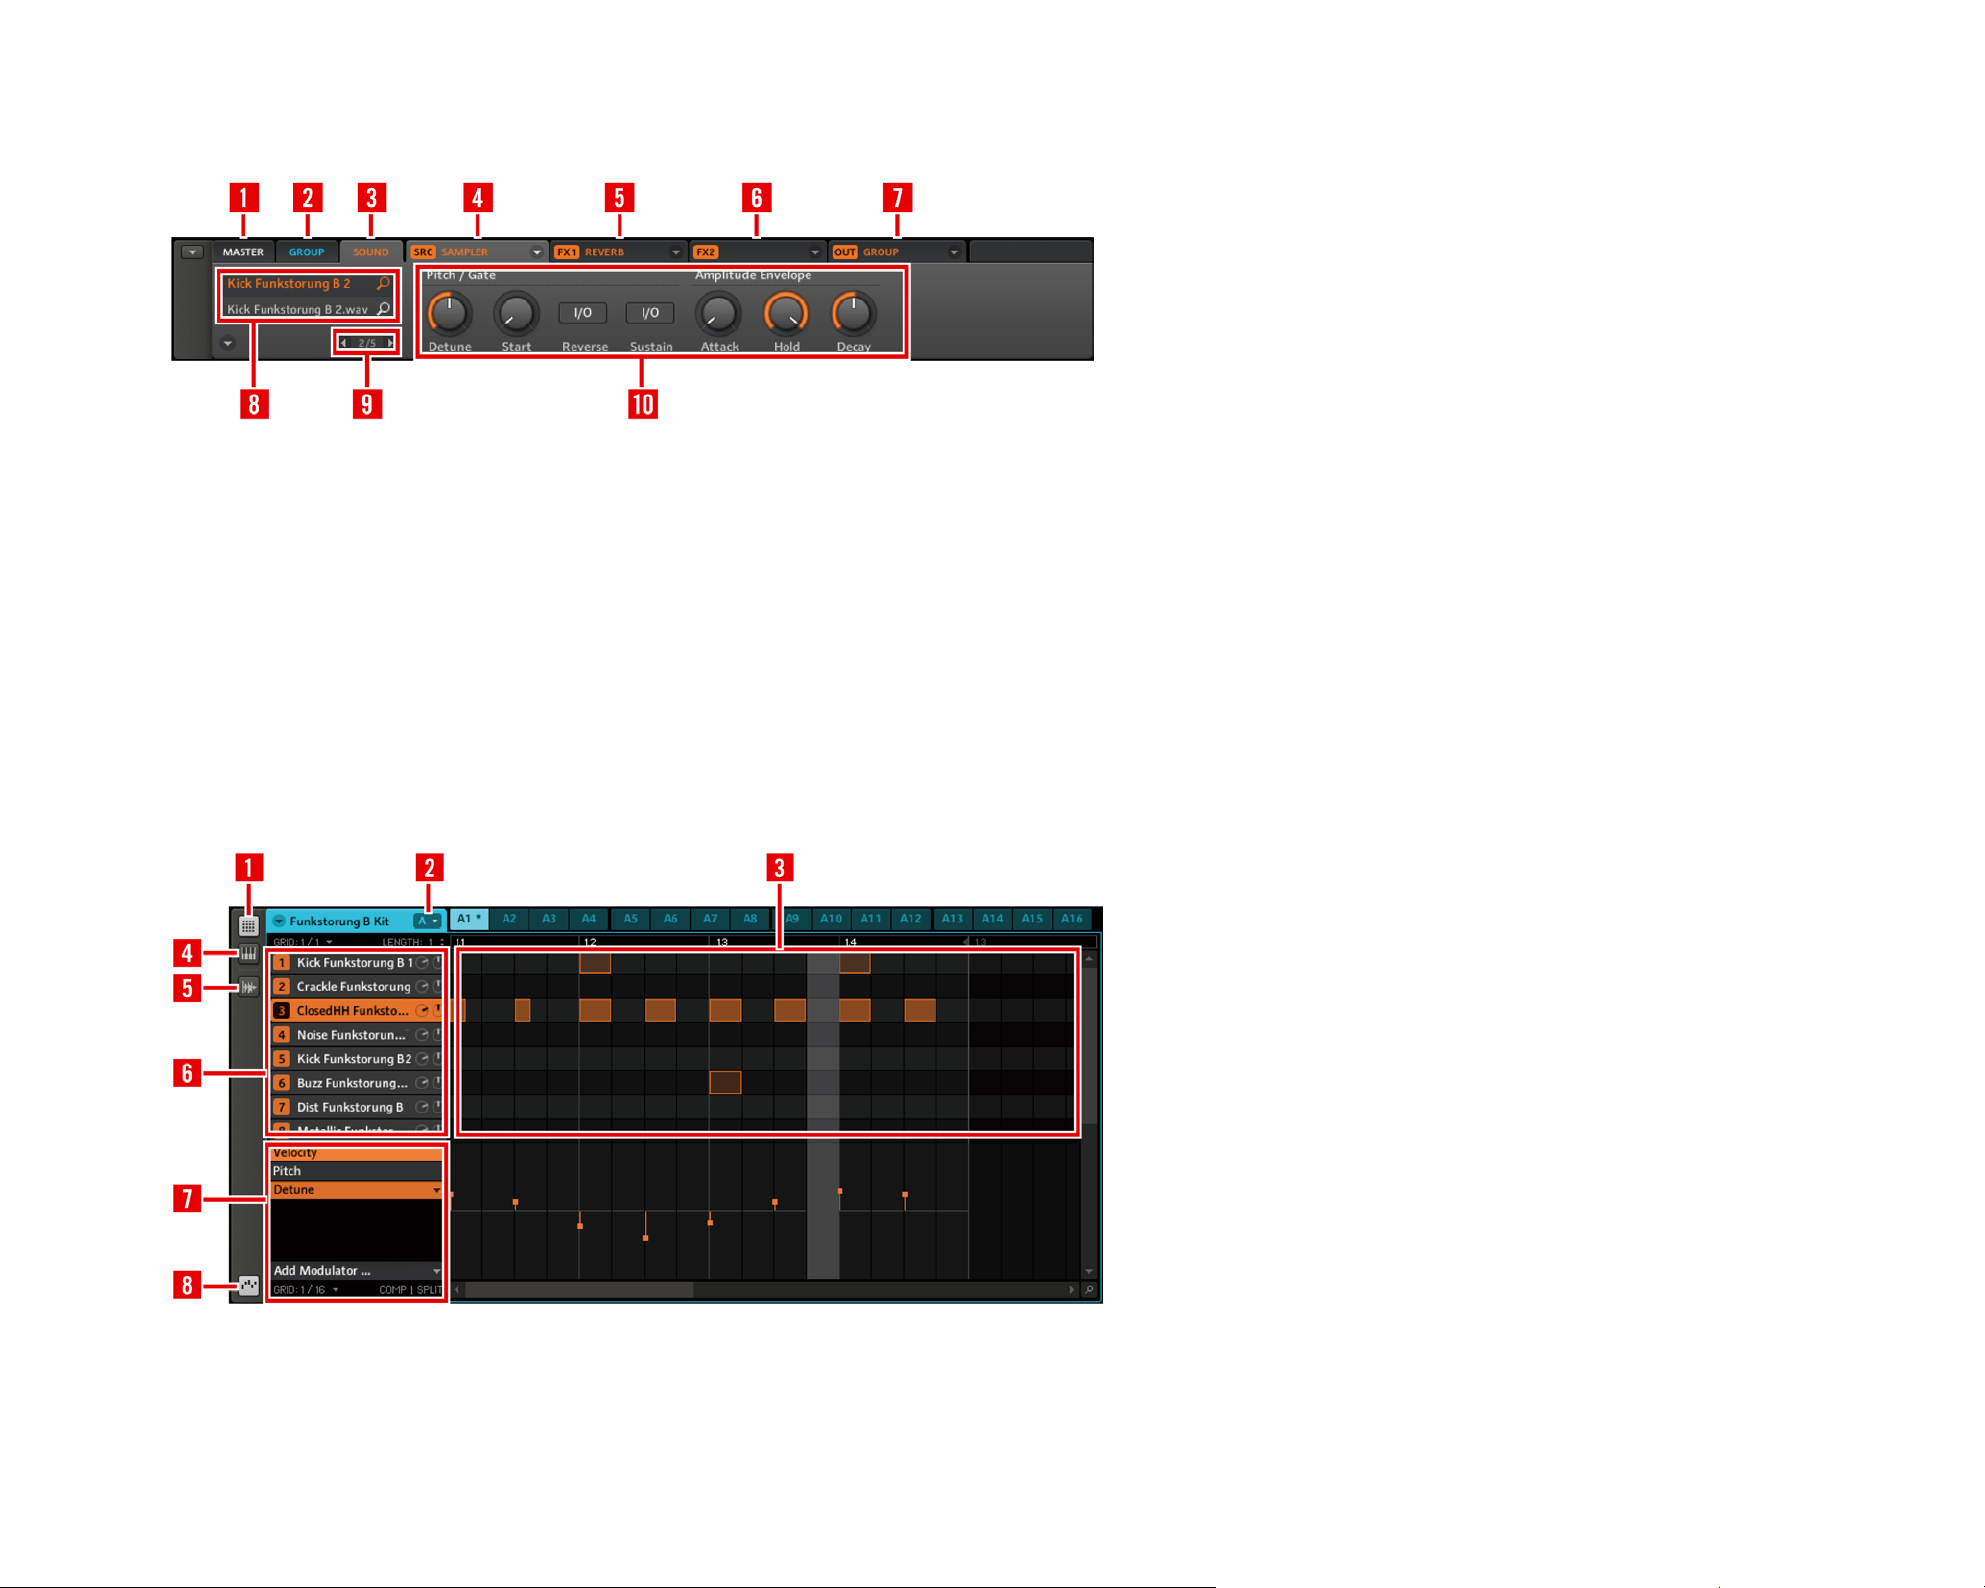
The Control Area
1 Master Tab
Master Tab
1
Group Tab
2 Group Tab
2
Sound Tab
3 Sound Tab
3
Source Tab
4 Source Tab
4
FX1 Tab
5 FX1 Tab
5
FX2 Tab
6 FX2 Tab
6
Output Tab
7 Output Tab
7
Quick Browse Area
8 Quick Browse Area
8
9 Parameter pages, depending on
9 Parameter pages, depending on
the selected Tab
the selected Tab
10 Page Selector
10 Page Selector
The Pattern Editor
1 Step Editor View Switch
1 Step Editor View Switch
Pattern Bank Menu
2 Pattern Bank Menu
2
Step Editor
3 Step Editor
3
Piano Roll /
4 Piano Roll /
4
Keyboard View Switch
Keyboard View Switch
Sampling View Switch
5 Sampling View Switch
5
Sound Slots
6 Sound Slots
6
Automation Lane
7 Automation Lane
7
Automation View Switch
8 Automation View Switch
8
MASCHINE Getting Started – 13
Page 14
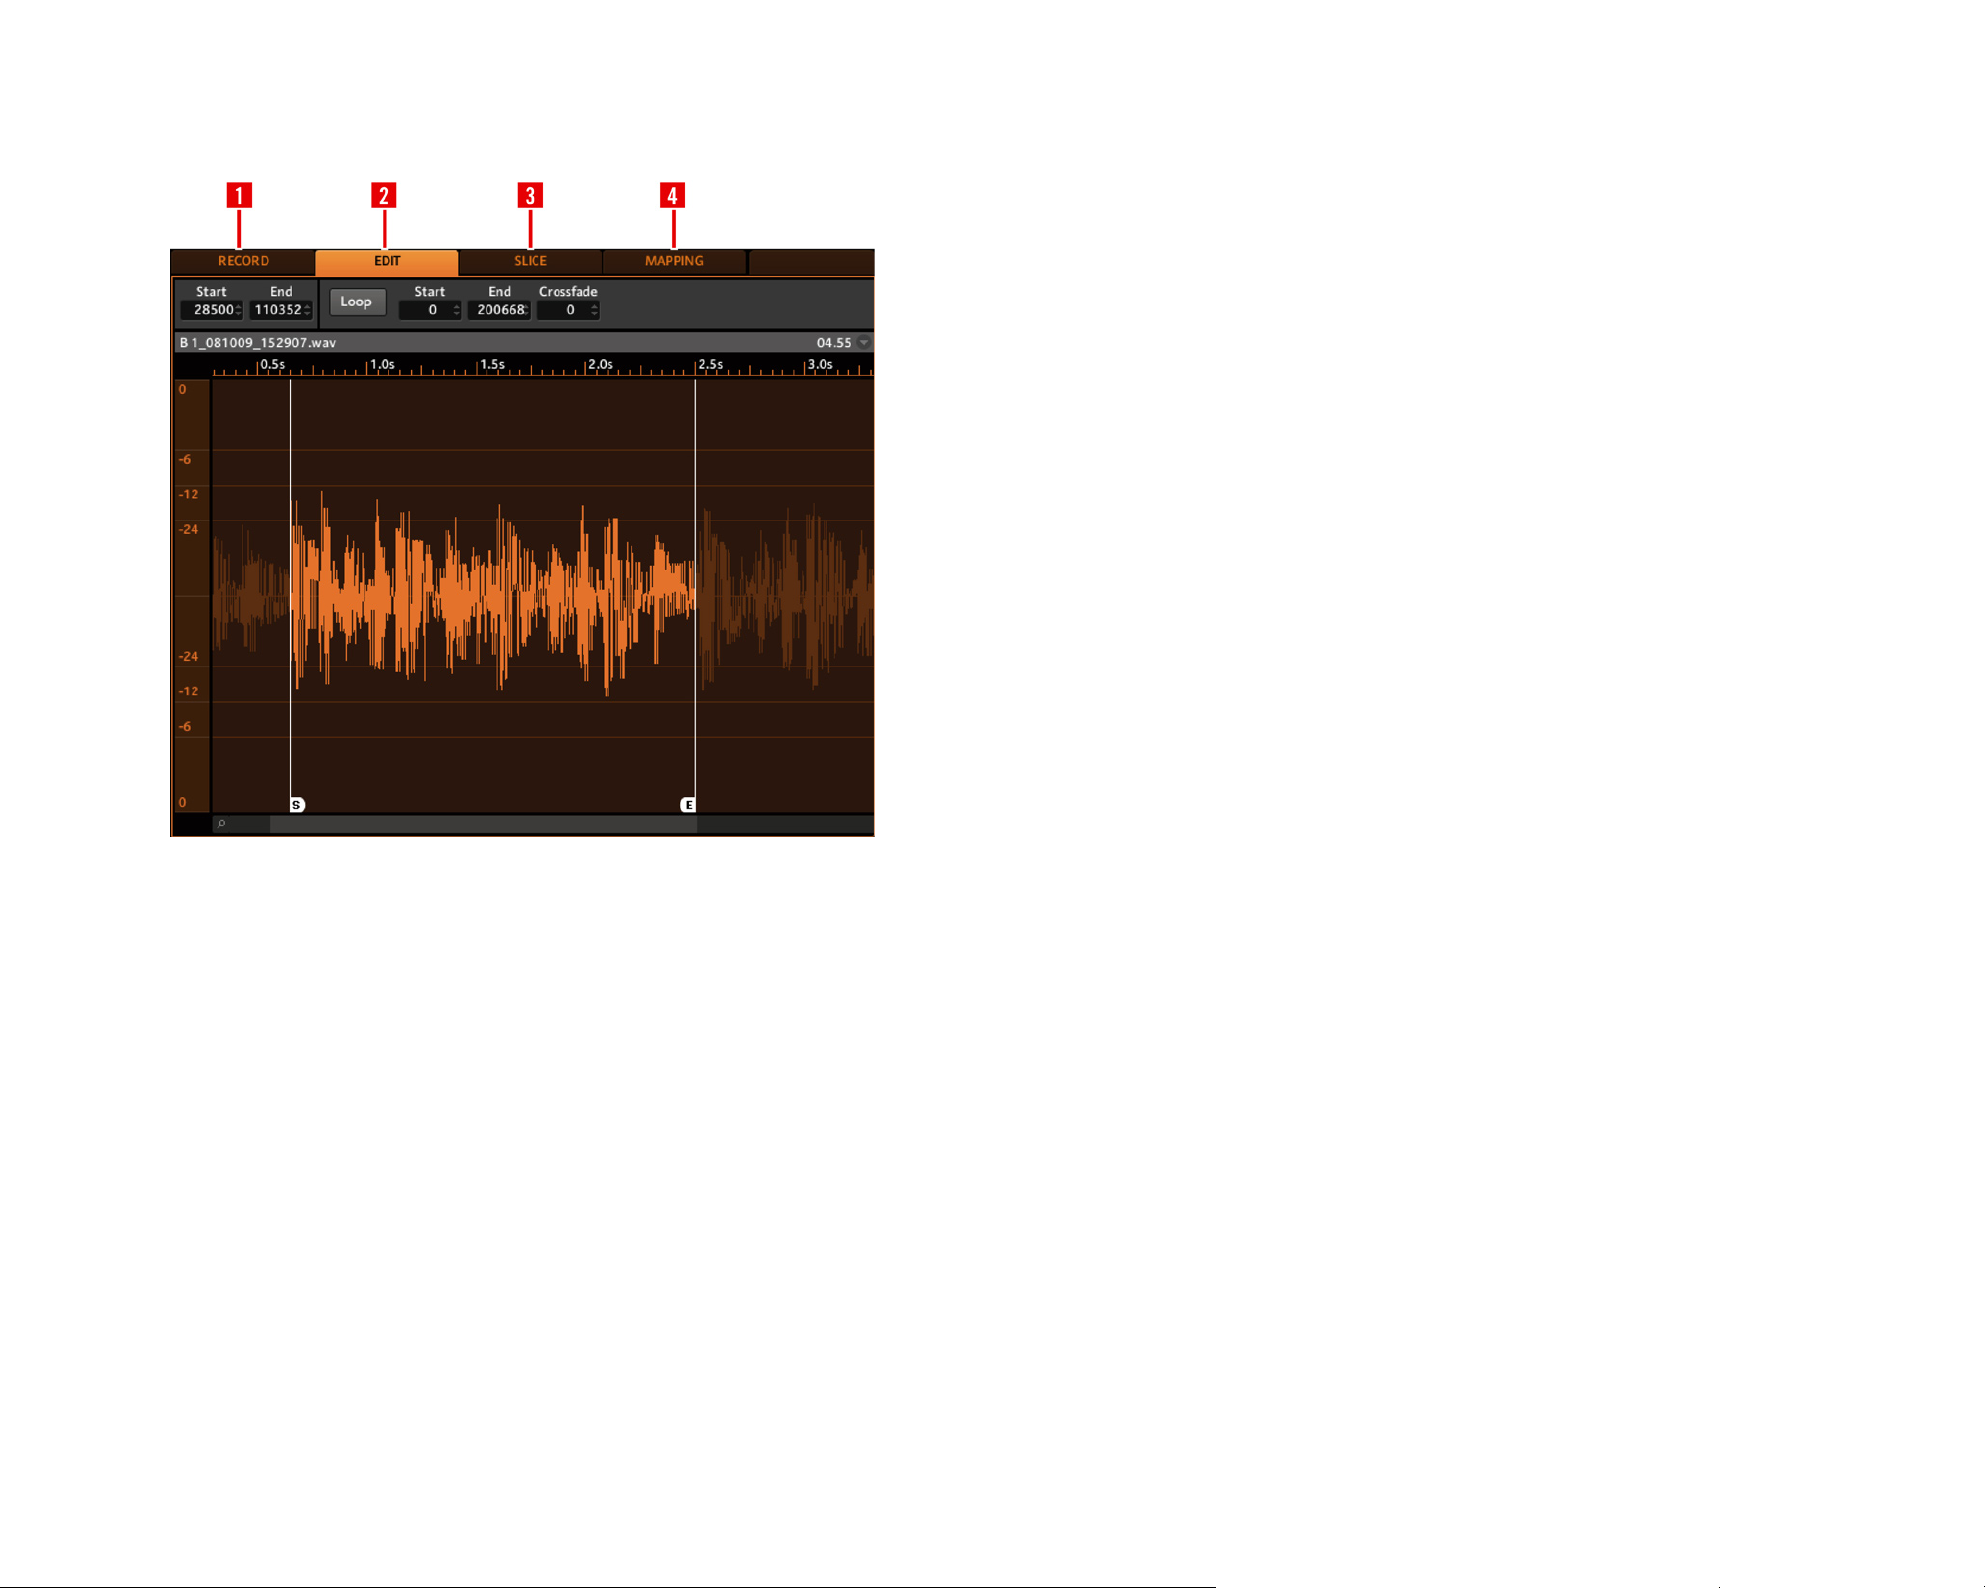
The Sampling Area
1
1 Record Tab
Record Tab
Edit Tab
2 Edit Tab
2
Slice Tab
3 Slice Tab
3
Mapping Tab
4 Mapping Tab
4
MASCHINE Getting Started – 14
Page 15
4. Creating a Pattern
In order to get you started with MASCHINE, let´s lay out a basic Pattern with some drums,
a bassline and a melody. On the way, you will learn how to create Sounds and Groups and
how to add Effects (FX) to them.
4.1 Finding Samples in the Browser
The Browser is your tool for managing, nding, tagging and categorizing Projects, Groups,
Patterns, Sounds, FX and Samples. If you want to know more about the Browser’s capabilities, read the “Browser” chapter in the MASCHINE Reference Manual.
Hardware
On the MASCHINE Controller, press the Browse Button. In the Left Display, you will
1.
now be presented with a selection of choices.
Turn Rotary Encoder 1 until the Filter on the Left Display turns to “Sample.” This
2.
indicates that only Samples will be displayed now in the right display.
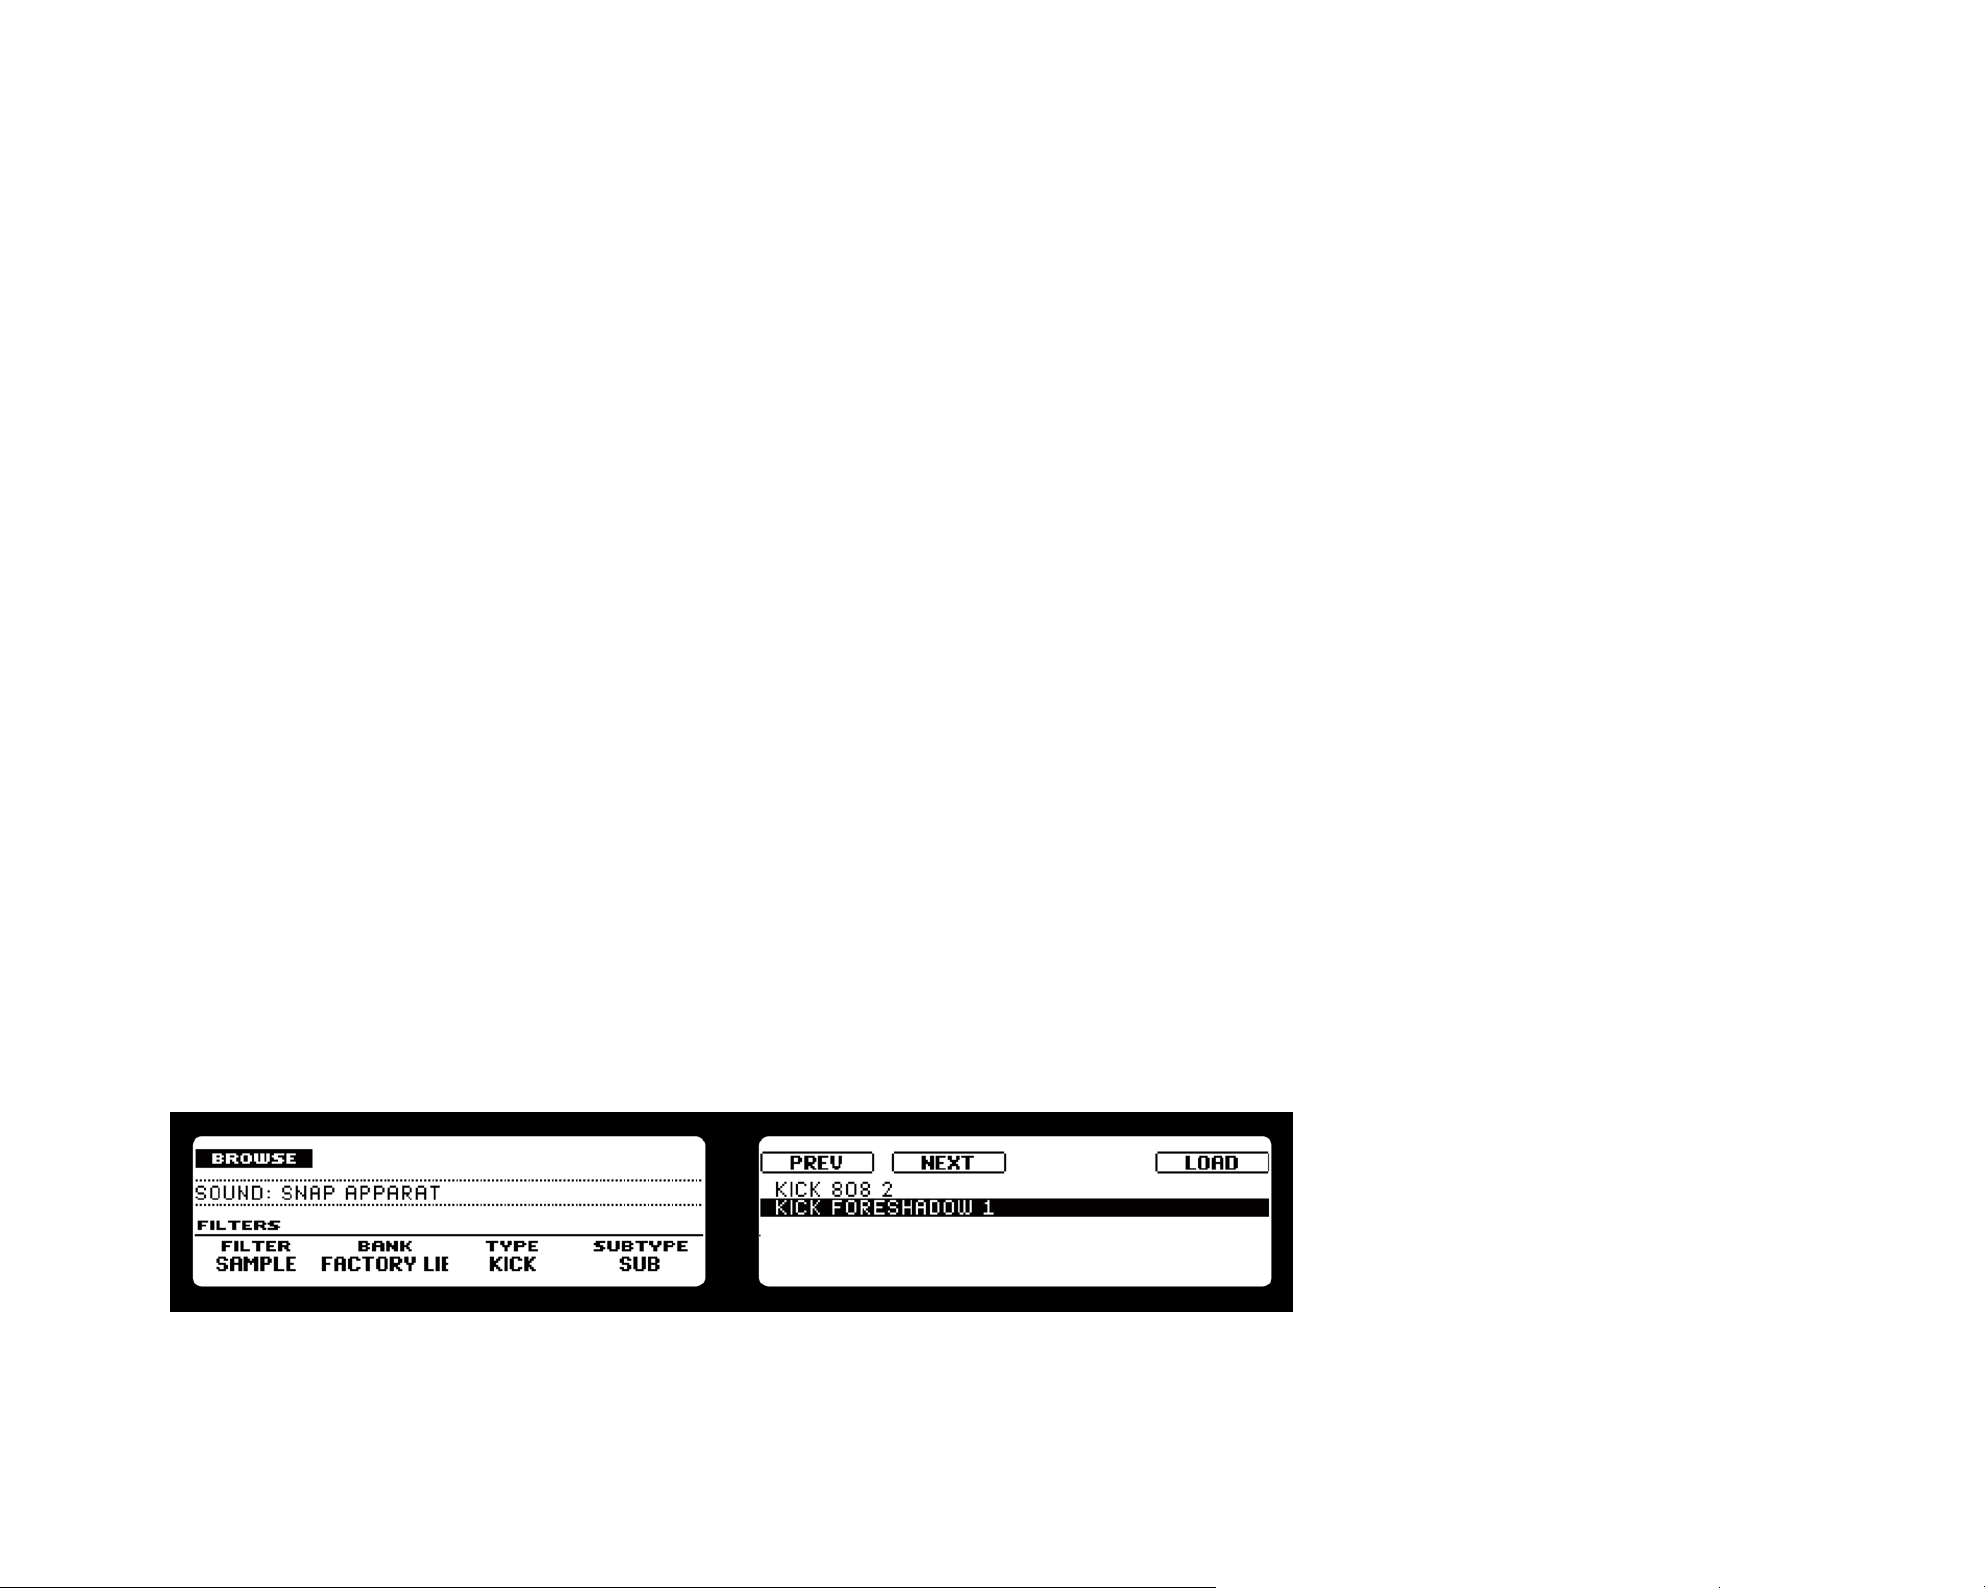
Since we are looking for a bass drum, rst turn Rotary Encoder 2 until the Factory
3.
Bank entry is set to “DRUM.” Turn Rotary Encoder 3 to select Type entry “KICK”, then
turn Rotary Encoder 4 until the Subtype is set to “SUB.” Using the Right Display and
Rotary Encoder 5 you can browse through all the bass drums now. With Button 8 you
can now load the selected bass drum into your Sound Slot.
The Browser on the Hardware
MASCHINE Getting Started – 15
Page 16
Software
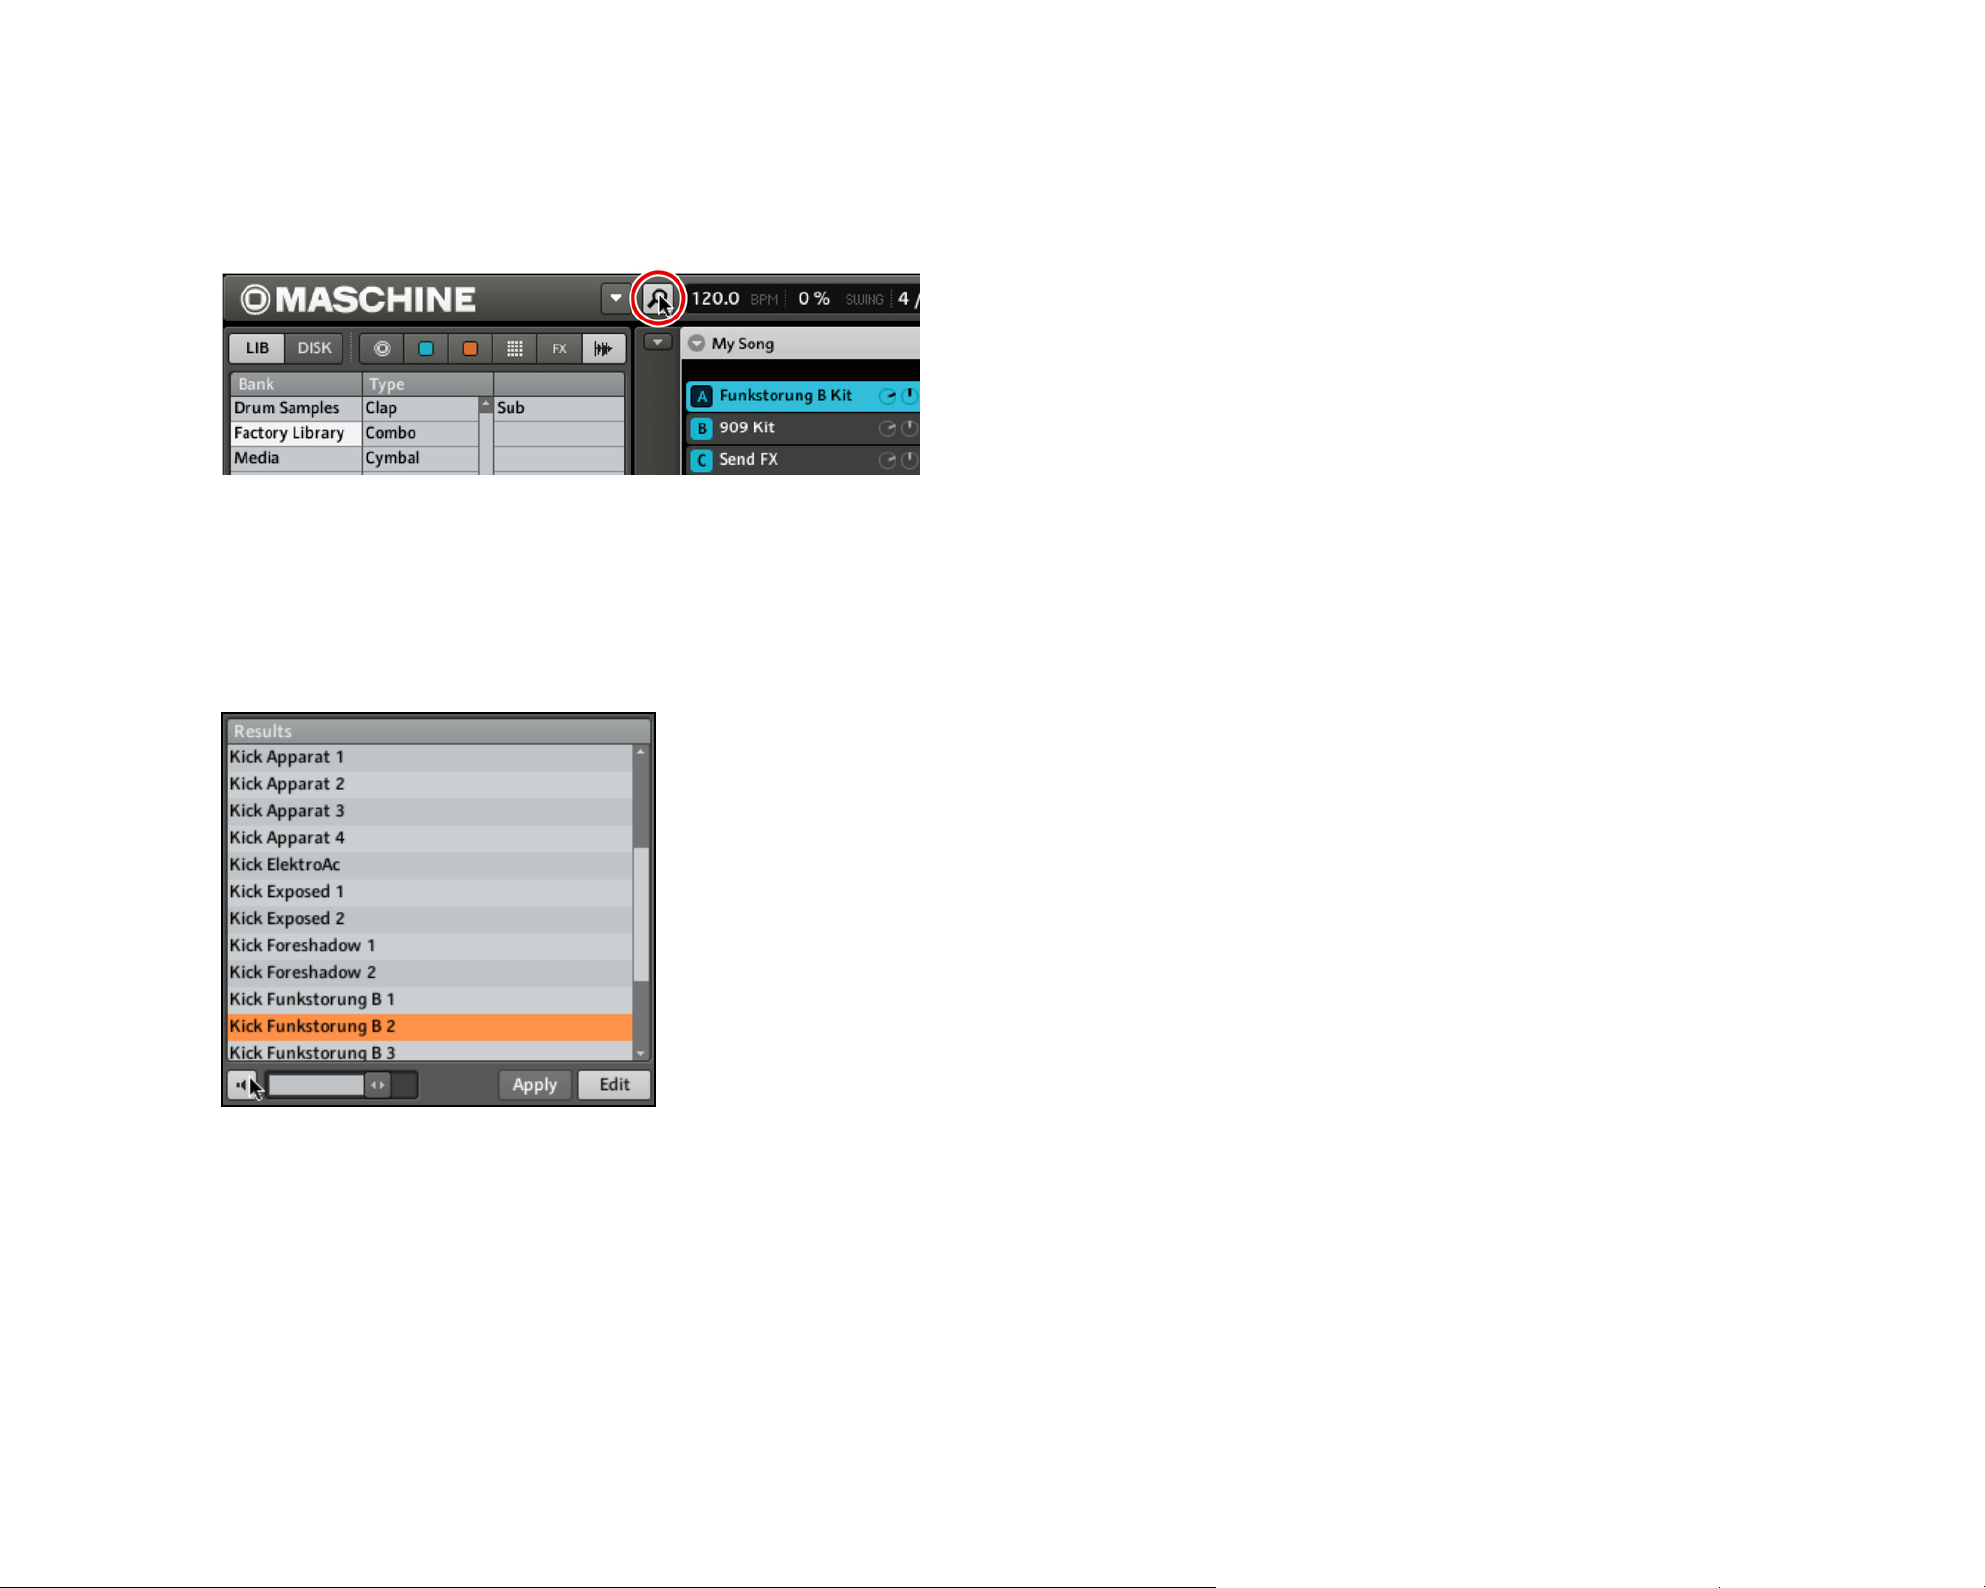
Click the B
1.
rowSEr BUtton
in the top row to show the Browser within the MASCHINE
window:
Click the Browser Button to open the Browser.
2. We will start by nding a bass drum for our Pattern: In the top row of the Browser, click
on lIB to select your library, then click the SamplE ICon to get a list of all the available
samples in the library. Now activate Prelisten by clicking the a
UdItIon BUtton
(with the
loudspeaker symbol on it) underneath the list:
A List of Samples in the Browser. Click the Audition Button to listen to the samples as you select them.
3. You can listen to the Samples by clicking on their names.
4. Since we want to nd a bass drum rst, type “kick” into the empty eld above the
list of Samples. As soon as you start typing, you will see the list below being updated
to display Samples matching your query.
MASCHINE Getting Started – 16
Page 17

The Browser, displaying a list of Samples that belong to the Search result “kick.”
5. Now you can listen to the available bass drums by clicking on their names in the list
and choose one you like.
Searching Samples by their names is not the only way to access the MASCHINE Library:
you can also use the Browser’s Tag Filter to narrow down your search using Tags.
4.2 Selecting Sounds and Creating a Group
Now that you know how to nd a Sample, we will create a Group which contains up to 16
Sounds and up to 64 Patterns associated with it.
Hardware
On the MASCHINE Controller, you were just browsing through the Samples using Rotary
Encoder 5. Found a bass drum that matches your taste? Okay, then load it by pressing
Button 8 on your MASCHINE Controller. It will be loaded into the focussed Sound and
thus be playable by hitting the respective Pad.
MASCHINE Getting Started – 17
Page 18
Software
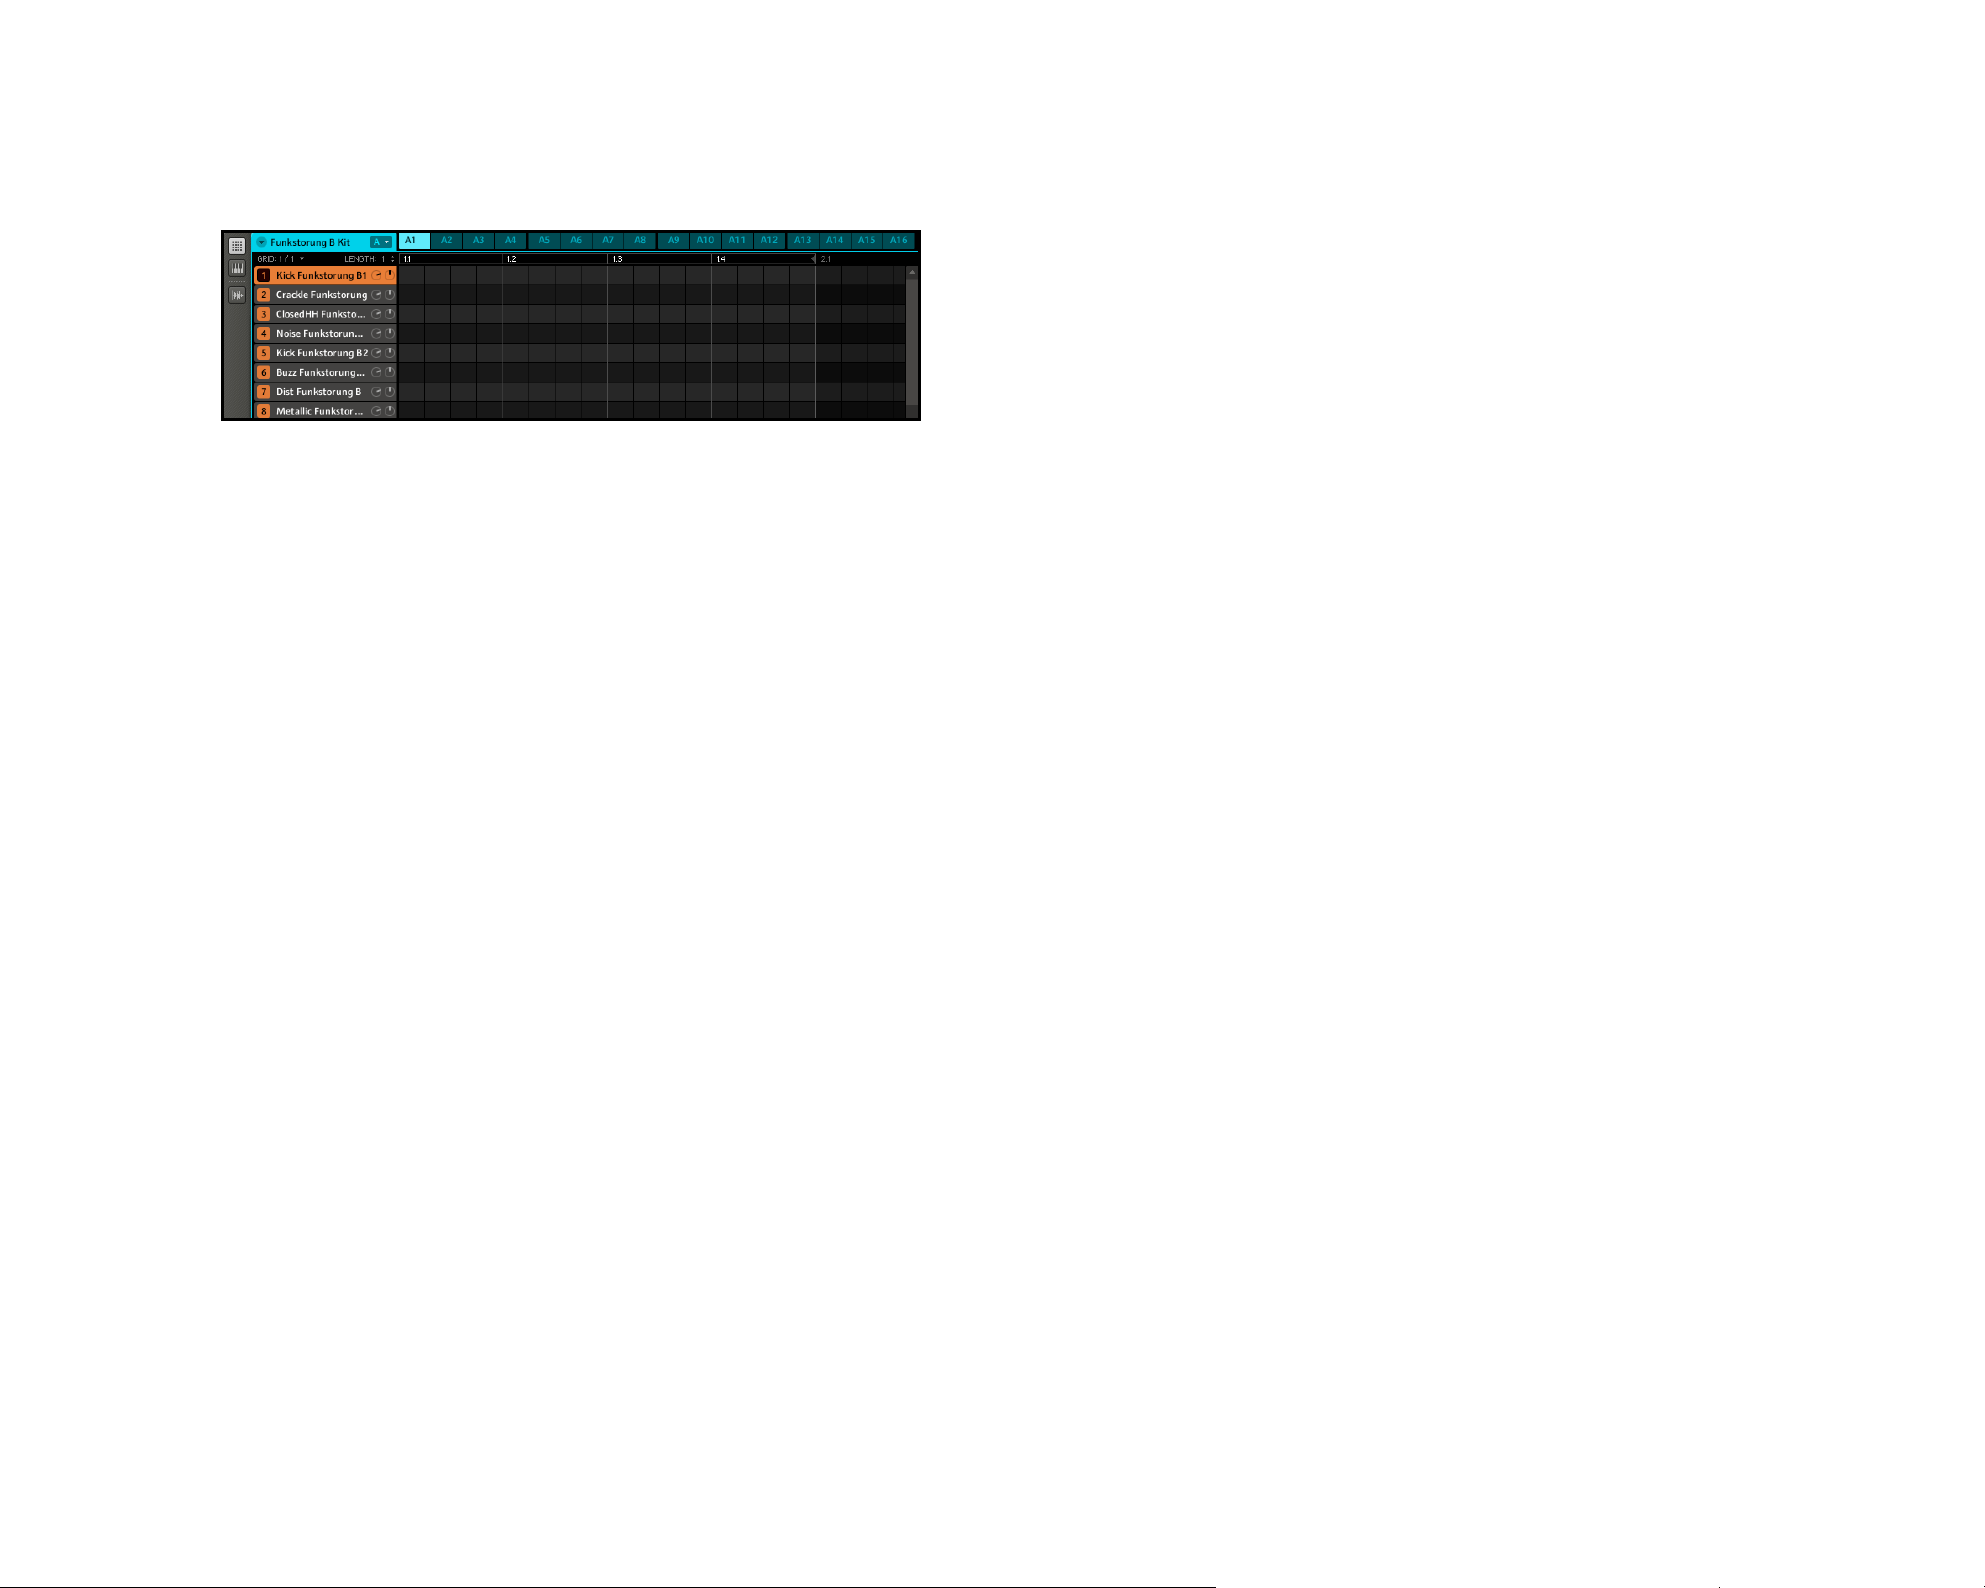
In the Pattern Editor, select Sound 1 by clicking on it:
1.
A Group with Sound 1 selected
2. Double-click on the Sample you want to use, in this case the bass drum. The display will
now show the name of the Sample instead of “Sound 1.” If you do not like the Sample’s
name that is being displayed, you can always change it by double-clicking on the Sound
Slot and typing in a new name. After you have loaded a Sample into Sound Slot 1, you
will recognize that Pad 1 on your hardware is lit. This indicates that there is a sample
assigned to Pad 1, so if you hit the pad, the bass drum sample will play.
In the same way you have just selected your bass drum, try to nd some other drum sounds
that make a good match: e.g. a clap, a snare drum, a hi-hat and maybe a rimshot, and
put together your drumset by assigning Sound after Sound.
MASCHINE Getting Started – 18
Page 19
4.3 Creating Patterns
Now that you have assembled a nice drum kit, let’s record a Pattern with it.
4.3.1 Adjusting Quantization using the Grid
The Step Grid property affects all Pattern editing actions, including quantization (“note
snap”). The default setting is 1/16th, however you may use another one or disable the
Step Grid completely.
Hardware
1.
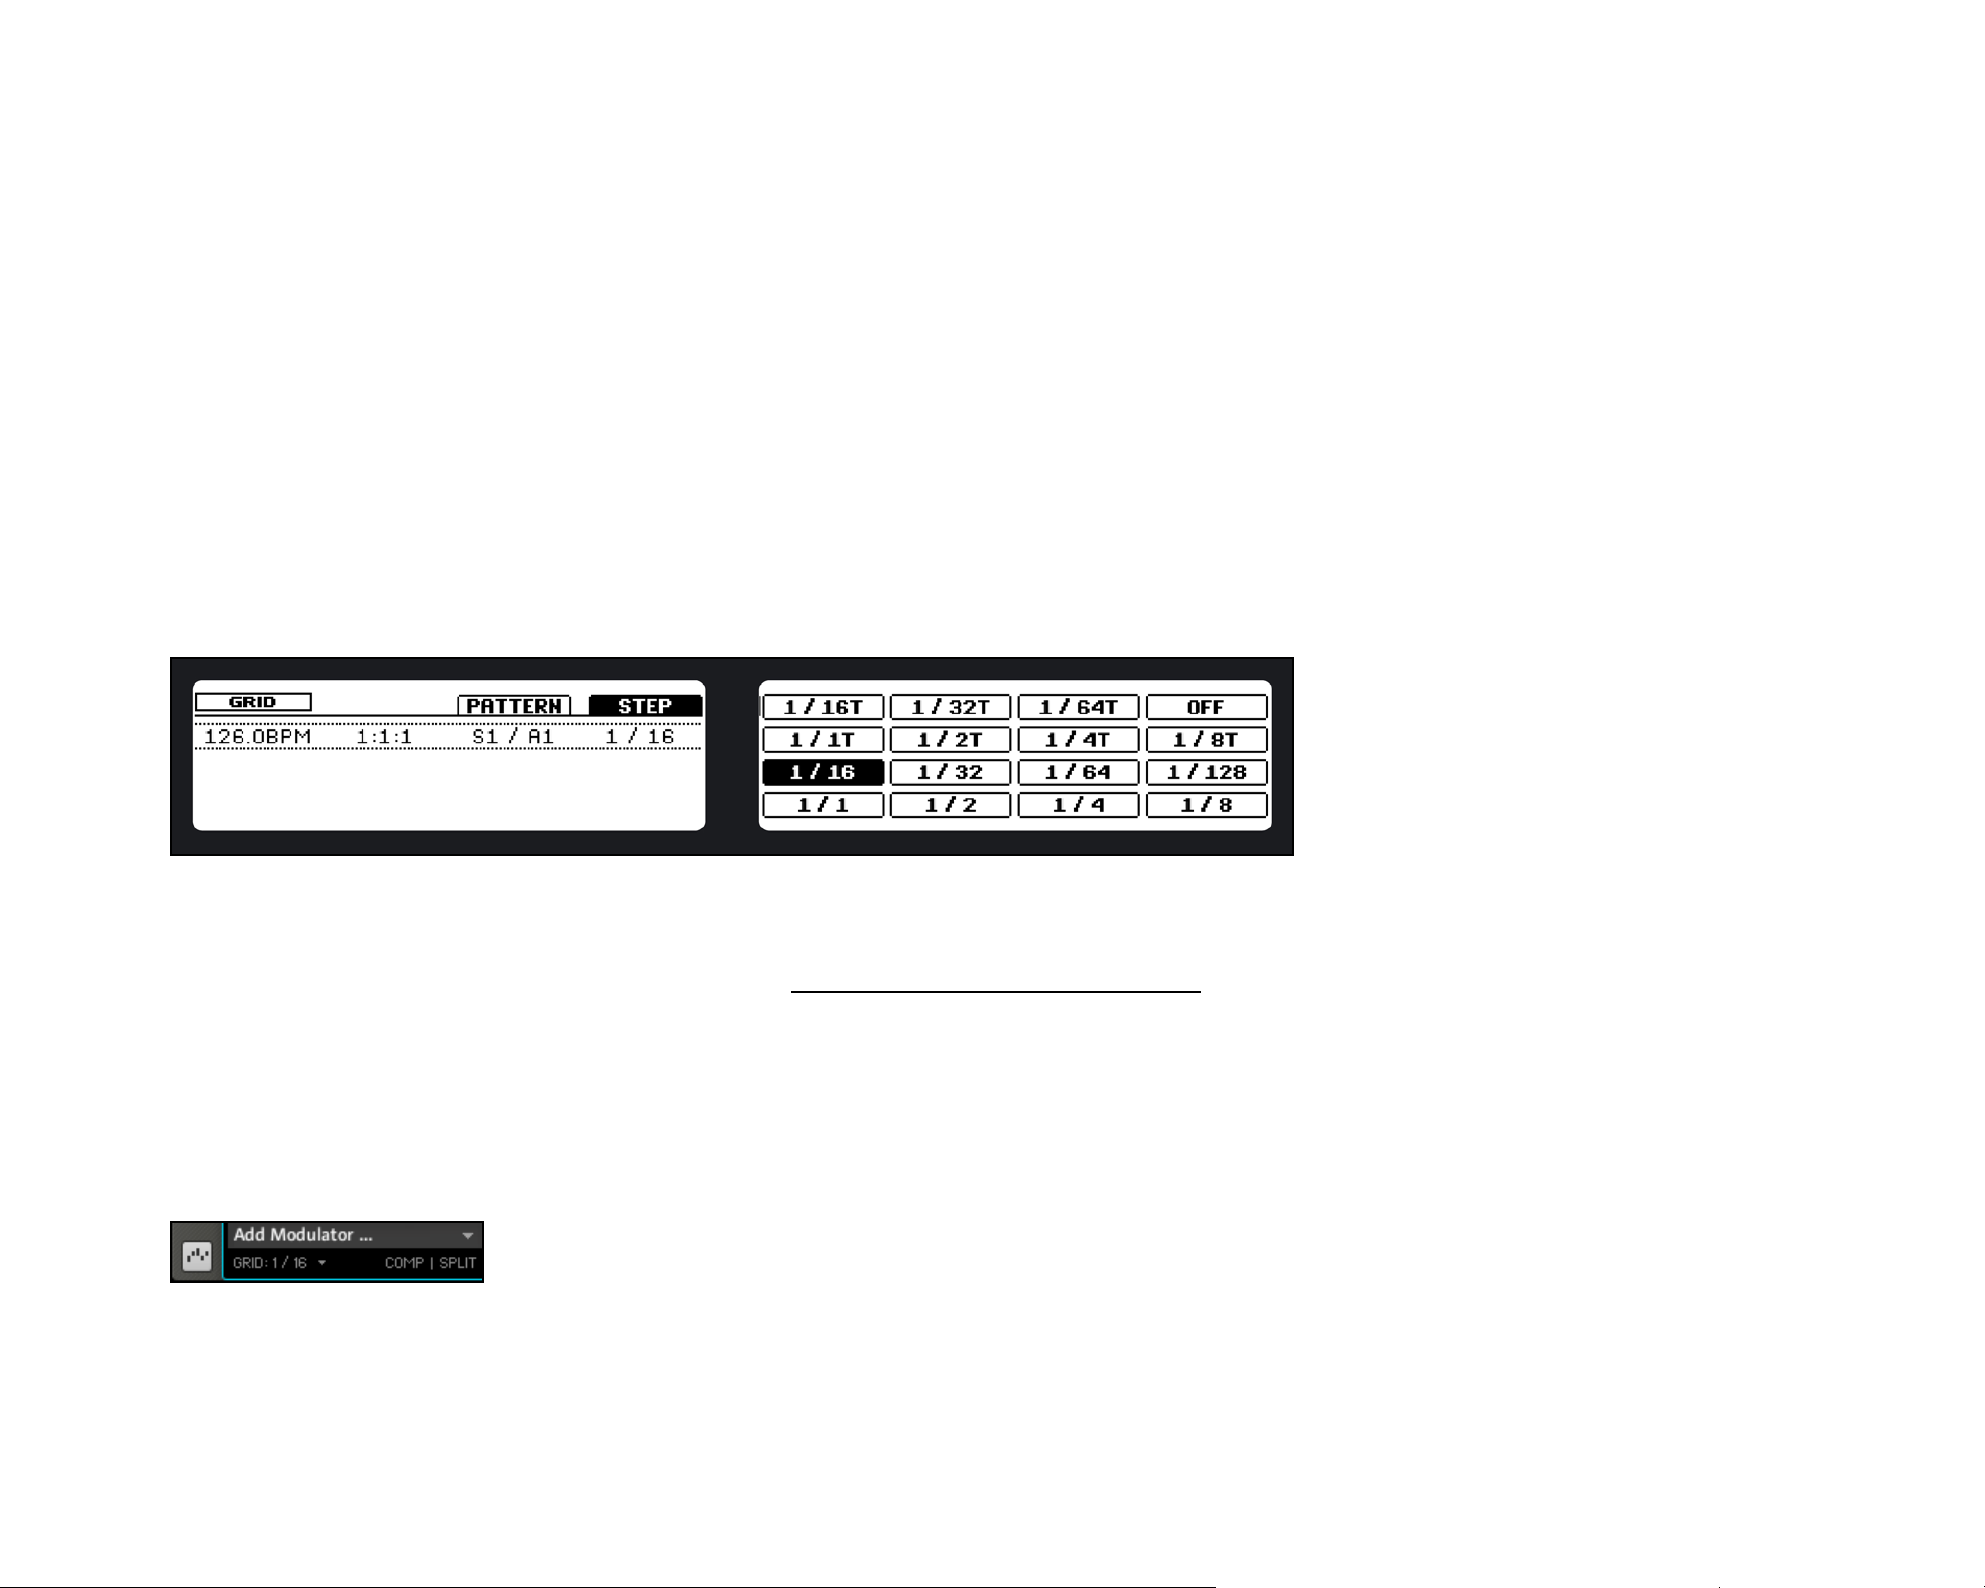
To change the Step Grid’s quantization settings, press and hold the Grid Button on the
MASCHINE Controller; the Right Display will show you which Pad represents which Grid.
The Right Display showing the available Grids
2. Select a Step Grid resolution by hitting the corresponding Pad.
If you want to adjust the Pattern Grid (see section 4.3.2 “Adjusting Pattern Length”), press
Button 3; then select a Pattern Grid resolution by hitting the corresponding Pad.
Software
The area to the right of the Sound Slots is called Step Editor. To change the Grid of the
Step , select a new value from the GrId mEnU:
The Grid Menu
MASCHINE Getting Started – 19
Page 20
4.3.2 Adjusting Pattern Length
Hardware
Adjusting the length of Pattern A1 by turning Rotary Encoder 1
To change the Pattern length, press the Pattern Button, then turn Rotary Encoder 1. Dialing
to the right will extend the Pattern, dialing to the left will shorten it. Adjust the step width
of the Pattern Length parameter (Pattern Grid) as described in the previous section.
Software
The Pattern Grid and Pattern Length Menus
The Pattern length is represented by the highlighted area of the Pattern. To change the
Pattern length, click in the Pattern Length Bar at the position you want your Pattern to
end. The Pattern length will resize to the mouse click position, quantized to the Arranger
Grid value. To change the step width that the Pattern length can be resized in, select a
resolution from the pattErn GrId mEnU.
MASCHINE Getting Started – 20
Page 21
4.3.3 Recording a Pattern
Now that you have chosen the Grid, let´s get going with the Pattern, starting with some
drums!
Hardware
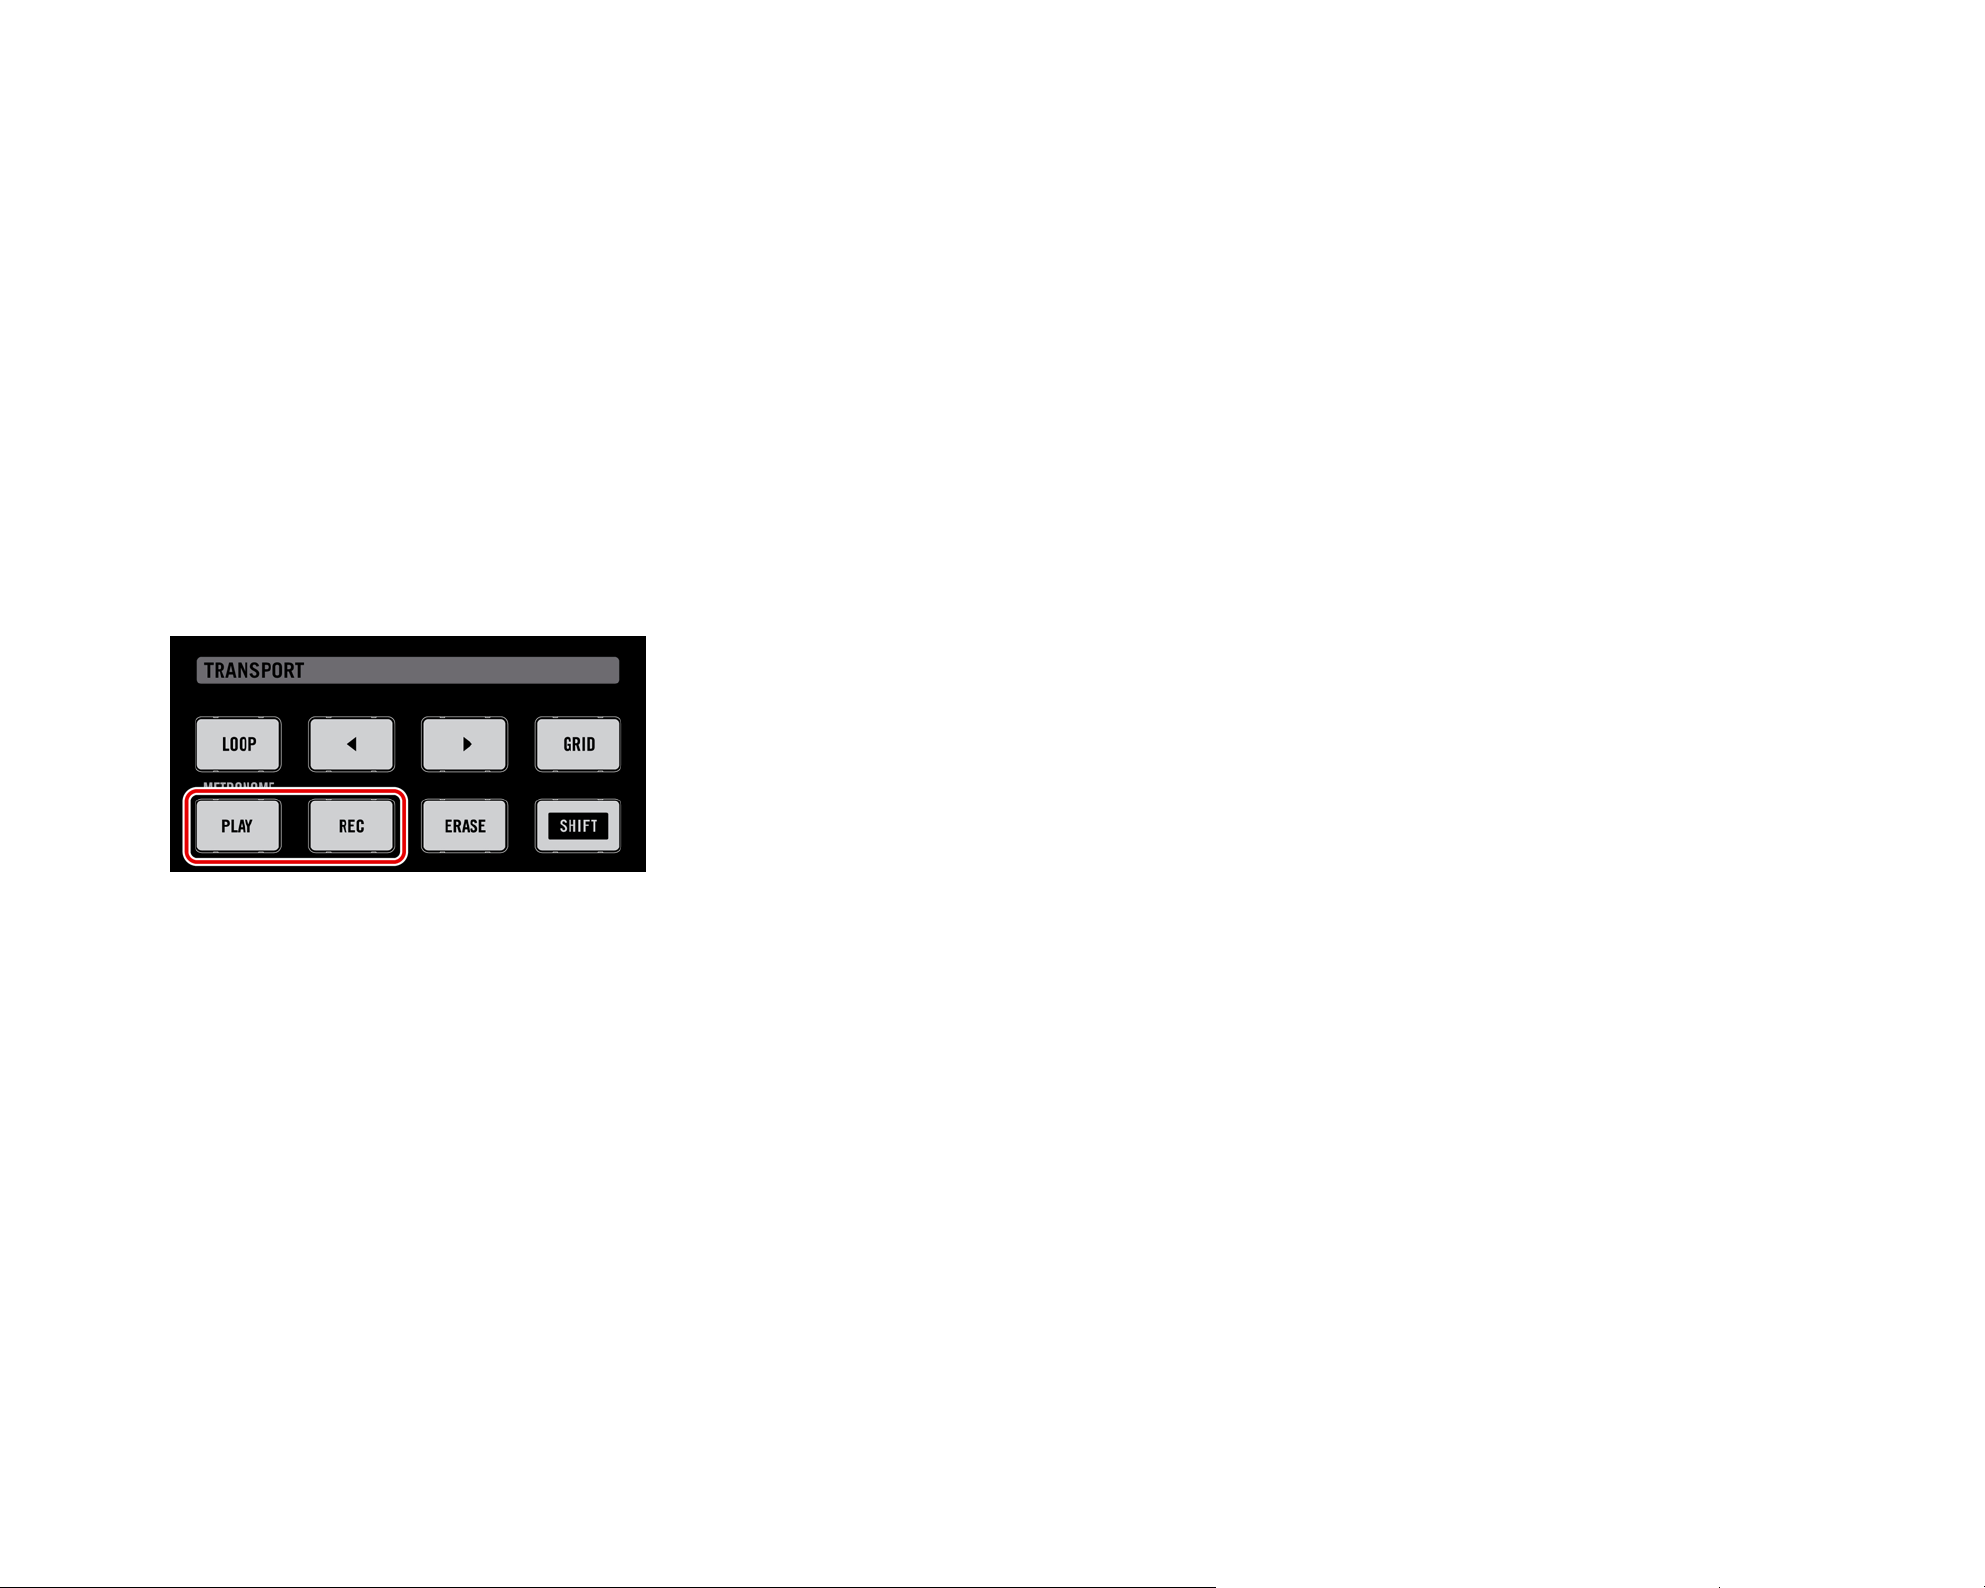
The rst possibility is to simply record some beats with the Pads: press the Play Button,
then the Record Button to enable Record Mode. Now hit the Pads you want to record and
listen to what happens. The Metronome will help you to keep the time when recording in
realtime. To activate the Metronome, hold down Shift and press Play. To deactivate the
Metronome, hold Shift and press Play again. If you want to quantize your recording afterwards, hold the MASCHINE Controller’s Shift Button and press Pad 5 (Quantize). Your
recording will be quantized according to the selected Grid
First possibility of recording a Pattern: press PLAY & REC and then play some Pads!
4.3.4 Step Sequencer
If you are familiar with classic drum machines such as those made popular by a well-known
Japanese company, you may want to program your Pattern using the Step Sequencer:
Hit the Pad with the Sound you want to record to select it.
1.
Press the Step Button. Now you will see a light chasing through the Pads, starting
2.
from Pad 1, going up all four rows from left to right and ending at Pad 16. Each Pad
now represents one step of a 16-step sequence: you can activate it by hitting the Pad
once, lighting it up. If you hit it again, the step is gone. This way it´s easy to quickly
put some drums together.
There is an Undo function
There is an Undo function
%
%
from the MASCHINE Controller: hold the
from the MASCHINE Controller: hold the
Shift Button and press Pad 1 to undo
Shift Button and press Pad 1 to undo
any pattern edits.
any pattern edits.
%
%
so if you want to program longer Patterns,
so if you want to program longer Patterns,
you will have to switch to the next 16 steps
you will have to switch to the next 16 steps
by using Buttons 7 and 8.
by using Buttons 7 and 8.
available that you can access
available that you can access
Only the rst 16 steps will be re-
Only the rst 16 steps will be re-
presented in the Step Sequencer,
presented in the Step Sequencer,
MASCHINE Getting Started – 21
Page 22

To switch to another Sound, use Buttons 5 and 6 on the left top of the Right Display.
3.
A typical 4/4 kick line in STEP mode
4.3.5 Note Repeat
Another possibility is using Note Repeat. It is a really handy way to program beats: it plays
the selected Sound automatically at a given quantization. While holding the Note Repeat
Button, press the Pad you want to record: notes will now be repeatedly triggered at the
selected rate shown on the Right Display. With Buttons 5 – 8, you can select different
quantization settings while playing. If you want to use quantization settings other than the
ones currently on display, turn Rotary Encoders 5-8, selecting the desired quantizations.
MASCHINE Getting Started – 22
Page 23

Software
In the MASCHINE Software, set a step by clicking into the Grid to the right of the respective Sound.
Adding Steps in the Grid on the Software
To clear the step, right-click (on Mac OS X: Control-click) it. You may also drag it to the
right or left, or stretch it by dragging its right border.
4.4 Creating Patterns in the Piano Roll/Keyboard Mode
There is an Undo function
There is an Undo function
%
%
from the MASCHINE software’s Edit
from the MASCHINE software’s Edit
menu or by pressing Ctrl/Cmd-Z on your
menu or by pressing Ctrl/Cmd-Z on your
computer keyboard.
computer keyboard.
available that you can access
available that you can access
Okay, drums might not be all we need, so what about a melody or bassline now? Choose
a tonal Sample in the way you chose a drum Sample as described in “Selecting Sounds
and creating a Group.” If you prefer to play your melodies with a MIDI keyboard, connect
it to the MIDI In on the Hardware. You can also use any USB MIDI keyboard selected in
the “Audio and MIDI Settings” of the MASCHINE Preferences. The connected MIDI input
device will always play the currently selected Sound.
The backside of the MASCHINE Hardware with the MIDI In
Try to experiment with all kinds
Try to experiment with all kinds
%
%
Keyboard Mode; some rather boring soun-
Keyboard Mode; some rather boring sounding Samples can be really interesting if
ding Samples can be really interesting if
you play them very low or very high!
you play them very low or very high!
of Samples in the Piano Roll /
of Samples in the Piano Roll /
MASCHINE Getting Started – 23
Page 24

Hardware
1.
Select your Sound by hitting the Pad it is assigned to.
2.
Now press the Keyboard Button. If you hit the Pads now, you will hear that they all play
the same Sound, but with different pitches each. The pitch scale is divided in halftones,
starting with Pad 1 as the lowest note going up to Pad 16 as the highest note.
3.
Press the Play Button, then the Record Button, and start to record your melody!
Software
1.
In order to select the Sound you want to record a melody with, click on it.
2.
Now click the Piano Roll/Keyboard Icon: the Grid that showed all Sounds of the Group
in one row now only shows the Sound you selected: by adding steps, you can choose
their pitch in halftones depending on where you put them, the lowest note being the
lowest row in the Piano Roll/Keyboard Editor.
The Software view of the Piano Roll/Keyboard Editor
In the next chapter, you will learn how to add effects and get to know the powerful routing system of MASCHINE.
MASCHINE Getting Started – 24
Page 25

4.5 Mute & Solo
“Muting” is used to bypass the audio signal of either a Sound or a Group, whereas
“Soloing” is pretty much the opposite: it mutes all other Sounds and Groups, so that
you can listen to the selected Sound or Group alone. The combination of both is a useful
means to play live and to test different sequences together.
4.5.1 Hardware
Solo
Press the Solo Button and hold it: now you can Solo Sounds by hitting their Pads and
Groups by hitting the corresponding Group Buttons. Solo is a temporary mode, therefore
you will have to hold the Solo Button to access it. If you press Solo and Button 1 at the
same time, the Solo function gets locked, e.g. you stay in Solo Mode until you press Solo
again.
Mute
Mute works in the same way as the Solo Mode: hold the Mute Button to mute Sounds by
pressing their respective Pads, and Groups by pressing the Group Buttons. You can also
lock Mute by pressing Button 1 at the same time and unlock it by pressing Mute again.
MASCHINE Getting Started – 25
Page 26

4.5.2 Software
Solo
To solo a Sound, right-click (on Mac OS X: Control-click) on the Pad icon in the Pattern
Editor:
Soloing the Kick 909 Sound
To unsolo it, right-click (on Mac: Control-click) on the Pad icon again.
To solo a Group, right-click (on Mac: Control-click) on the Group icon in the Arranger:
Soloing a Group
To unsolo it, right-click (on Mac: Control-click) on the Group icon again.
MASCHINE Getting Started – 26
Page 27

Mute
To mute a Sound, click on the Pad icon in the Pattern Editor:
Muting a Sound
To unmute the Sound, click on the Pad icon again.
To mute a Group, click on the Group icon in the Arranger:
Muting a Group
To unmute the Sound, click on the Group icon again.
MASCHINE Getting Started – 27
Page 28

5. Using Effects & Routing
Now that we have created the Pattern, let’s spice it up with some Effects. MASCHINE
provides a healthy selection of 20 Effects (FX) that can be applied on Sounds, Groups
and the Master, all as Insert Effects. By using the Routing System, Effects can also be
applied to external Inputs and set up as Send Effects.
5.1 Available FX
The Effects cover a wide range of sonic possibilities; for an in-depth description of all
Effects and their parameters, read the “Effects” chapter in the MASCHINE Reference
Manual.
MASCHINE FX are really designed to be modulated! Thats when the sounds really come
to life - when you start recording the knob movements. How to do that is described in
section 5.6 “Automating FX and Sampler Parameters”.
5.1.1 Dynamics
Limiter
The Limiter ensures that the signal level stays below 0db, thus preventing digital clipping.
It is recommended to place the Limiter in the Master FX slot. The Limiter can also increase
the perceived overall perceived volume by reducing the threshold. Note that the Limiter
introduces a small latency.
Maximizer
The Maximizer reduces the dynamics within the sound, making the overall sound louder.
Compressor
Classic compression effect to control the dynamic information of an audio signal.
MASCHINE Getting Started – 28
Page 29

Gate
The Gate cuts parts of the input signal which fall below the input threshold. This can be
used to rhythmically chop the signal and make it sound more “punchy.”
5.1.2 Modulation
Chorus
The Chorus is useful to “thicken” signals and enhance the stereo content. It is most ef-
fective on melodic sounds.
Flanger
Standard Flanger with LFO and envelope-follower modulators.
Phaser
Standard Phaser with LFO and envelope-follower modulators.
FM
FM modulates the frequency of the audio signal based on FM synthesis. High frequency
settings are useful for adding a subtle “gritty” texture to the input signal.
Freq Shifter
The Frequency Shifter allows for shifting selected frequencies of the audio signal.
MASCHINE Getting Started – 29
Page 30

5.1.3 Filtering
Filter
Filter with selectable characteristics that can be modulated via LFO or envelope fol-
lower.
EQ
Use the EQ to boost or cut selective frequencies of the audio signal.
5.1.4 Spatial and Reverb
Reverb
The Reverb adds room information to the signal, making it sound more spacious and natural. It is particularly suited to drum sounds.
Metaverb
Like the Reverb, the Metaverb adds spacial room information. However, in contrast to
the Reverb it has a much more “synthetic” sound, which is particularly suited to melodic
content.
Ice
Ice includes a bank of self-oscillating lters for interesting and colorful effects.
Reex
At moderate settings the Reex can be useful to emulate small, “tight” rooms. At more
extreme settings, it can produce interesting articial, metallic textures.
MASCHINE Getting Started – 30
Page 31

5.1.5 Distortion
Saturator
The Saturator combines compression and saturation to increase the overall loudness and
add additional harmonics. The Contour control determines how closely it responds to the
input volume.
Distortion
Combining overdrive, feedback and modulation, the Distortion produces a heavy distortion/fuzz effect.
Lo
The Lo effect reduces the Bitrate and Sample Rate of the audio signal for an interesting
“vintage” effect at subtle settings, and heavy digital distortion at extreme settings.
5.1.6 Delay
Beat Delay
The Beat Delay is a delay that is specialized for creating delays that are synced to the
tempo.
Grain Delay
By chopping the input into small grains, the Grain Delay is useful for creating ambient
textures. Increase Size, Space and Density to quickly transform any sound into an evolving ambient texture.
MASCHINE Getting Started – 31
Page 32

5.2 Applying FX to a Sound
You can apply two Effects directly to each of the Sounds of a Group.
Hardware
1.
Press Button 4 to put the focus on the Sound Tab which gets selected on the Left
Display, then hit the Pad with the Sound you want to apply the Effect to.
On the Right Display, you can now see the Modules FX1 and FX2. Select FX1 by
2.
pressing Button 6.
The Right Display showing the Modules FX1 and FX2
3. To choose an Effect for Module FX1, press Shift followed by Browse. The Right Display
now shows the list of the available Effects.
The Right Display showing a list of available Effects
4. You can browse through the available Effects by turning Rotary Encoder 5. When
you’ve found an Effect you want to apply, press Button 8 to load it into Module FX1.
You can also use Buttons 5 and 6 to step through the list and load the FX directly.
MASCHINE Getting Started – 32
Page 33

Software
Click on the Sound Tab to select the Sound you want to apply Effects to. The actual
1.
Sound that you assign the FX to is always the one currently in focus; in the example
underneath it´s the Clap 909 Sound.
The Sound Tab with the Clap 909 Sound in focus
2. Choose one of the two FX Modules (in this case we choose FX1) and click the Arrow
to the right to get a list of all available FX:
The dropdown menu of the FX1 Module showing the Effects
3. As an example, let´s choose the Reverb effect. After selecting it with the mouse, you
will nd the parameters displayed in the FX1 Module:
The parameters of the Reverb, ready to be tweaked
4. Now you can try out some of the parameters: turn the Size knob for a bigger Reverb
or adjust the Stereo Width by using the Stereo knob.
MASCHINE Getting Started – 33
Page 34

5.3 Applying FX to a Group
You can apply two Effects directly to each Group. The Effects will then be applied to all
the Sounds in the Group.
Hardware
1.
In Control Mode, press Button 3 to put the focus on the Group Tab which gets selected
on the Left Display, then press the Group Button of the Group you want to apply the
Effect to.
On the Right Display, you can now see the Modules FX1 and FX2. Select FX1 by
2.
pressing Button 6.
Pressing Button 6 on the Right Display
3. To choose an Effect for Module FX1, press Shift followed by Browse. The Right Display
now shows the list of the available Effects.
4. You can browse through them by either turning Rotary Encoder 5, or by using Buttons
5 and 6.
5. When you’ve found an Effect you want to apply, press Button 8 to load it into
Module FX1.
The Right Display showing the Load option
6. Now you can edit the Effect using the Rotary Encoders!
MASCHINE Getting Started – 34
Page 35

Software
Click on the Group Tab to switch to the Group level:
1.
The selected Group Tab
2. In the same way that FX get applied to the Sound currently in focus, they get ap-
plied to the Group currently in focus, so make sure to have your Group in focus in the
Arranger:
The Group in focus on the Arranger
3. Since our Group is mainly for drums, let´s apply some compression by adding the
Compressor to the FX1 Module:
MASCHINE Getting Started – 35
Page 36

The list of available Effects for the Group
4. Play around with the parameters of the Compressor to get used to it!
5.4 Master FX
You can apply two Effects to the Master so that all your Sounds and all your Groups together are being sent into the Effect.
Hardware
1.
Press Button 2 to put the focus on the Master Tab which gets selected on the Left
Display.
2.
On the Right Display, you can now see Modules FX1 and FX2. Select FX1 by pressing
Button 6.
3.
To choose an Effect for Module FX1, press Shift followed by Browse. The Right Display
now shows the list of the available Effects. You can browse through them by either
turning Rotary Encoder 5, or by using Buttons 5 and 6.
MASCHINE Getting Started – 36
Page 37

The list of available Effects for the Master on the Right Display
4. When you’ve found an Effect you want to apply, press Button 8 to load it into Module FX1.
Let´s take the EQ here: use Rotary Encoders 1-8 to adjust the frequencies and get
to know the EQ.
The parameters of the EQ on the Left and Right Display
Software
You might have realized now how this is going to start: rst you select the Master Tab and then
you click on the Arrow on the right of the FX1 Module to select an Effect for the Master.
Since we want to ne-tune the frequencies of the Song, we choose the EQ this time.
The list of available Effects for the Master
Use the mouse to turn the knobs on the EQ Module.
MASCHINE Getting Started – 37
Page 38

5.5 Muting FX
Muting FX might come in handy whenever you want to return to a dry, unaltered signal:
such as after applying so much Reverb that you can´t hear the dry signal anymore or to
get rid of the Feedback while using the Delay for example.
Hardware
1.
Depending on the Tab you used the Effect on, press either Button 2 (for the Master),
Button 3 (for a Group + the Group Button) or Button 4 (for a Sound + the Pad containing the Sound).
Now the Right Display shows the FX Modules. To mute one of the FX, press Shift
2.
followed by either Button 6 (for FX1) or Button 7 (for FX2).
The Right Display with FX1 and FX2 muted
3. To unmute the FX, press Shift followed by the respective Button (6 or 7) again.
Software
1. Select the Tab where you want to mute the Effect (either Sound, Group or Master) by
clicking on it.
2. Make sure you have the right Sound (click on it on the left of the Grid) or Group (click
on it on the left of the Arranger) in focus. For the Master, select the Master Tab.
3. Now click on the label (orange if it is a Sound, blue if it is a Group, white if it is the
Master) on the left side of the FX Modules to mute and unmute the desired Effect.
MASCHINE Getting Started – 38
Page 39

Muting the Reverb
5.6 Automating FX and Sampler Parameters
One of the really cool features of MASCHINE is the ability to automate parameters from
the FX Modules and the Sampler Modules both on the Hardware and on the Software in
a very easy way.
Hardware
To automate a parameter with the Hardware, rst make sure the song is playing, then
simply turn one of the 8 Rotary Encoders while holding down the F2 Button.
Your automation gets recorded now; if you want to discard it and try again, press Erase,
hold it and turn the Rotary Encoder again to delete the Automation of this parameter.
It is also possible to record Automation in the Step Sequencer: enter the Step Sequencer
by pressing the Step Button. Hold the Pad representing the Step you want to automate and
turn one of the Rotary Encoders with the parameter you want to record Automation for.
Software
If you take a closer look at the knobs on the parameter pages you will notice they have
an outer ring.
You can record Automation by moving that ring with a left click on it and then dragging
it up and down.
MASCHINE Getting Started – 39
Page 40

The outer ring of the knobs, used for automation
►
To remove the Automation, simply right-click (on Mac: Control-click) on that outer ring.
►
To edit the Automation, drag the automation points in the Automation Lane.
The Automation Lane
MASCHINE Getting Started – 40
Page 41

5.7 The Input Module and Advanced Routing
The Routing features allow for a exible way to handle routings within MASCHINE and
together with external instruments. Since the Routing capabilities are quite powerful, we
will focus on two common usage scenarios: routing external audio into the FX and setting
up Send FX.
For more in-depth information, please read the “Routing” chapter of the MASCHINE
Reference Manual.
5.7.1 Applying an Effect to an external audio source
Please make sure that you have connected an external audio signal source to your soundcard and that the inputs of the soundcard are activated. Open Audio and Midi Settings
from the File Menu.
Now activate the desired inputs by clicking on them; then click OK:
The Inputs of the soundcard
Audio signals coming from external sources will now be routed to MASCHINE’s FX section!
MASCHINE Getting Started – 41
Page 42

Hardware
First choose an empty Group by selecting it with one of the Group Buttons.
1.
Select an empty Sound Slot by pressing Button 4 and then one of the Pads, let´s say
2.
Pad 1.
Press Button 5 to select SRC (source). After that press and hold Shift, followed by
3.
Browse.
By using Buttons 5 & 6 or Rotary Encoder 5 you can select between Sampler and
4.
Input. Select Input and press Button 8 to conrm your selection.
Selecting the Input Source
5. You now can select your external source by turning Rotary Encoder 2. Then select
effect slot FX1 by pressing Button 6.
6. Press Shift followed by Browse: now you see the list of the available Effects.
7. Choose an Effect and load it using Button 8. Now the external audio will be processed
by the Effect.
Software
Choose an empty Group by selecting it in the Arranger, then choose one of the Sound
1.
Slots by clicking on it.
Select the Sound Tab and then click on the Source Tab.
2.
On the right of the Source Tab, you will nd an Arrow. Click on it and you will be pre-
3.
sented with two options in the dropdown menu: Sampler and Input. Choose Input.
MASCHINE Getting Started – 42
Page 43

Selecting the Input Module
4. You will now see two parameters: one knob for the Level of the external input and a
Button that lets you select a Source. Select Ext In 1 as the Source.
Selecting the Input Source: Ext In 1
5. Click on the FX1 Module next to the Input Module and select an Effect using the
Effect Menu from the upper right corner of the FX1 Tab. Now the external audio will
be processed by the Effect!
5.7.2 Setting up a Send Effect
Sometimes you may want to have a classic Send Effect, for example a classic reverb which
can be shared by multiple sound sources. This is how to set it up.
Hardware
Lets send the Snare of the 909 Kit to a Reverb Send Effect. Load the 909 Kit by
1.
double-clicking it in the Browser and create a basic Pattern.
Now select an empty Group with an empty Sound Slot, let´s say Sound 1. Select it
2.
by pressing its Pad.
Press Button 5 to select the Source Tab (SRC). After that press Shift and Browse.
3.
By using Buttons 5 & 6 or Rotary Encoder 5 you can select either Sampler or Input.
4.
Select Input and press Button 8 to conrm your selection.
MASCHINE Getting Started – 43
Page 44

Selecting the input source
5. To select an Effect Slot, press the Control Mode Button and then select FX1 by press
-
ing Button 6.
6. Press Shift followed by Browse: now you see the list of the available Effects.
7. Choose the Reverb, and load it using Button 8. Switch back to Control Mode by press-
ing the Browse Button again or pressing the Control Mode Button.
8. Now get back to the 909 Kit Group and select the Snare Sound by pressing Pad 2.
9. Go to the Output Tab (OUT, Button 8) and turn Rotary Encoder 5 to select the Aux 1
destination: choose Sound 1 out of the list.
As you can hear, the Snare is already being sent to the Effect; by turning the Aux 1 Level,
you can adjust the amount of signal that gets sent into the Reverb.
Software
Select the rst Sound Slot of an empty Group. Load the Reverb into the Sound Slot’s
1.
FX Tab.
Loading the Reverb
MASCHINE Getting Started – 44
Page 45

2. On the Source Tab (SRC), choose Input and leave the Source at Internal:
The SRC Input Tab
3. Now select the 909 Kit Group again and click the Output Tab (OUT) of the Sound
Snare 909:
The Output Tab
4. You can see the two Aux Sends, Aux 1 and Aux 2. In the dropdown menu of Aux 1,
choose Sound 1 to send the Snare 909 Sound to the Reverb in Sound 1:
Choosing Aux 1 Send
5. As you can hear, the Snare is already being sent to the Effect; by turning the Aux 1
Level, you can adjust the amount of signal that gets sent into the Reverb.
MASCHINE Getting Started – 45
Page 46

5.7.3 Routing Tips
For a better overview, rename the Sound you use as a Send Effect after the Effects
►
name.
You can build your own multieffects this way: up to two FX per Sound with 16 Sounds
►
per Group allow up to 32 different FX in one Group!
Since you can save Patterns together with your Group, you can also prerecord auto-
►
mation for your FX, for example lter sweeps or complex FX clusters with multiple FX
that you can use on your material.
The Routing in MASCHINE is a really powerful tool with a vast amount of possibilities.
You can set up your own FX Chains, route Sounds through several other Sounds or out
of your soundcard through a Hardware Effect and then back into MASCHINE. For more
information on Routing read the “Routing” chapter of the Reference Manual.
MASCHINE Getting Started – 46
Page 47

6. Creating a Song using Scenes
Creating a Song on MASCHINE is easy and straightforward. The basic concept is this:
Groups and their Patterns are combined in Clips, a Clip being a representation of a Group
with a specic Pattern. The Patterns are always named by their Bank and the Pattern
number: A1 is the rst Pattern of Bank A of the respective Group. A Song is divided into
up to 64 Scenes; the Scenes are Parts of the Song containing different Groups and their
Pattern content.
6.1 Creating a Clip in the Arranger
Each clip placed in the Arranger references one of the Patterns created in the Pattern
Editor. Therefore, when the content or length of a Pattern is edited, all referencing clips
in the Arranger will automatically get updated accordingly.
Hardware
Switch to Scene Mode by holding the Scene Button. The Right Display gives you an
1.
overview of the available Scenes. Hit Pad 1 to select Scene 1.
Enter Pattern Mode by pressing Pattern and lock it by pressing Button 1 at the
2.
same time.
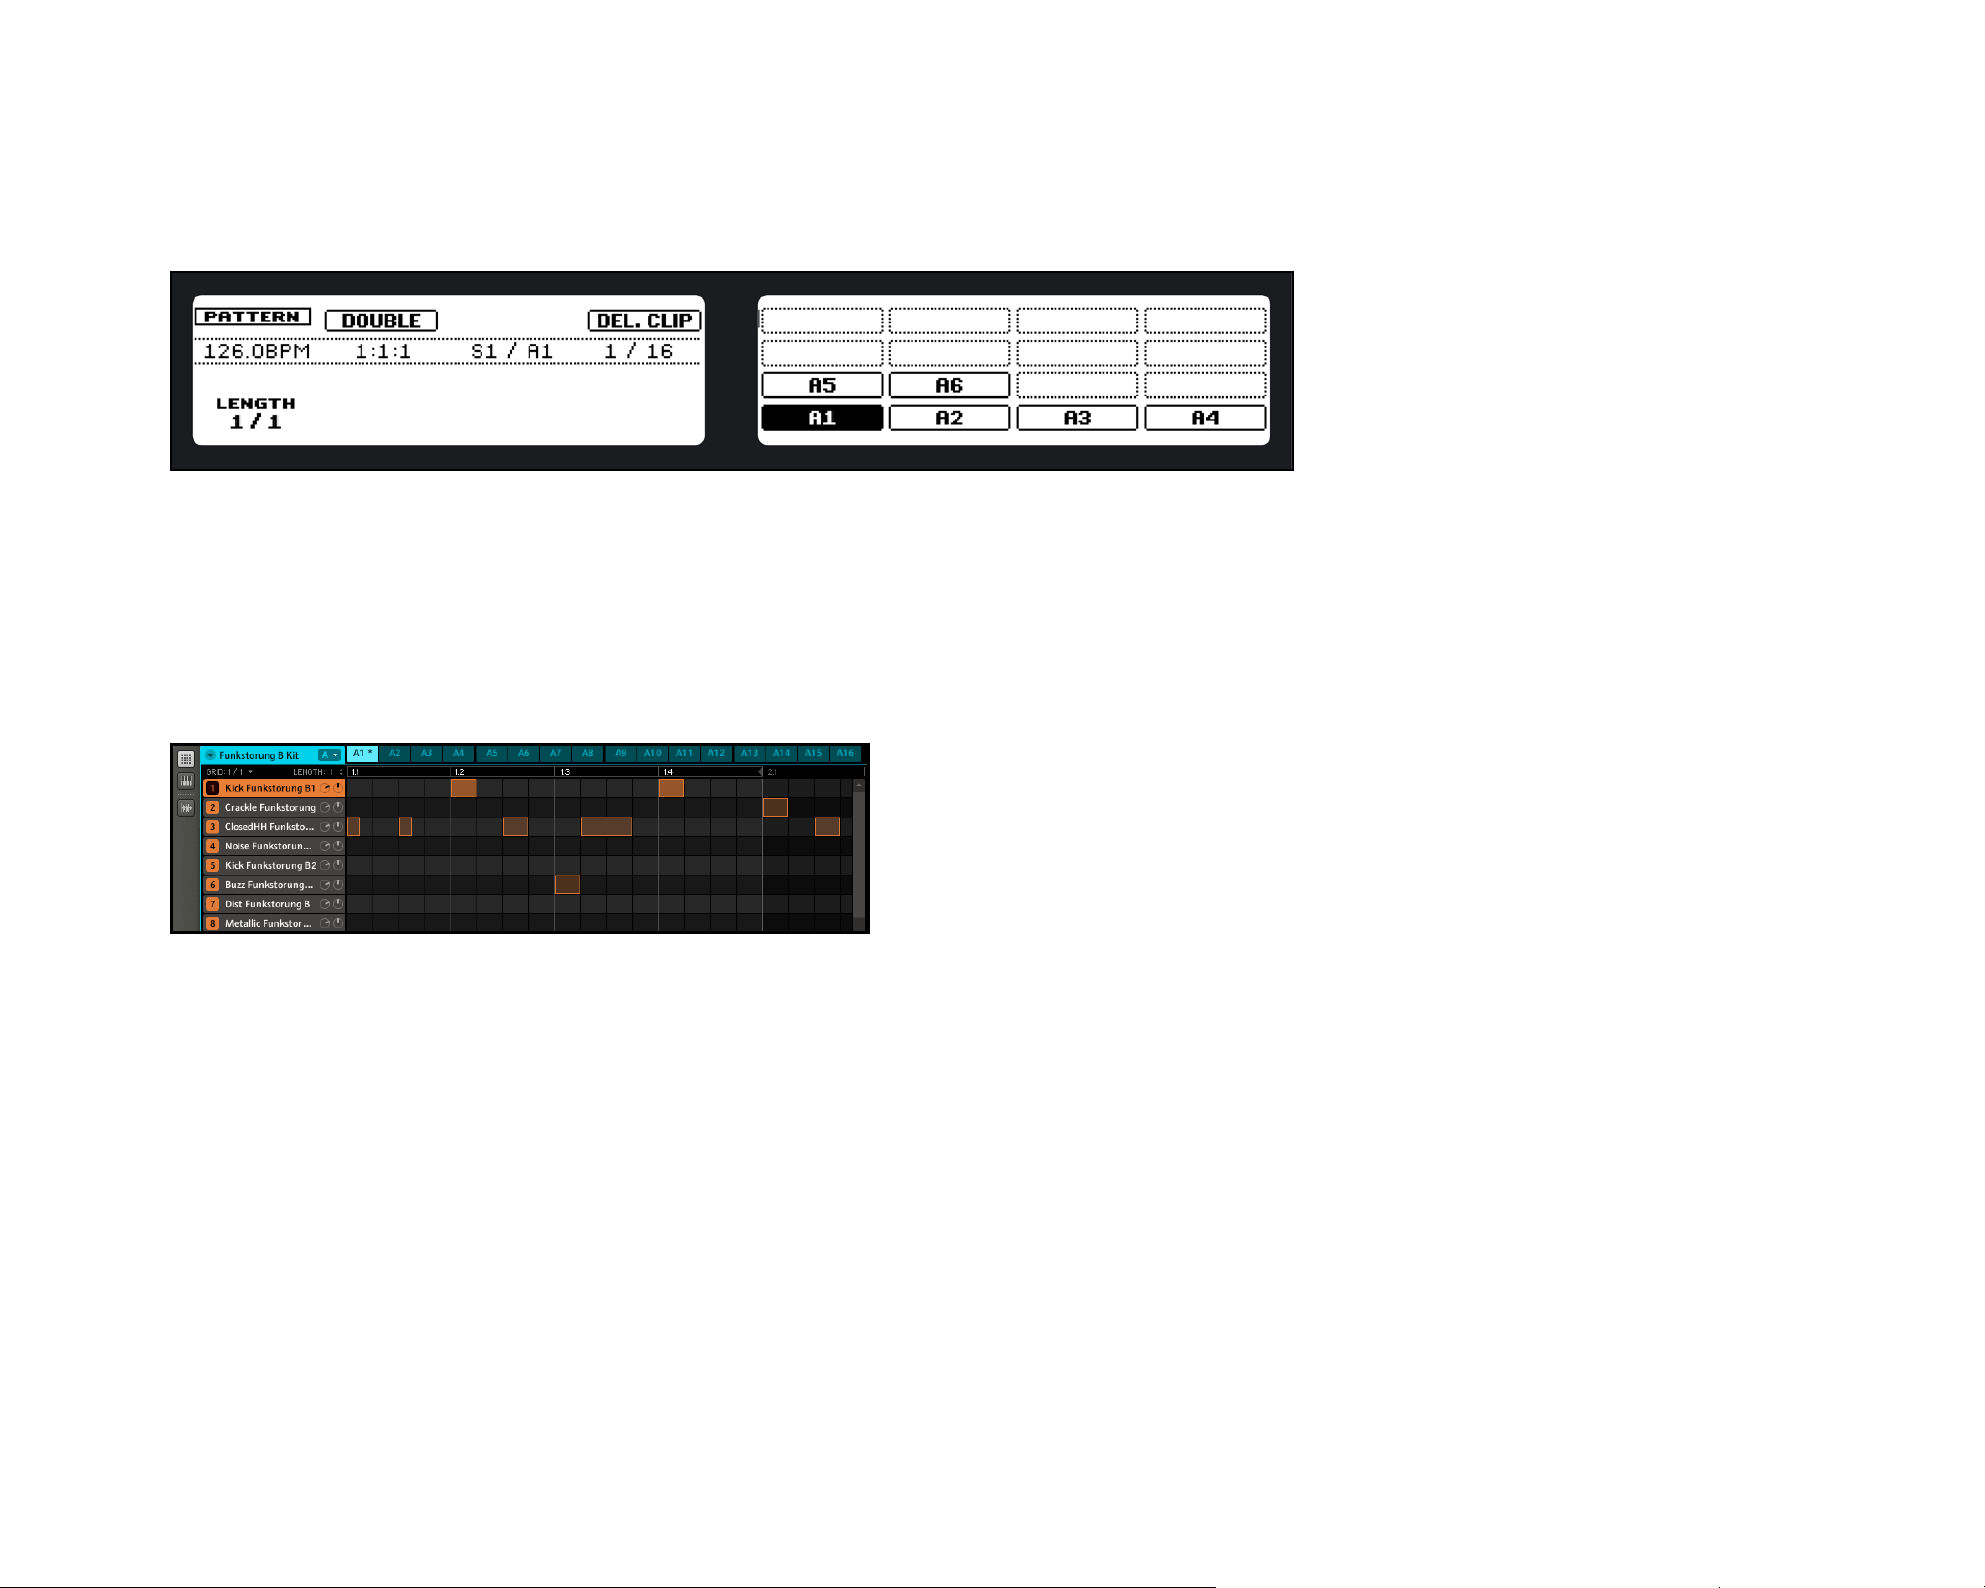
Choose your Pattern by selecting it with the Pads. Again the Right Display gives you an
3.
overview of the available Patterns. The selected Pattern will automatically be inserted
into the selected Scene.
Overview of the Patterns on the Right Display
MASCHINE Getting Started – 47
Page 48

4. To remove a Clip, press Button 4.
5. By pressing Button 2, you can double the Pattern length with the same content.
Software
Select the Scene you want to edit by clicking on the Scene Label in the Arranger Area.
1.
Selecting Scene 1
2. Select the Pattern you want to use in the Scene by clicking on it in the Pattern
Editor:
Selecting Pattern A1
3. A Clip, representing the selected Pattern, will be automatically inserted into the focused
Scene Column in the Arranger.
MASCHINE Getting Started – 48
Page 49

Creating a Clip
To delete a Clip, right-click (on Mac OS X: Control-click) it.
6.2 Inserting and Deleting Scenes
Hardware
1.
Enter Scene mode and lock it (press Scene and Button 1 at the same time).
2.
Using Button 3 (Insert) you can now copy the Scene currently selected to the following
Scene.
Inserting a Scene
3. To delete a Scene, press Button 4.
If there are already Scenes
!
they will get shifted upwards one Scene
number; respectively, if you delete a
Scene, the following Scene will be renumbered accordingly.
MASCHINE Getting Started – 49
behind the one being copied,
Page 50

Software
Select the Scene you want to edit by clicking on it.
1.
Now right-click (on Mac OS X: Control-click) and you will be presented with a dropdown
2.
menu allowing you to either cut (=delete), copy, paste or reset a Scene.
Editing options of a Scene
3. To rearrange Scenes, simply drag them to the place you want them to be.
6.3 Using the Loop Mode
A single selected Scene is always looping automatically. The Loop Mode allows you to
select several consecutive Scenes and play them one after the other in a Loop. This is
useful to check if the Scenes go well together and/or if the arrangement works.
Hardware
Enter Scene Mode by pressing the Scene Button and lock it by pressing Button 1 at
1.
the same time.
The loop range can be dened by selecting a start Scene and an end Scene. First,
2.
select the starting Scene by pressing the corresponding Pad. Then, while holding the
rst Pad, press the Pad corresponding to the end Scene.
MASCHINE Getting Started – 50
Page 51

Software
In Scene 1 click in the Arranger Timeline and drag to the right. The currently active Loop
will be highlighted. Release the Mouse Button in Scene 2. Now you will hear Scene 1 and
Scene 2 in sequence.
A Loop containing Scenes 1 and 2
Tip: Scene Surng!
By toggling between Scenes you can nd out if two Scenes are a good match, if you have
to add another one or edit it. Since the Scenes always loop, there is no break that could
disturb your inspiration! On the Hardware, press Scene together with Button 1 to lock it
and use the Pads to change between Scenes; on the Software, click in the Scene row on
the Scene you want to select.
MASCHINE Getting Started – 51
Page 52

7. Sampling
MASCHINE allows you to record internal or external audio signals using your soundcard.
This is a useful feature if you want to record your own Samples or rearrange Loops that
you have created yourself using MASCHINE.
Hardware
Choose an empty Sound Slot to record into by selecting it with its Pad.
1.
Now hit the Sampling Button to enter the Sampling Mode:
2.
The Record Pages on the Hardware Displays
2. You can choose the Source by using Rotary Encoder 1: it is either set to “External” for
audio signals connected to your audio interface, or “Internal” for audio signals from
MASCHINE itself (either from another Group, Sound or from the Master Output).
3. In this case we record from the Group called 909 Kit, so dial Rotary Encoder 1 to
select Internal followed by dialing Rotary Encoder 2 to select the 909 Kit Group.
4. There are two different ways to start a recording:
You can set a certain Threshold value, and the input signal level exceeding this
►
Threshold will start the recording.
You can synchronize the recording function to the sequencer by selecting the Sync
►
option, so that recording starts as soon as you start the sequencer.
Since we want to record a drumloop, we choose Sync by dialing Rotary Encoder 3,
and then dene a length of 1 bar by turning Rotary Encoder 4.
5. Now hit Button 5 (Start) and, since the recording is going to be triggered by the se-
quencer, press Play.
MASCHINE Getting Started – 52
Page 53

The Record Tab while a Sample is being recorded
6. After the recording is nished, the Right Display will show you the recorded Sample
as a waveform.
7. If you record multiple Samples, you can navigate between them by Button 7 and
Button 8. This is called the Recording History.
Software
First choose an empty Sound Slot to record into by clicking on its name.
1.
Now click the SamplInG Button right underneath the pIano roll/KEyBoard Button:
2.
The Record Tab
3. In the Record Tab, choose your Source. You can record Samples internally (check the
IntErn radio button) from another Group, Sound or the Master Output or from one of the
External Inputs (check the radio button labeled ExtErn). In this case we will record from
the Group called 909 Kit.
4. In the next Panel of the Record Tab, you can select a way to start the recording: either
by setting a Threshold value (adjustable with the mouse by dragging) or in Sync with the
Project Tempo. Since we want to record a drumloop from the 909 Kit, we choose Sync.
5. Click on the SynC radio button and enter a length of 1 bar using the mouse and dragging:
MASCHINE Getting Started – 53
Page 54

Entering the length in bars
6. Now hit Start and, since the recording is going to be triggered by the sequencer, Play.
7. After the recording stops, you will see the waveform of your Sample:
The waveform of the recorded Sample
8. Under the bigger waveform representing the recorded Sample, you can see a small icon
for each Sample that got recorded into this Sound Slot: this is called the Recording
History. You can drag the Samples to other Sound Slots to use them separately.
MASCHINE Getting Started – 54
Page 55

7.1 Editing a Sample
Hardware
With Button 2 you can reach the Edit Tab to edit the recorded Sample.
Change the Start and End point of the Sample with Rotary Encoder 1 and 2.
1.
Enable Loop Mode by pressing the right Page Button to navigate to the second page
2.
and then turn Rotary Encoder 1.
Adjust the Start and End point of the Loop on the second page using Rotary Encoders
3.
2 and 3.
The Edit Tab with a Loop
4. Since we recorded a drumloop in Sync, there is no need to adjust Start and End of
For external Samples coming
!
synced to MASCHINE by way of MIDI
Clock, it is more useful to record it manually or in Threshold Mode.
from an instrument that is not
the Sample or the Loop, but we have to enable Loop as described above.
Software
In the Edit Tab, you can do the following: adjust Start and End of the Sample, enable the
Loop Mode, adjust Start and End Points of the Loop, or set a Crossfade.
Select the Edit Tab by clicking on it.
1.
Adjusting the Start and End point is done by either dragging the small grey icons la-
2.
beled “S” (for Start) and “E” (for End) using the mouse, or by entering the Start and
End points in their respective elds.
MASCHINE Getting Started – 55
Page 56

The Edit Tab on the Software
3. Since we recorded a drumloop in Sync, there is no need to adjust Start and End, but
we have to enable Loop by clicking on the EnaBlE radio button.
4. The Loop Area is now highlighted: you can change the Loop Area by moving the handles
in the front and in the end of the Sample.
5. If you want to have a bigger view of what´s happening, use the maGnIfIEr ICon in the
low left: Dragging it to the right zooms in on the waveform, zooming out is done by
dragging it to the left.
MASCHINE Getting Started – 56
Page 57

A Loop in the Edit Tab
7.2 Slicing a Sample
Slicing a Sample is useful if you want to rearrange Loops or make them play correctly at
another tempo. Let´s slice the drumloop we have just recorded!
Hardware
Press Button 3 to enter the Slice Tab.
1.
The Slice Tab on the Hardware
MASCHINE Getting Started – 57
Page 58

2. You can now see the Slices of the Sample represented by vertical lines in the wave-
form on the Right Display. As we know the tempo is identical to our Project tempo,
we select “Auto” using Rotary Encoder 1.
3. There are two Slice Modes: “Trans” is detecting the Slices by identifying their tran-
sients, whereas “16th” slices the Loop into equally spread 16th notes. Choose “Trans”
by dialing Rotary Encoder 3.
4. Press Apply (Button 7) to slice the Sample. If you press Button 8 (Apply To), you can
choose a different Sound or Group Slot to put the Slices on.
5. After that the display will automatically change to Keyboard/Piano Roll Mode. You can
now play the Slices using the Pads.
6. If you change the tempo with the Tempo Encoder, you will hear the Loop changing its
tempo accordingly. If you can hear little clicks and pops between the Slices, adjust
the Sensitivity value using Rotary Encoder 4 and slice again.
Software
Click on the Slice Tab.
1.
Using the “Apply To” function
!
another Group to spread the rst 16
Slices on its Pads
%
Note Repeat to make them stutter or
just rearrange them by hitting the Pads
whenever you like.
(Button 8) you can also select
Jam around with the Slices and
see what you get: you can use
The Slice Tab on the MASCHINE software
MASCHINE Getting Started – 58
Page 59

2. You can see that our Loop now has a couple of equally spread vertical lines in the
waveform: this is where the Slices are going to be applied. As we know the tempo is
identical to our Project tempo, click on aUto in the Control Area; the BPM value will
remain unchanged.
3. Next, select the t
ranS
radio button. This means that the Loop will be sliced according
to the transients detected in the Sample (in contrast to slicing it into sixteenth notes).
You will notice that the vertical lines have snapped to the transients now.
4. Zoom in using the m
aGnIfIEr ICon
in the low left of the Slicing Area, then adjust the
Sensitivity by dragging up and down in the Sensitivity eld.
5. Now click on the a
pply
Button to slice the currently selected Sample. Alternatively,
click the Slice Dragger and drag it onto another Sound or Group Slot:
Dragging the sliced Sound onto a Sound Slot
6. The Piano Roll/Keyboard Editor will open automatically after that, and you will see a
couple of notes:
The notes representing the Slices of a Loop
MASCHINE Getting Started – 59
Page 60

These notes represent the Slices and trigger them in order to play the Loop just like we
recorded it. Try changing the tempo now, and you will hear that the Loop automatically
adjusts to the new tempo.
7.3 Mapping Samples
Since we sliced the Sample of our recorded drumloop already, we will not have to map
it: the slicing algorithm already did that and also provided the notes for the Slices in the
Piano Roll/Keyboard Editor.
However, mapping is useful for creating your own Sounds using multiple Samples instead
of just one. In the Mapping Editor you can set a root note, a note range on the keyboard,
velocity ranges and Tune, Gain and Pan for each Sample.
Hardware
Play around with the Slicing
%
these notes, quantizing or completely
rearranging them!
feature by removing some of
In the Sampling Mode, hit Button 4 to enter the Mapping Tab.
1.
On the right display you will see the sample wave form of the selected zone now. To
2.
switch between the zones of a sound consisting of more than one Sample (Multisample
Sound), use Button 7 and Button 8 for Previous and Next Zone.
To edit the velocity range of a Sample, switch to the next page using the Right Page
3.
Button: Rotary Encoder 1 and 2 are now used to dene the lowest and the highest
velocity.
The third page is used to enter Tune, Gain and Pan for the Sample Zone.
4.
If you want to delete a Zone, select it and press Button 6 to remove it.
5.
The Map Tab on the MASCHINE Controller
MASCHINE Getting Started – 60
Page 61

Software
Select an empty Sound Slot, then click the Sampling icon and enter the Mapping Tab
1.
by clicking on it:
Opening the Map Tab of the software
2. To add a new Sample, select one from the Browser and drag it into the mapping area.
A Zone will be created; you can drag the left and the right border of the Zone with
your mouse, thereby extending or minimizing it and dening a note range. The note
range of several Zones can overlap.
3. You can also set all necessary parameters for a Zone in the Control Area: make sure
the Zone is selected by clicking on it rst though.
Two Zones in the Map Tab
4. Now you can set the Root note, the note range, the velocity range, and Tune, Gain
and Pan for the selected Zone by changing the values in the respective elds.
MASCHINE Getting Started – 61
Page 62

8. Managing Projects
In this chapter we will show you how to use MASCHINE efciently: you will learn how to
save different elements of Projects independently so that you can easily use and nd them
for other Projects. These functions are only available in the MASCHINE Software. You will
also learn how to export audio les from Groups, Sounds and the Master Output.
8.1 Saving Sounds, Groups, Patterns and FX Presets
8.1.1 Saving a Sound
To save a Sound, right-click (on Mac OS X: Control-click) on the Sound Slot in the Arranger
and choose Save As… from the dropdown menu:
Saving a Sound
MASCHINE Getting Started – 62
Page 63

8.1.2 Saving a Group
To save a Group, right-click (on Mac OS X: Control-click) on the Groups Slot in the Arranger
and choose Save As... from the dropdown menu:
Saving a Group
8.1.3 Saving a Pattern
To save a Pattern, right-click (on Mac OS X: Control-click) on the Pattern Label in the
Arranger and choose Save As... from the dropdown menu:
Saving a Pattern
MASCHINE Getting Started – 63
Page 64

8.1.4 Saving an FX Preset
To save an FX Preset, click on the Arrow in the FX Module and choose Save As… from
the dropdown menu:
Saving an FX Preset
8.1.5 Tagging your les
As described in section 4.1 “Finding Samples in the Browser”, it is easy to nd Samples
and other MASCHINE le types with the Tag Filter of the MASCHINE Browser. To get the
most out of this feature, you need to categorize your les with attributes, which are referred
to as “Tags” in MASCHINE terminology.
To set Tags for a le, select the le from the Search Result List window and click on
1.
the EdIt Button in the lower right corner of the Browser.
MASCHINE Getting Started – 64
Page 65

The Tag Editor at the bottom of the Browser Area
2. Select or deselect Tags from the Tag Lists in the Tag Editor Window by clicking on the
Tag name. A File can have multiple Tags assigned to it.
3. You can add new Tags to the Tag Lists by clicking on the add new… entry at the end
of each list. Type in a new Tag name and press enter to add it to the Tag List. The
new entry will be automatically selected.
4. To assign the selected Tags to your le, click on the apply Button at the bottom of the
Tag Editor Window.
5. Tags can be applied to a multiple selection of les. This is a useful feature after add-
ing your own samples into the MASCHINE database. To select multiple les from the
search result list window, click the le names while holding shift or Ctrl/Cmd keys on
your computer keyboard. Ctrl+A/Cmd+A can be used to select all entries.
It is easy to import your own
%
MASCHINE data base, without moving
any les. Please refer to the Reference
Manual to learn more about le import
MASCHINE Getting Started – 65
sample collections to the
Page 66

8.2 Exporting Audio
There are several ways to export audio les in MASCHINE:
From the File menu, choose Export Audio:
1.
Selecting the Region in the Export Window
2. In the Export Window’s r
EGIon
dropdown menu you can select the Region you want to
export: all Scenes or the current Loop Range. From the Output menu, select what you
want to export: the Master, Groups or Sounds. If you select Groups or Sounds, a list
of available Groups or Sounds will be displayed with a checkbox next to each entry:
check all Groups or Sounds you wish to export.
MASCHINE Getting Started – 66
Page 67

Selecting the Output in the Export Window
3. Now click on the S
EttInGS
Button: here you can additionally select a Bit Depth, enable
Normalization and choose whether you wish to optimize the loop for looped playback
(Loop Optimize).
MASCHINE Getting Started – 67
Page 68

9. Tips for playing live
Since MASCHINE is a very hands-on tool for producing music as well as for performing
live, we gured we would gather some tips for you to get you started playing live. If you
are used to playing live, you may not need them, but maybe you will nd some new ideas
to integrate in your set.
9.1 Focus on the Hardware
In a live situation it is not very comfortable or intuitive to look back and forth from your
laptop screen running the MASCHINE Software to the MASCHINE Hardware.
9.2 Check your CPU power before playing
Some things can be very embarrassing, for example if you are on stage and your computer
starts to have hiccups because it cannot handle the amount of effects anymore. Although
the MASCHINE Software is programmed very efciently, this might happen if your computer is one of the older kind. So before you get on stage, give your live set a thorough
performance check by rst playing it at home.
9.3 Name your Groups and Sounds
Naming your Groups and Sounds gives you a better overview of exactly what you are doing, especially if you focus on playing with the MASCHINE Hardware. It might not be
something that is very interesting, but it certainly pays off in a sometimes rather hectic
live situation.
MASCHINE Getting Started – 68
Page 69

9.4 Use Mute & Solo and Scenes and Patterns with the Lock function
Mute and Solo is a good way to build up a live set especially on MASCHINE as you can
mute and solo Groups and Sounds at the same time. By locking the Mute and Solo function, you have both hands free to mute or solo Sounds and Groups. The same goes for
Pattern and Scene Modes: Locking Modes is done by pressing Button 1 at the same time
as the Mode Button, and unlocking by pressing Button 1 again.
9.5 Use Note Repeat
Note Repeat is a very useful tool for playing live: use it to add some additional drums,
drop in some effect sounds, play a bassline or a melody.
9.6 Set up your own Multieffect Groups
As described in chapter 5.7 “The Input Module and Advanced Routing” you can set up
multieffect Groups containing all the Send Effects you want to use in a live set.
9.7 Use a Limiter on your Master
This sounds rather conservative, but if you want to avoid digital distortion caused by an
overload of your soundcard, this is a useful safety measure.
9.8 Hook up your other gear and sync it with MIDI clock
If you have other gear such as a drum machine, a synthesizer or another sequencer that
is able to send MIDI Clock, hook it up to the MASCHINE Controller’s MIDI In and activate
External MIDI Sync from MASCHINE’s File Menu so that they can play together in sync.
MASCHINE can also receive MIDI Clock via an internal MIDI port, so you can synchronize
it with a MIDI Master.
MASCHINE Getting Started – 69
 Loading...