

Page 1

REFERENCE MANUAL
Page 2

The information in this document is subject to change without notice and does not represent a
commitment on the part of Native Instruments GmbH. The software described by this document is
subject to a License Agreement and may not be copied to other media. No part of this publication
may be copied, reproduced or otherwise transmitted or recorded, for any purpose, without prior
written permission by Native Instruments GmbH, hereinafter referred to as Native Instruments. All
product and company names are ™ or ® trademarks of their respective owners.
Reference Manual written by Benjamin Weiss and Nicolas Sidi
Edited by Nicolas Sidi
Document Version: 1.1 (03/2010)
Product Version: 1.5 (03/2010)
Special thanks to the Beta Test Team, who were invaluable not just in tracking down bugs, but in
making this a better product.
Page 3

Germany
Native Instruments GmbH
Schlesische Str. 28
D-10997 Berlin
Germany
info@native-instruments.de
www.native-instruments.de
USA
Native Instruments North America, Inc.
5631 Hollywood Boulevard
Los Angeles, CA 90028
USA
sales@native-instruments.com
www.native-instruments.com
© Native Instruments GmbH, 2010. All rights reserved.
Page 4

Table Of Contents
1 Introduction.................................................................................................................... 13
1.1 WelcometoMASCHINE!......................................................................................... 13
1.2 AboutthisManual.................................................................................................14
1.3 OtherDocumentation............................................................................................. 15
1.4 Beforeyoustart–Importantnotes......................................................................... 15
1.4.1 Name Plate Location ........................................................................15
1.4.2 Serial numbers ................................................................................15
1.4.3 Using the unit safely ........................................................................16
1.4.4 Disposal Notice ...............................................................................17
1.4.5 Specications subject to change ........................................................17
1.4.6 Copyright ........................................................................................17
1.4.7 Disclaimer.......................................................................................17
1.5 InstallingMASCHINE.............................................................................................18
1.5.1 System Requirements .......................................................................18
1.5.2 Installing MASCHINE on Windows® XP and Windows® Vista .................18
1.5.3 Installing the MASCHINE Software on Mac OS® X ...............................19
1.5.4 Activating MASCHINE ..................................................................... 20
1.5.5 Connecting the MASCHINE Controller ................................................ 21
1.6 MASCHINEController:Overview.............................................................................22
1.7 MASCHINESoftware:Overview..............................................................................24
1.7.1 The Header .................................................................................... 25
1.7.2 The Arranger .................................................................................. 25
1.7.3 The Browser ................................................................................... 26
1.7.4 The Control Area ............................................................................. 27
1.7.5 The Pattern Editor .......................................................................... 28
1.7.6 The Sampling Area .......................................................................... 29
MASCHINE 1.5 Reference Manual – IV
Page 5

2 BasicConcepts...............................................................................................................30
2.1 Namesandconceptsyoushouldknow...................................................................30
2.2 CommonOperations..............................................................................................32
2.2.1 Switching Views .............................................................................. 32
2.2.2 Showing and hiding user interface areas ............................................ 32
2.2.3 Navigating Parameter Pages in the Control Area .................................. 35
2.2.4 Undo and Redo .............................................................................. 36
2.3 Stand-aloneandPlug-inMode...............................................................................37
2.3.1 Switching Instances with the Hardware in Plug-in Mode ....................... 37
2.4 Preferences..........................................................................................................38
2.4.1 Preferences – General Tab................................................................ 39
2.4.2 Preferences – Default Tab .................................................................41
2.4.3 Preferences – User Paths Tab ........................................................... 42
2.4.4 Preferences – Libraries Tab .............................................................. 43
2.4.5 Preferences – Hardware Tab ............................................................. 44
2.5 AudioandMIDISettings........................................................................................45
2.5.1 Audio Tab ...................................................................................... 45
2.5.2 Routing Tab ................................................................................... 47
2.5.3 MIDI Tab ....................................................................................... 48
2.6 ConnectingExternalMIDIEquipment......................................................................49
2.6.1 Sync to External MIDI Clock ............................................................. 49
2.6.2 Send MIDI Clock............................................................................. 50
3 Browser..........................................................................................................................51
3.1 ElementsoftheBrowser........................................................................................51
3.1.1 Browser Mode Selector .................................................................... 52
3.1.2 File Type Selector ........................................................................... 52
3.1.3 Tag Filter ....................................................................................... 53
3.1.4 Text Search eld ............................................................................. 54
3.1.5 Search Result List........................................................................... 54
3.1.6 Locating missing Samples ................................................................ 55
MASCHINE 1.5 Reference Manual – V
Page 6

3.2 AddingyourownSamples......................................................................................56
3.2.1 Importing a Sample into the Library .................................................. 58
3.2.2 Tagging your Samples, Sounds, Groups, FX Presets, Patterns and
Projects ......................................................................................... 59
3.3 QuickBrowse........................................................................................................60
3.3.1 Using Quick Browse ........................................................................ 61
3.3.2 In-Place Auditioning ........................................................................ 61
3.4 TheBrowserontheHardware................................................................................62
4 CreatingSounds.............................................................................................................64
4.1 ChoosingaSourceforYourSound.........................................................................64
4.2 TheSamplerParametersintheSound’sSourceTab(SRC).......................................65
4.2.1 Page 1: Voice Settings and Engine .................................................... 66
4.2.2 Page 2: Pitch/Gate and Amplitude Envelope ....................................... 68
4.2.3 Page 3: FX and Filter Settings .......................................................... 70
4.3 FX........................................................................................................................70
4.3.1 Page 4: Modulation Envelope and Destination ..................................... 71
4.3.2 Page 5: LFO and Destination ............................................................ 72
4.3.3 Page 6: Velocity Destination and Modwheel Destination ....................... 74
4.4 TheSamplerParametersintheSound’sOutputTab(OUT).......................................75
4.4.1 Page 1: Main, Aux 1 and Aux 2 ........................................................ 75
4.4.2 Page 2: Pre Mix Options .................................................................. 76
4.5 SavingaSound.....................................................................................................77
4.6 CopyingandPastingSounds..................................................................................78
4.7 ResettingaSound.................................................................................................79
4.8 Mute&Solo.........................................................................................................80
4.9 LoadingREXFiles.................................................................................................83
4.10 SoundMIDIOptions...............................................................................................84
4.10.1 Sound MIDI Batch Setup ................................................................. 85
4.10.2 Sound MIDI Settings ....................................................................... 86
4.10.3 MIDI Output from Sounds ................................................................ 88
MASCHINE 1.5 Reference Manual – VI
Page 7

5 CreatingGroups..............................................................................................................90
5.1 TheGroupSourceTabParameters.........................................................................90
5.1.1 Page 1: Voice Settings ..................................................................... 90
5.1.2 Page 2: Pitch & Swing ..................................................................... 91
5.1.3 Page 3: Macro Controls ................................................................... 92
5.2 TheGroupOutTabParameters...............................................................................95
5.2.1 Page 1: Routing, Volume and Pan ..................................................... 95
5.2.2 Page 2: Aux Pre and Post ................................................................ 96
5.3 SavingaGroup.....................................................................................................97
5.4 CopyandPasteGroups..........................................................................................98
5.5 ResettingaGroup.................................................................................................98
5.6 NamingGroups&Sounds......................................................................................99
5.7 LoadingGroupswithoutPatterns..........................................................................100
5.8 MPCProgramImporttoGroups............................................................................ 101
5.8.1 Supported parameters from MPC Programs .......................................101
5.8.2 Importing MPC Program les ...........................................................103
6 WorkingwithPatterns(Hardware)................................................................................. 105
6.1 CreatingPatterns................................................................................................105
6.1.1 Pattern Mode ................................................................................105
6.1.2 Input Mode ...................................................................................106
6.1.3 Recording the Pads ........................................................................108
6.1.4 The Metronome .............................................................................108
6.1.5 Using the Step Sequencer ...............................................................108
6.1.6 Using Note Repeat ......................................................................... 110
6.1.7 Using the Piano Roll/Keyboard ......................................................... 111
6.1.8 Recording automation .................................................................... 112
6.1.9 Recording automation in the Step Sequencer .................................... 113
6.1.10 Step Grid, Pattern Length Grid and Quantization ................................ 113
6.2 EditingPatterns.................................................................................................. 115
6.2.1 Selecting notes and events .............................................................. 115
MASCHINE 1.5 Reference Manual – VII
Page 8

6.2.2 Erase/Clear ................................................................................... 116
6.2.3 Copy/Paste .................................................................................... 116
6.2.4 Nudge .......................................................................................... 117
6.2.5 Compare/Split ............................................................................... 117
6.2.6 Transpose .................................................................................... 117
7 WorkingwithPatterns(Software).................................................................................. 118
7.1 ThePatternEditor............................................................................................... 118
7.1.1 Selecting Patterns and Pattern Banks ............................................... 119
7.1.2 Copy and Paste Patterns .................................................................120
7.1.3 Resetting Patterns .........................................................................120
7.1.4 Saving Patterns .............................................................................120
7.2 EditingPatterns.................................................................................................. 121
7.2.1 Mouse actions in the Pattern Editor ..................................................122
7.2.2 The Zoom Tool ..............................................................................123
7.2.3 Compare/Split ............................................................................... 124
7.2.4 The Piano Roll/Keyboard ................................................................125
7.2.5 Recording and editing automation ....................................................125
7.2.6 Adding a Modulator ........................................................................127
7.2.7 Step Grid, Pattern Length Grid and Quantization ...............................128
7.2.8 Rendering Audio from Patterns using Drag & Drop .............................. 131
7.2.9 Rendering MIDI from Patterns using Drag & Drop ...............................132
8 TheMASCHINEEffects(FX)...........................................................................................134
8.1 Dynamics...........................................................................................................135
8.1.1 Compressor ..................................................................................135
8.1.2 Gate .............................................................................................136
8.1.3 Limiter .........................................................................................137
8.1.4 Maximizer .....................................................................................137
8.2 Filtering.............................................................................................................138
8.2.1 Filter ............................................................................................138
8.2.2 EQ ...............................................................................................140
MASCHINE 1.5 Reference Manual – VIII
Page 9

8.3 Modulation......................................................................................................... 141
8.3.1 Chorus .........................................................................................141
8.3.2 Flanger .........................................................................................142
8.3.3 FM ..............................................................................................143
8.3.4 Freq Shifter ...................................................................................145
8.3.5 Phaser ..........................................................................................146
8.4 SpatialandReverb.............................................................................................. 147
8.4.1 Ice ...............................................................................................147
8.4.2 Metaverb ......................................................................................148
8.4.3 Reex ..........................................................................................149
8.4.4 Reverb .........................................................................................150
8.5 Delay.................................................................................................................. 151
8.5.1 Beat Delay .................................................................................... 151
8.5.2 Grain Delay ...................................................................................152
8.5.3 Grain Stretch .................................................................................153
8.5.4 Resochord ....................................................................................154
8.6 Distortion...........................................................................................................155
8.6.1 Distortion ......................................................................................155
8.6.2 Lo ..............................................................................................156
8.6.3 Saturator ......................................................................................157
9 UsingFX.......................................................................................................................158
9.1 AddingFXtoaSound..........................................................................................158
9.2 AddingFXtoaGroup...........................................................................................160
9.3 AddingFXtotheMaster......................................................................................163
9.4 ApplyingFXtoanexternalinstrument.................................................................. 165
9.5 RecordingFXautomation.....................................................................................167
9.6 SavingFXPresets............................................................................................... 167
9.7 MutingFX........................................................................................................... 169
9.8 CreatingaSendEffect......................................................................................... 170
9.9 CreatingaMultiEffect........................................................................................ 173
MASCHINE 1.5 Reference Manual – IX
Page 10

10 CreatingaSongusingScenes....................................................................................... 175
10.1 SelectingaScene............................................................................................... 175
10.2 CreatinganddeletingaClipintheArranger......................................................... 176
10.3 SceneSync........................................................................................................ 178
10.4 InsertingandDeletingScenes.............................................................................180
10.5 CopyandPasteScenes....................................................................................... 181
10.6 UsingtheLoopModetocombinescenes............................................................. 181
10.7 TriggeringScenesviaMIDI.................................................................................. 183
11 Sampling&SampleMapping.........................................................................................185
11.1 ControllingSamplingfromtheHardware............................................................... 186
11.1.1 Recording a Sample (Hardware) .......................................................186
11.1.2 Editing a Sample (Hardware) ...........................................................188
11.1.3 Slicing a Sample (Hardware) ............................................................ 191
11.1.4 Mapping a Sample (Hardware) .........................................................194
11.2 ControllingSamplingfromtheSoftware...............................................................196
11.2.1 Recording a Sample (Software) ........................................................196
11.2.2 Editing a Sample (Software) ............................................................199
11.2.3 Slicing a Sample (Software) .............................................................201
11.2.4 Mapping a Sample (Software) ......................................................... 207
12 TheMasterSection....................................................................................................... 210
12.1 TheMasterSourceTab(SRC).............................................................................. 210
12.1.1 Page 1: Master Mixer .....................................................................210
12.1.2 Page 2: Group Panning ................................................................... 211
12.2 TheMasterOutputTab(OUT)............................................................................... 211
13 ExportingAudio............................................................................................................ 213
13.1 ExportAudio....................................................................................................... 213
13.2 CollateAudio...................................................................................................... 215
MASCHINE 1.5 Reference Manual – X
Page 11

14 AppendixA:MASCHINEControllerQuickReferenceChart............................................... 216
14.1 BasicSequencerControls.................................................................................... 216
14.2 LoadingandSaving............................................................................................. 217
14.3 SceneOperations............................................................................................... 217
14.4 PatternOperations............................................................................................. 218
14.5 BasicEditing....................................................................................................... 219
14.6 GroupOperations................................................................................................ 219
14.7 SoundOperations................................................................................................220
14.8 Effects................................................................................................................220
14.9 Muting................................................................................................................221
14.10 Soloing...............................................................................................................221
14.11 Automation......................................................................................................... 221
14.12 BasicSampling...................................................................................................222
14.13 SecondaryPadFunctions....................................................................................223
14.14 NavigationShortcutsontheMASCHINEController................................................224
14.15 OtherShortcutsontheMASCHINEController........................................................226
15 AppendixB:KeyboardShortcuts....................................................................................229
15.1 Views.................................................................................................................229
15.2 Navigation..........................................................................................................230
15.3 Editing................................................................................................................230
15.4 Transport............................................................................................................232
16 AppendixC:Tipsforplayinglive....................................................................................233
16.1 Preparations.......................................................................................................233
16.1.1 Focus on the Hardware .................................................................. 233
16.1.2 Customize the Pads of the Hardware ............................................... 233
16.1.3 Check your CPU power before playing .............................................. 233
16.1.4 Name your Groups and Sounds ....................................................... 234
16.1.5 Consider using a Limiter on your Master ........................................... 234
16.1.6 Hook up your other gear and sync it with MIDI clock ......................... 234
MASCHINE 1.5 Reference Manual – XI
Page 12

16.1.7 Improvise ..................................................................................... 234
16.2 BasicTechniques................................................................................................235
16.2.1 Use Mute & Solo .......................................................................... 235
16.2.2 Use Scene Mode and Scene Sync ................................................... 235
16.2.3 Create variations of your drums in the Step Sequencer ....................... 235
16.2.4 Use Note Repeat .......................................................................... 235
16.2.5 Set up your own Multi FX Groups and automate them ........................ 236
16.3 SpecialTricks.....................................................................................................236
16.3.1 Changing Pattern Length for variation .............................................. 236
16.3.2 Using the Loop Mode to cycle through Samples ................................ 236
16.3.3 Load long audio les and play with the start point ............................. 236
17 Index............................................................................................................................237
MASCHINE 1.5 Reference Manual – XII
Page 13

1 Introduction
1.1 Welcome to MASCHINE!
Thank you for buying MASCHINE!
MASCHINE is a groove production studio that implements the familiar working style of classical groove boxes along with the advantages of a computer based system. MASCHINE is
ideal for making music live, as well as in the studio. It’s the hands-on aspect of a dedicated
instrument, the MASCHINE Controller, united with the advanced editing features of the
MASCHINE software.
Creating beats is often not very intuitive with a computer, but using the MASCHINE Controller
to do it makes it easy and fun. You can tap in freely with the Pads or use Note Repeat to jam
along. Alternatively, build your beats using the Step Sequencer just as in classic drum machines.
Patterns can be intuitively combined and rearranged on the y to form larger ideas. You can
try out several different versions of a song without ever having to stop the music.
Since you can integrate it into any sequencer that supports VST, Audio Units, or RTAS plug-ins,
you can reap the benets in almost any software setup, or use it as a standalone application.
You can sample your own material, slice loops and rearrange them easily.
However, MASCHINE is a lot more than an ordinary groove box or sampler: it comes with an
inspiring 5 Gigabyte library containing over 250 kits and 14,000 samples, and a sophisticated,
yet easy to use tag-based Browser to give you instant access to the sounds you are looking for.
What’s more, MASCHINE give you lots of options for manipulating your sounds via internal
effects and other sound-shaping possibilities. You can also control external MIDI hardware
and 3rd party software with the MASCHINE Controller, while customizing the functions of
the Pads, Knobs and Buttons according to your needs utilizing the included Controller Editor
Application. This applies for the plug-in as well as the standalone version.
We hope you enjoy this fantastic gear as much as we do. Now let’s get going!
—The MASCHINE team at Native Instruments
MASCHINE 1.5 Reference Manual – 13
Page 14

1.2 About this Manual
This section introduces you to the symbols and text formatting used throughout this manual.
Special Paragraphs
The manual uses distinctive paragraphs to point out special facts and to warn of potential
dangers. The icons included in the paragraphs let you see what kind of information is provided:
The exclamation mark stands for additional instructions and hints. Read carefully when-
!
%
operating system you are using.
ever you see this symbol.
The light bulb icon introduces useful extra information. This information may often
help you to solve a task more efciently, but does not necessarily apply to the setup or
Special Formatting
This manual contains some elements that appear in a different font type. These distinctive
formats have been applied in order to let you recognize certain elements in the text at a glance:
•
Hardware and Software: Most of MASCHINE‘s functions are accessible via both, the
MASCHINE Controller and the MASCHINE software interface. In case there is no separate
chapter, instructions for MASCHINE Controller operation will be labeled with an orange
heading.
• Menu Item: Items from MASCHINE’s menus are printed in italics.
•
GUI E
Small CapS. Consequently you will notice that this formatting has been applied to all
names of knobs, buttons and other elements that let you interact with the MASCHINE
software, but not to the names that relate to the MASCHINE Controller’s Knobs, Pads, etc.
lEmEnt
: Elements from MASCHINE’s graphical user interface (GUI) are printed in
MASCHINE 1.5 Reference Manual – 14
Page 15

1.3 Other Documentation
This is MASCHINE’s Reference Manual covering all the features and aspects of the MASCHINE
Hardware and the MASCHINE Software in detail. If you would like to quickly get going without getting too deep into the specics, we recommend you read the printed Getting Started
Manual included in the box, which will give you a fast overview of MASCHINE’s main features
and functions.
This MASCHINE Reference Manual is available via the Native Instruments Service Center
application. Alternatively, you can download the Reference Manual from the Update Manager
on the Native Instruments Website:
http://www.native-instruments.com
You can use the MASCHINE Controller for controlling other MIDI-enabled 3rd party software
or external MIDI hardware. For further information on these functions, please refer to the
Controller Editor Manual, located in the Documentation folder inside the Controller Editor
installation folder.
1.4 Before you start – Important notes
This chapter contains important security and maintenance advice, as well as general information regarding the MASCHINE Controller hardware. Please read the following sections carefully.
1.4.1 Name Plate Location
The nameplate is located on the bottom of the MASCHINE Controller. It lists the product
model name and other technical information.
1.4.2 Serial numbers
MASCHINE comes with two serial numbers. The MASCHINE Controller serial number can be
found on bottom of the product. The serial number for the included version of the MASCHINE
Software is located on the cover of the installation CD.
MASCHINE 1.5 Reference Manual – 15
Page 16

1.4.3 Using the unit safely
Before using this unit, it is important that you thoroughly read the instructions below. This will
provide you with the information needed for setting up and using your MASCHINE Controller.
Warning
Do not open the MASCHINE Controller or attempt to disassemble or modify any internal parts!
The MASCHINE Controller does not contain any user-serviceable parts. If it appears to be malfunctioning, discontinue use immediately and have it inspected by qualied service personnel.
Caution
It is important you read the following instructions to make sure the MASCHINE Controller or
any device connected will not be damaged during usage or maintenance:
• Do not expose the unit to rain, use it near water or in damp or wet conditions.
• Make sure no objects or liquids of any kind penetrate the unit.
•
Never use or store the unit in areas subject to extreme temperatures (e.g., direct exposure
to sunlight in an enclosed vehicle and/or near heat-generating equipment), or high levels
of vibration.
• Do not place the MASCHINE Controller in an unstable position where the unit could ac-
cidentally fall.
•
Turn off the power for all components before connecting the device to any other electronic components.
•
Set all volume levels to their minimum before switching any connected component on/
off. Gradually raise the volume controls while playing the instruments to set the desired
listening level.
• Remove all connected cables before moving the MASCHINE Controller.
•
Do not use force on buttons, knobs, switches and connectors, if any parts should appear
to be malfunctioning. Discontinue use immediately and have it inspected by qualied
service personnel.
•
When cleaning the MASCHINE Controller, use a soft, dry cloth. Never use paint thinners,
solvents, cleaning uids, or chemical-infused wiping cloths.
MASCHINE 1.5 Reference Manual – 16
Page 17

1.4.4 Disposal Notice
Should this product become damaged beyond repair, or if you wish to dispose of it, please
observe the regulations of your area and country that relate to the disposal of electronic
products.
1.4.5 Specications subject to change
The information contained in this manual is believed to be correct at the time of printing or
digital release. However, Native Instruments reserves the right to make changes to the specications at any time without notice or obligation to update existing units.
1.4.6 Copyright
© Native Instruments GmbH 2010.
This publication may not be reproduced in whole or in part, summarized, transmitted, transcribed, stored in a retrieval system, or translated into any language, in any form or by any
means without prior written permission of Native Instruments GmbH.
1.4.7 Disclaimer
Native Instruments GmbH cannot be held responsible for damage or lost/destroyed data
caused by improper use or modication of the MASCHINE Controller.
MASCHINE 1.5 Reference Manual – 17
Page 18

1.5 Installing MASCHINE
This chapter will guide you through the MASCHINE installation procedure step by step. The
installation includes all components of MASCHINE: the MASCHINE application, the sound
library and the Controller Editor application.
1.5.1 System Requirements
• Windows® 7 / Vista / XP, Pentium® / Athlon® 2 GHz, 2 GB RAM
• Mac OS®10.5, Intel® Core™ Duo 2 GHz, 2 GB RAM
• USB 2.0 Port, DVD drive, 5 GB free disk space for full installation
1.5.2 Installing MASCHINE on Windows® XP and Windows® Vista
Make sure your MASCHINE Controller is not connected during installation procedure.
!
1. Place the Windows®-specic installation DVD in your computer's DVD-ROM drive.
2. Use Windows® Explorer to browse the content of the DVD-ROM.
3. Double-click the installer le named MASCHINE Setup.exe.
4. Click nExt.
5. To continue, you need to rst accept the license agreement. After you have read the li-
cense agreement, check the corresponding checkbox and click nExt.
6.
To perform a complete installation, leave the Complete option checked and click n
To deselect components or to install the MASCHINE application and sound library to an
alternative location, select Custom. Then click n
nation folders for the installation. To use the default path, just click nExt. If you wish to
select a custom path for a MASCHINE component, click ChanGE..., browse to the folder
where you want to install the application or sound library. Then click nExt.
Ext
. In the next dialog, choose the desti-
Ext
.
MASCHINE 1.5 Reference Manual – 18
Page 19

7.
The Setup Program will lead you through the installation procedure. Follow the onscreen
instructions.
8. After the installation has been performed successfully, click FInISh.
9.
Now to install the MASCHINE Controller hardware driver, you need to connect the
MASCHINE Controller to your computer. On Windows® Vista, the driver setup will nish
automatically. On Windows® XP, the following screen should appear:
10. Select No, not this time and click nExt.
In case of a warning message concerning the “Windows® Logo test” click ContInUE to
!
11. On the following screen select Install software automatically and click nExt.
12.
Now the MASCHINE Controller hardware driver installation will nish. Subsequently go
through the same procedure in order to install the MASCHINE Controller USB driver.
proceed.
1.5.3 Installing the MASCHINE Software on Mac OS® X
1. Place the installation DVD-ROM in your computer’s DVD-ROM drive. Its icon will appear
in the Mac OS® X Finder.
2. Connect the MASCHINE Controller using the USB cable.
If you want to connect the MASCHINE Controller to a USB-hub instead, make sure the
!
(bus-powered) USB hub.
3. Double-click the MASCHINE DVD icon to display the content of the DVD.
4. Double-click the installer le named MASCHINE.
5. Click ContInUE to proceed.
6. To continue, you need to rst accept the license agreement. After you have read the li-
cense agreement, press ContInUE and click aGrEE.
hub has its own power supply - the MASCHINE Controller will not work on a passive
MASCHINE 1.5 Reference Manual – 19
Page 20

7.
Select the hard disk onto which you would like to install MASCHINE. Please note that you
can only install MASCHINE onto hard disks which contain a Mac OS® X version matching the system requirements. Hard disks with no sufcient Mac OS® X version will be
agged with a red Stop sign and you will not be able to select them for the Installation
Destination dialog. From Mac OS® X 10.5 on, this screen will be skipped automatically.
8. Click ContInUE.
9. Select the elements you want to install (we recommend installing all elements, however
if you know that you don’t need a certain element like a plug-in format, uncheck the
checkbox next to it).
10.
If you want to install the MASCHINE Library contents to a custom location, e.g. to an
external hard disk, click the folder icon in the Location column to open a dialog in which
you can specify a destination for the installation.
Deselecting the Service Center application is not possible since it is required for activat-
!
ing the MASCHINE software.
11.
Click InStall to continue. The Setup Program will lead you through the installation proce-
dure. Follow the onscreen instructions.
12. To nish the MASCHINE Controller hardware driver installation you need to restart your
computer now.
1.5.4 Activating MASCHINE
When you start the MASCHINE software for the rst time, you will be asked to activate
MASCHINE using the Service Center. Please refer to the Service Center Quick Start Guide
included in delivery for all information on that matter.
The full Service Center documentation is located here:
Windows®: \Program Files\Native Instruments\Service Center\Documentation
Mac OS® X: /Applications/Service Center/Documentation
MASCHINE 1.5 Reference Manual – 20
Page 21
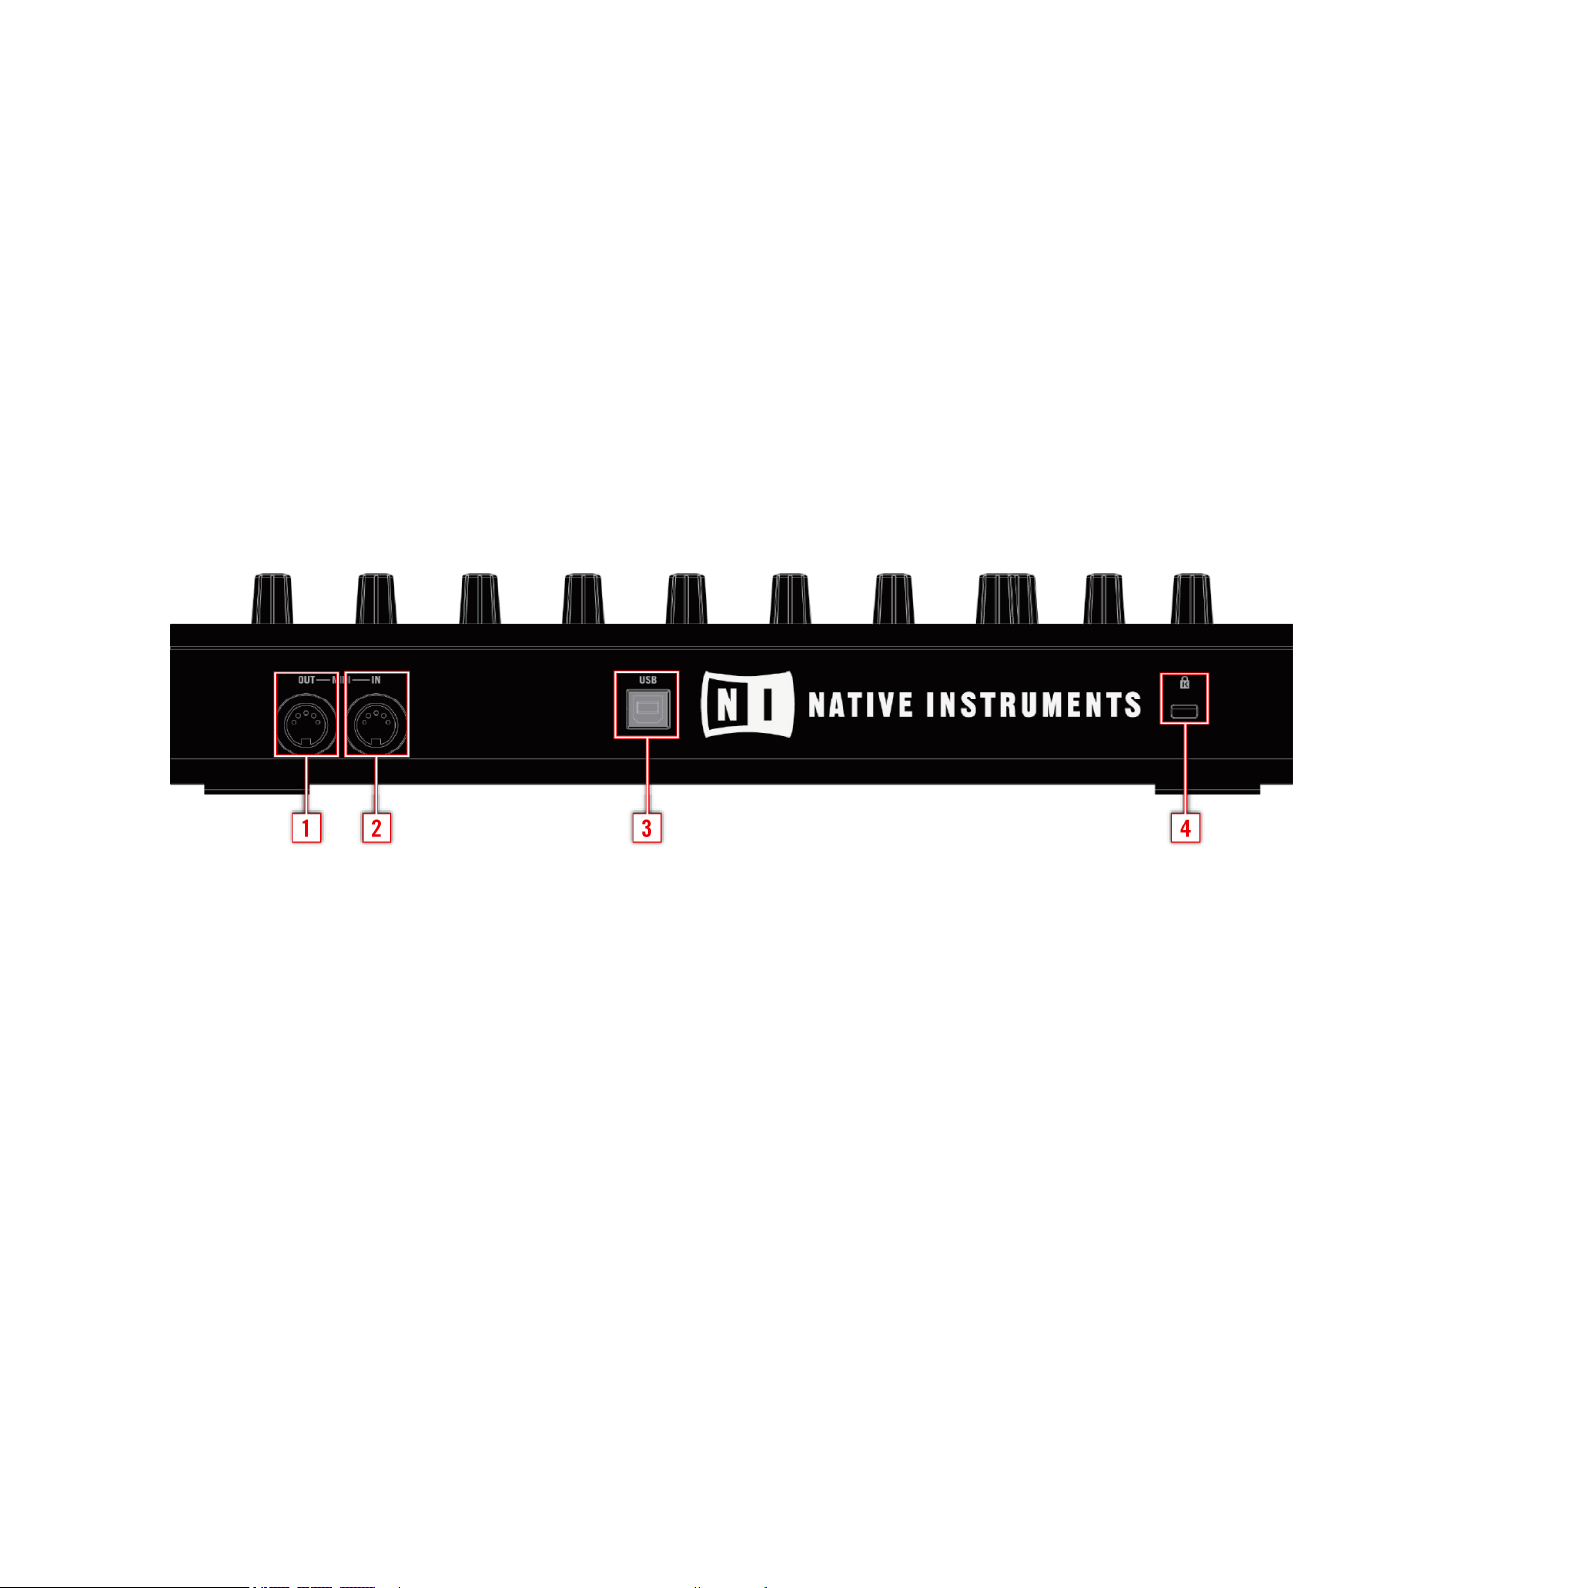
1.5.5 Connecting the MASCHINE Controller
Plug the USB cable (included in the package) into the USB port on the back of the MASCHINE
Controller, and connect the cable’s other end to one of the USB-ports of your computer.
If you want to run the MASCHINE Controller on a USB-hub instead, make sure the hub
!
powered) USB hub.
If you have any MIDI equipment such as synthesizers, keyboards, drum machines or samplers,
you may connect them to MASCHINE’s MIDI In and MIDI Out ports.
has its own power supply - the MASCHINE Controller will not work on a passive (bus-
MASCHINE Controller, rear panel:
1 MIDI Out
2 MIDI In
3 USB socket to connect to your computer.
4 Kensington Lock slot to lock your MASCHINE Controller to something immobile.
MASCHINE 1.5 Reference Manual – 21
Page 22
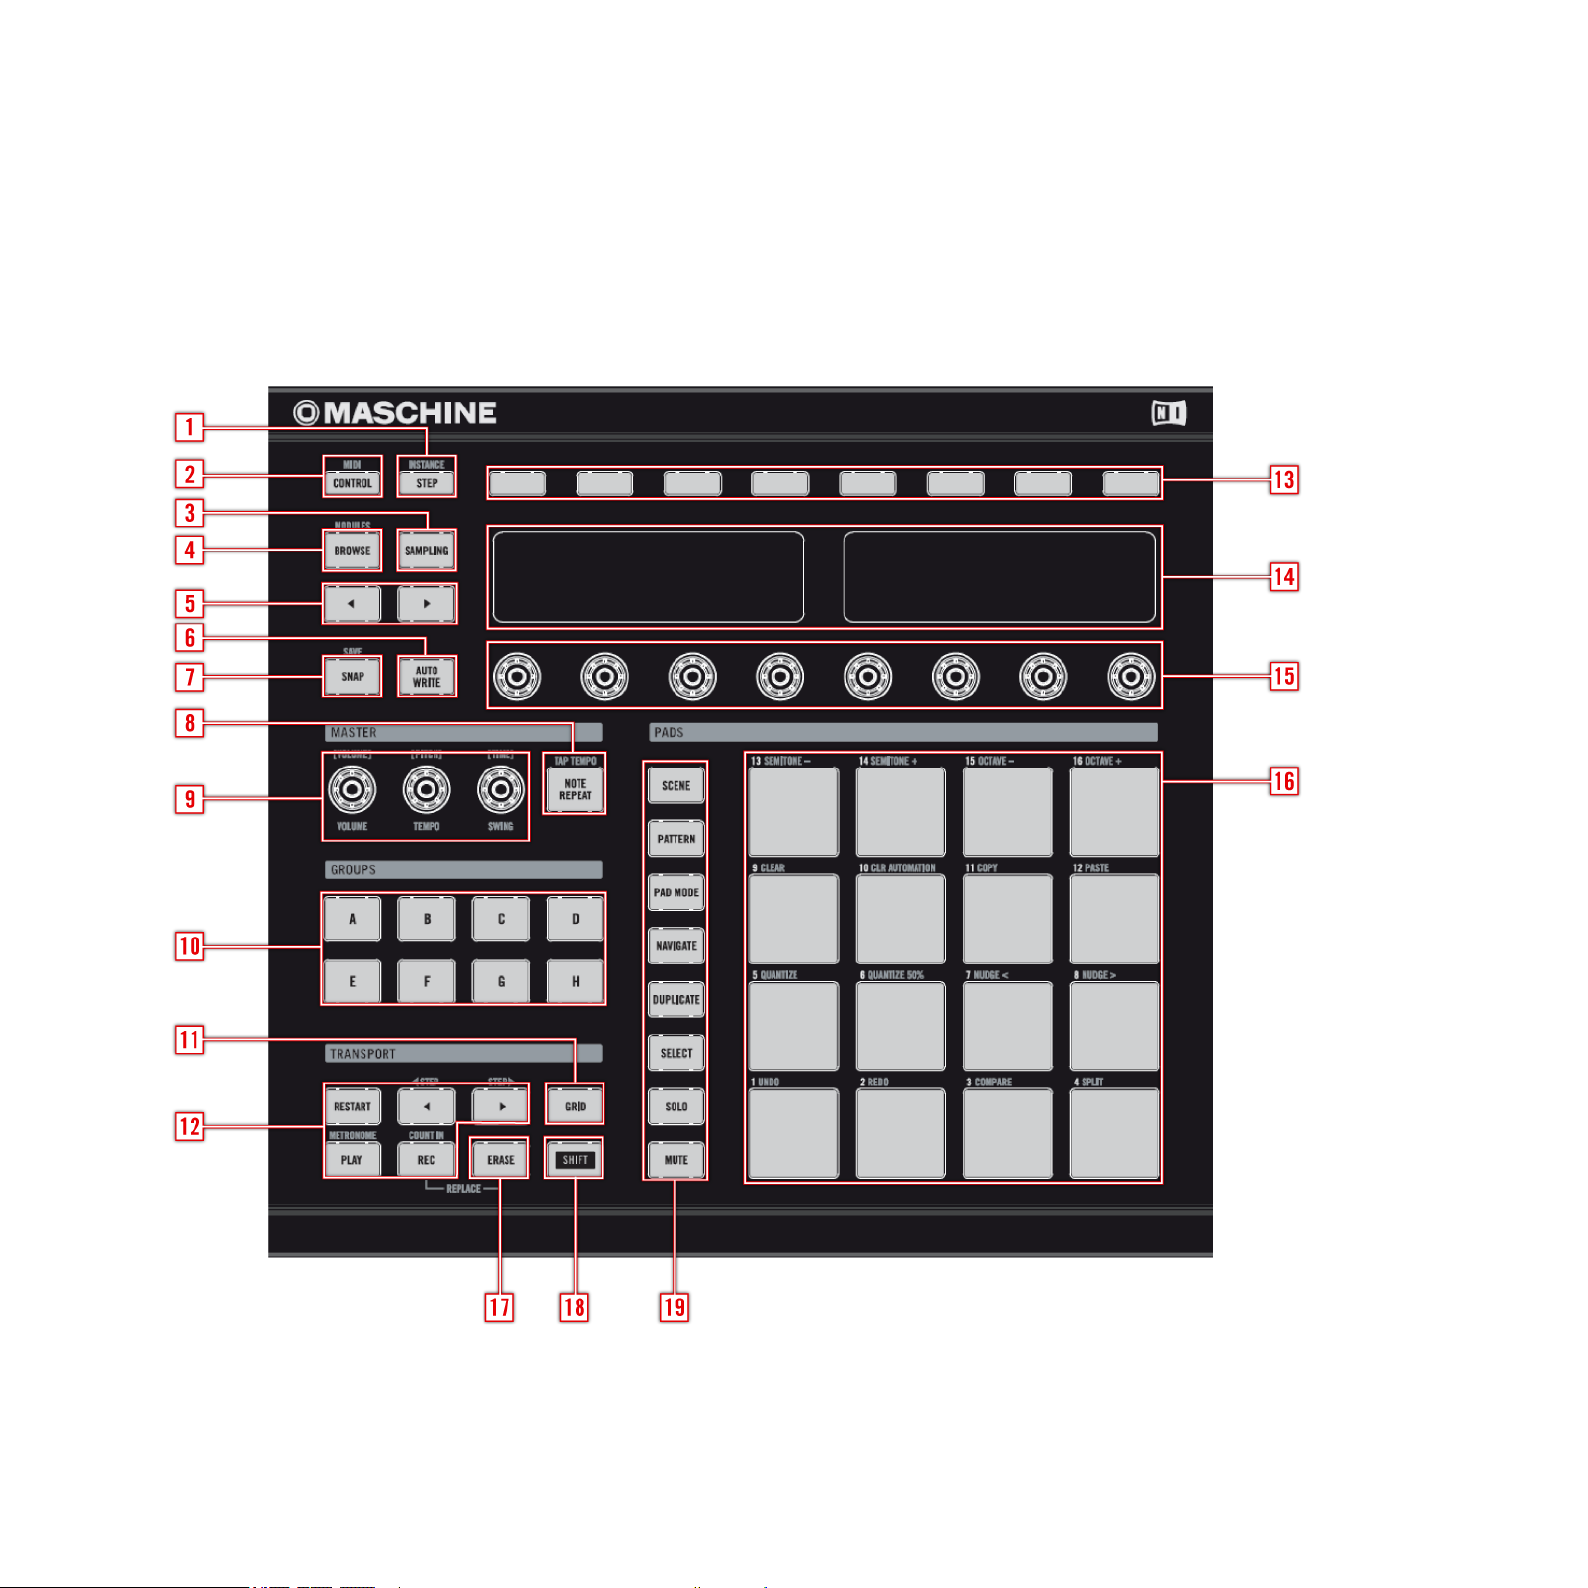
1.6 MASCHINE Controller: Overview
This chapter will introduce you to the MASCHINE Controller’s hardware elements. Virtually
all functions are available on both interfaces and you can access them through the software
as well as through the hardware. If you need to look up a certain user interface element’s
name, you can return to this chapter at any time for a refresher!
The MASCHINE Hardware Controller
MASCHINE 1.5 Reference Manual – 22
Page 23

1 Step Mode / Instance Button
2 Control Mode / MIDI Button
3 Sampling Button
4 Browse / Modules Button
5 Page Buttons
6 Auto Write Button (F2)
7 Snap Button (F1)
8 Note Repeat / Tap Tempo Button
9 Master Encoders: Volume, Tempo and Swing
10 Group Buttons
11 Grid Button
12 Transport Buttons
13 Buttons 1-8
14 MASCHINE Displays
15 Knobs 1-8
16 Pads
17 Erase Button
18 Shift Button
19 Modier Buttons
If you own an older Hardware Controller, some of its Buttons might have a different
%
if necessary.
name. In this document, we use the new names, followed by the older ones in brackets
MASCHINE 1.5 Reference Manual – 23
Page 24

1.7 MASCHINE Software: Overview
This chapter will introduce you to the MASCHINE software’s user interface elements. As
mentioned previously in the MASCHINE Controller Overview chapter, you can access virtually
all of MASCHINE’s functions via the MASCHINE Controller as well as in the software. If you
need to look up a certain user interface element’s name, you can return to this chapter at
any time for a refresher!
The MASCHINE Software
1 Header
2 Browser
3 Arranger
4 Control Area
5 Pattern Editor
MASCHINE 1.5 Reference Manual – 24
Page 25
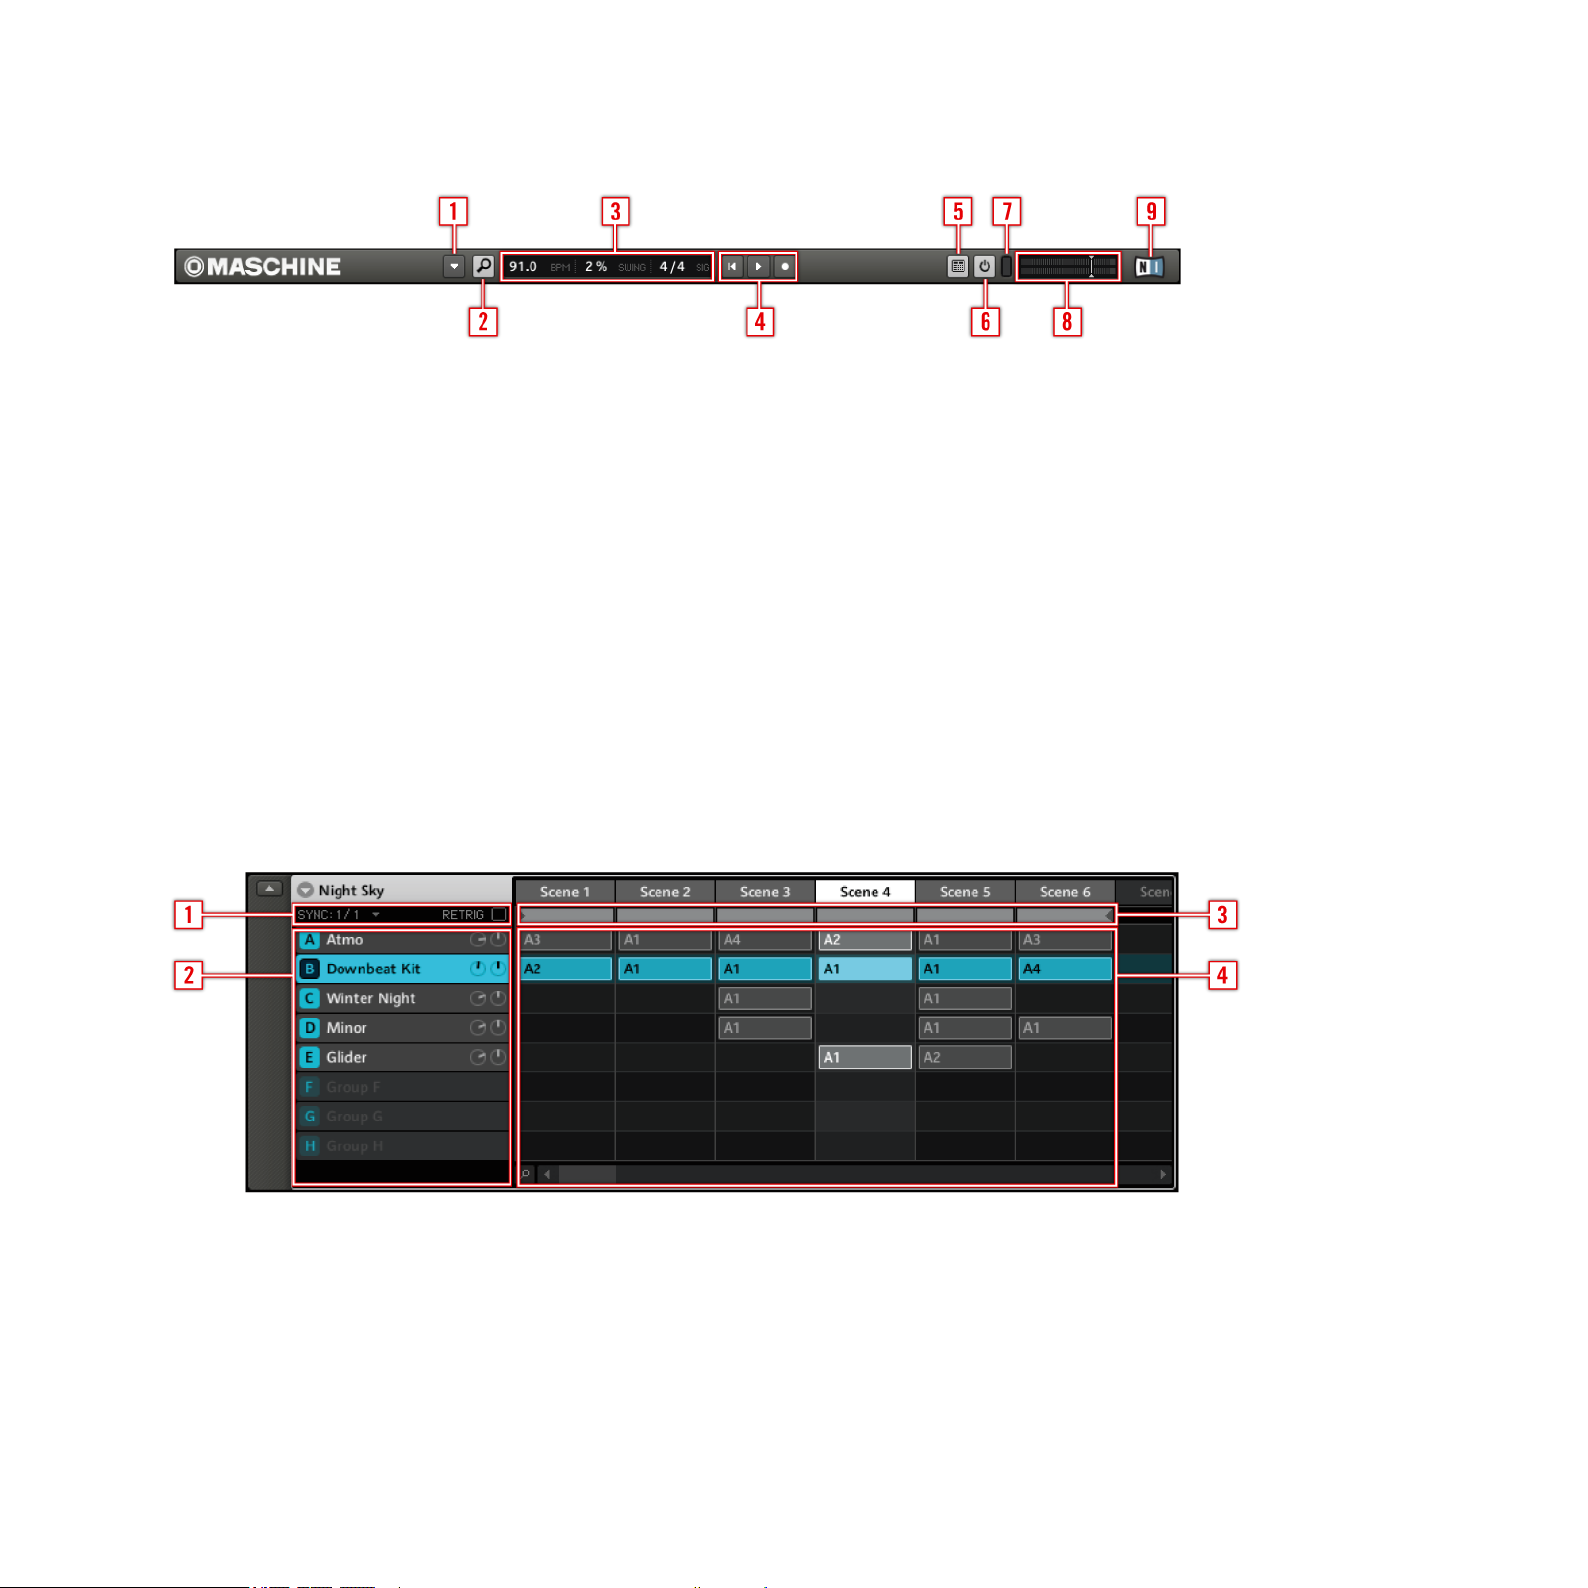
1.7.1 The Header
1 Menu Button
2 Browser Button
3 Display Area
4 Transport Controls
5 Connect Button
6 Audio Engine Button
7 CPU Meter
8 Volume Control
9 NI Logo
1.7.2 The Arranger
1 Play Mode Controls
2 Group Slots
3 Arranger Timeline
4 Clip Area
MASCHINE 1.5 Reference Manual – 25
Page 26

1.7.3 The Browser
1 Browser Mode Selector
2 File Type Selector
3 Tag Filter
4 Text Search Field
5 Search Result List
6 Tag Editor
7 Audition Controls
MASCHINE 1.5 Reference Manual – 26
Page 27
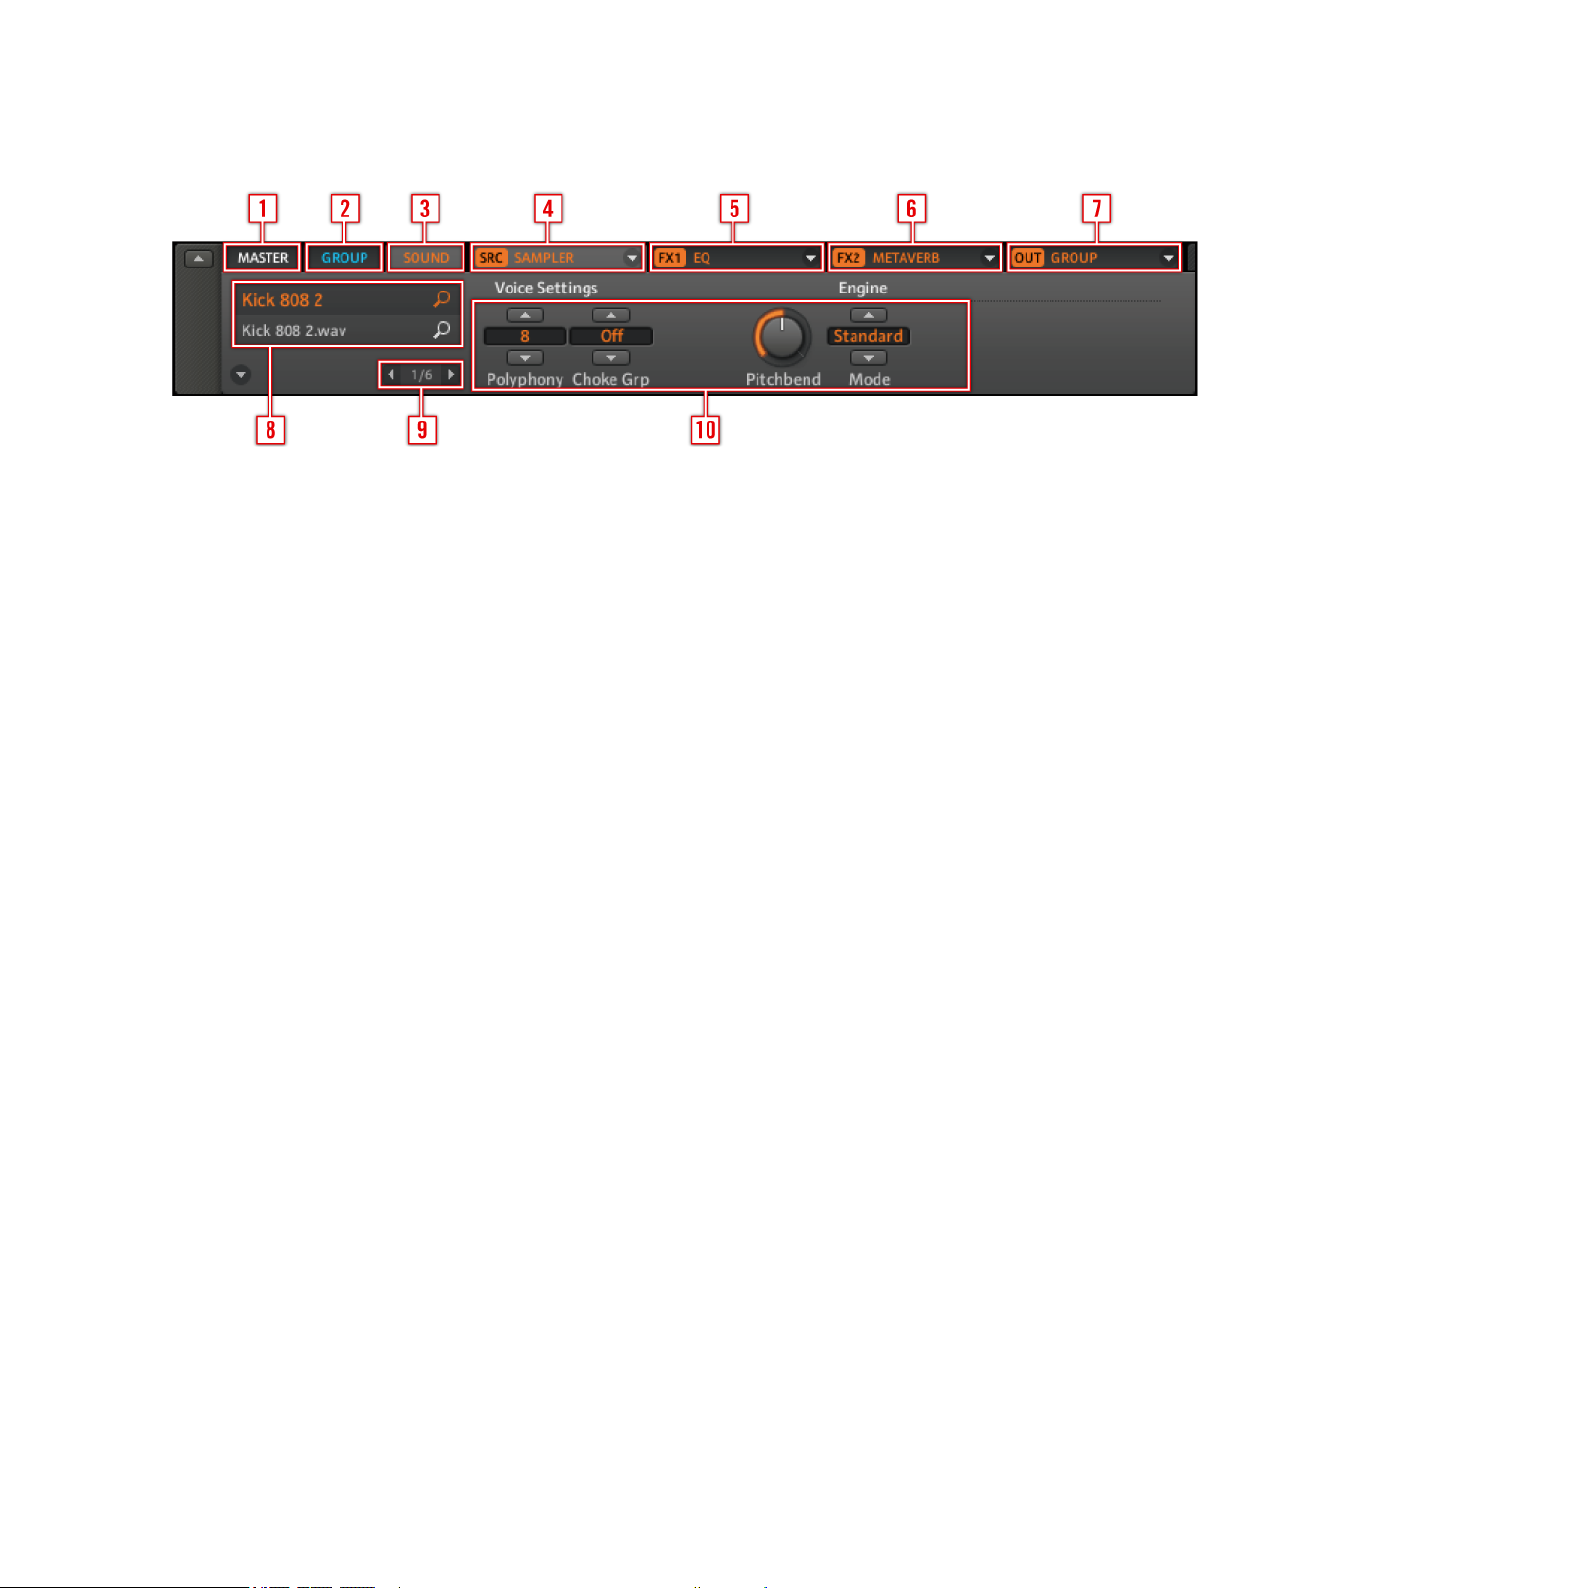
1.7.4 The Control Area
1 Master Tab
2 Group Tab
3 Sound Tab
4 Source Tab
5 FX1 Tab
6 FX2 Tab
7 Output Tab
8 Quick Browse Area
9 Page Selector
10 Parameter Pages, depending on the selected Tab and Page
MASCHINE 1.5 Reference Manual – 27
Page 28
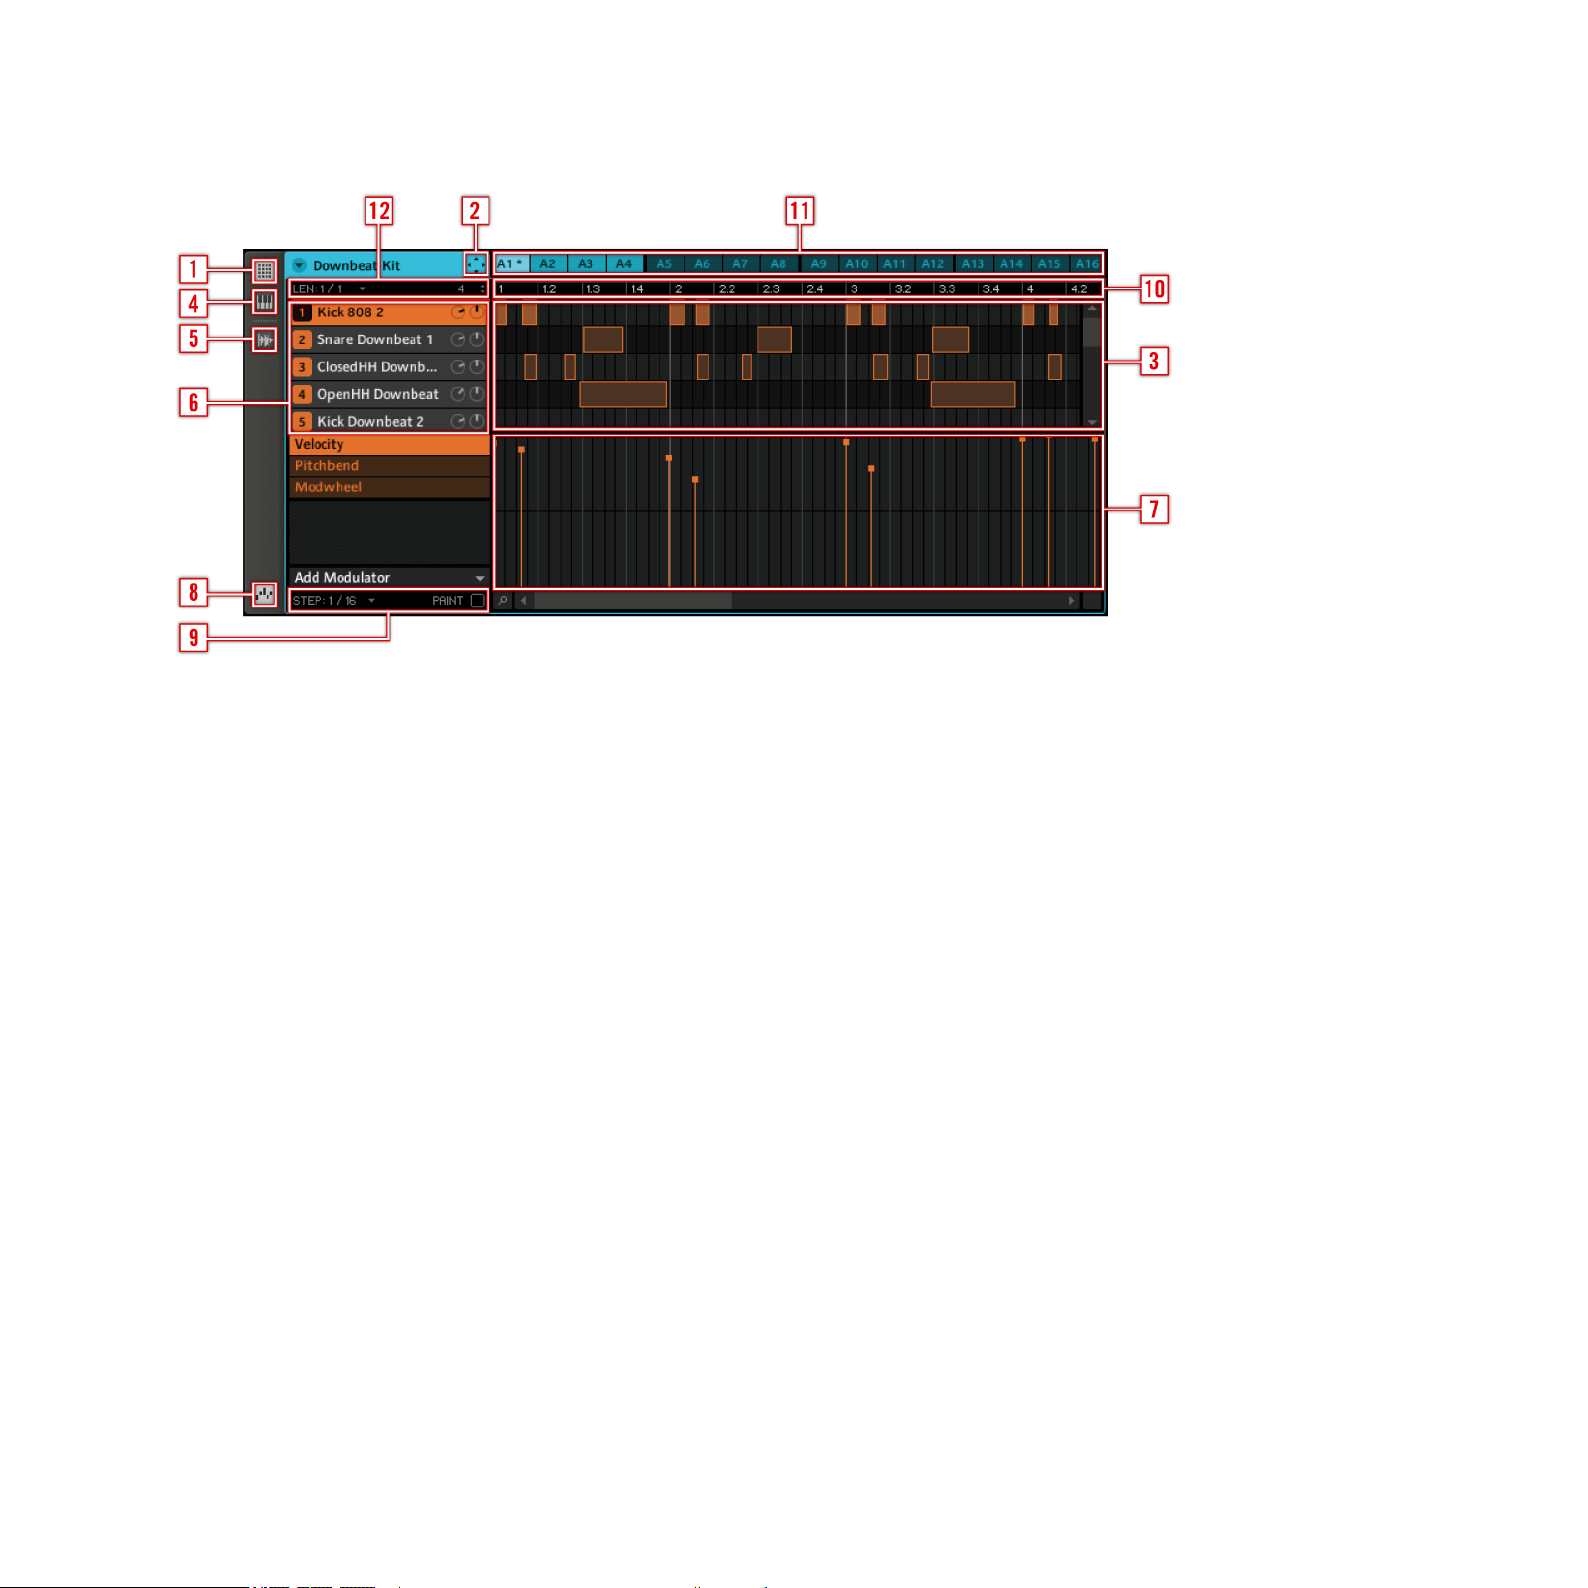
1.7.5 The Pattern Editor
1 Step Editor View Switch
2 Dragger Icon
3 Step Editor
4 Piano Roll / Keyboard View Switch
5 Sampling View Switch
6 Sound Slots
7 Automation Lane
8 Automation View Switch
9 Edit Controls
10 Pattern Timeline
11 Pattern Slots
12 Pattern Length Controls
MASCHINE 1.5 Reference Manual – 28
Page 29
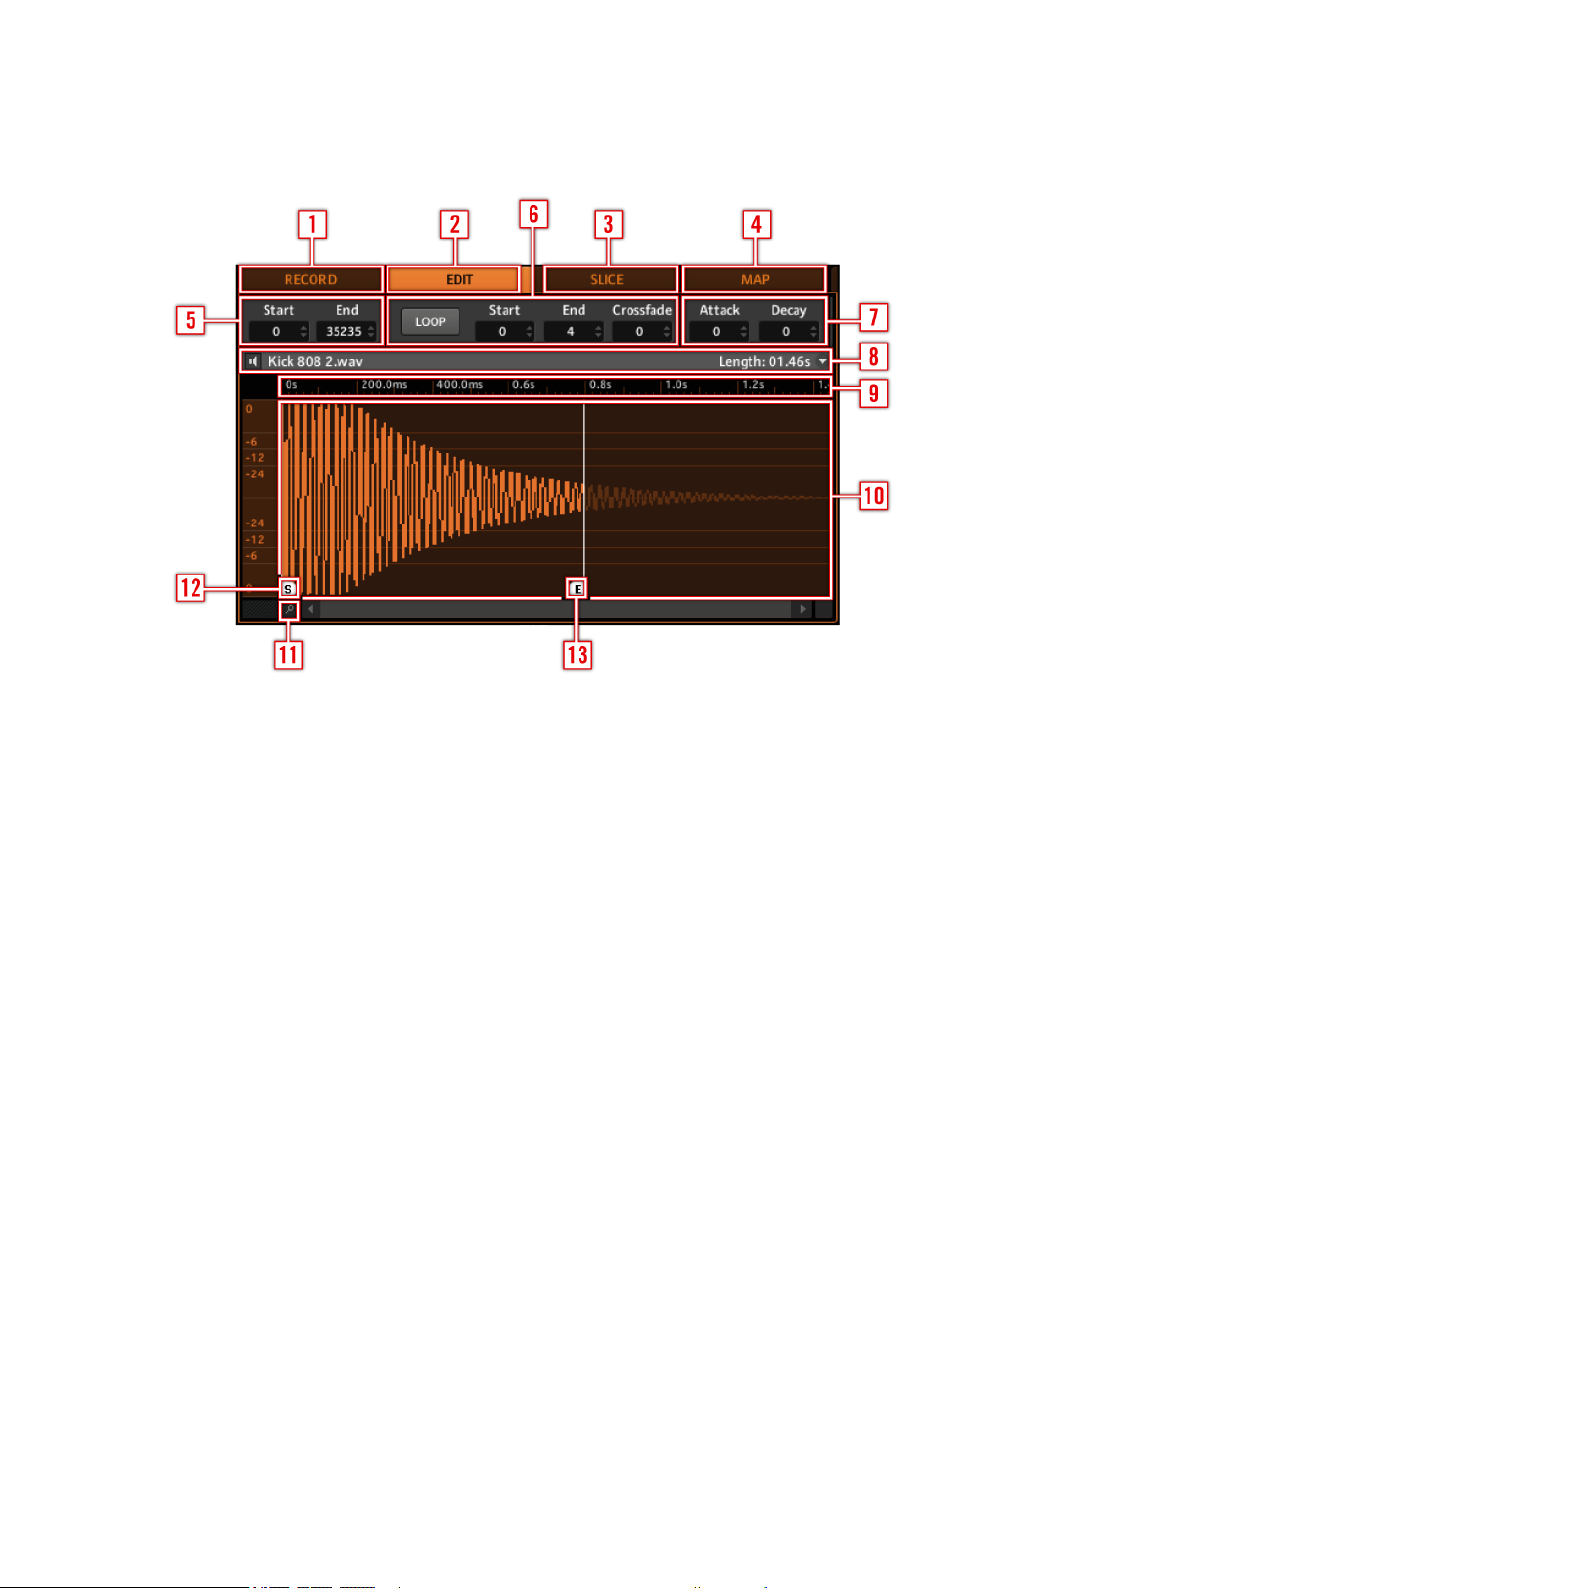
1.7.6 The Sampling Area
1 Record Tab
2 Edit Tab
3 Slice Tab
4 Mapping Tab
5 Trim Controls
6 Sample Loop Controls
7 Zone Envelope Controls
8 Info Bar
9 Sample Timeline
10 Sample View
11 Zoom Tool
12 Start Marker
13 End Marker
MASCHINE 1.5 Reference Manual – 29
Page 30

2 Basic Concepts
This chapter will introduce you to MASCHINE’s main elements and terminology and explain
how they relate to one another. You will also learn how to set up your audio interface and
how to connect MIDI devices. Make sure to also check out the tutorial video regarding Basic
Concepts: “Overview” (to be found on the Native Instruments website http://www.native-
instruments.com).
2.1 Names and concepts you should know
We will start with a list dening the most important concepts and names.
Browser
The Browser is the front end for accessing all the elements of your MASCHINE Projects: Projects,
Groups, Sounds, Samples, Patterns and FX Presets. Each of these can be stored and “tagged”,
meaning categorized in a way that allows you easy access to all of them. MASCHINE’s Factory
Library is already completely tagged, and you can also import your own Samples to the Library
and tag them as well. To learn more about the Browser, please read chapter 3, “Browser.”
Projects
A Project contains all data needed for a Song: up to eight Groups with their Patterns, 64
Scenes and all settings, automation, FX, Routings, Sounds and Samples. It’s like a snapshot
of the entire state of MASCHINE. You can nd more information in the chapter 3, “Browser”
Sounds
A Sound can hold either a single Sample or multiple Samples mapped across the keyboard.
Sounds are organized in Groups (see the Groups paragraph below). Two Insert FX and six
pages of parameters per Sound are available. Each Sound of the currently selected Group
is mapped to one of the 16 Pads on the MASCHINE Controller, so you can play the Sounds
by hitting the Pads. Refer to chapter 4, “Creating Sounds” for more information on Sounds.
MASCHINE 1.5 Reference Manual – 30
Page 31

Groups
A Group contains 16 Sound Slots, each of which can hold one Sound. It can have up to two
Insert FX and up to 64 Patterns assigned to it which are organized in four Banks. Refer to
chapter 5, “Creating Groups” for more information on Groups.
Patterns
A Pattern is a sequence that plays Sounds from the current Group. A Pattern is therefore
usually linked to a Group since it is a part of the Group; however you can also save it independently from the Group. This is useful if you want to try out different drum kits with the
same Pattern or different Sounds with a given melody. More information on Patterns can be
found in chapter 6, “Working with Patterns (Software)” and chapter 7, “Working with Patterns
(Software)”
Scenes
A Scene represents a combination of different Groups with their associated Patterns. Scenes
are used to chain patterns in order to build up a nished arrangement, or to trigger different parts of a Song while you are playing live. More information on Scenes can be found in
chapter 10, “Creating a Song using Scenes”
Master
This is where all audio signals from each of the Groups and Sounds come together and get
mixed. The Master bus can also host two Insert FX of its own. More information on the Master
can be found in chapter 10, “Creating a Song using Scenes.”
MASCHINE 1.5 Reference Manual – 31
Page 32

2.2 Common Operations
2.2.1 Switching Views
From the Main Menu & the Plug-in Menu you can select one of four different sizes to display
MASCHINE’s Software GUI:
The View entry in the Main Menu (Mac OS® X depicted)
The View entry in the Plug-in Menu
The Fullscreen View is also available from your computer keybord via the F5 function key.
2.2.2 Showing and hiding user interface areas
There are several areas on the software’s user interface that you can fold away or reduce in
size in order to give you a better overview on your screen. This is helpful if you have a small
display connected to your computer, or want to concentrate on one element without being
distracted by the other. This can be done on the MASCHINE Controller as well as in the software, but only affects your computer’s display.
MASCHINE 1.5 Reference Manual – 32
Page 33

Showing and hiding the Browser
Hardware
► Press and hold NAVIGATE; now press Button 5 to hide the Browser.
To bring it back, press Button 5 again.
!
The Navigate screen on the Left and Right Display of the MASCHINE Controller
Software
►
Click on the Browser Button (with the magnier symbol) in the Header to show and hide
the Browser.
The Browser Button in the Header
MASCHINE 1.5 Reference Manual – 33
Page 34

Minimizing the Arranger
Hardware
►
Press and hold NAVIGATE; now press Button 6 to minimize the Arranger to the currently selected Group Slot and again to show all Group Slots.
Software
► Click on the Minimize Button (showing an arrow) on the left of the Arranger to minimize
the Arranger to the currently selected Group Slot and again to show all Group Slots.
The Arranger in minimized view showing the Group Slot in focus
Hiding Parameter Pages in the Control Area
Hardware
►
Press NAVIGATE and then Button 7 to show and hide the parameter pages in the Control
Area.
Software
►
Click on the Minimize Button (showing an arrow) to the left of the Control Area to show
and hide the Parameter Pages in the Control Area.
The Control Area in full size
MASCHINE 1.5 Reference Manual – 34
Page 35

Hiding the Modulation Lane
Hardware
► Press NAVIGATE and then Button 8 to show and hide the Modulation Lane.
Software
► Click on the Automation View Switch on the left of the Modulation Lane to show and hide it.
The Automation View Switch
2.2.3 Navigating Parameter Pages in the Control Area
In some situations, the Control Area consist of more parameters than the displays can show
at once. Examples of this are the Groups’ Output Tab and the Sounds’ Source Tab if set to
Sampler. In these cases, the number of Parameters is divided into several Parameter Pages
that you can easily navigate with the Hardware and Software.
Hardware
On the MASCHINE Controller you can use the Page Buttons to navigate through the Parameter
Pages. Whenever there is more than one Page, it will be shown on the right of the Right
Display like this:
MASCHINE 1.5 Reference Manual – 35
Page 36

The display of available Pages in a Group Output Tab
Moreover, if there is another Page available to the left or to the right of the current Page, the
corresponding Page Button will be lit on your Controller.
Software
On the Software you click the Page Selector to navigate through the Pages:
The Page Selector in the Control Area: rst Page of the Master Source Tab
2.2.4 Undo and Redo
Undo and Redo are useful to cancel operations you have performed or to compare two versions before and after a change (also see the Compare/Split functions explained in chapter
6.2.5, “Compare/Split” for the Hardware and 7.2.3, ”Compare/Split” for the Software. In
MASCHINE you can undo everything you did after loading or creating your Project.
Note: If you save your Project, you will no longer be able to Undo or Redo any actions
!
Hardware
►
On the Hardware, perform the Undo operation by holding SHIFT and pressing Pad 1. To
perform the Redo operation, hold SHIFT and press Pad 2.
performed before saving!
MASCHINE 1.5 Reference Manual – 36
Page 37

Software
On the Software, use the common keyboard shortcuts for the Undo and Redo functions. For
Undo, press CTRL+Z (Command+Z on Mac OS® X). For Redo, press CTRL+Y (Command +
Y on Mac OS® X).
2.3 Stand-alone and Plug-in Mode
You can run MASCHINE as a stand-alone application or integrate it into your favorite Digital
Audio Workstation (or DAW, in short) by loading it as a plug-in. MASCHINE is available in the
VST, Audio Unit and RTAS plug-in formats. For further information on plug-in compatibility
and for a detailed description of how to use plug-ins in your host, please refer to the documentation included with your host software. If you did not install the plug-ins when installing
the MASCHINE Software, learn how to do add them in chapter 1.5, “Installing MASCHINE.”
Differences between Stand-alone and Plug-in Mode
When you are using MASCHINE as a plug-in within a host application (i.e. sequencer software like Cubase® or Pro Tools®), you can open multiple MASCHINE instances. Actually,
you can load as many instances of MASCHINE as your computer and your host application
can handle CPU-wise. In contrast to the stand-alone application, they are always synced to
the host. In plug-in mode you can also send a MIDIProgram Change message from your host
to switch between MASCHINE’s Scenes or record automation using the Macro Controls. To
learn more about these, have a look at chapter 10, ”Creating a Song using Scenes” and 5.1,
“The Group Source Tab Parameters.”
2.3.1 Switching Instances with the Hardware in Plug-in Mode
To switch from one instance to another in plug-in mode, press Shift and Step; using Knob 5
you can now select the desired instance and load it by hitting Button 8.
MASCHINE 1.5 Reference Manual – 37
Page 38

2.4 Preferences
You can nd the Preferences dialog under MASCHINE in the Main Menu (Mac OS® X) or in
the File menu (Windows®), as well as in the File submenu of the Plug-in menu:
Preferences on the Main Menu (Mac OS® X depicted)
Preferences in the Plug-in Menu
MASCHINE 1.5 Reference Manual – 38
Page 39

2.4.1 Preferences – General Tab
The Preferences – General Tab
Startup
rEload laSt projECt
Recording Audio
prEFEr projECt FoldEr
MIDI
If this option is checked, the last Project you worked on
when quitting MASCHINE will be loaded as soon as you
start MASCHINE again.
If this checkbox is marked, the Samples you record will be
put in the Project folder.
MASCHINE 1.5 Reference Manual – 39
Page 40

SynC oFFSEt SlavE
InpUt ChannEl
Depending on various variables such as the speed of your
CPU, your audio interface, your MIDI interface and the
Latency you selected in the Audio and MIDI Settings,
you may experience a lack of synchronization between
MASCHINE and the external MIDI Master. To compensate
for that, you can adjust this Sync Offset Slave value in milliseconds. An easy way to do that is to play a 4/4 kick drum
Pattern or a Metronome sound on both MASCHINE (see
chapter 6.1.4, ”The Metronome,” on how to activate the
Metronome) and the external MIDI Master and mix them
together moving the slider until they are played at exactly
the same time. As soon as you can hear a anger-like effect, you know you are close to the correct Sync Offset Slave
value. Keep on adjusting the Sync Offset Slave until you can
neither hear the anging effect nor two separate signals.
Use the Input Channel control to set the MIDI channel you
want MASCHINE to receive MIDI messages on. Limiting
MIDI input to one channel can keep MASCHINE from playing unwanted MIDI notes sent by external devices.
MASCHINE 1.5 Reference Manual – 40
Page 41
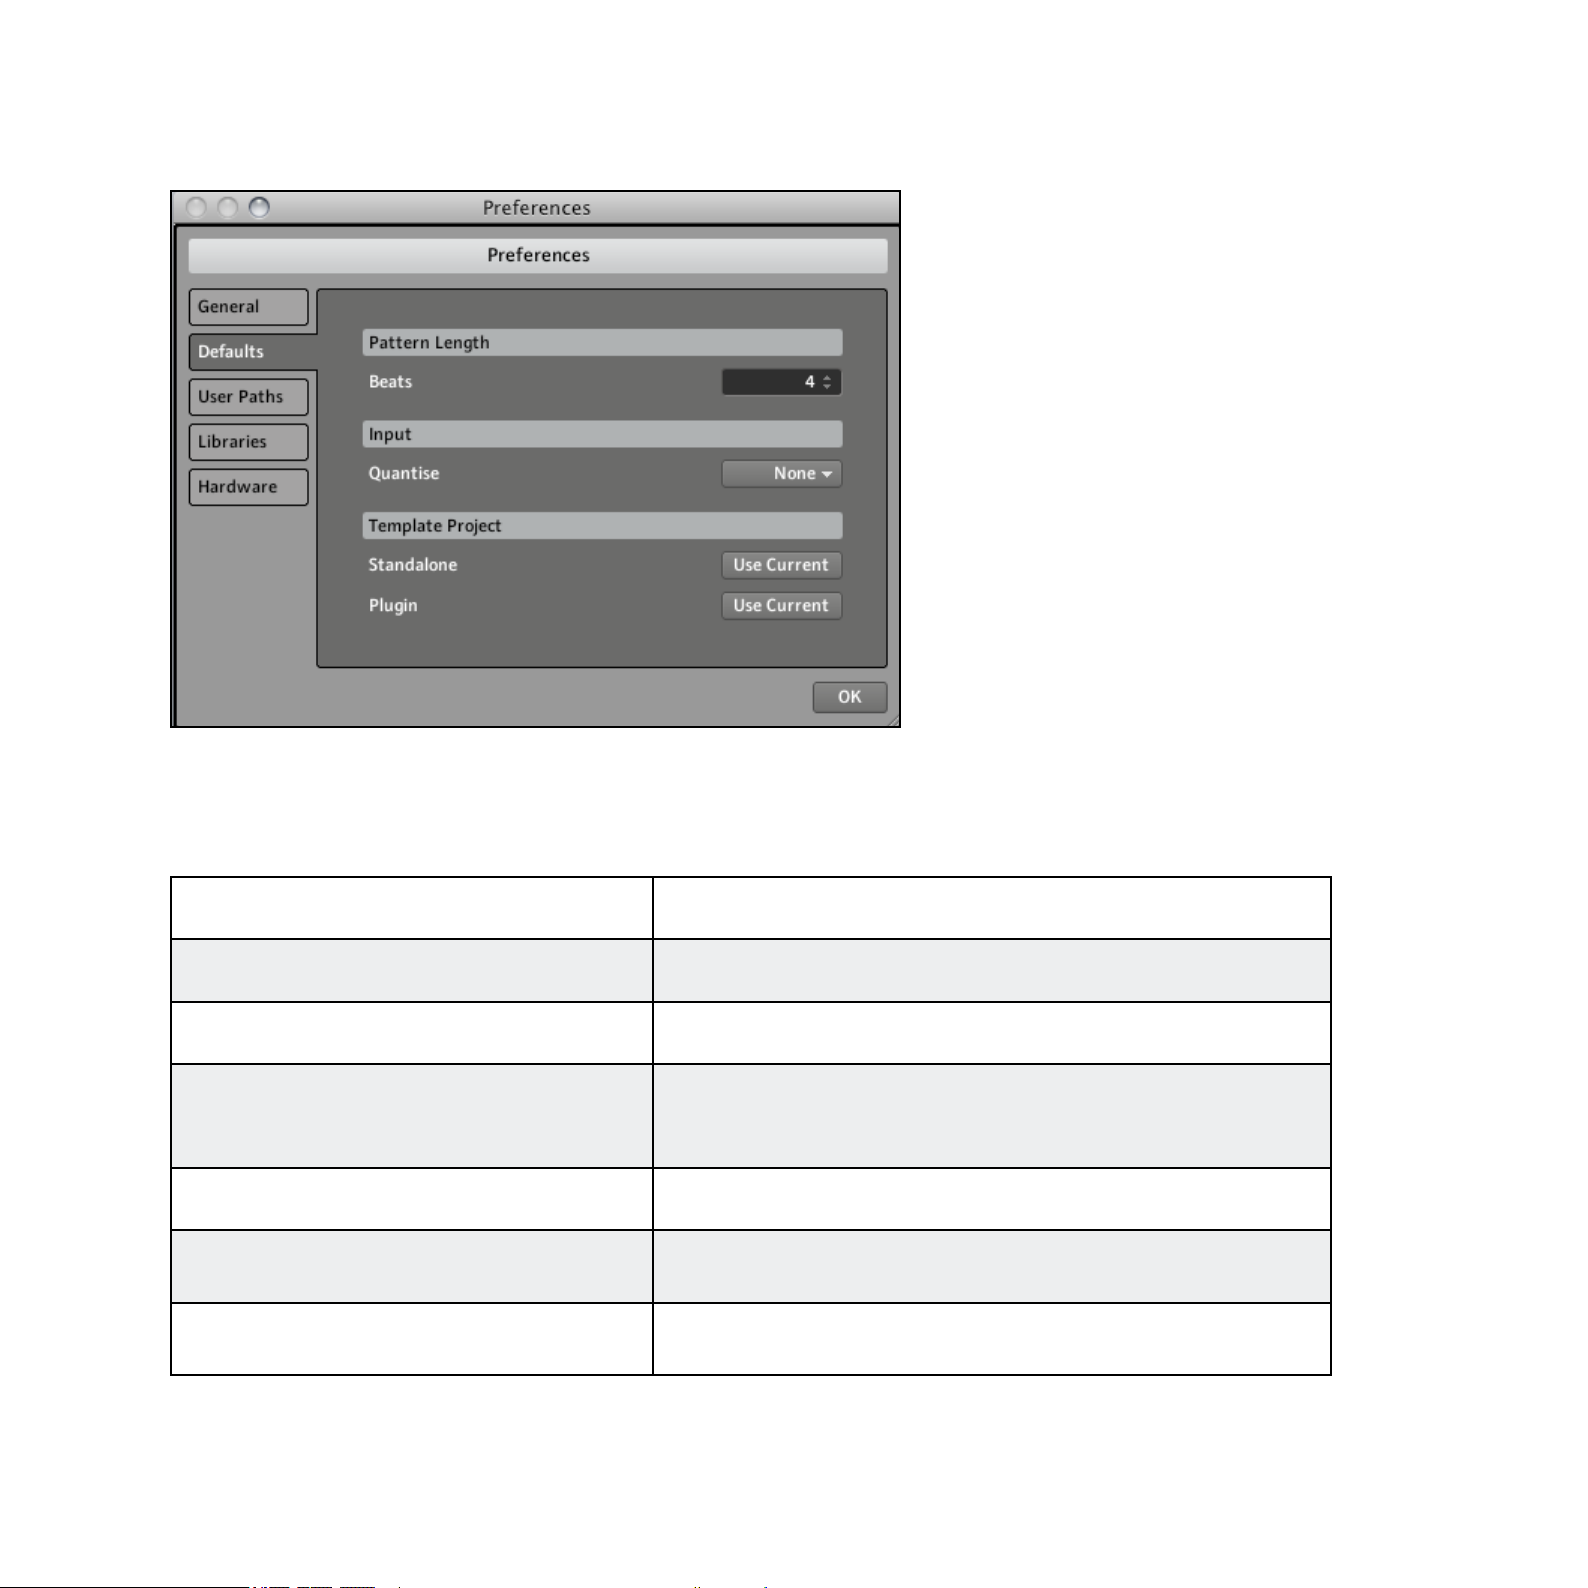
2.4.2 Preferences – Default Tab
The Preferences – Defaults Tab
The Defaults Tab allows you to dene a few default settings that will be used for every new
Project.
Pattern Length
BEatS Here you can dene the default length of the Patterns.
Input
This allows you to select one of the three quantise options:
QUantISE
Template Project
StandalonE
plUGIn
None (no quantization), Record (quantization only in Record
mode) or Play/Rec (quantization in Play and Record Mode).
Here you can select a Project that will automatically be
loaded when you start MASCHINE in stand-alone mode.
Here you can select a Project that will automatically be
loaded when you start MASCHINE in plug-in mode.
MASCHINE 1.5 Reference Manual – 41
Page 42

2.4.3 Preferences – User Paths Tab
The Preferences – User Paths Tab
The User Paths Tab shows the locations of all the Samples you have added to the Library
(consult chapter 3, ”Browser,” for more information on adding your own samples). By clicking
on the folder icon to the right, you can jump directly to the selected directory.
Click ADD to manually add directories to the Library; keep
add
rEmovE Click rEmovE to remove directories from the Library.
rESCan
in mind that any MASCHINE-compatible les in those directories will not be tagged if you add them like this (see the
Browser chapter for more information on tagging your les).
If you have changed the content of the selected directory (such as added or removed les), you should rescan it in order to let MASCHINE know which les have
been removed and/or added so that they show up in the
MASCHINE Library.
MASCHINE 1.5 Reference Manual – 42
Page 43

2.4.4 Preferences – Libraries Tab
The Preferences – Libraries Tab
rESCan
Click this button to rescan the MASCHINE Factory Library.
This is useful if you have moved the Factory Library to another hard drive or to another location on the same hard drive.
MASCHINE 1.5 Reference Manual – 43
Page 44

2.4.5 Preferences – Hardware Tab
The Preferences – Hardware Tab
The Hardware Tab enables you to customize how the Pads react to your playing, and the
brightness/contrast of the Displays.
Pads
Use the SEnSItIvIty SlIdEr to adjust how sensitive the Pads
SEnSItIvIty SlIdEr
vEloCIty SCalInG
Display
BrIGhtnESS
ContraSt lEFt & rIGht
respond to your touch. This sets the minimum threshold at
which MASCHINE will register a “hit.”
vEloCIty SCalInG determines how your playing is translated into
velocity values: starting from Soft 3 (a soft touch is enough to
get a big velocity value) through Linear to Hard 3 (you really
have to hit the Pad hard to get a big velocity value).
The Brightness Slider allows you to adjust the brightness of
both Left and Right Displays of the MASCHINE Controller.
With these sliders you can adjust the contrast of the Left
and Right Displays separately.
MASCHINE 1.5 Reference Manual – 44
Page 45
Adjusting the Settings from the Hardware
You also have access to these settings from the Hardware. To do this, you rst have to enter
the MIDI Mode by pressing SHIFT+CONTROL. From this MIDI Mode, press SHIFT+Button
4 to show the Settings Display Mode. In this Display Mode, the Left Display gives you access
to all of the settings described above, with the exception of the vEloCIty SCalInG. The Knobs
1-4 allow you to adjust the BrIGhtnESS, pad SEnSItIvIty, ContraSt lEFt and ContraSt rIGht, re-
spectively.
When you’re done, press SHIFT+CONTROL again to quit the MIDI Mode and get back to
the MASCHINE Mode.
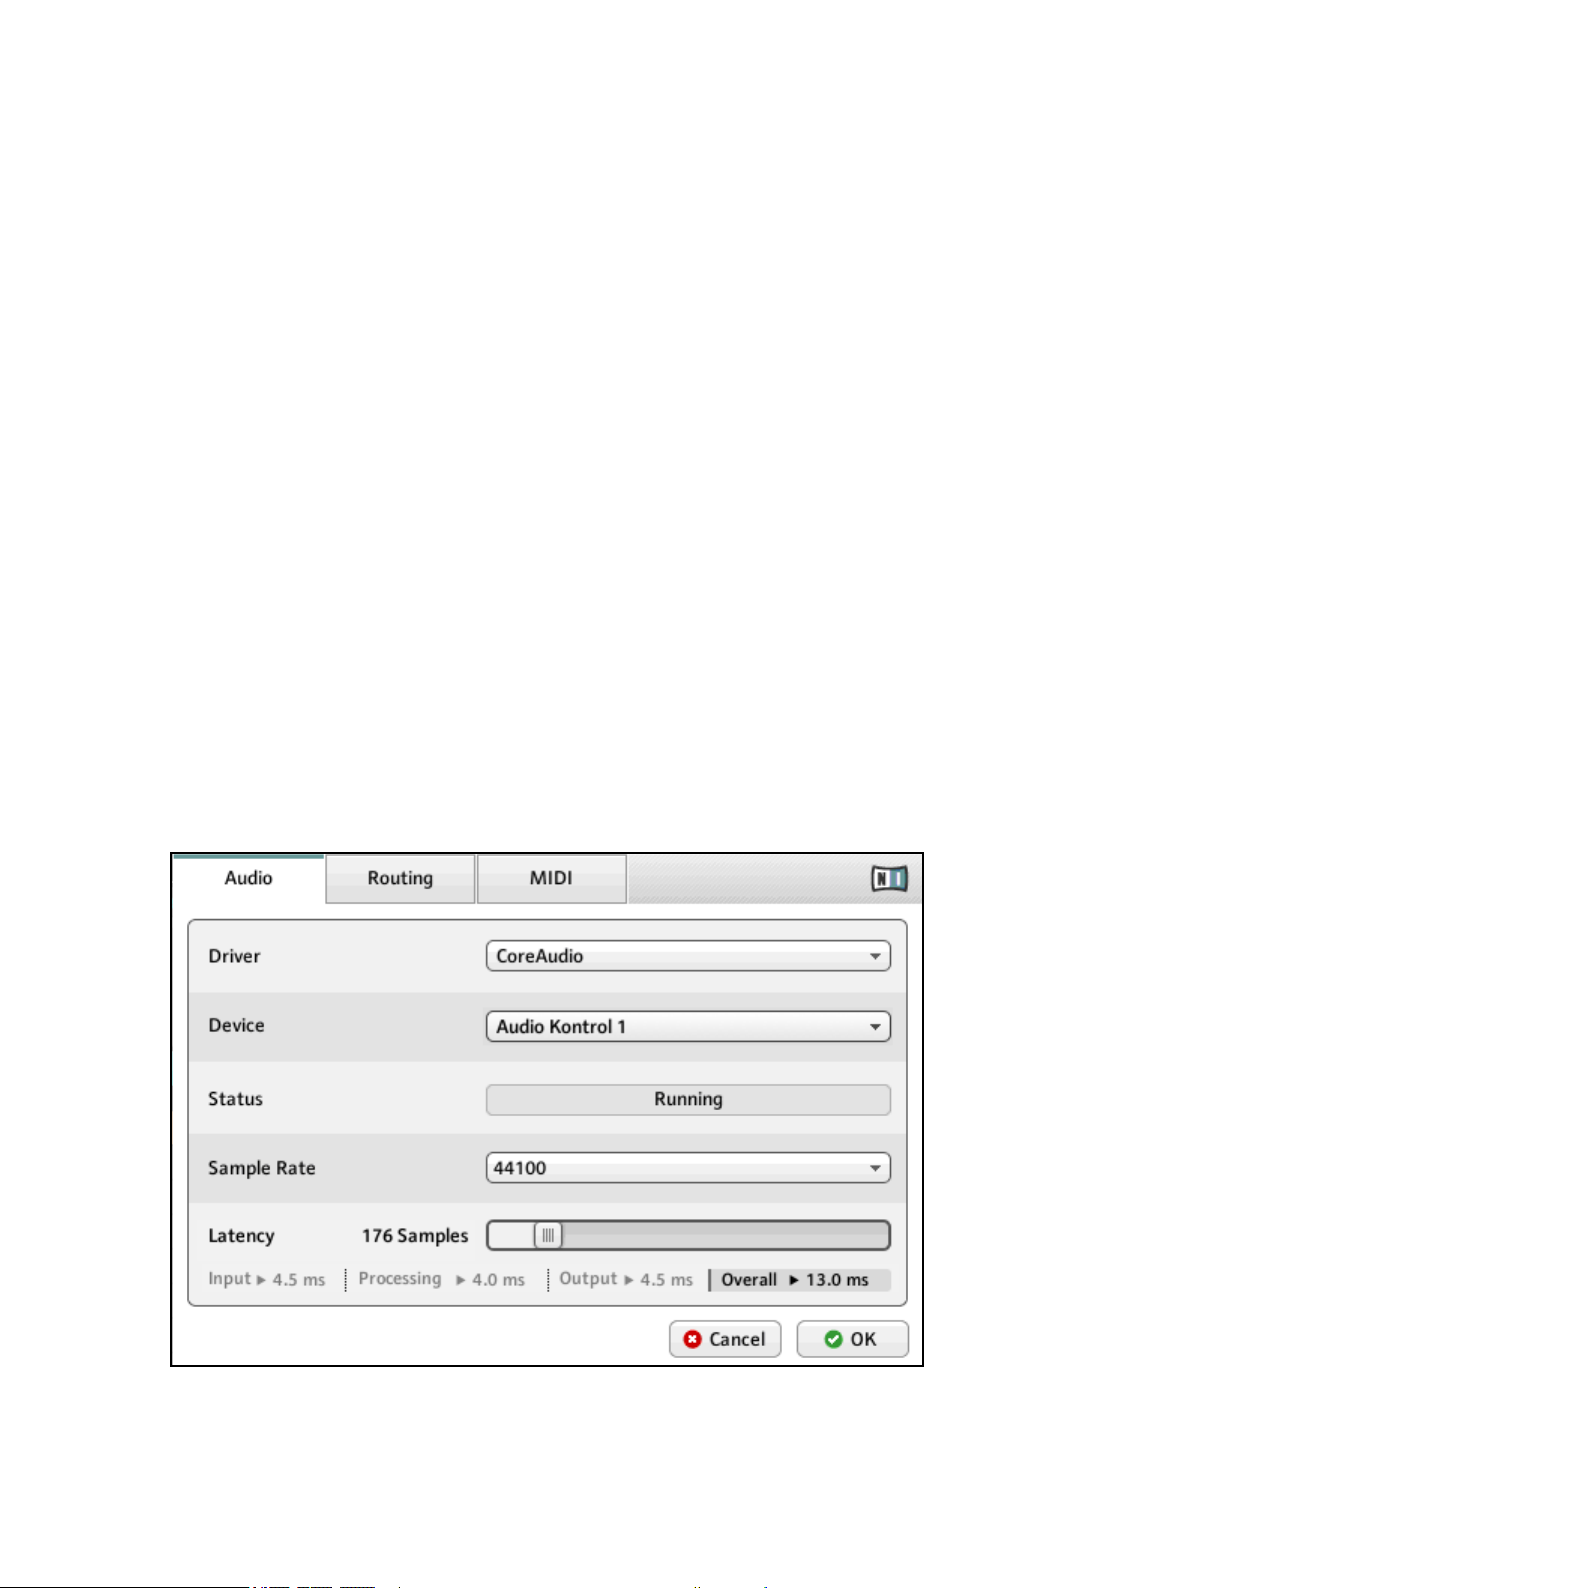
2.5 Audio and MIDI Settings
►
To open the Audio and MIDI Settings dialog, select the Audio and MIDI Settings… entry
from the File menu.
2.5.1 Audio Tab
The Audio Tab of the Audio and MIDI Settings dialog
MASCHINE 1.5 Reference Manual – 45
Page 46

drIvEr Select your audio driver here.
dEvICE
StatUS
SamplE ratE The currently selected Sample Rate of your audio interface.
latEnCy
This allows you to choose available devices if you have connected more than one audio interface.
This shows you whether your audio interface is currently
running.
MacOS®X: This slider allows you to adjust the latency of
your audio interface in samples. Lower values result in a
more immediate playing response but are heavier on both
the CPU and the audio driver, and may result in audible
clicks and pops. Larger values are easier on the CPU, but
introduce a larger latency (i.e. there may be a very small
delay between when you hit a pad and when you actually
hear it). You should therefore experiment with this setting
so that it is as low as possible without overloading your
CPU or introducing any audio artifacts.
Windows®: When using an ASIO driver on the Audio and
MIDI Settings dialog shows an ASIO Cong button instead
of the Latency slider. Click this button to open the settings
dialog of the selected ASIO driver.
MASCHINE 1.5 Reference Manual – 46
Page 47

2.5.2 Routing Tab
The Routing Tab of the Audio and MIDI Settings dialog
By clicking on this button, you can dene which two inputs
on your audio interface will be seen by MASCHINE. Select
InpUtS
oUtpUtS
the Inputs of your audio interface on the right column by
clicking on the elds: you will be presented with a dropdown
menu with all the available Inputs. The choices made here
will determine which Inputs can be used when sampling external sources, for example.
By clicking on Outputs, you will be presented with a list
of the eight stereo outputs from MASCHINE: in the right
column, you can assign them to the outputs of your audio
interface via a dropdown menu.
MASCHINE 1.5 Reference Manual – 47
Page 48

2.5.3 MIDI Tab
The MIDI Tab of the Audio and MIDI Settings dialog (Mac OSX version pictured; entries may vary on your computer )
Clicking on InpUtS displays a list of all the available MIDI
InpUtS
oUtpUtS
oFFSEt
Inputs of your system. You can activate each Input by
clicking in the Status column.
Clicking on oUtpUtS displays a list of all the available MIDI
Outputs of your system. You can activate each Output by
clicking in the Status column.
Use the oFFSEt control to compensate delay that may occur
during MIDI data transmission. Delayed MIDI clock data will
cause external devices to respond too late, thus making your
track sound out of sync.
Adjust the Offset value to set an amount of latency to be
compensated (in milliseconds). MASCHINE will then send
MIDI clock events ahead of time as dened.
MASCHINE 1.5 Reference Manual – 48
Page 49

2.6 Connecting External MIDI Equipment
To connect your external MIDI equipment, hook it up to the MASCHINE Controller’s MIDI In
or MIDI Out socket on the rear panel. If you connect a MIDI keyboard to the MIDI In, you
can directly play the currently selected Sound with it without having to set anything up. You
can also switch Scenes remotely by sending MIDI Program Change messages to MASCHINE.
More on this in chapter 10, ”Creating a Song using Scenes.”
2.6.1 Sync to External MIDI Clock
MASCHINE can be controlled externally via MIDI Clock by any device that is capable of
sending MIDI Clock. This could be hardware such as a drum machine, another groovebox or
sequencer, or even another software sequencer. To enable this, select the Sync to External
MIDI Clock entry from the File menu:
External Sync activated
If you use MASCHINE as a plug-in, it is automatically synced to the host application so
!
you don’t have to activate External Sync!
You have to dene at least one Input in the Audio and Midi Settings’ MIDI Tab to enable
!
External Sync.
MASCHINE 1.5 Reference Manual – 49
Page 50

2.6.2 Send MIDI Clock
MASCHINE can also send a MIDI Clock signal to any device that is capable of receiving MIDI
Clock. This could be hardware such as a drum machine, another groovebox or sequencer, or
even another software sequencer. To enable Send MIDI Clock, select it from the File menu:
Send MIDI Clock activated
MASCHINE 1.5 Reference Manual – 50
Page 51

3 Browser
The Browser is the place where you can organize and categorize all of your Samples, Sounds,
Groups, Projects, FX Presets and Patterns. This is done by tagging them, which means categorizing them by using keywords. Have a look at the tutorial videos “Browser & Library Part
One” and “Browser & Library Part Two” available on the Native Instruments website (http://
www.native-instruments.com) for more information. Given that the MASCHINE Software has
some advantages over the Hardware in this case, such as a very big screen and a QWERTYkeyboard, we will start with the Software rst.
3.1 Elements of the Browser
1 Browser Mode Selector
2 File Type Selector
3 Tag Filter
MASCHINE 1.5 Reference Manual – 51
Page 52

4 Text Search Field
5 Search Result List
6 Tag Editor
7 Audition Controls
3.1.1 Browser Mode Selector
The Browser Mode Selector with LIB selected
On the Browser Mode Selector, you can choose whether you want to browse the Library (click
lIB) or one of your hard drives (click dISk).
3.1.2 File Type Selector
1 Projects (.mprj)
2 Groups (.mgrp)
3 Sounds (.msnd)
4 Patterns (.mpat)
5 FX Presets (.mfxp)
6 Samples (.wav, .aiff)
The File Type Selector only appears up when you have selected the Library tab in the Browser
Mode Selector. On the File Type Selector you will nd 6 icons representing the different le
types of MASCHINE: Projects (1), Groups (2), Sounds (3), Patterns (4), FX Presets (5) and
Samples (6). By clicking on one of them, it causes only the les of the selected type to be
displayed in the Search Result List. You may also deactivate all of them to perform your search
on all le types at once.
MASCHINE 1.5 Reference Manual – 52
Page 53

3.1.3 Tag Filter
As with the File Type selector, the Tag Filter only shows up when you have selected the Library
in the Browser Mode Selector. Then it turns into the three category columns Bank, Type and
Subtype.
The Tag Filter with the letype Sample selected
Bank
Type
Subtype
The Bank category is meant to dene a basic structure. If
you add a large library with many types of Samples, this
might be the place to put its name.
The Type category is the rst in the tag hierarchy of
MASCHINE, and should be used to categorize your le in a
general way.
With the Subtype, you can narrow down the description of
your le even further.
MASCHINE 1.5 Reference Manual – 53
Page 54

3.1.4 Text Search eld
In the Text Search Field you can enter your search query. The search will be performed on the
le paths, the le name and the tags. If you want to search for a combination of two words
(e.g. “bass” and “analog”) just enter both words in the Text Search Field with a gap in between. As you start typing, the list of matches will start narrowing in the Search Result List.
To the right of it you will nd the Reset Switch that resets both text search and tag search.
3.1.5 Search Result List
The Search Result List shows all the les that match your query. Double-clicking one of the
matches will load the respective le. Depending on what File type you have selected, the le
will be loaded to different locations within MASCHINE:
The Search Result List showing Kicks from the MASCHINE Factory Library
•
If it is a Project it will load all associated les replacing all les currently in memory. A
dialog will appear asking you if you want to save changes to the currently loaded Project.
This is to prevent you from losing changes you performed on it by accidentally loading a
new Project without saving the old one.
• If it is a Group, it will be loaded into the Group Slot currently in focus.
• If it is a Sound, it will be loaded into the Sound Slot currently in focus.
MASCHINE 1.5 Reference Manual – 54
Page 55

• If it is a Pattern, it will be loaded into the Pattern Slot currently in focus.
• If it is a FX Preset, it will be loaded into the FX Slot currently in focus.
•
If it is a Sample, it will be loaded into the selected Zone of the Sound in focus replacing
the current one.
Since the FX Slots are not necessarily always in focus, you will have to make sure to
!
Sounds, Patterns, FX Presets and Samples into specic Slots or Tabs by dragging them from the
Browser and dropping them on the desired location.
select one before being able to load a FX Preset.Alternatively, you can load Groups,
3.1.6 Locating missing Samples
If you are loading a MASCHINE Project and the referenced samples cannot be found for any
reason, a dialog in which you can locate the missing samples will open.
The Missing Library Dialog allows you to locate missing samples
Sounds and Groups referencing missing samples are marked with an exclamation mark.
You can open the Missing Library dialog manually from the MASCHINE plug-in Menu.
%
in the File Menu when sample references cannot be resolved.
The Purge Missing Samples and the Find Missing Samples menu entries only show up
MASCHINE 1.5 Reference Manual – 55
Page 56

The Purge Missing Samples and the Find Missing Samples entries in the Maschine File Menu
►
Select Purge Missing Samples to remove all sounds with missing samples from your
MASCHINE Project.
3.2 Adding your own Samples
Apart from the huge Library, you might still want to use your own Samples. The supported le
types are Wav and Aiff. To be able to nd them in the Browser from the Hardware, you will
have to import them into the Library. Importing Samples does not mean they will be moved
from the directory they currently reside in, they will only be referenced by the Browser. That’s
why whenever you move Samples, make sure to update the paths to their respective directories as described in chapter 2.4, “Preferences.” Click on DISK in the File Type Selector and
on the right of it, you will be presented with a list of your hard drives:
MASCHINE 1.5 Reference Manual – 56
Page 57

The Browser with DISK selected showing the available volumes
In the tree view, choose the directory that contains your Samples. You can preview the
Samples automatically before loading them by activating the Audition function in the lower
row of the Browser. Click on the Audition Button; the slider to the right is the Volume Slider
for the Audition Control.
From left to right: Swap BUtton, aUdItIon BUtton, volUmE SlIdEr, Import BUtton
MASCHINE 1.5 Reference Manual – 57
Page 58

3.2.1 Importing a Sample into the Library
Selecting a Sample on your hard drive
After you have found your Sample, you can add it to the Library by clicking the I
mport BUtton
.
If you want to add multiple les at once, such as a folder of your favorite Samples, you can
select the whole folder and tag all les at once using the same dialog as when importing
single les. You can also make non-contiguous selections within a directory by clicking while
holding down the Ctrl key (PC) or the Command key (Mac). After pressing Import, you will
be presented with the Tag Editor to tag the Sample(s) you are about to import to the Library.
MASCHINE 1.5 Reference Manual – 58
Page 59

3.2.2 Tagging your Samples, Sounds, Groups, FX Presets, Patterns and Projects
In the three category columns of the Tag Editor (Bank, Type and Subtype), select the tags
you want to apply to the Sample you are importing:
The Tag Editor with selected Tags (highlighted and checkmarked)
Make sure to be as precise as possible when tagging your les in order to be able to
!
nd what you are looking for later.
You can add as many Tags to a le as you want to by clicking on them. A checkmark will appear next to the selected Tags. To remove the Tag from the Sample, click on it again. After
you have nished tagging, click the OK Button to import the Sample to the Library and apply
the selected Tags. You can cancel the Import by clicking the Cancel Button.
Adding new Tags
You can also add your own Tags. On the bottom of each of the three category columns in the
Tag Editor, there is an add new… entry:
Adding a new Tag in the Type Column
MASCHINE 1.5 Reference Manual – 59
Page 60

To add a new Tag, click on this entry and enter the Tag name with your computer keyboard.
The new Tag will then be available in that Tag category.
Editing Tags
It is also possible to edit the Tags that are on existing les in your Library. Just click on the
le you want to edit the Tags of in the Search Result List, click the Edit Button and select/
deselect Tags by checking/unchecking the respective checkmarks next to them.
Deleting Tags
To delete a Tag from the Tag Editor, right-click (on Mac OS® X: Control-click) on the Tag to
open the delete menu. It is possible to delete multiple Tags by selecting them in the Tag Filter
and then right-click (on Mac OS® X: Control-click) on the selection to open the delete menu.
3.3 Quick Browse
Quick Browse is a feature that allows you to quickly recall a search query you performed to get
to a given le. Let’s say you have loaded a Kick Sound after browsing the Library, then loaded
a Snare Sound to another Sound Slot and now you realize you are not satised with that Kick
Sound, but you heard a nice Kick Sound just before you chose the current one. Normally you
would now have to try to remember the name or the Tags you used to nd it, or browse all
Kick Sounds (given that the MASCHINE Library already has around 700 Kick Sounds, this
may take a considerable amount of time). With Quick Browse you can restore the query with
just one click. Quick Browse is available in the Sound Tab (for Sounds and Samples), in the
Group Tab (for Groups), in the Master Tab (for Projects), and the FX Tabs (for FX).
MASCHINE 1.5 Reference Manual – 60
Page 61

3.3.1 Using Quick Browse
The Quick Browse function in the Sound Tab
The Quick Browse function is activated by clicking on the Magnier Tool next to the le
name. If you click on the Magnier Tool the search query for the currently selected le will be
restored allowing you to choose other results for that query from the Search Result List. By
using the cursor keys on your computer keyboard, you can browse through les in the Search
Result List and they will be instantly loaded if In-Place Auditioning is activated (see below).
3.3.2 In-Place Auditioning
To activate In-Place Auditioning, click the S
will be highlighted in white:
Activating In-Place Auditioning by clicking the Swap BUtton
In-Place Auditioning is not only useful to look for an appropriate Sound, Group, FX or
%
Library with In-Place Auditioning activated and listen to Sounds and Samples you normally would
not use in that context.
This allows you to listen to Samples, Sounds, Groups, and FX Presets which will be instantly
loaded and can be listened to in context with the rest of your Project while it is playing. To deactivate this function, just click on the Magnier Tool on the right of the Text Search Field. You
will still be presented with the Search Result List if you click on the Magnier Tool next to the
Sample, but can also be very inspiring: with a Pattern playing, browse through your
wap BUtton
in the bottom row of the Browser which
le name in the respective Tab, but they will not be loaded automatically while browsing them.
MASCHINE 1.5 Reference Manual – 61
Page 62

3.4 The Browser on the Hardware
In contrast to the Software, the Browser on the Hardware can only load les that have already
been added to the Library. You cannot directly access specic directories on your hard drives
with the Browser on the Hardware. This is why you should always tag all your Samples and
import them to the Library using the Software beforehand.
To enter the Browser on the MASCHINE Controller, press BROWSE.
The Browser on the hardware displays with the Sound Tab in focus
Filter
Dial Knob 1 to select a le type you are looking for. Depending on which of the Buttons 2-4
are selected (the picture above shows the Browser with Button 4, i.e. the Sound Tab selected),
the Filter will allow you to select compatible le types only.
Master Group Sound
Group
Project
Patterns
FX
FX
Sound
FX
Sample
The Bank category is meant to dene a basic structure. Examples
Bank
for the Bank category from the Factory Library are Drums or Loops
or Factory FX.
The Type category is the rst in the tag hierarchy of MASCHINE and
Type
categorizes the le in a general way. Examples for the Type category
from the Factory Library are Brass, Analog FX or Kick.
MASCHINE 1.5 Reference Manual – 62
Page 63

With the Subtype, you can narrow down the description of your le
even further. Examples for the Subtype category are Djembe, Glitch
or Analog.
SUBtypE
The Browser on the hardware showing a Search Result List
If you want to use your Hardware a lot make sure to tag all the les you want to use
%
extensively! This makes it a lot easier to access them using the Hardware.
The Left Display is used to dene your lters and the Tag categories
by turning Knobs 1-4.
The Right Display shows the Search Result List and enables you to
load a le.
You can browse through the Search Result List by turning Knob 5; once you want to load
a le, hit Button 8. Button 5 and 6 allow you to directly load the next or the previous le
from the Search Result List in order to be able to compare them easily (just like In-Place
Auditioning on the software).
Quick Browse
The Browser on the MASCHINE Controller always restores the search query you performed to
get a given le. Read more about the Quick Browse function in section 3.3, “Quick Browse.”
MASCHINE 1.5 Reference Manual – 63
Page 64

4 Creating Sounds
Each Group consists of 16 Sound Slots that can be lled with either one audio le (a Sample
in MASCHINE terminology), or with multiple audio les mapped across the keyboard, as well
as any accompanying effects (a Sound in MASCHINE terminology). A Sound can also be used
as an effect source in MASCHINE; you could for example use a Sound to host a Send Effect
for other Sounds, or even route external audio signals through a given Sound (read chapter
9, “Using FX,” for more details on this). You can also sample directly to a Sound Slot (read
chapter 11, “Sampling & Sample Mapping,” for more details on this), or use it to send MIDI
notes (see section 4.10.3, “MIDI Output from Sounds”).
4.1 Choosing a Source for Your Sound
We will rst look at the Source Tab of your Sound, which allows you to dene what source
the Sound is going to use.
Hardware
On the MASCHINE Controller, rst press the Pad corresponding to the desired Sound. Press
Button 4 to select the Sound Tab, then press Button 5 to show its Source Tab (SRC). Then
press SHIFT+BROWSE to select the sound source.
Software
Alternatively, in the Software, click the Arrow in the Header of the Sound’s Source Tab (SRC):
Click on the little arrow in the Source Tab header to choose the source to use for that Sound.
There are three modes available: Sampler, Input and MIDI Out:
•
Sampler: allows the selected slot to play back Samples (as you will be doing most of the time).
•
Input: instead of playing back a Sample, this allows the selected Sound to be available
as a bussing point for other Sounds. You might for example like to host an effect such
MASCHINE 1.5 Reference Manual – 64
Page 65

as a reverb in this slot that can be made available to other Sounds in your Project. For
more info on how to use this mode, please refer to chapter 9.8, “Creating a Send Effect.”
•
MIDI Out: allows you to use a Sound to send MIDI notes to your host application or your
external MIDI equipment. For more info on the MIDI Out mode, refer to chapter 4.10.3,
“MIDI Output from Sounds.”
In the following section, we will concentrate on the Sampler mode, which is probably the one
you will use the most.
Tip: you don’t really ever need to explicitly choose Sampler; this will be done for you automatically any time you load a sound into the slot.
4.2 The Sampler Parameters in the Sound’s Source Tab (SRC)
The Sampler Parameters offer various ways to further shape each of your Sounds individually.
You can tune, change basic dynamics and apply effects as well as different modulation options. Not only arethese parameters automatable but they were designed to be tinkered with!
See chapter 6.1.8, ”Recording automation.” for the Hardware and chapter 7.2.5, ”Recording
and editing automation,” for the Software.
The Sampler Parameters are organized in 6 pages:
• Page 1: Voice Settings, Pitchbend and Engine Settings
• Page 2: Pitch/Gate and Amplitude Envelope
• Page 3: FX and Filter Settings
• Page 4: Modulation Envelope and Destination
• Page 5: LFO and Destination
• Page 6: Velocity Destination and Modwheel Destination
MASCHINE 1.5 Reference Manual – 65
Page 66

Hardware
►
On your MASCHINE Controller, use the Page Buttons to step through the various Parameter
Pages.
On the MASCHINE Controller, step through the pages by pressing the Page Buttons.
Software
► In the Software, use the Page Selector to step through the Parameter Pages.
In the software, step through the pages by clicking the Page Selector's arrow buttons.
4.2.1 Page 1: Voice Settings and Engine
Page 1 of 6 from the Sampler Source Tab on the hardware
Page 1 of 6 from the Sampler Source Tab on the software
MASCHINE 1.5 Reference Manual – 66
Page 67

Voice Settings Controls
polyphony
ChokE GroUp
Here you can dene a voice limit for the Sound. The default value is 8, the minimum 1 and the maximum 32
voices. You can also set this to Legato.
You can choose one of the 8 Choke Groups here or leave
this option set to Off. If you assign more than one Sound
to the same Choke Group, they will cancel each other out.
This is a behavior you can nd in vintage drum machines
(typically used to “choke” the open hi-hat with the closed
one), but also in monophonic synthesizers that are only capable of playing one note at a time.
GlIdE
pItChBEnd
Engine Controls
modE
modEl
FIltEr
If Legato is selected, this allows for a portamento-effect
between consecutive steps.
Here you can adjust how the Sound reacts on incoming
MIDI Pitchbend messages from an external MIDI Controller
or your host application. For more information on how to
setup your Sounds to receive MIDI, refer to section 4.10.1,
“Sound MIDI Batch Setup.”
This allows you to determine the mode of the sampling engine. Available options are Standard and Vintage.
If you choose Vintage in Mode, you can select between two
Models emulating the sonic characteristics of two legendary Samplers often used in Hip-Hop.
If you choose the S1200 model (see above), you can further shape the emulation model by activating a lter here.
The available lters are: None (no lter), Low, Lo-Mid, Hi-
Mid, and High.
MASCHINE 1.5 Reference Manual – 67
Page 68

4.2.2 Page 2: Pitch/Gate and Amplitude Envelope
Page 2 of the Sampler Source Tab on the Hardware
Page 2 of the Sampler Source Tab on the Software
Pitch/Gate Controls
tUnE
Start
rEvErSE If rEvErSE Is activated, the Sample will be played backwards.
Denes the basic pitch of your Sample: turn the knob to the right for a higher pitch and to the left for a lower pitch.
Determines the start point of the Sample (can also be modulated with
Velocity control on Page 6, see below).
Amplitude Envelope
The Amplitude Envelope allows you to tailor your Sample in terms of its loudness over time.
typE
Oneshot: This is typical vintage drum machine behavior: the sample is played in its entirety
from beginning to end with no envelope. Note: if Oneshot is activated, the following param-
eters will not be available!
MASCHINE 1.5 Reference Manual – 68
Page 69

AHD: AHD mode disables the Sustain and Release controls, and replaces them with the Hold
parameter. AHD mode is ideal for “re and forget” behavior, whereby you would like to have
the sound trigger for a certain amount of time regardless of how long you hold the Pad down.
ADSR: Typically, the ADSR envelope is used for longer, sustained Samples that require complex
dynamic control. Tip: unlike many other hardware devices, the Pads on MASCHINE are sensitive not only to being hit, but also to being held—so using the ADSR envelope, you can make
the Pads behave like a MIDI keyboard and sustain a note only for as long as it is held down.
Amplitude Envelope Controls
attaCk
hold
dECay
SUStaIn
rElEaSE
Attack determines how quickly the Sound reaches full volume after being triggered.
Hold determines how long the envelope will stay at its maximum level.
Decay determines how fast the envelope drops to the
Sustain level in ADSR mode; in AHD-mode it is used to
adjust how fast the Sound dies down. This parameter can
be modulated by Velocity.
Sustain determines the constant level being kept after
Decay until the note ends. This can also be controlled by
an external MIDI controller or keyboard using MIDI CC 64.
Release determines how long the sound takes to fade out
after the note has ended.
MASCHINE 1.5 Reference Manual – 69
Page 70

4.2.3 Page 3: FX and Filter Settings
Page 3 of 6 from the Sampler Source Tab on the hardware
Page 3 of 6 from the Sampler Source Tab on the software
4.3 FX
This is a small selection of basic FX, not to be mixed up with the FX section covered in depth
in chapter 9, ”Using FX.”
FX Controls
Comp
drIvE Denes the amount of saturation applied to a Sound.
Sr
BItS
Basic compressor allowing you to give a Sound more density.
SR stands for sample rate: you can use it to lower the original sample rate in order to give a Sound a lo- touch.
Allows you to lower the original bit rate of the Sound, resulting in a more rough, digital sounding lo- effect.
MASCHINE 1.5 Reference Manual – 70
Page 71

Filter Modes
The modE menu in the Filter section gives you access to a set of different lters. Using the
arrows you can choose from different lter types: EQ, HP2, BP2, LP2 and Off. Each type
results in different parameters to the right of it:
Filter Controls
EQ The EQ is an equalizer with FrEQUEnCy, BandwIdth and GaIn.
HP2 is a highpass lter with CUtoFF and rESonanCE. Cutoff
HP2
BP2
LP2
can be modulated by Velocity, the Modulation Envelope,
the LFO or the MIDI Modulation Wheel.
BP2 is a bandpass lter with CUtoFF. CUtoFF can be modu-
lated by Velocity, the Modulation Envelope, the LFO or the
MIDI Modulation Wheel.
LP2 is a low pass lter with CUtoFF and rESonanCE. CUtoFF
can be modulated by Velocity, the Modulation Envelope,
the LFO or the MIDI Modulation Wheel.
4.3.1 Page 4: Modulation Envelope and Destination
Page 4 of 6 from Sampler Source Tab on the hardware
Page 4 of 6 from Sampler Source Tab on the software
MASCHINE 1.5 Reference Manual – 71
Page 72

Modulation Envelope
The Modulation Envelope offers an envelope that shapes the modulation you apply to your
Sound. Its parameters are matched to those of the Amplitude Envelope on Page 2, so that
you have either an ADSR (Attack, Decay, Sustain, Release) envelope or an AHD (Attack, Hold,
Decay) envelope to control your modulations. If you choose ONESHOT Mode, only the AHD
envelope (pictured) will be available for modulation.
attaCk
hold How long the envelope will stay at its maximum level.
dECay
SUStaIn
rElEaSE
The time it takes for the envelope to reach its maximum
level.
With Decay you adjust how fast the envelope drops to the
Sustain level in ADSR mode; in AHD-mode it is used to
adjust how fast the envelope fades out.
The envelope level that will be maintained as long as the
note is played.
The time for the sustain level to return to zero after the
note has ended.
Destination
This is where you dene modulation targets for the Modulation Envelope. Available targets are:
• pItCh, located on Sampler Parameter Page 2
• CUtoFF, located on Sampler Parameter Page 3
• drIvE, located on Sampler Parameter Page 3
• pan, located on Output Parameter Page 1
4.3.2 Page 5: LFO and Destination
Page 5 of 6 from the Sampler Source Tab on the hardware
MASCHINE 1.5 Reference Manual – 72
Page 73

Page 5 of 6 from the Sampler Source Tab on the software
LFO
The LFO (Low Frequency Oscillator) is another modulation source based on waveforms with
different shapes.
Here you can choose the shape of the LFO waveform.
typE
SpEEd
Available shapes are Random, Saw, Rect (Rectangle), Tri
(Triangle) and Sine.
Controls the speed of the LFO measured in Hz (Hertz). If
you choose to synchronize the Speed by activating Sync, it
will show musical values instead.
phaSE
SynC
Denes the initial phase of the LFO waveform, expressed
as a percentage.
This button is used to activate synchronization of the LFO
to the tempo of your Project. If enabled, the values on the
Speed parameter will change into rhythmical values ranging from 16/1 (= one modulation cycle in 16 bars) to 1/32
(one modulation in 1/32nd note).
Destination
This is where you dene up to four modulation targets for the LFO:
• Pitch, located on Sampler Parameter Page 2
• CUtoFF, located on Sampler Parameter Page 3
• drIvE, located on Sampler Parameter Page 3
• pan, located on Output Parameter Page 1
MASCHINE 1.5 Reference Manual – 73
Page 74

4.3.3 Page 6: Velocity Destination and Modwheel Destination
Page 6 of 6 from the Sampler Source Tab on the hardware
Page 6 of 6 from the Sampler Source Tab on the software
Velocity Destination
Start
dECay
CUtoFF
volUmE
This is a built-in modulation source that allows you to
modulate the sample Start parameter on Page 2 based on
the input velocity. Positive values shift the sample start
position later in time as you play harder, negative values
shift it closer to the beginning of the sample as you play
harder. Tip: a typical example for this parameter is setting it
so that the initial attack transient of a snare drum is heard
only at high velocity values. This makes it sound “snappier”
when you play hard, and “mushier” or muted when you play
softly.
This allows you to modulate the Decay parameter of the
Amplitude Envelope on Page 2 by using Velocity.
This allows you to modulate the Cutoff parameter of the
Filters with lter types LP, HP, BP (on Page 3).
This allows you to modulate Volume, which is what Velocity
normally is used for.
MASCHINE 1.5 Reference Manual – 74
Page 75

Modwheel Destination
Start
CUtoFF
lFo dEpth
pan
Here you can determine how incoming MIDI Modulation
Wheel data affects the Sample start parameter on Page 2.
This allows you to modulate the Cutoff parameter of the
Filters with lter types LP, HP, BP (on Page 3) using the
MIDI Modulation Wheel.
Here you can adjust the effect of the MIDI Modulation
Wheel data on the LFO Depth of the LFO on Page 5.
Another modulation target for the MIDI Modulation Wheel:
the panorama position on Output Parameter Page 1.
4.4 The Sampler Parameters in the Sound’s Output Tab (OUT)
The Sound’s Output Tab allows you to route your Sound and dene Aux Sends. Aux Sends
allow you to send a denable amount of your Sound to other Groups or Sounds for further
processing. Read the chapter 9.8, ”Creating a Send Effect,” to get to know more about how
to set up a classic Send Effect.
4.4.1 Page 1: Main, Aux 1 and Aux 2
Page 1 of 2 from the Sampler Output Tab on the hardware
Page 1 of 2 from the Sampler Output Tab on the software
MASCHINE 1.5 Reference Manual – 75
Page 76

Main
This is used to dene where you want to send your Sound.
oUtpUt
lEvEl Here you adjust the overall volume level of your Sound.
pan Denes the pan position of your Sound in the stereo eld.
If MASCHINE is running as a plug-in, the External Outputs will correspond to virtual
%
own mixer channel within your DAW, for example.
outputs in your host. This allows you to send individual Sounds from MASCHINE to their
Available options are Master, Group, any other Sound
within the Project whose Source type is set to Input, the
External Outputs 1-8, and None.
Aux 1
The destination for Aux 1: available destinations are
dEStInatIon
Master, Group, all Sounds with Input enabled, the External
Outputs 1-8 and None.
lEvEl
Aux 2
dEStInatIon
lEvEl
4.4.2 Page 2: Pre Mix Options
Here you adjust the level of the signal that gets sent to the
Aux 1 destination.
The destination for Aux 2: available destinations are
Master, Group, all Sounds with Input enabled, the External
Outputs 1-8 and None.
Here you adjust the level of the signal that gets sent to the
Aux 2 destination.
Page 2 of 2 from the Sampler Output Tab on the Hardware
MASCHINE 1.5 Reference Manual – 76
Page 77

Page 2 of 2 from the Sampler Output Tab on the software
Aux 1
prE mIx
Aux 2
prE mIx
If this is enabled, the Sound will be fed into Aux 1 before
Main Level and Pan of the Sound.
If this is enabled, the Sound will be fed into Aux 2 before
Main Level and Pan of the Sound.
4.5 Saving a Sound
To save a Sound, right-click (on Mac OS® X: Control-click) on the Sound Slot in the Arranger
and select Save As… from the dropdown menu:
Saving a Sound
MASCHINE 1.5 Reference Manual – 77
Page 78

The Sound will be added to the Library and is ready to be tagged.
Saving a Sound is only available in the MASCHINE Software.
%
4.6 Copying and Pasting Sounds
Hardware
To copy a Sound from one pad to another, press and hold DUPLICATE, press the Pad of
the Sound you want to copy, then select your target Sound Slot (this can also be in another
Group, in this case rst press one of the Group Buttons) by hitting its Pad. All parameters of
the Sound will be copied including the source’s Pattern content.
To duplicate Sounds excluding the Pattern content, disable the EVENTS option (Button2)
%
Software
You can copy & paste Sounds by right-clicking (on Mac OS® X: Control-click) on the Sound
Slot. In the dropdown menu, choose Copy to copy a Sound. To paste the Sound, select an
empty Sound Slot by right-clicking (Mac OS® X: Control-click) on it and then select Paste
from the dropdown menu. All parameters of the Sound will be copied except for the source’s
Pattern content.
on the Duplicate Screen.
MASCHINE 1.5 Reference Manual – 78
Page 79

Copying a Sound
4.7 Resetting a Sound
Resetting a Sound results in removing its associated Sample(s) and FX as well as putting all
Sampler Parameters back to their default value.
Hardware
► Hold SHIFT+ERASE and then touch the Pad corresponding to the Sound to be reset.
Software
►
To reset a Sound, right-click (on Mac OS® X: Control-click) the Sound Slot and choose
Reset from the dropdown menu.
MASCHINE 1.5 Reference Manual – 79
Page 80
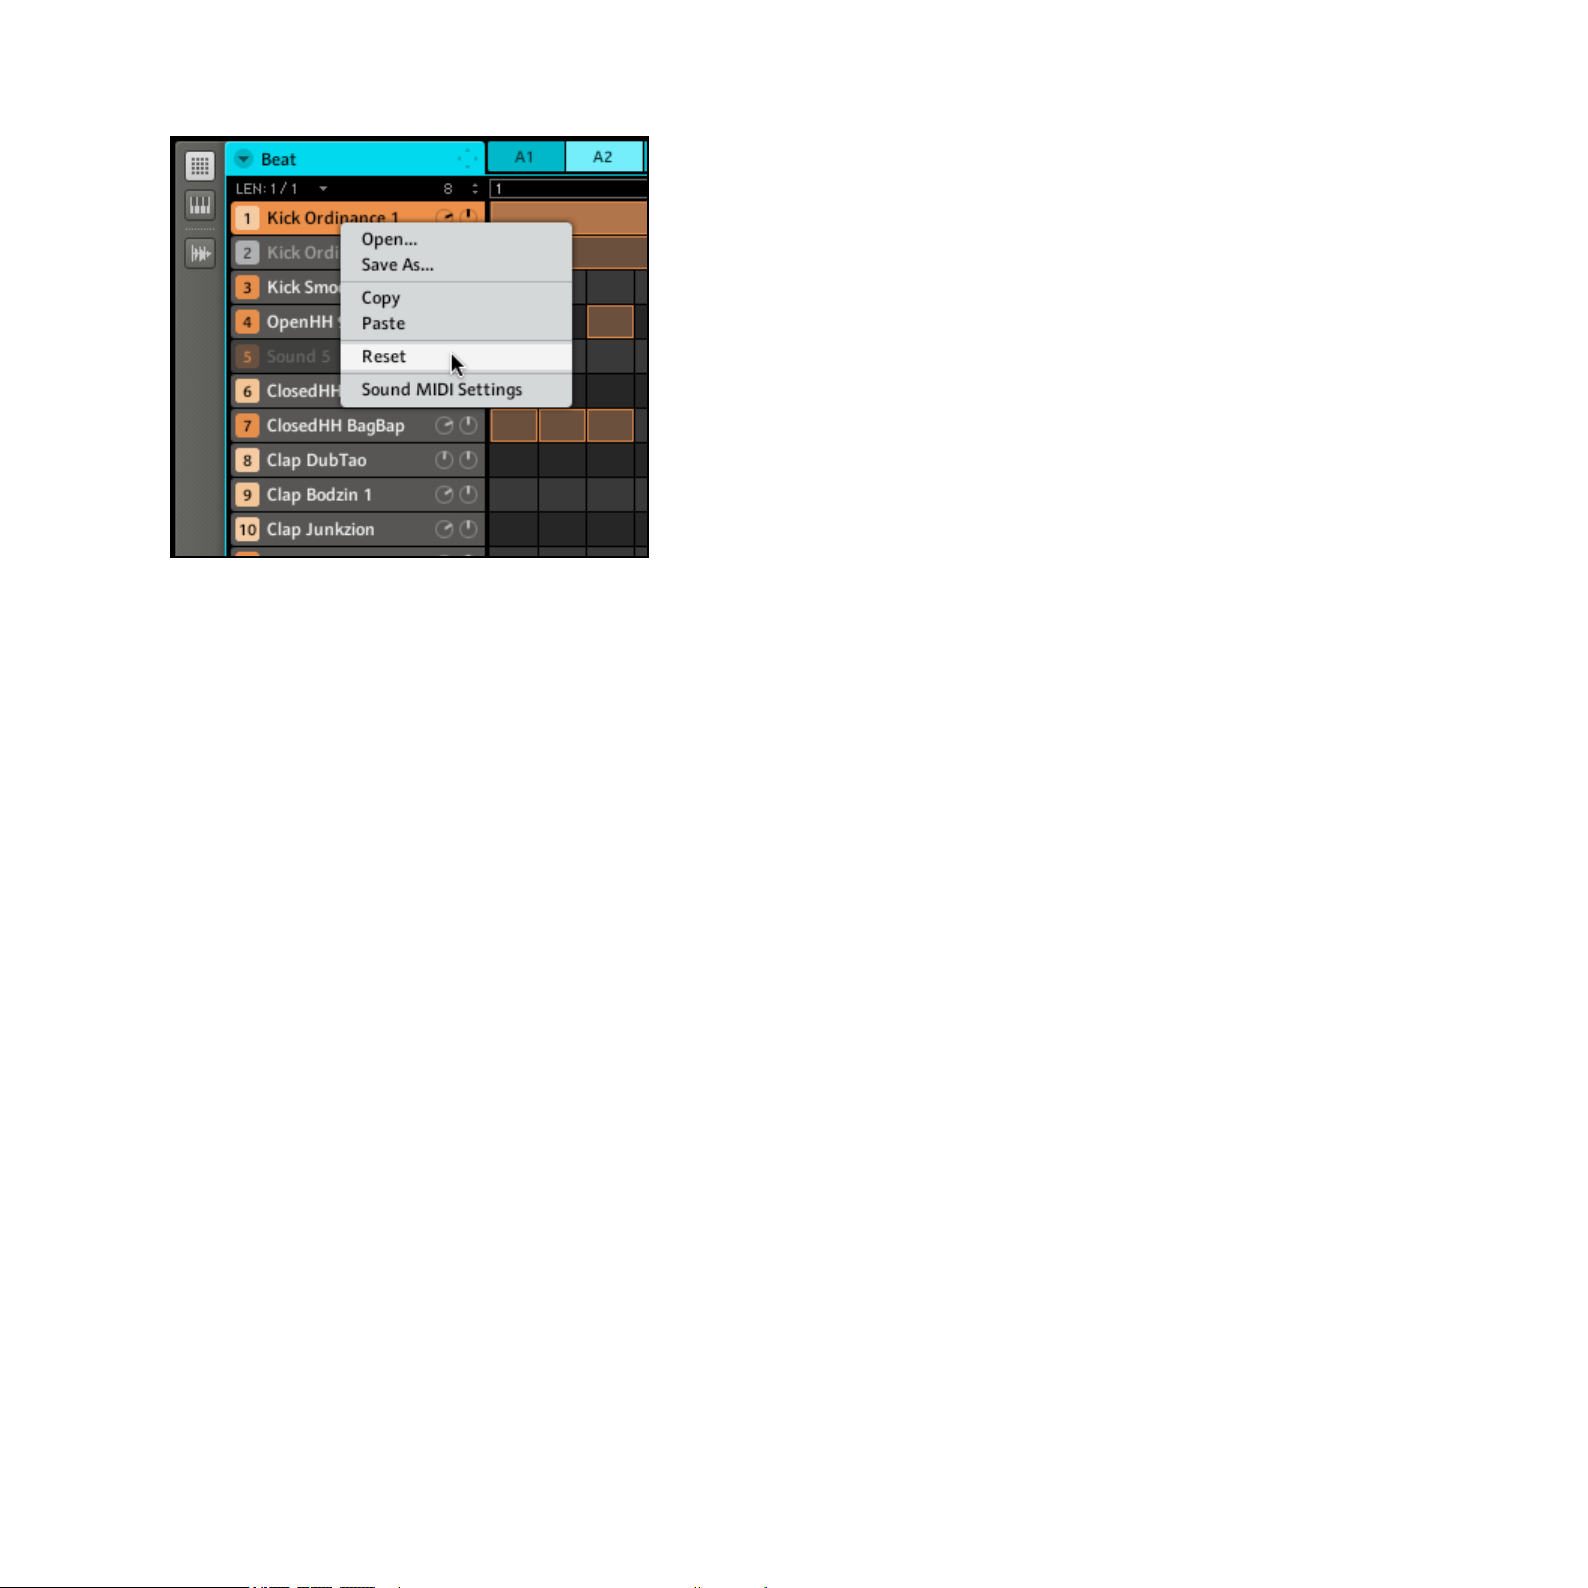
Resetting a Sound
4.8 Mute & Solo
Muting is used to bypass the audio signal of either a Sound or a Group, whereas Soloing is
pretty much the opposite: it mutes all other Sounds and Groups, so that you can listen to the
selected Sound or Group alone. The combination of both is a useful means to play live and
to test different sequences together.
Hardware
Soloing Sounds and Groups
► Press SOLO and hold it: now you can solo Sounds by hitting their Pads, and Groups by
hitting the corresponding Group Buttons.
Solo is a temporary mode, therefore you will have to hold SOLO to access it. If you press
SOLO and Button 1 at the same time, the Solo function gets locked, e.g. you stay in Solo
Mode until you press SOLO again. There are two more functions in the Solo Mode: All On
(press Button 3) to turn all Sounds on and None (press Button 4) to turn all Sounds of the
Group currently in focus off.
MASCHINE 1.5 Reference Manual – 80
Page 81

The Solo Screen on the hardware
Muting Sounds and Groups
Mute works in the same way as the Solo Mode: hold MUTE to mute Sounds by pressing their
respective Pads, and Groups by pressing the Group Buttons. You can also lock the Mute
function by pressing MUTE and Button 1 at the same time and unlock it by pressing MUTE
again. Like in the Solo Mode there are two more functions in the Mute Mode: All On (press
Button 3) to turn all Sounds on and None (press Button 4) to turn all Sounds of the Group
currently in focus off.
Since pressing SOLO mutes all sounds except one, the MUTE Button can be used to
%
down: Solo a given sound such as a kick drum, then build the track up again by bringing the muted
sounds back in one at a time with the MUTE button.
“release” Sounds that have been muted. You can use this technique to create a break-
The Mute Screen on the hardware
MASCHINE 1.5 Reference Manual – 81
Page 82

Software
Soloing a Sound
►
To solo a Sound, right-click (on Mac OS® X: Control-click) on the Pad icon in the Pattern
Editor.
Soloing the Kick Sound
► To unsolo a Sound, right-click (on Mac: Control-click) on the Pad icon again.
Soloing a Group
► To solo a Group, right-click (on Mac: Control-click) on the Group icon in the Arranger:
Soloing a Group
► To unsolo a Group, right-click (on Mac: Control-click) on the Group icon again.
Muting a Sound
► To mute a Sound, click on the Pad icon in the Pattern Editor.
Muting a Sound
► To unmute the Sound, click on the Pad icon again.
MASCHINE 1.5 Reference Manual – 82
Page 83

Muting a Group
► To mute a Group, click on the Group icon in the Arranger:
Muting a Group
► To unmute the Group, click on the Group icon again.
4.9 Loading REX Files
MASCHINE supports REX (ReCycle) les to be loaded. REX les are loops that are already
sliced and mapped to MIDI notes.
Only REX2 les are currently supported.
!
1.
First select an empty Sound that you want to load the REX le to by clicking on its Sound
Slot.
2.
Now use the Browser to navigate to the REX le on your hard disk that you want to load.
3.
Double-click on the REX le or drag it to a Sound Slot; you will notice that a new Pattern
has been created in the Piano Roll/Keyboard View. This Pattern contains the sequence
data of the REX le. For each REX le you import a Pattern will be created and added.
MASCHINE 1.5 Reference Manual – 83
Page 84

A REX le loaded on Sound 1 in the Piano Roll/Keyboard View
4.10 Sound MIDI Options
MASCHINE’s Groups and Sounds can be triggered via MIDI, both globally and individually. To
congure the appropriate MIDI settings, you have two functions at your disposal: Sound MIDI
Batch Setup (for whole Groups) and Sound MIDI Settings (for individual Sounds). Furthermore,
you can congure your Sounds’ outputs for sending MIDI data.
You can also trigger your Scenes using MIDI messages. Please refer to section 10.7,
%
”Triggering Scenes via MIDI,” for more info on this.
MASCHINE 1.5 Reference Manual – 84
Page 85

4.10.1 Sound MIDI Batch Setup
To create a MIDI setting for an entire Group, you can use the Sound MIDI Batch Setup function. Here you can set up how all Sounds of the selected Group respond to MIDI.
►
Right-click (on Mac OS® X: Ctrl-click) on the Group Slot in the Arranger and choose
Sound MIDI Batch Setup from the pop-up menu.
Selecting Sound MIDI Batch Setup for a Group
Now you will be presented with the Sound MIDI Batch Setup dialog:
The Sound MIDI Batch Setup dialog
MASCHINE 1.5 Reference Manual – 85
Page 86

Sound MIDI Batch Setup Options
Mapping Mode
rEStorE dEFaUltS
SoUndS to mIdI ChannElS
SoUndS to mIdI notES
Select this radio button to restore the Sound MIDI Batch
Setup to its default values. In the default state, each
Sound in this Group will receive notes from all MIDI channels, as long as it is in focus.
Select this radio button to have Sounds mapped to individual MIDI channels. This is useful if you want to play a
Sound in a tonal way.
Select this radio button to have Sounds mapped to MIDI
notes, starting with the Root Note. This is useful for drumkits.
mIdI ChannEl
root notE
Select a MIDI channel here if you have selected the
Sounds to MIDI Notes option.
Choose a Root Note here if you have selected the Sounds to
MIDI Notes option.
4.10.2 Sound MIDI Settings
You can also assign individual Sounds to MIDI. This is done in the Sound MIDI Settings.
► Right-click (on Mac OS® X: Ctrl-click) on the Sound Slot of a Sound and choose Sound
MIDI Settings from the pop-up menu.
Choosing Sound MIDI Settings for a Sound
Now you will be presented with the Sound MIDI Settings dialog:
MASCHINE 1.5 Reference Manual – 86
Page 87

The Sound MIDI Settings dialog
If the Sound MIDI Settings are disabled (i.e., the checkbox is unchecked), any incoming
!
Status Options
EnaBlE
Input Options
MIDI note will trigger the Sound as long as the Sound is in focus.
To enable Sound MIDI Settings, click this checkbox.
ChannEl
low notE
hIGh notE
Destination Options
root notE Dene the Root Note of the selected Sound here.
Choose on which MIDI Channel the Sound will receive MIDI
by selecting it in the dropdown menu.
Dene the lowest note on which the Sound will respond to
MIDI here.
Dene the highest note on which the Sound will respond to
MIDI here.
MASCHINE 1.5 Reference Manual – 87
Page 88

Combining the MIDI Settings for Scenes, Groups and Sounds, you can easily create
%
octave controlling the Scenes, second octave controlling your drumkit, third one for the piano
sound and so forth.
!
your custom MIDI setup and create a keyboard split for your live set, for example: rst
The settings for Sounds have a higher priority than the Group settings, as well as the
settings for Groups have a higher priority than the Scene settings.
4.10.3 MIDI Output from Sounds
You can output MIDI notes from individual Sounds allowing you to control your host application and/or external MIDI gear from MASCHINE’s sequencer.
Hardware
1. Select an empty Sound by pressing its Pad.
2. Press Button 5 to select the Source Tab (SRC).
3.
Press SHIFT+BROWSE. By using Buttons 5 & 6 or Knob 5 you can select either
Sampler, Input or MIDI Out.
4. Select MIDI Out and press Button 8 to conrm your selection.
Selecting MIDI Out in the Source tab
5.
Press BROWSE to leave this dialog and use Knob 1 to select the MIDI Channel you want
the Sound to send note data to.
Sound 5 sending MIDI data on MIDI Channel 1
MASCHINE 1.5 Reference Manual – 88
Page 89

You will notice that the Sound was automatically renamed to “MIDI Out” for clarity’s sake!
%
Software
1. Select an empty Sound Slot by clicking on it.
2. Select the Source tab (SRC) and click on the arrow to open the dropdown menu.
The dropdown menu in the Source tab
3. Choose MIDI Out, then select the MIDI Channel you want the Sound to send MIDI to.
Choosing MIDI Channel 1 as output for Sound 2
MASCHINE 1.5 Reference Manual – 89
Page 90

5 Creating Groups
A Group contains 16 Sound Slots with all their parameters. It can have up to two Insert FX and
up to 64 Patterns assigned to it, which are organized in 4 Banks. More on Patterns in chapter
6, ”Working with Patterns (Hardware),” and chapter 7, “Working with Patterns (Software).”
5.1 The Group Source Tab Parameters
5.1.1 Page 1: Voice Settings
The Group Source Tab Parameters on the hardware
The Group Source Tab Parameters on the software
Voice Settings
Here you can dene a voice limit for the Group. The de-
polyphony
fault value is 16, the minimum 1 and the maximum 32
voices.
MASCHINE 1.5 Reference Manual – 90
Page 91

5.1.2 Page 2: Pitch & Swing
The Pitch & Swing Page of the Group Source Tab on the hardware
The Pitch & Swing Page of the Group Source Tab on the software
Pitch
This parameter provides tuning for the Group as a whole:
tUnE
all Sounds of the Group will be tuned together. Dial it to
the right to get a higher pitch and to the left to get a lower
pitch.
Swing
amoUnt
CyClE
InvErt
Groups can have an individual Swing value independent of
the Global Swing settings. Swing allows for rhythmic shifting of a Pattern where the rst note in a series plays up to
twice as long as the one that follows, creating a “shufed”
feel. This effect is also found in vintage drum machines
and is often used in Chicago House and some Hip-Hop
styles. Increasing this parameter increases the strength of
the effect. Swing is a function better heard than described!
This determines on what musical resolutions the Swing is
applied. The default value is 1/8.
This Button allows you to invert the Swing function so that
instead of a long note followed by a short note, the opposite is true.
MASCHINE 1.5 Reference Manual – 91
Page 92

5.1.3 Page 3: Macro Controls
Macro Controls enable you to control selected parameters using eight Knobs per Group.
This is useful for playing live since you can choose a set of parameters to manipulate on
one screen without having to switch screens, but also allows you to automate MASCHINE
parameters using the host automation of your DAW. Please refer to the manual of your DAW
software for more information on that. In addition to that, Macro Controls also allow you to
control MASCHINE parameters through external MIDI Controllers using MIDI CCs. Finally
you can record them as automation in a Pattern (for more information on that, see section
6.1.8, ”Recording automation,” for the Hardware and section 7.2.5, ”Recording and editing
automation,” for the Software).
Software
The Macro Controls on the Software
Hardware
The Macro Controls on the Hardware
Assigning a Parameter to a Macro Control
The Macro Controls are assigned using the MASCHINE Software. Each Macro Control can
be assigned to one destination with the full range of the selected parameter. Macro Controls
are bipolar Knobs with a range of -100% to +100% (0% is centre). The value is being sent to
the destination as internal modulation and can be recorded as such. It is possible to assign
any modulatable parameters in the Group’s Source, FX1, FX2 and Output Tabs as well as any
modulatable parameter on any Sound inside the Group.
MASCHINE 1.5 Reference Manual – 92
Page 93

1.
Choose any controllable parameter of your Group or the Sounds contained in it and rightclick (on Mac OS® X: Ctrl-click) on it:
Assigning the Tune parameter of a Sound to a Macro Control
2.
Now choose one of the available Macro Controls 1-8. After assignment is made, a blue
dot shows that the parameter is assigned to a Macro Control:
Tune assigned to a Macro Control
Removing a Parameter from a Macro Control
To remove a parameter from the assigned Macro Control, right-click (on Mac OS® X: Ctrlclick) on it and select the Remove Macro Control entry from the pop-up menu:
Removing a parameter from a Macro Control
MASCHINE 1.5 Reference Manual – 93
Page 94

Assigning Macro Controls to external MIDI CCs
Just like the parameter assignment, the MIDI CC assignment is performed in the MASCHINE
Software. To select a MIDI CC, get back to the Page 3 of the Group Source Tab, right-click
(on Mac OS® X: Ctrl-click) on the Macro Control and choose your MIDI CC:
Assigning MIDI CC 1 to Macro Control 1
Alternatively, you can also let MASCHINE learn the MIDI CC it is supposed to react to. Choose
MIDI Learn from the pop-up menu and move the desired knob or fader on your connected
MIDI Controller:
Selecting MIDI Learn in the pop-up menu
MASCHINE 1.5 Reference Manual – 94
Page 95

As soon as you select MIDI Learn, a white dot starts to ash until the software receives an
incoming MIDI CC:
The white dot next to the Macro Control
→ When the MIDI CC has been received, the white dot will stop ashing.
5.2 The Group Out Tab Parameters
5.2.1 Page 1: Routing, Volume and Pan
Page 1 of 2 from the Group Out Tab Parameters on the hardware
Page 1 of 2 from the Group Out Tab Parameters on the software
MASCHINE 1.5 Reference Manual – 95
Page 96
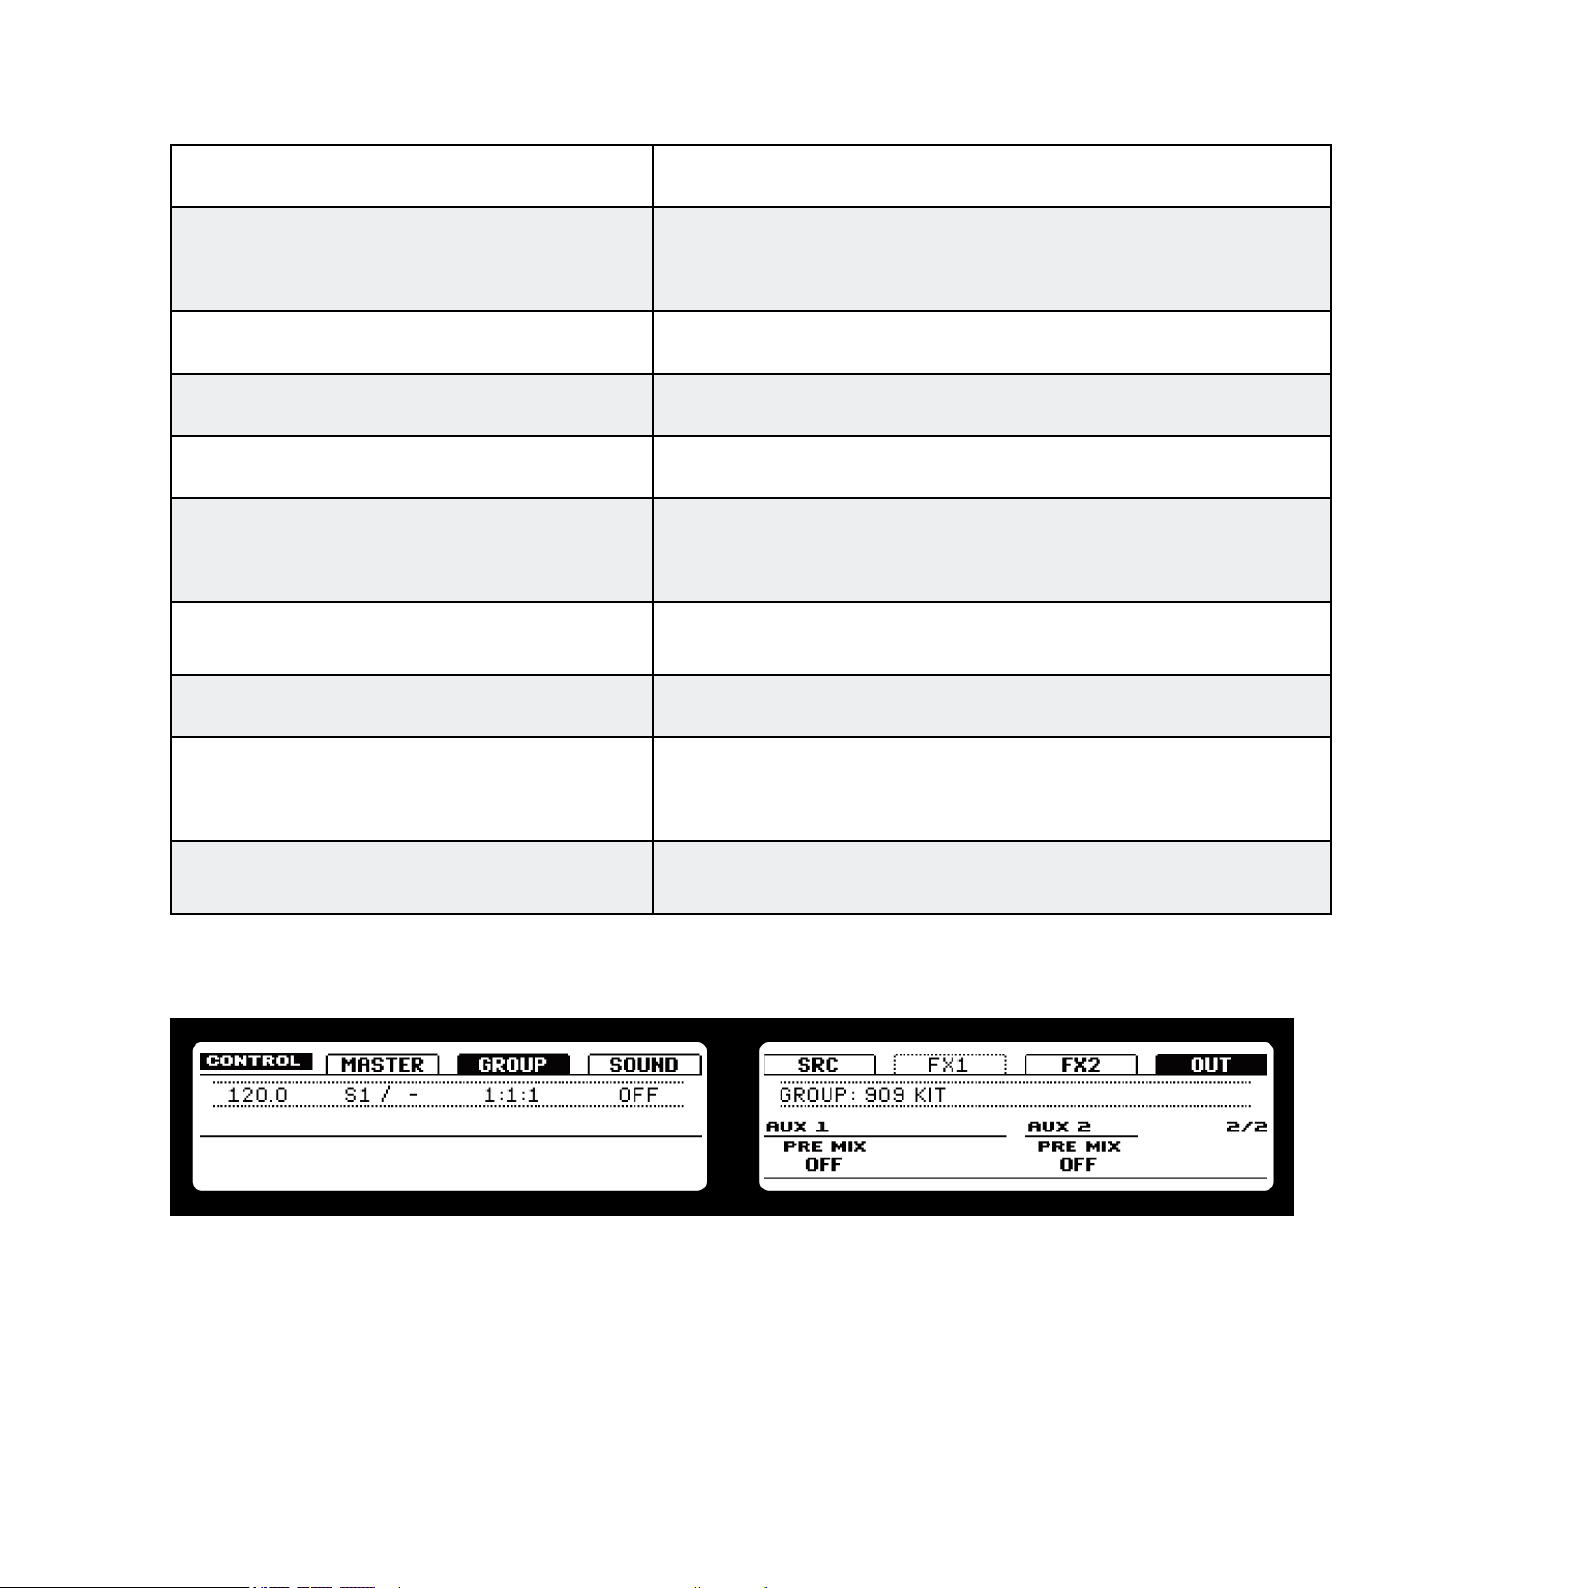
Main
This is used to dene where you want to send your Group.
oUtpUt
lEvEl Here you adjust the volume level of your Group.
pan Denes the pan position of your Group in the stereo eld.
Available options are Master, all Sounds with Input enabled,
the External Outputs 1-8 and None.
Aux 1
The destination for Aux 1: available destinations are
dEStInatIon
Master, all Sounds with Input enabled, the External
Outputs 1-8 and None.
lEvEl
Aux 2
dEStInatIon
lEvEl
5.2.2 Page 2: Aux Pre and Post
Here you adjust the amount of the signal that gets sent to the
Aux 1 destination.
The destination for Aux 2: available destinations are
Master, all Sounds with Input enabled, the External
Outputs 1-8 and None.
Here you adjust the amount of the signal that gets sent to the
Aux 2 destination.
Page 2 of 2 from the Group Out Tab Parameters on the hardware
MASCHINE 1.5 Reference Manual – 96
Page 97

Page 2 of 2 from the Group Out Tab Parameters on the software
Aux 1
prE mIx
Aux 2
prE mIx
If this is enabled, the Group will be fed into Aux 1 before
the volume control of the Group.
If this is enabled, the Group will be fed into Aux 2 before
the volume control of the Group
5.3 Saving a Group
To save a Group, right-click (on Mac OS® X: Control-click) on the Group’s Slot in the Arranger
and select Save As… from the dropdown menu:
Saving a Group
The Group will be added to the Library and is ready to be tagged.
Saving Groups is only available on MASCHINE Software.
%
MASCHINE 1.5 Reference Manual – 97
Page 98

5.4 Copy and Paste Groups
Hardware
► To copy a Group, press and hold DUPLICATE, press the Group Button of the Group you
want to copy, and then the Group Button of the target Group. All parameters of the Group
will be copied, including all Pattern content.
Software
You can copy & paste Groups by right-clicking (on Mac OS® X: Control-click) on the Group
Slot. In the dropdown menu, choose Copy to copy a Group. To paste a Group, select an empty
Group Slot by clicking on it and select Paste from the dropdown menu. All parameters of the
Group will be copied, including all Pattern content.
Copying a Group
5.5 Resetting a Group
Resetting a Group means removing the associated Sounds and FX as well as putting all Group
Parameters back to their default value.
Hardware
► Hold SHIFT+ERASE, then press the Group Button for the Group to be reset.
MASCHINE 1.5 Reference Manual – 98
Page 99
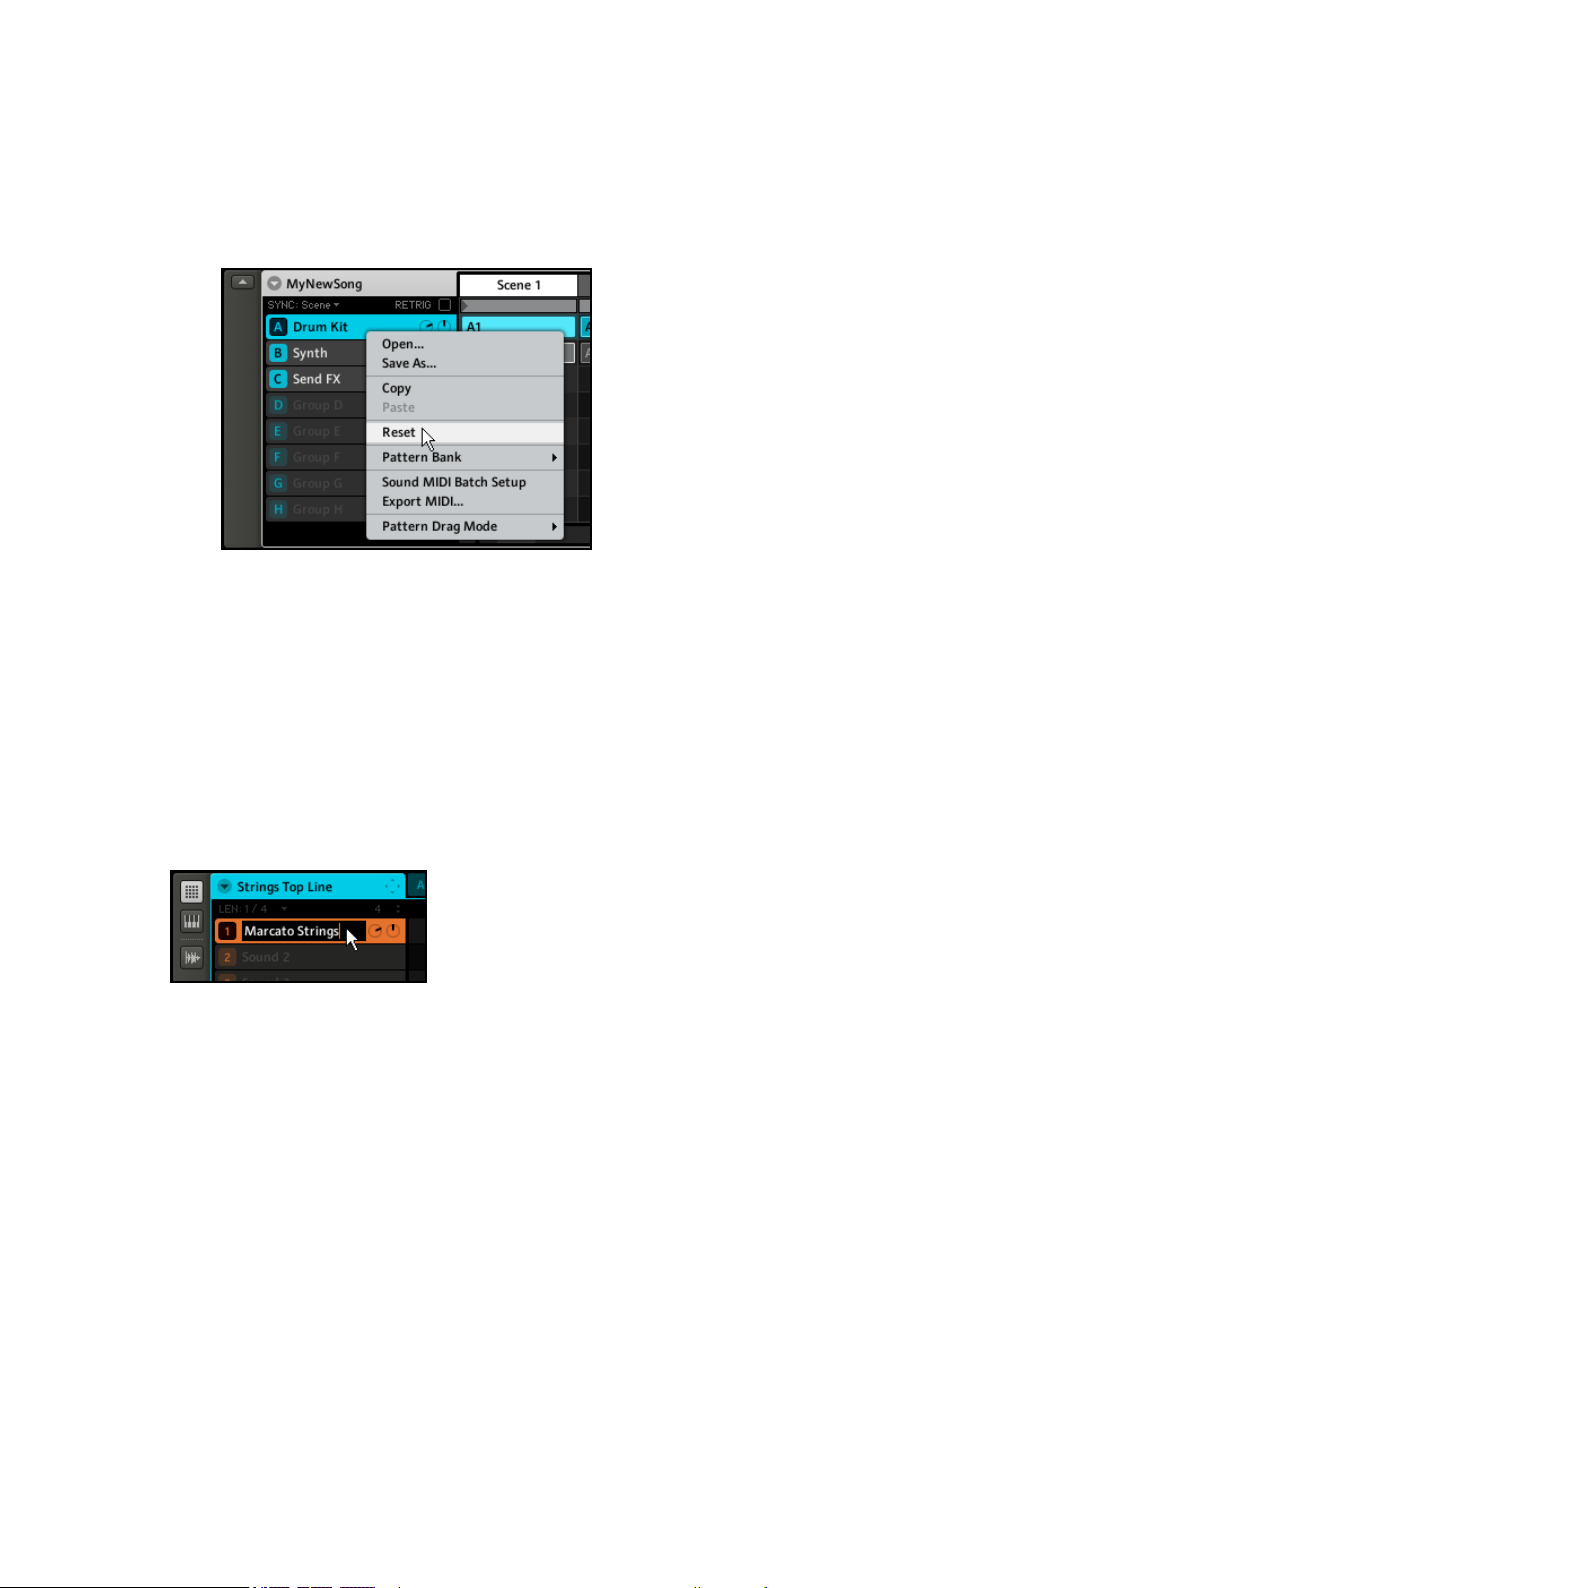
Software
►
To reset a Group, right-click (on Mac OS® X: Control-click) the Group Slot and choose
Reset from the dropdown menu.
Resetting a Group
5.6 Naming Groups & Sounds
Each Sound automatically gets the name of the Sample loaded into it; if there is no Sample,
the name will be Sound 1-16 by default. To name a Sound, double-click on its Sound Slot:
Renaming the Sound “Marcato Strings”
You can now edit the name of that Sound. Press the Return key to conrm.
Some hosts will catch the Enter key, as it is mapped to some function of the host
!
the name you have entered.
Group renaming is performed accordingly: double-click on the Group Slot to edit the name
of the Group. To conrm, hit the Enter key on your computer keyboard.
software. In this case, click anywhere else in the MASCHINE plug-in window to conrm
MASCHINE 1.5 Reference Manual – 99
Page 100

Renaming the Sound Group A
Naming is only available from within the Software, but any changes will also show up
!
on the Hardware.
5.7 Loading Groups without Patterns
If you want to build a Group from scratch, you can load Groups without Patterns both on the
MASCHINE Hardware and Software. Other than that, previously loaded Patterns will not be
removed, enabling you to try out a Pattern using different Sounds.
Hardware
1.
On the Hardware, enter the Browser by hitting BROWSE and select the Group tab by
pressing Button 3.
2.
On the Right Display you can now select whether you want to load the Group with or without its Pattern content by hitting Button 7. If Pattern is highlighted, the Pattern content
will be loaded together with the Group.
A selected Group with Pattern load option activated
MASCHINE 1.5 Reference Manual – 100
 Loading...