

Page 1

How to DJ using Native
Instruments Trak tor 2 and the
Kontrol S4
By: Jeremy Doss
Page 2

Page 3

Table of Contents iii
Table of Contents
Table of Contents................................................................................................................ iii
Introduction ........................................................................................................................ v
Chapter 1 ............................................................................................................................ vii
Checking the Equipment ................................................................................................. 3
Necessary Hardware ..................................................................................................... 3
Necessary Software ....................................................................................................... 3
Setting Up Traktor 2 with the Kontrol S4 ....................................................................... 4
Installing Traktor 2 ....................................................................................................... 4
Using the Setup Wizard ................................................................................................ 5
Routing the Audio Output ............................................................................................ 6
Connecting Speakers .................................................................................................... 6
Customizing the Program View ....................................................................................... 7
The Essential View........................................................................................................ 7
The Extended View ....................................................................................................... 8
The Browser View ......................................................................................................... 8
The Mixer View ............................................................................................................. 9
Chapter 2 ............................................................................................................................ 11
What Is Mixing? ............................................................................................................. 13
Finding New Music ........................................................................................................ 13
Finding Music on the Internet ................................................................................... 13
Finding Music in Stores .............................................................................................. 14
Analyzing New Music ..................................................................................................... 14
Building a Library ....................................................................................................... 14
Analyzing Genre ......................................................................................................... 15
Analyzing Beats per Minute (BPM)............................................................................ 15
Analyzing Key ............................................................................................................. 15
Following Common Mixing Trends ............................................................................... 16
Mixing By Genre ......................................................................................................... 16
Mixing By BPM ............................................................................................................ 17
Mixing By Key .............................................................................................................. 17
Page 4

iv Table of Contents
Chapter 3 ........................................................................................................................... 19
Controlling Traktor 2 with the Kontrol S4 .................................................................... 21
Blending Songs .............................................................................................................. 21
Loading Songs ............................................................................................................ 21
Lining Up the Grid and Syncing BPM ........................................................................ 22
Using the A-B Fader ................................................................................................... 22
Using the Volume Faders ........................................................................................... 23
Using Filters and Equalizers ...................................................................................... 23
Using Loops and Using Cues ......................................................................................... 23
Starting and Stopping Loops ...................................................................................... 24
Setting and Using Cues ............................................................................................... 24
Using the Effects Rack ................................................................................................... 25
Selecting Effects .......................................................................................................... 25
Turning Effects On and Using Deck Focus ................................................................ 25
Changing Effects Parameters ..................................................................................... 26
Improving Your Next Mix .............................................................................................. 26
Recording a Mix .......................................................................................................... 26
Analyzing a Crowd ...................................................................................................... 26
Index .................................................................................................................................. 27
Page 5

Introduction v
Introduction
Thank you for using Native Instruments Traktor 2 and the Kontrol S4! This document is
intended for those interested in learning how to use these p roducts to per form as a DJ
and keep up with current musical trends in a perform ance environment. Having years of
experience using these products in home and public environments, I have provided all
of the information necessary to have you impressing crowds in no time! Whether you
would like to use this knowledge for personal enjoyment or to perform for others, you
picked the right choice for a new hobby!
This manual is designed to provide a comprehensive guide to getting started with
Traktor 2 and your new Kontrol S4. Traktor 2 is a DAW (Digital Audio Workstation)
that is designed for mixing together audio files live on your computer. This DAW works
most efficiently with the Kontrol S4, a USB software controller designed specifically for
use with Traktor 2.
This manual only applies to the use of the Traktor 2 hardware with computers running
on the Windows platform and excludes information on setup with a Macintosh. Even
though Traktor 2 can be controlled by a variety of products, the scope of this doc ument
is limited to use with the Kontrol S4 only. The sections on selecting songs and arranging
them for performance will only cover the technical methods for doing so. Software and
hardware drivers are subject to change and may need to be updated for use.
Page 6

Page 7

Chapter 1
Setting Up
In this chapter, DJs will learn how to set up their Native Instruments software.
Page 8

Page 9
Chapter 1 3
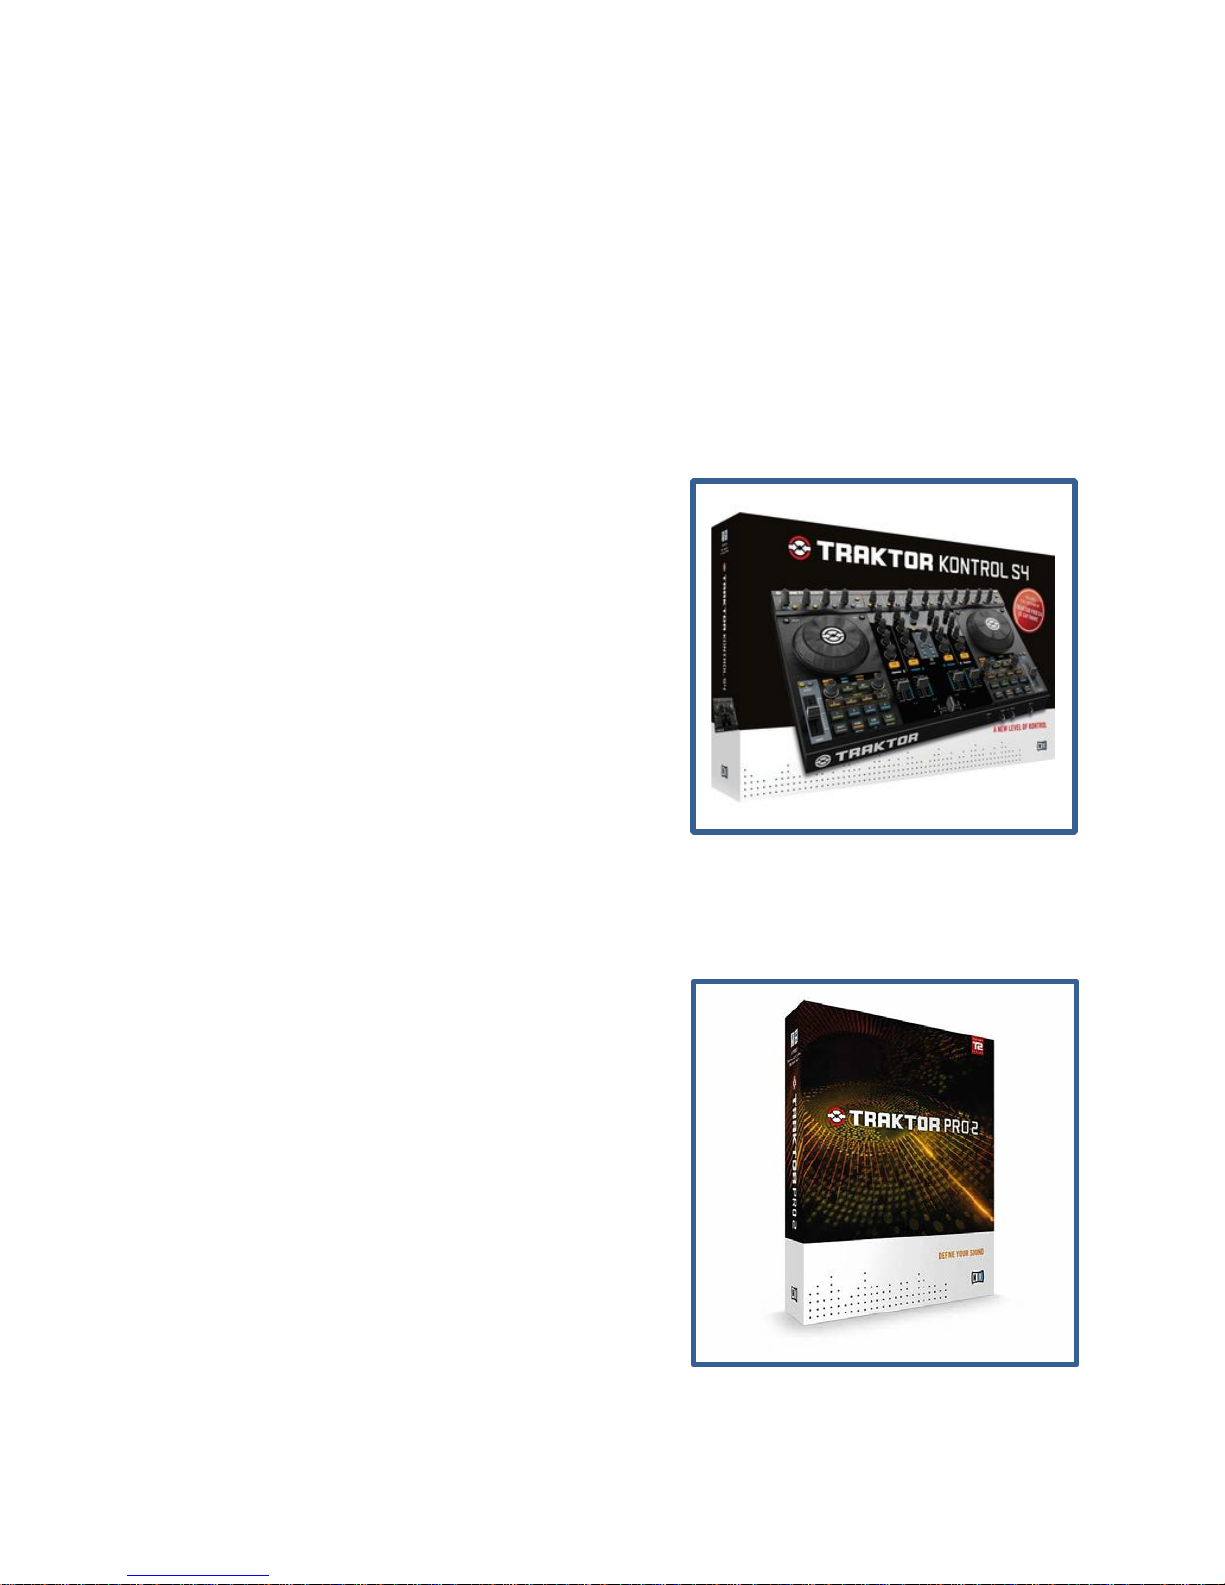
Figure 1: Traktor Kontrol S4
Figure 2: Traktor Pro 2 Software
Checking the Equipment
This section of the chapter will go through the different pieces of software and hardware
that are necessary for using Traktor 2 and the Kontrol S4. Checking to make sure all of
the necessary parts are present is essential to using these products.
Necessary Hardware
Using the Traktor 2 software requires ownership
of the following hardware:
• A computer running on the Microsoft
Windows platform
• Native Instruments Kontrol S4 for Traktor
• A USB 2.0/3.0 cable
• A Kontrol S4 power adapter
• A pair of speakers
• Two ¼” speaker cables or a pair of RCA
Cables
• A pair of over-ear headphones
Necessary Software
Using the Kontrol S4 requires a computer in
order to run the software that it controls. Using
this setup requires the following software:
• Windows XP or greater
• The Traktor 2 software (free with purchase
of a Kontrol S4)
• Mixed in Key song analysis software
• Drivers for your Kontrol S4 (must be up to
date)
Page 10
4 Setting Up
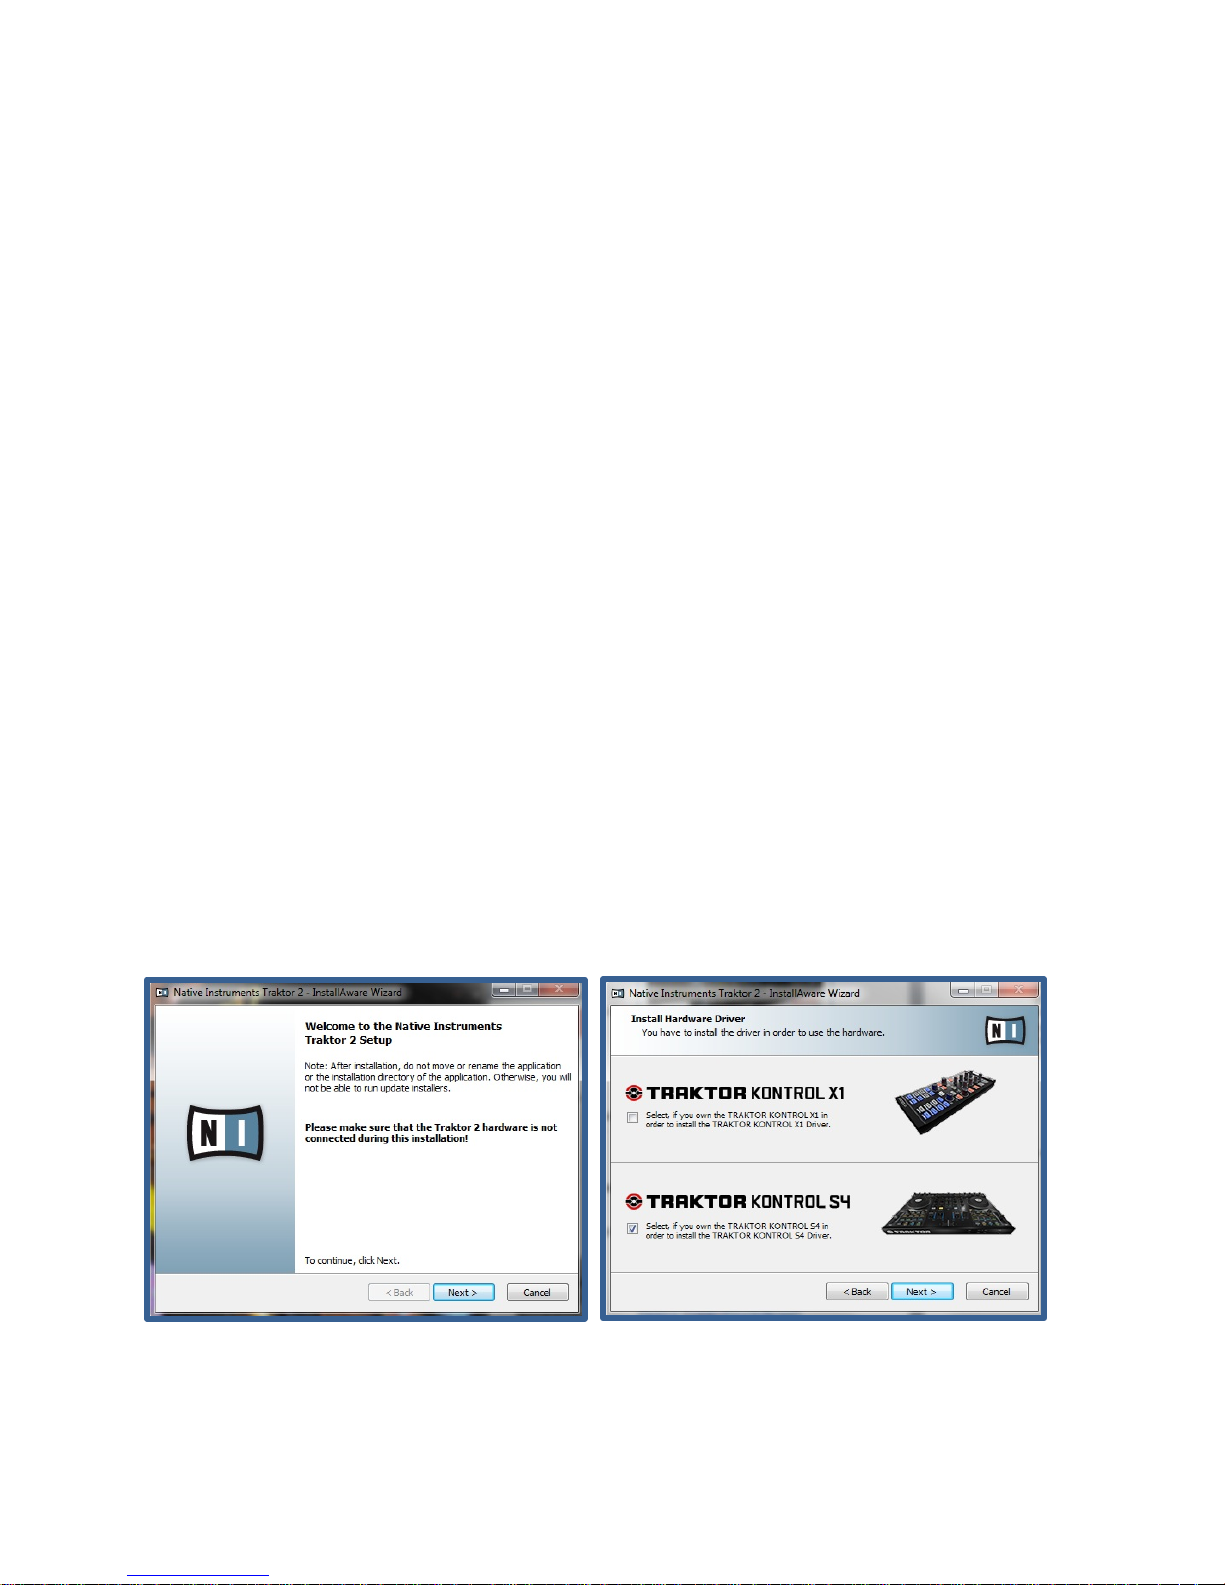
Figure 3: Kontrol S4 Driver Option
Figure 4: Traktor 2 Setup Wizard
Setting Up Traktor 2 with the Kontrol S4
This section of the chapter assumes that all necessary hardware and software are
accounted for. Setting up the software incorrectly can lead to poor sound quality or no
sound at all!
Installing Traktor 2
Installing this software requires the product key received upon the purchase of the
Kontrol S4 or standalone copy of Traktor 2. Copies are available for sale on the Native
Instruments website or one of many music stores. With the disk and associated key in
hand follow these steps for setup:
1. Insert disk into your computers disk drive
2. Auto-run the installer when prompted and wait
for the setup wizard to start (Figure 3)
3. Follow the on screen instructions until
prompted to install the Kontrol S4 driver
(Figure 4) and check the box
4. Continue following on screen instructions until
the installation has finished
The setup has now finished installing the Traktor 2 software as well as the hardware
driver for use with the Kontrol S4. You are now ready to run your version of Traktor 2.
Page 11
Chapter 1 5
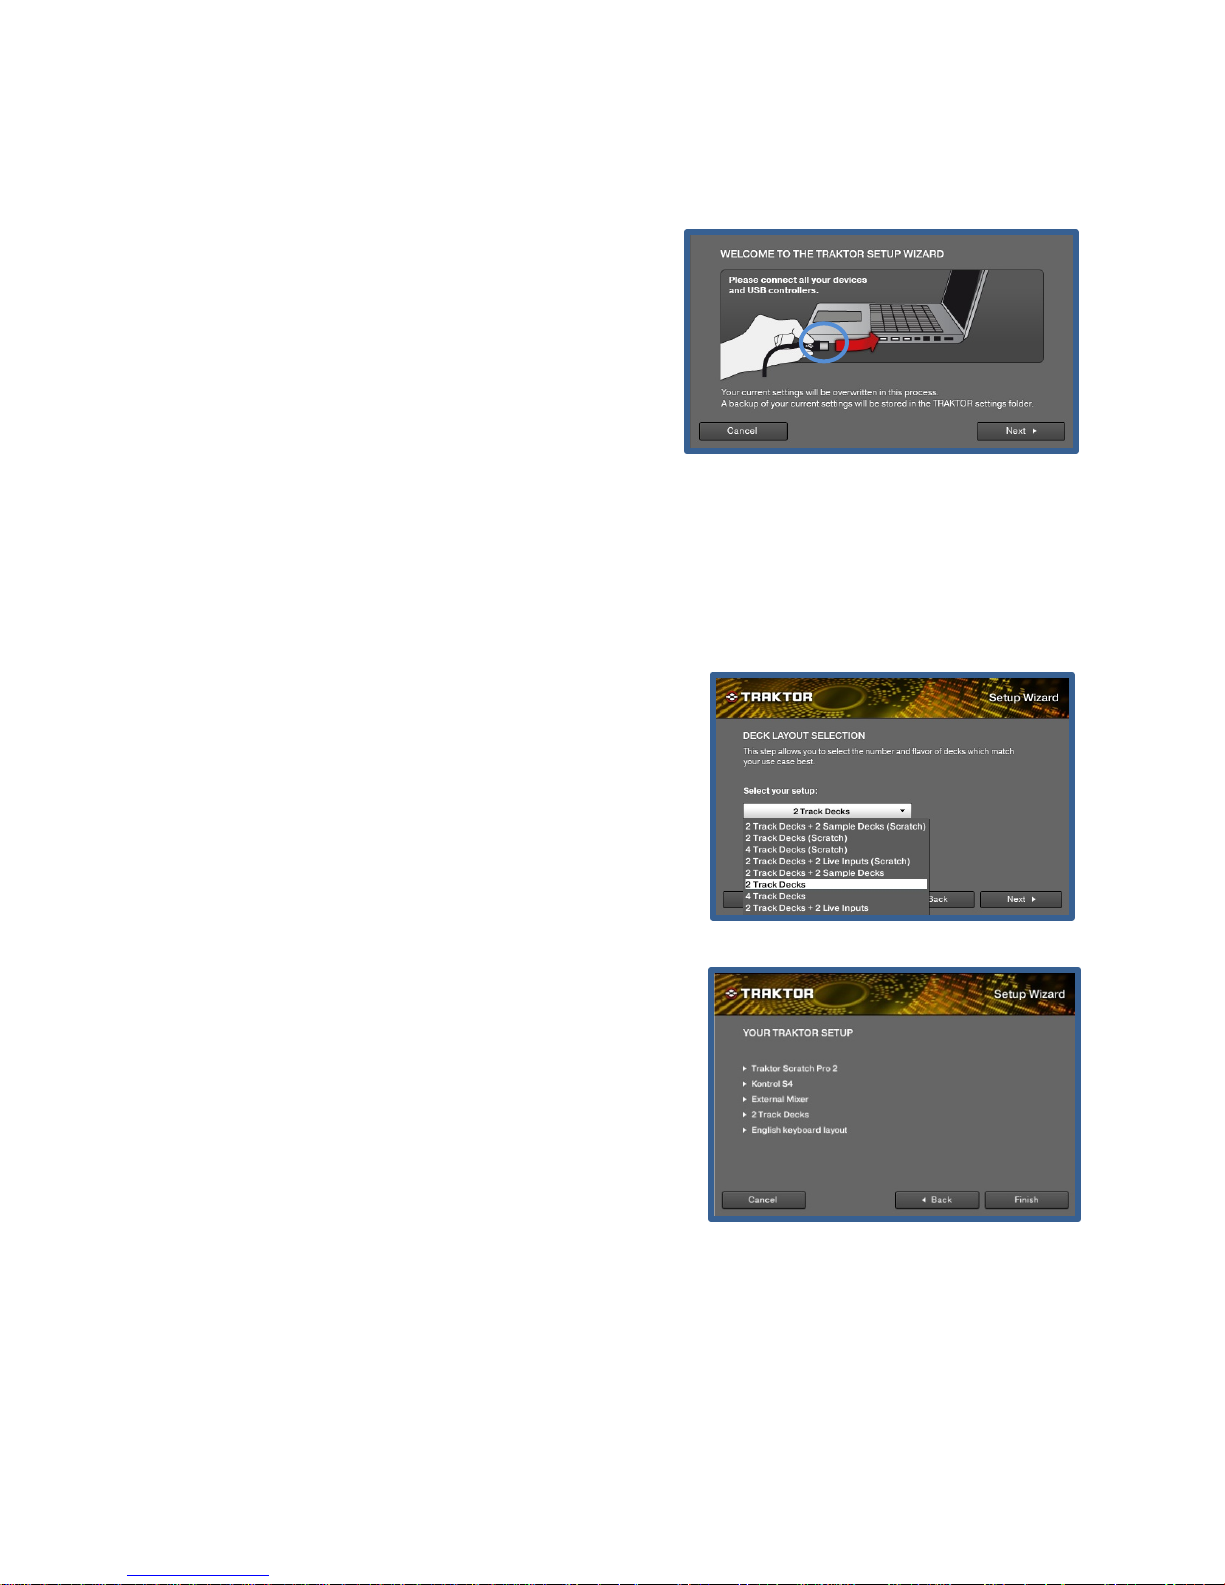
Figure 7: Finalizing Setup
Figure 5: Setup Wizard
Figure 6: Deck Layout Selection
Using the Setup Wizard
Once Traktor 2 runs, it will automatically open its
“Setup Wizard” (Figure 5). At this time, make
sure that the Kontrol S4 is plugged in to the
computer via its USB cable (labeled as “A” in
Figure 5). Once the controller is plugged in, click
“next” to continue.
The Kontrol S4 is considered an “external hardware controller” in Traktor 2. When
asked if using an external controller during the setup wizard, select “Yes” from the
dropdown menu and then select next. On the next screen, select “Native Instruments” as
your manufacturer and “Kontrol S4” as your model (These options may be selected as
your default already).
The Kontrol S4 requires only two track decks even
though it may be used with other controlling
hardware. Because only the Kontrol S4 is used in
this manual, select “2 Track Decks” from the setup
drop down menu in the “Deck Layout Selection”
window (Figure 6) and click next. The final window
in the setup wizard displays all of the options that
were chosen and should appear as it does in Figure
7.
Select “Finish” and complete the programs setup to
move on to customizing your program view.
Page 12

6 Setting Up
Figure 8: Preferences Button
Figure 10: Output Routing
Figure 9: Audio Setup
Figure 11: Kontrol S4 Outputs
B B B
A
Routing the Audio Output
In order to properly output audio through your Kontrol S4, the audio output must be
routed correctly. Doing so may be easily accomplished by following these steps:
• Open the preferences menu by selecting the “gear”
button at the top right of the program window
(labeled “A” in Figure 8)
• Select “Audio Setup” in the preferences menu
(labeled “A” in Figure 9)
• Make sure “Traktor Kontrol S4” is selected under the Audio Device drop-down
menu (labeled “B” in Figure 9)
• Select “Output Routing” in the preferences menu (labeled “A” in Figure 10)
• Make sure the mixing mode is set to “Internal” (labeled “B” in Figure 10)
Connecting Speakers
Once the audio output is routed correctly as
explained above, the audio is outputted through the
Kontrol S4’s main outputs (Figure 11).
Plug your speakers into the back of the Kontrol S4
either by stereo ¼” cables (labeled “A” in Figure 11),
or stereo RCA cables (labeled “B” in Figure 11).
Keep in mind that these outputs do not provide
power and require that your choice of speakers be self-powered (active speakers) or
amplified externally (passive speakers).
Page 13

Chapter 1 7
Figure 12: Program Views
Figure 13: Essential View
B
C
Customizing the Program View
This section explains the customization of the
appearance of Traktor 2. Customizing the program
view is a matter of preference. Traktor 2 makes this
easy by providing a drop-down menu with four preset
views: Essential, Ext e n ded, Mi xer , and Br ow ser
(Figure 12).
The Essential View
The “Essential” view contains the following:
• The “waveform windows” (labeled as “A” in Figure 13)
• The “playlist shortcuts” window (labeled as “B” in Figure 13)
• The “browser” windows (labeled as “C” in Figure 13)
Page 14

8 Setting Up
Figure 14: Extended View
B
C
Figure 15: Browser View
The Extended View
The “Extended” view contains the following:
• Everything from the “Essential” view (Figure 13)
• Two “effects racks” (labeled as “A” in Figure 14)
• “Loop controls” and main volume control (labeled as “B” in Figure 14)
• Mixer controls for each deck (labeled as “C” in Figure 14)
The Browser View
The “Browser” view contains only minimized “waveform windows” and enlarged
browser windows (Figure 15).
Page 15

Chapter 1 9
B A C
B
Figure 16: Mixer View
The Mixer View
The “Mixer” view contains the following:
• Everything from the “Extended” view (Figure 14)
• The deck “equalizers” and “volume faders” (labeled as “A” in Figure 16)
• The deck “move, cue, grid” menus (labeled as “B” in Figure 16)
• The deck “A-B fader” (l ab el ed as “C” in Figure 16)
For the sake of this manual and ease of operation, the “Mixer” view preset will be used
from this point on.
Page 16

10 Setting Up
Page 17

Chapter 2
The Mixing Process
This chapter will explain what mixing is, where to find songs, how to analyze
songs, and how to utilize common mixing trends.
Page 18

Page 19

Chapter 2 13
Figure 17: Beatport Home Page
What Is Mixing?
Mixing is the process of playing more than one song at a time and utilizing the various
features of Traktor 2. Mixing is not simply playing both son gs at equal volumes, but
using these features to add style and character to each song and each transition between
songs.
Finding New Music
This section explains how to find music from many different sources. These sources are
not the only ways to find music for use in the process of mixing, but are some of the
most popular.
Finding Music on the Internet
Possibly the quickest and easiest way to find music is on the internet. The internet is
extremely large and can be useful in finding the songs very quickly. Two examples of
websites for finding and purchasing music are www.beatport.com and www.itunes.com.
Beatport (Figure 17) is one of the most popular
sites for finding music specific to using in a DJ set.
Beatport allows searching for music by genre, label,
and artist and also has a feature that allows viewing
of the top 100 most popular songs on their website
which is very useful for finding what other people
may consider to be popular.
The iTunes library is another useful source for
finding music. It has all of the features that
Beatport uses. The iTunes library top 100 is
different from Beatport’s and can provide a
different view on popular songs in every genre.
Page 20

14 The Mixing Process
Figure 18: Track Collection
Finding Music in Stores
Purchasing a CD from a local shop is another way to find new music. Music can be
purchased from almost any major electronics store such as Best Buy, Wal-Mart, and
Target.
Buying CDs from these stores means that you will either have to load a CD into your
computer every time you play a song from it or upload the songs onto your hard drive.
Uploading songs to the hard drive is the most common option and can be accomplished
in many ways such as with iTunes.
Analyzing New Music
This section explains the importance of analyzing new music. Analyzing new music
allows different mixing techniques including mixing by genre, beats per minute, and
key.
Building a Library
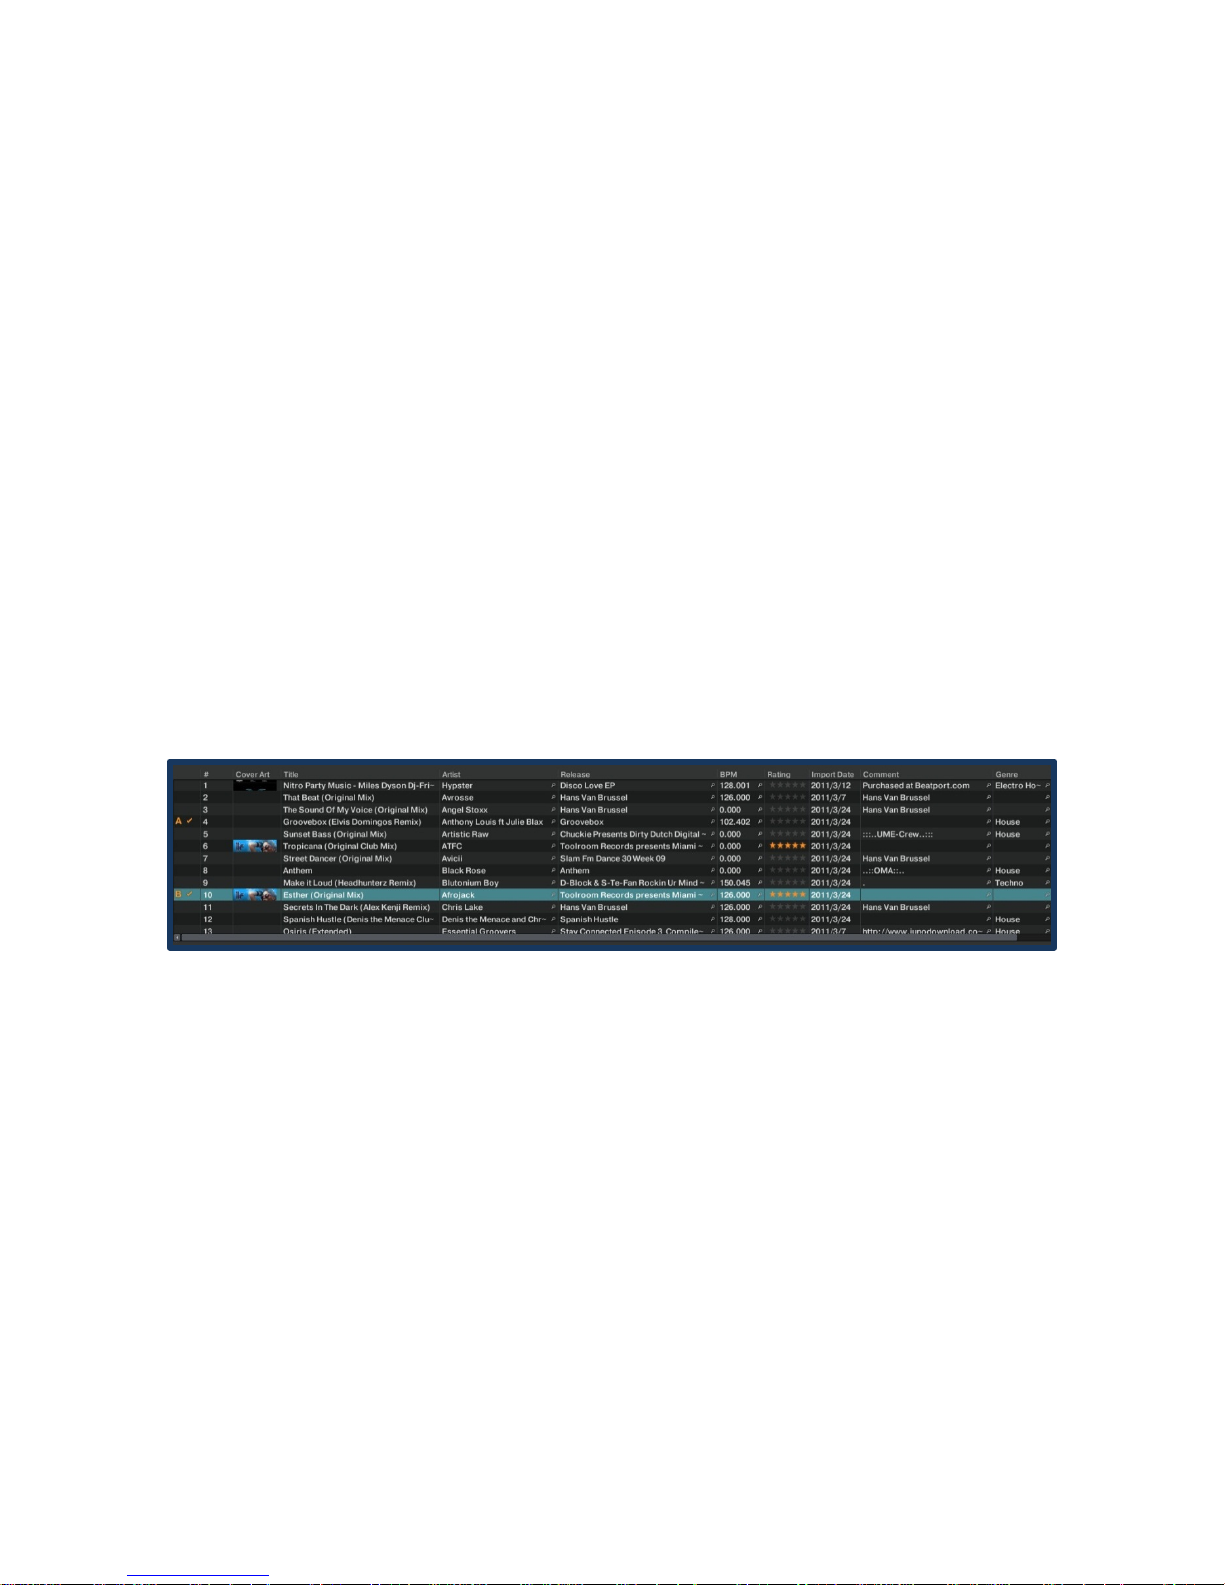
Once some new music i s found, it is important to organize it into a “library.” Libraries
provide an easy way to look for track in Traktor 2 for live performance. Libraries are
commonly divided into sections for genre, beats per minute, and key.
Libraries can be easily created by putting all of the new
music into one folder on the computer and dragging it into
the “Track Collection” tab in your browser window (Figure
18). Once the music is in the track collection, right click
where the folder was dropped and select “Analyze (Async)”
to analyze the beats per minute and key.
Page 21

Chapter 2 15
Analyzing Genre
Genre is used to describe the different categories of music that you might pl ay and are
provided by the songs producers upon purchase. Some common genres played by a DJ
include the following:
• House
• Electro House
• Dubstep
• Drum and Bass
• Breaks
• Glitch Hop
Genre is important because mixing songs with a similar genre will provide more
continuity to your mixing.
Most genres are divided by their different beats per minute, style, or time of creation.
Beats per minute is the most common difference between electronic genres.
Analyzing Beats per Minute (BPM)
Beats per minute (also known as tempo, or BPM) describes the pace at which the
common down beats of a song are played and is analyzed in Traktor 2 along with your
track collection and upon loading a song into a deck.
Beats per minute (BPM) is very important to mixing songs. Songs with the same BPM
play back at the same rate as one another, making it easier to mix between songs.
The common range for BPM is 70-200. Some tracks will be analyzed at 70 BPM but can
also be played at the same speed as a 140 BPM with the use of the “grid” menu (more on
the grid menu in chapter 3).
Analyzing Key
Key is the basic melodic structure of any given song and ranges from A major/minor to
G major/minor.
Analyzing a songs key can be done with various other programs, one of which is called
Mixed in Key (Figure 19). Mixed in Key analyzes a songs key and stores it in the browser
field called “comments” which can be later used to sort songs by their key. Mixed in Key
expresses key by using what is called the “Camelot Wheel” (Figure 20). The rules behind
Page 22
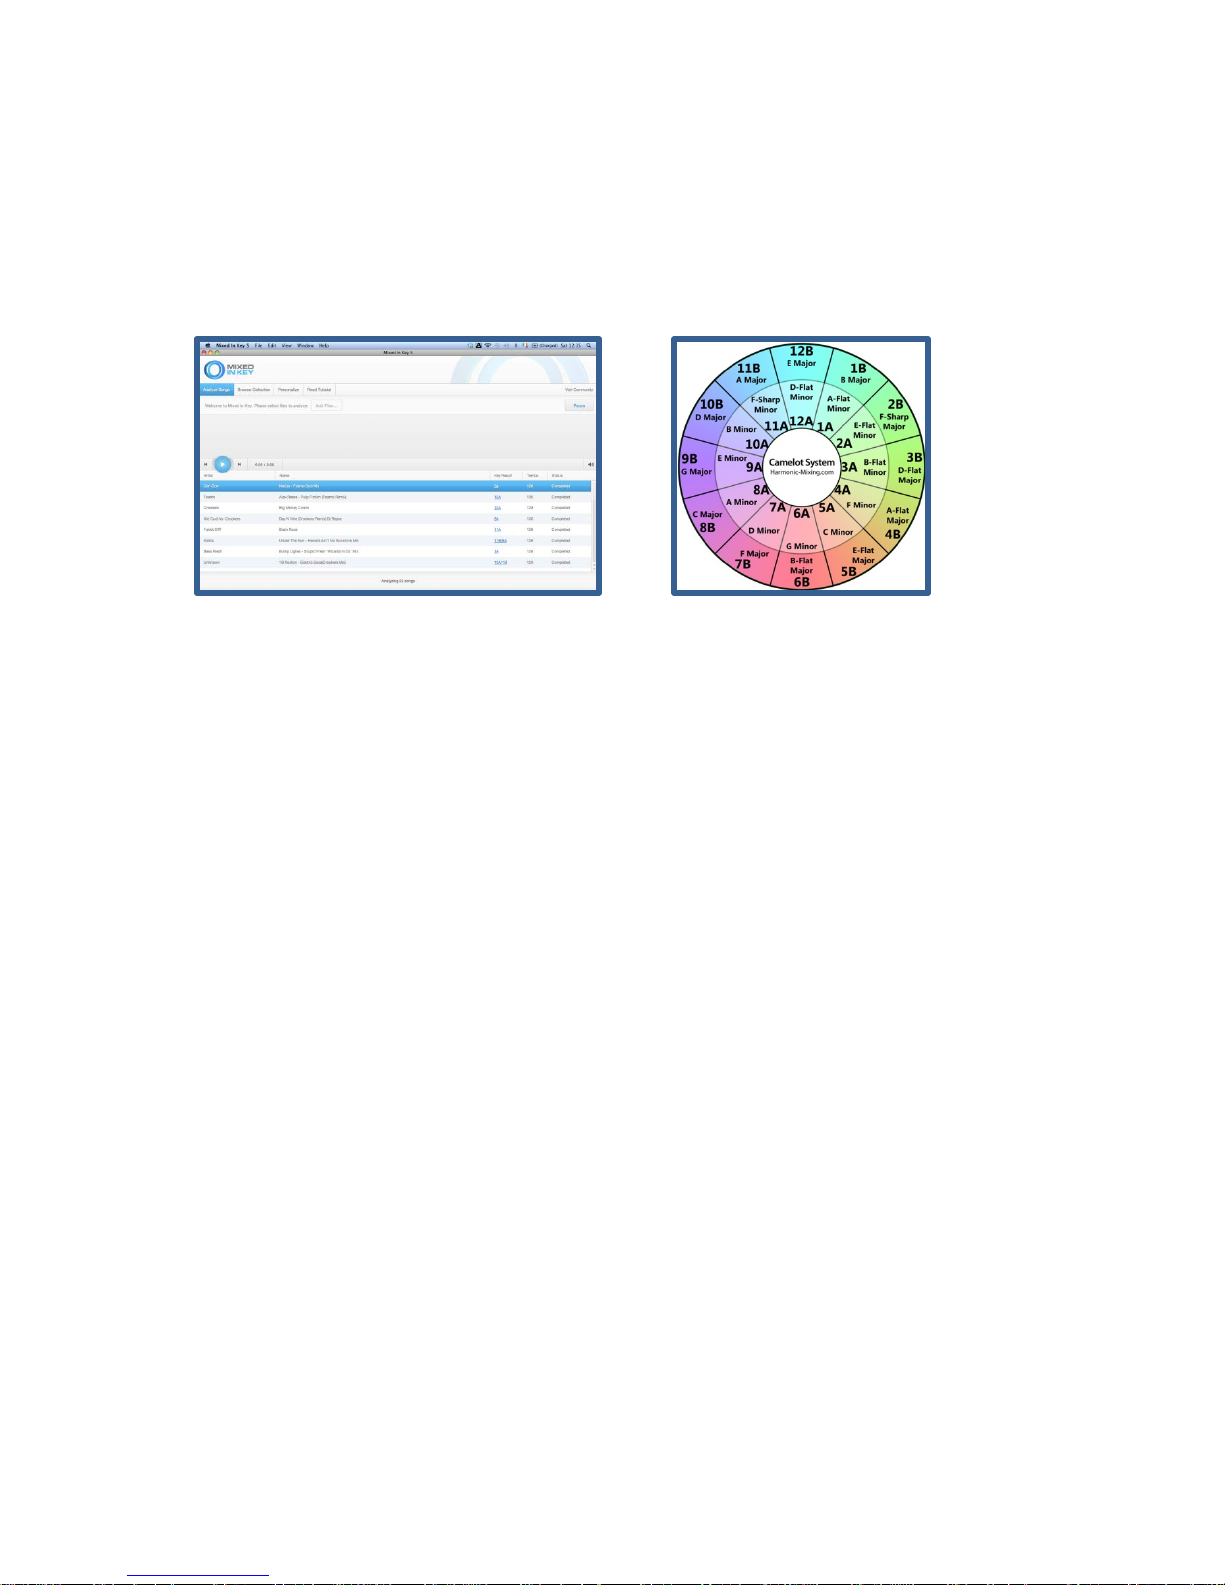
16 The Mixing Process
Figure 19: The Mixed in Key Software
Figure 20: Camelot Wheel
this involve making sure that your next song is either one number value away but with
the same letter (Ex. 1A to 2A) or one letter away but with the same number (E x. 1A to
1B).
Mixing in key ensures that the melodic scales in one song don’t interfere with the
melodic scales of another creating dissonance.
Following Common Mixing Trends
This section explains the popular trends and methods in mixing. The provided trends
aren’t the only way to mix your songs, but are very commonly successful ways to do so.
Mixing By Genre
Mixing with songs of the same genre is probably one of the most popular methods for
mixing. The basis of this idea is that a “rock” song will sound better mixed with another
rock song rather than with a smooth jazz song, even though the latter might still work
out. You can sort by genre in the browser window of Traktor 2 by clicking the “genre”
tab (Figure 21).
Page 23
Chapter 2 17
Figure 21: Browser Window Tabs
Mixing By BPM
Mixing with songs of the same BPM is the next best choice compare to mixing by genre.
Most beginners will choose this method because it is easier than mixing together two
songs with a different BPM, which requires use of the tempo fader. The only downside
to using all songs with the same BPM is that you’re limited to a small portion of your
library. This can cause issues because song diversity is an important part of being a DJ.
You can sort songs in the browser window of Traktor 2 by clicking the “BPM” tab
(Figure 21).
Mixing By Key
Mixing by key is one of the hardest ways to mix because it requires the use of either
Mixed in Key or software other than Traktor 2. The benefits heavily outweigh the
disadvantages though. Mixing in key can relate songs together even if they have
different genres or tempos. This method is the best way to add diversity to your mixes
including change in genre and BPM. If using Mixed in Key, you can sort song by key in
the browser window of Traktor 2 by clicking the “comments” tab (Figure 21).
Page 24

18 The Mixing Process
Page 25

Chapter 3
Using the Features of the Kontrol S4
This chapter explains how to use the Kontrol S4 to control Traktor 2 and mix
songs.
Page 26

Page 27

Chapter 3 21
Figure 22: Selected Song Example
Figure 23: Load Button
A
Controlling Traktor 2 with the Kontrol S4
This chapter explains how the different knobs and faders on the Kontrol S4 are used to
control the mixing process in Traktor 2. Usi ng this controller helps to simplify the
processes of blending songs, using loops and cues, and using effects.
Blending Songs
This section explains the different methods for mixing one song with another. Blending
songs is useful for transitioning from one song to another and even combining two
songs into one. While each method has its advantages and disadvantages, all methods
will be explored
Loading Songs
The first step to mixing songs is to load them onto each deck. The Kontrol S4 makes this
easy for you. The steps to loading a song are as follows:
1. Pick the first song to be played by selecting it in the browser window (Figure 22)
2. Load the selected song into either deck “A” (left deck) or deck “B” (right deck) by
pressing the load button for the desired deck (Labeled as “A” in Figure 23)
Once songs have been loaded onto their own decks they are free to be played and
synced.
Page 28

22 Using the Features of the Kontrol S4
Figure 24: Playback and Cue
Buttons
Figure 26: The A-B Fader
Figure 25: The Grid Window
B
A
Lining Up the Grid and Syncing BPM
Lining up the BPM and grid is necessary in order to have
two songs playing at the same tempo and on the same
beats. Before mixing, press play (labeled as “B” in Figure
24), listen to the playing song, and set the correct grid by
tapping the “Shift” button on your S4 (labeled as “A” in
Figure 24). The BPM and grid can also be manually
changed through the options in the grid window for each
deck (Figure 25).
Using the A-B Fader
The “A-B” fader is the horizontally oriented fader
(Figure 26). This fader is named as such because it
smoothly fades the volume of the song in deck A down
while bringing up the volume of the song in deck B at
the same time.
This fader is most commonly used when transitioning
from one track into another and even sometimes for
quick fading back and forth between two songs.
Page 29
Chapter 3 23
Figure 27: The Volume
Faders
Figure 28: EQ and
B
A
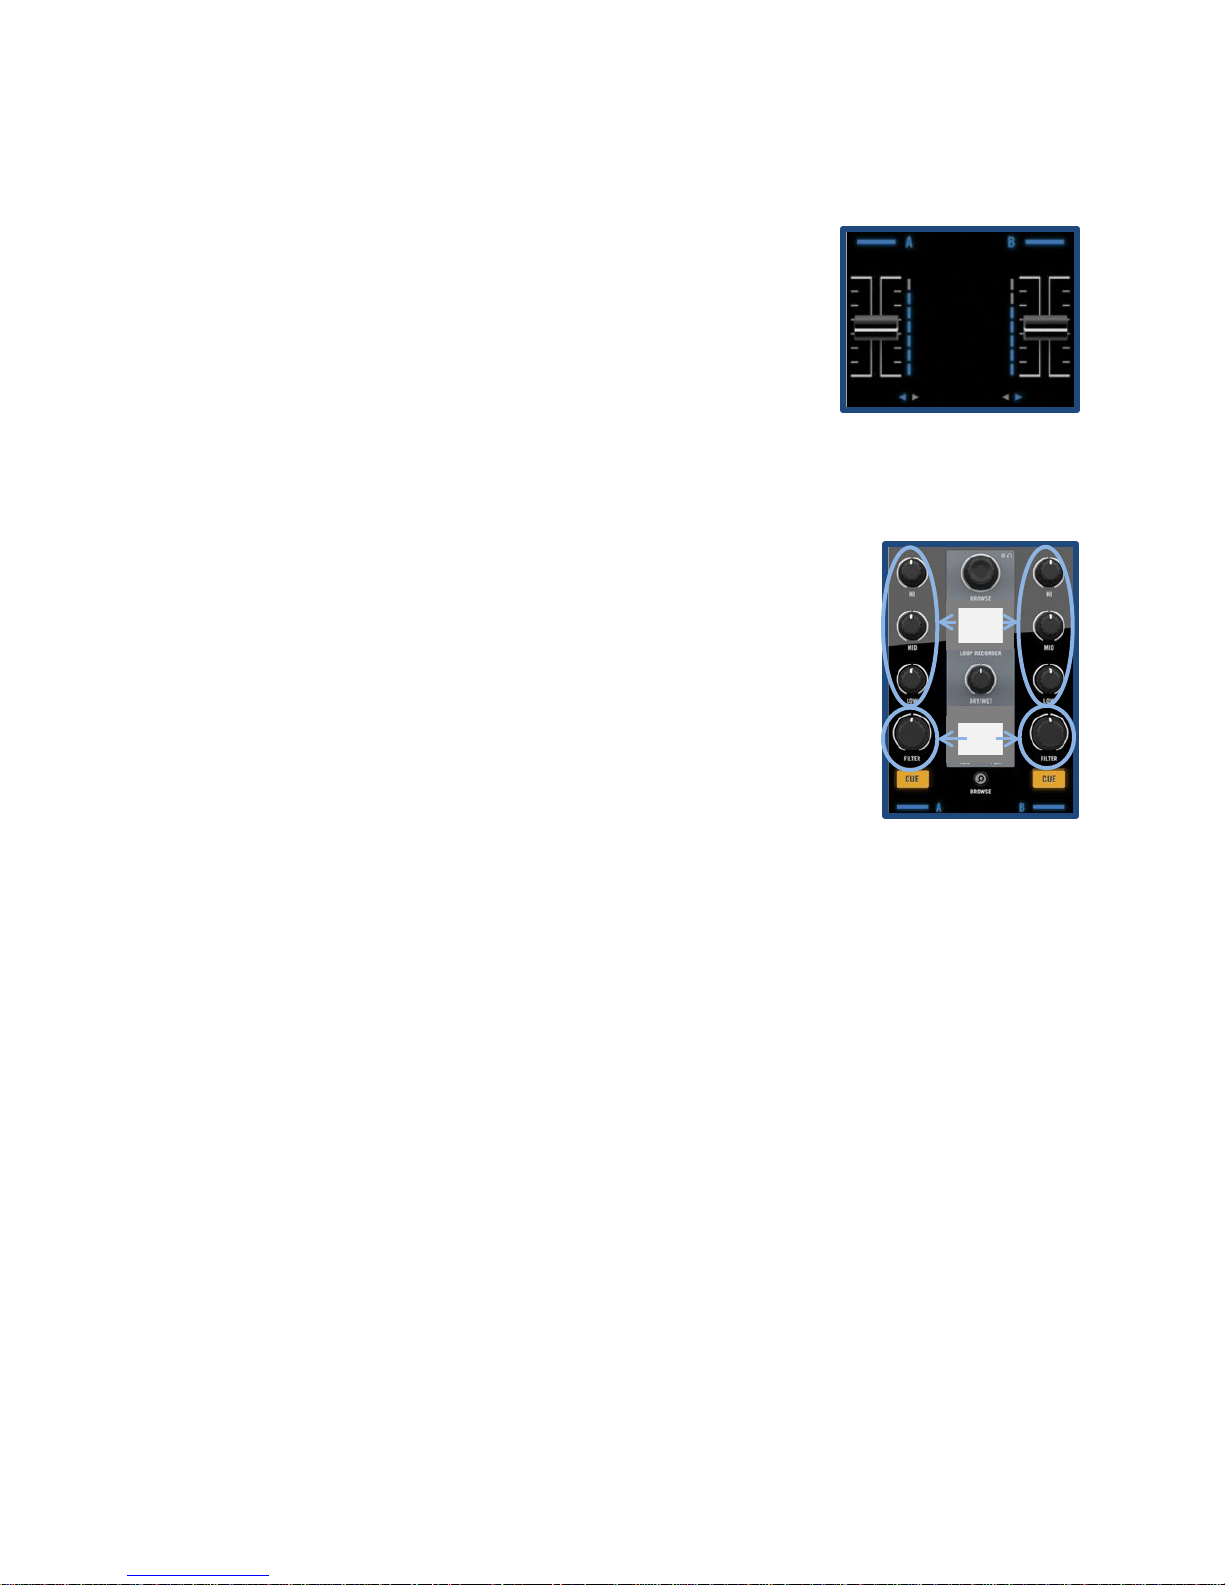
Using the Volume Faders
The volume faders (Figure 27) essentially do the same thing as
the A-B fader by controlling each decks volume. This is different
from the A-B fader because each fader controls the volume for
each deck separately. These faders are used the most when
matching the volume of one song to another and for controlling
one songs volume without affecting the others.
Using Filters and Equalizers
Each deck on the Kontrol S4 has its own filter and set of equalizers
(Figure 28).
Filter knobs (labeled as “B” in Figure 28) can be turned to smoothly
cut out either high frequencies or low frequencies in songs.
Equalizer knobs (labeled as “A” in Figure 28) do exactly the same
thing as filters except that they have three knobs, each controlling a
different band of frequencies.
Filtering and equalizing is useful if you want only a certain range of
frequencies from one song playing over another song and can add
Filter Control
more creativity to the blending of songs.
Using Loops and Using Cues
This next section will show how to use loops and cues as well as their varying uses and
properties. Loops describe the ability of Traktor 2 to repeatedly play and loop a section
of a song. Cues allow you to set a marker at any given point in a song so that you may
jump to it with the click of a button.
Page 30
24 Using the Features of the Kontrol S4
Figure 29: Loop Control
Figure 30: Cue and Play Buttons
D
B C A
A
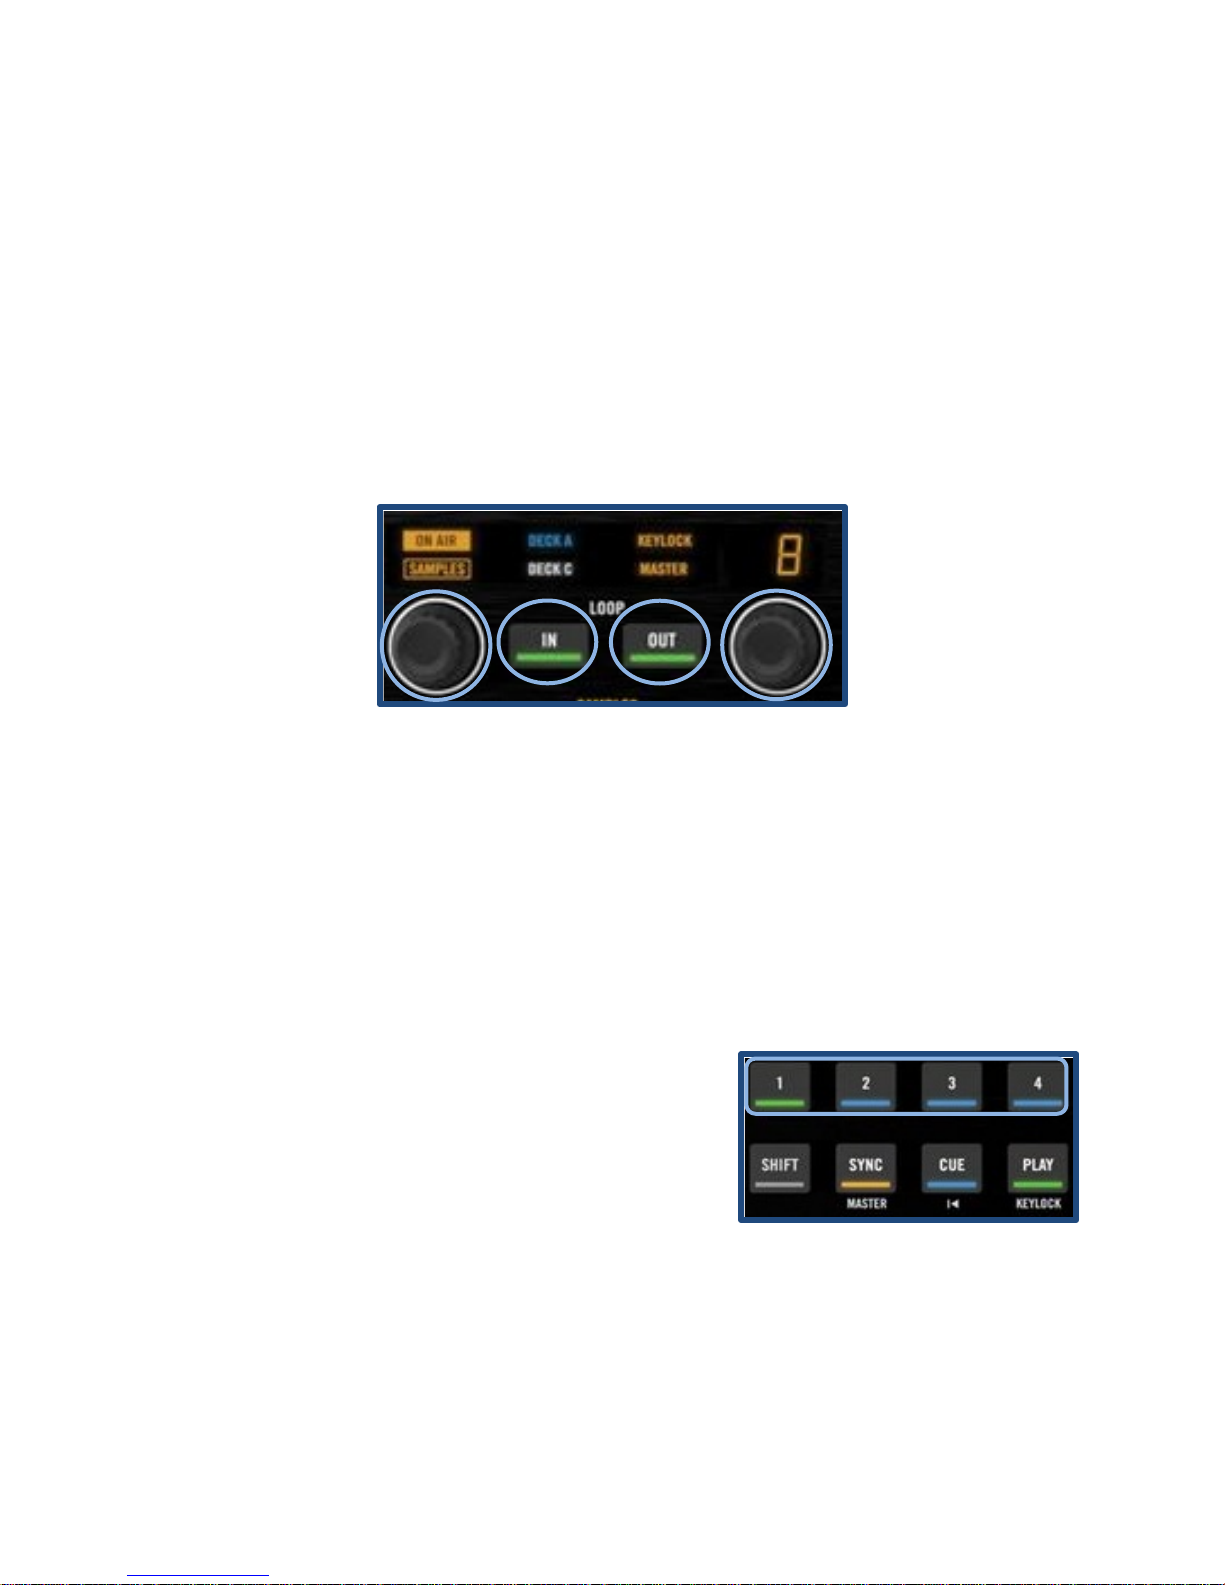
Starting and Stopping Loops
Loops can be started and stopped with each decks loop controls (Figure 29). To start
and stop loops follow these steps:
1. Set the loop length by turning the right loop knob (labeled as “D” in Figu r e 29)
2. Start a loop at the current point in a song by pressing in the right loop knob or
pressing the loop “IN” button (labeled as “B” in Figure 29)
3. Move the loop by turning the left loop knob (labeled as “A” in Figure 29)
4. Exit the loop by pressing in the right loop knob again or pressing the loop “OUT”
button (labeled as “C” in Figure 29)
Loops are useful for extending parts of songs in order to extend the mixing process and
can as many uses as you can come up with!
Setting and Using Cues
Cues can also be set and called easily with the Kontrol S4. To set and use cues follow
these steps:
1. Press cue buttons 1-4 (labeled as “A” in Figure
30) to set a cue a t the current point in a song
2. Press any previously set cues at any point to
instantly skip to that section of the song again
Cues are great for repeating important parts of songs as well as quickly skipping to
where you want to start a song.
Page 31
Chapter 3 25
Figure 31: Traktor 2 Effects Rack
Figure 33: Effects Routing
Buttons
Figure 32: Effects Knobs and Buttons
A
B
A B A
Using the Effects Rack
The effects racks for each deck (Figure 31) are used to add and stack varying audio
effects such as reverb and delay to each track separately or at the same time. These
effects can provide a creative dynamic to the mixing process.
Selecting Effects
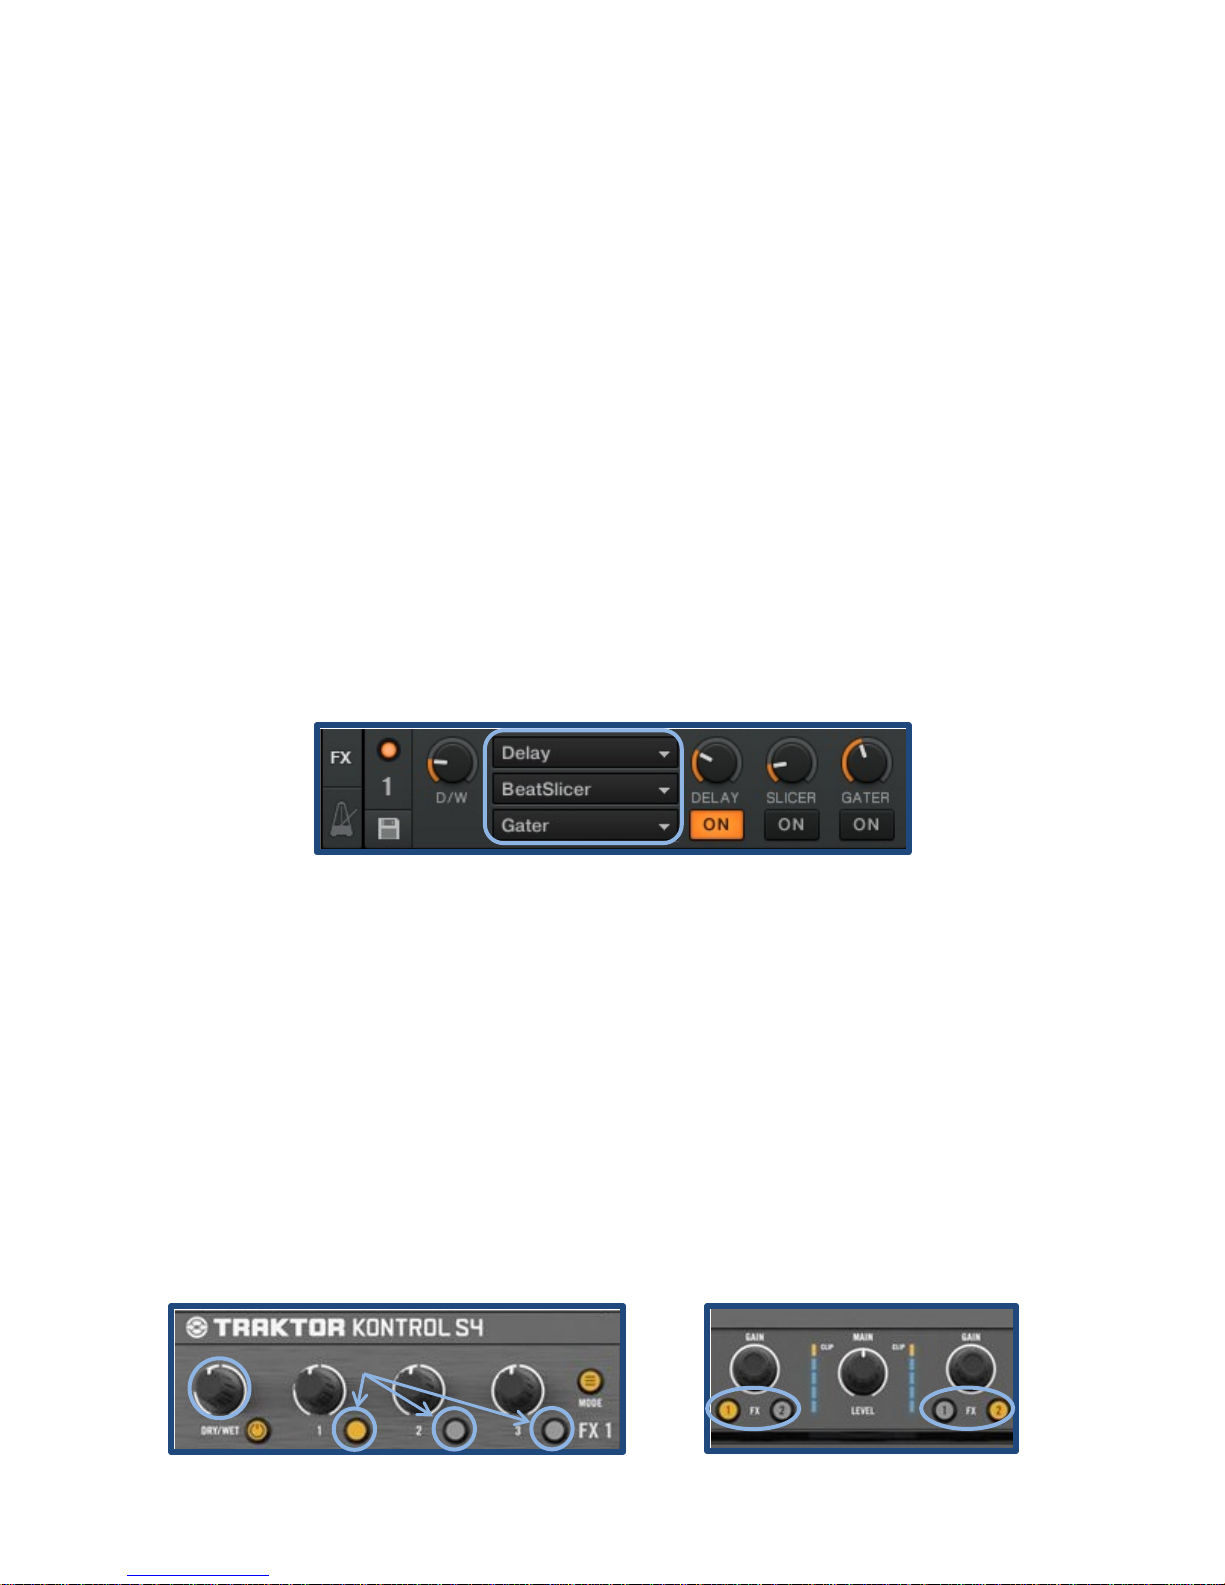
Traktor 2 has three drop-down menus for each deck (labeled as “A” in Figure 31) that
allow the selection of three different effects to be used either separately or together.
Some common effects include:
• Delay
• BeatSlicer
• Gater
• Bouncer
Turning Effects On and Using Deck Focus
Each effect has its own knob and associated button (Figure 32). Turning on each effect is
as simple as pressing the buttons (labeled as “B” in Figure 32) next to each effects knob,
causing them to light up in the process. The volume of the effect can be changed as well
by using the “DRY/WET” knob (labeled as “A” in Figure 32).
The deck that is being affected by the running effects can be changed by pressing the
deck routing buttons (Figure 33). Selecting button 1 or 2 on the left (labeled as “A” in
Figure 33) will route the left (button 1) or right (button 2) effects groups to affect deck A
while button 1 and 2 on the right (labeled as “B” in Figure 33) will route them to deck B.
Page 32

26 Using the Features of the Kontrol S4
A
Changing Effects Parameters
Changing each effects parameter knob (labeled as “A” in Figure 33) will change how the
effect sounds while it is altering a song. This is useful for having a variety of
characteristics being added to each song and for adding more dynamic to the mixing
process.
Improving Your Next Mix
Improving a mix means making it more enjoyable to yourself and others. There are
fundamentally two ways to tell how your mix really sounded once it is completed.
Recording a Mix
Recording a mix can allow accurate analysis of personal mistakes and song selection.
This is my favorite method of improving a mix because it allows the revision of the
mixing process and may be listened to repeatedly.
Analyzing a Crowd
There is no better way to tell what a crowd is into than to watch their body language
while mixing a live set. Here are some signs that can tell you that you have been doing
well:
• Using a technique that makes people dance or cheer
• Seeing more people crowdi ng in front of the stage
Find out when these things happen and try to figure out what you did to cause that
reaction. Now you have everything you need to start mixing songs and become a DJ with
Traktor 2 and Native Instruments Kontrol S4!
Page 33

Index 27
Index
A-B fader ..................................................................................................................................................... 23
Analyzing ......................................................................................................................................... 14, 15, 26
audio effects ............................................................................................................................................... 25
Beatport ...................................................................................................................................................... 13
beats per minute ................................................................................................................................... 14, 15
BPM ................................................................................................................................................. 15, 17, 22
Browser ..................................................................................................................................................... 7, 8
CD ................................................................................................................................................................ 14
controller............................................................................................................................................. v, 5, 21
crowd .......................................................................................................................................................... 26
cue ........................................................................................................................................................... 9, 24
cues ................................................................................................................................................. 21, 23, 24
DAW .............................................................................................................................................................. v
Deck......................................................................................................................................................... 5, 25
deck A .................................................................................................................................................... 22, 25
deck B .................................................................................................................................................... 22, 25
DJ iv, v, 13, 15, 17, 26
driver ............................................................................................................................................................. 4
drivers ........................................................................................................................................................... v
effects ......................................................................................................................................... 8, 21, 25, 26
effects racks ............................................................................................................................................ 8, 25
Equalizer ...................................................................................................................................................... 23
fader ............................................................................................................................................ 9, 17, 22, 23
fading .......................................................................................................................................................... 22
filter ............................................................................................................................................................. 23
Filtering ....................................................................................................................................................... 23
frequencies ................................................................................................................................................. 23
Genre .................................................................................................................................................... 15, 16
grid window ................................................................................................................................................ 22
hardware ........................................................................................................................................... v, 3, 4, 5
installer ......................................................................................................................................................... 4
iTunes .................................................................................................................................................... 13, 14
Key ..................................................................................................................................................... 3, 15, 17
Kontrol S4 .................................................................................................... iv, v, 3, 4, 5, 6, 19, 21, 23, 24, 26
library .............................................................................................................................................. 13, 14, 17
loop ....................................................................................................................................................... 23, 24
loops ................................................................................................................................................ 21, 23, 24
mix ....................................................................................................................................... 15, 16, 17, 19, 26
Mixed in Key .......................................................................................................................................... 15, 17
mixing ....................................................................................... v, 6, 11, 13, 14, 15, 16, 17, 21, 22, 24, 25, 26
Native Instruments ................................................................................................................ v, vii, 3, 4, 5, 26
preferences ................................................................................................................................................... 6
Page 34

28 Index
RCA ............................................................................................................................................................ 3, 6
Recording .................................................................................................................................................... 26
Setup ......................................................................................................................................................... 5, 6
Setup Wizard ................................................................................................................................................. 5
software ..................................................................................................................................... v, vii, 3, 4, 17
style ....................................................................................................................................................... 13, 15
Traktor 2 ......................................................................... iv, v, 3, 4, 5, 7, 13, 14, 15, 16, 17, 19, 21, 23, 25, 26
USB ........................................................................................................................................................ v, 3, 5
views ............................................................................................................................................................. 7
Windows platform .................................................................................................................................... v, 3
Page 35

29
This manual is dedicated to my brother in hopes that he may overcome his recent
misfortunes. You are in all of our hearts and thoughts forever...
Page 36

 Loading...