

Page 1

GETTING STARTED
Page 2

The information in this document is subject to change without notice and does not represent a
commitment on the part of Native Instruments GmbH. The software described by this document is
subject to a License Agreement and may not be copied to other media. No part of this publication
may be copied, reproduced or otherwise transmitted or recorded, for any purpose, without prior
written permission by Native Instruments GmbH, hereinafter referred to as Native Instruments. All
product and company names are ™ or ® trademarks of their respective owners.
Getting Started guide written by Dan Santucci
Edited by Nicolas Sidi
Document Version: 1.0 (10/2009)
Product Version: 4.0 (10/2009)
Special thanks to the Beta Test Team, who were invaluable not just in tracking down bugs, but in
making this a better product.
Page 3

Germany
Native Instruments GmbH
Schlesische Str. 28
D-10997 Berlin
Germany
info@native-instruments.de
www.native-instruments.de
USA
Native Instruments North America, Inc.
5631 Hollywood Boulevard
Los Angeles, CA 90028
USA
sales@native-instruments.com
www.native-instruments.com
© Native Instruments GmbH, 2009. All rights reserved.
Page 4

Table Of Content
1 WelcometoKONTAKTPLAYER!..........................................................................................6
1.1 AboutthisGettingStartedGuide..............................................................................6
1.2 SystemRequirements..............................................................................................6
1.2.1 PC Requirements .............................................................................. 7
1.2.2 Mac Requirements ............................................................................ 7
2 Setup...............................................................................................................................8
2.1 UsingKONTAKTPLAYERasaStand-aloneApplication...............................................8
2.1.1 Audio Conguration ........................................................................... 9
2.1.2 Latency Optimization ........................................................................10
2.1.3 MIDI Conguration ...........................................................................11
2.2 UsingKONTAKTPLAYERasaPlug-in...................................................................... 12
3 UserInterface................................................................................................................14
3.1 MainControlPanel................................................................................................ 15
3.2 TheRack.............................................................................................................. 16
3.3 Browser................................................................................................................ 16
3.3.1 Files Tab .........................................................................................17
3.3.2 Libraries Tab ...................................................................................18
3.4 InfoPane..............................................................................................................20
3.5 On-ScreenKeyboard..............................................................................................20
4 BasicOperation..............................................................................................................22
4.1 LoadingandPlayingInstruments............................................................................22
4.1.1 Loading an Instrument Using the Libraries Tab ................................... 23
4.1.2 Playing the Instrument ..................................................................... 25
4.1.3 Combining Instruments into Multis .................................................... 25
KONTAKT PLAYER Getting Started – IV
Page 5

4.2 LibraryDemoMode...............................................................................................27
4.2.1 Using Activated and Demo Mode Libraries in the Same Project ............. 28
4.2.2 Mode-dependent Operations ............................................................. 28
4.3 WorkingWithLibraries..........................................................................................29
4.3.1 Activating a Library ......................................................................... 29
4.3.2 Locating a Moved or Missing Library .................................................. 30
4.3.3 Removing a Library ......................................................................... 32
4.3.4 Adding a Library ............................................................................. 32
4.3.5 Other Library Box Functions ............................................................. 33
4.3.6 Locked Libraries ............................................................................. 34
4.3.7 Legacy Support (INTAKT, KOMPAKT, and KONTAKT PLAYER 1) ........... 35
4.4 SettingBasicInstrumentParameters.....................................................................35
4.4.1 Setting Audio and MIDI Ports ........................................................... 36
4.4.2 Adjusting Volume and Panning .......................................................... 37
4.4.3 Using Mute and Solo ....................................................................... 38
4.4.4 Performance View ........................................................................... 39
5 Troubleshooting..............................................................................................................40
KONTAKT PLAYER Getting Started – V
Page 6

1 Welcome to KONTAKT PLAYER!
Thank you for installing KONTAKT PLAYER. This document will get you up and running with
your KONTAKT PLAYER-compatible libraries and instruments powered by KONTAKT.
KONTAKT is one of the leading sampling solutions in the audio industry. KONTAKT 4 actually
includes KONTAKT PLAYER by way of Library Browser integration and intelligent handling.
They are not two separate applications. So, whenever we refer to KONTAKT in this document,
you can be sure the function addressed is also feature of KONTAKT PLAYER. Furthermore,
KONTAKT PLAYER can load all of your INTAKT, KOMPAKT and KONTAKT PLAYER 1 libraries, thus enabling you to use these libraries on Intel-based Macs.
1.1 About this Getting Started Guide
The purpose of this Getting Started document is to guide you through the basic steps of
setting up KONTAKT PLAYER and to get you acquainted with the fundamental aspects of
its user interface. After reading it, you should be able to start KONTAKT PLAYER both in
stand-alone mode and as a plug-in in your sequencer, nd, load and play sounds, and know
your way around the user interface. Because of this, we recommend that you take the time
to read this guide in its entirety.
1.2 System Requirements
In order to run KONTAKT PLAYER without problems, your computer and operating system
should at least fulll the minimum specications listed below.
KONTAKT PLAYER Getting Started – 6
Page 7

1.2.1 PC Requirements
Hardware: Pentium® or Athlon XP class running at 1.4 GHz or higher with at least 1 GB of
RAM
Operatingsystem: Windows® XP (SP2) or Windows Vista® (32/64 Bit)
Harddiskspace: 1 GB for minimal installation (without any sound library)
Audiohardware (for standalone operation): Any fully compliant ASIO™, DirectSound® or
WASAPI™ interface
1.2.2 Mac Requirements
Hardware: Intel® Core™ Duo 1.66 GHz or higher with at least 1 GB of RAM
Operatingsystem: Mac OS® X 10.5
Harddiskspace: 1 GB for minimal installation
Audiohardware (for standalone operation): Any fully compliant Core Audio™ or ASIO™ in-
terface
KONTAKT PLAYER Getting Started – 7
Page 8

2 Setup
Once the installation process has nished, you should nd the KONTAKT 4 installation directory on your hard drive. It contains the KONTAKT 4 / KONTAKT PLAYER application and the
documentation resources.
Before you start KONTAKT for the rst time, it’s worth explaining that it has two fundamentally different modes of operation. You have the choice of running KONTAKT:
•
as a normal application, in which case it will behave like any other program on your computer—we refer to this as the “stand-alone mode” in the documentation
or
•
as a virtual instrument plug-in within your sequencer or DAW (Digital Audio Workstation)
application.
The most important difference between these modes concerns the way in which KONTAKT
handles MIDI and audio streams:
•
In stand-alone mode, KONTAKT will address your MIDI and audio hardware directly (which
requires you to specify some details about your hardware and drivers).
• When using KONTAKT as a plug-in, these details will be taken care of by the sequencer
host application.
The following sections will explain both modes in more detail.
2.1 Using KONTAKT PLAYER as a Stand-alone Application
To start KONTAKT PLAYER as a stand-alone application, locate the application folder labeled
“Kontakt 4” on your computer and double-click “Kontakt 4.exe” (Windows) or “Kontakt 4.app”
(Mac OS X). Alternatively, you can use the shortcuts created during the installation process
in the usual locations on your operating system.
When you launch the KONTAKT application in this way, KONTAKT will start as a stand-alone
program that provides its own application menu, just like any other application on your com-
KONTAKT PLAYER Getting Started – 8
Page 9
puter. In this mode, KONTAKT will receive MIDI data from one or more ports of a MIDI interface and send audio signals directly to your audio interface. This can be very useful if you
don’t need the additional functionality of a full-blown sequencer environment for your task at
hand, for instance when you’re using KONTAKT as a live performance instrument.
When you start KONTAKT in stand-alone mode for the rst time, both audio and MIDI will
need conguring. In order to make KONTAKT receive MIDI notes from your keyboard and
play sound in response, you’ll rst have to tell it which hardware it should use. This is done
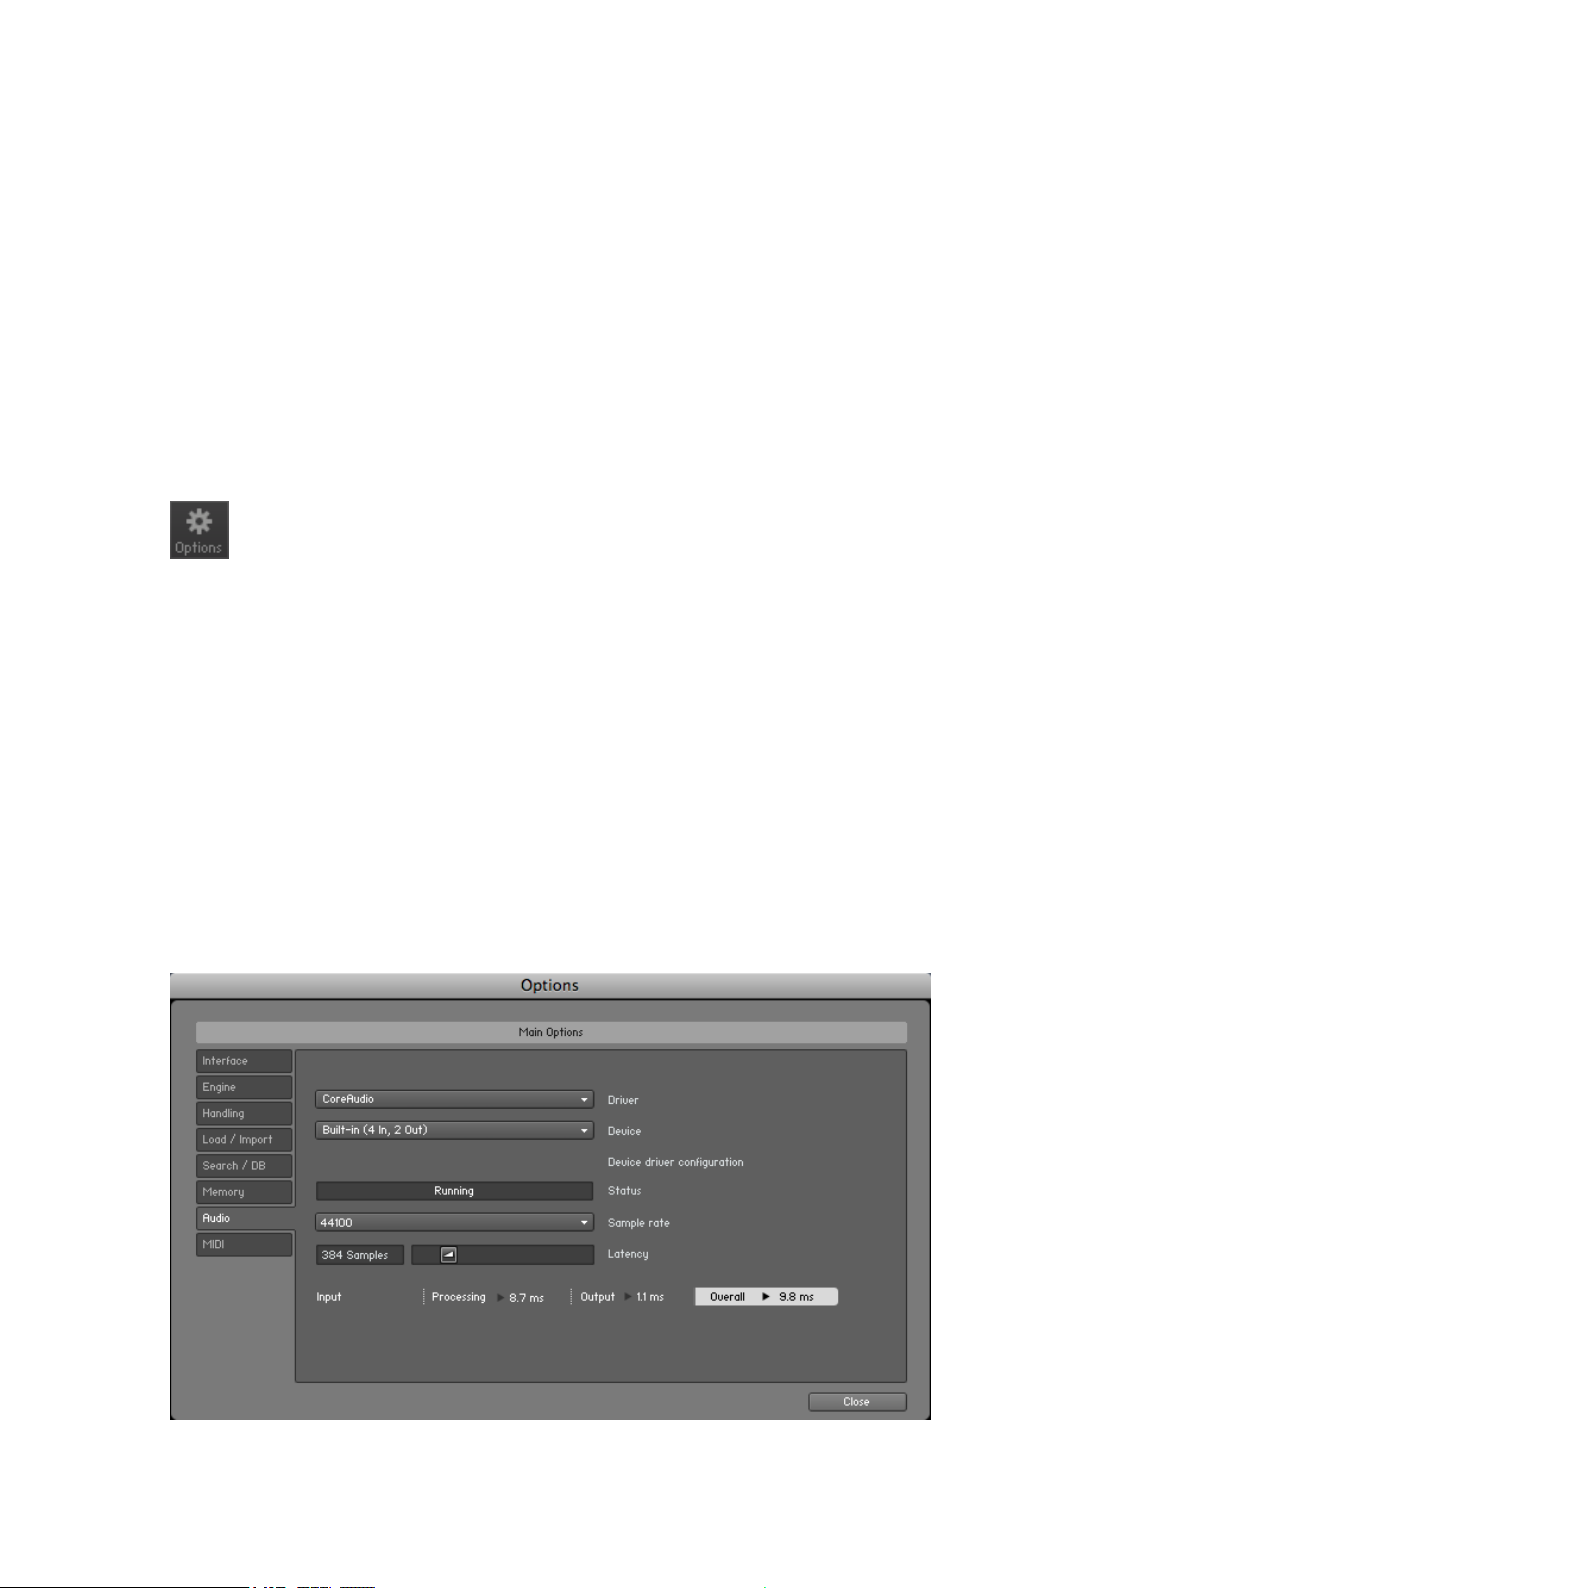
via the Options dialog, which should appear automatically upon the rst start. You can also
open this dialog at any time by clicking on the Options button at the top of the main window:
Click the Options button to open the Options dialog.
This Options dialog is the central place for conguring all aspects of KONTAKT’s user interface and its sample playback engine. In this chapter, we’ll only describe the Audio tab and
the MIDI tab at the bottom of the Options dialog; you can nd thorough explanations of the
other options in the KONTAKT 4 Reference Manual.
2.1.1 Audio Conguration
On the Audio tab of the Options dialog, you can specify which audio device KONTAKT should
use for playback and adjust global playback parameters.
Audio tab of the Options dialog.
KONTAKT PLAYER Getting Started – 9
Page 10

The dialog provides the following options:
•
Driver: With this drop-down menu, you can select which of your operating system’s device
driver architectures KONTAKT should use. Most professional audio devices provide
ASIO™, CoreAudio™ (Mac) or WASAPI™ (Windows) drivers.
•
Device: This menu lists all connected audio interfaces that match the driver architecture
chosen above. Select the audio interface you’d like to use for playback here.
• Samplerate: This drop-down menu allows you to set the global playback sample rate at
which KONTAKT will operate. Common values are 44100 Hz for music and 48000 Hz
for lm production. Note that this doesn’t have anything to do with the sampling rate at
which your samples have been recorded—if the playback rate doesn’t match a sample’s
recording rate, KONTAKT will handle all necessary conversion steps transparently for you.
•
Latency: This slider sets the size of the audio playback buffer in samples. Small values
will shorten the delay between pressing a key and hearing the resulting sound (this is
called “latency”), but may cause drop-outs and stuttering when playing a lot of voices at
the same time. Conversely, setting this to a higher value will make playback more reliable
at the cost of more latency.
2.1.2 Latency Optimization
The load that typical digital audio calculations generate on your processor is often not constant and predictable; parameter changes, additional voices or other processes can all cause
momentary peaks in the load, which can result in drop-outs or other audio artifacts if not
properly compensated for. That’s why audio programs don’t send the audio signals they generate directly to the hardware, but write them to a short buffer in memory instead. These
contents are in turn being sent to the actual hardware. This concept allows the program to
bridge short irregularities in the stream calculation and thus be more resistant to processing
peaks.
Of course, this “safety net” comes at a price—the buffering causes a delay, known as latency,
between the triggering of a note and the actual sound. This delay gets longer with increasing buffer sizes. Hence, it is vital to tune the buffer size in order to nd a good compromise
between latency and playback reliability. The optimal value depends on such diverse factors
KONTAKT PLAYER Getting Started – 10
Page 11
as your CPU, memory and hard disk access times, your audio hardware and drivers, and your
operating system environment.
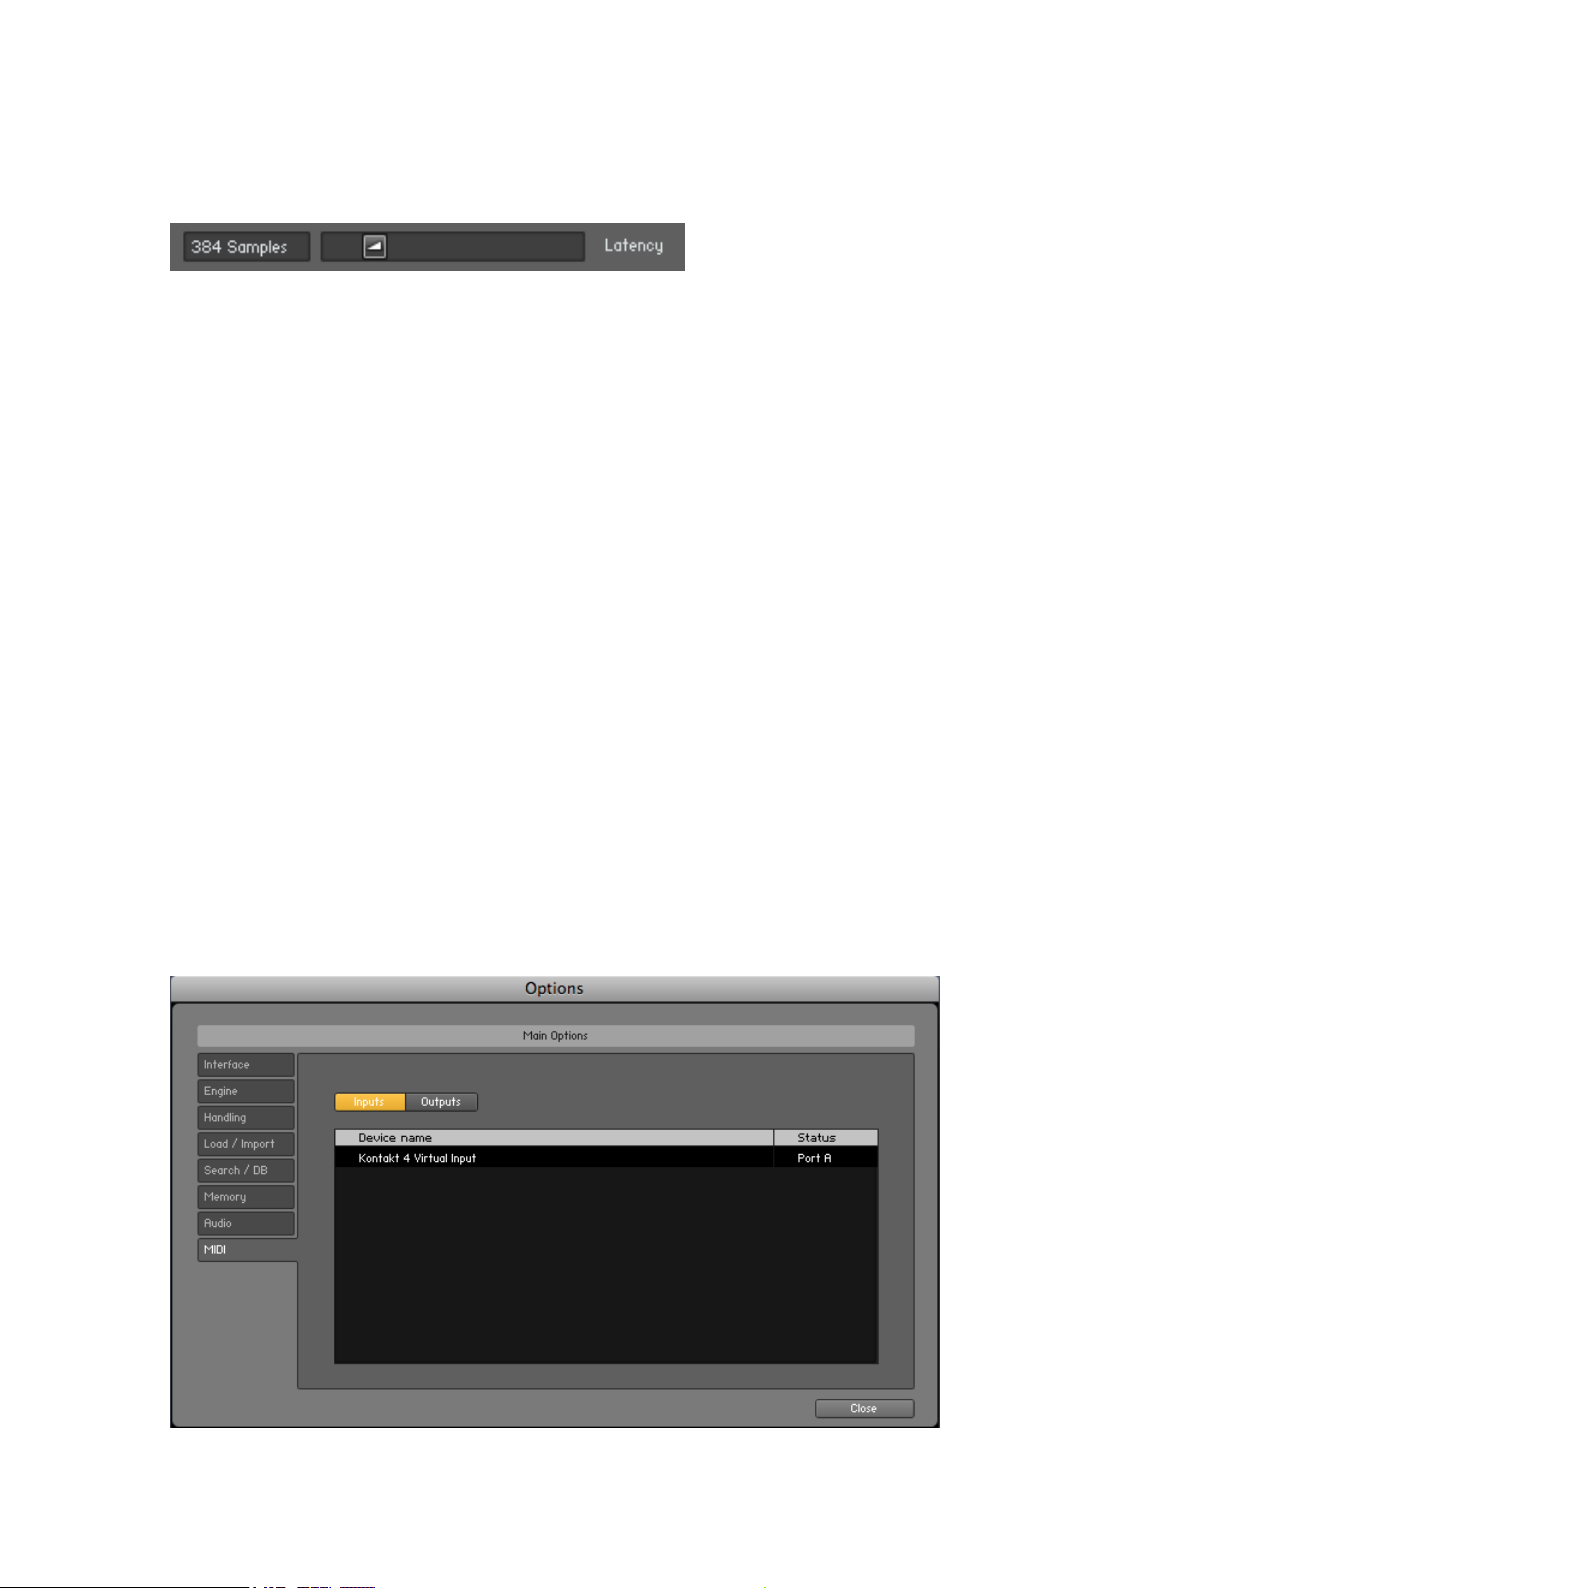
The Latency slider controls the size of the playback buffer.
In order to nd the optimal buffer size for your system, we recommend that you begin by setting the Latency slider described in the previous section to a healthy middle value between
384 and 512 samples. Gradually decrease that value during your normal work. When you
begin to notice drop-outs, increase the buffer again by a small amount.
Generally, it‘s a good idea to have as few other applications as possible running in the background when working with audio software. Also, if you can’t get below a certain buffer size
without getting drop-outs, consult the documentation of your audio hardware to nd out
whether you can access it via an alternative driver architecture, as some architectures allow
more efcient low-level access to the hardware than others.
2.1.3 MIDI Conguration
The MIDI tab in the Options dialog provides a list of all MIDI inputs and outputs that have
been found on your system. These are ports of physical MIDI interfaces connected to your
computer, but also any virtual MIDI ports that may be provided by drivers or other applications to facilitate inter-application MIDI usage.
MIDI tab of the Options dialog.
KONTAKT PLAYER Getting Started – 11
Page 12

In order to make KONTAKT respond to MIDI data from the outside, you‘ll have to enable one
or more ports that appear in the inputs list of the MIDI tab. To do this:
1. Make sure that the Inputs button is highlighted.
2. Identify the port(s) that you intend to use for MIDI input in the list.
3. If the Status eld on the right side of an entry reads Off, click on that value and assign
one of the MIDI port identiers (A-D).
→ This enables the respective port, which will later be identied by the selected letter
throughout the user interface.
2.2 Using KONTAKT PLAYER as a Plug-in
The plug-in version of KONTAKT allows you to use it as a virtual instrument inside your sequencer or HD recording program. That way, you can run multiple instances of KONTAKT
side-by-side along with your other sound generators and effect plug-ins, trigger them with the
data of MIDI tracks from within your sequencer, and directly feed their audio output into the
signal ow of your virtual mixer.
Depending on your operating system and choices upon installation, KONTAKT provides VST,
Audio Units, and RTAS® plug-in formats. Refer to the documentation of your sequencer to
nd out which of these formats is the right one in your case; if you have enabled the appropriate format at installation time, KONTAKT 4 should appear in the plug-in selection list
inside your sequencer. If it is not the case, re-run the installer and make sure the appropriate
plug-in is marked for installation.
The way in which virtual instrument plug-ins are integrated into the workow depends on
your sequencer; consult its documentation to nd out how to instantiate and work with the
KONTAKT plug-in. At some point, you will have to locate the plug-in folder labeled Native
Instruments and select Kontakt 4. There is no dedicated KONTAKT PLAYER plug-in!
KONTAKT PLAYER Getting Started – 12
Page 13
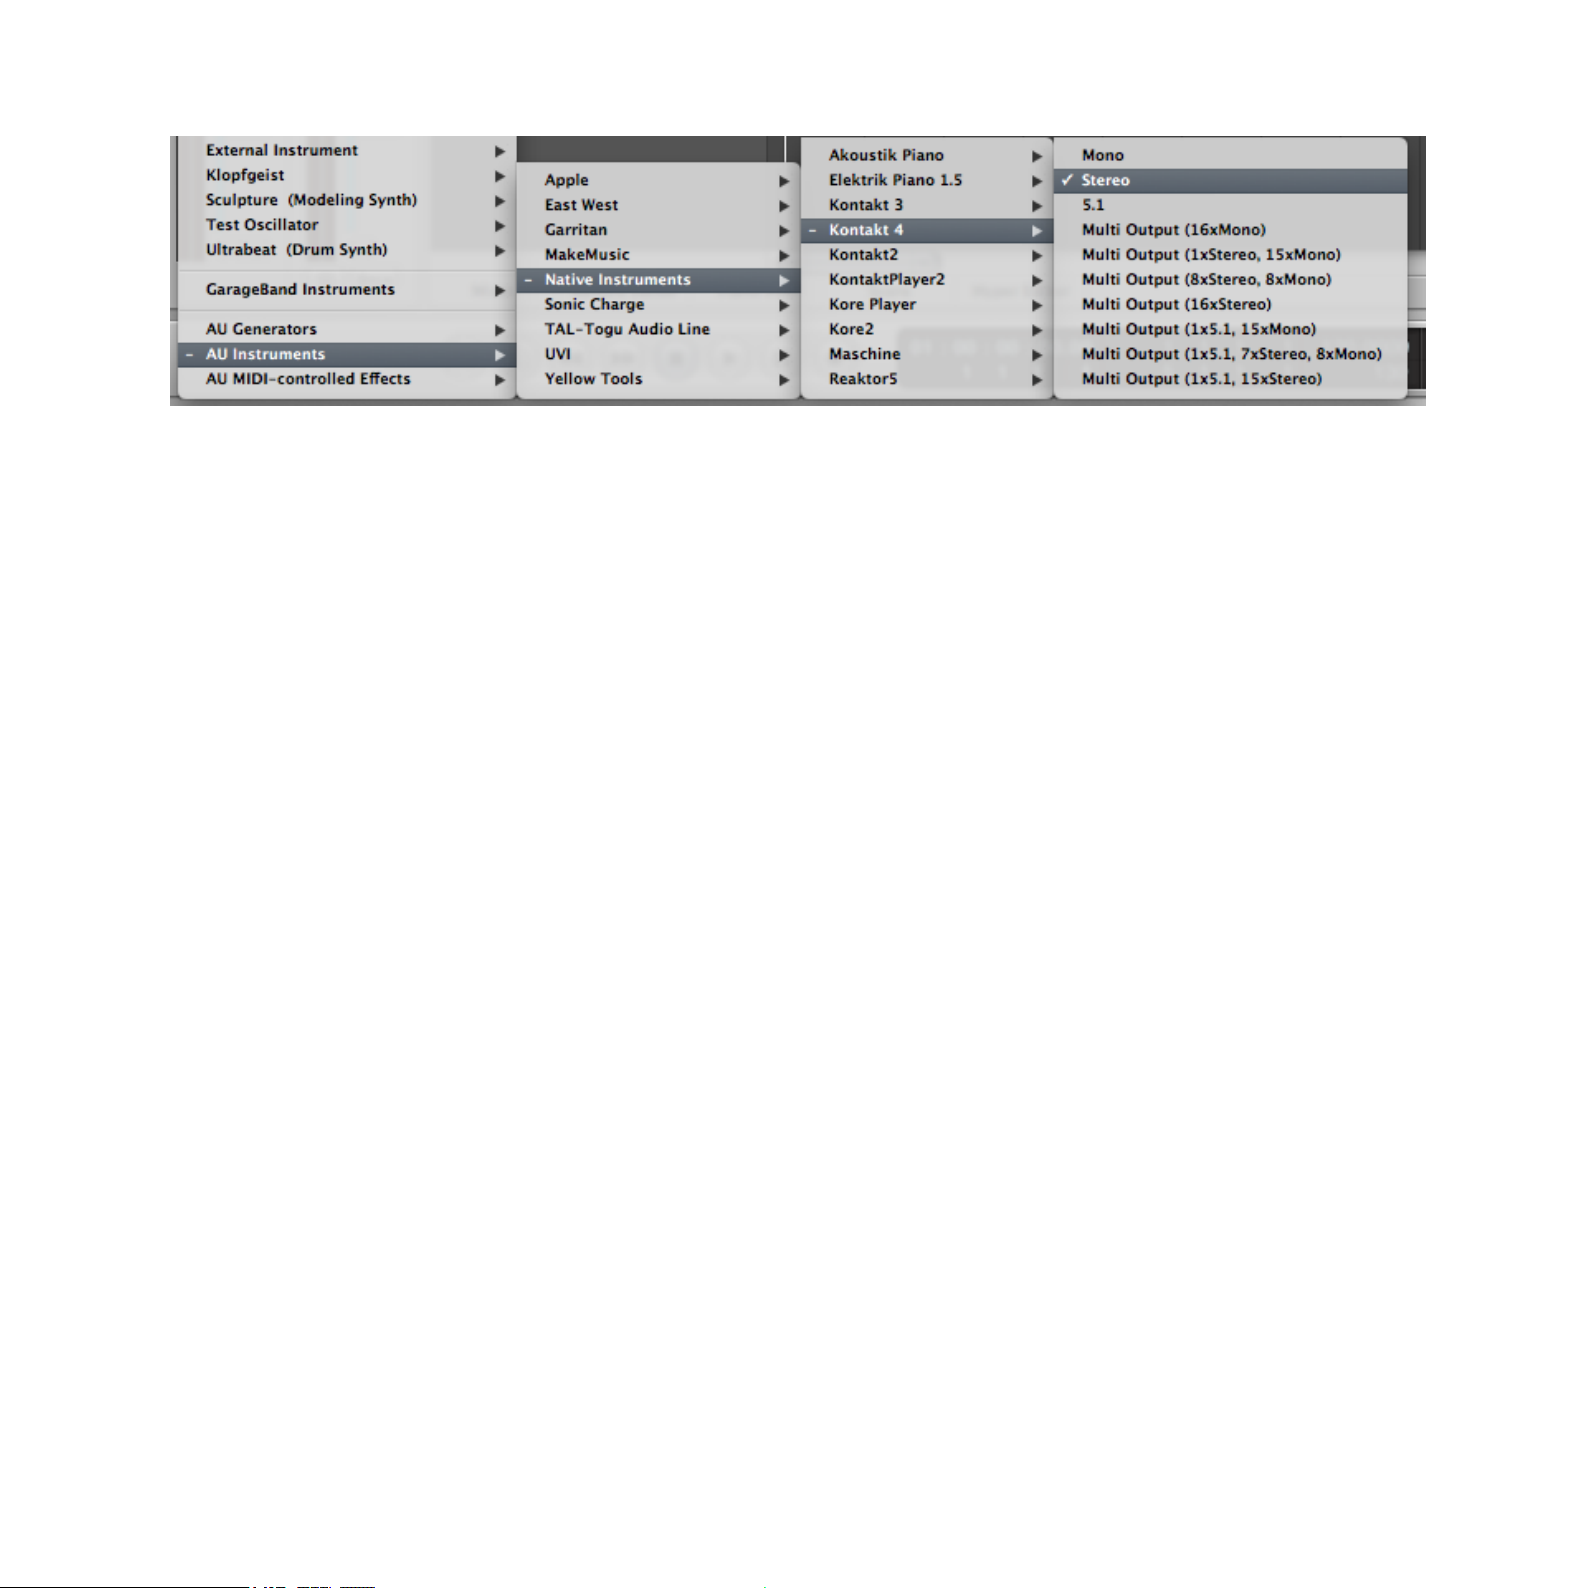
In your host software, select the Kontakt 4 entry from the list of available plug-ins.
KONTAKT PLAYER Getting Started – 13
Page 14

3 User Interface
Once KONTAKT has been properly congured, you’ll be greeted by its main window. This is
the central workspace in which you can nd and manage les, open Instruments, and combine them into Multi setups.
The KONTAKT PLAYER main window, with no Instruments loaded.
The main window is subdivided into a number of sections, each of which incorporates functions for carrying out a specic group of tasks. In the following sections, we’ll briey explain
the interface parts that are used for loading and playing instruments with KONTAKT PLAYER;
for a much more thorough description of all aspects of the user interface, please refer to the
KONTAKT 4 Reference Manual.
KONTAKT PLAYER Getting Started – 14
Page 15

3.1 Main Control Panel
At the top of the KONTAKT PLAYER window, you’ll nd a row of 9 squared buttons. This
is called the Main Control panel. As the name implies, it provides access to a range of essential control functions; some of the buttons toggle the visibility of certain parts of the user
interface, others open drop-down menus or dialogs that give access to further commands
and options. What follows is a short description of what each button does, from left to right;
please refer to the KONTAKT 4 Reference Manual for detailed information about the functions
of the Main Control Panel.
The Main Control panel at the top of the window provides access to various essential features and dialogs.
•
Browse: Toggles the visibility of the Browser section, which is the vertical bar on the left
side of the main window. If you know that you won’t need the functions of the Browser
for a longer period of time, you can save desktop space by hiding it. The Browser is explained in section 3.3 of this guide and in the KONTAKT 4 Reference Manual.
•
Master: Toggles the visibility of the Master Editor, where you can adjust various global
parameters such as overall volume, tempo, or master tuning.
•
Info: Toggles the visibility of the Info Pane, which will appear at the bottom of the window.
The Info Pane is explained in section 3.4 of this guide.
•
Output: Toggles the visibility of the Outputs section, which will appear at the bottom of
the window. Here you can congure KONTAKT’s internal audio channels, adjust output
levels, and add global insert and send effects.
•
Keyb: Toggles the visibility of the On-Screen Keyboard, which is explained in section 3.5
of this manual.
• Quick: Toggles the visibility of the Quick-Load Browser.
•
Files: Opens a drop-down menu that consists of various commands for loading, saving
and managing KONTAKT les, such as Instruments, Banks and Multis.
•
Options: Opens the Options dialog, where you can adjust a wide range of preferences that
pertain to the user interface and the sample playback engine of KONTAKT.
KONTAKT PLAYER Getting Started – 15
Page 16

•
Purge: Opens a drop-down menu of options related to the purge facility, which allows you
to temporarily unload samples from memory that are currently not in use.
3.2 The Rack
The Rack is the part of KONTAKT’s user interface that takes up the most screen space; it’s the
large area below the Main Control panel. Whenever you load an Instrument, it will appear in
the form of a horizontal header here. As the name suggests, the Rack is designed to resemble
a stack of 19” studio equipment; that is, any additional Instruments will appear alongside the
headers that are already there. This way, you can easily load up to 64 Instruments (distributed
across pages of 16 each) at the same time into a KONTAKT instance. Such a combination of
Instruments is called a Multi, and you can save and recall it just like an Instrument.
When you rst start KONTAKT, the Rack will be just an empty space, indicating that no
Instruments are currently loaded. You’ll need to either load an Instrument, or open a Multi.
Chapter 4.1 of this guide explains how you nd and load existing Instruments from the sound
libraries on your hard disk.
The Rack header controls.
On top of the Rack, you‘ll nd a row of user controls; most of these don‘t actually change
anything in your Multi, but affect which kinds of information will be visible in the Rack. Next
to a text line that shows the name of your currently loaded Multi, there are four page buttons
that allow you to navigate to one of the Rack pages of 16 Instruments each.
3.3 Browser
The Browser is the vertical pane on the left side of the window, right next to the Rack; if you
don’t see it, click on the Browse button in the Main Control panel to make it show up.
The main purpose of the Browser is to gather functions that let you organize and browse any
number of KONTAKT-relevant les in a variety of different ways. Among other things, you
KONTAKT PLAYER Getting Started – 16
Page 17

can use it to navigate through your le system in order to locate and load objects, access the
KONTAKT libraries installed on your hard disk in a quick and intuitive manner, import sampler
programs from third-party formats, and access KONTAKT’s powerful Database.
The functions provided by the Browser are spread across a number of sections and subsections
that you can access via the tabs on its top. We’ll here limit ourselves to brief explanations
of the Files and Libraries tabs, which offer access to your le system and your collection of
instruments powered by KONTAKT and other KONTAKT libraries, respectively.
3.3.1 Files Tab
When you click on the Files tab, the Browser will switch to a two- or possibly three-pane view
(the third pane at the bottom can be switched on and off). This tab allows you to navigate
through your le system in a tree-based view; this kind of navigation will be immediately familiar to you if you’re accustomed to using your operating system’s le browsers.
Files tab of the Browser. From top to bottom, you can see the Container Pane, the Objects Pane, and the Instrument
Navigator.
KONTAKT PLAYER Getting Started – 17
Page 18

The topmost pane, called the Container Pane, and the one just below it always operate in
unison. As its name suggests, the Container Pane displays the items in your le system that
contain other objects—such as volumes and directories—within a hierarchical tree view.
When KONTAKT nds other containers (such as subdirectories) in one of these entries, a
small icon will appear next to its name. A plus sign (“+”) indicates that the sub-contents are
currently hidden from view; click on the plus sign to “fold out” the container and access its
contents. That way, you can quickly navigate to any directory on your hard disk.
Once you’ve located a directory with les that are relevant to KONTAKT (such as Instruments),
highlight it by clicking on its name in the Container Pane. The pane below, called the Object
Pane, will now display the les in that particular directory as a at list. If this list is longer
than the pane, just click and drag the scrollbar on its right side to scroll down. Once you’ve
found what you’ve been looking for, either double-click the le or click and drag it over into
the Rack in order to load it into KONTAKT.
As mentioned, you may notice a third section below the Container Pane and Object Pane;
if not, you can show it by clicking the button labeled Instr Nav in the upper right corner of
the tab. This pane is called the Instrument Navigator and offers a handy overview list of all
Instruments in your current Multi. Clicking on an entry jumps directly to that Instrument’s
header within the Rack. Using the S and M buttons, you can quickly toggle the solo and mute
status of Instruments; these are explained in section 4.4.3 of this guide.
3.3.2 Libraries Tab
The Libraries tab of the Browser provides an immediate and intuitive way of accessing your
collection of commercial instruments powered by KONTAKT and other KONTAKT-based libraries that are installed on your hard disk.
KONTAKT PLAYER Getting Started – 18
Page 19

Accessing the KONTAKT Factory Selection sound library via the Libraries tab of the Browser.
In contrast to the Files tab, where you have to know where to look for the les that you want
to load, the Libraries tab shows all installed libraries in a at, easily accessible list—regardless of where they are located on your hard disk.
► To access the contents of a library, just click on the button labelled Browse on its head-
er.
→ Its directory structure will then show up below the header.
You can navigate through the contents in the same way you do in the panes of the Files tab,
the only difference being that in this case, both subdirectories and loadable objects appear
in the same list.
►
Once you have found an Instrument or Multi you’d like to load, simply double-click on its
name or drag it into the Rack.
KONTAKT PLAYER Getting Started – 19
Page 20

3.4 Info Pane
The Info Pane is a text bar at the bottom of the main window; if you don’t see it, click on the
Info button in the Main Control Panel (see section 3.1).
The purpose of the Info Pane is to provide you with a short description of whatever your mouse
cursor is currently pointing at; whenever you’re not sure what a specic button, knob or other
element of the user interface does, just point your mouse at it and read the description that
shows up in the Info Pane below the Rack.
The Info Pane provides helpful descriptions of KONTAKT‘s user interface elements.
Provided that the Browser is visible as well, the Info Pane will be separated into two sections.
In addition to the user interface descriptions, it will also display various details about the item
that‘s currently selected in the Object Pane of the Browser, if any.
3.5 On-Screen Keyboard
The On-Screen Keyboard appears just below the Rack when you click on the button labeled
Keyb in the Main Control Panel (see section 3.1).
The On-Screen Keyboard displays incoming MIDI notes and the key range of the selected Instrument.
This virtual piano keyboard offers several functions, the most obvious of which is that you
can trigger notes by clicking on its keys. This is the equivalent of pressing a key on your master keyboard. The notes will be sent to the Instrument that’s currently selected in the Rack
(just click on an Instrument Header to select it), or to the topmost one if none is selected.
KONTAKT PLAYER Getting Started – 20
Page 21

Conversely, when you play notes on your MIDI keyboard, you’ll notice that they’re being mirrored on the On-Screen Keyboard; this is an easy way to ensure that KONTAKT correctly
receives MIDI data from the outside.
Finally, provided that your current Multi contains any Instruments, a range of consecutive
keys will be colored blue; this indicates the playable key range of the currently selected (or
topmost) Instrument.
KONTAKT PLAYER Getting Started – 21
Page 22

4 Basic Operation
Now that you’re familiar with the fundamental parts of KONTAKT’s user interface, it’s time
to get practical. In the following sections, we’ll provide you with step-by-step instructions for
some common tasks, such as loading and playing Instruments, combining them into Multis,
and adjusting their basic playback parameters.
Please make sure you start with an empty Multi when following the instructions in this chapter;
if required, use the Reset Multi command from the Files menu in the Main Control panel to
remove all Instruments from your KONTAKT instance.
If any KONTAKT PLAYER compatible libraries or instruments powered by KONTAKT are found
on your computer, KONTAKT defaults to Player mode. In Player mode the Library Browser
is displayed and any installed 3rd Party Libraries are shown. Installed libraries show up as
Library Boxes.
4.1 Loading and Playing Instruments
KONTAKT offers you a number of different tools that let you keep track of your installed
sampling libraries and their contents. Ultimately, they all have the same purpose: to let you
locate and use any item you’re looking for as quickly as possible.
•
The Files tab of the Browser is a tree-based le system navigator that you can use to
traverse the directory structure of your system volumes, browse the contents of any directory, quickly listen to samples, and select KONTAKT items for loading.
•
The Libraries tab offers a more streamlined and intuitive way of accessing commercial
libraries in KONTAKT format.
•
The KONTAKT Database is a very powerful tool for managing large collections of
Instruments, Samples, Multis and Banks in a non-linear fashion. It allows you to tag your
items with freely denable attributes and rapidly lter your whole collection by means of
keywords and attributes.
KONTAKT PLAYER Getting Started – 22
Page 23

•
The load… command, which you can nd in the Files Menu of the Main Control panel,
will open a traditional le selector dialog that you should nd familiar from other applications:
load… command of the Files menu.
We’ll limit the scope of this section to the second option: The Libraries tabs of the Browser.
In order to nd out more about the other tools mentioned, refer to the KONTAKT 4 Reference
Manual.
4.1.1 Loading an Instrument Using the Libraries Tab
Let’s start by loading an Instrument! In this example we will use an Instrument from the
Factory Selection Library. The following description applies to all libraries in a very similar
manner, so you can use another library if desired.
1. Make sure the Browser is visible on the left side of the main window. If it’s not, click on
the button labeled Browse in the Main Control panel:
Toggle the visibility of the Browser with the Browse button in the Main Control panel.
2.
The Library Browser provides access to all KONTAKT PLAYER libraries installed on your computer. To show the Library Browser, click the Libraries tab.
KONTAKT PLAYER now displays all libraries as “boxes” in the Library Browser:
KONTAKT PLAYER Getting Started – 23
Page 24

Two Library Boxes in KONTAKT PLAYER’s Library Browser
ToloadanInstrument:
►
Click on the button labeled Browse at the bottom of the library’s box. The library’s content
will unfold and show all Instruments or sub-folders contained in the library:
Click the Browse button to access the Instruments and sub-folders your library contains.
The Factory Selection library contains numerous sub-folders, which are marked with a folder
icon next to their name. They can be opened by double-clicking on them.
► To get back to the parent folder, click on the rst entry of the list, which is marked with
an arrow:
KONTAKT PLAYER Getting Started – 24
Page 25

1. Double-click the Band entry.
2.
Once you’ve found an Instrument (whose lename will end with .nki) that you’d like to
load, either double-click on its name or click and drag it into the Rack.
→
An Instrument Header with that Instrument’s name and some controls will appear in
the Rack, indicating that the Instrument has been successfully loaded and is ready
for playing.
To load a selection of Instruments at once, press [Shift]+click multiple nki les and drag
%
If a dialog titled “Samples Missing” appears when you try to load the Instrument, it means
that KONTAKT cannot nd some or all of that Instrument’s Samples for some reason. In this
case, either click on Abort Loading and retry the process with a different Instrument, or read
the section about this dialog in the KONTAKT 4 Reference Manual to nd out how to solve
the problem.
them to the Rack.
4.1.2 Playing the Instrument
Once KONTAKT has successfully loaded the Instrument, it appears as a horizontal Instrument
Header within the Rack, which indicates that it’s ready for playing. If you have a master keyboard connected to your computer, play a few keys now. In case you’re using KONTAKT as
a plug-in within your sequencer, you may need to put the respective instrument track into
“record” or “monitor” mode rst. Provided that you’re playing in the correct key range of your
Instrument, you should hear its sound now.
If you can’t hear any output, refer to chapter 5 for possible problem solutions.
4.1.3 Combining Instruments into Multis
You now have loaded an Instrument into your KONTAKT PLAYER Rack. Let’s load a few more,
this time from another library. If you don’t have any more libraries installed, you could also
load single samples from other collections.
1.
Exit the Factory Selection Library Box by clicking the X in the upper right hand corner or
on the Browse button again.
KONTAKT PLAYER Getting Started – 25
Page 26

2. Now click on the second library’s Instruments button to display the library’s contents. If
the library has an Instruments folder, as in the case of MASCHINE DRUM SELECTION.
The button will then display Instruments instead of Browse:
If an Instruments folder is available in the Library, the button reads Instruments instead of Browse.
3. Double-click a folder to navigate further. Once you found some Instruments, hold [Shift]
(Mac) or [Ctrl] (Windows) and click on an Instrument and then on another. Click-drag the
selection to the right into the Rack.
→
We now have three Instruments, possibly from different libraries, loaded into our
Rack—such a combination of Instruments is called a Multi:
Three Instruments in the Rack (top and bottom once with activated Performance Views, middle one is collapsed).
Keep in mind you can load and mix up to 64 Instruments from any installed library this way.
KONTAKT PLAYER Getting Started – 26
Page 27

4.2 Library Demo Mode
Some Instruments are now loaded in the Rack. But, have a look at the Instrument name and
you’ll see the character string ***DEMO*** written in front of it:
An Instrument in Demo mode
This means that the library has not yet been activated and is currently in demo mode. You
can also recognize that the library is in demo mode by the button labeled Activate appearing
in the Library Box.
A library that has not been activated
The demo mode allows you to play any Instruments from a particular library for 15 minutes.
The countdown begins when the rst Instrument from that given library is loaded. After 15
minutes have passed, there will be a “Demo Timeout” message and any other Instruments
loaded in demo mode will also be timed out:
An Instrument from a timed-out library
KONTAKT PLAYER Getting Started – 27
Page 28

In demo mode you are free to make changes and also save them. However, please be aware
that any Instruments saved in demo Mode will be timed out the next time you try to load
them and will remain timed out until the library has been activated.
4.2.1 Using Activated and Demo Mode Libraries in the Same Project
A demo timeout shouldn’t necessarily disrupt your workow. Since the demo works separately for activated and non-activated libraries (i.e KONTAKT PLAYER as application does
not time out), you can continue working with activated libraries, making changes to activated
Instruments and saving them. You can even save a combination of activated and non-activated
Instruments as a Multi, either in a host project or and stand-alone mode. And no worries,
total recall works so any changes will be in place upon reloading.
Saving a host project where KONTAKT is instantiated as a plug-in will also tag a non-
!
activated library timed-out.
4.2.2 Mode-dependent Operations
Here is a comparison chart listing all the mode-dependent operations:
KONTAKT 4 KONTAKT PLAYER
Library, activated
Loading OK OK
Playing OK OK
Editing OK* n/a
Saving OK OK
Re-loading saved OK OK
Library, not activated
Loading** OK OK
KONTAKT PLAYER Getting Started – 28
Page 29

Playing 15 minutes 15 minutes
Editing n/a n/a
Saving OK OK
Re-loading saved after library activation after library activation
Self-made Instrument
Loading OK OK
Playing OK 15 minutes
Editing OK OK
Saving OK OK
Re-loading saved OK KONTAKT 4 license required
* some libraries are locked for editing by the library developer
** patches can always be loaded and recalled in demo mode
n/a = not available
4.3 Working With Libraries
4.3.1 Activating a Library
To remove the demo mode limitations, you need to activate your library via the Service Center
application:
To open the Service Center and activate your product:
1. Either click the Activate button in the Library Box or the Demo Timeout screen.
KONTAKT PLAYER Getting Started – 29
Page 30

2. In the dialog screen, click the button labeled Start Service Center to proceed:
Conrm that you want to activate the library by clicking on Start Service Center.
→ The Service Center will open, asking for the library’s serial number.
For more information about activating products via the Service Center, please see the
!
3.
Once the library is activated, restartKONTAKTPLAYER. If no Activate button is present in
the Library Box afterwards, the product has been successfully activated.
Service Center Quick Start Guide and manual.
4.3.2 Locating a Moved or Missing Library
Sometimes you may want to move an installed library to another location. This is no problem,
but the next time you start KONTAKT PLAYER you’ll have to manually nd the moved library.
After you have moved a library to a different location, a message will state that the library could not be found.
1. To point KONTAKT PLAYER to the library’s new location, click on Locate.
KONTAKT PLAYER Getting Started – 30
Page 31

2. The “Content Missing” dialog opens:
The Content Missing dialog allows you to locate libraries that have been moved.
3.
If you want to locate the folder manually, click on the button labeled Browse for folder. This will open a dialog allowing you to set a path to your library’s new location.
Alternatively, you can have KONTAKT PLAYER search the le system (by clicking on the
button labeled Search Filesystem). As KONTAKT PLAYER will scan all folders on your
computer, this may take a considerable amount of time.
→
After the missing le is located, the Library Box re-appears and functions as before.
For legacy libraries you will see a “Locate Folder” window. Use this to navigate to the library’s
install location. For more details about legacy libraries, see chapter 2.3.5, “Legacy Support
(INTAKT, KOMPAKT, and KONTAKT PLAYER 1).”
KONTAKT PLAYER Getting Started – 31
Page 32

4.3.3 Removing a Library
In case you uninstalled or deleted a library from your computer and the Library Box is still
visible, you can remove the leftovers by selecting the Remove library entry from the Library
Options menu.
Click the sprocket icon to open the Library Options menu.
4.3.4 Adding a Library
If you want to add a new or previously removed library to the Libraries tab, do the following:
1. Click on the Add Library button.
2.
In the dialog that opens, select the desired library folder and click on OK at the bottom of the dialog. For example, if you want to add Factory Selection, which is a Native
Instruments product, please select the Library folder (highlighted in blue below) inside
the Native Instruments main folder:
Select the library folder to add a library to the Libraries tab (highlighted in blue, here on Mac OS X).
KONTAKT PLAYER Getting Started – 32
Page 33

4.3.5 Other Library Box Functions
Learn more about how to access and use the options available in the Library Boxes.
Reorganizing Libraries in the Library Browser
You can drag the Library Boxes up or down to reorganize them as you please. A white insertion line is shown at the position where the box will be placed:
Click and drag the Library Boxes to change their order in the Library Browser.
Info Menu
Open the Info menu to access documentation content and additional product information.
The Info menu shows the content of the library’s Documentation folder.
► To open the Info menu, click on the button labeled i.
Most commonly, this menu holds links to the user manual as PDF le, to quick start guides,
tutorial videos, or even links to the developer’s website. The contents of this folder are library
dependent. You can add any entry you want by adding the corresponding les to the library’s
Documentation folder.
KONTAKT PLAYER Getting Started – 33
Page 34

All les located in the Documentation folder appear in the library’s Info menu (Mac OS X version pictured)
Library Options Menu
The Library Options menu
The Library Options menu holds commands to open containing folder and removing a library.
► To open the Library Options menu, click on the little sprocket icon.
In this menu, you will nd following entries:
•
Opencontainingfolder: Direct link to the library location on your hard drive. This command
can be helpful when you want to navigate to the library’s install location without using
the Finder (Mac OS X) or the Explorer (Windows).
• RemoveLibrary: Removes the Library Box from the Library tab (see section 4.3.3).
4.3.6 Locked Libraries
KONTAKT PLAYER libraries will always be locked for editing when in Player mode. If a library
is locked, its Instruments display a gear icon in their Instrument Header:
The gear icon in an Instrument Header indicates that its library is locked.
A click on this gear icon opens the Instrument Options (see the Reference Manual for more
info on this).
Some libraries are locked for editing, even if you own the full version of KONTAKT. The
!
decision to lock a library is that of library developer and not that of Native Instruments.
KONTAKT PLAYER Getting Started – 34
Page 35

4.3.7 Legacy Support (INTAKT, KOMPAKT, and KONTAKT PLAYER 1)
KONTAKT PLAYER can now display and load all of your INTAKT, KOMPAKT and KONTAKT
PLAYER 1 compatible libraries. By way of loading these libraries in KONTAKT PLAYER you
can use them on Intel-based Macs again.
Note that for these libraries there is no Performance View available for the Instruments (see
section 4.4.4 for more info on the Performance View). However, some Instrument updates
may be available. Please check the library manufacturer’s website for details.
Using Legacy Libraries Installed on External Hard Drives
If you installed your KONTAKT PLAYER, KOMPAKT or INTAKT library on an external hard
drive and would like to use it on another computer, do as follows:
1. Simply attach the hard drive to the other computer.
2. Click on the Add Library button and navigate to the library install location.
3. Click on OK.
→ The Library Box will show up in the Libraries tab.
KOMPAKT and INTAKT libraries will show up in the Libraries tab, but the Instruments only
!
Center.
function once you have fully authorized the library for the new computer via the Service
4.4 Setting Basic Instrument Parameters
Each Instrument Header provides a set of controls that allow you to adjust some basic parameters, which affect that Instrument’s MIDI and audio routing, playback volume, panning
position and tuning. KONTAKT will save and recall these settings along with the Multi data.
If you’re building a multi-timbral setup of Instruments, you can use these controls to create
a sub-mix inside KONTAKT, which takes place before the nal audio is being sent out to the
audio interface or host application.
KONTAKT PLAYER Getting Started – 35
Page 36

Instrument Header in maximized view.
Note that the following sections refer to Instrument Headers in their default, maximized state
that you can see above; they can also be switched into a minimized state that hides most of
their parameters in order to save vertical space in the Rack.
►
If any or all of the Instrument Headers in your Multi appear condensed, click the doublearrow icon on the right side of the Rack Header once or twice until they’re all expanded
to their default view:
Maximize all Instrument Headers by clicking the Size Toggle button in the Rack Header once or twice.
4.4.1 Setting Audio and MIDI Ports
We already touched this topic briey in the previous sections: In order to make an Instrument
respond to incoming MIDI data, you’ll have to tell KONTAKT on which MIDI input port and
channel it should “listen” for that data.
To select both the MIDI port and the MIDI channel:
►
Use the drop-down menu that appears when you click on the Midi Ch label in the
Instrument Header.
KONTAKT designates the available MIDI ports with the letters that you assigned to them in
the Options dialog, as explained in section 2.1.3:
Assign a MIDI input to your Instrument with the MIDI Ch drop-down menu.
KONTAKT PLAYER Getting Started – 36
Page 37

Similarly to the input MIDI channel, each Instrument also needs an audio output channel
assignment. This species to which of KONTAKT’s own mixer channels the output signal of
that Instrument will be routed.
To change the audio output:
► Click on the Output label in the Instrument Header:
Assign an audio output to your Instrument with the Output drop-down menu.
The available choices depend on the conguration of the Outputs section in your KONTAKT
instance; in other words, they don’t refer to physical audio outputs per se. For more information about KONTAKT’s internal audio routing, refer to the Outputs section chapter of the
KONTAKT 4 Reference Manual.
4.4.2 Adjusting Volume and Panning
You can set the playback volume and stereo panorama position for each Instrument in your
Multi independently. This is useful for creating a sub-mix inside your KONTAKT instance. If
multiple Instruments are being routed to the same audio output at the same time, there’s no
way to change their respective volumes or panorama positions independently from outside
KONTAKT.
In order to change the playback volume of an Instrument:
► Click and drag the horizontal slider on the right side of its Instrument Header:
Instrument Volume slider
KONTAKT PLAYER Getting Started – 37
Page 38

Be careful when you’re increasing the volume and keep an eye on the peak level meter above
the slider; if it hits the right border in loud passages, the level is set too high, which will cause
clipping artifacts in the audio output.
The panorama control is positioned to the left of the volume slider:
Panorama position slider
►
Click and drag it horizontally to place the Instrument’s signal within the stereo panorama.
At its center position, the signal is played back with no change; setting it all the way to the
left (value 100L) will make the signal disappear entirely from the right channel, and vice versa.
4.4.3 Using Mute and Solo
When you’re actively working on an arrangement or a Multi, it’s often helpful to temporarily
exclude certain Instruments from the mix or to isolate a single element for making better
judgments. You can do this with the buttons labeled S (Solo) and M (Mute) in the Instrument
Header:
Solo (S) and Mute (M) switches
Clicking on the Mute switch will exclude the signal of an Instrument from the mix; as a reminder, the button will be highlighted. Click on it again to switch the signal back into the mix.
Similarly, when you click on the Solo switch, all other Instruments in your Multi will be muted,
so you’ll hear the one you selected in isolation. You can also put multiple Instruments into
solo mode; in that case, the mute status of the remaining Instruments will persist until you
have switched off the last active solo button.
KONTAKT PLAYER Getting Started – 38
Page 39

4.4.4 Performance View
The Performance View shows a custom panel of controls which allow you to alter specic
Instrument characteristics. As these controls are programmed by the library developer, the
available controls will vary from library to library.
To display the Performance View of an Instrument:
► Click on the icon labelled PV in the lower right corner of the Instrument Header.
Here is a Performance View of one example Instrument:
The Performance View, showing the Instrument’s controls.
KONTAKT PLAYER Getting Started – 39
Page 40

5 Troubleshooting
If the Instrument doesn’t seem to respond, there are a few things you can check to make
sure your MIDI and audio setups are working correctly.
In a rst step, you should try to determine whether the problem is related to the MIDI or the
audio part of the chain.
Observe the small MIDI jack icon next to the Midi Ch label in the Instrument Header:
The MIDI jack icon ashes on incoming MIDI data.
If it ashes when you press a key on your master keyboard, the Instrument correctly receives
the incoming MIDI data. In this case, check the following things:
•
If the peak level meters on the right side of the Instrument Header show some activity
when you press a key, the Instrument already generates sound (see picture below); if you
don’t hear anything, the signal gets lost somewhere between KONTAKT’s internal output
routing and your monitor speakers. Make sure your audio interface is turned on and that
you’re listening to the right output channels.
The level meters show the peak level of an Instrument's audio signal.
• If you’re using KONTAKT in stand-alone mode, make sure that you have correctly set up
your audio interface in the Options dialog. This process is explained in section 2.1.1 of
this guide.
• If you’re using KONTAKT as a plug-in, nd out whether your sequencer or DAW applica-
tion gets any audio signal back from KONTAKT by observing the application’s level meters.
If it doesn’t, you might have to congure KONTAKT’s audio routing to work with your
sequencer rst; this process is explained in the Outputs section chapter of the Reference
Manual.
KONTAKT PLAYER Getting Started – 40
Page 41

•
If the level meters in the Instrument Header show no sign of activity when you press a
key, open the On-Screen Keyboard by clicking on the button labeled Keyb in the Main
Control panel. On it, you should see a range of keys with a blue tint; this is the active key
range of the Instrument. Make sure the notes you play are within that range.
• If you still don’t hear anything despite the Instrument receiving your MIDI data, it might
be that this particular Instrument requires some other action in order to generate sound;
this may be the case with some specially scripted Instruments, or with Instruments that
offer some kind of expression control via continuous MIDI controllers. Refer to the documentation of your sample library or try out a different Instrument.
If the small icon next to the Midi Ch label doesn’t light up when you press a key on your mas-
ter keyboard, the Instrument is not receiving your MIDI data. Here are some possible solutions:
• Check whether your master keyboard is turned on and the MIDI or USB cable that con-
nects it to the computer is correctly plugged in.
•
Make sure the value displayed next to the Midi Ch label in the Instrument Header match-
es the port that your master keyboard is connected to, and the MIDI channel on which it
is sending data:
To be able to play an Instrument, its MIDI input port and channel have to be assigned correctly.
• The ports of your MIDI interface are designated with letters (starting with A), with each
port having 16 different channels. In a lot of cases, the correct channel will be A 1, which
is the default; however, it’s entirely possible that your master keyboard is connected to a
different MIDI port or sending on a different channel. In that case, click on the value
displayed here and select the right port and channel from the drop-down menu that appears.
•
If you’re using KONTAKT in stand-alone mode, make sure that your MIDI hardware options are correctly set in the Options dialog. This process is described in section 2.1.3 of
this guide.
•
If you’re using KONTAKT as a plug-in within your sequencer or DAW application, make
sure that the sequencer is congured to forward incoming MIDI data to your KONTAKT
instance. For this, you may have to put the respective instrument track into “record” or
“monitor” mode. Refer to the documentation of your sequencer to nd out how to set it
up for playing virtual instruments.
KONTAKT PLAYER Getting Started – 41
 Loading...