


Quick
US300EX
Wireless N
CONTENTS
English........................................................................................................................................... ............ |
1-1 |
French........................................................................................................................................................ |
2-1 |
Portuguese................................................................................................................................................ |
3-1 |
Spanish...................................................................................................................................................... |
4-1 |
Quick
US300EX
Wireless N

US300EX Lite II
The Quick Installation Guide will help you to install US300EX Lite II in your computer, including basic hardware and software installation, as well as configuration of wireless network availability.
A. Hardware Installation
There are two ways to install the Adapter:
1.Plug the Adapter directly to the USB port on your computer.
2.Connect the adapter and your computer through the USB cable attached in package. The LED will light up when the Adapter is installed successfully and the PC is on.
B. Software Installation
1. Insert the Resource CD into your CD-ROM drive, and open the folder with the same name as your product. Then double-click Setup.exe in the proper folder according to your operating system to start the installation,
Figure 1 will appear.
2. Follow the step-by-step instructions following in the continued prompted screens to complete InstallShield Wizard steps.
Note:
1) If Windows XP warns about Windows Logo testing, click Continue Anyway to continue the installation.
2) After the Installation, or
or will appear at the bottom of the screen in your system tray.
Otherwise, there may be some problems about the installation, please check it seriously.
C. Configure wireless connection in Windows XP with MSI Wireless Client Utility
The Adapter's tray icon  shows the signal strength using color and the received signal strength
indication (RSSI). If the icon is (green), a wireless connection has been established. If the icon
 is (black), there is no connection. Follow the steps below to launch a wireless connection manually.
1. Double click the icon , then the Wireless Utility will appear, you can also run the utility by clicking
Start |
Program |
Ralink |
wireless |
Ralink Wireless Utility. On the prompted configuration tab page,click the Profile Management, and |
|
you will see the next screen (Figure 2). |
|
|
1-1

US300EX Lite II
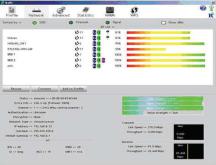 Figure 2.
2. Click Scan on the screen above, and you will see a new screen (shown in Figure 3), click Refresh, then the latest available Network will appear.
 Figure 3
3. In the screen above, highlight a network name and click Activate, then you will see the next screen (shown in Figure 4). Enter the Client Name and SSID, and you can connect to the network.
Figure 4
Note: If a well-balanced wireless network cannot be created, please refer to the User Guide on the Resource CD or your dealer for help.
D. Configure wireless connection in Windows XP with Windows XP Wireless Zero Configuration
1. To use Windows XP Wireless Zero Configuration, select Option Select Client Software… on the menu of
Utility shown in Figure 5.
1-2
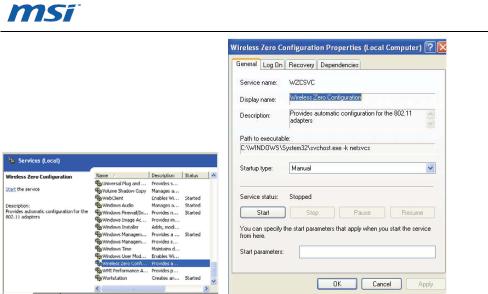
US300EX Lite II
Figure 5
3. Right-click the icon “  ”, and then select View Available Wireless Networks in the next screen (Figure
6). Figure 6
4. Then, Figure 7 will appear with many available wireless network choices. You can highlight a network and then click Connect to add to a network.
Note: If you have not installed SP2 for Windows XP, the screens below will not be available.
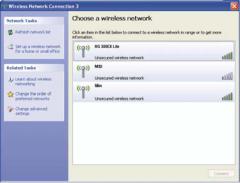 Figure 7
5. If the connection is finished, the icon will display like the next screen shown.
1-3

US300EX Lite II
 Figure 8
Note: If a well-balanced wireless network cannot be created, please ask your dealer for help.
E. WPS configuration
WPS function allows the Adapter to join a wireless network quickly.
If the wireless card supports Wi-Fi Protected Setup (WPS), you can establish a wireless connection between wireless card and router using either Push Button Configuration (PBC) method or PIN method.
Here we will introduce two ways to configure the WPS (For the configuration of WPS, here takes the Wireless Router of our company for example. For more ways of WPS
Configuration.
1. PBC (Push Button Configuration) method
1) Press the WPS button on the rear panel of the Router and released immediately.
Figure 9 Figure 10
Once the ‘figure 10’ image shown, choose the router name, above is ‘RG300EX LITE’ for example.
Press US300EX Lite II WPS button, the dongle would connect to router immediately, you could find the USB wifi card mac in the router connection page(figure10).
2. PIN method
1)Double click  icon, Figure 10 would shows up, you would see the Pin code from the right bar.
2)get pin code from the right colume.
3)input the PIN code to following page to
1-4
US300EX Lite II
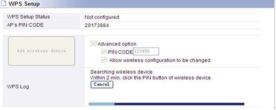 Figure 11
4) Go to wireless configuration, you would find the adapter information as following.
Figure12
COPYRIGHT & TRADEMARKS
Specifications are subject to change without notice. MSI is a registered trademark of Micro Star International Co., Ltd. Other brands and product names are trademarks or registered trademarks of their respective holders. No part of the specifications may be reproduced in any form or by any meansor used to make any derivative such as translation, transformation, or adaptation without permission from Micro Star International Co., Ltd. Copyright © 2006-2010 Micro-Star Int'l Co., Ltd. All rights reserved.
1-5
 Loading...