


3
IMPORTANT SAFETY INSTRUCTIONS
WARNING - WHEN USING ELECTRIC PRODUCTS, THESE BASIC PRECAUTIONS SHOULD ALWAYS BE FOLLOWED:
1.Read all the instructions before using the product.
2.Do not use this product near water - for example, near a bathtub, washbowl, kitchen sink, in a wet basement, or near a swimming pool or the like.
3.This product, in combination with an amplifier and headphones or speakers, may be capable of producing sound levels that could cause permanent hearing loss. Do not operate for a long period of time at a high volume level or at a level that is uncomfortable.
4.The product should be located so that its location does not interfere with its proper ventilation.
5.The product should be located away from heat sources such as radiators, heat registers, or other products that produce heat. No naked flame sources (such as candles, lighters, etc.) should be placed near this product. Do not operate in direct sunlight.
6.The product should be connected to a power supply only of the type described in the operating instructions or as marked on the product.
7.The power supply cord of the product should be unplugged from the outlet when left unused for a long period of time or during lightning storms.
8.Care should be taken so that objects do not fall and liquids are not spilled into the enclosure through openings.
There are no user serviceable parts inside. Refer all servicing to qualified personnel only.
NOTE: This equipment has been tested and found to comply with the limits for a Class B digital device, pursuant to Part 15 of the FCC rules. These limits are designed to provide reasonable protection against harmful interference in a residential installation. This equipment generates, uses, and can radiate radio frequency energy and, if not installed and used in accordance with the instructions, may cause harmful interference to radio communications. However, there is no guarantee that interference will not occur in a particular installation. If this equipment does cause harmful interference to radio or television reception, which can be determined by turning the equipment off and on, the user is encouraged to try to correct the interference by one or more of the following measures:
—Reorient or relocate the receiving antenna.
—Increase the separation between the equipment and receiver.
—Connect the equipment to an outlet on a circuit different from that to which the receiver is connected. —Consult the dealer or an experienced radio/TV technician for help.
CAUTION: Please note that any changes or modifications made to this product not expressly approved by Moog Music Inc. could void the user’s authority granted by the FCC to operate the equipment.
TABLE OF CONTENTS
06 UNPACKING & INSPECTION
06 SETUP & CONNECTIONS
07 DFAM OVERVIEW
07 Signal Flow
08 Exploring The DFAM
13 PANEL CONTROLS & FUNCTIONS
13 Voltage Controlled Oscillators
16Mixer
17Voltage Controlled Filter
20 Voltage Controlled Amplifier
22 Analog 8-Step Sequencer
24 Patchbay
30SYNCING MULTIPLE DFAMS
31SYNCING DFAM WITH A MOTHER-32
32USING DFAM AS A EURORACK MODULE
33PRESETS & PATCH SHEETS
40SPECIFICATIONS & ACCESSORIES
41SERVICE & SUPPORT INFORMATION
UNPACKING AND INSPECTION
Be careful when unpacking your new Drummer From Another Mother so that nothing is lost or damaged. We recommend saving the carton and all packing materials in case you ever need to ship the instrument for any reason.
The Moog DFAM ships with the following items:
1.DFAM Semi-Modular Analog Percussion Synthesizer
2.Power Supply
3.Owner’s Manual
4.Overlays
5.Patch Cables
6.Registration Card
What you will need:
1.Headphones with a 1/4" TRS plug, or a 1/4" TS instrument cable and an amplified speaker.
2.A properly wired AC outlet.
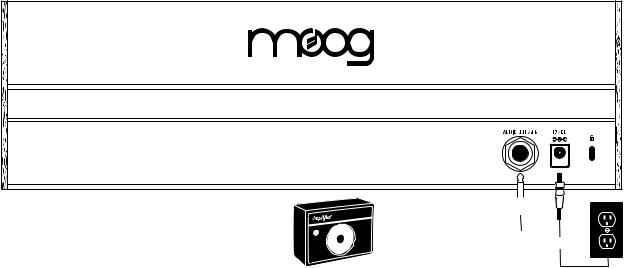
SETUP AND CONNECTIONS
POWER |
|
|
|
|
|
|
|
|
|
|
|
|
|
||
|
|
|
|
|
|
||
|
|
|
|
|
|
||
|
|
|
|
|
|
||
|
|
|
|
|
|
||
Amplifier Or Headphones |
|
|
|
|
|
||
|
|
|
|
|
|
|
|
Plug the included power adapter into |
|
Power |
Supply |
||||
|
|
||||||
|
|
||||||
the 12VDC power jack on the back of |
|
|
|||||
|
|
|
|
|
|
||
your DFAM. The universal power supply will |
|
|
|
|
|
|
|
operate with a power source from 100 to 240 Volts AC, 50/60Hz. |
|
|
|
|
|
|
|
Plug the other end of the included power adapter into an AC outlet. |
|
|
|
|
|||
NOTE: There is no power switch on your DFAM. Once connected to the power supply, the unit is ON. Your DFAM is an all-analog instrument and should be allowed a few minutes to warm up before use. In cases where it has been left in a cold car overnight, for example, it may take even longer for the oscillator tuning to stabilize. Do not operate your DFAM in direct sunlight.
AUDIO OUT / 
With the Master VOLUME knob turned all the way down, plug one end of a 1/4" TS instrument cable into the AUDIO OUT jack on the rear panel. Then plug the other end into an amplified speaker or mixing console input. This jack can also be used with a set of mono or stereo headphones.
WARNING: Do not use a TRS (balanced) cable for line output applications as this will cause phase cancellation and a very weak signal.
6

DFAM OVERVIEW
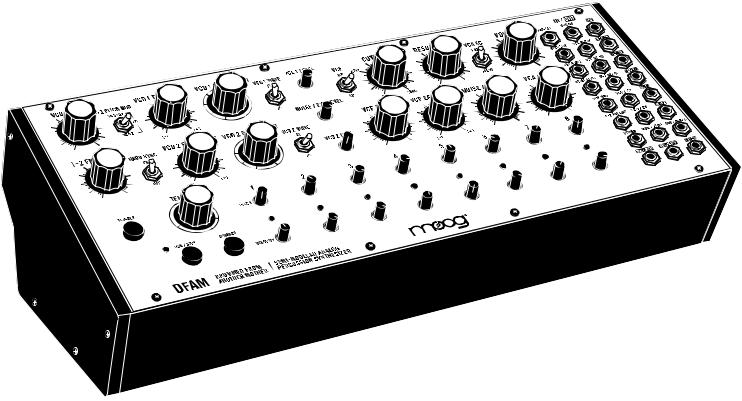
Your new Drummer From Another Mother (DFAM) is a highly-interactive, Semi-Modular Analog Percussion Synthesizer and a vibrant deviation from the traditional drum machine. As an addition to the Mother-32 family of Semi-Modular Analog Synthesizers, DFAM presents a uniquely expressive hands-on approach to percussive pattern creation.
SOUND SOURCES |
SOUND BLENDING |
SOUND SHAPING |
Two Voltage Controlled Oscillators |
3-Channel Mixer |
Selectable 4-pole Low Pass |
and a White Noise Generator |
|
or High Pass Ladder Filter |
MODULATION |
SEQUENCING |
PATCHING |
3 Envelope Generators with |
8-Step Analog Sequencer with |
24-point Modular Patchbay |
Voltage Controlled Decay |
Variable Pitch and Velocity per step |
with 15 inputs and 9 outputs |
DFAM SIGNAL FLOW
VCO 1 |
|
RESONANCE |
|
FREQ |
|
|
|
|
|
|
|
VCO 1 |
|
|
|
CV |
|
|
|
VCO 1 |
VCO 1 |
VCF |
VCA |
OUT |
|||
SEQ |
|
|
|
PITCH |
VCO 1 |
|
|
MOD |
|
|
|
LEVEL |
|
|
|
|
|
|
VCA OUT


 VOLUME
HP/LINE OUT
VCO 1 |
|
|
EXT |
|
|
|
|
VCA |
|
|
|
|
AUDIO |
|
|
|
|
|
|||
EG |
|
|
|
|
|
|
CV |
|
||
|
|
IN |
|
|
|
|
|
|
||
AMT |
+/- |
|
NOISE/ |
MIX |
|
HIGH |
|
|
|
|
|
|
|
|
EXT |
|
PASS |
|
|
|
|
|
|
|
|
LEVEL |
|
|
|
|
||
|
|
WHITE |
VCA |
|
|
|
|
FAST |
|
|
|
|
|
|
|
|
|
|
|||
|
|
NOISE |
|
|
|
|
LOW |
|
|
VCA |
|
|
|
|
NOISE/ |
|
|
PASS |
|
|
EG |
|
|
|
|
|
|
|
|
|
|
|
|
|
|
|
EXT |
|
|
|
|
SLOW |
|
|
|
|
|
LEVEL |
|
|
|
|
|
|
|
|
|
|
|
VCF |
CUT- |
|
|
|
|
|
|
|
|
|
|
|
|
|
||
|
HARD |
|
|
NOISE/ |
|
MOD |
OFF |
|
|
|
|
SYNC |
|
|
|
|
|
|
|
|
|
|
|
|
|
EXT |
|
|
|
|
|
|
|
|
|
|
CV |
|
|
VCF |
|
|
|
|
VC0 2 |
|
|
|
|
|
EG |
|
|
|
|
FREQ |
|
|
|
|
|
AMT |
+/- |
|
|
|
|
|
|
|
VCO 2 |
|
|
|
|
|
|
|
|
|
|
LEVEL |
|
|
|
|
|
|
VCO 2 |
|
|
|
|
|
|
|
|
|
|
CV |
|
|
|
|
|
|
|
|
|
|
|
|
VCO 2 |
VCO 2 |
VCF |
|
|
DECAY |
|
|
|
|
|
OUT |
EG |
|
|
|
|||
|
|
|
|
|
|
|
|
|||
|
SEQ |
|
|
|
|
|
|
|
|
|
|
PITCH |
|
|
|
|
|
|
|
|
EG |
|
MOD |
|
|
|
|
|
|
|
|
|
|
|
|
|
|
|
|
|
|
AMT |
|
|
|
|
|
|
|
|
AMPLITUDE |
DECAY |
||
|
|
|
|
|
|
|
|
|||
|
VCO 2 |
|
|
|
|
|
DETERMINED |
CV IN |
|
|
|
|
|
|
|
|
BY VELOCITY |
|
|
||
|
EG |
|
FM |
|
|
|
|
|
||
|
|
|
|
|
|
|
|
EG |
||
|
AMT |
+/- |
VCA |
|
|
|
SEQ |
|
|
|
|
|
|
|
|
|
|
|
OUT |
||
|
|
|
|
|
|
|
|
|
||
|
|
|
|
|
|
|
VELOCITY |
|
|
|
|
|
1 |
2 |
|
|
|
|
|
|
|
|
|
|
FM |
|
|
|
|
|
|
|
|
|
AMT |
|
|
|
|
|
|
|
|
|
|
|
FM |
|
|
|
SEQ |
|
|
|
SEQ |
VCO |
AMT |
|
|
|
|
|
|
||
PITCH |
EG |
|
CV |
|
|
|
TRIGGER |
|
|
|
7
EXPLORING THE DFAM
This hands-on tour of your DFAM will give you a basic foundation with which visceral rhythms can be synthesized. There are loads of tips, tricks and patching suggestions contained within this manual, but if you want to just jump to making cool sounds – go to page 33.
DEFAULT SETTINGS
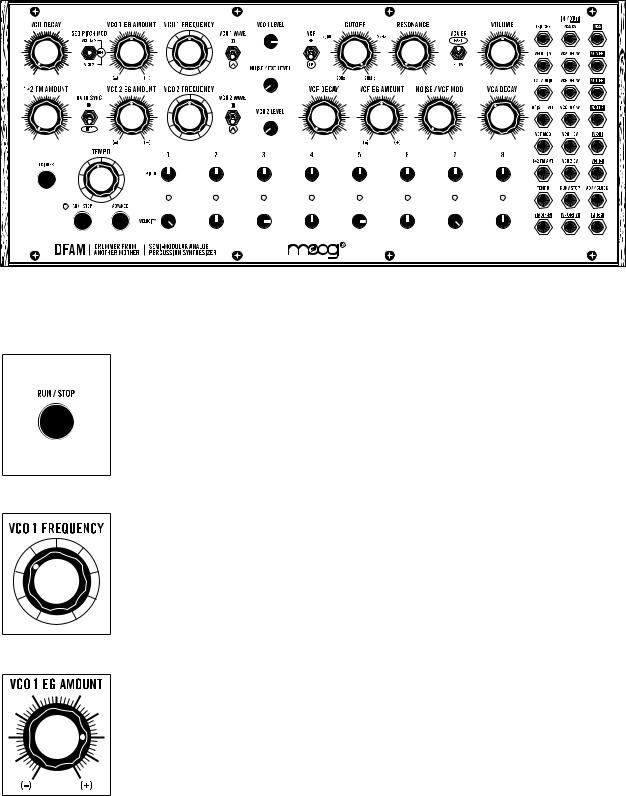
Start by setting your DFAM to the Default settings shown above.
START THE SEQUENCER
Push the RUN / STOP button to start the Sequencer.
SET THE PITCH
Turn the VCO 1 FREQUENCY knob slowly to the left until you hear a nice, deep bass note repeating (Somewhere between 10 and 11 O’clock). This is how you set the starting pitch for an Oscillator.
NOTE: DFAM has two Oscillators, which are its primary sources of sound. It has a White Noise Generator too, but we’ll get to that later.
ADDING PUNCH
Now, let’s add some punch to that bass note. Turn up the VCO 1 EG AMOUNT knob to 3 O’clock. This adds Envelope Modulation to the Pitch of Oscillator 1.
8
EXPLORING THE DFAM (Continued)
GET THE PITCH JUMPING
The VCO DECAY knob is going to add some more motion to the pitch of the note. It works in conjunction with the position of the VCO EG AMOUNT knobs. Try turning the VCO DECAY knob up slowly and listen to how it affects the sound. When you’re done experimenting, set this knob to 9 O’clock.
TIP: The VCO EG AMOUNT knob plays an extremely important role in how the DFAM sounds and behaves. It is the difference between a silly sound and a slamming kick drum. Take some time to rotate the VCO 1 EG AMOUNT knob and
listen to how it changes the character of a sound. When you are done, be sure to set it back to 3 O’clock.
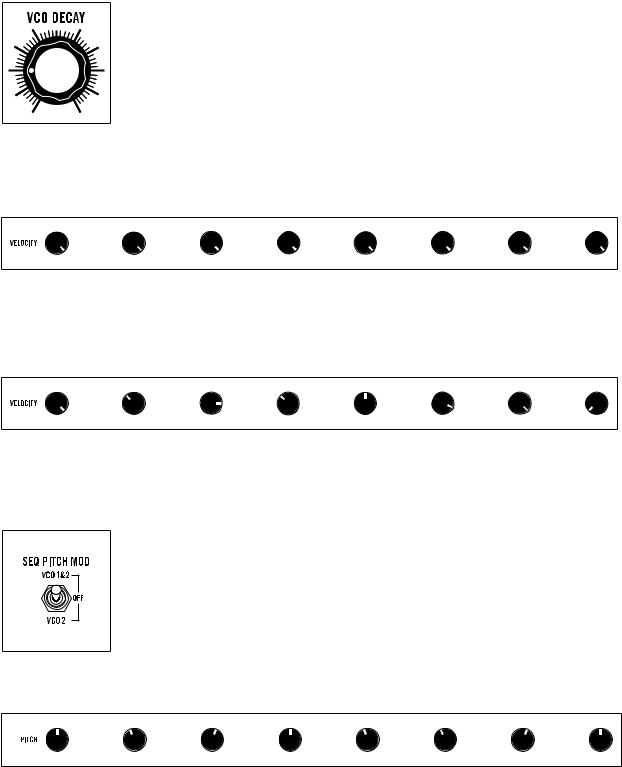
SEQUENCER VELOCITY
Turn all 8 Sequencer VELOCITY knobs to their maximum position. Notice how every hit now sounds the same.
RHYTHMIC VARIATION
Make some adjustments to all 8 of the Sequencer VELOCITY knobs and listen to how they affect both the volume and punch of the sound. They also have an enormous impact on the rhythm and feel of a sequence. Once you have a rhythm you are happy with, go to the next step.
SEQUENCING PITCH
It’s time to start using the Sequencer to control the pitch of your bass note. Move the SEQ PITCH MOD switch to the VCO 1&2 position. You should now be hearing subtle variations in pitch for each step of the sequence.
PITCH VARIATION
Make very small adjustments to all 8 of the Sequencer PITCH knobs and listen to how they affect the sound. These knobs have an extremely wide range, which will become very handy as you experiment with your DFAM over time.
TIP: If the notes your DFAM is playing have too much punch, try gently turning the VCO 1 EG AMOUNT knob toward the center until you like what you hear.
9

EXPLORING THE DFAM (Continued)
CHANGING THE WAVEFORMS
Let’s change up the sound. Set the VCO 1 WAVE switch to the SQUARE wave position and listen to how it affects the sound.
ADDING AN OSCILLATOR
Turn the VCO 2 LEVEL knob all the way up.
CREATING HARMONY
Turn the VCO 2 FREQUENCY knob to the right until it sounds in tune with
VCO 1 FREQUENCY.
HARD SYNC
Set the HARD SYNC switch to ON.
LISTENING TO HARD SYNC
Now grab the VCO 2 FREQUENCY knob and turn it all the way up and down a few times. Notice that the pitch of Oscillator 2 stays directly related to the pitch of Oscillator 1 when HARD SYNC is ON.
NOTE: Because of the way that HARD SYNC works when it is ON, if the
Frequency of Oscillator 2 goes below the Frequency of Oscillator 1, little to no sound will be output.
PICK A SOUND
Set the VCO 2 FREQUENCY knob to a place that makes a sound you like and then go to the next step.
10
EXPLORING THE DFAM (Continued)
EXPLORING FM
Gently turn the 1 2 FM AMOUNT knob to 12 the sound is changing. You are now shaking Oscillator 2 with Oscillator 1.
O’clock and listen to how or “modulating” the pitch of
Take a moment to experiment with how the 1 2 FM AMOUNT knob and the VCO 2 FREQUENCY knob interact with each other. Feel free to adjust these controls individually or at the same time. A lot of sounds can be created from here.
NOTE: FM is much more noticeable when HARD SYNC is set to OFF.
When you find a sound you really like, leave it where it is and we’ll shape it further.
FILTERING SOUND
Set the Filter CUTOFF knob to 11 O’clock. Notice that the sound is now dark and flat.
FILTER MODULATION
Slowly increase the VCF EG AMOUNT knob to 3 O’clock. This is adding Envelope Modulation to the Filter Cutoff Frequency.
FILTER ARTICULATION
The VCF DECAY knob will add a lot more motion to the timbre of this sound. Try turning it up slowly and listen to how it affects the articulation of each step in the sequence.
TIP: Adding a little RESONANCE will lighten the low end and give the Filter more of a peak.
When you’re done experimenting, set the VCF DECAY knob to 10 O’clock.
NOISE AS A SOUND SOURCE
Turn the NOISE / EXT LEVEL knob to 1 O’clock. Adding a little noise as a sound source to a percussive sound will give it a more natural attack and can also create greater sonic depth.
11

EXPLORING THE DFAM (Continued)
NOISE AS A MODULATION SOURCE
Now slowly turn the NOISE / VCF MOD knob all the way up. Notice the difference when Noise is used as a Modulation Source for the Filter. Instead of creating depth, it makes the sound seem distorted or lo-fi.
SET THE NOISE MODULATION
Set the NOISE / VCF MOD knob to 9 O’clock.
SHORTENING VCA DECAY
Turn the VCA DECAY knob to 10 O’clock and listen to how the sound tightens up. This is because the natural Decay tails are being chopped off by the VCA, which is essentially a dynamic volume control.
EXTENDING THE VCA DECAY
Turn the VCA DECAY knob to 1 O’clock and listen to how the sound opens up. This is because the natural Decay tails are allowed to pass through.
SOFTENING THE ATTACK
Set the VCA EG switch to SLOW and turn the VCA DECAY knob between 9 and 10 O’clock. Listen to how it softens the attack of the sound.
NOTE: Shorter VCA DECAY settings will result in more dramatic results when the VCA EG switch is set to SLOW.
This concludes our walkthrough.
REMEMBER: Experimentation and learning will reward you with a lifetime of rich synthesizer experiences.
12

PANEL CONTROLS & FUNCTIONS
VOLTAGE CONTROLLED OSCILLATORS (VCO)
In an analog synthesizer, oscillators are the primary source of sound. Your Drummer From Another Mother contains two Voltage Controlled Oscillators, also referred to as VCOs.
VCO 1 FREQUENCY / VCO 2 FREQUENCY
The VCO FREQUENCY knobs specify the starting Pitch of each Oscillator over a ten-octave range. With no modulation applied, these Oscillators will track pitch accurately over multiple octaves, allowing your DFAM to be utilized for a wide range of musical applications beyond percussive sounds alone.
From the panel, the Pitch of Oscillator 1 and Oscillator 2 can be modified in 3 ways:
1.With the VCO FREQUENCY knobs
2.With the Sequencer PITCH 1-8 knobs (See page 22)
3.With the VCO EG AMOUNT knobs (See page 16)
TIP: We recommend starting with both VCO FREQUENCY knobs at their center position. This setting is the equal to the center position of the Sequencer
PITCH 1-8 knobs.
WARNING: Because there are multiple ways to effect the Pitch of the Oscillators, it is possible for them to extend beyond the range of human hearing. If your DFAM stops making sound, this may be the case. Start by checking the patchbay as a
wrong patch is the most common cause of muted sound. Then, return both VCO FREQUENCY knobs to their center position. If this does not resolve the issue, set both VCO EG AMOUNT knobs to their center position. If this has not resolved the issue, set the SEQ PITCH MOD switch to OFF. If this still does not resolve the issue, we recommend going back to the Default settings found on page 8.
VCO 1 WAVE / VCO 2 WAVE
Each Oscillator contains two selectable Waveforms, each with a distinctly different sound or timbre. The VCO WAVE switch is used to select between the two.
TRIANGLE
The Triangle wave is a very smooth and “warm” sounding waveform consisting of odd-numbered harmonics only. Its fundamental is very strong, and its overtones are very weak, making it less harmonically complex than other waveforms. The Triangle wave is useful for crafting organic percussion sounds like toms or marimbas, and also for recreating classic analog drum sounds.
TIP: Adding little bit of Noise as a sound source via the NOISE / EXT LEVEL knob in the Mixer is a great way to mimic classic ‘80s percussion sounds.
SQUARE
The Square wave provides more harmonic content and a much fuller or more aggressive sound than the Triangle wave. Its basic timbre is rich, but somewhat hollow due to the lack of even-numbered harmonics. The Square wave is useful for creating deep, hard-hitting bass sounds and for adding metallic characteristics to higher pitched FM sounds.
TIP: Use the Filter CUTOFF knob to shape Square wave sounds and to create more impactful percussive timbres.
13
OSCILLATOR INTERACTION
DFAM’s Oscillators can interact with each other to provide new timbres and to create new sounds. HARD SYNC and FM are both useful tools that can be utilized individually or at the same time.
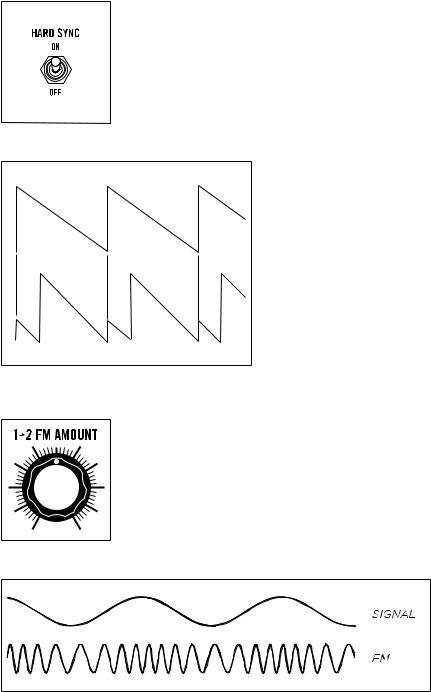
HARD SYNC
When set to ON, HARD SYNC forces the phase of Oscillator 2 to match — or to be in sync with — the phase of Oscillator 1. This forced synchronization causes the waveform of Oscillator 2 to take on a more complex waveshape as it works to stay aligned with Oscillator 1. This is useful for creating sharp, metallic, and flange-like sounds while also ensuring that the pitch of Oscillator 2 stays locked to Oscillator 1.
MASTER OSCILLATOR
HARD SYNC’D OSCILLATOR
TIP: With the HARD SYNC switch set to ON, turn the VCO 2 FREQUENCY knob and listen. Notice that it has an effect on the timbre of Oscillator 2, while maintaining a synchronized pitch with Oscillator 1.
NOTE: When the HARD SYNC switch is set to ON and the Frequency of Oscillator 2 is set below the Frequency of Oscillator 1, Oscillator 2 may be unable to complete
a wave cycle before resetting to match the phase of
Oscillator 1. In this case, Oscillator 2 may have little or no output. This is especially the case with Square waveforms.
1 2 FM AMOUNT (FREQUENCY MODULATION)
A common application of modulation is pitch vibrato. This occurs when a Low Frequency Oscillator (LFO) is used to smoothly vary the pitch of an audio oscillator up and down. If the frequency of that LFO is increased enough, the pitch of the audio oscillator is being moved up and down just as before, but at an extremely fast rate. This creates new sidebands and other harmonics not present in either of the original signals.
The sonic characteristics of FM are highly dependant on the pitch of both Oscillator 1 and Oscillator 2. Depending on the settings, the sound of FM can be described as complex, springy, bell-like, or aggressive.
Turning the 1 2 FM AMOUNT knob to the right will gradually increase the amount by which the Frequency of Oscillator 2 is being modulated by Oscillator 1.
TIP: Slowly turn the 1 2 FM AMOUNT knob to the right and listen to how it affects the sound. Now try adjusting the VCO FREQUENCY knobs and listen to how they interact with each other.
14
 Loading...