

Page 1
Operating instructions
Ovens and cookers
H 370-2, H 380-2
H 373-2, H 383-2, H 390-2
To avoid the risk of accidents
or damage to the appliance it is
essential to read these operating
instructions before it is installed or
used for the first time.
GiZWO
M.-Nr. 05 850 170
Page 2

Contents
Description of the appliance. . . . . . . . . . . . . . . . . . . . . . . . . . . . . . . . . . . . . . . . . 5
Features . . . . . . . . . . . . . . . . . . . . . . . . . . . . . . . . . . . . . . . . . . . . . . . . . . . . . . . . . . 7
Accessories . . . . . . . . . . . . . . . . . . . . . . . . . . . . . . . . . . . . . . . . . . . . . . . . . . . . . . . 8
Baking tray, grill pan and rack . . . . . . . . . . . . . . . . . . . . . . . . . . . . . . . . . . . . . . 8
Roasting filter . . . . . . . . . . . . . . . . . . . . . . . . . . . . . . . . . . . . . . . . . . . . . . . . . . . 8
Roast probe . . . . . . . . . . . . . . . . . . . . . . . . . . . . . . . . . . . . . . . . . . . . . . . . . . . . 9
Anti-splash tray. . . . . . . . . . . . . . . . . . . . . . . . . . . . . . . . . . . . . . . . . . . . . . . . . . 9
Telescopic carriage . . . . . . . . . . . . . . . . . . . . . . . . . . . . . . . . . . . . . . . . . . . . . . 9
Handle . . . . . . . . . . . . . . . . . . . . . . . . . . . . . . . . . . . . . . . . . . . . . . . . . . . . . . . 10
Lever. . . . . . . . . . . . . . . . . . . . . . . . . . . . . . . . . . . . . . . . . . . . . . . . . . . . . . . . . 10
Catalyser. . . . . . . . . . . . . . . . . . . . . . . . . . . . . . . . . . . . . . . . . . . . . . . . . . . . . . 10
Energy efficiency rating according to EN 50304. . . . . . . . . . . . . . . . . . . . . . . . . . 10
Caring for the environment . . . . . . . . . . . . . . . . . . . . . . . . . . . . . . . . . . . . . . . . . 11
Warning and Safety instructions . . . . . . . . . . . . . . . . . . . . . . . . . . . . . . . . . . . . 12
Safety feature . . . . . . . . . . . . . . . . . . . . . . . . . . . . . . . . . . . . . . . . . . . . . . . . . . . . 17
Safety cut-out. . . . . . . . . . . . . . . . . . . . . . . . . . . . . . . . . . . . . . . . . . . . . . . . . . . . . 17
Before using for the first time. . . . . . . . . . . . . . . . . . . . . . . . . . . . . . . . . . . . . . . 18
Setting the clock . . . . . . . . . . . . . . . . . . . . . . . . . . . . . . . . . . . . . . . . . . . . . . . . . . 18
Switching on the catalyser. . . . . . . . . . . . . . . . . . . . . . . . . . . . . . . . . . . . . . . . . . . 19
Cleaning the appliance . . . . . . . . . . . . . . . . . . . . . . . . . . . . . . . . . . . . . . . . . . . . . 19
Description of the oven systems . . . . . . . . . . . . . . . . . . . . . . . . . . . . . . . . . . . . 20
Oven - use. . . . . . . . . . . . . . . . . . . . . . . . . . . . . . . . . . . . . . . . . . . . . . . . . . . . . . . 22
Controls . . . . . . . . . . . . . . . . . . . . . . . . . . . . . . . . . . . . . . . . . . . . . . . . . . . . . . . . . 22
Function selector . . . . . . . . . . . . . . . . . . . . . . . . . . . . . . . . . . . . . . . . . . . . . . . 22
Temperature and Timer buttons . . . . . . . . . . . . . . . . . . . . . . . . . . . . . . . . . . . . 22
"–" and "+" buttons with indicator light . . . . . . . . . . . . . . . . . . . . . . . . . . . . . . . 22
Selecting an oven setting . . . . . . . . . . . . . . . . . . . . . . . . . . . . . . . . . . . . . . . . . . . 23
Recommended temperature . . . . . . . . . . . . . . . . . . . . . . . . . . . . . . . . . . . . . . . . . 24
Using the oven. . . . . . . . . . . . . . . . . . . . . . . . . . . . . . . . . . . . . . . . . . . . . . . . . . . . 25
Altering the temperature. . . . . . . . . . . . . . . . . . . . . . . . . . . . . . . . . . . . . . . . . . 25
Entering your own recommended temperature . . . . . . . . . . . . . . . . . . . . . . . . 26
Rapid heat-up . . . . . . . . . . . . . . . . . . . . . . . . . . . . . . . . . . . . . . . . . . . . . . . . . . . . 26
To switch off "rapid heat-up" . . . . . . . . . . . . . . . . . . . . . . . . . . . . . . . . . . . . . . . 27
Pre-heating the oven . . . . . . . . . . . . . . . . . . . . . . . . . . . . . . . . . . . . . . . . . . . . . . . 27
Energy-save function . . . . . . . . . . . . . . . . . . . . . . . . . . . . . . . . . . . . . . . . . . . . . . . 28
Oven lighting . . . . . . . . . . . . . . . . . . . . . . . . . . . . . . . . . . . . . . . . . . . . . . . . . . . . . 28
Night dimming . . . . . . . . . . . . . . . . . . . . . . . . . . . . . . . . . . . . . . . . . . . . . . . . . . . . 28
2
Page 3

Contents
Setting the minute minder. . . . . . . . . . . . . . . . . . . . . . . . . . . . . . . . . . . . . . . . . . 29
Altering oven settings . . . . . . . . . . . . . . . . . . . . . . . . . . . . . . . . . . . . . . . . . . . . . 30
Using the clock / timer. . . . . . . . . . . . . . . . . . . . . . . . . . . . . . . . . . . . . . . . . . . . . 33
Functions . . . . . . . . . . . . . . . . . . . . . . . . . . . . . . . . . . . . . . . . . . . . . . . . . . . . . . . . 33
Timer buttons . . . . . . . . . . . . . . . . . . . . . . . . . . . . . . . . . . . . . . . . . . . . . . . . . . 33
"–" and "+" buttons with indicator light . . . . . . . . . . . . . . . . . . . . . . . . . . . . . . . 33
Using the oven . . . . . . . . . . . . . . . . . . . . . . . . . . . . . . . . . . . . . . . . . . . . . . . . . 34
Setting the clock . . . . . . . . . . . . . . . . . . . . . . . . . . . . . . . . . . . . . . . . . . . . . . . . . . 34
Switching the time of day display on and off. . . . . . . . . . . . . . . . . . . . . . . . . . . . 35
Programming cooking times . . . . . . . . . . . . . . . . . . . . . . . . . . . . . . . . . . . . . . . . . 35
Programming cooking time in the oven . . . . . . . . . . . . . . . . . . . . . . . . . . . . . . 35
Programming hob zone cooking times. . . . . . . . . . . . . . . . . . . . . . . . . . . . . . . 36
Switching the cooking process off automatically. . . . . . . . . . . . . . . . . . . . . . . . . . 37
Switching on and off automatically . . . . . . . . . . . . . . . . . . . . . . . . . . . . . . . . . . . . 38
To set the End time . . . . . . . . . . . . . . . . . . . . . . . . . . . . . . . . . . . . . . . . . . . . . . 38
Checking, altering times or cancelling times entered . . . . . . . . . . . . . . . . . . . . . . 39
Baking . . . . . . . . . . . . . . . . . . . . . . . . . . . . . . . . . . . . . . . . . . . . . . . . . . . . . . . . . . 40
Baking chart . . . . . . . . . . . . . . . . . . . . . . . . . . . . . . . . . . . . . . . . . . . . . . . . . . . . . 42
Roasting . . . . . . . . . . . . . . . . . . . . . . . . . . . . . . . . . . . . . . . . . . . . . . . . . . . . . . . . 44
Roasting with the Roast Probe. . . . . . . . . . . . . . . . . . . . . . . . . . . . . . . . . . . . . . 46
Roasting chart . . . . . . . . . . . . . . . . . . . . . . . . . . . . . . . . . . . . . . . . . . . . . . . . . . . 50
Grilling . . . . . . . . . . . . . . . . . . . . . . . . . . . . . . . . . . . . . . . . . . . . . . . . . . . . . . . . . 51
Grill chart . . . . . . . . . . . . . . . . . . . . . . . . . . . . . . . . . . . . . . . . . . . . . . . . . . . . . . . 54
Rotisserie Chart . . . . . . . . . . . . . . . . . . . . . . . . . . . . . . . . . . . . . . . . . . . . . . . . . . 55
Defrosting . . . . . . . . . . . . . . . . . . . . . . . . . . . . . . . . . . . . . . . . . . . . . . . . . . . . . . . 56
Cleaning and care . . . . . . . . . . . . . . . . . . . . . . . . . . . . . . . . . . . . . . . . . . . . . . . . 57
Appliance front and control panel . . . . . . . . . . . . . . . . . . . . . . . . . . . . . . . . . . . . . 57
Accessories . . . . . . . . . . . . . . . . . . . . . . . . . . . . . . . . . . . . . . . . . . . . . . . . . . . . . . 59
PerfectClean . . . . . . . . . . . . . . . . . . . . . . . . . . . . . . . . . . . . . . . . . . . . . . . . . . . . . 60
Catalytic enamel surfaces . . . . . . . . . . . . . . . . . . . . . . . . . . . . . . . . . . . . . . . . . . . 62
To remove the oven door . . . . . . . . . . . . . . . . . . . . . . . . . . . . . . . . . . . . . . . . . 64
To remove the telescopic carriage . . . . . . . . . . . . . . . . . . . . . . . . . . . . . . . . . . 65
To remove the runners . . . . . . . . . . . . . . . . . . . . . . . . . . . . . . . . . . . . . . . . . . . 66
To lower the upper heating element . . . . . . . . . . . . . . . . . . . . . . . . . . . . . . . . . 66
To remove the catalytic enamelled back panel, side liners (if fitted) and roof
liner . . . . . . . . . . . . . . . . . . . . . . . . . . . . . . . . . . . . . . . . . . . . . . . . . . . . . . . . . . 67
3
Page 4

Contents
Correcting minor faults . . . . . . . . . . . . . . . . . . . . . . . . . . . . . . . . . . . . . . . . . . . . 69
After sales service . . . . . . . . . . . . . . . . . . . . . . . . . . . . . . . . . . . . . . . . . . . . . . . . 74
Extra accessories . . . . . . . . . . . . . . . . . . . . . . . . . . . . . . . . . . . . . . . . . . . . . . . . 75
Electrical connection UK, IRL, ZA . . . . . . . . . . . . . . . . . . . . . . . . . . . . . . . . . . . 77
Electrical connection AUS, NZ . . . . . . . . . . . . . . . . . . . . . . . . . . . . . . . . . . . . . . 79
Installation - cooker and hob control unit . . . . . . . . . . . . . . . . . . . . . . . . . . . . . 80
Installing the oven . . . . . . . . . . . . . . . . . . . . . . . . . . . . . . . . . . . . . . . . . . . . . . . . 84
Important Note: H 390 . . . . . . . . . . . . . . . . . . . . . . . . . . . . . . . . . . . . . . . . . . . . . . 86
4
Page 5
Description of the appliance
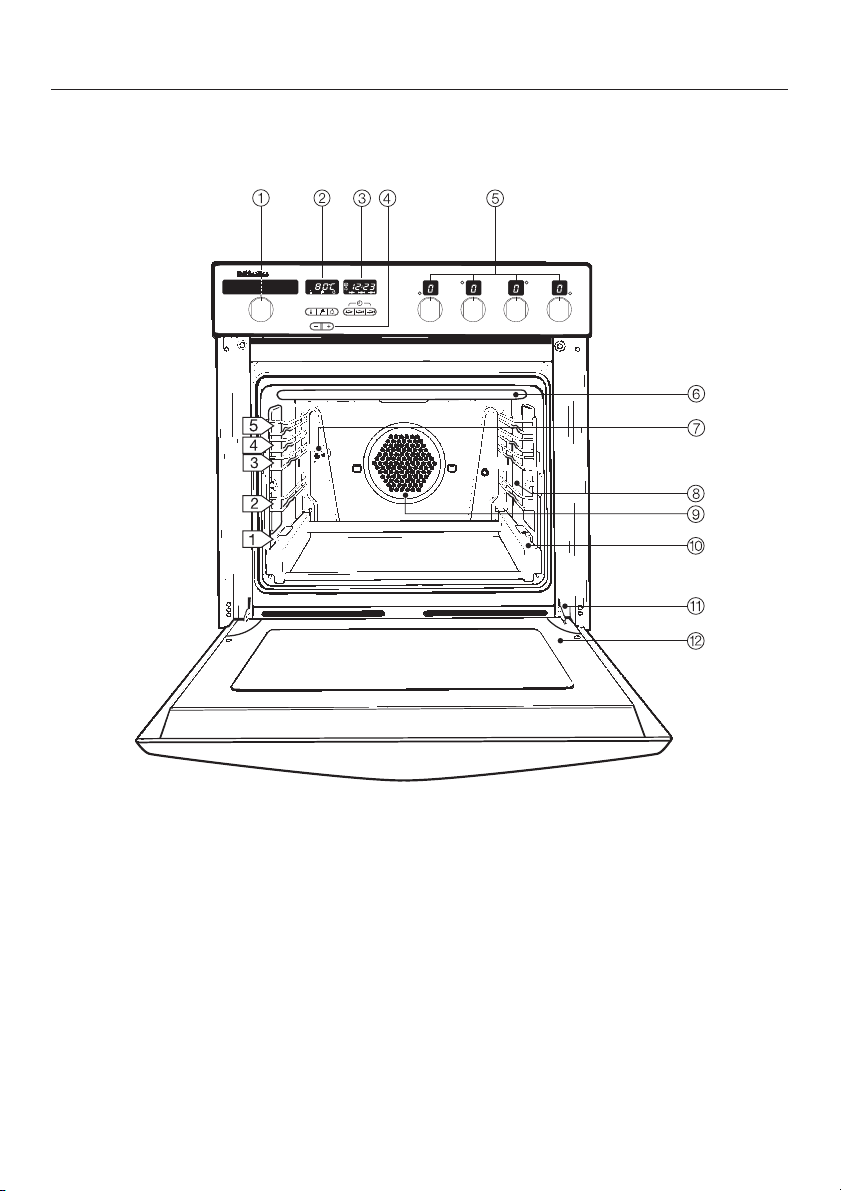
General view - "E"Model cooker with hob controls
Control panel *
a Oven function selector
b Oven: display and pushbuttons
c Timer: display and pushbuttons
d "+/–" Button with indicator light
e Hob zone controls *
* depending on model
Oven interior
f Heating element for top heat and
grilling with roof liner
g Grill motor *
h Connection socket for core tempera
ture probe (roast probe) *
i Air inlet for fan
j Telescopic carriage/Runner heights
1, 2, 3, 4, 5 *
k Door contact switch
l Oven door
-
5
Page 6
Description of the appliance
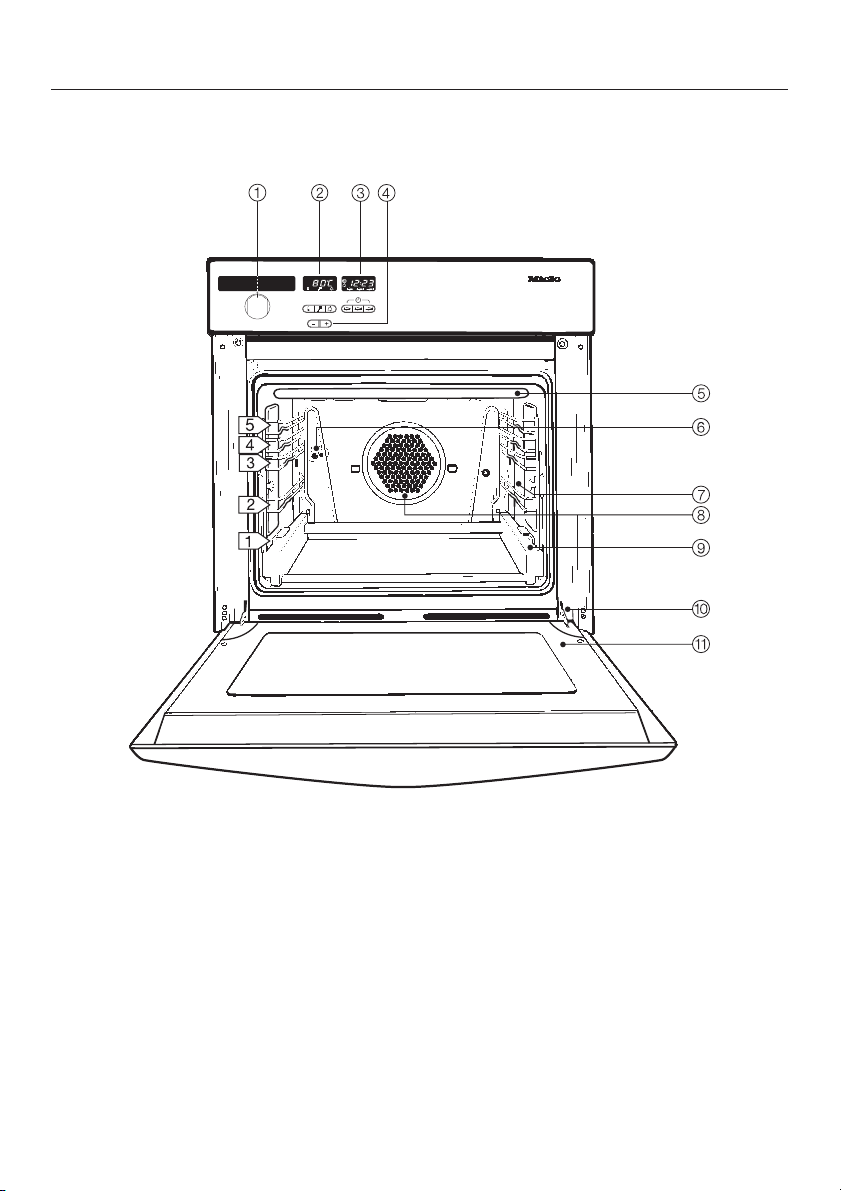
General view - "B" Model oven only
Control panel *
a Oven function selector
b Oven: display and pushbuttons
c Timer: display and pushbuttons
d "+/–" Button with indicator light
* depending on model
6
Oven interior
e Heating element for top heat and
grilling with roof liner
f Grill motor *
g Connection socket for core tempera
ture probe (roast probe) *
h Air inlet for fan
i Telescopic carriage/Runner heights
1, 2, 3, 4, 5 *
j Door contact switch
k Oven door
-
Page 7

Description of the appliance
Features
Electronic controls
In addition to operating the various
cooking programmes to bake, roast
and grill the electronic controls also of
fer the following features:
Clock display
–
Minute minder
–
Timer to automatically switch cooking
–
programmes on and off with auto
matic use made of residual heat
– Settings can be customised
– System lock, to prevent the appli-
ance being used unintentionally
– Safety cut-out
Cooling system
During use the cooling fan will automatically come on when a specific temperature is reached. The cooling fan mixes
hot air from the oven cavity with cool
room air before venting it out into the
kitchen through vents located between
the appliance door and the control
panel.
The controls and door handle will get
slightly warm. They are quite safe to
touch.
The cooling fan will continue to run for a
while after the oven has been switched
off to prevent any humidity building up
in the oven, on the control panel or in
the oven housing unit.
When the temperature in the oven has
fallen sufficiently the cooling fan will
switch off automatically.
-
-
Door contact switch
There is a door contact switch above
the right hand door hinge.
If the door is opened during operation,
the door contact switch automatically
switches off the heating elements, and
the fan if a "Fan" setting is being used.
This helps reduce the amount of heat
lost from the oven cavity, e.g. when
checking food.
PerfectClean treated surfaces
The following surfaces are all treated
with PerfectClean enamelling:
– Oven interior
– Runners
– Baking tray
– Grill pan
– Wire rack
PerfectClean enamelled surfaces have
very good anti-stick properties and are
much easier to keep clean than con
ventional enamel if cleaned regularly.
See "Cleaning and care" for more infor
mation.
Catalytic liners
The back panel, roof liner and side lin
ers (if fitted) are coated with dark grey
catalytic enamel. Soiling from oil and fat
is burnt off these surfaces when very
high temperatures are used in the oven.
This makes it easier to clean inaccessi
ble areas of the oven.
See "Cleaning and care" for more infor
mation.
-
-
-
-
-
7
Page 8
Description of the appliance
Catalyser
The catalyser is fitted into the oven's
ventilation system.
It filters fat from the escaping vapours
and thus reduces cooking smells.
The catalyser operates automatically for
all functions except "Defrost" and
"Lighting".
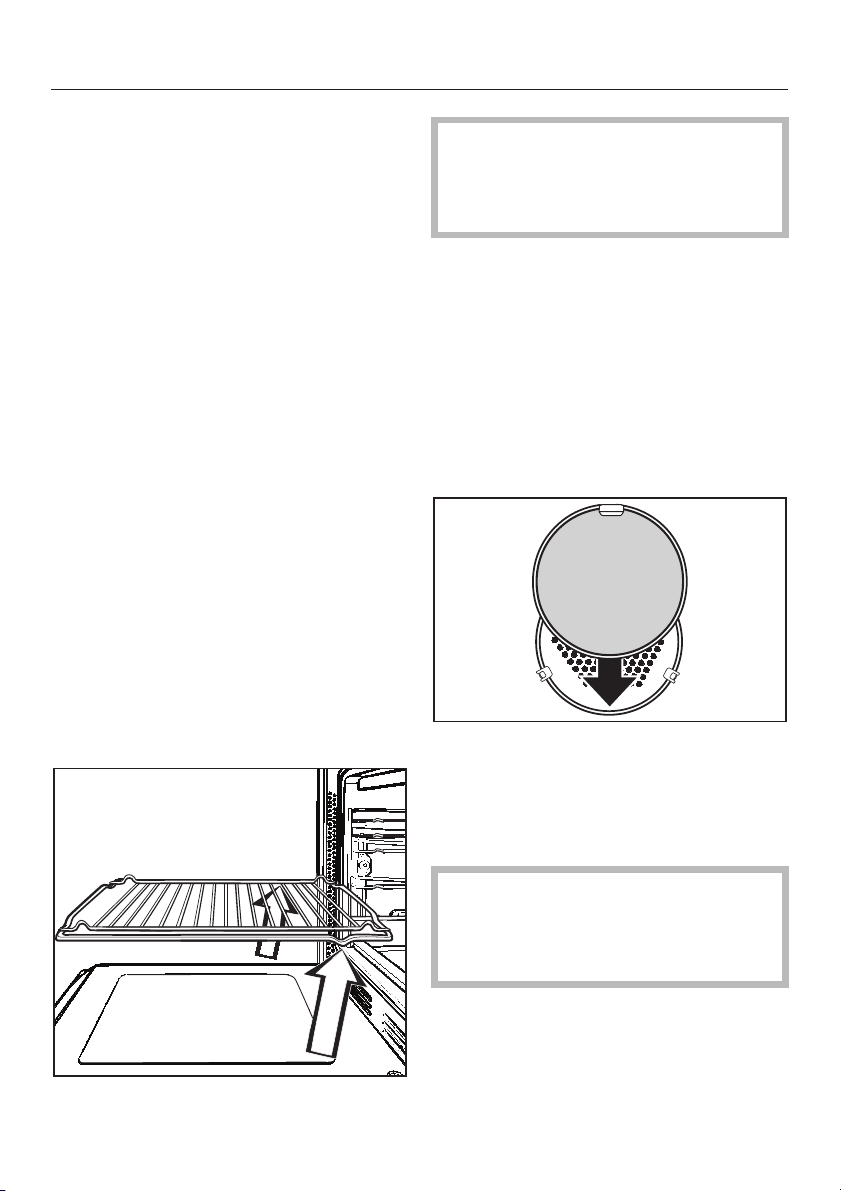
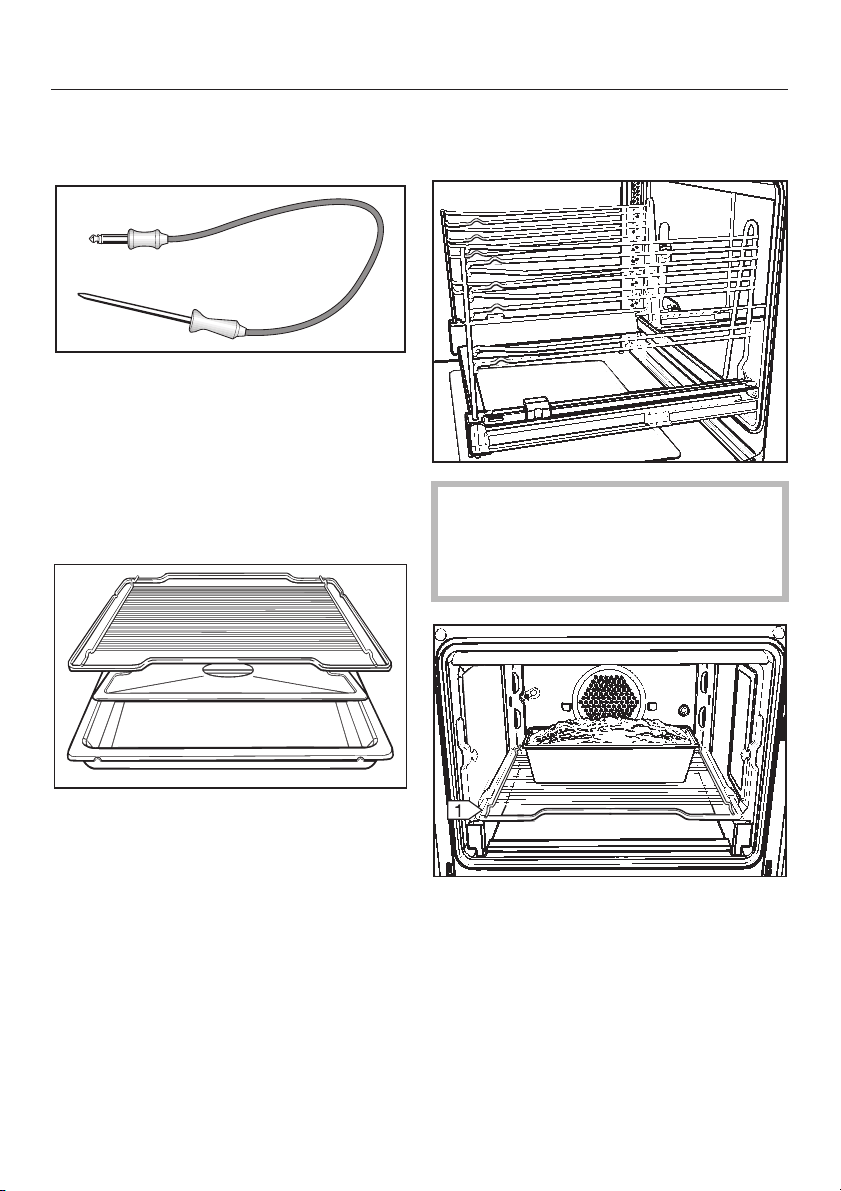
When pushing the tray, pan and rack
back in, always ensure that the
safety notches are at the rear of the
oven. (See illustration)
The tray, pan and rack can then only be
taken out of the oven by raising them
upwards and then pulling out.
Accessories
Most of the following accessories are
supplied with this oven.
These and other accessories are also
available to order from your Dealer or
the Miele Spare Parts Department. See
"Extra Accessories" further on in this
booklet for more details.
Baking tray, grill pan and rack
The baking tray, grill pan and rack are
fitted with non-tip safety notches which
prevent them being pulled right out
when they only need to be partially
pulled out.
Roasting filter
The roasting filter must be fitted in front
of the fan when cooking anything fatty
or where food is likely to splatter, e.g.
when open roasting and grilling meat.
The droplets of fat caught up in the cir
culating air are deposited on the roast
ing filter. This helps to keep the oven
and the area behind the interior back
panel cleaner.
Do not use the roasting filter when
baking. This would increase the
times needed for baking and give
uneven browning results.
-
-
8
Page 9
Description of the appliance
Roast probe
(depending on model)
The roast probe enables the roasting
process to be monitored simply and re
liably. See "Roasting with the roast
probe" for details.
Anti-splash tray
(depending on model)
Telescopic carriage
(depending on model)
-
When pushing the baking trays, grill
pan / oven tray or rack into the oven,
make sure that the telescopic carriage is pushed completely in.
The anti-splash tray should be placed
inside the deep sided grill pan when
grilling or roasting.
The juices from the food being cooked
collect under the anti-splash tray. This
prevents them from spitting and making
the oven dirty. The juices can then be
used for making gravy and sauces.
If you wish to use only the lowest runner
level for cooking, the side rails can be
taken out.
This has the advantage of:
–
making more space available inside
the oven, for larger roasting tins.
–
keeping the side rails clean.
9
Page 10
Description of the appliance
Rotisserie
(depending on model)
See "Grilling with the rotisserie" for de
tails.
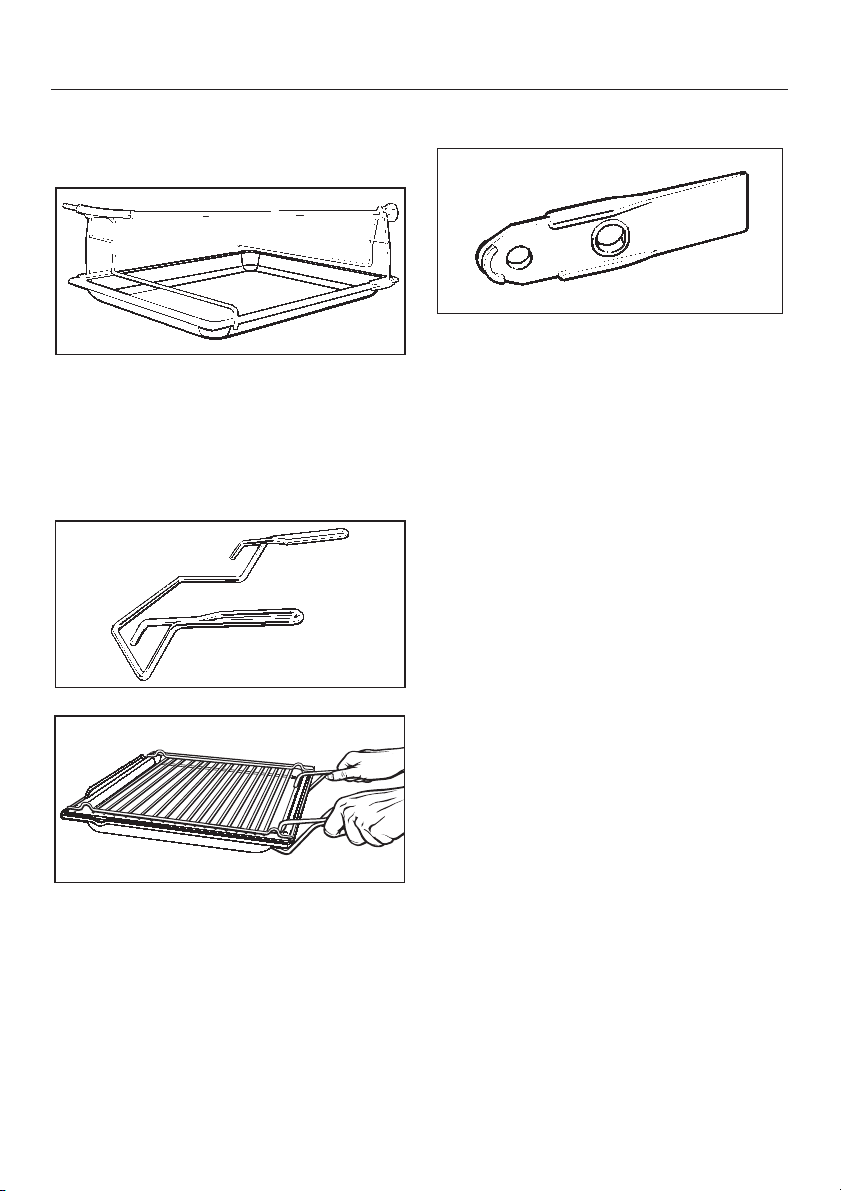
Handle
(depending on model)
Lever
Use the lever for lifting off the halogen
lamp cover.
-
Catalyser
Depending on model your appliance
may be fitted with a catalyser.
The catalyser is built in to the oven's
cooling system.
The catalyser filters fatty vapours and
reduces food smells.
Energy efficiency rating
according to EN 50304
To take the racks, baking trays or the
grill pan out of the oven, or to put them
into it. The two prongs at the top go in
side the rack, tray or pan and the
U-shaped supports underneath.
10
These appliances are rated energy effi
ciency class B in accordance with EN
50304. Tests were carried out using the
"Conventional" oven function with the
catalyser switched off.
Hob use and installation
For "E" models (hobs with integrated
-
hob controls) a separate set of instruc
tions is supplied with the hob which
covers its use and installation.
-
-
Page 11

Caring for the environment
Disposal of the packing
material
The transport and protective packing
has been selected from materials which
are environmentally friendly for disposal
and can normally be recycled.
Ensure that any plastic wrappings,
bags etc. are disposed of safely and
kept out of the reach of babies and
young children. Danger of suffocation!
Rather than just throwing these materi
als away, please ensure they are of
fered for recycling.
-
-
Disposal of your old appliance
Old appliances contain materials which
can be reclaimed or recycled. Please
contact your dealer, your local waste
collection centre or scrap merchant
about potential recycling schemes,
before disposing of the appliance.
Ensure that the appliance presents no
danger to children while being stored
for disposal. See the appropriate ad
vice in the "Warning and Safety instruc
tions".
-
-
11
Page 12

Warning and Safety instructions
Technical safety
This appliance complies with all rele
vant legal safety requirements. Im
proper use of the appliance can,
however, present a risk of both per
sonal injury and material damage.
Before installation and before using
the appliance for the first time, read
the operating instructions carefully.
They contain important notes on
safety, on the installation, operation
and care of the appliance. This way
you will avoid the risk of accidents
and damage to the appliance.
Keep these instructions in a safe
place and pass them on to any future user.
Correct usage
The appliance is intended for do-
mestic use to cook food, and in
particular to bake, roast, defrost, cook,
dry fruit etc, and to grill.
Any other usage is at the owner's risk
and could be dangerous. The manufac
turer cannot be held liable for damage
caused by incorrect or improper use of
the appliance.
Do not let children access the ap
pliance or its controls. Supervise its
use by the elderly or infirm. If allowing
older children to use the appliance
without supervision please ensure that
they are aware of how the oven works
and understand the dangers of im
proper use.
-
the voltage and frequency correspond
to the rating on the data plate, other
wise the appliance could be damaged.
Consult a competent person if in doubt.
continuity is complete between the ap
pliance and an effective earthing sys
tem, which complies with local and na
tional regulations. It is most important
that this basic safety requirement is
tested by a qualified electrician. The
manufacturer cannot be held liable for
the consequences of an inadequate
earthing system (e.g. electric shock).
necessary to ensure that all electrical
components are shielded.
Tampering with electrical connections
or components and mechanical parts is
highly dangerous to the user and can
cause operational faults.
qualified and competent person in ac
cordance with national and local safety
regulations. Repairs and other work by
unqualified persons could be danger
ous. The manufacturer cannot be held
liable for unauthorised work.
-
Before connecting the appliance to
the mains supply make sure that
-
The electrical safety of this appli
ance can only be guaranteed when
This appliance must only be operated as a built-in appliance. This is
Never open the casing of the appliance.
Installation work and repairs may
only be carried out by a suitably
-
-
-
-
-
-
12
Page 13

Warning and Safety instructions
The appliance is only completely
isolated from the electricity supply
when:
it is switched off at the wall socket
–
or the mains fuse is withdrawn
–
or the screw-out fuse is removed (in
–
countries where this is applicable).
Ensure current is not supplied to the
appliance while maintenance or re
pair work is being carried out.
Do not connect the appliance to
the mains electricity supply by an
extension lead.
Extension leads do not guarantee the
required safety of the appliance, (e.g.
danger of overheating).
The oven is designed to be built
into a tall unit. If you wish to install
it in a base unit, the stainless steel rail
above the control panel must be replaced by a sealing strip. The sealing
strip offers additional protection from
any liquids that might spill down from
the worktop, and can be purchased
from the Miele Spare Parts dept.
This equipment is not designed for
maritime use or for use in mobile
installations such as caravans, aircraft
etc. However, it may be suitable for
such usage subject to a risk assess
ment of the installation being carried
out by a suitably qualified engineer.
-
Use
Caution, danger of burning.
High temperatures are produced by
the oven and the hob cooking areas.
Great care should be taken to en
sure that small children do not
touch the appliance when it is being
used. The hob and also external parts
of the oven such as the door glass,
handle vent and control panel can be
come quite hot. For cookers with a hob
turn pan handles inwards to prevent
children from pulling pans over.
Children should not be left alone or
unattended in an area where an
oven is in use. They should never be allowed to sit or stand on any part of the
oven or play with it.
Do not store items of interest to children
in cabinets above an oven. Children
climbing on the oven to reach these
items could be seriously injured.
Use of heat-resistant oven gloves
is recommended, when placing
food in the oven, turning or removing it.
When working with "Conventional" heat
ing or when grilling, the element in the
roof of the oven and the roof liner get
very hot, and there is a danger of being
burnt.
-
-
-
13
Page 14

Warning and Safety instructions
When cleaning the roof of the oven
wait until the grill element has
cooled down before lowering it, to
avoid the danger of burning.
Do not use force to pull it down as
this can cause the element to
break.
Only use the Miele roast probe
(core temperature probe) supplied
with this appliance. If a replacement is
necessary it can be obtained from the
Miele Spare Parts dept or a Miele spe
cialist dealer.
After using do not remove the roast
probe until the oven interior is cool.
When not in use do not leave the
roast probe in the oven, especially
when grilling. High temperatures would
damage it.
Do not use plastic containers. They
melt at high temperatures and
could damage the oven.
Do not heat up unopened tins or
jars of food in the oven, as pres
sure can build up and they may ex
plode. This could result in injury or
damage.
Do not push pots and pans around
on the oven floor as this could
damage the surface.
-
-
Do not lean or sit on an open oven
door, or place heavy items on it.
This could damage the appliance. Take
care in the region of the hinges. The
oven door can support a maximum load
of 15 kg.
Make sure that nothing gets
trapped between the door and the
oven.
Cover any food which is left in the
oven to be kept hot. This avoids
the food drying out. It also prevents
steam condensing and possibly lead
ing to moisture damage in the oven.
If food is left in the oven after cook-
ing, e.g. to take advantage of the
residual heat, turn the temperature selector to the lowest setting. Leave the
function selector at the position set.
Do not switch the appliance off until the
food has been removed.
Moisture in the oven could lead to condensation forming on the control panel
and surrounding kitchen furniture and
drops of moisture collecting under the
worktop.
Condensation can:
- damage the housing unit / worktop.
- lead to moisture damage in the oven.
It could also result in deposits remain
ing in the catalyser, causing an un
pleasant smell to arise the next time the
appliance is switched on.
-
-
-
14
Page 15

Warning and Safety instructions
Bake larger deep-frozen items
such as pizzas on baking paper on
the rack itself or in the pizza pan (see
"Extra accessories"). Placing them on
the baking tray or in the grill pan can
cause the metal to distort. This distor
tion would increase with subsequent
use.
Deep frozen foods such as oven chips
or potato croquettes can be cooked on
the baking tray or grill pan.
Never add water to food on a hot
baking tray or grill pan or directly
onto food in a hot oven. The steam cre
ated could cause serious burns or
scalding and the sudden change in
temperature can damage the enamel.
Never line the floor of the oven with
aluminium foil when using Conventional top and bottom heat A, Bottom
heat B or Intensive baking F. Do not
place a dish, tin, baking tray or grill pan
on the floor of the oven.
If using a grill pan made by a different
manufacturer make sure that there is a
gap of at least 6 cm between the bot
tom of the pan and the floor of the oven.
If these instructions are not observed
the bottom heat will be blocked. This
can cause permanent damage to the
floor of the oven.
-
-
General notes
Never leave the appliance unat
tended when cooking with oils and
fats as these are a fire hazard if allowed
to overheat.
Do not use the oven to heat up the
room. Due to the high temperatures
radiated, objects left near the oven or
hob could catch fire.
Always ensure that food is suffi
ciently cooked or reheated. Many
factors will affect the overall cooking
time, including the size and amount of
food, its temperature, changes to the
recipe and the shape and size of cooking container. Some foods may contain
micro organisms which are only destroyed by thorough cooking at temperatures over 70°C for a minimum of 10
minutes. Therefore when cooking or reheating foods, e.g. poultry, it is particularly important that food is fully cooked
through. If in doubt select a longer
cooking or reheating time.
It is important that the heat is allowed to
spread evenly throughout the food be
ing cooked.
This can be achieved by stirring and/or
turning the food, and by observing a
sufficiently long standing time, which
should be added to the time needed for
cooking, reheating or defrosting.
-
-
-
Protective aluminium foil panels are
available in retail outlets which are
supposed to protect the oven cavity
from soiling and reduce the need for
cleaning. If used, cooking and baking
times will increase considerably.
They can also cause damage to the ap
pliance (e.g. by blocking the heat).
-
15
Page 16

Warning and Safety instructions
When using kitchen appliances
connected to sockets near the
oven, ensure that the cable cannot
come in contact with the hot cooking
zones or get trapped in a hot oven
door, which could melt the cable insula
tion and be dangerous.
Danger of electric shock.
Never use a steam cleaner to clean
this appliance. The steam could at
tack the electrical components and
cause a short circuit.
If using alcohol in your recipes
high temperatures can cause the
alcohol to vaporise and under adverse
circumstances the alcohol can catch
light on the hot heating elements. Alcohol should be burnt off before the dish
is placed in the oven to avoid this danger.
In countries which may be subject
to infestation by cockroaches or
other vermin, pay particular attention to
keeping the appliance and its surroundings in a clean condition at all
times.
Any damage which might be caused by
cockroaches or other vermin will not be
covered by the appliance guarantee.
Disposal of your old appliance
Before throwing an old appliance
away it must first be made unus
able. Switch off and disconnect it from
the power supply, cut off the cable di
rectly behind the appliance and render
any plug useless. This should be done
by a competent person.
-
The manufacturer cannot be held lia
ble for damage caused by non-com
pliance with these Warning and
Safety instructions.
-
-
-
-
16
Page 17
Safety feature
Operating lock for oven and
hob cooking zones when the
oven is not being used
The operating lock can be activated to
prevent the oven or hob being switched
on unintentionally, by children for exam
ple.
The operating lock is activated as fol
lows:
The function selector must be set to
the "0" position.
^
Press the "p" button until the key sym
bol appears in the display field.
Operating lock for oven and
hob cooking zones when the
oven is being used.
The oven can be programmed so that
once a temperature has been chosen
the target temperature can only be low
ered. See "Altering oven settings" for
details.
-
Safety cut-out
This is a safety feature to protect the
oven if it has been operating for an ex
ceedingly long period.
The length of time depends on the oven
function selected. Once this time has
elapsed, the oven will switch itself off
automatically.
The fault code "F6" will appear in the
display.
The oven can be used again immediately by simply turning the function selector to "0" and entering the process
again.
-
-
-
The oven (and cooking zones if appli
cable) can now not be switched on.
The key symbol disappears from the
display after 5 seconds. Whenever the
selector or a button is operated, the key
symbol reappears for 5 seconds.
To cancel the operating lock:
Turn the oven function selector to any
oven function.
^
Press the "p" until the key symbol in
the display field disappears.
-
17
Page 18
Before using for the first time
After installation and before using the
oven for the first time:
Set the clock.
–
Switch the catalyser on.
–
Clean the appliance.
–
Heat the oven up with nothing in it.
–
New appliances have a slight smell
on first use and this procedure will
dissipate the smells before you use
the oven to cook any food.
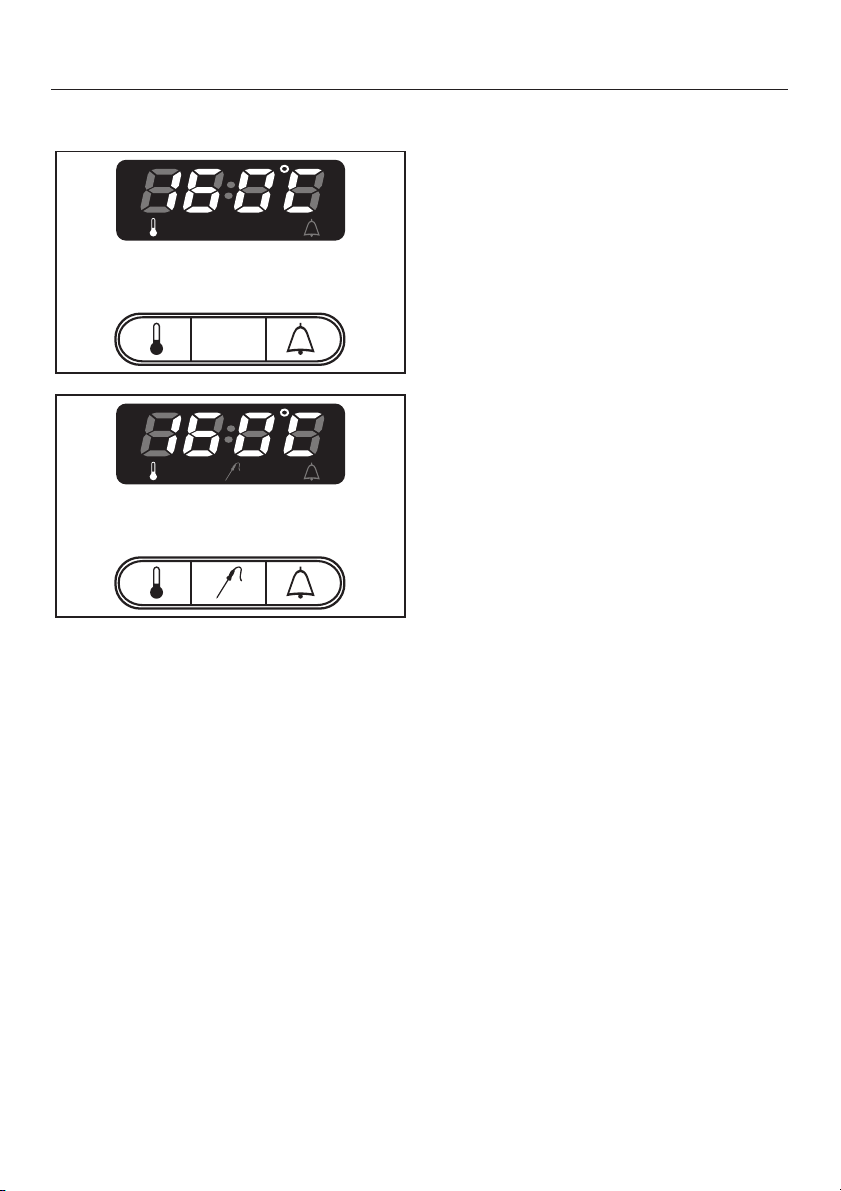
Setting the clock
When the appliance is first connected
to the power supply, or after a power
cut "12:00" and the symbols "f" and
")" flash in the display.
Press buttons "f" and ")" once at
^
the same time.
The following light up
"12:00" in the display,
–
– the "+/–" button indicator light.
^ While the indicator light between the
"+" and "–" buttons is still lit up, enter
the time of day in hours:minutes using the "+" or "–" buttons.
The display is set as standard for a
24 clock.
18
When the indicator light for the "+/–"
button goes out, the time of day has
been set and the display will change at
one-minute intervals. The colon flashes.
Page 19

Before using for the first time
Switching on the catalyser
Your appliance has a catalyser built-in
to the ventilation system.
When switched on, the catalyser re
moves fat particles from the air circulat
ing in the oven and also reduces cook
ing smells.
The oven is delivered with the catalyser
switched off (standard factory setting).
To switch the catalyser on please follow
the instructions given in the section "Al
tering oven settings" (Standard setting
02) of your operating instructions.
-
Cleaning the appliance
Oven interior
Before use please remove
– any stickers from the floor of the
oven, baking trays, grill pan etc.
– any cork spacers at the sides
above the oven cavity.
New appliances have a slight smell on
first use. Running the oven empty for at
least an hour at a high temperature will
dissipate this more quickly.
Turn the oven function selector to
^
"Fan Heat D".
While the indicator light for the "+/–"
button is still on, alter the oven temper
ature.
-
^ Select the highest temperature
(250 °C) with the "+" button.
The timer can also be used to set the
finish time.
Ensure the room is well ventilated
during this process.
-
^
Wipe out the oven interior using
warm water and a little washing up
liquid. Polish dry with a soft cloth.
Do not close the oven door until the
oven interior is dry.
^
Rinse the accessories.
19
Page 20

Description of the oven systems
Fan Heat D
This system works by the circulation of
heated air.
A fan situated on the back wall of the
oven sucks in the air, heats it over a
ring element and blows the heated air
through the carefully spaced openings
in the rear panel of the oven, enabling
approx. 20°C lower temperatures to be
used than with the Conventional heat
ing system.
The oven does not usually need to be
pre-heated as the heated air reaches
the food straight away.
Exception: Pre-heating may be necessary for foods such as puff pastry and
yeast mixtures where instant heat is required to make them rise quickly.
Using the fan heating system you can
bake and roast on different levels at the
same time.
If a temperature of at least 140°C is selected, the "rapid heat-up" feature is ac
tivated automatically.
The "Top Heat" heating element
switches in to heat the appliance up
more rapidly. This saves energy.
Food which browns quickly should not
be placed at the top of the oven when
rapid heat up is being used.
-
Auto Roast E
The oven heats initially to a high tem
perature which seals the meat to keep it
succulent and tasty.
As soon as the high temperature has
been reached, the oven temperature is
automatically returned to the prese
lected setting.
If a temperature of at least 140°C is se
lected, the "rapid heat-up" feature is ac
tivated automatically.
The "Top Heat" heating element
switches in to heat the appliance up
more rapidly. This saves energy.
Conventional heating A
With the conventional method of heating, radiant heat is directed on the food
from above and below. It is useful
where a fairly long cooking time is required and a deep colour and good
rise are needed.
-
It is usually necessary to pre-heat the
oven when using this method.
If a temperature of at least 150°C is se
lected, the "rapid heat-up" feature is ac
tivated automatically.
The fan and its heating element switch
in to heat the appliance up more rap
idly. This saves energy.
-
-
-
-
-
-
-
20
More practical advice about these
cooking functions is given in the
"Baking", "Roasting" and "Grilling"
sections of this book and in the
Miele cookbook supplied with this
oven.
Page 21

Description of the oven systems
Defrost G
Defrost can be operated without heat
ing, or at a temperature of up to 50°C.
When the defrost system is used with
out heating the air is circulated by the
fan at room temperature.
-
-
Intensive bake F
This method combines "Fan Heat" with
heat from the lower heating element,
and is particularly useful for dishes that
require a moist topping and crisp base
like pizza and quiche lorraine.
Fan grill N
Pre-heat the grill for at least 5 minutes
with the oven door closed, before grilling.
The hot air from the grill is distributed
over the food by the fan on the rear wall
of the oven. This enables a lower temperature to be selected than for conventional grilling.
The grill element is thermostatically
controlled and at times during grilling
will not glow red. This is quite normal.
Grill 2 n
Pre-heat the grill for at least 5 minutes
with the oven door closed, before grill
ing.
This method is particularly good for
grilling large quantities of food using
the grill pan to its full extent.
The entire upper heating element acts
as the grill.
The inner part of the grill will glow red a
few minutes after being switched on.
The outer part of the grill will remain noticeably darker, but will still produce the
heat necessary to grill.
The grill element is thermostatically
controlled and at times during grilling
will not glow red. This is quite normal.
-
The grill element is thermostatically
controlled and at times during grilling
will not glow red. This is quite normal.
Grill 1 m
Pre-heat the grill for at least 5 minutes
with the oven door closed, before grill
ing.
The inner part of the upper heating ele
ment acts as the grill. This will glow red
for a few minutes after being switched
on, and it is then ready for use. Use the
Grill 1 setting for small quantities.
More practical advice about these
cooking functions is given in the
"Baking", "Roasting" and "Grilling"
sections of this book and in the
Miele cookbook supplied with this
oven.
-
-
21
Page 22
Oven - use
Controls
The oven controls consist of the oven
function selector and pushbuttons.
Function selector
(depending on the model)
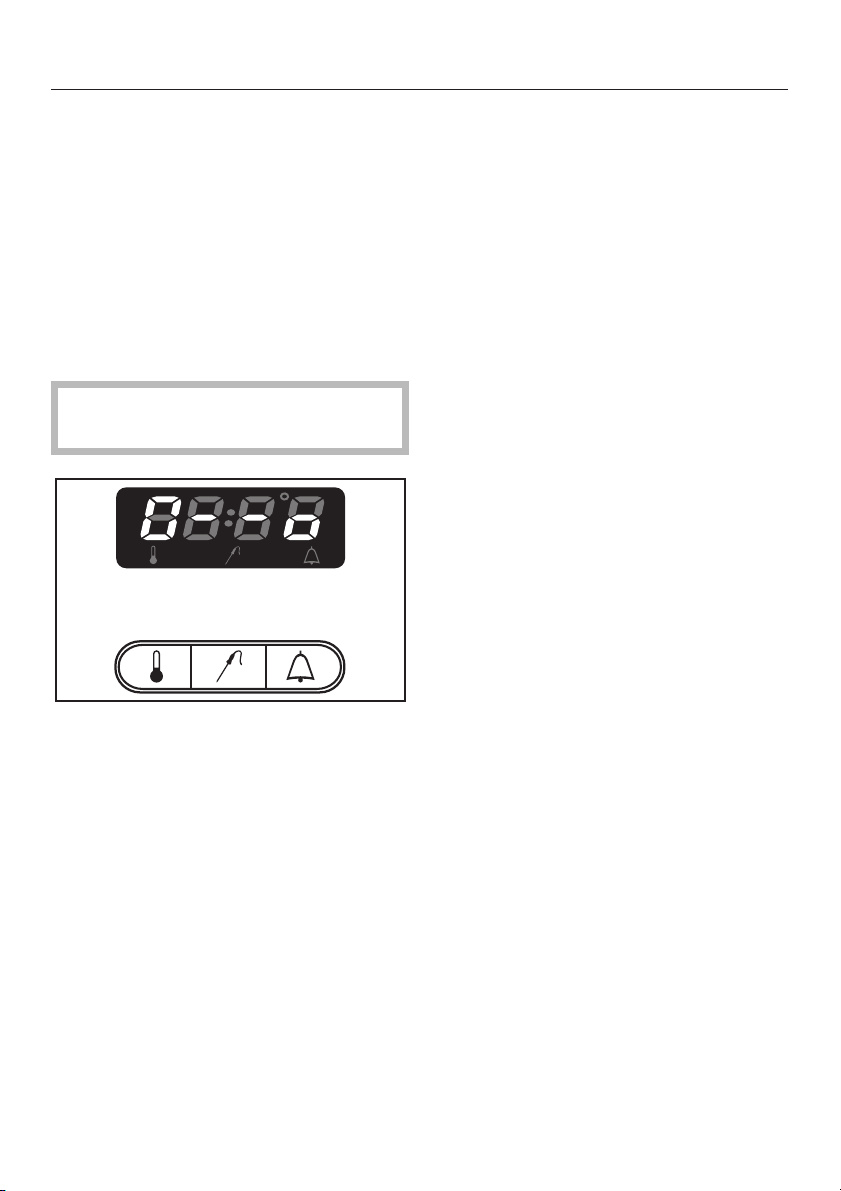
Temperature and Timer buttons
With the push buttons you can:
change the oven temperature.
–
change the core temperature, if the
–
roast probe is used.
– activate the minute minder.
Each push button has a matching sym-
bol in the oven display.
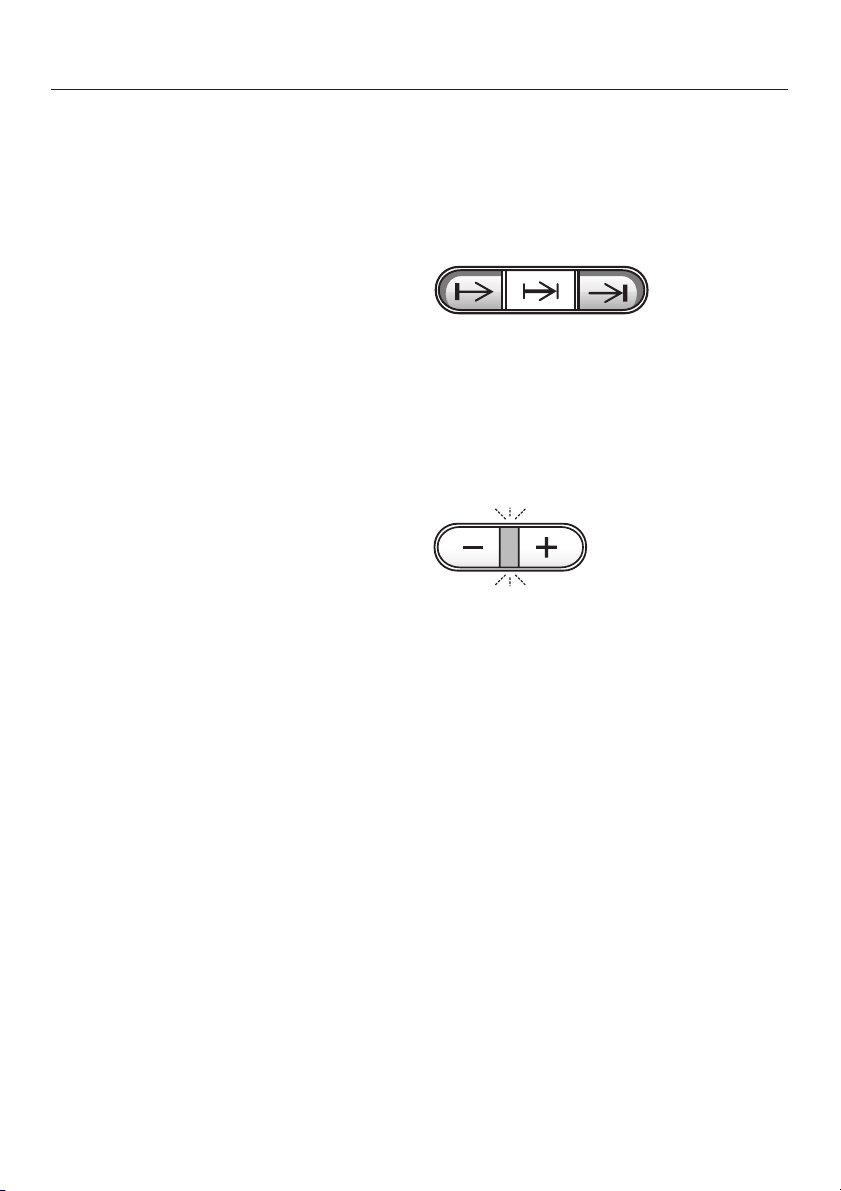
"–" and "+" buttons with indicator
light
The function selector can be turned
clockwise or anti-clockwise.
22
All entries and alterations to tempera
ture and time are made using the "+" or
"–" buttons.
Temperatures / times can be entered in
stages (short pushes on the button)
and quickly (hold button down).
In this way the following alterations can
be made
–
oven temperature in 5°C stages
–
core temperature in 1°C stages
–
minute minder in 1 min. stages.
-
Page 23

Oven - use
Selecting an oven setting
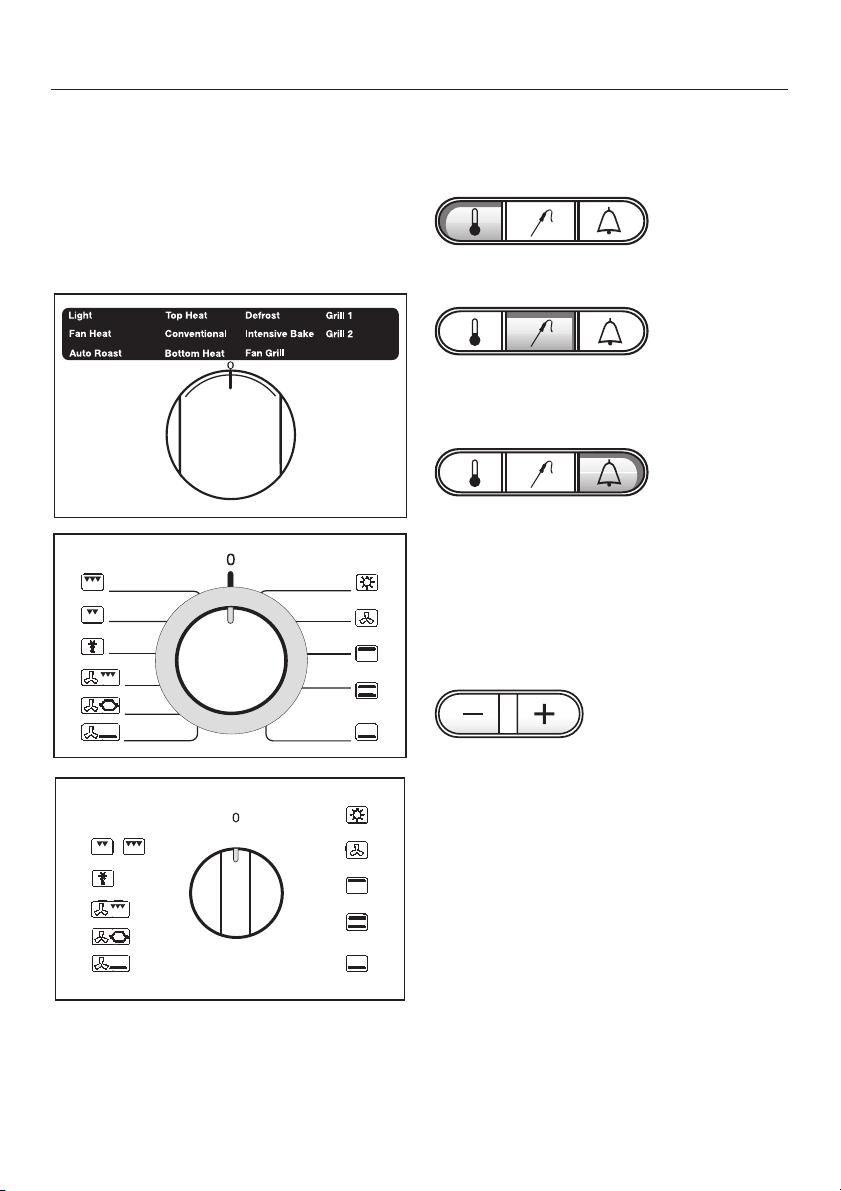
Light H
–
Turns on the oven light independ
ently.
H 390: All oven functions are dis
played as soon as the function selec
tor is switched to "Light H".
Fan Heat D
–
For baking or roasting on several lev
els at the same time.
Top heat C
–
For browning dishes, finishing dishes
with a cheese topping.
– Conventional A
Top and bottom heat together for
long, slow baking of traditional recipes, e.g. fruit cake, casseroles.
– Bottom heat B
Use this setting towards the end of
baking, to reheat or brown the base
of a cake, quiche or pizza.
– Auto Roast E
Initial high temperature to seal meat
followed by normal roasting tempera
ture.
Not suitable for baking, except for
baking freshly prepared wholemeal
or rye doughs, (not packet mixes).
Defrost G
–
For gentle defrosting of deep frozen
-
-
foods.
Intensive Bake F
–
For recipes which require a moist
topping, and a crisp base, e.g. piz
zas and quiche lorraine, German
style open fruit cakes and cheese
cake.
Not suitable for roasting or shallow
baking, (the base will brown too
much).
Fan Grill N
–
Ideal for grilling thicker items such as
stuffed meat, kebabs and pieces of
poultry etc. Grill with the oven door
closed.
– Grill 1 m
For grilling flat items, small quantities, and for browning small round
dishes. Grill with the oven door
closed.
– Grill 2 n
For grilling flat items, large quantities,
-
and for browning larger dishes. Grill
with the oven door closed.
-
-
23
Page 24
Oven - use
Recommended temperature
As soon as a heating system is selected, the recommended tempera-
ture for that system appears in the
oven display and the oven heating co
mes on.
* the initial boosted temperature is
approx. 230°C,
continuation temperature 160°C
If you wish to retain the temperature
suggested by the system, this will be
automatically adopted when the indica
tor light in the "+/–" button goes out and
the oven starts heating up.
The actual temperature in the oven is
then displayed.
The increase of temperature can be
followed in the display until the target
temperature is reached.
N.B. with Auto Roast E:
the oven heats initially to a high temperature (230 °C) to seal the meat to keep
it succulent and tasty.
As soon as this temperature has been
reached, the oven temperature automatically drops back down to the
pre-selected setting.
The display, however, will only show the
temperature rise until the target or
-
pre-selected temperature is reached!
-
The following temperatures are set at
the factory:
Fan Heat . . . . . . . . . . . . . . . . . . . 160°C
Auto Roast* . . . . . . . . . . . . . . . . . 160°C
Top Heat . . . . . . . . . . . . . . . . . . . 190°C
Conventional . . . . . . . . . . . . . . . . 190°C
Bottom Heat. . . . . . . . . . . . . . . . . 190°C
Defrost. . . . . . . . . no temperature given
Intensive Bake . . . . . . . . . . . . . . . 170°C
Fan Grill . . . . . . . . . . . . . . . . . . . . 200°C
Grill 1 (small) . . . . . . . . . . . . . . . . 240°C
Grill 2 (large) . . . . . . . . . . . . . . . . 240°C
24
If the oven door is opened, or if you re
duce the target temperature, the de
crease is shown in 1° steps.
-
-
Page 25
Oven - use
Using the oven
Place food on an appropriate runner
^
level in the oven.
Turn the oven function selector to the
^
required setting.
The following will light up:
the recommended temperature in the
–
oven display, and
the indicator light between the "–"
–
and "+" buttons.
Whilst this light is on, you can change
the recommended temperature with
the "+" and "–" buttons.
Each press of a button increases the
time you have in which to input the temperature.
As soon as the indicator light between
the "+" and "–" buttons has gone out the
oven heating switches on.
Heating is automatically interrupted as
soon as the oven door is opened. This
operates the door contact switch
which switches off the heating systems.
When "Fan Heat" is being used, the fan
is also switched off.
^
At the end of the cooking time take
the food out of the oven and switch it
off.
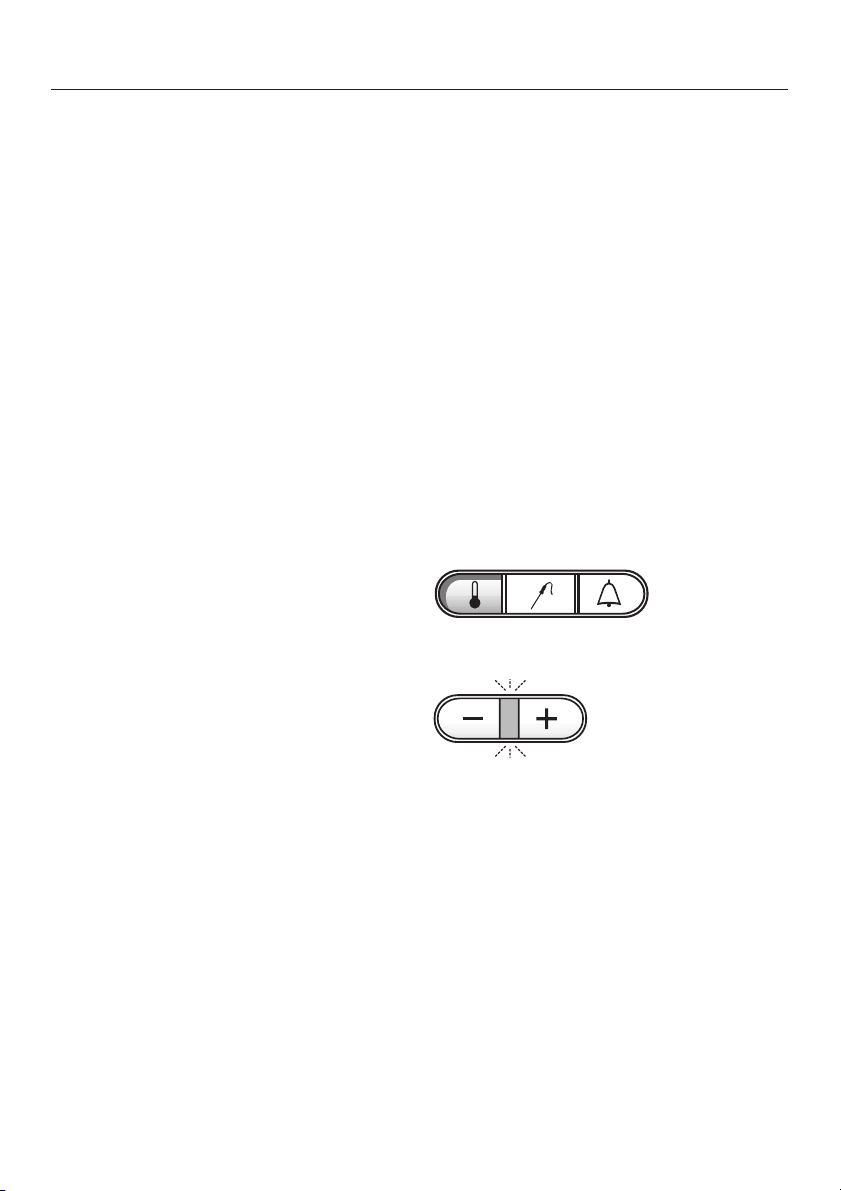
Altering the temperature
If the temperature recommended by the
system is not suitable, it can be altered
according to oven function within the
following range:
Fan Heat. . . . . . . . . . . . . . . . . 30-250°C
Auto Roast . . . . . . . . . . . . . . 100-230°C
Top Heat . . . . . . . . . . . . . . . . . 30-250°C
Conventional. . . . . . . . . . . . . . 30-280°C
Bottom Heat . . . . . . . . . . . . . 100-250°C
Defrost . . . . . . . . . . . . . . . . . . . 30-50°C
Intensive bake . . . . . . . . . . . . 50-250°C
Fan grill. . . . . . . . . . . . . . . . . . 50-260°C
Grill 1 (small) . . . . . . . . . . . . 200-300°C
Grill 2 (large). . . . . . . . . . . . . 200-300°C
In order to do this:
^ Press the "p" button.
^
Enter the required temperature with
the "+/–" button, when the light be
tween the two buttons is lit up.
-
Turning the function selector to "0" can
cels all settings and the symbols in the
display go out.
However, if the roast probe is still en
gaged in its socket the "e" symbol will
contine to show in the display.
If a minute minder time has been en
tered, the "l" symbol is lit and the dis
play shows the time counting down.
-
-
-
-
25
Page 26
Oven - use
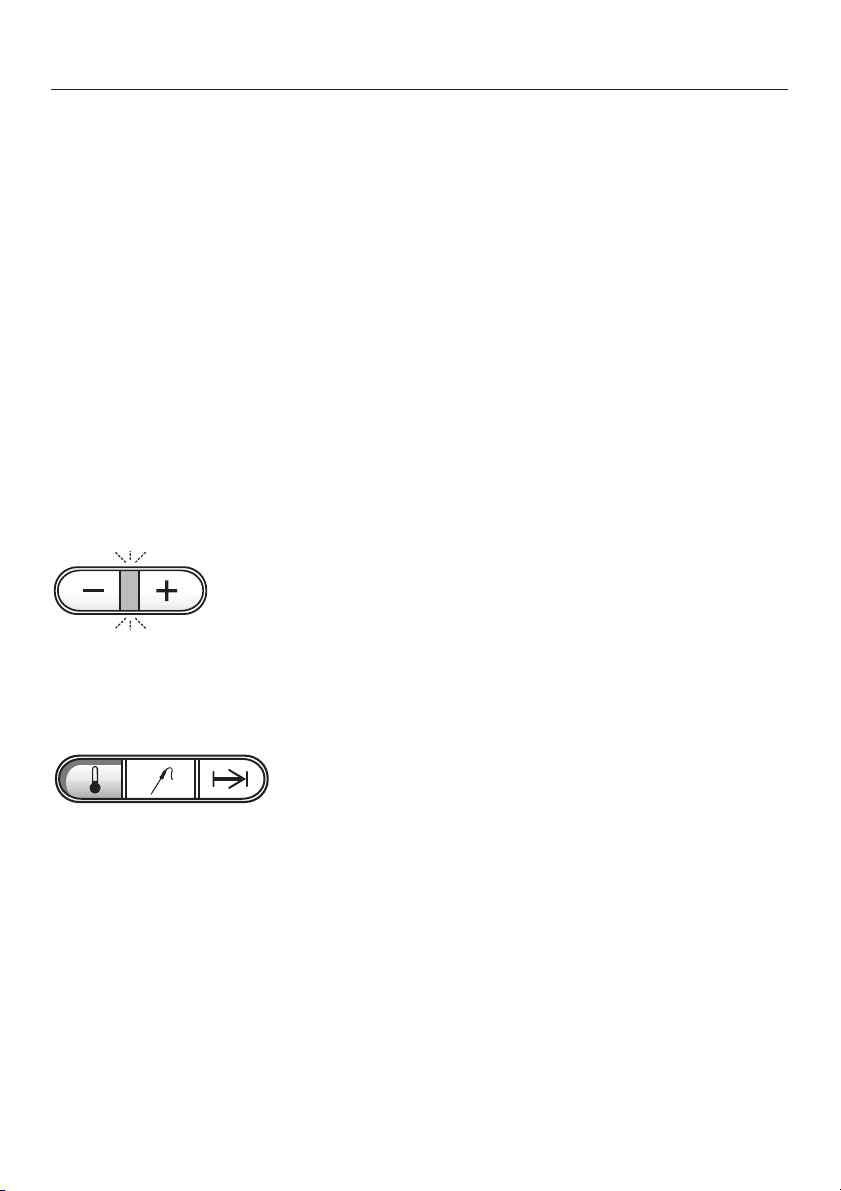
Entering your own recommended
temperature
If you frequently work with a tempera
ture which differs from the factory rec
ommended one, it is also possible to
enter your own recommended tempera
ture. (Exception: Defrost).
This saves changing the temperature
each time you use the setting.
Proceed as follows:
Use the function selector to choose
^
the function which is to be given a
different temperature.
The factory recommended temperature
appears in the display.
^ Now, immediately while the indicator
light in the "+/–" button is lit, use the
"+" or "–" button to enter the different
temperature required.
-
-
Rapid heat-up
With the "Fan Heat D", "Auto Roast E"
and "Conventional A" heating systems,
"rapid heat-up" is switched on automati
cally if the temperature required is
at least 140°C with "Fan Heat D" and
–
"Auto Roast E".
at least 150°C with "Conventional A".
–
The rotating "C" beside the required
temperature shows that "rapid heat-up"
is switched on.
During the heat-up phase, the "Fan
Heat" heating element and the fan as
well as the "Top Heat" heating element
come on simultaneously to heat up the
oven as rapidly as possible. This saves
energy.
As soon as the required temperature is
reached, the extra heating element is
switched off.
Once the required temperature is
reached, the extra heating element
does not switch on again even when
the temperature is later increased.
-
^
To save in memory press the "p" but
ton until the audible tone is heard.
Your own recommended temperature is
now stored in memory.
Next time this oven function is selected,
the stored recommended temperature
appears.
After a power cut, any individually pro
grammed temperatures are lost and
must be re-entered.
26
-
-
Exception: if the temperature is in
creased before the required tempera
ture is reached, "rapid heat-up" remains
switched on.
-
-
Page 27

Oven - use
To switch off "rapid heat-up"
For some dishes it may be desirable to
switch off "rapid heat-up" (pizza, bis
cuits, small cakes).
Select the oven system and tempera
^
ture for the cooking process.
"Rapid heat-up" can be switched off
^
as soon as the indicator light be
tween the "+" and "-" button has gone
out and the actual temperature ap
pears in the display.
^ Press the "–" button and hold until the
"C" in the display stops rotating.
"Rapid heat-up" is now switched off for
this particular cooking process.
"Rapid heat-up" is available for the next
programme once the oven function selector has been turned to "0" at the end
of a programme.
"Rapid heat-up" can be permanently
switched off if you do not want it (see
section on "Altering oven settings, Pro
grammable function 06").
-
-
-
Pre-heating the oven
Pre-heating is only necessary in a few
cases e.g.:
With "Fan Heat D":
Pre-heat for foods which cook in less
–
than 20 minutes and for foods such
as puff pastry and yeast mixtures
where instant heat is required to
make them rise quickly.
With "Conventional heat A":
Pre-heat the oven where a fairly long
–
cooking time is required and a deep
colour and good rise are needed.
With Grill 1 and Grill 2:
– Pre-heat the grill for at least 5 min-
utes with the oven door closed before placing food under the grill.
To pre-heat
^ Turn the function selector to the re-
quired function.
^
Select the required temperature.
^
-
When the required temperature has
been reached: Put the food into the
oven.
27
Page 28

Oven - use
Energy-save function
If you are programming a cooking pro
cess using the automatic timer, or if you
are cooking with the roast probe, the re
sidual heat is automatically used to
save energy.
Shortly before the end of the cooking
time the oven heating switches off.
The letters "EC" in the display field indicate that the energy-save function is in
operation.
The residual heat in the oven is sufficient to complete the cooking process.
-
Oven lighting
When the oven is in operation the oven
lighting goes out approx. 15 seconds
after pressing the last button.
To switch the lighting back on for a
^
short time, press one of the buttons.
The oven lighting comes on automati
cally when an oven function has been
selected and the oven door is opened.
If preferred, you can programme the
oven lighting to stay on for the duration
of the cooking programme, (see "Al
tering oven settings, setting 05").
Night dimming
Between the hours of 22:00 and 6:00
the lighting in the clock / timer display
is dimmed automatically.
Turning the function selector or pressing a button on the control panel during
this period will bring the timer display
back on in full brightness.
-
-
The cooling fan continues to run, as
does the hot air fan if a "fan" setting had
been chosen.
28
Page 29

Setting the minute minder
The minute minder can be used to time
any activity in the kitchen, e.g. boiling
eggs. (It cannot be used to switch the
oven off at the end of a set time).
You can set the minute minder at the
same time as another programme, e.g.
as a reminder to baste your roast or
add seasoning etc.
To enter / to change a time:
(1 min. - 23 hrs. 59 mins.)
^ Press the "l" button.
^ Enter the required time in hours and
minutes with the "+" button.
At the end of the set time:
an audible tone sounds for approx. 5
–
seconds.
At the same time the "l" symbol
–
flashes for approx. 1 minute.
The audible tone and the flashing sym
bol can be cancelled at any time by
pressing the "l" button.
To cancel the minute minder:
^ Press the "l" button.
^ Use the "–" button to set the time to
"0:00".
-
When the "+/–" button indicator light
goes out, the time set starts counting
down in minutes.
If the oven is being used at the same
time, the minute minder time period
only shows for a short time. Then the
oven or roast probe core temperature
shows again in the display. The "l"
symbol continues to be visible as a re
minder that the minute minder is work
ing.
-
-
29
Page 30

Altering oven settings
Some of the standard oven settings
(which are set at the factory) have an
alternative which you can select if re
quired. Each of these settings has an
identification number which is followed
by :0 or :1. Please consult the Chart for
the different options.
-
Proceed as follows:
Turn the oven function selector to "0".
^
Open the oven door fully.
^
Turn the oven function selector to the
^
"Light H" position.
Press the "p" button.
^
"01:0" or the most recently altered set
ting appears in the oven display.
Use the "+/–" button to call up the
^
identification number of the setting
required, (see chart).
If the identification number is followed
by :0 the factory setting is active.
If the identification number is followed
by :1 the alternative setting is active.
^ Press the "l" button to toggle be-
tween the standard and alternative
settings.
Note: Function 08:
Depending on model, the clock can be
put back by one hour or up to 4 hours
by pressing the "l" button several
times. See chart for details.
-
30
If you wish to alter more than one set
ting, you can do so now before saving
your changes in memory.
^
To save your settings in memory turn
the oven function selector to the "0"
position.
-
Page 31

Altering oven settings
Standard setting
(as delivered)
01:0 The oven function and tempera
ture can be changed at any
time.
02:0 The catalyser is switched off and
not filtering food smells and circulating deposits out of the oven.
03:0 The oven lighting comes on, as
soon as an oven function has
been selected.
Alternative
01:1 The locking function for the oven
is activated: after oven function
and temperature have been cho
sen, and the indicator light in the
"+/–" button has gone out, the
oven function set can no longer
be altered. The target tempera
ture can only be lowered.
Oven function, target tempera
ture, and any automatic cooking
time programming can only be
altered after the oven function
selector has been turned back to
the "Light H" or "0" position.
02:1 The catalyser is switched on and
filtering food smells and circulating deposits out of the oven.
03:1 The oven lighting comes on au-
tomatically as soon as the oven
door is opened, even when the
function selector is set at "0".
This is useful, e.g. for cleaning.
-
-
-
04:0 The temperature is displayed in
°C.
The clock/timer has a 24-hour
display.
05:0 To save energy, the oven light
switches off after approx.15 sec
onds when the oven is in opera
tion. It can be switched back on
again for a short time if required
by pushing any button.
04:1 The temperature is displayed in
°F.
The clock/timer has a 12-hour
display.
05:1 The oven lighting stays on for the
-
-
whole time when the oven is in
operation.
31
Page 32

Altering oven settings
Standard setting
(as delivered)
06:0 Rapid heat-up is on; during the
heat-up phase of the "Fan Heat
D", "Auto Roast E" and "Con
ventional A" heating systems,
the Fan Heat heating element
and the fan as well as the Top
Heat heating element are
switched on at the same time to
heat the appliance as rapidly as
possible. This saves energy.
07:0 The time of day originally en
tered appears in the time display.
08:0 Depending on model
– the time of day originally
entered appears in the
display when the l button
is pressed once.
– the time of day originally
entered appears in the display
only when "0" is reached
after pressing the "l"
button several times.
-
Alternative
06:1 "Rapid heat-up" is off.
-
07:1 The time is advanced by 1 hr.
08:1 Depending on model
– the time of day is put back
1 hour.
– the time of day can be put
back up to 4 hours by
pressing the "l" button
several times.
This function is required in the
USA when a radio controlled
clock is fitted, to take account
of the various times zones.
09:0 An audible tone sounds at the
end of a cooking process (also
applies to the Miele INFO CON
TROL unit if present).
32
09:1 The audible tone at the end of a
cooking process is switched off
-
(also applies to the Miele INFO
CONTROL unit if present).
Page 33

Using the clock / timer
Functions
The timer can:
– show the time of day,
– switch the oven (and separately,
where applicable, the hob front cooking zones) off, or on and off automatically.
Timer buttons
The timer buttons can be used to
set the start time for a cooking pro
–
cess
set the duration of a cooking process
–
– set the end time for a cooking pro-
cess
– set the time of day.
A corresponding symbol for each push
button appears in the display when ap
propriate.
-
-
33
"–" and "+" buttons with indicator
light
The "+" and "–" buttons are used to en
ter times in minutes and hours
Changes are effected in 1 minute
steps.
-
Page 34

Using the clock / timer
Using the oven
After selecting a cooking function or
switching on a hob zone you can se
lect a cooking time.
To enter a time you must keep the rele
vant timer button pressed in whilst op
erating the "-" or "+" button.
Press the relevant timer button.
^
The following will then light up
the relevant symbol in the clock/timer
–
display,
– the indicator light between the "–"
and "+" buttons.
^ Whilst this light is on, you can
change the time with the "+" and
"–" buttons.
Each press of a button increases the
time you have in which to input the tem
perature.
The time set is saved as soon as the in
dicator light between the "+" and "–"
buttons has gone out.
Setting the clock
When the appliance is first connected
to the power supply, or after a power
cut "12:00" and the symbols "f" and
")" will flash in the display.
-
-
The time can only be entered when
the function selector is at "0".
Press the "f" and ")" buttons at
^
the same time.
^ Enter the time of day in hours and
minutes with the + or – button.
As soon as the time has been saved in
memory it will start counting down minute by minute in the display. The colon
flashes.
The programmable functions 07 and 08
can be used to adjust the time from
winter to summer time and vice versa
(see section on "Altering oven set
tings").
-
34
Page 35

Using the clock / timer
Switching the time of day display on
and off
The time of day display can be
switched off to save energy.
To do this:
Press the "f" and ")" buttons to
^
gether, twice in quick succession.
The time of day continues to run un
seen.
If a process has been pre-programmed, the time of day display
cannot be switched off.
To switch the time of display back on
again:
-
Programming cooking times
The timer can be used to automatically
switch the oven and both the front hob
cooking zones off, or set them to come
on at a later time and then also be
switched off.
The oven, the left and right front hob
cooking zones can be programmed in
dependently of each other.
-
Programming cooking time in the
oven
In order to programme a cooking
process you must first select a cooking function.
Enter the time using the "f", "g" or
")" buttons.
After entering the time the actual time of
day will reappear in the display.
The f, g or ) symbols will show in
the display if a time has been programmed.
-
^
Press the "f" and ")" buttons to
gether, once.
Shortly before the end of cooking
time the oven heating switches off au
tomatically.
"EC" now appears in the oven display in
stead of the actual oven temperature to
let you know that the oven is in Energy
Save mode.
The oven heating will switch on again if:
–
the oven temperature is altered.
–
the cooking time is lengthened signif
icantly.
-
-
-
35
Page 36

Using the clock / timer
At the end of cooking time
the oven heating switches off auto
–
matically.
an audible tone sounds for approx.
–
5 seconds.
the ")" symbol flashes at the same
–
time.
Press the ) or turn the oven func
^
tion selector to "0".
The buzzer and the symbol are
switched off.
If the food is not cooked to your taste, a
new cooking time can be entered.
If the audible tone is not switched off it
will continue to sound at 5 minute intervals as a reminder that cooking time
has finished. This reminder continues
for up to an hour.
-
-
Programming hob zone cooking
times
Please note it is not possible to use
this programme for hobs which have
the KSE 200 control unit.
If a time is entered for a front cooking
zone a symbol for that zone will appear
in the clock/timer display:
"*" for the front left cooking zone.
"#" for the front right cooking zone.
"t" for both front hob zones.
You cannot programme a cooking
time until you have selected a setting for the zone.
Make sure the correct symbol is
showing in the display before programming in times.
Enter the time using the "f", "g" or
")" buttons.
36
After entering the time the actual time of
day will reappear in the display.
The f, g or ) symbols will show in
the display if a time has been pro
grammed.
When a cooking process has been
pre-selected the symbol for the
pre-programmed zone will also flash,
and the hob control light will go out.
When the process starts running, the
symbol for the chosen hob zone lights
up.
-
Page 37

Using the clock / timer
At the end of cooking time
the hob cooking zone will switch off
–
automatically,
an audible tone sounds for approx.
–
5 seconds.
the symbol for the selected hob zone
–
and the symbol ")" flash.
The ) symbol does not flash when
a cooking end time is entered for the
oven.
Turn the hob cooking zone selector to
^
"0".
The buzzer and the symbol are
switched off.
If the audible tone is not switched off it
will continue to sound at 5 minute intervals as a reminder that cooking time
has finished. This reminder continues
for up to an hour.
Switching the cooking process
off automatically
A time can be entered between 1 min
ute and 23 hours 59 minutes.
Turn the oven function selector or the
^
hob zone control to the required set
ting.
Press the "g" button.
^
"0:00" appears in the display.
^ Set the duration of a cooking process
As soon as the indicator light for the
"+/–" button goes out, the cooking process starts.
-
-
The end of cooking time is automatically calculated from the time entered.
Note:
You can also set the end of cooking
time using the relevant button.
37
Page 38

Using the clock / timer
Switching on and off
automatically
It is a good idea to set the oven to
switch on and off automatically for
roasting.
When baking the delay period set
should not be too long! Otherwise bat
ter or dough will dry out and the raising
agents will lose their effectiveness.
To switch a programme on and off au
tomatically there are several ways of
entering the times:
– Duration g and End time )
– Start time f and duration g
– Start time f and End time )
The time which has not been entered is
calculated automatically.
The symbols for the settings pro-
grammed will light up in the display until the oven switches on.
The following example shows the pro
gramming of a cooking process using
the duration and end buttons.
-
To set the End time
Turn the oven function selector or the
^
hob zone control to the required set
ting.
First enter the duration :
-
Press the "g" button.
^
"0:00" appears in the display.
-
^ Enter the duration.
Then set the End time:
^ Press the ")" button.
The time of day plus the cooking time
entered appears in the display.
-
38
^
Use the "+" button to set the end of
cooking time.
As soon as this time is saved in mem
ory the time of day will reappear in the
display and the heating elements in the
oven will switch off.
-
Page 39

Using the clock / timer
Checking, altering times or
cancelling times entered
Times which have been entered for a
process can be called up at any time.
Press the relevant button for the time
you wish to check, alter or cancel.
If times are programmed for several
processes, (e.g. the oven and each
front cooking zone) each process can
be seen by pressing briefly more than
once on the relevant button.
For example press the relevant button
for the oven and both the front cook
ing zones:
– once and the time entered for the
oven appears.
– twice and the time entered for the
left cooking zone * appears.
– three times and the time entered for
the right cooking zone # appears.
To check
^
Press the button for the time to be
checked.
"f"
The start time of the cooking process
appears. This goes out as soon as the
process begins.
To change
Press the relevant button.
^
As soon as the indicator light for the
^
"+/–" button goes out, you can
change the time.
If a button is pressed, where the time
was not entered, but calculated auto
matically by the system, the indicator
light in the centre of the "+/–" button
does not come on.
The time cannot be altered.
Cancelling the time
-
^ Press the "g" button.
^ Use the "–" button to set the time to
"0:00"
Cancelling a cooking time also cancels
the beginning and end of the cooking
time and vice versa.
Any programmed settings will also be
cancelled if you turn the function selector or hob control to "0".
If there is a power cut all programmes
entered will be deleted.
-
"g"
The display shows the duration of cook
ing time, or the time left if the
programme has started.
")" End of cooking time
-
39
Page 40

Baking
The following settings are recom
mended for baking:
Fan Heat D
–
Intensive Bake F
–
Conventional A
–
-
Bakeware
For the best baking results make sure
that you chose bakeware in a material
suitable for the particular heating sys
tem.
Fan Heat D, Intensive baking F
Most types of heat-resistant tins or
dishes are suitable, including
thin-walled and bright, non-reflective
metal tins. Place the tin or dish on the
baking tray in the oven, with the sloping
edge towards the door.
Conventional A
The following baking tins give an
evenly browned result:
Dark metal, aluminium or enamel tins
with a matt finish are preferable. Heat
resistant glass dishes can also be
used.
Avoid bright, shiny metal tins. These re
flect heat which means that the heat
does not penetrate to the food effec
tively and will result in uneven or poor
browning. In some cases the cakes
might not cook properly. Place the tin or
dish directly on the non-tip rack in the
oven. Use one shelf position only.
-
-
Fan Heat D
Several levels can be used at the same
time for baking. The recommended po
sitions are:
1 tray = 1st runner from the bottom
2 trays = 1st and 3rd runners
from the bottom
3 trays = 1st, 2nd and 4th runners
from the bottom.
If baking on three levels place tins
on the grill pan on the 1st runner po
sition and on baking trays on the
other runner levels.
Remember to remove the roasting
filter from in front of the fan opening.
Otherwise the baking time will be
longer and results uneven.
With Fan Heat D approx. 20 °C lower
baking temperatures are needed than
with the Conventional A setting.
Intensive baking F
Remember to remove the roasting
filter from in front of the fan opening.
Otherwise the baking time will be
longer.
This method of heating is particularly
useful for:
–
dishes that require a moist topping
and crisp base, such as pizzas and
quiche lorraine, or where the base
has not been pre-baked.
-
-
40
Place the tin or dish on the baking tray
on the 1st runner from the bottom only.
Page 41

Baking
Conventional A
Only one shelf should be used for this
function. If more than one shelf position
is needed use Fan heat instead.
This function is particularly good for
rich fruit cakes, pastries and breads
where a fairly long cooking time is re
quired and a deep colour and good
rise are needed.
It is usually necessary to pre-heat the
oven when using this method.
Place tins on the wire rack on runner
level 2 or 3 so that they are centrally
positioned in the oven.
-
General notes
Place rectangular tins in the oven as
shown in the illustration.
Bake larger deep-frozen items such
as pizzas on baking paper on the rack
itself or in the pizza pan (see "Extra ac
cessories"). Placing them on the baking
tray or in the grill pan can cause the
metal to distort. This distortion would in
crease with subsequent use.
Deep frozen foods such as oven chips
or potato croquettes can be cooked on
the baking tray or grill pan.
When baking cakes with fresh fruit
toppings and tall sponge cakes place
the tin in the grill pan to catch any
spillages and keep the oven cleaner.
When baking anything with a high salt
content (such as pretzels) these must
be placed on baking parchment. High
concentrations of salt can damage
PerfectClean surfaces.
The Baking Chart and the Miele
Cookbook give suggestions for tem
perature, runner heights and times.
For even browning –
– Select the runner height according to
the recipe and the setting chosen.
– Just before the end of baking time
test to see if the cake is done.
Insert a metal or wooden skewer into
the centre.
If it comes out clean, without dough
or crumbs sticking to it, the cake is
ready.
Always remove all trays and racks
not being used when using the oven
to get the best results and to keep
cleaning of the trays to a minimum.
The cooling fan will continue for a while
after switching the oven off.
-
-
41
Page 42

Baking chart
Fan Heat D
Temperature
in °C
Creamed mixture
Madeira cake
Rich fruit cake
Victoria sandwich (tin)
Fudge brownies (tray)
Date and walnut cake
Cookies
Small cakes
Whisked mixture
Souffle
Flan base
Swiss roll
1) 3)
1) 3)
1) 3)
1) 3)
150 – 170
–
160 – 170
160 – 170
–
150 – 170
150 – 170
180 – 190
160 – 180
160 – 180
Rubbed-in mixture
Sweet pastry base
Scones
Crumble
Teabread
Shortbread
Apple pie
Savoury pastry
1)
1)
2)
Savoury quiche
Pear and almond flan
Baked cheesecake
150 – 170
200 – 210
170
160 – 180
160
150 – 170
190 – 210
–
–
–
Yeast mixtures
Wholemeal rolls
Lardy cake
Stollen
White bread
Wholemeal bread
Pizza (tray)
1) 3)
Hot cross buns
Choux pastry
1) 3)
1)
–
–
150 – 170
160 – 180
190 – 210
170 – 190
170
Eclairs 160 – 180 1, 3 30 – 40
Flaky pastry
Meringues
Macaroons
Meringues
1)
1)
170 – 190 1, 3 20 – 25
120 – 140
60 – 70
rec. runner
from bottom
1
–
1
1
–
1, 3
1, 2, 4
2
1
1
1
1, 3
1
1
1
1
1
–
–
–
–
–
1
1
1
1
1, 3
1, 2, 4
1
Time
in mins.
50 – 60
–
20 – 25
25 – 30
–
15 – 20
20 – 25
25 – 30
20 – 25
20 – 25
20 – 25
20 – 25
30 – 35
60 – 115
20
55 – 75
25 – 35
–
–
–
–
–
45 – 65
40 – 50
60 – 70
40 – 50
20 – 25
30 – 50
3 – 4 hours
1) Pre-heat the oven when using "Conventional A" heat.
2) Pre-heat the oven when using "Fan Heat D" and "Conventional A" heat.
3) Switch off "rapid heat-up".
42
Page 43

Temperature
in °C
Baking chart
Conventional heat A Intensive baking F
rec. runner
from bottom
Time
in mins.
Temperature
in °C
rec. runner
from bottom
Time
in mins.
160 – 180
130 – 150
–
–
160
–
180 – 200
190
180 – 200
190 – 210
180 – 200
200 – 210
170 – 180
160 – 180
–
180 – 200
230 – 250
–
–
–
200 – 220
200 – 220
170 – 190
190 – 210
210 – 230
190 – 210
170 – 190
2
2
–
–
2
–
2
2
2
2 or 3
2 or 3
2 or 3
2 or 3
2
–
1
2 or 3
–
–
–
2 or 3
2
2 or 3
2 or 3
2 or 3
2 or 3
2 or 3
50 – 60
100 – 140
–
–
105 – 120
–
12 – 15
20 – 25
15 – 20
15 – 20
15 – 20
20 – 25
30 – 35
60 – 115
–
55 – 75
25 – 35
–
–
–
20 – 25
25 – 35
45 – 65
40 – 50
60 – 70
40 – 50
20 – 25
–
–
–
–
–
–
–
–
–
–
–
–
–
–
–
–
–
170 – 190
160 – 170
150 – 160
–
–
–
–
–
170 – 190
–
–
–
–
–
–
–
–
–
–
–
–
–
–
–
–
–
1
1
1
–
–
–
–
–
1
–
–
–
–
–
–
–
–
–
–
–
–
–
–
–
–
–
–
20 – 25
25 – 30
60
–
–
–
–
–
20 – 25
–
190 – 210 2 or 3 25 – 35 – – –
200 – 220 2 or 3 15 – 20 – – –
130 – 150
–
The information given in this chart is intended only as a guide. See the cook book supplied
with your oven for further details.
2
–
30 – 50
–
–
–
–
–
–
–
43
Page 44

Roasting
We recommend the following settings
for roasting in the oven:
Auto Roast E
–
Conventional A
–
Roasting in a covered pot
– This ensures that sufficient stock re-
mains for making gravy.
– The oven stays cleaner, too.
Roasting pots with a lid made from
earthenware, cast iron, ovenproof china
or glass and roasting foil are all suitable. Make sure any lids and handles
are heat-resistant.
Season the meat and place in the pot.
Add some knobs of butter or margarine
or a little oil or cooking fat. Add about
1/8 litre of water when roasting a big
lean joint of meat (2-3 kg) or roasting
poultry with a high fat content.
if a more intensive browning effect is
desired.
Open roasting
Auto roast E:
When roasting on the rack or in an
open tin make sure the roasting filter
is fitted in front of the fan in the back
of the oven before starting.
Use shelf position 1 for roasting.
Exception: With conventional A use
runner level 2 for poultry, meat or fish
weighing up to 1 kg.
The "Auto roast E" system uses an
approximately 20 °C lower roasting
temperature than the "Conventional"
heating system.
When roasting on the rack place the
rack and anti-splash tray over the grill
pan and push them in together.
Season the meat and place in the grill
pan.
Place the covered pot on the rack into a
cold oven.
Exception: Pre-heat the oven to the
temperature suggested when roasting
beef and beef fillet.
Browning only occurs towards the end
of the roasting time. Remove the lid
about halfway through the roasting time
44
Page 45

Calculating the roasting time
The traditional British method is to allow
15 to 20 minutes to the lb, according to
type of meat, plus approx. 20 minutes,
adjusting length of time as roasting pro
ceeds, to obtain the required result.
Temperature
See the Roasting chart for suggested
temperatures.
Do not select a higher temperature than
that advised. The meat will become
brown, but will not be cooked properly
inside.
Do not roast deep frozen meat. Meat
should be thoroughly defrosted before roasting.
Roasting
-
After the roasting process is
finished
Take the roast out of the oven, wrap in
aluminium foil and leave to stand for
about 10 minutes.
This helps retain juices when the meat
is carved.
The cooling fan will continue for a while
after switching off the oven.
45
Page 46

Roasting with the Roast Probe
Using the roast probe enables the
roasting process to be monitored sim
ply and reliably.
The tip of the probe measures the core
temperature at the centre of the meat
continuously.
When the pre-selected core tempera
ture is reached, the oven heating is au
tomatically switched off.
The roast probe can be used with the
following functions:
Auto Roast E
–
Conventional A
–
– Fan Heat D
– Fan Grill N
Using the roast probe
^ Prepare the meat in the usual way.
-
-
Please note:
You can place the meat in a pot or on
the rack.
Roasting bags or aluminium foil may
also be used, but only when left open at
the ends. Insert the probe through the
foil or bag into the centre of the meat.
If fat or bone come into contact with the
probe, this can lead to the oven being
switched off too early. Therefore:
do not let the probe touch any
–
bones.
do not insert it into a particularly fatty
–
area of the meat.
If the meat is very heavily marbled with
fat, select the highest core temperature
given in the roasting chart.
The roast probe should not be used for
poultry or game birds as these contain
a lot of bone.
^
Insert the probe as far as possible
into the meat.
The tip of the probe must reach the
central area of the meat.
46
Page 47

Insert the plug of the roast probe into
^
the socket until you feel it engage.
^ Turn the function selector to the re-
quired oven function.
The following light up:
– the recommended oven tempera-
ture in the oven display,
Roasting with the Roast Probe
To do this:
Press the "e" button.
^
Enter the desired temperature using
^
the "+" or "–" buttons.
When the light in the "+/–" button goes
out
– the oven heating switches on.
– the indicator light for the "+/–" button.
The recommended oven temperature
can be altered if required with the
"+/–" button.
Next, a food core temperature of 60°C
appears in the oven display, and the in
dicator light for the "+/–" button is on.
If necessary this food core tempera
ture can be altered with the "+/–" button
according to the type of food being
cooked, (see "Oven roasting chart" for
suitable choice of temperatures) and
can be altered within a range of 20°C to
99°C.
-
-
–
the actual core temperature ap
pears in the oven display. N.B. The
lowest temperature that can be dis
played is 20°C, so this will also be
shown until the roast probe registers
20°C.
-
-
47
Page 48

Roasting with the Roast Probe
Time left display
After a certain time the estimated resid
ual time (i.e. the time left to run), ap
pears in the oven display. The actual
core temperature is no longer visible
and cannot be called up.
The residual time is calculated from the
oven temperature selected, the required core temperature and the pattern of the increasing core temperature.
The residual time figure first shown is
an estimate. As the cooking process
continues you may see the time left figure increasing. This is due to the elec
tronics checking the core temperature
and readjusting the time left. This is
quite normal.
-
-
If, when the residual time is displayed:
the oven or core temperature is al
–
tered,
or a different oven function is cho
–
sen,
this will cancel all the residual time in
formation, and the actual temperature
will reappear.
If the oven door is held open for some
time, the residual time will be recalcu
-
lated.
Cooking time is completed automati
cally.
Shortly before the end of cooking time
the oven heating switches off.
The Energy-save function (as described under "Oven - use") comes into
action. The time left continues to be
shown in the display. If the "p" button is
pressed, "EC" appears.
If the oven temperature is altered or the
core temperature increased, the oven
heating will switch on again.
-
-
-
-
-
48
Page 49

Roasting with the Roast Probe
End of cooking time
As soon as the chosen core tempera
ture has been reached
an audible tone sounds for approx.
–
5 seconds, and
the "e" symbol flashes.
–
If the audible tone is not cancelled
early, it will continue to sound every 5
minutes for an hour as a reminder that
the process has finished.
The audible tone and the flashing "e"
symbol can be cancelled by:
– pressing the "e" button.
If the food is not sufficiently cooked,
a new core temperature can be entered.
– turning the oven function selector to
"0".
Any temperatures entered will also
be cancelled.
The cooling fan will continue for a while
after switching the oven off.
-
Please note:
The timer can be used to delay the start
of the cooking process.
When finished, cover the meat with alu
minium foil and allow to stand for
approx. 10 minutes. During this time the
core temperature rises another
5 – 10°C.
If the roast probe is left in the food at
the end of the cooking process, the
oven display will show the core temper
ature first rising and then sinking.
The time taken to roast meat by tem
perature using the probe is similar to
that when cooking by time.
You may need to insert the probe in a
different place and start again:
– if the cut of meat was too large (3 kg
or more) for the probe to be inserted
right to the centre.
– if the meat is not sufficiently roasted
when the set temperature is reached.
–
If the cut of meat is less than 1 kg the
probe cannot be used to gain an ac
curate result and the time required
should be calculated using tradi
tional methods.
-
-
-
-
-
49
Page 50

Roasting chart
runner
bottom
Beef (approx. 1 kg) 1
Venison (approx. 1 kg) 1
Leg of pork
(approx. 1 kg) 1
Rolled pork
(approx. 1 kg) 1
Rec.
from
4)
4)
4)
4)
Auto roast E
Temp.
2)
in °C
1)
Time
in mins.
Conventional A
Temp.
2)
in °C
180 60 – 80 200 70 – 90 60 – 80
180 75– 100 220 – 240 100 – 120 65 – 75
185 75 – 100 200 100 – 120 80 – 90
180 – 190 90 – 120 200 – 220 110 – 130 80 – 90
1)
Time
in mins.
temp.
°C
Core
in
3) 1) 5)
Leg of lamb
(approx. 2 kg) 1 180 110 – 130 200 150 80 – 85
Poultry (1 kg) 1
4)
180 – 190 60 – 80 200 – 220 70 – 90 –
Poultry (approx. 2 kg) 1 180 – 190 100 – 110 200 – 220 110 – 120 –
Poultry (approx. 2 kg)
1 180 – 190 100 – 120 200 – 220 110 – 140 –
stuffed
Poultry (approx. 4 kg) 1 170 – 180 160 – 180 190 – 210 170 – 190 –
Whole fish
(approx. 1.5 kg) 1
4)
160 – 180 35 – 55 200 – 220 35 – 55 –
Unless otherwise stated, the times given are for an oven which has not been pre-heated..
1) Fit the roasting filter for roasting.
2) If pot roasting set the temperature 20 °C higher.
3) Roasting using the core temperature roast probe e.
4) Use the 2nd runner from the bottom when using "Conventional" A .
5) Very rare: 60 – 65 °C, medium rare: 65 – 75 °C, medium: 75 – 80 °C, well done 80 °C
The information given in this chart is intended only as a guide.
See the cookbook supplied with your oven for further details.
50
Page 51

Put the roasting filter in front of the
fan grille in the back of the oven.
Grilling
Grill 2 n
Pre-heat the grill for at least 5 min
utes with the oven door shut.
Grilling with the oven door shut
saves energy and minimizes cook
ing smells.
Because the grill is thermostatically
controlled it will not glow red all the
time. This is normal.
The oven has three grill settings:
Grill 1 m
-
-
For grilling large quantities of thin cuts
and for browning food in large dishes.
The whole of the grill element is
switched on. The inner part glows red.
The outer part stays darker than the inner part but creates sufficient radiant
heat for grilling.
Fan Grill N
For grilling larger items, for example,
poultry, rolled meat.
For grilling small quantities of thin cuts
and for browning small dishes of food.
The inner part of the grill element is
switched on and glows red.
The roast probe can also be used to
monitor the temperature. See the ap
propriate section.
The roast probe cannot be used at
the same time as the rotisserie. The
cable would wind round the rotis
serie and be damaged.
-
-
51
Page 52

Grilling
Preparing food for grilling
Clean, wipe and season with pepper
and herbs. Do not season meat with
salt before grilling as this draws the
juices out.
Add a little oil if necessary. Other fats
quickly become black or cause the
food to smoke.
Clean flat fish and slices of fish in the
normal way. To enhance the taste add a
little salt or squeeze a little lemon juice
over the fish.
Grilling on the rack
Most items should be turned half way
^
through cooking.
Temperature
For thin cuts of meat
(e. g. chops or steak) . . . . . . . . . 275 °C
For grilling larger items,
(e. g. rolled meat, poultry) . . . . . 240 °C
See the grill chart for more information.
To grill thicker pieces of food more
gradually after an initial high tempera
ture, continue grilling at a lower temper
ature setting to allow the food to cook
through to the centre.
-
Grilling time
– Flat pieces of fish and meat usually
need 5 – 6 minutes per side depending on their texture.
– Use the Auto roast function for
thicker cuts.
-
^
Assemble the rack on the grill pan
and use the anti-splash tray if you
have one (see "Optional accesso
ries").
^
Place the food on the rack.
^
Select the required grill setting.
^
Set the temperature.
^
Pre-heat the grill for at least 5 min
utes with the door shut before grilling.
^
Place the grill pan under the grill and
shut the door.
For thin cuts use
runner level 4 or 5
For thickers cuts use
runner level 3 or 4
52
Tips on grilling
It is best to grill food of a similar thick
-
-
ness at the same time so that the grill
ing time for each item does not vary too
greatly.
One way of finding out how far through
a piece of meat has been cooked is to
press down on it with a spoon:
–
If there is very little resistance to the
pressure of the spoon, it is still red on
the inside ("rare").
–
If there is some resistance the inside
will be pink ("medium").
–
If there is great resistance, it is
throughly cooked through ("well
done").
-
-
Page 53

Grilling with the rotisserie
For grilling thicker items such as stuffed
meat, poultry, kebabs.
Insert the anti-splash tray in the grill
pan and place the roasting filter on the
back wall.
^ Fit the rotisserie supports into the grill
pan as illustrated.
Grilling
Insert the pointed end of the rotis
^
serie (1) into the motor slot at the
back of the rotisserie set up and lay
the other end (2) onto the holder as illustrated.
^ Turn the oven function selector to the
required grill setting.
-
^
Secure the meat to the rotisserie spit
using clamps as illustrated making
sure it is held centrally. Meat should
be balanced in the middle to give
even rotation.
^ Put the grill pan holding the assem-
bled rotisserie in the oven, using the
1st runner from the bottom.
See the Rotisserie chart for suggested
times and temperatures.
Two special accessories for rotisserie
grilling, a meat and poultry clamp, and
a kebab grilling device are available
from your Miele dealer or the Miele
Spare Parts Department.
53
Page 54

Grill chart
Pre-heat the grill for at least 5 minutes with the door shut before using.
Food to be grilled
Flat items of food
Beef steaks 3/4/5 290 3-5 250 5-10
Kebabs 4 260 8-12 240 8-12
Escalope 4/5 290 5-10 240 10-12
Liver 4/5 275 8-12 245 8-12
Burgers 4 210 10-15 200 10-15
Sausages 4 240 8-10 220 10-12
Chops 4 275 12-18 250 10-15
Fish fillet 4/5 250 10-15 220 12-16
Trout / Mackerel 4 275 16-20 220 20-25
Toast 5 240 3-6 220 5-10
Open toasted sandwich 4/5 240 4-6 220 5-7
Tomatoes 4 240 7-10 225 10-12
Bananas 5 240 6-10 225 6-10
Peach halves 2/3 230 6-8 210 6-8
Thicker grilling cuts
Chicken pieces (approx. 1 kg)
Mixed grill
Piece of pork, Ø 7 cm (approx. 1
kg)
Kebabs 3 250 25-35 230 25-35
3)
3)
Runner
from
bottom
3)
2/3 220 50-60 200 50-60
3 260 20-25 230 20-25
3 240 70-80 200 70-80
Grill 1 / Grill 2
tempera
ture
in °C
1)
total
grill time
in mins.
2)
Fan Grill
tempera
ture
in °C
-
1)
total
grill time
in mins.
2)
1) Fit the roasting filter when grilling
2) Turn half way through the grilling time.
3) Grilling on the rack.
The information given in this chart is intended only as a guide. See the cook book
supplied with your oven for further details.
54
Page 55

Rotisserie Chart
Type of meat Weight Grill temperature
Poultry
Small chicken 1.1 kg 240°C 30 - 40 mins
Medium chicken 1.3 kg 240°C 45 - 60 mins
Large chicken 1.8 kg 240°C 60 - 70 mins
Marinated chicken portions
Chicken leg, Chicken breast
Poussin (baby chicken) 450 g 240°C 30 - 35 mins
Duck *(medium bird) 1.6 kg 240°C 60 mins
Beef
Topside, small joint 0.7 kg 220°C Rare 30 - 40 mins
Lamb
Rolled, boned leg 1.3 kg 200°C Medium 50 - 60 mins
Rolled, boned shoulder 1 kg 200°C Medium 50 - 60 mins
Shish kebabs 3 skewers 220°C 12-15 mins
Pork
Boned leg 900 g 240°C 60 – 75 mins
Pork kebabs (1 inch cubes) for 3 skewers 240°C 15 - 20 mins
700 g
385 g
Grill 2 n
240°C
240°C
Well done 60 - 70 mins
Well done 75 - 85 mins
Well done 75 - 80 mins
Time
15 - 20 mins
15 - 20 mins
Medium 45 - 60 mins
NB This chart is intended as a guide only, individual tastes and cuts of meat will vary.
* Care should be taken when using the rotisserie for duck. Because of the fat content,
spitting is inevitable and will cause a lot of fat splashes around the oven. Fit the roasting
filter in the back of the oven.
55
Page 56

Defrosting
Turn the function selector to
^
"Defrost G"
For defrosting meat and delicate food
we recommend defrosting at room tem
perature, i.e. without selecting an oven
temperature.
However, an oven temperature of up to
50°C can be selected.
Where possible remove the packag
–
ing and put the food to be defrosted
on a baking tray or into a dish.
All meat and poultry should be fully
–
defrosted before cooking. Do not use
the liquids from defrosting.
– When defrosting poultry put it on the
rack over the grill pan to catch the
defrosted liquid, so that the meat is
not lying in this liquid.
It is particularly important to observe
food hygiene rules when defrosting
poultry. Do not use the liquid from
the defrosted poultry. Pour it away,
and wash the tray, the sink and your
hands. Danger of salmonella.
Do not refreeze food once it has
thawed.
The time needed for defrosting de
-
pends on the type and weight of the
food, and at what temperature it was
deep frozen.
-
-
–
Fish does not need to be fully de
frosted before cooking. Defrost so
that the surface is sufficiently thawed
to take herbs and seasoning.
56
-
Page 57

Cleaning and care
Appliance front and control
panel
All external surfaces and controls can
^
be cleaned using warm water with a
little washing up liquid applied with a
soft sponge or cloth.
Wipe the surfaces dry using a soft
^
cloth.
E-Cloth
A microfibre "E-Cloth" is available from
the Miele UK Spare Parts Department,
Part number 98013530, which is suit
able for cleaning surfaces such as
stainless steel, glass, plastic and
chrome without the use of chemicals. It
can be washed 300 times.
To prevent the risk of scratches and
damage to the surface structure of
glass, stainless steel and aluminium
fronted appliances pay particular attention to the following cleaning instructions.
-
Glass fronted appliances
The appliance front and controls are
susceptible to scratches and abrasion.
Avoid:
–
abrasive cleaning agents, e.g. pow
der cleaners and cream cleaners,
–
abrasive sponges, e.g. pot scourers
or sponges which have been previ
ously used with abrasive cleaning
agents,
-
each use.
This will help prevent grease or other
deposits adhering to surfaces and be
coming difficult to remove.
Aluminium fronted appliances
Aluminium is affected by the way that
light falls on it, by the surrounding envi
ronment and by the angle you observe
it from.
Aluminium surfaces and controls
may suffer discolouration or damage
if acids, alkalis or soiling are left on
them for too long. Remove these
straight away.
The appliance front and controls are
susceptible to scratches and abrasion.
Avoid:
– cleaning agents containing soda, ac-
ids or chlorides,
– abrasive cleaning agents, e.g. pow-
der cleaners and cream cleaners,
–
abrasive sponges, e.g. pot scourers
or sponges which have been previ
ously used with abrasive cleaning
agents,
–
-
stainless steel cleaners,
–
cleaning agents containing
descaling agents,
–
diswasher detergent,
–
oven sprays.
-
-
-
–
oven sprays.
Clean the door handle and the control
elements regularly, preferably after
57
Page 58

Cleaning and care
Stainless steel fronted appli
-
ances
The appliance front and controls are
susceptible to scratches and abrasion.
Please observe the cleaning instruc
tions for
stainless steel surfaces,
–
stainless steel coloured controls.
–
Stainless steel surfaces
Stainless steel surfaces can be cleaned
using a proprietary non-abrasive clean
ing agent designed specifically for use
on stainless steel, or with the Miele
E-Cloth.
Avoid:
– cleaning agents containing soda, ac-
ids or chlorides,
– abrasive cleaning agents, e.g. pow-
der cleaners and cream cleaners,
–
abrasive sponges, e.g. pot scourers
or sponges which have been previ
ously used with abrasive cleaning
agents.
-
-
Stainless steel coloured controls
The controls may suffer discolour
ation or damage if soiling is left on
them for too long.
Remove any soiling straight away.
Avoid:
cleaning agents containing soda, ac
–
ids or chlorides,
abrasive cleaning agents, e.g. pow
–
der cleaners and cream cleaners,
abrasive sponges, e.g. pot scourers
–
or sponges which have been previ-
ously used with abrasive cleaning
agents,
– stainless steel cleaners,
– oven sprays.
If you are unsure about a particular
product or need further advice
please contact your nearest Miele
Sales office. See back page for ad
dress.
-
-
-
-
To help prevent re-soiling, a proprietary
conditioning agent for stainless steel
can also be used.
Apply sparingly with even pressure us
ing a soft cloth following the direction of
the grain.
58
-
Page 59

Cleaning and care
Accessories
Always remove all accessories, trays
and racks which are not being used
when using the oven to get the best
results and to keep cleaning of the
trays to a minimum.
Baking tray, grill pan, rack and side
supports
The surfaces of these have been
treated with PerfectClean enamelling.
See "PerfectClean" for cleaning instructions.
Roasting filter
Clean in a solution of hot water and a
little washing up liquid or in the dishwasher.
Note: some dishwasher detergents may
cause the surface of the metal filter to
discolour. This discolouration will not affect the functioning of the filter in any
way.
Roast probe and baking carriage
telescopic runners (if fitted)
Wipe with a damp cloth.
Do not put the roast probe or the
baking carriage telescopic runners
into water, or clean them in the dish
washer. This would damage them.
Rotisserie
Clean in a solution of hot water and a
little washing up liquid. Stubborn soiling
should be soaked first before being removed. If necessary a non-abrasive
proprietary stainless steel cleaner may
be used.
-
59
Page 60

Cleaning and care
PerfectClean
Before using for the first time remove
any stickers from PerfectClean sur
faces.
The enamelled surfaces of the oven in
terior, baking tray, grill pan, rack and
side supports have been treated with a
new type of enamelling called
"PerfectClean".
This surface has very good anti-stick
properties which is much easier to keep
clean than conventional oven enamel, if
cleaned regularly.
Food can be taken off it more easily
and soiling from baking and roasting is
easier to remove.
The following notes on cleaning and
care should ensure that the anti-stick
and easy clean properties of
PerfectClean last for many years.
PerfectClean surfaces can be treated
as you would treat glass. If you are un
sure whether a particular cleaning
product is suitable for PerfectClean
consider whether you could clean a
window pane with the product without
damaging it.
Food can be sliced or cut up on the
PerfectClean surface in the same way
as on a baking tray with conventional
enamel.
Allow the oven and any accessories
to cool down before cleaning. Dan
ger of burning!
-
-
-
Normal soiling
Clean as soon as possible after each
use with a dishcloth, soft sponge (such
as the Vileda sponge supplied with
ovens in the UK) or a soft nylon brush,
and a solution of hot water and a little
washing up liquid. The longer soiling is
left the harder it may become to re
move.
Stubborn soiling
Stubborn soiling e.g. from roasting may
need to be soaked first with a damp
sponge to loosen it and if necessary a
scraper suitable for glass surfaces can
be used to remove it.
After cleaning rinse thoroughly with
clean water. The water must run off the
surface easily. Any residual cleaning
agents will hinder this effect.
Using oven sprays on very stubborn
soiling
Some oven cleaners contain strong
alkalines and / or abrasive
materials. Because the enamel is
designed to be easily cleaned the
use of these cleaners is not recom
mended.
However if you still cannot get the
surface clean, an oven cleaner can
be used for a couple of minutes only.
Do not attempt to use on a hot oven
or accessories. Allow the
PerfectClean surfaces to cool down
to room temperature before applying
oven sprays!
-
-
60
Page 61

Cleaning and care
Remove the catalytic back panel,
side liners (if fitted) and roof panel
before using oven sprays. The
chemicals used in oven sprays will
damage catalytic enamel rendering
it ineffective.
Apply a spray oven cleaner to the
soiled areas. Leave to take effect for a
couple of minutes only!
If necessary use a soft sponge (e.g. the
Vileda sponge as supplied with the
oven), soft nylon brush or a scraper
suitable for glass surfaces to loosen the
soiling.
Repeat the process if necessary.
After cleaning rinse thoroughly with
clean water and then dry thoroughly.
Important
For optimum performance of the
PerfectClean enamel it is important to
clean the oven and accessories after
each use.
The surfaces will become harder to
clean and the anti-stick properties
will deteriorate if soiling is not re
moved after each use and allowed to
build-up. In extreme cases cleaning
may even become impossible.
-
The following cause lasting damage
to the surface structure and reduce
the anti-stick effect and must not be
used on PerfectClean surfaces:
– abrasive cleaning agents
– wire wool or metal scourers
– pot scourers
– oven cleaning pads
– sponges and cloths which have
previously been used with
abrasive cleaning agents.
– oven spray must not be used in a
hot oven or left on for too long.
– items coated with PerfectClean
enamelling must not be cleaned
in a dishwasher.
Note
Soiling such as spilt juices and cake
mixtures are best removed whilst the
oven or tray is still warm. Exercise caution, make sure the oven is not hot danger of burning!
Spilt fruit juices may cause lasting dis
colouration of the surfaces and roasting
can cause matt areas to appear. Clean
these following the instructions given
above and do not try and use force to
remove them! This discolouration is
permanent but will not affect the effi
ciency of the enamel.
-
-
When baking items with a high salt con
tent (e.g. continental pretzels) place
them on baking parchment in the bak
ing tray or grill pan. Sodium deposits
can cause lasting discolouration to
PerfectClean surfaces.
-
-
61
Page 62

Cleaning and care
Catalytic enamel surfaces
The removable back panel, side liners
(if fitted) and roof liner are coated with a
dark grey catalytic enamel.
During fan operated cooking circulating
air in the oven deposits oil and fat
splashes predominantly on the back
panel of the oven. These splashes are
burnt off when the temperature of the
oven reaches over 200°C during baking
or roasting. The higher the temperature
the more effective the process.
The oven and accessories should be
cleaned after each use. Otherwise
further baking and roasting will cause
the deposits to bake on even harder
and cleaning may become difficult and
in extreme cases impossible.
Cleaning by hand
Allow the oven to cool down before
cleaning. Danger of burning!
Catalytic enamelled panels should be
^
cleaned using a solution of hot water
with a little washing up liquid applied
with a soft nylon brush.
Do not use abrasive cleaning
agents, hard brushes, scouring
pads or cloths, steel wool, knives or
other abrasive materials and do not
use oven spray on catalytic enamel
as the chemicals used in oven
sprays will damage catalytic enamel
rendering it ineffective.
If using oven sprays on PerfectClean
oven surfaces the catalytic back
panel, side liners (if fitted) and roof
liner must first be removed from the
oven.
62
Page 63

Cleaning and care
To clean at high temperatures
Before cleaning the catalytic panels
using high temperatures, make sure
that all PerfectClean surfaces have
been cleaned as previously de
scribed. Otherwise, the high temper
atures can cause deposits to be
come baked on to the PerfectClean
surfaces and become impossible to
remove.
If, after manual cleaning, the oven is
still heavily soiled, heating it to a high
temperature will help remove further
soiling caused by oil and grease
splashes from the catalytic surfaces.
Note that deposits of spices, syrups
and similar substances are not
removed by this process. These should
be removed while fresh by hand with a
mild solution of hot water and washing
up liquid applied with a soft brush.
-
-
Take all accessories out of the oven.
^
Turn the oven selector to
^
Fan heat D.
Turn the temperature selector to the
^
highest setting.
Run the oven for approx. 1 hour. The
^
length of time will depend on the
level of soiling.
It is a good idea to set the finish time for
the process using the timer. This way
you will not forget to switch the oven off
at the end.
Any remaining soiling will gradually disappear with each subsequent use of
the oven at high temperatures.
Should the catalytic enamelling on
the back panel, the side liners or the
roof liner become ineffective through
improper use or heavy soiling, a replacement can be obtained from
your Miele dealer or the Miele Spare
Parts dept.
63
Page 64

Cleaning and care
To make cleaning easier you can
remove the oven door,
–
take out the telescopic carriage or
–
the runners,
take out the back panel
–
take out the side liners (if fitted)
–
lower the top heating element.
–
To remove the oven door
Please note : the oven door is heavy.
It should be gripped firmly at the
sides when being removed or re-fit
ted.
^ Open the door fully.
Before the door can be removed, the
door hinges need to be locked so
that they do not damage the door
when it is taken out.
-
^ Lift the door up until it is nearly in the
closed position. The hinges will automatically swing out in this position,
then remove the door.
To re-fit the oven door
^ Hold the door as shown above and
carefully put the locked hinges into
the guide holes until they engage.
Open the door fully.
^
Flip down the locking clamps on
each door hinge. This locks the
hinges.
64
^
Still supporting the door, flip the lock
ing clamps up.
It is essential that the locking clamps
are flipped up when the door is
re-fitted after cleaning. Otherwise on
closing the door, the hinges could
work loose from the guide holes and
this could result in damage to the
door.
-
Page 65

To remove the telescopic carriage
(depending on model)
Cleaning and care
Make sure the oven heating ele
ments are switched off and cool to
avoid the danger of being burnt.
^ Pull out the telescopic carriage and
remove the side runners.
-
Pull on the fixing knob to release it.
^
^
Remove the frame from the guide
rails.
^
Take the guide rails out of the oven.
Reassemble in reverse order, carefully
ensuring all parts are correctly in place.
65
Page 66

Cleaning and care
To remove the runners
(depending on model)
Make sure the oven heating ele
ments are switched off and cool to
avoid the danger of being burnt.
^ Pull on the fixing knob to release it.
-
To lower the upper heating element
Make sure the oven heating ele
ments are switched off and cool.
Danger of burning.
Remove the runners.
^
^ Pull on the fixing knob to release it.
-
^
Take the runners out of the oven.
Reassemble in the reverse order, care
fully ensuring all parts are correctly in
place.
66
^
Gently lower the element.
Do not use force to pull it down as
this can cause the element to break.
-
Page 67

Cleaning and care
To remove the catalytic enamelled
back panel, side liners (if fitted) and
roof liner
Make sure the oven heating ele
ments are switched off and cool.
Danger of burning.
The catalytic panels and liners can be
removed for cleaning if necessary.
See "Cleaning and Care" for more infor
mation.
– Back panel
^ Remove the runners.
-
– Roof liner
Remove the runners.
^
Lower the top heating element.
^
Hold the roof liner firmly and unscrew
^
the knurled knob.
Take out the roof liner.
^
Reassemble in the reverse order, carefully ensuring all parts are correctly in
place.
– Side liners
(depending on model)
^ Take the runners or the telescopic
frame out of the oven.
^
Loosen the screws in the back panel
and take it out.
The oven must not be used without
the back panel fitted. This could
cause considerable injury.
Reassemble in the reverse order, care
fully ensuring all parts are correctly in
place.
^
Gently lift and pull out the catalytic
side liners.
Reassemble in the reverse order, care
fully ensuring all parts are correctly in
place.
-
-
67
Page 68

Cleaning and care
When reassembling the catalytic side
liners, ensure they sit correctly.
^ Ease the back lug into the opening in
the rear wall.
^ Put the runners or the guide rails of
the telescopic frame back into place.
Reassemble in the reverse order, carefully ensuring all parts are correctly in
place.
^
Lift the front locating hole on to the
guide pin behind the collar.
68
Page 69

Installation, maintenance and repairs
to the electrical components of this
appliance should only be carried out
by a suitably qualified and compe
tent person in accordance with na
tional and local safety regulations.
Repairs and other work by unquali
fied persons could be dangerous.
The manufacturer cannot be held lia
ble for unauthorised work.
Some minor problems however can be
dealt with as follows:
-
-
-
What to do if . . .
. . . the oven does not heat up.
Check whether,
^ the selector switch is set to the func-
tion required, and the temperature
control is set at the correct temperature.
Correcting minor faults
. . . the heating works, but not the
oven lighting.
The halogen lamp needs replacing.
To change the lamp:
Disconnect the appliance from the
^
electricity supply.
Switch off and unplug at the socket,
-
or remove the fuse, or switch off at
the isolator as appropriate.
Remove the runners and side liners
^
(if fitted).
Cover the floor of the oven with a
^
towel to protect the enamelling just in
case the lamp cover is dropped.
^ the operating lock is activated.
^
the mains fuse has blown. Contact a
qualified electrician or the Miele Ser
vice Department.
-
^
Use the lever to release the lamp
cover from its frame.
69
Page 70

Correcting minor faults
The glass cover is held in position by
two metal brackets which are secured
to the reflector.
Do not push the metal brackets to
the sides, as this would damage
both the brackets and the reflector.
It might also make it difficult to push
the glass cover back into its frame
again.
^
Pull the glass cover out of the rear
metal brackets.
On some models the halogen lamp
cover will come out together with the
glass cover.
^ Pull the defective halogen lamp out
and replace it with a new one, making sure it goes into its socket horizontally.
When purchasing a new lamp it is a
good idea to take the old one with
you to make sure you get the correct
replacement (12 V, 20 W, heat resis
tant to 300 °C, G4 fitting, Osram,
Type 64428).
-
70
Do not touch the surface directly
when changing the lamp as grease
particles from your fingers will ad
here to the surface and damage the
lamp. Please follow the manufac
turer's instructions.
-
-
Page 71

Correcting minor faults
. . . there is a distinctive smell of food
when using the oven
Make sure the catalyser is switched on.
See "Altering oven settings, setting 02".
. . . no noise is heard when the oven
door is opened during operation.
This is not a fault.
If the door is opened during operation,
the door contact switch causes the
oven heating, and the fan if on "Fan"
setting, to be switched off.
Push the glass cover back into the
^
metal brackets with the cut out edge
towards the rear.
^
Push the glass cover into its frame at
the front.
^
Replace the runners (and side liners
if fitted).
Reassemble in the reverse order, care
fully ensuring all parts are correctly in
place.
. . . a noise can be heard after baking,
roasting or grilling.
This is not a fault.
The cooling fan continues to run for a
while after the oven has been switched
off to prevent any humidity building up
in the oven, on the control panel or in
the oven housing unit. When the temperature has fallen sufficiently the fan
switches off automatically.
The temperature will fall faster when the
oven door is opened partially or fully.
-
71
Page 72

Correcting minor faults
. . . cakes and biscuits are not cooked
after following the times given in the
chart.
Check whether,
the correct temperature was set.
^
there has been a change to the rec
^
ipe. The addition of more liquid or
more eggs makes a moister mix
which would need longer to cook.
the roasting filter had been left in
^
place in front of the fan when cooking
with "Fan heat D" or "Intensive Bake
F" or was in place for "Auto Roast
E". In this case baking times might
be lengthened by 10 to 15 minutes.
. . . cakes or biscuits are unevenly
browned.
There will always be a slight unevenness. Product information sheets give a
percentage result for standard browning tests. These refer to results for one
tray.
If the item being baked is browning
very unevenly, check:
when baking with Fan Heat D:
–
whether the temperature was set too
high,
–
whether the roasting filter was in
place,
–
whether the correct runner height
was used.
-
when baking with Conventional A:
the colour and composition of the
–
baking tins being used. Light col
oured, shiny, or thin walled tins are
less suitable,
whether the correct runner height
–
was used.
. . . spots like rust appear on catalytic
surfaces.
When roasting on the rack, the circulat
ing air sometimes picks up spices,
which are then deposited on the oven
interior walls. Such residues are not removed by catalytic cleaning, they are
best removed while fresh with a mild
washing up liquid and a soft brush.
. . . the display light does not come
on when a hob control is switched on
(depending on model).
The lamp needs changing.
The lamp must be changed by a Miele
service technician.
. . . "F" and a number appear in the
oven display field.
This combination indicates a fault
^
If "F3" appears the core temperature
(roast) probe has a fault.
Remove the probe from its socket
and the message will disappear.
-
-
72
Page 73

Correcting minor faults
If "F6" appears the oven has auto
^
matically switched itself off during
use. This is a safety feature to protect
the oven if it has been operating for
an exceedingly long period. The
length of time depends on the oven
function selected.
The oven can be used again immedi
ately by simply turning the oven
function selector to "0" and then en
tering the process again.
If "F9" appears in the display, this
–
may mean that the maximum temper
ature of the appliance has been ex
ceeded.
The appliance automatically switches
itself off temporarily. As soon as the
temperature has fallen to an acceptable level the fault message disappears. The appliance switches itself
on again automatically.
If this fault message occurs repeatedly, please inform the Service dept.
Please quote the fault message.
–
If any other fault message appears
in the display, this will need a service
visit. Please quote the fault message.
. . . the time of day cannot be re-set
-
after a power cut.
This is not a fault.
Check whether the function selector is
still set to one of the functions. If it is,
turn it to the "0" position.
The time of day can now be set.
-
. . . the energy-save function is not
-
activated when cooking with the
roast probe or the timer.
This is not a fault.
Certain conditions must be fulfilled be
fore the system controlling the en-
ergy-save function comes into operation. Sometimes these do not occur.
. . . the residual time indicator is not
activated when cooking with the
roast probe.
This is not a fault.
Certain conditions must be fulfilled before the system controlling residual time
comes into operation. Sometimes these
do not occur.
-
. . . the timer display does not light up
when the oven is operating.
This is not a fault.
The display does not light up if the time
of day display has been switched off.
Press "f" and ")" at the same time.
"12:00" will appear in the display field.
73
Page 74

After sales service
In the event of faults which you cannot
easily remedy yourself, please contact:
your Miele Dealer
–
or
the nearest Miele Service Depart
–
ment, (see address on the back
page).
-
When contacting the Service dept,
please quote the Model and Serial
number of your appliance, both of
which are shown on the data plate, visi
ble below the oven interior, with the
oven door open.
If you have an oven and hob combina
tion also give the number of your hob.
Please note that telephone calls may
be monitored and recorded to im
prove our service.
-
-
-
74
Page 75

Extra accessories
The following accessories may come as
standard in some countries. They are
available at extra cost from your Dealer
or the Miele Spare Parts dept.
Pizza pan
This circular pan is suitable for cooking
pizzas, flat cakes made with yeast or
whisked mixtures, sweet and savoury
tarts, baked desserts, and can also be
used for deep frozen cakes and pizzas.
Baking stone
The baking stone is ideal for items
which need a well baked base such as
pizza, quiche, bread, bread rolls and
savoury snacks.
Gourmet oven dish
The gourmet oven dish can be placed
in the oven directly on the runners. It
has non-tip safety notches like the oven
tray to prevent it being pulled out too
far.
It has a special protective anti-stick
coating.
It is available either 22 or 35 cm deep.
A lid is available separately.
Catalytic side panels
If you roast or grill frequently catalytic
coated side panels can be fitted in the
sides of the oven to help keep it clean.
When ordering please state the model
number of your oven and whether it is
fitted with side runners or a telescopic
carriage. If they are to be fitted in an
oven with PerfectClean enamelling in
the sides of the oven the runners will
also need replacing.
The baking stone is made from heat re
taining fire brick and is glazed.
Place it directly on the rack.
A paddle made of untreated wood is
supplied with it for placing food on the
baking stone and taking it off.
-
75
Page 76

Extra accessories
Telescopic runners
The telescopic runners provide three
shelf levels.
Each shelf level can be drawn right out
of the oven individually to give a good
overview of cooking in progress.
Depending on country the H 390,
H 373 and H 383 can also be retro
spectively fitted with:
a receiver for the radio controlled
–
clock signal,
the Miele Info Control.
–
Radio controlled clock*
A receiver for the radio controlled clock
signal is connected to the cooker or
oven. Time of day adjustment occurs
automatically on receipt of the signal.
Miele Info Control*
A transmitter unit may be connected to
the cooker or oven. This is used to
transmit information at any time about a
cooking process (e.g. temperature, delay start, time remaining) to the mobile
receiver.
* Depending on country.
-
76
Page 77

Electrical connection UK, IRL, ZA
All electrical work should be under
taken by a suitably qualified and
competent person in strict accor
dance with national and local safety
regulations.
Installation, repairs and other work
by unqualified persons could be
dangerous. The manufacturer can
not be held liable for unauthorised
work.
Ensure power is not supplied to the
appliance while installation or repair
work is being carried out.
The voltage, rated load and fusing are
given on the data plate, visible below
the oven interior, with the oven door
open. Ensure that these match the
household mains supply. Please quote
these data, and the model and serial
number when contacting the Miele Service dept.
Connection of this appliance should be
made either via a fused connection unit
(rated load under 3000 W), or via a suit
able isolator (rated load over 3000 W),
which complies with national and local
safety regulations, and the on/off switch
should be easily accessible after the
appliance has been built in.
If the socket is not accessible after in
stallation (depending on country) an
additional means of disconnection must
be provided for all poles.
For extra safety it is advisable to install
a residual current device with a trip cur
rent of 30 mA (in accordance with DIN
VDE 0664, VDE 0100 Section 739).
When switched off there must be an
all-pole contact gap of 3 mm in the iso
-
-
-
-
lator switch (including switch, fuses and
relays acc. to EN 60 335).
Important U.K.
This appliance is supplied with a 3-core
cable for connection to a single phase
230-240 V 50 Hz supply.
The wires are coloured in accordance
with the following code:
Green/yellow = earth
Blue = neutral
Brown = live
In other countries check these details
with your supplier.
WARNING
THIS APPLIANCE MUST BE
EARTHED
Oven with integrated hob controls
"E" model
This is not available in all countries.
For some countries the version of the
oven with integral hob controls is sup
plied for connection to a 3N ~ 400 V
power supply.
Any adaptations must on be carried out
in consultation with the relevant Miele
Service Dept.
Possible combinations:
Miele built-in ovens may only be com
bined with hobs and their respective
control units as specified by Miele for
-
use with that oven.
Contact your Miele Dealer for further in
formation on suitable combinations.
-
-
-
-
77
Page 78

Electrical connection UK, IRL, ZA
IRL
The voltage and rated load are given
on the data plate, visible when the oven
door is open. Please ensure that these
match the household mains supply.
The appliance is supplied with a 3-core
cable for connection to a 230-240 volt
50 Hz supply.
The fuse rating is 32 amps for the
"E"-model with hob.
The fuse rating is 16 amps for the
"B"-model.
The wires are coloured in accordance
with the following code:
Green/yellow = earth
Blue = neutral
Brown = live
ZA
Data relating to electrical connection
will be found on the data plate, visible
when the oven door is open. Make sure
that these figures comply with the main
voltage. Connection should be made
via a suitable isolator which complies
with national and local regulations.
The appliance is supplied with a 3-core
cable for connection to a 230-240 volt
50 Hz supply.
The fuse rating is 20 amps for the
"B"-model.
The wires are coloured in accordance
with the following code:
Green/yellow = earth
Blue = neutral
Brown = live
WARNING
THIS APPLIANCE MUST BE
EARTHED.
78
WARNING
THIS APPLIANCE MUST BE
EARTHED.
Page 79

Electrical connection AUS, NZ
All electrical work should be under
taken by a competent person in
strict accordance with national and
local safety regulations.
The voltage and rated load are given
on the data plate, visible when the oven
door is open. Please ensure that these
match the household mains supply.
Please quote these data, and the model
and serial number when contacting the
Miele Service dept.
Connection of this appliance should be
made via a suitable isolator which complies with national and local regulations,
and which is accessible after the appliance has been built in.
-
AUS
Wall oven
The wall oven is suitable for connection
to an a.c. single phase 240 V, 50 Hz
electricity supply.
The fuse rating is 16 A.
NZ
Wall oven
The wall oven is suitable for connection
to an a.c. single phase 230 V, 50 Hz
electricity supply.
The fuse rating is 16 A.
WARNING
THIS APPLIANCE MUST BE
EARTHED.
Test marks . . . . . . . . . . Electrical Safety
. . . . . . . . . . . . . . . . . . . . . . C-Tick Mark
Electrically suppressed
according to. . . . . . . . . . . AS/NZS 1044
79
Page 80

Installation - cooker and hob control unit
Follow the relevant instructions for your
specific model.
Installation of the hob control
unit
Turn off the mains electricity supply
to the isolator.
Install the hob, see separate instruc
^
tions.
Connect the cooker to the electricity
^
supply by the isolator.
Align the cooker in front of the base
^
unit.
With some models there is a yellow
and green earth lead on the cooker
which must also be secured to the
base of the hob.
-
^ Pull the control knobs for the hob and
the cooker plugs out of the insert retainers.
80
^ Fit the KSE hob electronic unit into
place.
Page 81

Installation - cooker and hob control unit
H 370, H 380, H 383
The plugs on the cooker / hob and
the sockets on the hob electronic
control are colour coded.
^ Insert the hob control knobs into the
control facia.
Fit the cooker plugs into their
sockets.
H 373, H 390
The plugs on the cooker / hob and
the sockets on the hob electronic
control are colour coded.
^ Insert the hob control knobs into the
control facia.
Fit the cooker plugs into their
sockets.
^
Then fit the hob plugs into their sock
ets.
-
^
Then fit the hob plugs into their sock
ets.
-
81
Page 82

Installation - cooker and hob control unit
Installation of cooker
H 370, H 380, H 373, H 383
Do not fit insulation material inside
the housing unit. This would hinder
the intake of air to cool the appli
ance.
Push the cooker into the housing unit
^
as far as the oven trim and align.
-
82
^
Open the oven door and using two
screws secure the oven to the side
walls of the housing unit through the
holes in the oven trim.
The appliance must only be oper
ated when it has been built-in.
-
Page 83

Installation - cooker and hob control unit
H 390
Do not fit insulation material inside
the housing unit. This would hinder
the intake of air to cool the appli
ance.
^ Loosen the screws in the decor strips
and remove the decor strips.
Do not unscrew the screws completely.
-
Push the cooker into the housing unit
^
as far as the oven trim and align.
^ Open the oven door and using two
screws secure the oven to the side
walls of the housing unit through the
holes in the oven trim.
^
Put the decor strips back in place
and tighten the screws.
The appliance must only be oper
ated when it has been built in.
-
83
Page 84

Installing the oven
The oven is designed to be built into
a tall unit. If you wish to install it in a
base unit, the stainless steel rail
above the control panel must be re
placed by a sealing strip. The seal
ing strip offers additional protection
from any liquids that might spill
down from the worktop, and can be
purchased from the Miele Spare
Parts dept.
Follow the relevant instructions for your
specific model.
H 370, H 380, H 373, H 383
Do not fit insulation material inside
the housing unit. This would hinder
the intake of air to cool the appliance.
-
-
Turn off the mains electricity supply
to the isolator.
Connect the oven to the electricity
^
supply by the isolator.
Place the oven into the oven housing
^
unit as far as the oven trim and align.
84
^
Open the oven door and using two
screws secure the oven to the side
walls of the housing unit through the
holes in the oven trim.
The appliance must only be oper
ated when it has been built in.
-
Page 85

H 390
Do not fit insulation material inside
the housing unit. This would hinder
the intake of air to cool the appli
ance.
Installing the oven
-
Turn off the mains electricity supply
to the isolator.
^ Connect the oven to the electricity
supply by the isolator.
^
Place the oven into the oven housing
unit as far as the oven trim and align.
^
Loosen the screws in the decor strips
and remove the decor strips.
Do not unscrew the screws com
pletely.
-
^ Open the oven door and using two
screws secure the oven to the side
walls of the housing unit through the
holes in the oven trim.
^
Put the decor strips back in place
and tighten the screws.
The appliance must only be oper
ated when it has been built in.
-
85
Page 86

Installing the oven
Important Note: H 390
Pay particular attention to the distances necessary in the following installation
situations for the H 390:
86
Page 87

87
Page 88

Alteration rights reserved / 22 / 0703
(H 370-2, H 380-2, H 373-2, H 383-2, H 390-2)
This paper consists of cellulose which has been bleached without the use of chlorine.
M.-Nr. 05 850 170 / V01
 Loading...