


Akoya P2211T

29.5 cm / 11.6“ Notebook
MEDION® AKOYA
®
Instruction Manual

Table of Contents
1. About these Instructions ............................................................................. 5
1.1. Symbols and Key words used in these Instructions ................................... 5
1.2. Proper Use .................................................................................................................6
1.3. Declaration of Conformity ................................................................................... 6
2. Safety Instructions ....................................................................................... 7
2.1. Dangers for children and people with reduced ability to operate
electronics ................................................................................................................. 7
2.2. Operational Safety .................................................................................................. 7
2.3. Never Carry Out Repairs Yourself .....................................................................9
2.4. Data Backup .............................................................................................................. 9
2.5. Setup Location (in Notebook Mode) ...............................................................9
2.6. Environmental Requirements ..........................................................................10
2.7. Ergonomics .............................................................................................................10
2.8. Connecting..............................................................................................................11
2.9. Cabling......................................................................................................................12
2.10. Information about the Touchpad ....................................................................13
2.11. Notes on the integrated batteries ..................................................................14
2.12. Measures for protecting the display ..............................................................15
3. Included with your Notebook ................................................................... 15
4. Views ........................................................................................................... 16
4.1. Open Notebook .....................................................................................................16
4.2. Left Side ....................................................................................................................17
4.3. Bottom View of the Tablet Unit ........................................................................18
4.4. Right Side .................................................................................................................18
5. About this device ....................................................................................... 19
5.1. Use in notebook mode .......................................................................................19
5.2. Use in tablet mode ...............................................................................................19
6. First Use ...................................................................................................... 19
7. Power Supply ............................................................................................. 21
7.1. On/Off Switch .........................................................................................................21
7.2. Mains Power ...........................................................................................................21
7.3. Battery Mode ..........................................................................................................23
7.4. Power Management (Power Options) ...........................................................25
7.5. Sleep Mode .............................................................................................................25
8. Display ........................................................................................................ 26
8.1. Opening and Closing the Display ...................................................................26
8.2. Touch screen ...........................................................................................................26
8.3. Screen Resolution .................................................................................................28
8.4. Appearance and Customisation ......................................................................29
8.5. Connecting an External Monitor .....................................................................30
1 of 66

9. Data Input ................................................................................................... 32
9.1. The Keyboard .........................................................................................................32
9.2. The Touchpad .........................................................................................................33
10. The Hard Drives .......................................................................................... 35
11. The Sound System ..................................................................................... 36
11.1. External Audio Connections .............................................................................36
12. Network Operation .................................................................................... 37
12.1. What is a Network? ..............................................................................................37
12.2. Wireless LAN (Wireless Network) ....................................................................37
12.3. Bluetooth .................................................................................................................38
12.4. Flight Mode .............................................................................................................38
13. The Card Reader ......................................................................................... 39
13.1. Inserting a Memory Card ...................................................................................39
14. The Universal Serial Bus Port ................................................................... 40
15. Securing Your Notebook ........................................................................... 40
15.1. Password Setting (Power-on) ...........................................................................40
16. Software ..................................................................................................... 41
®
16.1. Getting to Know Windows
8 ............................................................................41
16.2. Windows Activation .............................................................................................41
16.3. Windows® 8 – What’s New .................................................................................42
16.4. Overview ..................................................................................................................44
16.5. Linking a User Account to a LiveID .................................................................46
16.6. Windows® 8 Start Screen ....................................................................................47
16.7. Windows® 8 Desktop ...........................................................................................48
16.8. Using the Search Function ................................................................................51
17. Control Panel .............................................................................................. 51
17.1. Windows® 8 Power On/Off Functions ............................................................53
17.2. Control Panel Settings.........................................................................................53
17.3. Resetting the Notebook to its Factory Settings .........................................54
17.4. UEFI firmware configuration .............................................................................55
17.5. Windows® 8 – Help and Support .....................................................................55
18. FAQ – Frequently Asked Questions .......................................................... 56
19. Customer Service ....................................................................................... 57
19.1. What To Do In Case of Hardware Problems ................................................57
19.2. Find The Cause ......................................................................................................57
19.3. Do You Need More Help? ...................................................................................58
19.4. Driver Support .......................................................................................................59
19.5. Transport ..................................................................................................................59
19.6. Maintenance ...........................................................................................................60
19.7. Upgrading/Modifying and Repair ..................................................................60
19.8. Notes for Service Technicians ...........................................................................61
2 of 66

20. Recycling and Disposal.............................................................................. 61
21. European EN 9241-307 Class II Standard ................................................. 62
22. Legal notice ................................................................................................ 64
23. Index ........................................................................................................... 65
3 of 66

Personal Information
Please append the following to your proof of ownership:
Serial number ................................................
Date of purchase ................................................
Place of purchase ................................................
You will find the serial number on the underside of the Notebook. Where applicable,
also copy the number on your warranty documents.
Our Target Group
This operating manual is intended to be read by both first-time and experienced
users. Regardless of any possible professional use, this Notebook is designed for use
in a private household. The entire family will be able to enjoy the wide variety of
applications it offers.
The Quality
We select our components with a close eye to functionality, ease of use, safety and
reliability. Thanks to our ideally balanced hardware/software concept we are able to
offer you a state-of-the-art Notebook that you will enjoy whether you are working
or at play. Thank you for purchasing our products. We are delighted to welcome you
as our new customer.
®
Trademarks: MS-DOS
and Windows®8 are registered trademarks of the Microsoft®
corporation. Intel, the Intel Logo, Intel Inside, Intel Core, Notebook, and Core Inside
are trademarks of Intel Corporation in the U.S. and/or other countries.
®
, the HDMI logo and the name High-Definition Multimedia Interface are
registered trademarks of HDMI Licensing LLC.
Other trademarks are the property of their respective owners.
4 of 66
1. About these Instructions
Before using the device for the first time, please read these operating
instructions carefully, paying special attention to the safety notices.
This device should only be used as designated and as described in these
instructions.
Please keep these instructions in a safe place for future reference.
Always include these instructions if passing the device on.
1.1. Symbols and Key words used in these
Instructions
DANGER!
Warning of immediate risk of fatal injury!
WARNING!
Warning: possible mortal danger and/or serious
irreversible injuries!
CAUTION!
Warning: possible light or moderate injuries!
CAUTION!
Please follow the guidelines to avoid injuries and/or
property damage.
PLEASE NOTE!
Additional information on using the device
PLEASE NOTE!
Please follow the guidelines in the operating instructions.
WARNING!
Warning: danger of electric shock!
WARNING!
Warning: danger due to excessive volume!
• Bullet point/information on operating steps and results
5 of 66

Tasks to be performed
1.2. Proper Use
This device is designed for the use, management and editing of electronic
documents and multimedia content, as well as for digital communication. The
device is intended for private use only and not for industrial/commercial use.
Please note that we shall not be liable in cases of improper use:
• Do not modify the device without our consent and do not use any auxiliary
equipment which we have not approved or supplied.
• Use only spare parts and accessories which we have supplied or approved.
• Follow all the instructions in this instruction manual, especially the safety
information. Any other use is deemed improper and can cause personal injury or
damage to the product.
• Do not use the device in extreme environmental conditions.
1.3. Declaration of Conformity
This product is supplied with the following wireless features:
• Wireless LAN (optional)
• Bluetooth (optional)
Medion AG hereby declares that this product conforms to the following European
requirements:
• R&TTE Directive 1999/5/EC
• Ecodesign Directive 2009/125/EC
Full declarations of conformity are available at www.medion.com/conformity.
6 of 66
2. Safety Instructions
2.1. Dangers for children and people with reduced
ability to operate electronics
• This device is not intended for use by people (including children)
with reduced physical, sensory or mental abilities or for those
without experience and/or knowledge, unless they are supervised
by a person responsible for their safety or they have been
instructed in its use.
• Children should be supervised to ensure that they do not play
with the device. Children should not be allowed to use this device
without supervision.
• Keep the device and its accessories out of the reach of children.
DANGER!
Keep plastic packaging out of the reach of children. There
is a risk of suffocation.
2.2. Operational Safety
Please read this section carefully and follow all instructions given. The
instructions will help you to operate the Notebook reliably and increase its service life.
• Never open the housing of the Notebook, battery or mains
adapter! This could result in an electric shock or even ignite a fire
which will damage your Notebook.
• Do not insert anything into the Notebook through the slots and
openings. This could result in an electric shock or even ignite a fire
which will damage your Notebook.
• The slots and openings on the Notebook are for ventilation
purposes. Do not cover these openings as this could cause the
device to overheat.
7 of 66

• The Notebook is not intended for use by companies in the heavy
industry sector.
• To avoid damage from lightning strikes, do not operate the
Notebook during thunderstorms.
• Do not place any objects on top of the Notebook and do not exert
pressure on the display. Otherwise, there is a risk that the display
may break.
• If the screen breaks, there is a danger of injury. If this happens, pick
up the shattered pieces wearing protective gloves and send them
to your service centre for professional disposal. Finally, wash your
hands with soap, as the pieces may have been contaminated with
chemicals.
• Do not fold the display back by an angle of more than 120°.
Exceeding this value may damage the housing or the Notebook.
Always hold the display firmly by the middle when folding it back,
adjusting the position and closing it. Failure to do so may damage
the display. Never use force to open the display.
• To avoid damaging the screen, do not touch it with sharp objects.
• Never lift the laptop up by the display as this could break the
mounting fixtures and the connectors.
• Place the tablet unit carefully and centrally in the mounting
fixtures on the base unit to avoid damage.
• Should the below occur, switch the Notebook off immediately/
do not switch the Notebook on, disconnect the mains plug and
contact customer services if
− the mains adapter or the attached power cable or plug is burnt
or damaged. Replace faulty mains cables/mains adaptors only
with original parts. These parts should not be repaired under
any circumstances.
− the Notebook housing is damaged or liquid has penetrated into
the device. Have the Notebook inspected by customer services.
Otherwise, it may not be possible to operate the Notebook
safely. There may be a risk of electric shock and/or harmful laser
radiation!
8 of 66

If the notebook gets wet,
• do not switch it on.
• disconnect the power cable and switch off the notebook.
• do not switch it back on until it has dried off completely.
2.3. Never Carry Out Repairs Yourself
WARNING!
Never try to open or repair the device yourself. There is a
risk of electric shock.
• If there is a fault, contact the Medion Service Center or other
suitable specialist workshop.
2.4. Data Backup
CAUTION!
Back up your data on external storage media before
each update. We do not accept any liability for claims for
compensation arising from loss of data or any consequential
loss or damage.
2.5. Setup Location (in Notebook Mode)
• Keep your Notebook and all connected devices away from
moisture and avoid dust, heat and direct sunlight. Non-compliance
with these instructions can lead to faults or damage to the
Notebook.
• Do not use the Notebook outdoors because external elements,
such as rain, snow, etc., could damage it.
• Set up and operate all components on a stable, level and vibrationfree surface to prevent the Notebook from falling down.
• Do not operate the Notebook or power adaptor for long periods
on your lap or any other body part as the heat dissipation on the
underside can result in uncomfortable overheating.
• In the first few hours of use new devices can give off a typical,
unavoidable but totally harmless smell, which wears off with time.
Ventilate the room regularly to prevent odour build-up.
• This device is not suitable for use with VDU workstations.
9 of 66

2.6. Environmental Requirements
• The Notebook is most reliably operated at an ambient temperature
between 5° C (+41° F) and 30° C (+86° F) and at a relative humidity
between 20% and 80% (without condensation).
• When powered off, the Notebook can be stored at temperatures
between 0° C and 60° C (+32° F and 140° F).
• During a thunderstorm, disconnect the mains plug and the
antenna plug. For extra safety, we recommend using an
overvoltage protection device to prevent the Notebook from
sustaining damage as a result of power surges or lightning strikes.
• After transporting the Notebook, wait until the device has reached
room temperature before switching it on. Large changes in
temperature or fluctuations in humidity can cause moisture buildup within the Notebook due to condensation. This can cause an
electrical short circuit.
• Keep the original packaging in the event the device needs to be
sent in the post.
2.7. Ergonomics
PLEASE NOTE!
Avoid dazzle, reflections and strong bright-dark contrast in
order to protect your eyes.
The Notebook should never be placed next to a window because this is the
brightest part of the room in daylight. This brightness can make it more difficult for
the eyes to adjust to the darker display. The Notebook should always be positioned
so that the direction of vision is parallel to the window front.
Setting up the Notebook with your back to the window is incorrect as reflections
from the bright window on the screen will then be unavoidable. A position looking
onto the window is also incorrect as the contrast between the dark screen and the
bright daylight can cause problems for the eyes to adjust and result in problems.
The parallel line of vision should also be maintained in relation to artificial lighting
equipment.
In other words, the same criteria and principles apply where the workspace is
illuminated with artificial light. Where space restrictions make it impossible to set up
the screen as described, then correct positioning (rotating, tilting) of the Notebook/
screen can prevent dazzling, reflections and excessive bright-dark contrast, etc. In
many cases, an improvement can also be achieved by using slats or vertical blinds
on the windows, partition walls or by changing the artificial lighting equipment.
10 of 66

2.8. Connecting
Follow the instructions below to connect your Notebook correctly
and safely:
2.8.1. Power Supply
DANGER!
Do not open the housing of the mains adapter. There is a
risk of electric shock when the housing is open. It does not
contain any parts requiring maintenance.
• The socket outlet must be close to the Notebook and easily
accessible.
• To disconnect the power supply from your Notebook (via the
mains adaptor), pull the mains plug from the power outlet.
• Plug the Notebook’s mains adapter into AC 100–240 V~, 50/60 Hz
earthed sockets only. If you are not sure about the power supply at
the set-up location, please ask your power supplier.
• Use only the mains adapter and power cable supplied.
• For extra safety, we recommend using an overvoltage protection
device to prevent your Notebook from sustaining damage as a
result of power surges or lightning strikes.
• If you want to disconnect the adapter from the mains, pull the
connector out of the wall socket first and then out of the socket
on the Notebook. The mains adapter or the Notebook may be
damaged if this process is carried out in the reverse order. Always
take hold of the plug when disconnecting the cable from the
socket. Never pull on the cable.
11 of 66

CAUTION!
Use only the supplied mains adapter to charge your device.
WARNING!
Listening to a device at high volumes for an extended
period via headphones/earphones can damage your
hearing. Excessive volume when using headphones or
earphones can damage your hearing. Before pressing
play, set the volume to the lowest setting. Start playback
and increase the volume to a comfortable level. Changing
the basic settings of the equaliser can also increase the
volume and thus cause permanent damage to your
hearing. Changing the drivers, software, equaliser,
operating system, etc., can also lead to an increase in
the volume and thus cause permanent damage to your
hearing.
2.9. Cabling
• Position the cables so that they cannot be stepped on or tripped
over.
• To avoid damaging the cables, do not place any objects on them.
• Do not connect peripheral devices – such as keyboards, mouse
and monitor, etc. – when the Notebook is switched on to avoid
damage to the Notebook or the devices. Some devices may also be
connected while the computer is running. This is generally the case
for devices with a USB connection. In all cases, observe the relevant
operating instructions.
• Maintain a distance of at least one metre from sources of highfrequency and magnetic interference (TV sets, loudspeakers,
mobile phones, DECT telephones, etc.) in order to avoid
malfunctions and data loss.
• Please note that only shielded cables that are shorter than 3
metres may be connected to the external interfaces of this
Notebook. Please only use double-shielded cables for printer cable
connections.
12 of 66

• Do not exchange the supplied cable for another one. Use only
the supplied cable as this cable has been extensively tested in our
laboratory.
• In addition, when connecting your peripherals only use the
connecting cables supplied with those devices.
• Ensure that all connection cables are connected to their
corresponding peripheral device to avoid any interference
radiation. Disconnect any cables that are not required.
• The only devices which may be connected to the Notebook are
those that meet the requirements set out in the EN60950 standard
“Information Technology Equipment – Safety” or devices that
meet the EN60065 standard “Audio, video and similar electronic
apparatus – Safety requirements”.
• Seuls les appareils conformes à la norme EN60950 « Sécurité pour
le matériel de traitement de l’information » ou à la norme EN60065
«Exigences de sécurité pour les appareils audio, vidéo et appareils
électroniques analogues » peuvent être raccordés à cet ordinateur
portable.
2.10. Information about the Touchpad
• The touchpad is operated with the thumb or another finger and
reacts to the energy given out by the skin. Do not use pens or
other objects as these can damage your touchpad.
13 of 66

2.11. Notes on the integrated batteries
CAUTION!
Danger of explosion if batteries are incorrectly
replaced. Replace only with the same or equivalent type
recommended by the manufacturer.
Dispose of used batteries according to the manufacturer‘s
instructions. Never attempt to disassemble or reassemble.
Do not heat up above 60°C (140°F). Do not dispose of in
fire or directly short circuit.
This device contains two integrated batteries: One battery is in the
base unit, the second battery is in the tablet unit. To increase the
lifespan and performance of your batteries and also to ensure reliable
operation, you should also heed the following instructions:
• Use only the supplied mains adaptor to charge the batteries. Make
sure (via the laptop display or acoustic signal) that the batteries are
fully discharged before charging them again.
• Always charge the batteries until the battery charging light goes
out. Please also observe the information in “Charging the batteries”
to assess the charge status of your batteries.
• The batteries are built into the devices and should only be
removed by a qualified technician/the Service Centre.
14 of 66

2.12. Measures for protecting the display
• The display is the most sensitive component part of the notebook
as it consists of thin glass. It can break if subjected to too much
stress. Do not scratch the cover of the notebook, because it will not
be possible to remove any scratches.
• Avoid contact between the display and hard objects (e.g. buttons,
wristwatch).
• Do not place any objects on the display.
• Do not allow any objects to drop onto the display.
• Do not pour any fluids into the notebook, as this could damage it.
• Do not scratch the display with your fingernails or hard objects.
• Do not clean the display with chemical cleaning products.
• Clean the display with a soft, dry and lint-free cloth.
PLEASE NOTE!
The surfaces of the device are covered in protective film to prevent
scratching during production and transport.
Remove the film once the device has been set up properly and before
you use it.
3. Included with your Notebook
Please check that the contents are complete and notify us within 7 days of purchase
if any of the following components are missing:
• Notebook
• AC Adapter with Power Cord
• OEM version of operating system
• Documentation
DANGER!
Keep packaging material such as plastic film away from
children. There is a risk of suffocation if used improperly!
15 of 66
4. Views
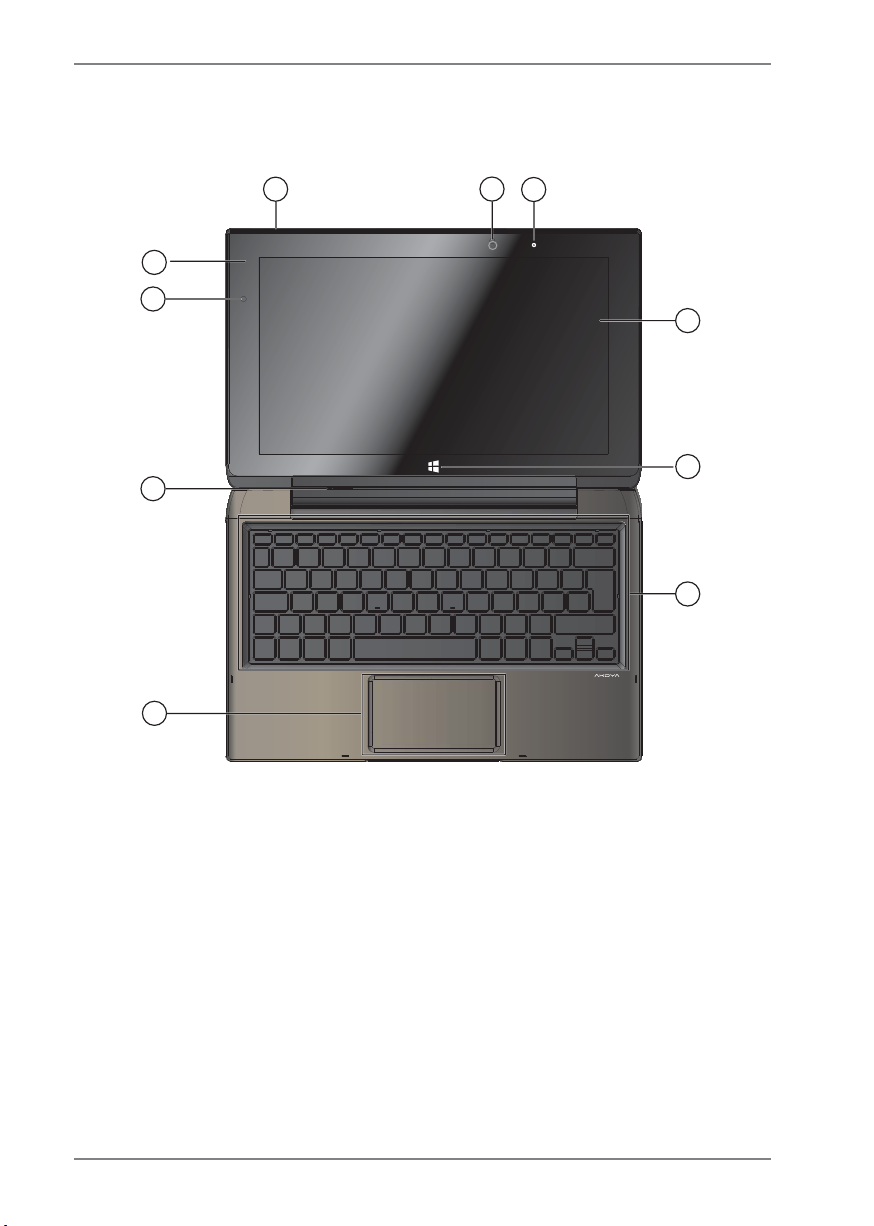
4.1. Open Notebook
10
1
9
8
7
2
3
4
5
6
1) Microphone
2) Webcam
3) Webcam LED
4) LCD Display
5) Windows Button
6) Keyboard
7) Touchpad
8) Unlocking the display
9) Battery LED
10) Light Sensor
16 of 66
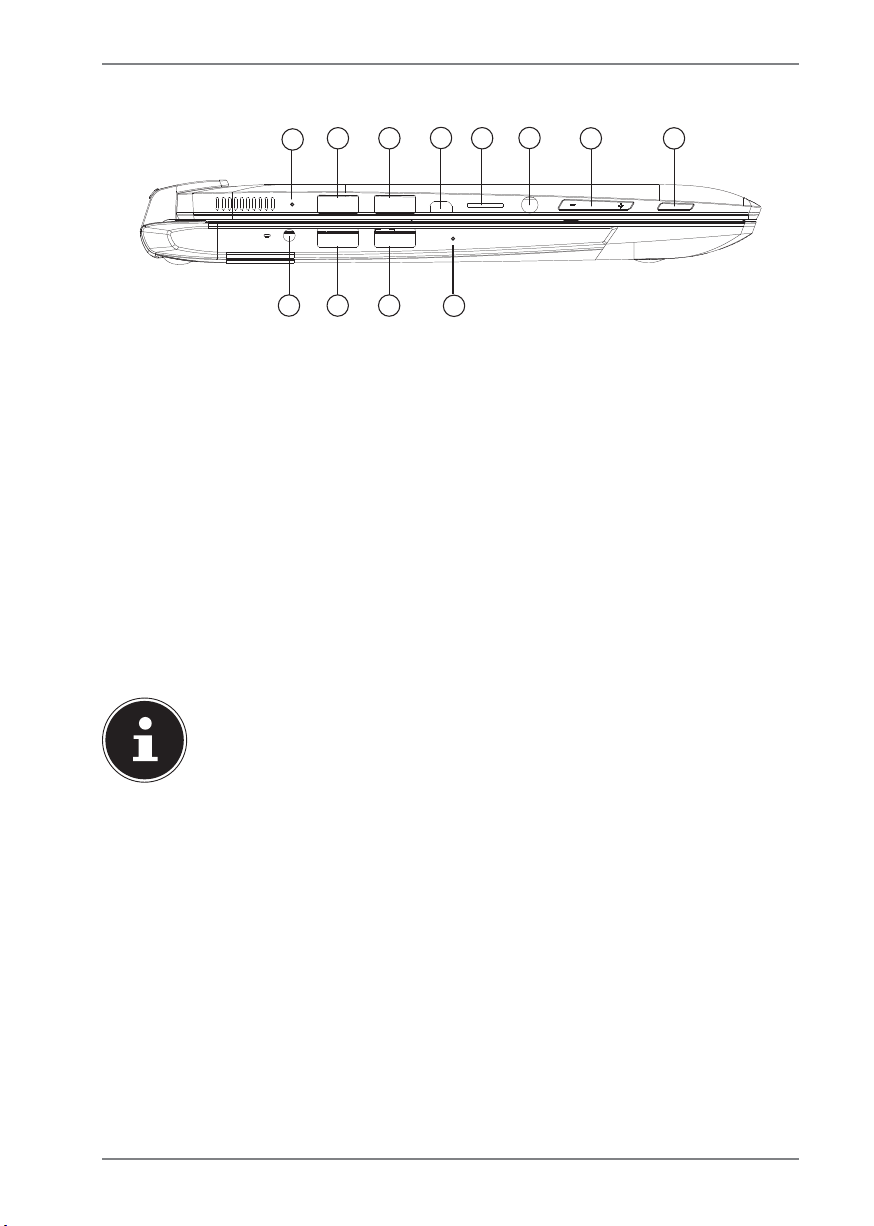
4.2. Left Side
12
11
22
13
20
21
11) Reset opening for the tablet unit
12) USB 3.0 Port
13) USB 2.0 Port
14) microHDMI Connector
15) microSD Card Slot
16) Audio Out / Microphone
17) Volume Buttons +/-
18) Power ON/OFF
19) Reset opening for the base unit
20) USB 2.0 Port
21) USB 2.0 Port
22) Power Socket
PLEASE NOTE!
If your device stops working properly, insert the point of a straightened
paper clip into the reset opening. The device will be reset. No data will
be deleted.
14
19
16
15
17 18
17 of 66
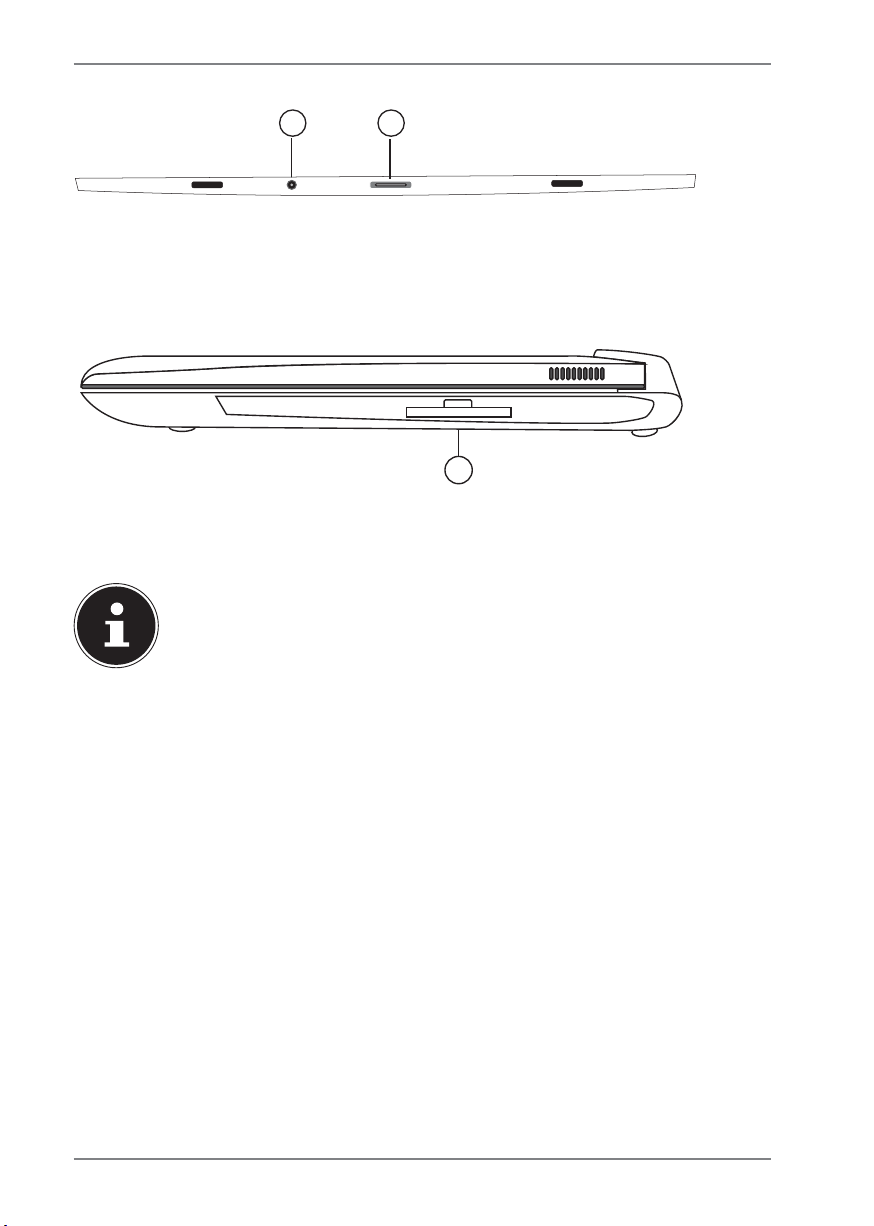
4.3. Bottom View of the Tablet Unit
23
23) Power Socket
24) Connection plug to the base unit
24
4.4. Right Side
25
25) Slot for 3G Card (card is not supplied, available soon in retail outlets and the
Medionshop)
PLEASE NOTE!
You can find out more on our website www.medion.com.
18 of 66

5. About this device
Thanks to its removable display, this device is designed for use in notebook mode as
well as tablet mode.
5.1. Use in notebook mode
A simple connection to the base unit turn the tablet unit into a notebook.
Hold the tablet unit firmly with both hands and place it onto the mounting
fixtures on the base unit until it audibly clicks into place.
ATTENTION !
Place the tablet unit carefully and centrally in the mounting
fixtures on the base unit to avoid damage.
5.2. Use in tablet mode
Slide the display release (8) to the left and, at the same time, carefully lift the
tablet unit out of the mounting fixtures on the base unit.
6. First Use
To operate your Notebook safety and ensure a long service life, you should read the
“Operational safety” chapter at the beginning of this manual. All operating software
is already fully preinstalled on the Notebook so there is no need for you to install
any more drivers and you can get started right away.
Connect the supplied mains adapter to the base unit (22). Next, connect the
power cable to the adapter and then plug it into a mains socket.
REMARQUE !
Alternatively, you can connect the mains adapter to the mains adapter
connection on the underside of the tablet unit (23), if you only plan to
work with the tablet unit.
19 of 66

Open up the display to the desired position using your thumb and forefinger.
The display should not be folded back by more than 120°. Always hold the
display firmly by the middle when folding it back, adjusting the position and
closing it. Failure to do so may damage the display. Never use force to open the
display.
PLEASE NOTE!
When first operating your Notebook please ensure that the mains
adapter is connected. This is required for Windows® 8 to correctly work
out the Windows® 8 performance index.
Switch the Notebook on by pressing the on/off switch (18). The Notebook will
now start and run through various steps.
PLEASE NOTE!
There should be no bootable disk (e.g. the recovery disc) in the optical
drive as this will prevent the operating system from being loaded from
the hard drive.
The operating system will be loaded from the hard drive. The loading process takes
a little longer during the initial setup. Once all the necessary data has been entered,
the operating system will be set up. The operating system is fully loaded once the
Windows
®
8 start-up screen appears.
PLEASE NOTE!
The initial installation may take a few minutes. Do not unplug the
Notebook from the mains or switch it off during the initial installation.
This may adversely affect the installation. Do not switch off the
Notebook until after the installation has been completed successfully
and the startup screen appears.
20 of 66
 Loading...