


Model
RC1200
User Guide
Learning
Remote Control
R

MAIN FEATURES & FUNCTIONS ........ 2
NAMES OF PARTS & FUNCTIONS ..... 3
LOADING BATTERIES.......................... 8
BASIC OPERATION .............................. 9
USE MODE .............................................................9
LEARN MODE ...................................................... 10
PROGRAMMING THE JOG DIAL.........................13
REWRITING NAMES ............................................ 14
ERASING PROGRAMMED CODES......................16
PROGRAMMING MACROS ................................. 20
EDITING MACROS ............................................... 22
USING MACROS ..................................................24
EXAMPLES OF MACRO PROGRAMS ................ 25
CLEARING MACRO PROGRAMS ....................... 28
USING THE CLONE MODE ................ 29
COPY MODE .......................................32
COPYING ON A BUTTON BY BUTTON BASIS ...32
COPYING THE JOG DIAL INFORMATION ..........34
OTHER FUNCTIONS...........................36
LIGHTING BUTTON ............................................. 36
LUMINOUS BUTTONS .........................................36
SETUP ..................................................................36
JOG DIAL COMMAND FUNCTIONS LISTING...
39
SPECIFICATIONS ............................... 43
ENGLISH
1

MAIN FEATURES & FUNCTIONS
ENGLISH
• PROGRAMMABLE LEARNING
FUNCTION
Can easily be programmed to learn the codes
for almost any other infrared-based remote,
allowing the remote control functions for many
different components to be consolidated
conveniently in a single unit.
This remote controller uses a non-volatile
memory so that the learned codes will be
retained even if the batteries are removed.
• PRESET CODES
Function buttons already contain preset codes
(using the RC-5/RC-6 remote control
language) for other remote-controllable
Marantz audio-visual component.
(This does not apply to some of the buttons.)
• LCD LIGHTING FUNCTION AND
LUMINOUS BUTTONS
To allow easy use in a location which has been
darkened for a home theater performance, for
instance, this remote controller features an
LCD backlight with electroluminescence (EL)
and luminous buttons which can store light.
• LARGE, EASY-TO-READ DISPLAY
Large LCD (liquid crystal display) messages
and other information at a glance.
• JOG DIAL
The function selected by Jog Dial (displayed
on the LCD) can be operated directly by the
enter button.
• MACRO CAPABILITY
Macro function allows the remote controller to
be programmed to execute complex strings of
multiple commands using a single keystroke.
• NAME ASSIGNMENT
Allows one to change the (displayed via the
LCD) name for a function button.
• CLONING FUNCTION
The unit features a cloning system that
enables a duplicate unit of this remote
controller which has already been
programmed to be easily made by
undertaking a series of key operations.
2

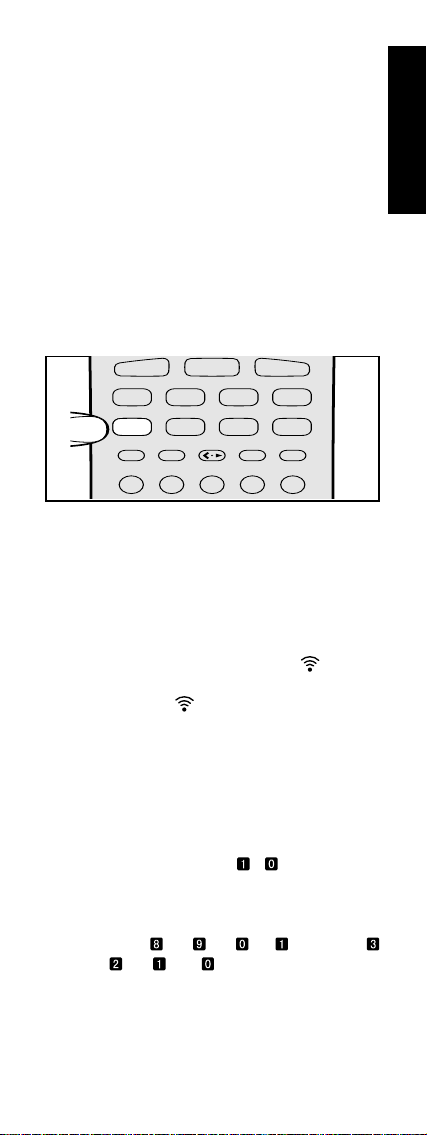
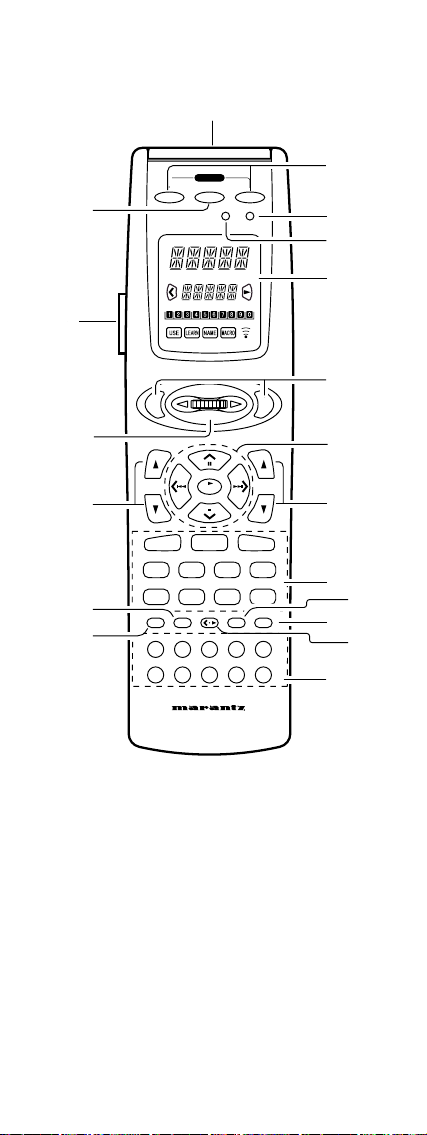
NAMES OF PARTS & FUNCTIONS
Names of Buttons & Functions
z MODE button
Used to change the operation mode of the
remote controller. Pressing this button cycles
the remote controller through USE → LEARN
→ NAME → CLONE TX → CLONE RX →
USE, with the currently selected mode
displayed on the LCD.
x MACRO button
Used to store a string of consecutive button
operations in the memory and also to revise
them.
Pressing it switches the remote controller in
and out of the MACRO mode. Its status is
displayed on the LCD.
c Power ON and OFF
buttons
Used to turn ON and OFF the power of the
amplifier or receiver or turn ON and OFF the
power of a source component which has its
own ON and OFF buttons.
v Source ON/OFF button
Used to turn specific sources (such as DVD
players, etc.) ON and OFF independently from
the rest of the system.
b LCD
Used to display information about currently
selected modes and functions.
n ENT buttons
Used to execute a function selected with the
Jog Dial m.
There are 2 ENT buttons, one on each side, so
that the remote controller can be used just as
easily with either hand.
The characters on the display can also be
programmed.
m Jog Dial
Used to select the operation content for each
source. Ten types of direct operation are
possible for each of the 11 functions including
LD, TV, AMP, etc. After selecting the desired
function, press either of the ENT buttons n to
transmit the signal.
ENGLISH
3

, Function buttons
Used to switch the remote controller to the
ENGLISH
command sets for specific sources (amplifier,
receiver, etc.), thereby allowing a single remote
controller to control up to 11 different
components. To use these buttons to switch the
amplifier’s source, press the desired button
twice within 2 seconds. The AMP button , is
used only to switch the command set of the
remote controller itself and therefore does not
transmit any signal. Further, the function
buttons may also be programmed to execute
macros. (A macro allows a complex string of
operations to be performed in series simply by
pressing a single button.) One button can be
programmed to learn sequences containing up
to 10 commands. The following is an example
of a macro sequence:
Turn the receiver ON → Switch the function to
DVD → Set the Surround Mode to Dolby
Digital → Switch the TV to video input → Set
the DVD player to Play.
. VOLUME up / down
button
Used to adjust the volume on receivers and
other components equipped with volume
control.
⁄0 CURSOR/CONTROL buttons
Used to operate on-screen and other displays
used by amplifiers and other components, as
well as to operate the PLAY, STOP, PAUSE,
NEXT, and PREVIOUS functions of each source.
⁄1 < • 3 (CURSOR/ CONTROL
switching) button
Used to switch the function of the CURSOR/
TRANSPORT CONTROL buttons ⁄0 between
CURSOR and TRANSPORT CONTROL, with
the currently selected function displayed on
the LCD when the DVD, LD, or VCR functions
are selected. When functions other than DVD,
LD, or VCR are selected, the < • 3 button
remains inactive.
⁄2 Channel up / down
button
Used to controls the up/down function of TV tuner,
or allows one to cycle through the tuner presets.
⁄3 MUTE button
Used to temporarily mute the sound for
preamplifiers, receivers, etc.
4

⁄4 GUIDE button
Used to call up the on-screen menus used to
control DVD players, digital satellite systems
(DSS), and other menu-equipped systems.
⁄5 CLEAR button
Used to clear the contents of memory or
programmed functions.
⁄6 MEMO button
Used to program your CD player’s track
memory, or to enter a VCR recording program,
and can be used to provide the MEMO
function included with other components in
your system.
⁄7 Ten-Key pad/Surround
Mode buttons
Used to enter numeric digits, useful for finding a
specific track on a CD, or to tune a preset radio
station, etc. When the function is set to AMP, it is
possible to choose Surround Mode, etc.
⁄8 Infrared Transmitter/
Receiver Window
Used to transmit remote control signals based
on beams of infrared light to system
components. To ensure that these signals are
properly received, make sure that this window
is pointing in the general direction of the
infrared receiver on the amplifier or other
components. This window should also be
pointed toward the source remote controller
when using Programmable Learning function.
⁄9 LIGHTING button
When this button is pressed, the LCD display
lights up, and it goes off 5 seconds later.
While it is held down, the display remains
lighted.
ENGLISH
Note:
The programmable learning function does not
work with buttons z, x, n, ⁄1 and ⁄9.
5
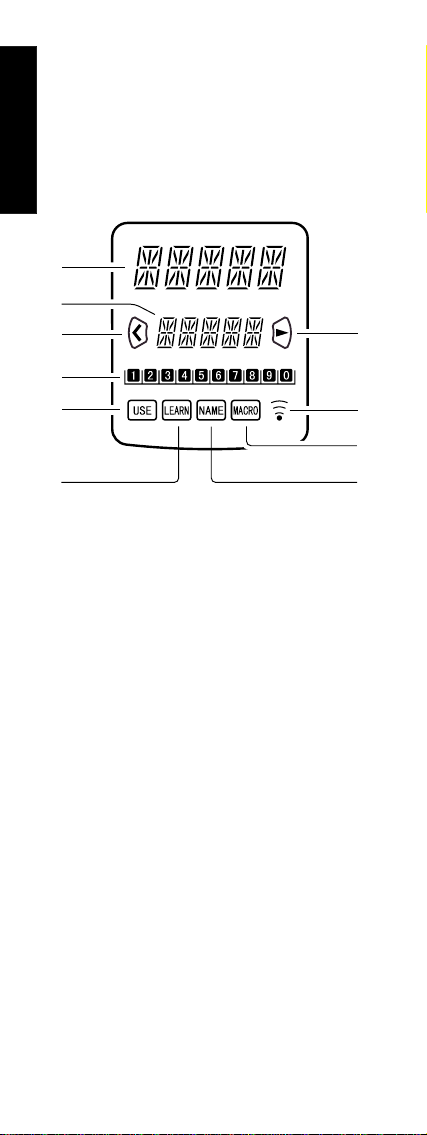
LCD (Liquid Crystal Display)
Information about currently selected functions
ENGLISH
and modes is displayed on the LCD. Pressing
any buttons will call up a full display of
information on the status of that function or
mode. This display will disappear after
approximately 1 minute, except for the
Function Name indicator A, which is always
displayed.
A
B
I
C
E
J
D
H
F
G
A Function Name indicator
Displays the name of the currently selected
function (LD, TV, etc.) using up to 5 characters.
B Command Name
indicator
Displays up to 10 types of commands for each
function using up to 5 characters.
C Command Page indicator
Allows confirmation of current command page
of Jog Dial m . Also, when setting or
transmitting macros, displays information such
as the number of macro steps and the time
intervals between command transmissions.
D Transmission indicator
Indicates when the remote controller is
transmitting a signal.
E USE indicator
Indicates the status in which the programmed
code is output.For normal operation the USE
indicator is displayed.
F LEARN indicator
Indicates when the remote controller is in the
LEARN mode. It also appears when
programming is cleared.
6

G NAME indicator
Indicates when the remote controller is in the
NAME mode and a function name is being
changed.
H MACRO indicator
Indicates when the remote controller is in the
MACRO programming mode.
I CURSOR indicator
Indicates when the CURSOR CONTROL
buttons are in the cursor mode.
J CONTROL indicator
Indicates when theCURSOR CONTROL
buttons are in a transport control mode such
as PLAY, STOP, etc.
NOTE:
• If the LCD flickers when a button is pressed
in order to transmit a command, the
transmission or learning is not possible. In
such a case, please replace the batteries.
Operating tip
• This remote controller uses non-volatile
memory, so that learned codes and macros
will be preserved even if the batteries are
removed.
ENGLISH
7

LOADING BATTERIES
ENGLISH
The life of the batteries used with the remote
control unit is about 6 months with normal use.
Also be sure to replace batteries earlier when
you notice that they are getting weak. Do not
use alkaline, manganese, nickel-cadmium (NiCd) or other different types of batteries
together.
(1) Remove the back cover.
(2) Insert the new batteries (AA type) with
correct (+) and (–) polarity.
(3) Close until it clicks.
8
BASIC OPERATION
USE MODE
The remote controller will normally be used in
the USE mode.
It comes preset with codes commonly used to
control 11 types of components manufactured
by Marantz, Philips and RCA (for DSS),
including DSS, DVD, TV, LD, VCR, AUX,
TUNER, CD, TAPE, CD-R/MD, and AMP, as
well as many others that utilize the RC-5
remote control language.
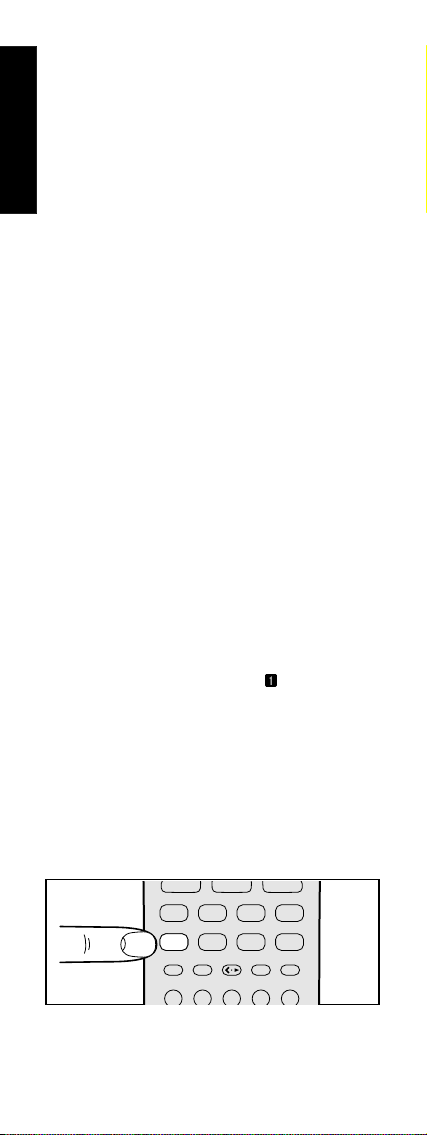
1. Press once one of the Function buttons
, to change to another component’s
commands, such as LD button.
CD
CD
DSS
LD
LD
CLEAR
AUTO
1
2. LD will be displayed on the LCD and the
function codes will be set to operate the
laser disc player, and if you double
clicked the LD function button, the
amplifier or receiver’s input will be
changed as well.
3. Now you can operate the laser disc player.
When a button is pressed, the symbol
indicates that a remote code is being
transmitted. is not displayed if a button
for which no code has been set is pressed.
4. The Jog Dial m is used to select any one
of up to 10 direct operations that can be
performed for each of the 11 functions
including LD, TV and AMP. Rotate the
Jog Dial m to select one of these
commands. The number of the current
page is indicated by - at LCD C.
The signal is sent when the ENT button n
is pressed.
Page numbers cycle up or down, for
example → → → → etc. or
→ → → → etc. depending on
which way the Jog Dial m is rotated.
The last page position for any given
command function is retained in the
memory even if the remote controller is
switched to the command function for
another component. (Last Memory)
DVD
TV
TUNER
MEMO
DOLBY THX
2
CD-R/MD
AUX
VCR
TAPE
AMP
MUTE
GUIDE
HALL
DTS
3
5
4
9
ENGLISH
If it is left for approximately 1 minute without
ENGLISH
pressing any buttons, all items on the LCD
will go off except the function indicator.
Even if the display goes off, the remote
controller will retain the status established
before the display went off. When any
button is pressed, the display will appear
on the whole LCD display.
LEARN MODE
The remote controller is capable of learning
and memorizing the remote control codes
used by almost any other remote controller
you may already own.
• If no commands have been programmed for
a particular function button, the remote
controller will transmit whatever codes have
been factory preset.
• The following example shows how to
program your remote controller and how to
use the codes for a laser disc player (LD).
• A different code can be programmed for
each function in each one of the buttons.
The COPY mode described later (on page
34) comes in handy if the same code is to
be sent by all the functions.
• The remote controller infrared receiver is
located at the top of the remote controller.
1. Use a ballpoint pen or other sharp point to
press the MODE button z until LEARN is
displayed and starts to blink. Each time
the button is pressed, the display cycles
through the modes one by one in
sequence: LEARN → NAME → CLONE
TX → CLONE RX → USE, etc.
• The USE mode is selected when the
MODE button is pressed after an
operation in the LEARN, NAME or
other mode.
2. Place the laser disc’s remote controller so
that its infrared signal transmitter is facing
the infrared signal receiver on the
Marantz remote controller at a distance of
about 5 centimeters (2 inches).
5cm
10
POWER
MODE
OFF
MACRO
00
SOURCE
ON /OFF
CONTROL RC 70
LEARNING REMOTE
ON
3. If the cursor is not aligned with the control
mode after the LD function button , on
the remote controller has been pressed,
press the < • 3 ( CURSOR/CONTROL
switching) button ⁄1 to display " ".
DSS
LD
LD
CLEAR
AUTO
TV
TUNER
MEMO
DOLBY THX
VCR
TAPE
GUIDE
AUX
AMP
MUTE
HALL
DTS
ENGLISH
DSS
LD
CLEAR
AUTO
MATRIX
1
TV
TUNER
MEMO
DOLBY THX
2
MOVIE
AUX
VCR
TAPE
AMP
MUTE
GUIDE
HALL
DTS
5
3
4
2CH OSD SLEEP
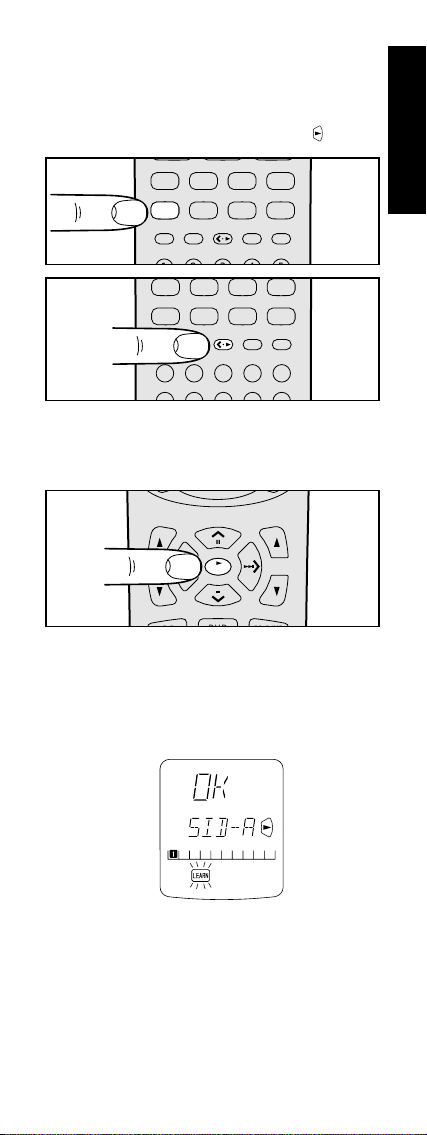
4. Press the PLAY button ⁄0 (3 OK ). The
LEARN indicator changes from blinking
to continuously lit.
Now release the button.
CH
OK
OK
VOL
5. Press and hold the PLAY button on the
laser disc player’s remote controller. The
remote controller has finished learning
the command when OK appears on the
LCD A.
• If AGAIN appears on the LCD, some
error has prevented the command
from being learned. If this happens,
simply repeat the procedure from step
4.
11

• In the rare event that NG appears on
ENGLISH
the LCD, it means that the remote
controller you are attempting to learn
from uses special signals that cannot
be learned by the Marantz remote
controller.
6. Follow the same procedure to make the
remote controller learn the ten-key ⁄7
operation used by the laser disc player’s
remote controller.
7. Repeat the procedure from step 3 to have
the remote controller learn the signal
codes for the other components such as
TV, VCR, etc.
• If no buttons are pressed for
approximately 1 minute while in the
LEARN mode, the remote controller
automatically returns to the USE mode.
• When programming the function
buttons, first switch to the desired
function, then press the button again.
8. When you have finished programming the
remote controller, use a ballpoint pen or
other sharp point to once again press the
MODE button z to return it to the USE
mode. The LCD displays the USE
indicator, and the newly programmed
codes now can be used.
If FULL is displayed on the LCD
If FULL is displayed on the LCD B when
programming in the LEARN mode, it means
that the memory has become too full to hold
any further codes.
If FULL is displayed no matter how many
times you attempt to enter new codes, it
means that the remote controller cannot
accept any new codes until some of the
previously learned codes are deleted to make
space in the memory. Select unneeded codes
for each of the Jog Dial control m and
Function buttons ,, which show FULL and
delete them from the memory.
12
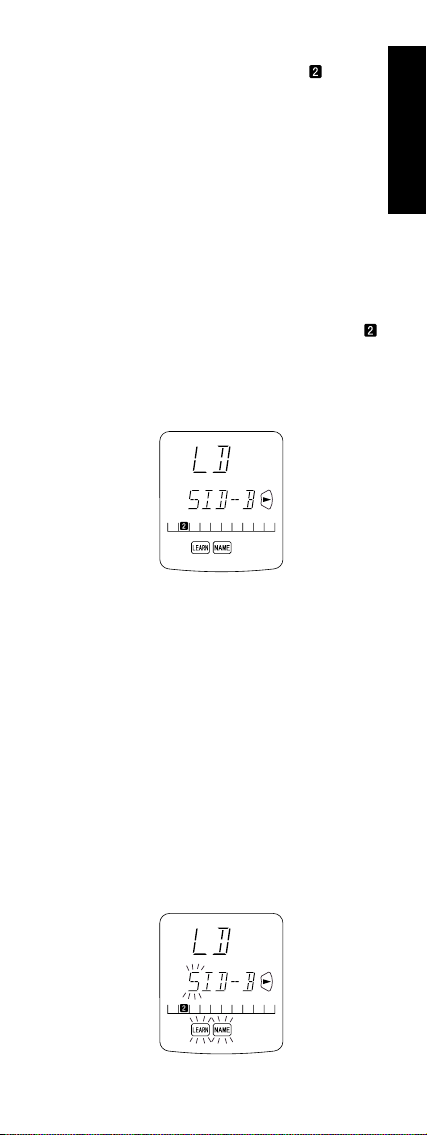
PROGRAMMING THE JOG DIAL
Let’s use the example of setting as the
SIDE-B code for the laser disc player.
1. Use a ballpoint pen or other sharp point to
press the MODE button z until the
LEARN indicator is displayed and starts
to blink.
2. Place the laser disc’s remote controller so
that its infrared transmitter window is
facing the infrared signal receiver window
on the Marantz remote controller at a
distance of about 5 centimeters (2
inches).
3. Press the LD Function button ,.
4. Rotate the Jog Dial m left or right until
is displayed, then press and release the
ENT button n.
• The LEARN and NAME indicators will
both be displayed.
5. Press the SIDE-B button on the laser
disc’s remote controller continuously until
OK is displayed on the Marantz remote
controller’s LCD, indicating that the
programming has been completed.
• If AGAIN appears on the LCD, some
error has prevented the command from
being learned. If this happens, simply
repeat the procedure from step 3.
When the programming has been
completed, the remote controller
automatically switches to the NAME
mode.
The left hand position on the LCD B
blinks, indicating the character in the
name to be rewritten.
ENGLISH
13
DVD
• If you do not wish to rewrite the name,
ENGLISH
simply press the OK Cursor button ⁄0.
• If you wish to rewrite the name, input the
desired characters using the ten-key
pad ⁄7. The part of the display which is
to be overwritten can be moved using
the left (<) and right (>) Cursor buttons
⁄0. When you are finished rewriting,
press the OK Cursor button ⁄0.
To simply erase already existing
characters, press the 0 button to
replace them with a blank space.
(Refer to next section on rewriting
names)
6. Use the same procedure to program the
codes for other 1-6 with the Jog Dial m.
7. When finished programming the codes
for each of the buttons, use a ballpoint
pen or other sharp point to press the
MODE button z to return the remote
controller to the USE mode. The LCD
displays USE indicator, and the newly
programmed codes now can be used.
REWRITING NAMES
This remote controller allows the names
accessible by Jog Dial m to be rewritten with
new ones of your choosing.
• Rewriting of names is performed for each
individual function.
• Let’s use a laser disc player as an example
to show how to change the ’s “SIDE-A” to
“LD-A”.
1. Use a ballpoint pen or other sharp point to
press the MODE button z to switch the
remote controller to the NAME mode. The
NAME indicator blinks.
2. Press the LD Function button ,.
The left-hand edge of the function name
now blinks.
CD
CD
TV
DSS
TUNER
LD
LD
CLEAR
MEMO
DOLBY THX
AUTO
1
2
3. Use the Jog Dial m to select the page for
CD-R/MD
AUX
VCR
TAPE
AMP
MUTE
GUIDE
HALL
DTS
5
3
4
which you wish to enter a new name.
Press the down (v) Cursor button ⁄0, and
move the blinking location to the Jog Dial.
14

4. The left-hand edge of LCD B now blinks
to indicate that the character at the
blinking location can now be overwritten.
New characters entered will be written
over the top of the current character so
that the current character is erased.
Use the < and > Cursor buttons ⁄0 to select
the characters to be rewritten.
5. Use the ten-key pad ⁄7 to select the desired
alphanumeric characters.
Pressing the number buttons on the tenkey pad will cycle through the
alphanumeric characters as follows:
Ten keypad Press, press again, press again, etc.
1A → B → C → 1 → A
2D → E → F → 2 → D
3G → H → I → 3 → G
4J → K → L → 4 → J
5M → N → O → 5 → M
6P → Q → R → 6 → P
7S → T → U → 7 → S
8V → W → X → 8 → V
9Y → Z → / → 9 → Y
0
SPACE
→ + → — → , → ’ → 0
→
SPACE
( )
6. Therefore, to enter the letter “L”, press the
4-key on the ten-key pad ⁄7 3 times in a
row to cycle from J to K to L.
ENGLISH
Once the desired character “L” appears,
press either of the < or > Cursor buttons
⁄0 and the L will be permanently written
over the former character. Press the 0-key
in order to replace unneeded extra
characters with spaces ( ).
15

7. Follow the same procedure to enter “D-
ENGLISH
A”. When finished, press the OK Cursor
button ⁄0. Pressing OK permanently fixes
the newly written characters.
Similarly, the function names can be
overwritten by pressing the function buttons.
• Up to 5 characters can be entered in the
function display and command display.
• To rewrite the names of the other items
in the Command Name indicator, use
the Jog Dial m to select the desired
command and repeat from step 5.
8. When you are finished rewriting, use a
ballpoint pen or other sharp point to press the
MODE button z to return the remote
controller to the USE mode. The USE
indicator is displayed on the LCD, and the
newly programmed codes now can be used.
POWER
SOURCE
ON /OFF
ON
LEARNING REMOTE
CONTROL RC
OFF
MACRO
MODE
1200
ERASING PROGRAMMED CODES
(Returning to Factory Presets)
Codes that have been programmed into the
memory can be erased in 4 ways: by
button(s), by function(s), by Jog Dial
command, and by erasing all memory
contents.
1. Use a ballpoint pen or other sharp point to
press the MODE button z to switch the
remote controller to the LEARN mode, so
that the LEARN indicator is blinking on
the LCD.
Note:
Erasing of programmed codes is only
possible in the LEARN mode.
16

POWER
SOURCE
ON /OFF
ON
LEARNING REMOTE
CONTROL RC
OFF
MACRO
MODE
1200
2. Erasing by Button(s)
To clear the codes and names
programmed in any of the buttons
• Press the button concerned twice while
holding down the CLEAR button ⁄5.
When the codes are cleared, the
button returns to its factory presets or
it is left empty.
Jog Dial codes can be cleared in the
same way: turn the Jog Dial to call up
the name of the command whose
codes are to be erased, and press the
ENT button n (either the left one or
the right one) twice while holding
down the CLEAR button ⁄5, and the
codes and command names
memorized in the button will be
cleared.
When the codes are cleared, the
button returns to its factory presets or
it is left empty.
• To erase codes programmed for the
CLEAR button ⁄5 , simply press the
CLEAR button ⁄5 continuously for 3
seconds.
As an example, let’s clear the PLAY
command from the laser disc player
command set.
1. While holding down the CLEAR button ⁄5:
ENGLISH
VOL
OK
OK
CD-R/MD
AUX
VCR
TAPE
AMP
MUTE
GUIDE
HALL
DTS
q
w
CH
DSS
LD
CLEAR
CLEAR
AUTO
CD
CD
TV
TUNER
MEMO
DOLBY THX
DVD
2. Press the OK Cursor button ⁄0 twice.
17

3. Erasing Jog Dial Codes
ENGLISH
To clear all codes and names previously
set for each of the functions (LD, TV, etc.).
• Press the function button whose codes
are to be cleared. When both the left
and right ENT buttons n are pressed
simultaneously while holding down the
CLEAR button ⁄5, "CLR?" appears at
LCD B.
ENT
ENT
ENT
ENT
VOL
OK
CD-R/MD
w
AUX
VCR
TAPE
AMP
MUTE
GUIDE
HALL
DTS
5
3
4
q
CH
DSS
LD
CLEAR
CLEAR
AUTO
1
CD
CD
TV
TUNER
MEMO
DOLBY THX
2
DVD
While holding down the CLEAR button ⁄5,
press both the left and right ENT buttons
n.
• To go ahead with the clearing operation,
press the OK Cursor button ⁄0. Clearing
the codes returns all ten of the
command names in the Jog Dial to their
factory presets or they are left empty.
LCD B will also be either returned to its
original display or left empty.
CH
DVD
OK
OK
VOL
-
• To cancel the memory clearing
operation, do not press OK Cursor
button ⁄0 and simply touch any other
button.
18

4. Erasing Codes by Function
This procedure clears all the codes and
names programmed for the LD, TV or any
another function.
• When the button for the function to be
cleared is pressed twice while holding
down the CLEAR button ⁄5, "CLR?"
appears at LCD B. To go ahead with
the clearing operation, press the OK
Cursor button ⁄0.
DVD
DVD
CD
w
q
DSS
DSS
LD
LD
CLEAR
CLEAR
AUTO
MATRIX
1
CD
TUNER
TUNER
MEMO
DOLBY THX
2
MOVIE
TV
TV
VCR
VCR
TAPE
TAPE
3
2CH OSD SLEEP
GUIDE
DTS
4
CD-R/MD
CD-R/MD
AUX
AUX
AMP
AMP
MUTE
HALL
5
This will return the button to its factorypresets or leave it empty if no factory
presets are available. Accordingly, the
LCD B will return to the factory-preset
displays, or will simply be empty.
• To cancel the memory clearing operation,
do not press the OK Cursor button ⁄0 and
simply touch any other button.
ENGLISH
5. Erasing All Memory Contents
This procedure clears (resets) all the data
programmed. Once all the data is
cleared, the memory is returned to its
factory preset status.
• When ON and OFF of the POWER
buttons c are pressed simultaneously
while holding down the CLEAR button
⁄5, "ACLR?" appears at LCD A.
19

To go ahead with the clearing operation,
ENGLISH
release the buttons, and press the OK
Cursor button ⁄0.
Once the data is cleared, the codes are
either returned to their original display or
left empty. LCD is similarly returned to its
factory preset or left empty. All the macro
programs are also cleared.
• To cancel the memory clearing
operation, do not press the OK Cursor
button ⁄0 and simply touch any other
button.
After the OK Cursor button ⁄0 is pressed,
clearing the entire memory will take
approximately 10 seconds.
PROGRAMMING MACROS
Macros make it possible to use a single
function button to perform more complex
series of operations that would normally
require pressing several buttons. A single
button can be programmed to perform up to
10 steps in sequence. A typical example of
such a series might be as follows:
• Turn the main amplifier power ON → Switch
the function to DVD → Set the Surround
Mode to Pro Logic → Switch the TV to video
input → Set the DVD player to PLAY.
• No signals may be transmitted during
macro programming.
• The various steps that make up a macro are
set initially to be sent one after another in 1
second intervals, however these intervals
may be shortened to as little as 0.5 seconds
or lengthened to as much as 5 seconds
using the Setup mode.
• In the macro mode, the number of steps the
macro contains is displayed on LCD c.
Macros may be programmed for each of the
11 function buttons, from LD to AMP.
1. Use a ballpoint pen or other sharp point to
press the MACRO button x until the
MACRO and LEARN indicators are
displayed blinking on the LCD.
POWER
SOURCE
ON /OFF
ON
LEARNING REMOTE
CONTROL RC
OFF
MACRO
MODE
1200
20

E
O
D
P
X
L
2. Press the Function button , for which
you wish to program a series of
operations. In this case, let’s use the
example of the laser disc player.
Press the LD Function button ,.
Example
The LCD A will display LD-M.
The characters displayed at LCD A are
as follows. However, when a function
name has been overwritten, "–M" appears
for the first 2 or 3 characters.
LD-M, DVD-M, TV-M, DSS-M, VCR-M,
AUX-M, TUN-M, CD-M, TP-M, AMP-M,
CDR-M (or MD-M for remote controller set
for MD).
• If a macro has already been set for the
selected function button, the LCD A
will blink. Also, the number of steps in
the macro is displayed on LCD C.
3. Press the buttons for the operations you
wish to program as a macro in the
sequence you want the macro to program
them. The name of the button pressed
appears on LCD A. The number of steps
in the macro is displayed on LCD C and
this number increases by 1 with each
button pressed.
For example, press LD, PLAY.
ENT
EN
ENGLISH
CH
w
DVD
CD
DSS T V
TUNER
LD
q
LD
CLEAR
AUTO
MEMO
DOLBY THX
Each function button can be programmed
to perform up to 10 steps in sequence.
V
OK
OK
CD-R/M
AU
VCR
TAPE
AM
MUT
GUIDE
HAL
DTS
21

• If, while programming, no buttons are
ENGLISH
pressed for approximately 1 minute,
the remote controller will automatically
return to normal mode, and no macro
will be programmed in the memory.
4. When you are finished programming
macros, use a ballpoint pen or other
sharp point to press the MACRO button
x. LCD A will display END, and the
display will return to normal.
• Macros cannot be programmed for the
MODE z, MACRO x, < • 3 ⁄1, VOL
/ ., MEMO ⁄6 or CLEAR ⁄5 buttons.
Although function operations in the
Macro Mode can be programmed
more than once, only the first function
memorized in the ten function buttons
including LD, CD, TV--but not the AMP
button--will be sent from the remote
controller (the amplifier or receiver
function will change). For this reason,
it is not possible to select multiple
amplifier functions in a macro button.
(If the AMP button is programmed, the
same operations as those in the other
function buttons will be performed.)
Therefore, when executing operations
in the Macro Mode, what happens is
that, starting with the second function
operation, only the function mode of
the remote controller is changed, and
no signals are sent.
EDITING MACROS
Macros may be edited using following
procedure.
1. Use a ballpoint pen or other sharp point to
press the MACRO button x until the
MACRO and LEARN indicators are
displayed blinking on the LCD.
2. Press the Function button , to be
changed. Let’s use the example of the
laser disc player, by pressing the LD
Function button ,.
• LD-M is displayed blinking on LCD A.
• The number of steps in the completed
macro is highlighted on LCD C. In this
example there are 3 macro programs
in memory.
22

• The is highlighted if no macros have
been programmed, and the remote
controller is ready for macro programming.
3. While pressing the VOL button ., press
the ^ and v Cursor button ⁄0 to call up the
part of the macro to be changed. Once the
part is displayed, release the buttons.
Pressing the ^ button increments the step
number; conversely, pressing the v button
decrements the step number.
• To change a step by overwriting it,
press the button in which the new step
will be memorized. What was
previously programmed will be cleared
and overwritten with the new step.
ENGLISH
w
CH
OK
OK
VOL
e
DVD
CD
CD-R/MD
• To insert a new step in between existing
steps in a macro, after step 3 press the
MEMO button ⁄6 , then press the button
for the new step. The numbers of the
other steps will be adjusted accordingly
to accommodate the new step. Since
only 10 steps may be stored in any
macro, the tenth step will be erased if a
step is inserted when the total number of
steps is already 10.
TUNER
LD
CLEAR
AUTO
MATRIX
1
MEMO
MEMO
DOLBY THX
2
MOVIE
TAPE
AMP
GUIDE
DTS
3
4
2CH OSD SLEEP
MUTE
HALL
5
• To erase a step in a macro, after step 3
call up the number of the step to be
erased and press the CLEAR button ⁄5.
TUNER
LD
CLEAR
CLEAR
AUTO
1
MEMO
DOLBY THX
2
TAPE
AMP
MUTE
GUIDE
HALL
DTS
5
3
4
23
q

• If while editing macros no buttons are
ENGLISH
pressed for approximately 1 minute,
the remote controller will automatically
return to normal mode, and no macro
changes will be programmed in the
memory.
4. When you are finished editing macros,
use a ballpoint pen or other sharp point to
press the MACRO button x. END will be
displayed on LCD A and the display will
return to normal.
Note:
When the Jog Dial m has been programmed
in a macro, changing the function
immediately before causes the jog
commands immediately after to be
automatically changed to the commands of
the new function. (The commands are
changed to the commands on the same
page number of the new function.)
USING MACROS
The following procedure will show how to use
the function buttons for which you have
programmed macros.
1. Press the Function button , for the
desired macro for 3 seconds. MACRO is
displayed on LCD A for approximately 1
second, after which the number of steps
in the macro is displayed on LCD C.
DVD
DVD
CD
DSS
DSS
LD
LD
CLEAR
CLEAR
CD
MEMO
TV
TV
TUNER
TUNER
VCR
VCR
TAPE
TAPE
GUIDE
CD-R/MD
CD-R/MD
AUX
AUX
AMP
AMP
MUTE
• The remote controller will do nothing if
no macros are programmed. The
macro steps are executed in order
and the names of their buttons are
displayed on the LCD. Also, the step
numbers displayed on LCD c
disappear as each step is executed.
2. After all macro commands have been
transmitted, the remote controller returns
to normal mode.
• To cancel the transmission of a
programmed macro, use the v Cursor
button ⁄0 (STOP button).
24

EXAMPLES OF MACRO PROGRAMS
CH
VOL
Example 1
Change the input source for the amplifier to
CD and play the 3rd track on a CD in the CD
player.
1. Use a ballpoint pen or other sharp point to
press the MACRO button x.
POWER
SOURCE
ON /OFF
ON
LEARNING REMOTE
CONTROL RC
2. Press the CD function button ,. CD-M is
displayed on the LCD.
CD
CD
DSS
TUNER
LD
3. Press CD ,, 3 ⁄7, and 3 OK ⁄0 in this
order.
OFF
MACRO
MODE
1200
OK
DVD
CD-R/MD
VCR
TAPE
AUX
AMP
TV
ENGLISH
q
CH
e
DSS
CLEAR
AUTO
w
MATRIX
LD
1
6
CD
CD
TV
TUNER
MEMO
DOLBY THX
2
MOVIE
7
OK
OK
DVD
2CH OSD SLEEP
8
VOL
CD-R/MD
AUX
VCR
TAPE
AMP
MUTE
GUIDE
HALL
DTS
5
3
3
4
9
0
25

When you are finished programming the
CH
VOL
ENGLISH
macro, use a ballpoint pen or other sharp
point to press the MACRO button x.
POWER
SOURCE
ON /OFF
ON
LEARNING REMOTE
CONTROL RC
OFF
MACRO
MODE
1200
Now, execute the macro you just programmed.
1. Press the CD Function button , for 3
seconds.
DSS
OK
DVD
CD
CD
TV
TUNER
LD
VCR
TAPE
CD-R/MD
AUX
AMP
2. The macro commands are transmitted to
the components in order, and the names
of the operations being performed are
displayed on the LCD in order.
Example 2
Turn the main amplifier ON → Change the
amplifier’s input source to LD → Set the
Surround mode to DOLBY → Switch the TV to
video input → Set the laser disc player to
PLAY
1. Use a ballpoint pen or other sharp point to
press the MACRO button x.
2. Press the LD Function button ,.
DSS
LD
LD
CLEAR
AUTO
CD
CD
TV
TUNER
MEMO
DOLBY THX
DVD
CD-R/MD
AUX
VCR
TAPE
AMP
MUTE
GUIDE
HALL
DTS
• Here the LD Function button , is
used as the macro button, but any
function button can in fact be used.
26

3. To set the various steps of the macro,
press the following buttons in order: AMP
,, POWER ON c, LD ,, AMP* ,, 2
(DOLBY) ⁄7, TV* ,, VIDEO (use Jog Dial
m to select VIDEO and press ENT button
n) , LD* ,, 3 ⁄0.
4. When you are finished programming the
macro, use a ballpoint pen or other sharp
point to press the MACRO button x. The
remote controller returns to normal mode.
Now, execute the macro you just
programmed.
1. Press the LD Function button , for 3
seconds.
DVD
CD
DSS
LD
LD
CLEAR
CD
TV
TUNER
MEMO
VCR
TAPE
GUIDE
CD-R/MD
AUX
AMP
MUTE
ENGLISH
The macro commands are transmitted in
order, and the names of the operations
being performed are displayed on LCD A
in order.
• When executing this macro, function
operations AMP*, TV*, and LD* only
switch the command set of the remote
controller and no signal is transmitted
to the component.
• To cancel the transmission of a
programmed macro, use the v Cursor
buttons ⁄0 (STOP button).
27

CLEARING MACRO PROGRAMS
The following procedure is used to erase
ENGLISH
macros you have programmed into the remote
controller’s memory.
• When one of the function buttons , (LD
in this example) is pressed for 3 seconds
while holding down the CLEAR button ⁄5,
"LDCL?" appears at LCD A. If you wish to
continue the clearing operation, press the
OK Cursor button ⁄0.
VOL
CD-R/MD
AUX
VCR
TAPE
AMP
MUTE
GUIDE
HALL
DTS
5
3
4
9
0
w
e
CH
DSS
LD
LD
CLEAR
CLEAR
AUTO
MATRIX
6
CD
CD
1
TV
TUNER
MEMO
DOLBY THX
2
MOVIE
7
OK
OK
DVD
2CH OSD SLEEP
8
q
• To cancel the memory clearing
operation, do not press OK Cursor
button ⁄0 and simply touch any other
button.
28

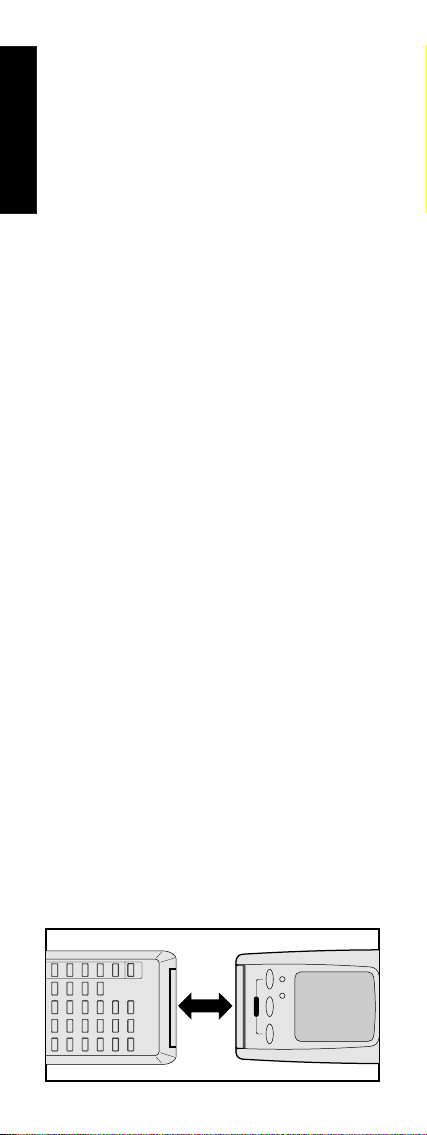
USING THE CLONE MODE
All the codes which have been programmed
can be copied altogether into another RC1200
remote controller by a few simple operations.
(Macros and the set-up contents will also be
copied.)
Note:
The clone function cannot be used for
copying unless the same model (RC1200)
is used for the remote controllers at the
sending and receiving ends.
1. Place the light sensor (in the head section)
of the remote controller at the receiving
end about 5 centimeters (2 inches) away
from and directly in front of the transmitter
(also in the head section) of the remote
controller at the sending end.
ON
LEARNING REMOTE
CONTROL RC
POWER
ON /OFF
1200
SOURCE
MACRO
OFF
MODE
5cm
2. Use a ballpoint pen or other sharp point to
press the MODE button z on the sending
unit to call up the CLONE and TX
displays. CLONE appears at LCD A and
TX at LCD B.
MODE
OFF
MACRO
SOURCE
1200
ON /OFF
POWER
CONTROL RC
LEARNING REMOTE
ON
ENGLISH
ON
LEARNING REMOTE
CONTROL RC
POWER
SOURCE
ON /OFF
1200
29
MACRO
OFF
MODE
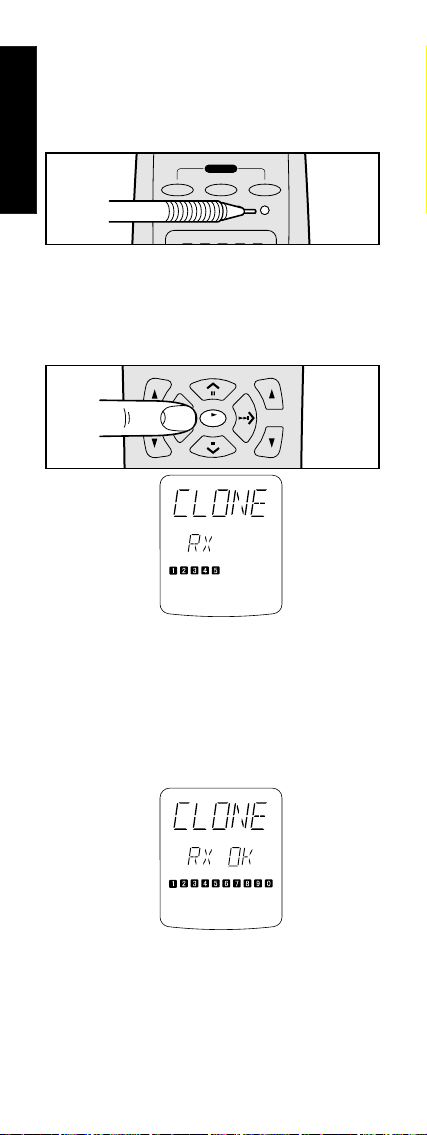
3. Use a ballpoint pen or other sharp point to
ENGLISH
press the MODE button z on the
receiving unit to call up the CLONE and
RX displays. CLONE appears at LCD A
and RX at LCD B.
POWER
SOURCE
ON /OFF
ON
LEARNING REMOTE
CONTROL RC
OFF
MACRO
MODE
1200
4. Press the OK Cursor button ⁄0 on the receiving
unit.
5. Press the OK Cursor button ⁄0 on the sending
unit. The copying operation is now
commenced.
CH
VOL
OKOK
6. During the copying operation, the bar
displays at LCD C on both units start
moving from left to right. After the entire
bar displays have lighted, the display at
LCD B on the receiving unit changes to
RX OK and the LCD display on the
sending unit changes to TX OK. Copying
is now completed.
• Do not touch either of the remote
controllers during the copying
operation. Doing so may cause
copying to fail.
• When copying has failed at an interim
point, RX NG will appear on the LCD
display of the receiving unit. Check
steps 1 to 5, and repeat.
30

• Copying takes about 3 minutes to
complete if the programming capacity
in the sending unit is 100%.
7. When copying is completed, use a
ballpoint pen or other sharp point to press
the MODE button z on both remote
controllers to call up the USE display.
POWER
SOURCE
ON /OFF
ON
LEARNING REMOTE
CONTROL RC
OFF
MACRO
MODE
1200
Note:
If RX NG is displayed, all the receiving
unit's buttons which were programmed will
be returned to the factory presets (RC-5).
ENGLISH
31

COPY MODE
ENGLISH
In the copy mode, the preset codes or
programmed codes stored in the buttons can be
transferred (copied) to other keys as desired.
The information that will be copied includes
not only codes but also names which have
been assigned. Information can be copied on
a button by button basis, and Jog Dial codes
can be copied.
Buttons which are excluded from the copying
process are the MODE button z, MACRO button
x, < • 3 button ⁄1 and function buttons ,.
COPYING ON A BUTTON BY BUTTON BASIS
As an example, the information stored in 1 ⁄7
on the ten-key pad for the LD function will be
copied here to 1 ⁄7 on the ten-key pad for the
DVD function.
1. Use a ballpoint pen or other sharp point to
press the operation MODE button z to
call up the LEARN display. LEARN now
blinks on the LCD display.
POWER
SOURCE
ON /OFF
ON
LEARNING REMOTE
CONTROL RC
OFF
MACRO
MODE
1200
2. Press the MEMO button ⁄6 for 3 seconds.
(The learn mode of the MEMO button is
established first, and after 3 seconds it
changes to the COPY mode.)
"CPY→" appears at LCD A.
TUNER
LD
CLEAR
AUTO
1
MEMO
MEMO
DOLBY THX
2
TAPE
AMP
MUTE
GUIDE
HALL
DTS
5
3
4
32

3. Select 1 of the LD function button on the
copy source. Press the LD function
button ,, and then press 1 on the ten-
key pad ⁄7 for 3 seconds.
The display at LCD B changes from LD to
1, and the characters "1" stops blinking
and remain lighted.
"CPY←" appears at LCD A.
DVD
CD
q
w
DSS
LD
LD
CLEAR
AUTO
MATRIX
6
1
1
CD
TUNER
MEMO
DOLBY THX
2
MOVIE
7
TV
VCR
TAPE
3
2CH OSD SLEEP
8
GUIDE
DTS
4
9
CD-R/MD
AUX
AMP
MUTE
HALL
5
0
The copy source has now been
established.
4. The copy destination is selected next. Press
the DVD function button ,, and then press
1 on the ten-key pad ⁄7 for 3 seconds.
The character "1" stops blinking and
remain lighted.
ENGLISH
DVD
DVD
CD
w
q
DSS
LD
CLEAR
AUTO
MATRIX
6
CD
1
1
TUNER
MEMO
DOLBY THX
2
MOVIE
7
TV
VCR
TAPE
3
2CH OSD SLEEP
8
GUIDE
9
DTS
4
CD-R/MD
AUX
AMP
MUTE
HALL
5
0
When copying finishes, the OK display
appears at LCD A.
"CPY→" appears again at LCD A.
Now repeat steps 3 and 4. When copying
is completed, press the MODE button z
and call up the USE display.
33

COPYING THE JOG DIAL INFORMATION
As an example, 1 (DISC+) for the CD function
ENGLISH
will be copied here to 1 (OSD) for the DVD
function.
1. Use a ballpoint pen or other sharp point to
press the operation MODE button z to
call up the LEARN display. LEARN now
blinks on the LCD display.
POWER
SOURCE
ON /OFF
ON
LEARNING REMOTE
CONTROL RC
2. Press the MEMO button ⁄6 for 3 seconds.
(The learn mode of the MEMO button is
established first, and after 3 seconds it
changes to the COPY mode.)
"CPY→" appears again at LCD A.
TV
DSS
CLEAR
AUTO
MATRIX
6
LD
1
TUNER
MEMO
MEMO
DOLBY THX
2
MOVIE
7
VCR
TAPE
GUIDE
3
2CH OSD SLEEP
8
3. Press the CD function button , on the
copy source, turn the Jog Dial m to
select 1 (DISC+), and then press the ENT
button n for 3 seconds.
OFF
MACRO
MODE
1200
AUX
AMP
MUTE
HALL
DTS
5
4
9
0
e
q
ENT
ENT
CH
CD
CD
DVD
ENT
w
VOL
OK
CD-R/MD
34

CD appears at LCD B, and then the 1
(DISC+) characters stop blinking and
remain lighted. (The Jog Dial name is
displayed.)
The copy source has now been
established.
"CPY←" appears at LCD A.
4. The copy destination is selected next.
Press the DVD function button ,, turn the
Jog Dial m to select 1 (OSD), and then
press the ENT button n for 3 seconds.
DVD appears at LCD B, and then the 1
(OSD) characters stop blinking and
remain lighted.
(The Jog Dial name is displayed.)
When copying finishes, the OK display
appears at LCD A.
"CPY→" appears again at LCD A.
Now repeat steps 3 and 4.
When copying is completed, press the
MODE button z and call up the USE
display.
ENGLISH
Operating tip
In the same way, copying is possible from
Jog Dial m to a button other than jog and
vice versa.
Now repeat steps 3 and 4.
When copying is completed, press the
MODE button z and call up USE on the
LCD display.
35

OTHER FUNCTIONS
ENGLISH
LIGHTING BUTTON
To allow easy use in a location which has been
darkened for a home theater performance, for
instance, this remote controller has an LCD display
which lights up. It lights up when the LIGHTING
button ⁄9 or any other button is pressed. While the
LIGHTING button ⁄9 is pressed, it lights, and when
it is released, it goes off.
• Signals can be sent even while the
LIGHTING button is held down.
• The display can be set to light for a duration
of 0 to 10 seconds.
Note:
• When the lighting duration is set to 0,
the LCD display will light up only while
the LIGHTING button ⁄9 is held down
and for 5 seconds after the button is
released.
LUMINOUS BUTTONS
The buttons on this remote controller are
designed to remain luminous in dim lighting
conditions. If the buttons are no longer
luminous when the remote controller is used in
low light, recharge them by placing it near a
fluorescent or other light source for a sufficient
amount of time. This should return the buttons
to their luminous condition.
SETUP
Switch the RC-5 destination or adjust the time
interval between transmissions of macro
operations as follows:
1. While pressing the MEMO button ⁄6 ,
press the OK Cursor button ⁄0. This will
switch the remote controller to the Setup
mode.
(Wait 3 seconds.)
VOL
OK
OK
CD-R/MD
AUX
VCR
TAPE
AMP
MUTE
GUIDE
HALL
DTS
q
w
CH
DSS
CLEAR
AUTO
LD
CD
TV
TUNER
MEMO
MEMO
DOLBY THX
DVD
36

The Setup mode includes the following
items, which may be accessed using the
^ and v Cursor buttons ⁄0.
• Switch destination (version) (VER)
• Adjust time interval between
transmissions of macro operations
(MACRO)
• LCD lighting duration adjustment
(LIGHT)
VER: Switches the type of preset codes
contained in the remote controller .
LCD A displays VER, while LCD B displays
either USA or REST. USA means that the CD-
R/MD Function button , is set to CD-R.
REST means that the CD-R/MD Function
button , is set to MD.
Use the < and > Cursor buttons ⁄0 to select the
desired version, then press the OK Cursor
button ⁄0. This will finish the operation and
return the LCD to its original state.
• To cancel the setting, press any button
other than the Cursor buttons ⁄0.
• To continue the setting, press the v Cursor
button ⁄0.
ENGLISH
Note:
Codes that have been programmed will not
be erased even if the VER setting is
changed, however the NAME indicator
displays associated with the Jog Dial
command will be changed. Also, the Jog
Dial commands for CD-R/MD functions that
are contained within macros will also
change.
37

MACRO: Adjusts the time interval between
transmissions of macro operations
ENGLISH
When the v Cursor button ⁄0 is pressed, LCD
a displays MACRO, while LCD b displays
STEP.
One square (7) in LCD c is equivalent to an
interval of 0.5 seconds, allowing intervals of up
to 5 seconds to be set. The remote controller is
set at the factory with an interval of 1 second,
as indicated by (77&&&&&&&&). Adjust the
interval between transmission of operation
codes using the < and > Cursor buttons ⁄0,
then press the OK Cursor button ⁄0.
• To cancel the setting, press any button
other than the Cursor button ⁄0.
LIGHT: Adjusts the LCD display lighting
duration.
When the ^ or v Cursor button ⁄0 is pressed,
TIME appears at LCD B. Every 7 at LCD C
represents a second, and a lighting duration
of up to 10 seconds can be set.
The unit is set at the factory with a duration of 5
seconds (77777&&&&&). When 0 is set, only
the LIGHTING button ⁄9 can be used to light
up the LCD display: no other buttons can be
used to perform this operation.
Press the < Cursor button ⁄0 to decrease the
lighting duration; conversely, press the >
button to increase it.
• After setting the duration, press the OK
Cursor button ⁄0.
• To cancel the setting, press any button
except the Cursor button ⁄0.
• To continue with the setting, press the ^ or v
Cursor button ⁄0.
38

JOG DIAL COMMAND FUNCTIONS LISTING
Each of the 10 Jog Dial commands on the LCD
has 5 character labels attached for preprogrammed remote commands. These
commands can be used with various Marantz
A/V components, or other components using
the Philips RC-5 remote control language
(without DSS function).
You can easily replace the factory-supplied
remote command codes with different codes
from other brands of component. Most of the
supplied functions apply to a wide variety of
component from many companies. The
following list shows the remote code
assignments for the Jog Dial commands, for
each of the 11 Function buttons, as supplied
from the factory. You can add or replace Jog
Dial commands, including re-naming them if
you wish, in order to customize the remote
controller for your own particular selection of
A/V components.
Function Command Note
AMP 1 MODE selects surround mode
2 A/D switches analog/digital
input
3 ATT switches attenuator for
analog input
4 NIGHT selects NIGHT mode
for Dolby Digital
5 MULTI activates multi-room
mode
6 6-DIR activates 6-channel in-
put
7 TRB+ increases treble
8 TRB- decreases treble
9 BAS+ increases bass
0 BAS- decreases bass
TUNER 1 FM FM band
2 AM AM/MW band
3 LW Long Wave band
4 T-MOD mono/stereo/muting
mode selector
5 SCAN programmed preset
channel scan
6 STM selects station mode
7 AF selects AF function
8 PTY selects PTY function
9 DISP selects display func-
tion
0 DWR selects DSR wave
range
39
ENGLISH

Function Command Note
TV 1 A/CH alternate channel
ENGLISH
CD 1 DISC+ CD changer next disc
LD 1 SID-A side A
TAPE 1 TP-A selects tape deck A
VCR 1 REC record
2 100S 100's
3 VIDEO selects video
4 INFO information
5 S-PIC smart picture
6 S-SUD smart sound
7 S-CH smart channel
8 ADV advance
9 OSD
0 MENU menu
2 DISC3 TEXT activates text function
4 SHUFL shuffle play function
5 REPT repeat function
6 TRAY tray open/close
7 AMS automatic music scan
8 TIME time display elapsed/
9 FF fast forward
0 REW rewind
2 SID-B side B
3 DISP display on/off
4 AMS automatic music scan
5 AUDIO selects audio mode
6 RPT-A repeat A start point
7 RPT-B repeat B stop point
8 CP/F selects chapter or frame
9 EDIT activates edit function
0 D/CX selects digital audio/
2 TP-B selects tape deck B
3 DIR auto reverse direction
4 TIME time display
5 TRAY tray open/close
6 AMS automatic music scan
7 REC record
8 PAUSE pause
9
0
2 SELCT selects TV or VCR
3 2XPLY twice normal playback
4 SLOW slower than normal
5 STIL still frame
6 OTR one touch recording
7 AUDIO audio track selector
8 SKIP skip to next program
9 VIS+ VHS index search next
0 VIS-
activates on-screen display
CD changer previous disc
remaining/total
analog audio/CX NR
speed
playback speed
marker
VHS index search previous
40

Function Command Note
DSS/V2 1 DISP brings up on-screen
channel marker
2 PREV goes to previously se-
lected channel
3 SELCT selects TV or VCR
4 AUDIO audio track selector
5 FAV favorite users and
channel lists
6 ALT alternate audio chan-
nel, languages
7 FTCH brings up on-screen
channel logos
8ANT select broadcast or
cable antenna
9 REC record
0 OTR one touch recording
AUX 1 No no output
2 No no output
3 No no output
4 No no output
5 No no output
6 No no output
7 No no output
8 No no output
9 No no output
0 No no output
DVD 1 OSD activates on-screen
display
2 TITLE selects title menu
3 ZOOM zoom mode on/off
4 MENU selects main menu
5 10+ digit entry +10
6 SETUP selects setup menu
7 ANGLE selects angle
8 SUB-T selects subtitle
9 RESUM resume function
0 AUDIO selects audio
ENGLISH
For USA setups
Function Command Note
CDR 1 INPUT selects input source
2 INCR increments track num-
ber
3 SYNC activates SYNCRO. re-
cording
4 REC records pause
5 PROG activates program
mode
6 TRAY tray open/close
7 DISP display mode
8 FINAL finalizes (writes TOC)
9 BLANK records blank
0 REPT activates repeat mode
41

For REST setups
Function Command Note
ENGLISH
MD 1 REC records pause
2 REPT selects repeat mode
3 RANDM random play
4 DISP selects display mode
5 EDIT selects edit mode
6 EJECT eject
7 LP selects SP/LP mode
8 DEL selects delete
9 ENTER selects enter
0 SYNC SYNCRO. recording
42

SPECIFICATIONS
System ........ Infrared type programmable remote control
Learning and transmission-capable infrared carrier
frequency band ............................................ 20 to 70 kHz
Transmission infrared wavelength band ...... 950+/-45nm
Maximum number of programmable codes .............. 407
Power supply ................... Size "AA" alkaline batteries x 2
Dimensions ........................... 225(H) x 65(W) x 26(D) mm
Weight (including batteries) .................................... 200 g
Accessories
Alkaline batteries ............................................................ 2
Product warranty (for USA only) ..................................... 1
User guide ....................................................................... 1
Note:
Depending on the types of codes
programmed, it may not be possible to
program a total of 407 codes.
ENGLISH
43
⁄8
⁄9
v
m
⁄2
⁄6
⁄5
ENT
CH
DSS
CLEAR
AUTO
MATRIX
6
LD
1
ON
LEARNING REMOTE
CONTROL RC
CD
TV
TUNER
MEMO
DOLBY THX
2
MOVIE
7
POWER
SOURCE
ON /OFF
OFF
MACRO
MODE
1200
OK
DVD
CD-R/MD
VCR
TAPE
GUIDE
DTS
3
4
2CH OSD SLEEP
9
8
AMP
AUX
c
z
x
b
n
ENT
⁄0
VOL
.
,
MUTE
HALL
5
0
⁄4
⁄3
⁄1
⁄7


“Dolby”, “Pro Logic” and the double-D symbol
are trademarks of Dolby Laboratories.
Confidential Unpublished Works. © 1992-1997
Dolby Laboratories, Inc. All rights reserved.
“DTS” and “DTS Digital Surround” are
trademarks of Digital Theater Systems, Inc. ©
1996 Digital Theater Systems, Inc. All rights
reserved.
Lucasfilm and THX are registered trademark
of Lucas film Ltd.
R
is a registered trademark.
www.marantz.com
Printed in Japan 00/02 287W851250 (MITi)
 Loading...