

Page 1

NOTE:
This equipment has been tested and found to comply
with the limits for a Class B digital device, pursuant
to Part 15 of the FCC Rules. These limits are
designed to provide reasonable protection against
harmful interference in a residential installation. This
equipment generates, uses and can radiate radio
frequency energy and, if not installed and used in
accordance with the instructions, may cause harmful
interference to radio communications. However,
there is no guarantee that interference will not occur
in a particular installation. If this equipment does
cause harmful interference to radio or television
reception, which can be determined by turning the
equipment off and on, the user is encouraged to
try to correct the interference by one or more of the
following measures:
- Reorient or relocate the receiving antenna.
- Increase the separation between the equipment
and receiver.
- Connect the equipment into an outlet on a
circuit different from that to which the receiver is
connected.
- Consult the dealer or an experienced radio/TV
technician for help.
NOTE:
Changes or modifi cations may cause this unit to fail
to comply with Part 15 of the FCC Rules and may
void the user’s authority to operate the equipment.
This Class B digital apparatus complies with Canadian
ICES-003.
Cet appareil numerique de la Classe B est conforme
a la norme NMB-003 du Canada.
DECLARATION OF CONFORMITY
This device complies with Part 15 of the FCC rules. Operation is subject to the
following conditions: (1) This device may not cause harmful interference, and (2) this
device must accept any interference received, including interference that may cause
undesired operation.
U.S. Responsible Party: Marantz America, Inc.
100 Corporate Drive,
Mahwah, NJ, 07430, U.S.A.
201-762-6500
TEL:
Type of Product:
Model:
Remote controller
RC101
Page 2

ENGLISH
WARRANTY
For warranty information, contact your local Marantz
distributor.
RET AIN YOUR PURCHASE RECEIPT
Your purchase receipt is your permanent record of a
valuable purchase. It should be kept in a safe place
to be referred to as necessary for insurance purposes
or when corresponding with Marantz.
IMPORTANT
When seeking warranty service, it is the responsibility of
the consumer to establish proof and date of purchase.
Your purchase receipt or invoice is adequate for such
proof.
FOR U.K. ONLY
This undertaking is in addition to a consumer's
statutory rights and does not affect those rights in
any way.
FRANÇAIS
GARANTIE
Pour des informations sur la garantie, contacter le
distributeur local Marantz.
CONSERVER L'ATTESTATION D'ACHAT
L'attestation d'achat est la preuve permanente
d'un achat de valeur. La conser ver en lieu sur pour
s'y reporter aux fi ns d'obtention d'une couverture
d'assurance ou dans le cadre de correspondances
avec Marantz.
IMPORTANT
Pour l'obtention d'un service couvert par la garantie, il
incombe au client d'établir la preuve de l'achat et d'en
corroborer la date. Le reçu ou la facture constituent
des preuves suffi santes .
DEUTSCH
GARANTIE
Bei Garantiefragen wenden Sie sich bitte an Ihren
Marantz-Händler.
HEBEN SIE IHRE QUITTING GUT AUF
Die Quittung dient Ihnen als bleibende Unterlage
für Ihren wertvollen Einkauf Das Aufbewahren der
Quittung ist wichtig, da die darin enthaltenen Angaben
für Versicherungswecke oder bei Korrespondenz mit
Marantz angeführt werden müssen.
WICHTIG!
Bei Garantiefragen muß der Kunde eine Kaufunterlage
mit Kaufdatum vorlegen. Ihren Quittung oder
Rechnung ist als Unterlage ausreichend.
ESPAÑOL
GARANTIA
Para obtener información acerca de la garantia
póngase en contacto con su distribuidor Marantz.
GUARDE SU RECIBO DE COMPRA
Su recibo de compra es su prueba permanente de
haber adquirido un aparato de valor, Este recibo
deberá guardarlo en un lugar seguro y utilizarlo
como referencia cuando tenga que hacer uso del
seguro o se ponga en contacto con Marantz.
IMPORTANTE
Cuando solicite el servicio otorgado por la garantia
el usuario tiene la responsabilidad de demonstrar
cuándo efectuó la compra. En este caso, su recibo
de compra será la prueba apropiada.
ITALIANO
GARANZIA
L’apparecchio è coperto da una garanzia di buon
funzionamento della durata di un anno, o del periodo
previsto dalla legge, a partire dalla data di acquisto
comprovata da un documento attestante il nominativo
del Rivenditore e la data di vendita. La garanzia sarà
prestata con la sostituzione o la riparazione gratuita
delle parti difettose.
Non sono coperti da garanzia difetti derivanti da
uso improprio, errata installazione, manutenzione
effettuata da personale non autorizzato o, comunque,
da circostanze che non possano riferirsi a difetti di
funzionamento dell’apparecchio. Sono inoltre esclusi
dalla garanzia gli interventi inerenti l’installazione e
l’allacciamento agli impianti di alimentazione.
Gli apparecchi verranno riparati presso i nostri Centri
di Assistenza Autorizzati. Le spese ed i rischi di
trasporto sono a carico del cliente.
La casa costruttrice declina ogni responsabilità per
danni diretti o indiretti provocati dalla inosservanza
delle prescrizioni di installazione, uso e manutenzione
dettagliate nel presente manuale o per guasti dovuti ad
uso continuato a fi ni professionali.
CE MARKING
English
The RC101 is in conformity with the EMC directive and low-voltage directive.
English
- Do not expose the equipment to rain or moisture.
- Do not remove the cover from the equipment.
- No naked fl ame sources, such as lighted candles,
should be placed on the equipment.
- When disposing of used batteries, please comply
with governmental regulations or environmental
public instruction’s rules that apply in your country
or area.
- No objects fi lled with liquids, such as vases, shall
be placed on the equipment.
Français
-
Ne pas exposer l’appareil à la pluie ni à l’humidité.
- Ne pas essayer de retirer le boîtier de l’appareil.
- Ne placer aucune source de fl amme nue, comme
une bougie allumée, sur l'appareil.
- Pour mettre au rebut les piles usées, respecter les
lois gouvernementales ou les règlements offi ciels
concernant l’environnement qui s'appliquent à
votre pays ou région.
- Aucun objet rempli de liquide, un vase par e xemple,
ne doit être placé sur l'appareil.
Deutsch
- Das Gerät nicht Regen oder Feuchtigkeit
aussetzen.
- Die Abdeckung nicht vom Gerät abnehmen.
- Es dürfen keine Gegenstände mit offener Flamme,
wie etwa brennende Kerzen, auf dem Gerät
aufgestellt werden.
Français
Le RC101 est conforme à la directive EMC et à la directive sur les basses tensions.
Deutsch
Das Modell RC101 entspricht den EMC-Richtlinien und den Richtlinien für Niederspannungsgeräte.
Español
El RC101 está de acuerdo con las normas EMC y las relacionadas con baja tensión.
Italiano
Il RC101 è conforme alle direttive CEE ed a quelle per i bassi voltaggi.
WARNINGS
AVERTISSEMENTS
WARNHINWEISE
- Beachten Sie bei der Entsorgung der verbrauchten
Batterien alle geltenden lokalen und überregionalen
Regelungen.
- Auf das Gerät dürfen keine mit Flüssigkeiten
gefüllte Behälter, wie etwa eine Vase, gestellt
werden.
Español
ADVERTENCIAS
- No exponga el equipo a la lluvia ni a la humedad.
- No extraiga la tapa del equipo.
- No deben colocarse sobre el equipo elementos
con fuego, por ejemplo velas encendidas.
- Cuando se eliminen baterías usadas, deben
cumplirse las reglamentaciones oficiales o las
normas de protección medioambiental aplicables
en su país o en su zona.
- No se deben colocar sobre el aparato recipientes
que contengan líquidos, como por ejemplo
jarrones.
Italiano
AVVERTENZE
- Non esporre l’apparecchio alla pioggia o
all’umidità.
- Non rimuovere il coperchio dell’apparecchio.
- Non posare sull'apparecchio sorgenti di fi amme
scoperte quali candele accese.
- Smaltire le pile usate in conformità alle norme
governative o disposizioni ambientali vigenti nel
proprio paese o zona.
- Non mettere sull'apparecchiatura alcun contenitore
di liquido, come ad esempio dei vasi.
Page 3
TABLE OF CONTENTS
INTRODUCTION ....................................1
A NOTE ABOUT RECYCLING ..............1
FEA TURES .............................................1
SPECIFICA TIONS ..................................1
FUNCTION AND OPERATION ..............2
OPERATION OF REMOTE CONTROLLER
REMOTE CONTROL ..........................................................3
LOADING BATTERIES .......................................................3
CAUTIONS ON BATTERIES ..............................................3
..3
CONTROLLING MARANTZ
COMPONENTS .................................4
CONTROLLING MARANTZ RECEIVER / AV AMPLIFIER
..4
CONTROLLING MARANTZ SOURCE
COMPONENTS .................................4
CONTROLLING A MARANTZ TV (TV) .............................. 4
CONTROLLING A MARANTZ DVD PLAYER (DVD) ........5
CONTROLLING A MARANTZ VCR DECK (VCR1/VCR2) 5
CONTROLLING A MARANTZ SATELLITE
BROADCASTING TUNER (DSS) ......................................5
CONTROLLING A MARANTZ TUNER (T1/T2) .................5
CONTROLLING A MARANTZ CD PLAYER (CD) .............6
CONTROLLING A MARANTZ CD RECORDER (CDR) ....6
CONTROLLONG A MARANTZ TAPE DECK (TAPE) ........6
CONTROLLING A MARANTZ UNIVERSAL DOCK (AUX1/AUX2)
..6
BASIC OPERATION ...............................7
NORMAL MODE .................................................................7
SETTING THE BACK LIGHT .............................................7
PRESET MODE ..................................................................7
PROGRAMMING WITH THE 4-DIGIT CODE ...................7
SCANNING THE CODE TABLE .........................................7
CHECKING THE CODE .....................................................7
RESETTING THE CODE ...................................................7
LEARN MODE .................................................................... 8
LEARNING PROCEDURE .................................................8
ERASING PROGRAMMED CODES (RETURNING TO
INITIAL SETTINGS) ...........................................................8
CLONE MODE ....................................................................9
OTHER OPERATIONS ...........................9
CHANGE THE MULTI ROOM CONTROL COMMANDS
FOR EACH ZONE .............................................................9
CHANGE THE CONTROL COMMANDS OF MULTI
SPEAKER FUNCTION FROM MULTI ROOM. ..................9
INTRODUCTION
Thank you for purchasing the Marantz RC101
Learning remote controller.
This remarkable component has been engineered
to provide you with many years of home theater
enjoyment. Please take a few minutes to read this
manual thoroughly before you operate the RC101.
A NOTE ABOUT RECYCLING
This product’s packaging materials are recyclable
and can be reused. This product and the accessories
packed together are the applicable product to the
WEEE directive except batteries.
Please dispose of any materials in accordance with
your local recycling regulations.
When discarding the unit, comply with your local
rules or regulations.
Batteries should never be thrown aw a y or incinerated
but disposed of in accordance with your local
regulations concerning chemical wastes.
FEATURES
Integrated Control of 12 Devices via multi room
control of Marantz AV Receiver
You can control up to 12 types of devices with
Marantz AV receiver in your theater room used multi
room control of Marantz AV receiver from another
area.
Wide Range of Preset Codes
This remote controller is provided with remote control
signals for Marantz products and DVD/TV/CD/DSS
equipment by major manufacturers.
You can enable the remote control operation of your
AV equipment by simply selecting the manufacturer
code corresponding to your equipment.
In the factory default setting, the remote controller is
preset for signals for multi room control of Marantz
AV Receiver and Marantz A V equipment products .
Learning Function
If you have an infrared-based remote controller, you
can use a simple operation to enable this remote
controller to learn its codes.
This remote controller uses non-volatile memory
so that the learned codes are retained even if the
batteries are removed.
Lighting Function
This remote controller features the backlight buttons
so that it can be used in a darkened location such as
a home theater.
Cloning Function
This remote controller features a cloning system.
This enables you to clone the programmed
information from one RC101 to another, by simply
pushing a series of buttons.
You can select whether to copy all programmed
information or copy the information for each source .
SPECIFICATIONS
System ............. Infrared programmable remote controller
Learning and transmittable infrared carrier frequency band
................................................................... < 80 kHz
Transmission infrared wavelength band .............. 940 nm
Power supply ................................Size AAA batteries x 2
Dimensions ....................... 224 (H) x 50 (W) x 24 (D) mm
(8 7/8 (H) x 2 (W) x 1 (D) inches)
Weight ....................................................110 g (0.242 lbs)
Accessories ................................................. Batteries x 2
................................................................ User guide
........................... Product warranty for USA/Canada
ENGLISH
1
Page 4
ENGLISH
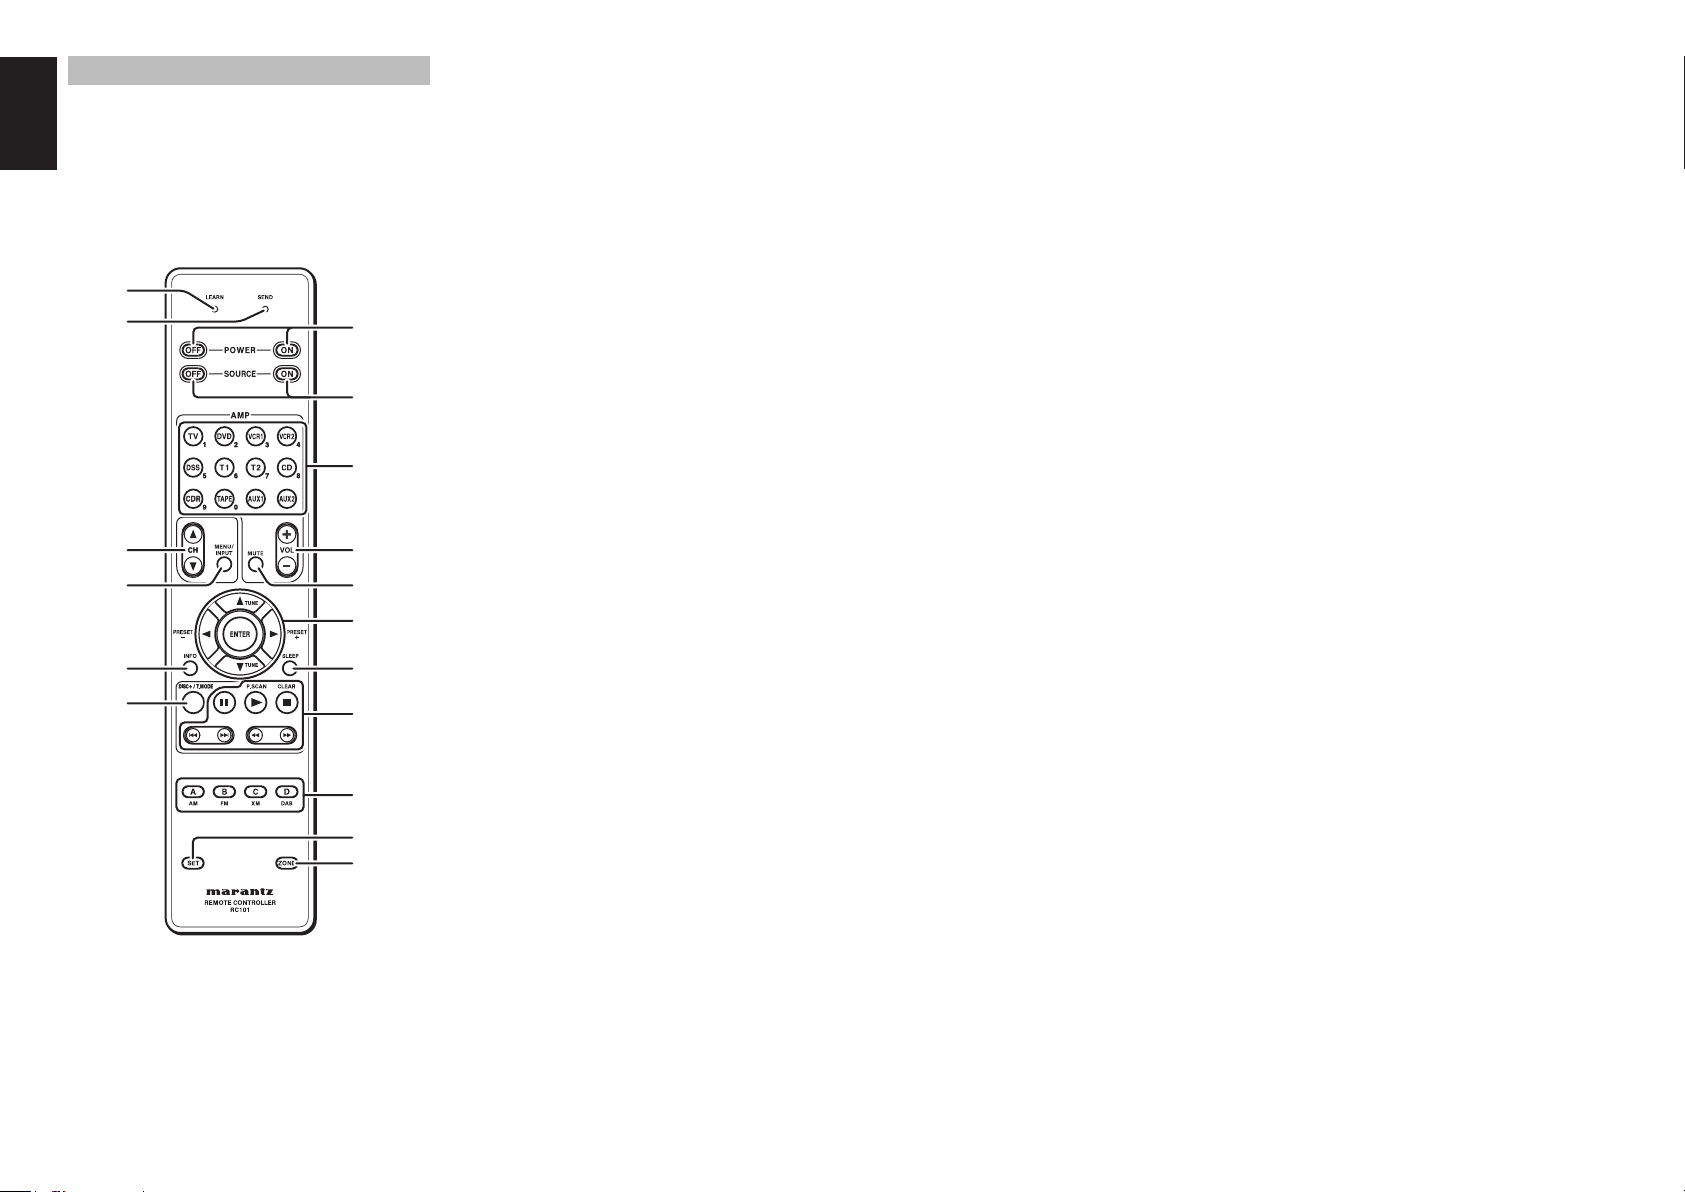
FUNCTION AND OPERATION
The remote controller is a universal remote controller.
The SOURCE ON/OFF button and control buttons
are used in common across different input source
components.
The input source controlled with the remote controller
changes when one of the input selector buttons is
pressed.
⁄7
⁄6
⁄5
⁄4
⁄3
⁄2
z
x
c
v
b
n
m
,
.
⁄0
⁄1
z POWER ON and OFF b uttons
(When Zone A/B/C mode is selected)
These buttons are used to turn on or off, for the multi
room control or multi speaker control of Marantz AV
receiver.
(When Zone D mode is selected)
These buttons are used to turn on or off, for the
Marantz AV receiver in main room.
x SOURCE ON and OFF buttons
These buttons are used to turn on or off a specifi c
source (such as a DVD player) independently from
the rest of the system.
c AMP - SOURCE /Numeric buttons
SOURCE buttons
These buttons are used to switch the source of your
A/V Receiver / amplifer . Each time a source button is
pressed, the remote control changes to the source
which was pressed.
This remote controller can control 12 types of
equipment. To change the A/V Receiver / amplifi er
source, press this button twice within two seconds.
The signal is sent when it is pressed the second
time.
(When Zone A/B/C mode is selected)
These buttons are used to select the source for
the multi room/multi speaker control of Marantz AV
receiver.
(When Zone D mode is selected)
These buttons are used to select the source for the
Marantz AV receiver in main room.
Numeric buttons
Use these buttons only for preset setting.
v AMP - VOL +/- buttons
(When Zone A/B/C mode is selected)
These buttons are used to adjust the volume for the
multi room control or multi speaker .
(When Zone D mode is selected)
These buttons are used to adjust the volume for the
Marantz AV receiver in main room.
b AMP - MUTE button
(When Zone A/B/C mode is selected)
This button is used to mute the audio for the multi
room control or multi speaker control of Marantz AV
receiver.
(When Zone D mode is selected)
These buttons are used to mute the audio for the
Marantz AV receiver in main room.
n 3, 4, 1, 2 (CURSOR) / ENTER
buttons
These buttons are used when operating cursor of a
source.
(When Tuner mode (T1 or T2) mode is selected)
PRESET +/ PRESET - buttons
Used to select a preset station up and down.
TUNE 3 /TUNE 4 buttons
Used to tune a frequency station up and down.
m SLEEP button
(When Zone A/B/C mode is selected)
This button is used for setting the sleep timer of multi
room control mode.
(When Zone D mode is selected)
This button is used for setting the sleep timer of
Marantz AV receiver in main room.
, CONTROL buttons
These buttons are used when operating PLA Y, STOP,
PAUSE and other commands of a source.
(When TUNER mode (T1 or T2) is selected)
P.SCAN button
Used to start preset scan.
CLEAR button
Used to stop preset scan.
. A/B/C/D buttons
(When TUNER mode (T1 or T2) is selected)
Used to select the band of tuner (AM/FM/XM/DAB).
(When the other source is selected)
Reserve key for the learning commands.
⁄0 SET button
This button is used to enter learn mode, preset mode
and clone mode.
⁄1 ZONE button
This button is used to set the zone area.
⁄2 DISC+/T.MODE
(When TUNER mode (T1 or T2) is selected)
Used to select auto stereo mode or mono mode
when the FM band is selected.
The “AUTO” indicator lights in the auto stereo mode.
(When CD/DVD/CDR mode is selected)
Used to change the disc for the CD/DVD/CDR
changer.
⁄3 INFO button
(When Zone A/B/C mode is selected)
When this button is pressed, the current setting
for selected multi room control of AV receiver is
displayed on the TV monitor.
(When Zone D mode is selected)
When this button is pressed, the current setting for
AV receiver are displayed on the TV monitor.
⁄4 MENU/INPUT button
(When DVD mode is selected)
Used to menu command.
(When TV mode is selected)
Used to select the TV video input.
⁄5 CH 3/4 b uttons
These buttons are used to change channels in TV
mode and DSS mode.
⁄6 SEND indicator
Indicates when the remote controller is transmitting
a signal.
⁄7 LEARN indicator
Indicates when the remote controller is in the LEARN
mode.
2
Page 5
OPERATION OF REMOTE CONTROLLER
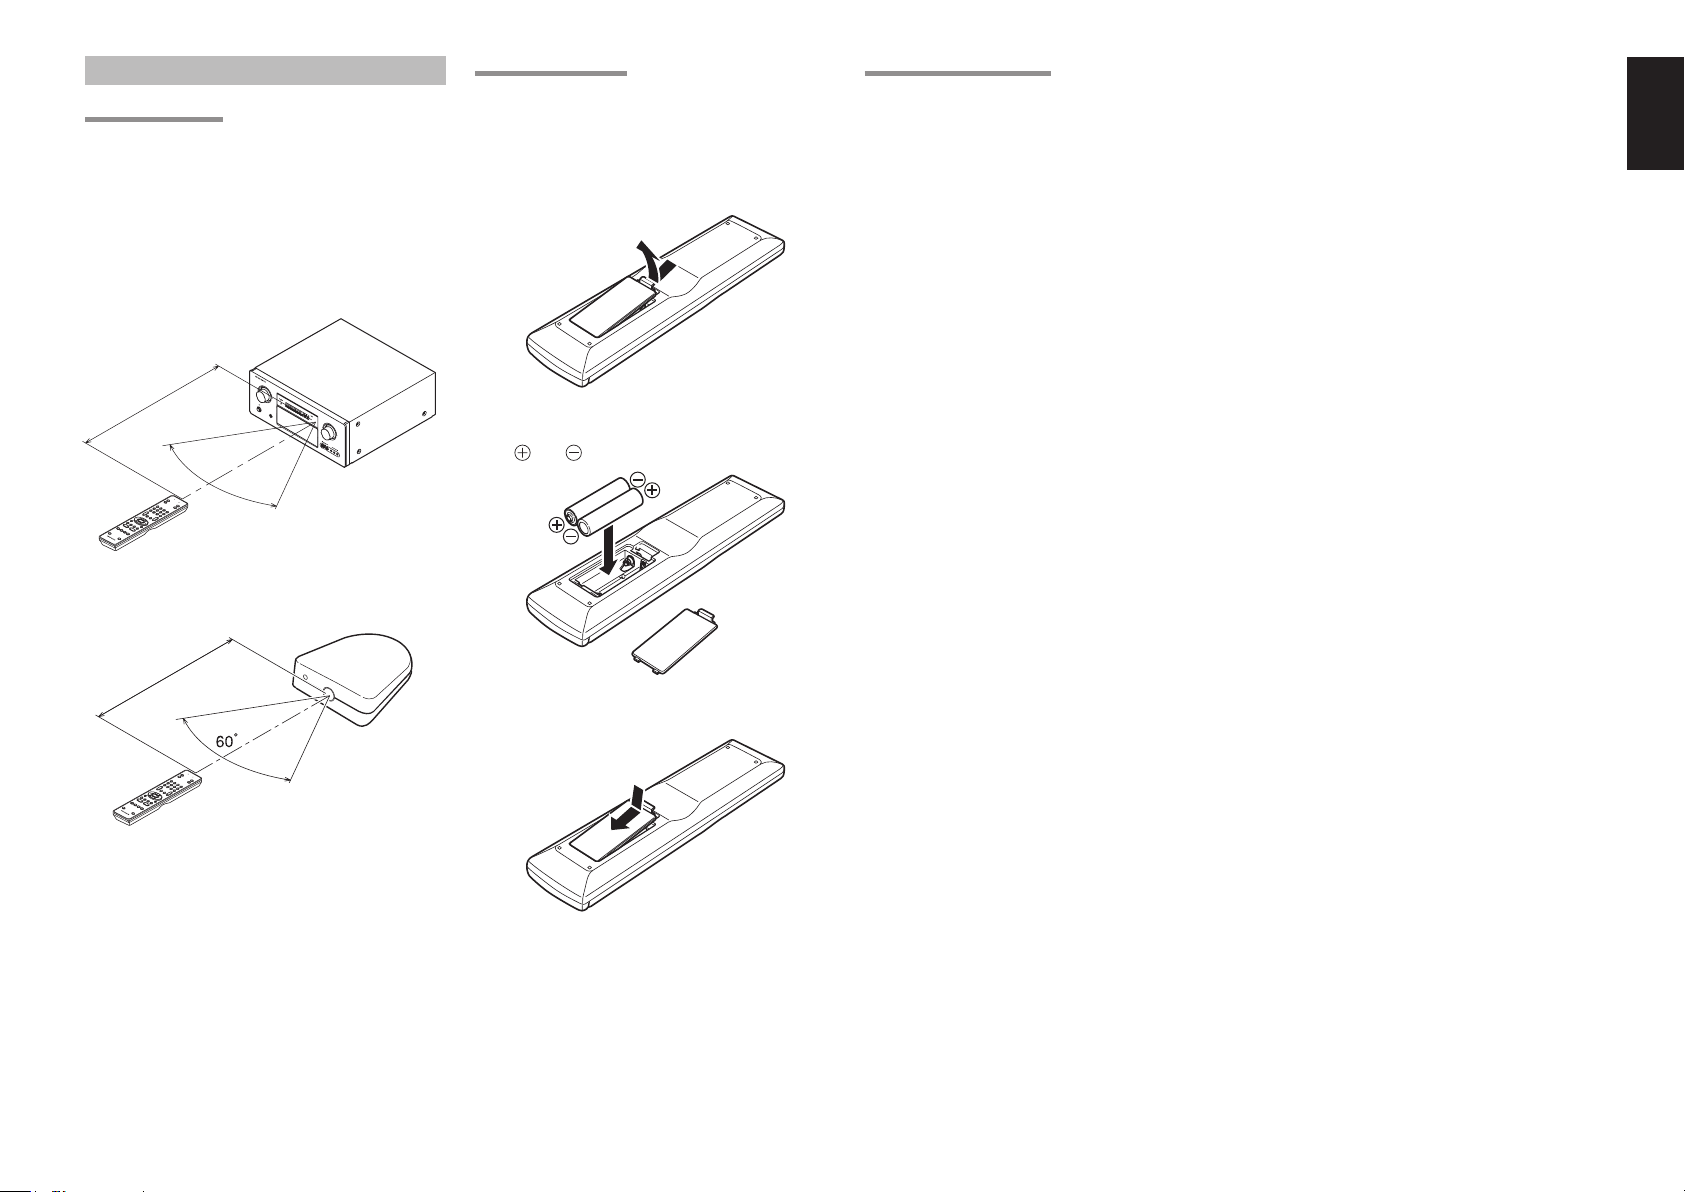
REMOTE CONTROL
The distance between the transmitter of the remote
controller and the IR SENSOR of the AV Receiv er/IR
Receiver should be less than 5 meters. If the remote
controller is pointed in a direction other than the IR
SENSOR or if there is an obstacle between them,
use of the remote controller may not be possible.
Remote-controllable range
SR8001
AV
S
U
IN
R
R
P
O
U
U
T SE
N
D
R
L
EC
E
C
E
T
I
V
O
E
R
R
S
R
8
0
0
1
D
I
S
P
S
TA
N
MUL
D
BY
S
LE
TI
E
P
A
P
UT
OW
A
U
O
T
E
O
R
SU
TU
ON/
RR
N
E
OF
D
D
F
I
R
S
EC
T
T
S
P
K
R
D
I
A
S
C
B
6.
1
VO
FF
M
T
X
P
6
E
.1
A
K
A
N
T
I
GH
T
P
T
H
O
A
N
N
E
ALO
S
D
G
I
G
I
T
A
L
S
U
R
RO
U
A
N
D
D
I
A
G
C
I
T
A
L
L
P
C
M
C
R
L
F
E
S
L
S
S
R
V
O
L
Approx. 5 m
S
Y
ST
E
M
R
E
MO
R
T
C
E
5
C
5
0
O
0
N
S
T
R
R
O
L
L
E
R
60°
RC101
E
N
TE
R
U
M
E
D
O
W
N
U
P
D
IGI
D
T
I
G
A
I
L
TA
L
S
V
A
I
D
U
E
X
O
1
I
N
PU
T
V
I
D
E
O
L
A
U
D
I
O
R
IR sensor
LOADING BATTERIES
The life of the batteries used with the remote
controller is about 4 months with normal use. Also be
sure to replace batteries earlier when you notice that
they are getting weak.
1. Remove the back cover.
2. Insert the new batteries (AAA type) with correct
and polarity.
CAUTIONS ON BATTERIES
• Use “AAA” type batteries in this remote controller.
• We recommend that you use alkali batteries.
• If the remote controller does not operate from
close to the main unit, replace the batteries with
new ones, ev en if less then a year has passed.
• The included battery is only for verifying operation.
Replace it with a new battery as soon as possible.
• When inserting the batteries, be careful to do so in
the proper direction, following the + and - marks in
the remote controller’s battery compartment.
• To prevent damage or battery fl uid leakage:
- Do not use a new battery with an old one.
- Do not use two different types of batteries.
- Do not shor t-circuit, disassemble, heat or
dispose of batteries in fl ames.
• Remove the batteries when not planning to use the
remote controller for a long period of time.
• If the batteries should leak, carefully wipe off the
fl uid from the inside of the battery compartment,
then insert new batteries.
• When disposing of used batter ies, please comply
with governmental regulations or environmental
public instruction’s rules that apply in your country
or area.
ENGLISH
Approx. 5 m
S
Y
S
T
E
M
R
E
MO
R
T
C55
E
C
0
O
0S
N
T
R
R
O
L
L
ER
3. Close the cover until it clicks.
RC101
Notes:
• Do not mix alkaline and manganese batteries.
• Do not mix old and new batteries.
3
Page 6

ENGLISH
CONTROLLING MARANTZ COMPONENTS
CONTROLLING MARANTZ SOURCE COMPONENTS
CONTROLLING MARANTZ RECEIVER / AV AMPLIFIER
(Refer to p. 9)
Zone A: Multi room A control
Zone B: Multi room B control
Zone C: Multi room C control
POWER ON/OFF
SOURCE
VOL +/–
MUTE Decreases the sound temporarily.
SLEEP Sets the sleep timer function.
INFO
Zone D: Main room control
POWER ON/OFF
SOURCE
VOL +/–
MUTE Decreases the sound temporarily.
SLEEP Sets the sleep timer function.
INFO
Turns on or off for each multi zone of
Marantz AV receiver / amplifi er.
Selects a particular source component for
each multi zone.
Adjusts the over all sound level for each
multi zone.
Turns on or off the “On Screen Display” for
the multi zone.
Turns on or off for main room of Marantz
AV receiver.
Selects a particular source component
for main zone.
Adjusts the over all sound level for Main
room.
Turns on or off the “On Screen Display” for
the main room.
1. Press the desired SOURCE button.
2. Press the desired operation buttons to play the selected component.
• For details, refer to the component’s user guide.
• It may not be possible to operate some models.
CONTROLLING A MARANTZ TV (TV)
SOURCE ON/OFF Turns the TV on and off
MENU/INPUT Select the TV video input
CH3/4 Selects TV channel up or down
ENTER
3(CURSOR)
4(CURSOR)
2(CURSOR)
1(CURSOR)
2
9
;
§
∞
6
5
DISC+/T.MODE –
A Reserve for learinig
B Reserve for learinig
C Reserve for learinig
D Reserve for learinig
Moves the cursor for setting in TV menu
–
–
–
–
–
–
–
4
Page 7

ENGLISH
CONTROLLING A MARANTZ DVD PLAYER (DVD)
• (*) RC101 dose not have the PRESET code library
for this key.
SOURCE ON/OFF Turns the DVD Player on and off
MENU/INPUT Select the DVD menu
CH3/4 –
ENTER
3(CURSOR)
4(CURSOR)
2(CURSOR)
1(CURSOR)
2
9
;
§
∞
6
5
DISC+/T.MODE DVD changer next disc (*)
A Reserve for learinig
B Reserve for learinig
C Reserve for learinig
D Reserve for learinig
Moves the cursor for setting in DVD
menu
Play
Stop
Pause
Skips to forward chapter/track
Skips to previous chapter/track
Searchs forward
Searchs backward
CONTROLLING A MARANTZ VCR DECK (VCR1/
VCR2)
• RC101 dose not have the PRESET code library for
this device.
SOURCE ON/OFF Turns the VCR deck on and off
MENU/INPUT –
CH3/4 –
ENTER
3(CURSOR)
4(CURSOR)
2(CURSOR)
1(CURSOR)
2
9
;
§
∞
6
5
DISC+/T.MODE –
A Reserve for learinig
B Reserve for learinig
C Reserve for learinig
D Reserve for learinig
Moves the cursor for setting in VCR
menu
Play
Stop
Pause
Skips to forward track
Skips to previous track
Searchs forward
Searchs backward
CONTROLLING A MARANTZ SATELLITE
BROADCASTING TUNER (DSS)
• (*) RC101 dose not have the PRESET code library
for this key.
SOURCE ON/OFF
MENU/INPUT Select the satellite tuner menu
CH3/4
ENTER
3(CURSOR)
4(CURSOR)
2(CURSOR)
1(CURSOR)
2
9
;
§
∞
6
5
DISC+/T.MODE –
A Reserve for learinig
B Reserve for learinig
C Reserve for learinig
D Reserve for learinig
Turns the satellite broadcasting tuner
on and off
Selects satellite tuner channel up or
down
Moves the cursor for setting in SATELLITE
Broadcasting TUNER menu
Play (*)
Stop (*)
PAUSE (*)
–
–
Searchs forward (*)
Searchs backward (*)
CONTROLLING A MARANTZ TUNER (T1/T2)
• RC101 dose not have the PRESET code library for
this device.
SOURCE ON/OFF Turns the Tuner on and off
MENU/INPUT –
CH3/4 –
ENTER –
3(CURSOR) Tunes a frequency station up and down
4(CURSOR) Tunes a frequency station up and down
2(CURSOR) Selects a preset station up and down
1(CURSOR) Selects a preset station up and down
2
9
;
§
∞
6
5
DISC+/T.MODE
A Selects AM mode
B Selects FM mode
C Selects XM mode
D Selects DAB mode
Starts preset scan
Stop preset scan
–
–
–
–
–
Selects the auto stereo mode or mono
mode
5
Page 8

ENGLISH
CONTROLLING A MARANTZ CD PLAYER (CD)
• (*) RC101 dose not have the PRESET code library
for this key.
SOURCE ON/OFF Turns the CD Player on and off
MENU/INPUT –
CH3/4 –
ENTER –
3(CURSOR) –
4(CURSOR) –
2(CURSOR) –
1(CURSOR) –
2
9
;
§
∞
6
5
DISC+/T.MODE CD changer next disc (*)
A Reserve for learinig
B Reserve for learinig
C Reserve for learinig
D Reserve for learinig
Play
Stop
Pause
Skips to forward track
Skips to previous track
Searchs forward
Searchs backward
CONTROLLING A MARANTZ CD RECORDER (CDR)
• RC101 dose not have the PRESET code library for
this device.
SOURCE ON/OFF Turns the CD Recorder on and off
MENU/INPUT –
CH3/4 –
ENTER –
3(CURSOR) –
4(CURSOR) –
2(CURSOR) –
1(CURSOR) –
2
9
;
§
∞
6
5
DISC+/T.MODE CDR changer next disc
A Reserve for learinig
B Reserve for learinig
C Reserve for learinig
D Reserve for learinig
Play
Stop
Pause
Skips to forward track
Skips to previous track
Searchs forward
Searchs backward
CONTROLLONG A MARANTZ TAPE DECK (TAPE)
• RC101 dose not have the PRESET code library for
this device.
SOURCE ON/OFF Turns the tape deck on and off
MENU/INPUT –
CH3/4 –
ENTER –
3(CURSOR) –
4(CURSOR) –
2(CURSOR) –
1(CURSOR) –
2
9
;
§
∞
6
5
DISC+/T.MODE –
A Reserve for learinig
B Reserve for learinig
C Reserve for learinig
D Reserve for learinig
Play
Stop
Pause
Skips to forward track
Skips to previous track
Searchs forward
Searchs backward
CONTROLLING A MARANTZ UNIVERSAL DOCK
(AUX1/AUX2)
• RC101 dose not have the PRESET code library for
this device.
SOURCE ON/OFF Turns the Universal Dock on and off
MENU/INPUT Call up the menu
CH3/4 –
ENTER
3(CURSOR)
4(CURSOR)
2(CURSOR)
1(CURSOR)
2
9
;
§
∞
6
5
DISC+/T.MODE Change the userinterface mode
A Reserve for learinig
B Reserve for learinig
C Reserve for learinig
D Reserve for learinig
Moves the cursor for setting in Universal
dock menu
Play
Stop
Pause
Skips to forward track
Skips to previous track
Searchs forward
Searchs backward
6
Page 9

BASIC OPERATION
NORMAL MODE
(
When operating Marantz AV equipment products
This remote controller is preset with a total of
12 types of remote codes, including Marantz TV
(television), DVD, VCR (VCR deck), DSS (satellite
broadcasting tuner), TUNER 1, TUNER 2, CD , CD-R,
TAPE (tape deck), AUX1 and AUX2.
Learning is not necessary for Marantz products. You
can use these products without setting any codes.
1. Press the SOURCE button.
For this example, press DVD.
Pressing the SOURCE button once changes
the remote control to the settings for the source
that was pressed.
To change the amplifi er on other source, press
the SOURCE button twice (double-click). The
code is sent, and then the amplifi er source
changes to DVD.
SETTING THE BACK LIGHT
Each time press the buttons, illuminate button 2
seconds.
To tur n off back light, press and hold down the SET
and 4 button until SEND indicator blinks twice.
T o turn on it again, press and hold down the SET and
¢ button until SEND indicator blinks twice.
Initial is back light ON.
PRESET MODE
(When operating non-Marantz AV equipment
products)
This remote controller is preset with remote control
codes from AV equipment by other manufacturers.
The preset codes are TV, DVD, CD and DSS.
Settings can be made in one of two ways.
When the preset codes are set, the following codes
are contained in the source button of the remote
controller.
Importants:
• Some codes may be not match your equipment.
In this case, you can use LEARN mode to store these
)
codes.
• The preset codes do not cover full functions.
If you need extra function, use LEARN mode to
store extra function.
• When the batteries are getting weak, the preset
procedure is not successful.
PROGRAMMING WITH THE 4-DIGIT CODE
1.
1.
2.
1. Press and hold down the SOURCE button (ex
TV) for the appliance which should be controlled
and press SET button until the SEND indicator
blinks twice. Then back light fl ushes.
2. Press the 4-digit code by numeric keys for
appliance (code table at the end of this book)
When the procedure is successful, the
indicator will blink twice.
Note:
If the indicator did not blink twice, then repeat steps 1
through 2 and try entering the same code again.
SCANNING THE CODE TABLE
3.
5.
2.
3.
2.
SEND
4. Stop when the appliance turns off.
Press ENTER button once to lock in the code.
5.
CHECKING THE CODE
2.
4.
3.
1.
1. Press and hold down the SOURCE button for
appliance which should be controlled and press
SET button until the SEND indicator blinking twice
then back light fl ushes.
Press the INFO button.
2.
The SEND indicator will blink twice.
To view the code for fi rst digit, press 1 once.
3.
Count the SEND indicator blinks (e.g. 3 blinks =
3) and write down the number.
Note:
If a code digit is “0”, the SEND indicator will not
blink.
Repeat step 3 three more times for remaining
4.
digits. Use 2 for the second digit, 3 for the third
digit, and 4 for the fourth digit.
1.
RESETTING THE CODE
2.
1.
1.
2.
1. Press and hold down the SOURCE button
for appliance which should be controlled and
press SET button until the SEND indicator
blinking twice.
Then back light fl ushes.
Press the below codes to reset.
2.
TV : 1000
DVD : 2000
CD : 3000
DSS : 4000
The indicator will blink twice.
Note:
After this procedure, the selected SOURCE button is
set initial code.
ENGLISH
See the attached manufacturer number list for the
preset manufacturers, devices, preset numbers, and
other settings.
Remote control
source name
TV TV Television
DVD DVD DVD player
CD CD CD player
DSS SATELLITE Satellite broadcasting
Corresponding preset
code
Device name
tuner equipment
1. Switch on the appliance which should be
controlled.
Press and hold down the SOURCE button for
2.
appliance which should be controlled and press
SET button until the SEND indicator blinking
twice. Then back light fl ushes.
Aim the remote controller at the appliance and
3.
alternately press the CH+ and
buttons slowly.
SOURCE ON
7
Page 10

ENGLISH
LEARN MODE
This remote controller is capable of learning and
storing codes used by other remote controls that you
already own.
For codes which are not learned, the remote
controller will transmit either the Marantz preset
codes from the initial settings, or remote codes from
another manufacturer’s AV equipment which is set
by the customer.
The receiver sensor for the remote control signals is
located at the top of the remote controller.
Notes:
• This remote controller is capable to learn around 60
codes.
• When the batteries are getting weak , the learing
procedure is not successful.
LEARNING PROCEDURE
1. Place the remote controller so that its infrared
signal transmitter is facing the infrared signal
receiver on the Marantz remote controller at a
distance of about 2 inches (0.05 m).
2 inches
SYSTEM REMOTE CO
NTROLLER
2. Press and hold down the SET and MENU/
INPUT buttons until LEARN indicator blinks.
4. Select the button to be learned.
• LEARN indicator lights up.
When the following key learned
• SOURCE buttons
The learning function is unavailable for all
SOURCE buttons in any mode.
• POWER ON button
• POWER OFF button
• VOL +/- button
• MUTE button
• INFO button
• SLEEP button
The above keys are common use in each
device mode. It can be learned in TV mode.
Press and hold the button of the original remote
5.
controller to learn until the SEND indicator
blinks twice.
• When the SEND indicator blinks once,
repeat this step.
• When the memory of the RC101 is full, the
LEARN and SEND indicators blink once.
If you want to learn the code, you should
erase other learned button.
Repeat steps 4 and 5 to learn other buttons in
6.
same SOURCE.
Repeat steps 3 to 6 to learn other SOURCE.
7.
When you have finished programming the
8.
remote controller, press the SET button, then
LEARN indicator stops blinking and exits from
the LEARN mode.
ERASING PROGRAMMED CODES (RETURNING TO
INITIAL SETTINGS)
Codes can be erased in three ways: by buttons,
sources, and by all memory contents.
Erasing the code by buttons
Press and hold down the SET and MENU/
1.
INPUT buttons until LEARN indicator blinks.
2. Select the SOURCE button to select the b utton
to be erased.
3. Press and hold down the SLEEP button and
press the learned button twice to be erased.
• SEND indicator blinks twice and the mode
returns to LEARN mode.
4. To return the NORMAL mode, press the SET
button.
Erasing the code by SOURCE
1. Press and hold down the SET and MENU/
INPUT buttons until LEARN indicator blinks.
3. Press ENTER button to continue erasing.
• The SEND indicator blinks twice and the
mode returns to LEARN mode.
• To cancel the erasing operation, do not
press ENTER button and simply touch any
other button.
4. To return the NORMAL mode, press the SET
button.
Erasing the all SOURCES
Press and hold down the SET and MENU/
1.
INPUT buttons until LEARN indicator blinks.
2. Press and hold down the SLEEP button and
press POWER ON and POWER OFF button.
• LEARN indicator lights.
3. Press ENTER button to continue erasing.
• The SEND indicator blinks twice and the
mode returns to LEARN mode.
• To cancel the erasing operation, do not
press ENTER button and simply touch any
other button.
3. Select the SOURCE button to select the
SOURCE.
8
Notes:
• When the SEND indicator blinks once again, the
transmitting code is unavailable for RC101, or the
transmitting signal is intercepted by noise.
• If no buttons are pressed for approximately 1
minutes while in the LEARN mode, the remote
controller automatically exits from the LEARN
mode.
2. Press and hold down the SLEEP button and
press the learned SOURCE button twice to be
erased.
• LEARN indicator lights.
4. To return the NORMAL mode, press the SET
button.
Note:
Erasing codes will return to the factory preset code,
or there will leave empty if the button has no factory
preset code.
Page 11

CLONE MODE
Creating copies using clone mode
All of the codes programmed to the RC101 remote
controller can be copied to another RC101 using a
few simple operations.
• The remote controller can copy the entire
contents.
• When copying the entire contents, all programmed
codes are copied.
Note:
The clone function can only be used for copying
when using the same model (RC101) for both the
transmitting and receiving remote controller.
Copying entire contents
1. Place the receiver sensor of the receiving
remote controller (top) so that it is facing the
transmitter of the transmitting remote controller
(top) at a distance of about 2 inches (5 cm).
R
OLLE
R
TE CONT
O
M
SYSTEM RE
2 inches
SYSTEM REM
O
TE CONT
ROLLER
2. Press SET button and PLAY button of the
transmitting remote controller until the SEND
indicator blinks twice.
Then backlight fl ushes
The transmitting side is now ready.
3. Press SET button and STOP button of the
receiving remote controller until the LEARN
indicator blinks twice.
4. Press the ENTER cursor button on the receiving
remote controller.
Then back lights tune off.
5. Press the ENTER cursor button on the
transmitting remote controller.
Then backlights tune off.
6. When copying is started, the SEND indicator of
transmitting remote controller and the LEARN
indicator of receiving remote controller start to
blink.
When the copying operation is completed, the
back lights of transmitting remote controller and
receiving remote controller are turned on.
Do not touch either of the remote controls
during the copying operation. Doing so could
cause copying to fail.
If the copying fails in the middle of the copying
process, back light of receiving remote are
flush. Press the SET button to return the
normal mode. Check and perform steps 1 to 5
again.
Copying takes about 30 seconds to complete
when the transmitting remote controller has
been programmed to 100% capacity.
7. Once copying is completed, press the SET
button on both remote controls.
OTHER OPERATIONS
CHANGE THE MULTI ROOM CONTROL COMMANDS
FOR EACH ZONE
(When operating Marantz A V Receiver b y Multi Zone
connected)
• Zone A: Multi room A control (Default)
• Zone B: Multi room B control
• Zone C: Multi room C control
• Zone D: Main room control
Change the control commands for each zone.
2.
1.
1. Press SET button and ZONE button until the
SEND indicator blinks twice.
Then backlight fl ushes.
2. Press each zone button(A/B/C/D button)
When the procedure is successful, the SEND
indicator will blink twice.
These buttons change a special code of each zone.
POWER ON/OFF
SOURCE
VOL +/–
MUTE
INFO
Tuner mode operation remote code (Refer to p.5)
SLEEP
CHANGE THE CONTROL COMMANDS OF MULTI
SPEAKER FUNCTION FROM MULTI ROOM.
1.
2.
1. Press SET button and POWER ON b utton until
the SEND indicator blinks twice.
Then backlight fl ushes.
2. Press the 1-digit code by numeric keys.
• Multi room mode: 1 (Default)
• Multi speaker mode: 2
Note
In case of Zone D, only control for main room is
possible.
3. Press ENTER button once to lock in the code.
When the procedure is successful, the SEND
indicator will blink twice.
These buttons change a special code of multi room
mode or multi speaker mode.
Note
The control commands can be set independently in
ZONE A/B/C.
POWER ON/OFF
3.
1.
VOL +/–
MUTE
ENGLISH
Then backlight fl ushes.
The receiving side is now ready.
9
Page 12

SETUP CODES
TV
Acer ..........................................................1141
Admiral .................................1002, 1009, 1089
Aiko ..........................................................1059
Aiwa ................................................1117, 1118
Akai ..........................................................1001
Amtron ......................................................1023
Anam ........................................................1113
Anam National ......................1023, 1069, 1092
AOC ........................... 1003, 1024, 1049, 1127
Audiovox ...................................................1023
Bell & Howell ..................................1009, 1025
Benq ...............................................1104, 1142
Broksonic .................. 1003, 1097, 1098, 1113
Celebrity ...................................................1001
Citizen ..................................1003, 1013, 1023
1026, 1059, 1063
Colortyme .......................................1003, 1043
Contec ......................................................1113
Contec/Cony ........................1023, 1045, 1047
Craig .......................... 1020, 1022, 1023, 1113
Crown .............................................1023, 1067
Curtis Mathes .......................1003, 1013, 1025
1026, 1062, 1103, 1110
Daewoo ..................... 1003, 1013, 1024, 1035
1036, 1059, 1084, 1101
Daytron .................................1003, 1013, 1016
Dimensia ........................................1103, 1110
Dumont .................................1003, 1010, 1153
Electroband ..............................................1001
Electrohome .............. 1001, 1003, 1069, 1133
Emerson ...............................1003, 1013, 1015
1020, 1021, 1022, 1023
1025, 1038, 1044, 1045
1048, 1055, 1061, 1094
1096, 1099, 1101, 1113
Envision ....................................................1003
Fisher ........................ 1025, 1051, 1091, 1160
Fujitsu ........................ 1038, 1124, 1125, 1155
Funai ....................................1023, 1038, 1113
Gateway ...................................................1150
GE ............................ 1003, 1018, 1022, 1046
1054, 1069, 1085, 1103
1110, 1113, 1133, 1136, 1153
Goldstar ................................1003, 1013, 1024
1030, 1045, 1080
Hallmark ...................................................1003
1100, 1112, 1154
Hisense ....................................................1116
Hitachi ....................... 1003, 1012, 1031, 1032
1037, 1041, 1045, 1047
1065, 1068, 1082, 1088
1094, 1139, 1140, 1145, 1159
Infi nity .......................................................1067
Janeil ........................................................1134
JBL ...........................................................1067
JC Penney ............................1003, 1013, 1018
1019, 1024, 1026
1046, 1047, 1054
1063, 1083, 1085
1100, 1103, 1110
1112, 1133, 1154
Jensen ......................................................1003
JVC .......................................1028, 1029, 1045
1047, 1050, 1060, 1065
Kawasho .........................................1001, 1003
Kenwood ..................................................1003
Kloss Novabeam ....... 1023, 1056, 1057, 1134
KTV ......................................1013, 1023, 1033
1034, 1073, 1099, 1113
LG ...................................................1024, 1030
M.Wards ...............................1002, 1009, 1038
Magnavo x .............................1003, 1052, 1053
1056, 1057, 1063
1067, 1081, 1106
Marantz .....................1003, 1031, 1067, 1122
Mitsubishi .............................1003, 1024, 1051
1115, 1122, 1133
Motorola .........................................1014, 1069
NEC ................. 1003, 1012, 1024, 1043, 1069
NET -TV ...........................................1137, 1150
Orion ...............................................1020, 1096
Panasonic ........1017, 1067, 1069, 1095, 1111
Philips ........................ 1003, 1011, 1045, 1052
1054, 1056, 1057, 1058
1063, 1067, 1069, 1106
Pioneer .................................1003, 1018, 1037
1070, 1071, 1094
1145, 1147, 1149
Plasmsync ................................................1135
Portland ..................... 1003, 1013, 1024, 1059
Price Club .................................................1026
Prism ........................................................1018
Proscan ..................... 1004, 1005, 1006, 1007
1008, 1085, 1103, 1110
Proton .............................................1003, 1045
Quasar ............ 1010, 1069, 1073, 1111, 1153
Radio Shack .........................1003, 1013, 1015
1023, 1024, 1025, 1045
1100, 1103, 1110, 1113
RCA ......................................1003, 1004, 1005
1006, 1007, 1008
1014, 1024, 1049, 1069
1075, 1079, 1085, 1087
1088, 1093, 1094, 1101
1103, 1110, 1113, 1153
Realistic ..................... 1013, 1015, 1023, 1025
1045, 1100, 1103, 1110
Runco .............................................1010, 1153
Sampo ......................................................1150
Samsung ................... 1003, 1013, 1024, 1026
1040, 1045, 1062, 1078
1083, 1090, 1100, 11051114
1120, 1121, 1146, 1148, 1157
Sansui ......................................................1119
Sanyo ........................ 1003, 1025, 1051, 1072
1077, 1091, 1156, 1157, 1158
Sharp ....................................1003, 1013, 1014
1015, 1045, 1055, 1064
1066, 1076, 1089, 1123
Signature ..................................................1009
Sony .....................................1001, 1102, 1108
Soundesign ..... 1003, 1023, 1038, 1063, 1113
Starlite ......................................................1023
Supre-Macy ..............................................1134
Sylvania ................................1003, 1039, 1042
1052, 1053, 1056, 1057
1063, 1067, 1089, 1151
Symphonic ...........................1023, 1039, 1044
Tandy ........................................................1014
Tatung .......................................................1069
T echnics ...................................................1018
T echwood .......................................1003, 1018
Teknika ...................... 1003, 1009, 1013, 1023
1024, 1026, 1038, 1045
1047, 1059, 1063, 1111, 1113
T elecaption ...............................................1074
Toshiba .................................1003, 1019, 1025
1026, 1042, 1074, 1098
1107, 1111, 1135, 1136
Totevision .................................................1013
Universal ........................................1046, 1054
Video Concepts ........................................1113
Viewsonic .............................1006, 1022, 1109
1128, 1129, 1130, 1131
1138, 1143, 1145, 1150
i
Wards ...................................1003, 1009, 1015
1024, 1038, 1044, 1046
1052, 1054, 1056, 1057
1067, 1086, 1103, 1110
White Westinghouse ......................1001, 1101
Yamaha ..........................................1003, 1024
Zenith ...................................1003, 1009, 1010
1132, 1144, 1153
CD
AIWA ....................................3001, 3002, 3003
AKAI .....................................3004, 3005, 3006
AUDIO .....................................................3007
AUDIO LABS ............................................3008
CALIFORNIA ...........................................3008
CARVER ..............................3010, 3011, 3009
CASIO ............................................3012, 3020
CURTIS ..........................................3020, 3012
DENON ....................................................3013
EMERSON ...............................................3014
FISHER ........... 3011, 3015, 3016, 3017, 3018
GE ............................................................3019
GENEXXA ............................3014, 3021, 3020
HARMON .............................3022, 3023, 3051
HITACHI ...................................................3020
INKEL .......................................................3024
JC PENNEY .........................3012, 3020, 3025
JVC .................................................3026, 3027
KARDON ..............................3022, 3051, 3023
KENWOOD ............... 3028, 3029, 3030, 3031
3032, 3033
KRELL ......................................................3010
LUXMAN ................... 3035, 3036, 3037, 3038
LX I .......................................3012, 3020, 3014
MAGNAVOX .........................3010, 3039, 3040
MARANTZ ................. 3010, 3041, 3042, 3043
MATHES .........................................3012, 3020
MCS ...............................................3012, 3020
MGA .........................................................3023
MISSION ..................................................3010
MITSUBISHI ...................................3023, 3044
NAD ................................................3034, 3045
NAKAMICHI .........................3046, 3047, 3048
NEC MCS .................................................3025
NIKKO ............................................3007, 3016
ONKYO ...................... 3049, 3050, 3051, 3052
3055, 3098
OPTIMUS ........3011, 3014, 3020, 3028, 3053
3054, 3056, 3057, 3058, 3059
PANASONIC ........................3008, 3060, 3061
PHILIPS .................... 3009, 3010, 3010, 3040
Page 13

PIONEER ........ 3020, 3021, 3062, 3063, 3064
QUASAR ..................................................3008
RCA ................. 3011, 3014, 3065, 3066, 3067
3068, 3069
REALISTIC ................ 3011, 3014, 3020, 3042
3054, 3057
ROTEL .....................................................3010
RS ORIGINAL ..........................................3070
SAE ................................................3010, 3083
SAMSUNG ...............................................3071
SANSUI ..................... 3014, 3068, 3072, 3073
SANYO ............ 3011, 3018, 3074, 3075, 3076
SCOTT .....................................................3014
SEARS ............ 3012, 3014, 3020, 3028, 3042
SHARP .................................3028, 3042, 3077
SHERWOOD ...3042, 3056, 3070, 3078, 3024
SHURE .....................................................3025
SONY .... 3039, 3079, 3080, 3081, 3082, 3097
SYL V ANIA ................................................3010
SYMPHONIC ...........................................3083
TEAC ............... 3016, 3042, 3057, 3083, 3084
3085, 3086
TECHNICA ...... 3007, 3008, 3061, 3087, 3088
THETA DIGITAL .......................................3040
TOSHIBA ..................................................3045
VICTOR ....................................................3026
YAMAHA ......... 3007, 3089, 3090, 3091, 3092
ZENITH ...........3016, 3093, 3094, 3095, 3096
DVD
Aiwa ................................................2036, 2037
Apex ......2012, 2017, 2018, 2019, 2021, 2034
BOSE .............................................2038, 2039
Denon .............................................2047, 2048
Funai ........................................................2049
GE ............................. 2009, 2020, 2029, 2033
Harman Kardon ........................................2061
Hitachi ..................................2008, 2012, 2031
JVC .......................................2006, 2010, 2040
2041, 2042, 2043
Kenwood ........................................2053, 2054
Koss ..........................................................2058
Magnavo x .................. 2007, 2011, 2023, 2025
Marantz ....................................................2025
Mitsubishi .......................................2011, 2015
Onkyo .......................................................2062
Oritron ............................................2009, 2030
Panasonic .................. 2003, 2015, 2016, 2055
Philips ...................................2007, 2011, 2058
Pioneer .................................2002, 2014, 2056
Proscan ................................2009, 2020, 2032
RCA ................. 2005, 2009, 2020, 2035, 2057
Sampo ......................................................2041
Samsung ......... 2008, 2012, 2022, 2024, 2027
Sanyo .............................................2050, 2052
Sharp ..............................................2044, 2045
Sherwood .................................................2051
Sony .....................................2001, 2013, 2059
Toshiba ...................... 2004, 2008, 2026, 2028
Yamaha ..........................................2046, 2060
Zenith .......................................................2010
Janeil ........................................................4025
JVC ...........................................................4017
Mitsubishi .................................................4001
Panasonic .......................................4004, 4010
Philips .............................................4031, 4035
Proscan ..................... 4002, 4008, 4009, 4011
Radio Shack ...................................4036, 4037
RCA ........................... 4002, 4008, 4009, 4029
Realistic ....................................................4040
Rural Cable ..............................................4036
Samsung ........................................4022, 4027
Sony .....................................4003, 4012, 4014
Star Choice ..............................................4032
Star T rak ...................................................4024
STS ..........................................................4038
SuperDish ................................................4028
T oshiba ...........................................4001, 4034
Uniden ..................................4005, 4006, 4013
Video Pall .................................................4025
Zenith .............................................4025, 4033
DSS
Alphastar ..................................................4027
BSB ..........................................................4021
Chaparral .................................................4039
DIRECTV .......................................4001, 4016
DISH Network ..........................................4030
Drake ........................................................4026
Echostar .......... 4007, 4017, 4018, 4019, 4020
Express Vu ...............................................4017
Fujitsu .......................................................4025
GE ........................................4002, 4008, 4009
General Instruments ......................4036, 4037
Hitachi ............................................4001, 4015
Hughes ...........................................4001, 4016
ii
Page 14

www.marantz.com
You can find your nearest authorized distributor or dealer on our website.
is a registered trademark.
02/2007 00M31CW851030 mzh-d
 Loading...