


Makita EN4951SH Manual
Original Instruction Manual Instructions d’emploi d’origine Originalbetriebsanleitung Manuale di istruzioni originale Originele gebruiksaanwijzing
Instrucciones de manejo originales Instruções de serviço original Original brugsanvisning
Πρωτότυπο εγχειρίδιο οδηγιών Orijinal Kullanım Kılavuzu
WARNING!
Read and understand this Manual. Always follow safety precautions in the Manual.
Improper use can cause serious injury!
AVERTISSEMENT !
Lisez et comprenez ce manuel. Respectez toujours les précautions de sécurité figurant dans le manuel. Une utilisation incorrecte peut provoquer des blessures graves !
WARNUNG!
Lesen und studieren Sie diese Betriebsanleitung sorgfältig. Befolgen Sie stets die Sicherheitsanweisungen dieser Betriebsanleitung. Bei unsachgemäßer Handhabung kann es zu schweren Verletzungen kommen!
AVVERTENZA!
Leggere e comprendere il presente manuale. Seguire sempre le precauzioni di sicurezza fornite nel manuale. L’uso improprio può causare infortuni gravi.
WAARSCHUWING!
Lees en begrijp deze gebruiksaanwijzing. Zorg altijd dat u de veiligheidsvoorzorgsmaatregelen in de gebruiksaanwijzing volgt. Verkeerd gebruik kan leiden tot ernstig persoonlijk letsel.
¡ADVERTENCIA!
Lea y comprenda este manual. Siga siempre las precauciones de seguridad del manual. ¡Un uso incorrecto puede provocar lesiones graves!
AVISO!
Leia e compreenda este manual. Siga sempre as precauções de segurança no manual. A utilização incorrecta pode causar ferimentos graves!
ADVARSEL!
Læs og forstå denne vejledning. Overhold altid sikkerhedsforholdsreglerne i vejledningen. Forkert anvendelse kan medføre alvorlig tilskadekomst!
ΠΡΟΕΙΔΟΠΟΙΗΣΗ!
Διαβάστε και κατανοήστε αυτό το εγχειρίδιο. Πάντοτε να ακολουθείτε τις προφυλάξεις ασφαλείας του εγχειριδίου. Η ακατάλληλη χρήση μπορεί να προκαλέσει σοβαρό τραυματισμό!
UYARI!
Bu Kılavuzu dikkatlice okuyun ve anladığınızdan emin olun. Bu Kılavuzda verilen güvenlik uyarılarını daima alın. Yanlış kullanım ciddi yaralanmalara neden olabilir!
EN4950H
EN4951SH
English |
(Original instructions) |
Thank you very much for choosing the MAKITA pole hedge trimmer.
We are pleased to offer you a product that is the result of an extensive development program and many years of knowledge and experience.
To safely obtain the best possible results from your MAKITA pole hedge trimmer, please read this manual thoroughly before using the machine, and follow all instructions given herein to assure proper operation of the MAKITA pole hedge trimmer.
Table of Contents |
Page |
Symbols............................................................................................ |
2 |
Safety instructions............................................................................. |
3 |
Technical data................................................................................... |
8 |
Designation of parts.......................................................................... |
9 |
Assembly......................................................................................... |
10 |
Shoulder strap (optional accessory)................................................ |
10 |
Fuel/refuelling.................................................................................. |
11 |
Precautions before starting the engine........................................... |
13 |
Operating the pole hedge trimmer.................................................. |
16 |
Maintenance.................................................................................... |
18 |
Storage............................................................................................ |
23 |
Troubleshooting.............................................................................. |
25 |
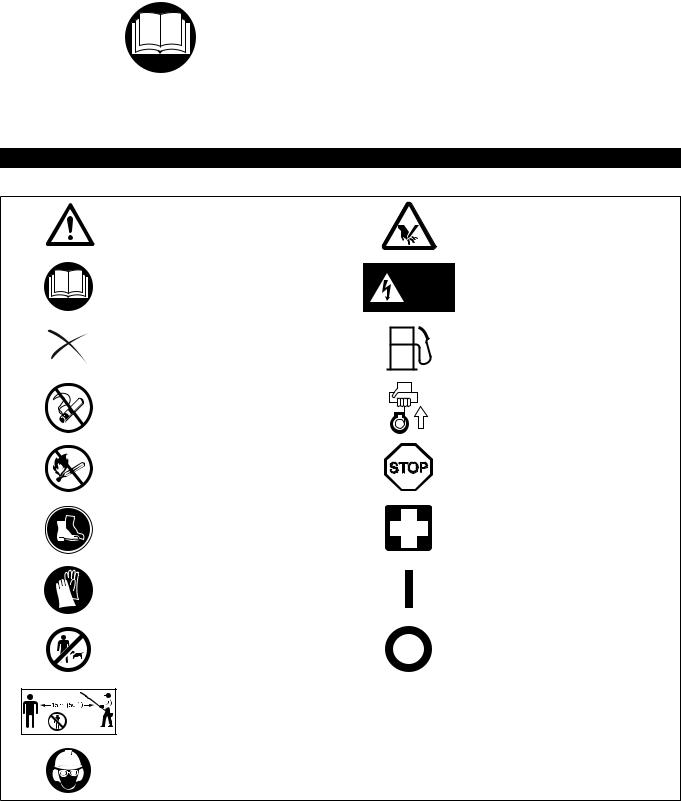
SYMBOLS
Please note the following symbols when reading this instruction manual.
WARNING/DANGER
Before usage, carefully read and fully understand the instructions in this manual
PROHIBITION
No smoking
No naked flame
Wear protective shoes
Wear protective gloves
Keep working area clear of persons and pets
Beware of pinching
Beware of electrical lines, risk of electrical shock
Fuel (Gasoline)
Engine manual-start
Emergency stop
First aid
ON/START
OFF/STOP
Wear a protective helmet and eye and ear protection
2
SAFETY INSTRUCTIONS
General Instructions
-- Before usage, carefully read this manual and thoroughly familiarize yourself with how to correctly handle the pole hedge trimmer. THIS EQUIPMENT CAN CAUSE
SERIOUS INJURY IF USED IMPROPERLY!
-- Always provide detailed instructions on how to correctly use the pole hedge trimmer when lending the equipment to another person. Make sure that the instruction manual is handed over together with the pole hedge trimmer.
-- First-time users should ask their dealer for basic instructions on the correct handling of the pole hedge trimmer.
-- Store this manual in a location where it is easily accessible for quick reference.
-- Do not allow persons under the age of 18 to operate the pole hedge trimmer.
Individuals over 16 years old, however, may use the pole hedge trimmer for training purposes if under the constant supervision of an adult familiar with the operation of the pole hedge trimmer.
-- Always use the pole hedge trimmer with the utmost care and attention.
-- Never attempt to modify the equipment.
-- Follow the regulations about handling of pole hedge trimmers in your country.
-- Serious injury may result if the pole hedge trimmer is used in the following circumstances. Do not use the pole hedge trimmer:
•When feeling tired or ill.
•After consumption of alcohol and/or medication.
•At night or in poor lighting conditions.
•During pregnancy.
Intended use
-- This pole hedge trimmer has been designed for the sole purpose of trimming hedges and bushes. Do not use the pole hedge trimmer for any other purposes.
Personal protective equipment
-- Clothes worn should be functional and tight-fitting without restricting movement.
Do not wear clothing or jewelry that could get entangled in underbrush or in the machine.
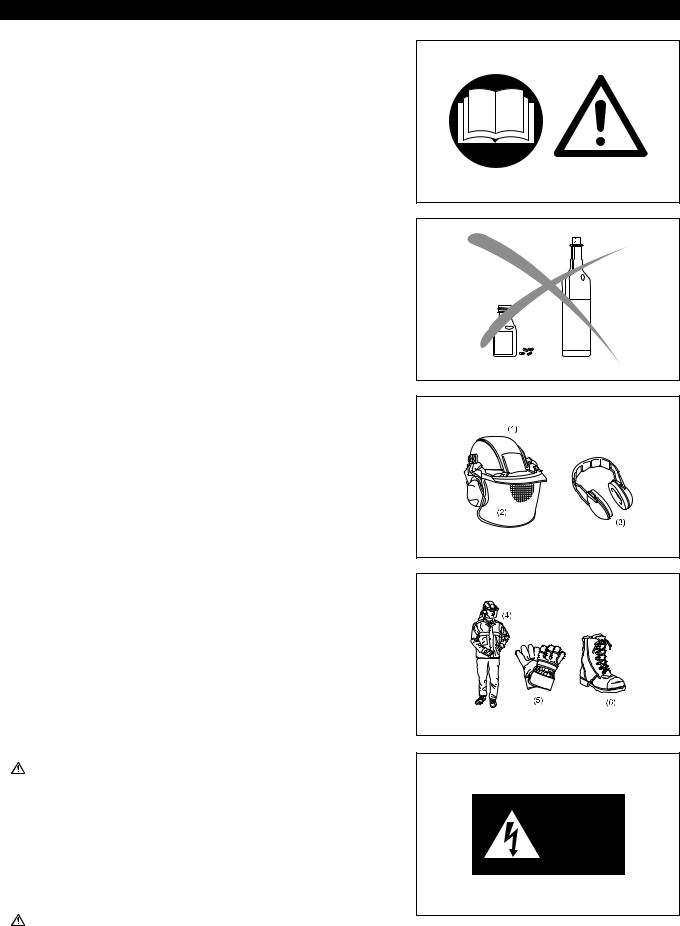
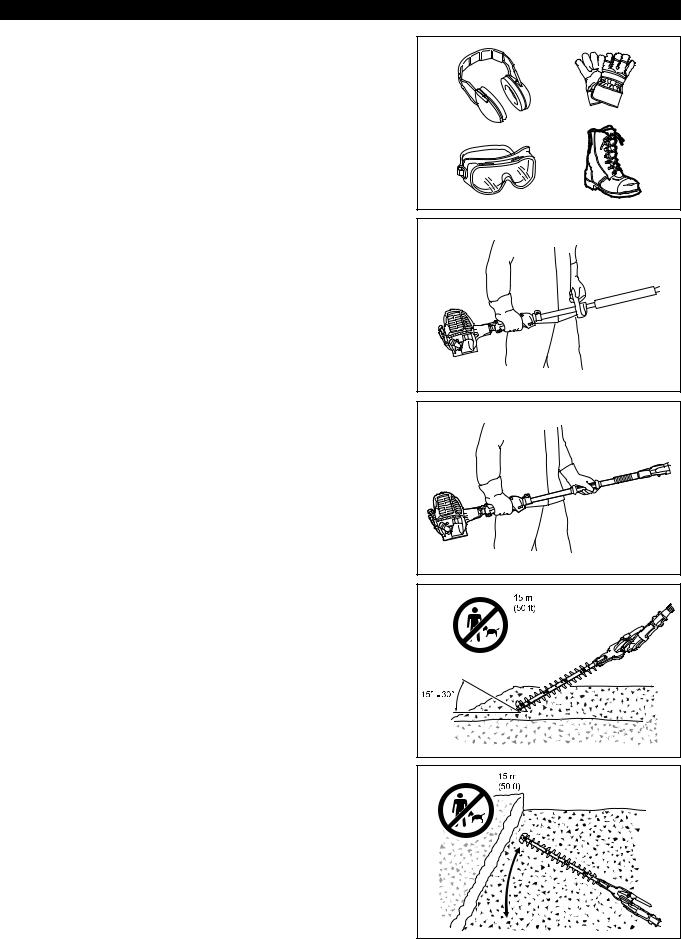
-- For adequate protection against injuries to head, eyes, feet, hands, as well as hearing impairment, the following protective equipment and clothing must be used when working with the pole hedge trimmer.
-- To prevent injury to the head or the eyes, always wear a protective helmet (1) with goggles or a visor (2).
-- To avoid hearing impairment, wear adequate ear defenders (3) at all times. -- Use of a well-fitting work overalls (4) is strongly recommended.
-- Always wear rugged, leather working gloves (5) when operating the pole hedge trimmer.
-- When using the pole hedge trimmer, always wear sturdy shoes (6) with a non-slip sole. Special work shoes ensure good footing and protect against injury.
-- When touching blades or blade unit, wear protective gloves. Blades can cut bare hands severely.
Work area safety
-- |
DANGER: Keep the pole hedge trimmer away from electric lines and |
communication cables. Touching or approaching high-voltage lines with pole |
|
|
hedge trimmer can result in death or serious injury. Watch power lines and |
|
electrical fences around the work area before starting operation. |
-- Start and operate the engine only outdoors in a well ventilated area. Operation in a confined or poorly ventilated area can result in death due to suffocation or carbon monoxide poisoning.
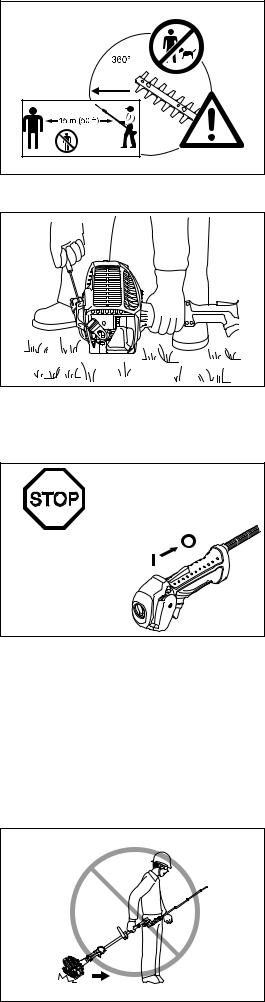
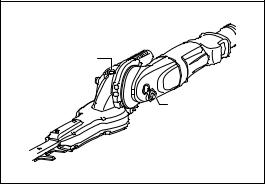
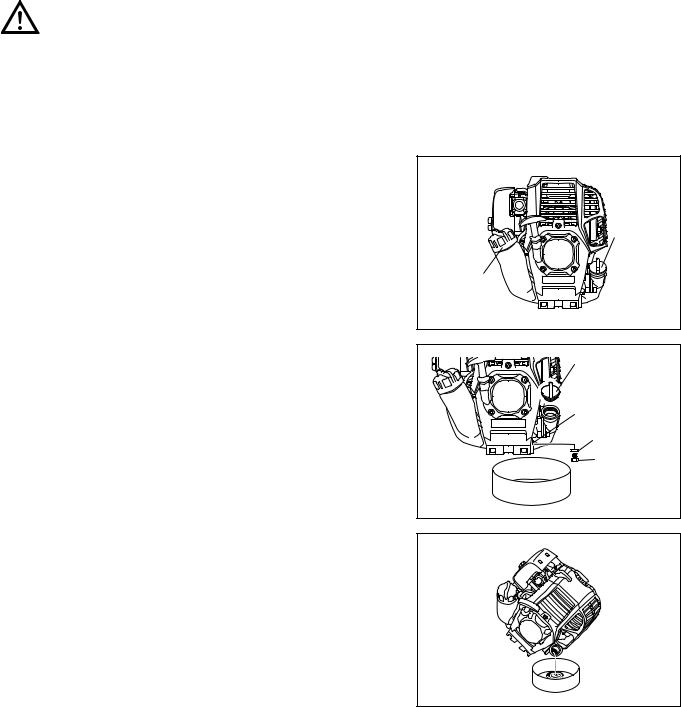
-- During operation, keep bystanders, in particular children, or animals at least 15 m away from the pole hedge trimmer. Stop the engine as soon as someone approaches.
-- Before operation, examine the work area for wire fences, stones, or other solid
|
objects. They can damage the blades. |
-- |
WARNING: Use of this product can create dust containing chemicals which |
may cause respiratory or other illnesses. Some examples of these chemicals |
|
|
are compounds found in pesticides, insecticides, fertilizers and herbicides. Your |
|
risk from these exposures varies, depending on how often you do this type of |
|
work. To reduce your exposure to these chemicals: work in a well ventilated area, |
|
and work with approved safety equipment, such as those dust masks that are |
|
specially designed to filter out microscopic particles. |
3
Starting the pole hedge trimmer
-- Before assembling or adjusting the equipment, switch off the engine and remove the spark plug cap.
-- Before starting the pole hedge trimmer, always make sure that the machine is in safe operational condition.
-- Never attempt to start the engine if the equipment is damaged.
-- Check the operation of the throttle lever safety mechanism. The lock-off lever should have a smooth and easy action. Make sure that the lock-off lever functions properly. Check that the handles are clean and dry and test the STOP switch to ensure that it is functioning properly.
Always start the pole hedge trimmer in accordance with the directions provided in this instruction manual.
Follow the instructions below to start the pole hedge trimmer
-- Start the pole hedge trimmer only after the machine has been completely assembled and all accessory parts have been attached.
-- When starting the engine, keep the blades clear of your body and other object, including the ground. The blades may move when starting and may cause serious injury or damage to the blades and/or property.
-- Before starting the engine, make sure that cutter blades are not obstructed by any foreign objects such as stones, branches, etc.
-- Stop the engine immediately if engine problems occur.
-- When pulling the starter knob, hold the equipment firmly against the ground by your left hand. Never step on the drive shaft.
-- If the blades move at idle, stop the engine and adjust the idle speed down.
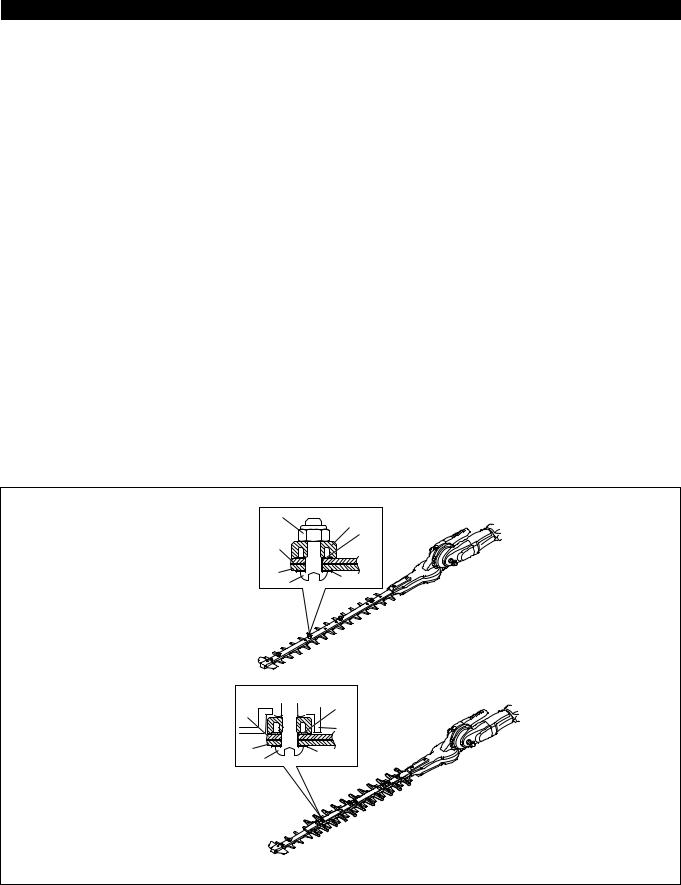
-- When operating the pole hedge trimmer, always maintain a firm grip on both handles. Wrap your fingers tightly around each handle, cradling the handle between thumb and forefinger. To keep the pole hedge trimmer under control at all times, avoid changing your grip during operation. Make sure that the control handles are in good condition and free of moisture, mud, oil or grease.
Always ensure secure and well-balanced footing
-- Always stop the engine immediately and discontinue operation if engine trouble occurs or if the machine starts making unusual noise.
-- Exhaust fumes are poisonous. Never operate the machine in an enclosed room or tunnel without ventilation (risk of suffocation and gas poisoning). Note that carbon monoxide is an odorless gas. Always make sure that areas where the engine is operated are adequately ventilated.
-- Stop the engine when resting, or when the pole hedge trimmer is left unattended. Place the machine in a safe location and make sure that no combustible material is nearby.
-- Never place a hot pole hedge trimmer onto dry grass or combustible material. -- To reduce the risk of fire, keep the engine and muffler free of debris, leaves or
excessive lubricant.
-- Never operate the engine if the muffler is malfunctioning.
-- Turn off the engine before transportation. -- Always stop the engine when:
•Resting
•Transporting the machine
•Cleaning the machine
•Refuelling the machine
•Performing maintenance on the machine
•Fixing a problem with the machine
-- When carrying the equipment, carry it in a horizontal position by holding the shaft.
Keep the hot muffler away from your body.
-- When transporting the machine in a vehicle, always securely attach the pole hedge trimmer to avoid leakage of residual fuel.
-- Always empty the fuel tank before transporting the pole hedge trimmer in a vehicle.
-- When unloading the machine from a vehicle, take extra care not to drop the pole hedge trimmer to the ground, as this may seriously damage the fuel tank.
-- Except in an emergency, never drop the pole hedge trimmer as this may seriously damage the machine.
-- When transporting the pole hedge trimmer, always lift the machine completely off of the ground. Never drag the engine across the ground as this may damage the fuel tank and possibly cause a fire.
-- Always use the cutter cover provided to protect and secure the cutting section of the pole hedge trimmer during transportation and storage.
-- If the equipment gets heavy impact or fall, check the condition before continuing work. Check the fuel system for fuel leakage and the controls and safety devices for malfunction. If there is any damage or doubt, ask our authorized service center for the inspection and repair.
-- Resting
-- Transporting the machine -- Cleaning the machine
-- Refuelling the machine
-- Performing maintenance on the machine
-- Fixing a problem with the machine
4
Refuelling
-- Before refuelling, stop the engine.
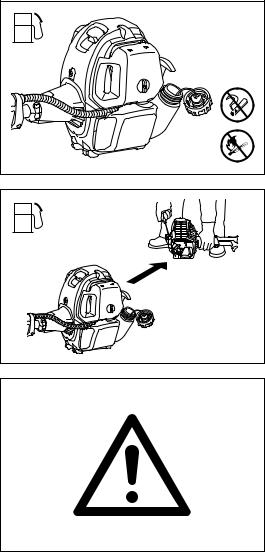
-- Never refuel near naked flames.
-- Do not smoke when refuelling.
-- Always allow sufficient time for the engine to cool down before refuelling.
-- Take care not to let your skin come into contact with petroleum products. Do not inhale gasoline fumes and always wear protective gloves when refuelling. Change and clean protective wear at regular intervals.
-- Take extra care to avoid spilling gasoline and oil in order to avoid contamination of the ground (environmental protection). If gasoline or oil has been spilled onto the pole hedge trimmer, immediately wipe the surface of the pole hedge trimmer with a rag.
To avoid spontaneous combustion, allow wet rags to dry sufficiently before discarding them into an appropriate, covered container.
-- Make sure that no fuel comes in contact with your clothing. Change fuelcontaminated clothing immediately (fire hazard).
-- Close the fuel tank and tighten the fuel tank cap securely. To restart the engine, transfer the pole hedge trimmer to a location at least 3 meters away from the place of refuelling.
-- Check the fuel tank cap at regular intervals to make sure that the cap is securely fastened.
-- Never refuel the machine in an enclosed room. Fuel vapors accumulate at ground level (risk of explosion).
-- Store fuel in appropriate containers only, and make sure that stored fuel is out of the reach of children.
Operation
-- In the event of an emergency, turn off the engine immediately.
-- If you feel any unusual condition (e.g. noise, vibration) during operation, switch off the engine. Do not use the pole hedge trimmer until the cause is recognized and solved.
-- The blades continue to move for a short period after releasing the throttle trigger or switch off the engine. Don’t rush to contact the blades.
-- Never attempt to operate the equipment with one hand. Loss of control may result in serious or fatal injury. To reduce the risk of cut injuries, keep your hands and feet away from the blades.
-- Keep your right hand under the shoulder height during operation. Otherwise you may lose control and result in injury.
-- During operation, never hit the blades against hard obstacles such stones and metals. Take particular care when cutting hedges next to or against wire fences. When working close to the ground, make sure that no sand, grit or stones get between the blades.
-- If the blades come into contact with stones or other solid objects, stop the engine immediately and check the blades for damage after removing the spark plug cap. Replace the blades if damaged.
-- Never touch or approach the blades while they are moving. Blades can cut your finger easily. When handling or approaching the blade, stop the engine and remove the spark plug cap.
-- If thick branches get jammed in the blades, immediately stop the engine, put the pole hedge trimmer down and then remove the obstruction after removing the spark plug cap. Check the blades for damage before using the equipment again.
-- Accelerating the engine with the blades blocked increases the load and may damage the engine and/or clutch.
-- Check the cutting blades frequently during operation for cracks or blunt edges. Before the inspection, switch off the engine and wait until the blades stop completely. Replace damaged or dull blades immediately, even if they have only superficial cracks.
-- Do not touch the gear case. The gear case becomes hot during operation.
-- Take a rest to prevent loss of control caused by fatigue. We recommend to take a
10 to 20-minute rest every hour.
-- Before cutting, pull the throttle lever fully to achieve the maximum speed. -- During operation, hold the pole hedge trimmer with both hands at all times.
-- Only use the pole hedge trimmer in good light and visibility conditions. Beware of slippery and wet areas (ice and snow) during the cold season (danger of slipping), and always ensure secure footing.
-- Never use the pole hedge trimmer while standing on an unstable surface or a steep slope.
-- Never use the pole hedge trimmer while standing on a ladder.
-- Never climb a tree to use the pole hedge trimmer from the tree.
-- To avoid stumbling or falling over objects, never walk backwards when working with the pole hedge trimmer.
-- Always stop the engine before cleaning or servicing the machine. Also, refrain from replacing parts before the engine has been stopped.
-- Do not operate the pole hedge trimmer if the cutting unit is damaged or worn.
3 m |
5

Vibration
-- People with poor circulation who are exposed to excessive vibration may experience injury to blood vessels or the nervous system. Vibration may cause the following symptoms to occur in the fingers, hands or wrists: “Falling asleep”
(numbness), tingling, pain, stabbing sensation, alteration of skin color or of the skin. If any of these symptoms occur, see a physician!
-- To reduce the risk of “white finger disease”, keep your hands warm during operation and well maintain the equipment and accessories.
Maintenance instructions
-- Have your equipment serviced by our authorized service center, always using only genuine replacement parts. Incorrect repair and poor maintenance can shorten the life of the equipment and increase the risk of accidents.
-- Always do your utmost to keep pollution and noise emissions as low as possible when operating the pole hedge trimmer. Pay special attention to correct adjustment of the carburetor.
-- Clean the pole hedge trimmer at regular intervals and periodically check whether all nuts and bolts are securely tightened.
-- Never service or store the pole hedge trimmer in the vicinity of naked flames, sparks, etc.
-- Never repair bent or broken blades by straightening or welding. It may cause parts of the blades to come off and result in serious injury. Contact MAKITA authorized service center for MAKITA genuine blades to replace them.
-- To prevent further damage and/or personal injury, refrain from repairing a malfunctioning pole hedge trimmer if not qualified to do so. For repairs always contact your dealer or an authorized service agent.
Do not attempt to modify or remodel the pole hedge trimmer as this may affect operation safety.
Maintenance work that can be performed by the user is limited to the activities described in this instruction manual. Any other procedures are to be executed by an authorized service agent.
Request MAKITA authorized service center to inspect and maintain the pole hedge trimmer at regular interval.
Use only genuine spare parts and accessories supplied by MAKITA via authorized service centers.
Use of unauthorized accessories and tools may increase the risk of accident and injury. MAKITA accepts no liability whatsoever for accidents or damage resulting from the use of unauthorized accessories and parts.
Storage
-- Before storing the equipment, perform full cleaning and maintenance. Fit the blade cover.
-- Empty the fuel tank before storage, and always store the pole hedge trimmer in a well-ventilated locked room. Make sure the pole hedge trimmer is out of children’s reach at all times.
-- Do not prop the equipment against something, such as a wall. Otherwise the pole hedge trimmer may fall suddenly and cause an injury.
First aid
As a precaution for the occurrence of an accident, make sure that a fully stocked first aid kit is ready at hand.
Replace any items taken from the first aid kit as soon as possible.
When asking for help in the case of an emergency, give the following information:
•Place of accident
•What happened
•Number of injured people
•Extent of injuries
•Your name
6

For European countries only
EC Declaration of Conformity
Makita declares that the following machine(s):
Designation of Machine: Petrol Pole Hedge Trimmer
Model No./ Type: EN4950H, EN4951SH
Conforms to the following European Directives:
2000/14/EC, 2006/42/EC
They are manufactured in accordance with the following standard or standardized documents:
EN ISO 10517
The technical file in accordance with 2006/42/EC is available from:
Makita, Jan-Baptist Vinkstraat 2, 3070, Belgium
The conformity assessment procedure required by Directive 2000/14/EC was in accordance with annex V.
EN4950H:
Measured Sound Power Level: 102.2 dB
Guaranteed Sound Power Level: 104 dB
EN4951SH:
Measured Sound Power Level: 102.2 dB
Guaranteed Sound Power Level: 103 dB
1. 12. 2014
Yasushi Fukaya
Director
Makita, Jan-Baptist Vinkstraat 2, 3070, Belgium
7

TECHNICAL DATA
Model |
|
EN4950H |
|
EN4951SH |
|
|
|
|
|
|
Loop handle |
|
Straight handle |
|
|
|
|
||
|
|
|
|
|
Dimensions (L x W x H) |
|
2,550 mm x 242 mm x 241 mm |
|
2,050 mm x 221 mm x 241 mm |
|
|
|
|
|
Net weight |
|
6.9 kg |
|
6.6 kg |
|
|
|
|
|
Volume (fuel tank) |
|
|
0.6 L |
|
|
|
|
|
|
Cutting length |
|
|
490 mm |
|
|
|
|
|
|
Maximum branch diameter |
|
|
7 mm |
|
|
|
|
||
Cutting strokes |
|
4,200 min-1 |
||
Engine type |
|
Air cooled, 4-stroke, single cylinder |
||
|
|
|
|
|
Engine displacement |
|
|
25.4 cm3 |
|
Maximum engine performance |
|
0.77 kW at 7,000 min-1 |
||
Engine speed |
|
10,000 min-1 |
||
at recommended max, spindle speed |
|
|
|
|
Fuel consumption |
|
|
0.33 kg/h |
|
|
|
|
||
Specific fuel consumption |
|
408 g/kWh |
||
|
|
|
||
Idling speed |
|
3,000 min-1 |
||
Clutch engagement speed |
|
4,400 min-1 |
||
Carburetor |
|
Diaphragm type |
||
(Diaphragm carburetor) |
|
|||
|
|
|
|
|
|
|
|
||
Spark plug |
type |
NGK CMR4A |
||
|
|
|
||
Electrode gap |
|
0.7 - 0.8 mm |
||
|
|
|
|
|
|
|
Vibration per ISO 10517 |
|
Vibration per ISO 22867 |
|
|
|
|
|
Right handle (rear grip) |
ahv eq |
8.9 m/s² |
|
8.0 m/s² |
|
|
|
|
|
Uncertainty K |
3.3 m/s² |
|
1.1 m/s² |
|
|
|
|||
|
|
|
|
|
Left handle (front grip) |
ahv eq |
6.3 m/s² |
|
8.0 m/s² |
|
|
|
|
|
Uncertainty K |
1.4 m/s² |
|
1.4 m/s² |
|
|
|
|||
|
|
|
|
|
|
|
Noise per ISO 10517 |
|
Noise per ISO 22868 |
|
|
|
|
|
Sound pressure level |
|
90 dB (A) |
|
90.2 dB (A) |
|
|
|
|
|
Uncertainty K |
|
1.8 dB (A) |
|
1.0 dB (A) |
|
|
|
|
|
Sound power level |
|
102.2 dB (A) |
|
102.2 dB (A) |
|
|
|
|
|
Uncertainty K |
|
1.6 dB (A) |
|
0.6 dB (A) |
|
|
|
|
|
Fuel |
|
Automobile gasoline (petrol) |
||
|
|
|
||
Engine oil |
|
API grade SF class or higher, SAE 10W-30 oil |
||
|
(automobile 4-stroke engine oil) |
|||
|
|
|||
|
|
|
|
|
Gear ratio |
|
|
1/4.78 |
|
|
|
|
|
|
8

DESIGNATION OF PARTS
|
|
|
13 |
|
|
|
17 |
|
4 |
2 |
|
|
|
|
|
|
5 |
|
|
|
|
|
EN4950H |
|
|
3 |
1 |
|
|
|
|
7 |
6 |
|
|
8 |
|
|
13 |
|
|
|
17 |
4 |
2 |
|
|
|
|
|
EN4951SH |
|
7 |
6 |
3 |
1 |
|
|
|
||
|
8 |
|
|
|
|
|
|
|
18 |
|
9 |
10 |
|
Designation of parts |
|
1 |
Throttle cable |
||
|
|
|
||
21 |
|
|
2 |
Lock-off lever |
|
|
3 |
Throttle lever |
|
|
|
|
||
|
|
|
4 |
Stop switch |
|
|
|
5 |
Handle |
|
|
|
6 |
Shaft |
|
|
|
7 |
Gear box |
14 |
|
|
8 |
Cutter blade |
|
|
9 |
Air cleaner |
|
|
|
|
||
|
|
|
10 |
Fuel tank cap |
|
12 |
|
11 |
Fuel tank |
|
|
12 |
Clutch case |
|
|
|
|
||
|
|
|
13 |
Spark plug cap |
|
15 |
11 |
14 |
Primer pump |
|
|
15 |
Muffler |
|
|
|
|
||
|
|
|
16 |
Recoil starter |
|
19 |
|
17 |
Starter knob |
|
|
|
18 |
Blade cover |
17 |
16 |
|
19 |
Oil cap |
20 |
|
20 |
Oil tank |
|
|
|
|
||
|
|
|
21 |
Shoulder strap |
|
|
|
|
(Optional accessory) |
9
ASSEMBLY
WARNING:
•Make sure that the engine is turned off, and remove the spark plug cap before assembling the pole hedge trimmer.
•Wear protective gloves!
•Secure cutting blades with the blade cover provided when connecting the trimmer unit to the pole.
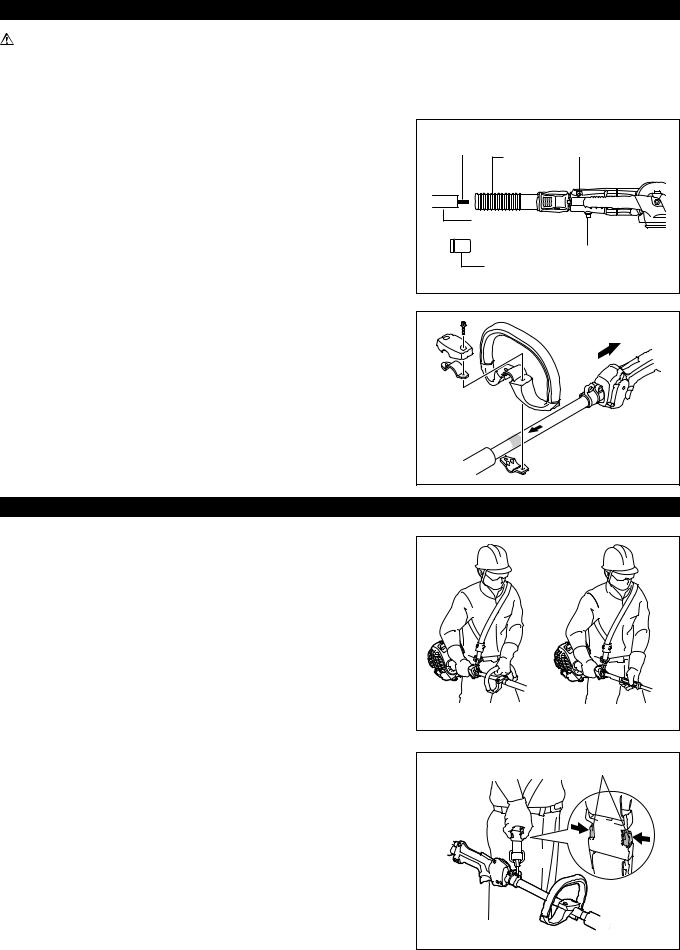
1.Remove the cap (1) from the shaft.
2.Loosen the M5 x 16 bolt (2) and M5 x 25 bolt (3).
3.Insert shaft (4) into the cover (5).
NOTE: Make sure that the shaft is completely inserted into the cover
(approx. 237 mm/ 9-3/8”).
If you are having trouble inserting the shaft, manually rotate the drive axle
(6)a little and try again.
4.Make sure that the shaft is properly inserted and then tighten the M5 x 16 bolt and the M5 x 25 bolt.
(6) |
(5) |
(3) |
|
|
|
|
(4) |
|
|
(1) |
(2) |
|
|
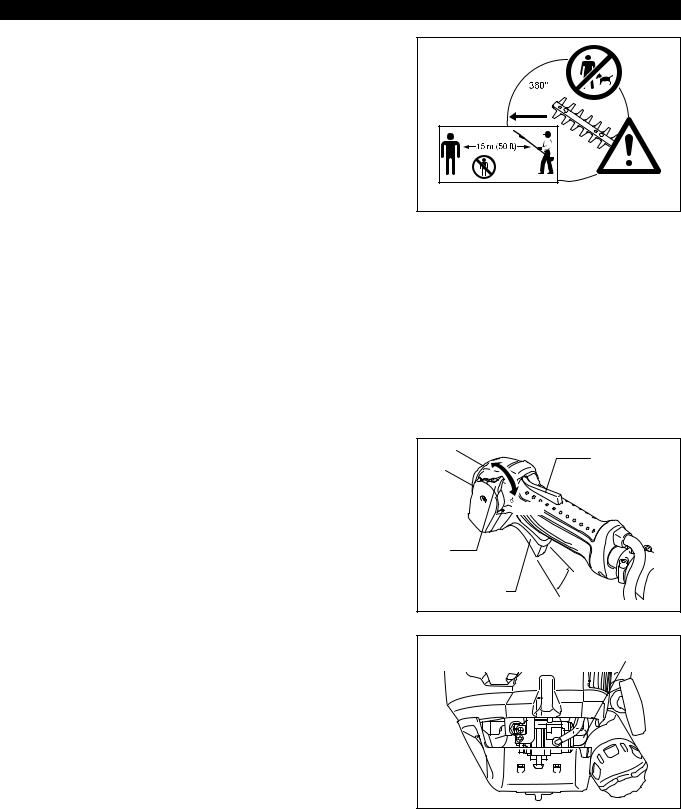
ATTACHING THE HANDLE (for EN4950H)
-- Fix the loop handle on the shaft as shown.
-- To keep a proper distance between the grips, set the loop handle ahead of the arrows.
to engine
Arrow mark
SHOULDER STRAP (optional accessory)
How to wear the shoulder strap
-- Wear the shoulder strap over the left shoulder.
-- Keep the pole hedge trimmer unit on the right hand side of the body.
-- Attach the strap to the hanger provided on the pole hedge trimmer and adjust the length of the strap to attain a comfortable working position.
Detachment
-- In an emergency, push the notches (1) at both sides, and you can detach the machine from you.
Be extremely careful to maintain control of the machine at this time. Do not allow the machine to be deflected toward you or anyone in the work vicinity.
WARNING: Failure to maintain complete control of the machine at all could result in serious bodily injury or DEATH.
EN4950H |
EN4951SH |
|
(1) |
10
FUEL/REFUELLING
BEFORE START OF OPERATION
Inspection and refill of engine oil
-- Perform the following procedure, with the engine cooled down.
-- Set the engine level, remove oil cap (Fig. 1), and check to see whether or not there is oil in the range between the upper limit and lower limit marks of the oil pipe (Fig. 2).
-- Top up with oil to upper limit mark if oil is insufficient (oil level is close to lower limit mark) (Fig. 3).
-- The area surrounding the external marks is transparent, so the amount of oil inside can be checked without having to remove the oil cap.
However, if oil pipe becomes extremely dirty, visibility may be lost, and oil level will have to be checked against stepped section on inside of oil pipe.
-- For reference, the oil refill time is about 10 h (every 10 refuelling).
If the oil changes in color or mixes with dirt, replace it with new one. (For the interval and method of replacement, refer to P20)
Recommended oil: SAE 10W-30 oil of API Classification, Class SF or higher (4-stroke engine for automobile)
Oil volume: Approx. 0.08 L
NOTE: If the engine is not kept upright, oil may go into around the engine, and may be refilled excessively. If the oil is filled above the limit, the oil may be contaminated or may catch fire with white smoke.
Point 1 in Replacement of oil: “Oil cap”
-- Remove dust or dirt near the oil refill port, and detach the oil cap.
-- Keep the detached oil cap free of sand or dust. Otherwise, any sand or dust adhering to the oil cap may cause irregular oil circulation or wear on the engine parts, which will result in troubles.
|
Oil cap |
External mark |
|
|
|
(upper limit) |
|
|
Internal stepped |
|
External mark |
|
|
(lower limit) |
|
|
section (upper limit) |
|
|
|
|
|
|
|
|
|
Top up with oil |
|
Internal stepped |
|
until oil level |
|
|
reaches internal |
|
|
section (lower limit) |
|
|
|
|
stepped section |
|
|
|
|
|
|
Oil pipe |
|
(upper limit). |
|
|
|
|
Fig. 1 |
Fig. 2 |
Oil pipe |
Fig. 3 |
The area between the external upper and lower limits is transparent, so oil level can be checked extternally against these marks.
(1) Keep the engine level, and detach the oil cap.
(2)Fill with oil to upper limit mark. (see Fig. 3)
Use oil bottle when filling.
(3) Securely tighten the oil cap. Insufficient tightening may cause oil leakage.
11

Note
•Do not replace oil with the engine in a tilted position.
•Filling with oil while engine is tilted leads to overfilling which causes oil contamination and/or white smoke.
Point 2 in Replacement of oil: “If oil spills out”
-- If oil spills out between the fuel tank and engine main unit, the oil is sucked into through the cooling air intake port, which will contaminate the engine. Be sure to wipe out spilled oil before start of operation.
REFUELLING
Handling of fuel
It is necessary to handle fuel with utmost care. Fuel may contain substances similar to solvents. Refuelling must be performed in a sufficiently ventilated room or in the open air. Never inhale fuel vapors, and keep fuel away from you. If you touch fuel repeatedly or for a long time, the skin becomes dry, which may cause skin disease or allergy. If fuel comes into the eye, clean the eye with fresh water. If your eye remains still irritated, consult your doctor.
Storage period of fuel
Fuel should be used within a period of 4 weeks, even if it is kept in a special container in a well-ventilated and shaded area.
Otherwise, fuel may deteriorate in one day.
STORAGE OF MACHINE AND REFILL TANK
-- Keep the machine and tank at a cool place free from direct sunshine.
-- Never keep the fuel in a car.
Fuel
The engine is a four-stroke engine. Be sure to use an unleaded automobile gasoline 87 or higher octane ((R+M)/2). It may contain no more than 10% alcohol (E-10).
Points for fuel
-- Never use a gasoline mixture which contains engine oil. Otherwise, it will cause excessive carbon accumulation or mechanical troubles. -- Use of deteriorated oil will cause irregular start-up.
Refuelling
WARNING: INFLAMMABLES STRICTLY PROHIBITED
-- Loosen the tank cap a little to release the tank pressure.
-- Detach the tank cap, and refuel, discharging air by tilting the fuel tank so that the refuel port will be oriented upward. (DO NOT fill fuel up to the top of the tank.)
-- Wipe well the periphery of the tank cap to prevent foreign matter from entering the fuel tank. -- After refuelling, securely tighten the tank cap.
•If there is any flaw or damage on the tank cap, replace it.
•The tank cap wears out in course of time. Replace it every two to three years.
Fuel tank cap
Fuel upper 
 limit
limit
Fuel tank
12
PRECAUTIONS BEFORE STARTING THE ENGINE
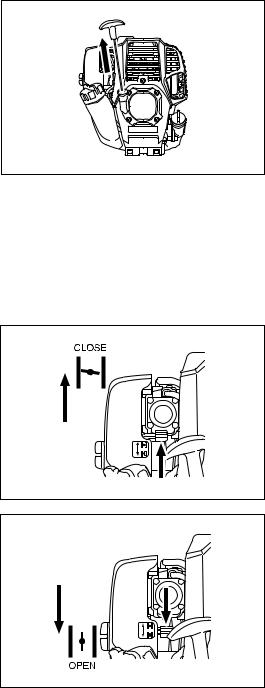
-- At all times allow a 15-meter diameter safety zone around the working area.
Make sure that all persons (in particular children) and/or animals remain outside this zone.
-- Before using the pole hedge trimmer, make sure that the machine is in safe operational condition. Make sure that the cutting blades are not damaged, and check the throttle lever for easy action. Make sure that the cutting blades are not in motion when the engine is idling. If the machine is not operating normally, contact your dealer to have the machine adjusted. Make sure that the handles are clean and dry, and test whether the I-O switch is functioning properly. Start the engine only in accordance with the instructions given in this manual. Do not use any other methods to start the pole hedge trimmer.
-- Start the engine of the pole hedge trimmer only after having read and fully understood the instructions. Never attempt to start a pole hedge trimmer that has not been fully assembled. Serious injury may result otherwise.
-- Before starting the engine, always make sure that the cutting blades are not obstructed by stones, branches or any other solid objects.
-- Check the working area for wires, cord, glass or other foreign objects that could get caught in the cutting blades.
-- Electrical shock: Be aware of all electrical lines in the vicinity. Check the entire work area for the presence of power lines and electrical fences before starting to work.
POINTS IN OPERATION AND HOW TO STOP
Observe the applicable accident prevention regulations!
STARTING
Move at least 3 m away from the place of refuelling. Put the pole hedge trimmer on a clean piece of ground taking care that the cutting blades do not come into contact with the ground or any other objects.
A: Cold start
1)Set this machine on a flat space.
2)Set the I-O switch (1) to OPERATION.
3)Primer pump
Continue to push the primer pump (2) until the fuel comes into the primer pump.
(In general, fuel comes into the primer pump by 7 to 10 pushes.) If the primer pump is pushed excessively, an excess of gasoline returns to the fuel tank.
OPERATION
Lock-off lever
STOP
(1)
Throttle lever |
High |
speed |
|
|
Low speed |
(2)
13
4)Recoil starter
Pull the start knob gently until it is hard to pull (compression point). Then, return the start knob, and pull it strongly. Never pull the rope to the full extension. Once the start knob is pulled, never release your hand immediately. Hold the start knob until it returns to its original point.
5)Warm-up operation
Continue warm-up operation for 2 to 3 minutes.
NOTE: In case of excessive fuel intake, remove the spark plug and pull the starter handle slowly to remove excess fuel. Also, dry the electrode section of the spark plug.
B: Startup after warm-up operation
1)Repeat pushing the primer pump gently.
2)Keep the throttle lever at the idling position.
3)Pull the recoil starter strongly.
4)If it is difficult to start the engine, open the throttle by about 1/3.
Pay attention to the cutting blades which may move.
At times, such as winter, when starting the engine is difficult, operate choke lever with the following procedure when starting engine.
•After implementing startup steps 1) to 3), set choke lever to the CLOSE position.
•Implement startup step 4) and start engine.
•Once engine starts, set choke lever to the OPEN position.
•Implement startup step 5) and complete warm up.
CAUTION: If a bang (explosive sound) is heard and the engine stops, or the just-started engine stalls before the choke lever is operated, return the choke lever to the OPEN position, and pull the starter knob a few times again to start the engine.
CAUTION: If the choke lever is left in the CLOSE position, and the starter knob merely pulled repeatedly, to much fuel will be sucked in, and the engine will become difficult to start.
14
STOPPING |
|
|
1) |
Release the throttle lever (2) fully, and when the engine speed has lowered, set |
|
|
the I-O switch (1) to STOP the engine will now stop. |
|
2) |
Be aware that the cutting head may not stop immediately and allow it to slow |
|
|
down fully. |
STOP |
|
|
|
|
|
(1) |
|
|
(2) |
ADJUSTMENT OF LOW-SPEED ROTATION (IDLING)
When it is necessary to adjust the low-speed rotation (idling), perform it by the carburetor adjusting screw (1).
CHECKUP OF LOW-SPEED ROTATION
-- Set the low-speed rotation to 3,000 rpm (/min).
If it is necessary to change the rotation speed, regulate the adjusting screw (1) with Phillips screwdriver.
-- Turn the adjusting screw to the right, and the engine speed will increase. Turn the adjusting screw to the left, and the engine speed will drop.
-- The carburetor is generally adjusted before shipment. If it is necessary to readjust (1) it, please contact Authorized Service Center.
15
OPERATING THE POLE HEDGE TRIMMER
-- Do not touch the cutting blade portion of the pole hedge trimmer during operation, or when the engine is running.
-- Take extra care not to inhale exhaust gases when working with the pole hedge trimmer. Never operate the pole hedge trimmer in an enclosed room or an area with insufficient ventilation (risk of suffocation and gas poisoning). Note that carbon monoxide is an odorless gas that is, it cannot be detected by the sense of smell.
-- Always wear adequate protective wear before starting to work with the pole hedge trimmer.
-- Stop the engine immediately if the muffler is not functioning properly.
-- Only use the pole hedge trimmer in good light and visibility conditions.
-- Do not operate the pole hedge trimmer in darkness or fog. Beware of slippery and wet areas (ice and snow) during the cold season (danger of slipping), and always ensure secure footing.
-- Never use the pole hedge trimmer while standing on an unstable surface or a steep slope.
-- Never use the pole hedge trimmer while standing on a ladder.
-- Never climb a tree to use the pole hedge trimmer from the tree.
-- Continuously check the working area for wires, cord, glass or other foreign objects that could get caught in the cutting blades.
-- Make sure that the cutting blades are in rapid motion before starting to cut.
-- Always grip the pole hedge trimmer with both hands and maintain a firm grip when working with the machine.
-- To assure optimal control over the pole hedge trimmer, always completely wrap your hands around the handles (use your thumb for counter pressure) and apply a firm grip on the handles.
-- Note that the cutting blades will remain in motion for up to two seconds after the throttle lever has been released.
-- Do not cut with the pole hedge trimmer at low engine speed.
-- The speed of the cutting blades cannot be adjusted properly with the throttle lever when the engine is running at low speed.
-- To trim the top surface of a hedge, first align the cutting blades at an angle of
15° - 30° in the cutting direction and keep the pole hedge trimmer in a horizontal position. Then start trimming the hedge using a swinging movement, much like drawing circle segments with the hedge trimmer shaft.
-- To trim the sides of a hedge, align the blades parallel to the surface to be cut and start trimming with semi-circular upward (down-up) movements.
-- Pay attention when trimming a hedge close to or against wire fences.
-- Do not touch hard objects such as wire fence, stone or ground with the cutting blades. It may cause blades to crack, chip or break.
-- Do not use the pole hedge trimmer over an extended period of time. As a general rule, for every 50 minutes of operation take a 10-20 minutes rest.
-- If the cutting blades come into contact with stones or other solid objects, stop the engine immediately and check the blades for damage. Replace the blades if damaged.
-- If the pole hedge trimmer develops a problem during operation (strange noises, vibration, etc.), immediately stop the engine. Do not use the machine again until the problem has been recognized and solved.
-- Always do your utmost to keep pollution and noise emissions as low as possible when operating the pole hedge trimmer. Pay special attention to correct carburetor adjustment.
-- If thick branches get jammed in the cutting blades, immediately stop the engine, lay the equipment on the ground and remove the obstruction. Check the blades for damage before using the machine again.
EN4950H |
EN4951SH |
16

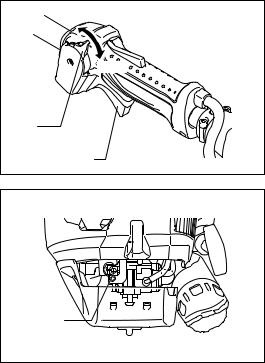
Adjustment of cutting angle
Warning:
-- Do not operate the tool with the loose and unstable cutter unit.
You can adjust the cutting angle upwards to 45°and downwards to 90°.
1.Stop the pole hedge trimmer engine and lay the machine on the ground.
2.To adjust the angle of the cutter unit, hold the handle (A) on the cutter unit with one hand, and hold the angle lock (B) as illustrated with the other hand.
3.Pull the angle lock gently, and change the angle of the cutter unit. After adjusting the angle, return the angle lock gently.
Note:
-- The cutter unit is fasten only with certain angles alongside the groove on the unit. Make sure the cutter unit sits properly. If the angle is not appropriate, the clutch is cut and the tool does not operate.
-- Do not adjust the cutter unit while the pole hedge trimmer is in an upright position.
-- Move the I-O switch to the “O” position and lay the pole hedge trimmer flat on the ground to adjust the cutting angle.
-- Always secure the blades with the blade cover provided before adjusting cutting angle.
In case the cutter unit is loose, the bolt (the axis of angle adjustment) needs to be tightened.
1.Set the socket wrench (1) and the hex wrench (2) on the bolt (3).
2.Adjust the tightness of the cutter unit by turning hex wrench, and then fasten the bolt by turning the socket wrench.
Note:
-- Do not fasten the cutter unit too tight. The angle of the cutter unit can not be changed if it is too tight.
A
B
(1)
(2)
(3)
17
MAINTENANCE
-- Before performing any maintenance work on the pole hedge trimmer (blade cleaning, etc.), always stop the engine and wait until the engine has cooled down.
As an additional safety precaution, also remove the spark plug cap.
-- Do not try to straighten or weld bent or broken cutting blades. Always replace damaged blades.
-- Stop the engine at regular intervals to check the cutting blades for possible damage (perform a tapping-resonance test to detect hard-to-see hairline cracks). Always make sure that the teeth of the blades are sharp.
-- Clean the pole hedge trimmer regularly. During cleaning also check all screws, nuts and bolts are well tightened.
-- To reduce the risk of fire, never service or store the pole hedge trimmer in the vicinity of open fires.
-- Always wear rugged protective gloves when handling the cutting blades.
-- Contact your dealer for replacement cutting blades.
-- Never use gasoline, benzine, thinner, alcohol or the like for cleaning.
Discoloration, deformation or cracks may result.
Sharpening the blade
If the cutting blades have become blunt and cutting performance is poor, have the blades sharpened by an authorized service agent.
Adjusting blade clearance
The upper/lower blades wear out gradually after operations. If you cannot get a clean cut though the blades are sharp enough, adjust the clearance as follows.
The tightness of the hex bolt decides the clearance of the blades. The nut holds the hex bolt with certain tightness. Too loose clearance causes blunt cut, but too tight clearance causes unnecessary heat and sooner worn-out of the blades.
1.Loosen the nut (1) with a box or open-ended wrench.
2.Tighten the hex bolt (2) with a hex wrench lightly till it stops. And then, screw it back between a quarter turn and a half turn to gain necessary clearance.
3.Tighten the nut (1), holding the hex bolt (2).
4.Apply light oil on the friction surface of the blades.
5.Start the engine, operate the throttle on and off for a minute.
6.Stop the engine and touch the surface. If they are not too hot to touch, you have made a proper adjustment. If they are too hot to touch, turn the hex bolt (2) back a little and repeat the step 5 to 6.
NOTE: Before making the adjustment, stop the engine and wait for the blades to stop.
The blades have a slot around the hex bolt (2). In case you find dust in the end of any of the slots, clean it.
1Hexagonal U-nut
2Hex bolt
3Plate
4 Blade guide
5Upper blade
6Lower blade
7Blade guard
1 |
4 |
|
|
3 |
5
6 |
3 |
2 |
EN4950H
5 1 

 4 3
4 3
|
|
7 |
6 |
2 |
3 |
EN4951SH
18
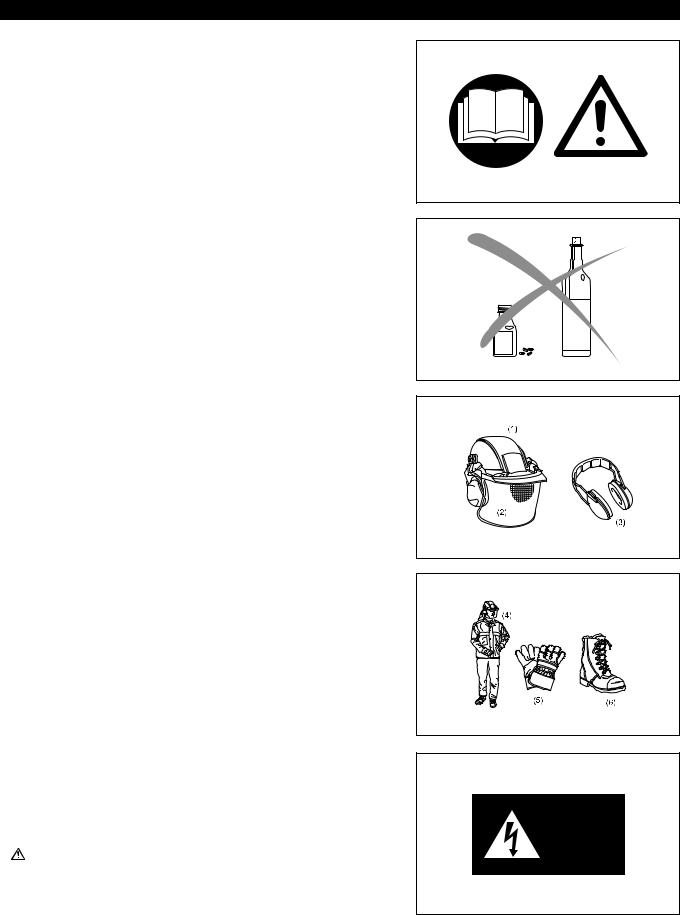
Adding grease and lubricant
Important: Make sure that the surface of gear box is completely cold before lubricating.
-- The gearbox of the pole hedge trimmer should be greased every 25 working hours. The grease hole locates under the bolt. Remove the bolt to lubricate. Add approx. 3 g (4 cc) of lubricant to the point A of the gearbox and 5 g (7 cc) of the lubricant to the point B respectively via the grease hole. Return the bolt after lubrication. After filling correct amount of grease, grease will come out a bit from the base of the blade during the first operation.
CAUTION: Observe greasing intervals and the amount of grease to be supplied. Mechanical parts of the pole hedge trimmer may be damaged if grease is not supplied at the prescribed intervals or if an insufficient amount of grease is added.
Daily inspection and maintenance
To ensure a long service life of your pole hedge trimmer, perform the following inspections and maintenance on a daily basis.
-- Before use;
•Always check for loose or missing parts before starting operation. Pay special attention to the cutting unit and make sure that the cutting blade lock screws are well tightened.
•Check for clogging of the cooling air passages and the cooling fins of the
cylinder before starting operation. Clean if necessary.
-- After use;
•Clean the pole hedge trimmer externally and inspect for damage.
•Clean the air filter. Clean the filter several times a day if working in extremely dusty conditions.
•Check the cutting blades for damage. Make sure that the blades are securely mounted.
•If the cutting blades still continue to run at idle after the adjustment, consult your nearest authorized service agent.
Grease hole
(under the bolt)
B
A
19
REPLACEMENT OF ENGINE OIL
Deteriorated engine oil will shorten the life of the sliding and rotating parts to a great extent. Be sure to check the period and quantity of replacement.
DANGER: In general, the engine main unit and engine oil still remain hot just after the engine is stopped. In replacement of oil, make sure that the engine main unit and engine oil are sufficiently cooled down. Otherwise, there may remain a risk of scald. Allow sufficient time after stopping engine for the engine oil to return to the oil tank to ensure accurate reading of the oil level indicator.
NOTE: If the oil filled above the limit, it may become dirty or may catch fire with white smoke.
Interval of replacement: After first 20 operating hours, followed by every 50 operating hours
Recommended oil: SAE10W-30 oil of API Classification SF Class or higher (4-stroke engine oil for automobile)
In replacement, perform the following procedure.
1) Make sure that the fuel tank cap is tightened securely.
2) Put large container (pan, etc.) under drain hole.
Oil cap
Fuel tank cap 
3)Remove drain bolt and then remove oil cap to drain out oil from drain hole. At this time, be sure not to mislay drain bolt’s gasket, or to dirty any of the removed components.
4)Once all the oil has been drained, combine gasket and drain bolt, and tightly secure drain bolt, so that it will not loosen and cause leaks.
*Use cloth to fully wipe off any oil attached to bolt and equipment.
Alternative draining method
Remove oil cap, tilt pole hedge trimmer toward oil filler hole, and drain out oil.
Collect oil in container.
Oil cap
Drain hole
Gasket
Drain bolt
20
5)Set the engine level, and gradually fill up to upper limit mark (6) with new oil.
6)After filling, tightly secure oil cap, so that it will not loosen and cause leaks. If oil cap is not tightly secured, it may leak.
Internal stepped section
(upper limit)
Internal stepped section (lower limit)
External mark
(upper limit)
External mark
(lower
limit)
(6) |
POINTS ON OIL
-- Never discard replaced engine oil in garbage, earth or sewage ditch. Disposal of oil is regulated by law.
In disposal, always follow the relevant laws and regulations. For any points remaining unknown, contact Authorized Service Agent.
-- Oil will deteriorate even when it is kept unused. Perform inspection and replacement at regular intervals (replace with new oil every 6 months).
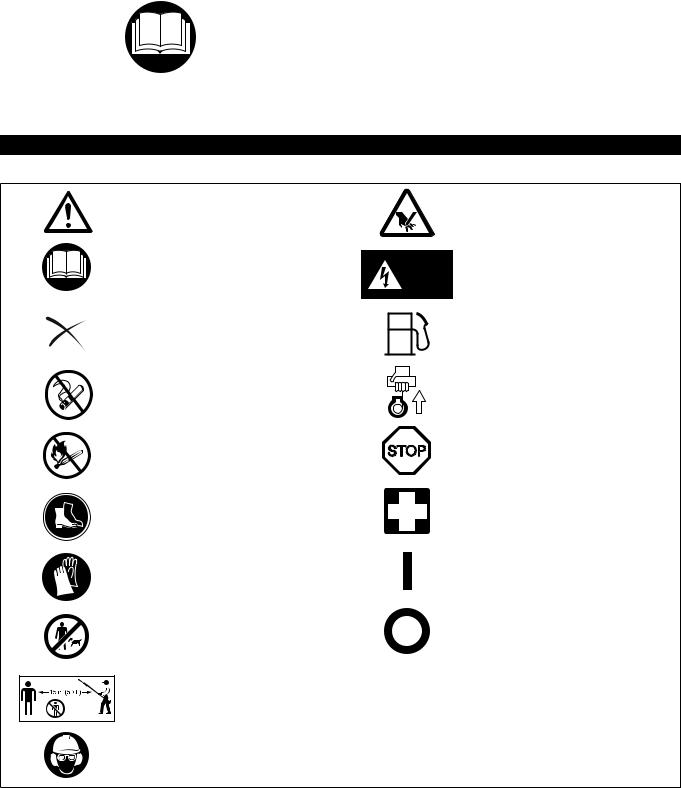
Cleaning the air cleaner
DANGER: Inflammables strictly prohibited
Check and clean the air cleaner daily or every 10 operating hours.
-- Turn the choke lever fully to the close side, and keep the carburetor free from dust or dirt.
-- Loosen the fixing bolt.
-- Remove the air cleaner cover by pulling its bottom side. -- Remove the elements and tap them to remove dirt.
-- If the elements are heavily contaminated:
Remove the elements, immerse them in warm water or in water-diluted neutral detergent, and dry them completely. Do not squeeze or rub them when washing.
-- Before attaching the elements, be sure to dry them completely. Insufficient drying of the elements may lead to difficult startup.
-- Wipe out oil adhering around the air cleaner cover and the breather part with waste cloth.
-- Fit the element (sponge) into the element (felt).
Fit the elements into the plate so that the sponge faces the air cleaner cover.
-- Immediately attach the cleaner cover and tighten it with fixing bolts. (In remounting, first place the upper claw, and then the lower claw.)
Element |
Plate |
|
|
(sponge) |
|
Air cleaner cover
Choke lever
Breather part
Element (felt)
Fixing bolt
NOTICE:
-- Clean the elements several times a day, if excessive dust adheres to it. Dirty elements reduce engine power and make starting engine difficult.
-- Remove oil on the elements. If operation continues with the elements remaining not cleared of oil, oil in the air cleaner may fall outside, resulting in contamination of the environment.
-- Do not put the elements on the ground or dirty place. Otherwise they pick up dirt or debris and it may damage the engine.
-- Never use fuel for cleaning the elements. Fuel may damage them.
21
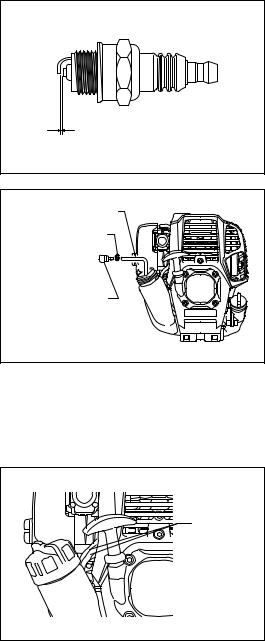
CHECKING THE SPARK PLUG
-- Only use the supplied universal wrench to remove or to install the spark plug.
-- The gap between the two electrodes of the spark plug should be 0.7 - 0.8 mm
(0.028” - 0.032”). If the gap is too wide or too narrow, adjust it. If the spark plug is clogged or contaminated, clean it thoroughly or replace it.
CAUTION: Never touch the spark plug connector while the engine is running (danger of high voltage electric shock).
Cleaning the fuel filter (suction head in the fuel tank)
WARNING: INFLAMMABLES STRICTLY PROHIBITED
Check and clean the fuel filter monthly or every 50 operating hours.
Check the fuel filter periodically. To check the fuel filter, follow the steps below.
(1)Remove the fuel tank cap, drain the fuel to empty the tank. Check the tank inside for any foreign materials. If any, remove them.
(2)Pull out the suction head by using a wire hook through the tank opening.
(3)If the fuel filter clogged slightly, clean it. To clean it, gently shake and tap it in fuel. To avoid damage, do not squeeze or rub it. The fuel used for the cleaning must be disposed in accordance with the method specified by regulations in your country.
If the fuel filter became hard or heavily clogged up, replace it.
(4)After checking, cleaning or replacing, push the fuel filter in all the way to the
bottom of the fuel tank.
Clogged or damaged fuel filter can cause insufficient fuel supply and reduce engine power. Replace the fuel filter at least quarterly to ensure satisfactory fuel supply to the carburetor.
0.7 mm - 0.8 mm
(0.028” - 0.032”)
Fuel pipe
Hose clamp
Fuel filter
Replacing the fuel pipe |
|
CAUTION: Inflammables strictly prohibited |
|
Check and clean the fuel pipe daily or every 10 operating hours. |
|
Replace the fuel pipe every 200 operating hours or every year regardless of |
Fuel pipe |
|
|
operating frequency. Otherwise fuel leakage may lead to fire. |
|
If you find any leakage during inspection, replace the fuel pipe immediately. |
|
INSPECTION OF BOLTS, NUTS AND SCREWS |
|
-- Retighten loose bolts, nuts, etc. |
|
-- Check for fuel and oil leakage. |
|
-- Replace damaged parts with new ones for safety operation. |
|
CLEANING OF PARTS
-- Keep engine clean by wiping down with a cloth rag.
-- Keep the cylinder fins free of dust or dirt. Dust or dirt adhering to the fins will cause piston seizure.
REPLACEMENT OF GASKETS AND PACKINGS
Replace gaskets and packings if the engine is disassembled.
For any maintenance or adjustment not described in this manual, ask your local
MAKITA authorized service center.
22

STORAGE
WARNING: When draining the fuel, stop the engine and wait for the engine to cool down.
Failure to do so may cause burns or fire.
ATTENTION: When you store the machine for a long time, drain all fuel from the fuel tank and carburetor, and keep it at a dry and clean place.
-- Drain fuel from the fuel tank and carburetor according to the following procedure:
1)Remove the fuel tank cap, and drain fuel completely.
If there is any foreign materials remaining in the fuel tank, remove it completely.
2)Pull out the fuel filter from the refill port using a wire.
3)Push the primer pump until fuel is drained from there, and drain fuel coming into
the fuel tank. |
Drain fuel |
Humidity |
4) Reset the filter to the fuel tank, and securely tighten the fuel tank cap. |
|
|
5) Then, continue to operate the engine until it stops. |
|
|
-- Remove the spark plug, and drip several drops of engine oil through the spark |
|
|
plug hole. |
|
|
-- Gently pull the starter handle so that engine oil will spread over the engine, and |
|
|
attach the spark plug. |
|
|
-- Attach the cover to the cutting blades. |
|
|
-- In general, store the machine in horizontal position. If it is not possible, place the |
|
|
machine as the motor unit comes below the cutting tool. Otherwise engine oil |
|
|
may leak from inside. |
|
|
-- Always pay attention to storing the machine in a safe place to prevent machine |
|
|
damage and personal injury. |
|
|
-- Keep the drained fuel in a special container in a well-ventilated shade. |
|
|
23

Attention after long-time storage
-- Before startup after long-time shutdown, be sure to replace oil (refer to P20). Oil will deteriorate while the machine is kept out of operation.
Operating |
|
|
|
|
|
|
|
time |
Before |
Daily |
25h |
50h |
200h |
Shutdown/ |
Corresponding |
|
operation |
(10h) |
rest |
P |
|||
Item |
|
|
|
||||
|
|
|
|
|
|
|
|
Engine oil |
Inspect |
|
|
|
|
|
11 |
|
Replace |
|
|
*1 |
|
|
20 |
Tightening parts |
Inspect |
|
|
|
|
|
22 |
(bolt, nut) |
|
|
|
|
|
|
|
Fuel tank |
Clean/inspect |
|
|
|
|
|
- |
|
Drain fuel |
|
|
|
|
*3 |
23 |
Throttle lever |
Check function |
|
|
|
|
|
13 |
Stop switch |
Check function |
|
|
|
|
|
13, 15 |
Cutting blades |
Inspect |
|
|
|
|
|
13, 18 |
Low-speed rotation |
Inspect/adjust |
|
|
|
|
|
15 |
Air cleaner |
Clean |
|
|
|
|
|
21 |
Ignition plug |
Inspect |
|
|
|
|
|
22 |
Cooling air duct |
Clean/inspect |
|
|
|
|
|
22 |
Fuel pipe |
Inspect |
|
|
|
|
|
22 |
|
Replace |
|
|
|
*2 |
|
- |
Gear-case grease |
Refill |
|
|
|
|
|
19 |
Fuel filter |
Clean/replace |
|
|
|
|
|
22 |
Clearance between |
Adjust |
|
|
|
*2 |
|
- |
air intake valve |
|
|
|
|
|
|
|
and air discharge |
|
|
|
|
|
|
|
valve |
|
|
|
|
|
|
|
Engine overhaul |
|
|
|
|
*2 |
|
- |
Carburetor |
Drain fuel |
|
|
|
|
*3 |
23 |
*1 Perform initial replacement after 20h operation.
*2 For the 200 operating hour inspection, request Authorized Service Agent or a machine shop. *3 After emptying the fuel tank, continue to run the engine and drain fuel in the carburetor.
24

TROUBLESHOOTING
Before making a request for repairs, check a trouble for yourself. If any abnormality is found, control your machine according to the description of this manual. Never tamper or dismount any part contrary to the description. For repairs, contact Authorized Service Agent or local dealership.
|
|
|
State of abnormality |
Probable cause (malfunction) |
|
|
Remedy |
|||||
|
|
|
|
|
|
Failure to operate primer pump |
Push 7 to 10 times |
|||||
|
|
|
|
|
|
Low pulling speed of starter rope |
Pull strongly |
|||||
|
|
|
|
|
|
Lack of fuel |
Feed fuel |
|||||
|
|
|
|
|
|
Clogged fuel filter |
Clean |
|||||
|
|
|
|
|
|
Broken fuel tube |
Straighten fuel tube |
|||||
|
|
|
|
|
|
Deteriorated fuel |
Deteriorated fuel makes starting more difficult. |
|||||
|
|
|
|
|
|
|
|
|
Replace with new one. (Recommended |
|||
|
|
|
|
|
|
|
|
|
replacement: 1 month) |
|||
|
|
|
|
|
|
Excessive suction of fuel |
Set throttle lever from medium speed to high |
|||||
|
|
|
|
|
|
|
|
|
speed, and pull starter handle until engine |
|||
|
|
|
|
|
|
|
|
|
starts. Once engine starts, cutting blades |
|||
|
Engine does not start |
|
|
|
start moving. Pay full attention to cutting |
|||||||
|
|
|
|
|
|
|
|
|
blades. |
|||
|
|
|
|
|
|
|
|
|
If engine will not start still, remove spark plug, |
|||
|
|
|
|
|
|
|
|
|
make electrode dry, and reassemble them as |
|||
|
|
|
|
|
|
|
|
|
they originally are. Then, start as specified. |
|||
|
|
|
|
|
|
Detached plug cap |
Attach securely |
|||||
|
|
|
|
|
|
Contaminated spark plug |
Clean |
|||||
|
|
|
|
|
|
Abnormal clearance of spark plug |
Adjust clearance |
|||||
|
|
|
|
|
|
Other abnormality of spark plug |
Replace |
|||||
|
|
|
|
|
|
Abnormal carburetor |
Make request for inspection and maintenance. |
|||||
|
|
|
|
|
|
Starter rope cannot be pulled |
Make request for inspection and maintenance. |
|||||
|
|
|
|
|
|
Abnormal drive system |
Make request for inspection and maintenance. |
|||||
|
|
|
|
|
|
Insufficient warm-up |
Perform warm-up operation |
|||||
|
|
|
|
|
|
Choke lever is set to “ |
|
” although engine is |
Set to “ |
|
” |
|
|
|
|
|
|
|
|
|
|||||
|
Engine stops soon |
warmed up. |
|
|
|
|||||||
|
Clogged fuel filter |
Clean or replace |
||||||||||
|
Engine speed does not increase |
|||||||||||
|
Contaminated or clogged air cleaner |
Clean |
||||||||||
|
|
|
|
|
|
|||||||
|
|
|
|
|
|
Abnormal carburetor |
Make request for inspection and maintenance. |
|||||
|
|
|
|
|
|
Abnormal drive system |
Make request for inspection and maintenance. |
|||||
Cutting blade does not move |
Inappropriate angle of cutter unit |
Make sure the angle lock engages properly. |
||||||||||
|
|
|
|
|
|
Loosened cutting blades-tightening nut |
Tighten securely |
|||||
|
|
|
|
|
|
Twigs caught by cutting blades. |
Remove foreign matter |
|||||
|
|
|
|
|
|
|||||||
|
Stop engine immediately |
|
|
|
|
|
|
|
||||
Abnormal drive system |
Make request for inspection and maintenance. |
|||||||||||
|
|
|
|
|
|
|||||||
Main unit vibrates abnormally |
Broken, bent or worn cutting blades |
Replace cutting blades |
||||||||||
|
|
|
|
|
|
Loosened cutting blades-tightening nut |
Tighten securely |
|||||
|
|
|
|
|
|
|
|
|
|
|
|
|
|
|
|
|
|
|
Abnormal drive system |
Make request for inspection and maintenance. |
|||||
|
Stop engine immediately |
|
||||||||||
|
|
|
|
|
|
|
|
|||||
|
|
|
|
|
|
|
|
|
|
|
|
|
Cutting blades do not stop immediately |
High idling rotation |
Adjust |
||||||||||
|
|
|
|
|
|
Detached throttle wire |
Attach securely |
|||||
|
|
|
|
|
|
|
|
|
|
|
|
|
|
|
|
|
|
|
Abnormal drive system |
Make request for inspection and maintenance. |
|||||
|
Stop engine immediately |
|
||||||||||
|
|
|
|
|
|
|
|
|||||
|
|
|
|
|
|
|
|
|
|
|
|
|
Engine does not stop |
Detached connector |
Attach securely |
||||||||||
|
|
|
|
|
|
Abnormal electric system |
Make request for inspection and maintenance. |
|||||
|
|
|
|
|
|
|
|
|
|
|
|
|
|
Run engine at idling, and set choke lever |
|
|
|
|
|
|
|
||||
|
to “ |
|
” |
|
|
|
|
|
|
|
||
|
|
|
|
|
|
|
|
|||||
|
|
|
|
|
|
|
|
|
|
|
|
|
|
|
|
|
|
|
|
|
|
|
|
|
|
When the engine does not start after warm-up operation:
If there is no abnormality found for the check items, open the throttle by about 1/3 and start the engine.
25
Français |
(Instructions d’origine) |
Merci beaucoup d’avoir choisi le taille-haie sur perche de MAKITA.
Nous sommes heureux de vous proposer un produit qui résulte de notre long programme de développement et de nombreuses années de savoir-faire et d’expérience.
Pour obtenir en toute sécurité les meilleurs résultats possibles de votre taille-haie sur perche de MAKITA, veuillez lire attentivement ce manuel avant d’utiliser l’appareil et suivre toutes les instructions indiquées afin de garantir le fonctionnement correct du taille-haie sur perche de MAKITA.
Table des matières |
Page |
Symboles........................................................................................ |
26 |
Consignes de sécurité..................................................................... |
27 |
Caractéristiques techniques............................................................ |
32 |
Nomenclature des pièces................................................................ |
33 |
Montage.......................................................................................... |
34 |
Bandoulière (accessoire fourni en option)....................................... |
34 |
Carburant/ravitaillement.................................................................. |
35 |
Précautions avant de démarrer le moteur....................................... |
37 |
Fonctionnement du taille-haie sur perche....................................... |
40 |
Entretien.......................................................................................... |
42 |
Entreposage.................................................................................... |
47 |
Résolution de problèmes................................................................ |
49 |
SYMBOLES
Le manuel d’instructions contient les symboles suivants.
AVERTISSEMENT/DANGER |
Prenez garde de ne pas vous pincer |
Avant d’utiliser l’appareil, lisez |
|
attentivement et comprenez parfaitement |
Attention aux câbles électriques : risque |
les instructions indiquées dans ce |
de choc électrique |
manuel. |
|
INTERDICTION |
Carburant (essence) |
Ne pas fumer |
Démarrage manuel du moteur |
Pas de flamme nue |
Arrêt d’urgence |
Porter des chaussures de sécurité |
Premiers secours |
Porter des gants de sécurité |
SOUS TENSION/DÉMARRAGE |
|
HORS TENSION/ARRÊT |
Éloigner les personnes et les animaux de |
|
la zone de travail |
|
Porter un casque de protection, des |
|
lunettes protectrices et des protège- |
|
oreilles |
|
26
CONSIGNES DE SÉCURITÉ
Instructions générales
-- Avant utilisation, lisez attentivement ce manuel et familiarisez-vous avec l’utilisation correcte du taille-haie sur perche. CET APPAREIL PEUT
PROVOQUER DES BLESSURES GRAVES S’IL N’EST PAS UTILISÉ
CORRECTEMENT !
-- Lorsque vous prêtez l’appareil à une autre personne, fournissez-lui toujours des instructions détaillées sur l’utilisation correcte du taille-haie sur perche. Veillez à ce que le manuel d’instructions accompagne toujours le taille-haie sur perche.
-- Si vous utilisez l’appareil pour la première fois, demandez à votre revendeur de vous fournir des instructions de base relatives au maniement du taille-haie sur perche.
-- Rangez ce manuel dans un endroit où il sera facilement accessible pour que vous puissiez vous y reporter rapidement.
-- Ne laissez pas les personnes âgées de moins de 18 ans utiliser le taille-haie sur perche. Toutefois, les individus de plus de 16 ans peuvent utiliser le taille-haie sur perche à des fins de formation s’ils sont sous la supervision constante d’un adulte familiarisé avec le fonctionnement des taille-haies sur perche.
-- Utilisez toujours le taille-haie sur perche avec une précaution et une attention extrêmes.
-- Ne tentez jamais de modifier l’appareil.
-- Respectez les normes d’utilisation des taille-haies sur perche dans votre pays.
-- Des blessures graves peuvent s’ensuivre si vous utilisez le taille-haie sur perche dans les cas suivants. N’utilisez pas le taille-haie sur perche :
•Si vous vous sentez fatigué ou malade.
•Après avoir consommé de l’alcool et/ou des médicaments.
•La nuit ou avec de mauvaises conditions d’éclairage.
•En cas de grossesse.
Utilisation conforme aux prescriptions
-- Ce taille-haie sur perche a été conçu exclusivement pour tailler des haies et des buissons. N’utilisez pas le taille-haie sur perche à d’autres fins.
Équipement de protection individuelle
-- Les vêtements que vous portez doivent être fonctionnels et ajustés, sans gêner vos mouvements. Ne portez pas de vêtements ou de bijoux susceptibles de s’accrocher aux sous-bois ou à l’appareil.
-- Pour protéger convenablement votre tête, vos yeux, vos pieds et vos mains de toute blessure et vous prémunir de troubles de l’audition, vous devez utiliser l’équipement de protection individuelle et les vêtements suivants lors de l’utilisation du taille-haie sur perche.
-- Pour éviter de vous blesser la tête ou les yeux, portez toujours un casque de protection (1) muni de lunettes de sécurité ou d’un écran (2).
-- Pour éviter les troubles de l’audition, portez en permanence un casque anti-bruit
(3).
-- Il est fortement recommandé d’utiliser une combinaison de travail bien ajustée
(4).
-- Portez toujours des gants de travail en cuir renforcé (5) lors de l’utilisation du taille-haie sur perche.
-- Lorsque vous utilisez le taille-haie sur perche, portez toujours des chaussures de sécurité (6) avec semelle antidérapante. Les chaussures de travail spéciales garantissent une bonne stabilité et protègent contre les blessures.
-- Lorsque vous touchez les lames ou le bloc des lames, portez des gants de protection. Vous risqueriez de vous couper grièvement les mains.
Sécurité de la zone de travail
--  DANGER : Gardez le taille-haie sur perche à distance des lignes électriques et des câbles de télécommunications. Toucher, ou simplement approcher, des lignes à haute tension avec le taille-haie sur perche peut entraîner la mort ou des blessures graves. Avant de commencer l’élagage, recherchez les lignes et clôtures électriques situées autour de la zone de travail.
-- Ne démarrez le moteur et n’utilisez l’appareil qu’en extérieur dans une zone bien
|
ventilée. Le fonctionnement de l’outil dans une zone confinée ou mal ventilée |
|
peut entraîner la mort par suffocation ou empoisonnement au monoxyde de |
|
carbone. |
-- Lors du fonctionnement de l’outil, éloignez les spectateurs, en particulier les |
|
|
enfants et les animaux, à au moins 15 m du taille-haie sur perche. Arrêtez le |
-- |
moteur dès qu’une personne s’approche. |
Avant l’utilisation, recherchez les éventuels clôtures en fils de fer, pierres |
|
|
ou autres objets solides présents dans la zone de travail. Ils risqueraient |
|
d’endommager les lames. |
-- |
AVERTISSEMENT : l’utilisation de ce produit peut entraîner la création |
de poussière contenant des produits chimiques susceptibles de provoquer des maladies respiratoires ou autres. Parmi ces produits chimiques figurent les composés présents dans les pesticides, les insecticides, les engrais et les herbicides. Les risques entraînés par l’exposition à ces produits varient suivant la fréquence d’exécution de ce type de travaux. Pour réduire votre exposition à ces produits chimiques : travaillez dans une zone bien ventilée et avec un
équipement de sécurité agréé, tel qu’un masque à poussière spécialement conçu pour filtrer les particules microscopiques.
27
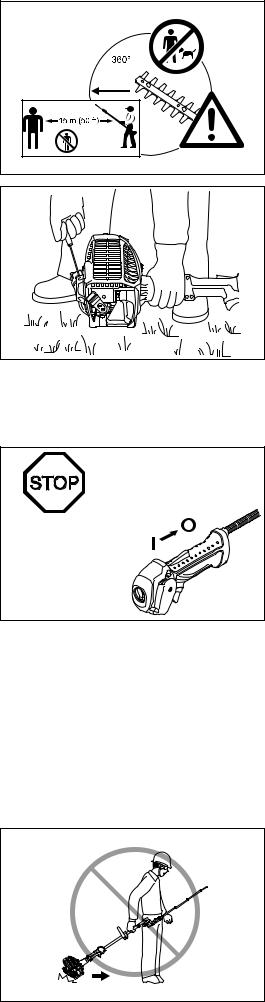
Démarrage du taille-haie sur perche
-- Avant d’assembler ou de régler l’appareil, éteignez le moteur et retirez le protecteur de bougie.
-- Avant de démarrer le taille-haie sur perche, assurez-vous toujours que l’appareil est en état de fonctionner en toute sécurité.
-- N’essayez jamais de démarrer le moteur si le matériel est endommagé.
-- Vérifiez le fonctionnement du mécanisme de sécurité du levier d’accélérateur.
Le levier de verrouillage doit pouvoir être actionné facilement et sans à-coups.
Assurez-vous que le levier de verrouillage fonctionne correctement. Vérifiez que les poignées sont propres et sèches et testez l’interrupteur STOP pour vous assurer qu’il fonctionne correctement.
Démarrez toujours le taille-haie sur perche conformément aux instructions fournies dans ce manuel d’instructions.
Suivez les instructions ci-dessous pour démarrer le taille-haie sur perche
-- Démarrez le taille-haie sur perche uniquement après avoir assemblé complètement l’appareil et fixé tous les accessoires.
-- Lorsque vous démarrez le moteur, maintenez les lames éloignées de votre corps et de tout objet, y compris du sol. Les lames pourraient bouger au démarrage et provoquer des blessures graves, être endommagées et/ou endommager d’autres objets.
-- Avant de démarrer le moteur, assurez-vous que les lames de coupe ne sont pas gênées par des corps étrangers, tels que des pierres, des branches, etc.
-- En cas de problème du moteur, arrêtez-le immédiatement.
-- Au moment de tirer sur le bouton du démarreur, maintenez fermement le matériel contre le sol avec votre main gauche. Ne montez jamais sur l’arbre d’entraînement.
-- Au ralenti, si les lames tournent, coupez le moteur et réduisez la vitesse.
-- Lors du fonctionnement du taille-haie sur perche, tenez toujours fermement les deux poignées. Serrez étroitement votre pouce et votre index autour de chaque poignée. Pour garder constamment le contrôle du taille-haie sur perche, évitez de changer de prise pendant l’utilisation. Assurez-vous que les poignées de commande sont en bon état et dépourvues d’humidité, de boue, d’huile ou de graisse.
Assurez-vous toujours d’avoir une bonne stabilité
-- Coupez toujours immédiatement le moteur et cessez d’utiliser l’appareil en cas de problème du moteur ou si l’appareil commence à émettre des bruits anormaux.
-- Les fumées d’échappement sont toxiques. N’utilisez jamais l’appareil dans une pièce confinée ou sous un tunnel sans ventilation (risque de suffocation et d’intoxication par les gaz). Notez que le monoxyde de carbone est un gaz inodore. Assurez-vous toujours que les lieux dans lesquels l’appareil est utilisé sont correctement ventilés.
-- Coupez le moteur lorsque vous faites une pause ou lorsque vous laissez le taillehaie sur perche sans surveillance. Placez l’appareil en lieu sûr et assurez-vous qu’aucun matériau combustible ne se trouve à proximité.
-- Ne placez jamais un taille-haie sur perche chaud sur de l’herbe sèche ou sur un matériau combustible.
-- Pour réduire les risques d’incendie, dégagez le moteur et le silencieux des débris, des feuilles ou d’un excès de lubrifiant.
-- Ne faites jamais fonctionner le moteur si le silencieux est défectueux. -- Coupez le moteur avant de transporter l’appareil.
-- Éteignez toujours le moteur lorsque vous :
•Pause
•Transport de l’appareil
•Nettoyage de l’appareil
•Ravitaillement de l’appareil
•Maintenance de l’appareil
•Correction d’un problème sur l’appareil
-- Lorsque vous transportez l’appareil, placez-le en position horizontale en tenant l’arbre. Gardez le pot d’échappement chaud éloigné de votre corps.
-- Lors du transport de l’appareil dans un véhicule, fixez toujours solidement le taille-haie sur perche pour éviter toute fuite de carburant résiduel.
-- Videz toujours le réservoir de carburant avant de transporter le taille-haie sur perche dans un véhicule.
-- Lors du déchargement de l’appareil d’un véhicule, veillez tout particulièrement à ne pas laisser tomber le taille-haie sur perche par terre, au risque d’endommager grièvement le réservoir de carburant.
-- Sauf en cas d’urgence, ne laissez jamais tomber le taille-haie sur perche, au risque de l’endommager grièvement.
-- Lors du transport du taille-haie sur perche, soulevez toujours complètement l’appareil afin qu’il ne touche plus le sol. Ne faites jamais glisser le moteur sur le sol, au risque d’endommager le réservoir de carburant, voire de déclencher un incendie.
-- Utilisez toujours le couvercle du dispositif de coupe fourni pour protéger et sécuriser la section de coupe du taille-haie sur perche pendant son transport et son stockage.
-- En cas de chute ou d’impact de l’appareil, vérifiez qu’il est en bon état avant de poursuivre le travail. Vérifiez qu’il n’y a pas de fuite de carburant dans le circuit d’alimentation, et que les commandes et dispositifs de sécurité fonctionnent correctement. En cas de dommage ou de doute, demandez à notre centre d’entretien agréé d’examiner et de réparer l’outil.
-- Pause
-- Transport de l’appareil -- Nettoyage de l’appareil
-- Ravitaillement de l’appareil -- Maintenance de l’appareil
-- Correction d’un problème sur l’appareil
28

Ravitaillement en carburant
-- Avant de procéder au ravitaillement, arrêtez le moteur.
-- Ne procédez jamais au ravitaillement à proximité de flammes nues.
-- Ne fumez pas lors du ravitaillement.
-- Laissez toujours suffisamment de temps au moteur pour refroidir avant de procéder au ravitaillement.
-- Veillez à ce que votre peau n’entre pas en contact avec des produits pétroliers. Ne respirez pas les fumées d’essence et portez toujours des gants de protection lors du ravitaillement.
Changez et nettoyez régulièrement les vêtements de protection.
-- Veillez tout particulièrement à éviter de renverser de l’essence et de l’huile afin d’éviter de contaminer le sol (protection de l’environnement). Si de l’essence ou de l’huile s’est déversée sur le taille-haie sur perche, essuyez immédiatement sa surface avec un chiffon.
Pour éviter toute combustion spontanée, laissez toujours sécher suffisamment les chiffons mouillés avant de les jeter dans un conteneur adapté et fermé.
-- Veillez à ce que le carburant n’entre pas en contact avec vos vêtements.
Changez immédiatement de vêtements s’ils ont été contaminés par du carburant
(risque d’incendie).
-- Fermez le réservoir de carburant et serrez à fond le bouchon du réservoir de carburant. Pour redémarrer le moteur, éloignez le taille-haie sur perche à au moins 3 mètres du lieu de ravitaillement.
-- Vérifiez régulièrement le bouchon du réservoir de carburant pour vous assurer qu’il est bien serré.
-- Ne procédez jamais au ravitaillement dans une pièce fermée. Les vapeurs de carburant s’accumulent au niveau du sol (risque d’explosion).
-- Rangez le carburant dans des conteneurs adaptés uniquement et assurez-vous que le carburant stocké est hors de portée des enfants.
Fonctionnement
-- En cas d’urgence, coupez immédiatement le moteur.
-- En cas de situation anormale (par exemple du bruit, des vibrations) pendant le fonctionnement, éteignez le moteur. N’utilisez pas le taille-haie sur perche avant d’avoir déterminé et corrigé la cause du problème.
-- Lorsque vous relâchez la commande d’accélérateur ou coupez le moteur, les lames tournent encore quelques instants. Ne touchez pas immédiatement aux lames.
-- Ne tentez jamais d’utiliser l’appareil avec une seule main. Une perte de contrôle pourrait entraîner des blessures graves ou mortelles. Pour réduire les risques de coupures, éloignez vos mains et vos pieds des lames.
-- Pendant l’utilisation, gardez votre main droite sous la hauteur de l’épaule. Dans le cas contraire, vous risquez de perdre le contrôle de l’appareil et vous blesser.
-- Pendant l’utilisation, ne heurtez jamais les lames contre des obstacles durs, tels que des pierres et des objets métalliques. Soyez particulièrement vigilant lors de la taille des haies situées à côté ou contre des clôtures en fils de fer. Lorsque vous travaillez près du sol, assurez-vous qu’il n’y a pas de sable, de gravier ou de pierres qui s’introduisent entre les lames.
-- Si les lames entrent en contact avec des pierres ou d’autres objets durs, arrêtez immédiatement le moteur, et vérifiez si les lames sont endommagées, après avoir retiré le protecteur de bougie. Remplacez les lames si elles sont endommagées.
-- Ne touchez jamais les lames et ne vous en approchez pas lorsqu’elles tournent. Vous pourriez aisément vous couper les doigts. Lorsque vous manipulez la lame ou vous en approchez, arrêtez le moteur et retirez le protecteur de bougie.
-- Si de grosses branches restent coincées entre les lames, coupez immédiatement le moteur, posez le taille-haie sur perche, et retirez l’obstacle après avoir retiré le protecteur de bougie. Vérifiez si des lames sont endommagées, avant d’utiliser à nouveau le matériel.
-- Si vous accélérez alors que les lames sont bloquées, vous augmentez la charge et risquez d’endommager le moteur et/ou l’embrayage.
-- Lors de l’utilisation, vérifiez fréquemment que les lames de coupe ne présentent pas de fissures et que leurs bords ne sont pas émoussés. Avant l’examen,
éteignez le moteur et attendez que les lames s’arrêtent complètement.
Remplacer immédiatement les lames endommagées ou émoussées, même si elles ne présentent que des fissures superficielles.
-- Ne touchez pas le carter d’engrenage. Le carter d’engrenage devient chaud lors du fonctionnement.
-- Reposez-vous pour éviter toute perte de contrôle due à la fatigue. Il est recommandé de faire une pause de 10 à 20 minutes toutes les heures.
-- Avant de tailler, tirez complètement le levier d’accélérateur pour atteindre la vitesse maximale.
-- Tenez toujours le taille-haie sur perche avec les deux mains pendant son fonctionnement.
-- Utilisez le taille-haie sur perche uniquement lorsque les conditions d’éclairage et la visibilité sont bonnes. Méfiez-vous des zones glissantes et mouillées (verglas et neige) en hiver (risque de glissade) et gardez toujours une bonne position d’équilibre.
-- N’utilisez jamais le taille-haie sur perche lorsque vous vous tenez sur une surface instable ou sur une pente abrupte.
-- N’utilisez jamais le taille-haie sur perche lorsque vous vous trouvez sur une échelle.
-- Ne grimpez jamais dans un arbre pour utiliser le taille-haie sur perche.
-- Pour éviter de trébucher ou de tomber sur des objets, ne marchez jamais à reculons lors de l’utilisation du taille-haie sur perche.
-- Coupez toujours le moteur avant de nettoyer l’appareil ou de procéder à son entretien. Évitez également de remplacer des pièces avant que le moteur soit à l’arrêt.
-- Ne faites pas fonctionner le taille-haie sur perche si le bloc de coupe est endommagé ou usé.
3 m |
29
Vibrations
-- Les personnes souffrant de troubles circulatoires peuvent subir des blessures au niveau des vaisseaux sanguins ou du système nerveux si elles sont exposées
à des vibrations excessives. Les vibrations peuvent entraîner les symptômes suivants aux doigts, mains ou poignets : engourdissement, picotements, douleur, sensation lancinante, changement de couleur de la peau ou altération de la peau.
Si l’un ou l’autre de ces symptômes apparaît, consultez un médecin !
-- Pour réduire le risque de « maladie des doigts blancs », gardez vos mains au chaud lors de l’utilisation et entretenez bien le matériel et les accessoires.
Instructions d’entretien
-- Faites entretenir votre matériel par notre centre d’entretien agréé, en utilisant toujours des pièces de rechange d’origine. Une mauvaise réparation et un entretien faible peuvent raccourcir la durée de vie du matériel et augmenter le risque d’accident.
-- Efforcez-vous toujours de maintenir la pollution et les émissions sonores les plus basses possibles lors de l’utilisation du taille-haie sur perche. Veillez particulièrement à régler correctement le carburateur.
-- Nettoyez régulièrement le taille-haie sur perche et vérifiez périodiquement que tous les écrous et boulons sont bien serrés.
-- Ne procédez jamais à l’entretien du taille-haie sur perche et ne le rangez pas à proximité de flammes nues, d’étincelles, etc.
-- N’essayez jamais de réparer les lames déformées ou cassées en les redressant ou en les soudant. Cela pourrait entraîner le décrochage des lames et provoquer des blessures graves. Contactez un centre d’entretien agréé MAKITA pour les faire remplacer par des lames MAKITA d’origine.
-- Pour éviter tout autre dommage et/ou blessure corporelle, ne réparez pas un taille-haie sur perche qui fonctionne mal si vous n’êtes pas qualifié pour le faire.
Pour les réparations, contactez toujours votre revendeur ou un agent d’entretien agréé.
N’essayez pas de modifier ou de transformer le taille-haie sur perche, au risque d’affecter la sécurité pendant son fonctionnement.
Les tâches de maintenance qui peuvent être effectuées par l’utilisateur sont limitées aux activités décrites dans ce manuel d’instructions. Toutes les autres procédures doivent être exécutées par un agent d’entretien agréé.
Faites examiner et entretenir régulièrement le taille-haie sur perche par un centre d’entretien agréé MAKITA.
Utilisez uniquement des pièces de rechange et des accessoires d’origine fournis par des centres d’entretien agréés MAKITA.
L’utilisation d’accessoires et d’outils non agréés peut accroître les risques d’accident et de blessure. MAKITA n’assume aucune responsabilité en cas d’accident ou de dommage résultant de l’utilisation d’accessoires et de pièces non agréés.
Entreposage
-- Avant d’entreposer l’appareil, procédez à son nettoyage et son entretien complets. Installez le protège-lame.
-- Videz le réservoir de carburant avant d’entreposer le taille-haie sur perche et rangez toujours ce dernier dans une pièce verrouillée bien ventilée. Assurez-vous que le taille-haie sur perche est constamment hors de portée des enfants.
-- N’appuyez pas l’appareil contre un support, tel qu’un mur. Le taille-haie sur perche pourrait tomber subitement et provoquer des blessures.
Premiers secours
Par précaution dans l’éventualité d’un accident, veillez à toujours disposer d’un kit de premiers secours parfaitement approvisionné.
Remplacez dès que possible tous les articles pris dans le kit de premiers secours.
En cas d’urgence, lorsque vous demandez de l’aide, indiquez les informations suivantes :
•Lieu de l’accident
•Ce qui s’est passé
•Nombre de personnes blessées
•Étendue des blessures
•Votre nom
30
 Loading...