

Page 1

POD
ULTIMATE TONE FOR GUITAR
XT
POD
ULTIMATE TONE FOR GUITAR
XT
POD
ULTIMATE TONE FOR GUITAR+DIG I/O
PRO
XT
POD
ULTIMATE TONE FOR GUITAR+DIG I/O
PRO
XT
Pilot’s Handbook
An in-depth exploration of the revolutionary technologies and pulsing tonal pleasures that lurk
use free line 6 Monkey to Make sure your Podxt is uP to
Electrophonic Limited Edition. Also available at www.line6.com. Revision H.
within PODxt and PODxt Pro.
includes details on Version 3 features.
date: www.line6.coM/Monkey
Page 2
PODXT MODELS
PODXT, PODXT Live and PODXT Pro all include the
Standard and Power Pack Models plus all guitar Cab Models.
See www.line6.com/modelpack to learn about adding other
Model Pack Models.
STOMPS
Standard Power Pack FX Junkie
FACIAL FUZZ
FUZZ PI
SCREAMER
CLASSIC DIST
OCTAVE FUZZ
BLUE COMP
RED COMP
VETTA COMP
AUTO SWELL
AUTO WAH
KILLER Z
TUBE DRIVE
VETTA JUICE
BOOST + EQ
BLUE COMP TREB
DINGO-TRON
CLEAN SWEEP
SEISMIK SYNTH
DOUBLE BASS
BUZZ WAVE
REZ SYNTH
SATURN 5 RING M
SYNTH ANALOG
SYNTH FX
SYNTH HARMONY
SYNTH LEAD
SYNTH STRING
BASS OVERDRIVE
BRONZE MASTER
SUB OCTAVES
BENDER
REVERBS
Standard Power Pack FX Junkie
LUX SPRING
STD SPRING
KING SPRING
SMALL ROOM
TILED ROOM
BRITE ROOM
DARK HALL
MEDIUM HALL
LARGE HALL
RICH CHAMBER
CHAMBER
CAVERNOUS
SLAP PLATE
VINTAGE PLATE
LARGE PLATE
MODS
Standard Power Pack FX Junkie
SINE CHORUS
ANALOG CHORUS
LINE 6 FLANGER
JET FLANGER
PHASER
U-VIBE
OPTO TREM
BIAS TREM
ROTARY DRUM
+HORN
ROTARY DRUM
AUTO PAN
ANALOG SQUARE
SQUARE CHORUS
EXPO CHORUS
RANDOM CHORUS
SQUARE FLANGE
EXPO FLANGE
LUMPY PHASE
HI-TALK
SWEEPER
POD PURPLE X
RANDOM S/H
TAPE EATER
WARBLE-MATIC
DELAY
Standard Power Pack FX Junkie
ANALOG DELAY
ANALOG W/ MOD
TUBE ECHO
MUTLI-HEAD
SWEEP ECHO
DIGITAL DELAY
STEREO DELAY
PING PONG
REVERSE
ECHO PLATTER
TAPE ECHO
LOW REZ
PHAZE EKO
BUBBLE ECHO
DELAYS
Standard Power Pack FX Junkie
ANALOG DELAY
ANALOG W/ MOD
TUBE ECHO
MUTLI-HEAD
SWEEP ECHO
DIGITAL DELAY
STEREO DELAY
PING PONG
REVERSE
ECHO PLATTER
TAPE ECHO
LOW REZ
PHAZE EKO
BUBBLE ECHO
WAHS
Standard Power Pack FX Junkie
VETTA WAH
JEN FASSEL
WEEPER
CHROME
CHROME CUSTOM
THROATY
CONDUCTOR
COLORFUL
STANDARD & POWER PACK AMP MODELS
# Standard Power Pack
0 BYPASS
1 TUBE PREAMP
2 LINE 6 CLEAN
3 LINE 6 JTS-45
4 LINE 6 CLASS A
5 LINE 6 MOOD
6 SPINAL PUPPET
7 LINE 6 CHEM X
8 LINE 6 INSANE
9 LINE 6 ACO 2
10 ZEN MASTER
11 SMALL TWEED
12 TWEED B-MAN
13 TINY TWEED
14 BLACKFACE LUX
15 DOUBLE VERB
16 TWO-T0NE
17 HIWAY 100
18 PLEXI 45
PP
19 PLEXI LEAD 100
20 PLEXI JUMP LEAD
21 PLEXI VARIAC
22 BRIT J-800
23 BRIT JM PRE
24 MATCH CHIEF
25 MATCH D-30
26 TREADPLATE DUAL
27 CALI CRUNCH
28 JAZZ CLEAN
29 SOLO 100
30 SUPER O
31 CLASS A-15
32 CLASS A-30 TB
33 L6 AGRO
33 L6 LUNATIC
34 L6 TREADPLATE
36 VARIAX ACOUSTIC
101 CITRUS D-30
102 CLASS A-30 FAWN
103 BRIT GAIN 18
104 J-2000 #2
105 LINE 6 BOUTIQUE
106 LINE 6 MODERN GAIN #1
METAL SHOP AMPS
# Amp Model
37 BOMBER UBER
38 CONOR 50
39 DEITY LEAD
40 DEITY’S SON
41 ANGEL P-BALL
42 BRIT SLIVER
43 BRIT J-900 CLN
44 BRIT J-900 DST
45 BRIT J-2000
46 DIAMOND PLATE
47 CRIMINAL
48 L6 BIG BOTTOM
49 L6 CHUNK CHUNK
50 L6 FUZZ
51 L6 OCTONE
52 L6 SMASH
53 L6 SPARKLE CLN
54 L6 THROTTLE
COLLECTOR CLASSICS AMPS
# Amp Model
55 BOMBER X-TC
56 DEITY CRUNCH
57 BLACKFACE VIBRO
58 DOUBLE SHOW
59 SILVERFACE BASS
60 MINI DOUBLE
61 GIBTONE EXPO
62 BRIT BASS
63 BRIT MAJOR
64 SILVER TWELVE
65 SUPRO ‘62 THUDERBOLT
66 L6 BAYOU
67 L6 CRUNCH
68 L6 PURGE
69 L6 SPARKLE
70 L6 SUPER CLN
71 L6 SUPERSPARK
72 L6 TWANG
CAB MODELS
# Cab Model
0 NO CAB
1 1X6 SUPER O
2 1X8 TWEED
3 1X10 GIBTONE
4 1X10 G-BRAND
5 1X12 LINE 6
6 1X12 TWEED
7 1X12 BLACKFACE
8 1X12 CLASS A
9 2X2 MINI T
10 2X12 LINE 6
11 2X12 BLACKFACE
12 2X12 MATCH
13 2X12 JAZZ
14 2X12 CLASS A
15 4X10 LINE 6
16 4X10 TWEED
17 4X12 LINE 6
18 4X12 GREEN 20’S
19 4X12 GREEN 25’S
20 4X12 BRIT T75
21 4X12 BRIT V30’S
22 4X12 TREADPLATE
23 1X15 THUNDER
24 2X12 WISHBOOK
GUITAR AMPS & CABS
BASS EXPANSION AMPS
# Amp Model
73 TUBE PREAMP
74 L6 CLASSIC JAZZ
75 L6 BRIT INVADER
76 L6 SUPER THOR
77 L6 FRANKENSTEIN
78 L6 EBONY LUX
79 L6 DOPPELGANGER
80 SUB DUB
81 AMP 360
82 JAGUER
83 ALCEMIST
84 ROCK CLASSIC
85 FLIP TOP
86 ADAM AND EVE
87 TWEED B-MAN
88 SILVERFACE BASS
89 DOUBLE SHOW
90 EIGHTIES
91 HIWAY 100
92 HIWAY 200
93 BRIT MAJOR
94 BRIT BASS
95 CALIFORNIA
96 JAZZ TONE
97 STADIUM
98 STUDIO TONE
99 MOTOR CITY
100 BRIT CLASS A100
BASS EXPANSION CABS
# Cab Model
25 1X12 BOUTIQUE
26 1X12 MOTOR CITY
27 1X15 FLIP TOP
28 1X15 JAZZ TONE
29 1X18 SESSION
30 1X18 AMP 360
31 1X18 CALIFORNIA
32 1X18+12 STADIUM
33 2X10 MODERN UK
34 2X15 DOUBLESHOW
35 2X15 CALIFORNIA
36 2X15 CLASS A
37 4X10 LINE 6
38 4X10 TWEED
39 4X10 ADAM EVE
40 4X10 SILVERCONE
41 4X10 SESSION
42 4X12 HIWAY
43 4X12 GREEN 20’S
44 2X12 GREEN 25’S
45 4X15 BIG BOY
46 8X10 CLASSIC
EFFECTS
BASS AMPS & CABS
Page 3
17
3
21
22
7
1416
27
28
31 32 33 34 35 36
6
29 30
1
4
10
11
12
2
15
1318
20
25
26
MOD
8
24
2319
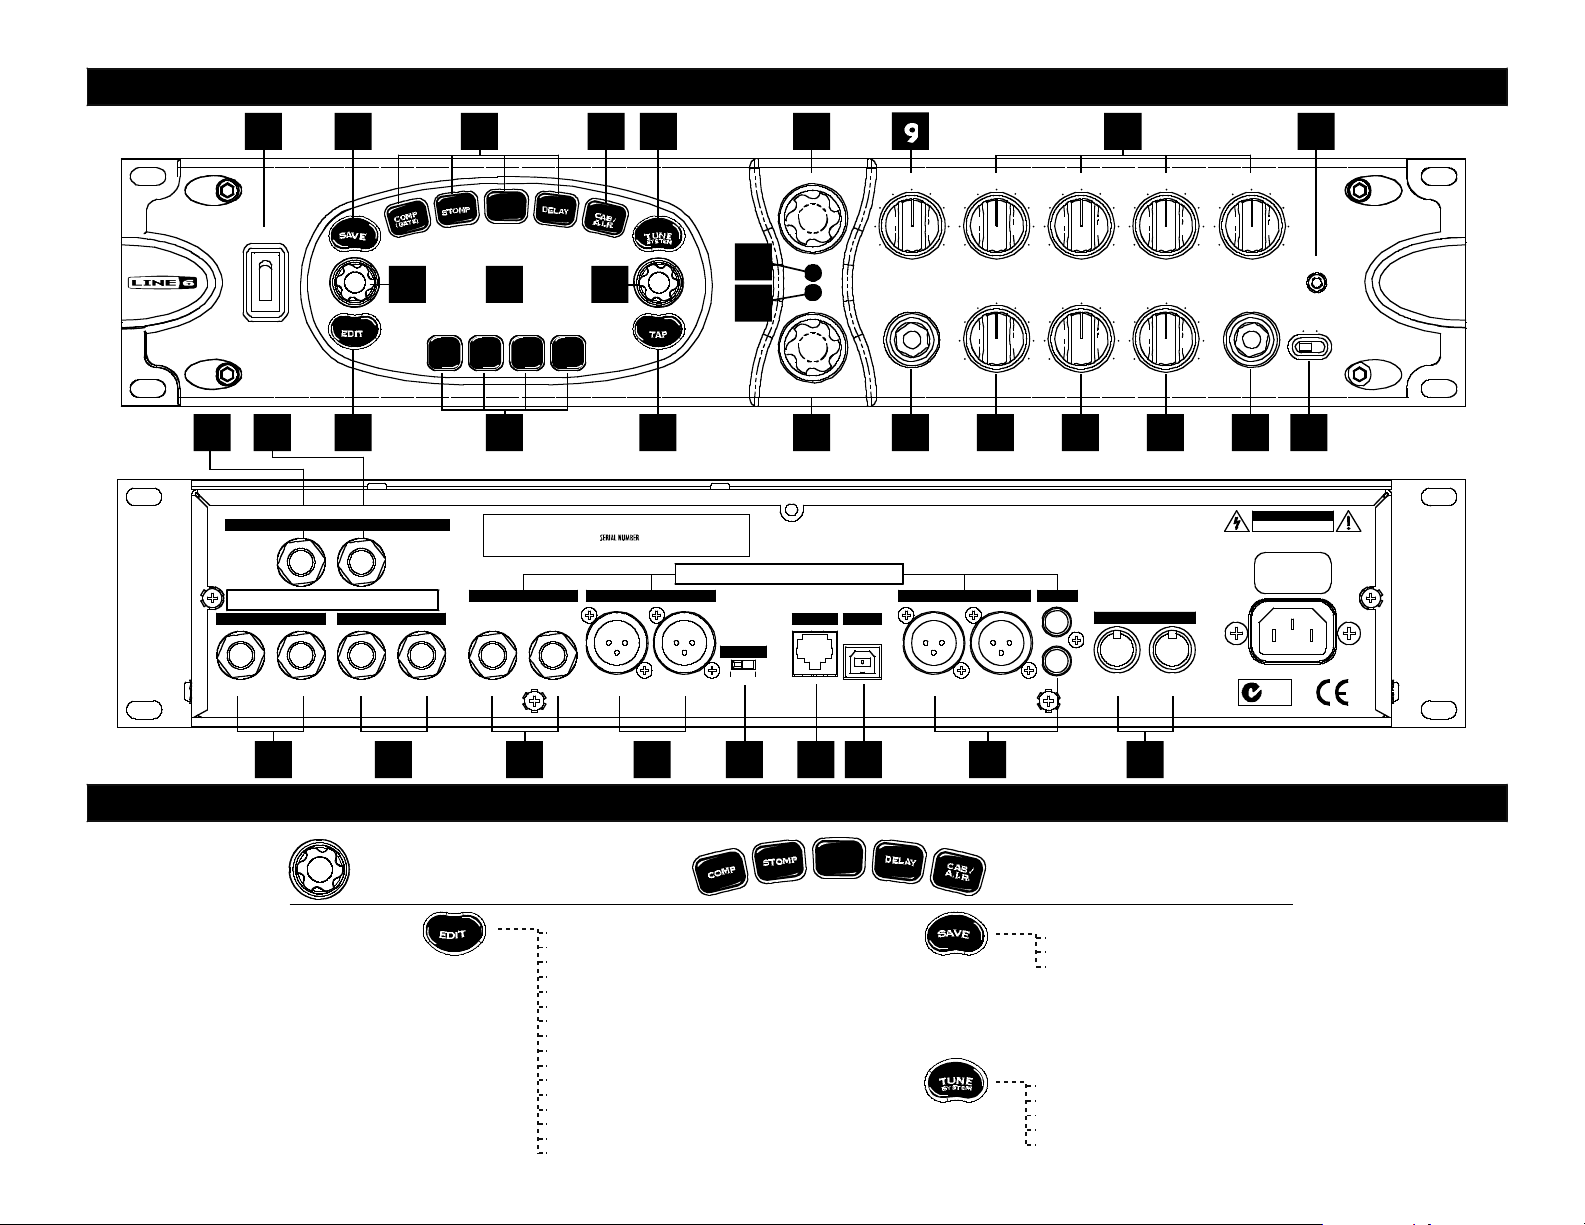
PODXT PRO CONTROLS REFERENCE
NAVIGATION REFERENCE
SELECT
• When EDIT, SAVE or TUNER is lit, “SELECT” selects pages
• Otherwise, “SELECT” chooses Channel Memories
MOD
• For Comp, Stomp, Mod, and Delay, the effect is on when lit.
• CAB/A.I.R. is lit when you are using a cab simulation.
• Double press an effect button to go straight to its EDIT page.
EDIT PAGES SAVE PAGES
TUNER PAGES
OUT/THRUIN
FBV Class Foot Controller only
(not compatible with Floor Board or FB4)
GROUND LIFT
L/MONO R/MONO LEFT RIGHT OUTIN
IN
OUT
GROUND
ANALOG REAMPING INPUT/OUTPUT
LEFT/
MONO
RIGHT LEFT/
MONO
RIGHT
BALANCED ANALOG OUT AES/EBU S/PDIF
MIDI
Line Level
Input
Unprocessed
Guitar Out
100 - 120V
~
50 - 60Hz
100 W Max.
POWER REQUIREMENTS
USBPEDAL
UNBAL ANALOG OUT
N222
CAU TION
RISK OF ELECTRIC SHOCK
DO NOT OPEN
EFFECTS RETURNEFFECTS SEND
Unbalanced
Balanced: Tip = + / Ring = -
SET MODES & LEVELS VIA
I/O & DIG SELECT
BUTTON
SERIES/PARALLEL VIA
I/O & DIG SELECT
BUTTON
STUDIO:
RECORDING OUTPUT
LIVE:
FEED T O ONSTAGE AM P
STUDIO:
+4 dBu
LIVE:
-10 dBV
0 10 0 10 0 10
0 100 100 10
CLIP
SIGNAL
MIDDLE TREBLEBASSDRIVE PRESENCE
CHAN VOLREVERB OUTPUT
AMP MODELS
EFFECTS
Guitar inPHONES
0 10
I/O & DIG
SELECT
INPUT LEVEL
NORMAL PAD
PODPRO
XT
ULTIMATE TONE FOR GUITAR + DIG I/O
POWER
0 10
WARNING/AVIS:
SHOCK HAZARD – DO NOT OPEN. RISQUE DE CHOC ÉLECTRIQUE – NE PAS
OUVRIR. TO R EDUCE TH E RISK OF FIRE OR ELECTR IC SHOCK DO NOT
EXPOSE THIS EQUIPMENT TO RAIN OR MOISTURE. TO RED UCE THE RISK
OF ELECTRIC SHOCK DO NOT REMOVE COVER. NO USER SERVICEABLE
PARTS INSIDE. REFER SERVICING TO QUALIFIED SERVICE PERSONNEL.
THIS DEVICE COMPLIES WITH PART 15 OF THE FCC RULES.
OPERATI ON IS SUBJECT TO THE FOLL OWING TWO
CONDITIONS: (1) THIS DEVICE MAY NOT CAUSE HARMFUL
INTERFERENCE, AND (2) THIS DEVICE MUST ACCEPT ANY
INTERFERENCE RECEIVED, INCLUDING INTERFERENCE THAT
MAY CAUSE UNDESIRED OPERATION.
• Save Sound to Channel Memory
• Custom Save Amp Model
• MIDI Dump
• Tuner
• What are you connecting to?
• Display c ontrast
• MIDI/Variax
• PODXT Live Software Version
• Amp Settings
• Amp Bypass Settings
• A.I.R. Settings
• Compressor and Gate Settings
• EQ Settings
• Stomp Select and Settings
• Stomp Settings (page 2 for some models)
• Modulation Select and Settings
• Modulation Settings (page 2)
• Delay Select and Settings
• Delay Settings (page 2)
• Reverb Select and Settings
• Reverb Settings (page 2)
• Wah Settings
• Volume Settings
• Switch Pedal, Effect Tweak and Tempo Settings
Page 4
1
2
7
17
6
MIDDLE
0 10
TREBLE
0 10
BASS
0 10
DRIVE
0 10
PRESENCE
0 10
CHAN VOL
0 10
REVERB
0 10
POD
ULTIMATE TONE FOR GUITA R
XT
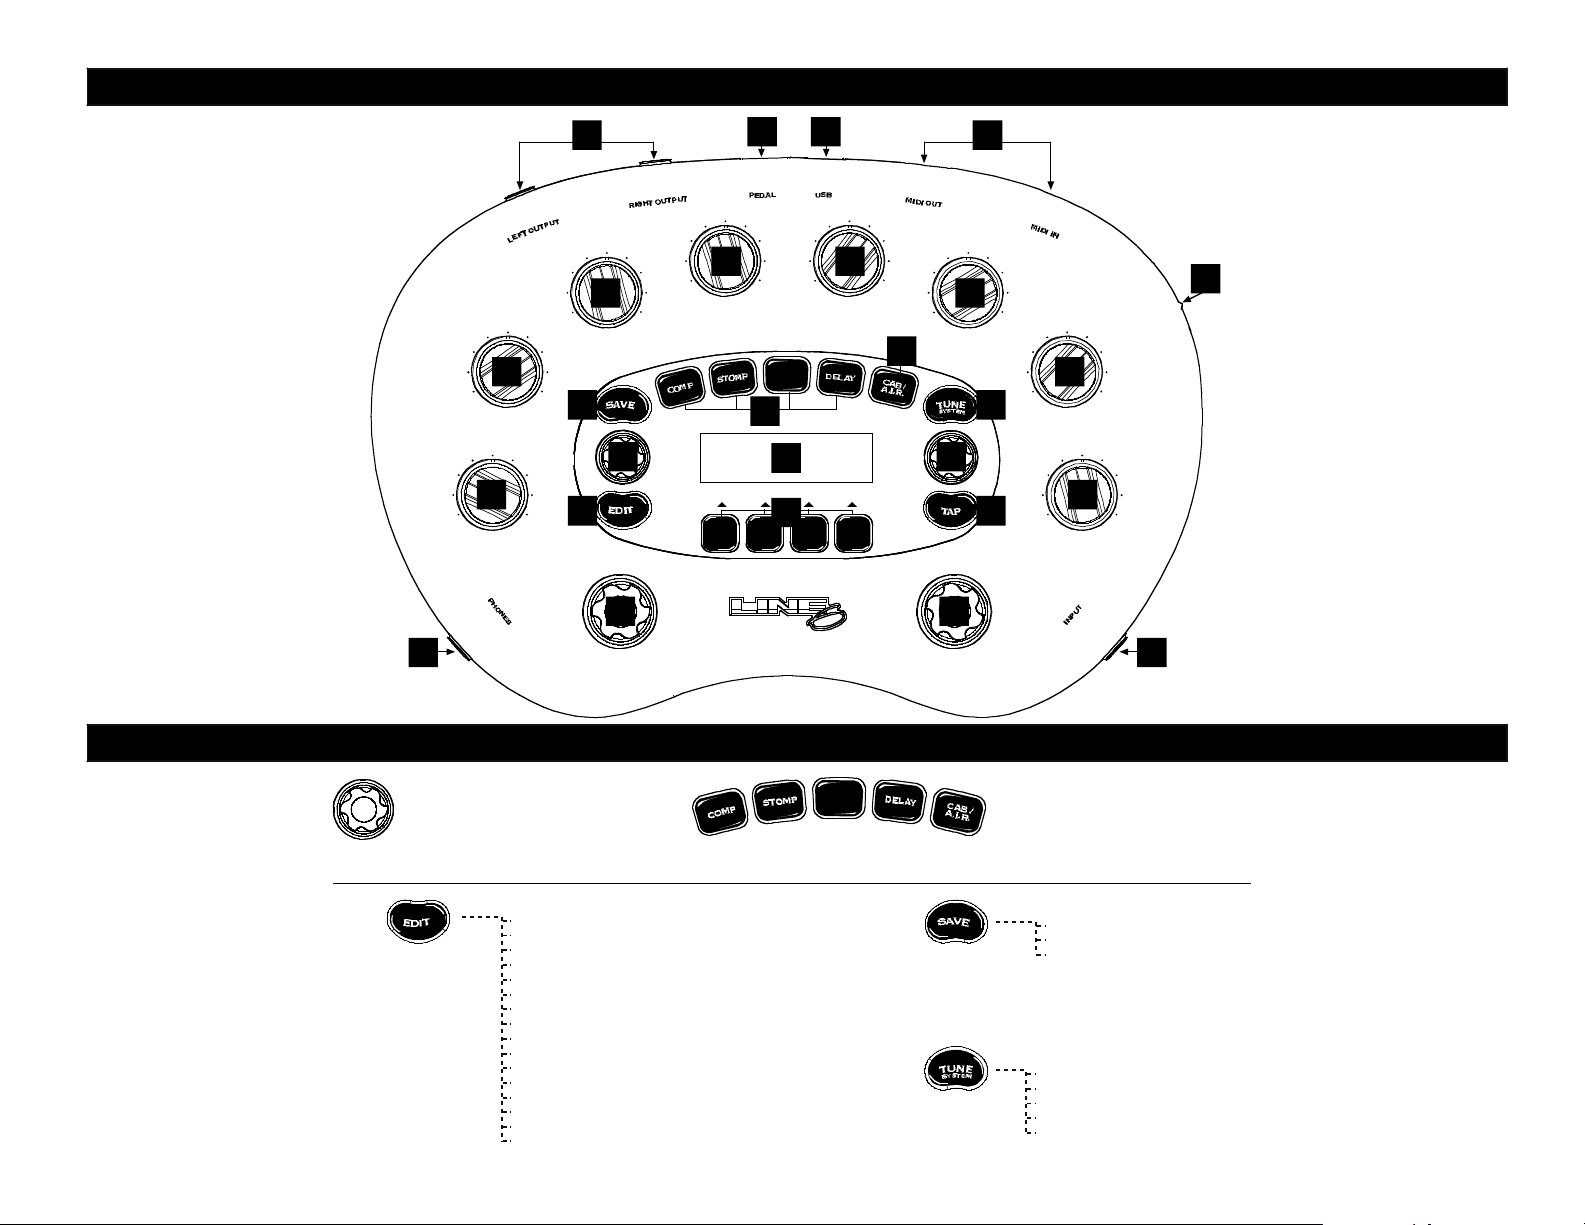
PODXT CONTROLS REFERENCE
OUTPUT
EFFECTSAMP MODELS
0 10
EFFECT
TWEAK
SELECT
4
9
10
10 10
10
11
12
15 13
1416
18
22
21 23
24
20
85
3
19
MOD
NAVIGATION REFERENCE
SELECT
• When EDIT, SAVE or TUNER is lit, “SELECT”
selects pages
• Otherwise, “SELECT” chooses Channel
Memories
MOD
• For Comp, Stomp, Mod, and Delay, the effect is on
when lit.
• CAB/A.I.R. is lit when you are using a cab simulation.
• Double press an effect button to go straight to its
EDIT page.
EDIT PAGES SAVE PAGES
TUNER PAGES
• Save Sound to Channel Memory
• Custom Save Amp Model
• MIDI Dump
• Tuner
• What are you connecting to?
• Display c ontrast
• MIDI/Variax
• PODXT Live Software Version
• Amp Settings
• Amp Bypass Settings
• A.I.R. Settings
• Compressor and Gate Settings
• EQ Settings
• Stomp Select and Settings
• Stomp Settings (page 2 for some models)
• Modulation Select and Settings
• Modulation Settings (page 2)
• Delay Select and Settings
• Delay Settings (page 2)
• Reverb Select and Settings
• Reverb Settings (page 2)
• Wah Settings
• Volume Settings
• Switch Pedal, Effect Tweak and Tempo Settings
Page 5
4
1
10
7
8
9
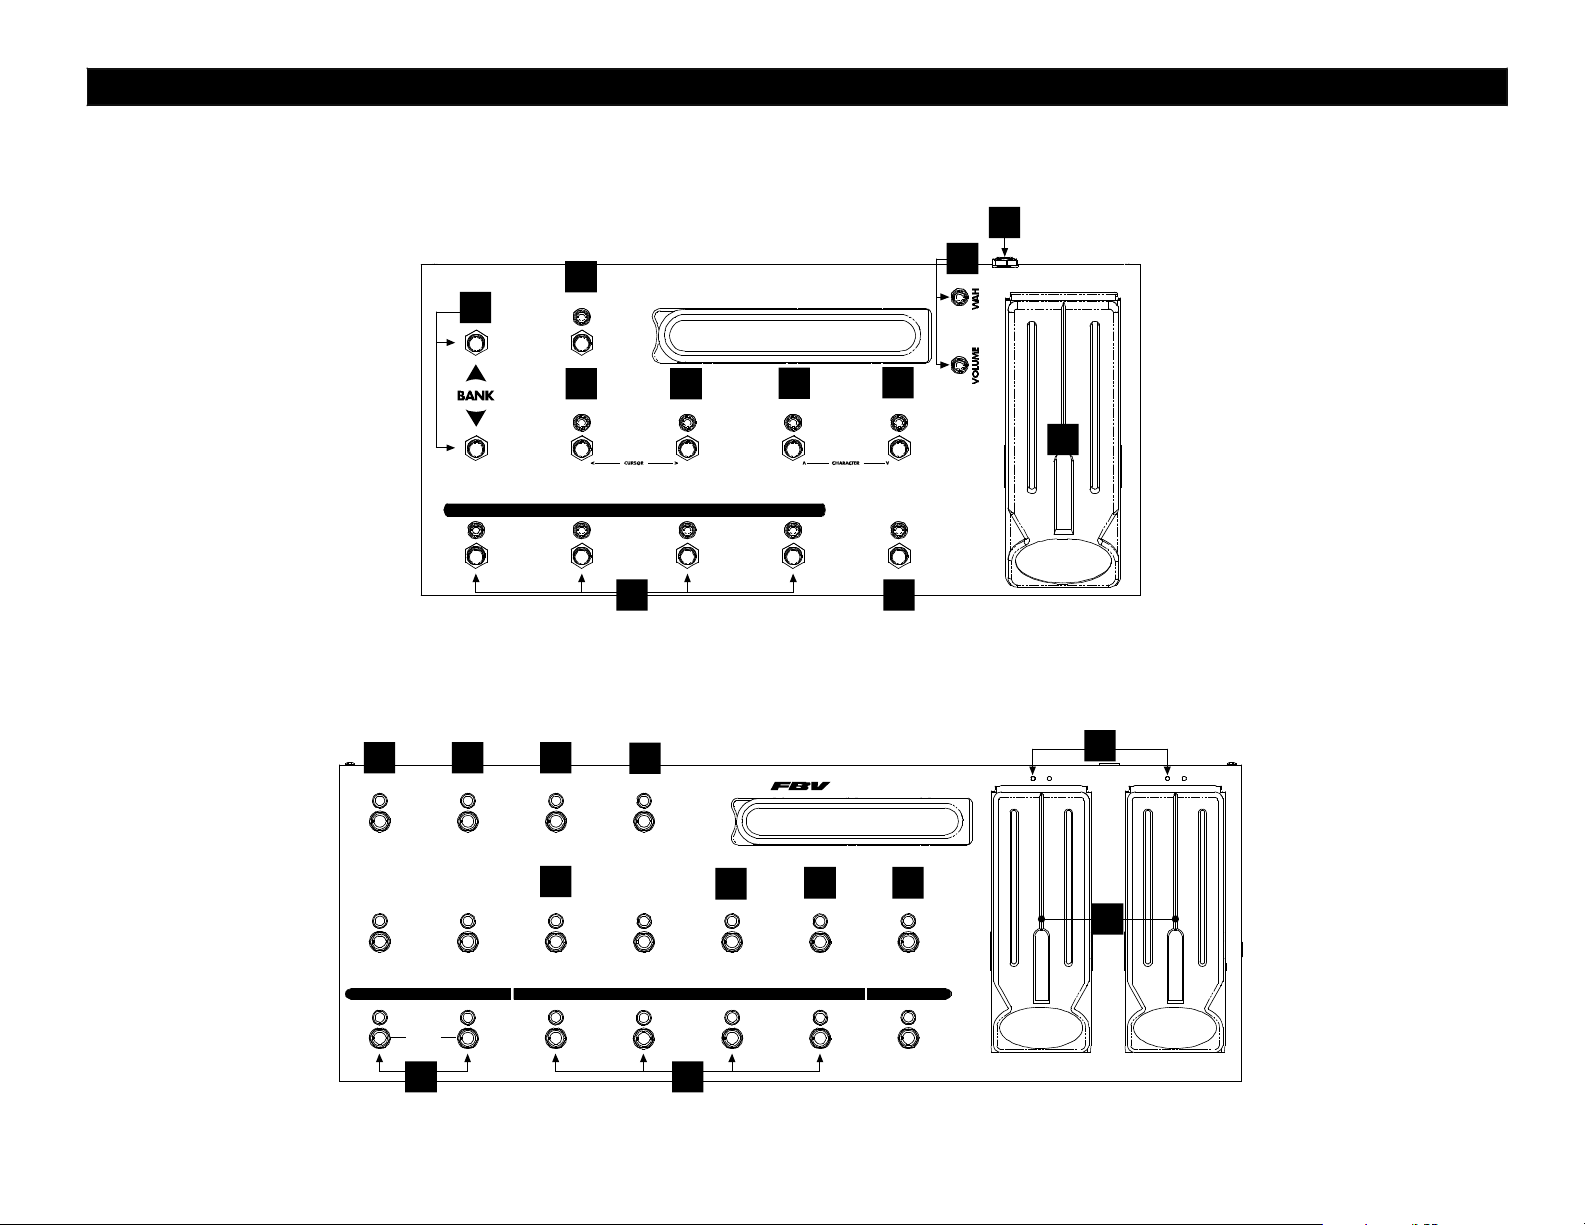
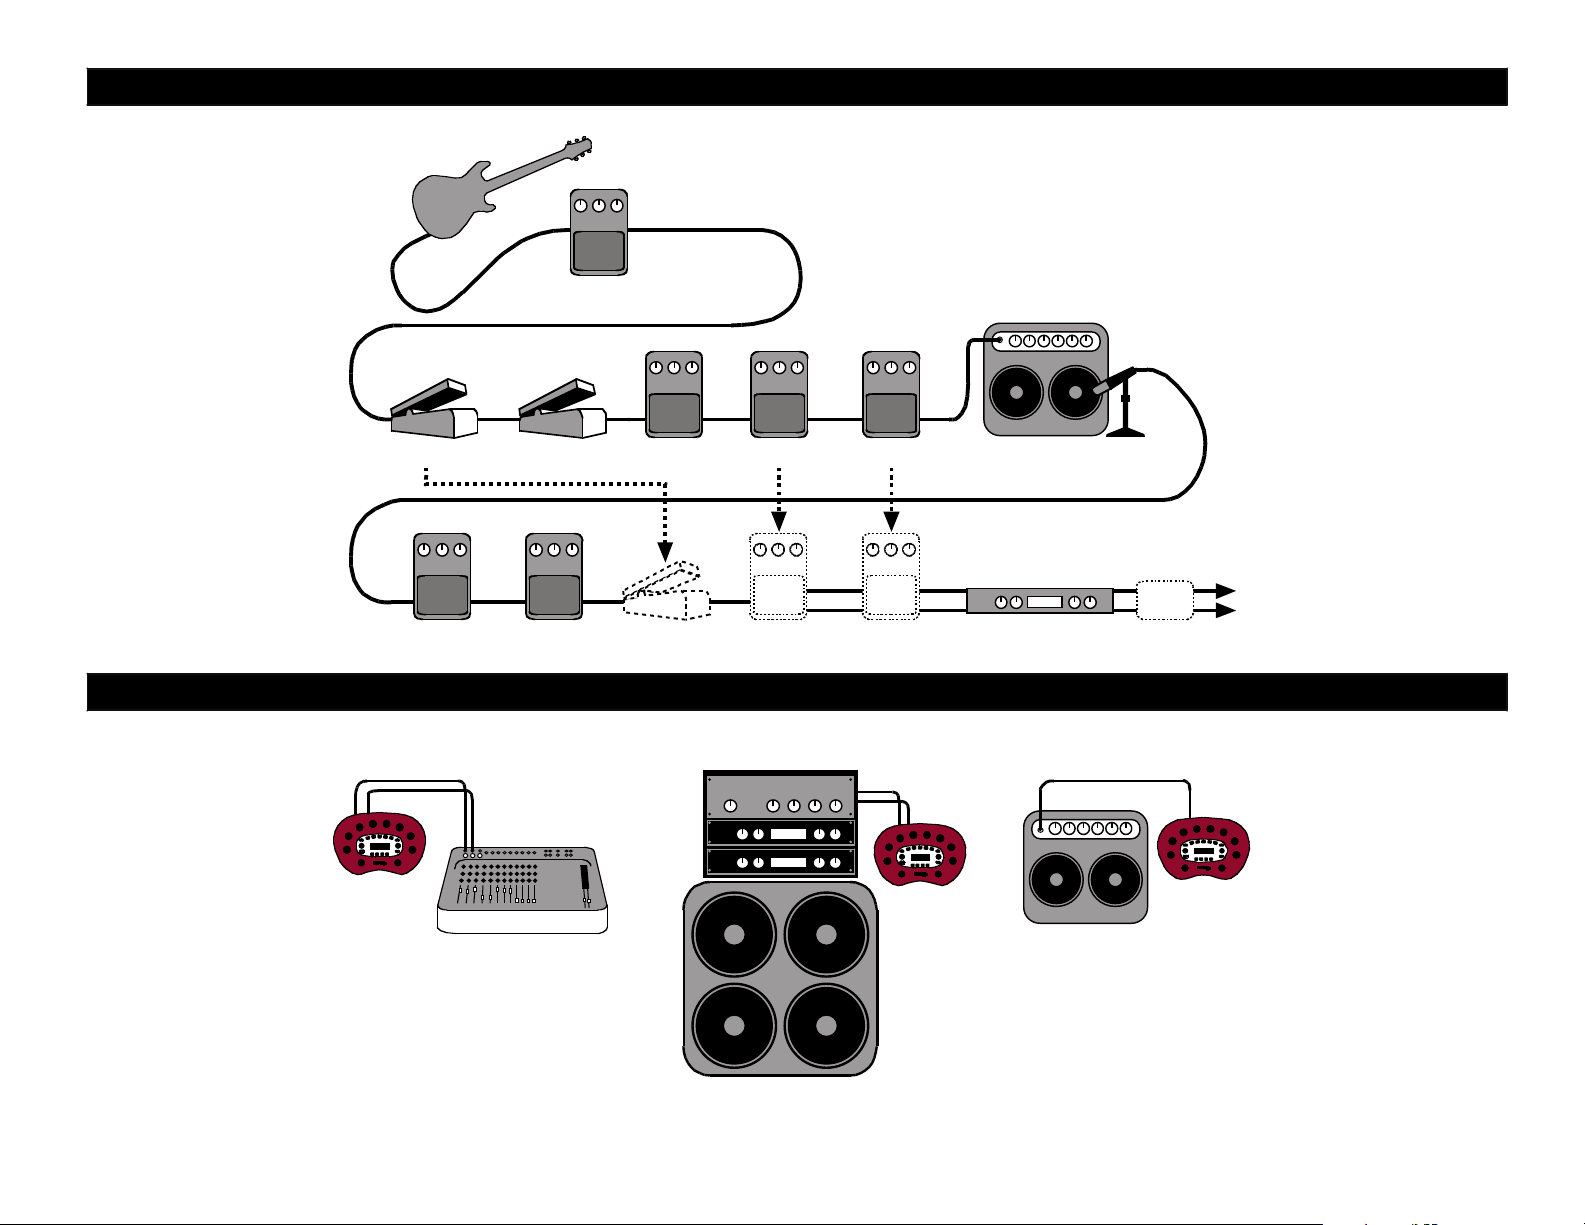
FX LOOP STOMP BOX 1 STOMP BOX 2 STOMP BOX 3
WAH PEDAL 1 PEDAL 2VOLUME
DELAYMODULATIONTREMOLOREVERB TAP TEMPOAMP 2AMP 1
HOLD FOR TUNER
CUSTOM FOOT CONTROLLE R
FACTORY/USER
CHANNEL A CHANNEL B CHANNEL C CHANNEL D FAVORITE CHANNELBANK DOWN BANK UP
STOMP MODULATION REVERB
FX LOOP
HOLD FOR TUNER
TAP
CHANNEL BCHANNEL A CHANNEL DCHANNEL C
FBV SHORTBOARD
DELAY
1
4
7
8
9
3
2
3
4
2
5
6
11
12
10
11
13
12
FBV SERIES REFERENCE
Page 6
AMP/CAB + A.I.R. II
REVERB LOOP
(PODXT Pro only)
MODULATION
COMP
THE "WHAT ARE YOU CONNECTED TO?" EDIT PAGE
(
see text pages for PODXT
Pro details
)
Use your A.I.R. settings to get the right mic sound
you’re looking for! Choose from:
MIC 1.........................................................57 ON AXIS
MIC 2 .......................................................57 OFF AXIS
MIC 3 .....................................................421 DYNAMIC
MIC 4 ...................................................67 CONDENSER
LIVE : 4x12 LIVE : 2x12STUDIO : DIRECT
All product names are trademarks of their respective owners, which are in no way associated or affiliated with Line 6. These product names and descriptions are provided for the sole purpose of identifying
the specific products that were studied during Line 6’s sound model development.
LEFT OUTPUT
Be sure to use TRS cables when
you want to get +4dBu levels to
the balanced inputs of a recorder,
mixer or power amp.
EQ
GATE
VOLUME
MODULATION DELAY
WAH STOMP
DELAY
VOLUME
Use the
VIBE
parameter to adjust the sound for your particular
Live setup. Experiment with all the options, since different
amp/cab combinations can give very different results, and you
may get the best sound with an unusual combination of settings.
SIGNAL FLOW & EFFECTS ROUTING OPTIONS
Page 7
The serial number can be found on the underside of your PODxt, or back panel of your
PODxt Pro. It’s the number that begins with “(21)”. Please note it here for future reference:
SERIAL NO:
WARNING: To reduce the risk of fire or electric
shock, do not expose this appliance to rain or moisture.
CAUTION: To reduce the risk of fire or electric shock, do not
remove screws. No user-serviceable parts inside. Refer servicing to
qualified service personnel.
CAUTION: This equipment has been tested and found to comply with the limits for a Class B digital device pursuant to Part
15 of FCC Rules. Operation is subject to the following two conditions: (1) This device may not cause harmful interference, and
(2) this device must accept any interference received, including interference that may cause undesired operation.
The lightning symbol within a triangle means
“electrical caution!” It indicates the presence
of information about operating voltage and
potential risks of electrical shock.
You should read these Important Safety Instructions
Keep these instructions in a safe place
Before using your PODxt, carefully read the applicable items of these operating instructions and safety suggestions:
1. Obey all warnings on the PODxt and in this Pilot’s Handbook.
2. Do not place near heat sources, such as radiators, heat registers, or appliances which produce heat.
3. Guard against objects or liquids entering the enclosure.
4a. PODxt: Connect only to AC power outlets rated 100-120V or 230V 47-63Hz (depending on the voltage
range of the included power supply).
4b. PODxt Pro: Connect only to AC power outlets rated 100-120V or 220-240V 47-63Hz (depending on the voltage
range of the unit).
5. Do not step on power cords. Do not place items on top of power cords so that they are pinched or leaned
on. Pay particular attention to the cord at the plug end and the point where it connects to the PODxt.
6. Unplug your PODxt when not in use for extended periods of time.
7. Do not perform service operations beyond those described in the PODxt Pilot’s Handbook. In the following
circumstances, repairs should be performed only by qualified service personnel:
• liquid is spilled into the unit
• an object falls into the unit
• the unit does not operate normally or changes in performance in a significant way
• the unit is dropped or the enclosure is damaged
8. Prolonged listening at high volume levels may cause irreparable hearing loss and/or damage. Always be sure to
practice “safe listening.”
The exclamation point within a
triangle means “caution!” Please
read the information next to all
caution signs.
PODxt Pilot’s Handbook © 2006, Line 6, Inc.
Page 8

Please Note:
Line 6, POD, Podxt, Podxt Pro, Vetta, FBV, FBV Shortboard, FBV4, Amp Farm, Line 6 Edit and Custom Tone
are trademarks of Line 6, Inc. All other product names,
trademarks, and artists’ names are the property of
their respective owners, which are in no way associated or affiliated with Line 6. Product names, images,
and artists’ names are used solely to identify the products whose tones and sounds were studied during Line
6’s sound model development for this product. The
use of these products, trademarks, images, and artists’
names does not imply any cooperation or endorsement.
Page 9

contents
Quick Start Guide 1•1
Register now! . . . . . . . . . . . . . . . . . . 1•2
Go on-line and get more stuff! . . . . . . . . . . . . 1•2
Introduction . . . . . . . . . . . . . . . . . . . 1•3
Welcome To PODxt... . . . . . . . . . . . . . . . 1•3
Who is Line 6? . . . . . . . . . . . . . . . . . 1•3
Modeling. . . . . . . . . . . . . . . . . . . . 1•4
Amp, Cab and Effect Models . . . . . . . . . . . . 1•4
There’s Magic in the A.I.R.. . . . . . . . . . . . . . 1•5
And Away We Go.... . . . . . . . . . . . . . . . . 1•7
Controls & Connections 2•1
PODxt Pro . . . . . . . . . . . . . . . . . . . 2•10
Getting Set Up 3•1
All Purpose Basics . . . . . . . . . . . . . . . . . 3•1
What are you connecting to? . . . . . . . . . . . . 3•2
The Ins and Outs of Great Tone . . . . . . . . . . . 3•2
Setting Levels . . . . . . . . . . . . . . . . . . 3•3
Radiation Alert . . . . . . . . . . . . . . . . . 3•3
Pedal Power . . . . . . . . . . . . . . . . . . 3•4
MIDI Mania . . . . . . . . . . . . . . . . . . 3•4
Re-Amping . . . . . . . . . . . . . . . . . . . 3•4
What is Re-Amping? . . . . . . . . . . . . . . . 3•4
I
Page 10

PODxt — Playing Live . . . . . . . . . . . . . . . 3•9
Mount Up . . . . . . . . . . . . . . . . . . . 3•9
Keeping Your Options Open . . . . . . . . . . . . . 3•9
What are you connecting to? . . . . . . . . . . . . 3•9
Getting The Right Tone With An Amp. . . . . . . . . . 3•11
External Stomp Boxes and PODxt.. . . . . . . . . . . . . . . . . . . 3•12
PODxt Pro — Configurations & Connections . . . . . . . 3•13
Selecting An Input . . . . . . . . . . . . . . . . 3•13
Input & Digital Out Options . . . . . . . . . . . . . 3•14
FORMAT: Sample rate, word length (bit depth), and clock source 3•14
MODE: Normal or Dry Guitar . . . . . . . . . . . . 3•15
GAIN: Extra gain on the digital outs . . . . . . . . . . 3•15
What are you connecting to? . . . . . . . . . . . . 3•16
FX Loop . . . . . . . . . . . . . . . . . . . . 3•17
AES/EBU or S/PDIF Data Format? . . . . . . . . . . 3•18
Radiation Alert . . . . . . . . . . . . . . . . . 3•18
Pedal Power . . . . . . . . . . . . . . . . . . 3•19
MIDI Mania . . . . . . . . . . . . . . . . . . 3•19
Re-Amping with PODxt Pro . . . . . . . . . . . . . 3•19
Analog Re-amping . . . . . . . . . . . . . . . . 3•19
Digital Re-amping . . . . . . . . . . . . . . . . 3•21
Creating & Storing Sounds 4•1
Recalling Channel Memories . . . . . . . . . . . . . 4•1
Recalling Effect Setups . . . . . . . . . . . . . . . 4•1
Editing Basics . . . . . . . . . . . . . . . . . . 4•1
Double Press for Easy Access . . . . . . . . . . . . 4•2
II
Page 11

Inside the Edit Menu . . . . . . . . . . . . . . . . 4•2
Amp knob settings . . . . . . . . . . . . . . . . 4•3
Amp Bypass Channel Volume . . . . . . . . . . . . 4•3
Cabinet and Mic settings (There’s magic in the A.I.R.!) . . . 4•4
Comp/Gate settings. . . . . . . . . . . . . . . . 4•4
EQ settings . . . . . . . . . . . . . . . . . . . 4•5
Stomp settings . . . . . . . . . . . . . . . . . 4•6
Mod and Delay settings . . . . . . . . . . . . . . 4•6
Config . . . . . . . . . . . . . . . . . . . . . 4•7
Setting your Tone to Tempo . . . . . . . . . . . . . . 4•8
Reverb settings . . . . . . . . . . . . . . . . . . 4•8
Wah Settings . . . . . . . . . . . . . . . . . . 4•9
Volume Settings . . . . . . . . . . . . . . . . . 4•9
Assigning the Pedal and Tweak Knob and dialing in Tempo . . 4•10
Saving Yourself . . . . . . . . . . . . . . . . . . 4•11
Saving a Channel Memory . . . . . . . . . . . . . 4•11
Custom Saving Amp Models . . . . . . . . . . . . . 4•12
Custom Saving Effect Setups . . . . . . . . . . . . 4•13
MIDI Dumps . . . . . . . . . . . . . . . . . . 4•14
Modeled Amps & Cabs 5•1
Which Amps and Cabs Are Modeled? . . . . . . . . . . 5•1
Cabinet Models . . . . . . . . . . . . . . . . . . 5•34
Effect Model Details 6•1
Comp . . . . . . . . . . . . . . . . . . . . . 6•1
Gate . . . . . . . . . . . . . . . . . . . . . 6•2
III
Page 12

The Stomp Effects: Fuzz, Distortion, Overdrive . . . . . . . 6•3
Stomp Effects: Compressors . . . . . . . . . . . . . 6•9
The Wah Pedals . . . . . . . . . . . . . . . . . 6•13
The Modulation Effects . . . . . . . . . . . . . . . 6•15
The Delay Effects . . . . . . . . . . . . . . . . . 6•23
Reverb . . . . . . . . . . . . . . . . . . . . . 6•30
MIDI 7•1
MIDI Basics . . . . . . . . . . . . . . . . . . . 7•1
What’s MIDI? . . . . . . . . . . . . . . . . . . 7•1
In/Out . . . . . . . . . . . . . . . . . . . . 7•1
MIDI Channel . . . . . . . . . . . . . . . . . . 7•2
MIDI Messages . . . . . . . . . . . . . . . . . 7•3
Backing Up PODxt Programs to Other Devices . . . . . . 7•4
Other Things You Can Do with MIDI . . . . . . . . . . 7•6
Changing PODxt Channels with MIDI Program Changes . . 7•6
Tweaking PODxt Tones with MIDI Controllers . . . . . . 7•6
Full MIDI Automation of PODxt .. . . . . . . . . . . . . . . . . . . . . . 7•6
MIDI Setup Trouble-shooting . . . . . . . . . . . . . 7•7
Putting Your Feet to Work 8•1
Meet the FBV Shortboard . . . . . . . . . . . . . . 8•1
Pushing Your Buttons . . . . . . . . . . . . . . . . 8•1
Saving and Naming with the FBV Shortboard . . . . . . . 8•3
Using an EX-1 . . . . . . . . . . . . . . . . . . 8•4
Appendix A: Amp Models 9•1
Iv
Page 13

Appendix B: MIDI Program Changes 9•3
Appendix C: PODxt MIDI Controls 9•4
Appendix D: Note Value Controller Values 9•7
v
Page 14

Quick Start Guide
Quick start Guide
or:
“Manual? I don’t need no stInkIng manual!”
PoDxt Pro owners, if you’re going to use anything beyond the standard guitar input and analog
outputs, we can’t cover all your options on this brief page. See Chapter 2 to learn about con-
trols, and then get deep with the inputs and outputs in the PoDxt Pro — Configurations &
Connections section that starts on page 3•8.
1. Turn the Output Level control all the way down to zero.
2. Connect the Left and Right Outputs to your recorder or mixer’s inputs, or
plug the left output into your guitar amp’s input. Or connect headphones to the
Phones jack on your PODxt for silent jamming.
3. Connect the included power pack or power cable to your PODxt, and plug the
other end into a power jack.
4. Connect your guitar to PODxt’s Input (PODxt’s Pro Guitar In).
5. Flip the Power switch to fire up.
6. PODxt comes ready to rock for direct connection to your recording setup. If
you’re connecting to a guitar amp, it’s essential to let your PODxt know so
it gives you the best tone. Do this by pressing Tune/System, then turning the
Select knob one step clockwise. Press the button below Dest (Destination) and
then turn the Effect Tweak knob to tell your PODxt what type of amp you’re
connecting to. PODxt will automatically override this setting when you plug in
headphones, so you don’t have to do anything to get great headphone sound.
7. Select an Amp Model using the Amp Model knob. Set the Chan Vol to max
and the Drive, Bass, Mid, Treble and Presence to your heart’s desire. Out-
put sets the, uh, output level.
8. Turn the Effects knob to load an Effects Setup, then twist the Reverb and
Effect Tweak knobs so you’re happy with the sound. Tap the Tap tempo button
to set the speed of the selected effect.
9. Browse pre-programmed tones using the Select knob. Press the far left button
under the display when the Edit button is NOT lit for a “Manual Override” and
where-the-knobs-are-is-how-it-sounds operation.
1•1
Now before you run off, please give the page a quick flip and....
Page 15

Quick Start Guide
Register now!
1•2
Go on-line and get more stuff!
Included in this manual is a handy, postage-paid card for you to send back to us to register your purchase. It’s very important that you fill that registration card out right now
and drop it in the mail, or jump on the Internet and register at www.line6.com. Registering insures that you’re dialed in for warranty service (warranty info is at the end of this
manual) and insures we can contact you if new software versions or other cool enhancements are offered — cutting edge technology and such.
Here at Line 6, our mission is to help you be more creative by bringing you powerful
new technologies. As part of that mission, we focus great effort on making the Internet a
valuable resource for every one of our customers. The Line 6 web site is one of the most
effective ways for us to deliver you what you need to make you and your PODxt ever
more powerful.
Connect to www.line6.com to check out Custom Tone—a truly massive, free, exclusive-to-Line-6 online tone library that gives you instant access to the signature sounds of
the greatest guitarists, bands, songs and gear of all time. It integrates with the free Line
6 Edit software that lets you edit your PODxt’s sounds, and save copies of them on your
computer. Our web site is also the place to download our GuitarPort software and USB
driver software, all free for your PODxt. You can even add more Models to your PODxt
(see www.line6.com/modelpacks for the details on that). And to make it easy to get
all this cool, computer-related stuff, look for the handy Line 6 Monkey utility, down-
loadable from our web site, which will check for and install the latest versions of everything for you! Visit the discussion boards to learn tips & tricks, trade advice, and generally hang out and get POD-a-licious with the whole extended family of PODxt users. Use
the Support pages to get answers to your technical questions and contact our customer
service experts. Or grab electronic versions of this book and other documentation, learn
what your favorite artists are doing with Line 6 gear, and see the latest products we’re
introducing for you.
Not on the Internet yet? This may be the time to make the big jump, and thereby ensure
that you will get all the great resources we can offer for you and your PODxt.
Page 16

Quick Start Guide
Introduction
Welcome To Podxt...
Thank you for inviting PODxt into your life. Whether you use your PODxt as a direct
recording miracle, a powerhouse preamp, a practice partner, or as a creative digital signal
processing tool (and heck, why should it be just one of these?) — we think you’ll agree
that PODxt is about the most amazing thing to happen to the electric guitar since, well,
since the guitar amplifier itself! PODxt delivers the incredible tones of the acclaimed
Line 6 Point-to-Point Interactive modeling technology (as featured in our Vetta series
amps) and fuses it with the wonderfully portable and easy to use POD, which has been
the guitar recording world standard for years. So you’ve got the tonal heritage of the
past century of guitar amplifier and stomp box design, plus no-compromise recording and
direct sound excellence — all ready to roll when you are.
Who is Line 6?
As you may know, Line 6 first came on the scene several years back with a new kind
of guitar amplifier — the first to put digital software modeling technology to work in a
combo amp for guitarists. We also knew then that guitarists need great amp tone when
recording, but generally don’t have the room to crank up that classic stack, or the money
to hire a team of ace engineers to get it to tape. So we squished our patented modeling
technology down into a small, kidney-bean-shaped wonder called POD, and forever
changed the world of guitar recording.
1•3
Once we’d gotten this whole modeling amp and POD thing started, it was time to see
what we could do if we really cranked up the horsepower and took our modeling to the
next level. I mean, once you’ve climbed to the top of the mountain, it’s on to the next
mountain, right? So, eyes glowing like power tubes, we stocked up on the Pepsi, gathered
our genius engineers into a secret lab, fired up our extensive collection of amplifiers and
stomp boxes... and spirited their treasured tones into a newly-supercharged modeling
technology we dubbed Point-to-Point modeling. It first hit the streets in the award-winning Vetta amp, whose superb tone and unparalleled selection of dream amps, cabinets
and effects make it a pretty good contender for the world heavyweight amp title. After
that, we poured the same magic elixir into the classic POD and—ta-dah!—PODxt was
born.
How does PODxt help you create a guitar tone that is out of this world, and then get
that tone wherever you need it? Easy! It’s…
Page 17

Quick Start Guide
1•4
Modeling
Modeling: just what is it, and why is it so important?
To answer that question, we’ll start with tubes (better know as “valves” to our friends in
England and elsewhere). Tubes, we can all agree, are the heart and soul of pretty much
every legendary guitar amp, and are key to the warm, harmonic-rich tone quality of
those amps. Solid state devices (transistors) are simply unable to duplicate tube warmth
and performance. And “hybrids” — a tube in a circuit along with a bunch of transistors
— are really a vain attempt at warming up a transistor-based tone. They fall short in any
comparison to a 100% tube circuit. So that’s it — tubes or nothin’, right? Well, not any
more....
You see, Line 6’s team of crack engineer-guitarists has spent years understanding pretty
much everything there is to know about tube-powered gear, including exactly how different types of tubes respond under various conditions typical of guitar amplifier design.
How tubes process an input signal, how the signal is colored and shaped, at what point it
begins to distort, the quality and characteristic of the distortion, what happens when the
signal gets to other parts of the system — complicated stuff, but all analyzable as electronic data. A guitar pickup output, after all, is an electronic signal, and tubes and all the
rest are really just a complex form of signal processing.
Having sussed it all out, the Line 6 engineers translated all this arcane knowledge into
software that simulates the signal processing of guitar amps’ tubes and other electronics,
entirely within the digital domain. Cool, huh? The Line 6 crew also directed their caffeine-enhanced modeling attention to a study of guitar speaker cabinets and the important part they play in communicating great guitar tone. And the great variety of stomp
box and rack effects that guitarists use to juice things up. They translated it all into
yet more powerful software, and it’s this revolutionary DSP (Digital Signal Processing)
software-based modeling technology that gives Line 6 the power to create super siliconbased life forms like PODxt.
Amp, Cab and Effect Models
The tone and technology know-how of Line 6 thus comes to you as Amp, Cab and Effect
Models based on a collection of gear recognized by guitarists the world over as true “tone
classics.” These models were tweaked through careful, scientific A/B comparisons to the
gear that inspired them, with an ear open for the effects of different volume levels and
settings of the originals’ tone and gain controls. The gain and equalization characteristics of the modeled gear were carefully measured so that changes to knobs on the models
Page 18

Quick Start Guide
would mirror the effects of these changes on the originals as closely as possible. We’re
talkin’ major attention to detail here. Tone control center frequencies, slopes, and cut/
boost range were painstakingly analyzed, in addition to a whole host of factors unique
to each piece of gear. Not only that, but since many classic amps and effects have highly
interactive circuits, we paid careful attention to the way that the setting of one knob
changes the way that another knob may behave. All in an effort to make our Models as
much like the amps, cabs and effects in our collection as possible. The resulting Amp,
Cab and Effect Models are the foundation of PODxt.
Now, then — here are a couple of things we want to be completely crystal clear on:
1. The Line 6 modeling process is a patented, 100% digital software-based technology exclusive to Line 6.
2. Line 6 Modeling is not sampling, nor is it solid state; no special
guitar, pickup, or cabling is needed.
There’s Magic in the A.I.R.
PODxt delivers its modeling tones through another innovation: Line 6’s A.I.R. direct
recording output. The A.I.R. (acoustically integrated recording) technology is the result
of intensive research and careful study of the tonal characteristics produced by the interaction of amplifiers, cabinets, speakers, microphones and the recording room during the
recording process.
1•5
The direct output of many preamps, amplifiers and direct box-style amp replacements
available today offer some limited form of cabinet simulation or speaker emulation.
Those that happen to be more than simple high end roll-offs have little or no control
options. Generic cabinet simulations cannot reproduce the markedly different tones
resulting from the choice of speakers, wood, and other details of a great real-life speaker
cabinet. Other equipment also fails to reproduce the significant tonal contribution of
microphone selection and placement, and do nothing to reproduce the subtle ambience
of the recording space.
The result is the familiar dissatisfaction with direct recording products — even those
that deliver a reasonably usable basic tone fail to reproduce the “life” of the guitar sound,
and destroy the proper feel in the process. It is as if your guitar strings became heavier
and less responsive, like they just went up a couple of gauges when you plugged into your
direct box. And your sound lost its life.
Page 19

Quick Start Guide
1•6
PODxt’s combination of Amp Models and A.I.R. technology provides superior direct
tones by recreating all the elements contributing to a great recorded guitar sound, and
giving you that tone with the same feel as playing through a real amp and speaker cabinet:
• The effect of the guitar amplifier circuit is emulated by the Amp Model you choose.
Each model was developed from extensive study of a classic amplifier treasured as a
tone classic.
• In a guitar amp, once the guitar signal passes through the electronics, it is output
to one or more speakers in a speaker cabinet. The specific design of the speakers, how
many there are, and how they are arranged contributes significantly to your guitar
tone, as does the construction and resulting tone of the wood box itself. A Marshall
head driving a single 12-inch speaker in an open-back cabinet, for instance, will sound
dramatically different from the same head driving a 4x12 closed-back cabinet. Line 6
has carefully constructed virtual software speaker cabinets that emulate the contribution made by real speaker cabinets to get great guitar sound.
• Once the sound makes it out of the speaker cabinet, the next important link in the
recording system is the microphone that receives that sound. Guitar recordists select
different microphones, and arrange them in different placements, to get particular
sounds. A microphone pointing directly into the cone of a speaker will hear something
different than one positioned off-axis. Line 6 carefully analyzed the coloring that various microphones add to the guitar sound, as well as the effects of different mic placement techniques, and gave you control of these details in your PODxt.
• The guitar amp, cabinet, and microphone don’t just sit in empty space. The room
that they are in contributes importantly to the guitar sound you will record. Reverb
can be used to capture the basic character of the space, simulating the effect of the
sound reflecting off the room’s walls, floors and ceiling. But there are other subtle
details that have more to do with the “spread” of the sound as it passes through the air
between the speaker and microphone. This final component is the key to the sense
that the listener is in one position in the room, and the guitar sound is in another
position, and that the two are separated by a mass of air that sound spreads through to
reach the listener.
Page 20

Quick Start Guide
All of these important sound-shaping components are accounted for in your PODxt.
Turn the Amp Model knob to call up the amplifier emulation you want. PODxt automatically matches that amplifier with an appropriate cabinet and microphone setup, and
gives you the sound of that setup coming through the air of a recording space. Turn the
reverb knob to taste, and start recording incredible mic’d up sound. Press a button and
twiddle a knob or two, and you can switch cabinets, change out mics and their placement, and adjust the “spread” of the sound in your virtual room as well.
The A.I.R. direct recording output is exclusive to Line 6. In combination with the Line
6 Amp, Cab and Effect Models, it is the key to PODxt’s phenomenally satisfying direct
recording sound.
And Away We Go....
So, now that you know what’s in store, it’s time to experience PODxt for yourself. Grab
your favorite axe, plug in, and flip back to the handy Quick Start Guide on the first
page of this chapter if you haven’t already been through that. Then fold out the back
cover and follow me, my friend, for the PODxt Grand Tour....
1•7
Page 21

controls & connections
Controls & Connections
Now would be a good time to turn to the nifty back cover of this manual and notice
that it folds out. Ooh, pretty pictures! The idea is to have this essential pictorial reference always opened out while you’re thumbing through the manual. It’s also got all the
essential details for quickly getting around on your PODxt. The boxed numbers that pop
up throughout this manual correspond to the numbers on the foldout’s illustrations. The
back side of the cover’s got handy pictures for the FBV and FBV Shortboard foot controllers, plus signal flow and connection guides.
1
Power Switch - Flip this to bring your PODxt to life. PODxt Pro includes
a standard IEC grounded power cable. For PODxt, use only the included PX-2 power
pack.
2
Input/Guitar In - Plug your guitar in here. (You techies will want to know
this is a mono, un-balanced connection).
3
Phones - Plug your headphones in here for silent concertos. The volume is set
by the Output knob. Any time you use headphones, it important to be sure they’re not
set for ridiculous volume before your slap them on your ears. Try an Output knob setting
of about 10 o’clock when first putting the headphones on, them turn up from there if you
need more volume.
2•1
So that you hear appropriate sound through the headphones, PODxt automatically
switches to Studio Mode whenever headphones are connected (for more on Studio
Mode, see “What are you connecting to?” on page
A quick note about headphones: Earbuds and headphones designed for use with portable
MP3 players and tape players are very low impedance as well as not very accurate in
frequency response. This makes them not suitable for use with PODxt. We recommend a
pair of 150-600 ohm pro or semi-pro level studio headphones for best results.
3•2).
Page 22

Controls & Connections
4
Output - This controls the overall output level of PODxt and also sets the
headphone level. Changing the Output level does not change your tone, so you can get
the tone you want at any volume level. This setting is not saved when you store settings
into one of the PODxt’s memory locations.
2•2
xt Pro users, note that this does not affect the level of the XLR Outputs in Live Mode (for
PoD
more on Live Mode, see “What are you connecting to?” on page
xt will give the best signal-to-noise performance when you have the Output con-
POD
trol at max. With the Output control turned down low, you may get extra hiss—which
obviously ain’t what you want—if you turn up your mixer or recorder’s output to compensate. In order to allow you to set the Output as high as possible when connecting to
recording, mixing, and other studio gear, be sure you are plugging Podxt’s out-
puts into line level, not microphone or guitar level inputs. Line level inputs should
allow you to turn PODxt’s Output up all the way (or close to it) and thereby get the best
sound possible. If your gear has inputs that function as mic/line level inputs, try to set the
trim for those inputs to the minimum level, and PODxt’s Output to maximum, when
setting levels.
5
Left & Right Output - (See numbers 33 and 34 for PoDxt Pro’s outputs.)
These balanced 1/4-inch TRS (tip/ring/sleeve) connectors are ready to rock with pro
+4dBu balanced equipment. They will also work happily with unbalanced –10dBV
equipment and standard guitar cables. If you need mono output, you can use either one.
6
Pedal - Looks like a telephone connector on steroids. Connect optional Line
6 FBV or FBV Shortboard foot controllers here. PODxt’s do not work with the Line 6
Floor Board and FB4.
7
USB - PODxt’s USB jack lets you connect it directly to most computers, and
record your PODxt directly to a wide variety of popular recording software. We’ve included a USB cable for use with our GuitarPort Windows software, Line 6 Edit software
for Mac OS X and Windows, our Custom Tone online tone library, and PODxt driver
software. All this software—along with directions for using it—is free for you to download at www.line6.com.
3•5).
Page 23

Controls & Connections
8
MIDI In & Out - Connect PODxt to your MIDI equipment to select Chan-
nel Memories (via Program Change messages), or automate PODxt settings (via controllers and/or SySex). You can also use MIDI (or USB) to communicate with the free Line
6 Edit software downloadable from www.line6.com. The PODxt MIDI OUT connects
to another device’s MIDI IN; its MIDI IN goes to another device’s MIDI OUT. Please
also see Chapter 7, Deep Editing and MIDI Control, to setup your MIDI gear with
xt and find out what MIDI can do for PODxt and you.
POD
9
Drive - This knob controls how hard you’re driving the input of the chosen Amp
Model. Like the input volume control on a non-master volume guitar amp, higher settings give you more “dirt.”
10
Tone Controls - Bass, middle, treBle, presence. Just like any guitar amp,
only when you change Amp Models, the response and interactivity of the controls
changes, too — so they act like the tone controls of the original amp that inspired the
Amp Model you’ve selected.
11
Chan Vol - This knob controls the relative volume level of the “channel” you
are playing through — thus, channel VOlume. Use this to balance levels between the
sounds you store in two different PODxt Channel Memories (say between your rhythm
and lead tones). In general, you want to set the chan VOl as high as possible to insure
you’re getting the best signal-to-noise ratio performance — but back off on this control if
you’re seeing CLIP in PODxt’s display.
2•3
TIP: You probably want to have all of your favorite sounds as loud as possible,
while also having the right difference in volume between your lead and rhythm
sounds, clean and dirty sounds, etc. Right? OK, then, to get this happy balance,
start with your favorite ‘clean’ sounds. Turn up their Chan Vol as high as you can
without getting the CLIP indicator in PODxt’s display when you strum hard. and
save them that way. Then switch amongst them to see if some are too loud, and
turn them down a bit to match well with the others. Next, move on to select
your ‘dirtier’ crunch and lead tones, comparing them to the clean sounds and
saving them with lower Chan Vol settings to match well with those clean sounds.
Now, each time you use your PODxt, you just have to set an Output volume level
you like, and you can switch amongst your various sounds without unhappy volume differences.
Page 24

Controls & Connections
12
Reverb - How much reverb do you want today? Spin this knob to set the Reverb
level. Several flavors of reverb live inside PODxt, including springs, rooms, chambers,
halls and plate reverbs.
2•4
13
Effects - This knob selects from PODxt’s Effect Setups — which set up a com-
bination of effects for you (all the details on effects are in Chapter 6, stOmpBOxes &
ffects). Think of each Effect Setup as a virtual pedal board or outboard gear rack that
e
you can match with any Amp Model. When you turn the effects knob, PODxt shows
the name of the Effect Setup that is loaded and you’ll hear the effects change instantly.
The effect buttons light to show which effects are on. There are 64 of these effect “rigs”
pre-programmed and ready for you to use.
14
Effect Tweak - This knob varies some aspect of the effect you’ve chosen. Turn
it up and the effect will generally go deeper, louder, faster, longer or just plain more.
You’ll know what you’re tweakin’ because a window will pop up on PODxt’s display to
show you. The delay time is usually set by the tap button. For the inside scoop, including how you can customize the effect tweak knob see Chapter 4, Creating & Storing
Sounds. If the effect that effect tweak is “targeting” is off, then, big surprise, effect
weak won’t change anything. While the edit or tune/system button is lit, the effect
t
weak knob adjusts parameter values instead.
t
15
Amp Models - When you spin this knob, it’s essentially like changing what
electronic “circuitry” is running inside PODxt to make your amp sound. (See the groovy
details in Chapter 5, Modeled Amps and Cabs.) You’ll see the Amp Model names
change in PODxt’s display. When you choose an Amp Model, Cabinet and Microphone
Models are also loaded automatically. For instance, when you choose the Brit Hi Gain
model (based on the classic Marshall JCM 800 head), a Cabinet Model based on a Marshall 4x12 will be loaded with it. You can also choose a different cabinet/mic setup by
pressing the caB/a.i.r. button (below).
In fact, Amp Models automatically load with all the amp-related settings pre-set for
a ready to go tone. Drive, Bass, Mid, Treble, Presence, Cab/A.I.R., EQ etc. will all be
determined by the Amp Model you choose — giving you a ready-to-rock sound with
the turn of just this one knob. Once you get familiar with PODxt, you can change these
amp-associated defaults to customize the settings of each of the Amp Models to fit your
tastes. Note that when you’re in Manual Mode, Drive, Bass, Mid, Treble, Presence, Channel
Volume and Reverb are set by the physical knob positions instead of being automatically set with
the amp selection. Complete details are in Chapter 5.
Page 25

Controls & Connections
16
Select - The PODxt has 128 Channel Memories. They are arranged in 32 banks
of four channels each. (The four are called A, B, C, and D.) You can think of each bank
as a sort of virtual four-channel guitar amp — and you’ll find that the same layout is used
on the optional Line 6 foot controllers for PODxt (the FBV and FBV Shortboard) which
are discussed later in Chapter 8.
The first 64 Channel Memories (Banks 1-16) store a variety of complete amp-and-effect
selections pre-programmed by the tone mavens at Line 6. The second 64 (Banks 17-32)
are left for your own creations (or you can load them up with one of the thousands of
great tones you’ll find at customTone.com).
You load PODxt channels by turning the select knob. When recalling a channel, you
may have left the physical Bass knob at minimum, whereas the just-recalled channel has
this control set to max. To change Bass (or anything else), just grab the knob you want
and tweak.
To leave the Channel Memory world and enter Manual operation, make sure the edit
button is not lit, and press the Soft Button
will read Manual Mode to let you know you’ve got WYSIWYG (what-you-see-is-what-
you-get) operation, and all the physical knob positions are being used to determine your
sound. More on all this later.
18
below the word manual. The display
2•5
When the edit, saVe or tune/system button is lit, the select knob selects from the
available display pages. When you press edit, it selects pages of effect and channel parameters; when you press tune/system, it takes you through all of the Tuner and systemwide settings; when saVe is lit, you’ll find amp and effect customization features as well
as MIDI dump operations. The vertical “scroll bar” on the left side of each display page
shows you where you are in that group of pages.
Page 26
Controls & Connections
17
Display - PODxt’s LCD (liquid crystal display) is your window into every param-
eter and setting available. Here’s how to get around:
2•6
1. When the
POD
Save, Edit or Tune/System button is lit, a scroll bar on the left side of
xt’s display shows you where you are in the available display “pages.” Press one
of these buttons to see the scroll bar now. For those that really need to get all the
nerdy details, each dot in that bar represents a page. As you turn the Select knob,
you move through the pages and so does the little square. When you’re on the first
page, the little square is at the top. When you get to the last page, the square’s at the
bottom. Square goes up, square goes down. Square goes up, square goes down. Fun for
the whole family!
2. Each page typically has words that appear in the bottom of the display. These words
label things you can adjust. Press the button below the thing you want to adjust,
then turn the Effect Tweak knob to do your adjusting.
18 Soft Buttons - These four buttons operate differently depending on what
you’re doing.
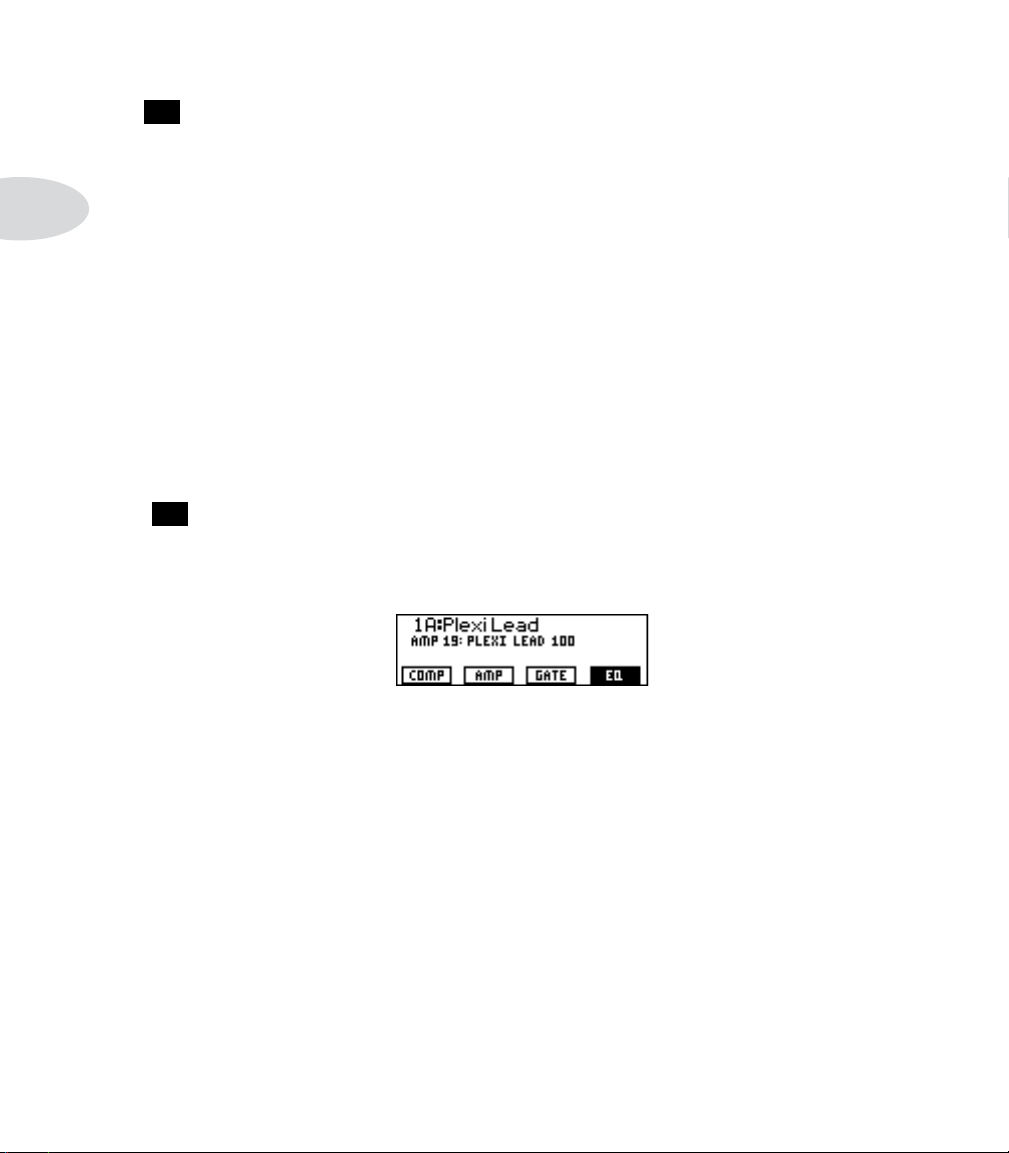
If the edit button is NOT lit, the PODxt’s display will look about like this:
You can press the far left Soft Button to enable manual mode. Press the second Soft Button from the left to show the saved settings of the Amp Model’s tone controls, then press
the lit edit button to exit that display. Press one of the two Soft Buttons on the right to
turn the Gate and eQ effects on/off (in the illustration, the Gate effect is off, and the
EQ effect is on). Double-pressing the button for Gate or eQ will jump you right to the
detailed settings for those effects. You can then press the lit edit button when you’re
finished tweaking.
If the edit button IS lit, the Soft Buttons will let you select which displayed setting
you’d like to tweak. See Chapter 4 for the detail on that.
Page 27

Controls & Connections
19
Effect On/Off Buttons - These four buttons allow you to quickly turn any
of four effects on or off (the effects are on when the buttons are lit).
• The cOmp button turns on/off the Compressor effect
• The stOmp button turns on/off the loaded Stomp-Box effect
• The mOd button turns on/off the loaded Modulation effect
• The delay button turns on/off the loaded Delay effect.
Double-press one of these buttons to adjust the loaded effect or load a different one. For
example, just press the cOmp button two times quickly and you’re instantly taken to the
Compressor and Gate edit page. Double-pressing the stOmp button will quickly take you
to the first Stomp Box edit page. Double-press the same button again (or press the edit
button) to leave Edit Mode.
20
CAB/A.I.R. - Press the caB/a.i.r. button once to pick a Cab Model to pair
with your amplifier, select the microphone used on the cabinet and even set the amount
of “room” that the mic captures. Unlike the effect On/Off buttons, this button is not
an on/off type control. A single press of this button simply lets you change cabs and mics
quickly. When the Cabinets are off, this button’s light will be off as well.
2•7
21
Save - When you want to store your own tweaked-up sounds in your PODxt this
button is the key. Exactly how it works is detailed in Chapter 4, Creating & Storing
Sounds. But you’re probably impatient, so here are the basics:
When using a pre-programmed sound, PODxt will display the bank number, channel letter and channel name at the top of the display. If you turn one of the knobs or change a
parameter in the edit mode pages, you’ll notice an asterisk appears to the left of the bank
number. This is a reminder to you that you have tweaked the memorized channel, and
that you should save it if you want your PODxt to remember the tweak.
To save the changes you’ve made to a Channel Memory, press the saVe button. The but-
ton will start to flash. Just press saVe again if you want to overwrite the currently loaded
Channel, using the same name. Or, if you’d like to change the name first, use the middle
two Soft Buttons to select a character, then press the right soft button and turn the
ffect tweak knob to change the character. Press the soft button under dest, turn the
e
ffect tweak knob, and you will see that you are switching through memory locations A,
e
B, C, and D in each of the sixteen numbered banks. Pick one to store your sound in, and
Page 28

Controls & Connections
press that saVe button a second time. The button’s light will stop flashing, a progress bar
will shown on the display, and the sound is stored at the location you chose, replacing
the sound that was there before.
2•8
After the sound is stored, you can bring it back any old time by simply turning the select
knob to call up the location where you stored it. (See Chapter 8 to learn how to do all
this with your feet on the optional foot controllers).
If you aren’t using one of the PODxt Channel Memories — you’re in Manual mode, and
you’re just getting the sound of where the knobs are set — you can store that state into a
memory location the same way. Press saVe, then dest, then use effect tweak to choose a
place to save to, and press saVe again.
If you decide you don’t want to store the sound after you’ve started saving, press any
other button to cancel the save. (The save will also be canceled if you don’t touch
anything for 15 seconds after pressing saVe.) If you accidentally save over a factory sound
you liked, the saVe button’s additional pages let you recall the factory preset version of a
Channel Memory any time. See Chapter 4 for details on this feature.
The saVe button also lets you customize any of the Amp Models and Effect Setups to
your own taste, so your favorite version of the amp or effect comes up instantly when you
turn amp mOdels or effects. See Chapter 4 for the details on that.
Page 29

Controls & Connections
22
Edit - A deep-dive into tone central is available at the press of the edit button.
While edit is lit, the select knob selects pages of everything that makes up a Channel
Memory. From here, you set all the effect parameters, select cabinets and microphones,
and assign a parameter to the effect tweak knob. To learn more about deep editing,
please see Chapter 4.
23 Tune/System - Press that puppy and — shazam! Instant digital chromatic
tuner. All Amp Model and effects processing are bypassed so you can hear those questionably-tuned strings clearly, should you choose to do so.
Play a note on your guitar and PODxt will show you what it is on that handy display; all
notes are displayed as flats, so you’ll see Ab instead of G#. Play that string you’re trying
to tune again, spin its tuning key so it goes sharp and flat, and the little ball will move to
the right if it’s sharp and back down to the left when the note’s flat. The little ball will
sit right in the middle when you’ve got it just right. Give PODxt’s tune/system button a
push and the tuner disappears just as swiftly as it came, taking you right back to normal
operation.
Tuner Bypass/Volume - Normally, the audio will be muted while you’re tuning, but if
you prefer to hear yourself tune, press the button labeled Mute, and turn effect tweak
counter-clockwise to select Bypass.
2•9
Tuner Reference - Want a different reference than A=440Hz? When you’re in the
tuner mode, press the button labeled 440 Hz and turn the effect tweak knob on PODxt
while watching the display. This control lets you set the reference frequency anywhere
from 430-450 Hz. This setting is stored so you don’t have to reset it every time you turn
on PODxt if you decide you want to be different (or if that piano in your rehearsal room
has decided to be different).
24
Tap - PODxt allows you to control the time and speed of your effects by simply
tapping on this button. To use the tap control, just tap the button at the tempo you
want and the effects that are set to “lock” to that tempo will change to match what you
tapped. There’s also a Tempo parameter near the end of the edit pages, so you’ll see exactly what Tempo you’ve Tapped. This is especially useful if you are trying to nudge your
ap setting to just the right value. See Chapter 4 to learn how to set up effects to follow
t
the tempo that you’ve tapped.
Page 30
Controls & Connections
FEATURE FOCUS
Podxt Pro
The following controls and connections are found on the PoDxt Pro only.
25
2•10
Input Level - The Normal setting of this switch is appropriate for most guitars.
If you see the Clip light 28 coming on, that means you’re overloading PODxt Pro’s
input. If that happens frequently, try the Pad setting here. This switches in input circuitry that’s appropriate for hotter signals output by some guitars with active pickups, or
from keyboards and other sources. For those non-guitar sources you may also want to try
the rear panel Line Level Input
CLIP indicator shows in the display if you are clipping in the internal DSP.
26
I/O & Dig Select - Press this to tell your PODxt Pro what it’s connected to
so it can give you the best sound, and to choose digital audio and other options.
• Press it once to select where you’re going to connect your input source to the
POD
• Press it a second time to tell PODxt Pro whether you’re using it in
the studio or live, how you have connected your effects loop and
what kind of digital gear you have connected to PODxt Pro.
• Press it a third time and it will dismiss the pages and take you back to whatever was
in the display before you pressed the button.
29
, which is a balanced TRS connection. A separate
xt Pro, and exactly what you want to come out of the digital outputs.
27
Signal Light - This lights to say, “Yep, I’m hearing some input.” If you’ve got
something feeding audio to your PODxt Pro but you can’t hear it and don’t see it here,
press the i/O & diG select button 26 and be sure you’ve got the right input selected. (This light doesn’t show input from USB, by the way.)
28
Clip Light - This lights to say, “Whoa, Nelly! That’s too much input!” (And,
again, it doesn’t show the status of USB audio.) Reduce the output level of the device
that’s feeding your PODxt Pro, or try the Pad setting of the handy input leVel
switch. For non-guitar sources, you may instead want to use the...
25
Page 31

29
FEATURE FOCUS
Line Level Input - Here’s a balanced connector for non-guitar sources (or
the line level output of a wireless guitar system). It’s also perfect for “re-amping”—feeding an already-recorded guitar into PODxt Pro for further processing. To use it, you’ll
also need to press the i/O & diG select button 26 and select the Line Input. The
front panel’s Signal light 27 shows you when you’ve got some signal coming, and the
28
lip
c
light shows you when you’re overdoing it and need to reduce the level you’re
feeding to PODxt Pro.
30
Unprocessed Guitar Out - This connector actually has at least a couple
of potential uses. If you’ve got a separate rack-mount tuner, you can feed it with this
signal for instance. But the real reason it’s here is to let you do the kind of after the fact
adjustments to your guitar tone that Pro Tools users with our Amp Farm plug-in software
have come to rely on.
The idea is this: you record this unprocessed guitar out signal to your recording system.
Then, you play it back through the Line Level Input
you’re mixing, and you can change amps, effects and every other aspect of your guitar
tone with complete flexibility.
’Course, it would be pretty hard to record a good guitar take without hearing the amp
and effects sound that you were planning to use, right? I mean, who can solo with a dry
guitar signal? The answer is that you don’t listen to this unprocessed signal while recording—instead, you monitor your PODxt Pro’s left/right processed outputs during the recording process. You can even record both the unprocessed guitar out and the processed
left/right outputs at the same time, so you’re ready for complete flexibility in later tone
adjustments, or you can just stick with what you had. Page 3•14 has details.
xt Pro’s digital outputs can also send unprocessed signal, if you prefer to capture
POD
this signal digitally. You can set them to do this from the display pages of the i/O & diG
select button
26
Controls & Connections
2•11
29
of your PODxt Pro when
.
31 32
Effect Send & Return - The effects loop is designed for line level
devices, like rackmount effect processors, not for stomp boxes (which you can run happily in front of your PODxt Pro). Use the left jacks if you want to run the send or return
mono. You can choose to run the loop series or parallel from the display pages of the i/O
& diG select
button
26
. If you have the loop set to series, but nothing plugged into
the loop return, PODxt Pro is smart enough to see this and disable the loop so you still
get sound. See page 3•12 for more details.
Page 32

Controls & Connections
FEATURE FOCUS
33
Unbalanced Analog Out - The display pages of the i/O & diG select
button
2•12
ready to plug into a recorder with unbalanced –10 dBV inputs. In Live Mode, they
don’t have speaker simulation, and are ready for connection to an on stage power amp.
Whichever you choose, the front panel Output knob 4 determines how much signal
you’ll get at these jacks. You can use either jack as a mono output, by the way.
26
configure these outputs for Studio or Live Use. In Studio Mode, they’re
34
Balanced Analog Out - The i/O & diG select button
“pages” configure these outputs for Studio or Live Use. In Studio Mode, they’re ready to
plug into a recorder with balanced +4 dBu inputs. In Live Mode, they’re ready to send
great sounding –10dBV signals to the house sound system or P.A. The front panel Out-
put knob
on stage adjustments to your volume without affecting the P.A.’s levels.
35
Ground - This switch lets you lift the grounds of PODxt Pro’s XLR Balanced
Analog Outs. This can be handy if you get an audible hum caused by a ground loop
when connecting to other grounded equipment.
36
AES/EBU & S/PDIF Inputs & Outputs - These jacks send and
receive digital audio signals. The display “pages” of the i/O & diG select button
choose which of these connections to use, along with sample rate, word length (“bits”)
and other details. You can use digital input at the same time as analog output, or analog
output as the same time as digital input, or any combination. You can even send digital
audio into PODxt Pro with one rate and word length, and choose a different rate and
word length for output.
xt Pro does not include a separate clock connector, but it can clock to the digital
POD
audio being received at either of its digital inputs, even if you are using an analog input
to get audio into your PODxt Pro. You can, for instance, connect a digital output from
your digital mixer PODxt Pro’s S/PDIF input, press the i/O & diG select button
26
set the fOrmat to match spdif, and PODxt Pro will clock to your mixer. PODxt Pro
will also format the digital audio it outputs to match the incoming format. Note: The
FX Loop in the PODxt Pro exists entirely after all of the digital processing and is in the
analog signal path, directly before the main outputs. This means that anything run in the
loop will not be present in the digital output signal.
26
display
4
does not affect the volume at these jacks in Live Mode. This lets you make
26
Page 33

GettinG set uP
The numbers in black boxes below and throughout the chapter refer to the back cover foldout’s
illustrations
PODxt is ready to give you world-class tone, no matter what you’re plugging into. It’s as
happy to live on stage, plugged into your ol’ standby amp, as it is working alongside the
most elite of world-class recording systems. (And who wouldn’t be?) To tell you what you
need for where you’re going, this chapter’s got three sections:
xt - In the Studio
Pod
xt - Playing Live
Pod
xt Pro - Connection & Configuration
Pod
But first, it’s the...
Getting Set Up
3•1
All Purpose Basics
1. Plug the power supply or cable into the wall, and connect it to the power connector
on your PODxt.
2. Connect your guitar to PODxt’s Input (PODxt Pro’s Guitar in) 2 .
3. PODxt: Connect PODxt to whatever you’re going to be playing it into. The Output
connectors 5 are balanced 1/4-inch TRS (tip/ring/sleeve) connectors, ready to rock
with pro +4dBu balanced equipment. They will also work quite happily with unbalanced -10dBV equipment and standard guitar cables. To run PODxt mono, you can
use either the left or riGht output.
PODxt Pro: Use either pair of rear panel outputs, and see the details in the third section of this chapter. Press the i/O & diG select button 26 to select Guitar (or
whatever else you want) as your input.
Page 34

Getting Set Up
3•2
Podxt — In the studIo
xt Pro users, fast forward to the
PoD
at the end of this chapter.
To use the USB connector, visit www.line6.com to download PoDxt USB Driver Software,
as well as Line 6 Edit Mac/Windows software or GuitarPort (Windows only) software.
What are you connecting to?
Your PODxt needs to adjust itself to deliver the best possible sound depending on what
you’re connecting to. Press the tune/system
clockwise until the display asks, “What are you connecting to?”
Press the Soft Button below dest and turn the effect tweak knob 14 to select studiO:
direct mode. In this mode, Line 6’s exclusive A.I.R. II DSP is active, and you are treated
to a virtual speaker-cabinet-air-microphone experience that’s so good you may never use
a regular guitar amplifier and microphone set up again.
Podxt Pro – Configurations & Connections
23
button and turn the select 16 knob
section
The dest setting you select will be remembered by your PODxt, so you don’t have to
re-set it every time you power up. If you change it to a different setting for a special situation you come across, don’t forget to change it back again to the setting you normally use
once you get back to your standard setup. When you plug your headphones into PODxt,
dest will be automatically set to studiO: direct, giving you the best tone for private jam-
ming.
The Ins and Outs of Great Tone
If you’re hooking your PODxt up to a recorder, mixer, or other equipment, be sure you
are plugging its outputs into line level inputs on your other gear, as opposed to microphone level or guitar level inputs. This will insure that you get the best signal-to-noise
ratio (lots of juicy guitar tone, not too much hiss) with PODxt. Some equipment only
gives you a single input for both mic & line level sources, allowing you to trim low level
signals (like mics) up to a high level at the inputs. If you are plugging your PODxt into
one of these inputs, try setting the trim to minimum, and twisting the Output
4
and
Page 35

Getting Set Up
channel VOlume
line-level only inputs, you’ll probably get better performance by plugging into these,
rather than the wide-ranging mic-to-line level trimmed inputs.
11
knobs up to maximum. If your equipment has a couple of open
Setting Levels
Start by setting PODxt to the sound you intend to use, strum hard, and set channel
Olume
V
display. Now play with the PODxt Output knob and any input volume control on your
system so you can get the maximum sound level out of your PODxt without going so far
that you overdrive the input on your system and cause unwanted distortion.
TIP: You probably want to have all of your favorite sounds as loud as possible,
while also having the right difference in volume between your lead and rhythm
sounds, clean and dirty sounds, etc. Right? OK, then, to get this happy balance,
start with your favorite ‘clean’ sounds. Turn up their Chan Vol as high as you can
without getting the CLIP indicator in PODxt’s display when you strum hard. and
save them that way. Then switch amongst them to see if some are too loud, and
turn them down a bit to match well with the others. Next, move on to select
your ‘dirtier’ crunch and lead tones, comparing them to the clean sounds and
saving them with lower Chan Vol settings to match well with those clean sounds.
Now, each time you use your PODxt, you just have to set an Output volume level
you like, and you can switch amongst your various sounds without unhappy volume differences.
11
as close to max as you can without getting the CLIP indicator in PODxt’s
3•3
Radiation Alert
You’re also likely to find, especially if you are using a guitar with single coil pickups, that
it is quite easy to pick up some serious noise from any computer CRT (which stands for
cathode ray tube) display you might have in your studio. CRT displays are, after all, just
special purpose ray guns that shoot photons at you all day long. Your guitar pickups receive and amplify the electro-magnetic fields that your display radiates, and you hear this
in your audio signal as buzz and hum. Moving farther from the CRT, and turning your
guitar so it does not directly face the computer’s display, will minimize this problem. But
if you find yourself in a tight studio setup, needing to lay down some quick tracks, and
being pestered by CRT-induced buzz, you may find it helpful to do as we have sometimes
done: set up your track to record and start your pre-roll; reach up and flick your computer
monitor’s power switch off; record your guitar part; stop your recording, flick the monitor
back on, and check out the buzz-free playback. Flatscreen LCD monitors generally don’t
Page 36

Getting Set Up
3•4
cause hum and buzz. And just in case you’re looking for an excuse to buy one... Line 6
Variax guitars are immune to this sort of radiation-induced hum also, since it does not
use traditional magnetic pickups.
Pedal Power
PODxt has several foot control options that make getting great guitar tracks even easier:
the Line 6 FBV foot controllers offer a range of functionality from basic A, B, C, D chan-
nel changes to full real-time control over almost every parameter in the PODxt. While
we’ll go into all the details in a later chapter, it’s good to know that both allow you to
select PODxt channels, tap in your effect speeds/times/tempos, and kick in the tuner,
plus both give you Wah and Volume pedal control. Whichever of these two Line 6 foot
controllers you choose, it will plug into the PODxt
older Line 6 Floor Board and FB4 pedals will not work with your PODxt.
6
Pedal jack. Remember that the
MIDI Mania
Those of you with MIDI-capable studios will find that your PODxt lets you control
everything via MIDI. Using MIDI, you can select any PODxt Channel and automate any
xt parameter. You are truly lord of your domain. Pretty neat, huh? Read the Deep
POD
Editing & MIDI Control chapter if you plan to venture into this realm.
Re-Amping
What is Re-Amping?
For years, creative recording engineers have used what they call “re-amping” to add a
whole other layer of creativity to the recording experience (some would say that it’s a
whole other layer of complexity, but we won’t get into that particular argument here).
What re-amping consists of, in the old-school way, is using a splitter/direct box to feed
the guitar to both an amp (for monitoring and recording one track) and straight to the
board (for a completely unprocessed dry signal to tape on a second track). This gives
the ability to tweak the guitar tone after the fact. If you get the perfect performance, but
discover on mixdown that the guitar tone isn’t sitting quite right in the track, you don’t
have to bring the guitarist back into the studio (paying his exorbitant rates) to re-cut the
track. You simply feed the dry guitar track back out to an amp and dial up a more appropriate tone.
To do all this used to require the aforementioned splitter/direct box, some sort of impedance and level matching box for feeding the signal back to the guitar amp (because the
Page 37

Getting Set Up
signal coming out of the board or direct from tape doesn’t look like a live guitar signal to
the amp, so it won’t sound quite like a live guitar when you’re done), a box full of mics,
a closet full of amps, a tangle of cables, and a lot of time to set all that stuff up. What a
pain, huh? Well, with the PODxt, you’ve already got the box full of mics and the closet
full of amps. We’ve built the rest into the USB driver (which is, of course, available for
free from the Line 6 website or through the Line 6 Monkey program we’ve mentioned
earlier in this manual).
Re-Amping via USB
Once you’ve downloaded and installed the USB driver, whether directly from the Line
6 website or by letting Line 6 Monkey do all the work for you, you’re ready to re-amp.
Here’s how:
The PODxt Family USB driver (which we will henceforth refer to as the driver to save
our delicate typing fingers, okay?) has four (4) different signal routing options, all of
which have their own purpose.
1. Send processed guitar – This routing option is the default setting for normal
3•5
recording. As you can see from the diagram, the guitar goes right to the internal
processing of the PODxt, the processed signal is sent to the computer (so you
can record it) and the output of the PODxt shows both the processed guitar
signal and the tracks that you’re playing on the computer. Pretty straightforward,
isn’t it?
Page 38

Getting Set Up
3•6
2. Send clean guitar – This is the basic re-amping “get my dry guitar recorded”
setting. The dry guitar input signal is sent to the computer for recording, and
also to the internal processing of the PODxt so you can hear how the guitar
sounds through the amp and effects you’ve dialed up. The tracks you’re playing
and the processed guitar signal are sent to the output of the PODxt so you can
monitor your performance.
3. Send clean guitar, re-amp playback – This one’s a little tricky, but it has it’s uses.
The dry guitar is sent to the computer and to the internal processing. The
computer signal is also sent to the internal processing and only the internally
processed signal from the PODxt is sent to the outputs. This one is useful if
you’re trying to double a guitar track you’ve already recorded (or play a harmony
line or contrapuntal part to that track) for a track that you’ll also be re-amping.
You’ll generally be playing only the 1st track and a click reference unless you like
the sound of the entire band through a raging amplifier.
Page 39

4. Send Re-amp playback – This would be your traditional re-amping set up. The
computer audio is sent to the internal processing of the PODxt, and the processed signal is fed back to the computer for recording and to the outputs of the
PODxt for monitoring.
So how do we put this all together? Here’s the basic workflow:
1. Using routing setting 2 - Send Clean Guitar, record the basic guitar track while
monitoring the whole mix through the PODxt’s outputs. This should result in a
recorded track of crystal clear, unprocessed dry guitar.
2. Using routing setting 4 - Send Re-amp Playback, use your recording program to
assign the playback of the track you want to re-amp to the PODxt input and arm
a new track for recording that’s assigned to the PODxt output. When you press
“Record” on your software, what you should end up with is a new track that has
all the juicy goodness of PODxt’s amp and effect modeling, while leaving your
original dry track alone, so you can do it all over again with yet another round of
re-amping.
Getting Set Up
3•7
Obviously, with all these different routing options available, there are a lot of other
things you can do - far more than we can cover in this manual, as a matter of
fact. We recommend spending some time experimenting with the other routing
options after you get the basic process down, and if you come up with something
really cool and twisted, let us know.
A few notes about stuff that you may run into:
Latency – No doubt about it, computer recording has latency issues. Anytime you send
Page 40

Getting Set Up
3•8
a signal in and out of the computer, it takes time, even if it’s only a couple of milliseconds. That new track you record by re-amping will be just a wee bit behind the original
track. Do it a few times and it’ll start to sound funny. Check your recording software for a
latency compensation feature. Sometimes it’s automatic, sometimes you just have to drag
the new drag backwards a couple of ticks to line it up with the original. Unfortunately,
there’s no magic wand for this. Time only moves forward, at least until you drag the track
back.
Latency, part II – How your buffer size is set on your recording software can have an
adverse effect on latency. Larger buffers equal higher latency, small buffers equal more
load on your CPU, which can mean clicks, pops, and dropouts. Every system is different,
so you’ll have to spend some time finding out what the most reliable settings on your
system are. We highly recommend NOT having other programs (like email, browser, and
especially games) running in the background while you’re recording. After all, they don’t
play Pong on the board in a pro recording studio.
Imaging – It may have stereo outputs, but the PODxt’s input is mono only. You can’t
feed it a stereo signal (well, you can, but what you’ll get out is mono). It’s important to
remember that when you’re assigning tracks to the PODxt for re-amping.
Page 41

Podxt — Playing Live
xt prO users, fast forwarD to the pOdxt prO – cOnfiGuratiOns &
pOd
OnnectiOns section at the enD of this chaPter.
c
Getting Set Up
Mount Up
If you perform live, you’ll probably want to have the PODxt in a handy spot on stage.
One of the easiest ways to get it there is with the optional PODxt mic stand/amp top
adaptor you can get from Line 6 — it’s described on the Line 6 web site (where it can
also be purchased). We know this is another shameless plug to get you to buy more gear,
but what the heck — this really is a handy little item to get the PODxt’s righteous red
aluminum chassis wherever you need it for mid-show tweaking. And that custom PODxt
carry case is simply smashing.... But let’s get back to educational stuff:
Keeping Your Options Open
When you’re playing live with PODxt, you’ve got a choice of setups. You can plug
straight out of the PODxt’s outputs into the house system for awesome tone without the
hassle of mics and cabinets and all that other stage setup. You can also choose to run
xt into a power amp and speaker cabinets, using it as the ultimate preamp. Or, you
POD
can plug your PODxt in between your guitar and a guitar amplifier so PODxt acts as a
tone shaping front end for the amp. Whichever setup you choose, you’re gonna have to
tell your PODxt about it first. Read along and we’ll get’cha dialed in like a pro.
What are you connecting to?
You can supply your PODxt with one of three answers to this question, and thereby
ensure that your friend on the floor gives you the best possible tones in any setup. Press
the Tune/System button and turn the Select knob clockwise until the display asks,
“What are you connecting to?”
3•9
Page 42

Getting Set Up
studiO direct—When plugging PODxt straight into a P.A., or using in-ear monitoring
systems, press the Soft Button below dest and turn the effect tweak knob 14 to select
studiO direct for amazing amp and effect tone, night after night. Line 6 exclusive A.I.R.
processing serves up a virtual speaker-cabinet-air-microphone experience so good you
may never use a regular guitar amplifier and microphone on stage again. You’re as powerful as the entire P.A.—and guaranteed to be in the mix!
3•10
cOmBO frOnt, cOmBO pwramp, stack frOnt & stack pwramp
—
Choose one of these modes when you’re plugging your PODxt into another guitar
amp, or a power amp and guitar speakers. When you’re running Amp Modeling in your
xt with one of these modes activated, the Mic and Room components of A.I.R.
POD
are turned off, and the Cabinet Models are revoiced to sound their best coming through
the kind of speaker you choose. The “Pwramp” variations should be used when you’re
running straight into a poweramp driving speakers, or running into the effect return of
an amp so that its own preamp is bypassed and you’re getting your PODxt’s signal right
to the power amp section. Choose a “Front” variation when you’re plugging right into
the front of a combo amp or head, which will also run you through that amp’s preamp
section. The two “Front” modes also give you some Tone Correction controls, as shown
here:
The idea of these Tone Correction controls is to adjust PODxt’s overall sound to
compensate for the tonal response of the preamp section of the amp that you’re
plugging into. We’ve found that it is often necessary to reduce the low frequency or
high frequency parts of the PODxt to get decent results in this sort of a configuration,
or shift the focus of the mid frequencies, so that’s what these controls are set to do.
Press the Soft Button 18 below lOws or hiGhs and twiddle the effect tweak 14 knob
to reduce the amount of low or high frequencies that the PODxt will send out. Use
fOcus to choose which mid frequencies to emphasize.
Note: When running PODxt into a guitar amp (as opposed to studio monitors or
headphones) remember that different speaker/amp combinations sound wildly
different. Consider the name of each dest choice as a recommendation only,
and experiment with all the options to see which sounds best for your particular setup.
Page 43

And last but not least On our lineup of available dest choices is...
Getting Set Up
BOSE PS1
—Choose this when plugging into a Bose PS1 Cylindrical Radiator™ loudspeaker system. We specially tuned this mode for great sound from the innovative new
sound system that you can learn more about from www.bose.com.
xt remembers the “What are you connected to?” settings you choose, so you don’t
POD
have to re-set them every time you power up. If you change to a different setting when
using a different setup, don’t forget to change back to your standard setting once you get
back to your regular setup.
Getting The Right Tone With An Amp
The first thing to consider when running PODxt in front of an amp is what you want to
achieve. If you want to use your amp for its tone, with PODxt supplying effects and some
extra distortion when needed, then you’ll generally get the best results turning the amp
modeling off on PODxt, and using a stomp box model when you want to add distortion.
The sounds that are pre-programmed in Banks 9-16 are set up this way, to complement
the tone provided by your amp. For this setup, you’ll want to plug right into your amp’s
front panel guitar input, and be sure you’ve made the proper choice of cOmBO frOnt
or stack frOnt on the “What are you connecting to?” system page (see page 3•5).
On the other hand, if you want to use PODxt’s Amp Modeling ability to transform the
basic tone of your amp to make it sound more like another amp, you’ll probably want
the amp modeling on. If you’ve got an amp with effect send/return jacks, or a power amp
input, we recommend you first try feeding your PODxt’s input into them, bypassing your
guitar amp’s own preamp and its tone contribution. Then be sure you’ve made the proper
choice of cOmBO pwramp or stack pwramp on the “What are you connecting
to?” system page (see page
the front of your amp, try cOmBO frOnt or stack frOnt mode on the “What are
you connecting to?” system page.
3•5). If, instead, you’re plugging right into the guitar input on
3•11
It’s also important to be realistic about what you’re going to achieve here — as good as it
is, PODxt won’t be able to make a $100 combo amp with a cheap speaker sound exactly
like the vintage amp of your dreams. When you’re plugging into the front of an amp, it’s
a good idea to start off with that amp in neutral. What is “neutral,” you ask? Well, if you
only have one volume control on your amp, set it low enough to get a “clean” tone; that
ensures PODxt’s sounds come through as purely as possible. If you have a master volume
in addition to a volume control on the input, set them both so that the first volume
doesn’t overdrive the master volume (so you’re getting a clean tone). This will vary from
Page 44

Getting Set Up
3•12
amp to amp, but usually the input volume is going to be less than the master volume to
get a clean, non-distorted sound. If you have passive tone controls, try setting your mid
control at max, and your treble and bass controls at zero (this is actually “flat” equalization-wise on most amps). Active tone controls may vary, but just be sure you’re not
overdriving the amp so the PODxt tone comes through without extra coloration. Once
you get going, you can tweak the amplifier settings to suit your tastes. Try to set PODxt’s
O
utput so you’re not overdriving the input of the amp.
External Stomp Boxes and Podxt
If you’ve been playing guitar for a while, you probably have some favorite pedals that
you dig. And even though PODxt has now graced your life with some pretty hip stomp
box and rack effects models, you probably still want to have the option of keeping those
old pedals in your arsenal. No problem! Just remember that if you’re going to use PODxt
with those other effects boxes in front, they’re going to act differently based on the Amp
Model you’ve selected on your PODxt. It’s just like you’d expect — different combinations will produce a veritable feast of tone! Some distortion boxes may sound overly
harsh if you max their output volume into your PODxt. Try lowering the distortion box’s
volume, and you can always add more gain with PODxt’s driVe knob or its own stOmp
effects.
Page 45

Podxt Pro — Configurations & Connections
FEATURE FOCUS
To use the USB connector, visit www.line6.com to download PoDxt USB Driver Software,
as well as Line 6 Edit Mac/Windows software or GuitarPort (Windows only) software.
Getting Set Up
Selecting An Input
Press the i/O & diG select button 26 once to see this page where you select from
xt Pro’s many inputs and digital options:
POD
Press the far-left Soft Button below input and select from these options:
Guitar in—Pick this when plugging your guitar straight into the front panel input
jack. When this is selected, audio from the rear panel’s line level input and digital inputs
is ignored.
line in—Select this option when whatever you want to run through PODxt Pro is
plugged into the rear panel line leVel input 29. When this is selected, audio from the
front panel input and the digital inputs is ignored.
aes left, aes riGht, aes l+r—Select one of these to use the rear panel aes/eBu
digital inputs. The aes l+r option merges the left and right AES inputs to mono, since
xt Pro only allows a mono input. When this is selected, the front and rear panel
POD
analog inputs are ignored.
spdif left, spdif riGht, spdif l+r—Select one of these for the rear panel s/pdif
tal inputs. The spdif l+r option merges the left and right S/PDIF inputs to mono, since
xt Pro only allows a mono input. When this is selected, the front and rear panel
POD
analog inputs are ignored.
36
36
2
digi-
3•13
Page 46

Getting Set Up
FEATURE FOCUS
3•14
Input & Digital Out Options
Press the i/O & diG select button
Pro’s many inputs and several digital options:
FORMAT: Sample rate, word length (bit depth), and clock source
Press the Soft Button below fOrmat and spin the effect tweak 14 knob to choose to
output any combination of 16, 20 or 24 bits along with 44.1, 48, 88.2 or 96 KHz. PODxt
Pro will use its internal clock to generate the sample rate you choose.
Or choose match aes in or match spdif in from the fOrmat options, to have PODxt Pro
clock to the sample rate being received, and output data in the same rate/bit format.
Clocking to external gear: Whatever you’ve selected as your input (including analog
Guitar In or Line In), you can still pick match aes in or match spdif in for fOrmat to have
xt Pro slave to the clock of your other digital equipment. For instance, feed PODxt
POD
Pro’s digital input with an output from your digital mixer, choose that source for fOrmat,
and PODxt Pro slaves to your digital mixer’s clock and matches its digital audio format.
Sweet.
26
once to see this page and select from PODxt
Page 47

MODE: Normal or Dry Guitar
FEATURE FOCUS
Getting Set Up
Press the Soft Button below mOde and spin the effect tweak 14 knob to choose nOr-
mal (delicious amp-cab-fx-mic-room processed sound comes out of the digital outs) or
dryGtr (unprocessed guitar comes out of the digital outs). See page 3•15 for more info
on why this can be cool.
GAIN: Extra gain on the digital outs
Press the Soft Button below Gain and spin the effect tweak 14 knob to add up to 12 db
of gain on the digital outs only. This can be used to increase the digital output level of
sounds that don’t have a lot of distortion or other settings that are driving their levels up.
“Danger, Will Robinson!” Well, not danger, really, but important to know: If you are
recording the dry guitar signal via the digital output and intend to re-amp the signal by
digitally feeding it back to PODxt Pro later, DO NOT add gain—leave the signal at
+0db—and play the signal back from your recorder to PODxt Pro’s digital input without
an increase or decrease in level. If you dash madly forward and don’t follow this advice,
you’ll be feeding the re-amp signal to PODxt Pro at a different level than the signal that
was used while you were tracking the guitar in the first place, and the change in input
gain to PODxt Pro will make it impossible to get a clean sound, or will give you a less
gainy sound than you expect. Of course, if you’re a danger-lover looking for unpredict-
able versatility during re-amping, this may be just your thing.... See page
on that.
3•15
3•15 for more
Page 48

Getting Set Up
FEATURE FOCUS
3•16
What are you connecting to?
You can supply your PODxt Pro with one of three answers to this question, and thereby
insure that your trusty tone partner gives you the best possible sound in any setup. To
start the dialogue, press the i/O & diG select button
“What are you connecting to?”
studiO: direct—When plugging PODxt Pro straight into a P.A., or using in-ear monitor-
ing systems, press the Soft Button below dest and turn the effect tweak knob 14 to
select studiO: direct for amazing tone, night after night. Line 6 exclusive A.I.R. process-
ing serves up a virtual speaker-cabinet-air-microphone experience so good you may never
use a regular guitar amplifier and microphone on stage again. You’re as powerful as the
entire P.A.—and guaranteed to be in the mix!
liVe: cOmBO & liVe: stack—These modes are best when you are running into a power
amp that is driving guitar cabinets. The Mic and Room components of A.I.R. are turned
off, and the Cabinet Models are revoiced to sound their best coming out of the 1/4-inch
jacks to feed the kind of speaker you choose. The XLR outputs have additional processing to simulate the sound as it will be heard coming out of your speakers, and can be sent
to a P.A. or house sound system.
26
twice to see the display ask,
BOSE PS1
speaker system. We specially tuned this mode for great sound from the innovative new
sound system that you can learn more about from www.bose.com. It is important that
you use only the XLR outputs in this mode, connecting them to the Bose system. (The
1/4-inch outputs do not output correct sound in this special mode.)
xt Pro remembers the dest setting you choose, so you don’t have to re-set every
POD
time you power up. If you change to a different setting when using a different setup, don’t
forget to change back to your standard setting once you’re back to your regular setup.
—Choose this when plugging into a Bose PS1 Cylindrical Radiator™ loud-
Page 49

Getting Set Up
FEATURE FOCUS
FX Loop
Press the Soft Button below fx lOOp and spin the effect tweak 14 knob to choose
series or parallel operation for the loop.
Setting lOOp to series means that PODxt Pro will send its full signal out to the effect,
and then output the signal that returns from the effect. If you turn the effect off, or turn
its output level all the way down, you won’t hear anything. Use the mix control on the
effect unit that’s connected to the loop to determine how much effect you hear versus
how much of the uneffected PODxt Pro sound. Please note that the PODxt Pro’s effects
loop is entirely analog and is placed directly before the analog outputs, so anything run
in the loop will not be present in the digital out. This is a great way to record “wet cab/
dry cab”, as you can record dry signal from the digital outs, then use the main outputs to
record the effected signal separately.
If you set lOOp to parallel, PODxt Pro will send a parallel copy of its signal to the loop,
while simultaneously sending its signal to its own outputs as usual. Some people prefer
this type of setup, because only a small portion of their tone is run through the effect,
preventing some effect units from degrading their overall tone. When running parallel,
you should set the mix control on the effect unit that’s connected to the loop to 100%
wet. Then adjust the balance of effect versus uneffected PODxt Pro sound by adjusting
the output volume control of the connected effect unit.
3•17
PLEASE NOTE: Many effects can result in compromised sound when run in parallel, because the signal coming back from the effect unit is out of phase with the
signal that has stayed in the PODxt Pro. This is generally not a problem for delay
or reverb, as long as the external effect is running 100% wet. It is often a problem
with modulation effects (chorus, phase, flange, etc.), compression, or any other effect that includes some unprocessed sound mixed with processed sound. For these
effects, series is generally the way to go with the effects loop.
You can turn the loop on/off from a connected FBV foot controller or the loop on/off parameter in the last edit displays. This on/off state is stored with Channels that you save,
so you can have some with the loop on, and some with the loop off.
Page 50

Getting Set Up
FEATURE FOCUS
AES/EBU or S/PDIF Data Format?
PODxt Pro’s AES/EBU and S/PDIF digital outputs are both active at the same time, and
each have the electrical properties appropriate to their respective digital standards. The
ones-and-zeroes digital data that is transmitted in the AES/EBU and S/PDIF standard is
almost—but not exactly—the same.
Since both of PODxt Pro’s physical digital outputs always sends the same data, we’ve
3•18
given you the diGOut parameter to decide whether this data should be formatted according to the AES/EBU standard, or the S/PDIF standard. In practice, many pieces of equipment will accept either data format from either connector, but if you want to be sure you
are sending exactly the right format that you prefer, this parameter is for you:
Radiation Alert
You’ll probably find, especially if you are using a guitar with single coil pickups, that
it is quite easy to pick up some serious noise from any computer CRT (which stands
for cathode ray tube) display you might have in your studio. CRT displays are, after
all, just special purpose ray guns that shoot photons at you all day long. Your guitar
pickups receive and amplify the electro-magnetic fields that your display radiates, and
you hear this in your audio signal as buzz and hum. Moving farther from the CRT, and
turning your guitar so it does not directly face the computer’s display, will minimize
this problem. But if you find yourself in a tight studio setup, needing to lay down some
quick tracks, and being pestered by CRT-induced buzz, you may find it helpful to do as
we have sometimes done: set up your track to record and start your pre-roll; reach up
and flick your computer monitor’s power switch off; record your guitar part; stop your
recording, flick the monitor back on, and check out the buzz-free playback. Flatscreen
LCD monitors generally don’t cause hum and buzz. And just in case you’re looking for
an excuse to buy one... Line 6 Variax guitars are immune to this sort of radiation-induced hum also, since it does not use traditional magnetic pickups.
Page 51

Pedal Power
FEATURE FOCUS
PODxt Pro has a couple of foot control options that make getting great guitar tracks
even easier: the Line 6 FBV and FBV Shortboard. While we’ll go into all the details
in a later chapter, it’s good to know that both allow you to select PODxt Pro channels,
tap in your effect speeds/times/tempos, and kick in the tuner, plus both give you Wah
and Volume pedal control. Whichever of these two Line 6 foot controllers you choose,
it will plug into the PODxt Pro Pedal 6 jack. Remember that the older Line 6 Floor
Board and FB4 pedals will not work with your PODxt Pro.
MIDI Mania
Those of you with MIDI-capable studios will find that your PODxt Pro lets you control
everything via MIDI. Using MIDI, you can select any PODxt Pro Channel and automate
any PODxt Pro parameter. You are truly lord of your domain. Pretty neat, huh? Read the
Deep Editing & MIDI Control chapter if you plan to venture into this realm.
Re-Amping with Podxt Pro
Having issues with commitment? PODxt Pro address your needs with its support for
re-amping—the process of recording “dry,” unprocessed guitar and then processing
it “live” during mixing so that you have totally flexibility to adjust your tone. This is
similar to the way most people record vocals without reverb—they may “audition” some
reverb while tracking, but the vocal signal sent to their recorder is generally sent without
the reverb, so they can make the final choice of reverb tone and amount during mixdown. Even if you don’t plan to rely on re-amping all the time, you may find it handy
to record a re-amp-ready dry guitar at the same time as your standard processed guitar
signal, so the dry guitar is standing by if you need to salvage what might otherwise turn
out to be an unusable take of a once-in-a-lifetime performance.
Getting Set Up
3•19
Analog Re-amping
Just like you would for normal recording, connect your guitar to the Guitar In jack on
the front of the PODxt Pro. And connect PODxt Pro’s left and right Analog Outs to
your audio system to you can hear what’s coming out of them. Play a little guitar just to
make sure you’re hearing it. OK so far.
Page 52

Getting Set Up
FEATURE FOCUS
3•20
Now, connect the rear panel Unprocessed Guitar Out to an analog input of your
recording device, and route it to a record track. This is the signal you will be recording
so that it can be used for re-amping during mixdown. You may also, if you wish, track
xt Pro’s left and right outputs to your recorder at the same time.
POD
Connect the monitor output from this record track that’s receiving the unprocessed guitar signal to the rear panel line in jack of PODxt Pro. Press the i/O & diG select button
26
once to see this page:
Press the Soft Button below input and spin the effect tweak 14 knob to choose line in.
xt Pro is now ready to process the signal that’s received at the line in, while simul-
POD
taneously sending your unprocessed guitar signal to the Unprocessed Guitar Out, so
you can record it.
Dial up your tone as you normally would, and record. The dry signal will be recorded,
and all the while you will hear the full Amp, Cab and Effects processing of your PODxt
Pro at the same time. Like listening to reverb on your vocal while recording, without
committing it to the recorded track. Pretty cool, huh?
Now, as you mix, you can adjust the guitar tone to your heart’s content. Turn up the
Drive a little, back off on the Chorus—heck, change the Amp Model and use a different modeled microphone selection. When you are ready to commit a processed sound to
a track, you can record the left and right analog or digital outputs of the PODxt Pro to
your recording system.
Page 53

Getting Set Up
FEATURE FOCUS
Digital Re-amping
In this scenario, we’re going to track PODxt Pro’s analog outputs, while also recording
a “safety” track of dry guitar digitally, so the dry guitar can be used later if you need to
make a tone change.
Connect your guitar to the Guitar In jack on the front of the PODxt Pro. Connect
xt Pro’s left and right Analog Outs to your audio system so you can record them
POD
while you are also listening to what’s coming out of them. Play a little guitar. Hear it?
OK so far.
3•21
Press the i/O & diG select button
Press the Soft Button below input and spin the effect tweak knob to choose Guitar in.
Select dryGtr for the mOde option. Connect PODxt Pro’s aes/eBu or
s/pdif
you’re simply “saving it for a rainy day” so that you can “fix it in the mix.”
Also, be sure Gain is set to +0dB; adding gain to get a hotter signal to your record track
won’t improve signal to noise ratio or any other aspect of audio quality, and will cause
problems when you actually attempt to use this signal later for re-amping, so take our
advice: don’t do it!
Now, the idea is to record the main analog outputs to your recorder, while the dry guitar
is also being recorded on a separate track. Monitoring the processed guitar signal and
punching in/out works exactly as you would expect it to if you were recording any other
analog signal into your recording app/device. The bonus here is that you also have a digitally recorded unprocessed guitar signal that can be used to create a new (or additional)
sound that you can use later. Speaking of which...
digital outputs to your recorder. Do not monitor this signal while recording—
26
once to see this page if it’s not already shown:
Page 54

Getting Set Up
FEATURE FOCUS
3•22
When you want to make use of that digitally recorded dry guitar signal, send it out of
your recorder to one of PODxt Pro’s digital inputs, and select that input as aes left has
been selected here:
Don’t change (increase or decrease) the playback level of the dry guitar track; send it out
to PODxt Pro at exactly the same level it was recorded at. Then connect PODxt Pro’s
analog or digital outputs to your recorder, and you record processed guitar sound while
making whatever tone changes best fit the needs of your final production.
Page 55

Creating & Storing Sounds
creatinG & storinG sounds
This chapter gives you the inside scoop on editing your new PODxt. Here, we’ll take you
through everything from loading and changing sounds to full customization of PODxt’s
Amp and Effect Models. Even you power users will want to read on and learn the tips
and tricks to the quickest way around for instant tonal satisfaction. You can also use
Line 6 Edit software, downloadable from www.line6.com, to edit your PODxt, backup
your memory, and save a library of sounds on your computer.
Recalling Channel Memories
When you first turn your PODxt on, the display will look something like this:
Use the select knob to spin through the channels, which are organized into 16 Banks,
where each Bank has four Channel Memories: A, B, C, D. (Chapter 8 tells how to do
this and more with your feet to make your guitar-playing hands happy!)
4•1
Try spinning that select knob to find something you like. Need a bit more bass, or perhaps lots more drive? No problem! Simply reach up, grab a knob and twiddle away, my
friend. In addition to the tone, volume and reVerB knobs, you’ve got those handy on/off
buttons for the effects, plus the smart effect tweak knob that is always ready to change
the most important effects parameter.
Recalling Effect Setups
One of the handy functions of your new PODxt is the ability to create and save custom
Effect Setups. Think of them like pre-wired pedal-boards, or pre programmed rack gear.
Your PODxt sports 64 of these setups, and they are accessed by turning the effects knob.
Give that knob a spin to see the names and hear the sounds of all those Effect Setups as
you turn. Later in this chapter we’ll show you how to save your own custom Effect
Setups for use anytime, anywhere!
Editing Basics
Page 56

Creating & Storing Sounds
In this section we’ll take a trip into tweak. A Deep Dive into the way your PODxt
works, and how to make it best work for you. PODxt’s knobs, buttons and display give
you direct access to absolutely every detail. No need to connect to a computer for detailed editing as is required for the original POD.
To begin your editing adventure, all you have to do is press the edit button to light it up.
Now turn the select knob. Well lookey here, everything you’d ever want to tweak on
your PODxt is right there in front of you. To change something shown on the display,
simply press the Soft Button
4•2
you tweak here, by the way, is remembered when you press saVe and choose a Channel
Memory to save to.
Double Press for Easy Access
Want to change the Mod effect, or pick a different Delay model? No worries! Press twice
quickly on the cOmp, stOmp, mOd or delay button any time to go straight to the first
page of parameters for the associated effect. Another double-press will pop you right back
out of Edit, so you can surf for more tone. (The caB/a.i.r. button just takes a single press
to select its page, or leave Edit.)
18
directly below it and spin effect tweak. Everything
When the edit button is NOT lit, you’ll notice that the two right Soft Buttons
have the boxed words Gate and eQ. Double-press one of them to jump right to the edit-
ing page for that effect. Then press the edit button to leave again.
Inside the Edit Menu
When the edit button is lit, you’ll see that there is a graphic representation of the edit
“menu” on the left side of the PODxt’s display. Turn the select knob, and notice that the
box in the graphic slides up and down the menu, with each dot in the graphic representing one of the available edit pages. This “scroll bar” is there to help you keep your place
in the great circle of life, er, edit pages.
18
Page 57

Creating & Storing Sounds
Amp knob settings
With the edit button lit, spin the select knob counterclockwise to select the first page
from the edit menu. This page shows the knob settings for the current channel. With
the edit button NOT lit, double-press the Soft Button labeled amp to see the Amp
Model settings. It looks like this:
At the top of the display you’ll also see the Amp Model name. Now, spin the amp
Odels knob. See how the tone controls change? This shows you the settings that the
m
helpful elves at Line 6 have programmed for each Amp Model. Read on to find out how
to customize them for your taste.
Look carefully now... do you see the little ‘dots’ by the knobs? These tell you where the
knobs were last saved. Reach up and spin the Drive knob. Notice that the knob moves
on the display. Cool, huh? And notice that the little dots are still where they were. This
allows you to compare your edit with the saved settings for this Channel Memory. Now,
that’s handy!
4•3
Amp Bypass Channel Volume
If you’ve got the amp off, the display will instead look like this:
This is the volume that this channel will be set to when amp is bypassed. It does not affect the volume that you’ll hear when amp is not bypassed.
Page 58

Creating & Storing Sounds
Cabinet and Mic settings (There’s magic in the A.I.R.!)
From the Amp Knob display, turn Select one click to the right (you can also get here
directly by pressing the Cab/A.I.R. button). You’re now looking at something like this:
4•4
These are the advanced A.I.R. settings where you can mix and match any cabinet model
with any amp, as well as dial in the perfect microphone setup.
Press the button under the displayed word caB, then use the effect tweak knob to spin
through the available Cabinet models.
You can change the microphone selection or spread of the room the same way. Press the
button under the displayed word mic, then use effect tweak to spin through the Mic op-
tions, or press the button under rOOm and dial in more or less room.
These settings allow you to completely customize the sound of the virtual recording environment we call A.I.R. — all without leaving the privacy of your own mind! Remember,
you can get to this page at anytime from anywhere with a single press of the caB/a.i.r.
button.
Comp/Gate settings
From the A.I.R. settings display, turn select one click to the right (you can also get here
directly by double-pressing the cOmp button any time, or double-pressing the Soft Button under the word Gate when the edit button is not already lit). You’re now looking at
something like this:
Just like any other edit page, you can press a Soft Button then turn the effect tweak
knob to adjust the settings shown here. Chapter 6 tells you more about getting the
most out of the Comp and Gate effects.
Page 59

Creating & Storing Sounds
EQ settings
From the Comp/Gate settings display, turn select one click to the right (you can also get
here directly by double-pressing the Soft Button
button is not already lit). Welcome to the eQ edit display:
18
under the word eQ when the edit
The 4 graphic sliders on the left side of the page show you the gain settings of the four
bands of PODxt’s 4 Band Semi-Parametric EQ. The bands toward the left are for lower
frequencies, the bands toward the right are for higher frequencies, and you can adjust
the gain and frequency of each of them. The far left band is a low shelf, affecting all
the sound at and below the frequency you select for it, and the far right is a high shelf,
affecting the sound at and above its frequency. The middle two are band pass filters,
affecting the sound centered on their frequency. The currently selected band is shown
with heavier graphics, like the fourth band in the illustration. Press one of the two Soft
Buttons on the left to select one of the four bands for adjusting.
Pressing the two left Soft Buttons simultaneously will set the EQ “flat,” so all bands
have a gain setting of 0 and a default setting for frequency. Press the third Soft Button
from the left and turn the effect tweak knob to adjust Gain for the correctly selected
band. Press the far right Soft Button and turn the effect tweak knob to adjust freQ for
the correctly selected band. As you do all this, you can press two right Soft Buttons
simultaneously any time to turn the EQ off (“EQ Bypassed” will show at the top of the
display) and on to see what difference the EQ is making, and insure that the changes
you’re making are improving your sound.
4•5
Page 60

Creating & Storing Sounds
Stomp settings
From the EQ settings display, turn Select one click to the right, or simply double-press
the Stomp button. You’ll be looking at the Stompbox Edit page that looks something
like this:
4•6
As with all of the effects, the first button from the left below the display allows you to
choose the effect model. You can also see that the model selected here, Vetta Comp, has
‘knobs’ for Sensitivity and Level. Pressing the button under sens selects it for tweaking
via the Effect Tweak knob.
Some Stomp effects will have a second page, which you’ll see if you turn the Select
knob. See Chapter 6 to learn the details of the many Stomp models, and how to get the
most out of each one of them.
Mod and Delay settings
Turn the Select knob one click clockwise from the Stomp page(s), or double-press the
Mod button to see the Mod settings pages. Turn Select another couple clicks clockwise
or double-press the Delay button to see the Delay pages. For the most part, things here
work like the other edit pages already described (and Chapter 6 will tell you about all
the Mod and Delay models in detail). The pages look something like this:
Delay Edit Page 1
Delay Edit Page 2
Page 61

Creating & Storing Sounds
AMP/CAB – A.I.R. II DELAYMODULATION
AMP/CABMODULATION DELAY
AMP/CAB + A.I.R. II
REVERBCOMP
GATE
VOLUME
MODULATION DELAY
WAH STOMP DELAYMODULATION
VOLUME
Config
The config parameter on the second Mod and Delay pages determine whether those effects will come before (pre) the amp or after it (pOst) in the signal flow.
Here’s a typical routing with a mOd effect
pre and a delay running pOst:
Here’s another routing with both mOd and
elay effects in the pre position:
d
And this is what the full signal flow looks
like inside your PODxt, including the pre and post options for Mod, Delay and the Volume pedal:
4•7
Page 62

Creating & Storing Sounds
Setting your Tone to Tempo
Mod Speed or Delay Time can optionally be set using note values and tempo:
4•8
1. Select the
2. Spin e
Delay time or Mod speed by pressing the button below it.
ffect tweak counter-clockwise until you start seeing little notes in the place
where milliseconds or Hertz used to be. Pick the note value you’d like your time or
speed to match.
3. Tap twice on the t
ap button to set your tempo, and your Delay and/or Mod now
match the tempo you tapped.
When you set your Delay time to match dotted-eighth notes, for instance, the time control will look like this:
Reverb settings
Our next stop on our little trip through the edit wonderland is the Reverb page. (To get
there, turn the Select knob one click clockwise from delay’s last edit page:
Here you’ve got the ability to change the reverb model (PODxt’s got plenty of them), as
well as the associated parameters necessary to get that really groovy verb going on. The
only thing you won’t find is reverb Mix — that’s because the mix is controlled by the
dedicated reVerB
12
knob.
Page 63

Creating & Storing Sounds
Wah Settings
From the last Reverb edit page, spin the select knob one click clockwise and you’ll find
the wah pedal parameters. The display now looks something like this:
Here you can choose the wah model and save the on/off state of the wah with a Channel Memory. That way when you recall that channel, the wah comes on automatically.
In fact, you can even save the position you want the wah to be set at when it comes on
— by pressing the button below pOsi and twiddling that effect tweak knob.
Volume Settings
Spin the select knob one more click clockwise and you’re at the volume pedal parameters. The display should look like this:
Here you can choose the position of the volume pedal in your signal flow: pre (before the
amp model), or pOst. The min setting determines how much volume you’ll hear when
the volume pedal is at its minimum (heel down) setting. Set it to 0% to have silence in
the heel down position.
4•9
Page 64

Creating & Storing Sounds
Assigning the Pedal and Tweak Knob and dialing in Tempo
Light up the Edit button and spring the Select knob clockwise to the last page and you’ll
get this page:
4•10
Press the Soft Button
18
under assiGn, and you can pick what the pedal of an optional
FBV Shortboard will control. Here are your choices:
Setting Internal Pedal Pedal 2
1 - w/Off
2 - vOl
1 - tweak
2 - vOl
1 - w/v
2 - tweak
Wah/Off Volume
Tweak Volume
Wah/Volume Tweak
Press the Soft Button under tweak, and you can choose which parameter the effect
weak knob will adjust when you are not in the edit pages.
t
The right side of this display shows you the tempo for this Channel Memory. This tempo
is used to calculate the time/speed of any delay and modulation effects that you set to
follow tempo. You set the tempo by tapping the tap button a couple of times. Or you can
press the button beneath tempO and spin the effect tweak knob until you get exactly the
tempo that will make your heart beat with passion and joy!
Page 65

Creating & Storing Sounds
Saving Yourself
PODxt lets you save as many as 128 tones that you create as described earlier in this
chapter. And even though we ship it to you chock full of some of our favorites, go ahead
and save over whatever you want. We recommend spending some time with each of the
factory sounds so you’ll know which you want to keep, and which you’ll want to save
over. And don’t worry, because we’ll soon show you how to recall that favorite factory
sound you just saved over and simply have to get back. You can also visit www.line6.com
to check out the ToneTransfer database, surf around, pull a few down, and even add your
own masterpieces to the lot.
Saving a Channel Memory
One of the simplest things to do with PODxt is call up a Channel Memory, make a few
tweaks, and save that Channel without changing its name. To simply save a Channel
you’ve changed, press saVe, then saVe again. That’s it.
Of course, you might want to stick your sound somewhere else, or at least change the
name so you know which one it is. PODxt lets you do that just as easily.
To save your edit to a new location - Make your edits, then press saVe. This calls
up a screen that looks something like this:
4•11
Now, press the button under the display that reads dest (short for destination) and
then use the effect tweak knob to pick a different Channel Memory. Pressing saVe
again will confirm your decision, and save your sound to that Channel Memory, replacing what was there before.
Give your tone a name - Make your edits, then press saVe. Again, you’ll see a
display like the one above. Now, use the cursOr < and > buttons to move the cursor
under the letters you want to change. Press the button under char (short for character)
and then use effect tweak to change the selected character. When you’re done, press
aVe again to complete the job. See, that wasn’t so bad.
s
Page 66

Creating & Storing Sounds
Custom Saving Amp Models
Using this powerful feature, you can pack your PODxt with all the special amp- tweaking genius that only you possess. This brilliance will then be available instantly at the
turn of the amp mOdel knob, loading your customized version of the Amp Model,
including your chosen Cab Model, Mic selection and your personal tweak of the ‘room’.
This way, when you turn the amp mOdel knob to load the Plexi-45 model, you’ll get
your personal Plexi-45, with all the controls set for your very own version. Here’s how it
works:
4•12
Choose an Amp Model, change the cab, tweak the room, and even use a different
microphone. Press the saVe button, then use the select knob to show the display that
looks like this:
You have entered the land of Custom Save. Now, if you want your current settings to
be recalled with this Amp Model, simply press saVe again.
xt saves the following controls with an Amp Model, and loads them when you
POD
turn the amp mOdels knob:
Controls you can customize
Amp Models
Cabinet Models
Microphone Model and Room amount
Drive, Bass, Middle, Treble, and Presence controls
Channel Volume
EQ settings
Page 67

Creating & Storing Sounds
Custom Saving Effect Setups
As we mentioned earlier, you’ve got easy access to as many as 64 pre-wired pedal-boards
and racks in your PODxt just by spinning the effects knob. We’ve set up 64 of these for
you, but if you always use that tweaked-up fuzz box feeding into your favorite settings of
an analog delay pedal, then phase it all up after the amp, and you use that over and over
with different Amp Models, just make it your own custom Effect Setup. Then, you can
mix it with any of your customized Amp Models any time you want.
It’s easy, just:
Press saVe and use the select knob to scroll down to the page that looks like this:
Where to put it — Press the button under the display that’s labeled dest (destina-
tion) and then use the effect tweak knob to select a location to store it. You may
decide to save these settings in the current location, or you can choose any of the 64
total spots.
What to name it — If you want to give your new Effect Setup a name, now’s the
time to do it! Use the cursOr < and > buttons to move the cursor under the letters you
want to change. Press the button under char (short for character) and then use effect
weak to change the selected character.
t
Commitment — Pressing saVe again will now take a snapshot of your current cOmp,
ate, stOmp, mOd, delay and reVerB settings, and keep them forever and ever.
G
4•13
Page 68

Creating & Storing Sounds
MIDI Dumps
If you want to transfer one or more tones directly from one PODxt to another PODxt,
or between PODxt and a MIDI data recorder, workstation, computer or sequencer,
read on. You’ll need a standard MIDI cable to do the deed. Connect the MIDI Out of
your PODxt to the MIDI In of the receiving device. If you’re exchanging MIDI with a
computer, you also have the option of installing the PODxt Family USB Driver software
(a free download from www.line6.com) and have your PODxt exchange MIDI messages
with your computer over a USB cable.
4•14
You can then transfer:
• All Channels
• The Current Channel
• The Effect Setups
• The Amp Setups (including your customizations)
Transferring All Channel Memories - This feature will let you send all of your
xt Channel Memories out via MIDI for a complete back-up of the 128 Channel
POD
Memories:
Press saVe once, and use the select knob to scroll down to this page:
Press the button under select. Turn the effect tweak knob to the left (counterclock-
wise) until the display reads:
Now, if you press saVe again, the entire set of 128 Channel Memories of your PODxt
will be dumped out of its MIDI jack. If another PODxt is connected, its brain will be
taken over by this data, making it a virtual clone of your own PODxt channels! Who
knew cloning was so easy?
Page 69

Creating & Storing Sounds
Transferring Only Some Channels - To transfer only one or more individual Channel Memories, Effects Setups or Amp Models from one PODxt to another, do this:
Press saVe once, and turn the select knob to show the page that looks like this:
Turn the effect tweak knob to tell PODxt what to transfer:
Any Channel Memory:
All Channel Memories:
All Amp Models:
All Effects Setups:
Now, if you press saVe again, the MIDI dump you’ve selected will be transmitted out
the MIDI jack, into the brain of a receiving PODxt, or into your computer or other
MIDI device for backup.
4•15
Page 70

Modeled Amps & Cabs
Modeled aMPs & cabs
Which Amps and Cabs Are Modeled?
General Notes About the Models
As you may have guessed, we’re tone fanatics here at Line 6. Once we’ve set our sights
on creating a software emulation of a particular kind of amp, we will scour the globe in
search of just the right specimen—that one, very particular amplifier that has the magic.
We are also intensely mindful of the fact that, although amp model names may stay the
same over the years, the circuit designs sometimes change radically. Amps from ’57, ’62,
’65, ’67, ’75, and 2001 may all bear the same model name, yet sometimes have totally different sound and response, and quite often a different look as well. And as we all know,
even two amps with the same circuit design, from the same era, can sound radically different, just on the basis of variance in component tolerances, among other things. Plus,
there’s the fact that every amp has its own special way of settling in over the years. And,
just like people, some of them only get better with age. That’s exactly why we went to
so much trouble to find the very best examples we could of every amp that we wanted
to model for PODxt. And it’s why, when describing the software amp models that are
emulations of other amplifiers, we’ve included photos here of the actual, individual amps
that we lovingly selected, studied and measured—so that you’ll know exactly which amp
we’re talking about.
5•1
So, now that you know what’s in store, let’s take a tour of the amp models that live inside
your PODxt, and the original equipment that helped to make them possible.
There are 42 Amp Models living within your PODxt, plus 24 Cabinet Model selections.
When you turn the effect tweak knob, you select an Amp/Cab combination. You can
then mix’n’ match different cabs with the amp (see Chapter 4 for details). Chapter 4
also tells you how you can customize PODxt to call up your favorite Amp/Cab combinations.
Page 71

Modeled Amps & Cabs
*
All product names are trademarks of their respective owners, which are in no way associated or affiliated with Line 6. These product names, descriptions and images are provided for the sole purpose
of identifying the specific products that were studied during Line 6’s sound model development.
ROLAND® and JAZZ CHORUS are registered trademarks of Roland Corporation. MARSHALL is
a registered trademark of Marshall® Amplification PLC. FENDER® and BASSMAN® are registered
trademarks of Fender Musical Instruments Corporation.
lIne 6’s orIgInals
We’ll start the introductions with the original Amp Models that Line 6 created to give
you even more tonal options than you could get from vintage gear alone:
Line 6 Clean
To create this Amp Model, we essentially grafted the preamp and tone stack of our
model based on* a JC-120 (Roland®’s popular “Jazz Chorus” solid state combo) onto
the poweramp and transformer of our model based on* a classic Marshall® JTM-45 tube
head, thereby giving you the crisp and clear front end typical of a solid state amp, but
with a rich, satisfying tube amp-style bite as you turn it up.
5•2
Line 6 JTS-45
Since the design of early Marshall®s was based on the Fender® Tweed Bassman circuitry,
we wondered what it would be like if we took the preamp and tone stack of our model
based on* the Marshall® JTM 45 and ran it into the poweramp and transformer of our
model based on* the Fender® ’58 Tweed Bassman. What we got was way happening, as
JTS-45 will attest. Great grind and nice punch. A tone the whole family can enjoy.
Line 6 Class A
One of the most satisfying tonal experiences as a guitarist is to play through an amp
that’s driven to the point where the poweramp is just starting to distort, but before it
achieves full clipping. For many players, this is the coveted ‘sweet spot’ they look for on
an amp. Because we’re not limited to physical reality when we’re creating amps in the
digital world, our goal for this one was to make an amp model that was nothing but sweet
spot. One of the great side effects is the ease of coaxing feedback out of this one.
Line 6 Mood
And here we give you a fantasia tone, based on our memories of grunge guitar tones we
have known and loved.
Page 72

Modeled Amps & Cabs
*
All product names are trademarks of their respective owners, which are in no way associated or affiliated with Line 6. These product names, descriptions and images are provided for the sole purpose
of identifying the specific products that were studied during Line 6’s sound model development.
DUAL RECTIFIER® is a registered trademark of Mesa/Boogie®, Limited. VOX® is a registered trademark of Korg Europe Limited.
Line 6 Spinal Puppet
You know how, when you’re playing head-bangin’ music, you look out into the audience
and see all those heads bobbing up and down? Those are Spinal Puppets. Need we say
more?
Line 6 Chemical X
Just like those secret ingredients that detergent companies used to crow about (Now
with Ingredient X-27!), the Line 6 sound design guys wouldn’t tell us anything about the
inspiration for this one or who it might have belonged to (no matter what type of bribery
we attempted). Suffice to say that it’s a very punchy hi-gain sound that also cleans up
quite nicely when you roll your volume back.
Line 6 Insane
Our goal here was to provide you with as much input gain distortion as possible short of
complete meltdown. You get ridiculous, rich tube drive to shame the distortion of pretty
much any amp on the planet (sort of like a Mesa/Boogie® Dual Rectifier® on 10 being
used as a preamp for a Soldano®), while still retaining tonal definition and character. As
a result, you’ll enjoy lots of bottom end and cabinet character with tons of wide-ranging
tone shaping. Crank up the Drive and take no prisoners!
Line 6 Piezacoustic 2
This one is designed to work with the piezo output of solidbody electrics that have one
of those newfangled bridges with the ‘acoustic’ pickup built in. Since you don’t have to
worry about the body shaking itself to pieces with feedback on that type of guitar, we’ve
cooked up this model with more low-mids and low frequencies.
Line 6 Agro
An aggressive high gain amp with a unique Mid control that will take you though the
entire gamut of tone on one knob. How did we do it? The mid knob for this model
changes the character of the distortion. When set to minimum the distortion exhibits
Fuzz pedal characteristics. When the Mid is set to noon it creates creamy modern high
gain amp tones a la Soldano®. And when the Mid knob is turned up to Max it’s very
much reminiscent of that Class A Vox® sound. Of course, then there are all the places in
between...
5•3
Page 73

Modeled Amps & Cabs
*
All product names are trademarks of their respective owners, which are in no way associated or affiliated with Line 6. These product names, descriptions and images are provided for the sole purpose
of identifying the specific products that were studied during Line 6’s sound model development.
MESA/BOOGIE® and RECTIFIER® are registered trademarks of Mesa/Boogie®, Limited.
Line 6 Lunatic
High gain with lots of high mids and no mud. Great for layering with other amps to cut
through on the high end. A wide range of top is available with the Treble and Presence
controls (maybe to the edge of lunacy).
Line 6 Treadplate
The original POD and POD 2.0 had a popular amp model that was our best attempt at
the time to make a model based on* the Mesa Boogie® Rectifier® series of amplifiers.
In addition to the Boogie® vibe, that model had some unique qualities that were all its
own, and people it liked so much, they asked us to let them get that same sound with the
newest generation PODxt. So here it is. In a way, Treadplate marks the first time we’ve
actually modeled another Line 6 product! Here is an excerpt from the old POD manual
5•4
to describe it: “...modeled after* a 1994 Mesa Boogie® Dual Rectifier Tremoverb®. You can
use this Amp Model to get that tight, high gain sound used by bands like Dream Theater or
Metallica.”
Line 6 Variax Acoustic
One of the great features of the Variax Digital Modeling Guitars from Line 6 are their
models of acoustic instruments. These sounds are best appreciated through a full range
monitor or P.A., due to their high frequency content. This Amp Model was created in
order to allow the Variax’s acoustic models to sound as full-range as possible through the
speakers of typical guitar amps. This can come in handy when you’re using an acoustic
model from a Variax, and listening to it through a guitar amp’s speakers. Keep in mind
that since this model provides a large amount of high frequency boost (to compensate for
the natural roll-off of typical guitar speakers) and overdriving a model playing an acoustic guitar is not usually a desired thing, this model will likely appear softer than most
of its compatriots. If you need more gain, the Drive knob can be used to add some tube
preamplification.
Page 74

Modeled Amps & Cabs
Zen Master - Based on* a Budda Twinmaster 2x12 combo
The Budda has a great, warm, Class A/B, sound. The Budda philosophy is all about
power tube distortion. Simplicity is the key. With relatively low front end gain, highly
interactive tone controls, and tube rectifier “sag,” it’s great at getting a classic cranked
sound for small gigs and recording (it’s all of 18 watts). Since the original Twinmaster has
no mid control, we’ve added a little bonus to our model in the form of some post-Amp
Model mid contouring available via PODxt’s middle control. As is true for all such “bonus” tone controls on PODxt’s models, you should set this control to 12 o’clock to get
groovy with the unadorned Budda-style vibe.
5•5
We used the Twinmaster’s Input 2, which is lower gain, when creating this model.
*
All product names are trademarks of their respective owners, which are in no way associated or affiliated with Line 6. These product names, descriptions and images are provided for the sole purpose
of identifying the specific products that were studied during Line 6’s sound model development.
Page 75

Modeled Amps & Cabs
*
All product names are trademarks of their respective owners, which are in no way associated
or affiliated with Line 6. These product names, descriptions and images are provided for the sole
purpose of identifying the specific products that were studied during Line 6’s sound model development. FENDER® and DELUXE REVERB® are registered trademarks of Fender Musical Instruments
Corporation.
5•6
Small Tweed - Based on* a 1953 “wide panel” Fender
®
Tweed Deluxe
®
This Amp Model will snarl with the best of them. The original amp had only a single
tone control, essentially a treble roll off. We set up the treBle knob to give you this
treble roll off when using this Amp Model. Which left us with the Bass and middle
knobs just sitting there, so we set up the Bass and middle as post-Amp Model controls,
which essentially lets you EQ up your tone as you would do on a mixing console after
recording your amp. Set the Bass and middle knobs at halfway to put them in ‘neutral’,
turn the presence to 0, and try the treBle knob somewhere above halfway for a classic
Tweed sound.
Page 76

Modeled Amps & Cabs
*
All product names are trademarks of their respective owners, which are in no way associated or affiliated with Line 6. These product names, descriptions and images are provided for the sole purpose
of identifying the specific products that were studied during Line 6’s sound model development.
FENDER® and BASSMAN® are registered trademarks of Fender Musical Instruments Corporation.
Tweed B-Man - Based on* a 1958 Fender
®
Bassman® 4x10 combo
The Bassman® 4x10 combo was the amp that started it all—instant rock and roll tone.
Originally a bass guitar amp, the Bassman® became a Blues staple for 6-string guitarists. It has the fat bottom end you’d expect from a bass amp, but also has the Fender®
twang on the top. Incidentally, when Jim Marshall built his first amps with Ken Bran
they were heavily influenced by the early Bassman®. One of the interesting things about
the Bassman® is just how interactive the middle and treBle controls are. The middle
control isn’t a bandpass, as in most tone control setups. Instead, it’s almost like a second
treble control. The two are additive, so if you’re running PODxt’s middle knob higher
than halfway up with this model, you’ll find that the treBle control might give you more
bright than you really want. On the other hand, when you turn the middle knob down,
you’ll probably want to boost the treBle. The Bassman®, like many of the amps modeled
for PODxt, didn’t have a master volume. So to get the kind of tone that the Bassman®
can deliver at higher gain settings, you had to crank it up loud enough to do some serious
damage to anyone who might be standing close by. With PODxt, you can get that kind
of tone at a bedroom or studio level — or even through your headphones! Try a Drive
setting of about 4 or 5—it’s guaranteed to dredge up the best R&B licks you know.
5•7
Page 77

Modeled Amps & Cabs
*
All product names are trademarks of their respective owners, which are in no way associated or affiliated with Line 6. These product names, descriptions and images are provided for the sole purpose
of identifying the specific products that were studied during Line 6’s sound model development.
CHAMP® is a registered trademark of Fender Musical Instruments Corporation.
5•8
Tiny Tweed - Based on* a 1961 Fender
®
Tweed Champ
®
This model has a great sound when the Drive is cranked (not bad clean, either). These
amps were originally designed to be sold to beginners, but rock and rollers quickly discovered that you could get a great distorted sound at fairly low volume levels. Many of
the classic guitar solos of the 50’s were recorded through a Champ®. The Champ® had no
tone control, only volume. With your PODxt, it’s easy to get a classic Champ® tone. Just
leave the Bass, middle and treBle controls parked at 12 o’clock, which means they are
“flat,” making no contribution to the tone. Set presence to 0, and it will also be letting
the unadorned classic Champ® tone through. When you’re ready to explore further sonic
territory, spin those and work your magic.
Page 78

Modeled Amps & Cabs
*
All product names are trademarks of their respective owners, which are in no way associated
or affiliated with Line 6. These product names, descriptions and images are provided for the sole
purpose of identifying the specific products that were studied during Line 6’s sound model development. FENDER® and DELUXE REVERB® are registered trademarks of Fender Musical Instruments
Corporation.
Blackface Lux - Based on* a 1964 Fender
®
Blackface Deluxe Reverb
®
The Holy Grail for many blues, country, and “roots” players has been a blackface Fender®
Deluxe Reverb®. After listening to quite a few candidates back when we were seeking
the ultimate Deluxe Reverb® to model during our development of Flextone and POD, we
stumbled upon an extremely cool ’64 Deluxe. We still haven’t found one better.
Most players love a Deluxe when it’s turned up to about 7 for a nice gritty sound that
cleans up when you back off your guitar’s volume knob just a little. Notice how the tone
control response changes as this Amp Model’s Drive is changed: clean settings are crisp
and present, while more driven settings will mellow the high end. This is typical of what
you get from a Deluxe and is nicely captured here. The Deluxe itself has only Bass and
reBle controls, leaving us, once again, with the prospect of a couple knobs with noth-
t
ing to say for themselves. But fear not; in this case, we’ve set up PODxt’s middle knob
so you can add some post-Amp Model Midrange contouring for a little more flexibility,
while presence adds, well, Presence. Once again, set the middle knob to its “neutral” 12
o’clock position and the presence knob to 0 for the classic Deluxe sound. Tweaked up
right, this tone will cut through and sing. We jacked into Input 1 of the Vibrato Channel
to get this model cooked up for PODxt.
5•9
Page 79

Modeled Amps & Cabs
*
All product names are trademarks of their respective owners, which are in no way associated or affiliated with Line 6. These product names, descriptions and images are provided for the sole purpose
of identifying the specific products that were studied during Line 6’s sound model development.
FENDER® and TWIN REVERB® are registered trademarks of Fender Musical Instruments Corporation.
5•10
Double Verb - Based on* a 1965 Fender
®
Twin Reverb
®
The classic blackface Fender® Twin® was a real workhorse. Everybody used it, from jazz
and country players to serious rockers. I myself remember seeing Johnny Winter at a
concert where both he and Rick Derringer—am I dating myself or what?—were using six
Twins stacked in a pyramid. Each. We were in the second balcony and it was REALLY
loud even all the way back there. The Twin® has a lot of tonal flexibility and is at home
in a great many different situations. It never gets extremely overdriven and dirty, mostly
just louder—a lot louder. This is the amp for the classic surf sound. Dial up the spring
reverb, switch on the tremolo, crank up the volume, and look out for bikinis.
Like most everyone who owns one, we plugged into Input 1 of the Normal Channel for
modeling purposes.
Page 80

Modeled Amps & Cabs
*
All product names are trademarks of their respective owners, which are in no way associated or affiliated with Line 6. These product names, descriptions and images are provided for the sole purpose
of identifying the specific products that were studied during Line 6’s sound model development.
GRETSCH® is a registered trademark of Fred W. Gretsch Enterprises, Ltd.
Two-Tone - Based on* a Gretsch
®
6156
Another amp made by Valco/Supro, this is the Gretsch® 6156. One of its curiosities is
that the output transformer is actually mounted on its single 10-inch speaker, rather than
on the amp chassis. It also has a lovely wraparound grill cloth, for a real futuristic look
(or what passed for it in the ’50s).
5•11
Page 81

Modeled Amps & Cabs
*
All product names are trademarks of their respective owners, which are in no way associated or affiliated with Line 6. These product names, descriptions and images are provided for the sole purpose
of identifying the specific products that were studied during Line 6’s sound model development.
HIWATT® is a registered trademark of Fernandes Company Ltd. VOX® is a registered trademark of
Korg Europe Limited. SELMER® is a registered trademark of The Selmer Company.
5•12
Hiway 100 - Based on* a Hiwatt
®
DR-103
Based on a Hiwatt® DR-103, this model gives a great, punchy sound that will cut
through almost anything and retains great definition even when cranked. That’s exactly what designer Dave Reeves was looking for when he left the Sound City division
of Dallas Arbiter in 1966 to form HyLight Electronics. Though his first designs were
more reminiscent of the Vox® and Selmer® amps of the day, it wasn’t long before Reeves
had started producing the amps that ’60s Brit-Rock fans have become familiar with.
Renowned for their ‘tank-like’ construction (due in part to Reeves’ hiring of ‘mil-spec’
wiring specialist Harry Joyce), it was no small wonder this amp was the choice of Pete
Townshend for so many years. It wasn’t just Townshend using Hiwatt®, either. Many
of the then-current crop of British rockers like Pink Floyd, The Moody Blues, Manfred
Mann, and Jethro Tull were also Hiwatt® endorsees. Crank this one up and you can see
for miles.
Page 82

Modeled Amps & Cabs
*
All product names are trademarks of their respective owners, which are in no way associated or affiliated with Line 6. These product names, descriptions and images are provided for the sole purpose
of identifying the specific products that were studied during Line 6’s sound model development.
MARSHALL® is a registered trademark of Marshall Amplification PLC. FENDER® is a registered
trademark of Fender Musical Instruments Corporation.
Plexi 45 - Based on* a 1965 Marshall
®
JTM-45
This Amp Model is based on a ’65 ‘block logo’ (predates the “scrolled” Marshall® logo)
JTM-45 head, complete with a gold Plexiglas front panel. When the royal agents we had
dispatched to the U.K. found this particular amp, we instantly fell in love. The amp even
has the original KT-66s in it, still in great shape! It’s one of the finest examples of a JTM45 we’ve ever heard, and it’s a constant battle at Line 6 to see who gets to take it home
for the weekend.
5•13
Those interested in the genealogy of tone will be interested to note that the JTM-45
marked the beginning of Marshall®’s transition from a mellower Fender®-like tone to the
distinctive, bright “crunchy” sound of the later Marshalls®.
Page 83

Modeled Amps & Cabs
*
All product names are trademarks of their respective owners, which are in no way associated or affiliated with Line 6. These product names, descriptions and images are provided for the sole purpose
of identifying the specific products that were studied during Line 6’s sound model development.
MARSHALL® is a registered trademark of Marshall Amplification PLC. FENDER® is a registered
trademark of Fender Musical Instruments Corporation.ts Corporation.
5•14
Plexi Lead 100 - Based on* a 1968 Marshall
®
‘Plexi’ Super Lead
Modeled after the infamous ‘68 Marshall® ‘Plexi’ Super Lead—coveted by tone connoisseurs the world over. We literally scoured the world for this particular amp, finally finding
a great example of a Super Lead languishing (we like to think fate preserved it for us) in
Holland. By the time this amp was built (ca. 1968), Marshall® had completely changed
the circuitry away from the Fender® 6L6 power tube heritage and moved to an EL34
tube. Another major tone difference was due to the necessary output & power supply
transformer changes. All this mucking about added up to create a tone forever linked
with Rock Guitar. Amps of this era didn’t have any sort of master volume control, so to
get the sound you’d have to crank your Super Lead to max—just the thing to help you really make friends with the neighbors. Hendrix used Marshall®s of this era; a decade later
Van Halen’s first two records owed their “brown sound” to a 100-watt Plexi (Our Super
Lead, in fact, has the ‘lay down’ transformer that was unique to ’68 models, the same as
Hendrix and Van Halen’s Marshall®s.). To get a crunch sound out of a Plexi, you would
likely crank the input volume and tone controls (to 10!). You’ll find that, in keeping
with our “make-it-sound-a-whole-lot-like-the-original” concept, PODxt’s model is set up
to do pretty darned near the same thing.
Page 84

Modeled Amps & Cabs
Plexi Jump Lead - Based on* a 1968 Marshall
®
‘Plexi’ Super Lead
Guitar playing is all about experimentation, isn’t it? That, and finding all the possible
ways to get more distortion out of whatever gear you have at hand.
One of the fun things you can do with a Plexi is take a short guitar cable and jumper
channel I and channel II (as they’re frequently numbered) together for a little extra
saturation. Some guys loved this sound so much that they pulled the chassis and permanently wired a jumper into the amp.
Being the obsessive/compulsive tone freaks we are, we just had to give you a model of
this setup, too.
5•15
*
All product names are trademarks of their respective owners, which are in no way associated or affiliated with Line 6. These product names, descriptions and images are provided for the sole purpose
of identifying the specific products that were studied during Line 6’s sound model development.
Page 85

Modeled Amps & Cabs
*
All product names are trademarks of their respective owners, which are in no way associated or affiliated with Line 6. These product names, descriptions and images are provided for the sole purpose
of identifying the specific products that were studied during Line 6’s sound model development.
MARSHALL® is a registered trademark of Marshall Amplification PLC.
5•16
Plexi Variac - Based on* a Marshall
®
Super Lead Variac
Ahhh, the stuff of legend. According to the stories, part of the magic behind Edward
Van Halen’s ‘Brown Sound’ was a Marshall® 100 watt Super Lead being purposely run at
higher voltage through the auspices of a Variable AC Transformer (aka a ‘Variac’).
While we don’t generally recommend experiments with high voltage sources, especially
ones that might blow up precious gear, we felt it was our duty to see if the stories were
true. So we cranked the Variac up to 140v AC and gave the ’68 Super Lead a power
workout. (Don’t worry, it survived to rock again.) We’re thinking those stories must not
be too far from wrong.
Page 86

Modeled Amps & Cabs
*
All product names are trademarks of their respective owners, which are in no way associated or affiliated with Line 6. These product names, descriptions and images are provided for the sole purpose
of identifying the specific products that were studied during Line 6’s sound model development.
MARSHALL® is a registered trademark of Marshall Amplification PLC.
Brit J-800 - Based on* a 1990 Marshall
®
JCM-800
Turn to this Amp Model to conjure up tones of the coveted JCM 800, one of Marshall®’s
most universally-acclaimed modern amps. This updated version of the Plexi continued
Marshall®’s heritage with added gain and edge for a new generation of rock guitarists.
One of the biggest differences here is that the tone controls are located after the preamp
tubes.
5•17
Incidentally, some versions of JCM 800’s get their distortion by clipping a diode. The
amp we modeled uses a tube for distortion.
The JCM 800 is, of course, the metal sound Marshall® made famous. And although not
many people play Marshall®s clean, it is a great tone, so you should also be sure to check
out this model with a low Drive setting. Of course, you can always pump up the drive
and rage...
Page 87

Modeled Amps & Cabs
*
All product names are trademarks of their respective owners, which are in no way associated or affiliated with Line 6. These product names, descriptions and images are provided for the sole purpose
of identifying the specific products that were studied during Line 6’s sound model development.
MARSHALL® is a registered trademark of Marshall Amplification PLC. ADA is a registered trademark of Audio Design Associates, Inc. MESA/BOOGIE® is a registered trademark of Mesa/Boogie,
Limited.
5•18
Brit JM Pre - Based on* a Marshall
®
JMP-1
Marshall®’s entry into the rackmount preamp world, the JMP-1, has been a favorite of
‘big-hair’ metal guitarists as well as many others looking for a tight, highly saturated tone
without the compression of poweramp ‘sag.’ It was also one of the first MIDI-controllable
preamps.
The overdrive flavor of the JMP is somewhat “Boogie®-esque” and many people saw the
JMP as Marshall®’s answer to the ADA MP-1 and Mesa Boogie® preamps. First introduced in the early nineties, the JMP has enjoyed a recent surge of popularity with new
metal bands looking for a really tight, aggressive, well focused tone without being overly
scooped. Your seven string is gonna love our model developed from our careful study of
the JMP-1.
Page 88

Modeled Amps & Cabs
*
All product names are trademarks of their respective owners, which are in no way associated or affiliated with Line 6. These product names, descriptions and images are provided for the sole purpose
of identifying the specific products that were studied during Line 6’s sound model development.
MATCHLESS® is a registered trademark of Matchless, LLC. FENDER is a registered trademark of
Fender Musical Instruments Corporation. MARSHALL® is a registered trademark of Marshall Amplification PLC.
Match Chief - Based on* a Matchless
®
Chieftain
We crafted this model from our studies of the Matchless® Chieftain. The Matchless® has
an EL34-powered “modern class A” design — hence this model’s name — and a unique
tone (largely due to the complicated EQ scheme).
The Chieftain was designed by Mark Sampson at Matchless® to blend a Fender®/Marshall® type front end with a classic ‘spongy’ and very reactive Class A power section.
5•19
With higher gain than the DC-30 (which is next in our hit parade), the Chieftain is a
great roots-music amp. It also features the incredibly sexy feature of a light up front logo
name plate, which may not affect tone, but it sure does look cool.
When, sad to say, Matchless® went out of business, both the Chieftain and the DC-30
became highly collectable pieces of gear, with used ones often fetching up to a thousand
dollars more than their original price. We’re happy to do our part to keep the Matchless®
legacy alive with the Matchless® models in your PODxt.
Page 89

Modeled Amps & Cabs
*
All product names are trademarks of their respective owners, which are in no way associated or affiliated with Line 6. These product names, descriptions and images are provided for the sole purpose
of identifying the specific products that were studied during Line 6’s sound model development.
MATCHLESS® is a registered trademark of Matchless, LLC. VOX® is a registered trademark of Korg
Europe Limited.
5•20
Match D-30 - Based on* a Matchless
®
DC-30
The DC-30 was the amp that really put Matchless® on the map. Mark Sampson, the
amp’s designer, who was generous enough to tell us the story of this amp’s creation, set
out to create a road-worthy Class A amp that could cover a wide range of tones.
Built like a tank (and weighing nearly as much), the DC-30 paid tribute to early Vox
amps. So if you like a Vox® AC-30 (or PODxt’s model based on one), you’ll also want to
check out PODxt’s model of the DC-30.
Page 90

Modeled Amps & Cabs
*
All product names are trademarks of their respective owners, which are in no way associated or affiliated with Line 6. These product names, descriptions and images are provided for the sole purpose
of identifying the specific products that were studied during Line 6’s sound model development.
MESA/BOOGIE® and RECTIFIER® are registered trademarks of Mesa/Boogie, Limited.
Treadplate Dual - Based on* a 2001 Mesa Boogie
®
Dual Recitifier® Solo
The Dual Rectifier® was part of Boogie®’s more modern, high gain approach for that “big
hair” sound. In contrast to the earlier Boogie®s, the Dual Rectifier®’s tone controls have
more influence at high gain settings, so you can scoop the mids and increase the bottom
end.
5•21
We used Channel 3 on the Modern setting for this one with the rear switches set to Bold
and Tube Rectifier, respectively.
Page 91

Modeled Amps & Cabs
*
All product names are trademarks of their respective owners, which are in no way associated or affiliated with Line 6. These product names, descriptions and images are provided for the sole purpose
of identifying the specific products that were studied during Line 6’s sound model development.
MESA/BOOGIE® and MESA ENGINEERING® are registered trademarks of Mesa/Boogie, Limited.
FENDER® and PRINCETON® are registered trademarks of Fender Musical Instruments Corporation.
5•22
Cali Crunch - Based on* a Mesa Boogie
®
Mark IIc+
Mesa® Engineering started out with Randall Smith souping up old Fender® Princeton
amps for SF Bay area musicians. Over the years, the amps evolved, adding effects loops,
switchable channels, and Randall’s Simul-Class design, in which one pair of output tubes
is run Class AB and the second pair run Class A. Boogie®s were really the first modern
guitar amplifiers and were quickly adopted by many players looking for more ‘oomph’ in a
smaller package.We used the Drive channel to do our modeling.
Page 92

Modeled Amps & Cabs
*
All product names are trademarks of their respective owners, which are in no way associated or affiliated with Line 6. These product names, descriptions and images are provided for the sole purpose
of identifying the specific products that were studied during Line 6’s sound model development.
ROLAND® is a registered trademark of Roland Corporation.
Jazz Clean - Based on* a Roland
®
JC-120
This transistor amp was known for a strident clean sound and built-in stereo chorus.
When using the JC-120 model, try cranking up the Treble for a shimmering clean sound
that’ll cut through just about any mix. It’s also perfect for that 80’s “new wave” sound
(after all, it was Andy Summers’ favorite amp with The Police).
You should also try setting all the tone controls at 12 o’clock for a darker jazz tone. It’ll
give you an essentially flat response, providing a balanced tone across the fret board for
jazz chord melodies or single-line phrasing.
5•23
Page 93

Modeled Amps & Cabs
*
All product names are trademarks of their respective owners, which are in no way associated or affiliated with Line 6. These product names, descriptions and images are provided for the sole purpose
of identifying the specific products that were studied during Line 6’s sound model development.
MARSHALL® is a registered trademark of Marshall Amplification PLC.
Solo 100 - Based on* a Soldano SLO-100
5•24
Mike Soldano first came to fame as the guy who could do all the really cool mods to your
Marshall®. It wasn’t long before he started building his own ‘hot-rod’ amps—sporting
chromed transformers and chassis, no less. Mike’s amps are also famous for their bulletproof construction and military spec wiring and components.
While primarily known for its high gain personality, the SLO-100 has a great clean tone
as well. Eric Clapton put Soldano on the map when he played “Saturday Night Live”
with his Soldano SLO-100.
Page 94

Modeled Amps & Cabs
*
All product names are trademarks of their respective owners, which are in no way associated or affiliated with Line 6. These product names, descriptions and images are provided for the sole purpose
of identifying the specific products that were studied during Line 6’s sound model development.
TELE® is a registered trademark of Fender Musical Instruments Corporation. Supro® is a registered
trademark of Zinky Electronics.
Super O - Based on* a Supro
®
S6616
Yet more of the stuff of legend. Jimmy Page has admitted to using his ’58 Tele® and a
Supro® amp to record most of the first two Led Zeppelin albums. The only problem is,
he’s never really copped to which Supro® model he used, since his simply saying the word
‘Supro®’ caused a run on pawnshops and music stores everywhere, making it virtually
impossible to find another one of whichever model it was that he used.
5•25
We went so far as to impose on our friendship with people we know who were actually
present during the recording of “Led Zeppelin II” to see if they remembered anything
about that particular amp. They didn’t recall the specific model number, only that it was
“a grey and silver tiny little bastard.” Other sources have claimed that it was the 1x12inch version. So, until Pagey speaks, the mystery remains, but, whatever the truth of
those Zep sessions may be, we’re confident that this Supro® S6616 model can be a fine
entrance ticket to the Houses of the Holy.
By the way, that’s a 6x9-inch speaker in this amp, just like in your car stereo. Go figure.
Page 95

Modeled Amps & Cabs
*
All product names are trademarks of their respective owners, which are in no way associated or affiliated with Line 6. These product names, descriptions and images are provided for the sole purpose
of identifying the specific products that were studied during Line 6’s sound model development.
VOX® is a registered trademark of Korg Europe Limited.
5•26
Class A-15 - Based on* a 1960 Vox
®
AC 15
Here’s another Vox®-inspired Amp Model. This model is based on Channel 1 of a wonderful 1960 AC 15. The sound is similar to the more famous Vox® AC 30, but this is a
smaller amp (one, instead of two, 12-inch speakers) with a warmer, more “woody” sound.
Once again, the original amp had only a single tone control—a treble cut. We faithfully
modeled that and then slipped in some post-Amp Model Bass and Mid contouring. Set
the Bass and middle in neutral (12 o’clock, or halfway up), presence to 0, and play with
the treBle control to get yourself some of those classic British invasion sounds.
To model this, we plugged into Input 2, which is slightly darker than Input 1, and gives
you more of that classic warm sound that the AC 15 is famous for.
Page 96

Modeled Amps & Cabs
*
All product names are trademarks of their respective owners, which are in no way associated or affiliated with Line 6. These product names, descriptions and images are provided for the sole purpose
of identifying the specific products that were studied during Line 6’s sound model development.
VOX® is a registered trademark of Korg Europe Limited.
Class A-30 TB - Based on* a 1967 Vox
®
AC-30 Top Boost
Music was changing in the early ’60s and guitarists were asking for more brilliance &
twang. So the Jennings Company, makers of Vox® amps, decided to add Treble and Bass
controls (and an extra 12AX7 gain stage, incidentally) in addition to the Treble Cut
knob it already had (which in actuality was a sliding bandpass filter that always seemed
like it was working backwards); this additional circuit became known as Top Boost.
The AC 30 with Top Boost was the amp made famous by many British invasion bands.
Much of the unique character of the Vox® sound can be attributed to the fact that Class
A amps overdrive in a very different way than Class AB. Brian May of Queen, Mike
Campbell of Tom Petty’s Heartbreakers, and The Edge of U2 have all used classic AC
30s to make their music. Although usually played fairly clean, a cranked AC 30 has a
great saturated lead tone, a la Brian May on the early Queen albums.
5•27
On this Amp Model, PODxt’s middle control acts like the original Cut knob on the AC
30.
For this model, we used the Hi gain input of the Brilliant channel. We also turned the
tone controls around, since original Top Boost amps had the bass and treble turned all
the way down when the knob was all the way up. Go figure.
Page 97

Modeled Amps & Cabs
Tube Preamp
Not even close to being a guitar amp, but once we got started, we just couldn’t stop
ourselves. The thinking went like this: ‘Once people get this PODxt, they’re gonna wish
they could use it for everything — warming up keyboards, crunching up drums, fuzzing
up vocals. We’ve gotta give ’em something to do that!’ So we did. The Tube Preamp
Model lets you warm up any sound source the way producers and engineers often do
in the studio with vintage tube gear. For more “edge” on vocals, try running your vocal tracks through PODxt. Or punch up (or munch up) a synth bass track by sending it
through PODxt and cranking up the Drive and EQ controls to suit your taste. Although
this is not actually a guitar amp model, you can even get some great guitar tones out of
it. Also try using it as a direct box for bass. When you do this stuff, you want to use the
Drive control like a mix knob on a reverb to control how much processing you want
5•28
to hear. You generally don’t want to mix the pre-PODxt sound with the post-PODxt
sound because of the comb filtering that results. Instead, jack the sound source right into
POD
the EQ is “flat.”
xt and then only monitor it through PODxt. With the tone controls at 12 o’clock,
Page 98

Modeled Amps & Cabs
*
All product names are trademarks of their respective owners, which are in no way associated or affiliated with Line 6. These product names, descriptions and images are provided for the sole purpose
of identifying the specific products that were studied during Line 6’s sound model development.
ORANGE is a registered trademark of Orange Musical Electronic Company, Ltd.
Citrus D-30 - Based on* a 2005 Orange
®
AD30TC
In 1968, in a little music store on Old Compton St. in London, Clifford Cooper was
having trouble getting amplifier manufacturers to take him seriously as a dealer, as they
thought he was too young, and his shop too small. So he did what seemed only logical to
an enthusiatic young man with a background in electrical engineering – he designed and
built his own amplifiers, Since he had come into a large quantiy of bright orange vinyl,
that was what he used to cover his cabinets. It wasn’t long before high-profile musicians
like Fleetwood Mac, Stevie Wonder, and Frank Zappa were beating a path to his door.
This model is based on a Orange® AD30TC head, a 30 watt, Class A number with a
great personality that gracefully marries vintage british mid-gain breakup with modern
shimmer and presence. Back off the drive and you’ll get chimey boutique tones, dig in
with the drive up and the AD30 purrs pure Brit Rock tone.
5•29
Page 99

Modeled Amps & Cabs
*
All product names are trademarks of their respective owners, which are in no way associated or affiliated with Line 6. These product names, descriptions and images are provided for the sole purpose
of identifying the specific products that were studied during Line 6’s sound model development.
VOX® is a registered trademark of Korg Europe Limited.
5•30
Class A-30 Fawn - Based on* a Non Top Boost Vox
®
AC-30
This Amp Model is based on the Normal Channel of a Non Top Boost Vox® AC-30.
The early Vox® amps were the first designed especially for electric guitar (Hey, some
early amps from other manufacturers have Accordion inputs! Polka, anyone?), and used
Class A power amp designs, rather than the much more common Class AB type. We
were lucky enough to find what we are told was one of Bryan Adams’ favorite AC 30s
for recording. Lenny Kravitz happened to be using it the week before we began testing.
It was one of the gems in a great collection of vintage amplifiers offered for rental in
Los Angeles, where Line 6 is located. We later bought this amp, and continued to hone
our emulation of it. This is definitely a good place to start to get yourself some of those
classic British invasion sounds. Like the Model A-15, the AC 30 NTB has only a single
treble control, so PODxt’s Bass and Middle controls here are set up for cut/boost after
the Amp Model processing to add a little extra flexibility without compromising the accuracy of the model. The 12 o’clock setting on these controls is flat response.
Here we modeled the Normal Channel and, as we did on the Class A-15 and Class A-30
TB model, we reversed the action of the Treble knob, so it doesn’t behave ‘backwards’
from every other amp.
Page 100

Modeled Amps & Cabs
*
All product names are trademarks of their respective owners, which are in no way associated or affiliated with Line 6. These product names, descriptions and images are provided for the sole purpose
of identifying the specific products that were studied during Line 6’s sound model development.
MARSHALL® is a registered trademark of Marshall Amplification PLC.
Brit Gain 18 - Based on* a Marshall
®
1974X “authentic re-issue”
Based on the Marshall® 1974X “authentic re-issue” of the famous 1974 18W Combo
from the late ‘60’s. (brief editorial aside: Marshall® has had a long tradition of coming up
with model numbers that can easily be taken for years. The Model 1974 combo was manufacturer from 1965 to 1968, the Model 1961 and 1962 combos were first made in 1965.
Is it any wonder we look confused sometimes?). The 1974 has a basic preamp, (gain and
tone controls) and a cathode biased twin EL84 power amp. It is a great recording amplifier, with a wonderfully com-pressed and harmonically rich tone.
5•31
 Loading...