


 Loading...
OWNER'S MANUAL
DRYER
Before beginning installation, read these instructions carefully. This will simplify installation and ensure that the product is installed correctly and safely. Leave these instructions near the product after installation for future reference.
RC90U2AV2E
RC90U2EV2E
www.lg.com
Copyright © 2019 LG Electronics Inc. All Rights Reserved
TABLE OF CONTENTS
This manual may contain images or content different from the model you purchased.
This manual is subject to revision by the manufacturer.
SAFETY INSTRUCTIONS............................................................. |
3 |
IMPORTANT SAFETY INSTRUCTIONS........................................................... |
3 |
INSTALLATION............................................................................ |
10 |
Specifications................................................................................................... |
10 |
Accessories..................................................................................................... |
10 |
Installation Place Requirements...................................................................... |
11 |
Stacking Installation Instructions..................................................................... |
12 |
Reversing the door.......................................................................................... |
15 |
OPERATION................................................................................. |
17 |
Using the Appliance......................................................................................... |
17 |
Sorting Laundry............................................................................................... |
18 |
Control Panel................................................................................................... |
19 |
Programme Table............................................................................................ |
20 |
Option Programme.......................................................................................... |
22 |
Rack Dry......................................................................................................... |
24 |
SMART FUNCTIONS................................................................... |
25 |
Using LG SmartThinQ Application................................................................... |
25 |
Using Smart Diagnosis™................................................................................. |
29 |
MAINTENANCE........................................................................... |
30 |
Cleaning the Lint Filter..................................................................................... |
30 |
Emptying the Water Container......................................................................... |
31 |
Cleaning the Cool Air Inlet Grill........................................................................ |
31 |
Wiping the Moisture Sensor............................................................................. |
31 |
TROUBLESHOOTING................................................................. |
32 |
Diagnosing Problems....................................................................................... |
32 |
Error Codes..................................................................................................... |
36 |
WARRANTY................................................................................. |
37 |
SAFETY INSTRUCTIONS
EN
The following safety guidelines are intended to prevent unforeseen risks or damage from unsafe or incorrect operation of the appliance.
The guidelines are separated into ‘WARNING’ and ‘CAUTION’ as described below.
This symbol is displayed to indicate matters and operations that can cause risk. Read the part with this symbol carefully
and follow the instructions in order to avoid risk.
WARNING
This indicates that the failure to follow the instructions can cause serious injury or death.
CAUTION
This indicates that the failure to follow the instructions can cause the minor injury or damage to the product.
IMPORTANT SAFETY INSTRUCTIONS
WARNING
To reduce the risk of explosion, fire, death, electric shock, injury or scalding to persons when using this product, follow basic precautions, including the following:
Children in the Household
This appliance is not intended for use by persons (including children) with reduced physical, sensory or mental capabilities, or lack of experience and knowledge, unless they have been given supervision or instruction concerning use of the appliance by a person responsible for their safety. Children should be supervised to ensure that they do not play with the appliance.
3
EN
Installation
•• Make sure the appliance is properly installed, grounded, and adjusted by qualified service personnel according to the installation instructions.
•• Never attempt to operate the appliance if it is damaged, malfunctioning, partially disassembled, or has missing or broken parts, including a damaged cord or plug.
•• This appliance should only be transported by two or more people holding the appliance securely.
•• Do not install the appliance in a damp and dusty place. Do not install or store the appliance in any outdoor area, or any area that is
subject to weathering conditions such as direct sunlight, wind, rain, or temperatures below freezing.
•• Tighten the drain hose to avoid separation.
•• If the power cord is damaged or the hole of the socket outlet is loose, do not use the power cord and contact an authorized service centre.
•• Do not plug multiple socket outlets, an extension power cable or adapter with this appliance.
•• Items such as foam rubber (latex foam), shower caps, waterproof textiles, rubber backed articles and clothes or pillows fitted with foam rubber pads should not be dried in the appliance.
4
EN
•• This appliance must not be installed behind a lockable door, a sliding door or a door with a hinge on the opposite side to that of the appliance, in such a way that a full opening of the appliance door is restricted.
•• This appliance must be grounded. In the event of malfunction or breakdown, grounding will reduce the risk of electric shock by providing a path of least resistance for electric current.
•• This appliance is equipped with a power cord having an equipmentgrounding conductor and a grounding power plug. The power plug must be plugged into an appropriate socket outlet that is installed and grounded in accordance with all local codes and ordinances.
•• Improper connection of the equipment-grounding conductor can result in risk of electric shock. Check with a qualified electrician or service personnel if you are in doubt as to whether the appliance is properly grounded.
•• Do not modify the power plug provided with the appliance. If it does not fit the outlet, have a proper outlet installed by a qualified electrician.
•• The appliance must not be supplied through an external switching device, such as a timer, or connected to a circuit that is regularly switched on and off by a utility.
Operation
•• Do not attempt to separate any panels or disassemble the appliance. Do not apply any sharp objects to the control panel in order to operate the appliance.
•• Do not repair or replace any part of the appliance. All repairs and servicing must be performed by qualified service personnel
unless specifically recommended in this Owner’s Manual. Use only authorized factory parts.
•• Keep the area underneath and around the appliance free of combustible materials such as lint, paper, rags, chemicals, etc.
•• Do not put animals, such as pets into the appliance.
5
EN
•• Do not leave the appliance door open. Children may hang on the door or crawl inside the appliance, causing damage or injury.
•• Never reach into the appliance while it is operating. Wait until the drum has completely stopped.
•• Do not put in, wash or dry articles that have been cleaned in, washed in, soaked in, or spotted with combustible or explosive substances (such as wax, oil, paint, gasoline, degreasers, drycleaning solvents, kerosene, vegetable oil, cooking oil, etc.). Improper use can cause fire or explosion.
•• In case of flood, disconnect the power plug and contact the LG Electronics customer information centre.
•• Do not push down the door excessively, when the appliance door is open.
•• Use new hose or hose-set supplied with the appliance. Reusing old hoses can cause a water leak and subsequent property damage.
•• Do not touch the door during a high temperature programme.
•• Do not use flammable gas and combustible substances (benzene, gasoline, thinner, petroleum, alcohol, etc.) near the appliance.
•• If the drain hose or inlet hose is frozen during winter, use it only after thawing.
•• Keep all washing detergents, softener and bleach away from children.
•• Do not touch the power plug or the appliance controls with wet hands.
•• Do not bend the power cable excessively or place a heavy object on it.
6
EN
Maintenance
•• Securely plug the power plug in the socket outlet after completely removing any moisture and dust.
•• Disconnect the appliance from the power supply before cleaning the appliance. Setting the controls to the OFF or stand by position does not disconnect this appliance from the power supply.
•• Do not spray water inside or outside the appliance to clean it.
•• Never unplug the appliance by pulling on the power cable. Always grip the power plug firmly and pull straight out from the socket outlet.
Technical Safety for Using the Dryer
•• Do not dry unwashed items in the appliance.
•• Fabric softeners, or similar products, should be used as specified by the fabric softener instructions.
•• Remove all objects from pockets such as lighters and matches.
•• Never stop the appliance before the end of the drying cycle unless all items are quickly removed and spread out so that the heat is dissipated.
•• The appliance is not to be used if industrial chemicals have been used for cleaning.
•• Items that have been soiled with substances such as cooking oil, vegetable oil, acetone, alcohol, petroleum, kerosene, spot removers, turpentine, waxes and wax removers should be washed in hot water with an extra amount of detergent before being dried in the appliance.
•• Do not drink the condensed water. Failure to do so may result in foodborne illnesses.
•• If the supply cord is damaged, it must be replaced by the manufacturer or its service agents or similarly qualified person in order to avoid a hazard.
7
EN
•• The lint trap has to be cleaned frequently.
•• Lint must not to be allowed to accumulate around the appliance.
•• Do not spray dry cleaning detergent directly onto the appliance or use the appliance to dry clothes left with dry cleaning detergent.
•• Do not dry clothes stained with oil substances. Oil substances (including edible oils) stained on clothes cannot be completely removed even after washing with water.
•• The appliance must not be supplied through an external switching device, such as a timer, or connected to a circuit that is regularly switched on and off by a utility.
•• Remove clothes from the product immediately when drying is complete or the power is turned off during the drying process. Leaving clothes that has been dried in the appliance unattended could result in fire. Clothes removed from the appliance after drying could result in fire. Remove clothes immediately after drying, and then hang or lay the clothes flat to cool.
8
EN
Disposal
•• Before discarding an old appliance, unplug it. Cut off the cable directly behind the appliance to prevent misuse.
•• Dispose of all packaging materials (such as plastic bags and styrofoam) away from children. The packaging materials can cause suffocation.
•• Remove the door before disposing of or discarding this appliance to avoid the danger of children or small animals getting trapped inside.
9
INSTALLATION
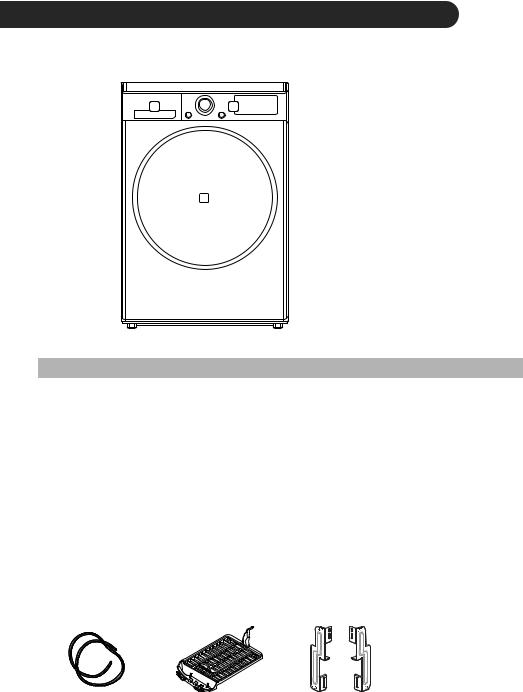
Specifications
EN
1 |
2 |
|
A Water container |
|
3 |
B |
Control panel |
|
C |
Door |
Model |
RC90U2AV2E / RC90U2EV2E |
Power supply |
220 - 240 V~, 50/60 Hz |
|
|
Size |
600 mm (W) X 690 mm (D) X 850 mm (H) |
|
|
Product weight |
56 kg |
Allowable temperature |
5 - 35 °C |
Max. capacity |
9 kg |
Rated power |
1,000 W |
Annual energy consumption |
194 kWh |
|
|
Country of origin |
MADE IN KOREA |
|
|
•• Appearance and specifications may vary without notice to improve the quality of the appliance.
Accessories
Please contact the LG Electronics Customer Information Centre for purchase.
Condensing Drain Hose |
Dry Rack |
Stacking Kit |
and Hose Holder |
|
|
10
Installation Place
Requirements
Location
5 cm |
1 cm |
1 cm |
Level floor : Allowable slope under the entire appliance is 1°.
Power outlet : Must be within 1.5 meters of either side of the location of the appliance.
•• Do not overload the outlet with more than one appliance.
Additional Clearance : For the wall, 5 cm: rear / 1 cm: right & left side
•• Do not place or store laundry products on top of the appliance at any time. These products may damage the finish or controls.
NOTE
•• For better drying performance, please keep the rear of the appliance away from wall.
•• Do not install the appliance where there is a risk of frost or dust.
•• The appliance may not be able to operate properly or may be damaged by freezing of condensed water in the pump and drain hose.
•• Do not install the appliance next to a hightemperature appliance like refrigerator, oven or stove etc, which can cause poor drying performance and programme duration, and adversely affect the proper functioning of the compressor. The appliance performs best at a room temperature of 23 °C.
EN
Positioning
•• Install the appliance on a flat hard floor.
•• Make sure that air circulation around the appliance is not impeded by carpets, rugs, etc.
•• Never try to correct any unevenness in the floor with pieces of wood, cardboard or similar materials under the appliance.
•• Do not install the appliance in rooms where freezing temperatures may occur. Frozen hoses may burst under pressure. The reliability of
the electronic control unit may be impaired at temperatures below freezing point.
•• If the appliance is delivered in winter and temperatures are below freezing, place the appliance at room temperature for a few hours before putting it into operation.
•• Please ensure that when the appliance is installed, it is easily accessible for an engineer in the event of a breakdown.
•• With the appliance installed, adjust all four feet using a spanner to ensure the appliance is stable, and a clearance of approximately 20 mm is left between the top of the appliance and the underside of any work-top.
Ventilation Requirement
•• Alcove or under counter
−− Ensure air flow of 3.17 m3/min through the appliance
•• Closet
−− Closet door must have 2 (louvered) openings, each having a minimum area of
387 cm2, located 8 cm from bottom and top of door.
11
 WARNING
•• Avoid installing the appliance around a heat source.The rear side of the appliance must be well ventilated. Failure to follow these instructions may result in problems.
•• The appliance should not be installed next to a refrigeration appliance.
•• The appliance is not designed for maritime use or for use in mobile installations such as caravans, aircraft etc.
Electrical Connection
•• Do not use an extension cord or double adapter.
•• Always unplug the appliance after use.
•• Connect the appliance to an earthed socket in accordance with current wiring regulations.
•• The appliance must be positioned so that the plug is easily accessible.
EN
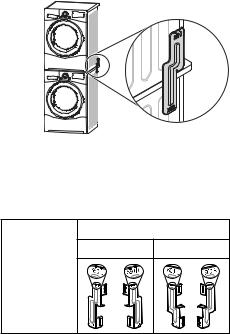
Stacking Installation Instructions
Your dryer can be placed on top of an LG washing machine and securely fixed with a stacking kit. This installation must be conducted by qualified service personnel to ensure it has been installed correctly.
The qualified service personnel will ensure you have the correct stacking kit for your model of washing machine and will ensure it is firmly fixed. For these reasons, expert fitting is essential.
Stacking Kit
In order to stack this dryer an LG stacking kit is required.
Dryer
Washing machine
This dryer may only be stacked on top of an LG washing machine. Do not attempt to stack this dryer on any other washing machine, as damage, injury or property damage could result.
Washing Machine Top plate size |
|
550 mm |
600 mm |
Shape and |
|
assembly |
|
direction |
|
12
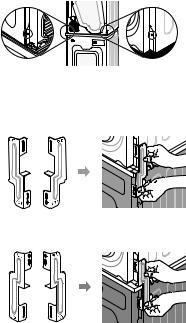
Installation Procedure
1 |
Place the LG dryer on the LG washing |
|
machine. |
2 |
Remove the two screws from the bottom of |
|
the rear cover on each side as illustrated |
below.
3 Align the stacking kit holes and the rear cover holes.
•• 3-1) 600 mm
•• 3-2) 550 mm
4 |
Fasten the two screws that were removed |
|
earlier from the dryer to the stacking kit. |
5 |
Use the four screws in the accessory box (16 |
|
mm) to assemble the washing machine rear |
|
cover and stacking kit. |
6 |
The procedure for the opposite side will be |
|
the same. |
EN
 WARNING
•• Incorrect installation can cause serious accidents.
•• The weight of the appliance and the height of installation make the stacking procedure too risky for one person. This procedure should be performed by two or more qualified service personnel.
•• The appliance is not suitable for a built-in installation. Please do not install as a built-in appliance.
•• Do not operate if the appliance is not properly stacked.
13
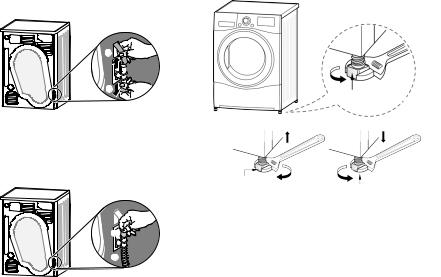
Condensed Water Drain-out
Normally, condensed water is pumped up to the water container where water is collected until manually emptied. Water can also be drained out directly to a mains drain, especially when the dryer is stacked on top of a washing machine. With a connecting kit for the mains drain hose, simply change the water path and re-route to the drainage facility as below:
1 |
Separate the anti-backflow lid(A) and the |
|
water container hose(B) from the connecting |
|
kit. |
|
|
|
|
2 |
Attach the anti-backflow lid(A) to the head |
|
of the connecting kit and then connect the |
|
drain hose(C) to the opposite side of the |
|
connecting kit. |
|
|
|
|
 CAUTION
•• If the hose is installed in a way that leaves it bent or pinched, drainage may not function properly.
EN
Leveling the appliance
Leveling the appliance prevents unnecessary noise and vibration. Place the appliance on a solid, level floor.
If the appliance is not properly level, adjust the front leveling feet as necessary.
Turn them clockwise to raise and counterclockwise to lower until the appliance no longer wobbles, both front-to-back and side-to-side and corner-to-corner.
Adjustable Feet
Adjustable Feet |
Adjustable Feet |
Diagonal Check
•• When pushing down the edges of the top plate diagonally, the appliance should not move up and down at all (Check both directions). If the appliance rocks when pushing the top plate diagonally, adjust the feet again.
14

Reversing the door
You can reverse the door for your convenience.
 WARNING
•• Do not reverse the door while the appliance is stacked on a washing machine.
•• Before removing the hinge screws, have an assistant support the weight of the door. The door could fall on the floor due to the weight of the door.
•• For safety reasons, two or more people need to work together to reverse the door.
NOTE
•• The appearance of the screws varies and the screws must be inserted differently depending on the position. Make sure the screw is properly selected before tightening.
1 Open the door and remove 2 screws on the door hinge. After removing the screws, put the door down carefully with the front side facing down to the floor.


 Cabinet
Door hinge
 WARNING
•• Remove the lower screw first. The door may fall on to the floor due to its weight and the door can be damaged.
EN
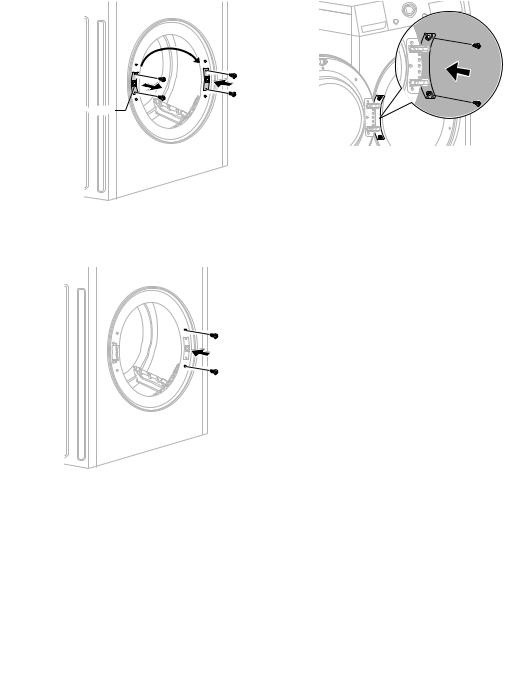
2 |
Remove 8 screws on the hinge assembly |
|
from the door. |
•• There are 6 screws on the front and 2 screws on the side.
Hinge |
assembly |
3 |
|
|
|
|
|
Remove the 3 screws from the door latch |
|||||
|
assembly which is fixed between the door |
||||
and the hinge assembly and then remove the screw which is fixed on the door hook.
Door latch


 assembly
4 |
Switch between the position the hinge |
|
|
assembly and door latch assembly and then |
|
|
tighten the screws in reverse order. |
|
|
•• Tighten the screw in proper position |
|
|
referring from 2 to 4 steps. |
|
Door latch |
Hinge |
|
assembly |
Assembly |
|
15
5 Remove the door catch from the appliance frame by removing 2 screws and then assemble them on the opposite side.
Door catch |
6 |
Remove the 2 decorative screws from the |
|
appliance frame and then assemble them on |
opposite side.
EN
7 Install the door with the screws removed in step 1 and then check the door closes properly.
16
OPERATION
Using the Appliance
Before the first cycle, set the appliance to dry for five minutes to warm up the drum. Open the door between loads the first few times you use the appliance to allow any odours from the interior of the appliance to disperse.
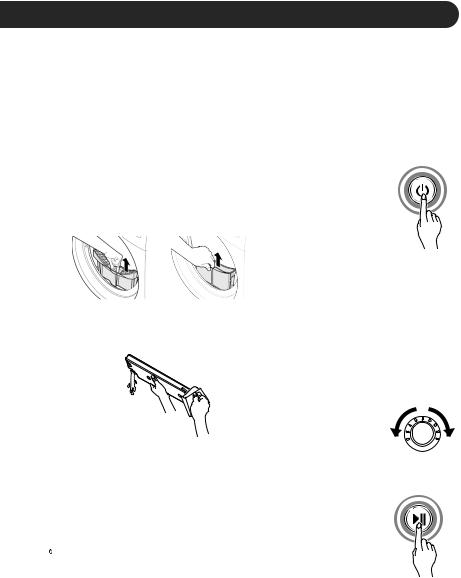
1 |
Ensure the lint filter and water container are |
|
clean. |
•• The lint filter is inside the door rim. It needs to be cleaned before each drying cycle.
•• Open the door and ensure the lint filter is clean. If it is not, please clean the lint filter.
•• Also check if the water container needs to be emptied for optimum drying results.
 CAUTION
•• Do not drink the condensed water.
NOTE
•• In some instances, LED window may display
 (Empty water symbol) and the appliance may stop because the water container is full.
2 Place laundry into the drum after sorting.
•• The clothes should be sorted by fabric type and dryness level and all the strings and belts of clothes should be well tied and fixed before being put into the drum. Push the laundry to the back to keep it away from the door seal. Otherwise, the door seal and clothes may be damaged. Close the door.
EN
 CAUTION
•• Be careful not to trap laundry between the door and rubber seal.
3 Turn the power on.
•• Press the Power button. The indicator icon above the button will become illuminated, indicating that the appliance is all set to run.
4 Select the drying programme you want.
•• You can choose a programme by turning the programme selector knob until the required programme is indicated.
•• If you press the Start/Pause button without choosing a programme, the appliance
will proceed with the Cotton programme. Please refer to the programme table for the detailed information.
5 Press the Start/Pause button.
6 |
After the cycle has finished, open the door |
|
and remove the laundry. |
7 |
Turn off the appliance. |
|
•• Press the Power button. |
17
 CAUTION
•• Be careful! The drum inside may still be hot.
•• The appliance must not be used for purposes other than those for which it was designed.
NOTE
•• The final part of a tumble dryer cycle occurs without heat (cool down cycle) to ensure that laundry is left at a temperature that ensures the laundry will not be damaged.
•• A high atmospheric temperature and a small room may both increase drying time as well as energy consumption.
Sorting Laundry
Clothes have their own wash care labels, so drying according to the wash care label is recommended.
Not only that, the laundry must be sorted according to size and type of fabric.
For the best drying performance and most efficient energy usage, do not overload the appliance.
Woollens
•• Dry woollens on the Wool programme. Be sure to follow fabric care label symbols first. Wool may not be completely dried from the cycle, so do not repeat drying. Pull woollens to their original shape and dry them flat.
Woven and Loopknit Materials
•• Some woven and loopknit materials may shrink, depending on quality.
Non-Iron and Synthetics
•• Do not overload the appliance. Take out nonIron items as soon as the appliance stops to reduce creases.
Baby Clothes and Night Gowns
•• Always check fabric care labels.
EN
Rubber and Plastics
•• Do not dry any items made from or containing rubber or plastics such as:
−− Aprons, Bibs and Chair Covers
−− Curtains and Table Clothes −− Bathmats
Fiberglass
•• Do not dry fiberglass items in the appliance. Glass particles left in the appliance may be subsequently picked up by your clothes in later cycles.
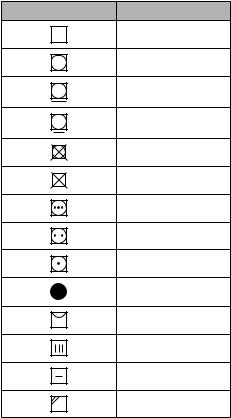
Icon |
Description |
Dry
Tumble dry
Permanent Press /
Crease resistant
Gentle / Delicate
Do not tumble dry
Do not dry
High heating
Medium heating
Low heating
No Heating / Air
Line dry / Hang to dry
Drip dry
Dry flat
In the shade
18

EN
Control Panel
A Power Button
•• Press the Power button to turn power on and off.
•• Press the Power button to cancel the Delay End function.
B Programme Selector
•• Programmes are available according to the laundry type.
•• The lamp will light up to indicate the selected programme.
C Start/Pause Button
•• This Start/Pause button is used to start or pause a dry cycle.
•• When in Pause, the power is turned off automatically after 14 minutes.
D Additional Programme Buttons
•• Use these buttons to select the desired options for the selected programme.
•• In order to use the Remote Start function, refer to SMART FUNCTIONS.
Display
•• 
 : This icon indicates that the lint filter should be cleaned or is clogged.
−− Cleaning notice: When you press the Power button, the icon will become displayed.
••  : This icon indicates that the water container needs to be emptied or is full.
−− Emptying notice: When you press the Power button, this icon will become displayed.
−− Full water notice: The icon will become displayed and a buzzer will sound while the appliance is in operation.
•• 
 : This icon indicates the lint filter insertion status. If the lint filter is not inserted, the appliance will not operate and the icon will become displayed.
•• 
 : This icon indicates the condenser auto cleaning status. The icon will be displayed during water sprays to the condenser.
19

EN
Programme Table
Drying Programme
Sensor Dry Programmes
Programme |
Laundry Type |
Detail |
Drying Level |
Capacity |
|
9 kg |
|||||
|
|
|
|
||
|
Towels, dressing gowns |
For thick and quilted fabrics |
Extra |
9 kg |
|
|
and bed linen |
||||
|
|
|
|
||
|
Bath towels, tea towels, |
For fabrics that do not need |
Cupboard |
|
|
Cotton |
underwear and cotton |
9 kg |
|||
to be ironed |
|||||
socks |
|
|
|||
|
|
|
|
||
|
Bed linen, table linen, |
For fabrics that need to be |
Iron |
|
|
|
towels, T-shirts, polo |
9 kg |
|||
|
ironed |
||||
|
shirts and work clothes |
|
|
||
|
|
|
|
||
|
|
|
|
|
|
|
Bed linen, table linen, |
For thick and quilted fabrics |
Extra |
|
|
|
tracksuits, anoraks and |
|
|||
|
that do not need to be ironed |
|
|||
|
blankets |
|
|
||
|
|
|
|
||
Mix |
|
|
|
|
|
Shirts and blouses |
For fabrics that do not need |
Cupboard |
4 kg |
||
|
to be ironed |
|
|||
|
|
|
|
||
|
Trousers, dressers, |
For fabrics that need to be |
Iron |
|
|
|
skirts and blouses |
ironed |
|
||
|
|
|
|||
|
Shirts, T-shirts, trousers, |
For polyamide, acrylic, and |
Cupboard |
|
|
|
polyester that do not need to |
|
|||
|
under-wear and socks |
be ironed |
|
|
|
Easy Care |
|
|
3.5 kg |
||
|
|
|
|||
Shirts, T-shirts, under- |
For polyamide, acrylic, |
Iron |
|||
|
|
||||
|
wear, anoraks and |
polyester that do need to be |
|
||
|
socks |
ironed |
|
|
|
Duvet |
Beddings, bed sheets |
For bulky items |
- |
2.5 kg |
|
Towel |
Towels, Pillowcases |
For cotton fabrics which do |
- |
4.5 kg |
|
not need to be ironed |
|||||
|
|
|
|
||
Allergy Care |
Cotton, underwear, bed |
Helps to remove allergens |
- |
4.5 kg |
|
sheets and baby clothes |
such as house mites |
||||
|
|
|
|||
Quick 30 |
Light and small items |
For small amount of |
|
|
|
polyamide, acrylic and |
- |
1 kg |
|||
less than 3ea. |
|||||
|
polyester items |
|
|
||
|
|
|
|
||
|
|
|
|
|
20
EN
Sensor Dry Programmes
Programme |
Laundry Type |
Detail |
Drying |
Capacity |
|
Level |
9 kg |
||||
|
|
|
|||
Sports Wear |
Soccer kit and training wear |
For polyester material |
- |
2 kg |
|
Wool |
Wool |
For wool fabrics |
- |
1 kg |
|
Delicate |
|
For fabrics that are heat- |
|
|
|
Silk, fine fabrics and lingerie |
sensitive, such as synthetic |
- |
1.5 kg |
||
|
|
fabrics |
|
|
|
|
Timed Drying Programmes |
|
|
||
Programme |
Laundry Type |
Detail |
Drying |
Capacity |
|
Level |
9 kg |
||||
|
|
|
|||
Rack Dry |
Silk, wool, delicate lingerie |
Refreshes clothes without |
- |
- |
|
tumble drying |
|||||
|
|
|
|
||
Cool Air |
All fabrics that need |
Tumbles without heat |
- |
- |
|
refreshing |
|||||
|
|
|
|
||
Warm Air |
Bath towels, bath robes, |
Small Items & damp |
|
|
|
dishclothes and acrylic |
clothing, Everyday items |
- |
- |
||
|
quilted fabrics |
suitable for heat drying |
|
|
|
 CAUTION
•• If the load is less than 1 kg, please use the Warm Air programme in Timed Drying programmes. Wool items should be dried using the Wool programme and heat-sensitive fabrics including silk, underwear and lingerie should be dried using the Delicate programme. Please comply with the recommended laundry load when you select your desired programme. Otherwise, your clothes may be damaged.
NOTE
•• It is suitable to dry normal wet cotton laundry and it is the most efficient programme in terms of energy consumption for drying wet cotton laundry.
•• Set programme at “Cotton Cupboard Energy (Full & Half Load)” for test in accordance in conformity with SASO 2883.
•• Standard Cotton programme : Cotton + Cupboard + Energy Option (Default)
−− (This is the most efficient programmes in terms of the test conditions proposed by SASO 2883.) −− (They are suitable to dry normal wet cotton laundry.)
−− (They are the most efficient programme in terms of energy consumption for drying wet cotton laundry.)
•• The test results depend on room temperature, type and amount of load, water hardness and water inlet temperature.
•• If the appliance is installed as built under, it may cause performance degradation.
•• If the laundry is not spun at a high speed during washing, energy consumption and drying time will increase.
21
Option Programme
Delay End
You can use the Delay End option to delay the finishing time of the drying cycle. Maximum Delay End is 19 hours. Minimum Delay End is 3 hours.
1 |
Turn the appliance on. |
2 |
Select a programme. |
3 |
Press the Delay End button. |
4 |
Settimedelayhour(s)bypressingtheMoreTime |
|
Less Time button. |
5 |
Press the Start/Pause button. |
Anti Crease _
The Anti Crease option prevents creases that are formed when the laundry is not unloaded promptly at the end of the drying cycle. When Anti Crease is selected, the appliance repeatedly runs and pauses, giving you two hours to unload the laundry. If the door is opened during the Anti Crease option, the option is cancelled.
EN
Favorite R
The Favorite option allows you to store a customized dry programme for future use.
1 |
Turn the appliance on. |
2 |
Select a programme. |
3 |
Select the option or additional programme. |
|
(Anti Crease, Dry Mode etc.) |
4 |
Press and hold the Favorite option button for |
|
three seconds. |
The Favorite option is now stored for future use. To reuse the stored programme, select the Favorite option and press the Start/Pause button.
Drum Light
Whilst the appliance is running it is possible to see inside the drum if you select the Drum Light function.
•• Press and hold the Dry Level button for 3 seconds to activate the Drum Light function.
•• Light on : Door is opened.
•• Light off : Door is closed. The light is turned off automatically.
Dry Mode
This additional program offers the option of saving energy or time.
•• Energy: Energy saving option.
•• Time: Time saving option. You will see Time indication on the LED.
22
EN
Child Lock I
Use this option to disable the controls. This feature can prevent children from changing cycles or operating the appliance.
Locking the Control Panel
1
2
Press and hold the Favorite and Delay End button simultenesouly for three seconds.
A beeper will sound, and CL will appear on
the display.
When the Child Lock is set, all buttons are locked except the Power button.
NOTE
•• Turning off the power or completing all cycles will not reset the child lock function. You must deactivate child lock before you can access any other functions.
Unlocking the Control Panel
Press and hold the Favorite and Delay End button simultenesouly for three seconds.
•• A beeper will sound and the remaining time for the current programme will reappear on the display.
Buzzer Q
This option enables you to turn the buzzer sound on and off.
More Time / Less Time
Use these buttons with the Manual Dry programmes to manually increase or reduce the drying time.
Press the More Time button to increase the selected programme time by five minutes.
Press the Less Time button to decrease the selected programme time by five minutes.
23
Loading...