


<![endif]>ENGLISH
OWNER’S MANUAL
Safety and Reference
Please read this manual carefully before operating your set and retain it for future reference.
*MFL71753616* |
www.lg.com |
|
(2102-REV00) |
Copyright © 2021 LG Electronics Inc. All Rights Reserved. |
Title
Warning! Safety instructions
Preparing
-- Lifting and moving the TV -- Mounting on the Table
-- Mounting to the Wall -- Antenna/Cable
-- Satellite dish
Connections
Troubleshooting
Specifications
-- Open Source Software Notice Information
-- Licenses
Starting TV |
Important Information for Preventing |
|
Image Retention |
||
-- Turning on the TV |
||
|
||
-- Registering Magic Remote Control |
Regulatory |
|
-- Connecting Smart Devices using NFC Tagging |
||
Using Remote Control |
|
|
-- Using Magic Remote Control |
|
Before reading this manual
•• Read this manual thoroughly before operating your TV, and keep it for future reference.
•• On the website you can download the manual including installation, using, troubleshooting, specifications, license etc and view its
contents on your PC or mobile device. |
|
|
||
|
|
|
||
User Guide |
For more information about this TV, read the USER GUIDE embedded in the product. |
|||
|
|
•• To open the USER GUIDE |
→ |
→ [Support] → [User Guide] |
Separate Purchase
•• Separate purchase items can be changed or modified for quality improvement without any notification. Contact your dealer to buy these items. These devices only work with certain models.
•• The model name or design may be changed depending on the upgrade of product functions, manufacturer’s circumstances or policies.
Note |
•• Product specifications or contents of this manual may be changed without prior notice due to upgrade of product |
|
functions. |
•• The items supplied with your product may vary depending on the model.
•• Image shown may differ from your TV.
2

Warning! Safety instructions
CAUTION
RISKOFELECTRICSHOCK
DONOTOPEN
CAUTION : TO REDUCE THE RISK OF ELECTRIC SHOCK, DO NOT REMOVE COVER (OR BACK). NO USER-SERVICEABLE PARTS INSIDE. REFER TO QUALIFIED SERVICE PERSONNEL.
This symbol is intended to alert the user to the presence of uninsulated “dangerous voltage” within the product’s enclosure that may be of sufficient magnitude to constitute a risk of electric shock to persons.
This symbol is intended to alert the user to the presence of important operating and maintenance (servicing) instructions in the literature accompanying the appliance.
WARNING : TO REDUCE THE RISK OF FIRE AND ELECTRIC SHOCK, DO NOT EXPOSE THIS PRODUCT TO RAIN OR MOISTURE.
•• TO PREVENT THE SPREAD OF FIRE, KEEP CANDLES OR OTHER ITEMS WITH OPEN FLAMES AWAY FROM THIS PRODUCT AT ALL TIMES.
•• Do not place the TV and/or remote control in the following environments:
-- Keep the product away from direct sunlight.
-- An area with high humidity such as a bathroom.
-- Near any heat source such as stoves and other devices that produce heat.
-- Near kitchen counters or humidifiers where they can easily be exposed to steam or oil.
-- An area exposed to rain or wind.
-- Do not expose to dripping or splashing and do not place objects filled with liquids, such as vases, cups, etc. on or over the apparatus (e.g., on shelves above the unit).
-- Near flammable objects such as gasoline or candles, or expose the TV to direct air conditioning.
-- Do not install in excessively dusty places.
Otherwise, this may result in fire, electric shock, combustion/ explosion, malfunction or product deformation.
•• Ventilation
-- Install your TV where there is proper ventilation. Do not install in a confined space such as a bookcase.
-- Do not install the product on a carpet or cushion.
-- Do not block or cover the product with cloth or other materials while unit is plugged in.
•• Take care not to touch the ventilation openings. When watching the TV for a long period, the ventilation openings may become hot.
•• Protect the power cord from physical or mechanical abuse, such as being twisted, kinked, pinched, closed in a door, or walked upon. Pay particular attention to plugs, wall outlets, and the point where the cord exits the device.
•• Do not move the TV whilst the Power cord is plugged in.
•• Do not use a damaged or loosely fitting power cord.
•• Be sure to grasp the plug when unplugging the power cord. Do not pull on the power cord to unplug the TV.
•• Do not connect too many devices to the same AC power outlet as this could result in fire or electric shock.
3

•• Disconnecting the Device from the Main Power
-- The power plug is the disconnecting device. In case of an emergency, the power plug must remain readily accessible.
•• Do not let your children climb or cling onto the TV. Otherwise, the TV may fall over, which may cause serious injury.
•• Outdoor Antenna Grounding (Can differ by country):
-- If an outdoor antenna is installed, follow the precautions below. An outdoor antenna system should not be located in the vicinity of overhead power lines or other electric light or power circuits, or where it can come in contact with such power lines or circuits as death or serious injury can occur.
•• Grounding (Except for devices which are not grounded.) -- TV with a three-prong grounded AC plug must be
connected to a three-prong grounded AC outlet. Ensure that you connect the earth ground wire to prevent possible electric shock.
•• Never touch this apparatus or antenna during a lightning storm. You may be electrocuted.
•• Make sure the power cord is connected securely to the TV and wall socket if not secured damage to the Plug and socket may occur and in extreme cases a fire may break out.
•• Do not insert metallic or inflammable objects into the product. If a foreign object is dropped into the product, unplug the power cord and contact the customer service.
•• Do not touch the end of the power cord while it is plugged in. You may be electrocuted.
•• If any of the following occur, unplug the product immediately and contact your local customer service.
-- The product has been damaged.
-- If water or another substance enters the product (like an AC adapter, power cord, or TV).
-- If you smell smoke or other odors coming from the TV -- When lightning storms or when unused for long periods
of time.
Even the TV is turned off by remote control or button, AC power source is connected to the unit if not unplugged in.
•• Do not use high voltage electrical equipment near the TV (e.g., a bug zapper). This may result in product malfunction.
•• Do not attempt to modify this product in any way without written authorization from LG Electronics. Accidental fire or electric shock can occur. Contact your local customer service for service or repair. Unauthorized modification could void the user’s authority to operate this product.
•• Use only an authorized attachments / accessories approved by LG Electronics. Otherwise, this may result in fire, electric shock, malfunction, or product damage.
•• Never disassemble the AC adapter or power cord. This may result in fire or electric shock.
•• Handle the adapter carefully to avoid dropping or striking it. An impact could damage the adapter.
•• To reduce the risk of fire or electrical shock, do not touch the TV with wet hands. If the power cord prongs are wet or covered with dust, dry the power plug completely or wipe dust off.
4

•• Batteries
-- Store the accessories (battery, etc.) in a safe location out of the reach of children.
-- Do not short circuit, disassemble, or allow the batteries to overheat. Do not dispose of batteries in a fire. Batteries should not be exposed to excessive heat.
-- Caution : Risk of fire or explosion if the battery is replaced by an incorrect type.
•• Moving
-- When moving, make sure the product is turned off, unplugged, and all cables have been removed. It may take 2 or more people to carry larger TVs. Do not press or put stress on the front panel of the TV. Otherwise, this may result in product damage, fire hazard or injury.
•• Keep the packing anti-moisture material or vinyl packing out of the reach of children.
•• Do not allow an impact shock, any objects to fall into the product, and do not drop anything onto the screen.
•• Do not press strongly upon the panel with a hand or a sharp object such as a nail, pencil, or pen, or make a scratch on it. It may cause damage to screen.
•• Cleaning
-- When cleaning, unplug the power cord and wipe gently with a soft/dry cloth. Do not spray water or other liquids directly on the TV. Do not clean your TV with chemicals including glass cleaner, any type of air freshener, insecticide, lubricants, wax (car, industrial), abrasive, thinner, benzene, alcohol etc., which can damage the product and/or its panel. Otherwise, this may result in electric shock or product damage.
5

Preparing
Lifting and moving the TV
Please note the following advice to prevent the TV from being scratched or damaged and for safe transportation regardless of its type and size.
•• It is recommended to move the TV in the box or packing material that the TV originally came in.
•• Before moving or lifting the TV, disconnect the power cord and all cables.
•• When holding the TV, the screen should face away from you to avoid damage.
•• Hold the side and bottom of the TV frame firmly. Make sure not to hold the transparent part, speaker, or speaker grill area.
•• When transporting a large TV, there should be at least 2 people.
•• When transporting the TV by hand, hold the TV as shown in the following illustration.
•• When transporting the TV, do not expose the TV to jolts or excessive vibration.
•• When transporting the TV, keep the TV upright, never turn the TV on its side or tilt towards the left or right.
•• Do not apply excessive pressure to cause flexing / bending of frame chassis as it may damage screen.
•• When handling the TV, be careful not to damage the protruding buttons.
•• Avoid touching the screen at all times, as this may result in damage to the screen.
•• When attaching the stand to the TV set, place the screen facing down on a cushioned table or flat surface to protect the screen from scratches.
6

Mounting on the Table
1Lift and tilt the TV into its upright position on a table.
• Leave a 10 cm (minimum) space from the wall for proper ventilation.
2Connect the power cord to a wall outlet.
|
10 cm |
10 cm |
10 cm |
|
(Depending on model)
•• Do not apply foreign substances (oils, lubricants, etc.) to the screw parts when assembling the product. (Doing so may damage the product.)
•• If you install the TV on a stand, you need to take actions to prevent the product from overturning. Otherwise, the product may fall over, which may cause injury.
•• Do not use any unapproved items to ensure the safety and product life span.
•• Any damage or injuries caused by using unapproved items are not covered by the manufacturer’s warranty.
•• Make sure that the screws are inserted correctly and fastened securely. (If they are not fastened securely enough, the TV may tilt forward after being installed.) Do not use too much force and over tighten the screws; otherwise screw may be damaged and not tighten correctly.
•• When installing on a cabinet or a shelf using a stand, make sure its width is greater than that of the TV.
•• If a television is not positioned in a sufficiently stable location, it can be potentially hazardous due to falling. Many injuries, particularly to children, can be avoided by taking simple precautions such as:
-- Using cabinets or stands recommended by the manufacturer of the television. -- Only using furniture that can safely support the television.
-- Ensuring the television is not overhanging the edge of the supporting furniture.
-- Not placing the television on tall furniture (for example, cupboards or bookcases) without anchoring both the furniture and the television to a suitable support.
-- Not standing the televisions on cloth or other materials placed between the television and supporting furniture. -- Educating children about the dangers of climbing on furniture to reach the television or its controls.
7
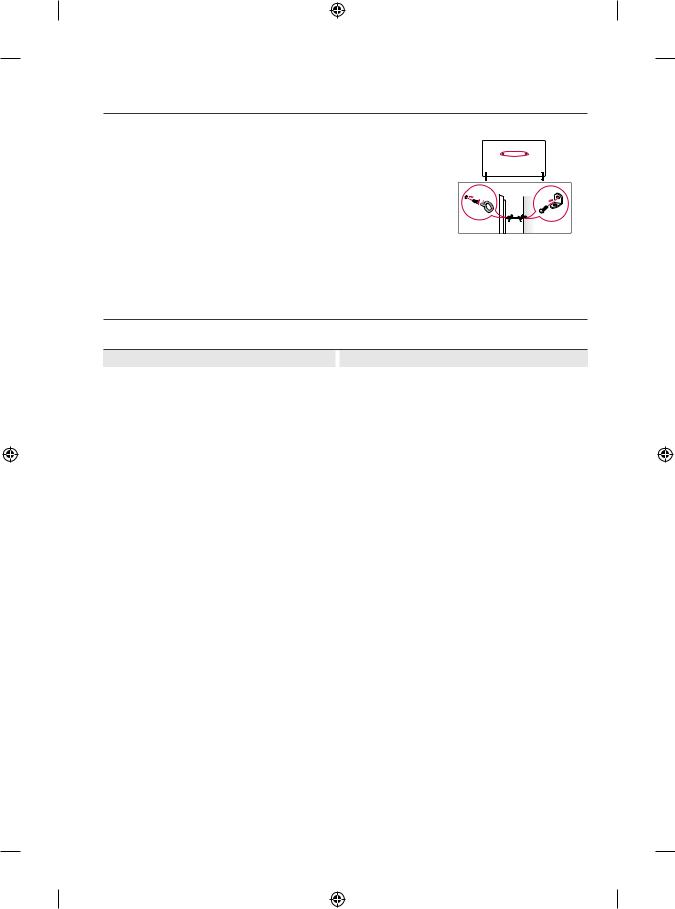
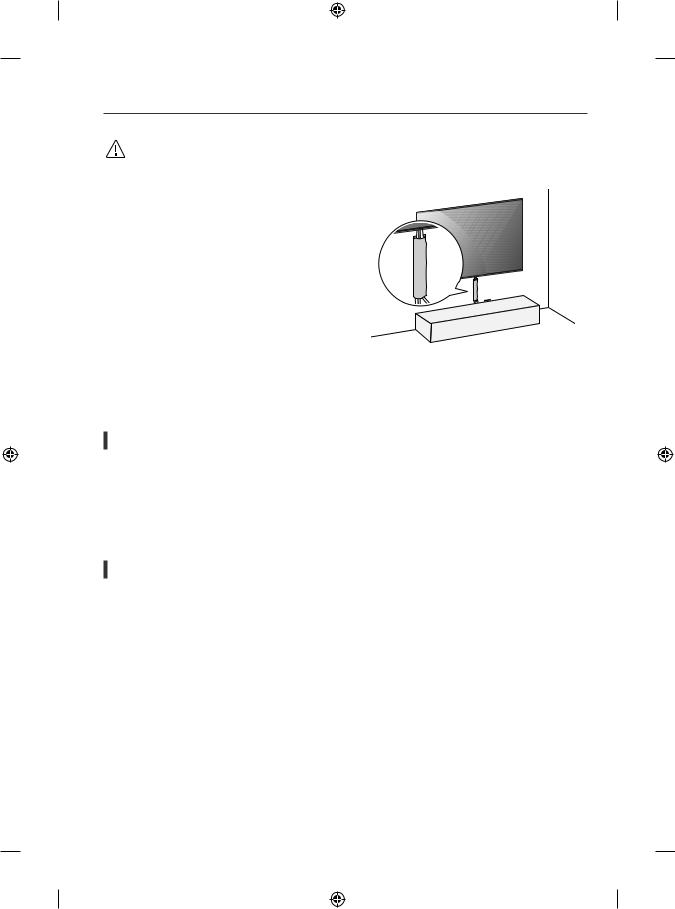
Securing TV to the Wall
1 Insert and tighten the eye-bolts, or TV brackets and bolts on the back of the TV.
• If there are bolts inserted at the eye-bolts position, remove the bolts first.
2 Mount the wall brackets with the bolts to the wall. Match the location of the wall bracket and the eye-bolts on the rear of the TV.
3 Connect the eye-bolts and wall brackets tightly with a sturdy rope. Make sure to keep the rope horizontal with the flat surface.
•• Use a platform or cabinet that is strong and large enough to support the TV securely. |
|
|
•• Brackets, bolts and ropes are not provided. You can obtain additional accessories from your local |
(Depending on model) |
|
dealer. |
||
|
Stand
(Depending on model)
Stand |
|
Model |
|
|
|
AP-G1DV55 |
|
OLED55G1* |
AP-G1DV65 |
|
OLED65G1* |
AP-G1DV77 |
|
OLED77G1* |
8
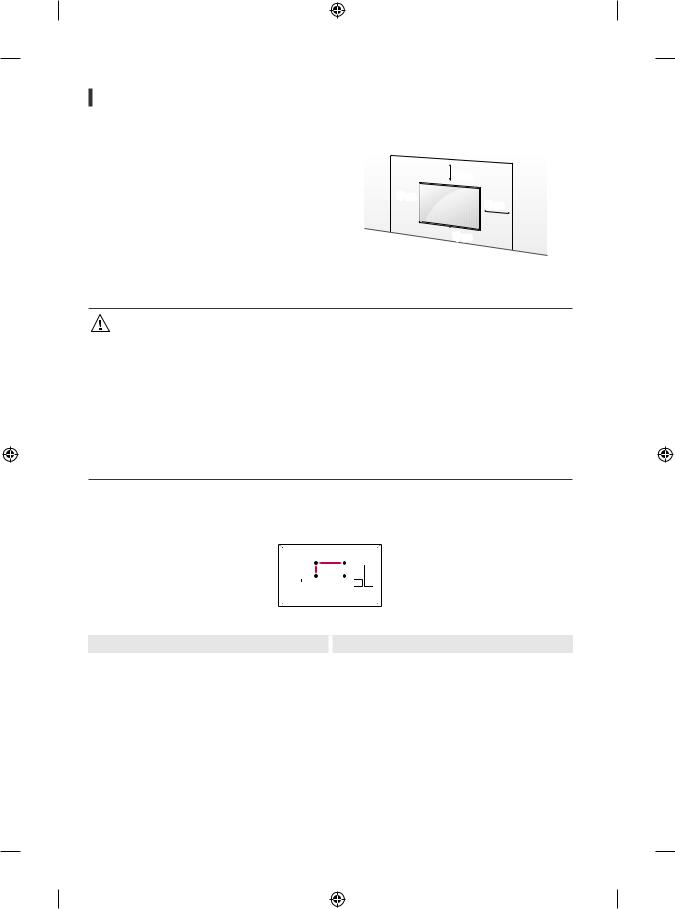
Mounting to the Wall
Attach an optional wall mount bracket at the rear of the TV carefully and install the wall mount bracket on a solid wall perpendicular to the floor. When you attach the TV to other building materials, please contact qualified personnel. LG recommends that wall mounting be performed by a qualified professional installer. We recommend the use of LG’s wall mount bracket. LG’s wall mount bracket is easy to move with cables connected. When you do not use LG’s wall mount bracket, please use a wall mount bracket where the device is adequately secured to the wall with enough space to allow connectivity to external devices. It is advised to connect all the cables before installing fixed wall mounts.
10 cm
10 cm 
 10 cm
10 cm
 10 cm
10 cm
(Depending on model)
•• Remove the stand before installing the TV on a wall mount by performing the stand attachment in reverse.
•• For more information of screws and wall mount bracket, refer to the Separate purchase.
•• If you intend to mount the product to a wall, attach VESA standard mounting interface (optional parts) to the back of the product. When you install the set to use the wall mounting bracket (optional parts), fix it carefully so as not to drop.
•• When mounting a TV on the wall, make sure not to install the TV by hanging the power and signal cables on the back of the TV.
•• Do not install this product on a wall if it could be exposed to oil or oil mist. This may damage the product and cause it to fall.
•• When installing the Full Contact Wall Mount, the TV may not be contacted firmly against the wall due to some wall conditions.
Wall Mounting Bracket
(Depending on model)
Make sure to use screws and wall mount bracket that meet the VESA standard. Standard dimensions for the wall mount kits are described in the following table.
|
|
|
|
|
|
|
|
|
|
|
|
|
|
|
|
|
|
|
|
|
|
|
|
|
|
|
|
Model |
|
|
|
OLED55/65/77G1* |
||
VESA (A x B) (mm) |
|
|
|
300 x 300 |
||
Standard screw |
|
|
|
M6 |
||
Number of screws |
4 |
|||||
Wall mount bracket |
|
|
|
OLW480B |
||
9

For more information, watch the installation video on your smart device.
Precautions for Safety
(Except for OLW480B)
•• Professional installers should read this manual carefully to ensure proper installation.
•• Professional installers should forward this manual to customers after installation and encourage them to read and store it in a convenient place for future reference.
After reading the installation manual, keep it in a convenient place for future reference.
•• Ask a professional installer appointed by the store for installation of the product.
Installation by someone other than a professional installer is extremely dangerous and may result in personal injury.
•• Do not install the product in an unstable site that cannot withstand its weight.
If the installation site lacks sufficient rigidity, the product may fall and cause personal injury.
•• Contact a professional installer appointed by the store prior to moving or replacing the product after installation. Installation is a technical task and safety issues may arise if an individual attempts to install or move the product personally.
•• Do not hang on the product or subject it to severe impact after installation. Doing so may cause the product to fall and cause personal injury.
•• When installing the product on a wall, do not hang the power line or signal cables from the back of the TV. This can damage the cords, resulting in a fire, electrical shock or malfunction of the product.
•• Be sure to wear work gloves when installing the product. -- Installing with unprotected hands may result in injury.
10
•• Install the product according to the instructions in the installation manual.
Failure to install the product according to the instructions in the installation manual can result in serious personal injury or product damage.
•• Be sure to have at least two people when installing the product or adjusting the product’s height.
Attempting to perform installation or adjustments personally may result in personal injury or damage to the product.
•• Make sure a wall is available prior to proceeding with installation. Make use of the anchors and screws provided with the product. Use of any unauthorized anchors or screws may not support the product’s weight, which poses safety risks.
•• When drilling in the wall for installation, be sure to use drill bits and drills of the specified diameter. Follow the instructions for the hole depth.
Drilling and installing the product in ways other than specified in the installation manual may result in an unstable installation and potential safety issues.
•• Do not wipe the product with a wet towel or use any heating equipment or humidifier under the place where the product is installed. Liquid water or vapor may enter the product and excessive heat may cause fire, electric shock, or malfunction.
•• Do not install the product near a fire sprinkler or detector, a place where vibration or shock may occur or near a high-voltage wire or power source.
•• Unplug the product’s power cord from the wall outlet before installing.
Installing the product while the power cord is plugged in may result in electric shock or fire.
•• Do not install the product with bare hands. Be sure to wear work gloves. Attempting installation without work gloves may cause personal injury.
•• Connect the product with the supplied cable. Use of an unauthorized cable may result in damage by friction with the wall. Make sure to use the supplied cable gender. (This may vary by model.)
Before Installation
(Except for OLW480B)
•• Do not use the product for any purpose other than installing the TV on a wall.
•• Avoid product damage and safety accidents caused by careless installing or use of improper or unauthorized wall mount.
•• Follow the instructions in the installation manual for a convenient installation of the wall mount.
•• Immediately discontinue installation and contact the service centre if you cannot fully understand the installation process. Use a professional installer if any installation issues remain after the inquiry.
•• Installation of this product on a concrete wall or wood stud is recommended. Installation of this product on other surfaces (Dry wall, plywood, bricks, etc.) is not recommended. Improper installation may result in the product falling.
•• Install the product only on a vertical wall.
Do not install on a tilted wall that exceeds building standards or on the heavily titled wall or ceiling.
LG is not responsible for problems caused by improper installation of the product, e.g., heavily tilted walls and ceilings.
11

•• Check the enclosed accessories before installation. We are not responsible for any lost or damaged accessories after the inner packaging is opened.
•• When an infant or small child swallows the enclosed accessories, various safety accidents such as choking may occur. Keep the enclosed accessories out of the reach of infants and children.
•• When tightening screws, tighten until fully snug.
Avoid using excessive force when tightening the screws. Doing so may damage the wall and product or reduce the rigidity or performance of the product.
•• Avoid installing a TV that exceeds the specified tensile load, and do not allow any external force to be applied to the product.
•• Avoid accidents by using work tools with care during installation.
Tools for Installation
•• “+” shaped screwdriver (manual or electric) / level / drill / Ø 8 mm drill bit for concrete or Ø 4 mm drill bit for steel
Securing TV to the Wall
(Except for OLW480B)
•• Please use the TV close to the wall after installation.
How to fix anchors and screws
(Except for OLW480B) Please make sure that:
•• Check that the material and thickness of the wall and finishing material comply with the installation manual. Before beginning the mounting process, you must be sure the wall is able to support the weight of the TV.
•• Should use the enclosed anchors and screws on crack-free concrete walls.
•• Never install the product on a plasterboard or wall made of paper or medium-density fiberboard (MDF). When it is necessary to install the product on such wall, anchor screws must be fastened to retaining walls (concrete) or wood Stud inside the finishing material.
•• The wall mount should be attached to a stud. This usually will not be a problem, but depending on individual circumstances, there may be cases when the ability to mount into a stud is not possible. In this case, there are a variety of drywall anchors, such as toggle bolts, which may provide a solution. If using drywall anchors, please be sure the anchors and the wall have the ability to support the weight of your TV. Please note that the supplied anchors may not be the correct ones for your individual situation, so you should check with a local professional.
•• Other unspecified walls must be capable of supporting pullout loads of over 70 kgf (686 N) and shear loads of over 100 kgf (980 N) per fastener.
•• Use an Ø 8 mm drill bit for concrete and a hammer (impact) drill or Ø 4 mm drill bit for wood stud to drill holes.
12
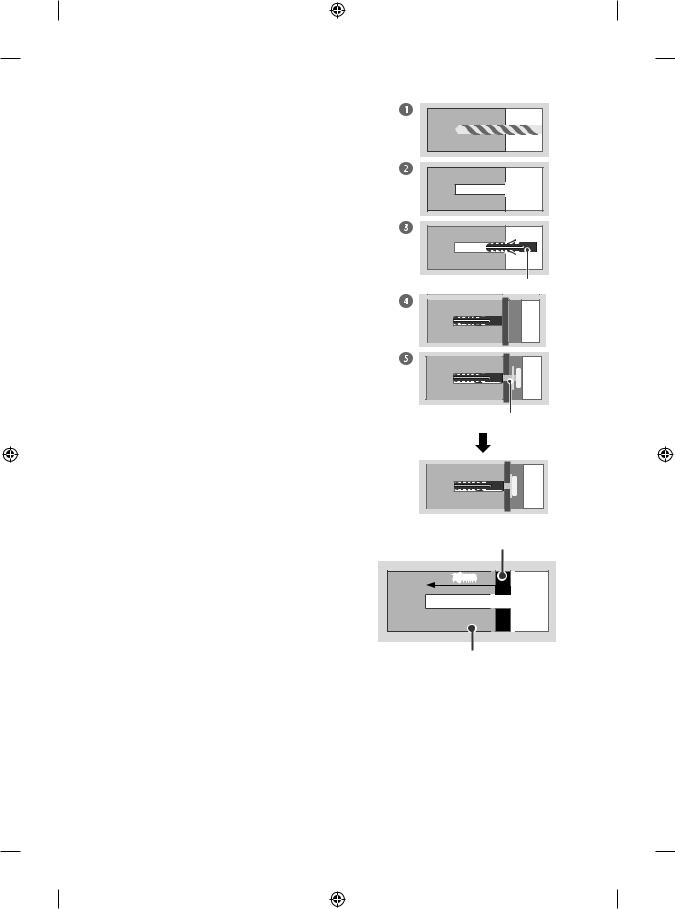
For installation on concrete wall
1Drill holes in anchor locations with a drill bit of Ø 8 mm to a depth of 80 mm to 100 mm.
2Clean the drilled holes.
3Insert the enclosed anchors for fixing the wall mount into the holes. (Use a hammer when inserting anchors.)
4Push the wall mount support closely toward the wall to match the hole locations.
5Tighten screws for fixing the wall mount to the holes. At this time, tighten the screws to a torque of between 45 kgf/cm to 60 kgf/cm.
For installation on wood stud
Use the Ø 4 mm drill bit for wood to drill holes with the depth of 76 mm. (Clean the drilled hole.)
Without using the wall mounting anchor, fasten the wall mounting screw directly to the wood stud.
Wall mounting anchor
Wall mounting screw
Drywall
76 mm
Wood stud
13
After Installation
•• When connecting additional cables from the sides, we recommend holding the centre of the TV horizontally or vertically and pulling the product to make sure there is sufficient distance from the wall before connecting.
•• When connecting additional cables from the bottom, we recommend releasing the TV from the wall mount before connecting.
•• Use cable management systems to arrange the cables at the bottom of the TV as shown below. Cable managements are not provided with the product, so purchase them separately.
(For example)
•• After installing the product, be sure to use it adhered to the wall.
-- Using the product while it is not adhered to the wall may damage or shake the product.
Antenna/Cable
Connect the TV to a wall antenna socket with an RF cable (75 Ω).
•• Use a signal splitter to use more than 2 TVs.
•• If the image quality is poor, install a signal amplifier properly to improve the image quality.
•• If the image quality is poor with an antenna connected, try to realign the antenna in the correct direction.
•• An antenna cable and converter are not supplied.
•• For a location that is not supported with ULTRA HD broadcasting, this TV cannot receive ULTRA HD broadcasts directly.
Satellite dish
Connect the TV to a satellite dish to a satellite socket with a satellite RF cable (75 Ω). (Depending on model)
14
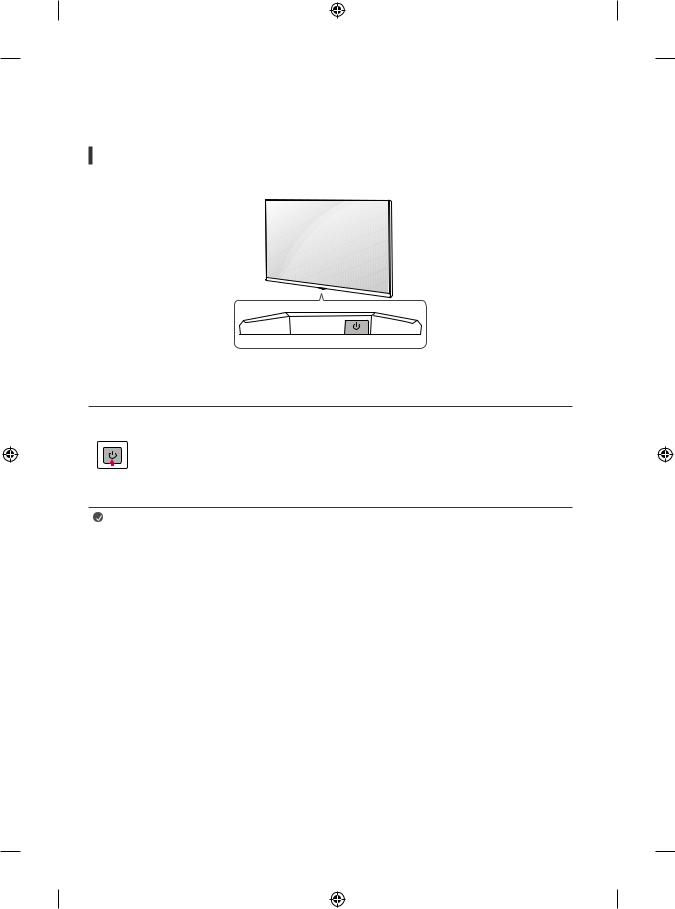
Starting TV
Turning on the TV
You can simply operate the TV functions, using the button.
Using button
Power On (Press)
Power Off1) (Press and Hold)
Menu Control (Press2))
Menu Selection (Press and Hold3))
1)All running apps will close, and any recording in progress will stop.
2)You can access and adjust the menu by pressing the button when TV is on.
3)You can use the function when you access menu control.
Note |
•• If the TV is turned on for the first time after it was shipped from the factory, initialization of the TV may take a few |
|
minutes. |
15

Adjusting the menu
When the TV is turned on, press the button one time. You can adjust the Menu items using the button.
|
|
|
Turns the power off. |
Changes the input source. |
|
||
|
|
|
|
|
|
|
|
|
|
|
Adjusts the volume level. |
Scrolls through the saved programmes. |
|
||
|
|
|
|
|
|||
|
|
Note |
•• Your TV’s OSD (On Screen Display) may differ slightly from that shown in this manual. |
|
|||
•• The available menus and options may differ from the input source or product model that you are using.
•• New features may be added to this TV in the future.
•• The device must be easily accessed to a location outlet near the access. Some devices are not made by turning on / off button, turning off the device and unplugging the power cord.
•• You need to enable easy access for connecting and disconnecting electric cables fed from the mains.
Inserting the battery
When the message [Magic Remote battery is low. Please change the battery.] is displayed, replace the battery.
To replace batteries, open the battery cover, replace batteries (1.5 V AA) matching the and
and ends to the label inside the compartment, and close the battery cover.
•• Do not mix new batteries with old batteries. This may cause the batteries to overheat and leak.
•• Failure to match the correct polarities of the battery may cause the battery to burst or leak, resulting in fire, personal injury, or ambient pollution.
•• This apparatus uses batteries. In your community there might be regulations that require you to dispose of these batteries properly due to environmental considerations. Please contact your local authorities for disposal or recycling information.
•• Batteries inside or inside the product shall not be exposed to excessive heat such as sunshine, fire or the like.
16

Registering Magic Remote Control
How to register the Magic Remote Control
To use the Magic Remote, first pair it with your TV.
1Put batteries into the Magic Remote and turn the TV on.
2Point the Magic Remote at your TV and press the Wheel (OK) on the remote control. * If the TV fails to register the Magic Remote, try again after turning the TV off and back on.
How to deregister the Magic Remote Control
Press the (Back) and
 (Home) buttons at the same time, for five seconds, to unpair the Magic Remote with your TV.
*Press and hold the (Home) and
 (Q. Settings) buttons for more than 5 seconds to disconnect and re-register the Magic Remote at the same time.
•• It is recommended that an Access Point (AP) be located more than 0.2 m away from the TV. If the AP is installed closer than 0.2 m, the Magic remote control may not perform as expected due to frequency interference.
Connecting Smart Devices using NFC Tagging
Using the NFC Feature
NFC is technology that uses Near Field Communication, allowing you to conveniently send and receive information without separate settings. By bringing a smart device near the NFC-enabled remote control, you can install the LG ThinQ app and connect the device to the TV.
1Turn on NFC in the smart device’s settings. To use NFC with Android devices, set the NFC option to enable ‘read/write tags’ in the smart device’s settings. The NFC settings may vary depending on the device.
2Bring the smart device near the (NFC) on the remote control. The required distance for NFC tagging is about 1 cm.
3Follow the instructions to install the LG ThinQ app on your smart device.
4Retagging the smart device to the remote control allows you to conveniently access various features on the connected TV through the LG ThinQ app.
Note |
•• This feature is available for NFC-enabled smart devices only. |
|
•• This feature is only available if the remote control has an NFC logo. |
17

Using Remote Control
Using Magic Remote Control
(Depending on model)
The descriptions in this manual are based on the buttons on the remote control. Please read this manual carefully and use the TV correctly.
Power Turns the TV on or off.
|
|
|
(Dash) Inserts a |
|
between numbers |
|
1 |
||||||
|
|
|
||||
|
|
such as 2-1 and 2-2. |
||||
 Accesses the saved programmes list.
Accesses the [Guide].
Accesses the [Edit Quick Access].
-- [Edit Quick Access] is a feature that allows you to enter a specified app or Live TV directly by pressing and holding the number buttons.
Volume buttons Adjusts the volume level.
Programmes buttons Scrolls through the
saved programmes.
Home Accesses the Home menu.
Home Launches the last used apps.
Input Changes the input source.
Input Accesses the [Home Dashboard].
Wheel (OK) Press the centre of button to select a menu. You can change programmes by using
 button.
Wheel (OK) Accesses the [Magic Explorer]. You can run the [Magic Explorer] feature when the pointer colour is changed to purple. If watching a programme, press and hold down the pointer onto the video.
When using [TV Guide], [Settings], [Sports Alert], or [Art Gallery], press and hold down on the text.
Up/Down/Left/Right Press the up, down, left or right button to scroll the menu. If you press  buttons while the pointer is in use, the pointer will disappear from the screen and Magic Remote will operate like a general remote control. To display the pointer on the screen again, shake Magic Remote to the left and right.
Microphone
1
2
3 |
3 |
3 |
3 |
3 |
3 |
Number buttons Enters numbers. Accesses the [Quick Help].
More actions Displays more remote control functions.
2  Audio descriptions function will be enabled.
Mute Mutes all sounds.
Mute Accesses the [Accessibility] menu.
Voice recognition Network connection is required to use the voice recognition function.
Check for recommended content. (Some recommended services may not be available in some countries.)
Voice recognition Speak while pressing and holding the button to use the voice recognition feature.
Q. Settings Accesses the Quick Settings.
Q. Settings Displays the [All Settings] menu.
Back Returns to the previous level.
Back Clears on-screen displays and returns to last input viewing.
These access special functions in some menus.
Red button Runs the record function.
3Streaming Service buttons Connects to the Video Streaming Service.
3 |
|
|
|
|
Home Dashboard Accesses the [Home |
|
|
|
|
|
Dashboard]. |
3 |
|
|
|
|
User Guide Accesses the [User Guide]. |
3 |
|
|
|
|
Accesses your favorite programmes list. |
3 |
, |
|
|
|
Control buttons Controls media |
|
|
||||
|
|
|
|
|
contents. |
(Some buttons and services may not be provided depending on models or regions.)
Note |
To use the button, press and hold for more than 1 second. |
•• In Analogue TV and some countries, some remote control buttons may not work.
18

Connections
Connect various external devices to the TV and switch input modes to select an external device. For more information of external device’s connection, refer to the manual provided with each device.
HDMI |
•• When connecting the HDMI cable, the product and external devices should be turned off and unplugged. |
||||||||||||
|
|
|
|
|
|
|
|
|
|
|
|
|
|
|
|
|
|
|
|
|
|
|
|
|
|
|
|
|
•• Supported HDMI Audio format (Depending on model): |
||
|
|
True HD (48 kHz), |
|
|
|
Dolby Digital / Dolby Digital Plus (32 kHz, 44.1 kHz, 48 kHz), |
|
|
|
PCM (32 kHz, 44.1 kHz, 48 kHz, 96 kHz, 192 kHz) |
|
|
|
||
Note |
•• If the device connected to Input Port also supports HDMI Deep Colour, your picture may be clearer. However, |
||
|
|
if the device doesn’t support it, it may not work properly. In that case, change the TV’s [HDMI Deep Colour] |
|
|
|
setting to off. |
|
|
•• |
→ |
→[General] → [Devices] →[HDMI Settings] →[HDMI Deep Colour] |
|
|
-- On: Support 4K @ 50/60 Hz (4:4:4, 4:2:2, 4:2:0), 4K @ 100/120 Hz (4:4:4, 4:2:2, 4:2:0) |
|
|
|
-- Off: Support 4K @ 50/60 Hz (4:2:0) |
|
|
•• Use a certified cable with the HDMI logo attached. |
||
|
•• If you do not use a certified HDMI cable, the screen may not display or a connection error may occur. |
||
|
•• Recommended HDMI Cable Types |
||
|
|
-- Ultra High Speed HDMI®/™ cable (3 m or less) |
USB |
|
Some USB Hubs may not work. If a USB device connected using a USB Hub is not detected, connect it to the USB |
|
|
port on the TV directly. |
Note |
•• For an optimal connection, HDMI cables and USB devices should have bezels less than 8 mm thick, 18 mm |
|||
|
width and 8 mm a wire diameter. Use an extension cable that supports |
or higher if the USB cable or |
||
|
USB memory stick does not fit into your TV’s USB port. |
|
||
|
C |
|
* A 8 mm |
|
|
|
B |
B |
|
|
|
* B 18 mm |
|
|
|
|
|
|
|
|
A |
|
A |
|
|
|
|
* C 8 mm |
|
19

IR Blaster |
Control the set-top box (cable/satellite/IP/OTT), Blu-ray/DVD player, soundbar, game consoles, etc., using the IR |
||||
|
Blaster. (Depending on country) |
||||
|
|
|
|
|
|
|
|
|
|
|
|
Note |
•• Connect the IR Blaster cable to the TV’s IR Blaster port. |
|
|
|
•• Place both ends (one or two) of the IR Blaster in front of the external device as shown in the picture below. |
||
|
•• Use universal control settings to control the device. Go to |
→ |
→[General] →[Devices] → |
|
[External Devices] →[Universal Control Settings]. |
|
|
•• Secure the IR Blaster with the 3M tape provided.
|
External |
Available external devices are: Blu-ray player, HD receivers, DVD players, VCRs, audio systems, USB storage |
|
|
Devices |
devices, PC, gaming devices, and other external devices. |
|
|
|
|
|
|
Note |
•• The external device connection may differ from the model. |
|
|
|
•• Connect external devices to the TV regardless of the order of the TV port. |
|
|
|
•• If you record a TV program on a Blu-ray/DVD recorder or VCR, make sure to connect the TV signal input |
|
|
|
cable to the TV through a DVD recorder or VCR. For more information of recording, refer to the manual |
|
|
|
provided with the connected device. |
|
|
|
•• Refer to the external equipment’s manual for operating instructions. |
|
|
|
•• If you connect a gaming device to the TV, use the cable supplied with the gaming device. |
|
|
|
•• In PC mode, there may be noise associated with the resolution, vertical pattern, contrast or brightness. If |
|
|
|
noise is present, change the PC output to another resolution, change the refresh rate to another rate or |
|
|
|
adjust the brightness and contrast on the [Picture] menu until the picture is clear. |
|
|
|
•• In PC mode, some resolution settings may not work properly depending on the graphics card. |
|
|
|
•• If ULTRA HD content is played on your PC, video or audio may become disrupted intermittently depending |
|
|
|
on your PC’s performance. (Depending on model) |
|
|
|
•• When connecting via a wired LAN, it is recommended to use a CAT 7 cable. (Only when |
port is |
|
|
provided.) |
|
|
|
|
|
20
Troubleshooting
Cannot control the TV with the remote control.
No image display and no sound is produced.
The TV turns off suddenly.
•• Check the remote control sensor on the product and try again.
•• Check if there is any obstacle between the product and the remote control.
•• Check if the batteries are still working and properly installed ( to
to  ,
,  to
to  ).
).
•• Check if the product is turned on.
•• Check if the power cord is connected to a wall outlet.
•• Check if there is a problem in the wall outlet by connecting other products.
•• Check the power control settings. The power supply may be interrupted.
•• Check if the auto-off function is activated on the settings related time.
•• If there is no signal while the TV is on, the TV will turn off automatically after 15 minutes of inactivity.
When connecting to the PC (HDMI), no signal is detected.
Abnormal Display
Generated Sound
•• Turn the TV off/on using the remote control.
•• Reconnect the HDMI cable.
•• Restart the PC with the TV on.
•• If the product feels cold to the touch, there may be a small “flicker” when it is turned on. This is normal, there is nothing wrong with product.
•• This panel is an advanced product that contains millions of pixels. You may see tiny black dots and/or brightly coloured dots (white, red, blue or green) at a size of 1 ppm on the panel. This does not indicate a malfunction and does not affect the performance and reliability of the product.
This phenomenon also occurs in third-party products and is not subject to exchange or refund.
•• You may find different brightness and colour of the panel depending on your viewing position(left/right/ top/down).
This phenomenon occurs due to the characteristic of the panel. It is not related with the product performance, and it is not malfunction.
•• “Cracking” noise: A cracking noise that occurs when watching or turning off the TV is generated by plastic thermal contraction due to temperature and humidity. This noise is common for products where thermal deformation is required.
•• Electrical circuit humming/panel buzzing: A low level noise is generated from a high-speed switching circuit, which supplies a large amount of current to operate a product. It varies depending on the product.
This generated sound does not affect the performance and reliability of the product.
•• Make sure to wring any excess water or cleaner from the cloth.
•• Do not spray water or cleaner directly onto the TV screen.
•• Make sure to spray just enough of water or cleaner onto a dry cloth to wipe the screen.
21

Specifications
(Depending on country)
Broadcasting Specifications
|
|
|
|
|
Digital TV |
|
|
|
Analogue TV |
|
|
|
|
|
|
|
|
|
PAL B/B, PAL B/G, PAL |
Television system |
|
|
|
|
DVB-T/T2, DVB-C, DVB-S/S2 |
D/K, PAL-I, |
|||
|
|
|
|
SECAM B/G, SECAM D/K, |
|||||
|
|
|
|
|
|
|
|
|
|
|
|
|
|
|
|
|
|
|
NTSC-M |
|
|
|
|
|
|
|
|
|
|
|
|
|
DVB-S/S21) |
|
DVB-C1) |
|
DVB-T/T21) |
|
|
|
|
|
|
|
|
|
VHF III : 174 ~ 230 MHz |
|
|
Programme coverage |
|
|
|
|
|
|
UHF IV : 470 ~ 606 MHz |
46 ~ 862 MHz |
|
|
|
950 ~ 2,150 MHz |
|
46 ~ 890 MHz |
|
UHF V : 606 ~ 862 MHz |
|||
|
|
|
|
|
|
||||
|
|
|
|
|
|
|
S Band II : 230 ~ 300 MHz |
|
|
|
|
|
|
|
|
|
S Band III : 300 ~ 470 MHz |
|
|
|
|
|
|
|
|
|
|
|
|
Maximum number of |
6,000 |
|
|
3,000 |
|
|
|||
storable programmes |
|
|
|
|
|||||
|
|
|
|
|
|
|
|
|
|
External antenna |
75 Ω |
|
impedance |
||
|
||
|
|
1) Only DVB-T2/C/S2 support model only.
|
Wireless module(LGSBWAC95)Specifications |
||
|
Wireless LAN (IEEE 802.11a/b/g/n/ac) |
||
|
|
|
|
Frequency range |
|
|
Output Power (Max.) |
|
|
|
|
2,400 to 2,483.5 MHz |
|
|
19 dBm |
|
|
|
|
5,150 to 5,725 MHz |
|
|
18 dBm |
|
|
|
|
5,725 to 5,850 MHz |
|
|
13.5 dBm |
|
|
||
|
Bluetooth |
||
Frequency range
2,400 to 2,483.5 MHz
Output power(Max.)
9 dBm
As band channels can vary per country, the user cannot change or adjust the operating frequency. This product is configured for the regional frequency table.
For consideration of the user, this device should be installed and operated with a minimum distance of 20 cm between the device and the body.
22

Environment condition
Operating Temperature
Operating Humidity
Storage Temperature
Storage Humidity
0 °C to 40 °C
Less than 80 %
-20 °C to 60 °C
Less than 85 %
•• The energy information provided with the product is indicated in accordance with the regulations of each country. (Depending on Country) -- The Energy consumption is measured in accordance with IEC 62087.
•• Actual Energy consumption may vary depending on factors such as the type of video content being played and TV settings.
•• For information of the power supply and power consumption, refer to the label attached to the product. (Depending on country) -- The typical power consumption is measured in accordance with IEC 62087 or each country’s energy regulations.
*On some models, the label is inside the external device connection terminal cover.
*Depending on the model or country, the typical power consumption may not be on label.
23

Open Source Software Notice Information
To obtain the source code under GPL, LGPL, MPL, and other open source licenses, that is contained in this product, please visit http://opensource.lge. com.
In addition to the source code, all referred license terms, warranty disclaimers and copyright notices are available for download.
LG Electronics will also provide open source code to you on CD-ROM for a charge covering the cost of performing such distribution (such as the cost of media, shipping, and handling) upon email request to opensource@lge.com.
This offer is valid for a period of three years after our last shipment of this product. This offer is valid to anyone in receipt of this information.
Licenses
(Magic Remote supported models only)
24
Important Information for
Preventing Image Retention
OLED is a self-emissive technology, which brings many significant benefits to image quality and performance. As with any self-emitting display, it is possible for users of OLED TVs to experience temporary image retention under certain conditions, such as when displaying a static image on the screen for a long time. LG OLED TVs incorporate dedicated functions that protect the screen from possible image retention.
If a static image persists on screen, screen brightness is automatically reduced in specific areas of, or across the entire screen. Once the static image disappears, screen brightness will automatically return to its prior setting. This is not a product malfunction.
Examples of Images that may Cause Image Retention
•• Still images or fixed images containing certain information that are displayed uninterrupted on the screen, such as channel numbers, station logos, program titles, news or movie subtitles, and headlines.
•• Fixed menu or icons for video game consoles or broadcasting set-top boxes.
•• Black bars shown on the left, right, top, or bottom of the screen, such as in images with a 4:3 or 21:9 ratio.
Recommended Measures for Preventing Image Retention
•• Avoid watching a video displaying an image as listed above for extended periods of time.
•• Adjust your TV settings as below when turning on a video exhibiting an image as listed above for extended periods of time.
-- |
→ |
→[Picture] →[Select Mode] →[Eco] / [APS] (Depending on country) |
-- |
→ |
→[Picture] →[Advanced Settings] →[Brightness] →[OLED Pixel Brightness] →Adjust to lower value |
-- |
→ |
→ [Support] →[OLED Screen Saver] →[Adjust Logo Brightness] →[High] |
•• Turn off the menu bar of an external device, such as a set-top box, to prevent long-term display of the menu bar of such device. (Please refer to the manual of the applicable external device for instructions.)
•• Adjust the settings as below when watching a video constantly showing black bars on the left, right, top or bottom, in order to remove the black bars.
--  →
→ →[Picture] →[Aspect Ratio] →[User Selection] →[Vertical Zoom] or [4-Way Zoom]
25

Information on Functions Supporting Image Quality in Relation to Temporary Image Retention
•• LG OLED TVs provide a feature called Pixel Cleaning, which helps to prevent temporary image retention.
•• When the accumulated television viewing time reaches 2,000 hours or more (this is equivalent to watching TV for five hours a day over the course of a year), Pixel Cleaning will be automatically activated once your TV is turned off. When turning off your TV, a notice will appear on the screen informing the activation of Pixel Cleaning. This feature will run for an hour while your TV is turned off. A horizontal line may appear at the top or bottom of the screen when the process is almost finished.
•• You may also manually activate Pixel Cleaning via the TV menu: →
→ →[Support] →[OLED Screen Saver] →[Pixel Cleaning].
•• Whenever you watch your TV for more than four cumulative hours, Pixel Cleaning will be automatically activated for a few minutes once your TV is turned off. (Note: Pixel Cleaning will not be activated if the power cord of your TV is not plugged in or the main power is off.)
26
 Loading...