


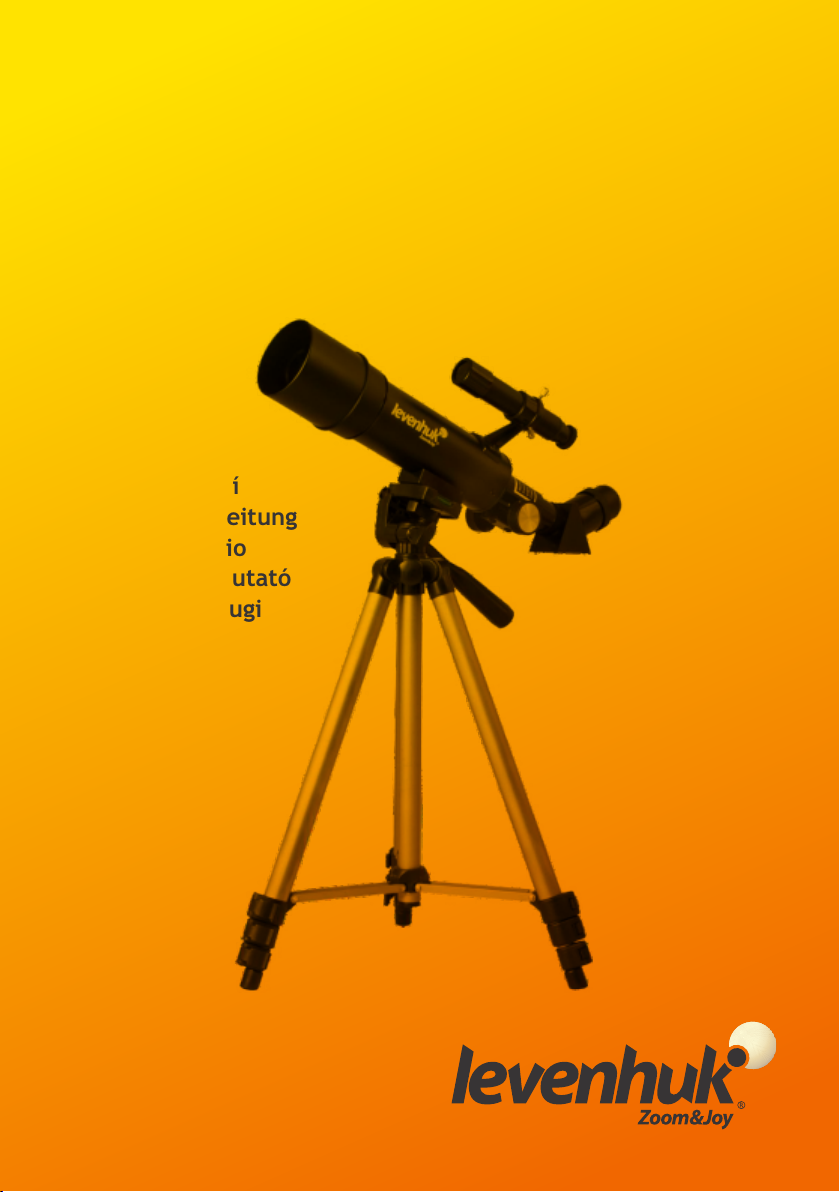
Skyline Travel 80
User Manual
Návod k použití
Bedienungsanleitung
Guía del usuario
Használati útmutató
Instrukcja obsługi
Инструкция по
эксплуатации
Levenhuk Skyline
Travel Telescopes
Levenhuk Skyline Travel 50
Levenhuk Skyline Travel 70
Levenhuk Skyline Travel 80
Radost zaostřit
Zoom ran und hab Fun!
Amplíe y disfrute
Kellemes nagyítást!
Radość przybliżania
Приближает с удовольствием
1
B A C
J
C J A
L
B
F
I
E
D
D
E
I
F
G
G
H
K
H
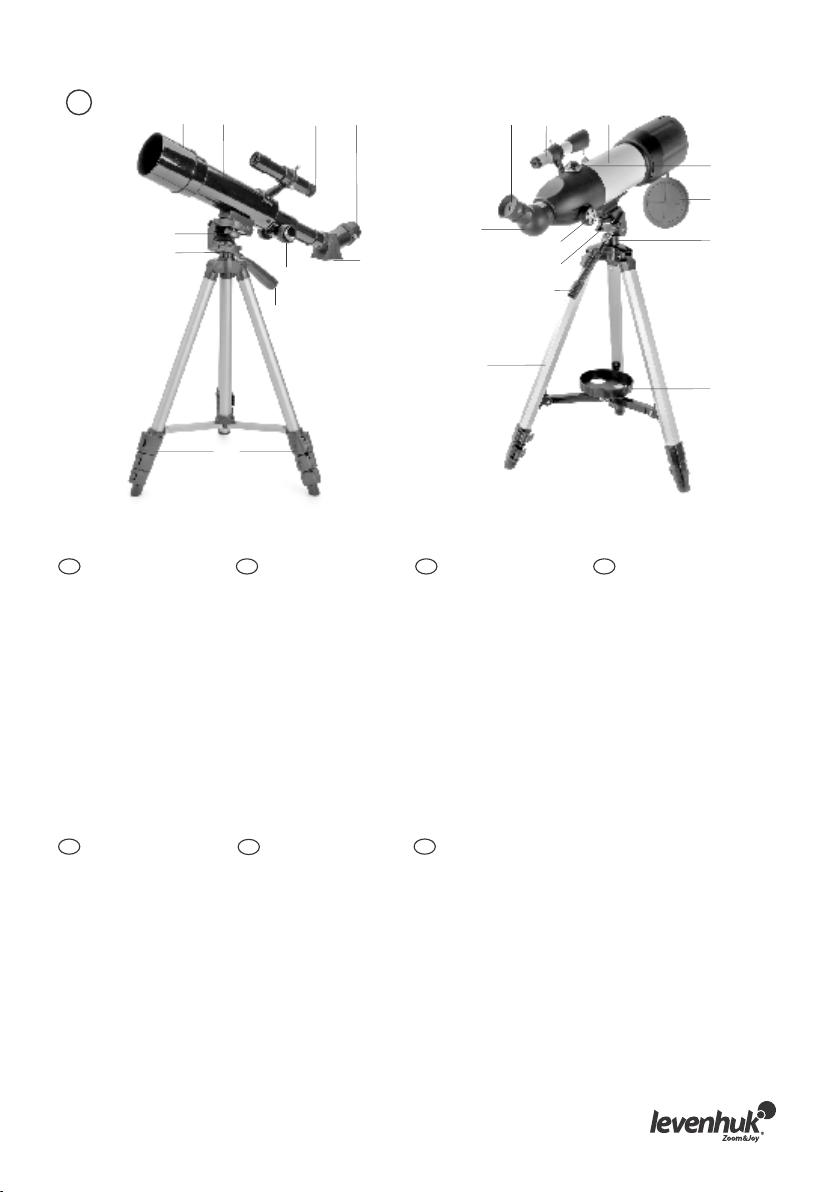
Skyline Travel 50/70 Skyline Travel 80
EN
Optical tube
A
Dust cap
B
Eyepiece
C
Diagonal mirror
D
Focuser
E
Altitude lock knob
F
Slow-motion control
G
Tripod
H
Azimuth lock knob
I
Finderscope
J
Accessory tray
K
(Skyline Travel 80)
Compass (Skyline
L
Travel 80)
HU
Optikai tubus
A
Porvédő kupak
B
Szemlencse
C
Diagonális tükör
D
Fókuszállító
E
Magassági szorítógomb
F
Lassú mozgás kontroll
G
Háromlábú állvány
H
Azimut szorítógomb
I
Keresőtávcső
J
Tartozéktartó tálca
K
(Skyline Travel 80)
Iránytű (Skyline
L
Travel 80)
CZ
Optický tubus
A
Ochranný kryt
B
Okulár
C
Diagonální zrcátko
D
Okulárový výtah
E
Aretační šroub elevace
F
Regulace jemného
G
nastavení
Stativ
H
Aretační šroub azimutu
I
Hledáček
J
Přihrádka na příslušenství
K
(Skyline Travel 80)
Kompas
L
(Skyline Travel 80)
PL
Tuba optyczna
A
Osłona przeciwpyłowa
B
Okular
C
Lustro diagonalne
D
Tubus ogniskujący
E
Pokrętło blokujące
F
teleskop w pionie
Pokrętło mikroruchów
G
Statyw
H
Pokrętło blokujące
I
teleskop w poziomie
Szukacz
J
Tacka na akcesoria
K
(Skyline Travel 80)
Kompas (Skyline
L
Travel 80)
DE
Optischer Tubus
A
Staubschutzkappe
B
Okular
C
Diagonalspiegel
D
Fokussierer
E
Höhenwinkel-Arreiterung
F
Feinabstimmung
G
Stativ
H
Azimuth-Arretierung
I
Sucherrohr
J
Zubehörablage
K
(Skyline Travel 80)
Kompass
L
(Skyline Travel 80)
RU
Труба телескопа
A
Пылезащитная крышка
B
Окуляр
C
Диагональное зеркало
D
Фокусер
E
Винт регулировки по
F
высоте
Ручка управления
G
тонкими движениями
Тренога
H
Винт регулировки по
I
азимуту
Искатель
J
Лоток для аксессуаров
K
(Skyline Travel 80)
Компас (Skyline Travel 80)
L
1
ES
Tubo óptico
A
Guardapolvo
B
Ocular
C
Espejo diagonal
D
Enfocador
E
Tornillo de bloqueo
F
de altitud
Control de movimiento
G
lento
Trípode
H
Tornillo de bloqueo
I
de azimut
Buscador
J
Bandeja de accesorios
K
(Skyline Travel 80)
Brújula (Skyline Travel 80)
L
2
1
1
EN
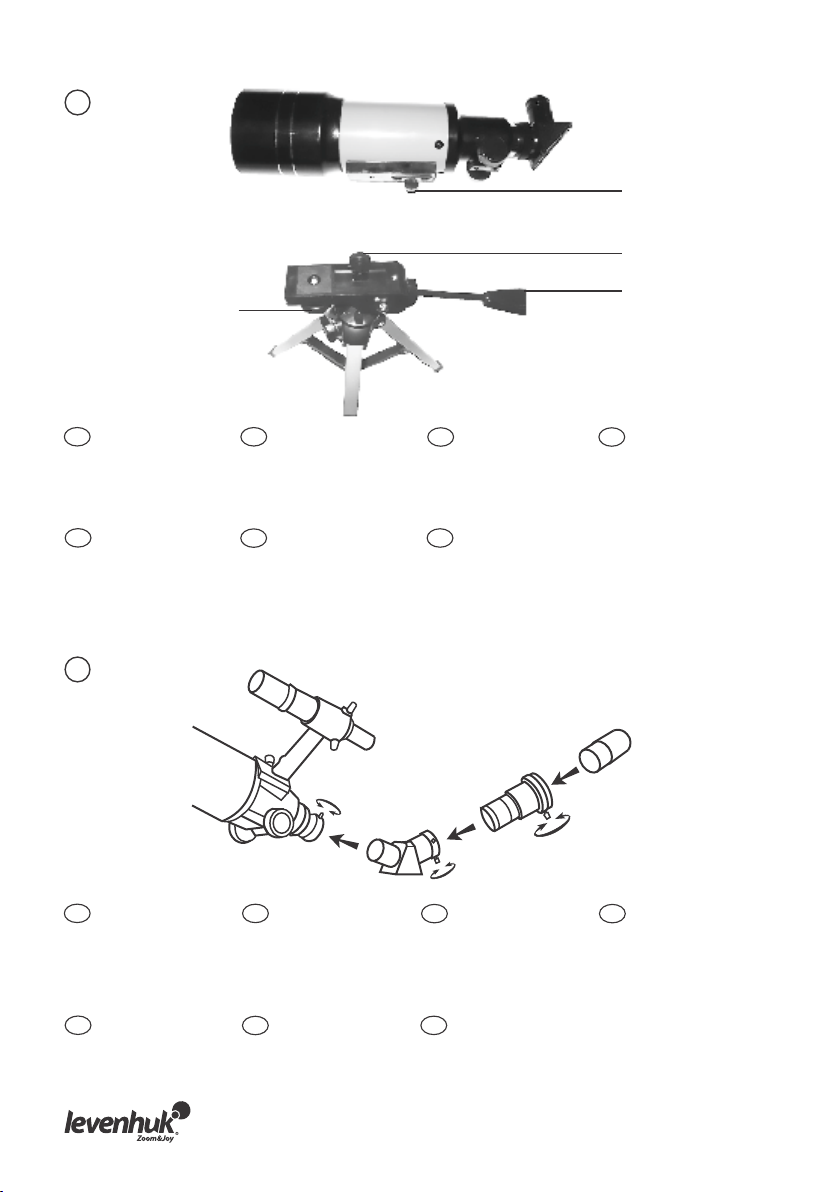
1. Mounting tab
2. Knurled knob
3. Slow-motion control
HU
1. Rögzítőlap
2. Bütykös gombot
3. Lassú mozgás
kontroll
3
2
CZ
1. Montážní jazýček
2. Rýhovaný šroub
3. Regulace jemného
nastavení
PL
1. Płytka mocująca
2. Pokrętło radełkowane
3. Pokrętło
mikroruchów
DE
1. Befestigungslasche
2. Rändelknopf
3. Feinabstimmung
RU
1. Крепежное «ушко»
2. Рифленый винт
3. Ручка управления
тонкими движениями
2
3
ES
1. Pestaña de montaje
2. Rueda moleteada
3. Control de
movimiento lento
3
EN
1. Diagonal mirror
2. Barlow lens
3. Eyepiece
HU
1. Diagonális tükör
2. Barlow-lencse
3. Szemlencse
CZ
1. Diagonální zrcátko
2. Barlowův člen
3. Okulár
PL
1. Lustro ukośne
2. Soczewka Barlowa
3. Okular
1
DE
1. Diagonalspiegel
2. Barlowlinse
3. Okular
RU
1. Диагональное зеркало
2. Линза Барлоу
3. Окуляр
2
ES
1. Espejo diagonal
2. Lente de Barlow
3. Ocular

Levenhuk Skyline Travel Telescopes
Levenhuk Skyline Travel refracting telescopes installed on simple Alt-Azimuth mounts make a
wonderful present for beginning astronomers of all ages. With these models, you can explore
craters on the Moon, observe details on surfaces of different planets, as well as enjoy the views
of bright deep-sky objects. Moreover, these refracting telescopes are a good fit for planetary
viewing. The models come with special backpacks – just pack your telescope in it and go for a star
hunt!
These instructions will help you set up, properly use, and care for your telescope. Please read
them thoroughly before getting started.
CAUTION! Never look directly at the Sun – even for an instant – through your telescope or
finderscope without a professionally made solar filter that completely covers the front of the
instrument, or permanent eye damage may result. To avoid damage to the internal parts of your
telescope, make sure the front end of the finderscope is covered with aluminum foil or another
non-transparent material.
Children should use the telescope under adult supervision only.
All parts of the telescope will arrive in one box. Be careful when unpacking it. Keep the original
shipping package; you will require it if you need to send the telescope to the service center. Make
sure all the parts are present in the packaging. Be sure to check the box carefully, as some parts
are small. No tools are needed other than those provided. All screws should be tightened securely
to eliminate flexing and wobbling, but be careful not to overtighten them, as that may strip the
threads. During assembly (and anytime, for that matter), do not touch the surfaces of the optical
elements with your fingers. The optical surfaces have delicate coatings on them that can easily be
damaged if touched. Never remove lenses from their housing, or the product warranty will be null
and void.
It is important to properly assemble your telescope in order to allow it to function properly. Take
the time to become familiar with your new telescope. Learn the names of the various parts,
where they are located and their function. It is the best to perform these functions during the day
time. When setting up for a viewing session, place the telescope in an area sheltered from the
wind if possible. The best night time viewing will be away from city light and when the
atmosphere is «steady». With a little practice you will learn to judge when viewing conditions are
good. Look for the nights when the stars shine brightly with little or no twinkling. Consider using
the telescope for earth (terrestrial) viewing before attempting to view astronomical objects. This
will familiarize you with how powerful each eyepiece will be, as well as introducing you to the
functions of your accessory lenses. We recommend you begin with the lowest power eyepiece.
EN
Telescope assembly
1. Gently pull the aluminum tripod legs apart as far as they will go until the center leg braces sit
flat, in a horizontal position.
2. The telescope tube has a mounting tab (1) on its underside. Place this tab into the slot on the
tripod top.
3. Tighten the knurled knob (2) on the tripod head to attach the tube onto the tripod.
4. Screw the control arm (3) into the threaded socket at the rear of the mount.
5. Insert the diagonal mirror into the end of the telescope tube.
6. Insert the eyepiece into the diagonal mirror.
7. Remove the dust cap from the front end of the telescope tube.
8. Your telescope is now ready for use.
2
3

Finderscope
A finderscope is a very useful accessory that simplifies the search for objects through the sky.
Using it, you can easily locate desired objects and keep them in the center of the field of view.
Secure the finderscope on the telescope tube. To do that, you need to align the base of the
finderscope with a fixing point on the telescope tube and secure it with the supplied fastener. It is
important to assemble it correctly – the telescope tube and the finderscope have to 'look' in one
direction and be strictly parallel to each other.
To align the finderscope, choose a distant object that is at least 300 yards (500 meters) away and
point the telescope at the object. Adjust the telescope so that the object is in the center of the
view in your eyepiece.
Using a Barlow lens
A Barlow lens is a useful accessory that increases the focal length of a telescope and thereby
increases magnification with every eyepiece used. Insert the diagonal mirror (1) into the focuser,
then insert the Barlow lens (2) into the diagonal mirror, and, finally, install the eyepiece (3) in the
Barlow lens.
3
Focusing
Slowly rotate the focus knobs one way or the other until the image in the eyepiece is sharp. The
image usually has to be finely refocused over time due to small variations caused by temperature
changes, flexures, etc. Refocusing is almost always necessary when you change an eyepiece, add
or remove a Barlow lens.
How to start observing
Before you start exploring the Cosmos, you should learn to operate the telescope during the day.
First, observe different terrestrial objects – houses, trees, antennas on the rooftops and many
others! This way you will learn to control the telescope and focus on desired objects.
Attention: The telescope should be used in a place protected from the wind. When you get to
observing the Moon, planets and stars at night, remember to choose locations away from street
lamps, car lights and window lights. Try to observe on nights when the stars shine bright and
evenly.
Point the telescope at the desired object, for example, the Moon. Looking through the
finderscope, slowly move the tube until the object is in the center. Now look through the
eyepiece and you will see the image of the object magnified many times!
When working with the telescope, be careful and patient. Don't push it and don't move it from its
place. After some training you will learn to move the telescope tube without losing the object
from the sight of the eyepiece.
4

Specifications
Optical design
Optics coating
Objective lens diameter (aperture), mm
Focal length, mm
Highest practical power, x
Maximum magnification with
the included accessories, x
Mount
Tripod
Accessory tray
Tripod height (adjustable), mm
Finderscope
Eyepiece barrel diameter
Eyepieces
Barlow lens
Diagonal mirror
Bag
Levenhuk Skyline
Travel 50
50
360
100
135
optical, 2x
H8mm (45x),
H20mm (18x)
Levenhuk Skyline
Travel 70
refractor
fully coated
70
400
140
120
AZ
aluminum
–
400—1250
optical, 5x24
1.25"
K10mm (40x),
K20mm (20x)
3x
backpack shoulder bag
+
Levenhuk Skyline
Travel 80
80
400
160
132
–
560—1200
optical, 5x20
K25mm (16x),
K9mm (44x)
Levenhuk reserves the right to modify or discontinue any product without prior notice.
Care and maintenance
Never, under any circumstances, look directly at the Sun through this device without a special
filter, or look at another bright source of light or at a laser, as this may cause PERMANENT
RETINAL DAMAGE and may lead to BLINDNESS.
Take necessary precautions when using the device with children or others who have not read or
who do not fully understand these instructions.
Do not try to disassemble the device on your own for any reason, including to clean the mirror. For
repairs and cleaning of any kind, please contact your local specialized service center.
Protect the device from sudden impact and excessive mechanical force.
Do not touch the optical surfaces with your fingers. To clean the telescope exterior, use only
special cleaning wipes and special optics cleaning tools from Levenhuk.
Store the device in a dry, cool place away from hazardous acids and other chemicals, away from
heaters, open fire and other sources of high temperatures.
Replace the dust cap over the front end of the telescope whenever it is not in use. This prevents
dust or dirt from settling on the mirror or lens surfaces.
Seek medical advice immediately if a small part or a battery is swallowed.
Children should use the telescope under adult supervision only.
Levenhuk International Lifetime Warranty
All Levenhuk telescopes, microscopes, binoculars and other optical products, except for accessories, carry a
lifetime warranty against defects in materials and workmanship. Lifetime warranty is a guarantee on the lifetime
of the product on the market. All Levenhuk accessories are warranted to be free of defects in materials and
workmanship for six months from date of retail purchase. Levenhuk will repair or replace such product or part
thereof which, upon inspection by Levenhuk, is found to be defective in materials or workmanship. As a
condition to the obligation of Levenhuk to repair or replace such product, the product must be returned to
Levenhuk together with proof of purchase satisfactory to Levenhuk. This warranty does not cover consumable
parts, such as bulbs (electrical, LED, halogen, energy-saving and other types of lamps), batteries (rechargeable
and non-rechargeable), electrical consumables etc.
For further details, please visit our web site: https://www.levenhuk.com/warranty
If warranty problems arise, or if you need assistance in using your product, contact the local Levenhuk branch.
5

Teleskopy Levenhuk Skyline Travel
Refraktory (neboli čočkové dalekohledy) Levenhuk Skyline Travel instalované na jednoduchých
azimutálních montážích představují úžasný dárek pro začátečníky všech věkových kategorií.
Pomocí těchto modelů můžete zkoumat krátery na Měsíci, sledovat detaily na povrchu různých
planet a vychutnávat si pohled na jasné objekty hlubokého vesmíru. Kromě toho jsou tyto
refrakční teleskopy vhodné k prohlížení planet. Dodávají se včetně speciálního batohu – stačí
dalekohled zabalit a vyrazit na lov hvězd!
Tento návod vám ukáže, jak teleskop sestavit, správně používat a pečovat o něj. Proto si jej
nejprve důkladně pročtěte.
VÝSTRAHA! Nikdy – ani na okamžik – se přes teleskop nebo pointační dalekohled (hledáček)
nedívejte přímo do slunce, aniž byste použili odborně vyrobený solární filtr, který bude zcela
překrývat objektiv přístroje. Nedodržením tohoto pokynu se vystavujete nebezpečí trvalého
poškození zraku. Abyste zabránili poškození vnitřních součástí svého teleskopu, zakryjte čelní
stranu pointačního dalekohledu (hledáčku) hliníkovou fólií nebo jiným neprůhledným materiálem.
Děti by měly teleskop používat pouze pod dohledem dospělé osoby.
Všechny součásti teleskopu jsou dodávány v jediné krabici. Při jejím vybalování postupujte
opatrně. Původní přepravní obal si uschovejte. Budete jej potřebovat, pokud bude přístroj nutné
zaslat do servisního střediska. Přesvědčte se, zda jsou v obalu všechny součásti. Obsah důkladně
zkontrolujte, neboť některé součásti jsou malé. Kromě nástrojů, jež jsou součástí dodávky,
nepotřebujete žádné jiné pomůcky. Kromě nástrojů, jež jsou součástí dodávky, nepotřebujete
žádné jiné pomůcky. Abyste vyloučili deformace a viklání, musejí být všechny šrouby pevně
utaženy, ale dbejte na to, abyste je nepřetáhli, neboť může dojít ke stržení závitů. Během
montáže (ani kdykoli jindy) se nedotýkejte prsty povrchu čoček objektivu teleskopu, pointačního
dalekohledu nebo okuláru. Povrchy optických prvků jsou potaženy speciální citlivou vrstvou,
kterou lze při nevhodné manipulaci snadno poškodit. Čočky nikdy nevyjímejte z jejich pouzdra;
nedodržení tohoto pokynu má za následek neplatnost záruky.
CZ
Pro správnou funkci teleskopu je důležité, aby byl správně sestaven. Teleskop si nejprve dobře
prohlédněte. Naučte se pojmenovat jednotlivé části a příslušenství, jejich umístění a funkce. S
teleskopem se seznamujte na denním světle. Před samotným pozorováním umístěte teleskop
pokud možno na místě chráněném před větrem. Nejlepší podmínky pro noční pozorování jsou
mimo městské osvětlení a za klidného počasí. Dobré podmínky pro pozorování se naučíte
poznávat, jakmile získáte trochu praxe. Snažte se vybírat takové noci, kdy hvězdy jasně záři a
téměř neblikají. Než začnete pozorovat astronomické objekty, zacvičte se na pozemních
objektech. Tak se seznámíte s okuláry různého zvětšení a naučíte se ovládat základní funkce
teleskopu a příslušenství. Doporučujeme, abyste při práci s teleskopem začínali od nejmenšího
zvětšení okuláru.
Montáž teleskopu
1. Opatrně vytáhněte hliníkové nohy stativu až na doraz, dokud středová nožní ramena nebudou
ve vodorovné poloze.
2. Tubus teleskopu má na spodní straně montážní jazýček (1). Tento jazýček vložte do drážky na
horní části stativu.
3. Utáhněte rýhovaný šroub (2) na hlavici stativu, aby se tubus upevnil na stativu.
4. Našroubujte ovládací rameno (3) do závitové zdířky na zadní straně montáže.
5. Vložte diagonální zrcátko do ukončení tubusu dalekohledu.
2
6

6. Vložte okulár do diagonálního zrcátka.
7. Z čela tubusu teleskopu sejměte ochranný kryt.
8. Teleskop je nyní připraven k použití.
Hledáček
Velmi užitečným doplňkem, který zjednodušuje vyhledávání objektů na obloze, je hledáček. S
jeho pomocí můžete snadno vyhledat požadované objekty a udržet je ve středu zorného pole.
Hledáček se upevňuje na tubus teleskopu. K tomu je třeba zarovnat základnu hledáčku s fixačním
bodem na tubusu teleskopu a zajistit ji dodaným kotvicím prvkem. Důležité je správné sestavení –
tubus teleskopu a hledáček musí „hledět“ stejným směrem a být vůči sobě v naprosto
rovnoběžném postavení.
Při seřizování pointačního dalekohledu si vyberte objekt ve vzdálenosti nejméně 500 m a namiřte
na něj teleskop. Teleskop nastavte tak, aby byl objekt ve středu zorného pole vašeho okuláru.
Použití Barlowova členu
Barlowův člen neboli Barlowova čočka je užitečným doplňkem, který zvětšuje ohniskovou
vzdálenost dalekohledu, a tím zvyšuje zvětšení každého použitého okuláru. Vložte diagonální
zrcátko (1) do okulárového výtahu, poté vsuňte Barlowův člen (2) do diagonálního zrcátka a
nakonec nainstalujte do Barlowova členu okulár (3).
3
Zaostření
Pomalu otáčejte knoflíkem ostření na jednu nebo druhou stranu, dokud není obraz v okuláru
ostrý. V důsledku drobného kolísání způsobeného změnami teploty, průhybem atd. je obraz
obvykle po nějaké době potřeba doostřit. Doostření je téměř vždy potřeba provést při výměně
okuláru, přidání nebo odstranění Barlowovy čočky apod.
Jak zahájit pozorování
Než začnete zkoumat vesmír, měli byste se naučit teleskop obsluhovat během dne. Nejprve
pozorujte různé pozemní objekty – budovy, stromy, antény na střechách a řadu dalších! Tak se
naučíte teleskop ovládat a zaostřovat na požadované objekty.
Pozor: Teleskop používejte v místě chráněném před větrem. Až se dostanete k pozorování
Měsíce, planet a hvězd na obloze, nezapomeňte si vybrat místo co nejdále od pouličního
osvětlení, reflektorů automobilů a svítících oken. Pozorování provádějte hlavně během nocí, kdy
hvězdy září jasně a rovnoměrně.
Teleskop namiřte na požadovaný objekt, například Měsíc. Dívejte se do hledáčku a přitom pomalu
pohybujte tubusem, dokud nebude objekt ve středu zorného pole. A teď se podívejte do okuláru a
uvidíte v něm mnohonásobně zvětšený obraz objektu!
Při práci s teleskopem postupujte opatrně a trpělivě. Neopírejte se o něj a nepřemisťujte jej. Po
určitém tréninku se naučíte tubusem teleskopu pohybovat tak, abyste pozorovaný objekt
neztratili ze zorného pole okuláru.
7
 Loading...