


Levenhuk Skyline PLUS Telescopes
EN User Manual
BG Ръководство за потребителя
CZ Návod k použití
DE Bedienungsanleitung ES Guía del usuario HU Használati útmutató IT Guida all’utilizzo PL Instrukcja obsługi
RU Инструкция по эксплуатации
Наслади се отблизо
Radost zaostřit
Zoom ran und hab Fun! Amplíe y disfrute Kellemes nagyítást! Ingrandisci il divertimento Radość przybliżania
Приближает с удовольствием
1

1a |
|
4 |
|
|
|
||
|
|
1 |
|
|
3 |
2 |
|
|
8 |
26 |
|
|
|
||
9 |
|
25 |
|
11 |
|
||
|
24 |
||
10 |
|
||
|
23 |
||
13 |
|
18 |
|
12 |
|
||
14 |
19 |
||
|
21 |
||
|
7 |
||
15 |
20 |
||
|
|||
|
16 |
22 |
|
|
17 |
||
|
|
||
|
|
28 |
|
|
27 |
29 |
1b |
10 |
|
|
|
|
|
|
9 |
2 |
|
11 |
|
13 |
|
7 |
|
|
|
|
14 |
|
|
8 |
|
6 |
3 |
|
26 |
|
|
|
|
25 |
|
5 |
24 |
|
|
23 |
|
18 |
19 |
|
16 |
21 |
|
15 |
20 |
|
|
22 |
|
|
|
|
17 |
|
28 |
27 |
29 |
|
EN
1Dust cap
2Dew cap
3Telescope tube
4Objective lens
5Primary mirror
6Secondary mirror
7Focuser tube
8Piggyback bracket
9Finderscope
10Finderscope bracket
11Adjustment screws
12Diagonal mirror
13Eyepiece
14Focusing knob
15Declination slow-motion control
16Latitude adjustment T-bolt
17Latitude lock knob
18R.A. axis scale
19R.A. slow-motion control
20Counterweight
21Counterweight lock screw
22Counterweight bar
23R.A. lock knob
24Declination axis scale
25Dec. lock knob
26Ring clamps
27Accessory tray
28Tripod leg
29Tripod lock knob
BG
1Капачка против прах
2Защитна капачка срещу роса
3Тръба на телескопа
4Леща на обектива
5Главно огледало
6Допълнително огледало
7Тръба на фокусиращото устройство
8Скоба „Piggyback“
9Визьор
10Скоба на визьора
11Регулиращи винтове
12Диагонално огледало
13Окуляр
14Бутон за фокусиране
15Управление за бавно движение на деклинацията
16Т-образен болт за регулиране на географската ширина
17Бутон за фиксиране на географската ширина
18Скала на оста на ректасцензия (R.A.)
19Управление за бавно движение на ректасцензия
(R.A.)
20Противотежест
21Заключващ винт за фиксиране на противотежестта
22Прът на противотежестта
23Бутон за фиксиране на ректасцензията (R.A.)
24Скала на оста на деклинацията
25Бутон за фиксиране на деклинацията
26Пръстеновидни скоби
27Поставка за принадлежности
28Крак на триножника
29Бутон за фиксиране на триножника
3
CZ |
|
DE |
|
1 |
Prachové víčko |
1 |
Staubschutzkappe |
2 |
Rosnice |
2 |
Taukappe |
3 |
Tubus teleskopu |
3 |
Teleskoptubus |
4 |
Čočka objektivu |
4 |
Objektivlinse |
5 |
Primární zrcátko |
5 |
Primärspiegel |
6 |
Sekundární zrcátko |
6 |
Sekundärspiegel |
7 |
Tubus okulárového výtahu |
7 |
Okularauszug |
8 |
Piggyback foto držák |
8 |
Huckepackschiene |
9 |
Pointační dalekohled |
9 |
Sucherrohr |
10 |
Konzola pointačního dalekohledu |
10 |
Sucherrohr-Halterung |
11 |
Šrouby konzol pointačního dalekohledu |
11 |
Stellschrauben |
12 |
Diagonální zrcátko |
12 |
Diagonalspiegel |
13 |
Okulár |
13 |
Okular |
14 |
Zaostřovací šroub |
14 |
Fokussierrad |
15 |
Ovládání jemného nastavení deklinace |
15 |
Deklinations-Feinabstimmung |
16 |
Šroub nastavení zeměpisné šířky |
16 |
Polhöhen-Stellschraube |
17 |
Aretační šroub zeměpisné šířky |
17 |
Polhöhen-Arretierung |
18 |
Stupnice osy rektascenze |
18 |
Rektaszensionsskala |
19 |
Ovládání jemného nastavení rektascenze |
19 |
Rektaszensions-Feinabstimmung |
20 |
Protiváha |
20 |
Gegengewicht |
21 |
Aretační šroub protiváhy |
21 |
Gegengewichts-Halteschraube |
22 |
Tyč protiváhy |
22 |
Gegengewichtsstange |
23 |
Aretační šroub osy rektascenze |
23 |
Rektaszensions-Arretierung |
24 |
Stupnice osy deklinace |
24 |
Deklinationsskala |
25 |
Aretační šroub osy deklinace |
25 |
Deklinations-Arretierung |
26 |
Objímky |
26 |
Rohrschellen |
27 |
Odkládací přihrádka pro příslušenství |
27 |
Zubehörablage |
28 |
Noha stativu |
28 |
Stativbein |
29 |
Aretační šroub stativu |
29 |
Stativ-Arretierung |
ES |
|
HU |
|
1 |
Guardapolvo |
1 |
Porvédő kupak |
2 |
Protector de rocío |
2 |
Párafogó csésze |
3 |
Tubo del telescopio |
3 |
Teleszkóp tubus |
4 |
Lente del objetivo |
4 |
Tárgylencse |
5 |
Espejo principal |
5 |
Elsődleges tükör |
6 |
Espejo secundario |
6 |
Másodlagos tükör |
7 |
Tubo de enfoque |
7 |
Fókuszállító tubus |
8 |
Adaptador para cámara |
8 |
Piggyback (ráültetéses) tartókonzol |
9 |
Buscador |
9 |
Keresőtávcső |
10 |
Horquilla del buscador |
10 |
Keresőtávcső talpazata |
11 |
Tornillos de ajuste |
11 |
Állítócsavarok |
12 |
Espejo diagonal |
12 |
Diagonális tükör |
13 |
Ocular |
13 |
Szemlencse |
14 |
Mando de enfoque |
14 |
Fókuszállító gomb |
15 |
Control de movimiento lento de declinación |
15 |
Deklinációs lassú-mozgás vezérlés |
16 |
Tornillo T de ajuste de latitud |
16 |
Szélességállító T-csavar |
17 |
Bloqueo de latitud |
17 |
Szélesség szorítógombja |
18 |
Escala del eje AR |
18 |
Rektaszcenziós tengely mérőskála |
19 |
Control de movimiento lento de AR |
19 |
R.A. lassú-mozgás vezérlés |
20 |
Contrapeso |
20 |
Nehezék |
21 |
Tornillo de bloqueo del contrapeso |
21 |
Nehezék szorítócsavarjai |
22 |
Barra de contrapesos |
22 |
Ellensúly rúdja |
23 |
Bloqueo de AR |
23 |
R.A. szorítógomb |
24 |
Escala del eje de declinación |
24 |
Dönthető tengely mérőskála |
25 |
Bloqueo de declinación |
25 |
Döntés szorítógombja |
26 |
Aros de sujeción |
26 |
Gyűrűszorítók |
27 |
Bandeja de accesorios |
27 |
Tartozéktartó tálca |
28 |
Pata del trípode |
28 |
Háromlábú állvány lába |
29 |
Bloqueo de ajuste de la altura |
29 |
A háromlábú állvány szorítógombja |
4
IT |
|
PL |
|
1 |
Coperchio antipolvere |
1 |
Osłona przeciwpyłowa |
2 |
Cappuccio anticondensa |
2 |
Odrośnik |
3 |
Tubo del telescopio |
3 |
Tubus teleskopu |
4 |
Lente obiettivo |
4 |
Soczewka obiektywowa |
5 |
Specchio primario |
5 |
Lustro główne |
6 |
Specchio secondario |
6 |
Lustro wtórne |
7 |
Tubo focheggiatore |
7 |
Tubus ogniskujący |
8 |
Sostegno parallelo per fotocamera |
8 |
Wspornik typu „piggyback” |
9 |
Mirino |
9 |
Celownica |
10 |
Supporto del cercatore |
10 |
Wspornik celownicy |
11 |
Viti di regolazione |
11 |
Śruby regulacyjne |
12 |
Specchio diagonale |
12 |
Lustro ukośne |
13 |
Oculare |
13 |
Okular |
14 |
Manopola messa a fuoco |
14 |
Pokrętło ustawiania ostrości |
15 |
Regolazione fine declinazione |
15 |
Pokrętło mikroruchów w osi deklinacji |
16 |
Vite di regolazione della latitudine |
16 |
Śruba młoteczkowa regulacji szerokości geograficznej |
17 |
Manopola di blocco della latitudine |
17 |
Pokrętło blokujące szerokości geograficznej |
18 |
Scala dell’asse AR |
18 |
Skala osi rektascensji |
19 |
Regolazione fine AR |
19 |
Pokrętło mikroruchów w osi rektascensji |
20 |
Contrappeso |
20 |
Przeciwwaga |
21 |
Vite di blocco contrappeso |
21 |
Śruba blokująca przeciwwagi |
22 |
Barra contrappeso |
22 |
Pręt przeciwwagi |
23 |
Manopola di blocco AR |
23 |
Pokrętło blokujące w osi rektascensji |
24 |
Scala asse declinazione |
24 |
Skala osi deklinacji |
25 |
Manopola di blocco Dec. |
25 |
Pokrętło blokujące w osi deklinacji |
26 |
Anelli di supporto |
26 |
Zaciski pierścieni |
27 |
Ripiano per accessori |
27 |
Tacka na akcesoria |
28 |
Gamba del treppiede |
28 |
Noga statywu |
29 |
Manopola di blocco del treppiede |
29 |
Pokrętło blokujące statyw |
RU
1Пылезащитная крышка
2Бленда
3Труба телескопа
4Линза объектива
5Положение главного зеркала
6Положение вторичного зеркала
7Фокусировочный узел
8Платформа для фотокамеры
9Искатель
10Крепление искателя
11Юстировочные винты искателя
12Диагональное зеркало
13Окуляр
14Ручка фокусировки
15Ручка управления тонкими движениями по оси склонения
16Регулировочный винт полярной оси по широте места наблюдения
17Фиксатор широты места наблюдения
18Шкала оси прямого восхождения
19Ручка управления тонкими движениями по оси прямого восхождения
20Противовес
21Винт фиксации противовеса
22Штанга противовеса
23Фиксатор оси прямого восхождения
24Шкала оси склонения
25Фиксатор оси склонения
26Кольца трубы
27Лоток для аксессуаров
28Ножка треноги
29Фиксатор высоты ножек треноги
5

2
3
4


 1
1
2
5
EN |
|
BG |
|
CZ |
|
1 |
Long |
1 |
Дълъг |
1 |
Dlouhý |
2 |
Short |
2 |
Къс |
2 |
Krátký |
DE |
|
ES |
|
HU |
|
1 |
Lange |
1 |
Largo |
1 |
Hosszú |
2 |
Kurz |
2 |
Corto |
2 |
Rövid |
IT |
|
PL |
|
RU |
|
1 |
Lunga |
1 |
Długi |
1 |
Длинный |
2 |
Corta |
2 |
Krótki |
2 |
Короткий |
6
6a |
|
EN |
|
BG |
CZ |
|||
|
|
1 |
Diagonal mirror |
1 |
Диагонално |
1 |
Diagonální |
|
|
|
|
||||||
|
|
|
2 |
Barlow lens |
|
огледало |
|
zrcátko |
|
|
|
3 |
Eyepiece |
2 |
Леща на Барлоу |
2 |
Barlowova čočka |
|
|
|
|
|
3 |
Окуляр |
3 |
Okulár |
|
|
DE |
|
ES |
HU |
|||
|
|
3 |
1 |
Diagonalspiegel |
1 |
Espejo diagonal |
1 |
Diagonális tükör |
|
|
|
2 |
Barlow-Linse |
2 |
Lente de Barlow |
2 |
Barlow-lencse |
|
2 |
|
3 |
Okular |
3 |
Ocular |
3 |
Szemlencse |
|
IT |
|
PL |
RU |
||||
1 |
|
|
||||||
|
|
1 |
Specchio diagonale 1 |
Lustro ukośne |
1 |
Диагональное |
||
|
|
|
2 |
Lente di Barlow |
2 |
Soczewka Barlowa |
|
зеркало |
|
|
|
3 |
Oculare |
3 |
Okular |
2 |
Линза Барлоу |
|
|
|
|
|
|
|
3 |
Окуляр |
6b |
|
EN |
|
BG |
Леща на Барлоу |
CZ |
Barlowova čočka |
|
|
|
1 |
Barlow lens |
1 |
1 |
|||
|
|
2 |
Eyepiece |
2 |
Окуляр |
2 |
Okulár |
|
2 |
|
DE |
|
ES |
Lente de Barlow |
HU |
Barlow-lencse |
|
1 |
|
1 |
Barlow-Linse |
1 |
1 |
|||
|
2 |
Okular |
2 |
Ocular |
2 |
Szemlencse |
||
|
|
IT |
|
|
PL |
|
RU |
|
|
|
1 |
Lente di Barlow |
1 |
Soczewka Barlowa |
1 |
Линза Барлоу |
|
|
|
2 |
Oculare |
2 |
Okular |
2 |
Окуляр |
|
7a |
|
7b |
|
|
|
8 |
|
|
9
7

10a |
10b |
11 |
|
4 |
|
|
|
|
1 |
|
5 |
|
7 |
|
2 |
|
|
|
|
|
3 |
|
6 |
|
8 |
|
|
|
|
|
|
EN |
|
BG |
|
CZ |
|
1 |
R.A. adjustment |
1 |
Бутон за фиксиране на ректасцензията |
1 |
Nastavení rektascenze |
2 |
Altitude adjustment (up-down) |
|
(R.A.) |
2 |
Nastavení elevace (nahoru-dolů) |
3 |
Azimuth adjustment (left-right) |
2 |
Регулиране на надморската височина |
3 |
Nastavení azimutu (doleva-doprava) |
4 |
R.A. scale |
|
(нагоре-надолу) |
4 |
Stupnice rektascenze |
5 |
Dec. adjustment |
3 |
Регулиране на азимута (наляво-надясно) |
5 |
Nastavení deklinace |
6 |
R.A. fine adjustment |
4 |
Скала на ректасцензията (R.A.) |
6 |
Jemné nastavení rektascenze |
7 |
R.A. adjustment |
5 |
Регулиране на деклинацията |
7 |
Nastavení rektascenze |
8 |
Dec. fine adjustment |
6 |
Фино регулиране на ректасцензията |
8 |
Jemné nastavení deklinace |
|
|
|
(R.A.) |
|
|
|
|
7 |
Регулиране на ректасцензията (R.A.) |
|
|
|
|
8 |
Фино регулиране на деклинацията |
|
|
DE |
|
ES |
|
HU |
|
1 |
Rektaszensionseinstellung |
1 |
Ajuste de AR |
1 |
R.A. szorítógomb |
2 |
Höhenwinkeleinstellung (auf/ab) |
2 |
Ajuste de altitud |
2 |
Magasságállítás (fel-le) |
3 |
Azimuteinstellung (links/rechts) |
3 |
Ajuste azimuthal |
3 |
Azimut-állítás (jobbra-balra) |
4 |
Rektaszensionsskala |
4 |
Escala AR |
4 |
R.A. mérőskála |
5 |
Deklinationseinstellung |
5 |
Ajuste de declinación |
5 |
Döntés beállítása |
6 |
Rektaszensions-Feineinstellung |
6 |
Ajuste fino de AR |
6 |
R.A. finombeállítása |
7 |
Rektaszensionseinstellung |
7 |
Bloqueo de la RA |
7 |
R.A. beállítása |
8 |
Deklinations-Feineinstellung |
8 |
Ajuste fino de declinación |
8 |
Döntés finombeállítása |
IT |
|
PL |
|
RU |
|
1 |
Manopola di blocco AR |
1 |
Regulacja w osi rektascensji |
1 |
Фиксатор прямого восхождения |
2 |
Regolazione dell’altezza (su-giù) |
2 |
Regulacji w pionie (góra – dół) |
2 |
Регулировка высоты (вверх-вниз) |
3 |
Regolazione dell’azimut (destra-sinistra) |
3 |
Regulacji w poziomie (lewo – prawo) |
3 |
Регулировка азимута (влево-вправо) |
4 |
Scala AR |
4 |
Dokładna regulacja w osi deklinacji |
4 |
Шкала прямого восхождения |
5 |
Regolazione declinazione |
5 |
Regulacja w osi deklinacji |
5 |
Фиксатор оси склонения |
6 |
Regolazione fine AR |
6 |
Dokładna regulacja w osi rektascensji |
6 |
Тонкая регулировка прямого |
7 |
Regolazione AR |
7 |
Regulacja w osi rektascensji |
|
восхождения |
8 |
Regolazione fine declinazione |
8 |
Skala osi rektascensji |
7 |
Фиксатор прямого восхождения |
|
|
|
|
8 |
Тонкая регулировка склонения |
8

12 |
13 |
|
1 |
|
|
6 |
|
EN |
|
|
|
|
|||
|
|
|
|
1 |
Big Dipper |
||||||||||
|
|
|
|
|
|||||||||||
|
|
|
|
|
|
|
|
|
|
|
2 |
Little Dipper |
|||
|
|
|
|
|
|
|
|
|
|
|
3 |
Polaris |
|||
|
|
|
|
|
|
|
|
|
|
|
4 |
NCP (North Celestial |
|||
|
|
|
|
|
|
2 |
|
|
|
|
|
Pole) |
|||
|
|
|
|
|
|
|
|
|
|
5 |
Cassiopeia |
||||
|
|
|
|
|
|
|
|
|
|
|
6 |
β Crucis |
|||
|
|
|
|
3 |
4 |
|
|
|
|
|
BG |
|
|
|
|
|
|
|
|
|
|
|
|
|
|
|
1 |
Голямата мечка |
|||
|
|
|
|
|
|
|
|
|
|
|
2 |
Малката мечка |
|||
|
|
|
|
|
|
|
|
|
|
|
3 |
Полярната звезда |
|||
|
|
|
|
|
|
|
|
|
|
|
4 |
NCP (Северен небесен |
|||
|
|
|
|
5 |
|
|
|
|
|
|
|
полюс) |
|||
|
|
|
|
|
|
|
|
|
|
5 |
Касиопея |
||||
|
|
|
|
|
|
|
|
|
|
|
6 |
β Крусис |
|||
CZ |
|
DE |
|
|
|
ES |
|
|
|
|
HU |
|
|
|
|
1 |
Velká medvědice |
1 |
Großer Wagen |
|
1 |
El Carro |
1 |
Nagy Göncöl |
|||||||
2 |
Malý medvěd |
2 |
Kleiner Wagen |
|
2 |
Osa menor |
2 |
Kis Göncöl |
|||||||
3 |
Polárka |
3 |
Polarstern |
|
3 |
Estrella Polar |
3 |
Polaris |
|||||||
4 |
SNP (Severní nebeský pól) |
4 |
NHP (Nördlicher Himmelspol) |
4 |
PNC (Polo Norte Celeste) |
4 |
Északi égi pólus |
||||||||
5 |
Kasiopeja |
5 |
Kassiopeia |
|
5 |
Casiopea |
5 |
Kassziopeia |
|||||||
6 |
β Crucis |
6 |
β Crucis |
|
6 |
β Crucis |
6 |
β Crucis |
|||||||
IT |
|
PL |
|
|
|
RU |
|
|
|
|
|
|
|
|
|
1 |
Grande Carro |
1 |
Wielka Niedźwiedzica |
|
1 |
Большая Медведица |
|
|
|
|
|
||||
2 |
Orsa Minore |
2 |
Mała Niedźwiedzica |
|
2 |
Малая Медведица |
|
|
|
|
|
||||
3 |
Polaris |
3 |
Gwiazdą Polarną |
|
3 |
Полярная звезда |
|
|
|
|
|
||||
4 |
Polo nord celeste (PNC) |
4 |
NCP (Północny biegun niebieski) |
4 |
СНП (Северный небесный |
|
|
|
|
|
|||||
5 |
Cassiopea |
5 |
Kasjopeja |
|
|
полюс) |
|
|
|
|
|
||||
6 |
β Crucis |
6 |
β Crucis |
|
5 |
Кассиопея |
|
|
|
|
|
||||
|
|
|
|
|
|
6 |
Бекрукс |
|
|
|
|
|
|||
EN |
|
BG |
|
|
|
|
14 |
|
|
2 |
|
|
|||
1 |
R.A. lock knob |
|
1 |
Бутон за фиксиране на |
|
|
|
|
|
|
|
||||
2 |
R.A. settling circle |
|
|
ректасцензията (R.A.) |
|
|
|
|
|
|
|
|
|
|
|
3 |
Arrow |
|
2 |
Кръг за настройка на |
|
|
1 |
|
|
|
|
|
|
|
|
|
|
|
|
ректасцензията (R.A.) |
|
|
|
|
|
|
|
|
|
|
|
|
|
|
|
|
|
|
|
|
|
|
|
|
|
||
|
|
|
3 |
Стрелка |
|
|
|
|
|
|
|
|
|
|
|
CZ |
|
DE |
|
|
|
|
|
|
|
|
|
|
|
3 |
|
1 |
Aretační šroub osy rektascenze |
|
1 |
Rektaszensions-Arretierung |
|
|
|
|
|
|
|
|
|
||
|
|
|
|
|
|
|
|
||||||||
2 |
Kruh pro nastavení osy |
|
2 |
Rektaszensions-Teilkreis |
|
|
|
|
|
|
|
|
|
|
|
|
rektascenze |
|
3 |
Pfeil |
|
|
|
|
|
|
|
|
|
|
|
3 |
Šipka |
|
|
|
|
|
|
|
|
|
|
|
|
|
|
ES |
|
HU |
|
|
|
|
|
|
|
|
|
|
|
|
|
1 |
Bloqueo de AR |
|
1 |
R.A. szorítógomb |
|
|
|
|
|
|
|
|
|
|
|
2 |
Aro de ajustes de AR |
|
2 |
R.A. beállító gyűrű |
|
|
|
|
|
|
|
|
|
|
|
3 |
Flecha |
|
3 |
Nyíl |
|
|
|
|
|
|
|
|
|
|
|
IT |
|
PL |
|
|
|
RU |
|
|
|
|
|
||||
1 |
Manopola di blocco AR |
|
1 |
Pokrętło blokujące w osi |
|
|
1 |
|
Фиксатор оси прямого |
|
|
|
|
|
|
2 |
Cerchio graduato AR |
|
|
rektascenji |
|
|
|
|
восхождения |
|
|
|
|
|
|
3 |
Freccia |
|
2 |
Tarcza ze współrzędnymi |
|
|
2 |
|
Установочный круг прямого |
|
|
|
|
||
|
|
|
|
rektascensji |
|
|
|
|
восхождения |
|
|
|
|
|
|
|
|
|
3 |
Strzałka |
|
|
3 |
|
Стрелка |
|
|
|
|
|
|
9
|
15 |
|
|
|
|
|
|
|
1 |
|
|
|
13 |
|
|||
|
|
|
|
|
|
|
|
|
|
|
|||||||
|
|
|
|
|
|
|
|
|
|
|
|
|
|||||
|
|
|
|
|
|
|
|
|
|
|
|
|
|
||||
|
|
|
|
|
11 |
|
|
|
|
|
|
|
|
|
|
||
|
|
|
|
|
|
|
|
|
|
|
|
|
|
|
|
|
|
|
6 |
|
|
|
|
14 |
|
|
|
|
9 |
|
|
|
|
||
|
|
|
|
|
|
|
|
|
|
|
|
|
|
|
|
||
|
2 |
|
|
|
|
|
|
|
|
|
|
|
|
|
|
3 |
|
|
|
|
|
|
|
|
|
|
|
|
|
|
|
|
|
|
|
|
7 |
|
|
|
|
|
|
|
|
|
|
|
|
|
|
|
|
|
5 |
|
|
|
|
|
|
|
|
|
|
|
|
|
|
|
|
|
|
|
|
|
|
|
|
|
|
|
|
|
|
|
|
|
|
|
|
|
|
|
|
|
|
|
|
|
|
|
|
|
|
|
|
|
|
|
|
|
|
|
|
|
|
|
|
|
|
|
|
|
|
|
|
|
10 |
|
|
|
|
|
|
|
|
|
|
|
|
|
|
|
|
|
|
4 |
|
|
8 |
|
|
|
|
12 |
|||||
EN |
|
|
BG |
|
|
|
|
CZ |
|||||||||
|
|
|
|
|
|
||||||||||||
|
|
|
|
|
|
|
|
|
|
|
|
||||||
|
|
|
|
|
|
|
|
|
|
|
|
||||||
1 |
Zenith |
1 |
|
Зенит |
|
|
|
1 |
|
Zenit |
|||||||
2 |
Meridian |
2 |
|
Меридиан |
|
|
|
2 |
|
Poledník |
|||||||
3 |
Latitude |
3 |
|
Географска ширина |
|
|
|
3 |
|
Zeměpisná šířka |
|||||||
4 |
Nadir |
4 |
|
Надир |
|
|
|
4 |
|
Nadir |
|||||||
5 |
N E S W |
5 |
|
С И Ю З |
|
|
|
5 |
|
S V J Z |
|||||||
6 |
Right Ascension |
6 |
|
Ректасцензия |
|
|
|
6 |
|
Rektascenze |
|||||||
7 |
Meridian line |
7 |
|
Линия на меридиана |
|
|
|
7 |
|
Poledník |
|||||||
8 |
Plane of Celestial Equator |
8 |
|
Равнина на небесния екватор |
|
|
|
8 |
|
Rovina nebeského rovníku |
|||||||
9 |
Polaris |
9 |
|
Полярната звезда |
|
|
|
9 |
|
Polárka |
|||||||
10 |
Plane of local horizon |
10 |
|
Равнина на местния хоризонт |
|
|
|
10 |
|
Rovina lokálního horizontu |
|||||||
11 |
Object you are viewing |
11 |
|
Обектът, който наблюдавате |
|
|
|
11 |
|
Pozorovaný objekt |
|||||||
12 |
Apparent movement of stars |
12 |
|
Явно движение на звездите |
|
|
|
12 |
|
Zdánlivý pohyb hvězd |
|||||||
13 |
Mount aligned on North Celestial Pole |
13 |
|
Монтировка, подравнена по Северния |
13 |
|
Montáž nastavená na severní |
||||||||||
14 |
Declination |
|
|
|
небесен полюс |
|
|
|
|
|
nebeský pól |
||||||
|
|
|
14 |
|
Деклинация |
|
|
|
14 |
|
Deklinace |
||||||
DE |
|
|
ES |
|
|
|
|
|
|
|
|
HU |
|
|
|||
1 |
Zenit |
1 |
|
Cénit |
|
|
|
1 |
|
Zenit |
|||||||
2 |
Meridian |
2 |
|
Meridiano |
|
|
|
2 |
|
Meridian |
|||||||
3 |
Breite |
3 |
|
Latitud |
|
|
|
3 |
|
Kiterjedés |
|||||||
4 |
Nadir |
4 |
|
Nadir |
|
|
|
4 |
|
Nadír |
|||||||
5 |
N O S W |
5 |
|
N E S O |
|
|
|
5 |
|
É K D NY |
|||||||
6 |
Rektaszension |
6 |
|
Ascensión Recta |
|
|
|
6 |
|
Rektaszcenzió |
|||||||
7 |
Meridianlinie |
7 |
|
Línea del meridiano |
|
|
|
7 |
|
Meridián vonal |
|||||||
8 |
Himmelsäquatorebene |
8 |
|
Plano del ecuador celeste |
|
|
|
8 |
|
Égi egyenlítő síkja |
|||||||
9 |
Polarstern |
9 |
|
Estrella Polar |
|
|
|
9 |
|
Polaris |
|||||||
10 |
Lokale Horizontebene |
10 |
|
Plano del horizonte local |
|
|
|
10 |
|
A helyi horizont síkja |
|||||||
11 |
Betrachtetes Objekt |
11 |
|
Objeto que está observando |
|
|
|
11 |
|
A megfigyelt objektum |
|||||||
12 |
Scheinbare Sternbewegung |
12 |
|
Movimiento aparente de las estrellas |
12 |
|
A csillagok látszólagos mozgása |
||||||||||
13 |
Am nördlichen Himmelspol |
13 |
|
Montura alineada con el Polo Norte celeste |
13 |
|
Északi égi pólusra állított állvány |
||||||||||
|
ausgerichtete Montierung |
14 |
|
Declinación |
|
|
|
14 |
|
Döntés |
|||||||
14 |
Deklination |
|
|
|
|
|
|
|
|
|
|
|
|
|
|
|
|
10
IT |
|
|
PL |
|
|
|
RU |
|
|
1 |
Zenit |
|
1 |
Zenit |
|
|
1 |
Зенит |
|
2 |
Meridiano locale |
|
2 |
Południk |
|
|
2 |
Меридиан |
|
3 |
Altezza |
|
3 |
Szerokość |
|
|
3 |
Широта |
|
4 |
Nadir |
|
4 |
Nadir |
|
|
4 |
Надир |
|
5 |
N E S O |
|
5 |
N E S W |
|
|
5 |
С В Ю З |
|
6 |
Ascensione retta |
|
6 |
Rektascensja |
|
|
6 |
Прямое восхождение |
|
7 |
Meridiano celeste |
|
7 |
Południk niebieski |
|
|
7 |
Линия меридиана |
|
8 |
Piano dell’equatore celeste |
|
8 |
Równik niebieski |
|
|
8 |
Плоскость небесного экватора |
|
9 |
Polaris |
|
9 |
Gwiazdą Polarną |
|
|
9 |
Полярная звезда |
|
10 |
Piano dell’orizzonte astronomico |
10 |
Płaszczyzna horyzontu |
|
10 |
Плоскость местного горизонта |
|||
11 |
Corpo celeste in osservazione |
|
11 |
Obserwowany obiekt |
|
|
11 |
Наблюдаемый объект |
|
12 |
Movimento apparente degli astri |
12 |
Pozorny ruch gwiazd |
|
|
12 |
Видимое движение звезд |
||
13 |
Montatura allineata con il polo celeste |
13 |
Montaż ustawiony na północny biegun |
13 |
Монтировка выровнена на |
||||
|
boreale |
|
|
niebieski |
|
|
|
Северный небесный полюс |
|
14 |
Declinazione |
|
14 |
Deklinacja |
|
|
14 |
Склонение |
|
EN |
|
16 |
|
|
|
|
|
|
|
1 |
Focuser |
|
|
|
|
|
|
|
|
2 |
Eyepiece holder |
|
|
|
|
|
|
|
|
3 |
Extender |
|
1 |
|
|
|
|
|
|
4 |
T-adapter |
|
|
|
|
|
|
|
|
5 |
Camera |
|
|
|
|
|
|
|
|
|
|
|
|
2 |
|
3 |
|
4 |
5 |
BG |
|
CZ |
|
|
DE |
|
|
ES |
|
1 |
Фокусиращо устройство |
1 |
Okulárový výtah |
1 |
Okularauszug |
|
1 |
Mecanismo de enfoque |
|
2 |
Държач на окуляра |
2 |
Nástavec |
2 |
Verlängerung |
|
2 |
Extensor |
|
3 |
Удължител |
3 |
Držák okuláru |
3 |
Okularhalterung |
|
3 |
Portaocular |
|
4 |
T-образен адаптер |
4 |
T-adaptér |
4 |
T-Adapter |
|
4 |
Adaptador T |
|
5 |
Камера |
5 |
Fotoaparát |
5 |
Kamera |
|
5 |
Cámara |
|
HU |
|
IT |
|
|
PL |
|
|
RU |
|
1 |
Fókuszállító |
1 |
Focheggiatore |
1 |
Tubus ogniskujący |
|
1 |
Фокусер |
|
2 |
Szemlencsetartó |
2 |
Portaoculare |
2 |
Przedłużenie |
|
2 |
Держатель окуляра |
|
3 |
Hosszabbító |
3 |
Estensore |
3 |
Wyciąg okularowy |
|
3 |
Экстендер |
|
4 |
T-adapter |
4 |
Adattatore T |
4 |
T-adapter |
|
|
(удлинитель фокуса) |
|
5 |
Kamera |
5 |
Fotocamera |
5 |
Aparat fotograficzny |
4 |
Т-адаптер |
||
|
|
|
|
|
|
|
|
5 |
Камера |
11

EN |
Levenhuk Skyline PLUS Telescopes |
CAUTION! Never look directly at the Sun — even for an instant — through your telescope or finderscope without a professionally made solar filter that completely covers the front of the instrument, or permanent eye damage may result. To avoid damage to the internal parts of your telescope, make sure the front end of the finderscope is covered with aluminum foil or another non-transparent material. Children should use the telescope under adult supervision only.
All parts of the telescope will arrive in one box. Be careful when unpacking it. We recommend keeping the original shipping containers. In the event that the telescope needs to be shipped to another location, having the proper shipping containers will help ensure that your telescope survives the journey intact. Be sure to check the box carefully, as some parts are small. All screws should be tightened securely to eliminate flexing and wobbling, but be careful not to overtighten them, as that may strip the threads. During assembly (and anytime, for that matter), do not touch the surfaces
of the optical elements with your fingers. The optical surfaces have delicate coatings on them that can easily be damaged if touched. Never remove lenses or mirrors from their housing, or the product warranty will be null and void.
Telescope optical system and construction
Levenhuk Skyline PLUS is a series of modern telescopes for entry-level and amateur astronomers. Reflectors are good for studying solar system and bright deep-sky objects, while refractors are suitable for planetary observations as well as for studying terrestrial objects.
This user manual is applicable to several refractor (fig. 1a) and reflector telescopes (fig. 1b) on equatorial mounts. Read the user manual carefully to find the information about the assembling and adjustment of your telescope model, and carefully follow the instructions.
Telescope assembly
•Slowly loosen the tripod locking knobs and gently pull out the lower section of each tripod leg. Tighten the clamps to hold the legs in place. Spread the tripod legs apart to stand the tripod upright.
•Adjust the height of each tripod leg until the tripod head is properly leveled. Note that the tripod legs may not be the same length when the equatorial mount is leveled.
•Place the accessory tray on top of the bracket, and secure it with thumbscrews from underneath. Attach the equatorial mount to the tripod head.
•Turn the azimuth adjustment knob up and tighten the knurled knob underneath the tripod head to secure mount to tripod (fig. 2).
•Orient the mount vertically.
•Loosen the Dec. lock knob. Rotate the mount 180°.
•Loosen the R.A. lock knob located on the opposite side. Rotate the mount 180°.
•Loosen the latitude lock knob. Set the angle according to your location latitude. Rotate the mount 180°.
•Retighten the Dec. and R.A. lock knobs (fig. 3).
•Slide the counterweights halfway along the counterweight bar.
•Holding the counterweights with one hand, screw the counterweight bar into the threaded hole on the mount. Tighten the locknut on the counterweight bar until it is locked.
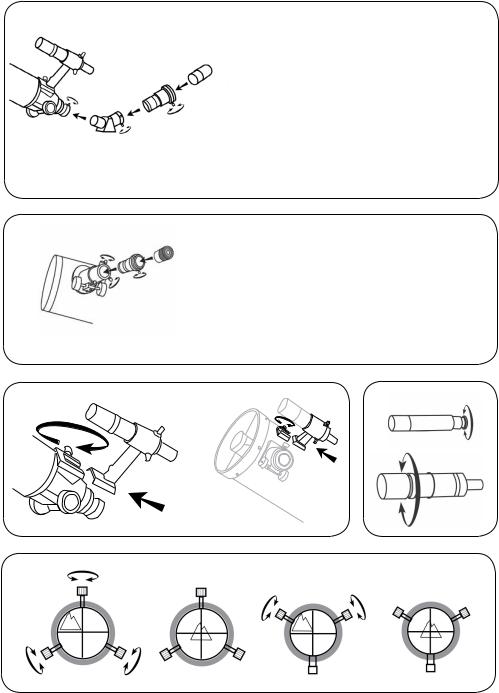
•Attach the slow-motion control to the worm gear mechanism. Tighten the locking screws to secure the control in place (fig. 4).
Telescope tube with ring clamps
•Remove the ring clamps from the telescope by releasing their thumbscrews and opening their hinges.
•Using the bolts provided, fasten the ring clamps to the mount with a wrench.
•Place the telescope tube between the rings and balance it.
•Close the hinges around the telescope and retighten the thumbscrews. Do not overtighten (fig. 5).
Telescope tube without ring clamps
•Place the telescope tube at the saddle and balance it. Fix the telescope tube with the lock knobs provided.
12
Optical accessories assembly
Your telescope can be equipped with additional accessories, such as eyepieces, diagonal mirror or prism, or a Barlow lens. The accessories should be installed in well-defined ordering.
Refractors (fig. 6a): Loosen the focuser thumbscrew. Insert the diagonal mirror into the focuser tube and retighten the thumbscrew to hold the diagonal mirror in place. Then, insert the desired eyepiece into the diagonal mirror and secure it by retightening the thumbscrew. If a Barlow lens is needed, install it between the focuser and the eyepiece.
Reflectors (fig. 6b): Loosen the focuser thumbscrew and take off the plastic cap from the focuser tube. Insert the selected eyepiece and secure it by retightening the thumbscrew. If a Barlow lens is needed, install it between the focuser and the eyepiece.
Optical finderscope assembly and alignment
Unthread two screws in the back of the telescope tube. Place the finderscope base above the holes on the tube. Lock the finderscope base into position by tightening the screws (refractor 7a, reflector 7b).
Optical finderscopes are very useful accessories. When they are correctly aligned with the telescope, objects can be quickly located and brought to the center of the view. Turn the scope end in and out to adjust focus (fig. 8).
To align the finderscope, choose a distant object that is at least 550 yards (500 meters) away and point the telescope at the object. Adjust the telescope so that the object is in the center of the view in your eyepiece. Check the finderscope to see if the object is also centered on the crosshairs. Use three adjustment screws to center the finderscope crosshairs on the object (fig. 9).
Focusing
Slowly rotate the focus knobs one way or the other until the image in the eyepiece is sharp. The image usually has to be finely refocused over time due to small variations caused by temperature changes, flexures, etc. Refocusing is almost always necessary when you change an eyepiece, add or remove a Barlow lens (refractor 10a, reflector 10b).
Balancing the telescope
A telescope should be balanced before each observing session. Balancing reduces stress on the telescope mount and allows precise slow-motion movements. A balanced telescope is especially crucial when using the optional clock drive for astrophotography. The telescope should be balanced after
all accessories (eyepiece, camera, etc.) have been attached. Before balancing your telescope, make sure that your tripod is balanced and on a stable surface. For photography, point the telescope in the direction you will be taking photos before performing the balancing steps.
R.A. Balancing
•For best results, adjust the altitude of the mount to between 15º and 30º if possible, by using the altitude adjustment T-bolt. Slowly unlock the R.A. and Dec. lock knobs. Rotate the telescope until both the optical tube and the counterweight rod are horizontal to the ground, and the telescope tube is to the side of the mount.
•Tighten the Dec. lock knob.
•Move the counterweights along the counterweight rod until the telescope is balanced and remains stationary when released.
•Tighten the counterweight screws to secure the counterweights.
Dec. Balancing
All accessories should be attached to the telescope before R.A. balancing, and the R.A. balancing should be done before proceeding with Dec. balancing. For best results, adjust the altitude of the mount to between 60° and 75° if possible.
•Release the R.A. lock knob and rotate around the R.A. axis so that the counterweight rod is in a horizontal position. Tighten the R.A. lock knob.
•Unlock the Dec. lock knob and rotate the telescope tube until it is parallel to the ground.
•Slowly release the telescope and determine in which direction it rotates. Loosen the telescope ring clamps and slide the telescope tube forward or backward between the rings until it is balanced.
•Once the telescope no longer rotates from its parallel starting position, retighten the tube rings and the Dec. lock knob. Reset the altitude axis to your local latitude.
13
Operating the mount
The mount has controls for both conventional altitude (up-down) and azimuth (left-right) directions of motion. These two adjustments are suggested for large direction changes and for terrestrial viewing. To adjust azimuth, loosen the big knob under the mount base and rotate the mount head about the azimuth axis. Use the altitude adjustment T-bolts to set the required altitude.
In addition, the equatorial mount has R.A. (hour angle) and Dec. controls for polar-aligned astronomical observing. Loosen the lock knobs to make large direction changes. Use the slow-motion controls for fine adjustment after the lock knobs have both been locked. An additional scale is included for the altitude axis. This allows polar alignment at your local latitude (fig. 11).
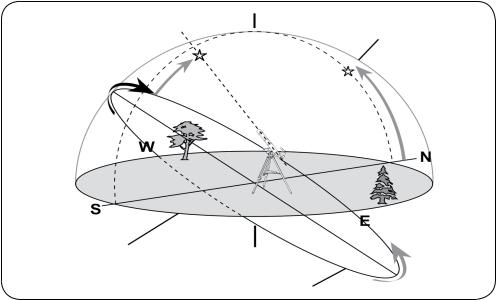
Polar adjustment
In order for your telescope to track objects in the sky you have to align your mount. This means tilting the head over so that it points to the North (or South) celestial pole. For people in the Northern Hemisphere this is rather easy as the bright star Polaris is very near the North Celestial Pole. For casual observing, rough polar alignment is adequate. Make sure your equatorial mount is leveled and the finderscope is aligned with the telescope before beginning.
Look up your latitude on a map, road maps are good for this purpose. Now look at the side of your mount head, there you will see a scale running from 0 to 90°. Loosen the mount latch slightly rotating the lock handle counterclockwise. A thumbscrew located underneath the mount head pushes the latch plate, thus changing the angle. Turn the screw until the pointer on the latitude scale is set at the latitude of your observation site (fig. 12).
Loosen the Dec. lock knob and rotate the telescope tube until the pointer on the setting circle reads 90°. Retighten the Dec. lock knob. Loosen the azimuth lock knob and move the mount so that the R.A. axis points roughly at Polaris. Use the two azimuth adjustment knobs above the “N” to make fine adjustments in azimuth if needed. For more accurate alignment, look through the finderscope and center the Polaris on the crosshairs using the azimuth and latitude adjustment knobs (fig. 13).
After a while you will notice your target drifting slowly North or South depending on the direction of the pole relative to Polaris. To keep the target in the center of the view, turn only the R.A. slowmotion control.
After your telescope is polar aligned, no further adjustments in the azimuth and latitude of the mount should be made in the observing session, nor should you move the tripod. Only movements in R.A. and DEC axis should be made in order to keep an object in the field. In the Southern Hemisphere you must align the mount to the SCP by locating its position with star patterns, without the convenience of a nearby bright star. The closest star is the faint 5.5-mag. Sigma Octantis which is about one degree away. Two sets of pointers which help to locate the SCP are α and β Crucis (in the Southern Cross) and a pointer running at a right angle to a line connecting α and β Centauri.
Tracking celestial objects
When observing through a telescope, astronomical objects appear to move slowly through the telescope’s field of view. When the mount is correctly polar aligned, you only need to turn the R.A. slow-motion control to follow or track objects as they move through the field. A R.A. motor drive can be added to automatically track celestial objects by counteracting the rotation of Earth. If the object is too faint you may want to use setting circles on an equatorial mount. Setting circles allow you to locate celestial objects whose celestial coordinates have been determined from star charts.
The telescope’s R.A. setting circle is scaled in hours, from 1 to 24, with small lines in between representing 10 minute increments. The upper set of numbers applies to observations in the Northern Hemisphere, while the numbers below them apply to observations in the Southern Hemisphere.
Setting (calibrating) the R.A. setting circle: in order to set your Right Ascension circle you must first find a star in your field of view with known coordinates. A good one would be the 0.0 magnitude star Vega in the Constellation Lyra. From a star chart we know the R.A. coordinate of Vega is 18h 36m.
Loosen the R.A. and DEC. lock knobs on the mount and adjust the telescope so that Vega is centered in the field of view of the eyepiece. Tighten the R.A. and DEC. lock knobs to lock the mount in place. Now rotate the R.A. setting circle until it reads 18h36m. You are now ready to use the setting circles to find objects in the sky (fig. 14).
A German Equatorial mount has an adjustment, sometimes called a wedge, which tilts the mount’s polar axis so that it points at the appropriate Celestial Pole (NCP or SCP). Once the mount has been polar aligned, it needs to be rotated around the polar axis only to keep an object centered. Do not reposition the mount base or change the latitude setting. The mount has already been correctly aligned for your geographical location (i.e. Latitude), and all remaining telescope pointing is done by rotating the telescope tube around the polar (R.A.) and declination axes (fig. 15).
14
A problem for many beginners is recognizing that a polar-aligned, equatorial mount acts like an altazimuth mount which has been aligned to a celestial pole. The wedge tilts the mount to an angle equal to the observer’s Latitude, and therefore it swivels around a plane which is parallel to the celestial (and Earth’s) equator. This is now its “horizon”; but remember that part of the new horizon is usually blocked by Earth. This new “azimuth” motion is called Right Ascension (R.A.). In addition, the mount swivels North (+) and South (-) from the Celestial Equator towards the celestial poles. This plus or minus “altitude” from the celestial equator is called Declination (Dec.).
Now, consider pointing the telescope to the western or eastern horizon. If the counterweight is pointing North, the telescope can be swiveled from one horizon to the other around the Dec. axis in an arc that passes through the NCP (any Dec. arc will pass through the NCP if the mount is polar-aligned). It can be seen then that if the optical tube needs to be pointed at an object north or south of this arc, it has to be also rotated around the R.A. axis. Pointing in any direction other than due North requires a combination of R.A. and Dec. positions.
Telescopes with long focal lengths often have a “blind spot” when pointing near the zenith, because the eyepiece-end of the optical tube bumps into the mount’s legs. To avoid this, the tube can be very carefully slipped up inside the ring clamps. This can be done safely because the tube is pointing almost vertically, and therefore moving it does not cause a Dec. balance problem. It is very important to move the tube back to the Dec. balanced position before observing other sky areas.
Something which can also be a problem is that the optical tube often rotates so that the eyepiece, finderscope and the focusing knobs are in less convenient positions. The diagonal mirror can be rotated to adjust the eyepiece. However, to adjust the positions of the finderscope and focusing knobs, loosen the tube rings holding the telescope tube and gently rotate it. Do this when you are going to observe an area for while, as it is inconvenient to repeat every time you briefly go to a new area.
Finally, there are a few things to consider to ensure that you are comfortable during the viewing session. First is setting the height of the mount above the ground by adjusting the tripod legs. You must consider the height that you want your eyepiece to be, and if possible plan on sitting on a comfortable chair or stool. Very long optical tubes need to be mounted higher or you will end up crouching or lying on the ground when looking at objects near the zenith. However, a short optical tube can be mounted lower so that there is less movement due to vibration sources, such as wind. This is something that should be decided before going through the effort of polar aligning the mount.
Camera adapter
To attach a camera to your telescope you may need an adapter to get the camera focused. Some reflectors require wider motion range than the one allowed by the focuser; some refractors are designed to be used with diagonal mirrors and thus need a longer focal length when used with camera. To achieve that, simply attach an extender to the focuser of your telescope and then attach the camera with a T-adapter to the extender (fig. 16).
Specifications
|
Levenhuk Skyline PLUS 60T |
|
Levenhuk Skyline PLUS 130S |
|
|
|
|
Optical design |
refractor |
|
Newtonian reflector |
|
|
|
|
Optics material |
|
optical glass with coating |
|
|
|
|
|
Aperture, mm |
60 |
|
130 |
|
|
|
|
Focal length, mm |
700 |
|
900 |
|
|
|
|
Highest practical power, x |
120 |
|
260 |
|
|
|
|
Mount |
EQ1 |
|
EQ2 |
|
|
|
|
The manufacturer reserves the right to make changes to the product range and specifications without prior notice.
Care and maintenance
•Never, under any circumstances, look directly at the Sun through this device without a special filter, or look at another bright source of light or at a laser, as this may cause PERMANENT RETINAL DAMAGE and may lead to BLINDNESS.
•Take necessary precautions when using the device with children or others who have not read or who do not fully understand these instructions.
15

•Do not try to disassemble the device on your own for any reason, including to clean the mirror. For repairs and cleaning of any kind, please contact your local specialized service center.
•Protect the device from sudden impact and excessive mechanical force.
•Do not touch the optical surfaces with your fingers. To clean the telescope exterior, use only special cleaning wipes and special optics cleaning tools from Levenhuk.
•Store the device in a dry, cool place away from hazardous acids and other chemicals, away from heaters, open fire and other sources of high temperatures.
•Replace the dust cap over the front end of the telescope whenever it is not in use. This prevents dust or dirt from settling on the mirror or lens surfaces.
•Children should use the telescope under adult supervision only.
Levenhuk International Lifetime Warranty
All Levenhuk telescopes, microscopes, binoculars and other optical products, except for accessories, carry a lifetime warranty against defects in materials and workmanship. Lifetime warranty is a guarantee on the lifetime of the product on the market. All Levenhuk accessories are warranted to be free of defects in materials and workmanship for six months from date of retail purchase. The warranty entitles you to free repair or replacement of the Levenhuk product in any country where a Levenhuk office is located if all warranty conditions are met. For further details please visit our web site: www.levenhuk.com/warranty
If warranty problems arise, or if you need assistance in using your product, contact the local Levenhuk branch.
BG |
Телескопи Levenhuk Skyline PLUS |
ВНИМАНИЕ! Никога не гледайте директно към Слънцето, дори за миг, през Вашия телескоп или визьор без професионално изработен соларен филтър, който покрива изцяло предната част на инструмента, понеже може да се получи невъзвратимо увреждане на очите. За да избегнете повреда на вътрешните части на Вашия телескоп, се погрижете предният край на визьора да бъде покрит с алуминиево фолио или друг непрозрачен материал. Децата трябва да използват телескопа само под надзора на възрастни.
Всички части на телескопа се получават в една кутия. Внимавайте, когато го разопаковате. Запазете оригиналната транспортна опаковка; Вие ще се нуждаете от нея, ако трябва да изпратите телескопа до сервизния център. Проверете внимателно кутията, понеже някои от частите са малки. Всички винтове трябва да бъдат затегнати здраво, за да се избегнат огъване и разклащане, но внимавайте да не ги затегнете прекомерно, тъй като това може да доведе до скъсване на резбите. По време на сглобяването (и не само тогава) не докосвайте повърхностите на оптичните елементи с пръсти си. Оптичните повърхности са с чувствително покритие, което може да се повреди лесно при докосване. Никога не демонтирайте лещите от корпуса им, понеже това ще направи гаранцията на продукта невалидна.
Оптична система и конструкция на телескопа
Levenhuk Skyline PLUS е серия модерни телескопи за астрономи на начално и любителско ниво. Рефлекторните телескопи са подходящи за изучаване на Слънчевата система и ярки обекти в далечния Космос, а рефракторните телескопи са подходящи за наблюдения на планети, както и за изучаване на наземни обекти.
Това ръководство за потребителя е приложимо за няколко рефракторни (фиг. 1a) и рефлекторни телескопа (фиг. 1b) върху екваториални монтировки. Прочетете внимателно ръководството за потребителя, за да намерите информация за сглобяването и настройката на Вашия модел телескоп, и внимателно следвайте инструкциите.
16
Сглобяване на телескопа
•Разхлабете внимателно застопоряващите бутони на триножника и издърпайте внимателно долната секция на всеки от краката на триножника. Затегнете винтовете, за да застопорите краката. Отдалечете краката на триножника, за да се разположи триножникът във вертикално положение.
•Регулирайте височината на всеки от краката на триножника, докато главата на триножника е правилно нивелирана. Имайте предвид, че краката на триножника може да не са с еднаква дължина, когато монтировката е нивелирана.
•Поставете поставката за принадлежности върху скобата и я закрепете отдолу с винтовете с глава с накатка. Закрепете екваториалната монтировка върху главата на триножника.
•Преместете нагоре бутона за регулиране на азимута и затегнете бутона с глава с накатка под главата на триножника, за да фиксирате монтировката към триножника (фиг. 2).
•Ориентирайте монтировката вертикално.
•Разхлабете бутона за фиксиране на деклинацията. Завъртете монтировката на 180°.
•Разхлабете бутона за фиксиране на ректасцензията, който се намира на отсрещната страна. Завъртете монтировката на 180°.
•Разхлабете бутона за фиксиране на географската ширина. Настройте ъгъла в съответствие с географската ширина на Вашето местоположение. Завъртете монтировката на 180°.
•Затегнете бутоните за фиксиране на деклинацията и ректасцензията (фиг. 3).
•Плъзнете противотежестите на половината от дължината на пръта на противотежестта.
•Като държите противотежестите с една ръка, завинтете пръта на противотежестта в отвора с резба на монтировката. Затягайте контрагайката на пръта на противотежестта, докато се фиксира.
•Закрепете управлението за бавно движение към червячния механизъм. Затегнете застопоряващите винтове, за да фиксирате управлението на място (фиг. 4).
Тръба на телескоп с пръстеновидни скоби
•Демонтирайте пръстеновидните скоби от телескопа чрез развиване на винтовете с глава с накатка и отваряне на техните панти.
•Затегнете пръстеновидните скоби с приложените болтове към монтировката с гаечен ключ.
•Поставете тръбата на телескопа между пръстените и я балансирайте.
•Затворете пантите около телескопа и затегнете отново винтовете с глава с накатка. Не ги затягайте прекомерно (фиг. 5).
Тръба на телескоп без пръстеновидни скоби
•Поставете тръбата на телескопа на монтажната плоча и я балансирайте. Фиксирайте тръбата на телескопа с приложените застопоряващи бутони.
Сглобяване на оптични принадлежности
Вашият телескоп може да бъде оборудван с допълнителни принадлежности, като окуляри, диагонално огледало или призма, или леща на Барлоу. Принадлежностите трябва да се монтират в точно определена последователност.
Рефракторни телескопи (фиг. 6a): Развийте винта с глава с накатка на фокусиращото устройство. Вкарайте диагоналното огледало в тръбата на фокусиращото устройство и затегнете отново винта с глава с накатка, за да задържите диагоналното огледало на място. След това поставете желания
окуляр в диагоналното огледало и го застопорете, като затегнете отново винта с глава с накатка. Ако е необходима леща на Барлоу, монтирайте я между фокусиращото устройство и окуляра.
Рефлекторни телескопи (фиг. 6b): Развийте винта с глава с накатка на фокусиращото устройство и махнете пластмасовата капачка от тръбата на фокусиращото устройство. Вкарайте избрания окуляр и го застопорете, като затегнете отново винта с глава с накатка. Ако е необходима леща на Барлоу, монтирайте я между фокусиращото устройство и окуляра.
Сглобяване и подравняване на оптичен визьор
Развийте двата винта на гърба на тръбата на телескопа. Поставете основата на визьора над отворите върху тръбата. Фиксирайте основата на визьора на място чрез затягане на винтовете (рефракторен телескоп 7a, рефлекторен телескоп 7b).
Оптичните визьори са много полезни принадлежности. Когато те са правилно подравнени с телескопа, обектите могат да се намират бързо и да се разполагат в средата на полето на обзор. Въртете края на визьора навътре и навън, за да регулирате фокуса (фиг. 8).
За да подравните визьора, изберете отдалечен обект, който е най-малко на 500 метра от Вас, и насочете телескопа към него. Регулирайте телескопа по такъв начин, че обектът да се намира в средата на полето на обзор на окуляра. Погледнете през визьора, за да видите дали обектът е центриран също и върху кръстосаната решетка. Използвайте трите регулиращи винта, за да центрирате кръстосаната решетка на визьора върху обекта (фиг. 9).
17
 Loading...