


Levenhuk Skyline BASE Telescopes
EN User Manual
BG Ръководство за потребителя
CZ Návod k použití
DE Bedienungsanleitung
ES Guía del usuario
HU Használati útmutató
IT Guida all’utilizzo
PL Instrukcja obsługi
RU Инструкция по эксплуатации
Наслади се отблизо
Radost zaostřit
Zoom ran und hab Fun! Amplíe y disfrute Kellemes nagyítást! Ingrandisci il divertimento Radość przybliżania
Приближает с удовольствием
1a |
2 |
3 |
|
|
|
|
|
|
1b |
|
|
|
|
5 |
|
|
|
|
|
||||||
1 |
|
|
|
4 |
5 |
6 |
7 |
|
|
|
|
|
|
|
|
|
|
|
|
|
|
|
6 |
||
|
|
|
|
|
|
|
|
|
|
|
|
|
|
|
|||||||||||
|
|
|
|
|
|
|
|
|
7 |
|
|
|
|
|
|
|
|
||||||||
|
|
|
|
|
|
|
|
|
|
|
|
|
|
|
|
|
|
2 |
|||||||
|
|
|
|
|
|
|
|
|
9 |
|
|
|
|
|
|
|
|||||||||
|
13 |
|
|
|
|
|
|
|
|
|
|
|
|
|
|
|
|
|
|
|
|
1 |
|||
|
|
|
|
|
|
|
|
|
|
|
|
|
|
|
|
|
|
|
|
|
|||||
|
12 |
|
|
|
|
11 |
|
|
|
|
|
|
|
|
|
|
|
|
|
|
|
|
|
|
|
|
|
|
|
|
|
|
|
|
|
|
|
|
|
|
|
|
|
|
|
|
|
|
|||
|
10 |
|
|
|
|
|
13 |
|
|
|
|
|
|
|
|
|
|
|
|
|
|
|
|||
|
|
|
|
|
|
|
|
|
|
|
|
|
|
|
|
|
|
|
|
|
|||||
|
|
|
|
|
|
|
|
|
|
|
|
|
|
|
|
|
|
|
|
|
|
||||
|
|
|
|
|
|
|
|
|
|
|
|
|
|
|
|
|
|
|
|
|
|
|
|
||
|
|
|
|
|
|
|
|
|
|
8 |
|
|
|
|
|
|
|
|
|
|
|
|
|
|
|
|
|
|
|
|
|
|
|
|
|
|
|
|
|
|
|
|
|
|
|
|
|
|
|||
|
|
|
|
|
|
|
|
|
4 |
|
|
|
|
|
|
|
|
|
|
12 |
|
|
|
|
|
|
|
|
|
|
|
|
|
|
|
|
|
|
|
|
|
|
|
|
|
|
|
|
|||
|
|
|
|
|
|
|
|
|
|
|
|
|
|
|
|
|
|
|
|
|
11 |
|
|
|
|
|
|
|
|
|
|
|
|
|
|
|
|
|
|
|
|
|
|
|
|
|
|||||
|
|
|
|
|
|
|
|
|
|
|
|
|
|
|
|
|
|
|
|
|
10 |
|
|
|
|
|
|
|
|
|
|
|
|
|
|
|
|
|
|
|
|
|
|
|
|
|
|||||
15
14
14
16
15
16
EN |
BG |
CZ |
|
||
1 |
Dust cap |
1 |
Капачка против прах |
1 |
Prachové víčko |
2 |
Dew cap |
2 |
Защитна капачка срещу роса |
2 |
Rosnice |
3 |
Objective lens |
3 |
Леща на обектива |
3 |
Čočka objektivu |
4 |
Telescope tube |
4 |
Тръба на телескопа |
4 |
Tubus teleskopu |
5 |
Finderscope |
5 |
Визьор |
5 |
Pointační dalekohled |
6 |
Finderscope base |
6 |
Скоба на визьора |
6 |
Držák pointačního dalekohledu |
7 |
Eyepiece |
7 |
Окуляр |
7 |
Okulár |
8 |
Diagonal mirror |
8 |
Диагонално огледало |
8 |
Diagonální zrcátko |
9 |
Eyepiece holder |
9 |
Държач на окуляра |
9 |
Držák okuláru |
10 |
Azimuth lock knob |
10 |
Бутон за фиксиране на азимут |
10 |
Aretační šroub nastavení |
11 |
Fork mount |
11 |
Монтировка с вилка |
|
azimutu |
12 |
Altitude slow-motion |
12 |
Управление за бавно |
11 |
Vidlicová montáž |
|
control |
|
движение по височина |
12 |
Jemné nastavení elevace |
13 |
Altitude lock knob |
13 |
Бутон за фиксиране на |
13 |
Aretační šroub nastavení |
14 |
Tripod leg |
|
надморската височина |
|
elevace |
15 |
Accessory tray |
14 |
Крак на триножника |
14 |
Noha stativu |
16 |
Tripod lock knob |
15 |
Поставка за принадлежности |
15 |
Přihrádka na příslušenství |
|
|
16 |
Бутон за фиксиране на |
16 |
Aretační šroub stativu |
|
|
|
триножника |
|
|
3

DE |
ES |
|
HU |
||
1 |
Staubschutzkappe |
1 |
Guardapolvo |
1 |
Porvédő kupak |
2 |
Taukappe |
2 |
Protector de rocío |
2 |
Párafogó csésze |
3 |
Objektivlinse |
3 |
Lente del objetivo |
3 |
Tárgylencse |
4 |
Teleskoptubus |
4 |
Tubo del telescopio |
4 |
Teleszkóp tubus |
5 |
Sucherrohr |
5 |
Buscador |
5 |
Keresőtávcső |
6 |
Sucherrohr-Halterung |
6 |
Base del buscador |
6 |
Keresőtávcső talpazata |
7 |
Okular |
7 |
Ocular |
7 |
Szemlencse |
8 |
Diagonalspiegel |
8 |
Espejo diagonal |
8 |
Diagonális tükör |
9 |
Okularhalterung |
9 |
Portaocular |
9 |
Szemlencsetartó |
10 |
Azimut-Arretierung |
10 |
Bloqueo de azimut |
10 |
Azimut szorítógomb |
11 |
Gabelmontierung |
11 |
Montura de horquilla |
11 |
Villa alakú állvány |
12 |
Höhen-Feinabstimmung |
12 |
Control de movimiento lento |
12 |
Magassági lassú mozgatású |
13 |
Höhen-Arretierung |
|
de altitud |
|
vezérlő |
14 |
Stativbein |
13 |
Bloqueo de altitud |
13 |
Magassági szorítógomb |
15 |
Zubehörablage |
14 |
Pata del trípode |
14 |
Háromlábú állvány lába |
16 |
Stativ-Arretierung |
15 |
Bandeja de accesorios |
15 |
Tartozéktartó tálca |
|
|
16 |
Bloqueo de ajuste de la altura |
16 |
A háromlábú állvány |
|
|
|
|
|
szorítógombja |
IT |
|
PL |
|
RU |
|
1 |
Coperchio antipolvere |
1 |
Osłona przeciwpyłowa |
1 |
Пылезащитная крышка |
2 |
Cappuccio anticondensa |
2 |
Odrośnik |
2 |
Бленда |
3 |
Lente obiettivo |
3 |
Soczewka obiektywowa |
3 |
Линза объектива |
4 |
Tubo telescopio |
4 |
Tubus teleskopu |
4 |
Труба телескопа |
5 |
Mirino |
5 |
Celownica |
5 |
Искатель |
6 |
Supporto del cercatore |
6 |
Wspornik celownicy |
6 |
Крепление искателя |
7 |
Oculare |
7 |
Okular |
7 |
Окуляр |
8 |
Specchio diagonale |
8 |
Lustro ukośne |
8 |
Диагональное зеркало |
9 |
Portaoculare |
9 |
Wyciąg okularowy |
9 |
Держатель окуляра |
10 |
Manopola di bloccaggio |
10 |
Pokrętło blokujące teleskop |
10 |
Фиксатор оси азимута |
|
azimutale |
|
w poziomie |
11 |
Хомут |
11 |
Montatura a forcella |
11 |
Montaż widłowy |
12 |
Ручка регулировки по высоте |
12 |
Regolazione ine dell’altezza |
12 |
Pokrętło mikroruchów w pionie |
13 |
Фиксатор оси высоты |
13 |
Manopola di blocco dell’ |
13 |
Pokrętło blokujące teleskop |
14 |
Ножка треноги |
|
altezza |
|
w pionie |
15 |
Лоток для аксессуаров |
14 |
Gamba del treppiede |
14 |
Noga statywu |
16 |
Фиксатор высоты ножек |
15 |
Ripiano per accessori |
15 |
Tacka na akcesoria |
|
треноги |
16 |
Manopola di blocco del |
16 |
Pokrętło blokujące statyw |
|
|
|
treppiede |
|
|
|
|
2a
4

2b
3a
3b
4a |
EN |
BG |
CZ |
|||
1 |
Diagonal mirror |
1 |
Диагонално огледало |
1 |
Diagonální zrcátko |
|
|
2 |
Barlow lens |
2 |
Леща на Барлоу |
2 |
Barlowova čočka |
|
3 |
Eyepiece |
3 |
Окуляр |
3 |
Okulár |
|
|
|
DE |
ES |
HU |
|||
|
|
3 |
1 |
Diagonalspiegel |
1 |
Espejo diagonal |
1 |
Diagonális tükör |
|
|
2 |
Barlow-Linse |
2 |
Lente de Barlow |
2 |
Barlow-lencse |
|
|
|
|
||||||
|
2 |
|
3 |
Okular |
3 |
Ocular |
3 |
Szemlencse |
1 |
|
|
|
|
|
|
|
|
|
|
IT |
PL |
RU |
||||
|
|
|
1 |
Specchio diagonale |
1 |
Lustro ukośne |
1 |
Диагональное зеркало |
|
|
|
2 |
Lente di Barlow |
2 |
Soczewka Barlowa |
2 |
Линза Барлоу |
|
|
|
3 |
Oculare |
3 |
Okular |
3 |
Окуляр |
5
4b |
EN |
BG |
CZ |
||||
1 |
Barlow lens |
1 |
Леща на Барлоу |
1 |
Barlowova čočka |
||
|
|||||||
|
2 |
Eyepiece |
2 |
Окуляр |
2 |
Okulár |
|
2 |
DE |
ES |
HU |
|||
1 |
1 |
Barlow-Linse |
1 |
Lente de Barlow |
1 |
Barlow-lencse |
2 |
Okular |
2 |
Ocular |
2 |
Szemlencse |
|
|
IT |
PL |
RU |
|||
|
1 |
Lente di Barlow |
1 |
Soczewka Barlowa |
1 |
Линза Барлоу |
|
2 |
Oculare |
2 |
Okular |
2 |
Окуляр |
5a 5b 6
7
6
8 |
1 |
|
|
4 |
|
|
|
|
|
6 |
|
|
|
|
|
|
|
|
|
|
|
|
|
|
|
|
|
|
5 |
|
3 |
|
|
|
|
|
|
|
|
|
|
|
|
|
|
|
|
|
|
|
|
|
|
|
|
|
|
|
|
2 |
|
|
|
||
EN |
BG |
CZ |
||||||
1 |
Zenith |
1 |
Зенит |
1 |
Zenit |
|||
2 |
Nadir |
2 |
Надир |
2 |
Nadir |
|||
3 N E S W |
3 С И Ю З |
3 S V J Z |
||||||
4 |
Meridian line |
4 |
Линия на меридиана |
4 |
Poledník |
|||
5 |
Rotation around the azimuth axis |
5 |
Въртене около азимуталната ос |
5 |
Otáčení kolem azimutální osy |
|||
6 |
Latitude |
6 |
Географска ширина |
6 |
Zeměpisná šířka |
|||
DE |
ES |
HU |
||||||
1 |
Zenit |
1 |
Cénit |
1 |
Zenit |
|||
2 |
Nadir |
2 |
Nadir |
2 |
Nadír |
|||
3 N O S W |
3 N E S O |
3 É K D NY |
||||||
4 |
Meridianlinie |
4 |
Línea del meridiano |
4 |
Meridián vonal |
|||
5 |
Azimut |
5 |
Rotación sobre el eje azimuthal |
5 |
Forgatás azimut tengely körül |
|||
6 |
Breite |
6 |
Latitid |
6 |
Kiterjedés |
|||
IT |
PL |
RU |
||||||
1 |
Zenit |
1 |
Zenit |
1 Зенит |
||||
2 |
Nadir |
2 |
Nadir |
2 Надир |
||||
3 N E S O |
3 N E S W |
3 С В Ю З |
||||||
4 |
Meridiano celeste |
4 |
Południk niebieski |
4 Линия меридиана |
||||
5 |
Azimut |
5 |
Obrót wokół osi azymutu |
5 Вращение по азимуту |
||||
6 |
Altezza |
6 |
Szerokość |
6 Широта |
||||
7
9a |
9b |
|
10 |
|
|
EN |
BG |
||
|
|
|
|
1 |
Focuser |
1 |
Фокусиращо устройство |
|
1 |
|
|
2 |
Eyepiece holder |
2 |
Държач на окуляра |
|
|
|
3 |
Extender |
3 |
Удължител |
|
|
2 |
3 |
4 |
4 |
T-adapter |
4 |
T-образен адаптер |
|
5 |
Camera |
5 |
Камера |
|||
|
|
|
5 |
||||
|
|
|
|
|
|
|
|
CZ |
DE |
ES |
HU |
||||
1 |
Okulárový výtah |
1 |
Okularauszug |
1 |
Mecanismo de enfoque |
1 |
Fókuszállító |
2 |
Držák okuláru |
2 |
Okularhalterung |
2 |
Portaocular |
2 |
Szemlencsetartó |
3 |
Nástavec |
3 |
Verlängerung |
3 |
Extensor |
3 |
Hosszabbító |
4 |
T-adaptér |
4 |
T-Adapter |
4 |
Adaptador T |
4 |
T-adapter |
5 |
Fotoaparát |
5 |
Kamera |
5 |
Cámara |
5 |
Kamera |
IT |
PL |
RU |
|
|
|||
1 |
Focheggiatore |
1 |
Tubus ogniskujący |
1 |
Фокусер |
|
|
2 |
Portaoculare |
2 |
Wyciąg okularowy |
2 |
Держатель окуляра |
|
|
3 |
Estensore |
3 |
Przedłużenie |
3 |
Экстендер (удлинитель фокуса) |
|
|
4 |
Adattatore T |
4 |
T-adapter |
4 |
Т-адаптер |
|
|
5 |
Fotocamera |
5 |
Aparat fotograiczny |
5 |
Камера |
|
|
8

EN |
Levenhuk Skyline BASE Telescopes |
CAUTION! Never look directly at the Sun — even for an instant — through your telescope or inderscope without a professionally made solar ilter that completely covers the front of the instrument, or permanent eye damage may result. To avoid damage to the internal parts of your telescope, make sure the front end of the inderscope
is covered with aluminum foil or another non-transparent material. Children should use the telescope under adult supervision only.
All parts of the telescope will arrive in one box. Be careful when unpacking it. We recommend keeping the original shipping containers. In the event that the telescope needs to be shipped to another location, having the proper shipping containers will help ensure that your telescope survives the journey intact. Make sure all the parts are present in the packaging. Be sure to check the box carefully, as some parts are small. No tools are needed other than those provided. All screws should be tightened securely to eliminate lexing and wobbling, but be careful not to overtighten them, as that may strip the threads.
During assembly (and anytime, for that matter), do not touch the surfaces of the optical elements with your ingers. The optical surfaces have delicate coatings on them that can easily be damaged if touched. Never remove lenses or mirrors from their housing, or the product warranty will be null and void.
Telescope optical system and construction
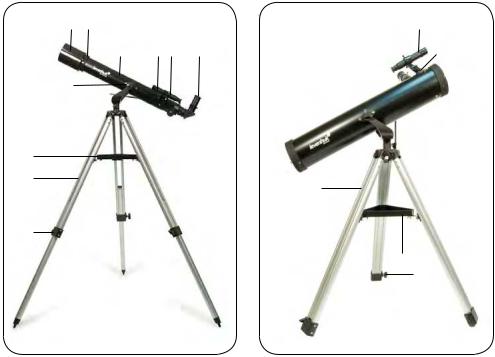
Levenhuk Skyline BASE is a series of easy to use entry-level telescopes. These telescopes are perfect for kids and beginners in astronomy. Relectors are good for studying solar system and bright deepsky objects, while refractors are suitable for planetary observations as well as for studying terrestrial objects.
This user manual is applicable to several refractor (ig. 1a) and relector telescopes (ig. 1b) on altazimuth mounts. Read the user manual carefully to ind the information about the assembling and adjustment of your telescope model, and carefully follow the instructions.
Tripod assembly
•Slowly loosen the tripod locking knobs and gently pull out the lower section of each tripod leg. Tighten the screws to hold the legs in place.
•Spread the tripod legs apart to stand the tripod upright.
•Adjust the height of each tripod leg until the tripod head is properly leveled. Note that the tripod legs may not be the same length when the mount is leveled.
•Place the accessory tray on top of the bracket, and secure it with thumbscrews from underneath (ig. 2a) or secure the accessory tray with one screw in the middle of the tray (ig. 2b).
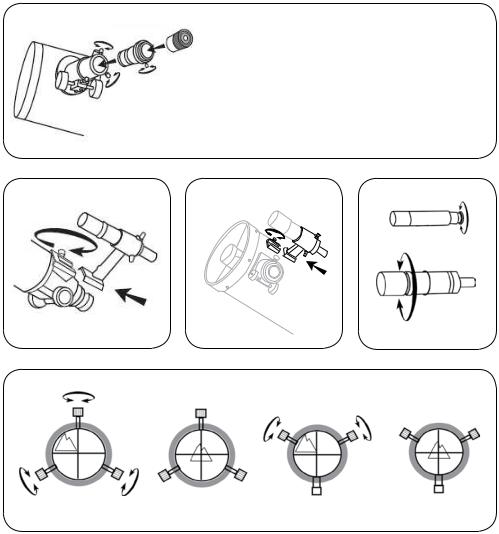
Mount assembly
Fork mount (ig. 3a):
•Remove the locking screw from the slow-motion control rod.
•Insert the rod into the hole on the side of the fork mount.
•Place the telescope tube between fork arms so that holes on the tube match the arm holes. Fasten the telescope tube to the mount with thumbscrews.
•Fasten the other end of the rod to the telescope tube by inserting the screw through shaft and tube holes and tightening it.
Mount without a fork (ig. 3b):
•Remove the altitude lock knob from the mount head.
•Place the telescope optical tube on the altazimuth mount so that the hole in the optical tube lines up with the hole in the mount head.
•Insert the altitude lock knob through the mount head and optical tube. Make sure the hole is clear all the way through before tightening the knob. Secure the altitude lock knob.
9
Optical accessories assembly
Your telescope can be equipped with additional accessories, such as eyepieces, diagonal mirror or prism, or a Barlow lens. The accessories should be installed in well-deined ordering.
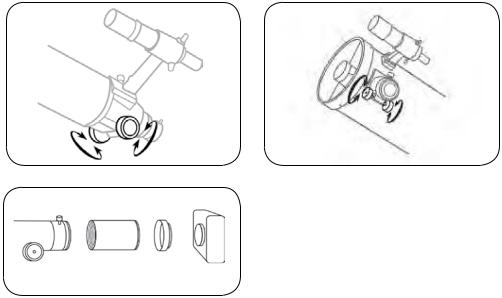
Refractors (ig. 4a): Loosen the focuser thumbscrew. Insert the diagonal mirror into the focuser tube and retighten the thumbscrew to hold the diagonal mirror in place. Then, insert the desired eyepiece into the diagonal mirror and secure it by retightening the thumbscrew. If a Barlow lens is needed, install it between the focuser and the eyepiece.
Relectors (ig. 4b): Loosen the focuser thumbscrew and take of the plastic cap from the focuser tube. Insert the selected eyepiece and secure it by retightening the thumbscrew. If a Barlow lens is needed, install it between the focuser and the eyepiece.
Optical inderscope assembly and alignment
Unthread two screws in the back of the telescope tube. Place the inderscope base above the holes on the tube. Lock the inderscope base into position by tightening the screws (refractor 5a, relector 5b).
Optical inderscopes are very useful accessories. When they are correctly aligned with the telescope, objects can be quickly located and brought to the center of the view. Turn the scope end in and out to adjust focus (ig. 6).
To align the inderscope, choose a distant object that is at least 550 yards (500 meters) away and point the telescope at the object. Adjust the telescope so that the object is in the center of the view in your eyepiece. Check the inderscope to see if the object is also centered on the crosshairs. Use three adjustment screws to center the inderscope crosshairs on the object (ig. 7).
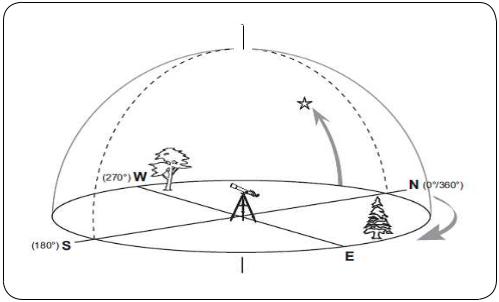
Operating the mount
The AZ mount is an alt-azimuth mount that allows you to rotate the telescope about the vertical and horizontal axes and change its altitude and azimuth. To adjust the azimuth, loosen the big locking knob under the mount base and rotate the tube left or right about the axis then retighten it. To adjust the altitude, loosen the altitude adjustment knob and rotate the tube. For more precise motions use the altitude slow-motion control. Due to Earth’s movement, the objects will be constantly shifting out
of your view, so you will have to adjust the altitude and azimuth of your telescope to continue your observations (ig. 8).
Reference materials usually list declination coordinates in degrees, hours and minutes above or below the horizon line. Azimuth coordinates may sometimes be listed with the compass points (N, SW, ENE, etc.), but it is more commonly listed in degrees around the 360-deg plane, where north is 0°, east is 90°, etc.
Focusing
Slowly rotate the focus knobs one way or the other until the image in the eyepiece is sharp. The image usually has to be inely refocused over time due to small variations caused by temperature changes, lexures, etc. Refocusing is almost always necessary when you change an eyepiece, add or remove a Barlow lens (refractor 9a, relector 9b).
Camera adapter
To attach a camera to your telescope you may need an adapter to get the camera focused. Some refractors are designed to be used with diagonal mirrors and thus need a longer focal length when used with camera. To achieve that, simply attach an extender to the focuser of your telescope and then attach the camera with a T-adapter to the extender (ig. 10).
10
Speciications
|
Skyline |
Skyline |
Skyline |
Skyline |
Skyline |
Skyline |
Skyline |
Skyline |
Skyline |
|
|
BASE 50T |
BASE 60T |
BASE 70T |
BASE 80S |
BASE 80T |
BASE 100S |
BASE 110S |
BASE 120S |
BASE 130S |
|
|
|
|
|
|
|
|
|
|
|
|
Optical design |
refractor |
refractor |
refractor |
Newtonian |
refractor |
Newtonian |
Newtonian |
Newtonian |
Newtonian |
|
relector |
relector |
relector |
relector |
relector |
||||||
|
|
|
|
|
||||||
|
|
|
|
|
|
|
|
|
|
|
Optics ma- |
|
|
|
optical glass with coating |
|
|
|
|||
terial |
|
|
|
|
|
|
||||
|
|
|
|
|
|
|
|
|
||
|
|
|
|
|
|
|
|
|
|
|
Aperture, mm |
50 |
60 |
70 |
76 |
80 |
102 |
114 |
114 |
130 |
|
|
|
|
|
|
|
|
|
|
|
|
Focal length, |
600 |
700 |
700 |
700 |
500 |
700 |
900 |
500 |
650 |
|
mm |
||||||||||
|
|
|
|
|
|
|
|
|
||
|
|
|
|
|
|
|
|
|
|
|
Highest prac- |
|
|
|
|
|
|
|
|
|
|
tical |
100 |
120 |
140 |
152 |
160 |
204 |
228 |
228 |
260 |
|
power, x |
|
|
|
|
|
|
|
|
|
|
|
|
|
|
|
|
|
|
|
|
|
Mount |
AZ1 |
AZ1 |
AZ2 |
AZ1 |
AZ2 |
AZ2 |
AZ3 |
AZ2 |
AZ3 |
|
|
|
|
|
|
|
|
|
|
|
|
The manufacturer reserves the right to make changes to the product range and speciications without prior notice.
Care and maintenance
•Never, under any circumstances, look directly at the Sun through this device without a special ilter, or look at another bright source of light or at a laser, as this may cause PERMANENT
RETINAL DAMAGE and may lead to BLINDNESS.
•Take necessary precautions when using the device with children or others who have not read or who do not fully understand these instructions.
•Do not try to disassemble the device on your own for any reason, including to clean the mirror. For repairs and cleaning of any kind, please contact your local specialized service center.
•Protect the device from sudden impact and excessive mechanical force.
•Do not touch the optical surfaces with your ingers. To clean the telescope exterior, use only special cleaning wipes and special optics cleaning tools from Levenhuk.
•Store the device in a dry, cool place away from hazardous acids and other chemicals, away from heaters, open ire and other sources of high temperatures.
•Replace the dust cap over the front end of the telescope whenever it is not in use. This prevents dust or dirt from settling on the mirror or lens surfaces.
•Children should use the telescope under adult supervision only.
Levenhuk International Lifetime Warranty
All Levenhuk telescopes, microscopes, binoculars and other optical products, except for accessories, carry a lifetime warranty against defects in materials and workmanship. Lifetime warranty is a guarantee on the lifetime of the product on the market. All Levenhuk accessories are warranted to be free of defects in materials and workmanship for six months from date of retail purchase. The warranty entitles you to free repair or replacement of the Levenhuk product in any country where a Levenhuk oice is located if all warranty conditions are met. For further details please visit our web site: www.levenhuk.com/warranty
If warranty problems arise, or if you need assistance in using your product, contact the local Levenhuk branch.
11
 Loading...