


Levenhuk biological microscopes
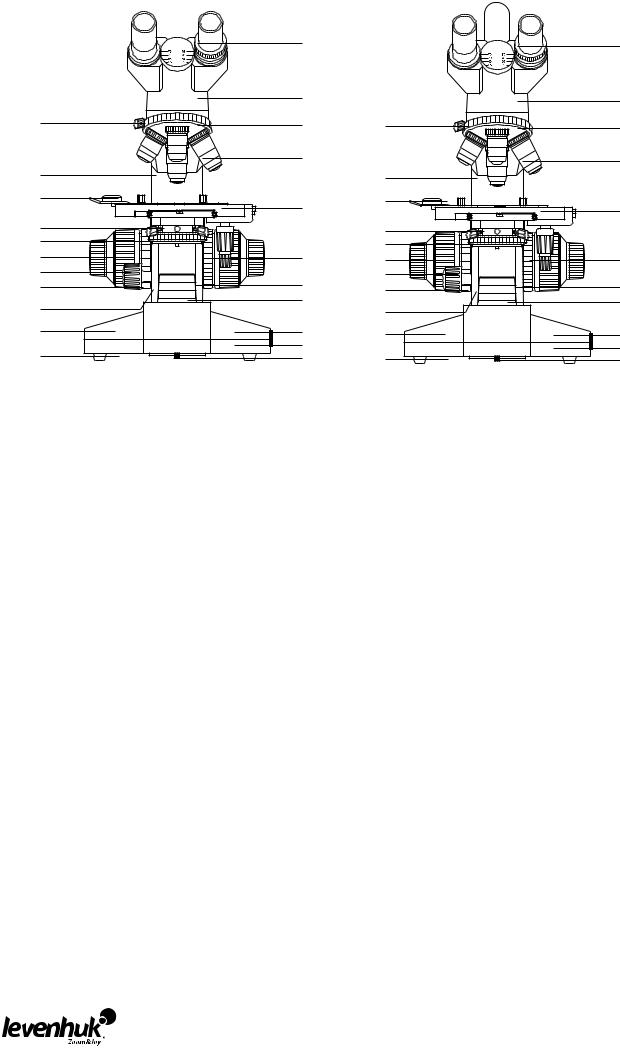
Levenhuk 850B (binocular)
Levenhuk 870T (trinocular)
Levenhuk D870T (trinocular)
User Manual Návod k použití Bedienungsanleitung Instrukcja obsługi
Инструкция по эксплуатации Посібник користувача
Radost zaostřit
Mit Vergnügen näher dran! Radość przybliżania
Приближает с удовольствием Наближує з радістю
4
6 |
7 |
9 |
12 |
13 |
14 |
15 |
17 |
19 |
22 |
1 |
|
1 |
2 |
|
2 |
3 |
4 |
3 |
5 |
5 |
|
6 |
8 |
7 |
8 |
|
9 |
|
|
|
12 |
|
|
11 |
13 |
11 |
|
16 |
14 |
16 |
|
15 |
|||
18 |
18 |
||
17 |
|||
|
|
||
20 |
19 |
20 |
|
21 |
|
21 |
|
23 |
22 |
23 |
1 |
Eyepiece |
1 |
Okulár |
1 |
Okular |
2 |
Binocular head / Trinocular head |
2 |
Binokulární hlavice / Trinokulární hlavice |
2 |
Binokularkopf / Trinokularkopf |
3 |
Revolving nosepiece |
3 |
Revolverový nosič objektivů |
3 |
Objektivrevolver |
4 |
Locking screw |
4 |
Pojistný šroub |
4 |
Verriegelungsschraube |
5 |
Objective lens |
5 |
Objektiv |
5 |
Objektivlinse |
6 |
Arm |
6 |
Rameno |
6 |
Stativarm |
7 |
Specimen holder |
7 |
Držák preparátu |
7 |
Probenhalter |
8 |
Stage |
8 |
Pracovní stolek |
8 |
Objekttisch |
9 |
Abbe condenser |
9 |
Abeův kondenzor |
9 |
Abbe-Kondensator |
10 |
Stage left/right movement control |
10 |
Regulátor koaxiálního pohybu pracovního |
10 |
Gleichachsiger Objekttischtrieb |
11 |
Iris diaphragm |
|
stolku |
11 |
Irisblende |
12 |
Fine focus knob |
11 |
Irisová clona |
12 |
Feinfokussierknopf |
13 |
Coarse focus knob |
12 |
Mikrošroub |
13 |
Grobfokussierknopf |
14 |
Condenser vertical movement control |
13 |
Makrošroub |
14 |
Kondensator-Vertikalbewegungsregler |
15 |
Focus system tension adjustment ring |
14 |
Regulátor vertikálního pohybu kondenzoru |
15 |
Fokusspannungsring |
16 |
Stage locking knob |
15 |
Regulátor mechanického napětí |
16 |
Objekttisch-Verriegelungsknopf |
17 |
Collector lens |
16 |
Pojistný šroub stolku |
17 |
Sammellinse |
18 |
Base |
17 |
Kolektor |
18 |
Sockel |
19 |
Power switch |
18 |
Stativ |
19 |
Stromschalter |
20 |
Brightness adjustment knob |
19 |
Hlavní vypínač |
20 |
Helligkeitsregler |
21 |
Rubber feet |
20 |
Regulátor jasu |
21 |
Gummifüße |
22 |
Lamp compartment locking screw |
21 |
Pryžové nožky |
22 |
Lampenfachschraube |
|
|
22 |
Pojistný šroub komory žárovky |
|
|
1 |
Okular |
1 |
Окуляр |
1 |
Окуляр |
2 |
Głowica dwuokularowa / trójokularowa |
2 |
Бинокулярная/тринокулярная насадка |
2 |
Бинокулярна/тринокулярна голівка |
3 |
Miska rewolwerowa |
3 |
Револьверная головка |
3 |
Обертальна насадка |
4 |
Śruba blokująca |
4 |
Винт фиксации обзорной головки |
4 |
Блокувальний гвинт |
5 |
Soczewka obiektywowa |
5 |
Объектив |
5 |
Лінза об'єктива |
6 |
Ramię mikroskopu |
6 |
Корпус |
6 |
Стержень |
7 |
Uchwyt na preparaty |
7 |
Зажим препарата |
7 |
Затискач зразка |
8 |
Stolik |
8 |
Предметный столик |
8 |
Столик |
9 |
Kondensor Abbego |
9 |
Конденсор Аббе |
9 |
Конденсор Аббе |
10 |
Pokrętło regulacji ruchu stolika w pionie |
10 |
Регулятор перемещения предметного |
10 |
Коаксіальне управління переміщенням |
11 |
Przysłona irysowa |
|
столика |
|
столика |
12 |
Pokrętło precyzyjnej regulacji ostrości |
11 |
Пластина ирисовой диафрагмы |
11 |
Діафрагма отвору |
13 |
Pokrętło zgrubnej regulacji ostrości |
12 |
Ручка тонкой фокусировки |
12 |
Ручка точного фокусування |
14 |
Pokrętło regulacji ruchu kondensora w |
13 |
Ручка грубой фокусировки |
13 |
Ручка грубого фокусування |
|
pionie |
14 |
Ручка подъема/опускания конденсора |
14 |
Ручка управління вертикальним |
15 |
Pierścień regulacji napięcia |
15 |
Ручка регулировки натяжения |
|
переміщенням конденсора |
16 |
Pokrętło blokujące stolika |
16 |
Ручка остановки предметного столика |
15 |
Колесо налаштування напруження |
17 |
Soczewka skupiająca |
17 |
Коллектор света |
16 |
Ручка блокування столика |
18 |
Podstawa |
18 |
Основание |
17 |
Лінза колектора |
19 |
Wyłącznik |
19 |
Переключатель |
18 |
Основа |
20 |
Pokrętło regulacji jasności |
20 |
Регулятор яркости |
19 |
Перемикач |
21 |
Gumowe nóżki |
21 |
Резиновые ножки |
20 |
Ручка регулятора яскравості |
22 |
Śruba blokująca obudowy lampy |
22 |
Винт замены лампы |
21 |
Гумові ніжки |
|
|
|
|
22 |
Блокувальний гвинт відділення лампи |

Biological microscopes Levenhuk 850B / 870T / D870T
EN
Never look directly at the Sun through optical devices or with the unaided eye! It can result in permanent eye damage or even BLINDNESS.
General Information
These microscopes are high precision instruments that may be used for clinical research and university studies; in laboratories and hospitals, technological centers and research institutes. They also perform well in medical studies in biology, bacteriology, cytology and pharmacology. Levenhuk 850B and 870T may be used for microphotography with additional accessories. The kit of Levenhuk D870T already includes an eyepiece digital camera that allows you to observe specimens on your PC monitor and save images on the hard drive.
This manual contains detailed information on the design and operational principles of your new microscope, as well as a troubleshooting and care and maintenance section. It is highly recommended that you read this manual before using the microscope for the first time. Abiding by the following instructions will ensure maximum service life of your microscope:
This instrument was designed for high-power observations of various biological specimens. It should not be used for any other purpose.
Do not try to take this microscope apart on your own, as you might damage the intricate optical system within. If the troubleshooting section of this manual did not contain a solution to your issue, you should contact the local Levenhuk service center.
Always unplug the microscope from a power source before opening the base or changing the illumination lamp. Regardless of the lamp type (halogen or incandescent), give it some time to cool down before trying to change it, and always change it to a lamp of the same type. When using the microscope, try not to use it near flammable materials or substances (benzene, paper, cardboard, plastic, etc.), as the base may heat up during use, and might become a fire hazard.
Always use the power supply with the proper voltage, i.e. indicated in the specifications of your new microscope. Plugging the instrument into a different power outlet may damage the electric circuitry of the microscope, burn out the lamp, or even cause a short circuit.
Never touch the microscope optics with your fingers, as fingerprints and smudges will significantly reduce the quality of your views.
These microscopes perform best under the following conditions: room temperature from 0 °C to 40 °C (32-104°F), relative humidity not exceeding 85%. High temperatures and humidity may cause lenses to fog from inside, thus damaging the optical system.
Any microscope is a very delicate instrument, so it should be handled with care. Even a slight impact might damage it.
Operating principle
Light emitted from a lamp passes through the condenser and illuminates a specimen. The image is magnified by the objective lens, refracted by the prism and then magnified once more by the eyepiece.
Total magnification = (objective lens magnification) x (eyepiece magnification).
The kit of these microscopes includes two WF10x eyepieces with wide field of view:
Magnification |
10x |
|
|
Field of view |
18 mm (0.71 in) |
|
|
Working distance |
24.95 mm (0.98 in) |
|
|
Objective lenses
Eyepiece
Prism
Objective lens
Specimen
Condenser
Lamp
The standard kit of these microscopes includes the following DIN achromatic objective lenses: 4x, 10x, 40x (springloaded) and 100x (spring-loaded, oil immersion). When using the 100x objective lens, both the lens and the cover glass of the observed specimen should be immersed in a transparent oil of high refractive index. This displaces the air and, as a result, increases the quality of your views. If some air bubbles are still present, you may have to rotate the revolving nosepiece once, or add some more immersion oil. Upon finishing the high-power observations, you should wipe the objective lens and the cover glass clean. Otherwise, the oil will dry and reduce the quality of subsequent views.
DIN achromatic objective lens |
4X |
10X |
40X |
100X |
Magnification |
4 |
10 |
40 |
100 |
Aperture |
0.1 mm |
0.25 mm |
0.65 mm |
1.25 mm |
Working distance |
36.9 mm (1.45 in) |
7.116 mm (0.28 in) |
0.632 mm (0.025 in) |
0.158 mm (0.006 in) |
Comments |
|
|
Spring-loaded |
Spring-loaded, oil immersion |

Binocular head
The binocular head of these microscopes may be inclined at a 30° angle and rotated 360 degrees. The interpupillary distance adjustment range is 55–75 mm (2.16–2.95 in), the diopter adjustment range is from +5 to -5 diopters on each eyepiece.
Revolving nosepiece
The state of the art nosepiece provides for smooth rotation and easily locks in place on the desired objective lens. The parfocal objective lenses used in these microscopes provide for simple switching from one magnification to the other, without having to refocus your view over and over again.
Stage
These microscopes are equipped with a 140 mm x 155 mm (5.5 in x 6.1 in) stage with coaxial controls. Press the stage clip lever and place a slide with a specimen on the stage. Release the lever and it will securely lock the slide in place. You can move the stage horizontally by using the coaxial controls below the stage. It moves within 70 mm (2.76 in) range in 0.1 mm (0.004 in) increments.
Abbe condenser
The numerical aperture (N.A.) of this high quality condenser is 1.25. Its position may be adjusted by turning the locking screws, without any additional tools:
rotate the revolving nosepiece until either a 4x or a 10x objective lens is locked in place; rotate the iris diaphragm to reduce its diameter;
lower the condenser until the diaphragm image is somewhat sharp; focus the view by loosening or tightening the locking screws.
The condenser has been aligned with the objective lens during production. If this alignment hasn't been performed, the field of view will be very irregular, with parts of it very bright, and others very dark. The rack-and-pinion mechanism moves the condenser up and down within a 20 mm (0.79 in) range. Generally, you would want to raise the condenser when using high-power objective lenses (40x, 100x) and lower it with low-power objective lenses (4x, 10x). The highest position of the condenser is locked at 0.2 mm away from the stage.
If the condenser-objective lens alignment has somehow gone awry, you have to perform the following operations: loosen the nut on the locking screw;
place a slide with a specimen on the stage; raise the condenser to its highest position;
tighten the locking screw until the condenser touches the bottom of the stage; retighten the nut on the locking screw.
Rotate the iris diaphragm to adjust its diameter in 2–30 mm (0.08–1.18 in) range, so that it corresponds with the N.A. of the objective lens currently in use. When the iris diameter is approximately 70–80% of the objective lens N.A., the observed image is sharp and clear. Remove one of the eyepieces and look through the tube. You will see the iris diaphragm. You can use a color filter with the diaphragm for additional contrast and detail on the image. The filters come in blue, green or yellow.
Focus system
The coarse and fine focus systems are operated with a rack-and-pinion mechanism. The coaxial design of the focus system allows you to adjust coarse and fine focus without any difficulties. Fine focus system adjusts in 0.002 mm (0.00008 in) increments; total adjustment range is 25 mm (0.98 in). You can use the coarse focus knob to quickly raise or lower the stage, and fine-tune the view with the fine focus knob.
Upon moving the stage into a desired position, you can secure it in place with the stage locking screw. Rotate it clockwise to lock the stage in its current position. It will remain in this position until you loosen the locking screw. If you are observing a large and heavy specimen, you might want to increase the coarse focus system knob tension. Rotate the adjustment ring on the focus knob and the stage will be lowered slowly and steadily, even with heavy specimens.
Illumination
Generally, a 6V/20W halogen lamp is used in the illumination system of a microscope. To adjust its brightness, rotate the corresponding knob, to better illuminate the observed specimen. The illumination should not be too bright with lowpowered objective lenses and vice versa. When changing the lamp to a new one, make sure to align it along the optical axis, otherwise, the quality of your views will be significantly decreased.
To change the old lamp, loosen the screw on the bottom of the base, remove the cover and replace the lamp.
Assembly
Unpack your new microscope with great care. Check if all the parts and accessories are present. Note that some parts might have been disassembled for easier shipping, therefore, you will have to assemble them before you can begin your observations.

 Assemble the binocular head. Loosen the locking screw and remove the plastic cover from the arm. Remove the plastic cover from the binocular head. Attach the binocular head to the arm and secure it in place with a locking screw. Do not try to loosen the other two screws on the arm.
 Assemble objective lenses. Usually, we assemble the objective lenses on the factory lines, but in some models, they are
 shipped separately. First, remove the dust cap from the nosepiece and take out the objective lenses from their packaging. Attach the objective lenses to the nosepiece in ascending order (from lowest magnification to highest).
 Assemble eyepieces. Remove the dust cap from the tube and attach the eyepieces.
Using the microscope
 Choose a spot, where the microscope will not be in direct sunlight. Try to move as far away from windows as possible and do not point eyepieces toward windows. Direct sunlight may damage the optics and lower the contrast of images.
 Place a slide with a specimen on the stage and lock it in place. Make sure that the cover glass faces upwards, otherwise, you might have problems focusing your view at higher magnifications (40x or 100x).
 Use a low-power objective lens (4x or 10x) and turn the illumination on.
 Using the coaxial stage movement controls, position the slide, so that the specimen is centered above the condenser lens.
 Focus your view with the coarse focus knob. It is much easier to focus your view at lower magnifications, so that when you use a high-power objective lens, you will only have to fine-tune the focus with the fine focus knob.
 Now that your view is focused, rotate the revolving nosepiece to a high-power objective lens. Thanks to the parfocal lenses in these microscopes, you will only have to use the fine focus knob to bring your views into focus. It has to be mentioned that 4x and 10x objective lenses will never touch the surface of the slide, due to the built-in limiters. And although 40x and 100x may reach the slide, thanks to their spring-loaded construction, they will never break it.
 If you cannot focus your view, you might want to try changing the diameter of the iris diaphragm, so that it corresponds to the N.A. of the objective lens used.
Troubleshooting
If you are experiencing some problems with your instrument during its service, refer to this section for possible solutions. However, if this doesn't help, you should contact your local service center. Remember, do not try to take the microscope apart, as this will make your warranty null and void, as well as may lead to irreversible damage to the intricate optical system of the instrument.
Problems with the microscope:
Problem |
Possible cause |
Solution |
|
|
|
Impossible to focus the view |
The stage is too low |
Raise the stage with the coarse focus knob |
|
|
|
The objective lens often damages slides |
The stage is too high |
Lower the stage with the fine focus knob |
|
|
|
Impossible to focus the view when using |
The slide may have been placed upside |
Place the slide properly or opt for a |
high-power objective lenses |
down, or the cover glass is too thick |
standard cover glass (0.17 mm (0.007 in) |
|
|
thick) |
When rotating the nosepiece, objective |
The cover glass is too thick |
Opt for a standard cover glass (0.17 mm |
lenses always scrape the surface |
|
(0.007 in) thick) |
Impossible to move the slide smoothly |
The stage clips are not locked |
Lock the stage clips manually |
|
|
|
Incomplete binocular vision |
Incorrect interpupillary distance |
Adjust the interpupillary distance |
|
|
|
|
Incomplete diopter adjustment |
Readjust diopter settings |
|
|
|
|
Insufficient brightness |
Check the illumination source and readjust |
|
|
the brightness |
Problems with the optical system:
Problem |
Possible cause |
Solution |
|
|
|
|
|
The field of view is |
The objective lens is not locked in place |
Rotate the revolving nosepiece to lock the desired |
|
reduced or not fully |
|
lens in place |
|
illuminated |
The optical axis is not aligned |
Readjust the illumination lamp |
|
|
|
|
|
|
The optics of the objective lens is dirty or dusty |
Clean the objective lens |
|
|
|
|
|
The field of view is |
The optics of the objective lens is dusty or dirty |
Clean the objective lens |
|
reduced or not fully |
|
|
|
The surface of the slide is dusty or dirty |
Clean the slide |
||
illuminated |
|
|
|
The condenser lens is too low |
Raise the condenser lens |
||
|
|||
|
|
|
|
Poor quality of views: |
The specimen is not protected with cover glass |
Put the cover glass over the specimen |
|
reduced contrast, blurred |
|
|
|
The cover glass is too thick or too thin |
Opt for a standard cover glass (0.17 mm (0.007 in) |
||
details, etc. |
|||
|
thick) |
||
|
|
||
|
The slide is placed upside down |
Place the slide correctly |
|
|
|
|
|
|
The upper lens of the objective lens is dirty |
Clean the lens |
|
|
|
|
|
|
The optics of the objective lens is dirty |
Clean the objective lens |
|
|
|
|
|
|
Immersion oil was not used at high magnifications |
Add immersion oil |
|
|
|
|
|
|
Air bubbles are present in the immersion oil |
Rotate the revolving nosepiece or add some more oil |
|
|
|
|

Poor quality of views: |
Using immersion oil with low refractive index |
Use the required immersion oil with high refractive |
reduced contrast, blurred |
|
indices |
details, etc. |
|
|
Prism surface is dirty |
Clean the prism |
|
|
|
|
|
Iris diaphragm diameter is too wide or too small |
Adjust the diameter |
|
|
|
|
Condenser lens is too low |
Raise the condenser lens |
|
|
|
One side of the field of |
Condenser lens is placed incorrectly or is inclined. |
Adjust the condenser lens |
view is darker than the |
|
|
The objective lens is not aligned to the optical axis |
Rotate the revolving nosepiece until the objective |
|
other |
|
lens locks in place |
The view is constantly |
The slide is not locked on the stage |
The objective lens is not aligned to the optical axis |
shifting during |
|
|
The objective lens is not aligned to the optical axis |
Rotate the revolving nosepiece until the objective |
|
observations |
|
lens locks in place |
The observed image is |
A blue filter is not used |
Use the blue filter |
yellow |
|
|
Condenser lens is too low |
Iris diaphragm diameter is too low |
Adjust the diameter |
|
|
|
|
Condenser lens is too low |
Raise the condenser lens |
|
|
|
|
The optics of the objective lens is dirty |
Clean the objective lens |
|
|
|
Problems with electric parts:
Problem |
Possible cause |
Solution |
|
|
|
|
|
Illumination does not |
Power cable has disconnected |
Check the power cable |
|
work, even though it is |
|
|
|
The lamp is not installed |
Install the lamp |
||
turned on |
|||
|
|
||
|
The fuse is blown |
Replace the lamp or the fuse |
|
|
|
|
|
Lamps burn out quickly |
Incorrect lamp is being used |
Use the standard lamp |
|
|
|
|
|
|
Lamp voltage is too high |
Lamp voltage is too high |
|
|
|
|
|
The illumination is too |
Incorrect lamp is being used |
Use the standard lamp |
|
dim |
|
|
|
The power source voltage is too low |
Lamp voltage is too high |
||
|
|||
|
|
|
|
The lamp keeps blinking, |
Electrical surges |
Adjust the power source |
|
brightness keeps changing |
|
|
|
The filament is about to burn out |
Change the lamp |
||
|
|
|
|
|
Power cable has disconnected |
Check the power cable |
|
|
|
|
Care and maintenance
Unpack the microscope with great care, make sure nothing falls on the ground;
All the optics are calibrated on the factory line, do not try to take them apart on your own;
The binocular head and the focus system are high-precision elements, and should not be taken apart. If you have any problems with either of them, contact our local service center;
All mechanical elements have to be protected from dust; all the mechanisms should be greased regularly; all the optical elements should be kept clean;
Store your microscope in a clean, dry place. Upon finishing your observations, replace the dust cover and unplug the instrument from the power source.
Digital camera
Levenhuk D870Т comes with an 8 Mpx C800 NG digital camera.
The camera allows you to observe specimens in fine detail and true colors on your PC monitor and save images on the hard drive.
The special software that comes in the kit allows you to view and edit the resulting images. Supported file formats include: *.bmp, *.jpg,*.jpeg,*.png, *.tif, *.tiff, *.gif, *.psd, *.ico, *.emf, *.wmf, etc.
Connect the camera to your PC via a USB cable that also acts as a power cable, so you do not have to plug it into a power source.
Compatible OS: C800 NG – Windows XP/Vista/7/8.
Camera model |
C800 NG |
Max. Resolution (for still images) |
3264x2448 |
Megapixels |
8.0 |
Sensor |
1/2.2° CMOS |
Dimensions (cylined unit maximum diameter) |
50 mm (1.97 ") |
Pixel size |
1.67μm x 1.67μm |
Sensitivity, V/lux.sec@550 nm |
0.31 |
Mounting location |
Eyepiece tube (replaces the eyepiece) |

Image format |
BMP, TIFF, JPG, PICT, SFTL, etc. |
Field of view diameter |
18 mm (0.71 in) |
Spectral range |
400 nm – 650 nm |
Exposure |
ERS |
White balance |
Auto/manual |
Exposure control |
Auto/manual |
Software image control |
Image size, brightness, exposure control |
Interface |
USB 2.0, 480 Mb/s |
System requirements |
Windows XP/Vista/7/8; USB port |
Software |
Software for image viewing and editing |
Shell |
Metal cylinder, painted black |
Power source |
USB 2.0 cable |
Temperature range |
-30 – 70 °C / -22–158 °F |
Generally, when using a low-power objective lens (4x, 10x) the image on the PC monitor will be too bright. In this case you can:
reduce the illumination brightness; reduce the iris diaphragm diameter; lower the Abbe condenser lens.
When using a high-power objective lens (40x, 100x) the image on the PC monitor will be too dark. In this case you can: increase the illumination brightness;
increase the iris diaphragm diameter' raise the Abbe condenser lens.
Caution
Never look at the sources of bright light or lasers through the camera or the microscope: it will cause PERMANENT RETINAL DAMAGE and may lead to BLINDNESS!
Do not try to take the camera or the microscope apart on your own.
Protect the camera and the microscope from moisture; do not use them in rainy weather. Protect the camera and the microscope from impacts or excessive pressure.
Do not overtighten the locking screws.
Keep the camera and the microscope away from hazardous environments, home and care heaters, incandescent lamps or open fire.
When cleaning the lenses, first blow any dust or debris off the surface or wipe the off with a soft brush. Then wipe the lens with a soft cleaning cloth slightly damp with spirits or ether.
Never touch the optics with your fingers.
International Warranty
The Vendor guarantees that the quality of the Levenhuk product purchased complies with the technical documentation requirements on conditions that the consumer observes rules of transportation, storage conditions and operating instructions.
Levenhuk Ltd. warrants the product against defects in materials.
During the warranty period the Buyer can return the defect product to the Vendor or to Levenhuk service center. Levenhuk Ltd. will repair or replace the defect product at its own discretion.
No claims are accepted in case the properly filled warranty slip is absent or contains corrections, or if the defect product has not been provided by the Buyer. The manufacturer or the seller is not liable for any damages caused by misuse of the product. No guarantee is provided in cases the product was used for purposes other than that intended or has mechanical damages, scratches, cracks, optics damages, as well as in cases the product is broken-down due to impact damages, squeezing or stretching or the product has been disassembled or repaired by unauthorized personnel.
This warranty does not cover components and/or accessories with limited use period, batteries, etc.
The period of warranty is 3 (three) years beginning on the date of purchase. Please keep the warranty slip along with your receipt.
For any warranty services please contact the local Levenhuk branch.
Levenhuk Worldwide:
USA: www.levenhuk.com
Czech Republic: www.levenhuk.cz
Russia: www.levenhuk.ru
Ukraine: www.levenhuk.com.ua
EU: www.levenhuk.eu
Purchase date ___________________________ Signature __________________________ Stamp

Biologické mikroskopy Levenhuk 850B / 870T / D870T
CZ
Nikdy se nedívejte tímto přístrojem ani nechráněným okem přímo do slunce! Mohlo by to tak dojít k trvalému poškození zraku nebo dokonce OSLEPNUTÍ.
Obecné informace
Tyto mikroskopy jsou vysoce přesné přístroje, které lze použít pro klinický výzkum a univerzitní studie, v laboratořích a v nemocnicích, technologických centrech i ve výzkumných institucích. Dobré uplatnění nacházejí i při medicínských studiích v biologii, bakteriologii, cytologii a farmakologii. Levenhuk 850B a 870T lze s dalším příslušenstvím použít pro mikrofotografii. Součástí soupravy mikroskopu Levenhuk D870T je i digitální fotoaparát, který vám umožňuje místo okuláru pozorovat preparáty na monitoru vašeho počítače a ukládat snímky na pevném disku.
Tento návod obsahuje podrobné informace o konstrukci a provozních principech vašeho nového mikroskopu, včetně kapitoly týkající se odstraňování závad, péče a údržby. Důrazně vám doporučujeme, abyste si tento návod přečetli ještě před prvním použitím mikroskopu. Životnost svého mikroskopu prodloužíte na maximum dodržováním následujících pokynů:
 Tento přístroj byl navržen pro náročná pozorování různých biologických preparátů. Neměl by se používat k žádnému jinému účelu.
 Nepokoušejte se tento mikroskop rozebírat, mohli byste poškodit složitý optický systém uvnitř. Pokud kapitola zabývající se odstraňováním závad v tomto návodu neobsahuje řešení vašeho problému, obraťte se na své místní servisní středisko Levenhuk.
 Před otevřením stativu nebo výměnou žárovky osvětlení vždy mikroskop odpojte od zdroje napájení. Bez ohledu na typ žárovky (halogenová nebo obyčejná) ji nechejte před výměnou nějakou dobu vychladnout a vždy ji vyměňujte za žárovku stejného typu. Mikroskop nepoužívejte v blízkosti hořlavých materiálů nebo látek (benzín, papír, lepenka, plast apod.), neboť by se mohly při práci zahřívat, a představovat tak požární riziko.
 Vždy používejte napájení o správném napětí tak, jak je uvedeno ve specifikacích vašeho nového mikroskopu. Připojení přístroje do odlišné zásuvky může vést k poškození elektronických obvodů mikroskopu, spálení žárovky nebo dokonce ke vzniku zkratu.
 Optiky mikroskopu se nedotýkejte svými prsty, neboť otisky prstů a šmouhy výrazně snižují kvalitu obrazu.
 Tyto mikroskopy pracují nejlépe za následujících podmínek: pokojová teplota mezi 0°C a 40°C, relativní vlhkost do 85%. Vysoké teploty a vlhkost mohou způsobit zamlžení čoček zevnitř, a tím i poškození optického systému.
 Každý mikroskop je velmi choulostivý přístroj, a je proto nutné s ním zacházet s náležitou péčí. K jeho poškození může dojít i po lehkém nárazu.
Princip činnosti
Světlo vydávané žárovkou prochází kondenzorem a osvětluje preparát. Obraz je zvětšen objektivem, odráží se v hranolu a nakonec ještě jednou zvětšen okulárem.
Celkové zvětšení = (zvětšení objektivu) x (zvětšení okuláru)
Souprava těchto mikroskopů obsahuje dva okuláry WF10x se širokým zorným polem:
Zvětšení |
10 |
Zorné pole |
18 mm |
|
|
Pracovní vzdálenost |
24,95 mm |
|
|
Objektivy
Okulár
Optický hranol
Objektiv
Preparát
Kondenzor
Žárovka
Standardní sada těchto mikroskopů obsahuje následující achromatické objektivy dle standardu DIN: 4x, 10x, 40x (odpružené) a 100x (odpružené, imerze v oleji). Při použití objektivu 100x by čočka i krycí sklíčko pozorovaného preparátu měly být ponořeny do transparentního oleje s vysokým indexem lomu. Ten vytlačí vzduch, a tím zvýší kvalitu obrazu. Pokud se stále objevují vzduchové bubliny, budete zřejmě muset jednou otočit revolverovým nosičem objektivů nebo přidat více imerzního oleje. Po skončení pozorování při vysokém zvětšení je potřeba čočku objektivu a krycí sklíčko do sucha otřít. Jinak olej zaschne a způsobí snížení kvality obrazu při dalším pozorování.
Achromatický objektiv dle standardu DIN |
4X |
10X |
40X |
100X |
Zvětšení |
4 |
10 |
40 |
100 |
Apertura |
0,10 mm |
0,25 mm |
0,65 mm |
1,25 mm |
Pracovní vzdálenost |
36,9 mm |
7,116 mm |
0,632 mm |
0,158 mm |
Poznámky |
|
|
Odpružení |
Odpružení, imerzní olej |

Binokulární hlavice
Binokulární (Levenhuk 850B) nebo trinokulární (Levenhuk 870T, D870T) hlavici tohoto mikroskopu lze naklonit v úhlu 30° a otočit o 360 stupňů. Vzdálenost mezi tubusy lze nastavit v rozsahu 55-75 mm, rozsah dioptrické korekce je od +5 to -5 dioptrií na každém okuláru.
Revolverový nosič objektivů
Tento moderní nosič nabízí možnost plynulého otáčení a snadno se nastavuje poloha požadovaného objektivu. Parfokální objektivy používané u těchto mikroskopů nabízejí snadný přechod od jednoho zvětšení k jinému, aniž by bylo potřeba znovu zaostřovat obraz.
Pracovní stolek
Tyto mikroskopy jsou vybaveny stolkem 140 mm x 155 mm s koaxiálními regulátory nastavení. Stiskněte páčku svorky stolku a na stolek položte sklíčko s preparátem. Páčku uvolněte a nechejte ji zajet do správné polohy. Stolkem můžete pohybovat v horizontálním směru pomocí koaxiálních regulátorů pod stolkem. Rozsah pohybu stolku je 70 mm v krocích po 0,1 mm.
Abbeův kondenzor
Numerická apertura (N.A.) tohoto vysoce kvalitního kondenzoru je 1,25 mm. Jeho polohu lze nastavit otáčením stavěcích šroubů, aniž by byly potřeba jakékoli další nástroje:
 pootočením revolverového nosiče nastavte objektiv 4x nebo 10x;
 pootočením irisové clony zmenšete její průměr;
 kondenzor spouštějte dolů, dokud nebude obraz clony částečně ostrý;
  utažením nebo povolením pojistných šroubů zaostřete obraz.
Kondenzor byl ve výrobě seřízen vůči čočce objektivu. Kdyby toto seřízení nebylo provedeno, bylo by zorné pole silně nepravidelné a střídaly by se v něm velmi jasné oblasti s velmi tmavými. Hřebenový převod pohybuje kondenzorem nahoru a dolů v rozsahu 20 mm. Obecně budete kondenzor potřebovat zvednout při použití objektivů s vysokým zvětšením (40x, 100x) a spustit dolů při použití objektivů s nízkým zvětšením (4x, 10x). Nejvyšší poloha kondenzoru je zafixována na 0,2 mm od pracovního stolku.
Pokud došlo k narušení seřízení kondenzoru a objektivu, musíte provést následující činnosti: uvolněte matici na pojistném šroubu;
na pracovní stolek umístěte sklíčko s preparátem; kondenzor zvedněte do nejvyšší polohy;
pojistný šroub utahujte, dokud se kondenzor nedotkne spodní strany pracovního stolku; znovu utáhněte matici na pojistném šroubu.
Otáčením nastavte irisovou clonu na průměr v rozsahu 2-30 mm tak, aby byla v souladu s N.A. použitého objektivu. Jakmile je průměr clony zhruba na úrovni 70-80% N.A. objektivu, je pozorovaný obraz ostrý a jasný. Vyjměte jeden z okulárů a podívejte se do tubusu. Uvidíte irisovou clonu. Pro vyšší kontrast a detailnější prokreslení obrazu můžete použít barevný filtr s clonou. Tyto filtry se dodávají v modré, zelené nebo žluté barvě.
Systém zaostřování
Systémy hrubého a jemného zaostřování jsou založeny na hřebenovém mechanismu. Koaxiální konstrukce systému zaostřování vám umožňuje provést bez jakýchkoli problémů hrubé i jemné zaostření. Systém jemného zaostřování provádí regulaci v krocích po 0,002 mm, celkový rozsah nastavení je 25 mm. K rychlému zvednutí nebo spuštění stolku můžete použít makrošroub a obraz následně přesně doostřit pomocí mikrošroubu.
Po přesunutí stolku do požadované polohy jej můžete zafixovat pomocí aretačního šroubu stolku. Zafixování stolku ve stávající poloze provedete otočením tohoto šroubu ve směru hodinových ručiček. V této poloze stolek zůstane, dokud aretační šroub neuvolníte. Při pozorování velkého a těžkého preparátu může být potřeba zvýšit mechanické napětí na makrošroubu. Otočte kroužkem regulace mechanického napětí na zaostřovacím šroubu a stolek se bude i s těžkými preparáty pohybovat pomalu a plynule.
Osvětlení
V osvětlovacím systému mikroskopu se obecně používá halogenová žárovka 6V/20W. Pomocí příslušného šroubu lze regulovat její jas tak, aby byl pozorovaný preparát co nejlépe osvětlen. Při použití slabších objektivů by osvětlení mělo být tlumenější a opačně. Při výměně žárovky za novou se ujistěte, zda je seřízena podle optické osy, jinak by mohlo dojít k výraznému snížení kvality obrazu.
Při výměně staré žárovky nejprve uvolněte šroub na stativu, pak sejměte kryt a vyměňte žárovku.
Montáž
Svůj nový mikroskop velmi opatrně vybalte. Zkontrolujte, zda balení obsahuje všechny díly a příslušenství. Vezměte na vědomí, že některé součásti mohly být v zájmu snadnější přepravy demontovány, proto je budete muset před zahájením svých pozorování sestavit.

Montáž binokulární hlavice. Uvolněte pojistný šroub a z ramene sejměte plastový kryt. Z binokulární hlavice sejměte plastový kryt. Binokulární hlavici připevněte k rameni a zajistěte ji na místě pojistným šroubem. Nepokoušejte se uvolnit dva zbývající šrouby na rameni.
Montáž objektivu. Objektivy obvykle sestavujeme ve výrobě, ale u některých modelů se dodávají samostatně. Nejprve z revolverového nosiče sejměte prachovku a vyjměte objektiv z obalu. Objektivy nasazujte na nosič v pořadí od nejmenšího k nejvyššímu zvětšení.
Montáž okulárů. Z tubusu sejměte prachovku a nasaďte okuláry.
Práce s mikroskopem
 Zvolte si místo, na němž nebude mikroskop vystaven přímému slunečnímu záření. Snažte se co nejvíce vzdálit od oken a nenatáčejte okuláry směrem k oknům. Přímé sluneční světlo může poškodit optiku a snížit kontrast obrazu.
 Na pracovní stolek položte sklíčko s preparátem a upevněte je na místě. Ujistěte se, zda je krycí sklíčko nahoře, jinak byste mohli mít problémy se zaostřením při vyšším zvětšení (40x nebo 100x).
 Použijte slabší objektiv (4x nebo 10x) a zapněte osvětlení.
 Pomocí koaxiálních regulátorů pohybu pracovního stolku přesuňte preparát do správné polohy tak, aby byl preparát vycentrován nad čočkou kondenzoru.
 Makrošroubem zaostřete obraz. Při menším zvětšení lze obraz zaostřit daleko snadněji, takže pokud následně použijete silnější objektiv, bude k jemnému zaostření stačit použít mikrošroub.
 Teď, když je obraz zaostřen, pootočením revolverového nosiče nastavte objektiv o vysokém zvětšení. Díky parfokálním čočkám použitým v těchto mikroskopech bude k zaostření obrazu nyní stačit mikrošroub. Díky zabudovaným omezovačům se objektivy 4x a 10x nikdy nedotknou povrchu krycího sklíčka preparátu. Objektivy 40x a 100x se sice mohou povrchu krycího sklíčka preparátu dotknout, díky odpružené konstrukci je ale nikdy nepoškodí.
 Nedaří-li se vám obraz zaostřit, můžete se pokusit změnit průměr irisové clony tak, aby odpovídala hodnotě N.A. použitého objektivu.
Odstraňování závad
Jestliže během práce s tímto přístrojem zaznamenáte nějaké problémy, pokuste se najít jejich řešení v této kapitole. Pokud se to ale nepodaří, měli byste se obrátit na místní servisní středisko. Mějte na paměti, že se nemáte pokoušet mikroskop rozebírat, neboť by tím pozbyla platnost vaše záruka a mohlo by to vést k nevratnému poškození choulostivého optického systému tohoto přístroje.
Problémy s mikroskopem:
Problém |
Příčina |
Řešení |
|
|
|
Obraz nelze zaostřit |
Pracovní stolek je příliš nízko |
Pomocí makrošroubu stolek zvedněte |
|
|
|
Objektiv často poškozuje |
Pracovní stolek je příliš vysoko |
Pomocí mikrošroubu spusťte stolek dolů |
sklíčka |
|
|
Při použití silných |
Preparát je možná vzhůru nohama nebo je krycí |
Uložte preparát správně nebo zvolte standardní krycí |
objektivů nelze obraz |
sklíčko příliš tlusté |
sklíčko (tloušťky 0,17 mm) |
zaostřit |
|
|
|
|
|
Při otáčení revolverového |
Krycí sklíčko je příliš tlusté |
Zvolte standardní krycí sklíčko (tloušťky 0,17 mm) |
nosiče objektivy vždy |
|
|
poškrábou povrch |
|
|
|
|
|
Preparátem nelze plynule |
Svorky stolku nejsou zajištěny |
Svorky zajistěte manuálně |
pohybovat |
|
|
|
|
|
Neúplné binokulární vidění |
Nesprávná vzdálenost tubusů: |
Upravte vzdálenost mezi tubusy |
|
|
|
|
Neúplná dioptrická korekce |
Upravte nastavení dioptrické korekce |
|
|
|
|
Nedostatečný jas |
Zkontrolujte zdroj osvětlení a upravte jas |
|
|
|
Problémy s optickým systémem:
Problém |
Příčina |
Solution |
|
Zorné pole není úplné |
Objektiv není na svém místě |
Pootočte revolverový nosič, dokud požadovaný |
|
nebo není plně osvětlené |
|
objektiv nezapadne na své místo |
|
|
Optická osa není správně seřízena |
Upravte polohu žárovky osvětlení |
|
|
|
|
|
|
Optika objektivu je znečištěna nebo zaprášená |
Vyčistěte čočku objektivu |
|
|
|
|
|
V zorném poli jsou |
Optika objektivu je znečištěna nebo zaprášená |
Vyčistěte čočku objektivu |
|
prachové tečky |
|
|
|
Povrch sklíčka preparátu je zaprášený nebo |
Sklíčko vyčistěte |
||
|
znečištěný |
|
|
|
|
|
|
|
Čočka kondenzoru je příliš nízko |
Zvedněte kondenzor nahoru |
|
|
|
|
|
Spatná kvalita obrazu: |
Preparát není chráněn krycím sklíčkem |
Položte přes preparát krycí sklíčko |
|
snížený kontrast, |
|
|
|
Krycí sklíčko je příliš tlusté nebo příliš tenké |
Zvolte standardní krycí sklíčko (tloušťky 0,17 mm) |
||
rozmazané detaily atd. |
|||
|
|
||
|
Preparát je uložen vzhůru nohama |
Položte preparát do správné polohy |
|
|
|
|
|
|
Horní čočka objektivu je znečištěná |
Čočku vyčistěte |
|
|
|
|
|
|
Optika objektivu je znečištěna |
Vyčistěte objektiv |
|
|
|
|
Spatná kvalita obrazu: |
Při vysokém zvětšení nebyl použit imerzní olej |
Přidejte imerzní olej |
|
snížený kontrast, |
|
|
|
rozmazané detaily atd. |
|
|
|
V imerzním oleji jsou vzduchové bubliny |
Otočte revolvingový nosič nebo přidejte trochu oleje |
||
|
|||
|
|
|
|
|
Použití imerzního oleje s nízkým indexem lomu |
Použijte předepsaný imerzní olej s vysokým indexem lomu |
|
|
|
|
|
|
Povrch hranolu je znečištěný |
Vyčistěte hranol |
|
|
|
|
|
|
Průměr irisové clony je příliš široký nebo příliš |
Upravte průměr |
|
|
malý |
|
|
|
|
|
|
|
Čočka kondenzoru je příliš nízko |
Zvedněte kondenzor nahoru |
|
|
|
|
|
Jedna strana zorného pole |
Kondenzor je v nesprávné poloze nebo je |
Upravte polohu kondenzoru |
|
je tmavší než druhá |
nakloněný. |
|
|
|
Objektiv není seřízen vůči optické ose |
Pootočte revolverovou hlavici, dokud objektiv nezapadne na |
|
|
|
své místo |
|
Obraz se při pozorování |
Preparát není na stolku dobře upevněn |
Preparát upevněte pomocí svorek na stolku |
|
neustále posouvá |
|
|
|
Objektiv není seřízen vůči optické ose |
Pootočte revolverovou hlavici, dokud objektiv nezapadne na |
||
|
|
své místo |
|
Pozorovaný obraz je žlutý |
Není nasazen modrý filtr |
Použijte modrý filtr |
|
|
|
|
|
Zorné pole je příliš tmavé |
Průměr irisové clony je příliš malý |
Upravte průměr |
|
|
|
|
|
|
Kondenzor je příliš nízko |
Zvedněte kondenzor nahoru |
|
|
|
|
|
|
Optika objektivu je znečištěna |
Vyčistěte objektiv |
|
|
|
|
Problémy související s elektrickými součástmi:
Problém |
Příčina |
Řešení |
|
|
|
|
|
Osvětlení nefunguje, i |
Napájecí kabel je odpojený |
Check the power cable |
|
když je zapnuté |
|
|
|
Není instalována žárovka |
Install the lamp |
||
|
|||
|
|
|
|
|
Je spálená pojistka |
Replace the lamp or the fuse |
|
|
|
|
|
Žárovka se rychle spálí |
Je použita nesprávná žárovka |
Použijte standardní žárovku |
|
|
|
|
|
Osvětlení je příliš |
Je použita nesprávná žárovka |
Použijte standardní žárovku |
|
tlumené |
|
|
|
Napětí napájecího zdroje je příliš nízké |
Upravte napájecí zdroj |
||
|
|||
|
|
|
|
Žárovka neustále bliká, |
Napěťové rázy |
Ke stabilizaci napájení použijte UPS |
|
jas kolísá |
|
|
|
Vlákno je těsně před přepálením |
Vyměňte žárovku |
||
|
|
|
|
|
Napájecí kabel je odpojený |
Zkontrolujte napájecí kabel |
|
|
|
|
Péče a údržba
Mikroskop vybalujte velmi opatrně a dbejte na to, aby nic neupadlo na podlahu; Veškerá optika se kalibruje ve výrobě, nepokoušejte se ji sami rozebírat;
Binokulární hlavice a systém zaostřování jsou velmi přesné součásti a nemají se rozebírat. Máte-li s nimi nějaké problémy, obraťte se na naše lokální středisko;
Veškeré mechanické součásti se musí chránit před prachem; veškeré mechanismy by se měly pravidelně mazat; veškeré optické prvky je potřeba udržovat v čistotě;
Svůj mikroskop ukládejte na čistém, suchém místě. Po skončení pozorování nasaďte prachovku a přístroj odpojte od zdroje napájení.
Digitální fotoaparát
Levenhuk D870T je vybaven digitálním fotoaparátem C800 NG 8 Mpx.
Tento fotoaparát vám umožňuje na monitoru vašeho počítače pozorovat jemné detaily preparátů ve skutečných barvách a snímky ukládat na pevném disku.
Speciální softwarová aplikace, která je součástí soupravy, vám umožní prohlížet si a upravovat výsledné snímky. Podporované formáty jsou: *.bmp, *.jpg,*.jpeg,*.png, *.tif, *.tiff, *.gif, *.psd, *.ico, *.emf, *.wmf atd.
Pomocí kabelu USB, který zároveň slouží jako napájecí kabel, připojte fotoaparát k počítači. To znamená, že fotoaparát nebudete muset připojovat k napájecímu zdroji.
Kompatibilní operační systémy: |
C800 NG – Windows XP/Vista/7/8. |
|
|
|
|
Model fotoaparátu |
|
C800 NG |
Max. rozlišení (fotografie) |
|
3264x2448 |
Rozlišení v megapixelech |
|
8.0 |
Snímač |
|
1/2.2° CMOS |
Rozměry (maximální průměr válce), mm |
50 |
|
Velikost pixelu |
|
1,67μm x 1,67μm |
Citlivost, V/lux-sec při 550 nm |
|
0,31 |
Montážní místo |
|
Tubus okuláru (nahrazuje okulár) |
 Loading...