

Page 1
11k
W
15k
W
22k
W
EDK82ZWKN2
Show/Hide Bookmarks
00468456
Netzschleifklemme Typ E82ZWKN2
06/03
Diese Anleitung
enthält wichtige Hinweise für den Einsatz der Netzschleifklemme E82ZWKN2 und beschreibt deren
Montage.
ist nur gültig
- für Netzschleifklemmen E82ZWKN2 für Frequenzumrichter 8200 motec, Typ E82MVxxx_2B
(0,25 kW und 0,37 kW).
- zusammen mit der Montageanleitung EDKMV3 für 8200 motec.
Die dem 8200 motec beiliegende Montageanleitung EDKMV3 enthält alle Angaben zur elektrischen
Installation und zur Inbetriebnahme.
Anschlußbedingungen
Summe der Netzströme max. 16 A!
Leitungsquerschnitte und Sicherungen F1 an die Summe der Netzströme anpassen.
Max. Leitungsquerschnitt: 2,5 mm
Max. 4 motec in Parallelschaltung erlaubt.
Der Ableitstrom gegen Erde ist größer 3,5 mA. Daher ist eine dauerhafte Festinstallation
erforderlich.
8200 motec
Typ Netzstrom 2 motec 3 motec 4 motec
E82MV251_2B
E82MV371_2B
* Netzschütz bestimmt durch den Einschaltstrom
** Mit externer Einschaltstrombegrenzung Typ E82ZJ004
Nationale und regionale Vorschriften beachten (z. B. VDE0113, EN 60204)!
Beachten Sie beim Einsatz der externen Einschaltstrombegrenzung
STOP
E82ZJ004:
Bei
zyklischem Netzschalten mindestens 3 Minuten zwischen Ausschalten
und Wiedereinschalten warten. Ansonsten ist die externe
Einschaltstrombegrenzung unwirksam!
3.4 A
5.0 A
2
(AWG14).
Benötigtes Netzschütz K10 bei Anschluß von:
11kW* 15kW* 22kW*
4kW**
4kW**
4kW**
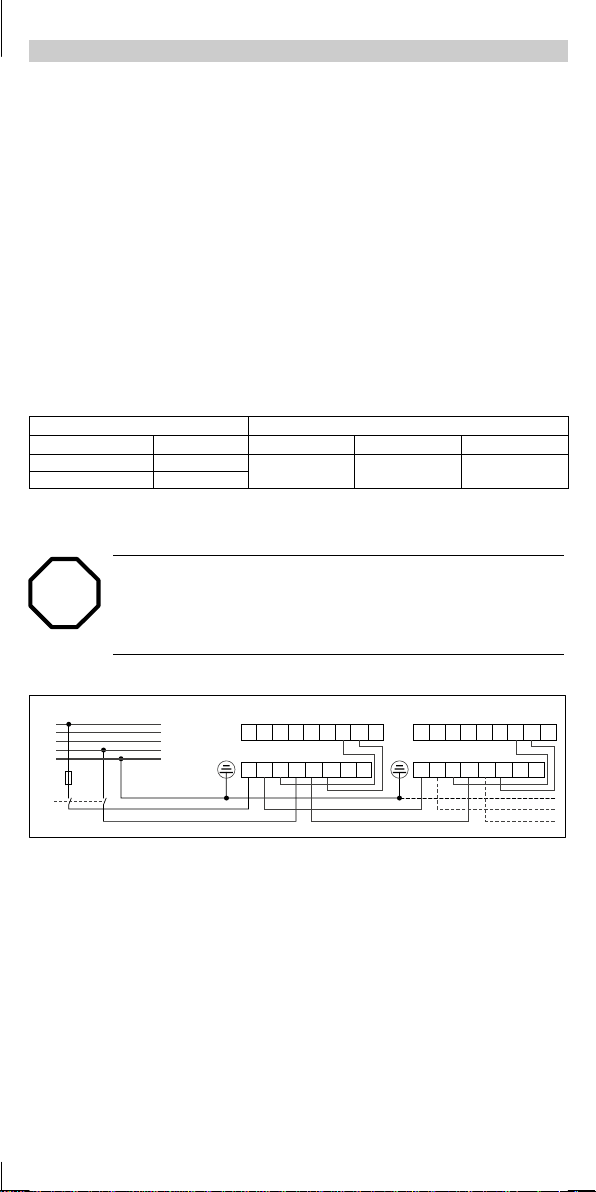
Prinzipschaltbild
1/N/PE AC 180 V … 264 V
L1
L2
L3
N
PE
F1
K10
l
motec 1 motec 2
L2/N L2/N
BR2 BR2K14 K14BR1 BR1K12 K12K11 K11
L3 L3
X1
L1 L1
L1 L1
L1 L1
L1 L1
L2/N L2/NL2/N L2/NL2/N L2/N
X1
L3 L3L3 L3
Lenze Drive Systems GmbH, Postfach 10 13 52, D-31763 Hameln
( (+49) 5154 82-0, Fax Service: (+49) 5154 82-1112
MAE82ZWKN2 2.0
Page 2

1.
Show/Hide Bookmarks
Netzschleifklemme in die Aufnahme
im motec-Trägergehäuse einsetzen.
2. Netzschleifklemme mit dem
motec-Trägergehäuse verschrauben.
Montage
3. Netzschleifklemme verdrahten.
l
-2-
MAE82ZWKN2 2.0
Page 3

11k
W
15k
W
22k
W
EDK82ZWKN2
Show/Hide Bookmarks
00468456
Main-bus connector type E82ZWKN2
06/03
These Instructions
inform about the use of mains-bus connectors E82ZWKN2 and describe how to install them.
are only valid
- for mains bus connectors E82ZWKN2 for 8200 motec frequency inverters, type E82MVxxx_2B
(0.25 kW and 0.37 kW).
- together with the Mounting Instructions EDKMV3 for 8200 motec.
The Mounting Instructions EDKMV3 delivered together with the 8200 motec inform about electrical
installation and commissioning.
Connection conditions
Sum of mains currents max. 16 A!
Cable cross-sections and fuses F1 must match the sum of mains currents.
Max. cable cross-section: 2.5 mm
Max. 4 motec can be connected in parallel.
The discharge current to earth is higher than 3.5 mA. Therefore permanent installation is required.
2
(AWG14).
8200 motec
Mains contactor K10 required for connection of:
Type Mains current 2 motec 3 motec 4 motec
E82MV251_2B
E82MV371_2B
* Mains contactor determined by switch-on current
** With external switch-on current limitation, type E82ZJ004
Observe na tional and regional regulations (e. g. VDE0113, EN 60204)!
3.4 A
5.0 A
11kW* 15kW* 22kW*
4kW**
4kW**
4kW**
Observe when using the externalswitch-on current limitation E82ZJ004:
cyclic mainsswitching, wait at least 3 minutes before yourswitch-on
STOP
With
the unit again. Otherwise, the external switch-on currentlimitation has no
effect.
Diagram
1/N/PE AC 180 V … 264 V
L1
L2
L3
N
PE
F1
K10
X1
motec 1 motec 2
L2/N L2/N
BR2 BR2K14 K14BR1 BR1K12 K12K11 K11
L3 L3
L1 L1
L2/N L2/NL2/N L2/NL2/N L2/N
L1 L1
L1 L1
L1 L1
X1
L3 L3L3 L3
l
Lenze Drive Systems GmbH, Postfach 10 13 52, D-31763 Hameln
( (+49) 5154 82-0, Fax Service: (+49) 5154 82-1112
MAE82ZWKN2 2.0
Page 4

1.
Show/Hide Bookmarks
Insert the mains bus connector into
the receptacle in the motec carrier
housing.
2. Screw the mains bus connector to
the motec carrier housing.
Mounting
3. Wire the mains bus connector
l
-2-
MAE82ZWKN2 2.0
Page 5

11k
W
15k
W
22k
W
EDK82ZWKN2
Show/Hide Bookmarks
00468456
Bornierpourbouclagedecâbles
réseau type E82ZWKN2
06/03
Le présent fascicule
contient des remarques importantes concernant l’utilisation du bornier pour bouclage de câbles
réseau E82ZWKN2 et décrit son montage.
n’est valable que
- pour des borniers pour bouclage de câbles réseau E82ZWKN2 pour des convertisseurs de
fréquence 8200 motec, type E82MVxxx_2B (0,25 kW et 0,37 kW) ;
- conjointement avec les instructions de montage EDKMV3 pour les 8200 motec.
Les instructions d’installa tion électrique et de mise en service sont comprises dans les instructions de
montage EDKMV3 (incluses dans l’emballage du 8200 motec).
Conditions de raccordement
Total de tous les courants réseau : 16 A maxi !
Adapter les sections de câble et les fusibles F1 en fonction du total des courants réseau.
Section maxi de câble : 2,5 mm
En connexion en parallèle, 4 motec sont autorisés au maximum.
Le courant de fuite vers la terre est supérieur à 3,5 mA. Cela implique la nécessité d’une
installation électrique fixe selon les normes.
8200 motec
Type Courant réseau 2 motec 3 motec 4 motec
E82MV251_2B
E82MV371_2B
* Contacteur réseau déterminé par courant de démarrage
** Avec module externe de limitation de courant de démarrage type E82ZJ004
Tenir compte des réglementations nationales et régionales (exemple : VDE0113, EN 60204) !
Nota concernant l’utilisation d’un m oduleexterne de limitatio n decourant
STOP
de démarrage E82ZJ004 :
Encasde misessous tension
de 3 minutes au minimum entre la coupure et la mise sous tension.
Autrement,la fonctionnalité du module externe delimitation de courant de
démarragerisqued’êtresupprimée!
3,4 A
5,0 A
2
(AWG14).
Contacteur réseau K10 nécessaire pour connexion de :
11kW* 15kW* 22kW*
4kW**
4kW**
répétées respecter impérativement une durée
4kW**
Schéma de principe
1/N/PE AC 180 V … 264 V
L1
L2
L3
N
PE
F1
K10
l
motec 1 motec 2
L2/N L2/N
BR2 BR2K14 K14BR1 BR1K12 K12K11 K11
L3 L3
X1
L1 L1
L1 L1
L1 L1
L1 L1
L2/N L2/NL2/N L2/NL2/N L2/N
X1
L3 L3L3 L3
Lenze Drive Systems GmbH, Postfach 10 13 52, D-31763 Hameln
( (+49) 5154 82-0, Fax Service: (+49) 5154 82-1112
MAE82ZWKN2 2.0
Page 6

1.
Show/Hide Bookmarks
Positionner le bornier pour bouclage
de câbles réseau dans le logement
prévu dans le boîtier motec.
2. Visser le bornier pour bouclage de
câbles réseau avec le boîtier motec.
Montage
3. Câbler le bornier pour bouclage de
câbles réseau.
l
-2-
MAE82ZWKN2 2.0
 Loading...