

Korg Pitchblack Pro OWNER’S MANUAL
© 2013 KORG INC.
4015-2 Yanokuchi, Inagi-city, Tokyo 206-0812 Japan
This product has been manufactured according to strict specications and voltage requirements that are appli-
cable in the country in which it is intended that this product should be used. If you have purchased this product
via the internet, through mail order, and/or via a telephone sale, you must verify that this product is intended to
be used in the country in which you reside.
WARNING: Use of this product in any country other than that for which it is intended could be dangerous and
could invalidate the manufacturer’s or distributor’s warranty. Please also retain your receipt as proof of pur-
chase otherwise your product may be disqualied from the manufacturer’s or distributor’s warranty.
IMPORTANT NOTICE TO CONSUMERS
Precautions
Location
Using the unit in the following locations can result in a malfunction.
In direct sunlight
•
Locations of extreme temperature or humidity
•
Excessively dusty or dirty locations
•
Locations of excessive vibration
•
Close to magnetic elds
•
Power supply
Please connect the designated AC adapter to an AC outlet of the correct voltage. Do
not connect it to an AC outlet of voltage other than that for which your unit is intended.
Interference with other electrical devices
Radios and televisions placed nearby may experience reception interference. Operate
this unit at a suitable distance from radios and televisions.
Handling
To avoid breakage, do not apply excessive force to the switches or controls.
Care
If the exterior becomes dirty, wipe it with a clean, dry cloth. Do not use liquid cleaners
such as benzene or thinner, or cleaning compounds or ammable polishes.
Keep this manual
After reading this manual, please keep it for later reference.
Keeping foreign matter out of your equipment
Never set any container with liquid in it near this equipment. If liquid gets into the
equipment, it could cause a breakdown, re, or electrical shock.
Be careful not to let metal objects get into the equipment. If something does slip into
the equipment, unplug the AC adapter from the wall outlet. Then contact your nearest
Korg dealer or the store where the equipment was purchased.
THE FCC REGULATION WARNING (for USA)
NOTE: This equipment has been tested and found to comply with the limits for
a Class B digital device, pursuant to Part 15 of the FCC Rules. These limits
are designed to provide reasonable protection against harmful interference in a
residential installation. This equipment generates, uses, and can radiate radio frequency energy and, if not installed and used in accordance with the instructions,
may cause harmful interference to radio communications. However, there is no
guarantee that interference will not occur in a particular installation. If this equipment does cause harmful interference to radio or television reception, which can
be determined by turning the equipment off and on, the user is encouraged to try
to correct the interference by one or more of the following measures:
Reorient or relocate the receiving antenna.
•
Increase the separation between the equipment and receiver.
•
Connect the equipment into an outlet on a circuit different from that to which
•
the receiver is connected.
Consult the dealer or an experienced radio/TV technician for help.
•
If items such as cables are included with this equipment, you must use
those included items.
Unauthorized changes or modication to this system can void the user’s authority
to operate this equipment.
battery contains heavy metals in excess of the regulated amount, a chemical symbol is displayed below the “crossed-out wheeled bin” symbol on the battery or battery package.
* All product names and company names are the trademarks or registered trademarks of their respective owners.
Notice regarding disposal (for EU)
When this “crossed-out wheeled bin” symbol is displayed on the product, owner’s manual, battery, or battery package, it signies that when
you wish to dispose of this product, manual, package or battery you
must do so in an approved manner. Do not discard this product, manual, package or battery along with ordinary household waste. Disposing in the correct manner will prevent harm to human health and potent ial damage to t he environment. Since the corre ct method of
disposal will depend on the applicable laws and regulations in your locality, please contact your local administrative body for details. If the
Précautions
Emplacement
L’utilisation de cet instrument dans les endroits suivants peut en entraîner le
mauvais fonctionnement.
En plein soleil
•
Endroits très chauds ou très humides
•
Endroits sales ou fort poussiéreux
•
Endroits soumis à de fortes vibrations
•
A proximité de champs magnétiques
•
Alimentation
Branchez l’adaptateur secteur mentionné à une prise secteur de tension appropriée. Evitez de brancher l’adaptateur à une prise de courant dont la tension ne
correspond pas à celle pour laquelle l’appareil est conçu.
Interférences avec d’autres appareils électriques
Les postes de radio et de télévision situés à proximité peuvent par conséquent
souffrir d’interférences à la réception. Veuillez dès lors faire fonctionner cet appareil à une distance raisonnable de postes de radio et de télévision.
Maniement
Pour éviter de les endommager, manipulez les commandes et les boutons de cet
instrument avec soin.
Entretien
Lorsque l’instrument se salit, nettoyez-le avec un chiffon propre et sec. Ne vous
servez pas d’agents de nettoyage liquides tels que du benzène ou du diluant,
voire des produits inammables.
Conservez ce manuel
Après avoir lu ce manuel, veuillez le conserver soigneusement pour toute référence ultérieure.
Evitez toute intrusion d’objets ou de liquide
Ne placez jamais de récipient contenant du liquide près de l’instrument. Si le
liquide se renverse ou coule, il risque de provoquer des dommages, un courtcircuit ou une électrocution.
Veillez à ne pas laisser tomber des objets métalliques dans le boîtier (trombones,
par ex.). Si cela se produit, débranchez l’alimentation de la prise de courant et
contactez votre revendeur korg le plus proche ou la surface où vous avez acheté
l’instrument.
Note concernant les dispositions (Seulement EU)
Quand un symbole avec une poubelle barrée d’une croix apparait
sur le produit, le mode d’emploi, les piles ou le pack de piles, cela
signie que ce produit, manuel ou piles doit être déposé chez un
représentant compétent, et non pas dans une poubelle ou toute
autre déchetterie conventionnelle. Disposer de cette manière, de
prévenir les dommages pour la santé humaine et les dommages
potentiels pour l’environnement. La bonne méthode d’élimination
dépendra des lois et règlements applicables dans votre localité, s’il
vous plaît, contactez votre organisme administratif pour plus de
détails. Si la pile contient des métaux lourds au-delà du seuil réglementé, un
symbole chimique est afché en dessous du symbole de la poubelle barrée
d’une croix sur la pile ou le pack de piles.
REMARQUE IMPORTANTE POUR LES CLIENTS
Ce produit a été fabriqué suivant des spécications sévères et des besoins en
tension applicables dans le pays où ce produit doit être utilisé. Si vous avez
acheté ce produit via l’internet, par vente par correspondance ou/et vente par
téléphone, vous devez vérier que ce produit est bien utilisable dans le pays
où vous résidez.
ATTENTION: L’utilisation de ce produit dans un pays autre que celui pour
lequel il a été conçu peut être dangereuse et annulera la garantie du fabricant
ou du distributeur. Conservez bien votre récépissé qui est la preuve de votre
achat, faute de quoi votre produit ne risque de ne plus être couvert par la
garantie du fabricant ou du distributeur.
* Touslesnomsdeproduitsetdesociétéssontdesmarquescommercialesoudéposéesdeleurdétenteurrespectif.
Vorsichtsmaßnahmen
Aufstellungsort
Vermeiden Sie das Aufstellen des Geräts an Orten, an denen.
es direkter Sonneneinstrahlung ausgesetzt ist;
hohe Feuchtigkeit oder Extremtemperaturen auftreten können;
•
Staub oder Schmutz in großen Mengen vorhanden sind;
•
das Gerät Erschütterungen ausgesetzt sein kann.
•
in der Nähe eines Magnetfeldes.
•
Stromversorgung
Schließen Sie das optionale Netzteil nur an eine geeignete Steckdose an. Verbinden
Sie es niemals mit einer Steckdose einer anderen Spannung.
Störeinüsse auf andere Elektrogeräte
Dieser kann bei in der Nähe aufgestellten Rund-funkempfängern oder Fernsehgeräten Empfangsstörungen hervorrufen. Betreiben Sie solche Geräte nur in einem
geeigneten Abstand von diesem Erzeugnis.
Bedienung
Vermeiden Sie bei der Bedienung von Schaltern und Reglern unangemessenen Kraftaufwand.
Reinigung
Bei auftretender Verschmutzung können Sie das Gehäuse mit einem trockenen, sauberen Tuch abwischen. Verwenden Sie keinerlei Flüssigreiniger wie beispielsweise
Reinigungsbenzin, Verdünnungs- oder Spülmittel. Verwenden Sie niemals brennbare
Reiniger.
Bedienungsanleitung
Bewahren Sie diese Bedienungsanleitung gut auf, falls Sie sie später noch einmal
benötigen.
Flüssigkeiten und Fremdkörper
Stellen Sie niemals Behältnisse mit Flüssigkeiten in der Nähe des Geräts auf. Wenn
Flüssigkeit in das Gerät gelangt, können Beschädigung des Geräts, Feuer oder ein
elek-trischer Schlag die Folge sein.
Beachten Sie, daß keinerlei Fremdkörper in das Gerät gelangen. Sollte ein Fremdkörper in das Gerät gelangt sein, so trennen Sie es sofort vom Netz. Wenden Sie sich
dann an Ihren KORG-Fachhändler.
Hinweis zur Entsorgung (Nur EU)
Wenn Sie das Symbol mit der „durchgekreuzten Mülltonne“ auf Ihrem
Produkt, der dazugehörigen Bedienungsanleitung, der Batterie oder
dem Batteriefach sehen, müssen Sie das Produkt in der vorgeschriebenen Art und Weise entsorgen. Dies bedeutet, dass dieses Produkt
mit elektrischen und elektronischen Komponenten nicht mit dem normalen Hausmüll entsorgt werden darf. Für Produkte dieser Art existiert
ein separates, gesetzlich festgelegtes Entsorgungssystem. Gebrauchte elektrische und elektronische Geräte müssen separat entsorgt wer-
den, um ein umweltgerechtes Recycling sicherzustellen. Diese Produkte müssen bei benannten Sammelstellen abgegeben werden. Die Entsorgung
ist für den Endverbraucher kostenfrei! Bitte erkundigen sie sich bei ihrer zuständigen Behörde, wo sie diese Produkte zur fachgerechten Entsorgung abgeben können. Falls ihr Produkt mit Batterien oder Akkumulatoren ausgerüstet ist, müssen
sie diese vor Abgabe des Produktes entfernen und separat entsorgen (siehe
oben). Die Abgabe dieses Produktes bei einer zuständigen Stelle hilft ihnen, dass
das Produkt umweltgerecht entsorgt wird. Damit leisten sie persönlich einen nicht
unerheblichen Beitrag zum Schutz der Umwelt und der menschlichen Gesundheit
vor möglichen negativen Effekten durch unsachgemäße Entsorgung von Müll.
Batterien oder Akkus, die Schadstoffe enthalten, sind auch mit dem Symbol einer
durchgekreuzten Mülltonne gekennzeichnet. In der Nähe zum Mülltonnensymbol
bendet sich die chemische Bezeichnung des Schadstoffes. Cd oder NiCd steht
für Cadmium, Pb für Blei und Hg für Quecksilber.
Dieses Produkt wurde unter strenger Beachtung von Spezikationen und Spannungsanforderungen hergestellt, die im Bestimmungsland gelten. Wenn Sie dieses
Produkt über das Internet, per Postversand und/oder mit telefonischer Bestellung
gekauft haben, müssen Sie bestätigen, dass dieses Produkt für Ihr Wohngebiet
ausgelegt ist. WARNUNG: Verwendung dieses Produkts in einem anderen Land
als dem, für das es bestimmt ist, verwendet wird, kann gefährlich sein und die
Garantie des Herstellers oder Importeurs hinfällig lassen werden. Bitte bewahren
Sie diese Quittung als Kaufbeleg auf, da andernfalls das Produkt von der Garantie
des Herstellers oder Importeurs ausgeschlossen werden kann.
*AlleProdukt- undFirmennamen sindWarenzeichenodereingetragene Warenzeichen
derbetreffendenEigentümer.
WICHTIGER HINWEIS FÜR KUNDEN
Precauciones
Ubicación
El uso de la unidad en las siguientes ubicaciones puede dar como resultado un
mal funcionamiento:
Expuesto a la luz directa del sol
•
Zonas de extremada temperatura o humedad
•
Zonas con exceso de suciedad o polvo
•
Zonas con excesiva vibración
•
Cercano a campos magnéticos
•
Fuente de alimentación
Por favor, conecte el adaptador de corriente designado a una toma de corriente
con el voltaje adecuado. No lo conecte a una toma de corriente con voltaje diferente al indicado.
Interferencias con otros aparatos
Las radios y televisores situados cerca pueden experimentar interferencias en la
recepción. Opere este dispositivo a una distancia prudencial de radios y televisores.
Manejo
Para evitar una rotura, no aplique excesiva fuerza a los conmutadores o controles.
Cuidado
Si exterior se ensucia, límpiese con un trapo seco. No use líquidos limpiadores
como disolvente, ni compuestos inamables.
Guarde este manual
Después de leer este manual, guárdelo para futuras consultas.
Mantenga los elementos externos alejados del equipo
Nunca coloque ningún recipiente con líquido cerca de este equipo, podría causar
un cortocircuito, fuero o descarga eléctrica. Cuide de que no caiga ningún objeto
metálico dentro del equipo.
Nota respecto a residuos y deshechos (solo UE)
Cuando aparezca el símbolo del cubo de basura tachado sobre un
producto, su manual de usuario, la batería, o el embalaje de cualquiera de éstos, signica que cuando quiere tire dichos artículos a
la basura, ha de hacerlo en acuerdo con la normativa vigente de
la Unión Europea. No debe verter dichos artículos junto con la basura de casa. Verter este producto de manera adecuada ayudará
a evitar daños a su salud pública y posibles daños al medioambiente. Cada país tiene una normativa especíca acerca de cómo
verter productos potencialmente tóxicos, por tanto le rogamos que
se ponga en contacto con su ocina o ministerio de medioambiente para más
detalles. Si la batería contiene metales pesados por encima del límite permitido, habrá un símbolo de un material químico, debajo del símbolo del cubo de
basura tachado.
Este producto ha sido fabricado de acuerdo a estrictas especicaciones y
requerimientos de voltaje aplicables en el país para el cual está destinado. Si
ha comprado este producto por internet, a través de correo, y/o venta telefónica, debe usted vericar que el uso de este producto está destinado al país en
el cual reside.
AVISO: El uso de este producto en un país distinto al cual está destinado
podría resultar peligroso y podría invalidar la garantía del fabricante o distribuidor.
Por favor guarde su recibo como prueba de compra ya que de otro modo el
producto puede verse privado de la garantía del fabricante o distribuidor.
*Todoslosnombresdeproductosycompañíassonmarcascomercialesomarcasregistradasdesusrespectivospropietarios.Instalarlabaterí.
NOTA IMPORTANTE PARA EL CONSUMIDOR
Thank you for purchasing the Korg
To help you get the most out of your new instrument, please read this
manual carefully.
pitchb lack PR O
rackmount tuner.
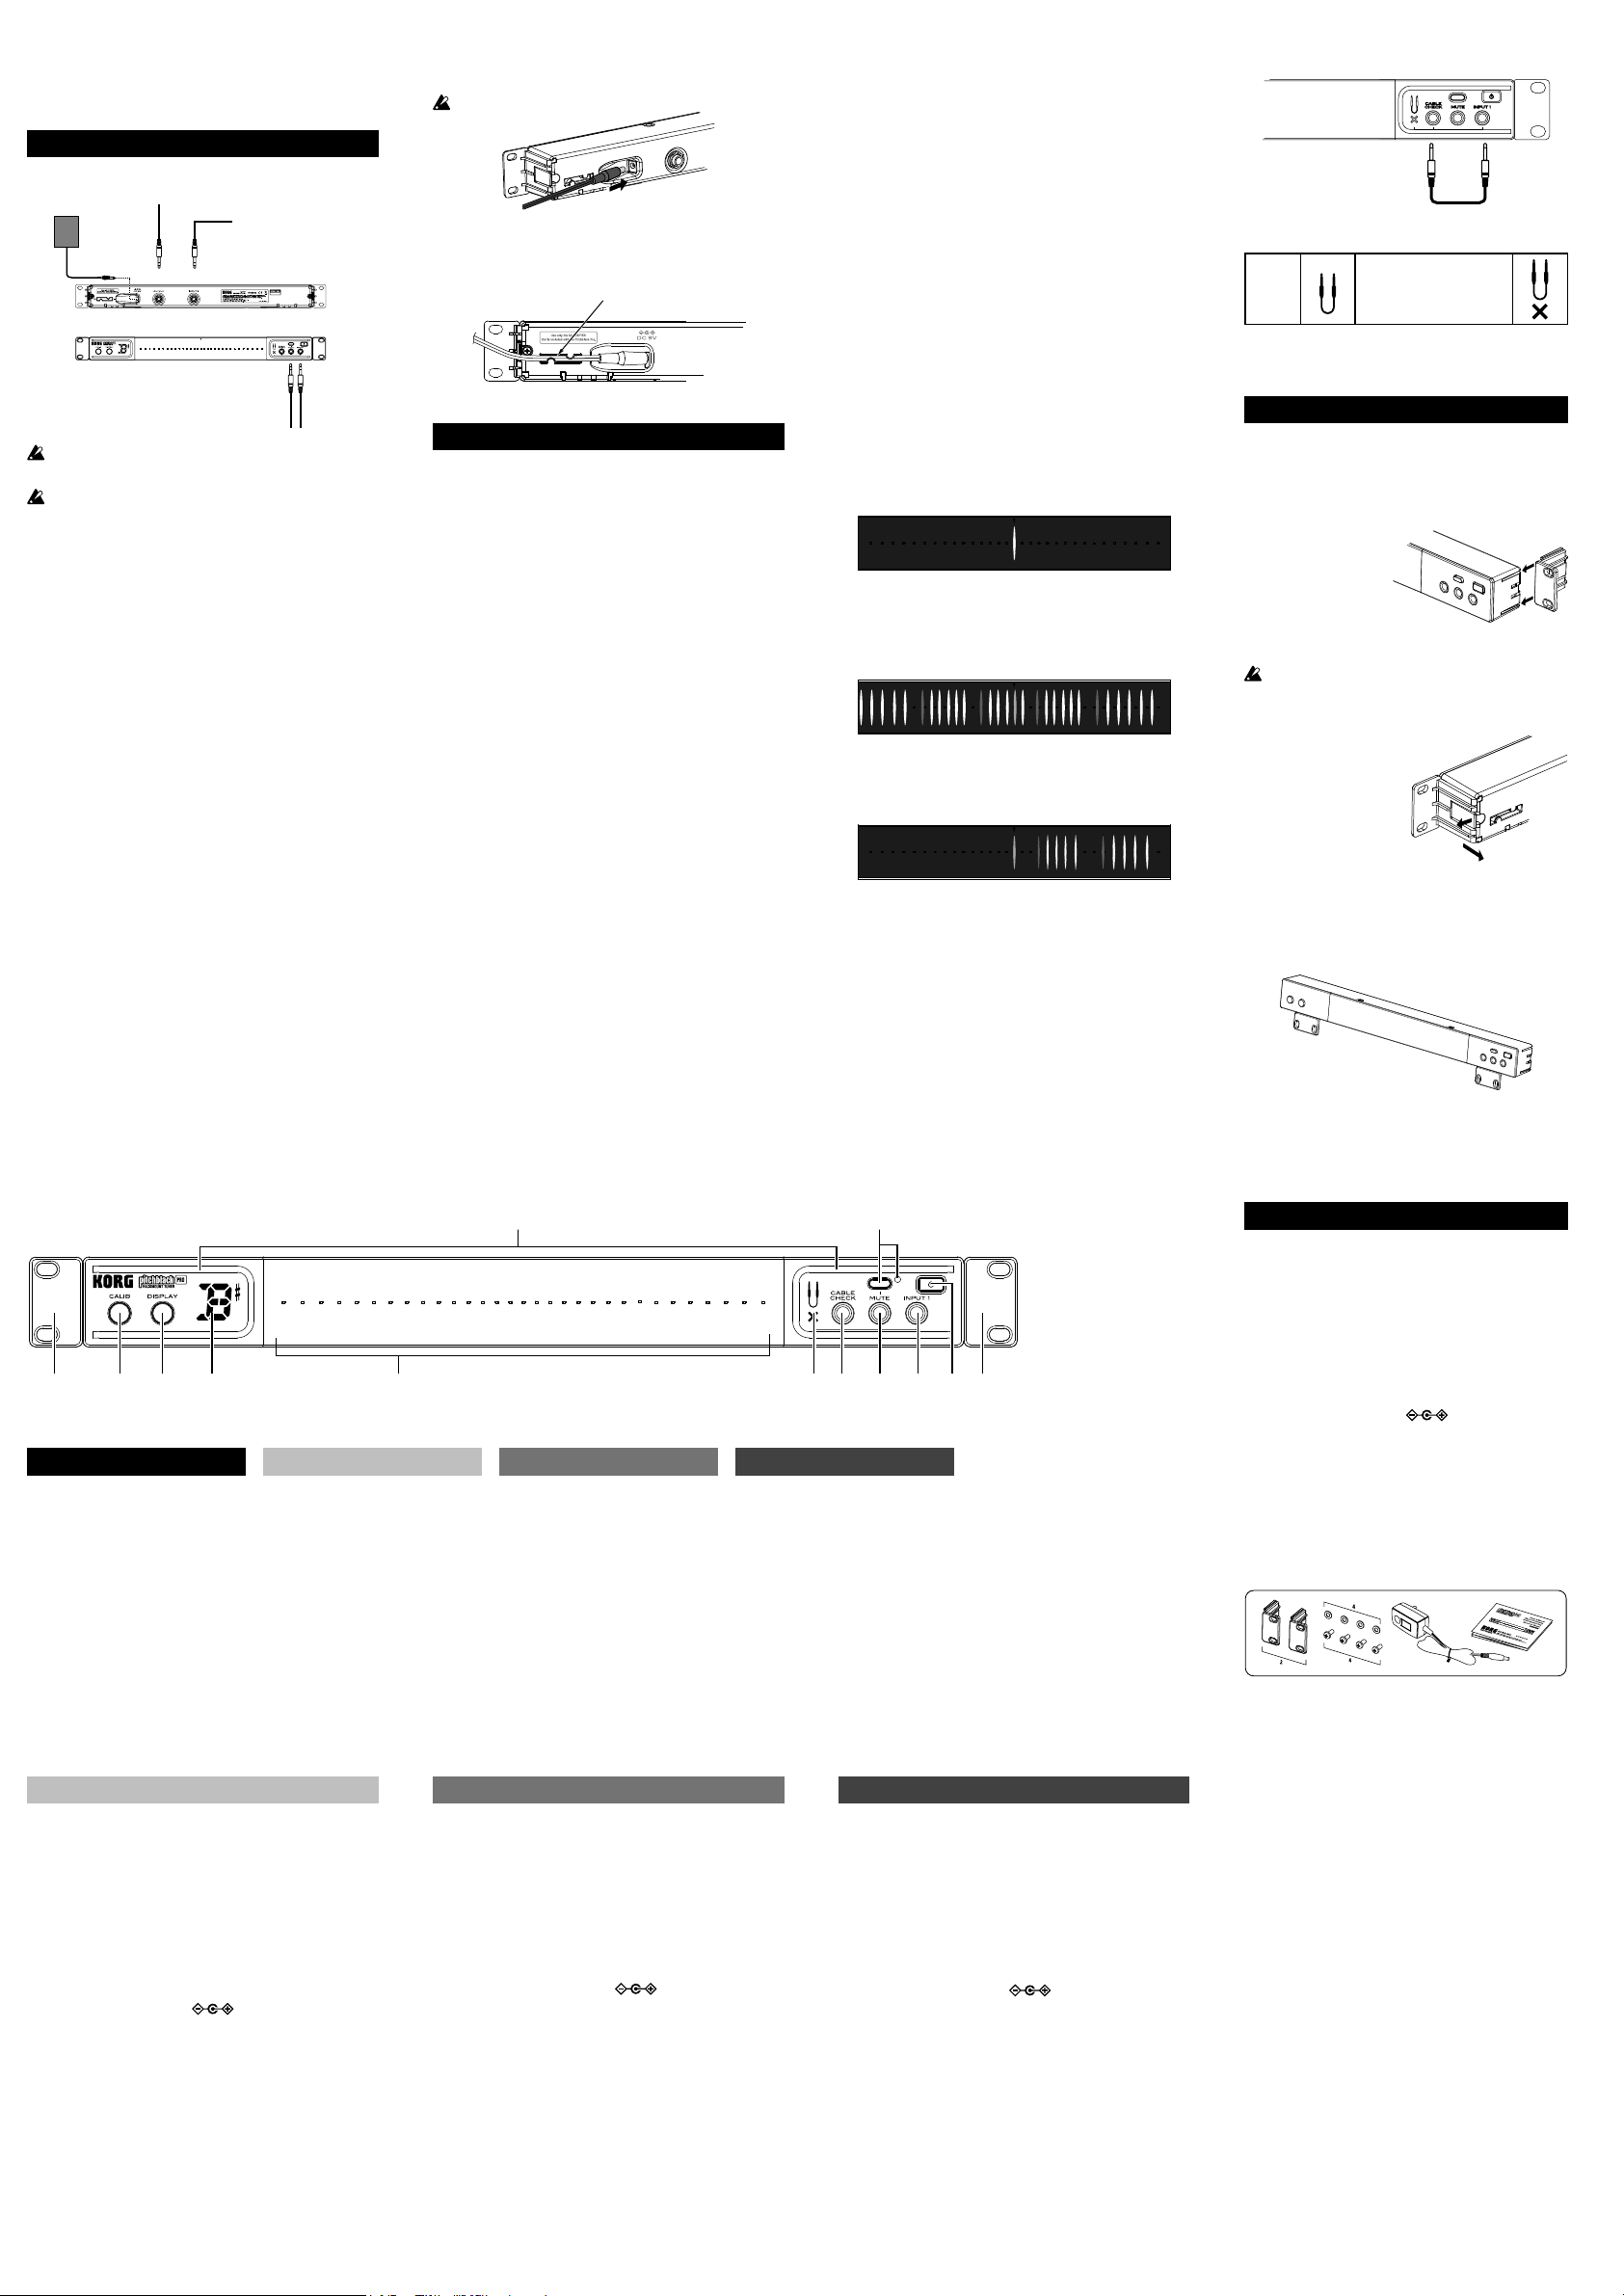
Connections
AC adapter (included)
To AC outlet
DC 9V IN
Turn off the power to all devices before you connect an instrument
to avoid damaging your equipment.
The INPUT 1/2, CABLE CHECK and OUTPUT jacks are mono.
Stereo (TRS) cables will not work.
Front panel
INPUT1 jack
Connect a cable from the INPUT 1 jack to the instrument to be tuned. If
a cable is connected to this jack, the INPUT 2 jack on the rear panel will
be disabled.
MUTE jack
Connect a latching (alternating) foot switch to this jack to enable or disable the mute function without using the MUTE button. When the mute
function is enabled, the MUTE LED will light up, and the signal will not
be output from the OUTPUT jack.
CABLE CHECK jack
Connect one end of a standard mono instrument cable to the INPUT 1
jack and the other end to the CABLE CHECK jack.
Rear panel
OUTPUT jack
Connect a cable from the OUTPUT jack to your effect pedals, amp, etc.
The signal that is input from the INPUT jack passes through the buffer
and is sent to the OUTPUT jack. By pressing the MUTE button, you can
enable or disable the mute function for the signal that is output from the
OUTPUT jack. When the mute function is enabled, the MUTE LED will
light up, and the signal will not be sent from the OUTPUT jack.
TIP
When the tuner is in the standby power mode, the signal will not
be sent from the OUTPUT jack.
INPUT 2 jack
Connect a cable from the INPUT 2 jack to the line level output device to
be tuned. If a cable is connected to the INPUT 1 jack on the front panel,
this jack will be disabled and cannot be used.
To your effect
pedals or amps etc.
INPUT 2
OUTPUT
Line out device(effecter,
keyboard, etc.)
INPUT 1MUTE
Guitar or bassFoot switch, etc.
DC 9 V IN jack
Connect the included AC adapter to this jack.
Never use any AC adapter other than the one that’s included.
Fasten the AC adapter’s power cord in place by hooking it on the cord
hook to prevent the included AC adapter’s plug from being disconnected from the terminal.
cord hook
Operation
Tuning procedure
1. Connect the device to be tuned to the INPUT 1 jack (guitars, etc.) or
the INPUT 2 jack (keyboards, etc.).
TIP
If a device is connected to the INPUT 1 jack on the front panel,
the INPUT 2 jack on the rear panel will be disabled and cannot be
used.
2. Press the STANDBY/ON button to turn on the tuner.
The POWER ON LED will light up, and the calibration setting (0–9)
will ash in the note display for a few seconds.
TIP
If there is no user input for up to 4 hours, the auto power-off function will automatically put the tuner in the standby power mode.
Holding down the MUTE button and pressing the STANDBY/ON
button while the tuner is turned on will disable the auto power-off
function.
3. Set the calibration, meter display, and mute function settings as
necessary.
4. Play a single note on your instrument.
5. Tune while watching the meter display. The note display will indicate
the note name that is closest to the pitch you input.
Adjusting the calibration
You can specify the calibration (standard pitch for tuning, middle A on a
piano=A4). The default setting is “0: 440 Hz”.
TIP
If the AC adapter is unplugged after the setting is changed, it will
return to the default setting.
1 Press the CALIB button.
The current setting is shown for several seconds on the display
(litblinking).
2 While the current calibration setting is shown in the note name dis-
play, press the CALIB button again to adjust the setting.
Each time you press the CALIB button you will cycle through the following settings.
0: 440 Hz, 1: 441 Hz, 2: 442 Hz, 3: 443 Hz, 4: 444 Hz, 5: 445 Hz, 6:
436 Hz, 7: 437 Hz, 8: 438 Hz, 9: 439 Hz
3 When you have selected the desired calibration setting, wait ap-
proximately two seconds without pressing any buttons. The new setting will blink several times in the note name display indicating that
the calibration has been set. The pitchblack PRO will automatically
return to tuner mode.
Meter display setting
You can specify the display pattern that’s shown on the meter’s display.
You can choose one of three patterns. The default setting is “1: Regular
meter”.
TIP
If the AC adapter is unplugged after the setting is changed, it will
return to the default setting.
1. Press the DISPLAY button.
The current setting is shown for several seconds on the display
(litblinking).
2. While this setting is shown, press the DISPLAY button to select the
desired display pattern. The setting will change each time you press
the button.
1: Regular meter
Tune your instrument so that the center LED of the meter display
is lit up. The LED illumination will move from the center toward the
right if the note is sharp, or from the center toward the left if the note
is at.
2: Strobe meter
Tune your instrument so that the illumination stops owing in the
meter display. The illumination will ow from left to right if the note is
sharp, or from right to left if the note is at.
3: Half-strobe meter
Tune your instrument so that the stream stops and only the center
LED is lit up. The right side of the meter display will strobe if the note
is sharp, and the left side of the meter display will strobe if the note
is at. When the pitch is correct, only the center LED will light up.
3. When you’ve chosen the desired setting, wait for two seconds with-
out pressing any buttons.
The display indication will blink several times, and the meter display
setting will be made. The tuner will then return to its normal state,
allowing you to tune.
Cable check function
CABLE CHECK INPUT 1
When the cable is connected, the cable check function will start
and the results will be shown on the CABLE CHECK LEDs.
Normal: Disconnected or short circuit:
TIP
Cable checking can only be done with mono cables. Stereo
cables cannot be checked.
Installing rack-mounting adapters
By installing the included rack-mounting adapters, the tuner can
be attached to an EIA standard rack or case, etc., with the appropriate rack screws.
TIP
There is no difference between the left and right rack-mount-
ing adapters.
Ali gn th e rack -m ountin g
adapters with the mounting
slots on the tuner, and then
slide in the adapters from the
back.
Securely install the adapters so that they lock into place and will
not slip out.
If the tuner is attached to the rack without sufciently install-
ing the adapters, the tuner may fall and become damaged.
Removal
Release the lock on the back of
the tuner, and then slide out the
adapter to remove it.
Rack-mounting holes
Use these holes to attach the
tuner to an EIA standard rack or
case with the included screws.
Using rack-mounting adapters as a stand
By installing the rack-mounting adapters in the mounting slots on
the bottom of the tuner, it can be positioned at an easy-to-read
angle when it is placed on a table.
1 2 3 4
Parts of the pitchblack PRO
1. CALIB button
2. DISPLAY button
3. Display
4. Meter Display
5. POWER ON LED
6. CABLE CHECK LED
7. CABLE CHECK jack
8. MUTE jack
9. MUTE button, LED
10. INPUT 1 jack (mono)
11. STANDBY/ON button
12. rack-mounting adapter
Description
1. Bouton CALIB
2. Bouton DISPLAY
3. Ecran
4. Afchage d’accordage
5. Témoin POWER ON
6. Témoin CABLE CHECK
7. Prise CABLE CHECK
8. Prise MUTE
9. Bouton MUTE, Témoin MUTE
10. Prise INPUT 1 (mono)
11. Bouton STANDBY/ON
12. adaptateur de montage en rack
5 9
6 7 8 10 1212 11
Beschreibung
1. CALIB-Taster
2. DISPLAY-Taster
3. Display
4. Meteranzeige
5. POWER ON-Diode
6. CABLE CHECK-Diode
7. CABLE CHECK-Buchse
8. MUTE-Buchse
9. MUTE-Taster, Diode
10. INPUT 1-Buchse
11. STANDBY/ON-Taster
12. Rack-Montageadapter
1. Botón CALIB
2. Botón DISPLAY
3. Pantalla
4. Pantalla del medidor
5. LED POWER ON
6. LED CABLE CHECK
7. Jack CABLE CHECK
8. Jack MUTE
9. Botón MUTE, LED MUTE
10. Jack INPUT 1 (mono)
11. Botón STANDBY/ON
12. adaptadores de montaje en bastidor
Controles
Specications
Tuning: 12-note equal temperament
Detection range: E0 (20.60 Hz)–C8 (4186 Hz), sine wave
Calibration range: A4 = 436–445 Hz (1 Hz steps)
Detection accuracy: ±1 cent
Input impedance: 1 M-ohm (tuner on)
Connects: Front: INPUT 1 jack, CABLE CHECK
jack, MUTE jack
Rear: INPUT 2 jack, OUTPUT jack, DC
Power supply: DC9V ( ) (Included AC adapter)
Dimensions (W x D x H): Tuner only: 430 mm × 49 mm × 44 mm /
With rack-mounting adapters: 482 mm ×
Weight: Tuner only: 363g / 12.80 oz.
Included items:
*
Appearanceandspecicationsaresubjecttochangewithoutnoticeforimprovement.
9V IN jack
16.93" x 1.93" x 1.73"
49 mm × 44 mm / 18.98" x 1.93" x 1.73"
(including extensions)
Owner’s manual, AC adapter, 4x Screws/
washers, 2x Rack-mounting adapter
(including extensions)
Fiche technique
Gamme: Tempérament égal (12 intervalles chromatiques)
Plage de détection: E0 (20.60Hz)~C8 (4186Hz), onde sinus
Plage de calibrage du diapason:
A4= 436~445Hz (par pas de 1Hz)
Précision de la détection:
Impédance d’entrée: 1 MΩ (accordeur activé)
Prises: Panneau avant: Prise INPUT 1, Prise CABLE
Panneau arrière: Prise INPUT 2, Prise OUT-
Alimentation: DC 9V ( ) Adaptateur secteur (inclus)
Dimensions (L x P x H): Accordeur seul:430mm x 49mm x 44mm (pieds
Avec adaptateurs de montage en rack:482mm x
Poids: Accordeur seul: 363g
Accessoires fournis: Manuel d’utilisation, Adaptateur secteur, vis/
*
Lescaractéristiquesetl’aspectduproduitsontsusceptiblesd’êtremodiéssansavispréalable.
±1 cent
CHECK, Prise MUTE
PUT, Prise DC 9V IN,
en caoutchouc compris)
49mm x 44mm (pieds en caoutchouc compris)
rondelles x4, adaptateur de montage en rack x2
.
Technische Daten
Stimmung: 12 Noten, gleichschwebende Stimmung
Erkennungsbereich: E0 (20.60Hz)–C8 (4186Hz), Sinuswelle
Kammertonfrequenz: A4= 436–445Hz (in 1Hz-Schritten)
Genauigkeit: ± 1 Cent
Eingangsimpedanz: 1MΩ (Stimmfunktion aktiv)
Anschlüsse: Vor derseite: INPUT 1-Buchs e, MUT E-
Rücks eite: INPU T 2-Buch se, OUTPUT-
Stromversorgung: DC 9V ( ) (Netzteil mitgeliefert)
Abmessungen (B x T x H): Nur Tuner: 430mm x 49mm x 44mm (inklu-
Mi t Ra ck-Mo ntage adapt ern: 482m m x
Gewicht: Nur Tuner: 363g
Lieferumfang: Be dienu ngsan leitu ng, AC -Netz teil ,4x
*
ÄnderungenderAusführungundtechnischenDatenohnevorherigeAnkündigungvorbehalten.
Buchse, CABLE CHECK-Buchse
Buchse, DC 9V IN-Buchse
sive Gummifüße)
49mm x 44mm (inklusive Gummifüße)
Sc hra ube n/B eil ags che ibe n, 2x R ack Montageadapter
Especicaciones
Anación: temperamento igual de 12 notas
Rango de detección: E0 (20.60Hz)–C8 (4186Hz), onda sinusoidal
Rango de calibración: A4= 436–445Hz (incrementos de 1Hz)
Precisión de detección: ±1 centésima
Impedancia de entrada: 1 MΩ (anador activado)
Conexiones: Panel frontal:jack INPUT 1, jack MUTE, jack
Panel posterior: jack INPUT 2, jack OUTPUT,
Alimentación: 9V CC ( ), Adaptador de CA (incluido)
Dimensiones (Anch. x Prof. x Alt.):
Solo anador:430mm x 49mm x 44mm (inclu-
Con ada ptadores de montaje en bas tidor:
Peso: Solo anador:363g
Elementos incluidos: Manual de usuario,
*
Elacabadoylasespecicacionesestánsujetasacambiosinprevioavisoparamejorarelproducto.
CABLE CHECK
jack DC 9V IN
yendo los tacos de goma)
482mm x 49mm x 44mm (incluyendo los tacos
de goma)
llos/arandelas, 2x adaptadores de montaje en
bastidor
adaptador de CA,
4x torni-
 Loading...