


 Loading...

User manual
bizhub PRO 1600P/2000P/2500P
Operating information

Copyright
2006-2008 Océ
All rights reserved. No part of this work may be reproduced, copied, adapted, or transmitted in any form or by any means without written permission from Océ.
Océ makes no representation or warranties with respect to the contents hereof and specifically disclaims any implied warranties of merchantability or fitness for any particular purpose.
Further, Océ reserves the right to revise this publication and to make changes from time to time in the content hereof without obligation to notify any person of such revision or changes.
Edition 2008-07 |
US |

Trademarks
Trademarks
List of trademarks
Xerox, DocuTech, DigiPath and FreeFlow are registered trademarks of Xerox Corporation.
Adobe and PostScript are registered trademarks of Adobe Systems Incorporated.
Products in this publication are referred to by their general trade names. In most, if not all cases, these designations are claimed as trademarks or registered trademarks of their respective companies.
3

Trademarks
4

Table of Contents
Table of Contents
Chapter 1
Introduction . . . . . . . . . . . . . . . . . . . . . . . . . . . . . . . . . . . . . . . . . . . . . . . . . . . . . . . 9
Notes for the reader . . . . . . . . . . . . . . . . . . . . . . . . . . . . . . . . . . . . . . . . . 10 Introduction to the bizhub PRO 1600P/2000P/2500P . . . . . . . . . . . . . . . 11 Available documentation . . . . . . . . . . . . . . . . . . . . . . . . . . . . . . . . . . . . . 12
Chapter 2
Power information . . . . . . . . . . . . . . . . . . . . . . . . . . . . . . . . . . . . . . . . . . . . . . . . . 13
The power modes . . . . . . . . . . . . . . . . . . . . . . . . . . . . . . . . . . . . . . . . . . 14 Turn on the machine . . . . . . . . . . . . . . . . . . . . . . . . . . . . . . . . . . . . . . . . 17 Shut down the machine . . . . . . . . . . . . . . . . . . . . . . . . . . . . . . . . . . . . . . 18
Chapter 3 |
|
Overview of the system components . . . . . . . . . . . . . . . . . . . . . . . . . . . . . . . . . |
21 |
Introduction to the main system components . . . . . . . . . . . . . . . . . . . . . 22 The operator panel. . . . . . . . . . . . . . . . . . . . . . . . . . . . . . . . . . . . . . . . . . 24 The operator attention light . . . . . . . . . . . . . . . . . . . . . . . . . . . . . . . . . . . 26 The output locations. . . . . . . . . . . . . . . . . . . . . . . . . . . . . . . . . . . . . . . . . 28 The paper modules . . . . . . . . . . . . . . . . . . . . . . . . . . . . . . . . . . . . . . . . . 31
Chapter 4
Working with the operator panel . . . . . . . . . . . . . . . . . . . . . . . . . . . . . . . . . . . . . 33
Introduction . . . . . . . . . . . . . . . . . . . . . . . . . . . . . . . . . . . . . . . . . . . . . . . 34 The dashboard . . . . . . . . . . . . . . . . . . . . . . . . . . . . . . . . . . . . . . . . . . 34 The Schedule view. . . . . . . . . . . . . . . . . . . . . . . . . . . . . . . . . . . . . . . . . . 37 Introduction to the 'Schedule' view . . . . . . . . . . . . . . . . . . . . . . . . . . . 37 Load the media . . . . . . . . . . . . . . . . . . . . . . . . . . . . . . . . . . . . . . . . . . 42 Instructions for printing to the stacker/stapler (iMFS) . . . . . . . . . . . . . 44 Stop a job . . . . . . . . . . . . . . . . . . . . . . . . . . . . . . . . . . . . . . . . . . . . . . 45 The Jobs view . . . . . . . . . . . . . . . . . . . . . . . . . . . . . . . . . . . . . . . . . . . . . 48 Introduction to the 'Jobs' view . . . . . . . . . . . . . . . . . . . . . . . . . . . . . . . 48 Schedule a waiting job for printing . . . . . . . . . . . . . . . . . . . . . . . . . . . 52 Reprint a job . . . . . . . . . . . . . . . . . . . . . . . . . . . . . . . . . . . . . . . . . . . . 54 Give priority to a scheduled job. . . . . . . . . . . . . . . . . . . . . . . . . . . . . . 56 Delete a job . . . . . . . . . . . . . . . . . . . . . . . . . . . . . . . . . . . . . . . . . . . . . 57 Print a scheduled job later. . . . . . . . . . . . . . . . . . . . . . . . . . . . . . . . . . 59 Make a proof . . . . . . . . . . . . . . . . . . . . . . . . . . . . . . . . . . . . . . . . . . . . 61 Print the job parameters . . . . . . . . . . . . . . . . . . . . . . . . . . . . . . . . . . . 63 Bundle and split jobs . . . . . . . . . . . . . . . . . . . . . . . . . . . . . . . . . . . . . . 64 Print all the jobs for which the media are available . . . . . . . . . . . . . . . 68
5

Table of Contents
Print the jobs that have a label . . . . . . . . . . . . . . . . . . . . . . . . . . . . . . 69 Checking and changing the job properties . . . . . . . . . . . . . . . . . . . . . 71 Change the media . . . . . . . . . . . . . . . . . . . . . . . . . . . . . . . . . . . . . 71 Change the number of sets . . . . . . . . . . . . . . . . . . . . . . . . . . . . . . 74 Change the output location. . . . . . . . . . . . . . . . . . . . . . . . . . . . . . . 76 Change the number of staples . . . . . . . . . . . . . . . . . . . . . . . . . . . . 78 Change the sorting method . . . . . . . . . . . . . . . . . . . . . . . . . . . . . . 80 Change the type of offset stacking . . . . . . . . . . . . . . . . . . . . . . . . . 82 Check the first set. . . . . . . . . . . . . . . . . . . . . . . . . . . . . . . . . . . . . . 85 Shift the image in the document printing mode . . . . . . . . . . . . . . . 87
The Trays view. . . . . . . . . . . . . . . . . . . . . . . . . . . . . . . . . . . . . . . . . . . . . 89 Introduction to the 'Trays' view . . . . . . . . . . . . . . . . . . . . . . . . . . . . . . 89 Assign the media to a paper tray. . . . . . . . . . . . . . . . . . . . . . . . . . . . . 92 The System view . . . . . . . . . . . . . . . . . . . . . . . . . . . . . . . . . . . . . . . . . . . 94 The Printer section . . . . . . . . . . . . . . . . . . . . . . . . . . . . . . . . . . . . . . . 94 Introduction to the 'Printer' section . . . . . . . . . . . . . . . . . . . . . . . . . 94 Check the status of the toner reservoirs. . . . . . . . . . . . . . . . . . . . . 96 Check the status of the staple cartridges . . . . . . . . . . . . . . . . . . . . 98 Reset the day counters. . . . . . . . . . . . . . . . . . . . . . . . . . . . . . . . . . 99 Find the meter readings . . . . . . . . . . . . . . . . . . . . . . . . . . . . . . . . 101 The Setup section . . . . . . . . . . . . . . . . . . . . . . . . . . . . . . . . . . . . . . . 102 Introduction to the 'Setup' section. . . . . . . . . . . . . . . . . . . . . . . . . 102 Work with the workflow profiles . . . . . . . . . . . . . . . . . . . . . . . . . . 104 Change the language . . . . . . . . . . . . . . . . . . . . . . . . . . . . . . . . . . 109 Change the warning time . . . . . . . . . . . . . . . . . . . . . . . . . . . . . . . 111 Change the advanced media settings . . . . . . . . . . . . . . . . . . . . . 114 Make an intermediate check print. . . . . . . . . . . . . . . . . . . . . . . . . 118 The Media section . . . . . . . . . . . . . . . . . . . . . . . . . . . . . . . . . . . . . . . 120 Introduction to the 'Media' section . . . . . . . . . . . . . . . . . . . . . . . . 120 Introduction to the media handling . . . . . . . . . . . . . . . . . . . . . . . . 122 Add temporary media to the 'Media catalog' . . . . . . . . . . . . . . . . 124 Perform a media registration for standard-size media . . . . . . . . . 126 Perform a media registration for large media . . . . . . . . . . . . . . . . 131 The Transaction section (optional) . . . . . . . . . . . . . . . . . . . . . . . . . . 137 Introduction to the 'Transaction' section . . . . . . . . . . . . . . . . . . . 137 Activate the transaction printing function . . . . . . . . . . . . . . . . . . . 140 Shift the image in the transaction printing mode . . . . . . . . . . . . . 142 Handle the media messages . . . . . . . . . . . . . . . . . . . . . . . . . . . . 143
Chapter 5
Keeping the printer running . . . . . . . . . . . . . . . . . . . . . . . . . . . . . . . . . . . . . . . . 147
Add toner . . . . . . . . . . . . . . . . . . . . . . . . . . . . . . . . . . . . . . . . . . . . . . . . 148 Finisher: Add staples . . . . . . . . . . . . . . . . . . . . . . . . . . . . . . . . . . . . . . . 150 Stacker/stapler (iMFS): Replace the staple cartridge. . . . . . . . . . . . . . . 155 Troubleshooting . . . . . . . . . . . . . . . . . . . . . . . . . . . . . . . . . . . . . . . . . . . 156
6

Table of Contents
Appendix A
Miscellaneous . . . . . . . . . . . . . . . . . . . . . . . . . . . . . . . . . . . . . . . . . . . . . . . . . . . 161
Product specifications . . . . . . . . . . . . . . . . . . . . . . . . . . . . . . . . . . . . . . 162
7

Table of Contents
8
Chapter 1
Introduction
9
Notes for the reader
Notes for the reader
Introduction
This manual helps you to use the machine. The manual contains a description of the machine and guidelines to use and operate the machine. There are also tips to increase your knowledge of the machine and to help you manage the workflow even better.
Definition
Attention Getters
Parts of this manual require your special attention. These parts provide important, additional information or are about the prevention of damage to your properties.
Note, Attention, and Caution
Caution: A part marked with Caution contains information to prevent personal injury.
Attention: A part marked with Attention contains information to prevent damage to items, for example the machine or a file.
Note: A part marked with Note contains additional information about the correct operation of the machine.
Safety information
The safety information for this product is included in a separate user manual with the title Safety information. This manual is part of the documentation set that you received with your product.
10 Chapter 1 Introduction

Introduction to the bizhub PRO 1600P/2000P/2500P
Introduction to the bizhub PRO 1600P/2000P/2500P
Introduction
The bizhub PRO 1600P/2000P/2500P is a series of high-volume, cut-sheet printers. The machines are intended for both document printing and stream printing. Duplex technology enables the machine to print on the front and back side of a sheet at the same time. Depending on the version, the sustained print speed, including reconditioning, ranges from 80-125 sheets per minute (A4 / Letter). That means the machine can print 160 - 250 images per minute (A4 / Letter) when printing a 2-sided document.
The print speed for 1-sided documents (A4/Letter) is 125 images per minute. This section gives a short description of the main features of the machine.
Note: Not all the configurations mentioned in this user manual are available worldwide. Please contact your local dealer for the available configurations in your country.
Overview of the main features
■Advanced scheduling concept on the operator panel to keep the machine running.
■Load and assign the media while the machine prints.
■Support of up to 12 paper trays (total input capacity up to 13,800 sheets) and a roll feeder.
■Support of up to 3 stackers, a finisher, a stacker/stapler and other external finishers.
■Support of a large range of media, media sizes and media weights.
■Support of PS/PCL/PDF and streaming PS.
11

Available documentation
Available documentation
Introduction
This machine is delivered with a documentation set that consists of the following items.
■A CD-ROM with all the manuals mentioned below
■A hardcopy user manual entitled 'Safety information'.
■Integrated Online Helps in the printer driver, the Settings Editor and other proprietary applications.
Main Content of the User Manuals
The following table provides an overview of the main content of the user manuals.
[1] Main Content of the User Manuals
User Manual |
Main content |
|
|
|
|
Operating |
■ |
Overview of the main system components |
information |
■ |
Working with the operator panel |
|
■ Handling and managing jobs on the operator panel |
|
|
■ Add media, toner and staples |
|
|
|
|
Maintenance tasks |
■ |
Replacing parts |
|
■ |
Cleaning parts |
|
■ Solve a paper jam in the engine module |
|
|
|
|
Safety information |
■ |
Instructions for safe use |
|
■ |
Safety Data Sheets |
|
|
|
12 Chapter 1 Introduction
Chapter 2
Power information
13

The power modes
The power modes
Introduction
This section describes the power switches and the main power modes of the machine.
The table in this section describes, among other things, the low-power mode and the sleep mode. These modes are energy-saving modes. You can set the timers for these modes in the Settings Editor on the controller. Furthermore, you can set a calendar timer in the Settings Editor. Then the machine will wake up from the sleep mode at the indicated time. You can use the calendar timer for example to make sure that the machine is ready for use at the beginning of your working day. The machine can warm up before you start your working day. Please refer to the online help on the Settings Editor for more information about these timers.
Description of the power switch and the On/Off button
The machine has the following switch and button to control the power supply.
■Power switch 
The power switch is located at the back side of the machine. The power switch connects and disconnects the machine to the mains power.
■On/Off button with amber and green LEDs  .
.
The On/Off button on the machine (see ‘Introduction to the main system
components’ on page 22) allows you to toggle between the stand-by mode and the sleep mode. This is only possible if the power switch  is in the '1' position and the start-up phase is completed.
14 Chapter 2 Power information

|
|
|
|
|
|
|
|
The power modes |
|||||
|
|
|
|
|
|
|
|
|
|
|
|
|
|
Description of the main power modes |
|
|
|
|
|
|
|
|
|
|
|
||
|
[2] The main power modes |
|
|
|
|
|
|
|
|
|
(1 – 2) |
||
|
|
|
|
|
|
|
|
|
|
|
|
|
|
|
Power mode |
Description |
|
|
Status of the |
|
Status of the |
||||||
|
|
|
|
|
On/Off |
|
Hold button |
||||||
|
|
|
|
|
button |
|
|
|
|
|
and |
||
|
|
|
|
|
|
|
|
|
|
Release |
|||
|
|
|
|
|
|
|
|
|
button |
|
|
||
|
|
|
|
|
|
|
|
|
|
|
|
|
|
|
Off |
The machine is completely off. |
Off |
|
Off |
||||||||
|
|
The power switch |
is in the |
|
|
|
|
|
|
|
|
|
|
|
|
'O' position. There is no power |
|
|
|
|
|
|
|
|
|
||
|
|
consumption. The machine |
|
|
|
|
|
|
|
|
|
||
|
|
cannot receive or print jobs. |
|
|
|
|
|
|
|
|
|
||
|
|
|
|
|
|
|
|
|
|
|
|
||
|
Starting up |
Stage 1: After you put the |
Blinking |
|
Off |
||||||||
|
(divided into 2 |
power switch |
in the 'I' |
amber |
|
|
|
|
|
|
|||
|
stages) |
position, but before you press |
|
|
|
|
|
|
|
|
|
||
|
|
the On/Off button . |
|
|
|
|
|
|
|
|
|
|
|
|
|
|
|
|
|
|
|
|
|
|
|
||
|
|
Stage 2: After you press the |
Continuous |
|
On |
||||||||
|
|
On/Off button . |
|
green |
|
|
|
|
|
|
|||
|
|
|
|
|
|
|
|
|
|
|
|
||
|
Stand-by |
The machine is ready to print |
Continuous |
|
On |
||||||||
|
mode |
jobs. |
|
|
green |
|
|
|
|
|
|
||
|
|
|
|
|
|
|
|
|
|
|
|
|
|
|
Run mode |
The machine is busy. |
|
Continuous |
|
On |
|||||||
|
|
|
|
|
green |
|
|
|
|
|
|
||
|
|
|
|
|
|
|
|
|
|
|
|
||
|
Low-power |
The machine automatically |
Continuous |
|
On |
||||||||
|
mode |
enters low-power mode when |
green |
|
|
|
|
|
|
||||
|
|
the machine has been in |
|
|
|
|
|
|
|
|
|
||
|
|
stand-by mode for a defined |
|
|
|
|
|
|
|
|
|
||
|
|
period of time and no button |
|
|
|
|
|
|
|
|
|
||
|
|
was pressed. |
|
|
|
|
|
|
|
|
|
|
|
|
|
The machine wakes up when a |
|
|
|
|
|
|
|
|
|
||
|
|
job arrives in the list of |
|
|
|
|
|
|
|
|
|
||
|
|
'Scheduled jobs' or when you |
|
|
|
|
|
|
|
|
|
||
|
|
press a button. The machine |
|
|
|
|
|
|
|
|
|
||
|
|
will start to warm up. |
|
|
|
|
|
|
|
|
|
|
|
|
|
|
|
|
|
|
|
|
|
|
|
|
|
15

The power modes
[2] The main power modes |
|
|
|
|
|
|
|
|
(2 – 2) |
||
|
|
|
|
|
|
|
|
|
|
|
|
Power mode |
Description |
|
|
Status of the |
Status of the |
||||||
|
|
|
|
On/Off |
Hold button |
||||||
|
|
|
|
button |
|
|
|
|
and |
||
|
|
|
|
|
|
|
|
Release |
|||
|
|
|
|
|
|
|
button |
|
|
||
|
|
|
|
|
|
|
|
|
|
||
|
|
|
|
|
|
|
|
|
|
|
|
Going into |
The machine is preparing to go |
Blinking |
On |
||||||||
sleep mode |
into sleep mode. |
|
|
amber |
|
|
|
|
|
||
|
|
|
|
|
|||||||
Sleep mode |
The machine automatically |
|
Continuous |
Off |
|||||||
|
goes from the low-power mode |
amber |
|
|
|
|
|
||||
|
into the sleep mode after a |
|
|
|
|
|
|
|
|
|
|
|
defined time. |
|
|
|
|
|
|
|
|
|
|
|
You can also place the machine |
|
|
|
|
|
|
|
|
||
|
into the sleep mode manually. |
|
|
|
|
|
|
|
|
||
|
Press the On/Off button |
to |
|
|
|
|
|
|
|
|
|
|
do this. The machine will enter |
|
|
|
|
|
|
|
|
||
|
the sleep mode as soon as the |
|
|
|
|
|
|
|
|
||
|
list of 'Scheduled jobs' is empty. |
|
|
|
|
|
|
|
|
||
|
The machine will wake up from |
|
|
|
|
|
|
|
|
||
|
the sleep mode when you press |
|
|
|
|
|
|
|
|
||
|
the On/Off button |
or when |
|
|
|
|
|
|
|
|
|
|
the calendar timer expires. The |
|
|
|
|
|
|
|
|
||
|
machine will also wake up |
|
|
|
|
|
|
|
|
|
|
|
when a printable job arrives in |
|
|
|
|
|
|
|
|
||
|
the list of 'Scheduled jobs', |
|
|
|
|
|
|
|
|
|
|
|
provided that the function |
|
|
|
|
|
|
|
|
|
|
|
'Automatic wake-up' in the |
|
|
|
|
|
|
|
|
|
|
|
Settings Editor is enabled. |
|
|
|
|
|
|
|
|
|
|
|
|
|
|
|
|
|
|
|
|
|
|
16 Chapter 2 Power information

Turn on the machine
Turn on the machine
Introduction
This section describes how to turn on the machine when it is completely off.
Note: When the machine is in sleep mode (see ‘The power modes’ on page 14), you must press the On/Off button  to wake up the machine.
Turn on the machine
1.Put the power switch  at the back of the machine in the 'I' position.
The On/Off button  blinks amber while the machine and the controller start up. Wait until the operator panel asks you to press the On/Off button
  .
.
2.Press the On/Off button  .
.
The On/Off button  remains green. The machine warms up.
17
Shut down the machine
Shut down the machine
Introduction
This section describes how to shut down the machine completely, for example for the holidays.
Note: If you want to put the machine into the sleep mode manually (see ‘The power modes’ on page 14), for example at the end of a working day, you must press the On/Off button  . Then the machine will go into the sleep mode as soon as the list of 'Scheduled jobs' is empty. When the machine is in the sleep mode, the On/Off button
  is continuous amber.
Illustration
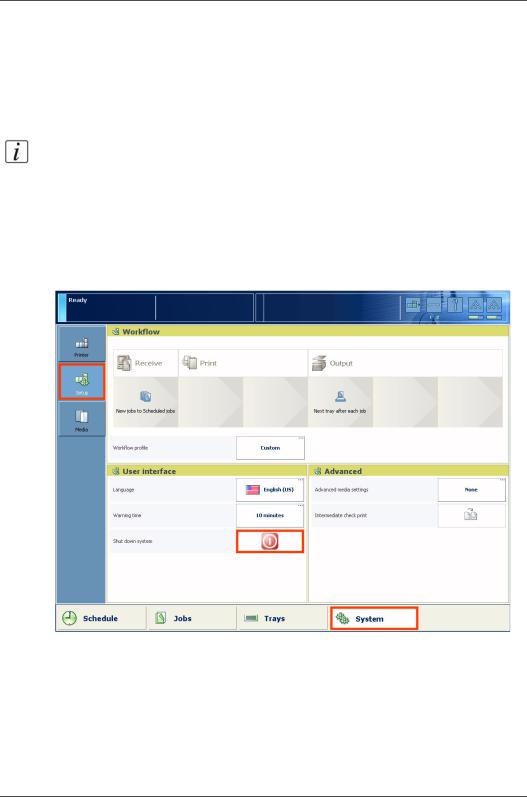
[1] Shut down the machine
Shut down the machine
1.On the operator panel, press the 'System' button.
2.Press the 'Setup' button.
3.Press the 'Shut down system' button in the 'User interface' section.
A dialog box asks you to confirm that you really want to shut down the machine.
18 Chapter 2 Power information

Shut down the machine
4.Press 'Yes'.
A message indicates when the shutdown will begin. Wait until the following has happened.
■The Hold button  and the Release button
  are off
■The On/Off button  blinks amber
■The screen of the operator panel is off.
5.Put the power switch  at the back of the machine in the 'O' position.
19
Shut down the machine
20 Chapter 2 Power information
Chapter 3
Overview of the system components
21
Introduction to the main system components
Introduction to the main system components
Introduction
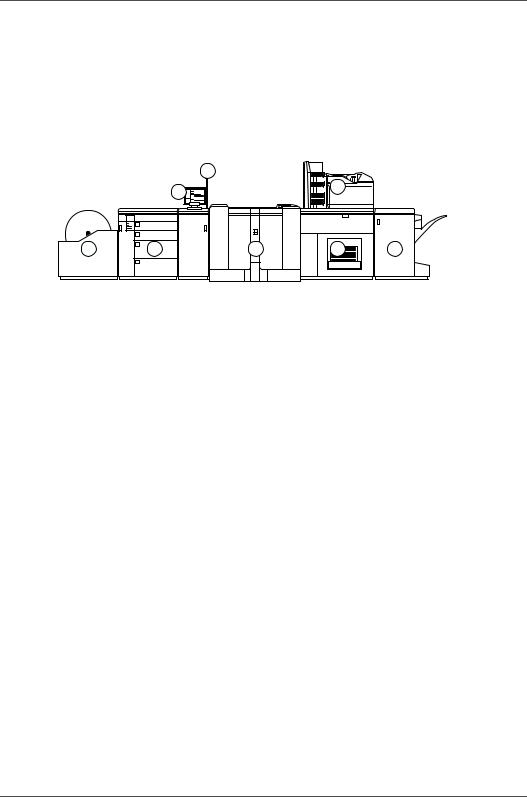
The following illustration shows the main system components. The table describes the main components. Please follow the links in the table for comprehensive information.
2
|
|
|
1 |
7 |
|
|
|
|
|
|
|
|
1 |
|
|
|
|
|
2 |
|
|
|
|
3 |
3 |
4 |
5 |
6 |
8 |
|
4 |
|
|
|
|
[2] The main system components
The main system components
[3] The main system components |
(1 – 2) |
|
|
|
|
|
Component |
Function |
|
|
|
1 |
Operator panel |
The operator panel helps you with your daily |
|
|
work, for example the scheduling of the jobs. |
|
|
Furthermore, the operator panel helps you to |
|
|
solve errors or perform maintenance tasks (see |
|
|
‘The operator panel’ on page 24). |
|
|
|
2 |
Operator attention |
The operator attention light enables you to check |
|
light |
the status of the system from a distance (see ‘The |
|
|
operator attention light’ on page 26). |
|
|
|
3 |
Roll feeder |
A roll feeder is an optional device that adds |
|
(optional) |
paper input capacity to your printer. When you |
|
|
use a roll feeder, you can only use 1 or 2 paper |
|
|
modules. A combination of 3 paper modules and |
|
|
a roll feeder is not possible. The operator panel |
|
|
displays the roll feeder and gives feedback about |
|
|
the status of the roll feeder. For example whether |
|
|
the roll is full or empty. Please refer to the |
|
|
documentation of the roll feeder manufacturer |
|
|
for more information, for example about |
|
|
replacing an empty roll. |
|
|
|
22 Chapter 3 Overview of the system components

|
|
|
Introduction to the main system components |
|
|
|
|
|
[3] The main system components |
(2 – 2) |
|
|
|
|
|
|
|
Component |
Function |
|
|
|
|
|
4 |
Paper module |
The paper module contains 4 paper trays. The |
|
|
|
paper trays contain the media that will be |
|
|
|
printed. The default configuration of the system |
|
|
|
contains 1 paper module. You can add 1 or 2 |
|
|
|
more paper modules to the default configuration |
|
|
|
to increase the media input capacity (see ‘The |
|
|
|
paper modules’ on page 31). |
|
|
|
|
|
5 |
Engine module |
The engine module contains the components that |
|
|
|
print the media. Access to the engine module is |
|
|
|
only required when a paper jam occurs or when |
|
|
|
maintenance is required. The doors at the |
|
|
|
left-hand side and right-hand side of the engine |
|
|
|
module give access to the toner units. |
|
|
|
|
|
6 |
Stacker |
The stacker is the output location of a default |
|
|
|
configuration. The system supports up to 3 |
|
|
|
stackers (see The output locations on page 28). |
|
|
|
|
|
7 |
Finisher (optional) |
The finisher on top of the stacker is an optional |
|
|
|
output location for the print jobs. The finisher |
|
|
|
can staple the jobs (see The output locations on |
|
|
|
page 28). |
|
|
|
|
|
8 |
Stacker/stapler |
The stacker/stapler (iMFS) is an optional output |
|
|
(optional) |
location for the print jobs (see The output |
|
|
|
locations on page 28). The stacker/stapler |
|
|
|
supports a large number of media sizes. |
|
|
|
|
23
The operator panel
The operator panel
Introduction
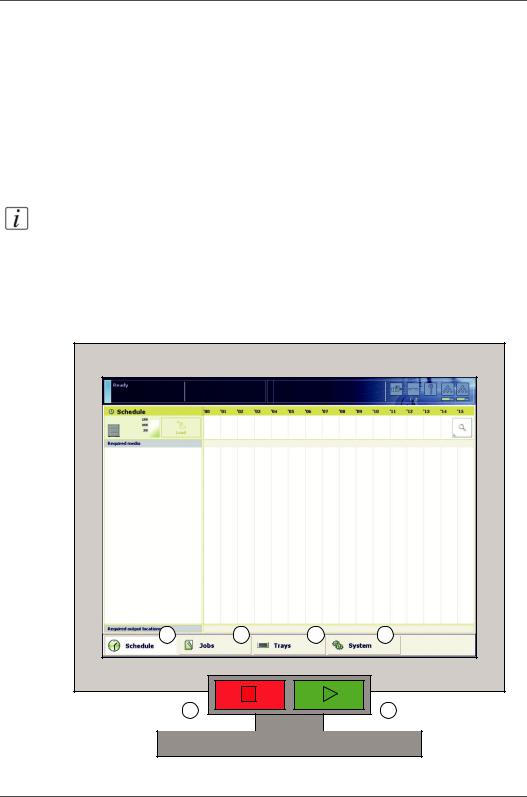
The operator panel is a touch screen panel. You must touch the buttons on the operator panel to access the various functions. The operator panel is divided into 4 main views. The taskbar at the bottom of the screen contains the buttons that give access to the 4 main views. Furthermore, the operator panel has 2 hardkeys ( and
and  ) at the bottom of the panel.
This section gives an overview of the main keys and buttons of the operator panel.
Note: You can clean the screen of the operator panel with a 50% mix of water and isopropyl alcohol (K2). Use a lint-free cloth. Always put the cleaner onto the cloth and not directly on the screen.
Illustration
3 |
4 |
5 |
6 |
1 |
2 |
[3] The operator panel
24 Chapter 3 Overview of the system components

The operator panel
The main components of the operator panel
[4] The main components of the operator panel
|
Component |
Function |
|
|
|
1 |
Hold key |
■ Put the machine on hold |
|
|
■ Stop printing after a set |
|
|
■ Stop printing as soon as possible (see |
|
|
‘Stop a job’ on page 45). |
|
|
|
2 |
Release key |
■ Allow the machine to print |
|
|
■ Resume printing when the machine is on |
|
|
hold. |
|
|
|
3 |
'Schedule' button |
Access the 'Schedule' view (see |
|
|
‘Introduction to the 'Schedule' view’ on |
|
|
page 37). |
|
|
|
4 |
'Jobs' button |
Access the 'Jobs' view (see ‘Introduction to |
|
|
the 'Jobs' view’ on page 48). |
|
|
|
5 |
'Trays' button |
Access the 'Trays' view (see ‘Introduction to |
|
|
the 'Trays' view’ on page 89). |
|
|
|
6 |
'System' button |
Access the 'System' view |
|
|
(see ‘Introduction to the 'Printer' section’ on |
|
|
page 94) |
|
|
(see ‘Introduction to the 'Setup' section’ on |
|
|
page 102) |
|
|
(see ‘Introduction to the 'Media' section’ on |
|
|
page 120) |
|
|
|
25

The operator attention light
The operator attention light
Introduction
The operator attention light informs you about the status of the machine. To improve the productivity, the operator attention light can warn you some time before the machine stops. You can set the warning time on the operator panel (see ‘Change the warning time’ on page 111).
The operator attention light contains 3 lights (red, orange and green) that indicate the current status of the machine. The colors of the lights match the status that is currently indicated on the operator panel. For example, when operator interaction is required soon, both the dashboard (see ‘The dashboard’ on page 34) and the operator attention light will display an orange warning. The dashboard displays a message with the required action.
This section describes the meaning of the colors of the operator attention light.
[4] The operator attention light
Status colors
[5] The colors of the operator attention light |
(1 – 2) |
|
|
|
|
Color |
Description |
|
|
|
|
Red |
The machine has stopped, for example because a |
|
|
required media type is not available or an error has |
|
|
occurred. |
|
|
Operator attention is required now. |
|
|
|
|
Orange |
The machine will stop soon, for example because an |
|
|
output location is almost full. The orange light lights up |
|
|
when the machine reaches the warning time. |
|
|
Operator attention is required soon. |
|
|
|
|
26 Chapter 3 Overview of the system components

|
|
The operator attention light |
|
|
|
|
|
|
[5] The colors of the operator attention light |
(2 – 2) |
|
|
|
|
|
|
Color |
Description |
|
|
|
|
|
|
Green |
The machine is busy printing. The machine can print |
|
|
|
longer than the defined warning time. |
|
|
|
Operator attention is not required. |
|
|
|
|
|
|
All lights off |
The machine is idle. There are no jobs scheduled for |
|
|
|
printing. |
|
|
|
|
|
27
The output locations
The output locations
Introduction
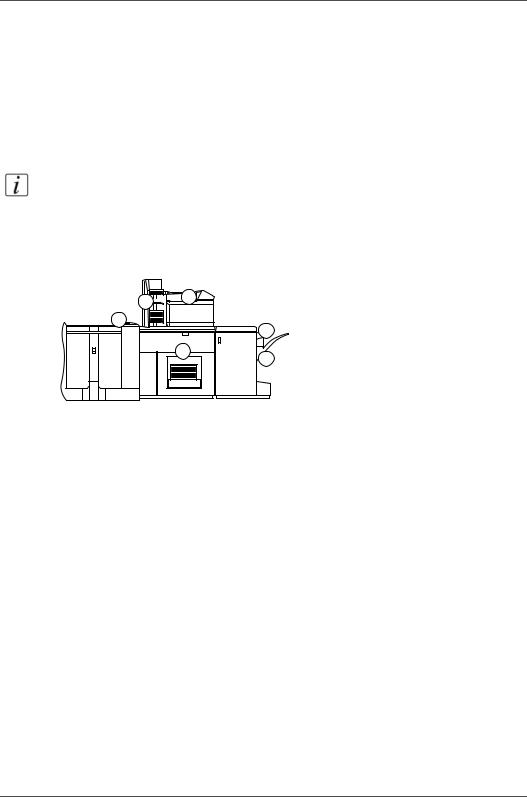
The machine supports several output locations for the printed jobs. The default configuration of your machine contains a stacker and the system output. The finisher and the stacker/stapler are optional output locations. Furthermore, you can connect several optional external finishers to the machine.
Note: You need the optional finisher, the optional stacker/stapler or another optional external finisher to staple the jobs.
Illustration
3 4
4
2
6
15
[5]The output locations
28 Chapter 3 Overview of the system components

|
|
|
|
The output locations |
||
|
|
|
|
|
|
|
Overview of the output locations |
|
|
||||
|
[6] Description of the output locations |
(1 – 2) |
||||
|
|
|
|
|
|
|
|
|
Component |
Description |
|
|
|
|
|
|
|
|||
|
1 |
'Stacker' |
The stacker is the default output location of the machine. The |
|||
|
|
|
stacker capacity is 6,000 sheets, in 2 stacks of 3,000 sheets |
|||
|
|
|
each (80 g/m2 or 20 lb. bond). |
|
|
|
|
|
|
The stacker does not contain staple cartridges. Therefore, the |
|||
|
|
|
stacker cannot be the output location for jobs that require |
|||
|
|
|
staples. |
|
|
|
|
|
|
|
|||
|
2 |
'System output' |
The system output is the output location for the following |
|||
|
|
|
prints. |
|
|
|
|
|
|
■ |
Error prints |
|
|
|
|
|
■ |
Configuration reports |
|
|
|
|
|
■ |
Job tickets |
|
|
|
|
|
■ The test sheets for the media registration. |
|
|
|
|
|
|
Make sure that you regularly remove the sheets from the |
|||
|
|
|
system output. |
|
|
|
|
|
|
|
|||
|
3 |
'Finisher' |
The optional finisher contains the following output trays. |
|||
|
|
(optional) |
■ |
3 output trays |
|
|
|
|
|
■ 1 upper output (see no. 4 below) |
|
|
|
|
|
|
The finisher contains 2 staple cartridges to staple the jobs. |
|||
|
|
|
The 3 output trays can receive A4, Letter and similar media |
|||
|
|
|
sizes. Stapled jobs (A4, Letter and similar media sizes only) |
|||
|
|
|
go into the output trays. The total capacity of the output trays |
|||
|
|
|
is 3,700 sheets (80 g/m2 or 20 lb bond). |
|
|
|
|
|
|
|
Note: The output trays cannot receive tab sheets. |
||
|
|
|
|
|||
|
4 |
'Finisher upper |
The finisher upper output is part of the finisher. The upper |
|||
|
|
output' |
output can receive all formats. However, the upper output is |
|||
|
|
|
mainly intended for large media or jobs with mixed size |
|||
|
|
|
media. The maximum capacity of the upper output is 500 |
|||
|
|
|
sheets (80 g/m2 or 20 lb bond). |
|
|
|
|
|
|
|
Note: The upper output does not contain staple |
||
|
|
|
|
cartridges. Therefore, the upper output cannot be |
||
|
|
|
|
the output location for jobs that require staples. |
||
|
|
|
|
|
|
|
29
Loading...