KitchenAid KSCS25FJSS01, KSBS25FJBL01 Owner’s Manual
CABINET DEPTH
SIDE BY SIDE REFRIGERATOR
Use&CareGuide
For questions about features, operation/performance, parts accessories or service, call: 1-800-422-1230
In Canada, call for assistance 1-800-461-5681, for installation and service, call: 1-800-807-6777 or visit our website at...
www.kitchenaid.com or www.kitchenaid.com/canada
RÉFRIGÉRATEUR CÔTE À CÔTE À PROFONDEUR D’ARMOIRE
Guided’utilisationetd’entretien
Au Canada, pour assistance, composer le 1-800-461-5681, pour installation ou service le 1-800-807-6777 ou visitez notre site web à...
www.kitchenaid.com/canada
Table of Contents/Table des matières ........................................................................... |
2 |
2210719

TABLE OF CONTENTS
REFRIGERATOR SAFETY.......................................................... |
3 |
INSTALLING YOUR REFRIGERATOR.......................................... |
4 |
Unpacking Your Refrigerator ....................................................... |
4 |
Space Requirements.................................................................... |
4 |
Electrical Requirements ............................................................... |
5 |
Water System Preparation........................................................... |
5 |
Connecting the Refrigerator to a Water Source .......................... |
6 |
Custom Door Panels.................................................................... |
7 |
Base Grille .................................................................................... |
8 |
Leveling Your Refrigerator ........................................................... |
8 |
Understanding Sounds You May Hear........................................ |
9 |
USING YOUR REFRIGERATOR .................................................. |
10 |
Ensuring Proper Air Circulation.................................................. |
10 |
Setting the Controls ................................................................... |
10 |
Adjusting Control Settings ......................................................... |
11 |
REFRIGERATOR FEATURES ...................................................... |
11 |
Water and Ice Dispensers.......................................................... |
11 |
Water Filtration and Monitoring System .................................... |
13 |
Refrigerator Shelves................................................................... |
14 |
Meat Drawer, Crisper and Covers ............................................. |
14 |
Crisper Humidity Control ........................................................... |
15 |
Beverage Drawer........................................................................ |
15 |
Utility or Egg Bin......................................................................... |
15 |
Wine or Can/Bottle Rack ........................................................... |
15 |
FREEZER FEATURES .................................................................. |
16 |
Ice Maker and Storage Bin ........................................................ |
16 |
Freezer Shelf .............................................................................. |
16 |
Freezer Basket ........................................................................... |
17 |
DOOR FEATURES........................................................................ |
17 |
Door Rails................................................................................... |
17 |
Door Bins.................................................................................... |
17 |
CARING FOR YOUR REFRIGERATOR....................................... |
17 |
Cleaning Your Refrigerator......................................................... |
17 |
Changing the Light Bulbs........................................................... |
18 |
Power Interruptions.................................................................... |
19 |
Vacation and Moving Care......................................................... |
19 |
TROUBLESHOOTING .................................................................. |
20 |
ASSISTANCE OR SERVICE......................................................... |
23 |
WARRANTY .............................................................................. |
24 |
WATER FILTER CERTIFICATIONS ......................................... |
25 |
PRODUCT DATA SHEETS ....................................................... |
26 |
TABLE DES MATIÈRES
SÉCURITÉ DU RÉFRIGÉRATEUR ........................................... |
27 |
INSTALLATION DU RÉFRIGÉRATEUR ...................................... |
28 |
Déballage de votre réfrigérateur ................................................ |
28 |
Espacement requis..................................................................... |
28 |
Spécifications électriques .......................................................... |
29 |
Préparation du système d’eau ................................................... |
29 |
Raccordement du réfrigérateur à une canalisation d’eau ......... |
30 |
Panneaux de porte sur commande ........................................... |
31 |
Grille de la base.......................................................................... |
32 |
Nivellement du réfrigérateur....................................................... |
32 |
Les bruits de l’appareil que vous pouvez entendre................... |
33 |
UTILISATION DU RÉFRIGÉRATEUR.......................................... |
34 |
Pour s’assurer d’une circulation d’air appropriée...................... |
34 |
Réglage des commandes .......................................................... |
34 |
Ajustement du réglage des commandes................................... |
35 |
CARACTÉRISTIQUES DU RÉFRIGÉRATEUR ........................... |
35 |
Distributeurs d’eau et de glaçons .............................................. |
35 |
Système de filtration et de contrôle d’eau................................. |
37 |
Tablettes du réfrigérateur........................................................... |
38 |
Tiroir à viande, bac à légumes et couvercles ............................ |
39 |
Réglage de l’humidité dans les bacs à légumes ....................... |
39 |
Tiroir à boisson........................................................................... |
40 |
Bac utilitaire ou oeufrier ............................................................. |
40 |
Porte-cannettes/bouteilles ou casier à vin ................................ |
40 |
CARACTÉRISTIQUES DU CONGÉLATEUR............................... |
40 |
Machine à glaçons et bac d’entreposage ................................ |
40 |
Clayette de congélateur ............................................................. |
41 |
Panier du congélateur ................................................................ |
42 |
CARACTÉRISTIQUES DE LA PORTE......................................... |
42 |
Tringles dans la porte................................................................. |
42 |
Compartiments dans la porte .................................................... |
42 |
ENTRETIEN DE VOTRE RÉFRIGÉRATEUR ............................... |
43 |
Nettoyage du réfrigérateur ......................................................... |
43 |
Remplacement des ampoules d’éclairage ................................ |
43 |
Pannes de courant ..................................................................... |
44 |
Entretien avant les vacances ou lors d’un déménagement....... |
44 |
DÉPANNAGE................................................................................. |
45 |
ASSISTANCE OU SERVICE......................................................... |
49 |
GARANTIE...................................................................................... |
50 |
FEUILLES DE DONNÉES SUR LE PRODUIT .......................... |
51 |
2
REFRIGERATOR SAFETY
Your safety and the safety of others are very important.
We have provided many important safety messages in this manual and on your appliance. Always read and obey all safety messages.
This is the safety alert symbol.
This symbol alerts you to potential hazards that can kill or hurt you and others.
All safety messages will follow the safety alert symbol and either the word “DANGER” or “WARNING.” These words mean:
You can be killed or seriously injured if you don't immediately follow instructions.
You can be killed or seriously injured if you don't follow instructions.
All safety messages will tell you what the potential hazard is, tell you how to reduce the chance of injury, and tell you what can happen if the instructions are not followed.
IMPORTANT SAFETY INSTRUCTIONS
WARNING: To reduce the risk of fire, electric shock, or injury when using your refrigerator, follow these basic precautions:
■Plug into a grounded 3 prong outlet.
■Do not remove ground prong.
■Do not use an adapter.
■Do not use an extension cord.
■Disconnect power before servicing.
■Replace all panels before operating.
■Remove doors from your old refrigerator.
■Use nonflammable cleaner.
■Keep flammable materials and vapors, such as gasoline, away from refrigerator.
■Use two or more people to move and install refrigerator.
■Disconnect power before installing ice maker (on ice maker kit ready models only).
■Use a sturdy glass when dispensing ice or water (on some models).
SAVE THESE INSTRUCTIONS
Proper Disposal of
Your Old Refrigerator
 WARNING
Suffocation Hazard
Remove doors from your old refrigerator.
Failure to do so can result in death or brain damage.
IMPORTANT: Child entrapment and suffocation are not problems of the past. Junked or abandoned refrigerators are still dangerous
– even if they will sit for “just a few days.” If you are getting rid of your old refrigerator, please follow these instructions to help prevent accidents.
Before you throw away your old refrigerator or freezer:
■Take off the doors.
■Leave the shelves in place so that children may not easily climb inside.
3
INSTALLING YOUR REFRIGERATOR
UnpackingYourRefrigerator
WARNING
Excessive Weight Hazard
Use two or more people to move and install refrigerator.
Failure to do so can result in back or other injury.
Removing packaging materials
■Remove tape and any labels from your refrigerator before using (except the model and serial number label).
To remove any remaining tape or glue, rub the area briskly with your thumb. Tape or glue residue can also be easily removed by rubbing a small amount of liquid dish soap over the adhesive with your fingers. Wipe with warm water and dry.
■Do not use sharp instruments, rubbing alcohol, flammable fluids, or abrasive cleaners to remove tape or glue. These products can damage the surface of your refrigerator. For more information, see the “Refrigerator Safety” section.
IMPORTANT: Do not remove any permanent instruction labels inside your refrigerator, or the Tech Sheet that is fastened to the base grille.
When Moving Your Refrigerator:
Your refrigerator is heavy. When moving the refrigerator for cleaning or service, be sure to protect the floor. Always pull the refrigerator straight out when moving it.
Do not wiggle or “walk” the refrigerator when trying to move it, as floor damage could occur.
Cleaning before use
After you remove all of the packaging materials, clean the inside of your refrigerator before using it. See the cleaning instructions in the “Caring for Your Refrigerator” section.
Important information to know about glass shelves and covers:
Do not clean glass shelves or covers with warm water when they are cold. Shelves and covers may break if exposed to sudden temperature changes or impact, such as bumping. For your protection, tempered glass is designed to shatter into many small, pebble-size pieces. This is normal. Glass shelves and covers are heavy. Use special care when removing them to avoid impact from dropping.
SpaceRequirements
 WARNING
Explosion Hazard
Keep flammable materials and vapors, such as gasoline, away from refrigerator.
Failure to do so can result in death, explosion, or fire.
1 |
|
|
|
36" |
|
|
1 |
|
|
|
|
|
|||
|
|
|
|
|
|||
|
|
|
|
|
|||
|
|
|
(91.5 cm) |
|
|
||
|
|
|
|
|
|
|
|
|
|
|
|
|
16 1/2" |
|
|
13 1/4" |
|
|
|
|
|||
|
(34 cm) |
|
|
(42 cm) |
|||
|
|
|
72" |
|
|
|
|
|
|
|
(182.9 cm) |
|
|
|
|
2 |
|
12 1/2" |
20 1/4" |
|
|
2"(5 cm) |
(32 cm) |
(51.5 cm) |
2" |
||
|
|||||
|
|
|
|||
|
|
|
|
(5 cm) |
|
|
|
2 1/2" |
9 1/4" |
|
|
|
|
(6.5 cm) |
(23.5 cm) |
|
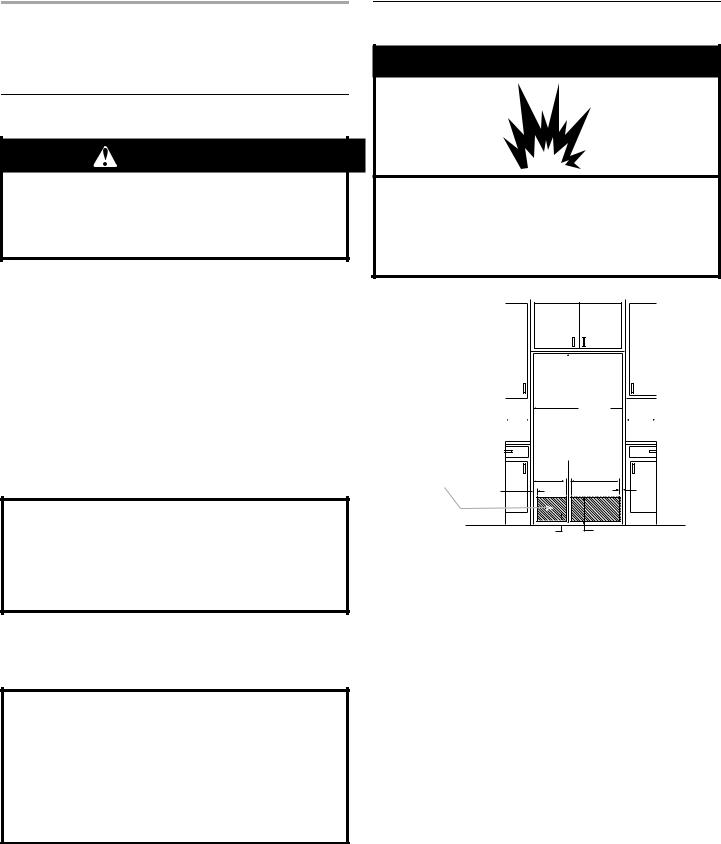
1.Minimum fixed wall position
2.Recommended locations for electrical and water connections.
3.For full-overlay cabinet doors and a trim kit, the height of the opening must be 72C\v in. (184.8 cm).
■If you are installing the refrigerator to fit flush with the front of the base cabinets, all shoe molding and baseboards must be removed from the rear of the refrigerator opening.
■The water hookup and electrical hookup must be placed near the bottom of the refrigerator.
■A trim kit is available for those installations where the refrigerator will not fit flush. See the “Assistance or Service” section for ordering information.
NOTE: Do not install the refrigerator near an oven, radiator, or other heat source, nor in a location where the temperature will fall below 55°F (13°C).
4
ElectricalRequirements
 WARNING
Electrical Shock Hazard
Plug into a grounded 3 prong outlet.
Do not remove ground prong.
Do not use an adapter.
Do not use an extension cord.
Failure to follow these instructions can result in death, fire, or electrical shock.
Before you move your refrigerator into its final location, it is important to make sure you have the proper electrical connection:
Recommended grounding method
A 115 Volt, 60 Hz., AC only 15 or 20 ampere fused, grounded electrical supply is required. It is recommended that a separate circuit serving only your refrigerator be provided. Use an outlet that cannot be turned off by a switch. Do not use an extension cord.
NOTE: Before performing any type of installation, cleaning, or removing a light bulb, turn the control, (Thermostat, Refrigerator or Freezer Control depending on the model) to OFF and then disconnect the refrigerator from the electrical source. When you are finished, reconnect the refrigerator to the electrical source and reset the control (Thermostat, Refrigerator or Freezer Control depending on the model) to the desired setting.
WaterSystemPreparation
Please read before using the water system.
Immediately after installation, follow the steps below to make sure that the water system is properly cleaned.
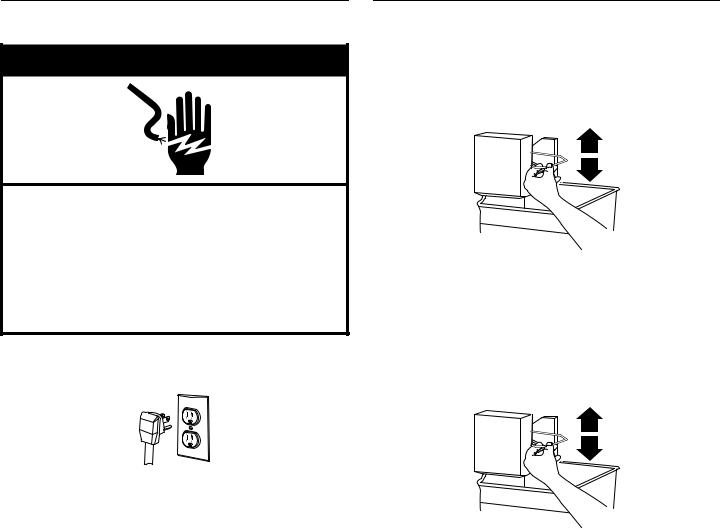
1.Turn off the ice maker by opening the freezer door and lifting up the wire shut-off arm as shown.
2.Flush the water system by dispensing and discarding
2 to 3 gallons (approximately 6 to 7 minutes) of water through the dispenser. This will clean the system and help clear air from the lines. Additional flushing may be required in some households.
3.Turn on the ice maker by opening the freezer door and lowering the wire shut-off arm as shown. Allow 24 hours to produce the first batch of ice. Discard the first three batches of ice produced. Ice maker should then produce approximately 7 to 9 batches of ice in a 24-hour period.
5
Connecting the Refrigerator
to a Water Source
Read all directions carefully before you begin. IMPORTANT:
In order to prevent possible leakage resulting in property damage, be sure to observe the following:
■If operating the refrigerator before installing the water connection, turn ice maker to the OFF position to prevent operation without water.
■All installations must be in accordance with local plumbing code requirements.
■Use the water tubing provided and check for leaks.
■Install water tubing only in areas where temperatures will remain above freezing.
REMEMBER: It may take up to 24 hours for your ice maker to begin producing ice.
Tools required:
■Standard screwdriver
■M\zn in. and Z\x in. open-end wrenches or two adjustable wrenches
■Z\v in. drill bit
■Hand drill or electric drill (properly grounded)
NOTE: Your refrigerator dealer has a kit available with a
Z\v in. saddle-type shut-off valve, a union, and copper tubing. Before purchasing, make sure a saddle-type valve complies with your local plumbing codes. Do not use a piercing-type or C\zn in. (4.76 mm) saddle valve which reduces water flow and clogs more easily.
Cold Water Supply
The ice maker water valve contains a flow washer which is used as a water pressure regulator. The ice maker needs to be connected to a cold water line with water pressure between 30 and 120 psi. If a problem occurs, call your utility company.
Connecting to water line:
1.Unplug refrigerator or disconnect power.
2.Turn OFF main water supply. Turn ON nearest faucet long enough to clear line of water.
3.Find a Z\x in. (12.70 mm) to 1Z\v in. (3.18 cm) vertical COLD water pipe near the refrigerator.
NOTE: Horizontal pipe will work, but the following procedure must be followed: Drill on the top side of the pipe, not the bottom. This will help keep water away from the drill. This also keeps normal sediment from collecting in the valve.
4.Route Z\v in. (6.35 mm) copper tubing from the water pipe to the lower rear corner of the refrigerator location. Be sure both ends of copper tubing are cut square.
5.Turn OFF main water supply. Turn ON nearest faucet long enough to clear the line of water.
6.Using a grounded drill, drill a Z\v in. (6.35 mm) hole in the cold water pipe you have selected.
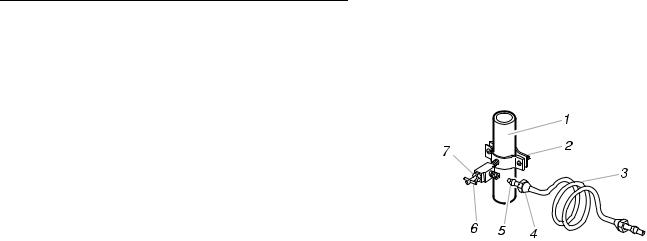
1.Cold Water Pipe
2.Pipe Clamp
3.Copper Tubing
4.Compression Nut
5.Compression Sleeve
6.Shut-Off Valve
7.Packing Nut
7.Fasten shut-off valve to cold water pipe with pipe clamp. Be sure outlet end is solidly in the Z\v in. (6.35 mm) drilled hole in the water pipe and that washer is under the pipe clamp.
Tighten packing nut. Tighten the pipe clamp screws carefully and evenly so washer makes a watertight seal. Do not overtighten or you may crush the copper tubing, especially if soft (coiled) copper tubing is used. Now you are ready to connect the copper tubing.
8.Slip compression sleeve and compression nut on copper tubing as shown in the diagram. Insert the end of the tubing into the outlet end of the shutoff valve as far as it will go. Screw the compression nut onto the outlet end with an adjustable wrench. Do not overtighten.
9.Place the free end of the tubing into a container or sink, and turn ON main water supply and flush out tubing until water is clear. Turn OFF the shut-off valve on the water pipe.
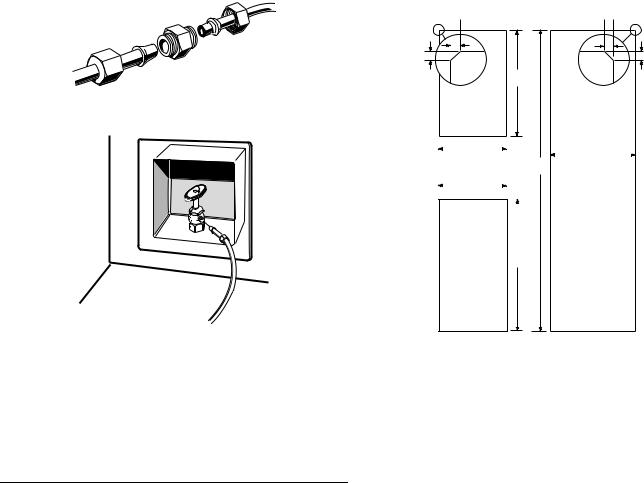
10.Slip the compression sleeve and compression nut onto the other end of the copper tube. Insert into the tube coupling as far as it will go. Screw compression nut onto coupling and tighten with wrenches. Do not overtighten.
11.Add strain relief to hold coupling in position.
6
Connecting to refrigerator:
1.Remove the shipping tape from gray, coiled water tubing on the rear of the refrigerator.
2.Style 1: Thread the provided nut onto the coupling on the end of the copper tubing. Tighten the nut by hand. Then tighten it with a wrench two more turns. Do not overtighten.
Style 2: Thread the provided nut onto the water valve as shown.
Weight requirements for raised panel inserts:
■Refrigerator door panel should not exceed 28 lbs. (12.7 kg).
■Freezer door panels should not exceed 21 lbs. (9.5 kg) combined weight.
Dimensions for custom wood panels:
1/8" |
1/8" |
(3.18 mm) |
(3.18 mm) |
1/8" |
1/8" |
(3.18 mm) |
(3.18 mm) |
|
24 3/16" |
|
(61.5 cm) |
|
15 3/8" |
|
|
|
|
19 3/32" |
|
(39 cm) |
|
|
|
|
|
|
|
68 15/32" |
(48.5 cm) |
|||
|
|
|
||||
|
|
|
|
(174 cm) |
|
|
|
15 3/8" |
|
|
|
|
|
|
|
|
|
|
|
|
|
(39 cm) |
|
|
|
|
|
|
|
|
|
|
|
|
|
|
|
|
|
|
|
29 7/8"
(76 cm)
Tighten the nut by hand. Then tighten it with a wrench two more turns. Do not overtighten.
3.Turn shut-off valve ON. Check for leaks. Tighten any nuts or connections (including connections at the valve) that leak.
4.Plug in refrigerator or reconnect power.
5.Flush the water system (see the “Water System Preparation” section).
NOTE: It may take up to 24 hours for your ice maker to begin producing ice.
CustomDoorPanels
Creating Custom Wood Panels
If you plan to install custom wood decorator panels, you will need to create the panels yourself or consult your cabinet maker or carpenter. See dimensional drawings for wood panel inserts.
Flat panels:
You can create a custom flat panel a maximum of Z\v in. (6.35 mm) thick to replace your decorator panels. Flat wood panels less than Z\v in. (6.35 mm) thick are not recommended.
Raised panels:
A raised panel design can be created by screwing or gluing wood panels to Z\v in. (6.35 mm) backing or by using C\v in. (19.05 mm) stock with routed edges. Raised panels should be spaced
2Z\v in. (5.70 cm) from the back edge of the handle to allow room for fingers to grasp the handle.
Installing Custom Wood Panels
1.Remove any packing tape.
2.Remove the refrigerator and freezer door trims from the hinge side of each door by pulling the trim away from the bottom of the door first.
3.Partially unscrew the two screws that hold the top trim in place. It is not necessary to completely remove the screws. Loosen the screws approximately Z\v in. (6.35 mm) from the trim to allow the panels to slide freely.
4.Remove the existing door panels, if panels were provided.
5.Slide custom door panels into place.
NOTE: The freezer door panels may require Z\, in. (3.18 mm) cardboard fillers behind the panels to keep them from being loose in that area.
7
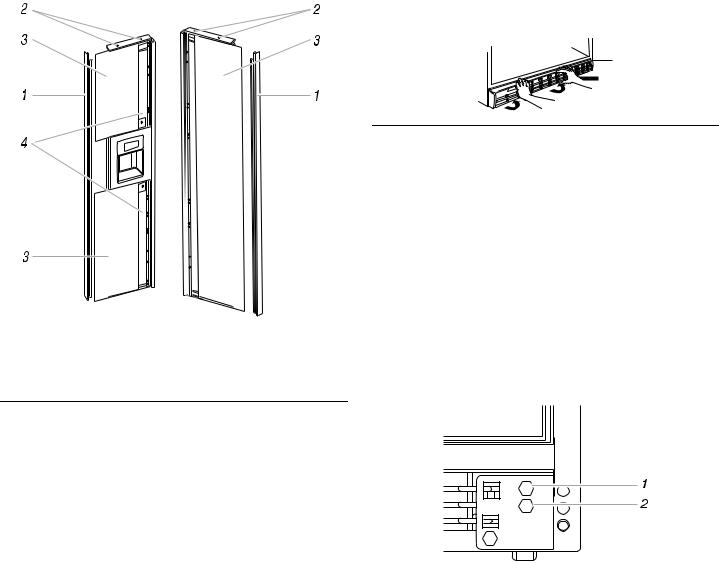
6.Replace the hinge side trims by inserting the notched end under the top trim first.
7.Tighten the two top trim screws.
To replace the base grille:
1.Open the refrigerator and freezer doors to 90°.
2.Place the lower clips in the openings in the metal panel.
3.Roll the grille up toward the refrigerator until it snaps into place.
1.Side Trims
2.Top Trim Screws
3.Door Panels
4.Filler Panels
LevelingYourRefrigerator
Your refrigerator has a front and rear roller at the base of the product on each side. All four rollers can be adjusted from the front of the product. If your refrigerator seems unsteady or you want the doors to close easier, adjust the refrigerator's tilt using the instructions below:
1.Check the installation location to be sure that you have the proper clearance for the refrigerator. (See the “Space Requirements” section.)
2.Plug into a grounded 3 prong outlet.
3.Move the refrigerator into its final position.
4.Open the refrigerator and freezer doors to locate the leveling bolts at the left and right of the refrigerator base. If your refrigerator has a base grille, remove it (see “Base Grille” earlier in this section).
NOTE: The top bolt will adjust the rear of the refrigerator, and the bottom bolt will adjust the front of the refrigerator.
BaseGrille
Style 1:
To remove the base grille:
1.Open the refrigerator and freezer doors 90°.
2.Remove screws from the base grille using a Phillips screwdriver.
Note: Do Not Remove Tech Sheet that is fastened behind the base grille.
To replace the base grille:
1.Open the refrigerator and freezer doors to 90°.
2.Position the base grille in front of the refrigerator and replace the screws.
Style 2:
To remove the base grille:
1.Open the refrigerator and freezer doors to 90°.
2.Grasp the grille with both hands.
3.Lift up and tilt the top of the grille toward you.
NOTE: Do not remove the Tech Sheet that is fastened behind the grille.
1.Rear Leveling Bolt
2.Front Leveling Bolt
5.Use a Z\x in. (12.70 mm) socket wrench to adjust the leveling bolts. Turn the leveling bolt to the right to raise that side of the refrigerator or turn the leveling bolt to the left to lower that side. It may take several turns of the leveling bolts to adjust the tilt of the refrigerator.
NOTE: Be careful not to unscrew the leveling bolts too much when lowering the refrigerator. The bolt head will start to come away from the refrigerator when in the lowest position. If the screw does come out of the rear roller bracket, the compartment access cover on the back of the refrigerator will have to be removed to reinstall the bolt.
8
6.Adjust the front leveling bolt to bring the refrigerator top parallel with the cabinet above the refrigerator. Leave approximately Z\, in. (3.18 mm) gap between the top hinges and the cabinet. If you do not have a cabinet above the refrigerator, simply adjust the refrigerator to make it level.
Style 1
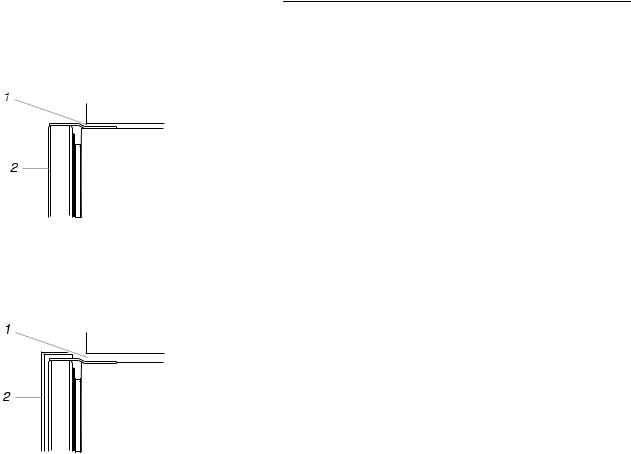
1.Leave Z\, in. (3.18 mm) minimum clearance for leveling the refrigerator. Leave Z\v in. (6.35 mm) minimum clearance if you have full-overlay cabinet doors.
2.Front of the refrigerator
Style 2
1.Leave C\v in. (19.05 mm) minimum clearance between a full-overlay cabinet door and a refrigerator with a trim kit.
2.Front of the refrigerator
7.Adjust the rear leveling bolt to bring the refrigerator level with the side cabinets or cabinet end panels.
8.If you want, you may now use the four leveling bolts to raise the refrigerator to close the gap between the refrigerator top hinge and the cabinet opening. Check that all four rollers still touch the floor and that the cabinet doors above the refrigerator open all the way.
NOTE: Cabinets with full-overlay doors will require Z\v in. (6.35
mm)additional clearance between the top hinge and cabinet to prevent the doors from hitting the hinge when opening. If you have a trim panel kit on the refrigerator doors, C\v in. (19.05 mm) additional clearance is needed to prevent the cabinet doors from hitting the refrigerator door trim.
9.Replace the base grille.
Understanding SoundsYou May Hear
Your new refrigerator may make sounds that your old one didn’t make. Because the sounds are new to you, you might be concerned about them. Most of the new sounds are normal. Hard surfaces, like the floor, walls, and cabinets, can make the sounds seem louder than they actually are. The following describes the kinds of sounds and what may be making them.
■If your product is equipped with an ice maker, you will hear a buzzing sound when the water valve opens to fill the ice maker for each cycle.
■The defrost timer will click when the automatic defrost cycle begins and ends. Also, the Thermostat Control (or Refrigerator Control depending on the model) will click when cycling on and off.
■Rattling noises may come from the flow of refrigerant, the water line, or items stored on top of the refrigerator.
■Your refrigerator is designed to run more efficiently to keep your food items at the desired temperature. The high efficiency compressor may cause your new refrigerator to run longer than your old one, and you may hear a pulsating or high-pitched sound.
■Water dripping on the defrost heater during a defrost cycle may cause a sizzling sound.
■You may hear the evaporator fan motor circulating the air through the refrigerator and freezer compartments.
■As each cycle ends, you may hear a gurgling sound due to the refrigerant flowing in your refrigerator.
■Contraction and expansion of the inside walls may cause a popping noise.
■You may hear air being forced over the condenser by the condenser fan.
■You may hear water running into the drain pan during the defrost cycle.
9
 Loading...