


KSM1CB
INSTRUCTIONS INSTRUCTIONS INSTRUCCIONES

WELCOME TO THE WORLD OF KITCHENAID.
We’re committed to helping you create a lifetime of delicious meals for family and friends. To help ensure the longevity and performance of your appliance, keep this guide handy. It will empower you with the best way to use and care for your product. Your satisfaction is our #1 goal. Remember to register your product online at www.kitchenaid.com, or by
mail using the enclosed Product Registration Card.
Join us in the kitchen at www.kitchenaid.com.
USA: 1.800.541.6390 |
KitchenAid.com |
Canada: 1.800.807.6777 |
KitchenAid.ca |
2

PRECISE HEAT MIXING BOWL INSTRUCTIONS
TABLE OF CONTENTS
PRECISE HEAT MIXING BOWL SAFETY
Important safeguards 4 Electrical requirements 5
PARTS AND FEATURES
Parts and accessories 6 Control panel display 7
ASSEMBLING THE PRECISE HEAT MIXING BOWL |
|
Before first use |
8 |
Attaching the Precise Heat Mixing Bowl to Stand Mixer |
8 |
Bowl-Lift Stand Mixer.......................................................................................... |
8 |
Tilt-Head Stand Mixer.......................................................................................... |
9 |
USING THE PRECISE HEAT MIXING BOWL
Connecting the Precise Heat Mixing Bowl 10 Programming the manual mode 10 Using the temper mode 12 Using the sleep mode 13 Removing the Precise Heat Mixing Bowl from the Stand Mixer 14
TIPS FOR GREAT RESULTS
Temperature guide for chocolate recipes 15 Temperature guide for other recipes 15
CARE AND CLEANING
Cleaning the Precise Heat Mixing Bowl base 16 Cleaning the stainless steel bowl, lid, and accessories 16
TROUBLESHOOTING 17 WARRANTY AND SERVICE 18
English
PROOF OF PURCHASE & PRODUCT REGISTRATION
Always keep a copy of the itemized sales receipt showing the date of purchase of your Precise Heat Mixing Bowl. Proof of purchase will assure you of in-warranty service. Before you use your Precise Heat Mixing Bowl, please fill out and mail your product registration card packed with the unit, or register on-line at www.kitchenaid.com. This card will enable us to contact you in the unlikely event of a product safety notification and assist us in complying with the provisions of the Consumer Product Safety Act. This card does not verify your warranty. Please complete the following for your personal records:
Model Number_________________________________________________________________________
Ser_ial Number_ ________________________________________________________________________
Date Pur_chased_______________________________________________________________________
Stor_e Name_ _________________________________________________________________________
3
PRECISE HEAT MIXING BOWL SAFETY
and the safety of others are very important.
many important safety messages in this manual and on your read and obey all safety messages.
safety alert symbol.
alerts you to potential hazards that can kill or hurt you
.
messages will follow the safety alert symbol and either the “DANGER” or “WARNING.” These words mean:
 DANGER
  WARNING
You can be killed or seriously injured if you don't immediately follow instructions.
You can be killed or seriously injured if you don't follow instructions.
All safety messages will tell you what the potential hazard is, tell you how to reduce the chance of injury, and tell you what can happen if the instructions are not followed.
IMPORTANT SAFEGUARDS
When using electrical appliances, basic safety precautions should always be followed, including the following:
1.Read all instructions.
2.Do not touch hot surfaces. Use handles or knobs.
3.To protect against risk of electrical shock, do not put Precise Heat Mixing Bowl base in water or other liquid.
4.Close supervision is necessary when any appliance is used by or near children.
5.Unplug from the outlet when not in use, before putting on or taking off parts, and before cleaning.
6.Do not operate any appliance with a damaged cord or plug, or after the appliance malfunctions, or is dropped or damaged in any manner. Return appliance to the nearest Authorized Service Facility for examination, repair, or electrical or mechanical adjustment.
7.The use of attachments not recommended or sold by KitchenAid may cause fire, electric shock, or injury.
8.Do not use outdoors.
9.Do not let cord hang over edge of table or counter, or touch hot surfaces.
4

PRECISE HEAT MIXING BOWL SAFETY
10. |
Do not place on or near a hot gas or electric burner, or in a heated oven. |
|
11. |
Extreme caution must be used when moving an appliance containing hot oil |
|
|
or other hot liquids. |
|
12. |
This appliance is not intended for use with oil. |
English |
13. |
to be sure it is cooked to an internal temperature of at least 165°F (74°C). |
|
If LED indicator lights are flashing during or after cooking cycle, the Precise |
|
|
|
Heat Mixing Bowl may have lost power during the cooking cycle. Check food |
|
14. |
Always attach plug to appliance first, then plug cord into the wall outlet. |
|
|
To disconnect, turn any control to “off,” then remove plug from wall outlet. |
|
15. |
Do not use appliance for other than intended use. |
|
SAVE THESE INSTRUCTIONS
Electr_ical r_equir_ements
Volts: 120 VAC
Hertz: 60 Hz
NOTE: This Precise Heat Mixing Bowl is equipped with a polarized plug (one blade is wider than the other). To reduce the risk of electrical shock, this plug will fit in a polarized outlet only one way. If the plug does not fit fully in the outlet, reverse the plug. If it still does not fit, contact a qualified electrician. Do not modify the plug in any way.
5
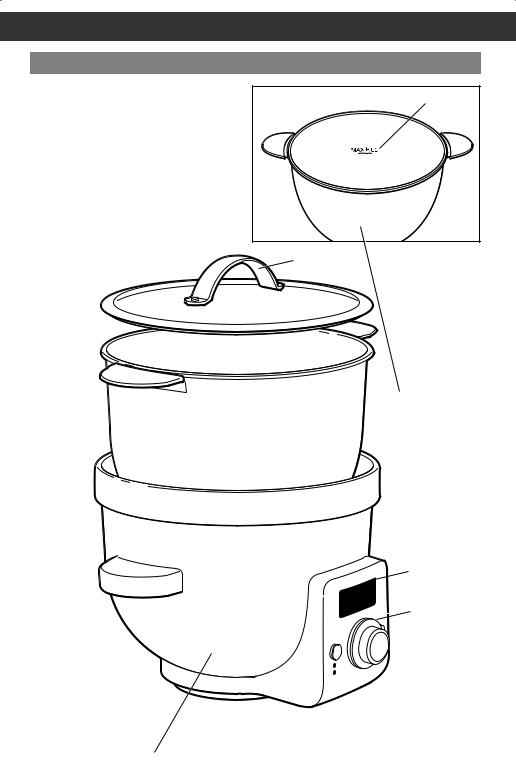
PARTS AND FEATURES
Par_ts and accessor_ies
“Max fill” line
Lid
Stainless  steel bowl
liner_
Digital display with timer_
Handles 
Contr_ol
panel
Power_  cor_d
cor_d
(not shown)
Bowl
base
6
PARTS AND FEATURES
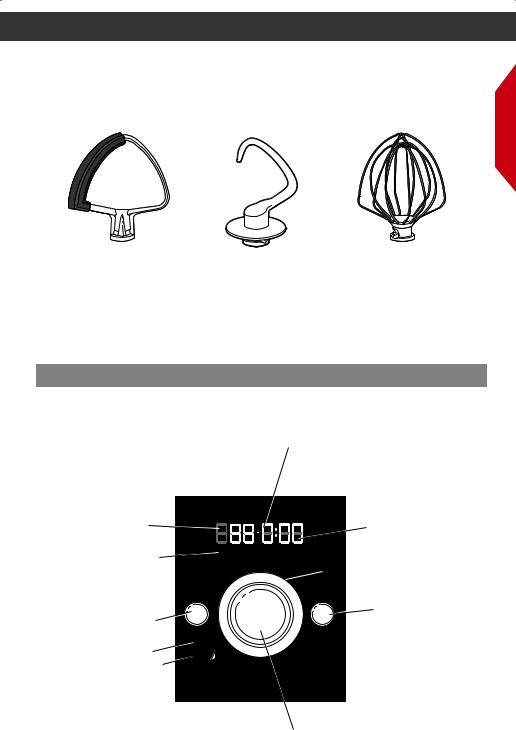
English
Flex edge |
Dough hook |
Wir_e whisk |
beater_ |
|
|
Contr_ol panel display
Temper_atur_e indicator_
Pr_eheating/Temper_ mode indicator_s
Digital display
Time indicator_
Preheating In Temper
Manual/Chocolate mode |
Star_t/Cancel |
button |
|
button |
|
Manual mode indicator_ |
|
Chocolate mode indicator_ |
|
|
Temper_atur_e / Time |
|
selection toggle button |
7
ASSEMBLING THE PRECISE HEAT MIXING BOWL
Before first use
Before using your Precise Heat Mixing Bowl for the first time, wash the stainless steel bowl liner, lid, and stir accessory, soapy water, then rinse with clean water and dry. Do not use abrasive cleaners or scouring pads.
NOTE: These parts can also be washed in the top rack of the dishwasher.
The Precise Heat Mixing Bowl can either be used by itself, or attached to a KitchenAid® Stand Mixer with the lid removed. When using the Precise Heat Mixing Bowl alone, see the “Using the Precise Heat Mixing Bowl” section.
NOTE: When using the Precise Heat Mixing Bowl by itself, place it on a flat, level surface.
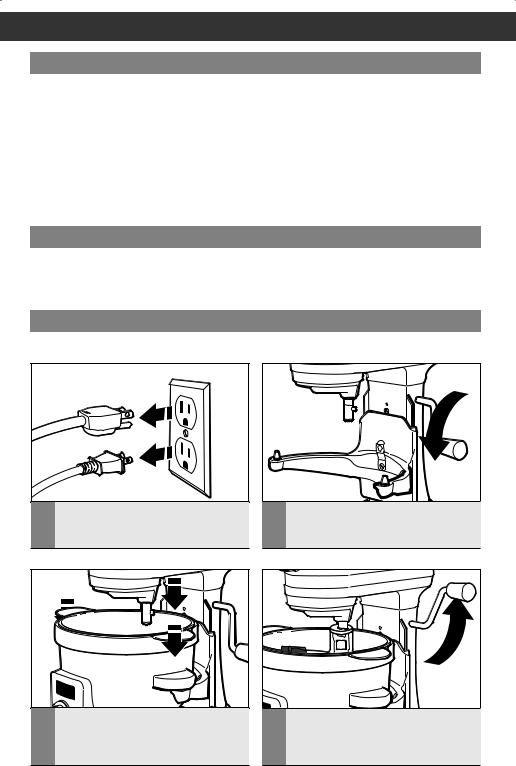
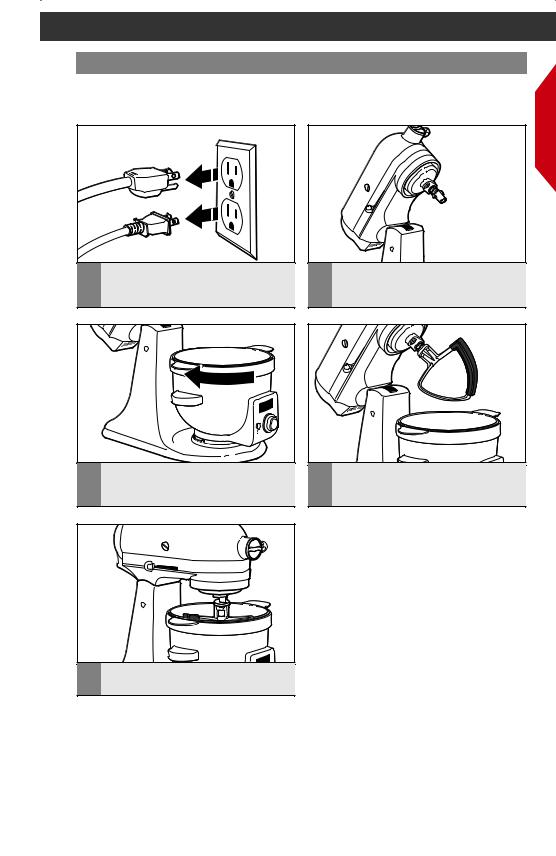
Attaching the Pr_ecise Heat Mixing Bowl to Stand Mixer_
The Precise Heat Mixing Bowl can either be used by itself, or attached to a KitchenAid® Stand Mixer with the lid removed. Before attaching the Precise Heat Mixing Bowl to a Stand Mixer decide how to attach it by determining which model Stand Mixer you have.
Bowl-Lift Stand Mixer_
Use the handles to attach the Precise Heat Mixing Bowl to the Stand Mixer.
1 |
Be sure the Stand Mixer’s speed control |
is OFF and Stand Mixer and Precise Heat |
Mixing Bowl are both unplugged.
2 |
Place the bowl-lift lever on the Stand |
Mixer in the down position. |
3 |
Fit the handles on the Stand Mixer bowl |
support arms, and press down on the |
back of the Precise Heat Mixing Bowl to snap it into the bowl-lift.
4 |
If desired, attach the appropriate |
accessory for your recipe. Then rotate |
the Stand Mixer bowl-lift lever back in the up position.
8
ASSEMBLING THE PRECISE HEAT MIXING BOWL
Tilt-Head Stand Mixer_
Use the attachment ring to the bowl clamping plate to attach the Precise Heat Mixing Bowl to the Stand Mixer.
1 |
Be sure the Stand Mixer’s speed control |
2 |
Tilt the Stand Mixer motor head back. |
is OFF and Stand Mixer and Precise Heat |
|
||
|
Mixing Bowl are both unplugged. |
|
|
English
3 |
Place the Precise Heat Mixing Bowl on |
the clamping plate, and attach by turning |
gently in a clockwise direction.
5 |
Place the Stand Mixer motor head back |
in the down position and lock into place. |
4 |
If desired, attach the appropriate |
accessory for your recipe. |
9
USING THE PRECISE HEAT MIXING BOWL
Connecting the Pr_ecise Heat Mixing Bowl
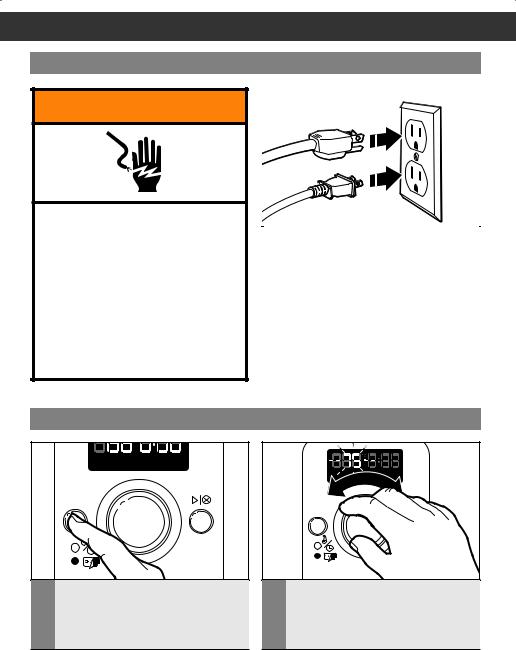
 WARNING
Electrical Shock Hazard
Plug into a grounded 3 prong outlet.
Do not remove ground prong. Do not use an adapter.
Do not use an extension cord.
Failure to follow these instructions can result in death, fire, or electrical shock.
|
|
1 |
Plug in the Stand Mixer and the Precise |
Heat Mixing Bowl. |
|
|
|
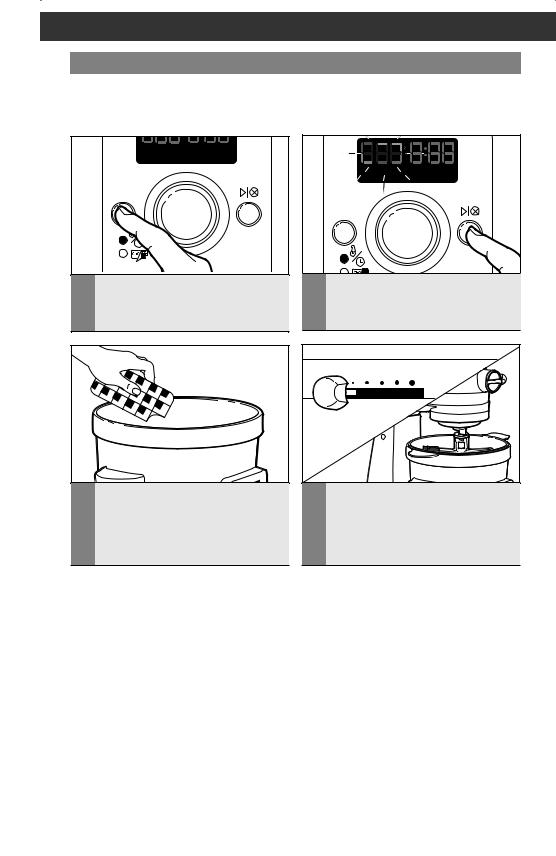
Pr_ogr_amming the manual mode
Preheating In Temper
1 |
To program the time and temperature |
on your Precise Heat Mixing Bowl, press |
the MANUAL/CHOCOLATE mode button once. The Manual indicator and the temperature will flash.
2 |
While the temperature flashes, turn the |
TEMPERATURE/TIME selection toggle |
button to set your desired temperature.
10
USING THE PRECISE HEAT MIXING BOWL
Preheating In Temper
3 |
To set the timer, press TEMPERATURE/ |
TIME selection toggle button once. |
While the hour position flashes, turn the TEMPERATURE/TIME selection toggle button to set your desired time.
Preheating In Temper
5 |
When the time and temperature |
are programmed, press the START/ |
CANCEL button. “Preheating” will display. When the desired temperature has been reached, a tone will sound 3 times and the timer will start to count down.
NOTE: To program the temperature without programming the timer, press the START/CANCEL button immediately after programming the temperature.
Preheating In Temper
English
4 |
Repeat step 3 to set the minutes. (Time |
can be selected in 1 minute increments |
up to 1 hour. Times longer than 1 hour are selected in 15 minute increments.)
6 |
Put ingredients into the stainless steel |
bowl. Be sure not to fill past the “Max |
fill” line. If desired, place the lid on the bowl. The lid is used at higher temperatures to maintain consistent heat within the stainless steel bowl.
NOTE: When using the Precise Heat Mixing Bowl by itself, place it on a flat, level surface. The lid may be used at any time when using without the Stand Mixer.
11
USING THE PRECISE HEAT MIXING BOWL
Using the temper_ mode
Tempering refers to the melting and cooling of chocolate to prepare it for dipping, recipes such as truffles, and molding chocolate candies. The tempering process gives chocolate a glossy, smooth finish and a “snap” when bitten into.
Preheating In Temper
1 |
Press the MANUAL/CHOCOLATE |
mode button 2 times. The Chocolate |
indicator will flash and the temperature will display.
Preheating In Temper
2 |
Press the START/CANCEL button. |
“Preheating” will display. |
0 |
Stir |
2 |
4 |
8 |
10 |
3 |
During preheating, add 3/4 of the |
4 |
After approximately two minutes of |
chocolate into the Precise Heat Mixing |
preheating, the chocolate will begin to |
||
|
Bowl. Be sure not to fill past the “Max |
|
visibly melt. Begin stirring. Use the flex |
|
fill” line. For best results, use chocolate |
|
edge beater and the STIR setting on your |
|
made for melting, or add the chocolate |
|
Stand Mixer. |
|
in small pieces. |
|
|
12
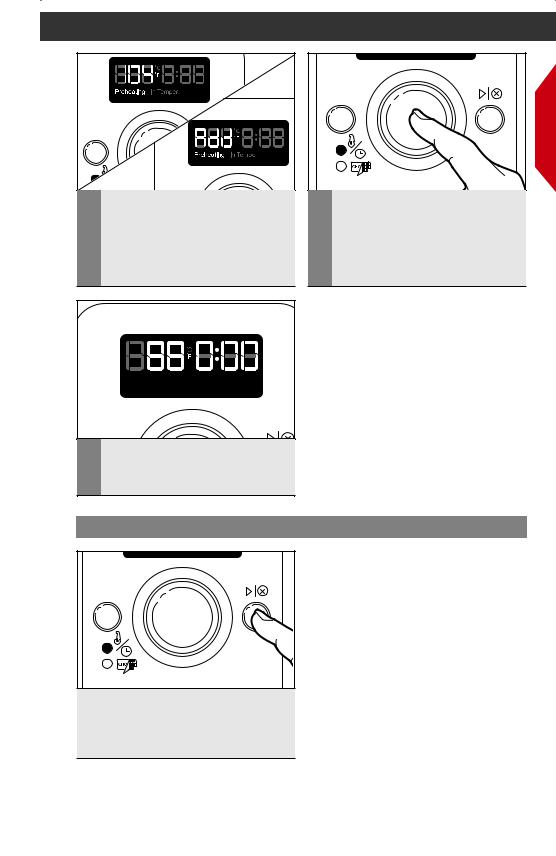
USING THE PRECISE HEAT MIXING BOWL
5 |
Once the Precise Heat Mixing Bowl is |
preheated, a tone will sound. The display |
will flash between “104°F” and “Add”.
|
Preheating In Temper |
7 |
The temperature slowly reduces to cool |
the chocolate, as indicated on the digital |
display. The chocolate is ready for use when “In Temper” is displayed.
Using the sleep mode
At the end of 10 hours the Precise Heat Mixing Bowl will automatically enter Sleep mode to conserve energy. To exit Sleep mode, press any button, and the Precise Heat Mixing Bowl is ready to use.
English
6 |
When you are ready to add the |
remaining chocolate, press the |
TEMPERATURE/TIME” selection toggle button. Add the chocolate in small amounts until the desired temperature is reached. (See “Temperature guide for chocolate recipes.”)
NOTE: The temperature will automatically hold for up to 10 hours, or until a button
is pressed, or the Precise Heat Mixing Bowl is unplugged.
13

USINGCMD +THES IFTPRECISECLICK HEATTO CHANGEMIXINGCOPYBOWL
Removing the Pr_ecise Heat Mixing Bowl fr_om the Stand Mixer_
1 |
Be sure the Stand Mixer’s speed control |
is OFF and Stand Mixer and Precise Heat |
Mixing Bowl are both unplugged.
2 |
If necessary, remove any accessories |
from the Stand Mixer (see the |
“Instructions” manual that came with your Stand Mixer for more information).
IMPORTANT: Attachments may by hot. Allow them to cool before removing.
3 |
For Bowl-Lift Stand Mixers: place the bowl-lift lever on the Stand Mixer in the down |
position. Pull up on the Precise Heat Mixing Bowl to disenage the snap-lock, and lift to |
remove the Precise Heat Mixing Bowl from the bowl-lift arms.
For Tilt-Head Stand Mixers: Tilt the Stand Mixer motor head back. Turn the Precise Heat Mixing Bowl gently in a counterclockwise direction on the clamping plate to remove.
4 |
Remove the stainless steel bowl liner |
from inside the Precise Heat Mixing |
Bowl base, by turning to unlock, then lifting the liner out of the base.
14

TIPS FOR GREAT RESULTS
Temper_atur_e guide for_ chocolate r_ecipes
Recipe |
Temper_atur_e |
Mode |
|
||
|
|
|
|
English |
|
Melt white or milk chocolate |
117° F (47°C) |
Refer to “Programming |
|||
12 oz / 340 g |
the manual mode” section |
||||
|
|
||||
Melt dark chocolate |
119°F |
(48°C) |
Refer to “Programming |
||
|
|||||
12 oz / 340 g |
the manual mode” section |
|
|||
|
|
|
|||
|
|
|
|
||
Temper milk or dark chocolate |
bring to 104°F (40°C), |
Refer to “Using the |
|
||
then gradually reduce to |
|
||||
12 oz / 340 g |
temper mode” section |
|
|||
86-88°F |
(30-31°C) |
|
|||
|
|
|
|||
|
|
|
|
||
Temper white chocolate |
bring to 104°F (40°C), |
Refer to “Programming |
|
||
then gradually reduce to |
|
||||
12 oz / 340 g |
the manual mode” section |
|
|||
80-82°F |
(27-28°C) |
|
|||
|
|
|
|||
|
|
|
|
|
|
Temper_atur_e guide for_ other_ r_ecipes
Recipe |
Temper_atur_e |
|
Melt marshmallows |
113°F (45°C) |
|
10 oz / 284 g |
||
|
||
Melt soft cheese, |
90-120°F (32-49°C) |
|
32 oz / 906 g |
||
|
||
Rising bread dough |
hold at 95-100°F (35-38°C) |
|
(Single batch*) |
||
|
||
Simmer water |
194°F (90°C) |
|
(2 cups) |
||
|
||
Slow cook** |
as needed |
|
|
|
*KitchenAid basic White Bread recipe, see Stand Mixer “Instructions” manual.
**See the “Recipes” book that came with the Precise Heat Mixing Bowl.
15
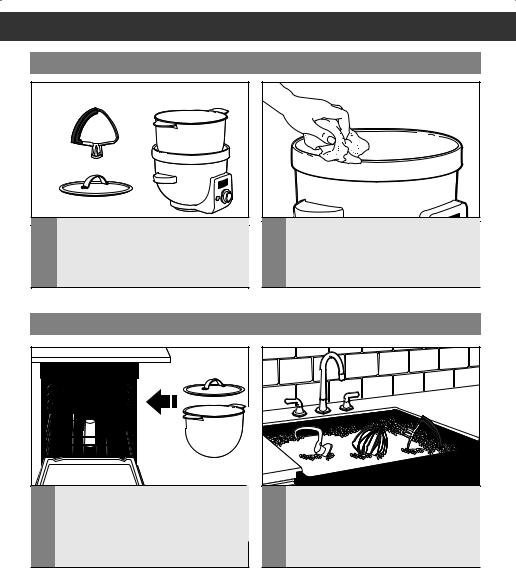
CARE AND CLEANING
Cleaning the Pr_ecise Heat Mixing Bowl base
1 |
Remove the stainless steel bowl liner, |
lid, and any accessories from the |
Precise Heat Mixing Bowl base before cleaning.
2 |
Wipe the exterior and base of the |
Precise Heat Mixing Bowl with a |
soft cloth. If needed, use a mild hand dishwashing liquid and a soft, damp cloth to clean. Dry thoroughly.
Cleaning the stainless steel bowl, lid, and accessor_ies
1 |
Wash the stainless steel bowl liner and |
lid, in the top rack of the dishwasher, or |
wash by hand in hot, soapy water, then rinse with warm water. Dry all parts thoroughly before reassembling the Precise Heat Mixing Bowl.
2 |
Wash the wire whisk, dough hook, or |
flex edge beater by hand in hot, soapy |
water, then rinse with warm water.
16

TROUBLESHOOTING
1.If the digital display is not illuminated:
•Check to see whether the Precise Heat Mixing Bowl is plugged into an outlet. If it is, check the fuse or circuit breaker on the electrical circuit the bowl is connected to and make sure the circuit is closed.
2.If all the lights on the digital display are flashing:
•The Precise Heat Mixing Bowl was not in place when the Start/Cancel button was pressed. Check that the bowl is properly attached for your model of Stand Mixer.
3.If the display shows “Er1” on the digital display:
•The Precise Heat Mixing Bowl sensed that an interruption occurred with the Bowl Temperature Sensor (BTS). Unplug the bowl and plug back in to see if that will reset the unit.
If the display shows “Er2” on the digital display:
•The BTS has sensed an abnormal temperature. Unplug the Precise Heat Mixing Bowl and allow it to be brought to room temperature before plugging it back in.
4.If the Temperature indicator flashes quickly 3 times when selecting the desired Temperature setting:
•The dial was rotated past the maximum temperature setting. Turn dial the other way to reduce the Temperature selection.
If the problem cannot be corrected using the steps above, see the “Warranty and service” section. Do not return the Precise Heat Mixing Bowl to the retailer; retailers do
not provide service.
English
17
WARRANTYCMD + SHIFTANDCLICKSERVICETO CHANGE COPY
KitchenAid® Stand Mixer_ Attachment Warrr_anty for_ the 50 United States, the Distr_ict of Columbia, Puer_to Rico, and Canada
This warranty extends to the purchaser and any succeeding owner for Stand Mixer Attachments operated in the 50 United States, the District of Columbia, Puerto Rico, and Canada.
Length of Warranty: |
One Year Full Warranty from date of purchase. |
|
|
|
|
KitchenAid Will Pay |
Hassle-Free Replacement of your Stand Mixer Attachment. |
|
for Your Choice of: |
See the next page for details on how to arrange for service, |
|
|
or call the Customer eXperience Center toll-free at |
|
|
1-800-541-6390. |
|
|
OR |
|
|
The replacement parts and repair labor costs to correct |
|
|
defects in materials and workmanship. Service must be |
|
|
provided by an Authorized KitchenAid Service Center. |
|
|
|
|
KitchenAid Will |
A. |
Repairs when Stand Mixer Attachment is used in |
Not Pay for: |
|
other than normal single family home use. |
|
B. |
Damage resulting from accident, alteration, misuse |
|
|
or abuse. |
|
C. |
Any shipping or handling costs to deliver your Stand |
|
|
Mixer Attachment to an Authorized Service Center. |
|
D. |
Replacement parts or repair labor costs for Stand |
|
|
Mixer Attachment. operated outside the 50 United |
|
|
States, District of Columbia, Puerto Rico, and Canada. |
DISCLAIMER OF IMPLIED WARRANTIES; LIMITATION OF REMEDIES
IMPLIED WARRANTIES, INCLUDING TO THE EXTENT APPLICABLE WARRANTIES OF MERCHANTABILITY OR FITNESS FOR A PARTICULAR PURPOSE, ARE EXCLUDED TO THE EXTENT LEGALLY PERMISSIBLE. ANY IMPLIED WARRANTIES THAT MAY BE IMPOSED BY LAW ARE LIMITED TO ONE YEAR, OR THE SHORTEST PERIOD ALLOWED BY LAW. SOME STATES AND PROVINCES DO NOT ALLOW LIMITATIONS OR EXCLUSIONS ON HOW LONG AN IMPLIED WARRANTY
OF MERCHANTABILITY OR FITNESS LASTS, SO THE ABOVE LIMITATIONS OR EXCLUSIONS MAY NOT APPLY TO YOU.
IF THIS PRODUCT FAILS TO WORK AS WARRANTED, CUSTOMER’S SOLE AND EXCLUSIVE REMEDY SHALL BE REPAIR OR REPLACEMENT ACCORDING TO THE TERMS OF THIS LIMITED WARRANTY. KITCHENAID AND KITCHENAID CANADA DO NOT ASSUME ANY RESPONSIBILITY FOR INCIDENTAL OR CONSEQUENTIAL
DAMAGES. This warranty gives you specific legal rights and you may also have other rights which vary from state to state or province to province.
18
 Loading...