


KitchenAid KSM3316XBM0, KSM3316XHT0, KSM3316XWH0, KSM3316XMS0, KSM3316XFW0 Owner’s Manual
...KSM3311X
KSM3316X
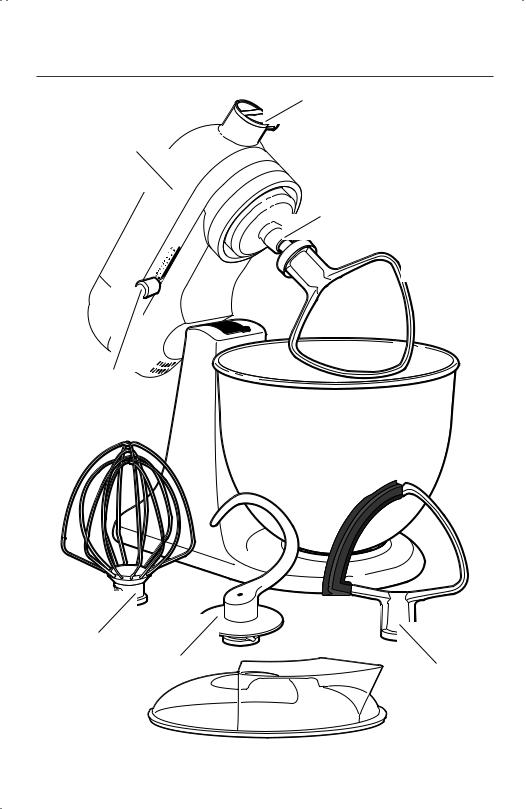
PARTS AND FEATURES
PARTS AND ACCESSORIES
Motor head
Speed control
Wire whip
Dough hook
Attachment hub
Beater shaft
Flat
 beater*
 Bowl**
Flex Edge beater*
 Pouring shield*
*Select models only and accessories sold separately.
**Bowl type may vary. Bowls are also available for purchase as separate accessories.
2 | PARTS AND FEATURES

STAND MIXER SAFETY
ENGLISH |
IMPORTANT SAFEGUARDS
When using electrical appliances, basic safety precautions should always be followed, including the following:
1.Read all instructions.
2.To avoid risk of electrical shock, do not put Stand Mixer in water or other liquid.
3.Close supervision is necessary when any appliance is used by or near children.
4.Unplug the Stand Mixer from outlet when not in use, before putting on or taking off parts, and before cleaning.
5.Avoid contacting moving parts. Keep hands, hair, and clothing, as well
as spatulas and other utensils, away from beater during operation to reduce the risk of injury to persons and/or damage to the Stand Mixer.
6.Do not operate any appliance with a damaged cord or plug or after the appliance malfunctions or has been damaged in any manner. Return appliance to the nearest Authorized Service Facility for examination, repair or adjustment.
7.The use of accessories not recommended or sold by KitchenAid may cause fire, electric shock or injury.
8.Do not use the Stand Mixer outdoors.
9.Do not let the cord hang over the edge of table or counter.
STAND MIXER SAFETY | 3
STAND MIXER SAFETY
10.Do not let the cord contact hot surfaces, including the stove.
11.Remove the flat beater, wire whip, or spiral dough hook from the Stand Mixer before washing.
SAVE THESE INSTRUCTIONS
THIS PRODUCT IS DESIGNED FOR HOUSEHOLD USE ONLY.
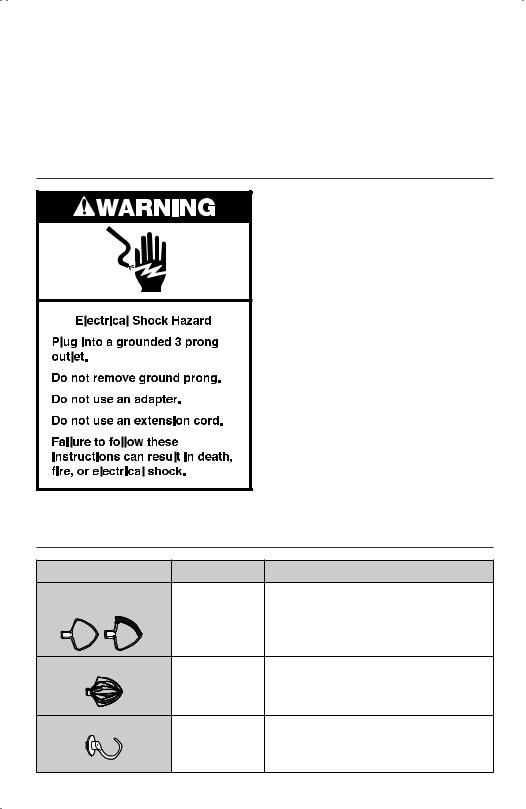
ELECTRICAL REQUIREMENTS
Voltage: 120 V Frequency: 60 Hz Wattage: 250 Watts
NOTE: The power rating for your Stand Mixer is printed on the serial plate.
Do not use an extension cord. If the power supply cord is too short, have a qualified electrician or serviceman install an outlet near the appliance.
The maximum rating is based on the attachment that draws the greatest load (power). Other recommended attachments may draw significantly less power.
USING THE STAND MIXER
CHOOSING THE RIGHT ACCESSORY
ACCESSORY |
USE TO MIX |
DESCRIPTION |
FLAT BEATER* |
Normal |
Cakes, Creamed frostings, Candies, |
FLEX EDGE BEATER* |
to heavy |
Cookies, Biscuits, Pie pastry, Meat loaf, |
|
mixtures |
Mashed potatoes |
WIRE WHIP |
Mixtures |
Eggs, Egg whites, Heavy cream, |
|
that need air |
Boiled frostings, Sponge cakes, |
|
incorporated |
Mayonnaise, some Candies |
DOUGH HOOK |
Mixing and |
Breads, Rolls, Pizza dough, Buns |
|
kneading yeast |
|
|
doughs |
|
4 | USING THE STAND MIXER |
* Select models only and accessories sold separately. |
|
|
||
USING THE STAND MIXER
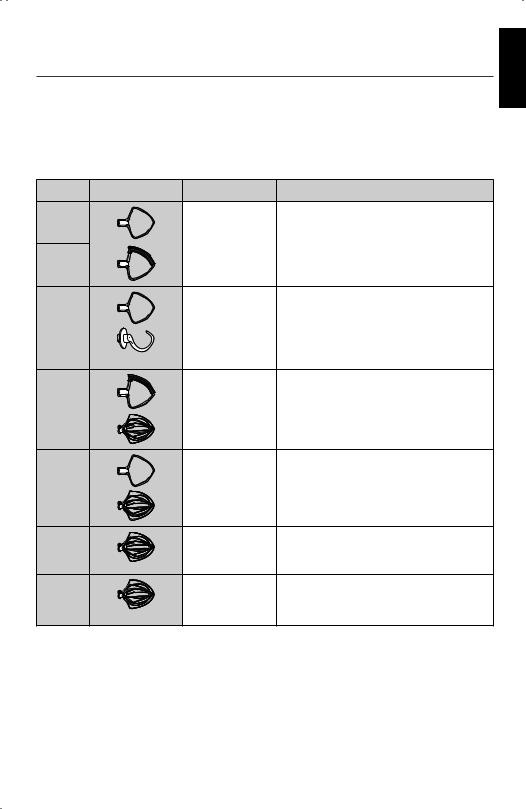
SPEED CONTROL GUIDE
All speeds have the Soft Start® feature which automatically starts the Stand Mixer at a lower speed to help avoid ingredient splash-out and “flour puff” at start-up, then quickly increases to the selected speed for optimal performance.
NOTE: The speed control can be set between the speeds listed in the chart to obtain speeds 1, 3, 5, 7, and 9 if a finer adjustment is required. Do not exceed Speed 2 when preparing yeast doughs as this may cause damage to the Stand Mixer.
SPEED ACCESSORY |
ACTION |
DESCRIPTION |
STIR |
STIR |
For starting all mixing procedures, slow |
|
|
stirring, combining, and mashing. Use to |
|
|
add flour and dry ingredients to batter, |
1 |
|
and to add liquids to dry ingredients. |
|
Do not use Speed 1 to mix or knead |
|
|
|
|
|
|
yeast doughs. |
2 |
SLOW MIXING |
For slow mixing, mashing, and faster |
|
|
stirring. Use to mix and knead yeast |
|
|
doughs, heavy batters, and candies; |
|
|
start mashing potatoes or other |
|
|
vegetables; cut shortening into flour; |
|
|
mix thin or splashy batters. |
4 |
MIXING, |
For mixing semi-heavy batters, such |
|
BEATING |
as cookies. Use to combine sugar and |
|
|
shortening, and to add sugar to egg |
|
|
whites for meringues. Medium speed |
|
|
for cake mixes. |
6 |
BEATING, |
For medium-fast beating (creaming), |
|
CREAMING |
or whipping. Use to finish mixing cake, |
|
|
doughnut, and other batters. High |
|
|
speed for cake mixes. |
8 |
FAST BEATING, |
For whipping cream, egg whites, |
|
WHIPPING |
and boiled frostings. |
10 |
FAST WHIPPING |
For whipping small amounts of cream, |
|
|
or egg whites; for final whipping of |
|
|
mashed potatoes. |
NOTE: To move the speed control lever with ease, lift slightly up as you move it across the settings in either direction.
FOR DETAILED INFORMATION ON USING THE STAND MIXER:
Visit kitchenaid.com/quickstart for additional Instructions with videos, inspiring recipes, and tips on how to use your Stand Mixer.
ENGLISH
USING THE STAND MIXER | 5
USING THE STAND MIXER
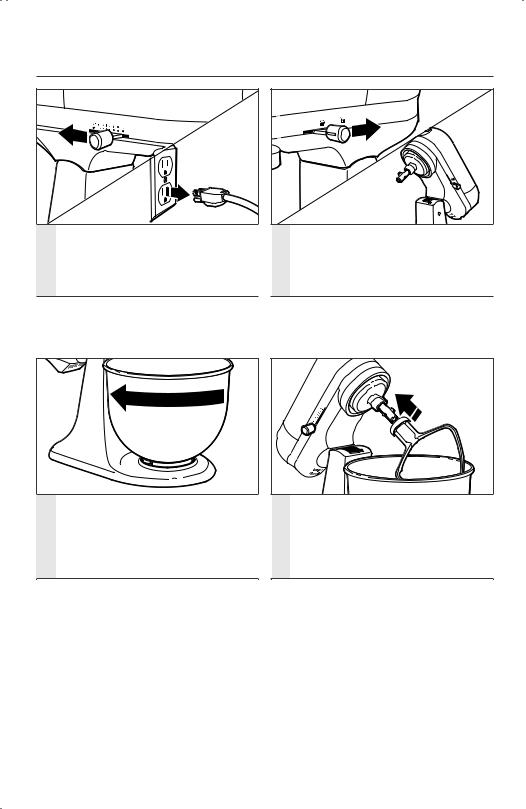
ASSEMBLING THE STAND MIXER
Check to be sure that the Stand
1 Mixer is unplugged, and the speed control is turned to “0”.
NOTE: To move the speed control lever with ease, lift slightly up as you move it across the settings in either direction.
Raise the motor head: Slide the locking lever to the unlock position
2 and lift the motor head. Once lifted, slide the locking lever to the lock position to keep the motor head up.
Attach the bowl: Place the bowl on
3 the bowl clamping plate and gently turn it in a clockwise direction to lock it into place.
Attach any accessory: Slip the accessory onto the beater shaft and
4 press upward as far as possible. Turn the accessory counterclockwise to hook the accessory over the pin on the shaft.
6 | USING THE STAND MIXER
 Loading...