


KSM2FPA
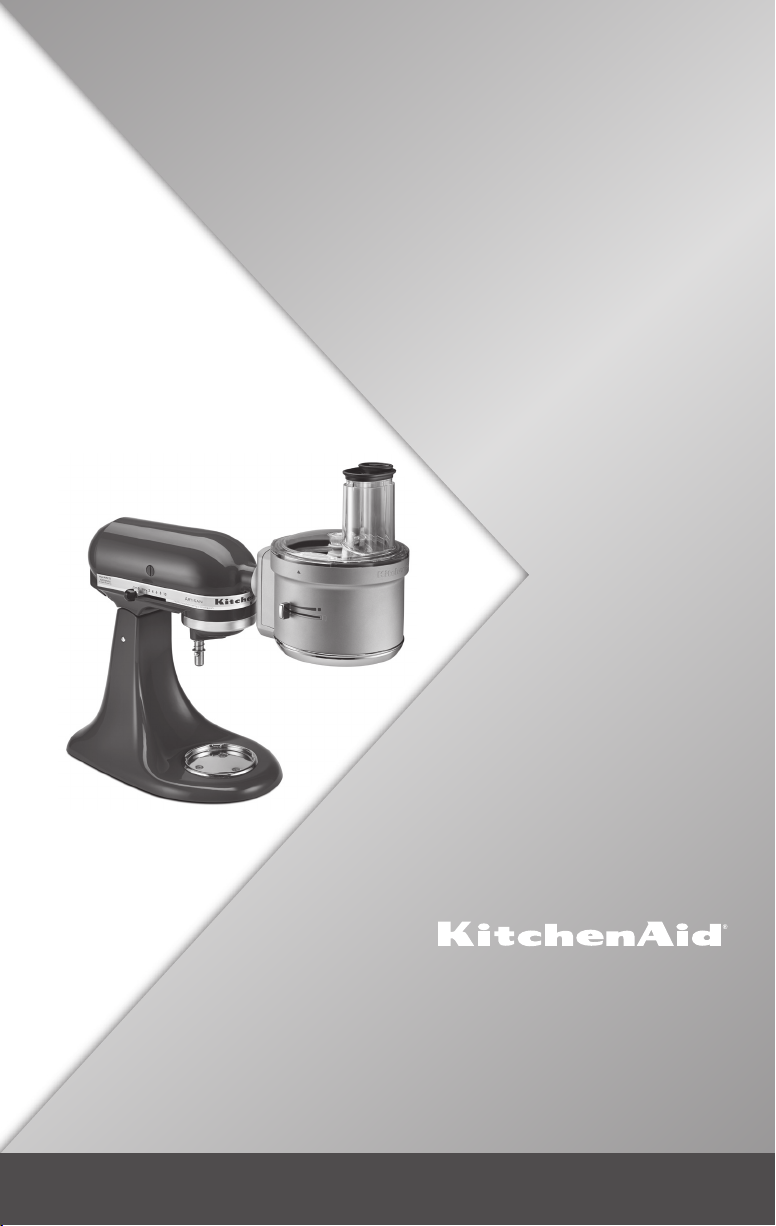
KSM1FPA
KSM2FPA
INSTRUCTIONS
INSTRUCTIONS
INSTRUCCIONES
The KitchenAid® Food Processor Attachment is designed exclusively for use with all
KitchenAid® household Stand Mixers. For complete information on the use of these Stand Mixers,
L' accessoire du robot culinaire KitchenAid® est conçu pour être utilisé exclusivement avec des batteurs
sur socle à usage domestique KitchenAid®. Pour des renseignements complets sur l’utilisation de
El accesorio procesador de alimentos KitchenAid® está diseñada exclusivamente para usarse con todas las
batidoras domésticas con base KitchenAid®. Para obtener la información completa sobre el uso de estas
please read the instructions that came with your Stand Mixer.
ces batteurs sur socle, lire le guide d’instructions fourni avec le batteur sur socle.
batidoras con base, lea las instrucciones que vienen con su batidora con base.
WELCOME TO THE WORLD OF KITCHENAID.
We’re committed to helping you
create a lifetime of delicious meals for
family and friends. To help ensure the
longevity and performance of your
appliance, keep this guide handy. It will
empower you with the best way to
use and care for your product. Your
satisfaction is our #1 goal. Remember
to register your product online at
www.kitchenaid.com or by
mail using the enclosed
Product Registration Card.
USA: 1.800.541.6390
Canada: 1.800.807.6777
2
Join us in the kitchen at www.kitchenaid.com.
KitchenAid.com
KitchenAid.ca

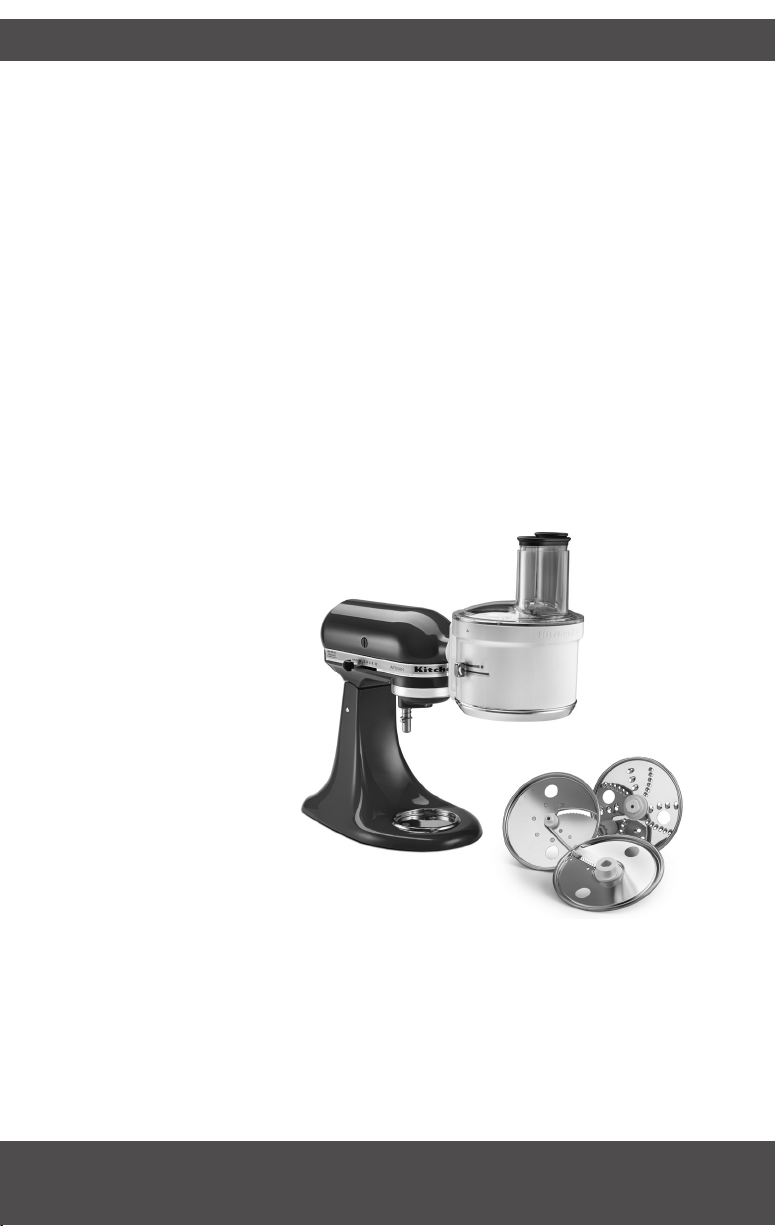
FOOD PROCESSOR ATTACHMENT INSTRUCTIONS
TABLE OF CONTENTS
FOOD PROCESSOR ATTACHMENT SAFETY
Important safeguards ........................................................................................... 4
PARTS AND FEATURES ......................................................................................... 6
GETTING STARTED
Before rst use .................................................................................................... 7
Selecting the right tool.........................................................................................7
INSTALLING THE DISCS
Installing the reversible shredding disc ................................................................ 8
Installing the julienne disc .................................................................................... 8
Installing the adjustable slicing disc ...................................................................... 9
Installing the dicing disc and blade ..................................................................... 10
OPERATING THE FOOD PROCESSOR ATTACHMENT
Attaching the Food Processor attachment to the Stand Mixer ......................... 11
Speed selection guide ........................................................................................ 13
Using the Food Processor attachment .............................................................. 14
Using the 2-in-1 food pusher .............................................................................14
TIPS FOR GREAT RESULTS
Using a slicing or shredding disc ........................................................................ 15
Helpful Hints......................................................................................................16
RECIPES...................................................................................................................17
CARE AND CLEANING ........................................................................................ 21
TROUBLESHOOTING .......................................................................................... 22
WARRANTY AND SERVICE ................................................................................23
English
PROOF OF PURCHASE & PRODUCT REGISTRATION
Always keep a copy of the itemized sales receipt showing the date of purchase of your Food
Processor attachment. Proof of purchase will assure you of in-warranty service. Before you
use your Food Processor attachment, please ll out and mail your product registration card
packed with the unit, or register on-line at www.kitchenaid.com. This card will enable us to
contact you in the unlikely event of a product safety notication and assist us in complying
with the provisions of the Consumer Product Safety Act. This card does not verify your
warranty. Please complete the following for your personal records:
Model Number ______________________________________________________________________
Serial Number ______________________________________________________________________
Date Purchased _____________________________________________________________________
Store Name ________________________________________________________________________
3
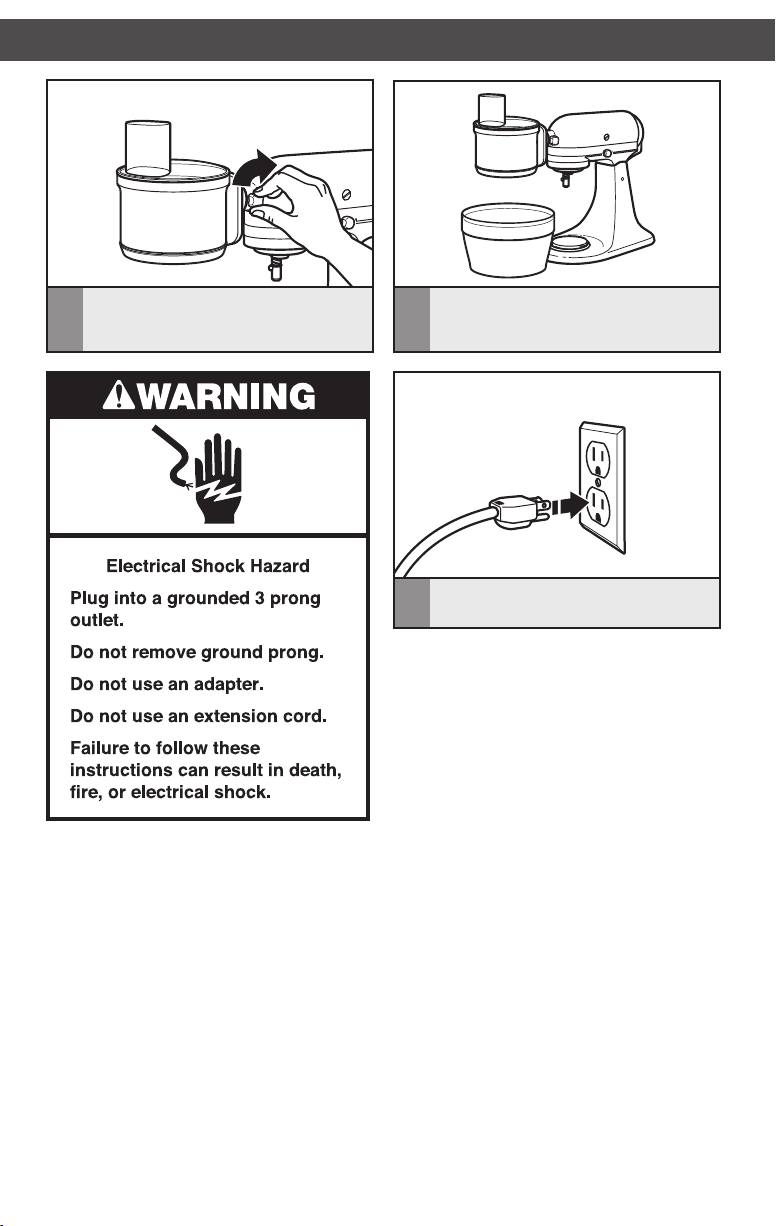
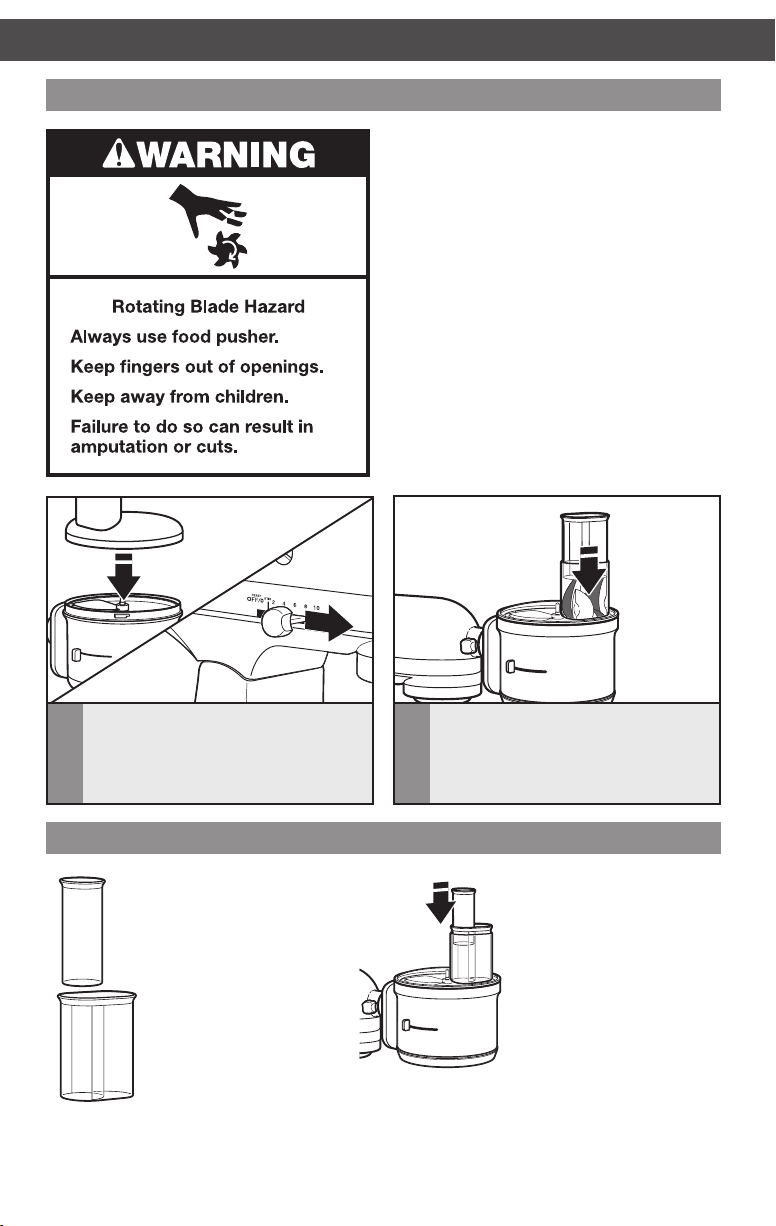
IMPORTANT SAFEGUARDS
When using electrical appliances, basic safety precautions should always be
followed, including the following:
1. Read all instructions.
2. To protect against risk of electrical shock, do not put Stand Mixer in water or
other liquid.
3. Always make sure interlock lid is securely closed before Stand Mixer motor
is turned on. Do not remove the lid while Food Processor attachment is in
operation.
4. Be sure to turn the Stand Mixer OFF (and detach Food Processor attachment
from Stand Mixer) after each use of the Food Processor attachment and before
cleaning. Make sure the motor stops completely before disassembling.
5. Do not put your ngers or other objects into the Food Processor attachment
opening or discharge chute while it is in operation. Never feed by hand. Always
use the pusher. If food becomes lodged in opening or discharge chute, use
pusher or another piece of fruit or vegetable to push it down or remove. When
this method is not possible, turn the motor off and disassemble Food Processor
attachment to remove the remaining food.
6. Avoid contacting moving parts.
4

FOOD PROCESSOR ATTACHMENT SAFETYFOOD PROCESSOR ATTACHMENT SAFETY
7. The use of attachments not recommended or sold by KitchenAid may cause
re, electric shock, or injury.
8. Do not use outdoors.
9. Close supervision is necessary when any appliance is used by or near children.
10. Do not use the appliance if the driver mechanism or rotating parts are
damaged. Return appliance to the nearest Authorized Service Facility for
examination, repair, or electrical or mechanical adjustment.
11. Do not let the Stand Mixer cord hang over the edge of table or counter.
12. Keep hands and utensils away from moving blades or discs while processing
food to reduce the risk of severe injury to persons or damage to the Food
Processor attachment.
13. Blades are sharp. Handle carefully.
14. Do not remove the lid until discs or blades stop.
15. Do not attempt to defeat the cover interlock mechanism.
16. To avoid damaging the gear assembly, do not immerse Food Processor
attachment assembly in water or other liquids.
SAVE THESE INSTRUCTIONS
English
5
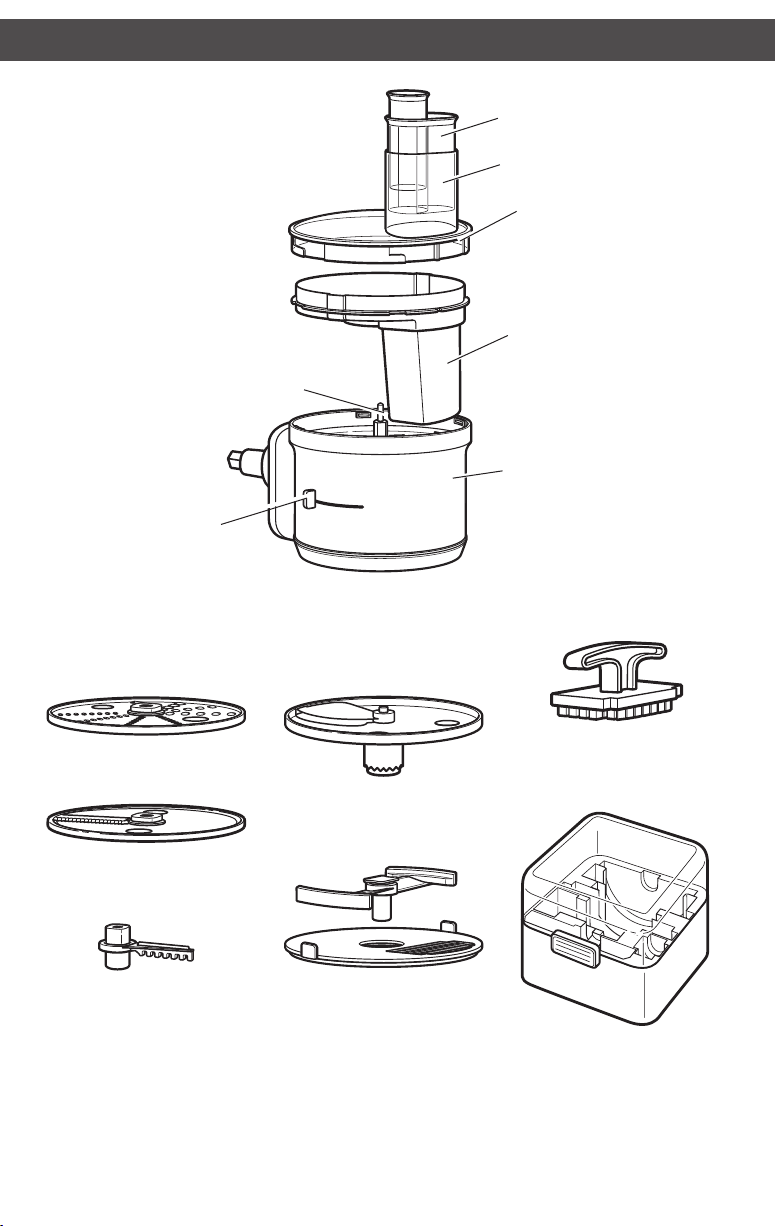
PARTS AND FEATURES
Drive pin
Adjustable
slicing disc
control
2-in-1 food pusher
Feed tube
Lid with
interlock
Liner
Attachment
assembly*
Reversible
shredding disc
Julienne disc
Disc adapter
(use with Julienne
and Reversible
shredding discs
Adjustable
slicing disc
Dicing disc
and blade
(KSM2FPA only)
*Wipe clean only. See “Care and cleaning” section for more information.
6
Dicing disc cleaner
(KSM2FPA only)
Storage case
(KSM2FPA only)
Before First Use
Before using your Food Processor
attachment for the first time, wash all
parts and accessories either by hand or in
the dishwasher (see “Care and cleaning”
section).
IMPORTANT: To avoid damaging the Food
Processor attachment, do not immerse
the attachment assembly in water or
other liquids. All other parts are top rack
dishwasher safe.
NOTE: This product is designed for
household use only.
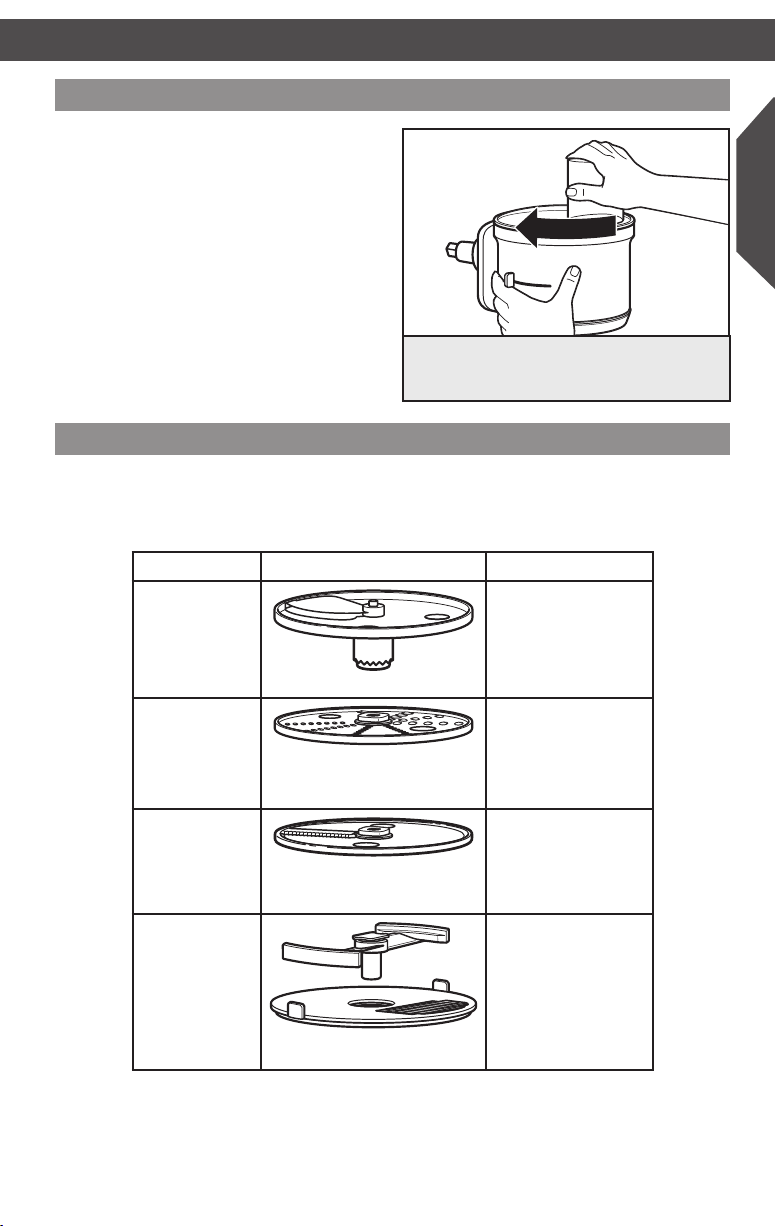
Grasp the feed tube on the interlock lid
and turn it clockwise to remove it from the
attachment assembly.
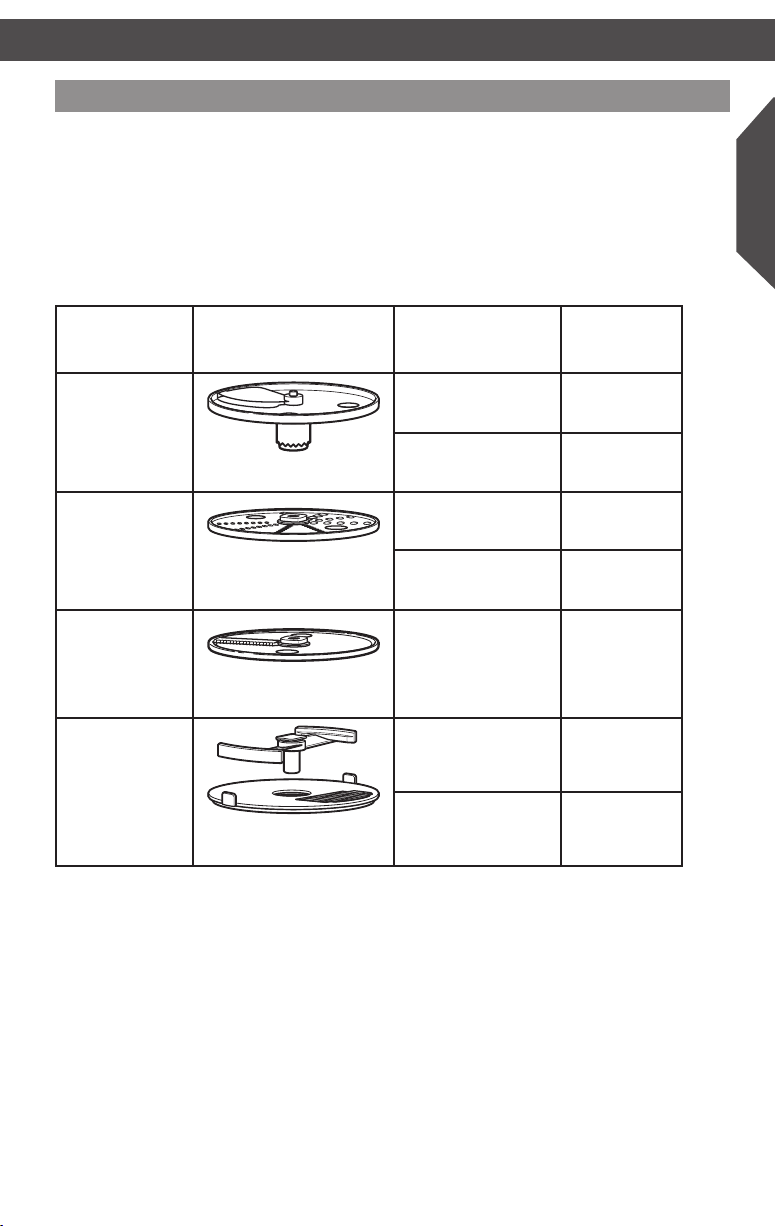
Selecting the right tool
The guide below will help you select the right tool for your recipe. See the section "Installing
the discs" for more detailed information for each disc.
FUNCTION TOOL FOOD
Slicing
Adjustable slicing disc
Shredding
Reversible shredding disc
Soft fruits
Soft vegetables
Hard vegetables
Cooked meats
Soft vegetables
Hard vegetables
Hard cheese
English
Julienne
Dicing
Vegetables
Julienne disc
Soft fruits
Soft vegetables
Hard vegetables
Dicing disc and blade
7
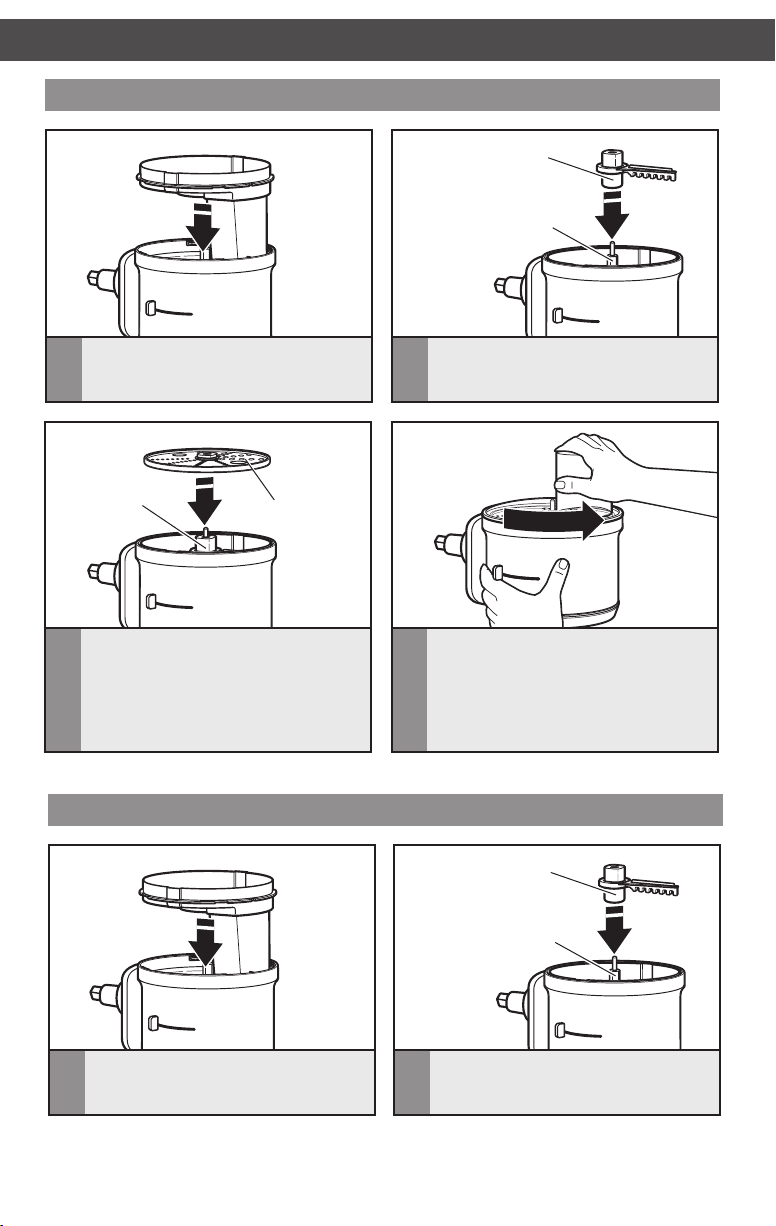
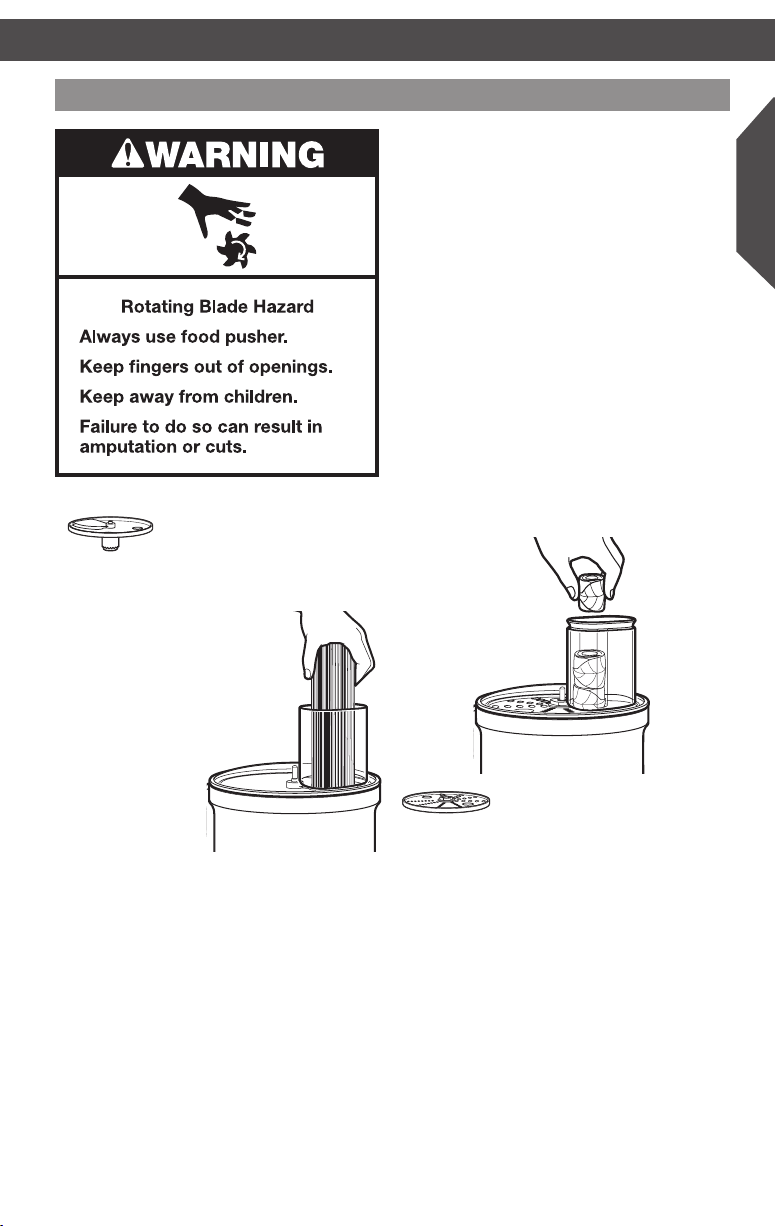
Installing the reversible shredding disc
Disc adapter
Drive pin
Insert the liner into the attachment
1
assembly so that the feed tubes line
up and the liner lies flat.
Disc adapter
Hold the reversible shredding disc
3
by the 2 finger grips with the desired
shredding side facing UP. Install the disc
on the disc adapter by fitting the adapter
through the hole in the bottom of the
disc until it is seated against the liner.
Finger grip
Installing the julienne disc
Slide the disc adapter onto the drive pin.
2
Install the lid by turning counter
4
clockwise, being sure it locks into place.
Disc adapter
Insert the liner into the attachment
1
assembly so that the feed tubes line
up and the liner lies flat.
8
Drive pin
Slide the disc adapter onto the drive pin.
2
INSTALLING THE DISCSINSTALLING THE DISCS
Disc
adapter
Hold the julienne disc by the 2 finger
3
grips, with the smaller side of the middle
hole facing UP. Install the disc on the disc
adapter by fitting the adapter through
the hole in the bottom of the disc until it
is seated against the liner.
Finger grip
Installing the adjustable slicing disc
Insert the liner into the attachment
1
assembly so that the feed tubes line
up and the liner lies flat.
Install the lid by turning counter
4
clockwise, being sure it locks into place.
Drive pin
Hold the slicing disc by the finger grips
2
and lower it onto the drive pin. You
may need to turn the disc/drive adapter
until it drops down into place.
Finger grip
English
Set the desired slicing thickness by
3
moving the control lever to the left
for thinner slices or to the right for
thicker slices.
NOTE: If the sliced food is not the desired
thickness, the control lever can be adjusted
during operation.
Install the lid by turning counter
4
clockwise, being sure it locks into place.
9
INSTALLING THE DISCS OPERATING THE FOOD PROCESSOR ATTACHMENT
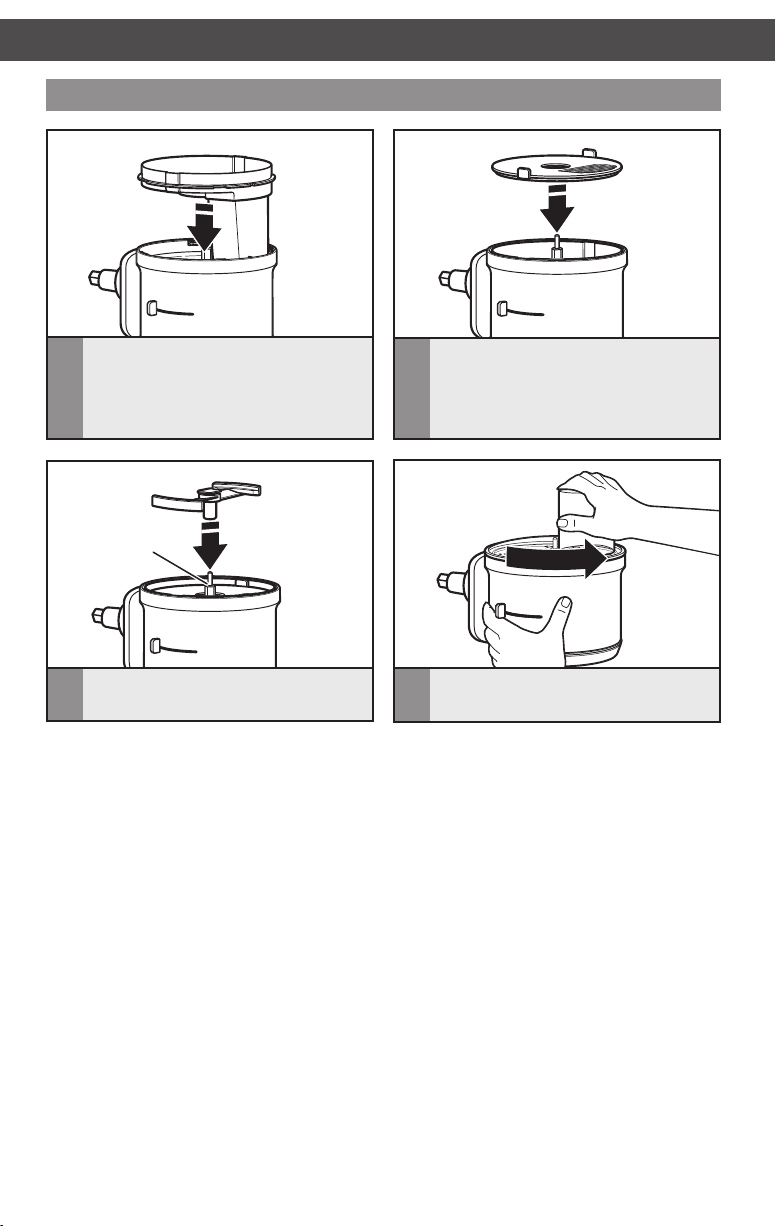
Installing the dicing disc and blade
Insert the liner into the attachment
1
assembly so that the feed tubes line
up and the liner lies flat.
Drive pin
Install the blade on top of the dicing disc
3
by sliding it onto the drive pin.
Hold the dicing disc by the middle hole
2
and disc edge, chute lip-side facing
DOWN. Place the disc on top of the
liner so that the dicing grate aligns with
the liner’s feed tube.
Install the lid by turning counter
4
clockwise, being sure it locks into place.
10
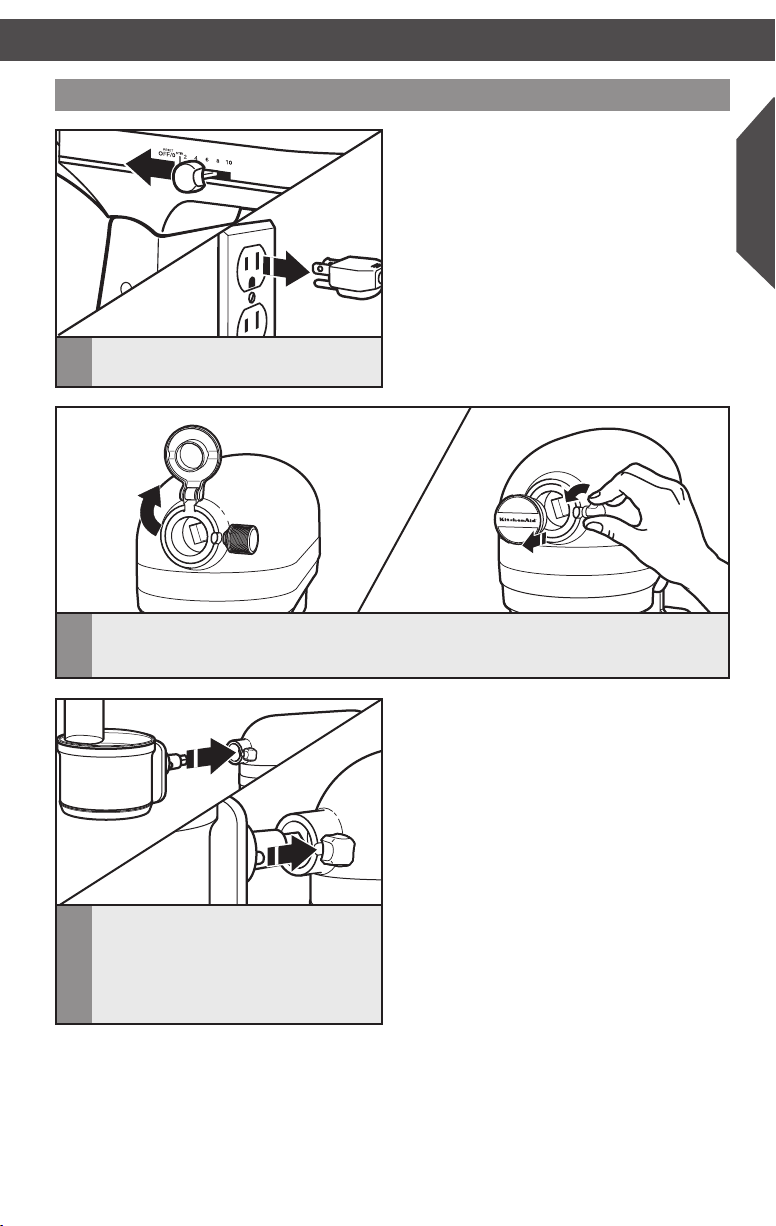
Attaching the Food Processor attachment to the Stand Mixer
Turn Stand Mixer OFF and unplug.
1
For Stand Mixers with a hinged attachment hub cover: Flip up to open.
2
For Stand Mixers with a removable attachment hub cover: Turn the attachment knob
counterclockwise to remove attachment hub cover.
English
Insert the attachment into the
3
attachment hub. Rotate attachment
back and forth if necessary. The pin
on the attachment housing will fit
into the notch of the hub rim when
in proper position.
11
Tighten attachment knob until the Food
4
Processor attachment is completely
secured to Stand Mixer.
Place a bowl or container under the
5
food exit chute.
Plug into a grounded 3 prong outlet.
6
12
OPERATING THE FOOD PROCESSOR ATTACHMENTOPERATING THE FOOD PROCESSOR ATTACHMENT
Speed selection guide
Different foods require varying degrees of pressure and speed for optimized results.
• In general, use light pressure and low speeds for soft, delicate foods — soft fruits and
vegetables like kiwi or ripened tomatoes, as well as soft cheeses like mozzarella.
• Use rmer pressure with high speed for harder foods — hard vegetables like potatoes
and carrots, meats like pepperoni, and hard cheeses like Pecorino Romano.
Use the table provided to determine the appropriate speed for your recipe.
English
FUNCTION DISC FOOD STAND
Slicing
Adjustable slicing disc
Shredding
Reversible shredding disc
Julienne
Julienne disc
Dicing
Dicing disc and blade
Soft fruits
Soft vegetables
Hard vegetables
Cooked meats
Soft vegetables 2
Hard vegetables
Hard cheese
Vegetables 4
Soft fruits
Soft vegetables
Hard vegetables 10
MIXER
SPEED
2
10
10
4
13
OPERATING THE FOOD PROCESSOR ATTACHMENT
Using the Food Processor attachment
Before operating the Food Processor
attachment, be sure the attachment
assembly and discs are properly assembled
and attached to the Stand Mixer (see
“Assembling the Food Processor
attachment” section). Place a bowl or
container underneath the feed tube to
catch all processed food.
Place the interlock lid on the attachment
1
assembly, making sure to click the lock
into place. Turn on the Stand Mixer on
to the appropriate speed. See the Speed
selection guide for more information
Using the 2-in-1 food pusher
The 2-in-1 food
2-Piece
Food
Pusher
14
pusher features a
smaller chute inside
of a larger food
pusher.
Use the small feed
tube and pusher to
process small or
slender items, like
single carrots or
celery stalks.
Use the food pusher to slowly feed
2
items into the attachment assembly.
To slice or shred small
items, insert the 2-piece
food pusher into the feed
tube so that the smaller
chute is oriented as shown.
Place food items in the
smaller chute and use
the small food pusher
to process.
Using a slicing or shredding disc
To slice or shred fruits or
vegetables that are long
and relatively small in
diameter, such as carrots
and bananas:
Cut food to t feed
tube vertically and
pack feed tube
securely to keep
food positioned
properly. Process
using even pressure
with the food
pusher. Or use the
small feed tube in
the two-piece food
pusher. Position
food vertically in the
tube and use the
small food pusher to process food.
To slice or shred fruits and vegetables
that are round, such as onions, and
apples:
Peel, core, and remove seeds. Cut in halves
or quarters to t feed tube. Position in feed
tube. Process using even pressure with the
food pusher.
To slice or shred fruits and vegetables
that are small:
Position food vertically or horizontally in
layers within the feed tube. Fill feed tube
in order to keep food positioned properly.
Process using even pressure with the
food pusher. Or use the small feed tube
in the two-piece food pusher. Position
food vertically in the tube and use the
small food pusher to process food.
To slice cooked meat or poultry,
such as pepperoni:
Food should be very cold. Cut in pieces
to t feed tube. Process food using rm,
even pressure with the food pusher.
To shred spinach and other leaves:
Stack leaves. Roll up and stand up in feed
tube. Process using even pressure with
the food pusher.
To shred rm and soft
cheeses:
Firm cheese should be very cold. For best
results, thoroughly freeze soft cheeses,
such as mozzarella, before processing. This
may take several hours to achieve proper
rmness for best processing.
English
15

Helpful hints
• To avoid damage to the blade or motor,
do not process food that is so hard or
rmly frozen that it cannot be pierced
with the tip of a sharp knife. If a piece
of hard food, such as a carrot, becomes
wedged or stuck on the blade, stop the
mixer and remove the blade. Gently
remove food from the blade.
• Position slicing discs so the cutting
surface is just to the right of the feed
tube. This allows the blade a full rotation
before contacting the food.
• To capitalize on the speed of the
processor, drop ingredients to be
chopped through the feed tube while
the mixer is running.
• Soft and medium-hard cheese may spread
out or roll up on the shredding disc. To
avoid this, shred only well-chilled cheese.
• A few larger pieces of food may
remain on top of the disc after slicing
or shredding. If desired, cut these by
hand and add to mixture.
• Sometime slender foods, such as carrots
or celery, fall over in the feed tube,
resulting in an uneven slice. To minimize
this, cut food in several pieces and
pack the feed tube with the food. For
processing small or slender items, the
small feed tube in the 2-piece food pusher
will prove especially convenient. For best
results, cut a small amount off the end to
create a at surface when processing a
single carrot or celery stalk.
• Different foods require varying degrees of
pressure and speed for optimal results. In
general, use light pressure and low speed
for soft, delicate foods (soft fruits and
vegetables like kiwi, ripened tomatoes,
soft cheeses), and rmer pressure
with high speed for harder foods (hard
vegetables like potatoes and carrots, hard
cheeses and meats like pepperoni).
• After removing the lid, place it upside
down on the counter. This will help keep
the counter clean.
• Your Food Processor attachment is
not designed to perform the following
functions:
- Grind coffee beans, grains, or
hard spices
- Grind bones or other inedible
parts of food
- Liquefy raw fruits or vegetables
- Slice hard-cooked eggs or unchilled
meats.
• If any plastic parts should discolor due
to the types of food processed, clean
them with lemon juice.
• Quickly rinse the liner between foods to
elminate cross contamination of foods.
16

RECIPESTIPS FOR GREAT RESULTS
Crispy Potato Latkes
DISCS
USED:
Makes 12-16 latkes
TIP: If a thermometer is
unavailable, test the oil heat
by placing a piece of potato
mixture into the pan. Oil is
ready when it bubbles.
5 Russet potatoes, scrubbed
and peeled
¼ large white onion, peeled
2 large eggs, beaten
2 tablespoons all-purpose our
¾ teaspoon salt
½ teaspoon pepper
¼ cup oil for frying
Place the adjustable slicing disc on the
KitchenAid® Food Processor attachment and
slide the external lever to the 5th notch. Place
the onion into the large feed tube and slice
into a large bowl. Remove the slicing disc.
Place the 4 mm shredding disc on the food
processor attachment and use the large food
pusher to shred the potatoes into a large bowl
and cover with water. Soak for 15 minutes
and dry throughly on a large kitchen towel.
Add the potatoes to the onions and toss. Add
the eggs, our, salt, and pepper and mix well
with clean hands.
Heat the oil in a large sauté pan to 375°F
(191°C). For each latke, place ¼ cup of the
potato mixture into the pan and pat it down
lightly. Fry for 5-7 minutes on each side or
until the potatoes are very brown and crispy.
Place cooked latkes onto a large platter or
plate lined with paper towel to absorb the oil.
Serve latkes with sour cream or applesauce.
Apple and Brie Crostini with Honey and Toasted Walnuts
DISCS
USED:
Makes 40-50 crostini
TIP: Pears can be substituted
for apples if desired.
1 baguette, sliced into ½-inch
rounds
1 Honeycrisp apple, cored
3 Tbs honey
½ oz Créme de Brie
½ cup toasted, crumbled
walnuts
4 chives, snipped
Preheat oven to 375°F (191°C). Lightly brush
each baguette round with extra virgin olive
oil and bake for 8-10 minutes or until just
beginning to brown.
Position the adjustable slicing disc on the Food
Processor attachment with the slice setting for
thickest slices. Place the apple pieces vertically
into the feed tube and slice.
Spread 1 teaspoon Brie on each crostini, top
with one apple slice, and drizzle ¼ teaspoon
of honey over top. Sprinkle with walnuts
evenly then garnish with the chives.
English
17

Spiced Garlic Dill Pickles
DISCS
USED:
Makes 8 pint-sized jars
TIP: To add more heat to the
pickles, slice two jalapeños
with the adjustable slicing disc
and place 1 to 2 slices in each
jar. The more seeds that are
added, the spicier the pickles
will become.
8 peeled garlic cloves
8 teaspoons dill seed
4 teaspoons black
peppercorns
4 teaspoons crushed red
pepper akes
4 teaspoons mustard seeds
2 teaspoons celery seeds
¼ large white onion, peeled
5 large seedless cucumbers
4 tablespoons granulated
sugar
4 tablespoons kosher salt
4 cups apple cider vinegar
4 cups water
In each 8 pint jar, place 1 garlic clove,
1 teaspoon dill seed, ½ teaspoon black
peppercorns, ½ teaspoon red pepper akes,
½ teaspoon mustard seeds, and ¼ teaspoon
celery seeds.
Place the adjustable slicing disc on the
KitchenAid® Food Processor attachment and
slide the external lever to the 4th notch. Place
the onion into the large feed tube and slice on
low speed. Remove onion and place 5-6 slices
in the bottom of each jar.
Slide the external lever to the 6th notch. Feed
the cucumbers through the large feed tube
to slice. Remove the cucumbers and ll each
jar evenly with the slices, packing them in as
necessary.
In a large saucepan, combine the sugar, salt,
cider vinegar, and water and bring to a boil,
stirring occasionally to help dissolve the sugar
and salt. Remove from heat and pour 1 to 1¼
cups of brine overtop the contents of each
jar, leaving ½ inch space from the top.
Secure the lids and allow jars to cool to room
temperature before chilling. Chill for 48 hours
before serving.
Goat Cheese Toasts with Vegetables and Basil
DISCS
USED:
18
Makes 20 toasts
TIP: Reheat any remaining
toasts the following day at
400°F (204°C) for 5-6 minutes.
1 small zucchini
1 small yellow squash
3 Roma tomatoes
2 sheets puff pastry, thawed
4 ounces goat cheese
20 basil leaves
olive oil spray
salt and fresh ground pepper
to taste
Preheat oven to 400°F (204°C) and line 2
baking sheets with parchment paper.
Set the adjustable slicing disc on the
KitchenAid® Food Processor attachment
and slide the external lever to the 5th notch.
Using the small feed tube, slice the zucchini,
squash, and tomatoes. Remove vegetables
and set aside.
Unfold the puff pastry sheets on a lightly
oured surface. Use a 3-inch circular cutter to
cut 9 circles from each sheet. Chill remaining
pastry scraps for further use.
Place the pastry rounds onto the prepared
baking sheets and gently spread 1½ teaspoons
of goat cheese onto each. Layer one slice
of zucchini, one slice of squash, one slice
of tomato and one basil leaf on top of the
cheese. Lightly spray each with the olive oil
spray and sprinkle with a pinch of salt and
pepper. Bake at 400°F (204°C) for 20-25
minutes or until puff pastry is golden around
the edges.
Serve warm or at room temperature.

RECIPESRECIPES
Potato Red Pepper Breakfast Hash
DISCS
USED:
Makes 6 ¾-cup servings
TIP: Hash can be made one
day ahead, then reheated on a
baking sheet at 400°F (204°C)
for 10 minutes.
3 Russet potatoes, washed
and dried
½ red pepper, cored and seeded
¼ white onion, peeled
1 jalapeño pepper, cored
and seeded
1 tablespoon extra-virgin olive
oil
1 tablespoon unsalted butter
1 green onion, snipped
1 garlic clove, minced
¾ teaspoon kosher salt, or
to taste
1 teaspoon fresh ground pepper
½ cup cooked bacon, crispy
and crumbled
NOTE: This recipe requires the KSM2FPA
model or accessory pack, KSMFPAEP.
Assemble the dicing kit on the KitchenAid®
Food Processor attachment. Dice the
potatoes, red pepper, onion, and jalapeño
through the large feed tube.
Heat olive oil and butter in a large sauté pan
set over medium heat. Add the potatoes to
the pan and toss with the salt and pepper.
Cook for 3 minutes, then stir (some potato
may stick to the bottom of the pan).
Add the red pepper, onion, jalapeño and
garlic, and cook for an additional 10-12
minutes or until potatoes are well cooked
and begin to brown.
Turn the heat to low, add bacon and green
onion and cook for an additional 3 minutes.
Remove from heat and serve with over
medium eggs.
English
19

RECIPES
White Wine Sangria Spritzer
DISCS
USED:
Makes 8-10 servings
TIP: For an alternative avor,
use a sweet red wine in place
of the Sauvignon Blanc.
2 limes
1 lemon
1 starfruit
1 cup raspberries
1
/3 cup Grand Marnier
1 bottle Sauvignon Blanc
1 cup soda water
1 cup ice
Sorbet Fruit Pops
DISCS
USED:
Makes 8 sorbet cups
TIP: Any variation of fruit can
be used. As an alternative, slice
nectarines and mango in the
food processor and pair it with
a pineapple sorbet.
7 strawberries, hulled
2 kiwi, peeled
1 banana, peeled
½ gallon sorbet, lemon or
raspberry
8 8-ounce plastic cups
8 popsicle sticks
Place the adjustable slicing disc on the
KitchenAid® Food Processor attachment
and slide the external lever to the 6th notch.
Using the large feed tube, slice the limes,
lemon and starfruit. Remove the slicing disc
and place the fruit in a large pitcher.
Add the raspberries, Grand Marnier,
Sauvignon Blanc, soda water, and ice to the
pitcher and stir gently. Allow to sit for 30
minutes before serving. Serve chilled.
Place the adjustable slicing disc on the
KitchenAid® Food Processor attachment and
slide the external lever to the 6th notch.
Use the small food feed tube and slice the
strawberries, kiwi, and banana. Remove the
slicing disc and set the fruit aside.
Line the plastic cups side by side, and place
4-5 slices of each of the fruit around the
bottom sides of the cup. Spoon approximately
¾ to 1 cup of the sorbet into the middle of
the fruit and up to the rim of the cup.
Stick one popsicle stick into the center of the
sorbet of each cup. Place nished cups into
the freezer and freeze for 24 hours before
serving. Sorbet cups will keep up to 1 week in
the freezer.
20
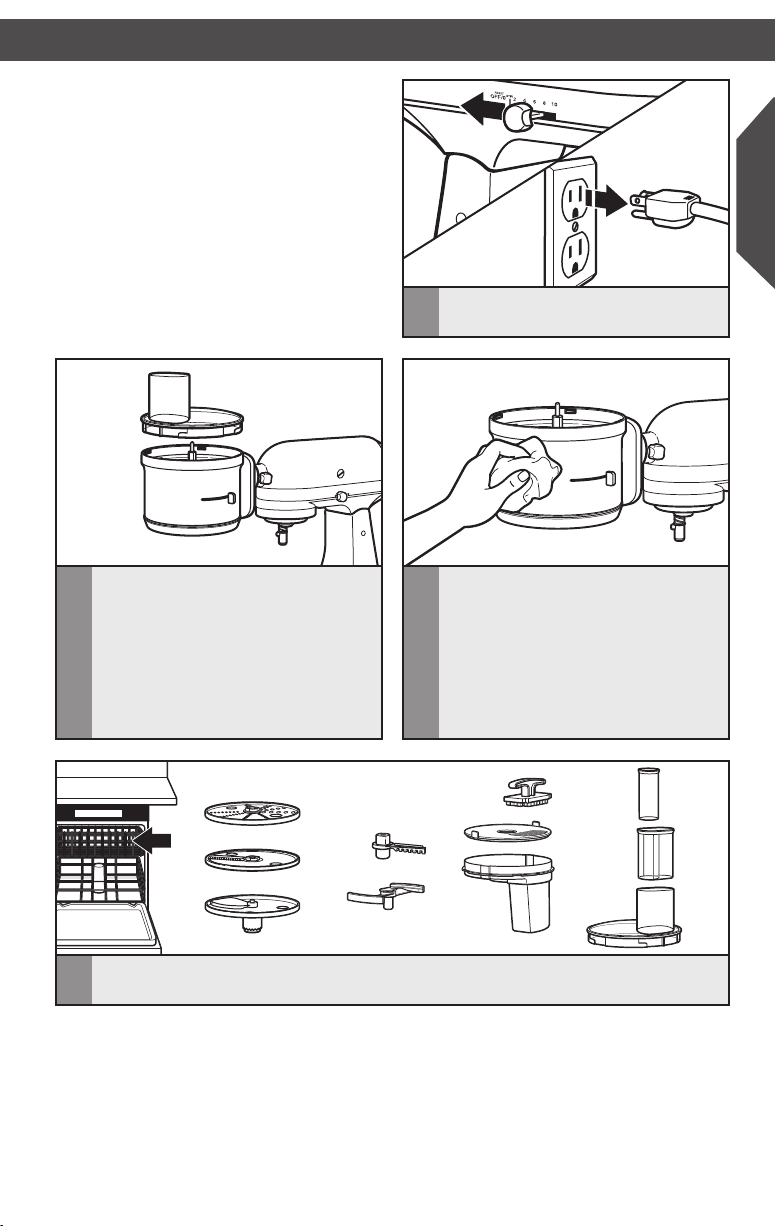
CARE AND CLEANING
IMPORTANT: To avoid damaging the
Food Processor attachment, do not
immerse the attachment assembly in
water or other liquids. All other parts are
top rack dishwasher safe.
Turn Stand Mixer OFF and unplug from
1
outlet.
English
Remove and disassemble Food
2
Processor attachment.
All other parts may be washed in warm, sudsy water or placed in the top rack of the
4
dishwasher for cleaning.
Wipe the attachment assembly with a
3
warm, damp cloth. Avoid using abrasive
cleaners or scouring pads as they may
scratch the attachment assembly casing.
Thoroughly dry with a soft cloth. To
avoid damaging the Food Processor
attachment, do not wash or immerse
the attachment assembly in water or
other liquids.
21
TROUBLESHOOTING WARRANTY AND SERVICE
Food Processor attachment doesn’t run
• Check to see whether the Stand Mixer
is plugged into a grounded 3 prong outlet.
If it is, check the fuse or circuit breaker
on the electrical circuit the Stand Mixer
is connected to and make sure the circuit
is closed.
• Is the fuse in the circuit to the Stand Mixer
in working order? If you have a circuit
breaker box, be sure the circuit is closed.
• Unplug the Stand Mixer, then plug it back
into the outlet.
• Check to make sure the Food Processor
attachment was assembled correctly, and
the interlock lid is properly aligned and
locked in place.
Food Processor attachment not shredding or slicing properly
• Make sure the raised-blade side of
the disc is positioned face up on the
common adapter.
• If using the adjustable slicing blade,
make sure it is set to the correct
thickness.
• Make sure ingredients are suitable
for slicing or shredding. See “Tips for
Great Results” section.
Lid won’t close when using a disc
• Make sure the disc is installed correctly, and
is positioned properly on the disc adapter.
If the problem is not due to the above item,
see the “Warranty and Service” section.
Do not return the Food Processor attachment
to the retailer. Retailers do not provide
service.
Clutch engages
If the clutch activates, there will be a very loud clicking noise.
1. Check to make sure there are not too
many items in the Food Processor
attachment.
2. Make sure any hard seeds are removed.
Stand Mixer motor slows down
This is normal operation and is not damaging to the performance of the attachment.
22

KitchenAid® Food Processor Attachment Warranty
for the 50 United States, the District of Columbia,
Puerto Rico, and Canada
This warranty extends to the purchaser and any succeeding owner for Food Processor
attachments operated in the 50 United States, the District of Columbia, Puerto Rico,
and Canada.
Length of Warranty: One Year Full Warranty from date of purchase.
KitchenAid Will Pay
for Your Choice of: See the next page for details on how to arrange for service,
or call the Customer eXperience Center toll-free at
1-800-541-6390.
OR
The replacement parts and repair labor costs to correct
defects in materials and workmanship. Service must be
provided by an Authorized KitchenAid Service Center.
KitchenAid Will A. Repairs when Food Processor attachment is used in
Not Pay for: other than normal single family home use.
B. Damage resulting from accident, alteration, misuse
or abuse.
C. Any shipping or handling costs to deliver your Food
Processor attachment to an Authorized Service Center.
D. Replacement parts or repair labor costs for Food
Processor attachments operated outside the 50 United
States, District of Columbia, Puerto Rico, and Canada.
DISCLAIMER OF IMPLIED WARRANTIES; LIMITATION OF REMEDIES
IMPLIED WARRANTIES, INCLUDING TO THE EXTENT APPLICABLE WARRANTIES
OF MERCHANTABILITY OR FITNESS FOR A PARTICULAR PURPOSE, ARE
EXCLUDED TO THE EXTENT LEGALLY PERMISSIBLE. ANY IMPLIED WARRANTIES
THAT MAY BE IMPOSED BY LAW ARE LIMITED TO ONE YEAR, OR THE SHORTEST
PERIOD ALLOWED BY LAW. SOME STATES AND PROVINCES DO NOT ALLOW
LIMITATIONS OR EXCLUSIONS ON HOW LONG AN IMPLIED WARRANTY
OF MERCHANTABILITY OR FITNESS LASTS, SO THE ABOVE LIMITATIONS OR
EXCLUSIONS MAY NOT APPLY TO YOU.
IF THIS PRODUCT FAILS TO WORK AS WARRANTED, CUSTOMER’S SOLE AND
EXCLUSIVE REMEDY SHALL BE REPAIR OR REPLACEMENT ACCORDING TO THE
TERMS OF THIS LIMITED WARRANTY. KITCHENAID AND KITCHENAID CANADA
DO NOT ASSUME ANY RESPONSIBILITY FOR INCIDENTAL OR CONSEQUENTIAL
DAMAGES. This warranty gives you specic legal rights and you may also have other
rights which vary from state to state or province to province.
Hassle-Free Replacement of your Food Processor attachment.
English
23

WARRANTY AND SERVICE
Hassle-Free Replacement Warranty –
50 United States, District of Columbia, and Puerto Rico
We’re so condent the quality of our
products meets the exacting standards of
KitchenAid that, if your Food Processor
attachment should fail within the rst year of
ownership, KitchenAid will arrange to deliver
an identical or comparable replacement to
your door free of charge and arrange to have
your original Food Processor attachment
returned to us. Your replacement unit will
also be covered by our one year limited
warranty. Please follow these instructions to
receive this quality service.
Hassle-Free Replacement Warranty – Canada
We’re so condent the quality of our
products meets the exacting standards of
the KitchenAid brand that, if your Food
Processor attachment should fail within
the rst year of ownership, KitchenAid
Canada will replace your Food Processor
attachment with an identical or comparable
replacement. Your replacement unit will also
be covered by our one year limited warranty.
Please follow these instructions to receive
this quality service.
If your Food Processor attachment should
fail within the rst year of ownership, take
the Food Processor attachment or ship
collect to an Authorized KitchenAid Service
If your Food Processor attachment should
fail within the rst year of ownership, simply
call our toll-free Customer eXperience
Center at 1-800-541-6390 Monday through
Friday. Please have your original sales receipt
available when you call. Proof of purchase
will be required to initiate the claim. Give
the consultant your complete shipping
address. (No P.O. Box numbers, please.)
When you receive your replacement Food
Processor attachment, use the carton and
packing materials to pack up your original
Food Processor attachment.
Centre. In the carton include your name and
complete shipping address along with a copy
of the proof of purchase (register receipt,
credit card slip, etc.). Your replacement
Food Processor attachment will be returned
prepaid and insured. If you are unable to
obtain satisfactory service in this manner call
our toll-free Customer eXperience Centre
at 1-800-807-6777.
Or write to us at:
Customer eXperience Centre
KitchenAid Canada
200 - 6750 Century Ave.
Mississauga, ON L5N 0B7
Arranging for Service after the Warranty Expires, or
Ordering Accessories and Replacement Parts
In the United States and Puerto Rico:
For service information, or to order
accessories or replacement parts, call
toll-free at 1-800-541-6390 or write to:
Customer eXperience Center,
KitchenAid Small Appliances,
P.O. Box 218, St. Joseph, MI 49085-0218
Outside the United States and Puerto Rico:
Consult your local KitchenAid dealer or
the store where you purchased the Food
24
®/™ © 2014. All rights reserved. Used under license in Canada.
Processor attachment for information on
how to obtain service.
For service information in Canada:
Call toll-free 1-800-807-6777.
Or write to:
Customer eXperience Centre
KitchenAid Canada
200 - 6750 Century Ave.
Mississauga, ON L5N 0B7
 Loading...