


KitchenAid KSM154GBQ3TG0, KSM154GBQ3BF0, KSM154GBQ3BW0, KSM154GBQ3CE0, KSM154GBQ3CU0 Owner’s Manual
...K45 Series
KSM45–KSM200 Series
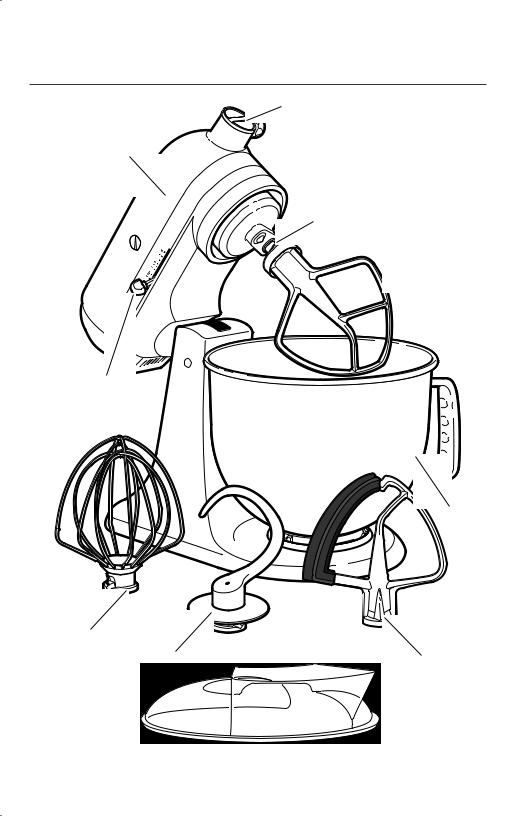
PARTS AND FEATURES
PARTS AND ACCESSORIES
Motor head
Speed control
Wire whip
Dough hook
Attachment hub
Beater shaft
Flat
 beater
Bowl
Flex Edge beater*
 Pouring shield*
*Accessory sold separately

STAND MIXER SAFETY
ENGLISH |
IMPORTANT SAFEGUARDS
When using electrical appliances, basic safety precautions should always be followed, including the following:
1.Read all instructions.
2.To avoid risk of electrical shock, do not put Stand Mixer in water or other liquid.
3.Close supervision is necessary when any appliance is used by or near children.
4.Unplug the Stand Mixer from outlet when not in use, before putting on or taking off parts, and before cleaning.
5.Avoid contacting moving parts. Keep hands, hair, and clothing, as well
as spatulas and other utensils, away from beater during operation to reduce the risk of injury to persons and/or damage to the Stand Mixer.
6.Do not operate any appliance with a damaged cord or plug or after the appliance malfunctions or has been damaged in any manner. Return appliance to the nearest Authorized Service Facility for examination, repair, or adjustment.
7.The use of accessories not recommended or sold by KitchenAid may cause fire, electric shock, or injury.
8.Do not use the Stand Mixer outdoors.
9.Do not let the cord hang over the edge of table or counter.
STAND MIXER SAFETY | 3
STAND MIXER SAFETY
10.Do not let the cord contact hot surfaces, including the stove.
11.Remove the flat beater, wire whip, or spiral dough hook from the Stand Mixer before washing.
SAVE THESE INSTRUCTIONS
This product is designed for household use only.
ELECTRICAL REQUIREMENTS
Voltage: 120 V Frequency: 60 Hz
Wattage: 275 Watts MAX for models K45, KSM45-KSM80
300 Watts MAX for models KSM85-KSM110
325 Watts MAX for models KSM120-KSM200
NOTE: The power rating for your Stand Mixer is printed on the serial plate.
Do not use an extension cord. If the power supply cord is too short, have a qualified electrician or serviceman install an outlet near the appliance.
The maximum rating is based on the attachment that draws the greatest load (power). Other recommended attachments may draw significantly less power.
4 | STAND MIXER SAFETY
USING THE STAND MIXER
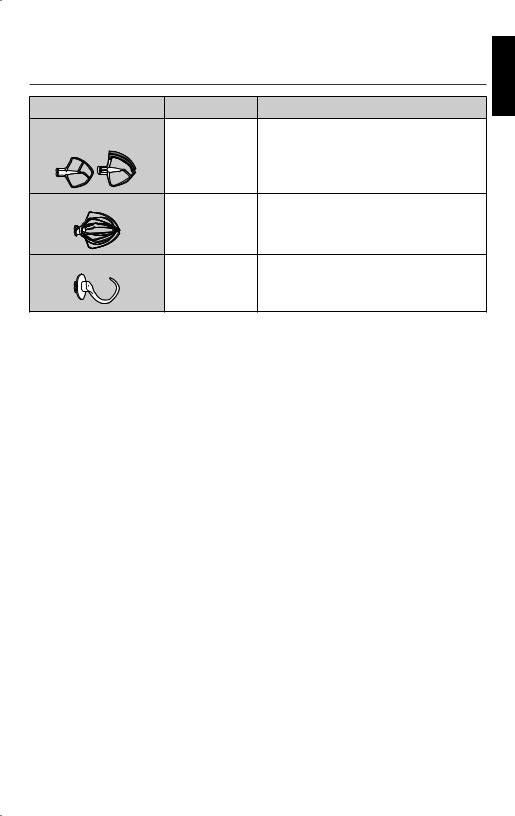
CHOOSING THE RIGHT ACCESSORY
ACCESSORY |
USE TO MIX |
DESCRIPTION |
FLAT BEATER |
Normal |
Cakes, creamed frostings, candies, |
FLEX EDGE BEATER* |
to heavy |
cookies, biscuits, pie pastry, meatloaf, |
|
mixtures |
mashed potatoes |
WIRE WHIP |
Mixtures |
Eggs, egg whites, heavy cream, |
|
that need air |
boiled frostings, sponge cakes, |
|
incorporated |
mayonnaise, some candies |
DOUGH HOOK |
Mixing and |
Breads, rolls, pizza dough, buns |
|
kneading yeast |
|
|
doughs |
|
ENGLISH
*Accessory sold separately
USING THE STAND MIXER | 5
USING THE STAND MIXER
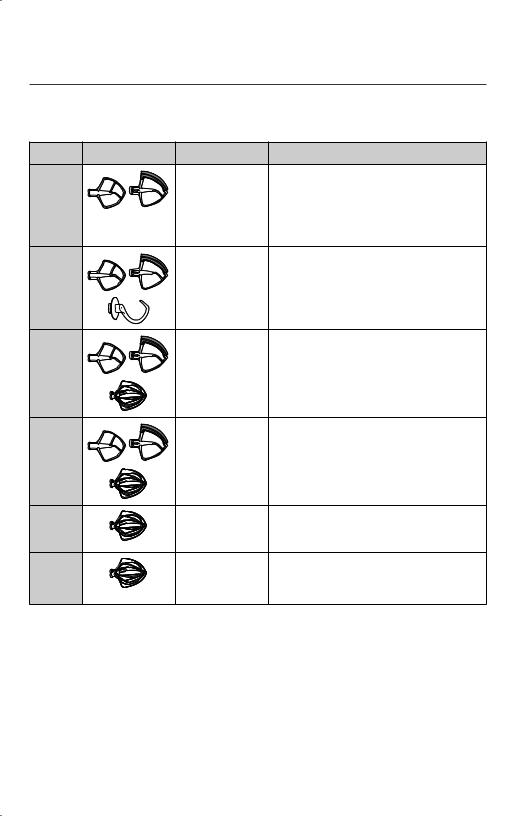
SPEED CONTROL GUIDE
NOTE: The speed control can be set between the speeds listed in the chart to obtain speeds 1, 3, 5, 7, and 9 if a finer adjustment is required. Do not exceed Speed 2 when preparing yeast doughs as this may cause damage to the Stand Mixer.
SPEED ACCESSORY |
ACTION |
DESCRIPTION |
STIR |
STIR |
For slow stirring, combining, mashing, |
|
|
starting all mixing procedures. Use to |
|
|
add flour and dry ingredients to batter |
|
|
and to add liquids to dry ingredients. |
|
|
Do not use Speed 1 to mix or knead |
|
|
yeast doughs. |
2 |
SLOW MIXING |
For slow mixing, mashing, faster |
|
|
stirring. Use to mix and knead yeast |
|
|
doughs, heavy batters and candies, start |
|
|
mashing potatoes or other vegetables, |
|
|
cut shortening into flour, mix thin or |
|
|
splashy batters. |
4 |
MIXING, |
For mixing semi-heavy batters, such |
|
BEATING |
as cookies. Use to combine sugar and |
|
|
shortening and to add sugar to egg |
|
|
whites for meringues. Medium speed |
|
|
for cake mixes. |
6 |
BEATING, |
For medium fast beating (creaming) or |
|
CREAMING |
whipping. Use to finish mixing cake, |
|
|
doughnut, and other batters. High |
|
|
speed for cake mixes. |
8 |
FAST BEATING, |
For whipping cream, egg whites, and |
|
WHIPPING |
boiled frostings. |
10 |
FAST WHIPPING |
For whipping small amounts of cream, |
|
|
egg whites, or for final whipping of |
|
|
mashed potatoes. |
NOTE: To move the speed control lever with ease, lift slightly up as you move it across the settings in either direction.
6 | USING THE STAND MIXER

USING THE STAND MIXER
ASSEMBLING THE STAND MIXER
Check to be sure that the Stand
1 Mixer is unplugged, and the speed control is turned to “0”.
NOTE: To move the speed control lever with ease, lift slightly up as you move it across the settings in either direction.
Attach the bowl: Place the bowl on
3 the bowl clamping plate and gently turn it in a clockwise direction to lock it into place.
Raise the motor head: Slide the
2 locking lever to the unlock position and lift the motor head.
Attach any accessory: Slip the accessory onto the beater shaft and
4 press upward as far as possible. Turn the accessory counterclockwise to hook the accessory over the pin on the shaft.
ENGLISH
USING THE STAND MIXER | 7
USING THE STAND MIXER
ASSEMBLING THE STAND MIXER
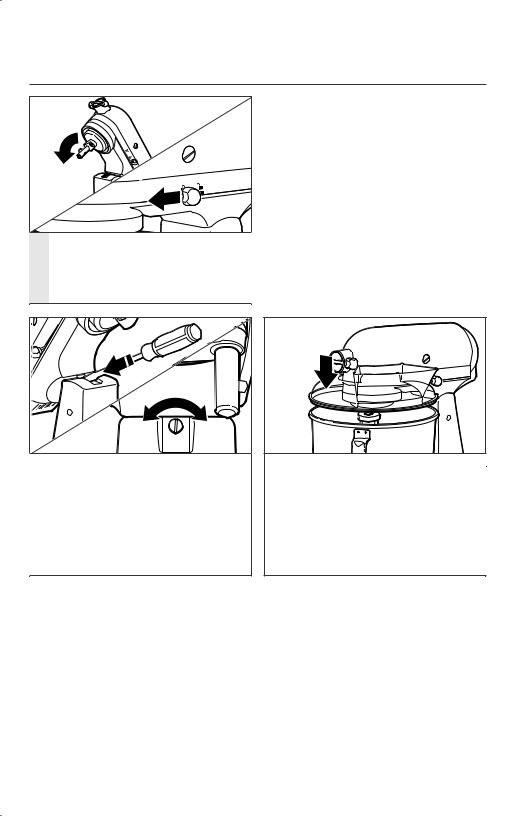
Lower the motor head until it is all the way down, then slide the locking
5 lever to the lock position. Before mixing, test lock by attempting to raise motor head.
(OPTIONAL) To adjust beater to bowl clearance: Tilt the motor head back; then, using a flat-head screwdriver, turn the screw slightly counterclockwise (left) to raise the beater, or clockwise (right) to lower the beater. Adjust the beater so that it just clears the surface of the bowl. If you overadjust the screw, the bowl lock lever may not lock into place.
(OPTIONAL) Place the pouring shield*:
Slide the pouring shield from the front of the Stand Mixer over the bowl until the pouring shield is centered. The bottom rim of the pouring shield fits inside of the bowl. The pouring chute will be just to the right of the attachment hub as you face the Stand Mixer.
IMPORTANT: Your Stand Mixer is adjusted at the factory so that the flat beater just clears the bottom of the bowl. If, for any reason, the flat beater hits the bottom of the bowl or is too far away from the bowl, you can easily correct the clearance.
NOTE: When properly adjusted, the flat beater will not strike on the bottom or sides of the bowl. If the flat beater or the wire whip is so close that it strikes the bottom of the bowl, coating may wear off the beater or wires on the whip may wear.
*Accessory sold separately
8 | USING THE STAND MIXER
USING THE STAND MIXER
OPERATING THE STAND MIXER
NOTE: The Stand Mixer may warm up during use. Under heavy loads with extended mixing time, the top of the unit may become hot. This is normal.
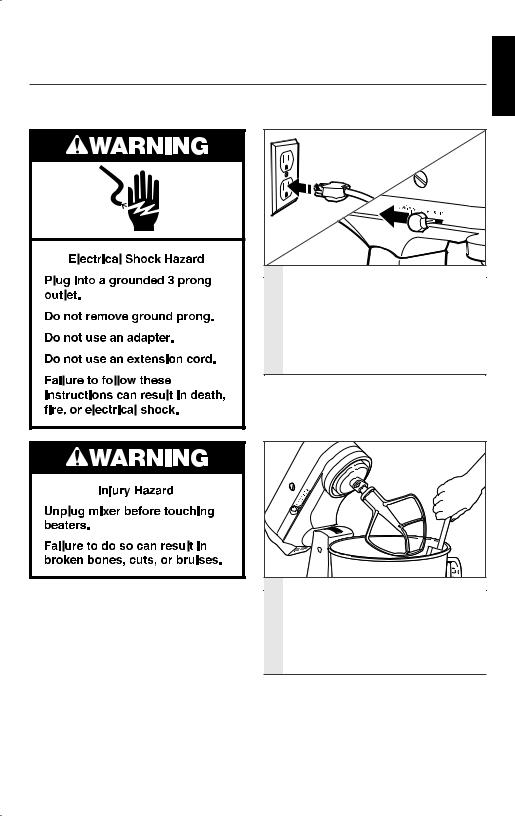
Plug the Stand Mixer into a grounded 3 prong outlet. Always set the speed control lever on
1 lowest speed to start, then gradually increase speed to avoid splashing ingredients. See the “Speed control guide” to select the best speed for your recipe.
NOTE: To move the speed control lever with ease, lift slightly up as you move it across the settings in either direction.
Do not scrape the bowl while the Stand Mixer is operating. The bowl and beaters are designed to provide
2 thorough mixing without frequent scraping. Scraping the bowl once or twice during mixing is usually sufficient.
ENGLISH
USING THE STAND MIXER | 9
USING THE STAND MIXER
NOTE: The pouring shield* can be used to avoid ingredients splashing out of the bowl when mixing as well as to easily pour ingredients in the bowl while mixing.
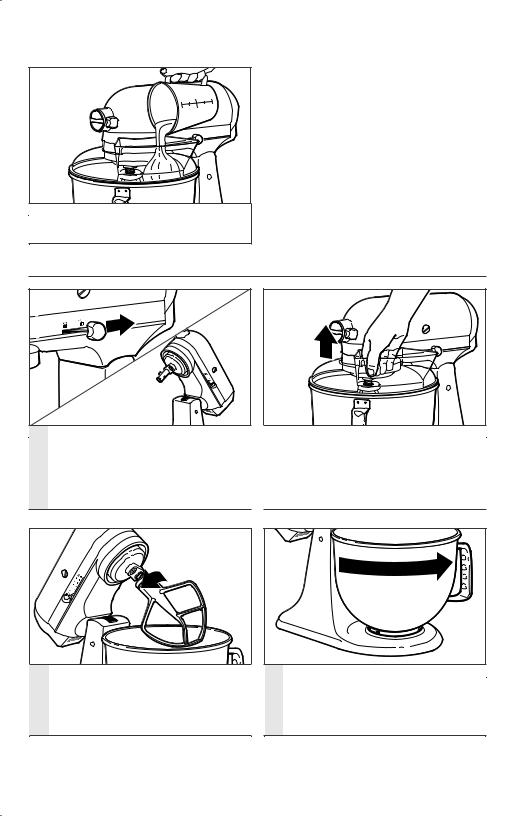
(OPTIONAL) Pour ingredients into the bowl through the pouring chute.
DISASSEMBLING THE STAND MIXER
Raise the motor head: Check to be sure that the Stand Mixer is
1 unplugged, and the speed control is turned to “0”; then, slide the locking lever to the unlock position and lift the motor head.
(OPTIONAL) Remove the pouring shield*: Lift the front of the pouring shield clear of the rim of the bowl, and pull away from the Stand Mixer.
Remove the accessory: Press the accessory upward as far as possible,
2 then turn the accessory clockwise and pull it away from the beater shaft.
Remove the bowl: Gently turn
3 the bowl counterclockwise to release it from the bowl clamping plate.
*Accessory sold separately
10 | USING THE STAND MIXER
USING THE STAND MIXER
OPTIONAL ATTACHMENTS
KitchenAid offers a wide range of optional attachments such as the spiralizer, pasta cutters, or food grinder that may be attached to the Stand Mixer attachment power hub as shown here.
ENGLISH
1 |
Check to be sure that the Stand |
2 |
Turn the attachment knob |
Mixer is unplugged and the speed |
counterclockwise to remove |
||
|
control is turned to “0”. |
|
attachment hub cover. |
Insert attachment into attachment hub, making certain that attachment power shaft fits into the square attachment hub socket. It may be
3 necessary to rotate the attachment back and forth. When it is in the proper position, the pin on the attachment will fit into the notch on the hub rim.
Tighten the attachment knob by turning it clockwise until the
attachment is completely secured 4 to the Stand Mixer. See the
Instructions manual that came with your attachment for detailed
directions on using the attachment.
USING THE STAND MIXER | 11

TIPS FOR GREAT RESULTS
EGG WHITES
Place room-temperature egg whites in clean, dry bowl. Attach bowl and wire whip. To avoid splashing, gradually turn to designated speed and whip to desired stage.
AMOUNT |
SPEED |
1 egg white |
GRADUALLY to 10 |
2 or more egg whites |
GRADUALLY to 8 |
Whipping stages
With your KitchenAid Stand Mixer, egg whites whip quickly. Avoid over-whipping.
WHIPPED CREAM
Pour cold whipping cream into chilled bowl. Attach bowl and wire whip. To avoid splashing, gradually turn to designated speed and whip to desired stage.
AMOUNT |
SPEED |
less than 3/4 cup (200 ml) |
GRADUALLY to 10 |
more than 3/4 cup (200 ml) |
GRADUALLY to 8 |
Whipping stages
Watch cream closely during whipping. Because your KitchenAid Stand Mixer whips so quickly, there are just a few seconds between whipping stages.
12 | TIPS FOR GREAT RESULTS

TIPS FOR GREAT RESULTS
MIXING TIPS
Mixing time
Your KitchenAid Stand Mixer will mix faster and more thoroughly than most other electric mixers. Therefore, the mixing time in most recipes must be adjusted to avoid over-beating.
To help determine the ideal mixing time, observe the batter or dough and mix only until it has the desired appearance described in your recipe, such as “smooth and creamy.” To select the best mixing speeds, use the “Speed control guide” section.
Adding ingredients
The standard procedure to follow when mixing most batters, especially cake and cookie batters, is to add:
1/3 dry ingredients 1/2 liquid ingredients 1/3 dry ingredients 1/2 liquid ingredients 1/3 dry ingredients
Use Speed 1 until ingredients have been blended. Then gradually increase to desired speed.
Always add ingredients as close to side of bowl as possible, not directly into moving beater. The pouring shield can be used to simplify adding ingredients.
NOTE: If ingredients in very bottom of bowl are not thoroughly mixed, the beater is not far enough into the bowl. See the “Assembling the Stand Mixer” section.
Cake mixes
When preparing packaged cake mixes, use Speed 4 for medium speed and Speed 6 for high speed. For best results, mix for the time stated on the package directions.
Adding nuts, raisins, or candied fruits
Solid materials should be folded in the last few seconds of mixing on Speed 1. The batter should be thick enough to keep the fruit or nuts from sinking to the bottom of the pan during baking. Sticky fruits should be dusted with flour for better distribution in the batter.
Liquid mixtures
Mixtures containing large amounts of liquid ingredients should be mixed at lower speeds to avoid splashing. Increase speed only after mixture has thickened.
Kneading yeast doughs
ALWAYS use the dough hook to mix and knead yeast doughs. Use Speed 2 to mix or knead yeast doughs. Use of any other speed creates high potential for unit failure.
Do not use recipes calling for more than 7 cups (900 g) all-purpose flour or 6 cups (800 g) whole-wheat flour when making dough in a 4.28-L bowl.
Do not use recipes calling for more than 8 cups (1 kg) all-purpose flour or 6 cups (800 g) whole-wheat flour when making dough in a 4.8-L bowl.
ENGLISH
TIPS FOR GREAT RESULTS | 13

CARE AND CLEANING
CLEANING THE STAND MIXER
IMPORTANT: Do not wash the wire whip in the dishwasher. Do not immerse the Stand Mixer body in water or other liquids. These parts should be hand-washed.
Turn Stand Mixer off and unplug before cleaning. Wipe the Stand Mixer body with a soft, damp cloth.
1 Do not use household/commercial cleaners. Wipe off the beater shaft frequently to remove any accumulation of residue. Do not immerse in water.
Bowl, pouring shield*, flat beater, and white dough hook may be washed
2 in a dishwasher. Or, clean them thoroughly in hot sudsy water and rinse completely before drying. Do not store beaters on shaft.
IMPORTANT: The wire whip is not dishwasher-safe. Clean it thoroughly
3 in hot, sudsy water and rinse completely before drying. Do not store wire whip on shaft.
*Accessory sold separately
14 | CARE AND CLEANING
TROUBLESHOOTING
If your Stand Mixer should malfunction, please check the following:
1. The Stand Mixer may warm up during use. Under heavy loads with extended mixing time periods, you may not be able to comfortably touch the top of the unit. This is normal.
2. The Stand Mixer may emit a pungent odor, especially when new. This is common with electric motors.
3. If the flat beater hits the bowl, stop the Stand Mixer. See the “Assembling the Stand Mixer” section and adjust the beater to bowl clearance.
4. The speed control lever does not move smoothly or easily. To move the speed control lever with ease, lift slightly up as you move it across the settings in either direction.
5. If your Stand Mixer should fail to operate, please check the following:
• Is the Stand Mixer plugged in?
• Is the fuse in the circuit to the Stand Mixer in working order? If you have a circuit breaker box, be sure the circuit is closed.
• Turn off the Stand Mixer for 10-15 seconds, then turn it back
on. If the Stand Mixer still does not start, allow it to cool for 30 minutes before turning it back on.
If the problem cannot be corrected: See the “Warranty and service” section. Do not return the Stand Mixer to the retailer; retailers do not provide service.
ENGLISH
TROUBLESHOOTING | 15

WARRANTY AND SERVICE
KITCHENAID STAND MIXER WARRANTY FOR
THE 50 UNITED STATES, THE DISTRICT OF COLUMBIA, PUERTO RICO, AND CANADA
This warranty extends to the purchaser and any succeeding owner for Stand Mixers operated in the 50 United States, the District of Columbia, Puerto Rico, and Canada.
Length of Warranty: |
One Year Full Warranty from date of purchase. |
|
|
KitchenAid Will Pay |
Hassle-Free Replacement of your Stand Mixer. See |
for Your Choice of: |
the next page for details on how to arrange for |
|
service, or call the Customer eXperience Center |
|
toll-free at 1-800-541-6390. |
|
OR |
|
The replacement parts and repair labor costs to correct |
|
defects in materials and workmanship. Service must be |
|
provided by an Authorized KitchenAid Service Center. |
|
|
KitchenAid Will |
A. Repairs when your Stand Mixer is used in other |
Not Pay for: |
than normal single family home use. |
|
B. Damage resulting from accident, alteration, |
|
misuse or abuse. |
|
C. Any shipping or handling costs to deliver your |
|
Stand Mixer to an Authorized Service Center. |
|
D. Replacement parts or repair labor costs for |
|
Stand Mixer attachments operated outside the |
|
50 United States, District of Columbia, Puerto |
|
Rico, and Canada. |
DISCLAIMER OF IMPLIED WARRANTIES; LIMITATION OF REMEDIES
IMPLIED WARRANTIES, INCLUDING TO THE EXTENT APPLICABLE WARRANTIES OF MERCHANTABILITY OR FITNESS FOR A PARTICULAR PURPOSE, ARE EXCLUDED TO THE EXTENT LEGALLY PERMISSIBLE. ANY IMPLIED WARRANTIES THAT MAY
BE IMPOSED BY LAW ARE LIMITED TO ONE YEAR, OR THE SHORTEST PERIOD ALLOWED BY LAW. SOME STATES AND PROVINCES DO NOT ALLOW LIMITATIONS OR EXCLUSIONS ON HOW LONG AN IMPLIED WARRANTY OF MERCHANTABILITY OR FITNESS LASTS, SO THE ABOVE LIMITATIONS OR EXCLUSIONS MAY NOT APPLY TO YOU.
IF THIS PRODUCT FAILS TO WORK AS WARRANTED, CUSTOMER’S SOLE AND EXCLUSIVE REMEDY SHALL BE REPAIR OR REPLACEMENT ACCORDING TO THE TERMS OF THIS LIMITED WARRANTY. KITCHENAID AND KITCHENAID CANADA DO NOT ASSUME ANY RESPONSIBILITY FOR INCIDENTAL OR CONSEQUENTIAL DAMAGES. This warranty gives you specific legal rights and you may also have other rights which vary from state to state or province to province.
16 | WARRANTY AND SERVICE
 Loading...