


KDPM704KPS0
KitchenAid KDPM704KPS0, KDTM804KPS0, KDTM804KBS0, KDTM704KPS0, KDTM604KPS0 Owner’s Manual
...
OWNER’S MANUAL
MANUEL DE L’UTILISATEUR
MANUAL DEL PROPIETARIO
DISHWASHER MAINTENANCE ......3
DISHWASHER LOADING TIPS ........4
DISHWASHER CARE ....................... 5
DISHWASHER SETTING MENU ......6
ERROR CODES ................................ 7
Error codes / blinking lights .................. 7
INSTALLATION REQUIREMENTS ...8
Tools and parts .....................................8
Location requirements ........................10
Product and cabinet opening
dimensions: .........................................11
Drain requirements .............................12
Water supply requirements .................12
Electrical requirements .......................12
INSTALLATION INSTRUCTIONS ...13
Prepare cabinet opening—
new utilities ......................................... 13
Install optional moisture barrier -
recommended for wood countertops ...13
Electrical connection ..........................14
Prepare dishwasher ............................15
Remove access panel and insulation ....15
Disconnect and remove drip tray
assembly ............................................. 15
Connect water line to ll valve ............ 16
Connect ll hose to ll valve ............... 17
Drain hose connection ........................ 18
Power cord connection ....................... 18
Install door handle
(on some models) ...............................20
Place dishwasher in cabinet ............... 20
Custom panel installation
(custom panel models only) ................ 21
Choose anchor attachment method ... 21
Final installation check........................22
Secure dishwasher in cabinet
opening ............................................... 23
Connect water line to house
shut-off valve ......................................24
Connect drain hose ............................24
Complete installation .......................... 26
Check operation .................................27
Install access panels ........................... 27
If dishwasher does not operate ..........28
ENTRETIEN DU
LAVE-VAISSELLE ........................... 30
CONSEILS DE CHARGEMENT
DU LAVE-VAISSELLE ....................31
ENTRETIEN DU
LAVE-VAISSELLE ........................... 32
MENU DE RÉGLAGE DU
LAVE-VAISSELLE: ......................... 33
CODES D’ANOMALIES ..................34
Codes d’anomalies/témoins
qui clignotent ......................................34
EXIGENCES D’INSTALLATION .....35
Outils et pièces ................................... 35
Exigences d’emplacement .................37
Dimensions d’ouverture du produit
et de l’armoire: ................................... 38
Exigences d’évacuation ...................... 39
Spécications de l’alimentation
en eau ................................................. 39
Spécicationsélectriques ................... 39
INSTRUCTIONS D’INSTALLATION ...40
Préparation de l’ouverture
d’encastrement de l’armoire –
nouveaux raccordements de service ... 40
Installer la barrière anti-humidité
en option – recommandée pour
les comptoirs en bois .........................40
Raccordement électrique....................41
Préparation du lave-vaisselle .............. 42
Retrait du panneau d’accès
et de l’isolation ................................... 42
Débrancher et enlever le plateau
d’écoulement ...................................... 42
Branchement de l’arrivée d’eau
à la valve de distribution ..................... 43
Branchement du tuyau de remplissage
à la valve de distribution ..................... 44
Raccord du tuyau de vidange ............. 45
Branchement du cordon
d’alimentation .....................................45
Installer la poigne de porte
(sur certains modèles) ......................... 47
Placer le lave-vaisselle dans l’armoire ... 47
Installation du panneau personnalisé
(modèles avec panneau personnalisé
seulement) ..........................................48
Choix de l’option de xation ............... 48
Vérication nale de l’installation ........49
Fixation du lave-vaisselle dans
l’ouverture d’encastrement
de l’armoire ......................................... 50
Branchement de l’arrivée d’eau
au robinet d’arrêt de la maison ...........51
Raccordement du tuyau de vidange ... 51
Terminer l’installation ..........................53
Contrôle du fonctionnement ............... 54
Installation des panneaux d’accès .....54
Si le lave-vaisselle ne fonctionne pas ...55
MANTENIMIENTO DE
LA LAVAVAJILLAS .........................57
CONSEJOS PARA CARGAR
LA LAVAVAJILLAS .........................58
CUIDADO DE LA LAVAVAJILLAS ... 59
MENÚ DE AJUSTES DE
LA LAVAVAJILLAS: ........................60
CÓDIGOS DE ERROR ....................61
Códigos de error / Luces
parpadeantes ...................................... 61
REQUISITOS DE INSTALACIÓN ... 62
Herramientas y piezas ........................62
Requisitos de ubicación .....................64
Dimensiones del producto
y de la abertura del gabinete: ............. 65
Requisitos de desagüe .......................66
Requisitos de suministro de agua ......66
Requisitos eléctricos...........................66
INSTRUCCIONES
DE INSTALACIÓN ..........................67
Preparación de la abertura del
gabinete: instalaciones nuevas ........... 67
Instalación opcional de la barrera
contra la humedad (recomendado
para los mostradores de madera) ....... 67
Conexión eléctrica .............................. 68
Prepare la lavavajillas ..........................69
Retire el panel de acceso
y el aislante ........................................ 69
Desconecte y retire el ensamblaje
de la bandeja de goteo ....................... 69
Conecte la tubería de agua
a la válvula de llenado.........................70
Conecte la manguera de llenado
a la válvula de llenado.........................71
Conexiones de la manguera
de desagüe ......................................... 72
Conexión del cable de alimentación ...72
Instale la manija de la puerta
(en algunos modelos) .......................... 74
Coloque la lavavajillas en el gabinete . 74
Instalación del panel a la medida
(en modelos con paneles a la medida
solamente) ..........................................75
Selección del método de sujeción
de anclaje ............................................75
Vericación nal de la instalación .......76
Asegure la lavavajillas en la abertura
del gabinete ........................................77
Conexión de tubería de agua a
manguera de válvula de cierre
del hogar ............................................. 78
Conecte la manguera de desagüe ...... 78
Complete la instalación ......................80
Verique el funcionamiento .................81
Instale los paneles de acceso .............81
Si la lavavajillas no funciona ............... 82
TABLE OF CONTENTS/TABLE DES MATIÈRES/ÍNDICE
W11323304B
2
SAVE THESE INSTRUCTIONS
IMPORTANT SAFETY INSTRUCTIONS
WARNING: When using the dishwasher, follow basic precautions, including the following:
Read all instructions before using the dishwasher.
Use the dishwasher only for its intended function.
Use only detergents or rinse agents recommended for use in a
dishwasher, and keep them out of the reach of children.
When loading items to be washed:
1) Locate sharp items so that they are not likely to damage the
door seal; and
2) Load sharp knives with the handles up to reduce the risk of
cut-type injuries.
Do not wash plastic items unless they are marked “dishwasher
safe” or the equivalent. For plastic items not so marked, check
the manufacturer's recommendations.
Do not touch the heating element during or immediately after use.
Do not operate the dishwasher unless all enclosure panels are
Do not leave the dishwasher open when not loading or unloading
dishes.
properly in place.
Do not tamper with controls.
Do not abuse, sit on, or stand on the door, lid, or dish racks of
the dishwasher.
To reduce the risk of injury, do not allow children to play in or
on the dishwasher.
Under certain conditions, hydrogen gas may be produced in a
hot water system that has not been used for two weeks or
more. HYDROGEN GAS IS EXPLOSIVE. If the hot water system
has not been used for such a period, before using the
dishwasher turn on all hot water faucets and let the water flow
from each for several minutes. This will release any
accumulated hydrogen gas. As the gas is flammable, do not
smoke or use an open flame during this time.
Remove the door or lid to the washing compartment
when removing an old dishwasher from service or
discarding it.
Do not use replacement parts that have not been recommended
by the manufacturer (e.g. parts made at home using a 3D printer).
GROUNDING INSTRUCTIONS
SAVE THESE INSTRUCTIONS
■
For a grounded, cord-connected dishwasher:
The dishwasher must be grounded. In the event of a
malfunction or breakdown, grounding will reduce the risk of
electric shock by providing a path of least resistance for
electric current. The dishwasher is equipped with a cord
having an equipment-grounding conductor and a grounding
plug. The plug must be plugged into an appropriate outlet
that is installed and grounded in accordance with all local
codes and ordinances.
WARNING:
Improper connection of the equipment-
grounding conductor can result in a risk of electric shock.
Check with a qualified electrician or service representative if
you are in doubt whether the dishwasher is properly
grounded. Do not modify the plug provided with the
dishwasher; if it will not fit the outlet, have a proper outlet
installed by a qualified electrician.
■
For a permanently connected dishwasher:
The dishwasher must be connected to a grounded metal,
permanent wiring system, or an equipment-grounding
conductor must be run with the circuit conductors and
connected to the equipment-grounding terminal or lead on
the dishwasher.

3
DISHWASHER MAINTENANCE
Detergents
High-quality premeasured tablets and packs are recommended
for improved performance.
Quality tablets and packs have been proven better than powder,
liquid, or gel detergents at reducing lming on dishes. Using
tablets and packs over time will start to reduce or eliminate white
lm. They are suitable for all water hardness and soil levels. Also,
by using a rinse aid, you can minimize repeat buildup of white
lm (not all packs and tablets contain rinse aid). Always place
premeasured detergents in main compartment and close lid.
NOTE: Follow instructions on the package when using other
dishwasher detergent types.
■ Use automatic dishwasher detergent only. Add detergent just
before starting a cycle.
■ Fresh automatic dishwasher detergent results in better
cleaning. Store tightly closed detergent container in a cool, dry
place.
■ Extremely hard water mineral deposits (15 grains per U.S.
gallon or more) can cause damage to your dishwasher and
make it difcult to achieve good results. A water softener is
recommended to avoid damage and achieve good results.
■ For more details about powders, liquids, and gels and hard
water conditions consult the brand website.
Rinse aid
Using rinse aid will optimize your drying and wash performance.
This dishwasher is specically designed to be used with rinse aid
for improved drying performance and controlling buildup of hard
water deposits. Rinse aid needs to be added to the product every
1 to 3 months depending on usage.
Refer to the Quick Start Guide or brand website for information
about lling the rinse aid dispenser.
Cycle Selection and Energy
Efcient dishwashers run longer to save water and energy,
just as driving a car slower saves on gas. Typical cycle time is
approximately 2 1/2 hours, but can take less or signicantly
more time depending on your selections and incoming water
temperature and amount of food soils on the dishes. For
optimum performance the dishwasher should be connected to a
120 F (49° C) hot water supply.
If you rst press the Start button, the main sensor cycle with
heated drying will be automatically selected. This cycle senses
the soil amount, and toughness of soil, to adjust the cycle for
improved cleaning.
Sanitize or Sani
Sanitizes dishes and glassware in accordance with NSF
International NSF/ANSI Standard 184 for Residential
Dishwashers. Certied residential dishwashers are not intended
for licensed food establishments. Only sanitizing cycles have
been designed to meet the requirements of the NSF/ANSI
184 performance standard for soil removal and for sanitization
efcacy. There is no intention, either directly or indirectly, that
all cycles on a NSF/ANSI 184 certied dishwasher meet the
NSF/ANSI 184 performance standard for soil removal and for
sanitization efcacy. The Sani Rinse indicator glows at the end
of the cycle if the Sani Rinse option was successfully completed.
If the indicator does not activate, it is probably due to the cycle
being interrupted.
Tip Over Hazard
Do not use dishwasher until completely installed.
Do not push down on open door.
Doing so can result in serious injury or cuts.
WARNING
4
DISHWASHER LOADING TIPS
NOTE: Features are model specic. Your dishwasher may not have all features described.
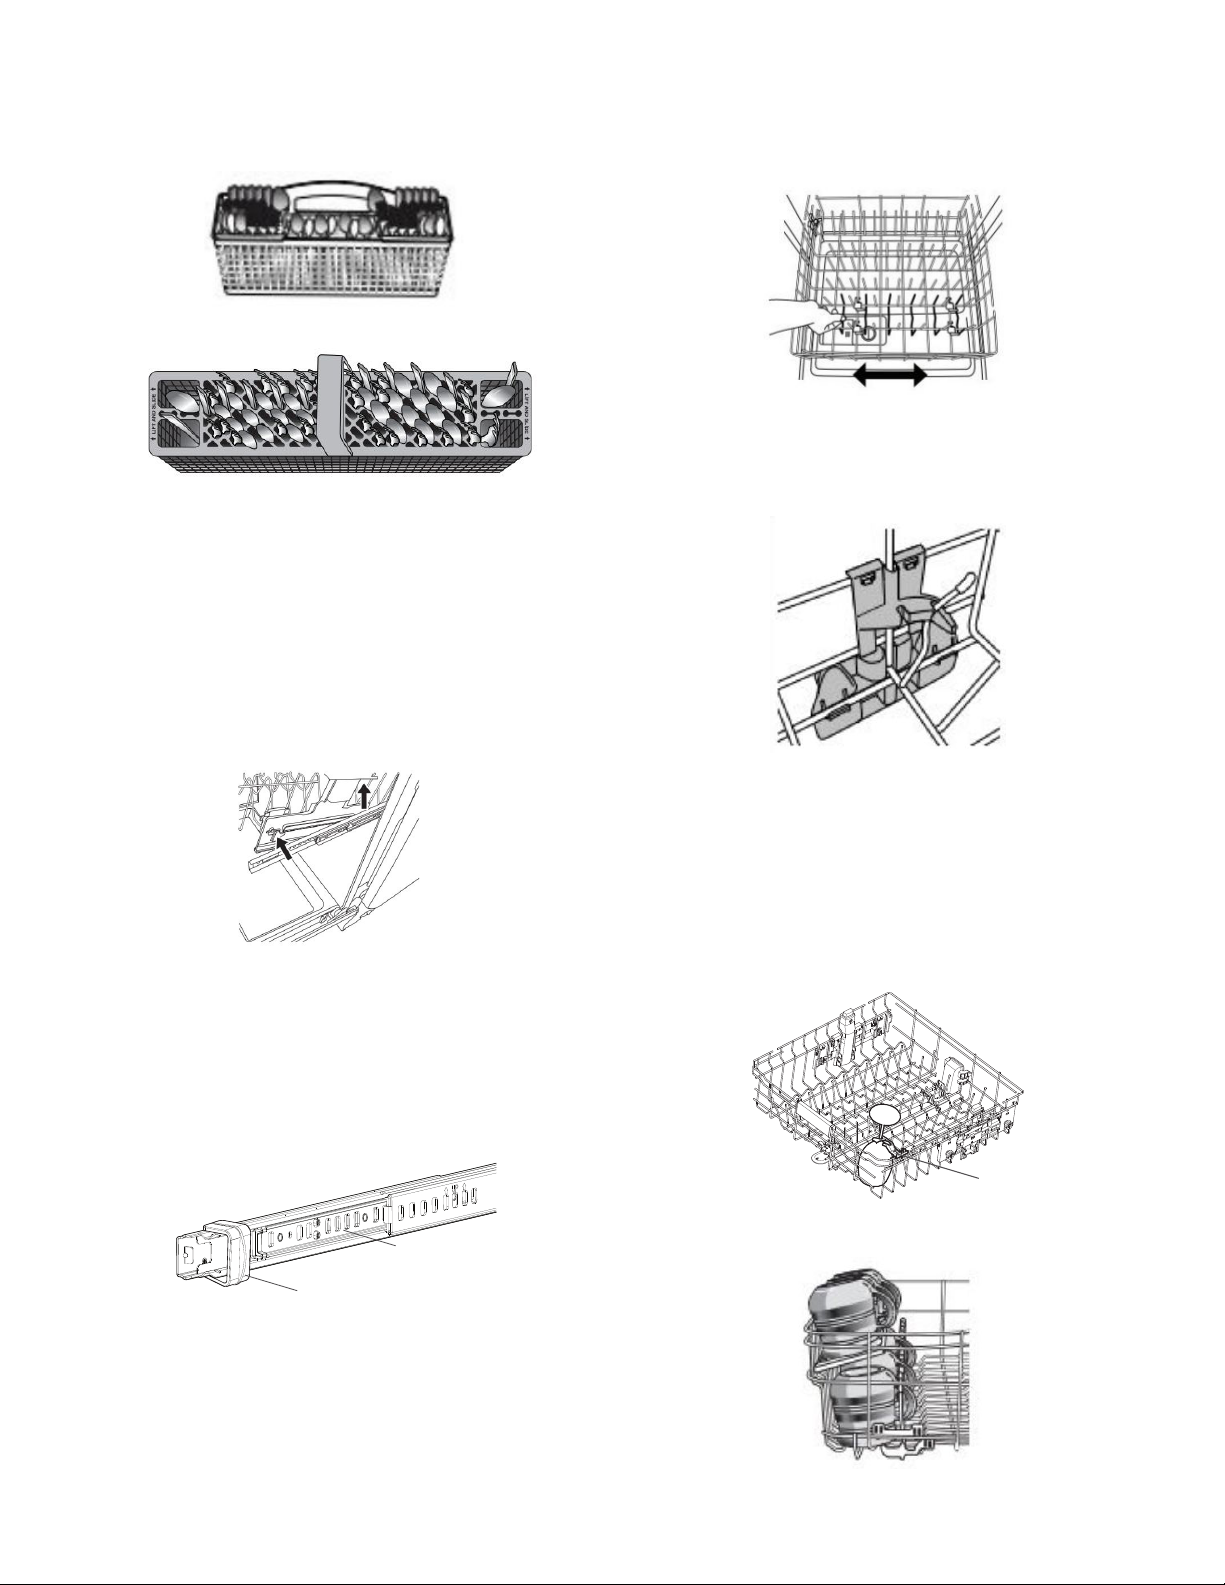
Silverware Baskets
Use silverware basket lids to provide optimal spacing and best
cleaning performance.
NOTE: If your silverware does not t into the designated slots,
open the lids (Style 1) or lift on the ends of the lids and pull to
remove (Style 2). Mix silverware types to keep them separated.
Load knives down, forks up, and alternate spoons for best
cleaning results.
Removing Upper Racks
In order to make space for tall items, your upper racks are
removable. The manner in which to remove will depend on
whether the rack is mounted with Style 1 or Style 2. Remove
dishes prior to removing any racks.
To remove the rack, pull the rack forward about halfway out of
the tub. On one side, press the tab on the track in and pull up
the front end of the rack, out of the track. Then repeat this step
on the other side to completely remove the front end of the rack.
Then remove the rack by pulling the back end out using a forward
and upward motion.
To replace the rack, Push back of rack into rail rst and then push
front down.
To remove the rack, pull the rack out until it stops. On the left and
right side of the rack, push the plastic track stops on the front of
the rail sideways to open them. Pull out the rack.
To replace the rack, push the rack back onto the rails. Push the
track stops closed.
Sliding Bowl Tines
The sliding bowl tines allow you to easily load bowls of multiple
sizes. Grab the moveable tine row in the lower rack and slide into
the desired position.
Fold Down Tines
Fold down tines allow you to optimize the spacing in the rack.
Fold down tines might be in the lower rack , the second level rack
and/or third level rack depending on your model. To fold or unfold
the tine, hold the tine nearest the clip at the end of the tine row
and gently push it past the stop on the clip and in the direction
you want to fold it.
Stemware Holder
Use the stemware holders to support wine glasses and other
stemware. Push them up to rotate them out of the way when not
needed.
Cup Shelf
Use the cup shelf to hold additional cups or small items. Push up
to fold out of the way when not needed.
Style 1
Style 2
Style 1
Style 2
Stemware
Holder
Rack
Track Stop
5
DISHWASHER CARE
Interior Cleaning
Many detergents may leave white spots or a white residue on
dishware and on the interior of the dishwasher. Over time this
residue can become unsightly and could affect dishwasher
performance. Use of a dishwasher cleaning product such as
affresh
®
Dishwasher Cleaner can help to remove the residue.
Monthly use of affresh
®
Dishwasher Cleaner is recommended to
help maintain the dishwasher. Follow package directions.
NOTE: We recommend the use of high-quality, premeasured
detergent tablets or packs and the use of rinse aid for dishwasher
cleaning and daily care.
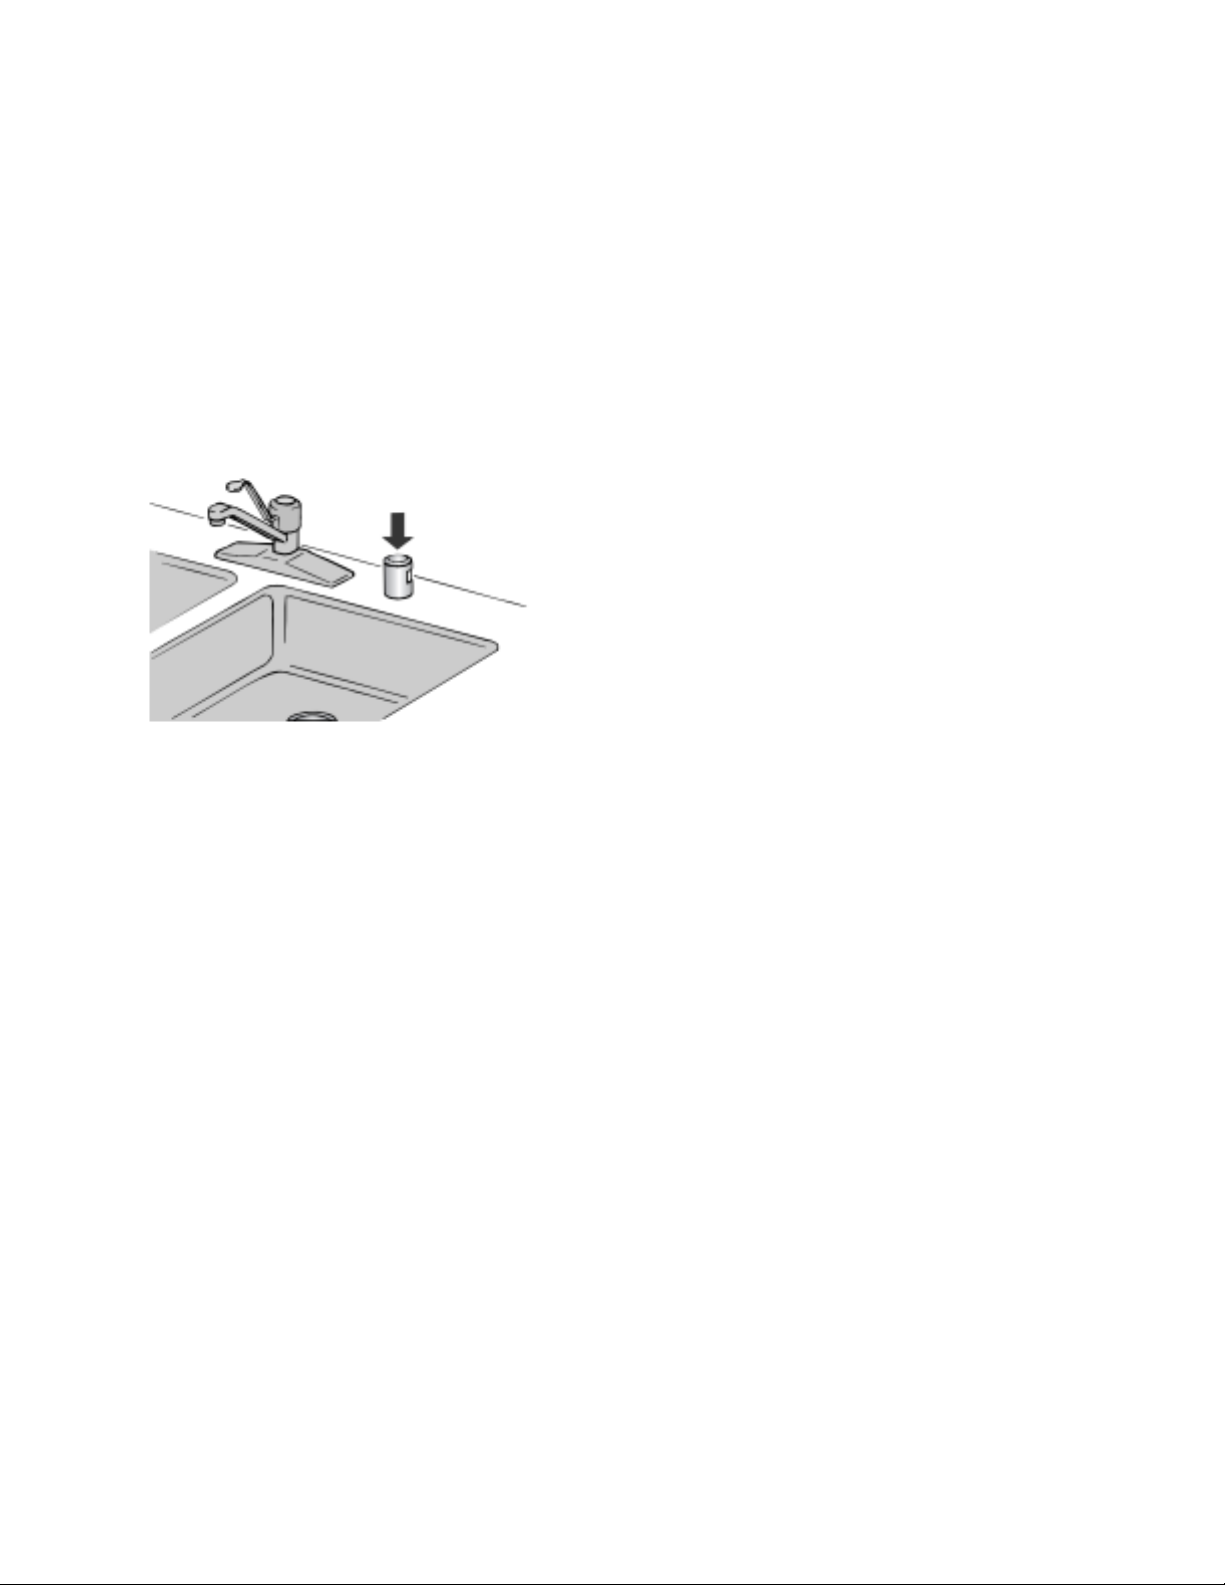
Countertop Air Gap
If you have a drain air gap, check and clean it if the dishwasher
isn't draining well.
Extended Time Without Use
To Reduce Risk of Property Damage During Vacation or
Extended Time Without Use
■ When you will not be using the dishwasher during the summer
months, turn off the water and power supply to the dishwasher.
■ Make sure the water supply lines are protected against freezing
conditions. Ice formations in the supply lines can increase
water pressure and cause damage to your dishwasher or
home.
■ Damage from freezing is not covered by the warranty.
■ When storing your dishwasher in the winter, avoid water
damage by having your dishwasher winterized by authorized
service personnel.
Exterior Cleaning
Clean the exterior of dishwasher with a soft, damp cloth and mild
detergent. Avoid using abrasive cleaning products on the exterior
of the dishwasher. Abrasive cleaning products can damage the
nish.
Troubleshooting
The brand website listed on the Quick Start Guide has detailed
information to troubleshoot most problems customers encounter.
This information may save you the cost of a service call.
Foreign Object Cup
If the Foreign Object Cup is full the Quick Start Guide or the
brand website listed on the Quick Start Guide has detailed
information about how to empty it.
6
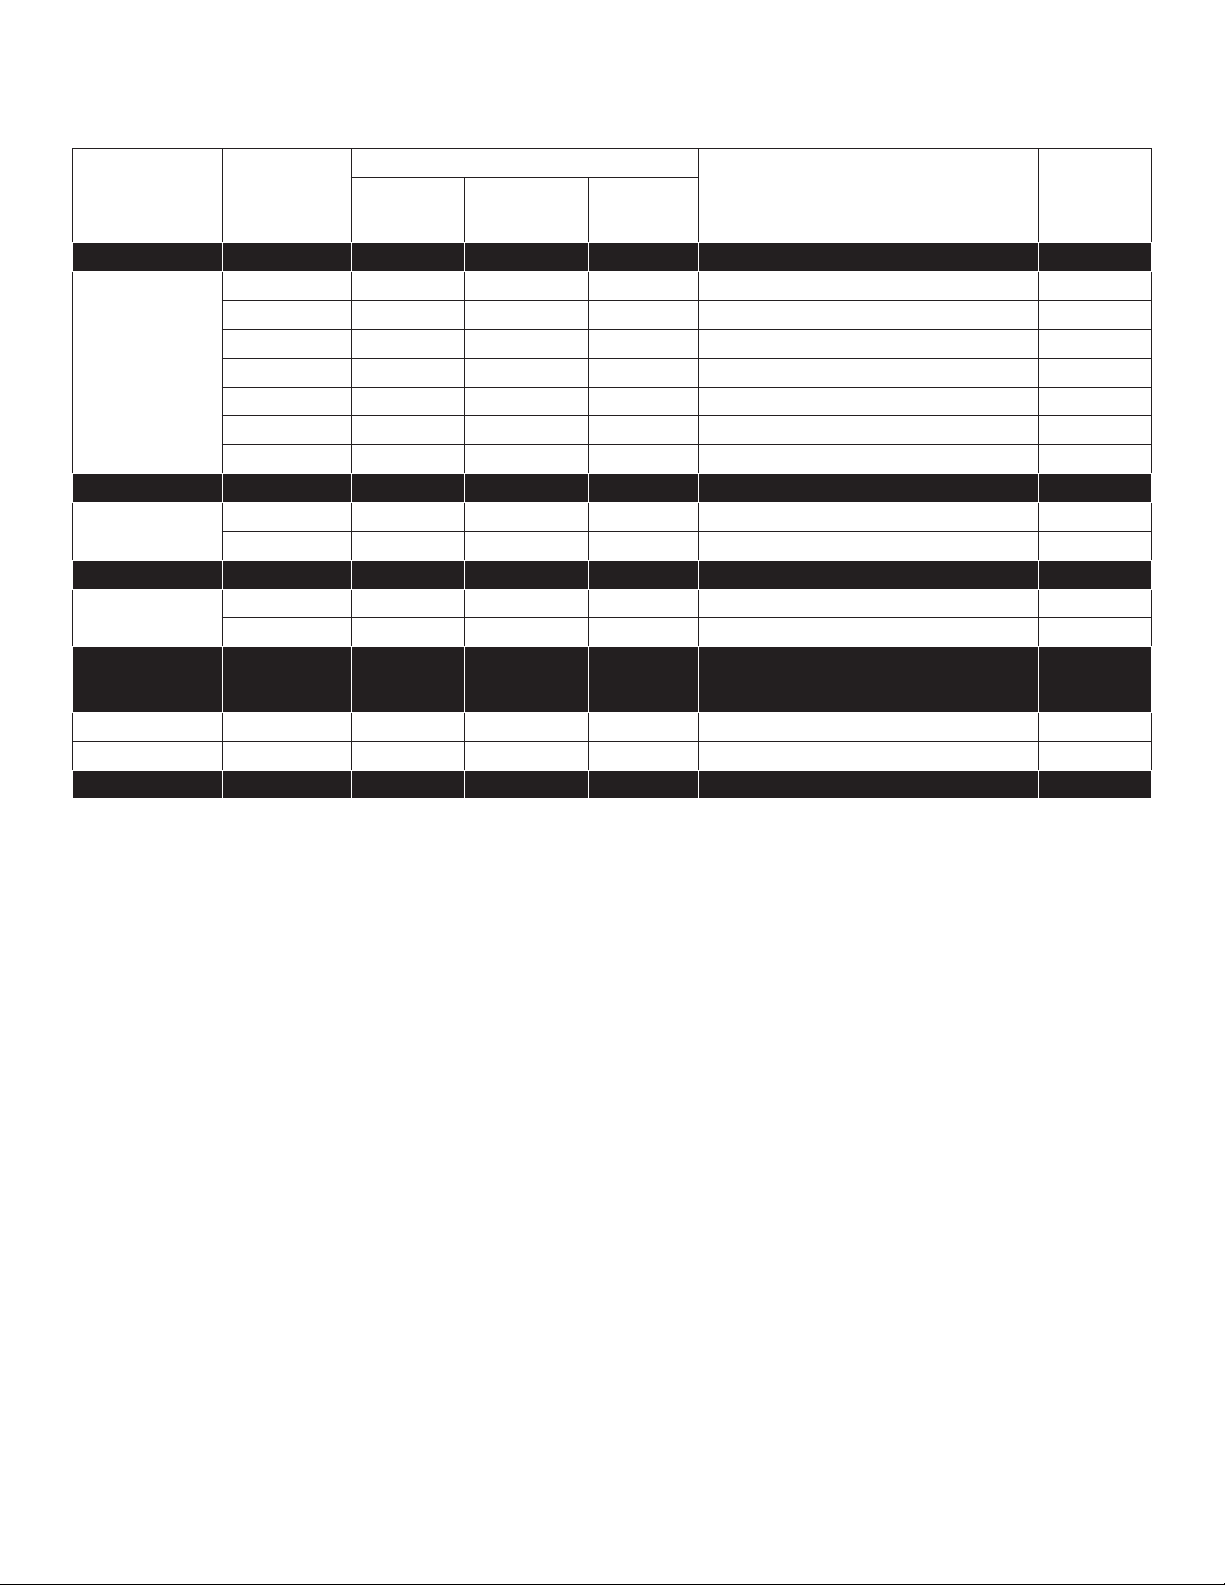
DISHWASHER SETTING MENU:
Follow the below instructions to enter into the menu to change your current settings.
Menu
Display Text
(if display is
present)
LED Pattern (no display)
What this setting does
Default
Setting
PROWASH
OR
SENSOR
TOUGH OR
COOKWARE
NORMAL
Rinse Aid Level A X Adjust amount of rinse aid dispensed
Rinse Aid Level
sub-menu
A 0 X X X 0 mL - rinse aid off
A 1 X 1 mL X
A 2 X 2 mL
A 3 X X 3 mL
A 4 X 4 mL
A 5 X X 5 mL
A 6 X X 6 mL
Sound Level S X X Turn sound On and Off
Sound Level
sub-menul
S 1 X Sound On X
S 0 X Sound Off
Light in Tub L X Turn the inner light on and off (if present)
Lights in Tub
sub-menul
L 1 X Light in Tub ON when door is opened X
L 0 X Light in Tub OFF when door is opened
Kosher
Consumer
Friendly mode
E X X
Turn Kosher Consumer Friendly mode
On and Off
E 1 X Turn mode ON
E 0 X Turn mode OFF X
Factory Reset r X X X Factory Reset
1. Press and hold the “Hi Temp” button for 5 seconds until “Hi Temp” and “Dry” lights turn on.
2. Press the “Start/Resume” button within 2 seconds. If you do not press Start within 2 seconds, then the display will turn off and you
will need to start over and go back to step 1.
a. For Models with a Display, an “A” will show in the display to indicate Rinse Aid Level.
b. For Non-display models,“Tough or Cookware” light will turn on to indicate Rinse Aid Level.
3. To go to a feature other than Rinse Aid Level, press the “Cycle” button or “Normal” button (depending on model) to move to the
feature you would like to change (Sound Level, Light in Tub, Kosher Friendly, Factory Reset, Rinse Aid Level). See the table for what
is shown on the display to indicate these features.
4. Press the “Start/Resume” button to select the feature and enter the sub-menu. The display will change to show the current setting
of the feature. (For example, if you selected Sound Level and you haven’t changed it before, then S1 will show for display models
and sensor will light for non-display models.)
5. Press “Cycle” button or “Normal” button (depending on model) to change the value of the feature setting. (For example, if you want
to turn the sound off, then press the “Cycle” or “Normal” button and S0 shows on display models or “pots and pans” lights for non-
display models.)
6. Press the “Start/Resume” button to conrm the new selection. The feature setting will not be changed until the “Start/Resume”
button is pressed.
The dishwasher will return to the Off state when the Start button is pressed.
To exit the customer settings menu at any time, press the “Cancel” button, or wait 30 seconds without pressing any buttons.
NOTE: To see the current setting of a feature, follow steps 1-4. When the “Start/Resume” button is pressed in step 4, the dishwasher
will show the current setting. Press the “Cancel” button to exit without making any changes.
NOTE: If you enter into a Feature Setting Page and need to go back to the Main Menu Press “Cancel” and proceed to step 1.
NOTE: To exit “Kosher Consumer Friendly Mode” at any time, press the “Cancel” button or you can wait 72 hours.
Kosher Consumer Friendly Mode: When turned on, will disable all of the buttons on the dishwasher except for the cancel key, and
disable the light inside the tub (if equipped) for a time period of 75 hours. If this mode is turned on during a cycle, then the status
lights at the end of cycle will not turn off when the door is opened and then re-closed. To exit this mode, press the “Cancel” button, or
wait 75 hours.

7
ERROR CODES
ERROR CODES / BLINKING LIGHTS
Issue
Code Shown
(7 Seg Display)
(if present)
Code Shown on
Front Panel LED *
(# blinks, Pause, #
blinks)
What will happen? What to do?
Dishwasher fails
to operate ll valve
correctly
F1E1
1 Pause 1 Pause -
pause, repeat
Drain sequence
will begin, machine
operation will be
prevented
Turn off water to unit (if possible).Turn
off power to unit. If the water cannot
be turned off, DO NOT turn off power
and keep door closed. Press Cancel
key one time to silence alarm tone. Call
service.
Motor controller
failure
F1E2
1 Pause 2 Pause,
repeat
Cycle ends Call service
No water present at
dishwasher
H2O
8 Pause 1 Pause -
pause, repeat
Cycle is paused
Ensure ll hose is connected to
product. Ensure water supply is turned
ON. Press Start to resume cycle. If
alarm still present, call service.
Wash motor failure F7E2
7 Pause 2 Pause,
repeat
Cycle ends Call service
Dishwasher
overlls
F8E4
8 Pause 4 Pause -
pause, repeat
Drain sequence
will begin, machine
operation will be
prevented
Turn off water to unit (if possible).Turn
off power to unit. If the water cannot
be turned off, DO NOT turn off power
and keep door closed. Press Cancel
key one time to silence alarm tone. Call
service.
Fill valve stuck on F8E5
8 Pause 5 Pause -
pause, repeat
Drain sequence
will begin, machine
operation will be
prevented
Turn off water to unit (if possible).Turn
off power to unit. If the water cannot
be turned off, DO NOT turn off power
and keep door closed. Press Cancel
key one time to silence alarm tone. Call
service.
Dishwasher will not
drain
F9E1
9 Pause 1 Pause -
pause, repeat
Cycle ends
If drain hose is connected to a garbage
disposal, conrm that drain hose is not
clogged and disposal plug has been
knocked out. If unit still will not drain,
call service.
Water present
under dishwasher
FAE5
10 Pause 5 Pause -
pause, repeat
Cycle ends Call service.
User interface
service
communication
fault
F6E1
6 Pause 1 Pause -
pause, repeat
Product will not able to
start or resume cycles
Call service.
8
INSTALLATION REQUIREMENTS
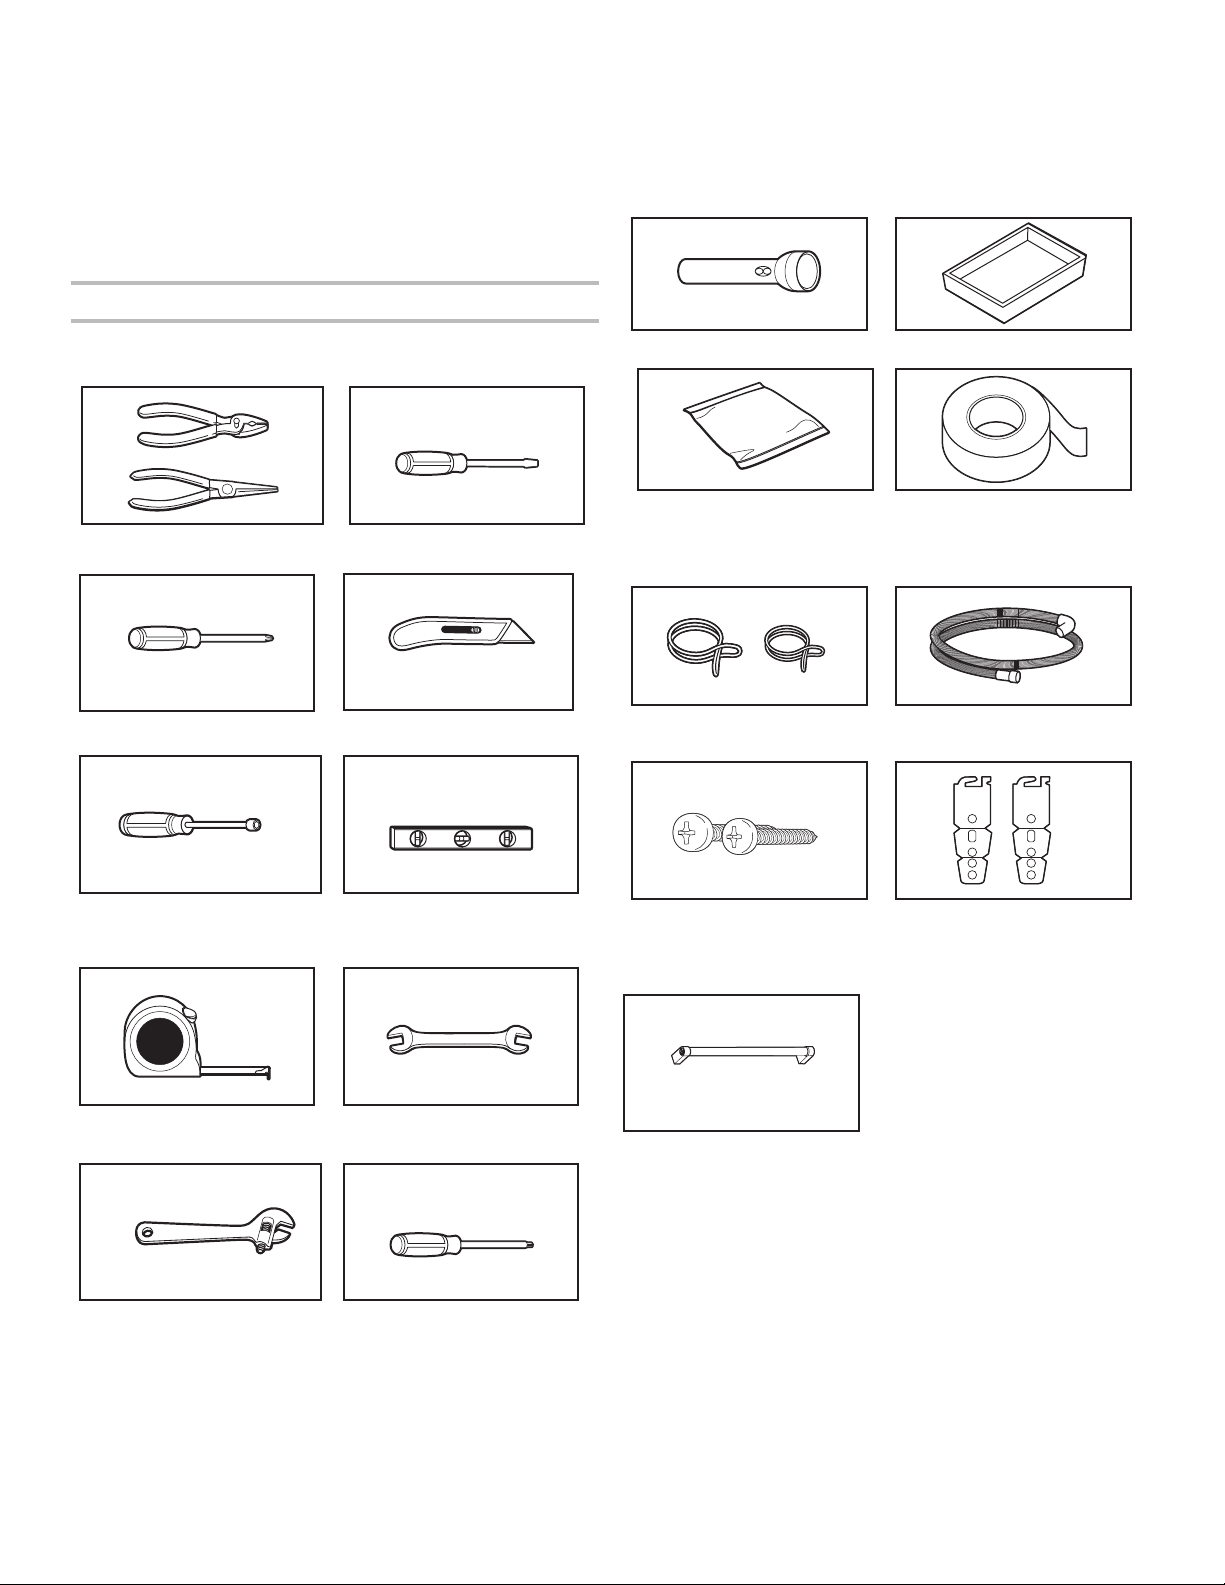
TOOLS AND PARTS
Gather the recommended tools and parts before starting
installation. Read and follow the instructions provided with
thetools listed here.
All Installations
Tools Needed:
Pliers Flat-blade screwdriver
Phillips screwdriver Utility knife
5/16" (7.9 mm) and
1/4" (6.4 mm) nut drivers or hex
sockets
Small level
Measuring tape or ruler 5/8" (15.9 mm) open-end
wrench
10" adjustable wrench that
opens to 1
1
/
8
" (29 mm)
Torx
†
T20 and, if installing
custom front panels, Torx T15
screwdrivers
Other Useful Items You May Need:
Flashlight Shallow pan
Bath towel Masking, or duct tape
Parts Supplied:
Drain hose clamps (2)
(1 large/red and 1 small/silver)
Drain hose
#8 x 1/2" (12.7 mm) Phillips-head
screws (2)
Undercounter mounting
brackets (2)
Make sure all parts are included in the literature package.
Door handle (on some models)
†TORX, T15, and T20 are trademarks of Acument Intellectual Properties, LLC.
9
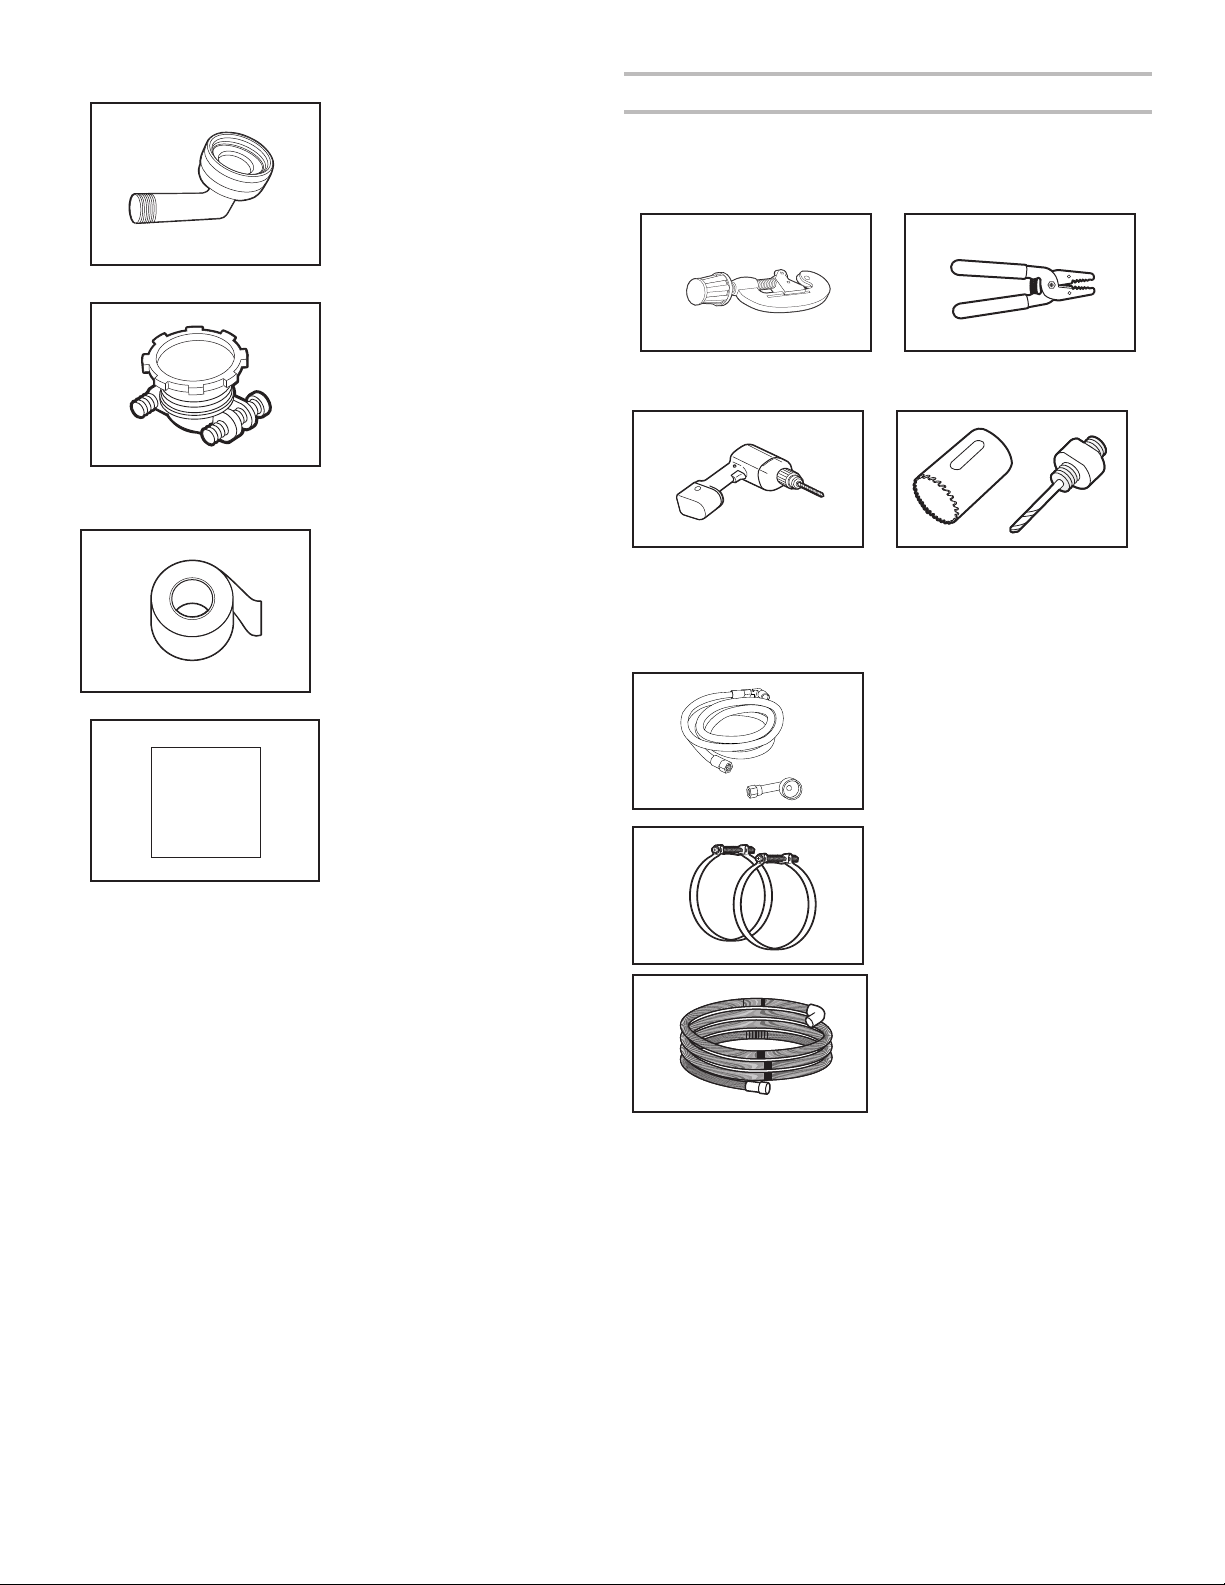
Other Parts Needed (not provided):
3/8" (9.5 mm) Compression x
3/4" (19 mm) Hose Fitting
with rubber seal and 90°
elbow (required to properly
connect household water line
to the dishwasher.)
Part no: W10685193
Household Wiring (Metallic)
Strain Relief to t 7/8"
(22 mm) hole (required to
properly secure household
wiring to the dishwasher
terminal box.)
Part no: 4396672
NOTE: Use only UL Listed/
CSA Approved parts.
Optional Accessory Parts Available:
Moisture Barrier Tape
NOTE: Moisture barrier tape
is an optional, added level
of protection if installing a
dishwasher under a wooden
countertop. Recommended
but not required for wooden
countertop.
Part no: 4396277
Side Panel Kit
For enclosing the side of the
dishwasher when installing it
at the end of your cabinetry
(Whirlpool part number varies
with color).
Call us at our toll-free number or visit the brand website listed in
the Quick Start Guide for accessory and part information.
First-Time Installations
Check local codes. Check existing electrical supply. See the
“Electrical Requirements” section. It is recommended that
electrical connections be made by a licensed electrical installer.
Additional Tools Needed:
Small tubing cutter Wire stripper
Cordless drill 1/2" (12.7 mm), 3/4" (19 mm),
and 1
1
/
2
" (38 mm)
hole saw bits
Additional Parts Needed (not provided):
Copper Tubing (3/8" O.D.
suggested) or Flexible
Braided WaterSupply Line
Kit. Kitincludes braided hose
and 3/8" compression x
3/4"hosetting.
Part no: W10278635RP
Screw-Type Clamps 1
1
/
2
"- 2"
(38 mm - 50 mm) (3maximum)
Optional-Longer Drain Hose
(Maximum length 12 ft (3.7 m)
NOTE: Must meet AHAM/
IAPMO test standards, t 1"
(25 mm) drain connection,
and be resistant to heat and
detergent.
Part no: W11381654
NOTE: If using a exible braided hose, replace inlet hose after
5years to reduce the risk of hose failure. Record hoseinstallation
or replacement dates on the hose for futurereference.
NOTE: Be sure to purchase only Whirlpool factory-certied
parts and accessories for your appliance. Your installation may
require additional parts. To order, refer to the contact information
referenced in your Quick Start Guide.
 Loading...