


JAVASTUDIO™
COLLECTION
PROGRAMMABLE COFFEE MAKERS
INSTRUCTIONS
KCM511
KCM514
KCM515
1-800-541-6390
Details Inside
®
FOR THE WAY IT’S MADE.™
1

Hassle-Free Replacement Warranty
We’re so confident the quality of our
products meets the
exacting standards of
KitchenAid that, if your Coffee Maker should fail
within the first year of ownership, KitchenAid will arrange to deliver an identical or comparable replacement to your door free of charge and arrange to have your original Coffee Maker returned to us. Your replacement unit will also be covered by our one year full warranty. Please follow these instructions to receive this quality service.
If You Reside In The 50 United States and your KitchenAid® Coffee Maker should fail within the first year of ownership, simply call our toll-free Customer Satisfaction Center at
1-800-541-6390 Monday through Friday, 8 a.m. to 8 p.m. (Eastern Time), or Saturday, 10 a.m. to 5 p.m. Give the consultant your complete shipping address. (No P.O. Box Numbers, please.)
When you receive your replacement Coffee Maker, use the carton and packing materials to pack-up your original Coffee Maker. In the carton, include your name and address on a sheet of paper along with a copy of the proof of purchase (register receipt, credit card charge slip, etc.).
For a detailed explanation of warranty terms and conditions, including how to arrange for service outside the United States, see pages 17 and 18.
Proof of Purchase & Product Registration
Always keep a copy of the sales receipt showing the date of purchase of your Coffee Maker. Proof of purchase will assure you of in-warranty service.
Before you use your Coffee Maker, please fill out and mail your product registration card packed with the unit. This card will enable us to contact you in the unlikely event of
a product safety notification and assist us in complying with the provisions of the Consumer Product Safety Act. This card does not verify your warranty.
Please complete the following for your personal records:
Model Number _______________________________________________________
Serial Number ________________________________________________________
Date Purchased _______________________________________________________
Store Name __________________________________________________________

Table of Contents |
|
|
INTRODUCTION |
|
|
Hassle-Free Replacement Warranty........................................... |
Inside Front Cover |
|
Product Registration Card ........................................................ |
Inside Front Cover |
|
Coffee Maker Safety .......................................................................................... |
|
2 |
Electrical Requirements ...................................................................................... |
|
2 |
Important Safeguards........................................................................................ |
|
3 |
FEATURES AND OPERATION |
|
|
Coffee Maker General Features .......................................................................... |
|
4 |
Display and Control Pad Features....................................................................... |
|
6 |
Pre-Use Cleaning ............................................................................................... |
|
8 |
Installing the Water Filter................................................................................... |
|
8 |
To Set the Time-of-Day Clock ............................................................................. |
|
9 |
Brewing Coffee................................................................................................ |
|
10 |
Using the Thermal Carafe ................................................................................ |
|
11 |
The Pause and Pour Feature............................................................................. |
|
12 |
Using the Automatic Brew Timer ..................................................................... |
|
12 |
The Cleaning Needed Indicator........................................................................ |
|
13 |
Coffee Brewing Suggestions: Advice for Great Taste ........................................ |
|
14 |
CARE AND CLEANING |
|
|
Cleaning the Coffee Maker .............................................................................. |
|
15 |
Descaling the Coffee Maker............................................................................. |
|
15 |
Troubleshooting and Error Codes..................................................................... |
|
16 |
WARRANTY AND SERVICE INFORMATION |
|
|
Warranty for the 50 United States and District of Columbia ............................ |
|
17 |
Warranty For Puerto Rico................................................................................. |
|
18 |
Arranging for Service after the Warranty Expires.............................................. |
|
18 |
Arranging for Service Outside the 50 United States and Puerto Rico |
................18 |
|
Ordering Accessories and Replacement Parts ................................................... |
|
18 |
1

Coffee Maker Safety
Your safety and the safety of others are very important.
We have provided many important safety messages in this manual and on your appliance. Always read and obey all safety messages.
This is the safety alert symbol.
This symbol alerts you to potential hazards that can kill or hurt you and others.
All safety messages will follow the safety alert symbol and either the word “DANGER” or “WARNING.” These words mean:
 DANGER
 WARNING
You can be killed or seriously injured if you don’t immediately follow instructions.
You can be killed or seriously injured if you don’t follow instructions.
All safety messages will tell you what the potential hazard is, tell you how to reduce the chance of injury, and tell you what can happen if the instructions are not followed.
Electrical Requirements
Volts: 120 V.A.C. only. Hertz: 60 Hz
 WARNING
Electrical Shock Hazard
Plug into a grounded 3 prong outlet.
Do not remove ground prong.
Do not use an adapter.
Do not use an extension cord.
Failure to follow these instructions can result in death, fire or electrical shock.
NOTE: Your Coffee Maker has a 3 prong grounded plug. To reduce the risk of electrical shock, this plug will fit in an outlet only one way. If the plug does not fit in the outlet, contact a qualified electrician. Do not modify the plug in any way.
Do not use an extension cord. If the power supply cord is too short, have a qualified electrician or serviceman install an outlet near the appliance.
2

IMPORTANT SAFEGUARDS
When using electrical appliances, basic safety precautions should always be followed, including the following:
1.Read all instructions.
2.Do not touch hot surfaces. Use handles or knobs.
3.To protect against electrical shock, do not immerse cord, plugs, or Coffee Maker in water or other liquid.
4.Close supervision is necessary when any appliance is used by or near children.
5.Unplug Coffee Maker from outlet before cleaning. Allow to cool before putting on or taking off parts, and before cleaning the appliance.
6.Do not operate any appliance with a damaged cord or plug, or after the appliance malfunctions or has been damaged in any manner. Return appliance to the nearest Authorized Service Facility for examination, repair, or adjustment.
7.The use of accessories not recommended by the appliance manufacturer may result in fire, shock or injury to persons.
8.Do not use outdoors.
9.Do not let cord hang over edge of table or counter, or touch hot surfaces.
10.Do not place on or near a hot gas or electric burner, or in a heated oven.
11.Do not use appliance for other than its intended use.
12.Do not use appliance without lid properly placed on container.
13.The container is designed for use with this appliance. It must never be used on a range top.
14.Do not set a hot container on a wet or cold surface.
15.Do not use a cracked container or a container having a loose or weakened handle.
16.Do not clean container with cleaners, steel wool pads, or other abrasive material.
17.This product has been UL Listed for household use.
SAVE THESE INSTRUCTIONS
3

General Features
JavaSpa™ Showerhead
Split-Lid 
Brew Basket
Reservoir
Fill-Channel
“Time Since
Brew” Display
Brew Timer
Display
Clean Touch™


 Control Pad
Wrap-Around
Housing
Glass Carafe
Coffee Scoop
Gold Tone
Permanent
Filter
4

General Features
JavaSpa™ Showerhead
Extra-wide showerhead sprays the brew basket evenly with hot water, ensuring even coffee extraction and outstanding flavor.
1100-Watt Heat Pump
(not shown)
Powerful heat pump brews rich, flavorful coffee.
Electronic Temperature Control
Fully electronic control directly monitors the temperature of the heat pump to brew - and keep - coffee at optimal temperatures.
Pause & Pour Feature
Pause and pour lets you remove the carafe and pour a cup of coffee before brewing is finished. A special valve seals the brew basket tightly, eliminating drips.
End-Of-Brewing Tone
A tone sounds when coffee is finished brewing.
Automatic Shutoff
Coffee Maker automatically shuts off two hours after brewing.
Split-Lid
Access the brew basket and water reservoir by lifting the split-lid. The front lid covers the brew basket and reservoir fill-channel. The rear lid covers the water reservoir and water filter.
Brew Basket
Lift the front lid to access the removable, dishwasher-safe brew basket. The basket holds a 10-12 cup flat-bottom paper coffee filter or the gold tone permanent filter.
Reservoir Fill-Channel
The Coffee Maker features a convenient front-fill water reservoir. Just lift the front lid and use the convenient fill-channel to add water. You can also lift the rear lid and add water directly to the reservoir.
Brew Timer Display
Shows the AM or PM time-of-day. An easy-to-set 24 hour brew timer will brew coffee at the selected time, day or night.
“Time Since Brew” Display
30, 60, 90, and 120-minute segments light up to indicate the time elapsed since the last carafe was brewed.
Clean Touch™ Control Pad
The control pad makes operating the Coffee Maker simple. The pad is sealed against spills, will not trap grime, and is a snap to wipe clean.
Glass Carafe
(models KCM511, KCM514) Dishwasher-safe glass carafe features a no-drip pouring spout and comfortable handle.
Stainless Steel Thermal Carafe
(model KCM515 – not shown) Thermal carafe preserves flavor by keeping coffee warm without continuous heating. Stainless steel construction with vacuum insulation will keep coffee piping hot for hours.
Gold Tone Permanent Filter
The high-performance gold tone filter eliminates the need for paper coffee filters. Coffee Maker can also use paper filters, if desired.
continued…
5
General Features
Ion-Exchange Water Filter / Water Level Indicator (not shown) Advanced filter reduces chlorine and other contaminants which impair coffee flavor. Filter also softens the water, which increases the time between descalings. The filter handle serves as a convenient water level indicator.
Coffee Scoop
Use one rounded scoop of ground coffee for each cup desired.
Full-Length Cord Storage
(not shown)
Compartment in back of unit keeps excess cord out of the way.
Wrap-Around Housing
Stylish design minimizes heat loss from the carafe while protecting it from accidental spills and breakage.
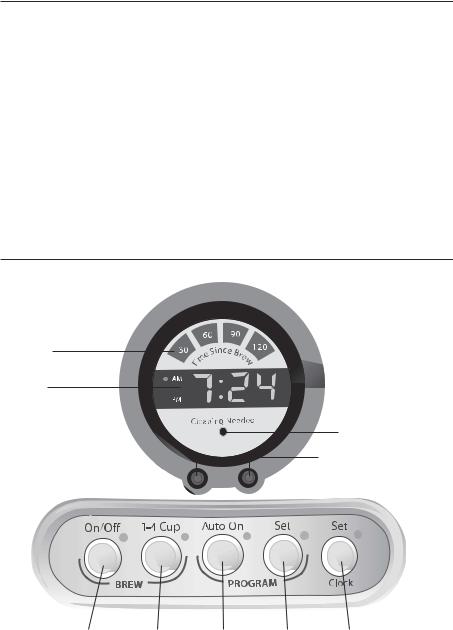
Display and Control Pad Features
“Time Since Brew”
Display
Brew Timer
Display
Cleaning Needed
Indicator
“H” and “M” Buttons
On/Off |
1-4 Cup |
Auto On |
Set |
Set |
|
|
|
(Program) |
(Clock) |
6
 Loading...