


KitchenAid KCO275WH0, KCO275SS0, KCO275QWH0, KCO275QSS0, KCO275QOB0 Owner’s Manual
...
KCO275
INSTRUCTIONS INSTRUCTIONS INSTRUCCIONES

WELCOME TO THE WORLD OF KITCHENAID.
We’re committed to helping you create a lifetime of delicious meals for family and friends. To help ensure the longevity and performance of your
appliance, keep this guide handy. It will empower you with the best way to use and care for your product. Your satisfaction is our #1 goal. Remember to register your product online at www.kitchenaid.com or by
mail using the enclosed Product Registration Card.
Join us in the kitchen at www.kitchenaid.com.
USA: 1.800.541.6390 |
KitchenAid.com |
2 Canada: 1.800.807.6777 |
KitchenAid.ca |
|
|

COUNTERTOP OVEN INSTRUCTIONS |
|
TABLE OF CONTENTS |
|
COUNTERTOP OVEN SAFETY............................................................................ |
4 |
Important safeguards.......................................................................................... |
5 |
Electrical requirements....................................................................................... |
6 |
PARTS AND FEATURES |
|
Parts and accessories.......................................................................................... |
7 |
Control panel features........................................................................................ |
8 |
Selecting oven rack positions.............................................................................. |
8 |
COOKING MODES GUIDE |
|
Cooking Modes................................................................................................... |
9 |
Toast and Bagel Modes........................................................................................ |
9 |
COOKING MODES............................................................................................... |
10 |
TOASTING MODES.............................................................................................. |
13 |
ADDITIONAL FUNCTIONS |
|
Convection option............................................................................................ |
14 |
Frozen option.................................................................................................... |
14 |
Changing between Fahrenheit and Celsius....................................................... |
14 |
GETTING STARTED |
|
Before first use.................................................................................................. |
15 |
Using the Countertop Oven............................................................................. |
15 |
OPERATING THE COUNTERTOP OVEN |
|
Adjusting the rack position................................................................................ |
16 |
Setting a cooking mode..................................................................................... |
16 |
Preheating......................................................................................................... |
17 |
TIPS FOR GREAT RESULTS |
|
Countertop Oven use tips................................................................................ |
18 |
Food cooking tips.............................................................................................. |
18 |
Choosing bakeware for Countertop Oven use................................................ |
18 |
CARE AND CLEANING |
|
Removing and cleaning the crumb tray............................................................. |
19 |
Cleaning your Countertop Oven...................................................................... |
19 |
TROUBLESHOOTING |
|
If your Countertop Oven malfunctions or fails to operate............................... |
20 |
WARRANTY........................................................................................................... |
21 |
English
3
PROOF OF PURCHASE & PRODUCT REGISTRATION
Always keep a copy of the itemized sales receipt showing the date of purchase of your Countertop Oven. Proof of purchase will assure you of in-warranty service. Before you use your Countertop Oven, please fill out and mail your product registration card packed with the unit, or register online at www.kitchenaid.com. This card will enable us to contact you in the unlikely event of a product safety notification and assist us in complying with the provisions of the Consumer Product Safety Act. The completion and submission of product registration information is not required to obtain your product warranty. Please complete the following for your personal records:
Model Number____________________________________________________________________
Ser_ial Number_ ___________________________________________________________________
Date Pur_chased__________________________________________________________________
Stor_e Name ___________________________________________________________________
COUNTERTOP OVEN SAFETY
4

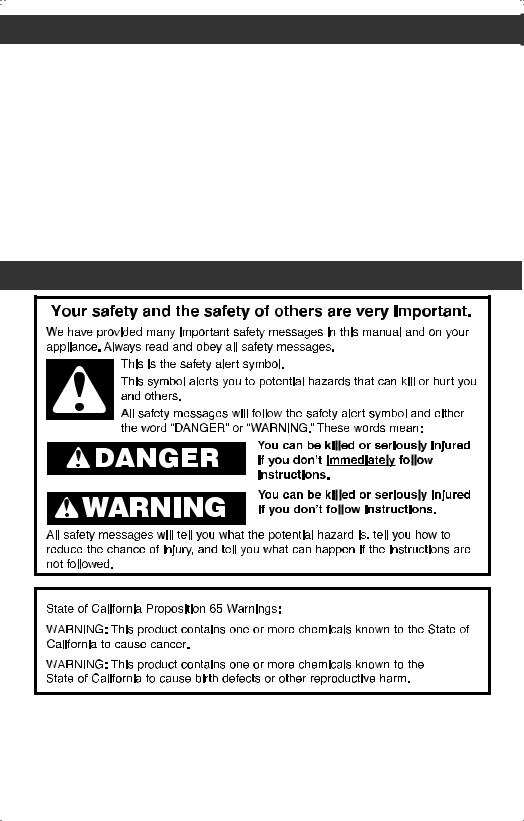
COUNTERTOP OVEN SAFETY
IMPORTANT SAFEGUARDS
When using electr_ical appliances, basic safety pr_ecautions should always be followed, including the following:
1.Read all instructions prior to first use.
2.Do not touch hot surfaces. Use handles or knobs.
3.To protect against electrical shock, do not immerse cord, plugs, or any parts of the oven in water or other liquid.
4.Close supervision is necessary when any appliance is used by or near children.
5.Unplug from outlet when not in use and before cleaning. Allow to cool before putting on or taking off parts.
6.Do not operate any appliance with a damaged cord or plug, or after the appliance malfunctions, or is dropped or damaged in any manner. Return appliance to the nearest Authorized Service Facility for examination, repair, or adjustment.
7.The use of accessory attachments not recommended by the appliance manufacturer may cause injuries.
8.Do not let cord hang over edge of table or counter, or touch hot surfaces.
9.Do not place on or near a hot gas or electric burner, or in a heated oven.
10.Extreme caution must be used when moving an appliance containing hot oil or other hot liquids.
11.Use extreme caution when removing broiler pan tray or disposing of hot grease.
12.Oversize foods or metal utensils must not be inserted in a Countertop Oven as they may create a fire or risk of electric shock.
13.A fire may occur if Countertop Oven is covered or touching flammable material, including curtains, draperies, walls and the like, when in operation. Do not store any item on top of the appliance when in operation.
14.Do not clean with metal scouring pads. Pieces can break off the pad and touch electrical parts, creating a risk of electric shock.
15.Extreme caution should be exercised when using containers constructed of materials other than metal or glass.
16.Do not store any materials, other than manufacturer’s recommended accessories, in this oven when not in use.
17.Do not place any of the following materials in the oven: paper, cardboard, plastic, or anything similar.
18.Do not cover crumb drawer or any part of the oven with metal foil. This will cause overheating of the oven. Foil is permitted in the multipurpose pan to catch grease.
19.To disconnect, turn oven off by pressing Start/Cancel button, then remove plug from wall outlet.
20.Do not use outdoors.
21.Do not use appliance for other than intended use.
22.This product is designed for household use only.
SAVE THESE INSTRUCTIONS
English
5
COUNTERTOP OVEN SAFETY
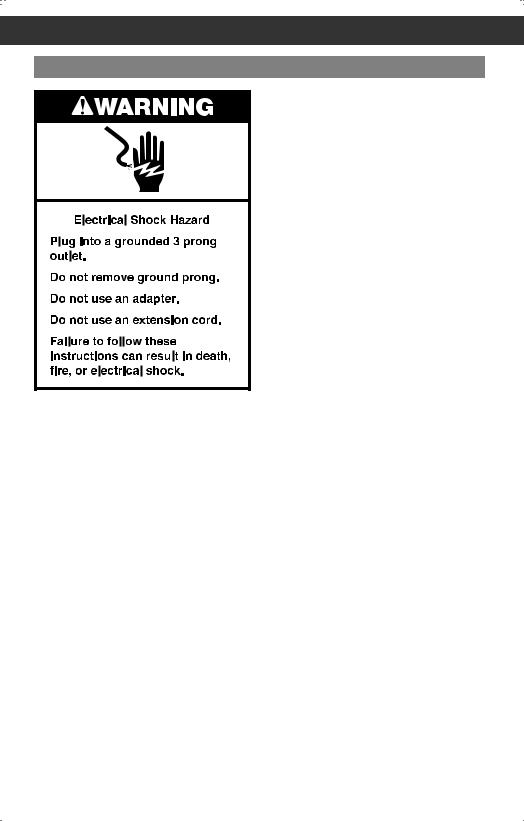
Electr_ical r_equir_ements
Voltage: 120 VAC
Frequency: 60 Hz Wattage: 1800 Watts
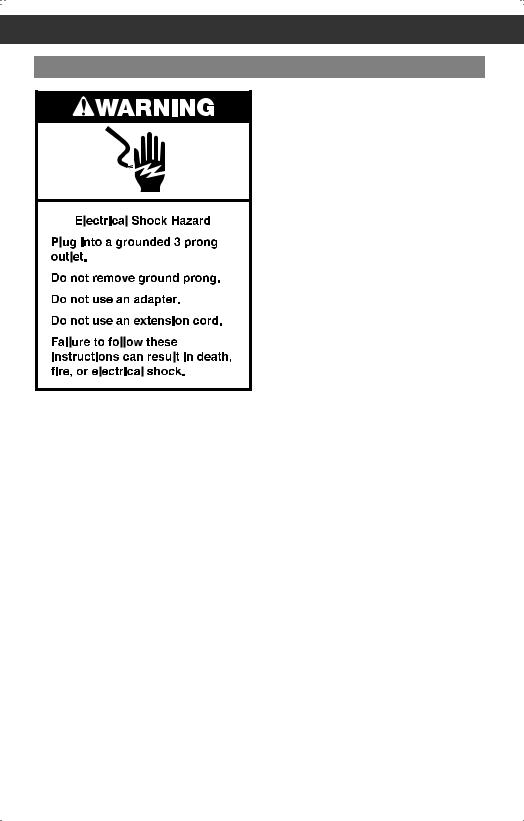
NOTE: This countertop oven has a
3 prong grounded plug. To reduce the risk of electrical shock, this plug will fit in an outlet only one way. If the plug does not fit in the outlet, contact a qualified electrician. Do not modify the plug in any way.
Do not use an extension cord. If the power supply cord is too short, have a qualified electrician or technician install an outlet near the appliance.
A short power supply cord (or detachable power supply cord) should be used to reduce the risk resulting from becoming entangled in or tripping over a longer cord.
Longer detachable power supply cords or extension cords are available and may be used if attention is exercised in their use.
If a longer detachable power supply cord or extension cord is used:
•The marked electrical rating of the cord set or extension cord should be at least as great as the electrical rating of the appliance.
•The cord should be arranged so that it will not drape over the countertop or tabletop where it can be pulled on by children or tripped over unintentionally.
If the appliance is of the grounded type, the extension cord should be a grounding-type 3-wire cord.
6
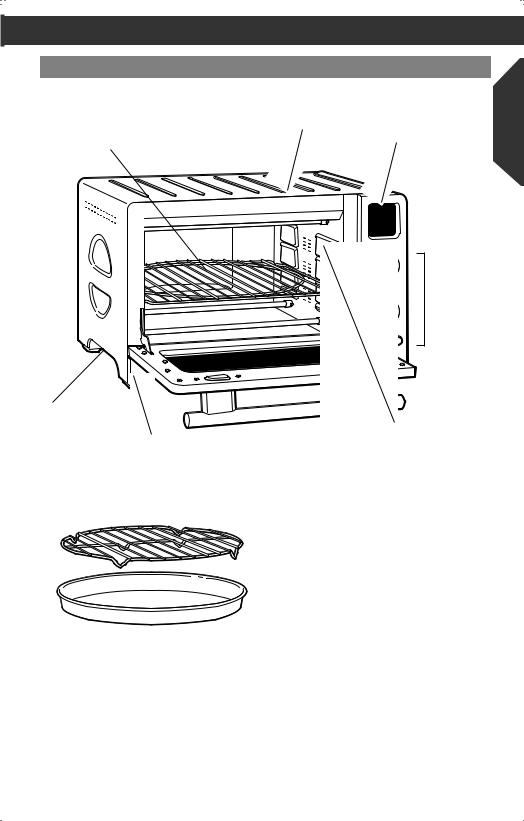
PARTS AND FEATURES
Par_ts and accessor_ies
|
|
Cool down sur_face for_ |
|
Chr_ome-plated |
r_emovable oven r_ack |
High-contr_ast |
|
|
|||
steel oven r_ack |
|
display |
|
|
|
|
|
|
|
|
|
English
Built-in lifting handles (not shown)
Removable cr_umb tr_ay (not shown)
Contr_ols with die-cast knobs
Cer_amaShield™ non-stick sur_faces
Chr_ome-plated steel br_oiling r_ack
Nonstick multipur_pose pan
7
PARTS AND FEATURES
Contr_ol panel featur_es
Convection button
The convection fan circulates air faster and more evenly, for better surface browning and crisping.
Temper_atur_e
Adjustable in 5° Fahrenheit or Celsius* increments in most cooking modes.


 Time
Time
Adjustable in 1 minute increments in most cooking modes.
Cooking mode selector_
Temper_atur_e/Time contr_ol knob (pr_ess to select)
r_ozen button
Star_t/Cancel button
*Hold convection button and frozen button down at the same time for 3 seconds to change temperature to Celsius mode.
Selecting oven r_ack positions
Follow these guidelines to position rack: |
|
1 (Top) |
|
Use for broiling most meats. |
|
2 (Middle) |
|
Optimal for most baking and cooking |
1 |
operations, including pizza, reheating, |
|
general cooking, and convection baking. |
2 |
Must use this setting for toast. Suitable |
3 |
for broiling some taller items. |
|
3 (Bottom) |
|
The bottom rack position leaves plenty of |
|
height for cooking taller items. Use this |
|
position for Asado Roast mode, and for |
|
reheating and warming. |
|
8

COOKING MODES GUIDE
Your Countertop Oven features 9 cooking modes specially designed for a variety of cooking tasks. Each uses the KitchenAid® Even-Heat™ system to control a combination of elements, applying heat where it’s needed for optimal results. Memory settings allow you to customize the
time and temperature in each mode to fit your specific needs. The Countertop Oven will remember all your settings for the next use (until unplugged). The additional Convection and Frozen functions (available on certain cooking modes) allow you to take countertop cooking to a whole new level.
English
Refer to the quick guide below for Cooking Mode options, or see detailed explanations and tips for each cooking mode on the following pages.
COOKING MODES
Pr_eheat is not r_equir_ed for_ Keep War_m, Reheat, Br_oil modes.
Cooking |
Rack |
Pr_eset |
Temp. Range |
Pr_eset Time |
Convection |
Mode |
Position |
Temp. in °F |
in °F (°C) |
(in minutes) |
Available? |
|
|
(°C) |
|
|
|
|
|
|
|
|
|
Bake |
2 or 3 |
350°F (177°C) |
150–450°F |
30 |
Yes |
|
|
|
(66–232°C) |
|
|
|
|
|
|
|
|
Asado Roast |
|
450°F (232°C) |
450 °F |
10 |
Auto |
Stage 1 |
3 |
||||
|
|
|
(232°C) |
|
|
Stage 2 |
3 |
325°F (163°C) |
150–450°F |
45 |
N/A |
|
|
|
(66–232°C) |
|
|
|
|
|
|
|
|
Broil* |
1 or 2 |
450°F (232°C) |
350°F (177°C) |
8 |
Yes |
|
|
|
or 450°F |
|
|
|
|
|
(232°C) |
|
|
|
|
|
|
|
|
Keep Warm |
2 or 3 |
170°F (77°C) |
150–200°F |
60 |
N/A |
|
|
|
(66–93°C) |
|
|
|
|
|
|
|
|
Reheat |
2 or 3 |
300°F (149°C) |
150–450°F |
15 |
Auto |
|
|
|
(66–232°C) |
|
|
|
|
|
|
|
|
Cookie |
1 |
375°F (190°C) |
150–450°F |
10 |
Yes** |
|
|
|
(66–232°C) |
|
|
|
|
|
|
|
|
Pizza*** |
1 or 2 |
400°F (204°C) |
150–450°F |
17 |
Yes |
|
|
|
(66–232°C) |
|
|
|
|
|
|
|
|
*Broil mode allows selection between 350°F (177°C) and 450°F (232°C) options only.
**When using Convection with Cookie mode, cooking temperature is automatically adjusted down by 25°F.
***Pizza mode includes a 30 second Broil time at the end of the cooking cycle to brown cheese.
TOAST AND BAGEL MODES
Pr_eheat is not r_equir_ed for_ Toast or_ Bagel modes.
Cooking |
Rack |
Pr_eset |
Shade r_ange |
Pr_eset |
Range |
Mode |
Pos. |
Shade |
(light to |
Slices |
(Number_ of |
|
|
|
dar_k) |
|
Slices) |
|
|
|
|
|
|
Toast |
2 |
4 |
1–8 |
2 |
1–6 |
|
|
|
|
|
|
Bagel |
2 |
4 |
1–8 |
2 |
1–6 |
|
|
|
|
|
|
9

COOKING MODES
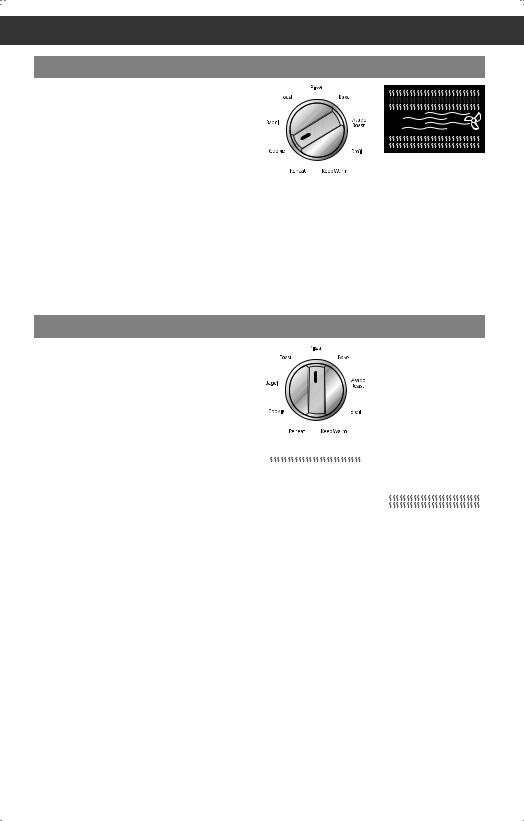
What is Even-Heat™ technology?
The KitchenAid® Even-Heat™ system helps provide consistent cooking results, without cold spots or overcooking. By cycling different heating elements on and off, and using certain elements for only part of the cooking cycle, Even-Heat™ allows
tender, juicy roasts or pizzas with deliciously browned cheese—automatically.
Top elements
On |
Off |
 Convection
(shown on)
On 
Bottom elements
Bake
In Bake mode, the Even-Heat™ system distributes power to the top and bottom heating elements to maintain the desired oven temperature. The top center element will be off.
Bake mode tip
•Food may finish cooking up to 30% faster when using Convection mode. Check baked goods such as cakes, muffins, and pastries before the expected finish time to avoid over-cooking.
NOTE: For temperature and time settings and options in Bake mode, see the “Cooking modes” chart.
Asado Roast
The Asado Roast mode uses staged cooking to allow larger items like whole chickens or pork roasts to develop a crispy crust while slowly cooking the interior. The
Even-Heat™ system distributes power to the top and bottom heating elements to maintain the desired oven temperature. The convection fan will operate in the first stage to assist with crisping the roast exterior, and
will then turn off to prevent over-drying.
Temper_atur_e & time infor_mation
In Asado Roast mode, the time and temperature is set in 2 stages.
Stage 1 (Crisping) During Stage 1, the outer layer of your roast will crisp as the interior begins to warm. The convection fan will default to ON to assist with crisping the roast exterior, but may be turned off, if desired. Smaller cuts of meat may require less crisping than larger roasts; please consult your recipe.
Stage 2 (Roasting) Temperature is reduced in Stage 2 to allow heat to slowly and evenly reach the center of your food until it arrives at the desired finish temperature.
The convection fan will turn OFF to prevent overdrying the outside.
NOTE: For temperature and time settings and options in Asado Roast mode, see the “Cooking modes” chart.
10
COOKING MODES
Br_oil
Broiling uses direct radiant heat to cook food from above. The Even-Heat™ system will distribute power to all three top heating elements to deliver two levels of efficient broiling. The bottom elements will not
be on.
Convection mode can be used with thin cuts of fish, eliminating the need for flipping.
Br_oil mode tips
•For best results, use the 12" (30 cm) multipurpose pan and rack. It is designed to drain juices and help avoid spatter and smoke.
•For proper draining, do not cover the rack with foil. Instead, the bottom of the multipurpose pan may be lined with aluminum foil for easier cleaning.
•Foods cooked under the broiler will burn very quickly if not monitored near the end of their cooking times.
English
•Pull oven rack out before turning or removing food. Use tongs to turn food to avoid the loss of juices. Very
thin cuts of fish, poultry, or meat may not need to be turned.
•After broiling, remove the pan and food from the oven. Drippings will bake on the pan if left in the heated oven, making cleaning more difficult.
NOTE: For temperature and time settings and options in Broil mode, see the “Cooking modes” chart.
Keep War_m
In Keep Warm mode, the Even-Heat™ system distributes power to the top and bottom elements to keep food warm before serving.
Keep War_m Tips
•The preset temperature is 170°F (77°C), but you may wish to adjust this depending on the item being warmed.
IMPORTANT: Food must be at serving temperature before it is placed in the oven to keep warm.
NOTE: For temperature and time settings and options in Keep Warm mode, see the “Cooking modes” chart.
Reheat
The Even-Heat™ system distributes power to the top and bottom elements to bring food to serving temperature. (The top center element is off.)
Reheat mode tips
•The preset suggested temperature is 300°F (149°C), but you may need to adjust this depending on the item being reheated.
•Reheating too long may over-cook or dry out food.
NOTE: For temperature and time settings and options in Reheat mode, see the “Cooking modes” chart.
11
COOKING MODES
Cookie
In Cookie mode, the Even-Heat™ system distributes power to the top and bottom heating elements to maintain the desired oven temperature. The top center element will be off.
When using Convection in Cookie mode, EasyConvect™ Conversion automatically reduces oven temperature by 25°F (14°C) to prevent overcooking.
Convection tips for_ Cookie mode
•Cookies will cook faster and more efficiently in Convection Mode because their surface area is relatively small.
•Keep heat loss to a minimum by opening the oven door only when necessary.
•Cookies may finish cooking up to 30% faster when using Convection Mode. Check cookies before the expected finish time to avoid overcooking.
NOTE: For temperature and time settings and options in Cookie mode, see the “Cooking modes” chart.
Pizza
In Pizza mode, the Even-Heat™ system distributes power to the top and bottom heating elements to maintain the desired oven temperature. The top center element is off until the end of this mode. The last stage of this mode will finish off the cheese by browning with high heat.
Fr_ozen Mode
Pizza setting will default to frozen mode. You may use the Frozen button to provide extra time for frozen pizzas to cook, or deselect it when cooking freshly prepared pizzas.
Pizza mode tips
•For frozen pizzas, it is recommended to follow time and temperature directions included on the food packaging.
•Thin crust pizzas will cook faster and more efficiently in Convection Mode because their surface area is relatively small. Place thin crust pizzas directly on the oven rack for crispier crust. Please keep in mind that convection can speed up cooking time by up to 30%. You should check pizza often in the final minutes to ensure optimal results
with this feature. Once you determine optimal time, reset your memory setting to the new desired time.
|
|
|
Cooking stage |
|
Browning stage |
•Thick crust, self-rising, or deep-dish pizzas will require longer cooking times. Use the 12" (30 cm) nonstick pan for fresh or deep-dish pizzas to maintain shape and keep sauce contained.
•Pizzas may need to be rotated during cooking to ensure even results.
NOTE: For temperature and time settings and options in Pizza mode, see the “Cooking modes” chart.
12

TOASTING MODES
Toast
In Toast mode, the Even-Heat™ system distributes power between the top and bottom heating elements to deliver fast and even toasting.
Use the Toast mode for bread, toaster pastries, frozen waffles. If reheating pastries, use the Reheat function.
Toast mode tips
•Place bread directly on the middle position. It does not need to be flipped during the toasting cycle.
•Select the Frozen option to allow frozen bread or similar items extra time to thaw while cooking.
Bagel
In Bagel mode, the Even-Heat™ system distributes power between the top and bottom heating elements to nicely brown the top of cut bagels while gently warming the outside.
Bagel mode tips
• Place bagels directly
on the oven rack with the cut sides
facing UP. Bagels
do not need to be flipped during the
Bagel cycle.
•Select the Frozen option to allow frozen bagels extra time to thaw while cooking.
 English
NOTE: For temperature and time settings and options in Toast mode, see the “Toast and bagel modes” chart.
NOTE: For temperature and time settings and options in Bagel mode, see the “Toast and bagel modes” chart.
13

ADDITIONAL FUNCTIONS
Convection option
Convection cooking uses a fan to circulate air inside the oven
to provide faster, more even
cooking. The Convection option
is available on most cooking modes. On Reheat and Stage 1 of Asado
Roast, Convection will default to ON automatically. Convection is NOT available on Toasting modes.
When using Convection in Cookie mode, EasyConvect™ Conversion automatically reduces oven temperature by 25°F (14°C) to prevent overcooking.
Fr_ozen option
The Frozen option adds additional cycle time to the selected cooking mode to allow for thawing and proper cooking. The additional time varies depending on the selected cooking mode.
Convection Mode Tips
•Thinner foods will cook faster and more efficiently in Convection Mode because their surface area is relatively small.
•Food may finish cooking up to 30% faster when using Convection Mode. Check baked goods such as cakes, muffins, and pastries before the expected finish time to avoid overcooking.
•Don’t cover foods with lids or aluminum foil so that surface areas remain exposed to the circulating air, allowing browning and crisping.
•Use pans with lower sides to promote better airflow.
NOTE: The Frozen option is NOT available on Broil, Asado Roast, Reheat, or Keep Warm.
Changing between Fahr_enheit and Celsius
To change between degrees Fahrenheit and degrees Celsius, press and hold Convection and Frozen at the same time for about 3 seconds.
14

GETTING STARTED
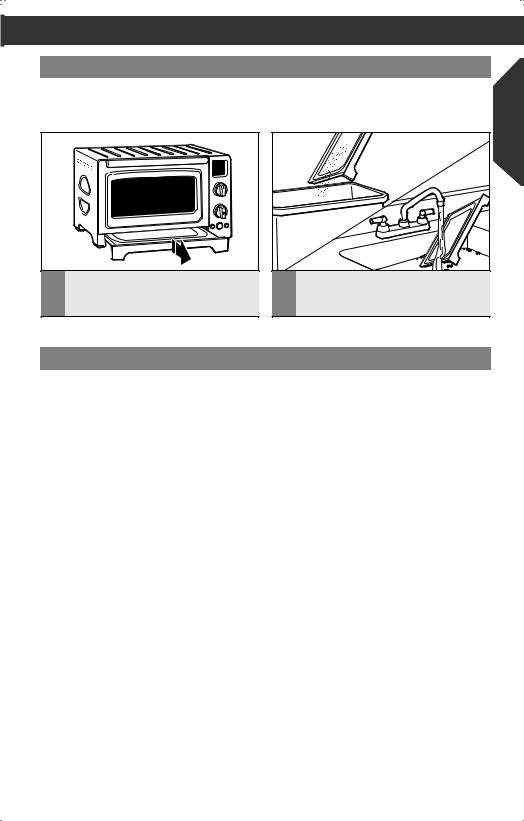
Before first use
1.Place the Countertop oven on a dry, flat, level surface such as a countertop
|
or table. |
4" (10 cm) |
|
2. |
Be sure the sides, back, and top of the |
||
|
|||
|
oven are at least 4" (10 cm) away from |
|
|
|
any walls, cabinets, or objects on the |
|
|
|
counter or table. |
|
3. Remove all accessories and wash in hot, sudsy water. Dry thoroughly before placing in the oven.
4.Remove all packaging materials and labels, if present.
NOTE: Upon first use, the oven may produce light smoke. This is normal.
(10 cm)
4" (10 cm)
English
Using the Counter_top Oven
1 |
Plug into a grounded 3 prong outlet. The |
Countertop Oven should be the only |
appliance operating on the circuit. The Countertop Oven is now ready to use.
15
OPERATING THE COUNTERTOP OVEN
Adjusting the r_ack position
|
|
|
|
|
|
|
|
|
1 |
To adjust oven rack position, slide the |
|
oven rack out completely. |
||
|
|
|
2 |
Align the sides of the oven rack with |
the grooves for the desired position and |
slide straight in.
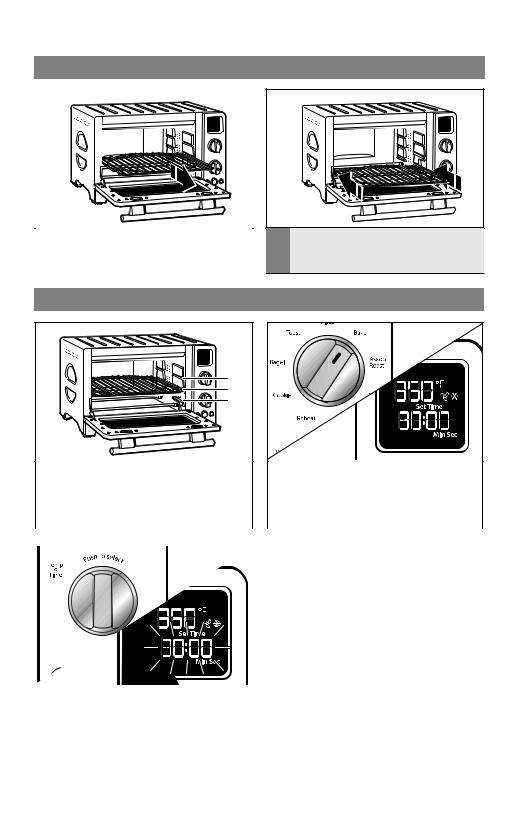
Setting a cooking mode
1
2
3
1 |
Make sure there will be enough |
clearance between the top of the |
food item to be cooked and the top elements. If necessary, adjust oven rack position. Close the door.
3 |
Adjust the Temperature/Time control |
knob, if desired (See “Cooking Modes” |
and “Toast and Bagel Modes” charts for options). Press the knob to change between temperature and time. The selected field will blink in the display.
2 |
Rotate the Mode knob to select the |
desired cooking mode. The preset |
temperature and time (shade and number of slices for Bagel and Toast mode) will be displayed.
4 |
Select CONVECTION or FROZEN |
options, if desired. |
NOTE: Options not available with all Cooking Modes. See “Cooking Modes” chart and “Toast and Bagel Modes” chart for more information.
16

OPERATING THE COUNTERTOP OVEN
5 |
To preheat the oven, press START/ |
CANCEL. Once the oven reaches the |
desired temperature, a tone will sound.
NOTE: Preheating is not available on Broil, Keep Warm, Reheat, Toast, or Bagel modes.
7 |
When the cooking cycle is complete, |
a tone will sound. |
Pr_eheating
English
6 |
Open the door, place the food to be |
cooked in the oven, and close the door. |
Press START/CANCEL again and the timer will begin counting down.
NOTE: If START/CANCEL is not pressed within 5 minutes of the Preheating complete tone, the oven will automatically turn off.
Preheating your Countertop Oven is important for consistent and even results. Once you select your desired cooking mode and any other settings, and press START, Even-Heat™ Preheat saturates the oven walls and cooking racks above the oven’s set temperature to remove cold spots that draw heat away from food. This also helps the oven stay at the desired temperature
when the door is opened for short periods of time.
During preheating, the light ring around the Start/Cancel button will be on, and the Preheat indicator will show on the LCD. Once the oven has reached the set temperature, a tone will sound to let you
know you can insert food and begin cooking. Preheating is NOT necessary in all cooking modes.
17

TIPS FOR GREAT RESULTS
Counter_top Oven use tips
Ar_e guesstimates for_ Toast Mode OK?
Experience will teach you how much time to use for toasting various kinds of bread. Frozen, dark, or whole-grain breads require a longer time. Rye breads are the most susceptible to over-toasting and spot charring. Fresh, soft, or white breads require a shorter time.
For_ foods that melt
When cooking small pieces of food or foods that will melt, use the multipurpose pan. This will keep food from falling onto the cooking elements.
To minimize cleanup
Spray the multipurpose pan with nonstick cooking spray for easier cleanup when cooking wet or sticky foods. Wash pan
thoroughly after each use to avoid buildup of cooking spray.
Size limits for_ food and cooking container_s
For best results, food and/or oven-safe containers (see “Food Cooking Tips” section) must fit into the Countertop Oven without touching the cooking elements or inside walls of the Countertop Oven. The door must close completely. This allows air to circulate around the food, helping ensure consistent cooking temperature.
For_ extended use
When cooking for a long time at high temperatures, you may detect a slight odor from the Countertop Oven insulation materials. This is normal.
Food cooking tips
•Check food cooking progress through the clear, tempered glass door window. Your Countertop Oven wiII perform better and be more energy efficient if you open the door less often.
•If top of food item browns too fast, lower the oven rack position or reduce temperature. If bottom of food item browns too fast, raise rack position or reduce temperature. Please remember that adding the convection option could reduce the needed cooking time by up to 30%.
•Remove all plastic and/or paper wrappers from foods before cooking.
•Use only loosely covered oven-safe containers. Airtight containers may cause food to boil over or splatter.
•Although more energy efficient and faster than traditional ovens, countertop oven surfaces can become hot during cooking. Touch only the door handle and knobs during oven operation.
•Do not place items on top or near Countertop Oven while in use. Only use the included cooling rack to gently cool food on the top of this oven.
•Replace cardboard, glass, or plastic lids with aluminum foil for use in the Countertop Oven.
Choosing bakewar_e for_ Counter_top Oven use
•The nonstick multipurpose pan included with the Countertop Oven is suitable for items such as cookies, rolls, biscuits, nachos, and pork chops.
•A variety of standard baking dishes, such as a 9" (23 cm) round or square cake pan, a 6-cup (1.5 L) muffin pan, small baking sheets, and 1 and 2 qt (0.95 mL and 1.9 L) round, square, and rectangular casserole dishes, may be used. The door must close completely.
•Choose bakeware made of metal, ovensafe glass, ceramic, or silicone.
•Use lowest oven rack position when using deep, oven-safe glass or ceramic containers and allow at least 1" (2.5 cm) clearance between the top of the container and the upper cooking elements.
•Do not use glass lids. If a cover is desired, use a loosely fitted sheet of aluminum foil shiny side up or down.
•Many convenience foods are packaged in nonmetallic containers only suitable for use in microwave ovens. Check package directions to determine whether the container is suitable for use in a regular oven.
18
CARE AND CLEANING
Removing and cleaning the cr_umb tr_ay
The crumb tray should be emptied and cleaned at least after every few cooking cycles, or after any spills.
1 |
To remove the crumb tray, grasp the |
2 |
Empty and wash in warm, soapy water, |
grip underneath and slide straight out. |
if needed. Dry with a soft cloth and slide |
||
|
|
|
back into place. |
English
Cleaning your_ Counter_top Oven
Unplug your Countertop Oven from the wall socket before cleaning.
•Allow Countertop Oven and accessories to cool completely before cleaning.
Inter_ior_:
•For easy cleaning, the inside walls of the Countertop Oven feature Ceramashield™, a nonstick ceramic coating. Remove heavy spatter after use with a nylon or polyester mesh pad, sponge, or cloth dampened with warm water. Dry with a paper towel or soft, dry cloth.
IMPORTANT: Do not use cleaning agents, cleansers, or metal scouring pads on the inner oven coating as they may reduce its effectiveness. The ceramic nonstick coating inside the oven is scratch-resistant. However, dropping or hard impacts can chip or crack the ceramic coating.
•Hand washing is recommended for racks and pan. Remove all items from the Countertop Oven. Wash the oven rack, broiling rack, and multipurpose pan in hot, sudsy water. Rinse and dry thoroughly.
NOTE: The oven rack, multipurpose pan, and broiling rack are dishwasher safe, but hand washing is recommended.
Exter_ior_:
•Do not use abrasive cleaners or metal scouring pads. They could scratch the surface.
•For painted surfaces:
Wipe the outside of the Countertop Oven with a clean, damp cloth and dry thoroughly.
•For stainless steel surfaces:
Wipe the outside of the Countertop Oven with a clean, damp cloth and dry thoroughly. A nonabrasive liquid
cleaner may be used for stubborn stains. KitchenAid recommends the use of affresh® stainless steel cleaner for all stainless steel surfaces. affresh® cooktop cleaner and scrubbing pads are also recommended for cleaning the toughest baked-on residue on stainless steel and glass surfaces. Ensure all surfaces are completely dry before using your oven. Please visit www.affresh.com to learn more.
19
TROUBLESHOOTING
If your_ Counter_top Oven malfunctions or_ fails to oper_ate
•Is the Counter_top Oven plugged into a gr_ounded 3 pr_ong outlet?
Plug the Countertop Oven into a grounded 3 prong outlet.
•Is the fuse in the cir_cuit to the Counter_top Oven in wor_king or_der_?
If you have a circuit breaker box, make sure the circuit is closed. Try unplugging the Countertop Oven, then plug it back in.
•Upper_ cooking elements visibly glow, but bottom cooking elements do not.
The upper cooking elements use higher power for better browning performance. The lower cooking elements are on,
but may not visibly glow like the upper cooking elements. This is normal and your Countertop Oven is working properly.
•Power on light is flashing rapidly.
The Countertop Oven has a 2-hour auto shutoff feature. If the constant on feature is being used, the Countertop Oven will automatically shut off after 2-hours and the power on indicator light will flash rapidly.
•If the pr_oblem cannot be corrr_ected:
See the “KitchenAid Warranty and Service” sections. Do not return the Countertop Oven to the retailer – retailers do not provide service.
20
WARRANTY
KitchenAid® Counter_top Oven Warrr_anty for_ the 50 United States, the Distr_ict of Columbia, Puer_to Rico, and Canada
This warranty extends to the purchaser and any succeeding owner for Countertop Ovens operated in the 50 United States, the District of Columbia, Puerto Rico, and Canada.
Length of Warrr_anty: |
One Year Full Warranty from date of purchase. |
|
|
KitchenAid Will Pay |
Hassle-Free Replacement of your Countertop Oven. |
for_ Your_ Choice of: |
See the next page for details on how to arrange for |
|
service, or call the Customer eXperience Center |
|
toll-free at 1-800-541-6390. |
|
OR |
|
The replacement parts and repair labor costs to correct |
|
defects in materials and workmanship. Service must be |
|
provided by an Authorized KitchenAid Service Center. |
|
|
KitchenAid Will |
A. Repairs when Countertop Oven is used in other than |
Not Pay for_: |
normal single family home use. |
|
B. Damage resulting from accident, alteration, misuse |
|
or abuse. |
|
C. Any shipping or handling costs to deliver your |
|
Countertop Oven to an Authorized Service Center. |
|
D. Replacement parts or repair labor costs for |
|
Countertop Ovens operated outside the 50 United |
|
States, District of Columbia, Puerto Rico, and Canada. |
DISCLAIMER OF IMPLIED WARRANTIES; LIMITATION OF REMEDIES
IMPLIED WARRANTIES, INCLUDING TO THE EXTENT APPLICABLE WARRANTIES OF MERCHANTABILITY OR FITNESS FOR A PARTICULAR PURPOSE, ARE EXCLUDED TO THE EXTENT LEGALLY PERMISSIBLE. ANY IMPLIED WARRANTIES THAT MAY BE IMPOSED BY LAW ARE LIMITED TO ONE YEAR, OR THE SHORTEST PERIOD ALLOWED BY LAW. SOME STATES AND PROVINCES DO NOT ALLOW LIMITATIONS OR EXCLUSIONS ON HOW LONG AN IMPLIED WARRANTY OF MERCHANTABILITY OR FITNESS LASTS, SO THE ABOVE LIMITATIONS OR EXCLUSIONS MAY NOT APPLY TO YOU.
IF THIS PRODUCT FAILS TO WORK AS WARRANTED, CUSTOMER’S SOLE AND EXCLUSIVE REMEDY SHALL BE REPAIR OR REPLACEMENT ACCORDING TO THE TERMS OF THIS LIMITED WARRANTY. KITCHENAID AND KITCHENAID CANADA DO NOT ASSUME ANY RESPONSIBILITY FOR INCIDENTAL OR
CONSEQUENTIAL DAMAGES. This warranty gives you specific legal rights and you may also have other rights which vary from state to state or province to province.
English
21
 Loading...