


KitchenAid KDTM604KPS, KDPM804KPS, KDTM404KPS, KDFM404KBS, KDPM604KBS INSTALLATION INSTRUCTIONS AND OPERATION MANUAL
...DISHWASHER
USER INSTRUCTIONS
THANK YOU for purchasing this high-quality product. Register your new dishwasher at register.kitchenaid.com. In Canada, visit our |
|
website at www.kitchenaid.ca. |
|
For future reference please make a note of your product model and serial numbers. These can be located near the door on the right- |
|
hand or left-hand side of the dishwasher interior. |
|
Model Number_________________________________________ |
Serial Number___________________________________________ |
Table of Contents |
|
DISHWASHER SAFETY.................................................................. |
1 |
WHAT’S NEW IN YOUR DISHWASHER........................................ |
3 |
PARTS AND FEATURES................................................................. |
4 |
START-UP/QUICK REFERENCE................................................... |
5 |
QUICK STEPS ................................................................................ |
5 |
DISHWASHER USE......................................................................... |
6 |
CYCLE AND OPTION DESCRIPTIONS......................................... |
8 |
DISHWASHER FEATURES........................................................... |
11 |
FILTRATION SYSTEM................................................................... |
12 |
DISHWASHER CARE.................................................................... |
13 |
TROUBLESHOOTING................................................................... |
14 |
WARRANTY................................................................................... |
17 |
Dishwasher Safety
Your safety and the safety of others are very important.
many important safety messages in this manual and on your appliance. Always read and obey all safety
safety alert symbol.
alerts you to potential hazards that can kill or hurt you and others.
messages will follow the safety alert symbol and either the word “DANGER” or “WARNING.” mean:
 DANGER
  WARNING
You can be killed or seriously injured if you don't immediately follow instructions.
You can be killed or seriously injured if you don't follow instructions.
All safety messages will tell you what the potential hazard is, tell you how to reduce the chance of injury, and tell you what can happen if the instructions are not followed.
W11133228B
1

IMPORTANT SAFETY INSTRUCTIONS
WARNING: When using the dishwasher, follow basic precautions, including the following:
 Read all instructions before using the dishwasher.
  Use the dishwasher only for its intended function.
 Use only detergents or rinse agents recommended for use in a dishwasher, and keep them out of the reach of children.
 When loading items to be washed:
1)Locate sharp items so that they are not likely to damage the door seal; and
2)Load sharp knives with the handles up to reduce the risk of cut-type injuries.
 Do not wash plastic items unless they are marked “dishwasher safe” or the equivalent. For plastic items not so marked, check the manufacturer's recommendations.
 Do not touch the heating element during or immediately after use.
 Do not operate the dishwasher unless all enclosure panels are properly in place.
 Do not tamper with controls.
 Do not abuse, sit on, or stand on the door, lid, or dish racks of the dishwasher.
 To reduce the risk of injury, do not allow children to play in or on the dishwasher.
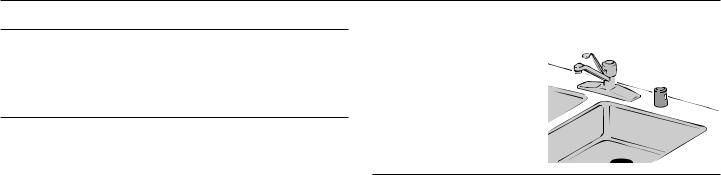
 Under certain conditions, hydrogen gas may be produced in a hot water system that has not been used for two weeks or more. HYDROGEN GAS IS EXPLOSIVE. If the hot water system has not been used for such a period, before using the dishwasher turn on all hot water faucets and let the water flow from each for several minutes. This will release any accumulated hydrogen gas. As the gas is flammable, do not smoke or use an open flame during this time.
 Remove the door or lid to the washing compartment when removing an old dishwasher from service or discarding it.
SAVE THESE INSTRUCTIONS
GROUNDING INSTRUCTIONS
|
For a grounded, cord-connected dishwasher: |
|
Check with a qualified electrician or service representative |
|
|||
|
|||
|
The dishwasher must be grounded. In the event of a |
|
if you are in doubt whether the dishwasher is properly |
|
|
grounded. Do not modify the plug provided with the |
|
|
malfunction or breakdown, grounding will reduce the risk of |
|
|
|
|
dishwasher; if it will not fit the outlet, have a proper outlet |
|
|
electric shock by providing a path of least resistance for |
|
|
|
|
installed by a qualified electrician. |
|
|
electric current. The dishwasher is equipped with a cord |
|
|
|
|
For a permanently connected dishwasher: |
|
|
having an equipment-grounding conductor and a grounding |
|
|
|
|
||
|
|
||
|
plug. The plug must be plugged into an appropriate outlet |
|
The dishwasher must be connected to a grounded metal, |
|
that is installed and grounded in accordance with all local |
|
|
|
|
permanent wiring system, or an equipment-grounding |
|
|
codes and ordinances. |
|
|
|
|
conductor must be run with the circuit conductors and |
|
|
|
|
|
|
WARNING: Improper connection of the equipment- |
|
connected to the equipment-grounding terminal or lead on |
|
grounding conductor can result in a risk of electric shock. |
|
the dishwasher. |
|
|
|
SAVE THESE INSTRUCTIONS
 WARNING
Tip Over Hazard
Do not use dishwasher until completely installed.
Do not push down on open door.
Doing so can result in serious injury or cuts.
2
What’s New in Your Dishwasher
Energy
Congratulations on purchasing your waterand energy-efficient dishwasher! This dishwasher cleans by spraying the dishes with water and pauses to allow the detergent to soak into and release the soils on the dishes. The cycles are longer due to the soak and pauses for exceptional cleaning. Your dishwasher contains an optical water sensor. The optical water sensor is used to determine the optimum water and energy consumption for great cleaning performance. Efficient dishwashers run longer to save water and energy, just as driving a car slower saves on gas. The first cycle using the sensor will run longer to calibrate the optical sensor.
Performance
Rinse Aid
Using rinse aid will optimize your drying and wash performance. This dishwasher is specifically designed to be used with rinse aid for improved drying performance and controlling buildup of hard water deposits. The use of rinse aid greatly improves drying by allowing water to drain from the dishes after the final rinse. Rinse aid also keeps water from forming droplets that can dry as spots or streaks.
SLIDE 
Detergent
The United States and Canada have passed restrictions limiting the amount of phosphorus (phosphates) in household dishwasher detergents to reduce the impact of detergents on our environment. Major manufacturers have reformulated their dishwasher detergent. With these recent changes it is recommended to use tablets and packs for convenience and improved performance.
SLIDE
Filtration System
Your dishwasher has the latest technology in dishwasher filtration. This triple filtration system minimizes sound and optimizes water and energy conservation while providing optimal cleaning performance. We suggest you clean both your upper and lower filters and rinse under running water according to the chart in the Filtration System section. Maintenance of your filters regularly will sustain peak cleaning performance.
|
L |
C |
O |
K |
|
U
N
L
OCK
N
R
P U S H
D O W N & UT
3
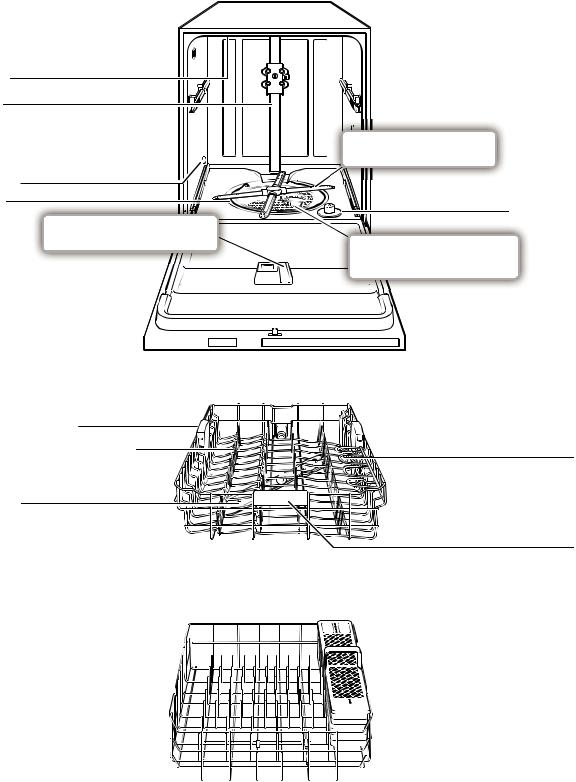
Parts and Features
Side dry vent
(on some models) 
Upper level wash
Water feed tube
Model and serial number label 
Water inlet opening |
Heating element |
Overfill protection float |
Detergent dispenser 
 (dispenser location varies by model)
|
|
|
|
|
Premium top rack adjusters |
|
|
||
FLEXI-FOLD DOWN™ adjustable tines |
|
Cup shelf |
||
(on some models) |
|
|||
Upper spray arm |
|
|
||
|
|
|
|
Rack handle |
TOP RACK


 Silverware basket
BOTTOM RACK
4
Start-Up/Quick Reference
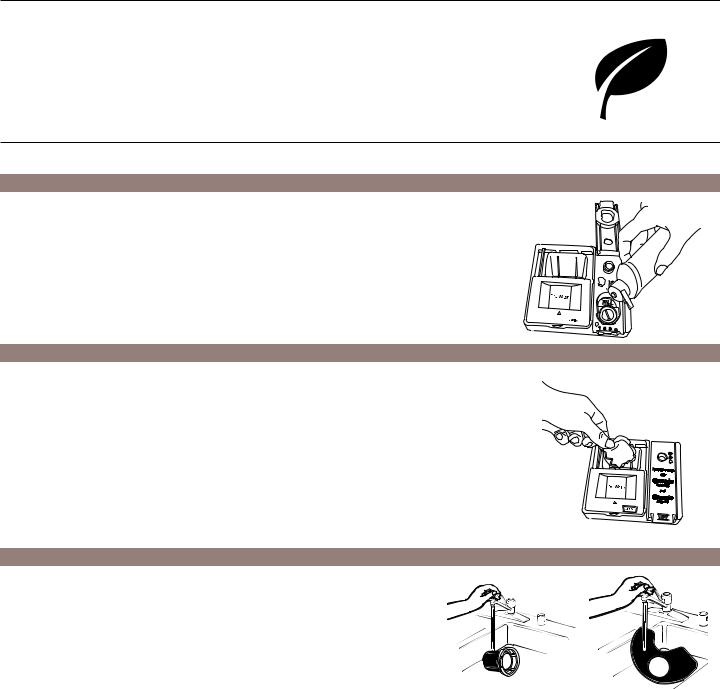
Clean EQ Wash System removable filters to maintain peak performance
Cleaning the filters periodically helps to keep the dishwasher working at peak performance. The filters can be found at the bottom center of your dishwasher.
See “Filtration System” section for information on removing and maintaining the filters.
Drying – Rinse aid is essential
You must use a drying agent such as a rinse aid for good drying performance. Rinse aid along with the Heat Dry and Extended Heat Dry option will provide best drying and avoid excessive moisture in dishwasher interior.
Extended Heat Dry |
SLIDE |
For best drying use the Extended
Heated Dry option.
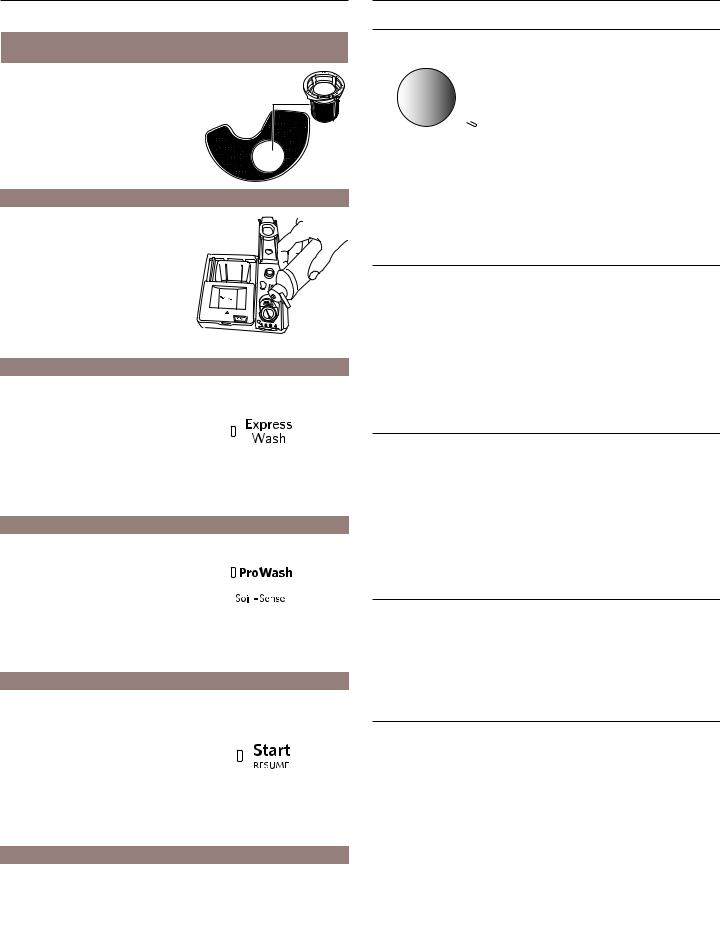
Express Wash – When you need fast results
Efficient dishwashers run longer to save water and energy, just as driving a car slower saves on gas. When you need fast results, the Express Wash will clean your
dishes using slightly more water and energy. Select the Heat Dry option to include automatic drying (adds approximately 38 to 45 minutes to the Express Wash cycle).
ProWash™ cycle for optimal cleaning
The most advanced and versatile cycle. ProWash™ cycle senses the soil amount and toughness of soil to adjust the cycle for optimal cleaning using only the amount of water and energy needed. The ProWash™ and Tough cycles are recommended
for tough soil. No need to pre-rinse dishes; just scrape leftover food into the trash or disposal and load.
Press Start/RESUME every time you add a dish
IMPORTANT: If anyone opens the door (such as, to add a dish, even during the Delay hours), the Start/ RESUME button must be pressed each time. Push door firmly closed within 4 seconds of pressing Start/RESUME. If the door is not closed within 4 seconds, the Start/ RESUME button LED will flash, an audible tone will be heard, and the cycle will not start.
Proper Detergent Dosing
We recommend quality tablets and packs for convenience and improved performance.
When using other forms of detergent, it is possible to use too much. This can lead to etching of your dishes. See “Add Detergent” in the Dishwasher Use section, to determine the amount of detergent needed based on soil level and water hardness.
Quick Steps
1 Remove bulk food and load dishwasher.
Scrape off excess food into garbage or food disposer.
Load dishes so that water spray will reach every surface.
2 Add detergent and rinse aid.
SLID |
E |
SLIDE |
|
3 Select a cycle and options (varies by model).
4 Start the dishwasher.
To start and resume a cycle, press Start/RESUME and close the door within 4 seconds. If the door is not closed within 4 seconds, the Start/ RESUME LED will flash, an audible tone will sound, and the cycle will not start.
5 Unload dishwasher and clean the filter.
See “Recommended Time Interval to Clean Your Filter” in the “Filtration System” section for the recommended cleaning schedule.
5
Dishwasher Use
STEP 1
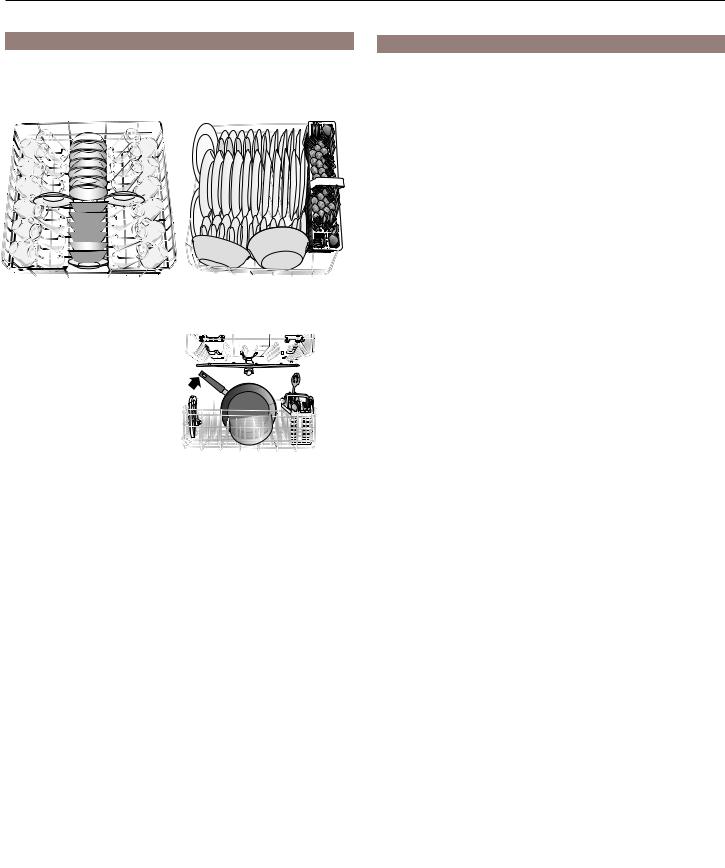
Prepare and Load the Dishwasher
IMPORTANT: Remove leftover food, bones, toothpicks, and
other hard items from the dishes. Remove labels from containers before washing.
14-place load – upper rack |
14-place load – lower rack |
■■ Check that nothing blocks the upper or lower spray arm.
Items in rack can block the spray arms.
■■ Check that when the dishwasher door is closed, no items are blocking the detergent dispenser.
■■ Items should be loaded with soiled surfaces facing down and inward to the spray as shown in the graphics above. This will improve cleaning and drying results. Angle dirtiest dish surface downward, allowing space for water to flow up through rack and between dishes.
■■ Avoid overlapping items, like bowls or plates that may trap food.
■■ Place plastics, small plates, and glasses in upper rack. Wash only items marked “dishwasher safe.”
■■ To avoid thumping/clattering noises during operation, load dishes so they do not touch one another. Make sure lightweight load items are secured in racks.
■■ When loading silverware, always place sharp items pointing down. Mix items in each section of the basket with some pointing up and some down to avoid nesting. Spray cannot reach nested items.
■■ Use the slots in the covers and suggested loading patterns to keep your silverware separated for optimum wash.
STEP 2
Add Detergent
Premeasured Detergents
High-quality premeasured tablets and packs are
recommended for improved
performance. Quality tablets and packs have been proven better than powder, liquid, or gel
detergents at reducing filming on dishes. Using tablets and packs over time will start to reduce or eliminate white film. They are
suitable for all hardness and soil levels. Also, by using a
rinse aid, you can minimize repeat buildup of white film (not all packs and tablets contain rinse aid). Always place premeasured detergents in main compartment and close the lid.
NOTE: Follow instructions on the package when using other dishwasher detergent types or use the chart below for standard powdered detergents.
■■ Use automatic dishwasher detergent only. Add detergent just before starting a cycle.
■■ Fresh automatic dishwasher detergent results in better cleaning. Store tightly closed detergent container in a cool dry place.
To close lid |
To open lid |
Place selected detergent in the dispenser. Place finger, as shown, and slide lid closed. Press firmly until it clicks.
Powders and Gels
SLIDE 
SLIDE
Push OPEN, as shown, and the lid will slide open.
Water |
Soil Level |
Prewash |
Main Wash |
|
Hardness |
|
Compartment* |
Compartment |
|
|
|
|
|
|
Soft (0-4 |
Light |
None |
“Soft” fill line |
|
grains |
|
|
|
|
Normal |
None |
“Soft” fill line |
||
per U.S. |
||||
|
|
|
||
gallon) |
Heavy |
Full |
“Soft” fill line |
|
|
||||
|
|
|
|
|
Medium |
Light |
None |
“Soft” fill line |
|
(5-9 grains |
|
|
|
|
Normal |
Full |
Full** |
||
per U.S. |
|
|
|
|
gallon) |
Heavy |
Full |
Full** |
|
|
|
|
|
|
Hard (10- |
Light |
Full** |
Full** |
|
14 grains |
|
|
|
|
Normal |
Full** |
Full** |
||
per U.S. |
||||
gallon) |
Heavy |
Full** |
Full** |
|
|
|
|
|
*The prewash compartment is on top of the sliding door of the dispenser.
**A full main wash compartment contains 2 Tbsp (30 mL).
6

IMPORTANT: Extremely hard water mineral deposits (15 grains per U.S. gallon or more) can cause damage to your dishwasher and make it difficult to achieve good results. A water softener is recommended to avoid damage and achieve good results.
NOTE: Follow instructions on the package when using other dishwasher detergent types.
STEP 3
Add Rinse Aid
STEP 4
Select a Cycle
Efficient dishwashers run longer to save water and energy, just as driving a car slower saves gas. Cycle times may increase or decrease depending on selections. Estimated cycle times after calibration are listed in the “Cycle and Option Descriptions” chart in the following section. Select the desired cycle by pressing the Cycles button. Each time you press the Cycles button, it will advance to the next available cycle.
SLIDE 
IMPORTANT: Your dishwasher is designed to use rinse aid. The use of rinse aid greatly improves drying by allowing water to drain from the dishes after the final rinse. Rinse aid also keeps water from forming droplets that can dry as spots or streaks.
Filling the dispenser
The dispenser holds 5 oz (150 mL) of rinse
aid. Under most conditions, this will last Full one to three months.
NOTE: Indicator reads correct fill level when door is completely opened.
1.To add rinse aid, open the rinse dispenser lid by gently pushing in the center of the lid with your thumb and pulling up on the edge.
2.Pour rinse aid into the opening until the dispenser is full. Do not overfill.
|
Wa |
sh |
e |
|
|
|
|
 Add
Add
OPE |
N |
|
ID |
E |
|
|
SL |
|
3.Clean up any spilled rinse aid.
Spilled rinse aid can create excessive suds.
4.Close the dispenser by pushing down gently on the lid.
Rinse Aid Setting
Your rinse aid dispenser is adjustable. For most water conditions, the factory setting will give good results. If you have hard water and notice calcium buildup on your dishware, you may want to try a higher setting. If you notice foam in your dishwasher, use a lower setting.
To adjust the setting:
Turn the arrow adjuster to a higher number to increase the amount of rinse aid.
If you change the setting only change it one number at a time and run a few cycles before changing it again. Too much rinse aid can reduce cleaning performance and too little may leave spots or rings.
Select Options
See the “Cycle and Option Descriptions” chart in the following section.
You can customize the cycles by selecting the options desired and pressing the Start/RESUME keypad.
STEP 5
Start or Resume a Cycle
■■ If needed, run hot water at the sink nearest your dishwasher until the water is hot. Turn off water.
■■ For best dish washing results, water should be 120ºF (49ºC) as it enters the dishwasher.
■■ Select the wash cycle and options desired. To repeat the same cycle and options used previously, press the Start/RESUME keypad twice. Within 4 seconds of pressing
Start/RESUME, you must firmly push the door closed. If the door is not closed within
4 seconds, the Start/RESUME LED will flash an audible tone will be heard, and the cycle will not start.
■■ You can add an item at the beginning of the cycle. Open the door slowly and add the item. Press the Start/RESUME keypad and close the door firmly within 4 seconds. If the door has been open more than 4 seconds, the LED will flash a tone will sound and the dishwasher will not resume unless you press Start/RESUME again.
IMPORTANT: If the door has been opened for more than a few seconds after the cycle has started (even during the Delay time), the Start/RESUME button must be pressed again or the cycle will not resume.
7

Cycle and Option Descriptions
Estimated cycle times may increase or decrease, depending on water temperature, soil conditions, dish load size, and options selected. You can customize your cycle by selecting an option.
See option selections. If you change your mind, press the option again to turn off the option or select a different option. You can change an option any time before the selected option begins. At each stage of the wash cycle, you may hear noises that you are not used to hearing in your previous dishwasher. Each cycle will provide a series of pauses and water sprays throughout the wash cycle. This is normal and will provide optimal cleaning performance.
CYCLE SELECTIONS
IMPORTANT: The sensor in your dishwasher monitors the soil level. Cycle time and/or water usage can vary as the sensor adjusts the cycle for the best wash performance. If the incoming water is less than the recommended temperature or food soils are heavy, the cycle will automatically compensate by adding time, heat, and water as needed.
|
CYCLE |
ESTIMATED |
WATER |
|
|
WASH TIME* |
USAGE |
|
|
W/O OPTIONS |
GALLONS |
|
|
(HR:MIN) |
(LITERS) |
|
|
|
|
ProWash |
This cycle senses the load size, soil amount, and toughness of soil, to adjust |
2:10 to 3:15 |
3.38 to 7.4 |
|
the cycle for improved cleaning, using only the amount of water and energy |
|
(12.8 to 28.0) |
Soil - Sense |
needed. The ProWash™ cycle is automatically selected if you first touch Start/ |
|
|
|
RESUME Includes a heated drying option.* |
|
|
Tough |
Use for hard-to-clean, heavily soiled pots, pans, casseroles, and regular |
2:45 to 3:25 |
7.4 (28.0) |
|
tableware. Includes a heated drying option. |
|
|
Normal |
This cycle is recommended for daily, regular, or typical use to completely |
2:00 to 3:10 |
2.4 to 7.4 |
|
wash and dry a full load of normally soiled dishes. This dishwasher’s |
|
(9.09 to 28.0) |
|
government energy certifications were based on the Normal cycle with only |
|
|
|
the Heat Dry or Extended Heat Dry option selected.** |
|
|
Express |
For fast results, the Express Wash will clean dishes using slightly more water |
0:55 to 1:05 |
7.87 (29.8) |
Wash |
and energy. For improved drying, select a heated drying option. |
|
|
NOTE: Some detergents are not recommended for short wash cycles, please |
|
|
|
|
|
|
|
|
refer to your detergent packaging for more information. Includes a heated |
|
|
|
drying option. |
|
|
|
|
|
|
Rinse |
Use for rinsing dishes, glasses, and silverware that will not be washed right |
0:18 |
2.0 (7.5) |
Only |
away. Do not use detergent. |
|
|
|
|
|
|
|
|
|
|
*The government energy certifications are not based on this cycle. See the Normal cycle description for the government energy certification cycle. Using the Sensor cycle may increase your energy usage.
**No other washing and drying temperature options were selected, and the dishwasher was not subjected to truncated testing. Rinse aid was not used, and there was no detergent used in the prewash.
8
OPTION SELECTIONS
|
OPTIONS |
CAN BE |
WHAT IT DOES |
ADDED |
ADDED |
|
|
|
SELECTED |
|
TIME TO |
WATER |
|
|
|
WITH |
|
CYCLE |
GALLONS |
|
|
|
|
|
|
(LITERS) |
|
Hi-Temp |
Raises the main wash temperature to |
ProWash™ |
Raises the main |
0:00 to |
1.2 to 6.2 |
|
Wash |
improve cleaning for loads containing |
Normal |
wash temperate up |
0:30 |
(4.8 to 23.3) |
|
tough, baked-on food. |
|
to 135°F (57°C). |
|
|
||
|
|
|
|
|||
Sound on/off |
|
|
|
|
|
|
Hold 3 Sec |
|
|
|
|
|
|
|
|
|
|
|
|
|
Extended |
Dries dishes with heat. This option, with the |
Available with |
Activates the |
Heat |
0 |
|
Heat Dry |
use of rinse aid, will provide the best drying |
any cycle |
heating element at |
Dry: 0:10 |
|
|
|
performance. Plastic items are less likely to |
except Rinse |
the end of a wash |
to 0:50 |
|
|
|
deform when loaded in the top rack. Turn |
Only |
cycle to speed |
Extended |
|
|
Heat Dry |
the Heat Dry option off for an air dry. |
|
drying times. Heat |
Heat Dry |
|
|
|
|
Dry defaults to On |
|
|||
|
|
(includes |
|
|||
|
|
|
when any cycle is |
|
||
|
|
|
Heat Dry |
|
||
|
|
|
selected, except for |
|
||
|
|
|
time): 0:40 |
|
||
|
|
|
Express Wash and |
to 1:20 |
|
|
|
|
|
Rinse Only. |
|
||
|
|
|
|
|
||
|
Sanitizes dishes and glassware in |
|
|
|
|
|
|
accordance with NSF International |
ProWash™ |
Increases the main |
0:00 to |
1.2 to 6.2 |
|
|
NSF/ANSI Standard 184 for Residential |
|||||
|
Normal |
wash temperature |
2:20 |
(4.8 to 23.3) |
||
|
Dishwashers. Certified residential |
|||||
|
|
from 105°F (41°C) |
|
|
||
|
dishwashers are not intended for licensed |
|
|
|
||
|
|
to 140°F (60°C) and |
|
|
||
|
food establishments. Only sanitizing |
|
|
|
||
|
|
the final rinse from |
|
|
||
|
cycles have been designed to meet |
|
|
|
||
|
|
140°F (60°C) to |
|
|
||
|
the requirements of the NSF/ANSI 184 |
|
|
|
||
|
|
155°F (68°C). |
|
|
||
|
performance standard for soil removal |
|
|
|
||
|
|
|
|
|
||
Sani |
and for sanitization efficacy. There is no |
|
|
|
|
|
intention, either directly or indirectly, that |
|
|
|
|
||
Rinse |
all cycles on a NSF/ANSI 184 certified |
|
|
|
|
|
dishwasher meet the NSF/ANSI 184 |
|
|
|
|
||
|
|
|
|
|
||
|
performance standard for soil removal and |
|
|
|
|
|
|
for sanitization efficacy. The Sani Rinse |
|
|
|
|
|
|
indicator glows at the end of the cycle if |
|
|
|
|
|
|
the Sani Rinse option was successfully |
|
|
|
|
|
|
completed. If the indicator does not |
|
|
|
|
|
|
activate, it is probably due to the cycle |
|
|
|
|
|
|
being interrupted. |
|
|
|
|
|
2-4-8 Hr. |
Runs the dishwasher at a later time or |
Available with |
Delays the start |
0 |
0 |
|
Delay |
during off-peak electrical hours. Select a |
any cycle |
of a cycle to the |
|
|
|
wash cycle and options. Press the Delay |
|
specified time. |
|
|
||
|
|
|
|
|||
|
keypad. Press Start/RESUME. Close the |
|
|
|
|
|
|
door firmly. |
|
|
|
|
|
|
NOTE: Any time the door is opened (such |
|
|
|
|
|
|
as to add a dish), the Start/RESUME |
|
|
|
|
|
|
keypad must be touched again to resume |
|
|
|
|
|
|
the delay countdown. |
|
|
|
|
|
Control |
Use the Control Lock option to avoid unintended use of dishwasher between cycles, and option changes during |
|||||
Lock |
a cycle. |
|
|
|
|
|
To turn on Control Lock, touch and hold Control Lock for 3 seconds. Control Lock light will stay on for a short |
||||||
|
||||||
Hold 3 Sec |
time, indicating that it is activated. When the Lock indicator is lit, all keypad selections are disabled. If you touch |
|||||
any keypad selection while your dishwasher is locked, the light flashes three times. The dishwasher door can |
||||||
|
||||||
|
still be opened/closed while the controls are locked. To turn off Control Lock, touch and hold Control Lock for 3 |
|||||
|
seconds. Control Lock light turns off. |
|
|
|
|
|
9

CONTROLS AND CYCLE STATUS
Control |
Purpose |
Comments |
|
|
|
Start |
To start or resume |
If the door is opened during a cycle or the power is interrupted, the |
RESUME |
a wash cycle. |
Start/RESUME indicator flashes. |
|
|
|
|
|
|
Cancel |
To cancel a wash |
Close the door firmly. Touch and hold Cancel/DRAIN for 3 seconds. The |
Drain |
cycle after it has |
dishwasher starts a 2-minute drain (if needed). Let dishwasher drain |
been started |
completely. |
|
Hi-Temp |
To turn the audible |
Touch and hold Hi-Temp Wash for 3 seconds to turn the audible tones on or |
Wash |
tones on or off. |
off. Only audible tones for confirming keypad touches can be turned |
|
on/off. Important audible tones, such as indicating a cycle has been |
|
Sound on/Off |
|
interrupted, cannot be deactivated. |
|
|
|
Hold 3 Sec |
|
|
|
|
|
|
To indicate the |
The display will indicate cycle progress such as Washing, Drying, Clean, and |
|
status of the cycle. |
Sanitized. The cycle has completed when the Clean light is lit. If you select the |
|
|
Sani Rinse option, when the cycle is finished, the Sanitized indicator glows. If |
|
|
the dishwasher did not properly sanitize your dishes, the Sanitized indicator |
|
|
flashes at the end of the cycle. This can happen if the cycle is interrupted or |
|
|
if water could not be heated to required temperature. The light goes off when |
|
|
you open and close door or touch Cancel. |
Canceling a Cycle
1.Open the door slightly to stop the cycle. Wait for the spraying action to stop before completely opening the door.
2.Press and hold Cancel/DRAIN once. The Cancel/DRAIN light will light up.
3.Close the door and the dishwasher starts a drain cycle (if water remains in bottom of dishwasher). Let the dishwasher drain completely. The Cancel/DRAIN light turns off after2 minutes.
Changing a Cycle After Dishwasher Is Started
You can interrupt a cycle and restart your dishwasher from the beginning using the following procedure:
1.Open the door slightly to stop the cycle. Wait for the spraying action to stop, then open the door completely.
2.Check that detergent dispenser cover is still closed. If cover is open, you will need to refill the detergent dispenser before restarting your new cycle.
3.Press Cancel/DRAIN and wait approximately 2 minutes until the machine drains and the Cancel/DRAIN light turns off.
4.Select new cycles and options.
5.Press Start/RESUME.
Adding a Dish After Dishwasher Is Started
1.Open the door slightly to stop the cycle. Wait for the spraying action to stop and then completely open the door.
2.If the detergent dispenser door is closed you may add a dish. If the detergent dispenser door is already opened an added dish might not be cleaned.
3.Press Start/RESUME and close the door. If the door is not closed within 4 seconds, you will hear a series of beeps and the dishwasher will not start.
10
Dishwasher Features
Silverware Basket
Silverware basket lids:
Use silverware basket lids to provide optimal spacing and best cleaning performance.
NOTE: If your silverware does not fit into the designated slots, push tabs inward on either end and lift lid off of the silverware baskets. Mix silverware types to keep them separated. Load knives down, forks up, and alternate spoons for best cleaning results.
Cup Shelves
Fold down the extra shelf on the right-hand side of the top rack to hold additional cups, stemware, or long items such as utensils and spatulas. For best results on cups, stagger the spacing so that the cups on the shelf are not directly above the cups below.
Premium Adjustable 2-Position Top Rack
You can raise or lower the top rack to fit tall items in either the top or bottom rack. Adjusters are located on each side of the top rack.
To raise the rack:
Press both rack adjuster thumb levers and lift the rack until it is in the up position and level.
To lower the rack:
Press both rack adjuster thumb levers and slide the rack to its down position
and level.
NOTE: The top rack must be level.
Removable Top Rack
The removable top rack allows you to wash larger items such as pots, roasters, and cookie sheets in the
bottom rack.
IMPORTANT: Remove dishes prior to removing the top rack from the dishwasher.
To remove the rack:
To gain access to the removable tabs on the tracks/rails, pull the upper rack forward about halfway out of the tub.
On one side, press the tab on the track in and pull up the front end of the rack, out of the track. Then repeat this step on the other side to completely remove the front end of the rack. Then remove the rack by pulling the back end out using a forward and upward motion.
To replace the rack:
Pull the tracks forward about halfway out of the tub.
Along the sides of the racks are round attachment tabs. Align the rack’s back end attachment tabs with the cutout in the track. Push down into place.
Pull the tracks completely out, and align the rack’s front end attachment tabs with the cutout in the track. Push down into place. You will hear a snap when the front end of the rack is secured into place on each side.
11

Filtration System
Your dishwasher has the latest technology in dishwasher filtration. This filtration system minimizes sound and optimizes water and energy conservation while providing superior cleaning.
The filter system consists of two parts, an upper filter assembly and a lower filter.
IMPORTANT: To avoid damage to dishwasher, do not operate your dishwasher without filters properly installed. Be sure lower filter is securely in place and upper filter assembly is locked into place. If upper assembly turns freely, it is not locked into place.
The filters may need to be cleaned when:
■■ Visible objects or soils are on the upper filter assembly. ■■ Dishes feel gritty to the touch.
Upper filter assembly
Lower filter
It is very easy to remove and maintain the filters. The chart below shows the recommended cleaning frequency.
RECOMMENDED TIME INTERVAL TO CLEAN YOUR FILTER
Number of Loads Per Week |
If you only scrape before |
If you scrape and rinse |
If you wash before loading |
|
loading* |
before loading |
|
8–12 |
Every 2 months |
Every 4 months |
Once per year |
|
|
|
|
4–7 |
Every 4 months |
Once per year |
Once per year |
|
|
|
|
1–3 |
Twice per year |
Once per year |
Once per year |
*Scrape excess food into the trash or food disposer prior to loading the dishwasher. We recommend this practice because it will conserve the water and energy that you would have used to prepare your dishes. This will also save you time and effort.
Very Hard Water
If you have hard water (above 15 grains), clean your filter at least once per month. Buildup of white residue on your dishwasher indicates hard water. For tips on removing spots and stains, see the “Troubleshooting” section.
Filter Removal Instructions
1.Turn the upper filter assembly a quarter turn counterclockwise and lift out.
 Locating tab
Filter Reinstallation Instructions
1.Noting the previous illustrations, place the lower filter under the locating tabs in the bottom of the dishwasher, so the round opening for the upper filter assembly lines up with the round opening in the bottom of the tub.
2.Insert the upper filter assembly into the circular opening in the lower filter.
 Locating tab
|
L |
|
PU |
S |
H |
|
|
O |
|
|
|
|
|
||
C |
|
|
|
|
D |
|
|
|
|
|
|
O |
|
|
|
K |
|
|
|
|
W |
|
|
|
|
|
|
N |
|||
|
|
|
|
|
& |
||
|
|
|
|
|
|
U |
T |
|
|
|
|
|
R |
|
|
|
|
|
|
|
|
|
|
|
U |
|
|
|
N |
|
|
|
|
|
|
|
|
|
|
|
NL |
|
|
|
|
|
|
|
|
OCK |
|
|
|
|
|
To replace upper filter assembly
To remove upper filter assembly
2.Separate the upper filter assembly by gently pulling apart.
3.Clean the filters as shown.
Cleaning Instructions
IMPORTANT: Do not use wire brushes, scouring pads, etc., as they may damage the filters.
Rinse filter under running water until most soils are removed. If you have hard-to-remove soils or calcium deposits from hard water, a soft brush may be required.
3.Slowly rotate the filter clockwise until it drops into place. Continue to rotate until the filter is locked into place. If the filter is not fully seated (still turns freely), continue to turn the filter clockwise until it drops and locks into place.
NOTE: The upper filter assembly arrow does not have to align with the arrow in the lower filter as long as the filter is locked.
IMPORTANT: To avoid damage to dishwasher, do not operate your dishwasher without the filters properly installed. Be sure the lower filter is securely in place and the upper filter assembly is locked into place. If the upper filter assembly turns freely, it is not locked into place.
|
L |
C |
O |
|
|
K |
|
U
N
L
OC
K
|
P |
|
|
U |
|
|
|
S |
|
|
H |
|
|
D |
|
|
O |
|
|
W |
|
|
N |
|
|
& |
|
U |
T |
N |
R |
|
12
Dishwasher Care
Cleaning the Exterior
Clean the exterior of dishwasher with a soft, damp cloth and mild detergent. If your dishwasher has a stainless steel exterior, it has a coating that is resistant to fingerprints. Avoid using abrasive cleaning products on the exterior of the dishwasher.
Cleaning and Maintaining the Interior
Many detergents may leave white spots or a white residue on dishware and on the interior of the dishwasher. Over time this residue can become unsightly and could affect dishwasher performance. Use of a dishwasher cleaning product such as affresh®† Dishwasher Cleaner can help to remove the residue. Monthly use of affresh®† Dishwasher Cleaner is recommended to help maintain the dishwasher.
To Use:
1.If cleaning without dishes, place one tablet in the detergent dispenser. Do not add detergent (If significant buildup is noticeable, a second tablet can be placed in the bottom of the dishwasher.)
2.If cleaning with dishes, place one tablet in the bottom of the dishwasher. Place detergent in the dispenser.
3.Run a Normal wash cycle.
Another method to remove white residue is to use a vinegar rinse. However, vinegar is an acid and using it too often could damage your dishwasher.
Place (do not pour), 2 cups (500 mL) white vinegar in a glass or dishwasher-safe measuring cup on the bottom rack. Run the dishwasher through a complete washing cycle using an air-dry or an energy-saving dry option. Do not use detergent. Vinegar will mix with the wash water.
NOTE: KitchenAid® recommends the use of high-quality, premeasured detergent tablets or packs and the use of rinse aid for dishwasher cleaning and daily care.
If you have a drain air gap, check and clean it if the dishwasher isn’t draining well.
To Reduce Risk of Property Damage During Vacation or Extended Time Without Use
■■ When you will not be using the dishwasher during the summer months, turn off the water and power supply to the dishwasher.
■■ Make sure the water supply lines are protected against freezing conditions. Ice formations in the supply line scan increase water pressure and cause damage to your dishwasher or home.
■■ Damage from freezing is not covered by the warranty.
■■ When storing your dishwasher in the winter, avoid water damage by having your dishwasher winterized by authorized service personnel.
†affresh® is a registered trademark of Whirlpool U.S.A.
13

Troubleshooting
First try the solutions suggested here. If you need further assistance or more recommendations that may help you avoid a service call, refer to the warranty page in this manual, or visit producthelp.kitchenaid.com In Canada, visit www.kitchenaid.ca.
Contact us by mail with any questions or concerns at the address below:
In the U.S.A.: |
In Canada: |
KitchenAid Brand Home Appliances |
KitchenAid Brand Home Appliances |
Customer eXperience Center |
Customer eXperience Centre |
553 Benson Road |
200 – 6750 Century Ave. |
Benton Harbor, MI 49022-2692 |
Mississauga, Ontario L5N 0B7 |
Please include a daytime phone number in the correspondence. |
|
|
|
PROBLEM |
SOLUTION |
|
|
DISHWASHER DOES NOT RUN |
NOTE: It is normal for the dishwasher to repeatedly pause several times during a cycle. |
|
If the Start/RESUME light is blinking, press Start/RESUME and close the door within 4 |
|
seconds. |
|
Be sure the door is closed and latched. |
|
■■ Check that there is not an interference between large casserole dishes and the wash |
|
system at the back of the dishwasher. |
|
■■ Check to see if any items are protruding through the bottom or back of the rack. Also |
|
check to see if tall items are hitting the upper rack or spray arm. Adjust loading as |
|
necessary to ensure door is closed and latched. |
|
Press the Start/RESUME or Cancel keypads or open and close the door before selecting |
|
your cycle/option. Controls must be awakened after a period of inactivity. |
|
Be sure the Control/Lock feature is not on. If the control lock indicator is lit, press and |
|
hold Sani Rince for 3 seconds. The Control Lock LED will turn off and you can then |
|
operate the controls. |
|
Be sure you have selected a cycle. See “Cycle and Option Descriptions” section. |
|
Be sure there is power to the dishwasher. A circuit breaker or fuse may have tripped. |
|
If lights other than Start/RESUME blink and the unit will not run, you will need to call for |
|
service. If the numeric display shows a code “F2E2” you will need to call for service. |
DETERGENT REMAINS IN THE |
Check for dishware, such as cookie sheets, cutting boards, or large containers, etc., that |
DISPENSER OR TABLET IS ON |
may be blocking the detergent dispenser from opening properly. |
BOTTOM OF TUB |
Be sure your detergent is fresh and lump-free. |
|
|
|
Be sure the cycle has completed (the Clean light is on). If it has not completed, you will |
|
need to resume the cycle by closing the door and pressing Start/RESUME. |
CYCLE RUNS TOO LONG |
NOTES: |
|
■■ To use less water and reduce energy consumption, you will encounter cycles that |
|
typically run for up to 3 hours. |
|
■■ A water heater setting of 120°F (49°C) is best the dishwasher will delay longer while |
|
heating cooler water. |
|
■■ Some options will add time to the cycle. See the “Cycle and Option Descriptions” |
|
section. The Heat Dry or Extended Heat Dry option adds approximately 45 minutes. |
|
Try the Express Wash cycle. |
|
Run the hot water at a faucet close to the dishwasher before starting the cycle. |
|
|
DISHWASHER NOT DRYING |
NOTE: Plastic and items with nonstick surfaces are difficult to dry because they have a |
|
porous surface which tends to collect water droplets. Towel drying may be necessary. |
|
Use of rinse aid along with the Heat Dry or Extended Heat Dry option is needed for proper |
|
drying. |
|
Proper loading of items can affect drying. (See specific loading instructions within this |
|
guide). Glasses and cups with concave bottoms hold water. This water may spill onto |
|
other items when unloading. |
|
■■ Unload the bottom rack first. |
|
■■ Locate these items on the more slanted side of the rack for improved results. |
|
|
WILL NOT FILL |
Be sure the water to the dishwasher is turned on. |
|
Check that the overfill protection float is free from obstructions. See the “Parts and |
|
Features” section. |
|
Check for suds in the dishwasher. If foam or suds are detected, the dishwasher may not |
|
operate properly or may not fill with water. See “Blinking Lights” in the “Troubleshooting” |
|
section. |
14
PROBLEM |
SOLUTION |
|
|
WATER REMAINS IN THE |
Be sure the cycle has completed (the Clean indicator is on). If it has not, you will need to |
TUB/WILL NOT DRAIN |
resume the cycle by pressing Start/RESUME and closing the door within 4 seconds. |
|
If dishwasher is connected to a food waste disposer, be sure the knockout plug has been |
|
removed from the disposer inlet. |
|
Check for kinks in the drain hose. |
|
Check for food obstructions in the drain or disposer. |
|
Check your house fuse or circuit breaker. |
|
|
HARD WATER (WHITE RESIDUE |
NOTE: Extremely hard water mineral deposits can cause damage to your dishwasher and |
ON DISHWASHER INTERIOR OR |
make it difficult to achieve good cleaning. A water softener is strongly recommended if your |
GLASSWARE) |
hardness is 15 grains or more. If a water softener is not installed, the following steps may |
|
help: |
|
Use a commercial cleaner designed for dishwashers once per month. |
|
Clean the upper and lower filters at least once per month. See “Cleaning Instructions” in the |
|
“Filtration System” section. |
|
Always use a rinse aid. Always use a high-quality, fresh detergent. |
|
Use a detergent booster/water softener additive designed for dishwashers. |
|
|
ODORS |
NOTE: If the dishwasher is not used daily, you can run a rinse cycle with the partial load |
|
until a full load is ready to run. |
|
Run a vinegar rinse through the dishwasher by putting 2 cups (500 mL) of white vinegar in |
|
an upright glass measuring cup in the lower rack. Run a Normal cycle with the Heat Dry or |
|
ProDry™ option turned off. Do not use detergent. |
|
The dishwasher may not be draining properly, see “Water Remains In The Tub/Will Not |
|
Drain” in the “Troubleshooting” section. |
NOISY |
Surging sounds can occur periodically throughout the cycle while the dishwasher is |
|
draining. |
|
Normal water valve hissing may be heard periodically. |
|
A normal snap sound may be heard when the detergent dispenser opens during the cycle |
|
and when the door is opened at the end of the cycle. |
|
Improper installation will affect noise levels. |
|
Be sure the filters are properly installed. |
|
A thumping sound may be heard if items extend beyond the racks and interfere with the |
|
wash arms. Readjust the dishware and resume the cycle. |
FOOD SOILS REMAIN ON DISHES |
Be sure the dishwasher is loaded correctly. Improper loading can greatly decrease the |
|
washing performance. See the “Dishwasher Use” section. |
|
Check filter to ensure it is properly installed. Clean it if needed. See “Cleaning Instructions” |
|
in the “Filtration System” section for details. |
|
Select the proper cycle and option for the type of soils. The Tough cycle with the Hi-Temp |
|
Wash option can be used for tougher loads. |
|
Be sure the incoming water temperature is at least 120°F (49°C). Use the proper amount |
|
of fresh detergent. More detergent is needed for heavier soiled loads and hard water |
|
conditions. |
|
Scrape food from dishes prior to loading (do not prerinse). |
DISHES DIRTY/SUDS IN |
If foam or suds are detected by the dishwasher sensing system, the dishwasher may not |
DISHWASHER/CYCLE NOT |
operate properly or may not fill with water. |
COMPLETE |
Suds can come from: |
|
|
|
■■ Using the incorrect type of detergent, such as dish detergent for hand washing dishes, |
|
laundry detergent, or hand soap. |
|
■■ Not replacing the rinse aid dispenser cap after filling (or refilling) the rinse aid. |
|
■■ Using an excessive amount of dishwasher detergent. |
|
■■ Inadequately rinsing off detergent from dishes washed by hand before loading them into |
|
the dishwasher. |
|
Call for service. |
|
If no water was present in the machine at any time during a heated wash cycle, the cycle |
|
will end and the Clean indicator will not come on. See “Will Not Fill” in the “Troubleshooting” |
|
section. |
DID NOT SANITIZE |
If the Sanitized light is blinking, the load is NOT sanitized. The cycle was interrupted in the |
|
final rinse or the temperature for your water heater is set too low. Set your water heater to |
|
120ºF (49°C). |
DAMAGE TO DISHWARE |
Improper loading can cause dishes to become chipped or damaged. (See specific loading |
|
instructions within this guide.) |
15
PROBLEM |
SOLUTION |
|
|
BLINKING LIGHTS |
Blinking indicators will occur when the cycle is paused or when the cycle has been |
|
interrupted by opening the door. If the Start/Resume light is blinking, press the |
|
Start/RESUME keypad and close the door within 4 seconds. |
|
See “Start or RESUME a Cycle” in the “Dishwasher Use” section. |
|
If the Clean light or any other lights are blinking and the dishwasher will not run, call for |
|
service. |
CLOUDY OR SPOTTED |
Add or adjust the amount of liquid rinse aid for better drying and to reduce spotting. See the |
DISHWARE (AND HARD WATER |
“Detergent and Rinse Aid” section. |
SOLUTION) |
Use the correct amount of detergent. |
|
|
|
Confirm that the cloudiness is removable by soaking the item in white vinegar for 5 minutes. |
|
If the cloudiness disappears, it is due to hard water. Adjust the amount of detergent and |
|
rinse aid. See “Hard Water (White Residue on Dishwasher Interior or Glassware)” in the |
|
“Troubleshooting” section. If it does not come clear, it is due to etching (see below). Be sure |
|
the incoming water temperature is set at 120°F (49°C). |
|
Try using the Hi Temp Wash and Sani Rinse options. |
|
To remove spotting, run a vinegar rinse through the dishwasher. |
|
■■ Wash and rinse the affected dishware and load into dishwasher. Remove all silverware |
|
and metal items. Put 2 cups (500 mL) of white vinegar in a glass measuring cup in the |
|
lower rack. Run a Normal cycle with the Heat Dry option turned off. No detergent is |
|
needed. |
ETCHING (PERMANENT |
This is an erosion of the surface of the glassware and can be caused by a combination of |
CLOUDINESS) |
water that is too hot, using too much detergent with soft water, or pre-washing. Detergent |
|
needs food soil to act upon. If etching has occurred, the glassware is permanently damaged. |
|
To avoid further etching, adjust the detergent amount to match the water hardness, stop |
|
pre-washing, and use water heating options only when incoming water temperature is below |
|
120°F (49°C). |
LEAKING WATER |
Be sure dishwasher has been installed properly and is level. Suds can cause the dishwasher |
|
to overflow. Measure the detergent accurately and use only detergents designed for use in a |
|
dishwasher. Less detergent is needed in soft water. Try another brand of detergent if sudsing |
|
continues. |
|
To avoid rinse aid leaking from the dispenser, be sure the lid is securely attached and avoid |
|
overfilling. |
TUB IS DISCOLORED |
High iron content in the water can discolor the tub. |
|
Tomato-based foods can discolor the tub or dishware. Large amounts of tomato-based |
|
foods should be removed from the dishes before loading. |
|
A citrus-based cleaner can be used to clean. |
|
|
16

KITCHENAID® DISHWASHER
LIMITED WARRANTY
ATTACH YOUR RECEIPT HERE. PROOF OF PURCHASE IS REQUIRED TO OBTAIN WARRANTY SERVICE.
Please have the following information available when you call the Customer eXperience Center:
■■ Name, address, and telephone number ■■ Model number and serial number
■■ A clear, detailed description of the problem
■■ Proof of purchase, including dealer or retailer name and address
IF YOU NEED SERVICE:
1.Before contacting us to arrange service, please determine whether your product requires repair. Some questions can be addressed without service. Please take a few minutes to review the Troubleshooting section of the Use and Care Guide or visit producthelp.kitchenaid.com.
2.All warranty service is provided exclusively by our authorized KitchenAid Service Providers. In the U.S. and Canada, direct all requests for warranty service to:
KitchenAid Customer eXperience Center
In the U.S.A., call 1-800-422-1230. In Canada, call 1-800-807-6777.
If outside the 50 United States or Canada, contact your authorized KitchenAid dealer to determine whether another warranty applies.
LIFETIME LIMITED WARRANTY
WHAT IS COVERED
FIRST YEAR LIMITED WARRANTY (PARTS AND LABOR)
For one year from the date of purchase, when this major appliance is installed, operated, and maintained according to instructions attached to or furnished with the product, KitchenAid brand of Whirlpool Corporation or Whirlpool Canada LP (hereafter “KitchenAid”) will pay for factory specified replacement parts and repair labor to correct defects in materials or workmanship that existed when this major appliance was purchased or, at its sole discretion, replace the product. In the event of product replacement, your appliance will be warranted for the remaining term of the original unit’s warranty period.
SECOND THROUGH FIFTH YEAR LIMITED WARRANTY (CERTAIN COMPONENT PARTS ONLY – LABOR NOT INCLUDED)
In the second through fifth years from the date of original purchase, when this major appliance is installed, operated, and maintained according to instructions attached to or furnished with the product, KitchenAid will pay for factory specified replacement parts for the following components to correct non-cosmetic defects in materials or workmanship in these parts that prevent function of this major appliance and that existed when this major appliance was purchased. This is a limited five year warranty on the below named parts only and does not include repair labor.
■■ Nylon dish racks |
■■ Electronic controls |
LIFETIME LIMITED WARRANTY (STAINLESS STEEL TUB
AND INNER DOOR LINER ONLY)
For the lifetime of the product from the date of original purchase, when this major appliance is installed, operated, and maintained according to instructions attached to or furnished with the product, KitchenAid will pay for factory specified replacement parts and repair labor for the following components to correct non-cosmetic defects in materials or workmanship that existed when this major appliance was purchased:
■■ Stainless steel tub |
■■ Inner door liner |
YOUR SOLE AND EXCLUSIVE REMEDY UNDER THIS LIMITED WARRANTY SHALL BE PRODUCT REPAIR AS PROVIDED HEREIN. Service must be provided by a KitchenAid designated service company. This limited warranty is valid only in the United States or Canada and applies only when the major appliance is used in the country in which it was purchased. This limited warranty is effective from the date of original consumer purchase. Proof of original purchase date is required to obtain service under this limited warranty.
WHAT IS NOT COVERED
1.Commercial, non-residential, multiple-family use, or use inconsistent with published user, operator, or installation instructions.
2.In-home instruction on how to use your product.
3.Service to correct improper product maintenance or installation, installation not in accordance with electrical or plumbing codes, or correction of household electrical or plumbing (e.g., house wiring, fuses, or water inlet hoses).
4.Consumable parts (e.g., light bulbs, batteries, air or water filters, preservation solutions).
5.Defects or damage caused by the use of non-genuine KitchenAid parts or accessories.
6.Damage from accident, misuse, abuse, fire, floods, acts of God, or use with products not approved by KItchenAid.
7.Repairs to parts or systems to correct product damage or defects caused by unauthorized service, alteration, or modification of the appliance.
8.Cosmetic damage including scratches, dents, chips, and other damage to the appliance finishes, unless such damage results from defects in materials and workmanship and is reported to KitchenAid within 30 days.
9.Discoloration, rust, or oxidation of surfaces resulting from caustic or corrosive environments including, but not limited to, high salt
concentrations, high moisture or humidity, or exposure to chemicals.
10.Pickup or delivery. This product is intended for in-home repair.
11.Travel or transportation expenses for service in remote locations where an authorized KitchenAid servicer is not available.
12.Removal or reinstallation of inaccessible appliances or built-in fixtures (e.g., trim, decorative panels, flooring, cabinetry, islands, countertops, drywall) that interfere with servicing, removal,
or replacement of the product.
13.Service or parts for appliances with original model/serial numbers removed, altered, or not easily determined.
The cost of repair or replacement under these excluded circumstances shall be borne by the customer.
DISCLAIMER OF IMPLIED WARRANTIES
IMPLIED WARRANTIES, INCLUDING ANY IMPLIED WARRANTY OF MERCHANTABILITY OR IMPLIED WARRANTY OF FITNESS FOR A PARTICULAR PURPOSE, ARE LIMITED TO FIVE YEARS OR THE SHORTEST PERIOD ALLOWED BY LAW. Some states and provinces do not allow limitations on the duration of implied warranties of merchantability or fitness, so this limitation may not apply to you. This warranty gives you specific legal rights, and you also may have other rights that vary from state to state or province to province.
DISCLAIMER OF REPRESENTATIONS OUTSIDE OF WARRANTY
KitchenAid makes no representations about the quality, durability, or need for service or repair of this major appliance other than the representations contained in this warranty. If you want a longer or more comprehensive warranty than the limited warranty that comes with this major appliance, you should ask KitchenAid or your retailer about buying an extended warranty.
LIMITATION OF REMEDIES: EXCLUSION OF INCIDENTAL AND CONSEQUENTIAL DAMAGES
YOUR SOLE AND EXCLUSIVE REMEDY UNDER THIS LIMITED WARRANTY SHALL BE PRODUCT REPAIR AS PROVIDED HEREIN. KITCHENAID SHALL NOT BE LIABLE FOR INCIDENTAL OR CONSEQUENTIAL DAMAGES. Some states and provinces do not allow the exclusion or limitation of incidental or consequential damages, so these limitations and exclusions may not apply to you. This warranty gives you specific legal rights, and you also may have other rights that vary from state to state or province to province.
03/17
17
INSTRUCTIONS
D’UTILISATION DU
LAVE-VAISSELLE
Nous vous REMERCIONS d’avoir acheté ce produit de haute qualité. Enregistrez votre nouveau lave-vaisselle au register.kitchenaid.com. Au Canada, consultez notre site Web au www.kitchenaid.ca.
Pour référence ultérieure, consignez par écrit les numéros de modèle et de série de votre produit. Vous les trouverez près de la porte sur le côté droit ou gauche de l’intérieur du lave-vaisselle.
Numéro de modèle______________________________ |
Numéro de série______________________________________ |
|
Table des matières |
|
|
SÉCURITÉ DU LAVE-VAISSELLE................................................ |
|
18 |
QUOI DE NEUF DANS VOTRE LAVE-VAISSELLE..................... |
20 |
|
PIÈCES ET CARACTÉRISTIQUES .............................................. |
|
21 |
DÉMARRAGE/GUIDE RAPIDE.................................................... |
|
22 |
ÉTAPES RAPIDES......................................................................... |
|
23 |
UTILISATION DU LAVE-VAISSELLE............................................ |
|
24 |
DESCRIPTION DES PROGRAMMES ET OPTIONS................... |
27 |
|
CARACTÉRISTIQUES DU LAVE-VAISSELLE............................. |
31 |
|
SYSTÈME DE FILTRATION.......................................................... |
|
32 |
ENTRETIEN DU LAVE-VAISSELLE.............................................. |
|
33 |
DÉPANNAGE................................................................................. |
|
34 |
GARANTIE..................................................................................... |
|
37 |
Sécurité du lave-vaisselle
Votre sécurité et celle des autres sont très importantes.
nombreux messages de sécurité importants dans ce manuel et sur votre appareil électroménager. toujours lire tous les messages de sécurité et de vous y conformer.
symbole d’alerte de sécurité.
d’alerte de sécurité vous signale les dangers potentiels de décès et de blessures graves.
messages de sécurité suivront le symbole d’alerte de sécurité et le mot « DANGER » ou « AVERTISSEMENT ». signi ent :
 DANGER
 AVERTISSEMENT
Risque possible de décès ou de blessure grave si vous ne suivez pas immédiatement les instructions.
Risque possible de décès ou de blessure grave si vous ne suivez pas les instructions.
Tous les messages de sécurité vous diront quel est le danger potentiel, comment réduire le risque de blessure et ce qui peut se produire en cas de non-respect des instructions.
18
 Loading...