


KEB35A
3KHB1231T

HAND BLENDER INSTRUCTIONS |
|
TABLE OF CONTENTS |
|
HAND BLENDER SAFETY |
|
Important safeguards.......................................................................................... |
3 |
Electrical requirements....................................................................................... |
4 |
PARTS AND FEATURES |
|
Parts and accessories.......................................................................................... |
5 |
ASSEMBLING THE HAND BLENDER |
|
Preparing the Hand Blender for use................................................................... |
6 |
OPERATING THE HAND BLENDER |
|
Using the stainless steel blending attachment..................................................... |
6 |
Techniques for better blending and crushing...................................................... |
7 |
TIPS FOR GREAT RESULTS |
|
Quick tips............................................................................................................ |
8 |
CARE AND CLEANING |
|
Cleaning the Hand Blender................................................................................. |
8 |
HAND BLENDER SAFETY
2 |

HAND BLENDER SAFETY
IMPORTANT SAFEGUARDS
When using electrical appliances, basic safety precautions should always be followed, including the following:
2. |
To protect against risk of electrical shock, do not put motor |
<![if ! IE]> <![endif]>English |
1. |
Read all instructions. |
|
|
body, cord or electrical plug of this Hand Blender in water |
|
3. |
or other liquid. |
|
This appliance can be used by children aged from |
|
|
|
8 years and above and persons with reduced physical, |
|
|
sensory or mental capabilities or lack of experience |
|
|
and knowledge if they have been given supervision or |
|
|
instruction concerning use of the appliance in a safe way |
|
|
and understand hazards involved. Children shall not play |
|
|
with the appliance. Cleaning and user maintenance shall |
|
4. |
not be made by children without supervision. |
|
Unplug from outlet when not in use, before putting on |
|
|
5. |
or taking off parts, and before cleaning. |
|
Avoid contact with moving parts. |
|
|
6. |
Do not operate any appliance with a damaged cord or |
|
|
plug or after the appliance malfunctions, or is dropped |
|
|
or damaged in any manner. Return appliance to the |
|
|
nearest Authorized Service Centre for examination, |
|
7. |
repair or electrical or mechanical adjustment. |
|
The use of attachments not recommended or sold |
|
|
8. |
by KitchenAid may cause fire, electric shock or injury. |
|
Be certain chopper adapter is securely locked in place |
|
|
9. |
before operating appliance. |
|
Do not use outdoors. |
|
10.Do not let cord hang over edge of table or counter.
11.Do not let cord contact hot surfaces, including the stove.
12.When mixing liquids, especially hot liquids, use
a tall container or make small quantities at a time to reduce spillage.
3

HAND BLENDER SAFETY
13.Keep hands and utensils out of container while blending to prevent the possibility of severe injury to persons or damage to the unit. A scraper may be used, but must be used only when the unit is not running.
14.Blades are sharp. Handle carefully.
15.To disconnect, turn any control to “OFF,” then remove plug from wall outlet.
16.This appliance is intended to be used in household and similar applications such as:
-staff kitchen areas in shops, offices, and other working environments
-farmhouses
-by clients in hotels, motels, and other residential type environments
-bed and breakfast type environments.
SAVE THESE INSTRUCTIONS
This product is designed for household use only.
Electrical requirements
Brazil:
Volts: 127 V.A.C. Hertz: 60 Hz
Taiwan:
Volts: 110 V.A.C. Hertz: 60 Hz
NOTE: If the plug does not fit in the outlet, contact a qualified electrician. Do not modify the plug in any way. Do not use an adapter.
Do not use an extension cord. If the power supply cord is too short, have a qualified electrician or serviceman install an outlet near the appliance.
4
PARTS AND FEATURES
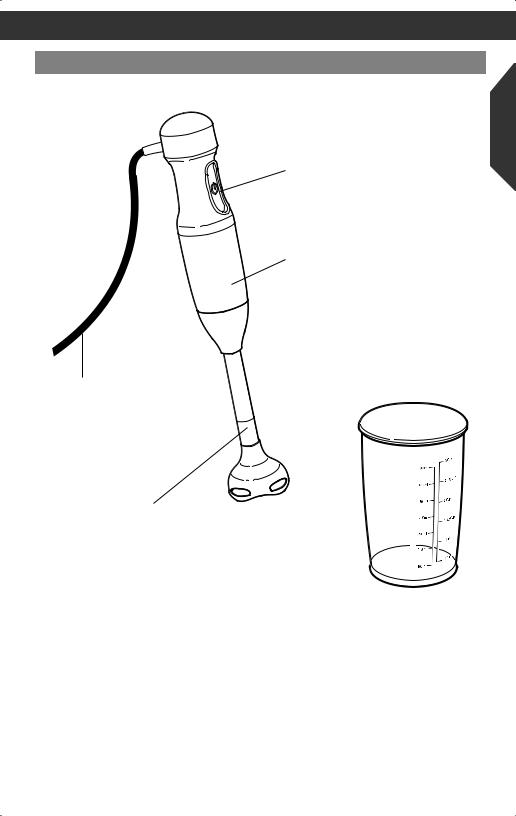
Parts and accessories
Speed control dial
 Provides easy adjustment of speed.
One-touch Power button
Located on the front of the motor body and activated by pressing and holding during blending. To stop blending, simply release the power button.
Motor body
Designed for a comfortable, non-slip grip.
Powerful DC motor (not shown)
Provides powerful blending action and is designed for quiet, long-life operation.
1.5 m (5 ft.) power cord
Long enough to take the Hand Blender to the
cooktop or work area and rounded with no grooves for easy cleanup.
Stainless steel blending attachment
Simply seats onto the motor body and is rotated to lock together. The sharp stainless steel blade is covered to help prevent splashing while blending.
Blending jar and lid
Handy for individual blending jobs and features a non-slip base. Lid seals the top of the jar to store blended ingredients.
<![endif]>English
5
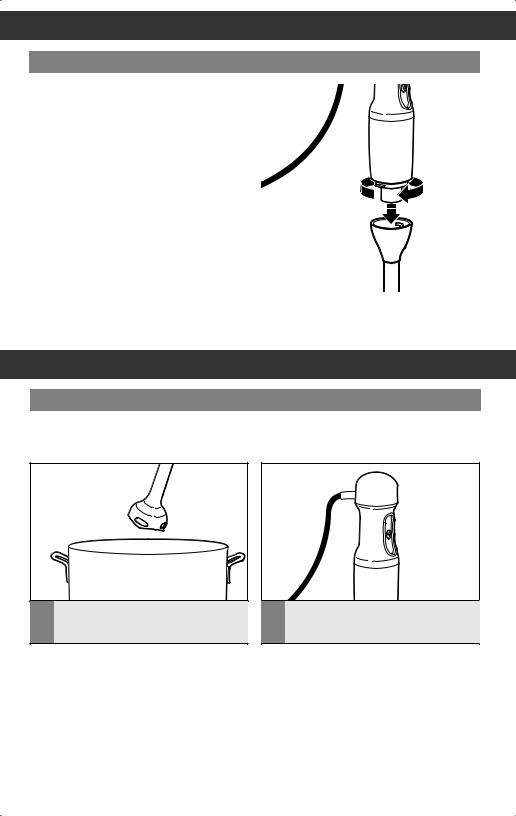
ASSEMBLING THE HAND BLENDER
Preparing the Hand Blender for use
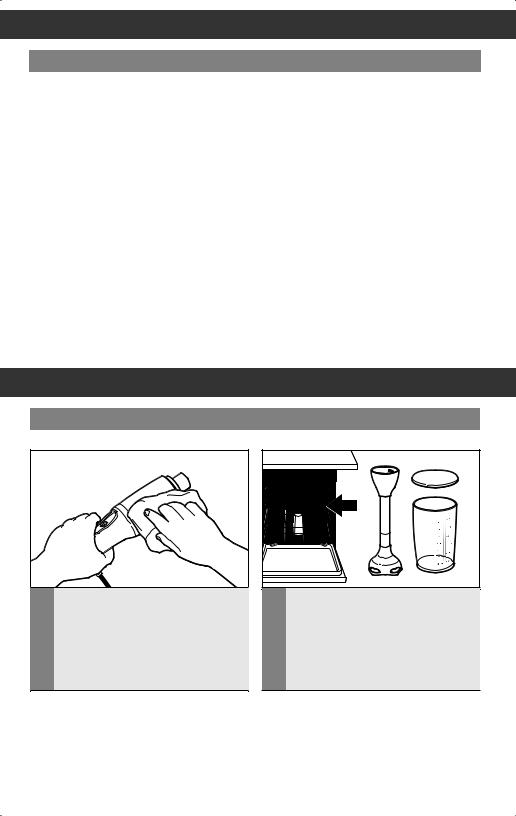
Before First Use
Before using the KitchenAid Hand Blender for the first time, wipe the motor body and attachment adapter with a clean, damp cloth to remove any dirt or dust. Mild dish soap may be used, but do not use abrasive cleansers. Dry with a soft cloth. Wash
all attachments and accessories by hand or in the dishwasher. Dry thoroughly. See “Care and cleaning” section for more information.
NOTE: Do not immerse the motor body or the adapter in water.
NOTE: Always be sure to unplug the power cord from the wall socket before attaching or removing attachments.
|
|
1 |
Insert blending arm attachment into |
motor body and twist to lock. |
|
|
|
OPERATING THE HAND BLENDER
Using the stainless steel blending attachment
Use the stainless steel blending arm attachment for smoothies, milk shakes, soup, cooked vegetables, frosting, or baby food.
1 |
Insert the Hand Blender into the |
mixture. |
NOTE: Hand Blender should only be immersed in liquids the length of the attachment. Do not submerge beyond the seam of the blending attachment. Do not immerse the motor body into
liquids or other mixtures.
Speed

 control dial
2 |
Set Hand Blender on Speed 1. Adjust the |
speed by turning the speed control dial |
on top of the motor body.
6

OPERATING THE HAND BLENDER
Power
 button
3 |
Press POWER to activate the Hand |
Blender. |
4 |
When blending is complete, release |
the power button before removing the |
Hand Blender from the mixture. Unplug immediately after use, before removing attachment.
Techniques for better blending and crushing
<![endif]>English
Drawing up |
Wrist |
|
movement |
||
|
For better blending: Rest the Hand Blender on the bottom of the container momentarily, then hold at an angle and using a light circular motion, slowly draw it upwards against the side of the container. Allow your wrist motion and the weight of the Hand Blender to do the work. As you draw up the Hand Blender, you will notice the ingredients from the bottom of the container rising up. When the ingredients are no longer rising from the bottom, return the Hand Blender to the bottom of the container and repeat until mixture is at the desired consistency.
TIP: To prevent overflow, allow room in the container for the mixture to rise
when blending.
For better crushing: Insert Hand Blender with blending arm attached into the container. For hard, frozen fruits or ice, add a small amount of liquid to where the blade is submerged. Remember to stop the Hand Blender before removing it from the container to avoid splashing.
7
TIPS FOR GREAT RESULTS
Quick tips
•Cut solid foods into small pieces for easier blending or chopping.
•The Hand Blender is equipped with thermal protection from high operating temperatures. Should the Hand Blender suddenly stop during use, unplug it and allow 10 minutes to automatically reset.
•To avoid splashing, insert the Hand Blender into the mixture before pressing the power button, and release the power button before pulling the Hand Blender out of the mixture.
•When blending in a saucepan on a cooktop, remove the pan from the heating element to protect the Hand Blender from overheating.
•For best blending, hold the Hand Blender at an angle and gently move up and down within the container. Do not pound down on the mixture with the Hand Blender.
•To prevent overflow, allow room in the container for the mixture to rise when using the Hand Blender.
•Be sure the extra long cord of the Hand Blender is not extending over a hot heating element.
•Do not let the Hand Blender sit in a hot pan on the cooktop while not in use.
•Remove hard items, such as fruit pits or bones, from the mixture before blending to help prevent damage to the blades.
•Do not use your Hand Blender to process coffee beans or hard spices such as nutmegs. Processing these foods could damage the blades of the Hand Blender.
•Do not use the jar in the microwave oven.
•Maximum time of continuous operation should not exceed 1 minute.
CARE AND CLEANING
Cleaning the Hand Blender
1 |
To clean the motor body: Unplug the |
Hand Blender, then remove the blending |
attachment. Wipe the motor body with a damp cloth. Mild dish soap may be used, but do not use abrasive cleansers. Wipe power cord with a warm, sudsy cloth; then wipe clean with a damp cloth. Dry with a soft cloth.
IMPORTANT: Do not immerse the motor body in water.
2 |
To clean the blending attachment, |
blending jar, and lid: Wash in hot, |
soapy water, or in the top rack of the dishwasher. Dry thoroughly.
8
 Loading...